Seascape Photography: The Definitive Photography Guide
Hey there, fellow PhotoPiller!
Welcome to the exhilarating world of seascape photography, a genre that's as dynamic as the ocean itself.
If you've ever stood on the shoreline, mesmerized by the endless dance of waves, you already know why seascape photography is so captivating. It's not just about capturing images; it's about immortalizing the ever-changing moods of the sea. From serene sunrises to tempestuous waves, seascapes offer an endless canvas for creativity. And that's exactly what we're going to explore together.
In this guide, you're going to learn the A to Z of seascape photography.
We'll dive into the technicalities of shutter speeds and apertures, the art of composition, and the magic of capturing light. You'll discover how to read the sea's temperament and use it to your advantage, creating images that don't just capture a scene but tell a story.
Get ready to get inspired by photos like the one above these lines by the great Sergio Arias...
But here's the thing: the sea is unpredictable, and that's where planning becomes your best ally.
This is why I swear by the PhotoPills app. It's not just a tool; it's your personal photography assistant. With PhotoPills, you'll learn how to find the best shooting location, predict track the Sun and Moon, and understand the best times for that perfect natural light. It's about being at the right place, at the right time, with the right settings.
So, are you ready to embark on this adventure? Whether you're a seasoned pro or just starting out, there's something in here for everyone.
Grab your gear, and let's dive into the world of seascape photography together. Trust me, by the end of this guide, you'll not only have a deeper appreciation for the sea but also the skills to capture its essence like never before.
Let's get started!
"The sea, once it casts its spell, holds one in its net of wonder forever." - Jacques Cousteau
Get this ebook for free now!
Content
- 20 seascape photography ideas that will inspire you
- What is seascape photography?
- The perfect location for seascape photography (and how to find it)
- How to plan your seascape photos shots like a pro
- Most used lens filters in seascape photography
- All the equipment you need to take seascapes
- How to take daytime seascape photos
- How to take a seascape photo at night
- 15 seascape photography tips to improve your technique
- 12 photographers that excel at shooting seascapes
- Keep enjoying the journey!
1.20 seascape photography ideas that will inspire you
Browsing through the portfolios of other photographers can be incredibly inspiring, especially if you're feeling stuck creatively.
Websites like Instagram, 500px, Flickr, and Unsplash are filled with stunning photographs (more on that in section 3), and taking the time to study images that strike a chord with you can help you uncover new techniques and ideas to try in your own photography.
Remember, the goal isn't to imitate others but to learn from the art that speaks to you. When an image catches your eye, pause to consider what makes it stand out. Is it the way it's framed, the color tones, or perhaps the subject itself?
After you've explored and reflected on these images, don't just move on. Take the aspects that inspired you and apply them to your own work during your next photo session!
I hope this selection of seascape pictures helps you ignite your imagination...
Sunrise (1)

Photo by Adrián Ragona
Photographing a seascape at Sunrise offers you a unique and captivating experience.
This time of day, known for its serene and tranquil qualities, provides a special natural light that can transform a seascape into a masterpiece. The soft, warm hues of the rising sun cast a golden glow over the water, creating a magical atmosphere. This natural light is not only gentle on the eyes but also on the camera sensor, allowing for a rich range of colors and subtle details to be captured without the harsh contrasts often found in midday light.
Additionally, Sunrise is a time of day when the world is still waking up, resulting in fewer distractions and a more peaceful environment. This calmness is often reflected in the water, offering smooth surfaces that beautifully mirror the sky and create a sense of harmony in the composition.
Blue hour (2)

Photo by Lluis Comellas
This time of day, occurring just before Sunrise or after Sunset, is characterized by a deep blue hue in the sky, which casts a serene and almost surreal light over the landscape. This soft, diffused natural light is particularly flattering for seascapes, as it enhances the natural colors and textures of the water and sky, creating a harmonious and balanced composition.
The calmness of the blue hour often results in smoother water surfaces, ideal for capturing reflections and subtle details that might be lost in the harsher light of midday. Additionally, the cooler color temperature during this time adds a sense of tranquility and depth to the images, making them more emotionally resonant.
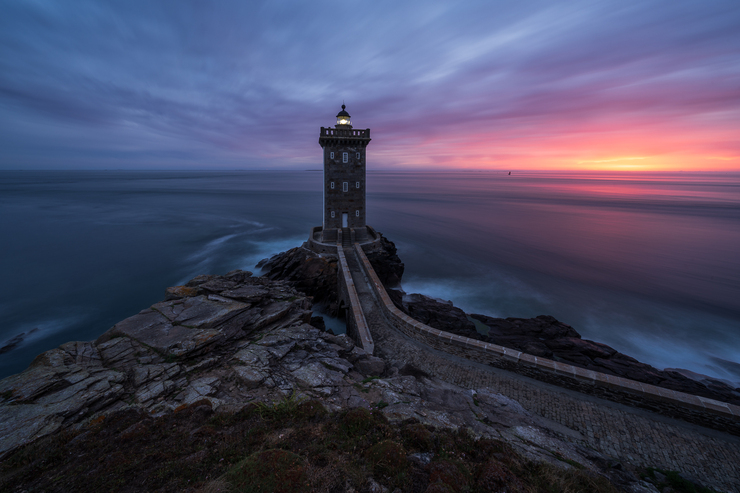
The blue hour also provides a brief window where the natural light is balanced with any artificial lights, such as those from lighthouses or nearby buildings, allowing for a perfect blend of natural and human elements in the composition.
Golden hour (3)

Photo by Daren Cox
The golden hour offers a unique, soft natural light that enhances the natural beauty of the seascape.
The Sun's low position in the sky produces longer shadows, adding depth and dimension to the scene. The warm, golden tones of the light during this hour can transform an ordinary seascape into a scene filled with rich, vibrant colors.
This natural light is also more diffused and less harsh than midday sun, reducing the contrast between shadows and highlights and allowing for more balanced exposures.
Additionally, the golden hour often brings a sense of calm and tranquility to the sea, capturing the essence of the seascape in a serene and picturesque manner. The combination of the magical light and the inherent beauty of the sea creates a perfect setting for capturing stunning and emotive pictures.
Sunset (4)

Photo by Aharon Amran
As the Sun dips towards the horizon, the sky transforms into a canvas of vibrant colors, ranging from deep oranges and reds to soft pinks and purples. This dramatic natural light not only enhances the visual appeal of the seascape but also creates a warm, inviting atmosphere in the photograph.
The setting Sun casts a golden glow over the water, highlighting textures and patterns on the sea's surface and accentuating the contours of the waves. The interplay of natural light and shadow adds depth and dimension to the scene, making the image more dynamic.
Furthermore, the tranquil mood of Sunset, often accompanied by calmer winds and tides, can result in serene and reflective water surfaces, perfect for capturing reflections. This magical time of day also encourages a sense of peace and contemplation, adding an emotional depth to the photograph that resonates with viewers.
Overcast (5)

Photo by Anto Camacho
Photographing a seascape under an overcast sky can be a remarkably good idea due to several reasons.
Firstly, the diffused natural light from the cloud cover eliminates harsh shadows and evenly distributes light across the scene, enhancing the natural colors and textures of the seascape. This soft, even lighting is particularly beneficial for capturing the intricate details of the water and shoreline, allowing for a more nuanced and balanced composition.
Additionally, overcast skies often bring a dramatic and moody atmosphere to seascapes, adding an emotional depth and artistic quality to the photographs. The clouds themselves can become a compelling element in the composition, their patterns and textures adding interest to the sky, which might otherwise be featureless in clear conditions.
Furthermore, the subdued natural light conditions reduce the contrast between the sky and the landscape, making it easier to achieve a well-exposed image without the need for graduated filters or extensive post-processing.
Storm (6)

Photo by Elliott Christopher
Storms bring with them an intensity and rawness that can transform an otherwise familiar seascape into a scene brimming with emotion and power.
The churning of the sea, the play of light through dark, brooding clouds, and the contrast between the tumultuous water and the steadfastness of the land create a dynamic and compelling composition. The storm's unpredictability adds an element of surprise, where each wave and gust of wind can dramatically alter the scene, offering endless opportunities for unique shots.
Furthermore, the challenging conditions push your skills and creativity, often resulting in more impactful and memorable images.
Capturing seascapes during a storm not only provides a visual spectacle but also conveys the awe-inspiring power of nature, making it a rewarding experience for any photographer.
Wind (7)

Photo by Marcel Weber
Photographing a seascape on a windy day can be a fantastic idea due to the dynamic and dramatic elements that wind introduces to the scene.
Windy conditions often lead to more turbulent and lively seas, which can add a sense of movement and energy to your photographs. The waves, stirred up by the wind, create interesting patterns and textures on the water's surface, offering a unique and ever-changing subject for your lens.
Additionally, the wind can lead to fascinating cloud formations in the sky, enhancing the overall composition with a more dramatic backdrop. This combination of restless seas and expressive skies can transform a standard seascape into a captivating, moody, and evocative image.
Moreover, the challenge of capturing the right moment in such changing conditions can be incredibly rewarding, both in terms of the experience and the resulting images.
However, it's important to be prepared for the challenges that come with windy conditions, such as protecting your gear and stabilizing your camera.
Fog (8)

Photo by Xavier Mas
A seascape on a foggy day offers a unique and ethereal atmosphere.
Fog acts as a natural diffuser of light, softening the harshness of daylight and creating a gentle, muted atmosphere. This soft natural light reduces contrast and allows for subtle details and textures to emerge, particularly in the water and sky.
The fog also adds a layer of mystery and depth to the scene, as it partially obscures the horizon and distant elements, inviting viewers to imagine what lies beyond. This can lead to a sense of tranquility and timelessness in the photograph.
Additionally, the monochromatic tones that often accompany foggy conditions can emphasize the mood and compositional elements of the seascape, allowing you to focus on form, line, and texture without the distraction of vibrant colors.
Snow (9)
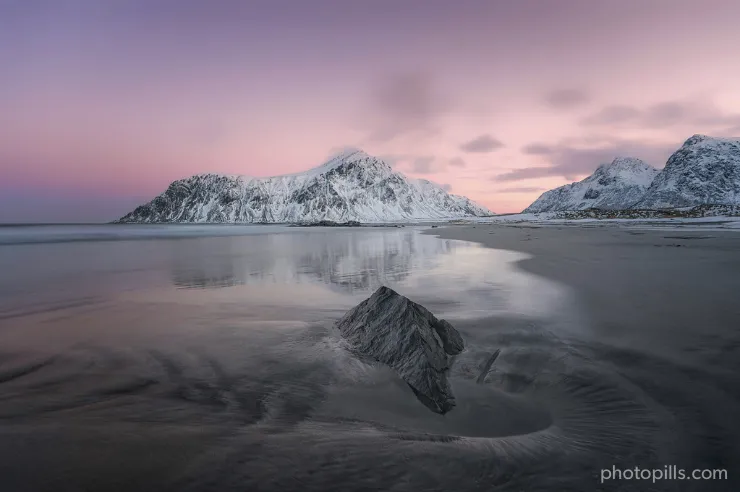
The combination of snow and sea creates a rare and striking contrast, blending the serene tranquility of a snowy landscape with the dynamic movement of the sea. This juxtaposition not only offers a visual feast but also evokes a sense of peacefulness and awe. The snow-covered shores and icy formations add a layer of texture and depth to the scene, enhancing the natural beauty of the coastline.
Furthermore, the presence of snow can transform an otherwise familiar seascape into a surreal, almost otherworldly vista, providing photographers with a fresh perspective and new creative possibilities. The soft, diffused natural light often found in snowy conditions is ideal for capturing the delicate interplay of light and shadow, adding a gentle, ethereal quality to the images.
Ice (10)

Photo by Maurizio Pignotti
The contrast between the fluid, dynamic nature of the sea and the solid, often intricately sculpted form of the glacier ice creates a captivating juxtaposition. This contrast not only enhances the visual appeal of the image but also tells a story about the natural world.
The presence of glacial ice in the seascape serves as a poignant reminder of the ongoing changes in our environment, particularly the effects of climate change on our planet's glaciers and oceans.
Furthermore, the unique textures and colors of the ice block, ranging from deep blues to crystalline whites, add depth and complexity to the composition. The interaction of natural light with the ice and water can produce a range of effects, from subtle reflections to dramatic, shimmering highlights, offering endless opportunities for creative expression.
Waterfall (11)

Photo by Stefano Fornasiero
Photographing a seascape with a waterfall combines the dynamic elements of both the sea and the waterfall, creating a visually captivating scene. The sea, with its ever-changing tides and waves, offers a sense of movement and unpredictability, while the waterfall adds a dramatic focal point.
This combination allows for a variety of creative approaches, such as using long exposure to blur the water's motion, creating a dreamy, ethereal effect, or capturing the powerful moment of water crashing down. The contrast between the cascading waterfall and the vastness of the sea often results in a compelling composition that highlights nature's power and beauty.
Additionally, the interaction of light with water, both in the sea and the waterfall, can produce stunning effects, especially during golden hour.
Black and white (12)

Seascapes in black and white offer a unique and artistic perspective that can transform an ordinary scene into something extraordinary.
Without the distraction of color, the viewer's attention is drawn to the raw textures, contrasts, and forms that define the seascape. The interplay of light and shadow becomes more pronounced, emphasizing the dramatic interplay between the sky, water, and land.
Black and white photography also evokes a timeless quality, lending a sense of nostalgia or universality to the image. It allows for a deeper exploration of mood and atmosphere, often resulting in a more emotional and contemplative response from the viewer.
The simplicity of monochrome can also highlight the power and majesty of the sea, showcasing its vastness and the intricate details of waves, clouds, and reflections in a more profound way.
Silhouette (13)

Photo by Derick Carss
Photographing a seascape while facing the Sun to create silhouettes can be a highly effective technique for several reasons.
Firstly, it emphasizes the contrast between light and shadow, creating a striking visual impact. The Sun's position directly ahead can backlight the scene, outlining subjects in the foreground with a bright halo of light, which enhances their shapes and forms. This approach simplifies the composition, focusing the viewer's attention on the silhouetted elements and the interplay of light and darkness.
Additionally, the Sun's low angle at Sunrise or Sunset can produce warm, vibrant colors in the sky and water, adding a dramatic backdrop to the silhouette.
This method also allows for creative storytelling, as the silhouetted shapes can evoke mystery and leave room for interpretation.
Selfie (14)
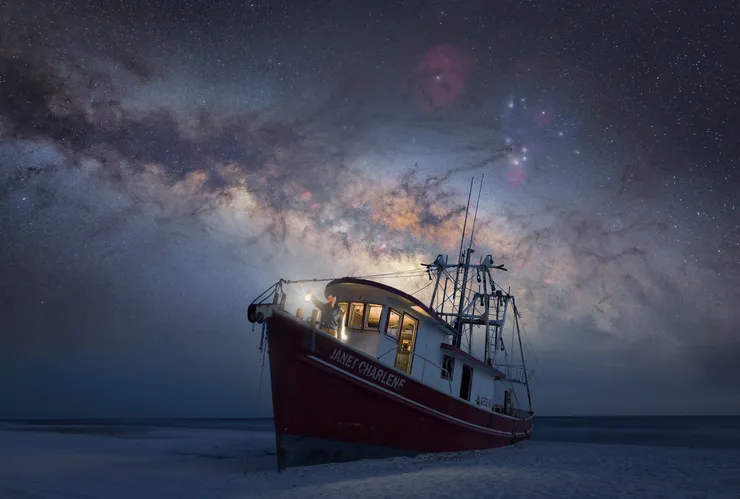
Photo by Dan Thompson
Capturing a seascape that includes a selfie can be a fantastic idea because it combines the majestic beauty of the natural world with a personal touch.
Seascapes, with their vast, open horizons, rolling waves, and often dramatic skies, provide a stunning backdrop that can elevate a simple selfie to something far more visually compelling. Including yourself in the frame adds a human element to the scene, creating a connection between the viewer and the vastness of nature. It's a way to capture not just a beautiful landscape but also a moment of personal experience within that landscape.
It's also a great way to remember a specific place and time, preserving not just the view but also your presence within it! ;)
Moon (15)

Photo by Gorka Vicente
The Moon brings a sense of mystery and awe to the scene.
Its soft, ethereal light gently illuminates the water, creating a serene and almost otherworldly atmosphere. This interplay of Moonlight and water can result in a range of visual effects, from shimmering reflections to subtle highlights on the waves, adding depth and texture to the image.
Moreover, the presence of the Moon in a seascape can evoke emotions and convey moods that range from tranquility to melancholy. It also provides a natural focal point, drawing the viewer's eye and giving the composition a sense of balance and harmony. Whether it's a Full Moon casting its bold light or a crescent Moon adding a delicate touch, including the Moon in seascape photography can transform an ordinary scene into something truly magical and memorable.
Milky Way (16)

Photo by Txema Franco
Photographing a seascape with the Milky Way creates a surreal and ethereal scene, where the rhythmic patterns of the sea meet the celestial splendor of the stars. The Milky Way, with its luminous arc, adds a dramatic backdrop to the tranquil waters, enhancing the depth and dimension of the image.
The contrast between the eternal, unchanging nature of the stars and the ever-moving, ever-changing sea creates a powerful juxtaposition. This blend not only offers a visual feast but also evokes a sense of wonder and infinity, reminding us of the vastness of the universe and our place within it.
Moreover, the relative darkness required to capture the Milky Way means that seascapes under such conditions are often devoid of human presence, adding a layer of tranquility and untouched natural beauty to the picture.
Star Trails (17)

Photo by Edén Sánchez
In this case, the dynamic movement of the ocean, with its rhythmic waves and serene horizon, contrasts strikingly with the celestial dance of the stars, which etch luminous paths across the night sky. This juxtaposition not only adds a layer of depth and complexity to the composition but also evokes a sense of wonder and tranquility.
The long exposure required for capturing Star Trails allows you to record the passage of time, where each star's trajectory reflects the Earth's rotation, adding a surreal and dreamlike quality to the seascape.
Moreover, the relative stillness of the seascape elements anchors the image, providing a sense of stability amidst the swirling cosmic activity.
Meteor Shower (18)

Photographing a seascape during a Meteor Shower combines the serene beauty of the ocean with the spectacular drama of the night sky, creating a truly unique and captivating image.
The contrast between the steady, timeless nature of the sea and the fleeting, dynamic meteors adds a layer of depth and intrigue to the composition.
This juxtaposition not only highlights the vastness and beauty of the natural world but also offers a sense of scale and perspective that can be profoundly moving.
Eclipse (19)

Photo by Krutik Thakur
Photographing a seascape during any eclipse (lunar or solar) offers a unique and captivating experience for photographers. The eclipse adds a dramatic and rare celestial element to the natural beauty of the seascape.
The above shot was taken during the partial eclipse of October 25, 2022. As the Moon partially obscures the sun, it creates a fascinating interplay of light and shadow, casting an ethereal and otherworldly glow over the water. This unusual lighting can transform an ordinary seascape into a scene of surreal beauty, enhancing the textures and colors of the water and sky.
Additionally, the eclipse provides a focal point in the sky, adding a sense of scale and grandeur to the composition.
Capturing this rare event requires skill and timing, making the resulting images all the more rewarding. That's why planning your shot with PhotoPills is so important!
Photos by PhotoPillers (20) [bonus track]

I created this section with the hope of sparking your creativity, offering numerous examples to fuel your photographic imagination.
If I've succeeded in inspiring you, that's fantastic.
If not, no worries, I have another idea.
Why not draw inspiration from the myriad of photos captured by fellow PhotoPillers around the world?
Our Instagram account (do follow us at Instagram) and the PhotoPills app (navigate to Menu > My Stuff > Awards) are treasure troves of stunning images. They feature diverse landscapes, moments of Sunrise, golden hour, blue hour, Sunset, and astronomical events like the Moon, Milky Way, Star Trails, Meteor Showers, drone captures,|lunareclipse|, solar eclipses, and more.
Prepare to be amazed for hours!
Plus, if you're keen on inspiring others and want to participate in our PhotoPills Awards, send us your photo for a chance to win exciting prizes.
Now, let's continue our journey into the world of seascape photography.
Let's dive in!
2.What is seascape photography?

Photo by Juan Anders Lemos
Before jumping into the action, it's good to start from the very basics.
What is seascape photography?
Seascape photography is actually a subtype of landscape photography, with the emphasis on the sea and coastline.
So in order to be called a seascape, the shot generally showcases the sea, often accompanied by elements like cliffs, beaches, or rock pools.
Also known as coastal or ocean photography, this genre uniquely captures the sea's ever-changing nature. Unlike other landscapes, seascapes are characterized by the perpetual motion of water, making each moment unique.
Seascape photography often combines the principles of landscape photography with the use of long exposures and lens filters. The goal is to capture the beauty and dynamism of the sea.
- Seascape photography is a subgenre of landscape photography. While landscape photography covers a broad range of natural scenes, seascape photography specifically focuses on scenes where the sea or ocean is a prominent element.
- Long exposure in seascape photography can turn crashing waves into misty, ethereal forms, or capture the smooth patterns of water moving around rocks or shorelines.
- Lens filters are used to create artistic effects. Polarizing filters can reduce reflections on the water, making underwater elements more visible, while ND filters allow for the long exposures needed to create those captivating effects in the water.
To become a true master of seascape photography, have a look at our:
What time is best for seascape photography?
Having explored what a seascape entails, let's delve into the optimal timing for capturing these scenes. The term "time" in photography often refers to two distinct aspects: the time of day and the time of year.
Here's a short summary:
- Time of the year. The ideal season for seascape photography is fall, while winter can offer some good opportunities too.
- Time of the day. The best times of the day for seascape photography are typically during the golden hour and the blue hour.
Now that you know the answer, let's focus on identifying why these are the best seasons and times of the day to photograph seascapes.
The best time of the year
The best time of the year for seascape photography largely depends on your specific goals and the desired mood or atmosphere you aim to capture.
Here are some factors you should consider:
- Tidal movements. Understanding the tides is crucial for seascape photography. Low tide can reveal interesting rock formations, tide pools, and patterns in the sand, while high tide can offer powerful wave actions.
- Weather Patterns. Some photographers prefer stormy conditions for more dramatic shots, while others prefer clear skies for a minimalist approach.
- Wildlife. Depending on the region and time of year, certain wildlife like migratory birds or sea animals might be more prevalent, adding interest to the scene.
- Specific events. Events like sea storms, red tides, or bioluminescent plankton blooms can offer unique and rare photographic opportunities.
Now let's have a look at the different seasons of the year.
- Spring. It offers a fresh and vibrant atmosphere with clearer skies and blooming flora. This can add a colorful foreground to your seascape shots. However, depending on the location, spring tides can be more pronounced, offering dynamic water movements.
- Summer. Longer days provide more opportunities for shooting, especially during the golden hours. Calmer seas and warmer temperatures can be ideal for capturing serene seascapes. Summer can also bring more tourists to popular coastal areas, potentially crowding the scene.
- Fall. It offers dramatic skies, stormy seas, and changing colors in the foliage, adding depth and drama to seascapes. Nevertheless, the weather can be unpredictable, so you need to be prepared for sudden changes.
- Winter. Winter seascapes can be incredibly dramatic, with stormy seas, snow-covered landscapes, and unique lighting conditions. The colder months can also mean fewer tourists, allowing for more isolated shots. Take into account that the weather can be challenging, with colder temperatures and shorter days. Safety should be a priority, especially when dealing with icy conditions or rough seas.
The best time of the day
The best times of the day for seascape photography are typically during the golden hour and the blue hour, each offering unique lighting conditions that can dramatically enhance your images:
Golden hour
The golden hour occurs shortly after Sunrise and just before Sunset. The exact timing varies depending on your location and the time of year.
During this time, the sunlight is softer and warmer in color, casting a golden hue. This natural light is more diffused, reducing harsh shadows and highlights.
The golden hour light can add a magical, warm glow to your seascape photos. It can enhance textures and colors, and the angle of the light can create interesting shadows and depth. The reflection of the golden light on the water can also add a beautiful, serene quality to your images.
Blue hour
The blue hour occurs during the twilight periods, just before Sunrise and just after Sunset. It's characterized by a short window of time where the sky takes on a deep blue hue.
The natural light during the blue hour is soft and even, with a cool blue tone. It's generally darker than during the golden hour, creating a more moody and tranquil atmosphere.
The blue hour is ideal for capturing the peaceful and serene aspects of the sea. The cool tones can emphasize the moodiness of the ocean, and the even light is excellent for capturing details without harsh shadows. Long exposure photography works particularly well during the blue hour, allowing you to capture the movement of the water and clouds in a dreamlike way.
3.The perfect location for seascape photography (and how to find it)

Photo by Mikel Iraeta
Location matters a lot.
If you don't have a good spot, it's harder to take a photo that really makes an impression, tells a story, or shows a feeling...
This is especially true for seascape photography, where some places work better than others.
When searching for a spot, keep an eye out for these key elements...
The ingredients of the perfect location
Choose the type of seascape (scene) you want to photograph
As I explain to you in the landscape photography guide, you can choose between two large groups of landscapes: natural or urban.
Natural seascape
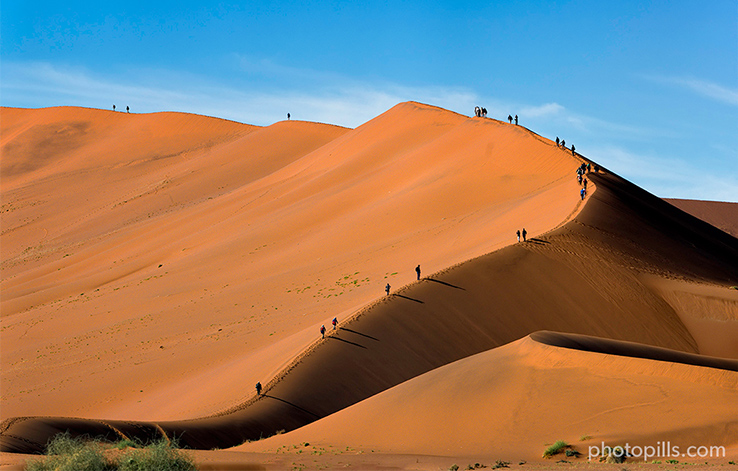
- Normally, photos of choppy seas are full of details – like the shapes of the waves, the foam, the spray, and any floating objects. But if you use a longer shutter speed, you can make all these details vanish, turning the busy scene into a smooth, silky surface.
- To get a great long exposure shot of a seascape, look for clouds and wind. Clouds that are scattered and wind can add movement to the sky, making your photo more dramatic.
- There's something really calming about a smooth, flowing waterfall. When you're taking pictures of water, think about which way the water is moving and make sure there's enough space for it in your photo.
- If you're really into taking pictures of Star Trails and amazing shots of the Milky Way, choose a clear night without clouds. The clearer the sky, the better your chances are of getting great long exposure shots at night.
Urban seascape
- Urban seascapes offer a unique blend of natural and man-made beauty. So Look for places where the city meets the sea, such as harbors, piers, waterfronts, or beaches with a city skyline in the background.
- A long exposure can smooth out the water and capture the movement of clouds, creating a serene contrast to the static urban structures. It can also turn moving lights, such as those from boats or cars, into interesting light trails.
- Include elements like bridges, buildings, boats, or piers to create a connection between the urban environment and the sea. Look for reflections of city lights on the water for added interest.
- The golden hour often provides soft, warm light that can beautifully illuminate both the cityscape and the seascape. The blue hour (during twilight) can offer a dramatic contrast between the cool tones of the sky and sea and the warm lights of the city.
Make sure your photo fits well in your frame
After you've picked the kind of place you want to photograph, make sure you have enough space in your picture to:
- Capture things like the Sun, its natural light, the Moon, the Milky Way, or Star Trails...
- Show the location in that special moment. Is it a picture of Portland Head Light and the coastline? Are you in Sydney taking a photo of the bay, or are you amazed by the view of Table Mountain?
- Put in a strong main subject. I'll tell you more about this in the next section.
Check its orientation
Keep in mind, it's important to get all the things you've thought of into your picture.
It could be the Sun setting by some rocks in the ocean, the Moon coming up behind a tall building, or the Milky Way lining up with a tree next to the water...
And if you want what you've imagined to happen just the way you want so you can take a photo of it, think about:
- Where some of these elements (like the Sun, the rocks, the Moon, the building, the Milky Way, the tree) are going to be.
- Where you need to be in relation to them. In other words, where you should stand and where you should point your camera.
Find a location with tons of place to move
Like I just said, it's important that you have enough space to move around at your photo location.
Firstly, the more room you have, the more ways you can set up your shot. By moving around, you can find different compositions, make sure you're standing where you like best, and check that everything is okay (like your tripod being stable and making sure you won't fall or slip).
Secondly, sometimes the picture you have in mind might only work one way. It doesn't happen often, but it's possible. So, if you have more space, you can make little adjustments to get all the parts of your picture exactly where you want them.
Put an interesting subject in your composition
Just like in any other kind of photography (like Milky Way or Star Trails), it's important to have something interesting in your picture.
It's the best way to share a story (your story) because that element will be the main focus. It will also be what catches the eye of anyone looking at your photo.
What should you look for when you're picking a spot to take photos?
Search for anything in the scene that stands out: a special rock shape, a tree, an unusual building (like a lighthouse, old ruins, a modern structure, a bridge, etc.), a statue, or even a shipwreck...
As you can tell, there are lots of choices.
Your imagination is the only limit! :)
But remember, just because you have a good subject doesn't mean you'll automatically get a good photo.
To take the best photo, no matter how amazing your subject is, you need to:
- Get the lightness right.
- Plan ahead with tools like PhotoPills, which you'll learn about in section 4.
- Choose the best natural light.
- Set up your shot carefully.
- Tell a story.
Use simple composition tricks
You've found a special area of your location that really brings your story to life.
That's awesome!
But don't just stop there.
Look a bit further and check out other things you might find on-site (or even online from your couch) that could make your story even stronger.
Dig deeper and your photo will make a much bigger impact.
Use different elements to "paint" in your picture. What kind of elements? Things like lines, triangles, patterns, textures, or a stand-alone item.
The goal is to guide the person looking at your photo. You want their eyes to move around the picture the way you intend, highlighting or creating an effect like symmetry, a certain balance, or a striking contrast.
Don't just stick to the surface and avoid the obvious!
It's the only way to create a truly unique image.
Show movement in your photos
Taking a photo of motion and actually showing motion are two different things.
When you take a photo of motion, you're making sure to get the action into the picture, taking care of all the technical stuff like exposure and composition by using the right camera techniques.
But when you show motion, you're focusing on telling a story. It's all about your skill in presenting movement in a way that makes the viewer understand what you're trying to say.
Here's the thing, though: most people look at photos more by feeling than by thinking about the technical details. So, you're a good storyteller if you can get your message across without having to explain it.
To show motion, you need... well, something that's moving!
It could be water (like a waterfall, the ocean, a river, a lake, or a canal), clouds, lights (like car headlights)... or even people walking around.
There are basically just 2 camera techniques for showing movement:
- Motion blur happens when you use a slow shutter speed.
- Freeze motion is the opposite – it happens with a fast shutter speed.
How to find the best seascape location
If you're looking to find the perfect spot for seascape photography, you just need some time.
That time will let you explore what kinds of seascapes are out there, figure out what exactly you're looking for in a location, and where to find it.
This is how I approach it.
Revisit the same photography location again and again
I can't say this enough, and that's why I'm putting it first. I've always taken my best photos in places I know really well, that I love, and that I've been photographing for a long time.
When you find a place you really like, keep going back.
Go back over and over. Check out every nook and cranny and try different compositions, at different times of the year and in different weather.
Gradually, you'll start taking better pictures, believe me.
Get photo ideas from external sources
Once you decide where and at what time of year you're going to take photos, check all the sources of information that you can think of. Here are some ideas that can help you:
- Your main source of inspiration should be the photos of other photographers that draw your attention. Have a look at Instagram, Flickr, 500px, Unsplash, Getty Images, 1x.com, Viewbug, Pexels, Youpic, Shutterstock, Adobe Stock and Google Images.
- Learn from other photographers' discoveries and check the locations they have previously explored. Certain communities, such as Locationscout and ShotHotspot, offer this information.
- Analize publications like travel magazines (National Geographic, Condé Nast Traveler and Travel + Leisure), travel curated content (Exposure), travel guides (Lonely Planet) and the photography section of newspapers such as The Atlantic, The Guardian and The New York Times.
- Revisit your favorite photographers' websites and pay attention to their galleries. Have you checked the PhotoPills Masters' websites participating in the PhotoPills Camp?
- Don't forget the Wikipedia! It has tons of lists of interesting places. Let's say you're looking for lighthouses... Type in Google "lighthouse list Wikipedia" and you'll be surprised.
- A reliable and full of surprises source of information are the locals. No one knows the area better and provides greater advice.
- How long since your last visit to a library or a bookstore? Yes, books will tell you more about the local history and natural biodiversity of an area or town.
- Try to visit the nearest Town Hall or tourist office and look for first hand information.
- Again, check the Points of interest (POIs) included in PhotoPills.
- And finally, scout the area. It's usually the most effective strategy :)
Explore and walk around!
The old-school way always works XD
Sometimes, I just pick a spot on the map and explore it. I really enjoy walking around the area, looking for photo opportunities, but without lugging all my equipment.
You wouldn't believe how much fun I have just being there, searching for subjects, figuring out compositions, framing... Basically, spending hours imagining, visualizing, and scouting for potential photo spots is a big part of my photography.
It really helps me think up, plan, and get ready for the shot.
I dare you to try it too!
In a nutshell, these are the strategies I use. I hope you find them as helpful as I do.
And if you have any other sources of inspiration that you think are important, share them with me and the other PhotoPillers by leaving a comment at the end of this guide :)
In photography, sharing always makes things more fun!
Awesome!
You're almost there...
So far, you've picked your location. If you haven't, hurry up and choose one because we're about to plan a photo.
You're not far from capturing the photo of your dreams.
Let's get to work!
4.How to plan your seascape photos like a pro
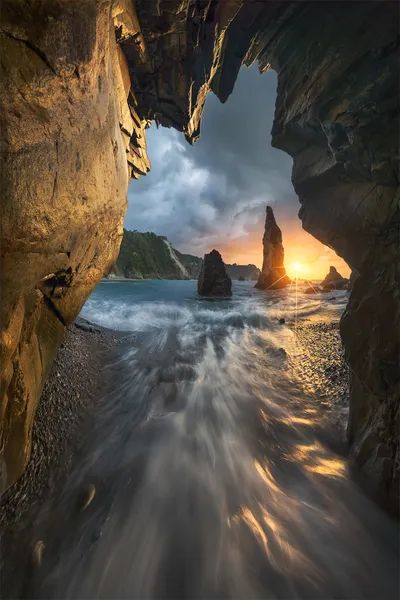
Photo by Juan López Ruiz
Preparation is key in capturing stunning seascape shots.
When you plan your photo, you'll pinpoint:
- The perfect location to set up your shot,
- The ideal direction to aim your camera, and
- The optimal date and time for the shoot...
This prep work ensures you know the exact spot to be, the day to be there, and the time to click the shutter.
And don't worry, planning your shoot is simpler and quicker than you might think. With PhotoPills, you can have it all mapped out in just a few minutes.
In this video you'll learn how to plan any seascape photo you imagine:
If you're keen on mastering a particular feature of the app, check out the PhotoPills YouTube channel where you'll discover a wealth of tutorials ;)
To simplify things further, below are some practical planning examples that cut right to the chase...
Understand and plan the light: golden hour and blue hour
Why do seascape photographers love the magic hours so much? What are they, and when do they happen?
Magic hours refer to two special times of the day:
- The golden hour. This is when the light is warm, casting shades of red, orange, yellow, or, true to its name, gold. It happens when the Sun is between 6º above and 4º below the horizon.
- The blue hour. During this time, the light turns a deep blue, giving off a cool tone and making colors look more intense. It occurs when the Sun is between 4º and 6º below the horizon.
Both periods provide the most ideal light for capturing stunning seascape photos.
Here's a video in which Rafa explains everything you need to know about natural light.
Plan the golden hour
Planning a photo that happens during golden hour is very simple. You can do it in 7 steps:
Place the Red Pin on a potential location.
Select the date you want to photograph the golden hour.
Find out the Sunrise/Sunset direction. Check the thick yellow line (Sunrise) or the thick orange line (Sunset).
Find out the Sunrise/Sunset time on Panel 4.
Check different locations until you find a photo that you like.
Check at what time the golden hour starts on Panel 6.
Save the plan using the Save button.
You have a complete step by step guide in section 4 of our golden hour photography guide.
Plan the blue hour
Planning a photo that happens during blue hour is very simple. You can do it in 7 steps:
Place the Red Pin on a location that you like.
Select the date you want to shoot the blue hour.
Find out the Sunrise/Sunset direction. Check the thick yellow line (Sunrise) or the thick orange line (Sunset).
Find out the Sunrise/Sunset time on Panel 4.
Check different locations until you find a photo that you like.
Check at what time the golden hour starts on Panel 6.
Save the plan using the Save button.
You have a complete step by step guide in section 4 of our blue hour photography guide.
Plan a Sunrise or Sunset on a certain date
Picture this: you're planning to capture the next Sunrise or Sunset. You've got the date set, but you're wondering where the best spot to take the photo is and what time you should be there.
You can find the answers to these questions with the main feature of PhotoPills: the Planner.
Here's a video in which Rafa explains in great detail how to plan spectacular Sunrise and Sunset photos.
To plan a Sunrise/Sunset photo for a certain date you have to follow 6 steps:
Place the Red Pin on a location that you like.
Select the date you want to photograph the Sunrise/Sunset.
Find out the Sunrise/Sunset direction. Check the thick yellow line (Sunrise) or the thick orange line (Sunset).
Find out the Sunrise/Sunset time on Panel 4.
Check different locations until you find a photo that you like.
Save the plan using the Save button.
You have a complete step by step guide in
Plan a Sunrise or Sunset in a certain position
Let's say you have a vision of the Sun rising or setting at a particular spot in your photo, but you're not sure when this can happen.
Basically, you need to figure out two things:
- Whether the photo you have in mind is actually achievable.
- If it is, the exact date and time it will occur.
The perfect tool to help you with this is the PhotoPills Planner.
In the video below, Rafa gives a detailed explanation on how to plan for a stunning Sunset shot when you're not certain of the specific date you want to capture it.
To plan a Sunrise/Sunset photo when you don't know the date of the photo you have to follow 9 steps:
Place the Red Pin on the shooting spot.
Place the Black Pin where you want the Sun.
Find the dates on which the photo is possible with the Search option.
Enter the date range.
Set the azimuth of the Sun.
Set the elevation of the Sun.
Get the results table with the days when the photo is possible.
Choose the date that best suits what you need.
Save the plan using the Save button.
You have a complete step by step guide in
Plan the Milky Way
Give PhotoPills a shot for planning your dream Milky Way picture. It's an incredibly handy app!
Check out the upcoming video to discover:
- The simple steps to plan an optimal Milky Way photo for a specific date using PhotoPills.
- Techniques to pinpoint the precise date and time the Milky Way aligns with your envisioned shot if you're unsure when it occurs.
To plan a photo of the Milky Way you have to follow 6 steps:
Place the Red Pin on a potential location.
Set the date of the photo.
Activate the Milky Way layer.
Change the time with the Time bar until the Milky Way is in the position you want.
Move the Red Pin to adjust the shooting spot.
Save the plan using the Save button.
You have a step by step guide in section 7 of our Milky Way photography guide.
Plan Star Trails
Curious about the pattern of Star Trails you can capture? Wondering if Moonlight will illuminate your scene, or where Polaris and the celestial equator will be positioned? Pondering the perfect time to start snapping photos?
You'll tackle these queries (and many others) while planning.
Lucky for you, PhotoPills holds all the solutions.
Don't just take my word for it, watch this video where Rafa guides you through planning a Star Trails photo, step by step.
To plan a Star Trails photo you have to follow 3 steps:
Go to the location and stand in front of the subject.
In PhotoPills, tap Night RA from the Pills menu.
Use the Night Augmented Reality (AR) to find the Polaris, the celestial equator, and every possible star trail pattern. Look at the blue circles.
You have a step by step guide in section 5 of our Star Trails photography guide.
Plan a Meteor Shower
To capture a Meteor Shower effectively, it's crucial to be aware of the radiant's position throughout the event.
Wondering what the radiant is?
It's the spot in the sky that appears to be the origin point from where meteors seem to spread out.
And how do you pinpoint this spot?
It's simple...
Just use PhotoPills to discover its location.
In this video Rafa shows you how to plan any Meteor Shower photo.
To plan a photo of Meteor Showers you have to follow 3 steps:
Select the Meteor Shower.
Find out the key Meteor Shower information.
Find your shooting spot and framing (locate the radiant in the sky).
You have a step by step guide in section 12 of our Meteor Shower photography guide.
Plan a solar eclipse
This type of planning lets you know where to go, and when to go, to capture every phase of the eclipse. And also how to find the right shooting spot to capture the eclipse aligned with your favorite subject.
In this video Rafa teaches you to plan a solar eclipse. Although his explanations will help you plan any solar eclipse, whether it's partial, annular or total.
To plan a photo of a solar eclipse you have to follow 8 steps:
Select the eclipse you want to plan.
Place the Red Pin in a location within the path of totality.
Find out when the eclipse phases occur on Panel 10.
Find out where in the sky the eclipse will occur.
Place the Black Pin on your subject.
Find the shooting spot.
Check the size of the eclipse on Panel 2.
Plan the field of view and the depth of field with the map tools.
You have a step by step guide in section 5 of our solar eclipse photography guide.
Don't forget to check the weather forecast
The countdown to your photo shoot is on, and you're feeling ready. You've checked and double-checked everything, confident that nothing will go wrong.
But have you considered everything?
Pause for a moment and think...
That's right, the one thing beyond our control: the weather. Us PhotoPillers have a saying for this: “Plan and Pray”. We even have a t-shirt emblazoned with the 'Plan & Pray' slogan to remind us of this reality!
Always remember to check the weather forecast when you're planning to shoot outdoors. It's crucial for predicting the conditions you'll encounter at your location and ensuring they align with your vision.
Sometimes, you might just get the perfect clouds and the ideal wind direction to enhance your shot.
So, don't forget to look up the cloud cover and wind details – they're vital to your shoot's success!
My weather apps
Whenever I can, I prefer to start with the national meteorology service of the location I'm shooting at, as it tends to offer the most precise and trustworthy forecasts.
However, when it comes to weather, I believe it's better to be safe than sorry. That's why I cross-reference the information with additional sources to ensure I have the most accurate data possible.
Below are the two additional resources I turn to for comparing and validating what the local national meteorology service tells me.
Windy
Windy is my favorite application when I want to know what kind of weather I'm going to find at the shooting location. I find it very useful because I can check a lot of information and it has a very nice interface.
The application tells you, for a specific location, the following data: wind (direction and speed), rain, snow, temperatures, clouds (at different altitudes) and waves (direction, strength and water temperature).
The bar at the bottom of the screen also offers a lot of information. It gives you, for example, a 7-day forecast of all these elements and you can choose to see them in different formats (basic, meteogram and aerogram). Also, I love the option to see satellite images.
With Windy you can create your own custom maps including the data and colors you prefer. And, of course, you can see how the forecast changes over several days.
You can download the Windy application on your smartphone and tablet. You can also go to the website on your laptop and desktop computer.
Windy is available on iOS and Android.
Ventusky
As I said before, when it comes to checking weather forecasts, I like to be conservative and check multiple sources.
And my second favorite option is Ventusky, an app that uses multiple maps to give you tons of weather information.
By default, the main interface is a map of your local area that allows you to see, at a glance, what the weather is like in your location. Thanks to a color code you can see the temperature and the wind direction lines that move over the earth. Of course, you can change the units in the configuration settings.
To see the weather nationwide, zoom out the map. To see it internationally, zoom out even further.
You can also see an animated weather forecast on the screen. Tap the Play button (lower left corner) and you'll see the weather evolution in the next hours or days. You can see a 7-day forecast or go back in time.
You can download the Ventusky application on your smartphone and on your tablet. But you can also use it through the website on your laptop and desktop computer.
Ventusky is available on iOS and Android.
Study the clouds (and the wind)
Clouds, as well as the direction and speed of the wind, play a crucial role in the composition of your photograph. The appearance, hue, and movement of clouds can add drama to your image.
Therefore, if the weather predictions suggest that there will be clouds in your scene at the time of your shoot, it's wise to analyze them closely. By understanding their patterns, you can leverage their dynamic nature to enhance your seascape photography.
How fast are they going to move?

No need to worry, we're not diving into a complex meteorology lesson here... :D
I just want to highlight some points about the different cloud types you might come across, especially when it comes to seascape photography.
If there's wind where you're shooting, clouds will be key in showing movement in your photos.
But the question is, how much movement will there be?
This depends on the cloud type and how quickly they're moving, which will influence the shutter speed you'll use:
- High clouds drift quite slowly, so you might need shutter speeds of 3 minutes or more.
- Middle clouds move at a moderate pace, so shutter speeds between 2 and 3 minutes are usually good.
- Low clouds zip by quickly, so go for shutter speeds of 2 minutes or less.
Keep in mind these are rough guidelines, as the actual speed will vary with the wind's strength.
What color can they have?

Clouds add a layer of emotion to seascape photos, and their colors can be truly breathtaking.
It's crucial to know when the sun's rays will paint the clouds with color.
Let's break down the types of clouds into three categories, each taking on color at different times around sunrise or sunset:
- High clouds catch the first and last light, changing color before sunrise or after sunset.
- Middle clouds are touched by color about 5 minutes before sunrise until 15 minutes after, and similarly, they change hues 15 minutes before sunset until 5 minutes after.
- Low clouds are illuminated during the actual moments of sunrise and sunset, particularly those on the opposite side of the sky from the Sun.
Predict the tides
If you're planning a photo in a tidal zone... Don't forget to check the high and low tide hours!
There are countless websites and applications for it, but my favorite is tides4fishing.
As a safety precaution
Taking seascape photos along the coast requires caution, as it can be risky.
When you're out capturing images by the sea, you'll likely encounter rocks and stones that can be treacherously slick if they're wet.
Moreover, it's crucial to consider the tides and their impact on wave intensity.
That's why scouting the location beforehand is key, along with knowing the tide schedule for your shoot day. The variance between low and high tide can be significant, depending on your location.
Always err on the side of caution to prevent any unwelcome incidents.
To get a better composition
Besides safety, understanding the sea's behavior at your photo location is important. Tides can dramatically alter the landscape.
For instance, rocks you want to include in your shot might be visible or submerged depending on the tide. If they're underwater when you plan to shoot, your session might be ruined.
Consider the beautiful reflections created when a receding tide leaves a thin water film on the sand. Combine this with the warm light of the golden hour, and you could capture stunning images.
Therefore, factoring in the tides is essential when picking your spot and deciding on the best time to shoot.
And protect your gear
Water can be a real threat for your camera equipment.
Here's how to protect it:
- Check if your tripod is water-resistant. It's likely to end up standing in wet areas, and you don't want it to rust or break.
- Carry multiple microfiber cloths. Filters in front of your lens attract water drops, which can leave marks and dirt on your photos if not wiped off.
- Choose the right shoes. Wear boots with non-slip soles to safely navigate wet, slippery rocks, and keep your feet dry.
And remember, once you're home, clean your equipment with fresh, warm water, especially the tripod. Saltwater can cause long-term damage if not washed off properly.
5.Most used lens filters in seascape photography

Photo by Aitor Pla
A lot of landscape photographers think lens filters are super important. Picking the right filters and using them at the right moments can really change how your final photo looks, especially with seascape shots.
That's why I put together a complete guide on lens filters a while back.
In that guide, you'll find all the info you need to get really good at using different lens filters to make cool effects and how to use the PhotoPills ND filter calculator.
But for now, here's a quick summary.
What is a lens filter?
A lens filter is a piece of equipment that you attach to the front of your camera's lens. It lets you create effects that would be really hard, or almost impossible, to achieve otherwise.
Lens filters can be made from polyester, resin, or glass. Glass is the highest quality material (and also the most expensive).
The most commonly used lens filters in seascape photography are:
- The polarizer (CPL) filter.
- The neutral density (ND) filter.
- The graduated neutral density (GND) filter.
- The reverse graduated neutral density (GND) filter.
I'll give you more details about each one further down.
I personally use Lucroit glass filters. I like them because, even though they're pricier than other brands, they help me produce higher quality images. So, I think it's worth spending a bit more on them.
In section 6, you'll find my specific recommendations for what I think are the best lens filters.
Lens filter systems (or mounting methods)
There are a few different types of filter systems:
- The square or rectangular ones (these are my favorites).
- The circular screw-on ones.
- The drop-in ones for some telephoto lenses.
- The square gel lens filters for some wide-angle lenses.
The last two types aren't used very often, so I won't go into much detail about them.
Square and rectangular lens filters

Some lens filters are square (usually neutral density or ND filters) or rectangular (graduated neutral density or GND filters):
- Square lens filters come in different sizes (70, 75, 100, 150, 165, and 180mm), but the most common size is 100mm.
- Rectangular ones can be 67x85, 75x90, 70x100, 100x150, 150x170, 165x200, and 180x210mm, with the most popular size being 100x150mm.
Benefits of using square and rectangular lens filters
- You need a filter holder to use them, that is a piece of plastic or metal that you attach to your lens.
- The filter holder has several slots where you can slide several filters at the same time.
- As these lens filters are not circular, nor do they depend on a specific lens size, they are perfectly interchangeable. Therefore, you can use the same filters with different lenses.
- It's easy to slide the GND filters very precisely to position the transition exactly where you need.
- You won't get any vignetting.
Downsides of using square and rectangular lens filters
- They are bigger than circular filters and much more fragile. If you drop one, it's likely to break.
- You need a filter holder to use them, so you have to carry extra gear. While you could hold the filter with your hand depending on the shutter speed, I really recommend using a holder because it makes things easier.
Circular screw-on lens filters

A circular filter is a round piece of glass, resin, or polyester with a metal edge that allows you to screw it onto your camera lens.
Some common sizes for circular lens filters are 43mm, 49mm, 52mm, 44mm, 58mm, 62mm, 68mm, 72mm, and 77mm.
Benefits of using circular lens filters
- You can keep them attached to your lens, so putting them on is quick and easy.
- They're simple to stack by just screwing one on top of the other.
- They're relatively small and thin, making them easy to store and carry.
- They're more durable than other types of filters.
Downsides of using circular lens filters
- They need to fit your lens's thread, so they must be a specific size. This makes it tricky to switch between lenses, but you can use a step-up ring to help.
- Circular lens filters can be hard to unscrew, especially in cold weather.
- When you use multiple filters together, it can cause vignetting (the corners of the image are darker than the center).
In my view, these reasons are enough to suggest using square and rectangular filters. They are the ones I use and I really like them.
Polarizer (CPL) filter

A circular polarizing filter (CPL) is a glass piece that reduces the amount of reflected light that goes through your camera's lens and reaches the sensor.
With a polarizer, you can:
- Remove non-metallic reflections, which is great for making water clearer and showing more background detail.
- Get rid of glares on the surface of objects.
- Reduce some of the mist in a scene.
These effects can't be replicated with Lightroom or Photoshop.
Another cool thing a polarizer does is boost the saturation and contrast of your photo.
However, polarizing filters have some downsides and issues to be aware of:
- They can mess up the sky in your shot. If you use a polarizer with a wide-angle lens during sunrise or sunset, it can make parts of the sky look unnaturally dark. This is also a problem for panoramas. Be extra careful with panoramas: any issue caused by the polarizer is almost impossible to fix later.
- A polarizing filter reduces light in the scene. Depending on the type, it can cut out 1 to 3 stops of light, so you need to adjust your shutter speed accordingly.
- A polarizer can cause vignetting, especially with wide-angle lenses, affecting the corners of the frame. To prevent this, don't stack too many filters and choose slim or nano polarizing filters.
- A CPL filter might create flares or halos in the final image.
Despite these issues, I think a circular polarizing filter is a must-have for any photographer, especially those who shoot seascapes. With a high-quality filter and some practice, you can achieve amazing results.
Neutral density (ND) filters

A neutral density (ND) filter is a piece of glass or semi-transparent resin that you put in front of your camera lens.
The ND filter helps reduce the light that gets to the sensor evenly. It's like sunglasses for your camera, allowing you to cut down light (always evenly, remember). This is useful for capturing certain effects without making the brightest parts of your scene too bright:
- You can slow down the shutter speed to create beautiful effects, like a silky look in the sea during Sunset, without making the scene too bright.
- You can use wider apertures (without making the scene too bright) to get a shallower depth of field. This is handy if you want to make a backlit subject stand out from the background.
- The effect you achieve depends on how many stops your filter cuts out (1, 2, 3 stops, etc.).
But... Be cautious!
The density the manufacturer lists might not be accurate, so I recommend you check your ND filters yourself.
By "check," I mean "figure out the actual density of the ND filter." It's a pretty straightforward process that I explain in detail in our lens filters guide (section 6).
Graduated neutral density (GND) filters

A graduated neutral density (GND) filter is a piece of glass or resin that you can put in front of your camera lens.
It's called graduated neutral density filter because:
- The filter's density changes gradually, reducing light bit by bit.
- From the bottom edge of the filter to the middle, it changes from clear to a neutral gray color.
- From the middle to the top edge of the filter, the gray gets darker, cutting out more and more light.
It helps you:
- Balance the light in your photo. In other words, it reduces light in just a certain part of the image, like the sky.
- Improve local contrast. This means it makes the details and colors in your image look better.
Not all filters change from dark to clear in the same way.
The gradient can be hard, soft, or blended.
- In hard filters, the change from dark to clear is very sharp, almost like a straight line.
- In soft filters, the change is gradual: the dark part slowly turns clear.
- A blender filter is completely dark at the top (almost like an ND filter) and completely clear at the bottom. The difference with the other two is that the density changes gradually along the entire length of the filter.
Reverse graduated neutral density (reverse GND) filters

The reverse graduated neutral density, or reverse GND filter, is a special type of graduated filter.
What's unique about it is that the darkest part, which is the part that reduces the light, is right in the middle of the filter. From there, it gets lighter towards the top. The bottom half is totally clear (so it doesn't take away light from the front part of your picture).
That's why they call it reverse.
It's mostly used for taking pictures of Sunrises and Sunsets when the light is coming from behind, especially when the horizon is clear and doesn't have things like trees or buildings sticking up.
Other types of filters
Special lens filters are usually used for more creative or unusual photos.
Here are some examples to think about:
- An ultraviolet (UV) filter is a glass filter, often circular, that you screw onto your lens. It blocks ultraviolet rays.
- A light pollution filter helps to reduce the effect of artificial city lights on your night photos or astrophotography.
- A solar filter is made for photographing the Sun or solar eclipses.
- A black card is just that – a piece of black card or any dark, smooth, flat surface.
- An infrared filter blocks visible light and only lets infrared light reach the camera's sensor.
- The Star Glow lens filter makes bright stars shine more and brings out their natural colors. It also hides fainter stars, making constellations stand out.
- The SharpStar2 lens filter helps with focusing, especially if you're struggling to get consistently sharp, focused stars.
- The Gold-N-Blue (Singh-Ray) and Varicolor Blue/Yellow (Cokin) circular polarizing filters are unique. Instead of removing reflections, they color them blue or yellow as you turn the filter.
- A Skylight filter is almost always circular. It blocks ultraviolet rays and has a slight orange-pink tint.
Still with me? Awesome!
Now you know what a lens filter is and the different types you can use to create an amazing seascape photo.
It's time to get your equipment ready :)
6.All the equipment you need to take seascapes

Photo by Osama Alsaadoun
Camera gear matters. And when it comes to seascape photography, it matters even more.
Recently, a lot of people have been asking me about how I capture seascapes. But, more specifically, their question is always the same:
"OK Toni, what do you need for seascape photography?"
Well, here's a detailed description of all the equipment you need to take seascape photos.
Camera
The quality of your seascape photos is influenced by the type of camera you use and its technical capabilities.
So, what are the basic needs?
A decent camera for seascape photography should:
- Be able to shoot in RAW format.
- Have a Manual (M) and Bulb (B) mode.
- Generate relatively low noise.
How take long exposures with your iPhone (or any other smartphone)
"Wait, can you really do that?"
Yes, you can!
Let's explore how you can take seascape shots with your iPhone or any other smartphone.
Option #1: Use a dedicated app
You can download an app designed for cool long exposure effects. If you can keep your phone fairly steady, it will give you a sharp photo with some parts of the scene looking blurred.
- For iPhone (Apple Store): Try Spectre, an AI-powered app for amazing long exposures.
- For Android (Google Play Store): Camera FV-5 is great. It's mainly for shooting, but it has a long exposure mode for low-light photos and light trails.
Option #2: Use specific lens filters for smartphones
Some brands make filters for phones, just like the ones for DSLR or mirrorless cameras:
- Square and rectangular filters. NiSi has a variety of filters for phones (like polarizer, ND, GND, light pollution). They're smaller, and you'll need a filter holder and a clip for your phone.
- Circular filters. Brands like PolarPro or Singh offer different circular filters for phones.
You'll also need an app that lets you shoot in manual (M) or semi-automatic mode (A/Av or S/Tv).
Here are some app examples, but there are many more:
- For iPhone (Apple Store): Camera+, ProCamera, and Halide Mark II.
- For Android (Google Play Store): HD Camera, ProCam X, and Camera ZOOM FX Premium.
And remember to use some sort of tripod!
Since you'll be shooting at slower shutter speeds, you need a tripod or some support to keep your phone stable. If you hold it in your hands, your photos might come out blurry.
Point-and-shoot cameras
Generally, most point-and-shoot cameras give you pretty decent image quality and are a great deal for the price.
However, your ability to get creative with your photos will depend on whether you can find a filter system that works with your camera.
Here are a couple of options:
- The Lensmate circular filter adapter for the Sony RX100 (all versions).
- Or my personal favorite, the MagFilter magnetic filters.
If these don't work, you can always try holding the filters in front of the lens yourself or moving them around while you're taking the photo.
Go ahead and play around with it, because you never know. You might end up taking an incredible photo!
Low-end cameras
The following cameras allow full manual and semiautomatic basic exposure, which, in turn can help you control your long exposure:
- Cameras with an APS-C sensor: Nikon Z30; Canon 4000D, 250D and M5; Sony a6600.
- Cameras with a Micro 4/3 sensor: Olympus OM-D E-M10 Mark IV and Panasonic G95.
- Compact camera (1" sensor): Sony RX100 VII.
Mid-range cameras
In the mid-range price (and quality), I recommend you the following cameras:
- Cameras with an APS-C sensor: Nikon Z50, Zfc and D7500; Canon R10, R7, 850D, 90D and 6D Mark II; Fuji X-S20 and X-T30 II; Pentax KF; Sony a6700.
- Cameras with a Micro 4/3 sensor: Olympus OM-D E-M5 Mark III and Panasonic G9 II.
- Full Frame cameras: Nikon Z5 and D750; Canon RP; Sony a7C II.
High-end cameras
On the higher price range (and higher quality), I recommend you these cameras:
- Cameras with an APS-C sensor: Nikon D500; Fuji XH-2S, XT-5 and X-Pro3.
- Cameras with a Micro 4/3 sensor: Olympus OM-1 and Panasonic GH6.
- Full Frame cameras: Nikon Zf, Z6 II, Z7 II, Z8, Z9, D780, D850 and D6; Canon R8, R6 Mark II, R5, R3, 5D Mark IV, and 1D X Mark III; Panasonic S5 II, S5 II X, S1R and S1H; Pentax K-1 Mark II; Sony a7 IV, a7 CR, a7R V, a9 III and a1.
Lens
What's the best lens for seascape photography?
The lens you choose and the focal length you use really depend on what you want to show in your photos.
If you're aiming to capture a big chunk of the landscape, go for a wide-angle lens. For instance, the Nikon 14-24mm f/2.8 is a great choice (and it's my go-to!).
If you're more into highlighting a smaller section of the scene, a mid-range lens would be your best bet.
And, if you're all about zooming in on specific details, you should consider using a standard telephoto lens. Good options include the Nikon 24-120mm f/4 or the Canon 24-105mm f/4.
Lens filters
Lens filters are a must-have for seascape photography.
But with so many options out there, what's the ideal lens filter kit for beginners (or even for those who are more experienced)?
I've put together a detailed guide on lens filters to help you out.
Here's a quick rundown of my suggestions...
Which ND filter should I buy?
The best ND filter for daytime seascape photography is the 6-stop ND filter (ND 1.8).
Why? A 6-stop ND filter is, in my opinion, perfect for taking shots in two time frames:
- From the Sunrise actually happens until 30 minutes after Sunrise.
- From 30 minutes before Sunset until the Sunset actually happens.
Other popular ND filters:
- 3-stop ND filter (ND 0.9)
- 8-stop ND filter (ND 2.4)
- 10-stop ND filter (ND 3.0)
Which GND filter should I buy?
The best GND filter for daytime seascape photography is the 3-stop soft GND filter (GND 0.9).
Why? The 3-stop soft GND filter is certainly the GND filter I use the most. As for the transition (soft), this filter is perfect for seascapes (natural and urban) where the horizon line is straight.
Other popular GND filters:
- 4-stop soft GND filter (GND 1.2)
- 2-stop soft GND filter (GND 0.6)
- 3-stop soft reverse GND filter (reverse GND 0.9)
Which polarizer (CPL) filter should I buy?
The best polarizer (CPL) filter, in my opinion, is the 112mm Slim circular polarizer from Lucroit.
Why? This specific choice is based on the fact that quality-wise it is excellent and I can mount it on my Lucroit lens filter holder together with other three filters with no vignetting up to 14mm full frame equivalent.
Filter holder

Alright, there are two main types of filters: the circular screw-on ones and the square or rectangular filters.
For square or rectangular filters, you have two options:
Hold them by hand in front of the lens.
Use a filter holder.
A filter holder is just what it sounds like – a holder. It's typically made of plastic and attaches to the front of your lens with an adapter ring (I'll talk more about this soon). The holder has several slots where you can slide in different filters. The number of slots varies by brand, but most holders can accommodate three filters.
Of course, the size of the filter holder you need depends on your filters' size.
So, if you've decided on 100mm filters for your lenses, you'll need a holder of the same size.
I personally use a 100mm Lucroit filter holder for my lenses like the Zeiss Milvus 18mm f/2.8, Nikon 17-35mm f/2.8, Sigma 35mm f/1.4, and Nikon 70-200mm f/2.8.
For my Nikon 14-24mm f/2.8 lens, I use a 165mm Lucroit filter holder. Remember, you can use this system on smaller diameter lenses with an adapter.
Filter holders are made by the filter brands themselves. Some of the well-known ones are Lucroit, Nisi, Haida, Lee, Formatt-Hitech, and Benro.
Adapter rings

To attach the filter holder to your lens, you'll need an adapter ring. This ring typically has a threaded back that screws onto the lens. The front part usually has a click system that lets you easily snap the filter holder in place with a gentle press.
But the most crucial aspect of an adapter ring isn't how it attaches. It's the size.
The first thing to consider is the diameter of your lens. If you don't match this, the ring won't fit your lens.
Let's say you have two lenses: one with a 77mm diameter and another with a 58mm diameter. To use your filter holder with both, you'll need two adapter rings: one 77mm and one 58mm. Pretty straightforward, right?
You can find adapter rings in all sorts of sizes, and they're usually quite affordable.
Tripod and ballhead
You absolutely need a sturdy tripod for successful seascape photography. It's crucial, especially for long exposures, to ensure your camera doesn't move at all during the shot. Keeping your camera steady is key to avoiding any blurs in your photos.
"Toni, can I use my basic tripod for long exposures with filters?"
Well, basic tripods are often lightweight and can be unstable. But here are some tips to help:
- Hang a bag of stones or your camera bag from the hook at the bottom of the tripod's center column. But avoid this on windy days, as it could have the opposite effect!
- Try not to extend the center column of the tripod if it has one, as it can make it less stable.
Thinking of buying a good tripod? The Manfrotto 055XPRO3 is a popular choice among advanced amateur photographers. Also, check out Travel line.
If you're willing to spend a bit more, consider carbon fiber tripods. They're strong but lighter than aluminum ones and can handle weights from 5 kg to over 25 kg (11-56 lb), depending on the model. Brands like Gitzo, Manfrotto, Benro, Induro and Really Right Stuff offer high-quality tripods in both carbon and aluminum.
Now, what about the ballhead? It's a matter of personal preference, but make sure it can handle at least 5/7 kg (11/16 lb) and comes with a removable plate. I personally use the Really Right Stuff BH-55. It supports up to 23 kg (50 lb), easily handling my gear. It's precise and comfortable to work with.
Other ballheads I recommend are the Gitzo GH1382QD, the Kirk Enterprises BH-1 and the Arca Swiss Monoball Z1 SP. They're all robust and can handle a minimum of 13.5 kg (30 lb).
If you're using a super telephoto lens, you might want to consider a gimbal head, like the Benro GH2 that I use.
Intervalometer
When taking seascape shots, it's crucial to avoid any camera shake, as it can lead to a bunch of blurry photos. To prevent this, you need a way to take pictures without physically touching your camera.
You might think of using shutter releases or intervalometers. But here's a tip: skip the remote shutter release and go for a good intervalometer instead.
Why choose an intervalometer? Well, remote releases aren't programmable. You can't set them to take photos at regular intervals automatically.
On the other hand, intervalometers are programmable. You can set the exposure time, the interval between shots, the total number of photos you want, and even the delay before the first picture.
Looking for some good intervalometers? Here are my suggestions:
- For a pro intervalometer, check out SMDV.
- If you're looking for budget-friendly options, brands like Neewer, Phottix, and Vello have some great choices.
A great alternative is a device called CamRanger. Right now it's available for Nikon, Canon, Fuji and Sony cameras.
It's a stand-alone device that you connect to your DSLR or mirrorless camera with a USB cable. It creates an ad hoc WiFi network to which you can connect your smartphone or tablet (iOS, Android and Windows). Thanks to the CamRanger application you can control your camera without a computer or an Internet connection.
Best of all, this device is independent. Therefore, if your mobile device loses its connection, the CamRanger has an internal memory to keep shooting. Imagine that you are making a timelapse, your sequence would be cut if the camera stops taking pictures in the time frame you've set...
So the CamRanger is great for many types of photos: timelapses (of the Milky Way, of Star Trails, of solar eclipses or lunar eclipses...), bracketing, focus stacking for macro and landscapes... and many more!
Memory cards
There are lots of different SD Cards (Secure Digital) out there, varying in capacity and data transfer speed. Among the many brands, I personally like SanDisk and ProGrade.
For those just starting out, 32GB SD cards of class 10 or U1 (starting from around €12) are pretty good. They're affordable and can store a decent number of photos. However, their main downside is that they don't have the fastest data transfer speed, meaning it takes a bit longer to save each photo to the card.
My advice? Go for a memory card with a high transfer rate. It saves each picture to the card quicker, and these days, SD cards have become so affordable. For example, you can get an SDHC speed class 10 16GB card without breaking the bank, and you really shouldn't settle for anything less.
Also, I suggest using several smaller capacity cards instead of a few large ones. If you lose or damage a card, you won't lose as many photos. It's a safer way to protect your pictures.
While some cameras still use CompactFlash (CF) cards, they're gradually becoming less common.
Replacing them, SanDisk, Nikon, and Sony introduced a new card format called XQD, used in various Full Frame, APS-C, and mirrorless camera models. These XQD cards:
- Have a high storage capacity, ranging from 32GB to 256GB.
- Offer super fast reading and recording speeds (400MB/s compared to 160MB/s for a CF card or 250MB/s for an SD card).
- Are very secure, resistant, and durable.
In 2017, CFexpress launched the latest standard memory card from the CompactFlash Association with two new form factors, Type A and Type C, while the existing XQD form factor became Type B.
- Type A has mainly been adopted by Sony in its newest models.
- Type B is more common and affordable, used by Nikon in its Z series, Canon in some EOS R bodies, and Panasonic in the S1/S1R and GH6.
- Type C isn't being produced yet.
Microfiber cloth
I recommend always having a few microfiber cloths in your backpack. Microfiber is the ideal material for cleaning the front glass of your lens and your filters. It's gentle and won't scratch, stain, or leave any residue on the glass.
It's easy to get fingerprints or grease on the filters, especially when handling them. And if you're shooting near the ocean, sea spray might leave droplets on the filter. Or it might rain...
Basically, there's a high chance your filter will get dirty. They tend to attract dirt like magnets.
And if you don't clean them, that grime will show up in your photos.
So, to avoid spending hours editing out black spots on your computer, always have several microfiber cloths handy!
Before wrapping up, here are some basic tips for cleaning your filters:
- Only use microfiber cloths for cleaning. Other fabrics might scratch the filter.
- If your filter gets stained with salt water, remember to rinse it with fresh, warm water when you get home, and then dry it thoroughly with a microfiber cloth.
- When washing your microfiber cloths, don't use bleach (it damages the fabric). Avoid washing them with cotton towels (microfiber picks up all the lint) and skip the fabric softener, as it removes the static charge that makes microfiber effective.
Now that we've covered all the essential gear you need, there's no time to lose.
Let's dive into learning how to take seascape photos! :)
7.How to take daytime seascape photos

Photo by David García
As we saw in section 2, every scene is different depending on the season and the time of the day you're shooting in. So there is not a unique way of capturing daytime seascape photos.
However, it's good to have a workflow. Having it doesn't mean you must follow each step, but it gives you a starting point.
Don't worry if you don't have an established routine yet. I'll share mine with you ;)
This is my step by step workflow to take daytime seascapes
- In daylight.
- Around Sunrise.
- Around Sunset.
- During the golden hour.
- During the blue hour.
- During a solar eclipse.
However, if you want to go into detail on how to do daytime long exposure photography, keep reading.
What daytime seascape photography settings should you use?
Your settings will depend on 2 things: the natural light conditions of the scene and how you want to convey movement.
To capture the photo you've imagined, using the exposure triangle to get the "right" exposure.
Here are what I consider the best settings to take daytime seascape shots:
- Aperture: f/8, and never go above f/16.
- ISO: ISO 100 or the lowest possible.
- Shutter speed: It depends on the lens filters you're using. More on that below.
Aperture
My favorite is f/8, which is the sweet spot of most of my lenses. But make sure you keep it between f/8 and f/16. Never go over f/16 to avoid diffraction.
ISO
You should always use the lowest possible ISO to avoid noise. Therefore, use ISO 100 or the native ISO in your camera.
Shutter speed
It depends on the lens filter(s) you're using to create the effect you want!
- Polarizer (CPL) lens filter. Remember it subtracts an average of 1 stop. You can learn how to use this lens filter reading section 5 of our lens filters guide.
- One or several ND filters. Use the PhotoPills Long Exposure calculator to know the equivalent shutter speed. You have all the details in section 7 of our lens filters guide.
- One or several GND filters. Depending on the number of GND filters you use, add up each filter's density. You have a detailed explanation of all the workflow you need to follow to find out the shutter speed in section 8 of our lens filters guide.
How to take daytime seascape photos step by step
Imagine I'm shooting a daytime seascape for which I need:
- A polarizer (CPL) filter. More on how to shoot with it in section 5 of our lens filters guide.
- An ND filter. More on how to shoot with it in section 7 of our lens filters guide.
- A GND filter. More on how to shoot with it in section 8 of our lens filters guide.
Here's the exact workflow I follow, detailed step by step, so you can follow it too or adapt it to your liking.
You can also read a shortcut.
Get to your shooting spot in advance
It's a good idea to get to your photography location well ahead of time, at least 2 or 3 hours early. You definitely don't want to be rushing to capture your shot.
Remember, patience is key.
Arriving early helps you avoid mistakes and gives you time to:
- Double-check your plan with PhotoPills. You can fine-tune your shooting spot and even the time you plan to shoot.
- Make sure you can get to your spot easily and safely, without any unexpected hazards.
- Explore different areas or viewpoints that might offer a fresh or additional perspective to the one you originally had in mind.
- Spend time on your composition. Finding the perfect shot takes patience, calm, and time. Or at least, finding the shot that's perfect for you.
On this last point, it's important to use your imagination: a photo taken with filters can present a scene very differently from how you see it with your eyes. That's the magic of photography ;)
That's why it's crucial to try and predict how the water will look silky, which way the clouds will move... Anything that can help you craft a composition that elevates your image.
Place the tripod, ballhead, camera, and lens
When you're out in the field, set up your tripod at the spot you've planned to shoot from (section 3) and ensure it's steady.
Attach your camera and lens to the ballhead. Make sure everything is tightly secured to prevent any shaking during the shooting.
Now, it's time to focus on your composition.
Decide on the elements you want to include in your shot:
- Looking for a broad view? Opt for a wide angle lens with a focal length like 14mm, 18mm, or 24mm.
- Want to zoom in a bit more? Go for a longer focal length, maybe 85mm or 105mm.
These choices will help you figure out if the lens you're currently using is the right one. If it's not, or if you've had a change of heart about your composition, simply switch out the lens for a different one.
Remove the UV filter
Using a ultraviolet (UV) filter isn't really helpful.
This kind of filter can slightly lower the sharpness and contrast in your photos. Plus, it might lead to reflections, halos, and flares.
If you normally keep a ultraviolet (UV) filter attached to your lens, it's a good idea to take it off when you begin setting up your equipment.
Turn off the lens stabilization system
Since you're using a tripod, make sure to turn off the vibration reduction or image stabilization feature on your lens (VR/IS). This stops the lens from trying to fix vibrations that aren't there, which could actually make your image less sharp.
Shoot in RAW
Always take photos in RAW format!
This format captures all the details your camera sensor sees, giving you more to work with for better pictures. Make sure to use it to its fullest.
Put the camera in manual (M) or semi-automatic (A/Av or S/Tv) mode
Now it's time to pick the shooting mode.
If you go for Manual (M) mode, you're in charge of everything. You get to decide the exposure time, aperture, and ISO to create the photo you want.
If you'd like a bit of help from your camera, choose one of the semi-automatic modes. In Aperture Priority mode (A or Av), you pick the aperture, and the camera figures out the shutter speed. On the other hand, in Shutter Speed Priority mode (S or Tv), you set the shutter speed, and the camera chooses the aperture.
Select the spot metering mode
The metering mode helps you figure out the right exposure for the most important part of your scene – the key tone. This is where you want to know the light levels and what camera settings you need for a perfect shot.
Don't worry if you don't nail it on your first try. It's totally fine to take a few test shots until you get the results you want.
My tip? Whenever you can, use the spot metering mode.
But if you're in a scene where the light is pretty consistent, the center-weighted metering mode works well too.
Choose the focal length and work on your composition
To achieve this, tweak the focal length until you find the one that fits your desired frame.
If you're using a lens with a fixed focal length, simply move the tripod. Make sure it's stable, then adjust the ballhead knobs to aim the camera where you want.
Next, take your time to really fine-tune your composition.
Attach the filter holder to the camera
Attach the lens adapter ring to the lens and set up the filter holder.
Hold on a moment... ;)
Don't put any lens filters into the holder slots just yet, even if you already know which ones you want to use. You'll add them in a bit later.
Set the ISO
The ISO setting is based on how much noise your camera creates in the photos. Begin with the lowest ISO your camera has (100 or 200).
If you find that the shutter speed is too slow for your liking, slowly increase the ISO. Keep going until you find a good balance between the amount of noise in the photo and the shutter speed you want.
Set the aperture
The aperture controls how much of your scene is in focus in the photo – you control depth of field.
- If you want to show more of the scene in focus (increase depth of field), then you should close the diaphragm (use a smaller aperture like f/8, f/11, f/16).
- But if you open the diaphragm (use a larger aperture like f/1.4, f/2.8, f/4), less of the scene will be in focus. This can help you draw the viewer's attention to a specific part of the scene.
Focus
In photography, getting the focus right is super important.
So, remember this: don't put any lens filter in front of the camera just yet. If you do, the camera won't be able to see clearly through the lens filter, making it really tough to focus. And even if you do manage to focus, there's a good chance it won't be on the right part of your scene.
You might be wondering, "Where should I focus, then?"
Well, it really depends! It depends on which part of the scene you want to be super sharp and which part you're okay with being a bit blurry. In other words, it's all about where you want the area of focus to be in your scene.
You've got a few choices here...
Maximize the depth of field with short focal lengths (focus at the hyperfocal distance)
Maximize the depth of field with short focal lengths (focus at the hyperfocal distance)
When you're using short lenses (8-35mm) and you want as much of your scene in focus as possible, focus at the hyperfocal distance.
What's that? Well, imagine you want everything in your picture, from the stuff right in front of you to the faraway horizon, to be clear and sharp. That's when you use the hyperfocal distance.
It's basically a special distance. When you focus your camera at this distance, everything from halfway between you and that point, all the way to infinity, will be in focus.
I use this trick a lot for taking pictures of landscapes, night scenes, buildings, and more.
Check out this video where I show you how to focus at the hyperfocal distance.
Note: If the main subject is at a greater distance than the hyperfocal distance, you should focus directly on the subject. You will lose some depth of field in the foreground but everything that is at infinity will remain focused and the subject will be tack sharp.
You can calculate the hyperfocal distance very easily with the PhotoPills depth of field calculator.
That's pretty much everything you need to know.
But if you're super into details like I am, you might be curious about more stuff related to hyperfocal distance...
It's actually determined by a few things: the size of your camera's sensor, the lens you're using, and the aperture setting. Oh, and there's this thing called the Circle of Confusion (CoC), but that's getting really technical ;)
If you want to dive deep into all this, check out 'Depth of Field: The Definitive Photography Guide'. It's got all the nitty-gritty details.
Maximize depth of field with long focal lengths (focus on a point within the lower third of the scene)

When you're using lenses with longer focal lengths, the hyperfocal distance gets really far away. Sometimes, it's so far that you can't even focus at that distance.
So, what can you do instead? A good trick is to focus on a point that's about one-third of the way up from the bottom of your frame or scene.
You want a shallow depth of field
When you want to make sure the viewer's attention is drawn to a specific part of the scene, just focus on that spot. This is usually your main subject.
How do you make sure only that part is in sharp focus? Well, you can open up the lens (use a wider aperture), get closer to what you're focusing on, or use a lens with a longer focal length.
"Alright Toni, I know where I want to focus. But how do I actually do it?"
Great question!
You've got two choices: you can focus manually by hand, or you can use your camera's autofocus feature.
How to focus using the manual focus
First, switch your camera or lens to manual focus.
Once you've picked your focus point, manually adjust the focus by gently turning the focus ring on your lens.
To make this easier, use your camera's Live View on the LCD screen. This will help you focus precisely. If your camera has Focus Peaking or Focus Magnifier features, turn them on too, as they'll make it even easier to get that sharp focus.
Zoom in using Live View until you can see the tiny details of your subject.
Then, slowly turn the lens's focus ring until those details are crystal clear.
If you're not used to manual focusing, move the focus ring very slightly. When your subject looks focused, keep turning the ring just a bit more until it's slightly out of focus. Then, reverse the direction and bring it back into focus. This way, you'll clearly see when everything is perfectly sharp.
How to focus using the autofocus
If you're not comfortable with manual focusing, you can use your lens' autofocus instead.
Choose where you want to focus and press the shutter button halfway down until the camera focuses. Most cameras make a "beep" sound when they've focused correctly.
After focusing, switch your lens from autofocus to manual focus. This stops the camera from refocusing when you take the shot.
This step is really important. Remember to do this to avoid any issues.
Another method to lock the focus is to use a different button for focusing, instead of the shutter button. This means you can focus by pressing a button on the back of your camera with your thumb. When you let go, the focus stays on the point you selected.
If you're interested in setting up this back button focus, check your camera's user manual for instructions.
Take a test shot
Set the shutter speed so that the light meter in your camera is at zero. This means your photo will be properly exposed.
Take a test shot to make sure your focus is good and to check the histogram.
Once your subject is in sharp focus and the exposure looks right (meaning you're not losing detail in the brightest or darkest parts), make a note of the shutter speed you used.
Start working with the polarizer (CPL) filter
Here's a brief summary of the steps you should follow.
But if you need a more detailed explanation on how to use the polarizing filter, read section 5 of our lens filters photography guide.
Mount the polarizer (CPL) filter on the filter holder
The position of the polarizer (CPL) filter depends on the brand and system you're using:
- Brands like Lee or Lucroit have a filter holder that allows you to attach the polarizer in front using an adapter ring.
- Other brands, like NiSi, have a different setup where the CPL filter is placed closest to the camera sensor.
No matter which system you have, you should always begin by attaching your CPL filter and adjusting it to affect the specific area of the scene you're focusing on.
Rotate the polarizer (CPL) filter
After you've set up your shot just the way you like it, all you need to do is slowly turn the filter. Do this bit by bit.
While you're doing this, keep an eye on your camera's Live View screen, or the electronic viewfinder if you're using a mirrorless camera. This way, you can see if the filter is creating the effect you're after and if it's doing so with the right amount of intensity.
Meter the light in the key tone of the scene
Now that you've determined how, where and how much the polarizer affects the scene, it's time to meter the light in the key tone of the scene (with the polarizing filter on).
Adjust the shutter speed and take a test shot
Keep in mind that, based on the angle of polarization, the filter reduces light by about 1.5 to 2 stops. So, you'll need to tweak the shutter speed to make sure the light meter is balanced at zero.
If you're using a mirrorless camera (which has an electronic viewfinder) or a DSLR that offers this feature, make use of the live histogram. It's a handy tool to help you adjust the exposure just right.
Go ahead and take a test photo, then have a look at the histogram to make sure everything looks good.
Place the GND filter (or the reverse GND filter)
Here's a brief summary of the steps you should follow.
But if you need a more detailed explanation on how to shoot with one or more GNDs, read section 8 of our lens filters photography guide.
Meter the light in the darkest and brightest area of the scene
Now that you've got your circular polarizing filter set up (and remember, don't take it off!), it's time to figure out which graduated neutral density filter (GND filter) or reverse GND filter you need.
- First, meter the light in the scene's darkest part, where the filter's translucent section will go.
- Then, meter the light in the scene's brightest part, where the filter's darker section will be placed.
- Use the PhotoPills Long Exposure tool to calculate the exposure values for both these areas.
- Once you have those values, you can determine the right density for the GND filter you need.
Select the GND filter (or the reverse GND filter) you need and insert it
Now, pick the right strength and type of graduated neutral density filter (GND filter) or reverse GND filter for your scene. This could be a soft, medium, or hard gradation. Then, place it in the outer slot of your lens filter holder.
Here's how you should arrange it, leaving one slot empty:
- For systems like Lee or Lucroit: Lens > empty slot > GND filter > Polarizer.
- For systems like NiSi: Lens > Polarizer > empty slot > GND filter.
Adjust the shutter speed and take a test shot
Your camera is still in spot metering mode.
Now, measure the light in the brightest part of the scene where you want clear details.
Next, let in more light than usual by 1 or 2 stops (+1EV or +2EV), but make sure you don't exceed your camera's limit for overexposure.
Take a test photo and look at the histogram to make sure the exposure is just right.
If it's not, try again until you get it right.
If necessary, adjust the position of the graduated filter (GND and/or reverse GND)
Here's the crucial part: figuring out the position of the filter.
Where should the gradient (the part of the filter that fades from dark to light) go?
When you hold a GND filter and look through it, you can see the gradient area pretty well. But when you put it in front of the lens, it's harder to spot this area through the viewfinder.
Ideally, you want to slide the filter so that the gradient lines up with the horizon in your photo (or the line where the bright and dark areas meet). But here's a tip: you'll get a more natural-looking photo if you place the gradient just a bit below the horizon.
The main issue to avoid is setting the gradient too high above the horizon. If you do that, you'll end up with a really bright line just above the horizon in your photo, and it won't look good.
You can see what I mean in the next photo.

On the flip side, if you put the filter too low, parts of your photo, like the background or things in the front, will turn out too dark. Pay extra attention to things that stick up above the horizon, like trees, rocks, or mountains.
Here's an example.

Here's the final photo in which you can see how the filter position doesn't negatively affect the photo. The dark stripes have disappeared.

Bonus: using a GND filter AND a reverse GND filter
If you're planning to use both a GND filter and a reverse GND filter, here's what to do:
Figure out which GND filter you need by measuring the difference in light stops between the brightest part of the darkest area and the brightest part of the brightest area (where you'll use the filter). Use the PhotoPills Long Exposure calculator to find out the exposure values (EV).
Do the same for the reverse GND filter: measure the difference in light stops between the brightest part of the darkest area and the brightest part of the brightest area (where you'll use the filter). Again, use the PhotoPills Long Exposure calculator to find out the exposure values (EV).
Place both filters in the filter holder and set your exposure based on the brightest part of the scene.
Cover the viewfinder
When you're taking seascape shots with ND filters, or if there's a bright light behind the viewfinder, make sure to cover the viewfinder.
You can use a piece of black tape or anything else handy, even chewing gum! :D
Just be careful not to jostle your camera or move the focus ring on your lens while you're setting up your filters.
Place the ND filter
Here's a brief summary of the steps you should follow.
But if you need a more detailed explanation on how to shoot with one or more NDs, read section 7 of our lens filters photography guide.
Insert the ND filter in the filter holder
Put the ND filter in the slot right next to the lens, ensuring that the foam gasket fits snugly against the filter holder. This helps to prevent light from leaking in better than if you put the ND filter in the outer slots.
If you need to use two ND filters together for a long exposure in bright light, place the darker (or denser) ND filter in the first slot. Darker ND filters are more likely to cause reflections due to light leaking in.
Enter the Test settings in the PhotoPills Long Exposure calculator
These are the base exposure settings, that is the exposure allowing you to expose correctly using the GND filter. You calculated it previously.
Enter the Equivalent settings in the PhotoPills Long Exposure calculator
Here are the settings you'll use for your final photo: the aperture, ISO, and the actual strength of your ND filter.
PhotoPills will show you the equivalent shutter speed you need when using the ND filter to maintain the same exposure level.
Note: If you're taking pictures of a Sunrise or Sunset, keep in mind that the light changes quickly. If you use an ND filter, the exposure time suggested by PhotoPills might be too long, and you could lose light or end up with a photo that's too dark. In such cases, consider using a less dense ND filter or not using one at all.
Take the picture with the polarizer, the ND filter, the GND filter and the final exposure
Now, if your camera has it, use the live histogram option to adjust the exposure accurately.
Finally, take the picture and use the histogram to check that you've got the correct exposure.
One more thing...
Work fast!
Most seascape photographers, whether they're beginners or pros, often use lens filters during dawn and dusk. That's because the light at these times has a special color.
Try taking photos with filters during the golden hour, the blue hour, and twilights, and you'll notice a big difference compared to other times of the day.
But here's the catch: that perfect natural light doesn't stick around for long...
And setting up your gear and taking photos with lens filters, especially a long exposure, takes a bit more time than other types of photography...
So, aim to nail it on your first try!
And if you don't, try to correct it quickly. Otherwise, by the time you figure it out, that magical light will have disappeared.
8.How to take a seascape photo at night

Photo by Antonio Solano
Venturing out to remote locations at night for photography might seem daunting, but there's really nothing to worry about!
Firstly, I recommend not doing these shoots solo. Always have company. Secondly, embrace and enjoy the whole experience. The satisfaction from both the final image and the journey to capture it will make any apprehensions fade away!
Your approach might differ slightly based on what you're aiming to photograph.
To help you begin, here's my step-by-step guide for capturing seascape shots at night with these elements:
- The Milky Way.
- Star Trails.
- Meteor Showers.
- A person (night portrait).
- The zodiacal light.
- The Northern lights (auroras).
But if you want to go into detail on how to take a seascape photo at night, keep reading.
What seascape settings should you use at night?
Your settings will depend on 2 things: the light conditions of the scene and the subject that you're photographing.
It's just a matter of getting the "right" exposure and using the exposure triangle to achieve it.
Here are what I consider the best settings to take a long exposure shot at night:
- Aperture: The widest aperture possible (f/2.8, f/4, depending on your lens).
- ISO: The maximum value for which your camera doesn't produce excessive noise (ISO 1600, 3200, 6400 or higher).
- Shutter speed: It depends on the type of picture you're capturing. More on that below.
Aperture
You need to collect as much light as possible during the exposure time. So use the widest aperture possible (f/2.8, f/4, depending on your lens). The more light reaches the sensor, the more stars, meteors or light trails you'll get and the brighter they'll be.
ISO
Remember that you're shooting at night so don't be afraid to crank up the ISO.
Set the ISO to the maximum value for which your camera doesn't produce excessive noise (ISO 1600, 3200, 6400 or higher).
If necessary, you can fine tune it later depending on the shutter speed you'll be using.
Shutter speed
- The Milky Way. Use the PhotoPills Spot Stars calculator. On the table of results, use the NPF rule value as your reference setting. Depending on the camera and settings you determine, your maximum exposure time should be between 12-30s.
- Star Trails. You have two options: taking an ultra-long exposure of 2 to 5 hours to capture the star's movement in one photo, or my favorite one, stacking multiple exposures of 20-30 seconds of the stars.
- Meteor Showers. Use the PhotoPills Spot Stars calculator. On the table of results, use the NPF rule value as your reference setting. Depending on the camera and settings you determine, your maximum exposure time should be between 10-25s.
- A person (night portrait). You should use a maximum exposure time between 3-4s, and make sure that your subject is completely still.
- The zodiacal light. You want to get stars as big bright spots, so you should use a maximum shutter speed between 10-20s.
- Light trails. Use a shutter speed between 10-20 seconds to capture long light trails. Just as you can do with Star Trails or fireworks, stack several images in your post-processing to add different light trails to the same photo.
- Fireworks. Use a shutter speed between 2-10 seconds to capture long light trails. Just as you can do with Star Trails or a vehicle's light trails, stack several images in your post-processing to add different fireworks to the same photo.
- The Northern lights (auroras). Set your shutter speed between 1-25 seconds depending on the Northern Lights activity.
- Faint and static aurora: 10-25 seconds.
- Vibrant aurora: If you can see the aurora and notice some movement, set a shutter speed between 3-10 seconds.
- Very strong aurora: If the aurora is very active and it moves very quickly, set a shutter speed between 1-3 seconds. Your goal is to freeze its movement and avoid blowing out the highlights.
How to take a seascape photo at night step by step
You've had a vision.
You meticulously planned it, perhaps several months in advance.
Now, here you are, standing under the vast expanse of a dark, starry sky, in a breathtaking natural setting.
You've dialed in all the settings for a seascape night shot... And you're poised to capture the image.
Let's walk through the setup process for your photo session, one step at a time.
Get to your shooting spot in advance
This stage is vital in photography, regardless of the kind of image you're aiming to capture. It gives you the opportunity to thoroughly explore the location and gives you a lot of time to set up your equipment.
What's even more critical is confirming that you're positioned at the precise shooting spot. This is the cornerstone of any successful seascape night picture!
If you've planned your shoot using PhotoPills (tell me you did!), then it's essential to position yourself exactly where the Red Pin indicates on the app.
To do so, you can use the PhotoPills Night Augmented Reality view to double-check you're at the right spot and that you'll have your subject (e.g. the Moon or Milky Way) where you want.
Place the tripod, ballhead, camera, and lens
Set up your tripod and ballhead on the most stable ground you can find, ensuring it won't wobble.
Attach the lens you plan to use for the shoot to your camera, then secure the camera and lens onto the ballhead. Next, connect the intervalometer and verify that it's functioning correctly.
It's crucial to recheck the stability of your setup. Even the smallest vibration could blur your subject, which would be quite disappointing!
Remove the UV filter
The next thing you should do when setting up your equipment is to take off the ultraviolet (UV) filter you typically use for lens protection.
During nighttime shoots, a ultraviolet (UV) filter might actually ruin your photos. It can slightly diminish the sharpness and contrast, and may also lead to unwanted reflections, halos, and lens flares.
Turn off the lens stabilization system
Many lenses come with a built-in feature to counteract shaking, known by various names: Canon labels it Image Stabilization (IS), Nikon refers to it as Vibration Reduction (VR), and Sigma calls it Optical Stabilizer (OS). Brands like Sony, Olympus, and Pentax, on the other hand, opt for stabilization within the camera body.
However, when your camera is securely mounted on a tripod, these stabilization systems might attempt to correct for vibrations that aren't there, potentially causing your night seascape shots to blur. To avoid this, it's best to turn off the lens's stabilization feature when your camera is on a tripod.
Long exposure noise reduction: on or off?
Noise is a significant challenge in night photography, especially during a long exposure.
Modern cameras often come with a feature to mitigate this issue: the long exposure noise reduction setting. This function works by capturing a second, light-free exposure with identical settings to the original shot. This "dark frame" contains a noise pattern similar to your actual photo. The camera then uses this to cancel out the noise from your initial image.
However, there are several reasons why this feature might not be ideal for seascape night photography:
- It's generally more efficient to take shorter exposures and not have to wait as long to review your shots.
- It drains the battery faster, which could leave you without power before you've finished shooting.
- For techniques like image stacking, where you capture multiple short exposures to combine later, having a delay between shots reduces the number of images you can take, thus decreasing your chances of capturing phenomena like meteors.
Instead, consider taking a dark frame at the end of your session by covering the lens and capturing just the noise. This can be used in post-processing to reduce noise across your images.
In conclusion, when shooting seascape shots at night, it's often best to disable the long exposure noise reduction feature.
Shoot in RAW
Make it a point to capture your photos in RAW format!
This gives you a superior quality image to work with, providing greater flexibility for editing, post-processing, and fixing mistakes that would be unmanageable otherwise.
Remember, the image preview on your camera's LCD screen is a JPEG representation of the RAW file. Consequently, the histogram displayed on your camera doesn't precisely reflect the RAW file's data.
Use the shortest focal length you can
Choose the smallest focal length available to you, such as 14mm, 18mm, or 24mm, and aim to stay below 35mm. This strategy serves two purposes:
- It broadens your field of view, allowing you to include more of the sky in your shot.
- It lets you use a longer exposure time (the slowest shutter speed possible) to gather more light, which helps in capturing stars as distinct, luminous spots.
I'll delve into more detail about setting the shutter speed (exposure time) in a later section.
Select the Manual shooting mode (M)
Using your camera's automatic mode won't work for seascapes at night.
Instead, switch to Manual shooting mode (M), which grants you complete control over the exposure settings. This means you can adjust the aperture and shutter speed to your liking, allowing you to gather ample light for a well-exposed photograph.
Use a light pollution filter (optional)
When dealing with light pollution from sources like sodium vapor lights, which cast a yellowish tint, consider using a light pollution filter. This filter can help eliminate the unwanted glow directly through your camera.
To set it up, attach the lens adapter ring to your lens, secure the filter holder, and then slide the light pollution filter into place.
Set the aperture
To photograph the night sky brimming with stars, it's essential to let in as much light as you can.
Open your lens to its widest aperture setting, like f/2.8 or f/4, to allow more light to hit the sensor, revealing more stars and making them appear brighter.
This also enables you to maintain a lower ISO, reducing noise in your images. This technique is particularly useful when shooting the Milky Way, Star Trails and Meteor Showers.
Select the ISO
Feel free to increase the ISO as needed. Adjust the ISO to the highest level your camera can handle without introducing too much noise – this could be ISO 1600, 3200, 6400, or even higher.
The goal is to balance the exposure triangle by manipulating the ISO. I'll guide you through shortly ;)
Focus
When it comes to focusing you have two options:
- Focusing at the hyperfocal distance.
- Focusing at one star.
Depending on the technique you prefer, choose one or the other.
Focusing at the hyperfocal distance
The easiest way to have everything in the scene acceptably in focus is to focus at the hyperfocal distance.
How to calculate the hyperfocal distance
Once you've decided the focal length and aperture, use the PhotoPills Depth of Field calculator to calculate the hyperfocal distance for your camera settings.
As an example, using my Nikon Z6 together with an aperture of f/2.8 and a focal length of 14mm, the hyperfocal distance is 2.33 m.


How to focus at the hyperfocal distance
Watch this video to learn how to focus at the hyperfocal distance:
Once you have the hyperfocal distance (2.33 m in this example), make sure you're not focusing at a shorter distance. If you do, you'll get the stars completely blurred, even if you miss the hyperfocal by one inch (or a couple of cm).
It's much better to make focus exceeding the hyperfocal distance by 2 feet (or half a meter) rather than falling short. I'm serious, don't fall short!
You can learn all you need to know about the hyperfocal distance and the depth of field with our extremely detailed DoF Guide.
Lock the focus
After using the automatic focus mode to focus at the hyperfocal distance, set it back to manual focus. It's the best way to ensure your focus doesn't change.
Always check whether the stars are in focus before starting the shooting.
Finally, you need to take a test shot.
Use the Live View function on the LCD of your camera to focus accurately. And if your camera has the Focus Peaking and/or Focus Magnifier functions, turn them on too because they will help you to be even more precise.
Now, find a star and zoom in on it to magnify it (or use the Focus Magnifier option). Then, turn the focus ring to make focus on it. Turn it until you see the star as a tiny little dot (actually, the smallest possible dot).
Once the camera is attached to the tripod, take as many test shots as you need to see if everything is in focus and adjust accordingly.
The last thing you want is to spend the whole night in the cold and find out at the end that your stars are out of focus.
Focusing at one star
If you want the stars to be tack sharp, but you don't mind losing a bit of sharpness in your subject, then focus on one star.
Set the camera and lens to manual focus.
Now, find a star and zoom in on it to magnify it (or use the Focus Magnifier option). Then, turn the focus ring to make focus on it. Turn it until you see the star as a tiny little dot (actually, the smallest possible dot).
Set the shutter speed (exposure time)
To determine the ideal shutter speed for capturing stars as bright spots without trails, you'll need to consider two factors:
The shutter should remain open long enough to collect as much light as possible, allowing more stars to appear in your photo.
The exposure time should be short enough to prevent star movement from creating trails, keeping the stars as sharp points of light.
For calculating the necessary exposure time, use the PhotoPills Spot Stars calculator by following these steps:
- Open the PhotoPills app and navigate to the Spot Stars calculator.
- Enter your camera model, the lens focal length, the aperture setting, the minimum declination of the stars you're capturing, and select the accuracy mode (with the default usually being sufficient).
If you're unsure of the stars' minimum declination, use the AR feature in PhotoPills. Point your phone in the direction you're planning to shoot, and let the app calculate the exposure time for you. If in doubt, you can default the declination to 0º.
The results will show two values based on the NPF rule and the 500 rule. The NPF rule provides a more precise exposure time, considering your camera's megapixel count, while the 500 rule offers a general guideline.
If you want to learn more about the NPF rule and the 500 rule, you should read section 9 of our Milky Way photography guide.
Depending on the camera and settings you use, you should use a maximum exposure time between 10-25s.


Fine tune the ISO
Last but not least, you'll need to fine-tune the ISO. You've likely been using a very high ISO for your test shots, but now it's time to balance it based on:
- The exposure triangle (aperture, shutter speed, and ISO).
- The amount of noise your camera generates at high ISO settings.
With the aperture and shutter speed already set to capture the correct exposure, your task is to adjust the ISO to complement these settings.
The ideal ISO for your final shot will largely depend on how well your camera handles noise at high ISO levels.
Begin with a high ISO value, such as 6400, 3200, or 1600, and take a series of test shots. As you review each shot, pay attention to the histogram and zoom in on the image preview to assess the noise level. Based on what you see, adjust the ISO up or down.
This process may involve some trial and error, but with practice, you'll quickly become adept at finding the sweet spot for your ISO settings.
Set the white balance manually
When shooting in RAW, you have the flexibility to tweak white balance later during editing.
However, if you aim to get the true colors of the stars straight out of the camera, consider these initial white balance settings and fine-tune as needed:
- For a scene with a dark sky, start with a white balance of 3900K.
- If your scene is affected by light pollution, begin with a white balance of 3400K.
Review the composition, the focus, and the exposure
You're nearly there.
Take a test photo to verify your composition, ensure the focus is sharp, and confirm the exposure is as intended – don't overlook checking the histogram.
You might need to tweak a few things, such as adjusting the composition, refocusing, or altering the ISO to achieve the desired histogram, as previously mentioned.
A couple of test shots should get you all set to capture your final image.
Light paint the foreground (optional)
For night seascape photos with depth and dimension, consider illuminating the foreground.
Ensure the artificial light is gentle and dim for a more authentic look, especially during New Moon or when the Moon is just a sliver.
When adding light to the foreground, evaluate your exposure by examining the histogram. It might take several trial shots to fine-tune the level of artificial light in your composition.
Take a shot and check the histogram
Before you dive into a photography spree, make sure to review your camera's histogram.
This tool lets you assess the image exposure on your camera's display and tweak settings like aperture, shutter speed, and ISO to get the lightness of the picture just right.
Now that we've got that covered, let's move on!
9.17 seascape photography tips to improve your technique

Photo by Matt Matthews
Use the PhotoPills Long Exposure calculator (1)
As you learnt in section 7, the PhotoPills Long Exposure calculator helps you quickly calculate long exposure times when using ND filters.
It's incredibly easy to use it, and you'll nail the exposure in a few seconds.
This is a quick recap on how to use it:
Take a test shot and set your light meter centered at 0.
Check the histogram to ensure everything is correctly exposed.
In the PhotoPills Long Exposure calculator, set that you want to find out the shutter speed.
Enter your test settings.
Enter the equivalent settings: Set the ND filter you want to use. If necessary, change the aperture or ISO.
And that's it! PhotoPills has done the numbers for you and it displays the shutter speed that you need.
No need to do any calculations. PhotoPills does everything for you! :)
Plan and scout the location (2)
By thoroughly planning and scouting, you can maximize your chances of capturing compelling seascape images, ensuring you're at the right place at the right time with the right conditions.
Planning involves researching and visiting potential shooting locations in advance. This preparation helps you understand the landscape, anticipate lighting conditions, and identify compelling compositions.
Researching tides and weather is crucial:
- Tides. Tidal movements significantly impact seascapes. Low tide may reveal interesting rock formations, tide pools, or patterns in the sand, while high tide offers dynamic wave action. You can find the list of my favorite apps and websites in section 4.
- Weather. Weather conditions dramatically affect the mood and lighting of seascapes. Different weather conditions, from sunny to stormy, can offer you unique photographic opportunities. You can find the list of my favorite apps and websites in section 4.
I always (always) recommend to visit the location before your planned shoot. This allows you to explore different vantage points and understand the terrain.
Ideally, you should spend at least a couple of hours:
- Observing natural light and shadows. Pay attention to how the light interacts with the landscape at different times of the day. Note where the sun rises and sets thanks to the PhotoPills Planner and the augmented reality view (AR).
- Identifying compositions. Look for leading lines, interesting rock formations, or other elements that can add depth and interest to your photos.
- Analyzing your safety during the shooting session. While scouting, assess any potential safety hazards. Be aware of slippery rocks, incoming tides, and unstable cliffs.
Prioritize safety (3)
Seascape photography often involves working in environments that can be unpredictable and potentially hazardous. Understanding and respecting the power of the sea is crucial. Hazards can include slippery rocks, sudden waves, changing tides, and unstable cliffs.
That's why you should always:
1. Check the weather and tide conditions
- Always check the weather forecast before heading out. Be aware of any warnings for storms, high winds, or heavy rain.
- Familiarize yourself with the tide timetable for your location. Be aware of high tide times to avoid getting cut off by rising waters.
2. Wear appropriate clothing and footwear
- Dress in layers to adapt to changing conditions. Waterproof and windproof clothing can be essential.
- Wear sturdy, non-slip footwear that provides good grip on wet and slippery surfaces.
3. Be aware of your surroundings
- Observe the wave patterns. Rogue waves can appear unexpectedly and can be much larger than the average wave height.
- Don't take unnecessary risks for a shot. If a location feels unsafe, it's better to find an alternative spot.
- Always know your escape route in case the tide comes in quickly or if large waves start to break closer to shore.
4. Make sure sure your equipment is safe
- Use a sturdy tripod and ensure your camera is securely attached. Be mindful of your equipment bag; place it in a safe, dry spot.
- Use rain covers (or even a plastic shower cap!) for your camera, especially when shooting in splash zones.
5. Make sure you are safe
- Carry a fully charged mobile phone or a charged power bank just in case.
- Inform someone about your shooting location and expected return time. It's important that someone knows where you are in case of an emergency.
- Know the local emergency services number and the quickest way to get help if needed.
- Have a basic first aid kit for minor injuries.
Use appropriate gear (4)
Seascape photography often requires specific gear to handle the challenging coastal environment and to capture the dynamic nature of the sea.
Be prepared to get close to the action and possibly wet for the best shots. And don't be afraid of getting wet!
In this sense, always wear appropriate footwear, such as waders or shoes with good grip to prevent slips. And wear weather-appropriate clothing that protects you against the elements. Here layering is key!
Since water plays a big role during the shooting session, bring a waterproof bag for carrying and protecting your equipment.
One final piece of advice, or two I should say...
Bring a plastic cover to protect your camera from salt spray and sand. Even a simple plastic shower cap can be effective.
Don't forget to bring a lens cleaning kit. It's essential for removing water spots or sand from the lens – including a bunch of microfiber cloths and lens cleaning fluid.
And of course, check your gear before heading out and before starting the shooting session. Make sure all equipment is clean, charged, and functioning.
Experiment with shutter speed (5)
Shutter speed is one of the key settings in photography that determines how long the camera's sensor is exposed to light.
In seascape photography, it plays a crucial role in capturing the movement of water and can dramatically alter the mood and feel of an image. From the ferocity of crashing waves to the serene flow of a tidal current, the possibilities are endless...
You basically have to decide between:
1. Freezing motion.
- To freeze the motion of waves or capture the dramatic splash of water, use fast shutter speeds. This could range from 1/500s to as fast as 1/2000s, depending on the speed of the water and the desired effect.
- Fast shutter speeds are great for highlighting details in the water, like individual droplets or the intricate shapes of waves.
2. Creating motion blur.
- Slower shutter speeds allow the sensor to capture the movement of water over time, creating a sense of motion. This can give water a silky, smooth appearance.
- For a pronounced blur effect, such as smoothing out waves or capturing the movement of clouds, shutter speeds can be several seconds to minutes long. This often requires the use of a neutral density filter (ND) to prevent overexposure during daylight (more on filters in our lens filters photography guide).
For a long exposure, a sturdy tripod is essential to prevent camera shake and ensure sharp images. And to avoid camera shake, use an intervalometer or your camera's timer function.
But don't be frustrated if you don't get what you want on the first attempt. Use the try & fail technique: experiment with different shutter speeds to see how they affect the water's appearance. What works best can vary depending on the scene and your vision.
And don't forget 2 important factors that will influence your choice of shutter speed:
- The available natural light.
- The speed and nature of the water's movement.
Maximize depth of field (6)
Depth of Field (DoF) refers to the range of distance within a photo that appears acceptably sharp. In seascape photography, maximizing DoF is often desirable to ensure that both the foreground and the background are in focus, creating a sense of depth and scale.
That way you can capture detailed and compelling images where every element, from the pebbles on the beach to the distant horizon, contributes to the story and beauty of the seascape.
To maximize DoF, use a smaller aperture (higher f-number like f/8, f/11, or f/16) to make more of the scene in focus from foreground to background. Nevertheless, be aware that very small apertures (like f/22 or smaller) can lead to diffraction, which reduces image sharpness.
When choosing your lens, don't forget that most lenses have a 'sweet spot', an aperture setting where they perform best in terms of sharpness. This is often around f/8 to f/11.
A general rule of thumb is to focus about one-third into the scene, which often results in a good DoF for your seascape photos. However, focusing at the hyperfocal distance ensures maximum sharpness throughout the image. Remember that PhotoPills can help you calculate this based on your lens and aperture.
But don't take anything for granted. While maximizing DoF is often preferred in seascape photography, there are times when you can use a shallow DoF creatively, such as isolating a subject or creating a dreamy atmosphere.
Focus on composition (7)
Composition in photography refers to the arrangement of elements within the frame. It's about making deliberate decisions on how to arrange the elements in your seascape photos. It's about guiding the viewer's eye and creating a visually compelling image that tells a story or conveys a mood.
In seascape photography, effective composition can turn a good scene into a great photograph, guiding the viewer's eye and evoking emotions.
Here are a few suggestions that you can use while working on your composition:
- Use the rule of thirds to create a balanced composition. Imagine your image divided into nine equal segments by two vertical and two horizontal lines. Placing key elements along these lines or at their intersections can create a balanced, visually pleasing composition.
- Use leading lines to guide the viewer's eye. Use natural lines, such as the shoreline, a jetty, or patterns in the sand, to lead the viewer's eye into the image, towards the main subject or across the scene.
- Use the foreground to add depth. Including interesting elements in the foreground, like rocks, driftwood, or patterns in the sand, can add depth and context to your seascape photos.
- Use symmetry and patterns to create visual appeal. Symmetry, whether it's in the reflections on water or the shape of waves, can be visually appealing. Patterns, too, can add interest and texture to your composition.
- Use negative space to convey a sense of movement. If you have moving elements, like birds or boats, leave space in the direction they are moving. This creates a sense of movement and anticipation. Moreover, negative space, like an expansive sky or a calm sea, can balance a composition and give it a sense of tranquility.
- Use natural frames to draw attention. Use natural elements like rocks, trees, or arches to frame your seascape, drawing attention to the main subject.
- Apply simplicity to avoid clutter. Sometimes, less is more. A simple composition with few elements can be powerful and more impactful.
- Make sure you keep the horizon line straight. A crooked horizon can be distracting. Keep the horizon straight, and decide whether to place it high or low in the frame depending on what you want to emphasize (sky or water).
- Take advantage of the reflection to create a mirror effect. Calm water can create beautiful reflections. Use them to add symmetry and interest to your composition.
- Create a juxtaposition including contrasting elements in the frame. Placing contrasting elements (like a rugged rock against a smooth sea) can create visual tension and interest.
But most of it all, don't be afraid to experiment!
Try different angles, heights, and distances. Sometimes, changing your perspective can dramatically improve your composition.
Capture different perspectives (8)
Capturing different perspectives in seascape photography is about exploring and experimenting. It will help you reveal hidden beauty, create more dynamic compositions, and tell more compelling stories through your images.
Get out of your comfort zone and experiment with different techniques. Look beyond the obvious and be open to seeing the scene in new ways.
1. Explore different angles.
- Low angle. Getting down low can emphasize foreground elements and create a sense of immersion in the scene. It can make waves appear more dramatic and give a unique perspective. If it's safe, consider getting into the water for a unique, water-level perspective. This can be especially compelling when capturing waves.
- High Angle. Shooting from an elevated position, like a cliff or a hill, provides a broader view of the seascape and can highlight patterns and textures in the water and shoreline that aren't visible from ground level.
- Aerial photography with a drone. Drones offer a bird's-eye view and can reveal patterns, shapes, and compositions that are impossible to see from the ground. Have a look at our drone photography guide to become an expert on the subject.
2. Use various focal lengths.
- Wide-angle lens. With this type of lens you can capture expansive views. It's great for including both foreground and background elements, giving a sense of scale.
- Telephoto lens. It allows you to isolate specific elements, such as distant waves, boats, or wildlife. It can also compress the scene, bringing the background and foreground closer together visually.
Embrace different weather conditions (9)
Embracing different weather conditions in seascape photography means being open to the beauty and drama that each type of weather can bring.
Use the unique qualities of natural light, atmosphere, and mood that come with varying conditions to create compelling and diverse images.
Shoot in various weather conditions for diverse effects, from dramatic skies to soft-focused images on misty days:
- Golden hour. The warm, soft light during golden hour can transform a seascape with golden hues and long shadows.
- Blue hour. The cool, serene light during blue hour offers a tranquil and moody atmosphere.
- Sunny days. Bright, sunny days can create high-contrast scenes with deep shadows and vibrant colors. Use a circular polarizing filter (CPL) to manage reflections and enhance the blue of the sky and the sea.
- Overcast days. Cloudy skies provide diffused, soft light that reduces harsh shadows and evenly illuminates the scene. This is ideal for capturing details and subtle tones.
- Rain. It can add an element of freshness and vibrancy. Capture raindrops on surfaces, reflections in puddles, and the glistening wet environment.
- Stormy weather. Storms can bring dramatic skies, turbulent seas, and a sense of drama. Capture the energy of the waves and the moodiness of the clouds. As always, prioritize your safety over the shot and protect your gear.
- Fog and mist. Foggy conditions can create ethereal, minimalist scenes. Emphasize shapes and silhouettes, and play with the muted color palette.
Be prepared to adapt your plans according to the weather. Sometimes unexpected weather changes can lead to the most striking images.
Use natural light (10)
Natural light in seascape photography is essential. It's a powerful tool that can transform an ordinary scene into an extraordinary photograph.
You need to observe and understand the nuances of light throughout the day and in different weather conditions. That's how you learn to use natural light to enhance the mood, texture, and visual impact of your images. I suggest you have a close look at our super complete natural light guide to learn how to make the most out of it.
Deciding the time of the day you'll be shooting is very important. Different times of day offer different hues and shadows, influencing the mood and colors of your photos.
I particularly love shooting during:
- Golden hour because it offers me warm, soft light that can add a magical quality to seascapes. This time of day produces long shadows that can add depth and texture to your images.
- Blue hour provides cool, even light. It's ideal for capturing tranquil seascapes with a serene or melancholic mood.
However, I recommend you experiment with shooting at various times for different lighting, colors, and weather conditions (e.g. cloudy, overcast, rain, etc.).
In order to try different things you need to:
1. Plan and anticipate your seascape photo.
- Use PhotoPills to track the position of the Sun and plan your shoots accordingly.
- Visit your location at different times to understand how light interacts with the landscape.
2. Wait for the right time.
Patience is key in seascape photography. Be observant of changes in weather, colors, and moods because the best is yet to come!
3. Be flexible.
Be prepared to adapt your composition and settings based on the available natural light. Sometimes the best shots come from unexpected lighting conditions. You never know...
Incorporate reflections and movement (11)
Use reflections and movement to add depth, interest, and emotion to your images. Reflections can create a sense of calm and symmetry, while movement can convey power, tranquility, or the passage of time. Both are powerful tools for creating dynamic and engaging seascapes.
Capturing reflections
Use reflections to lead the viewer's eye into the image or to highlight the main subject. Symmetrical compositions can be particularly striking.
- Use water as a mirror. Smooth water surfaces, like calm seas or tide pools, can act as mirrors, reflecting the sky, clouds, or surrounding landscape. This can add symmetry and balance to your composition.
- Look for wet surfaces. After rain, wet sand or rocks can also provide reflective surfaces, adding an extra dimension to your seascape photos.
- The golden hour or blue hour are particularly good for capturing vibrant reflections, as the low angle of the sun illuminates the sky with colors.
Conveying movement
Capture the movement of water, clouds or any other interest element for dynamic images.
- Capture waves. You can freeze waves with fast shutter speeds, showing power and detail, or blurred with slow shutter speeds, creating a sense of motion and tranquility.
- Look for moving clouds. Long exposures can also capture the movement of clouds, adding a dynamic element to the sky.
- Use different shutter speeds. Experiment with different shutter speeds to find the right balance for the type of movement you want to convey. Slow shutter speeds (several seconds to minutes) are often used for a smooth, ethereal effect, while fast shutter speeds (fractions of a second) freeze motion.
Experiment with black and white (12)
Convert some images to black and white to explore the essence of the scene in its most fundamental form.
Take advantage of natural light, shadows, textures, and composition to tell a story or evoke an emotion, stripped of the distractions of color. Black and white photography can reveal a different beauty and depth in seascapes, offering a fresh perspective and a timeless atmosphere.
Without color, the focus shifts to textures, shapes, and contrasts. This can bring out details that might be overlooked in color photos.
If you're looking for inspiration, learn from Masters and look at the works of famous black and white photographers to understand how they used natural light, composition, and contrast to create compelling images.
How to choose the right scenes
- Observe the weather and lighting. Overcast days, fog, or mist can work well in black and white, emphasizing mood and atmosphere. Bright sunny days can create strong shadows and highlights, offering high contrast.
- Look for high contrast between light and dark elements. This could be the bright foam of waves against dark rocks or the play of light and shadows.
- Find textures and patterns. Textures in the sand, rocks, or water can become more pronounced in black and white, adding depth and interest to the image.
- Work on simple compositions. Without color to guide the eye, simpler compositions can be more effective in black and white.
- Create abstracts. Black and white can be great for creating abstract images, focusing on shapes and forms rather than colors.
Don't neglect you post-processing
I know it sounds obvious, but I need to write it. Shoot in RAW. This gives you more flexibility to adjust contrast, brightness, and details during post-processing.
Use a powerful photo editing software such as Lightroom or Photoshop to convert your color images to black and white. This allows you to control the conversion process and adjust the tones to your liking.
Play with contrast to make your black and white images pop. Increase contrast to emphasize the drama of a scene, or decrease it for a softer, more subtle effect.
And if you're a more advanced user, apply the dodge and burn technique. This process involves selectively brightening (dodging) or darkening (burning) parts of the image. Use it to guide the viewer's eye and highlight key elements.
Include wildlife and people (13)
If you include wildlife and people in your seascape shots, you're adding layers of interest, emotion, and narrative to your images. These elements can transform a beautiful seascape into a compelling story that resonates with viewers because you'll be creating a connection between the viewer and the scene.
Including wildlife or people in your seascape photos can provide a sense of scale, helping viewers understand the size and grandeur of the natural elements.
Both wildlife and people can add a dynamic, lively element to your images, making them more engaging and relatable.
Candid shots of people or interactions between wildlife can add a sense of authenticity and emotion to your photos. So pay attention to facial expressions and body language, as they can convey a wide range of emotions and add depth to your images.
Incorporating wildlife
Capture wildlife in their natural habitat, engaging in typical behaviors. This could be birds flying, fish jumping, or seals lounging on rocks.
Wildlife photography often requires patience. Wait for the right moment when the animal is in the perfect position or doing something interesting.
Always respect wildlife and maintain a safe distance. Avoid disturbing their natural behavior or habitat.
And the best of it all is that you can use your images to highlight the beauty of the seascape and the importance of preserving these environments for wildlife and future generations.
Including people
People in your photos can help tell a story.
- A lone figure looking out to sea can evoke feelings of solitude or contemplation, while a group of people playing on the beach can convey joy and energy.
- Show how people interact with the seascape, whether it's walking along the shore, surfing, or fishing.
During Sunrise or Sunset, include people as silhouettes against the colorful sky. This can add drama and mystery to your images.
Photograph iconic subjects (14)
Iconic seascapes often include well-known landmarks, such as famous beaches, cliffs, lighthouses, or rock formations. Capturing these subjects can immediately resonate with viewers due to their recognizability.
Some seascapes may have historical or cultural significance, which can add depth and context to your photographs. Think about the story you want to tell with your image. What makes this place iconic, and how can you convey that through your photograph?
Research and scout locations beforehand. Look for iconic spots that are popular among photographers or hold a special place in local culture.
Plan your visit to coincide with the best lighting conditions. Sunrise, Sunset, and the blue hour can dramatically enhance the beauty of iconic subjects. Visit the location in different seasons or weather conditions to capture a unique take on the subject.
While iconic subjects are often photographed, try to find unique angles or perspectives to make your images stand out. This could involve shooting from a higher vantage point, getting close to the water, or finding a reflection.
Consider the placement of the iconic subject within your frame.
- Use compositional techniques like the rule of thirds, leading lines, or framing to create a balanced and engaging image.
- Include interesting foreground elements to add depth and lead the viewer's eye towards the iconic subject.
Use a variety of lenses (15)
Having a variety of lenses at your disposal allows you to adapt to different situations and subjects. Whether you want to capture the grandeur of the entire seascape or focus on a single wave, having the right lens makes a difference.
Don't be afraid to experiment with different lenses in unexpected ways. For example, using a macro lens for a wide seascape shot can lead you to capture more intimate seascape photos.
Telephoto lenses allow you to zoom in on distant subjects, such as ships, wildlife, or specific sections of the water. They can also compress the scene, making elements appear closer together than they are.
Maintain your equipment (16)
Maintaining your equipment in seascape photography is crucial for ensuring the longevity and performance of your gear.
Regular cleaning, protection from the elements, proper storage, and careful handling can prevent damage and keep your equipment in top condition, allowing you to focus on capturing stunning seascapes without worrying about equipment failures.
Perform a regular cleaning
- Regularly clean your lenses with a soft, lint-free cloth and lens cleaning solution. Remove dust, fingerprints, and salt spray to ensure clear images.
- Dust on the camera sensor can cause spots in your photos. Use a sensor cleaning kit or have it professionally cleaned if you're not comfortable doing it yourself.
- Wipe down the camera body, viewfinder, and any accessories like tripods or filters. Keep your gear free from sand, salt, and moisture.
- Clean your tripod regularly, especially after using it in sandy or salty conditions. Tighten all screws and make sure the legs extend and retract smoothly.
Protection your gear from elements
- If possible, use weather-sealed camera bodies and lenses to protect against moisture and dust. However, remember that weather sealing is not foolproof.
- Use rain covers, waterproof bags, and lens hoods to protect your equipment from the elements. Even simple items like plastic bags can be helpful in a pinch.
- Be cautious around sand and water. Change lenses in a clean environment to avoid getting sand or moisture inside the camera.
Store your gear properly
- Store your equipment in a dry, cool place. Humidity can cause fungus and mold to grow on lenses and internal components.
- Use silica gel packets in your camera bag to absorb moisture and prevent condensation.
- Always use lens caps and body caps to protect your equipment from dust and scratches when not in use.
Enjoy the process (17)
Be present in the moment and enjoy the experience of being in nature. Seascape photography isn't just about the end result; it's also about the process of connecting with the environment.
Don't be afraid to try new techniques, compositions, or ideas. Enjoy the process of learning and experimenting, even if not every shot is a masterpiece. Use photography as a means of personal expression. Enjoy the process of creating something that reflects your vision and emotions.
Good photography often requires waiting for the right light or moment. Embrace this as part of the experience rather than a frustration:
- View challenges as opportunities for problem-solving and learning. Whether it's dealing with difficult lighting or technical issues, finding solutions can be rewarding.
- Sometimes things don't go as planned. Enjoying the process means accepting setbacks and learning from them.
Finally, view your photography as a learning journey. Enjoy the process of growing and evolving as a photographer.
Take time to reflect on your experiences and what you've learnt!
10.12 photographers that excel at shooting seascapes

Photo by Andrea Zappia
I love honing my photography skills by studying the work of others who are particularly skilled or have a distinct style.
That's why I want to share a list of my favorite seascape photographers with you. They might just spark your creativity.
Some of these talented individuals have been mentors at the PhotoPills Camp, one of our cherished events, where you can learn directly from them in a wonderful environment!
I'm sharing this in hopes that it will help you refine your seascape photography skills.
And if there's a name you think should be on everyone's radar, feel free to introduce them to our community by leaving a comment at the end of this guide :)
Francesco Gola
Francesco Gola is passionate about two things: the serene beauty of seascapes and the sweet taste of Nutella, and it's anyone's guess which one he prefers more.
He's found his niche in the world of seascapes, where he's not just capturing moments but entire periods, allowing reality to intertwine with emotion through long exposure photography.
His talent for long exposure photography is off the charts, producing seascape images that are nothing short of mesmerizing. Every inch of his photos is a proof of his meticulous attention to detail, each one a perfect piece of a larger, stunning visual creation.
To learn more from him, I suggest you have a look at his seascape photography masterclass.
Rachel Talibart
For someone who describes herself as a 'poor swimmer and a poorly sailor', it seems incredible that award-winning coastal and seascape photographer Rachel Talibart chose the sea as her muse.
Rachael can happily spend all day at the beach – once she was even lulled to sleep by the sound of the waves in the Outer Hebrides. Scotland's Western Isles are just one of four locations that she returns to regularly (the others being Sussex, Oregon and Portugal), and this familiarity, coupled with the knowledge that she will return, enables her to relax and be more experimental.
This approach allows Rachael to focus on small details – water washing over a shell, or an abstract painting of rust, for example – without worrying too much about whether or not she has captured the 'famous Instagram shot'. These quieter shots, often created at the tideline, are particularly rewarding for Rachael because she can capture that moment nobody else has seen before the tide washes it away...
José B. Ruiz
Let's give José B. Ruiz the spotlight he deserves! This guy is a wizard behind the lens, especially when it comes to capturing the great outdoors. He's not just any photographer from Spain; he's a maestro of nature, portraits, and those breathtaking landscapes.
José is a firm believer in the power of lens filters to elevate landscape photography, especially for those mesmerizing long exposures. With years of experience and a diverse range of filters under his belt, he's not just skilled, he's a true filter pro.
What's really cool is that he's got this trick where he tweaks the filters mid-shot to work his magic. Trust me, it's a game-changer!
If you're not yet familiar with José B. Ruiz, you'd better watch his composition masterclass.
Michael Shainblum
Michael Shainblum is a landscape photographer and time lapse creator based in San Francisco (USA).
Michael first made a name for himself through his unique creativity and the ability to capture scenes and moments in his distinct style of surreal, visual storytelling. A dedication to challenging the boundaries of creativity, as well as a flair for coming up with unique ideas.
Seascape photography has been one of his main focuses for a long time. Growing up by the sea in San Diego, the ocean has always been a place for him to relax and clear his head. Taking coastal photography has allowed him to do two of his favorite things, spend a day at the beach and shoot photography.
Albert Dros
Albert Dros is deeply passionate about landscape photography, almost to the point of obsession.
His journey into serious photography began in Hong Kong, where the vibrant cityscape and nature inspired him to capture stunning images. Upon returning to the Netherlands, he continued to develop his craft, leading to a full-time career in photography fueled by passion and dedication.
He has a particular fondness for cityscapes, yet his photographs of natural landscapes are equally captivating. His meticulous dedication and strategic planning shine through, culminating in the creation of breathtaking seascape photographs.
Learn how to take stunning landscape photos and how to post-process them from start to finish watching this masterclass.
Michael Schlegel
Berlin-based photographer Michael Schlegel is fascinated by long-exposure fine art black and white photography.
His black-and-white photographs are the result of a carefully wrought recipe: a minimalist setting, intense contrasts, and long exposure times. The results are impressive – like seeing the wind blow, the fog drift, and river water flow.
You'll notice that in many of his shots, he uses ND (neutral density) filters to be able to get longer exposure times. This allows him to create patterns in the sky, or to get rid of distracting elements.
He's been inspired by the work of famous artists like Ansel Adams, Michael Kenna, Hiroshi Sugimoto, and Elger Esser to name a few. Travelling is his passion and he likes to have a spiritual relationship with the landscapes he comes across.
Daniel Kordan
Daniel Kordan is a Russian photographer who has a knack for capturing breathtaking landscapes, especially mountains and seascapes. His work is renowned worldwide, as he frequently shares his work in various social media platforms.
He's an explorer at heart. Having realized his passion for photography and traveling at a young age, he now spends his time sharing his vision and the many wonders of the world with people all around him.
His photographic style avoids absolute black and focuses on harmonious color compositions and detailed mid-tones. One of his superpowers is his skillful use of lens filters, which lets him snag epic seascapes and stunning night shots that just draw you in.
He and his family moved to Bali a while ago so now he spends part of his time unveiling the stunning seascapes of Indonesia through his unique perspective. From cascading waterfalls to pristine beaches and dramatic cliffs, Daniel is a great proponent of using lens filters to capture awe-inspiring seascapes.
Rafa Irusta
Rafa Irusta is a landscape photographer based in the north of Spain. Additionally, Rafa has expanded his expertise to include aerial photography and video with drones.
A large part of Rafa's work revolves around seascapes. He has a strong preference and affinity for outdoor photographs taken near the sea. The cliffs, beaches and rock formations of the coast provide such fascinating subject matter for photographers that he finds himself returning to it again and again.
A significant part of his work involves photographic training through workshops and talks, where he shares his landscape photography techniques to help others improve their skills. Prepare to embark on an extraordinary visual journey as Rafa shares his expertise and artistic vision in this masterclass (only in Spanish).
Sarah Hatton
Sarah Hatton is a Melbourne-based landscape and adventure photographer known for her long exposure work. She transitioned from graphic design to professional photography in 2015 and has since created a substantial portfolio.
She takes pride in being a prominent female photographer in her field and aspires to be one of the most recognized in the landscape and adventure photography genres.
She spends most of her time in Australia and New Zealand. Both countries are a haven for adventurers and photographers alike, where every seascape offers a unique photo opportunity, and every tide brings a new story.
However, she also likes to travel, either on her own (she has plans to visit Antarctica, Iceland, and Russia) or guiding other photographers to unique locations worldwide.
Mathieu Rivrin
Mathieu Rivrin is a professional photographer living in Brest, France.
With over 2,000 kilometers of coastline, when it comes to photographing incredible seascapes Brittany excels. So capturing the Brittany coast is a synonym of photographing breathtaking landscapes. Here, the wind gets wild, and the lighthouses and the cliffs turn impetuously to the sea.
For Mathieu, photography is a means of escape, and living in such a unique location, he enjoys capturing extreme weather phenomena. Lighthouses fascinate him, and he eagerly awaits storm season each year to watch the sea unleash its fury on these coasts.
He struggles to choose his favorite places in Brittany but has a soft spot for the Gulf of Morbihan, the Iroise Sea islands, and the Crozon peninsula.
Warren Keelan
Warren Keelan is a seascape and ocean photographer whose work captures the powerful southern coast of Australia. His portfolio includes contemporary wide-angle seascapes and images that convey a mood or a moment, often appearing painterly or artistic.
His journey into photography began with a disposable waterproof camera to shoot surfing friends, evolving to professional equipment and techniques that capture the interplay of water and light. Keelan's work is influenced by his background as a musician and his passion for the ocean, focusing on the unpredictable nature of waves.
Keelan's unique perspective has won him acclaim, and he operates a successful gallery in Wollongong. He has received numerous awards and aims to continually improve his skills, with plans to explore ocean portraiture and new locations for his photography.
Olivier Robert
Olivier Robert is a landscape photographer with over 25 years dedicated to a minimalist style.
He was introduced to photography and the darkroom process at a young age and received his first camera when he was just 15. It was around this time that he first encountered Asia, a profound experience that deeply affected his lifestyle and worldview. Asian traditional art and philosophy have since been his primary inspirations.
For ongoing projects and family commitments, he has split his time between Europe and Japan for many years. He extensively explores Japan's 47 prefectures in search of timeless, simple, and occasionally enigmatic landmarks. His journey has taken him to the farthest corners of the country, including its mountains, temples, and shrines.
As you can see from his work, many of his photographs are seascapes. Oliver has tons of black and white photographs of the motionless ocean, captured in a simply picturesque and otherworldly way. The calm simplicity of the images is meditative, using repetition as a tool.
11.Keep enjoying the journey!
Alright, it's go-time! Grab your camera and start snapping.
Remember, the key to mastering seascape photography is relentless practice. Keep at it, day after day, until it becomes second nature. This craft is all about learning through doing, especially when it comes to capturing those stunning long exposures in various scenarios.
Hit a snag? Can't find what you're looking for in this guide? Don't sweat it. Drop me a comment right here. I'm always around to lend a hand or offer some advice.
Before you dash off, there's one more gem I've got for you.
Check out these articles:
Trust me, both are a goldmine. They will equip you with all the know-how you need to get the most out of your gear and elevate your photography game.
Remember, the learning never stops. Keep pushing, keep exploring, and most importantly, keep enjoying the journey!
Note: Some links on this page are affiliate links. What does this mean? If you buy/rent using these links you're helping support us and it costs you nothing extra. Thank you for your support.
Get this ebook for free now!