Lens Filters: The Definitive Guide (2024)
Lens filters are a great tool to improve your photography style.
But don't get confused!
This guide is not about filters that you can apply on Instagram... quite the contrary.
This guide is about how you can use different types of lens filters (yes, those pieces of glass that you place in front of the lens) to create a bunch of jaw-dropping images straight on camera.
Tons of fun, great creative potential, less time in post-processing... Lens filters have lots of advantages!
Filters are awesome!
So keep reading...
In this guide you'll find everything you need to become an expert in shooting with all types of lens filters.
Everything!
From the types of lens filters (polarizer, ND, GND, UV etc.) and their applications, including a lot of practical examples to inspire you, how to use the PhotoPills ND filter calculator, and a step-by-step explanation on how to use camera lens filters to create amazing effects.
Are you ready?
The adventure begins.
Welcome to the wonderful world of lens filters!
"Obviously, we all look at things through the filter of our own experience." - Malcolm-Jamal Warner
Get this ebook for free now!
Content
- 15 photos shot with lens filters that will inspire you
- Lens filter types (and the effect they produce)
- What lens filters are essential?
- The best lens filters 2024
- How to use the polarizer filter
- How to find out the actual density of your ND filter with PhotoPills
- How to use an ND filter (or several ones)
- How to use an GND filter (and a reverse GND filter)
- How to stack lens filters (ND, GND and polarizer)
- How to shoot a long exposure stacking several lens filters (ND, GND and polarizer)
- How to move lens filters during the long exposure
- How to shoot a long exposure with a light pollution filter
- How to take photos with an infrared filter
- How to take photos with a solar filter
- 10 lens filter tips to improve your technique
- 12 photographers that master the use of lens filters
- It's your turn!
1.15 photos shot with lens filters that will inspire you
A great photo always starts with a great idea.
Something you have imagined, something that you think it would be possible and that you want to capture with your camera.
It's a very simple creative process but it's very, very powerful.
As PhotoPillers (crazy photographers and PhotoPills users) we usually sum it up in three words:
"Imagine. Plan. Shoot!"
It's our motto, our battle cry.
But don't worry, we still haven't forced any PhotoPiller to tattoo it onto his arm, wearing our t-shirt is enough :D
Jokes aside, when shooting with filters, as with any other type of photography, location is key.
Yes, locations are an inspiration.
But if in addition to a dream location, you add some of these resources to your creative process, success is guaranteed :P
Imagine... Let your imagination fly!
Waterfall (1)
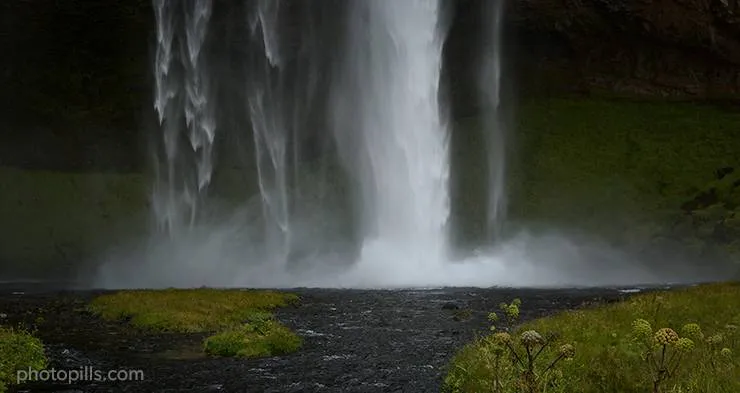
While there's no official record, estimates say there may be as many as 10,000 waterfalls in Iceland. Isn't it amazing?
Foss is the Icelandic word for waterfall, and the names of some of the waterfalls are so incredibly hard to pronounce (and to remember!).
I took this picture during our Iceland expedition. And in order to convey motion and the strength of the water falling down I used a 3-stop ND filter.
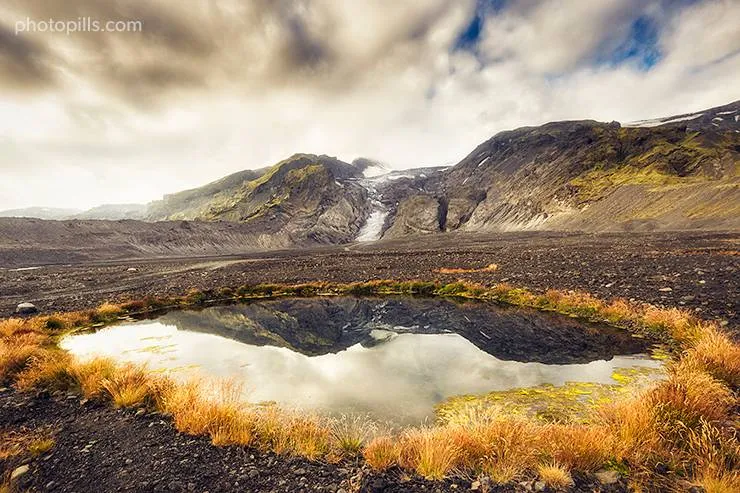
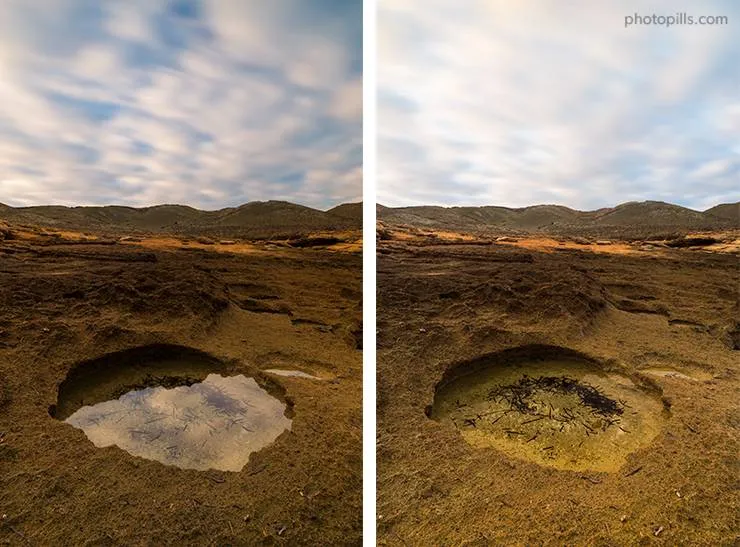
Sunrise (2)
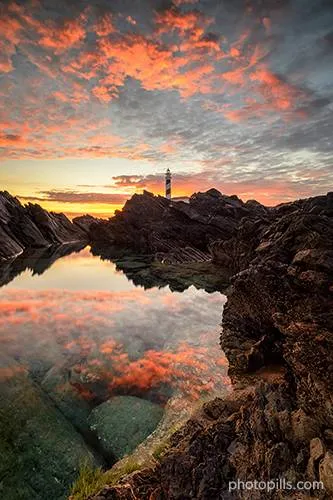
In order to photograph this dawn golden hour, I had to wait until it had rained first. The pool you see in the foreground is far from the sea and the only way to see it full is after a heavy rain.
Here I used a CPL filter to polarize the lower part of the frame. I wanted to boost the reflection of the clouds in the water to get a symmetry between the ground and the sky.
Speaking about the sky, I had to trust that it had the right clouds: not too high, not too low, not too dense, not too thin... This is the only way I could get the Sun to heat them up and cast a strong orange tint on them.
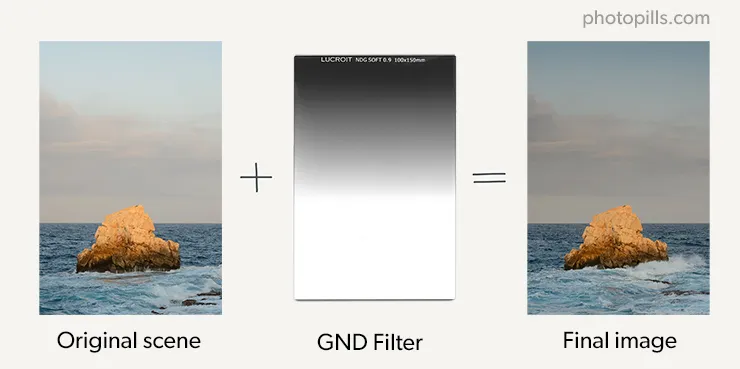
So to avoid blowing the highlights and to enhance the orange saturation, I used a 3-stop soft GND filter.
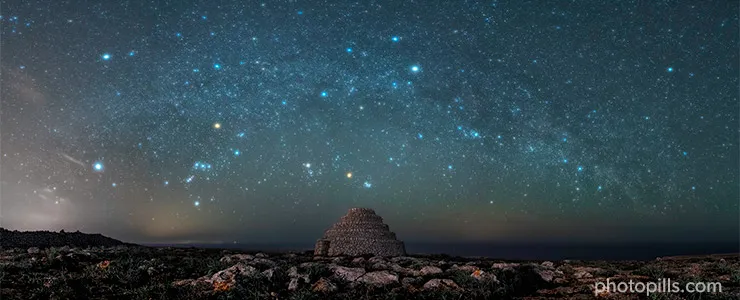
Milky Way (3)

In this picture I wanted to create a connection between the stars and one of those rare buildings that our ancestors left for us to enjoy... and photograph!
The photo shows the Milky Way together with an amazing construction: the Naveta d'es Tudons – a remarkable megalithic chamber tomb that you can find in Menorca (Spain). And this building served as a collective ossuary between 1200 and 750 BC. Isn't it amazing?
In order to capture both in a single frame I used a couple of filters: the Optolong clear sky 77mm filter (to reduce the light pollution) and the Kase Starglow filter (to get brighter stars).
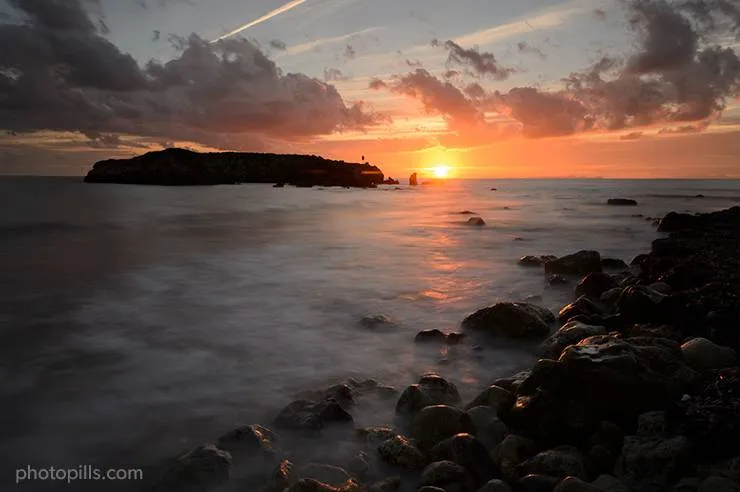
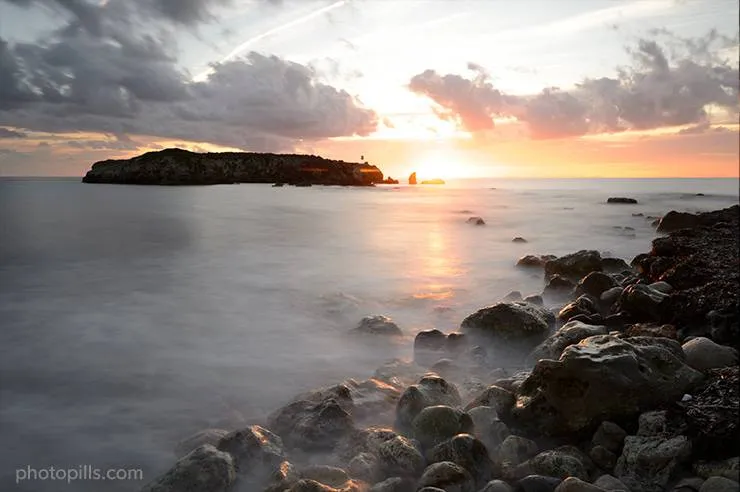
Sunset (4)
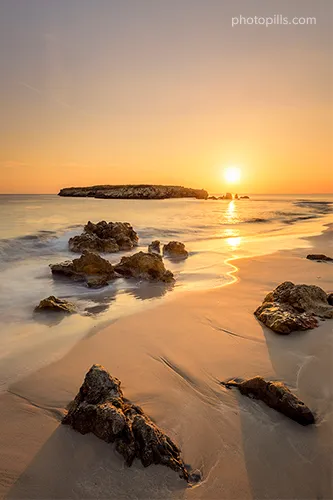
I consider myself an extremely lucky person for living where I live, on the beautiful island of Menorca (Spain), where seascapes are unique. The perfect place to take long exposures with my lens filters.
Capturing this inspiring and warm Sunset beach photo was a great pleasure.
To get the shot I used 2 lens filters: a 6-stop ND filter to create a silky water effect and smooth the foam and waves, and a 2-stop reverse GND filter to control the highlights (ie. the Sun) because it was very close to the horizon.
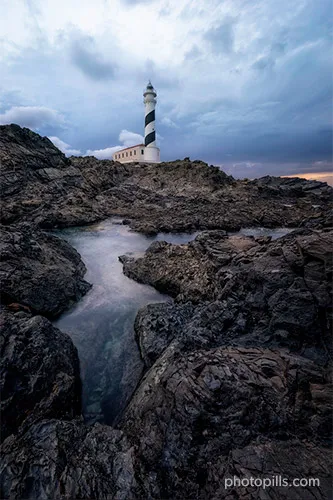
Stars (5)
This hut is, along with the Favàritx lighthouse, my favorite photography subject in Menorca.
I've captured it many times and in many situations: at day, at Sunrise, at Sunset, at night with the Moon, with a comet, with the zodiacal light... Everything you can imagine!
As you can see from the picture above, the results are just spectacular!
Drone (6)
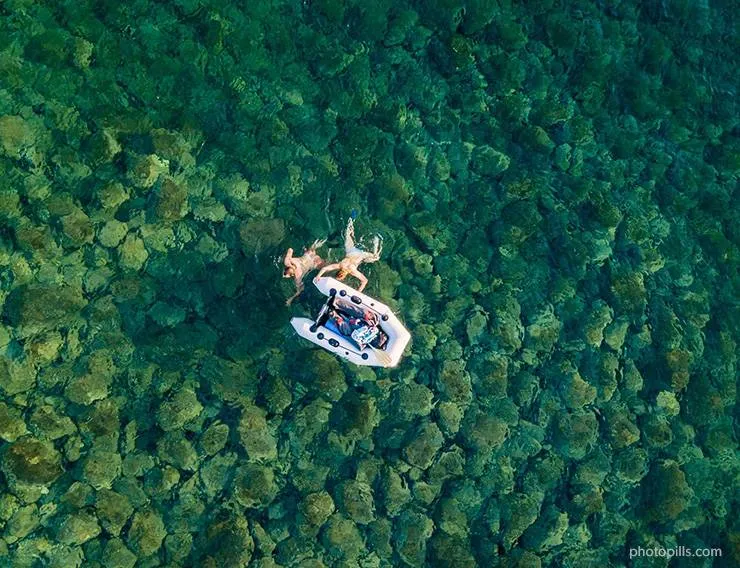
Where would you say this photo was taken? On some island in the Caribbean? In a corner of the Indian Ocean?
No... In Menorca! ;)
On the island we are lucky to have one of the cleanest and most pristine coasts in the Mediterranean.
So during the summer I love to fly my drone and capture the waters of Menorca...
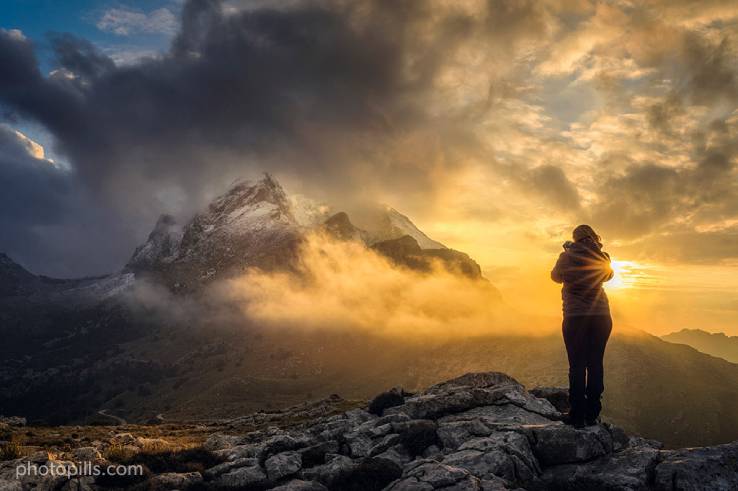
Golden hour (7)
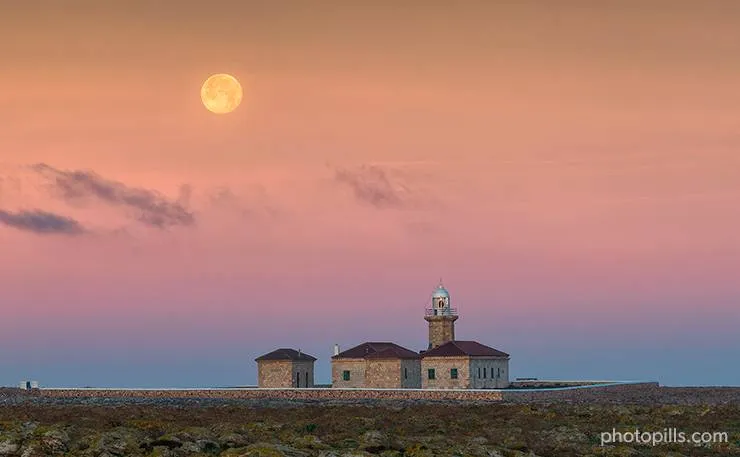
I love photographing the Full Moon during the golden hour: its deep yellow stands out among the roses and oranges in the sky as if it were a fireball.
I wanted to boost the color of the sky, but most specifically, the color of the Moon so I used a soft GND filter. In addition to this, the GND filter helped me avoid blowing out the highlights.
On top of it, I got quite far from the main subject, the Punta Nati lighthouse, so that the Moon looks bigger in the photo...
Blue hour (8)
The Favàritx lighthouse is one of my favorite photographic subjects in the world. Whenever I get a chance, I try to capture it...
It's a perfect location for Sunrises, Moonrises and also for Sunsets and Moonsets.
In this case, I was photographing a Sunrise during the PhotoPills Camp 2019, and the sky was overcast. All of it? Not really.
As you can see in the picture above, there was a narrow strip near the horizon behind the lighthouse without clouds. As the Sun was rising, I decided to take a long exposure with a GND filter to control the highlights in this particular area of the frame.
And since there was little light in the scene I used a small aperture (f/16) to use a slow shutter speed (8s) and create a silky water effect.
Seascape (9)
Imagine a warm, natural glow that makes any landscape look its best. That's the magic of golden hour photography.
In this particular seascape, I wanted to have the Sunset to the side. That way, it would cast an amazing red tone on the side of the rocks in the foreground. I was expecting a sky on fire so I decided to use a GND filter to control the highlights in the sky.
Moreover, I used an ND filter to shoot a long exposure and to add some motion to the water.
Reflection (10)
Whenever I see this picture it brings back great memories of the PhotoPills expedition to Iceland. Those were very emotional days...
But back to lens filters, this photo is a perfect example of how useful a polarizer can be when it comes to highlighting reflections. Especially if you find yourself facing a scene in which the water is perfectly flat.
Once you have the CPL filter mounted, turn it one way or the other while you're composing the photo. You'll see how the water goes magically from being completely transparent to being a perfect mirror.
While you're checking the effect of the circular polarizing filter, change your point of view. As you can see in this photo, the idea was to frame the scene in such a way that the mountains would create a reflection on the water as big as possible. And that's exactly what I did.
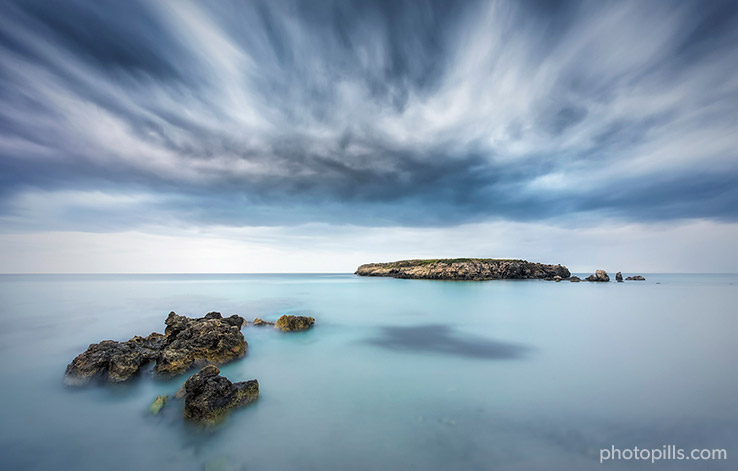
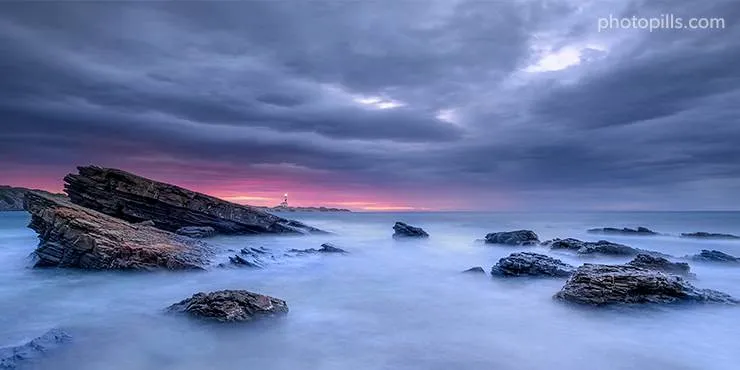
Clouds (11)
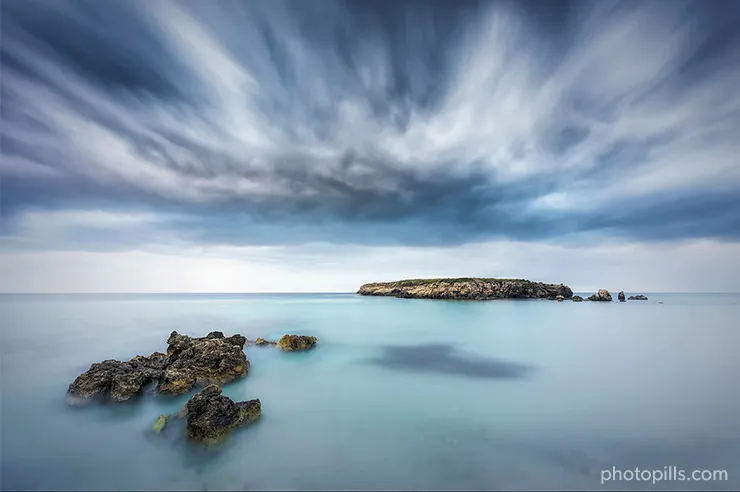
I love a threatening sky full of clouds. And if there's a storm it's even better. The chances of conveying drama are just amazing.
If you think that the current weather condition prevents you from taking a photo now, it won't be the same in an hour or even ten minutes.
Even though I was 100% sure that I was going to get soaked I was determined to get a shot in this location. There was a relatively strong wind and the clouds were moving from the coastline into the sea. Since I wanted to emphasize the sky I used an ND filter to smooth the water and convey motion through the clouds.
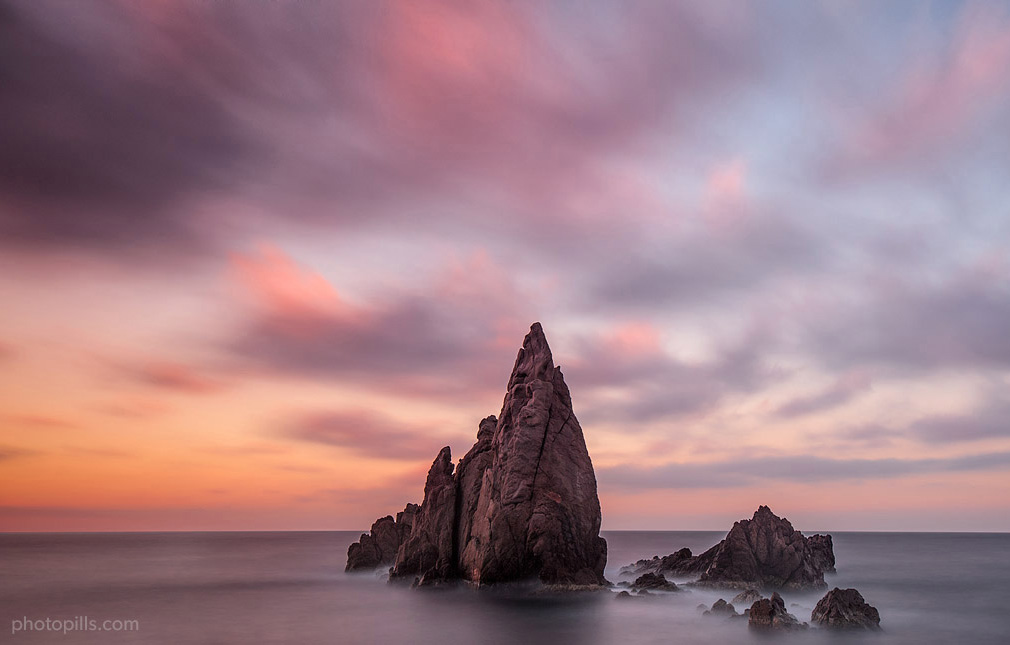
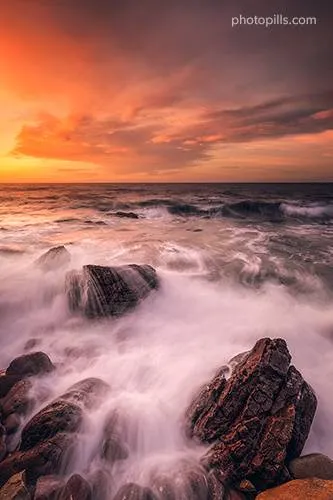
Water (12)
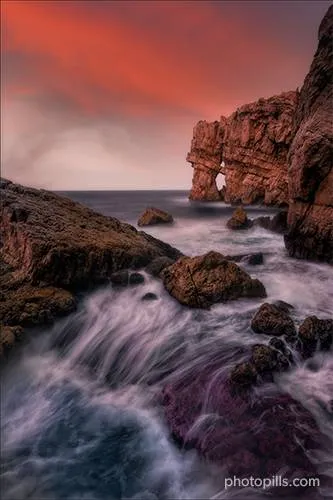
This is a wonderful Sunset that I captured during a lovely winter afternoon. It's a warm scene thanks to the red sky and the reddish tones of the rocks.
I love photographing seascapes. You should know it by now... ;)
So here I used a couple of filters. First, a soft GND filter to avoid blowing out the sky highlights. Then, an ND filter to get a silky effect on the water and enhance the purple tones of the rock in the foreground.
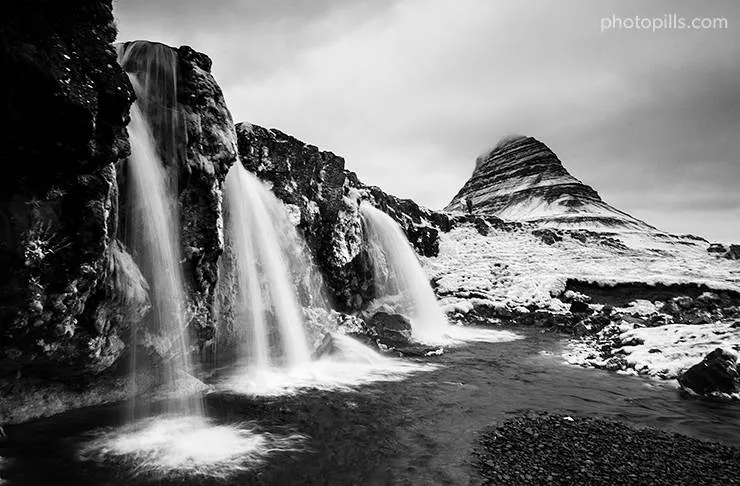
Infrared (13)
Have you been to Iceland?
If you answered "yes", then this location should sound familiar to you.
But if you haven't traveled there, you may have seen this location in the portfolio of one of your favorite landscape photographers. It's an extremely popular place where thousands of photographers go every year.
And I wasn't going to miss the chance... :)
I have to confess that I did take the usual postcard shot that, as I was mentioning before, I'm sure you've already seen online.
But I also wanted to capture a special memory of the Kirkjufell and its waterfalls.
I've had a Nikon with an infrared filter installed on the sensor for many years. And it's a camera that I like to use on special occasions like this one.
If you compare this photo with the regular postcard shot that I took, you'll notice that when I was in Iceland, the Kirkjufell didn't have snow. Neither the rocks and the edges of the waterfalls. Actually, everything had a beautiful green color.
A high contrast black and white image is very similar to any picture you get with an infrared camera. But as I wrote, they're only "similar"...
Well, that's why an infrared filter is magical: it makes you see things that are different from reality ;)
Rainbow (14)
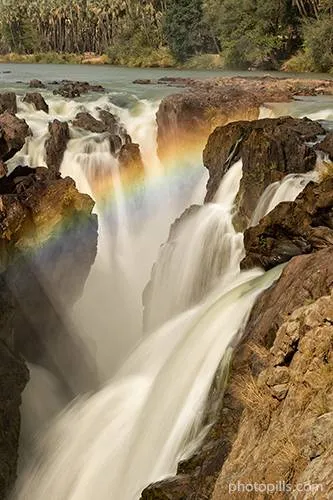
In this scene the greatest challenge wasn't actually the composition, but being able to capture the rainbow formed thanks to the water spray.
Because of the terrain and the location of the waterfall on the Kunene River, the natural border between Namibia and Angola, it was very difficult to work on any composition other than what you see in the photo. I barely had room to position the tripod, but I tried to place it as close as possible to the cliff's edge so that the waterfall would be in the central part of the frame.
But as I told you at the beginning, the key to the image is the rainbow.
To clearly highlight it on the image, I decided to use a polarizer and rotate it until the rainbow stood out as much as possible. Conversely, if I had turned the filter in the other direction, it would have vanished.
Thanks to the ND filter I was able to use a slower shutter speed and thus get silky water to convey strength and dynamism. Those were the same things that I was perceiving while listening to the water fall onto the canyon.
Solar eclipse (15)
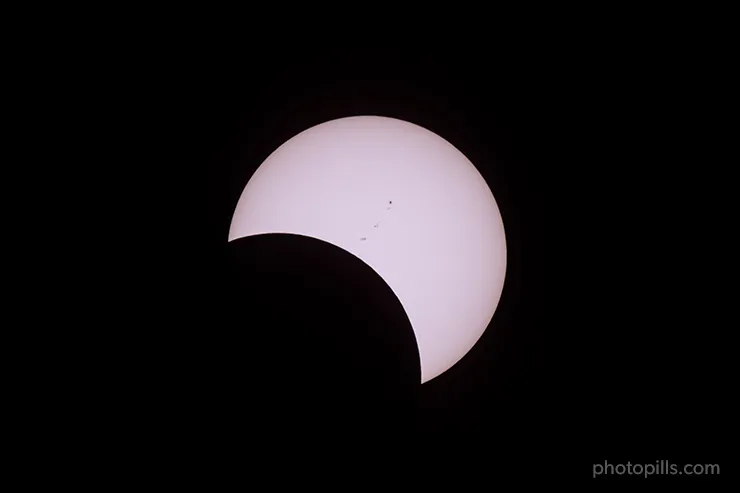
Have you ever had the chance to see a partial solar eclipse? And a total one?
No? Well, you should. It's a once in a lifetime experience.
And if you've been as lucky as me, and you've managed to photograph a total eclipse, it's something you'll never forget. Those images will be stuck in your memory (and on your hard drive :)) forever.
Living and photographing the total solar eclipse of August 21, 2017 in Portland (USA) was quite an experience... and a challenge.
I took this photo during the partial eclipse phase, a few minutes before totality, that is the (brief) moment during which the Moon covers the Sun completely.
Obviously, when you're photographing the partial eclipse phase, don't forget to protect your camera with a solar filter and your eyes with a pair of approved eclipse glasses. You'll prevent the sensor and your retinas from ending up severely damaged.
If you also want to learn how to photograph all the phases of a total solar eclipse, including the diamond ring, Baily's beads, the corona, the chromosphere and even details of the Moon's surface, take a look at 'Solar Eclipses: The Definitive Photography Guide'.
The only problem is that a total solar eclipse is not very frequent. So maybe you should start to practice with a lunar eclipse first: 'Lunar Eclipses: The Definitive Photography Guide'.
Photos by PhotoPillers (16) [bonus track]
Throughout this section I have tried to inspire you with examples of photos that you can take using lens filters.
I hope they motivate you to explore your own photography ideas.
But if it's not the case, if you're still a bit lost, I recommend you to check out a very powerful source of inspiration.
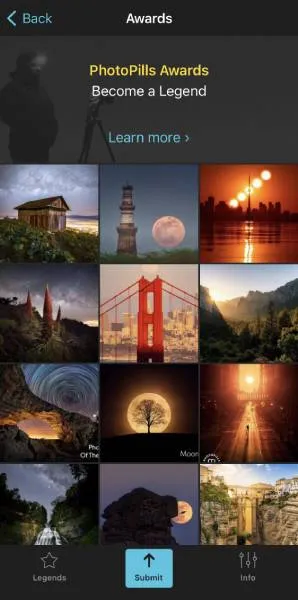
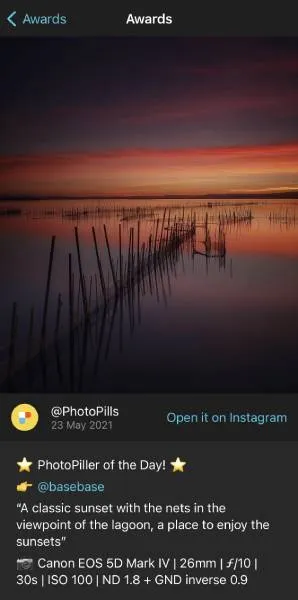
Would you like to see lots of photos that other PhotoPillers have imagined, planned and captured all over the world?
What if I told you that not only will you be able to see pictures taken with lens filters, but you will also find pictures of blue hour, golden hour, Sunrise, Sunset, Moon, Milky Way, Star Trails, Meteor Showers, drone, lunar eclipses, solar eclipses and other astronomical events...?
It would be awesome, huh?
Well...
You'll find them in our Instagram account (follow us!) and in the PhotoPills app (My Stuff Menu > Awards).
And if you want us to highlight your photos and inspire other PhotoPillers, you'll find all the information here: PhotoPills Awards.
So... what's next?
Do you feel inspired?
"Sure Toni, now I have a tons of ideas!"
I hope so, because we're about to enter into the exciting world of photography filters.
Let's see the types of lens filters and their practical applications.
It gets bumpy from here on out! :P
2.Lens filter types (and the effect they produce)
Explaining in depth the different types of lens filters and their practical applications is going to take me a while (and a lot of pages)...
The following table is a summary of the options you have.
| Filter | What is it for? |
|---|---|
| Polarizer | Eliminates non-metallic reflections. Eliminates or enhances fog and rainbows. Increases saturation and contrast. |
| Neutral density (ND) | Reduces evenly the light that reaches the sensor. Increases the exposure time. |
| Graduated neutral density (GND) | Gradually reduces the light that reaches the sensor with greater intensity on one of the edges of the filter. Successfully captures scenes with a high dynamic range. |
| Reverse graduated neutral density | Gradually reduces the light that reaches the sensor with greater intensity from the center of the filter. Successfully captures a high dynamic range scenes. |
| Ultaviolet (UV) | Blocks ultraviolet rays. |
| Light pollution reduction | Prevents sodium vapor bulbs from changing the color temperature of the night scene. |
| Solar | Allows to photograph directly the Sun or a solar eclipse preventing the sensor from capturing infrared (IR) and ultraviolet (UV) rays. |
| Black card | Prevents light from reaching the sensor. |
| Infrared | Allows only infrared light to reach the sensor. |
| SharpStar2 | Focusing aid to consistently get sharp, focused stars. |
| Gold-N-Blue Polarizer | Adds variable gold or blue tones to reflections depending on the orientation of the filter. |
| Varicolor Blue/Yellow Polarizer | Adds variable gold or blue tones to reflections depending on the orientation of the filter. |
| Skylight | In film cameras, it offsets the bluish cast that some scenes can have. |
As you can see, the creative options you have with lens filters are endless!
But let's start from the beginning...
What is a lens filter?
A lens filter is a piece of gear that you place in front of the lens of your camera and allows you to achieve a series of effects (see table above) that otherwise would not be possible (or almost impossible).
The lens filter actually modifies the light and/or color that reaches the camera sensor so you get a correct exposure or achieve a specific effect. Later on, I'll go into depth on these effects as I explain in detail each of the different lens filter types.
A lens filter can be made of
- Glass. It's the best quality material, gives better results and produces fewer side effects, so it's more expensive.
- Resin. It gives a very high quality product both in color accuracy and optical quality.
- Polyester. It's a good, low cost alternative to glass or resin, but it may produce a less perfect effect.
"Toni, what lens filters do you use?"
I use Lucroit glass filters. I like them because, although they are more expensive than those of other brands, they allow me to produce higher quality images. So it's worth spending a bit more money on them.
In section 4 you'll find specific recommendations on what I consider the best lens filters.
Let's keep going.
A filter can be circular screw-on, drop-in, square or rectangular.
And depending on its shape, the mounting method onto the lens varies. The mounting method is known as a "system".
Lens filter systems (or mounting methods)
There are several filter systems:
- The square or rectangular (my favorites).
- The circular screw-on.
- The drop-in for some telephoto lenses.
- The square gel lens filter for some wide angle lenses (very rarely used so I won't go into detail).
Square and rectangular lens filters
Certain lens filters can be square (usually neutral density or ND) or rectangular (graduated neutral density or GND ones).
Square lens filters can come in many different sizes (70, 75, 100, 150, 165 and 180mm), although the most common one is 100mm.
Rectangular ones can be 67x85, 75x90, 70x100, 100x150, 150x170, 165x200 and 180x210mm, although the most used size is 100x150mm.
How do you know your square and rectangular lens filter size?
It's very simple.
It depends on the minimum focal length of your lens.
Imagine you have this very popular beginners' lens: the 18-55mm f/3.5-5.6 from Nikon (or any other brand).
If you use it with an APS-C camera, take into account the cropping factor (1.5x for Nikon). Thus, the field of view at 18mm will be a bit wide (18 x 1.5 = 27mm). In this case, a 100mm lens filter will be more than enough.
Let's suppose now that you have a Nikon 14-24mm f/2.8. It's a very fast and high-end wide angle lens.
If you combine it with a full frame camera and you take a picture at 14mm, the field of view of this lens is so wide that any lens filter smaller than 165mm will create a beautiful vignetting in the corners... XD
If you have a Micro 4/3 camera, that is a camera with a relatively small sensor, be careful with the size of lens filters you use.
Why? Because if you use lens filters that are too big for this system, the transition area may cover a good portion or all of the image. The lens filter will be behaving more like a blender rather than a GND.
Moreover, sometimes you can use a hard GND filter as a soft GND if you have a Micro 4/3 camera.
In fact, if you have doubts about any of your lenses, the best thing to do is read reviews online. Or ask at your local photo store. It's very easy to find reliable information.
Be careful with the GND filter transition
I'll go into detail of all the transitions a GND filter can have later on.
But I just wanted to warn you about one thing...
The focal length, the aperture you set and the sensor size affect your lens filter transition.
Due to the "zoom" effect, the transition in a super telephoto lens (focal lengths above 200mm) looks much softer compared to a wide angle lens (focal lengths below 24mm).
In addition to this, the greater the aperture the more blurred you'll see the gradient, as a result of the shallower depth of field.
Advantages of using square and rectangular lens filters
- You need a filter holder to use them, that is a piece of plastic or metal that you attach to your lens.
- The filter holder has several slots where you can slide several filters at the same time.
- As these lens filters are not circular, nor do they depend on a specific lens size, they are perfectly interchangeable. Therefore, you can use the same filters with different lenses.
- It's easy to slide the GND filters very precisely to position the transition exactly where you need.
- You won't get any vignetting.
Drawbacks of using square and rectangular lens filters
- They are bigger than a circular filter and much more fragile. If you drop one of your lens filters on the ground, it will most likely break.
- You need a filter holder to be able to use them, so you'll need to carry more equipment. The filter holder is not essential, you could hold the filter with your hand depending on the shutter speed, but I highly recommend you to use one because it will make your life easier.
The most popular brands of square and rectangular lens filters are Lucroit, NiSi, Lee, Benro, Formatt-Hitech, Cokin, Singh-Ray, Kase, Breakthrough and Haida.
If you're interested in buying lens filters:
- You can find my suggestions on the must-have lens filters in section 3.
- I tell you everything about the best lens filters in section 4.
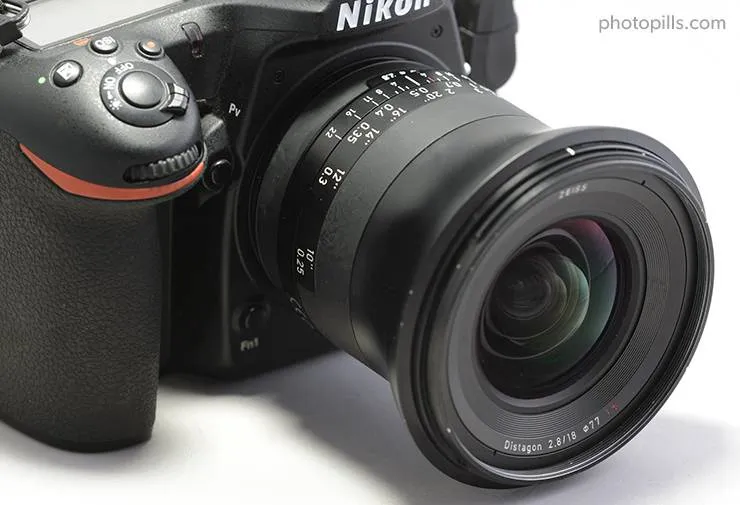
Circular screw-on lens filters
A circular filter is a piece of glass, resin or polyester in the shape of a circle that has a metallic edge so you can screw it onto the lens thread.
Some of the common sizes for circular lens filters are 43mm, 49mm, 52mm, 44mm, 58mm, 62mm, 68mm, 72mm, and 77mm.
How do you know your circular lens filter size?
Obviously, the size of the lens filter you should buy depends on your lens' specific diameter.
So, at first sight, you may not be able to use a circular lens filter of a certain diameter on a lens that doesn't have that specific diameter.
And I've written "at first sight" on purpose because you can always get a tool that allows you to use the same circular filter on different lenses – an adapter ring.
Imagine you have a 77mm diameter lens and a 58mm diameter one. My recommendation would be to buy a 77mm circular lens filter and an adapter ring to screw it onto your 58mm lens.
Keep in mind that it doesn't work the other way around. In other words, if you had a 58mm filter, it wouldn't cover the entire surface of your 77mm lens, so you would end up seeing the filter edges in the photo.
Therefore, your circular filter should have the same diameter as your bigger lens.
Advantages of using circular lens filters
- You can leave them screwed onto your lens so mounting them is very simple and fast.
- It's very easy to stack them as you only have to screw one on top of the other.
- They are relatively small and thin so they are easily stored and transported.
- They are more resistant than other types of filters.
Drawbacks of using circular lens filters
- Because they have to fit into the thread of your lens, they must have a specific diameter. So it's complicated to interchange between one lens and another. However, as I explain in section 15 there's a turnaround – using a step-up ring.
- Circular lens filters can be difficult to unscrew. Sometimes they get stuck and are hard to handle in cold and low temperature situations.
- When you want to apply several filters, placing them on top of each other produces vignetting (darkening of image corners when compared to the center).
In my opinion, these reasons are enough to recommend you to use square and rectangular filters. They are the lens filters I use and I love them.
However, that doesn't mean that you can't stack circular filters with square and/or rectangular filters. For example, the B+W ND 3.0 (10 stops) circular filter is spectacular. So you could include it in your kit and, at the same time, use a rectangular GND filter along with a filter holder.
It's not the most comfortable combination in the world, but it can be a very good option depending on the type of filters you have and the quality you're looking for.
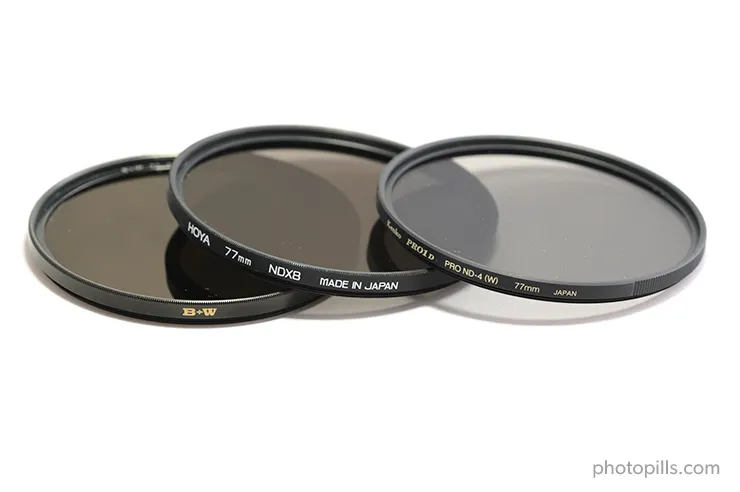
If you're interested in buying circular filters, these are the most popular brands: Hoya, B+W, Haida, Tiffen, Breakthrough, Singh-Ray, NiSi, Formatt-Hitech and Haida.
Drop-in lens filters for telephoto lenses
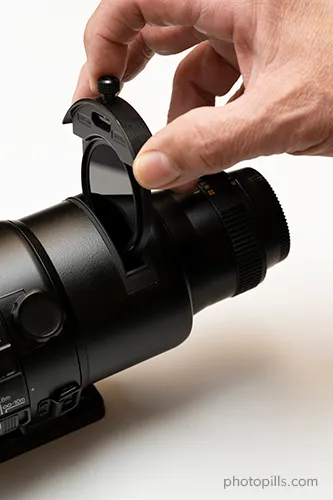
A drop-in lens filter is only used for telephoto lenses with a long (from 200mm) or very long (up to 800mm) focal range.
The problem with any long-range and some angular telephoto lenses is that the front lens is so large that no conventional lens filter, whether circular, square or rectangular, can help you get the effects you're looking for.
Instead, these lenses have a slot in the back where you can insert a drop-in glass lens filter. This slot has nothing to do with another slot that certain wide angles have and where you can insert a very thin pre-cut gelatin sheet. These gelatin sheets also act as a filter, although for other purposes.
As you can see in the photo below, to insert the filter in this slot you need an adapter where you can place a neutral density filter (ND) filter or a polarizer filter.
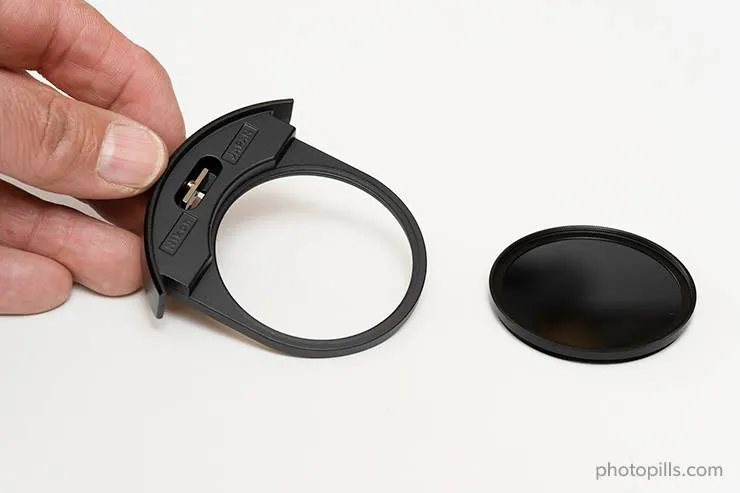
You'll be using circular filters in both cases, so they must have a specific diameter to fit perfectly into the adapter and then into the telephoto lens.
Now that you know the different mounting systems to attach the filter to the lens of your camera, let's focus on the different types of filters and their applications.
Depending on the effect you want to get in your final image, you'll use one filter or another.
So let's see the different types of filters, their uses, and their advantages and disadvantages.
Polarizer (CPL) filter
What is a polarizer (CPL) filter?
A circular polarizing filter (CPL) is a piece of glass that reduces the amount of reflected light entering through the lens of your camera and captured by the sensor.
When light waves hit a non-metallic surface, they bounce off and are reflected along a parallel plane to that surface.
Depending on how you position the polarizer and how you rotate it, you can block these waves that travel along a specific plane. Therefore, as you rotate the filter, these effects appear or disappear.
Moreover, you can control the intensity of this effect by changing the camera's line of focus with respect to the Sun.
In other words, the circular polarizer filter is perfect for removing reflections, as long as they're non-metallic.
Types of polarizing filters (and how they work)

Polarizing filters can be linear or circular.
But don't get confused!
The name of these filters has nothing to do with their shape (square or round), or the fact that they rotate (every single one does), but with the way they work.
As I said at the beginning of this section, this type of filter depends on the behavior of the light.
When a beam of light moves in a straight line, it does so as it oscillates in an infinite number of planes around the axis that marks the movement direction. Each of these planes is a polarization plane. So with the polarizer you can reduce all those planes to one or a very small range of them.
Maybe this diagram will help you understand it better.
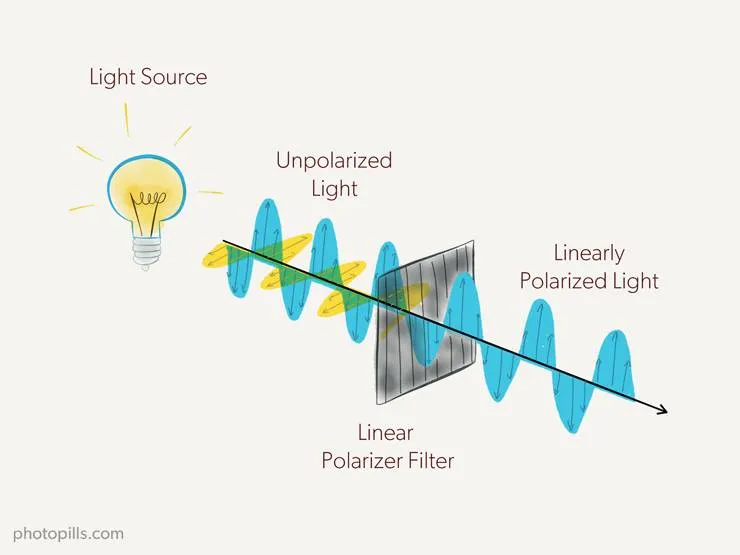
This is how a linear polarizing filter works.
But there's a problem...
Well, your DSLR or mirrorless camera may not work properly.
Don't panic, it won't break down. The thing is that, as the light is polarized linearly in a single plane, the light meter or the autofocus system can be confused when metering. And your photo will be badly exposed, out of focus or both.
How can you avoid it?
Correct!
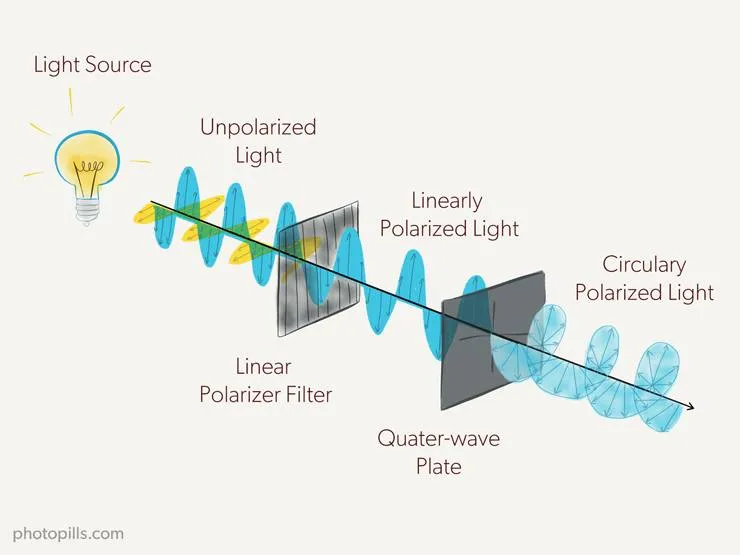
Using a circular polarizing filter (CPL). This type of filter has a second element, called a quarter wave plate that converts the already linearly polarized light into a circular polarization, thus avoiding any problems with the light meter or the autofocus system.
Why should you use a polarizing filter?
There are two main reasons:
- It's extremely easy to use.
- It creates an effect that you can't reproduce in post-processing.
As I explained to you before, using a polarizing filter is super easy. All you have to do is rotate the filter. Depending on how darker it is, reflections will disappear.
However, you can't replicate the effect of a CPL filter in post-processing. There's no way to reduce any glare or haze in a scene without a polarizer. That's why I always recommend having one with you when going on a shooting session.
When to use a CPL filter
Again, with a polarizer you can remove:
- Non-metallic reflections. It's very useful for example to make the water more transparent and show more detail on the background.
- Glitter on the surface of an object.
- Part of the mist in the scene.
Remember that is something that you can't achieve with Lightroom or Photoshop.
Another interesting thing that you can get with this filter is to increase the saturation and contrast of your photo.
One of the biggest frustrations we landscape photographers have is that our photos sometimes lack color saturation.
Why?
Well, this is mainly due to the way the light bounces off the ground and all the other elements in the scene. The light bounces following a series of specific angles (each angle depends on the element in which it bounces), so the image looks dull and flat.
However, if you place a circular polarizing filter in front of your lens and rotate it to a certain angle, the filter is able to eliminate most of the light reflected in your scene. In other words, it increases your photo saturation and contrast.
Similarly, when shooting distant subjects (e.g. a mountain range), the polarizer reduces the haze.
Finally, a CPL filter increases the sharpness and the detail quality of your photos.
What are the drawbacks of using a polarizing filter?
Unfortunately, polarizing filters have a number of disadvantages and problems.
Here are some things you should be aware of:
- A polarizing filter can ruin the sky in your shot. If you use a polarizer with a wide angle lens during a Sunrise or Sunset it can make the sky appear unnaturally dark in certain areas. This is also true for panoramas. Be very careful when making panoramas: any problem or effect caused by the polarizer will be almost impossible to correct in post-processing.
- It'll take you longer to compose if you use a polarizing filter because you need to rotate it carefully until you get the effect you're looking for. Don't forget that the polarizing effect of the filter varies greatly depending on the position of the Sun and the direction in which you're pointing the camera.
- A polarizing filter subtracts light from the scene. Depending on the model, it can be between 1 and 3 stops so you need to take this into account when setting the shutter speed.
- A polarizer can cause vignetting. This is especially true if you use a wide angle lens because vignetting will affect the corners of the frame. To avoid this, you shouldn't stack too many filters and only buy slim or nano polarizing filters.
- A polarizer may produce flare or halos in the final image.
- For any polarizer, a rainbow is reflected light. If your polarizing filter is engaged, the rainbow will disappear from your photo. Rotate or remove the polarizer.
- Finally, a quality polarizing filter is expensive. Instead of buying many different sized filters, I recommend that you buy the largest diameter filter you can screw onto your bigger lens. Then, buy adapter rings for all the other lenses you have. That way you can use the same filter with all your lenses.
Despite these drawbacks, I believe that a circular polarizing filter (CPL) is an essential accessory in the backpack of any photographer (especially landscape ones). With a high quality filter and a little practice you can get spectacular results.
And not only that.
Remember you can't replicate the effect of a circular polarizing filter (CPL) using any post-processing software. If you don't get it on camera while in the field, you won't get at home in front of the computer.
Also, as you'll learn in section 9, you can stack the polarizer with other lens filters such as ND or GND ones for spectacular results.
The most popular brands are Lucroit, B+W, Formatt-Hitech, NiSi, Lee, Hoya, Haida, Cokin, Breakthrough and Singh-Ray.
If you're interested in buying lens filters:
- You can find my suggestions on the must-have lens filters in section 3.
- I tell you everything about the best lens filters in section 4.
Neutral density filter (ND)

What is a neutral density (ND) filter?
A neutral density (ND) filter is a piece of glass or semi-transparent resin that you place in front of the lens.
It allows you:
- Increase the exposure time.
- Use a very large aperture (small f number).
The idea in both cases is to get spectacular effects in your photos.
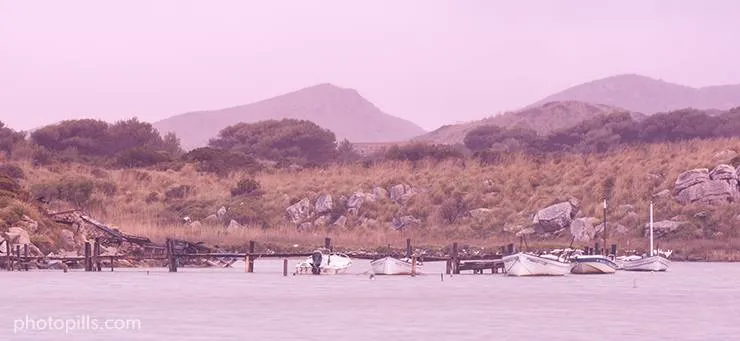
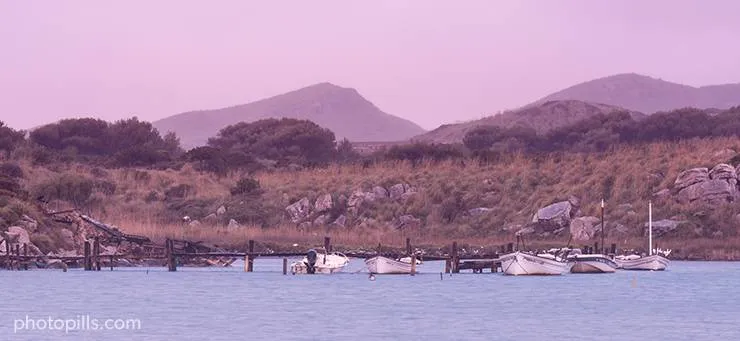
When to use an ND filter?

The first picture was taken without an ND filter. In the second one, you can see how the ND filter allowed me to increase the exposure time creating a nice silk effect in the moving water.
In section 7 I explain in depth how to use ND filters. You should definiteIy read this section carefully ;)
Straight to the point...
The ND filter allows you to evenly reduce the light that reaches the sensor. It allows you to subtract light (always evenly, remember). This helps you capture certain effects without overexposing the scene:
- You can slow down the shutter speed to create beautiful effects without overexposing the brightest tones. It allows you, for example, to capture a silk effect in the sea during a Sunset.
- You can use larger apertures (without overexposing the scene) to capture a shallower depth of field. This is useful, for example, if you want to separate the backlit subject from the background.
- The effect you get depends on the number of stops you're able to subtract according to the filter you're using (1, 2, 3 stops...).
Another advantage of the neutral density filter is that since it reduces light evenly, it doesn't alter the contrast or sharpness of your image.
Nor does it introduce any color cast. Or it shouldn't because, unfortunately, it's not always the case depending on the filter manufacturer.
Nevertheless, the density of these filters is "neutral" because of this lack of color cast.
In short, they are sunglasses for your lens.
ND filter chart
With an ND filter you block part of the light entering through the diaphragm to the sensor. And to do that, you need to "subtract" that light precisely. That's why manufacturers offer a wide range of filters of different densities.
In this ND filter table you'll find the most common filters, depending on their density or light reduction capacity.
| Filter | Light reduction (stops) | Density | Light transmission % |
| ND2 | 1 | 0.3 | 50% |
| ND4 | 2 | 0.6 | 25% |
| ND8 | 3 | 0.9 | 12.5% |
| ND16 | 4 | 1.2 | 6.25% |
| ND32 | 5 | 1.5 | 3.125% |
| ND64 | 6 | 1.8 | 1.563% |
| ND128 | 7 | 2.1 | 0.781% |
| ND256 | 8 | 2.4 | 0.391% |
| ND400 | 8 2/3 | 2.6 | 0.25% |
| ND512 | 9 | 2.7 | 0.195% |
| ND1024/ND1000 | 10 | 3.0 | 0.098% |
Thus, an ND 0.3 filter reduces 1 stop the light reaching the sensor. An ND 0.6 filter reduces 2 stops, an ND 0.9 filter reduces 3 stops, an ND 3.0 filter reduces 10 stops, and so on.
Remember, each time you reduce the exposure 1 stop, the sensor captures half the light.
Therefore, a filter allows only 1/(2power) of the initial light to go through it. In this case, "power" is the number of stops that the filter subtracts.
For example, a 6-stop neutral density filter only allows 1/64 of the light to go through your lens:
1/(26) = 1/(2×2×2×2×2×2) = 1/64
Depending on the light you want to subtract, choose a more or less dense filter.
But... Be careful!
The density indicated by the manufacturer is not always the real one, so I suggest you calibrate your ND filters.
If you're interested in buying lens filters:
- You can find my suggestions on the must-have lens filters in section 3.
- I tell you everything about the best lens filters in section 4.
How to calibrate an ND filter?
By "calibrate" I mean "find out the actual density of the ND filter". It's a very simple process that I explain in detail in section 6.
Now, let's get on with the GND filters!
Graduated neutral density filter (GND)
What is a graduated neutral density (GND) filter?
A graduated neutral density filter (GND) is a piece of glass or resin that you can place in front of your lens.
But, unlike ND filters, the density of a GND filter varies gradually on its surface (it isn't uniform). It's made up of two distinct parts: a completely transparent area, and a darker section.
It allows you to:
- Reduce the exposure difference (dynamic range) in the frame. In other words, remove light just in a specific area of the image, like the sky, for instance.
- Increase local contrast. That is, the detail and color of the image are improved.
The idea is to help your camera simultaneously capture detail in both bright and dark areas of the scene.
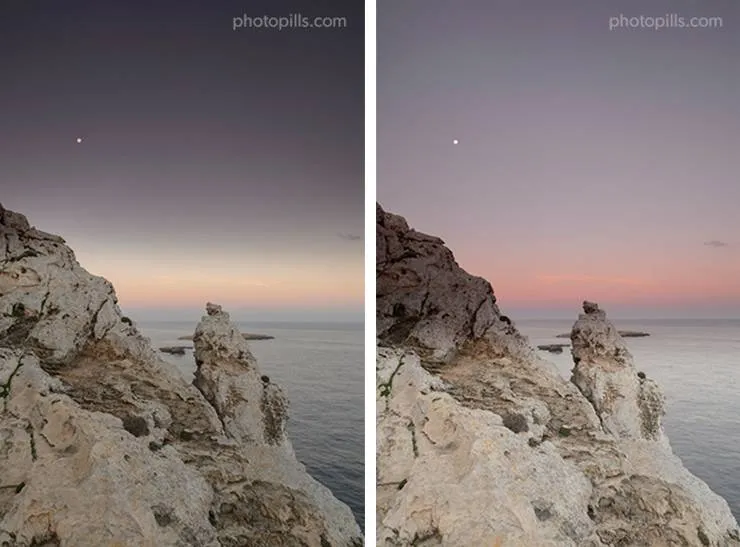
When to use a GND filter?
You can reduce the exposure difference of the scene
GND filters don't subtract light evenly on all surfaces. As its name suggests, they subtract it gradually. This means that there are certain areas of the filter that subtract more light than others.
So you can decide on which area of the frame you want to subtract more (or less) light. This is particularly useful in scenes where the light gradually changes within the frame. For example, in scenes where the upper area is brighter than the lower area. Or one side has more light than the other.
By placing the darkest area (the one that subtracts more light) over the highlights of the frame, your camera is able to correctly capture a high contrast scene. In other words, with just one shot you'll be able to capture detail in both the highlights as in the shadows.
Without the GND filter, the highlights will probably be blown out or the shadows will be clipped. You have to decide whether to correctly expose one area or another.
With the filter you can darken the brightest area, so that the difference between the brighter and darker areas is smaller. Therefore, you'll be reducing the dynamic range of the scene.
They are called graduated neutral density filters because:
- Their density varies gradually, subtracting light gradually.
- From the bottom edge of the filter to the center, this gradual variation goes from transparent to a neutral gray tone.
- From the center to the top edge of the filter, this gray's density gradually increases, subtracting more and more light.
To summarize, they are sunglasses for your lens whose crystals have a progressive tint.
Although some photographers consider that filters are an artificial tool that alters reality, the truth is that a graduated neutral density filter helps you get just the opposite: capture a photo that is very close to what your eyes see.
You can increase local contrast
There is another lesser-known advantage of GND filters: they allow you to increase local contrast. In other words, the detail and color of the image are improved.
This is because, as I told you, this type of filter reduces the dynamic range of the scene. One thing is linked to the other.
Let me explain it in detail.
And in order to do it, I have to refer to the exposing to the right (ETTR) concept.
In short, the camera doesn't capture the same detail in all tones. In fact, it always captures far more detail in the highlights than in the shadows.
This lack of information in the shadows makes it the area of the image where you get noise first and where you get less contrast. If you reduce the dynamic range of the scene, the shadows will become brighter, the sensor will capture more information, and the contrast will be higher.
You don't have to use a GND filter in extreme situations: you can also use a GND filter in scenes where the dynamic range doesn't exceed that of your camera. Imagine a spectacular sky full of clouds. The filter can accentuate the detail of the clouds, or it can darken them and increase their clarity compared to the rest of elements.
Actually, as you'll see later on in section 8, their uses are (almost) endless.
But before explaining real examples, let's take a look at the different GND filters that you can find on the market.
GND filter chart
Remember that the GND filters mission is to control how much light you want the sensor to capture. So, depending on the amount of light you want to subtract, you should choose filters of different densities.
The most popular filters have 2, 3 and 4 stops.
In the GND filter table below you have the naming according to the filters' brand.
| Filter | Light reduction (stops) | Density |
| GND2 | 1 | 0.3 |
| GND4 | 2 | 0.6 |
| GND8 | 3 | 0.9 |
| GND16 | 4 | 1.2 |
| GND32 | 5 | 1.5 |
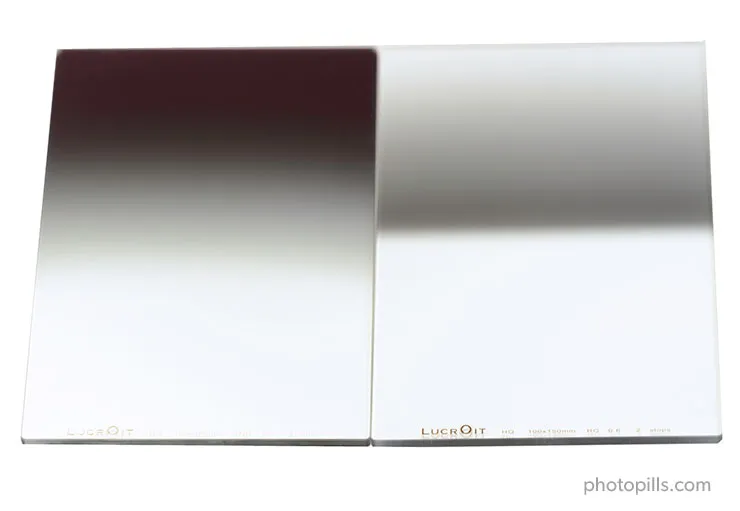
Types of GND filters according to the transition
Not all filters have the same transition from the darkest part to the clearest or more translucid part.
The transition can be hard, soft or diffused.
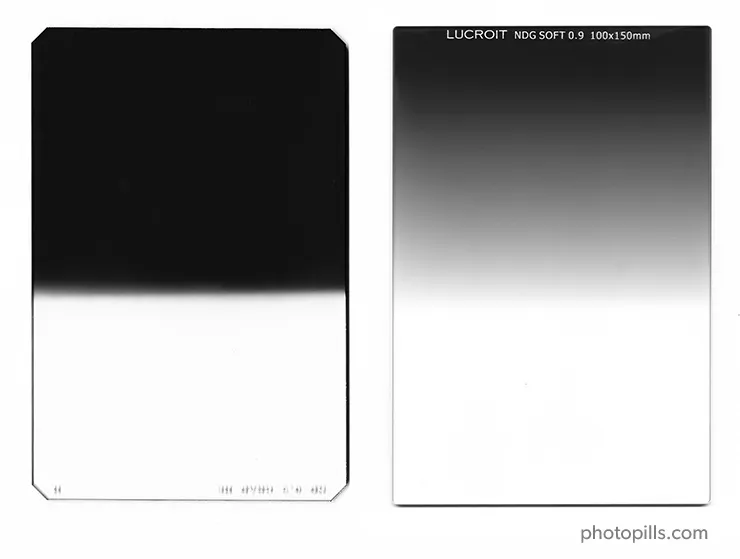
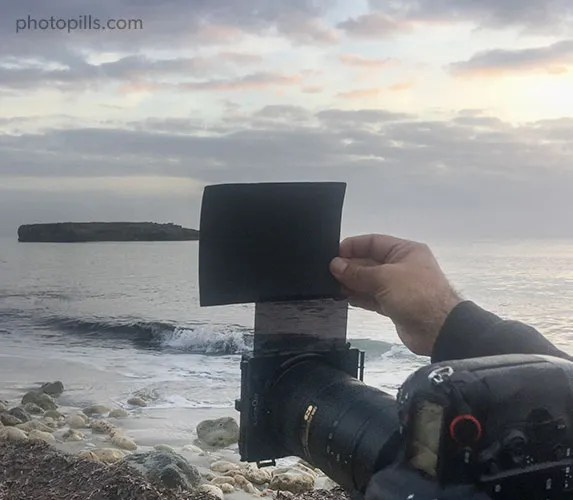
Hard graduated neutral density (GND) filters
In hard GND filters the transition between the dark and the transparent part is clearly marked with an almost perfectly defined horizontal line.
You can see it perfectly if you hold a filter with your hand and put it in front of a light source.
They will be very useful when your scene has a clean horizon (i.e. there are no elements above the horizon). Or when the scene has a clearly visible straight line separating light and dark tones.
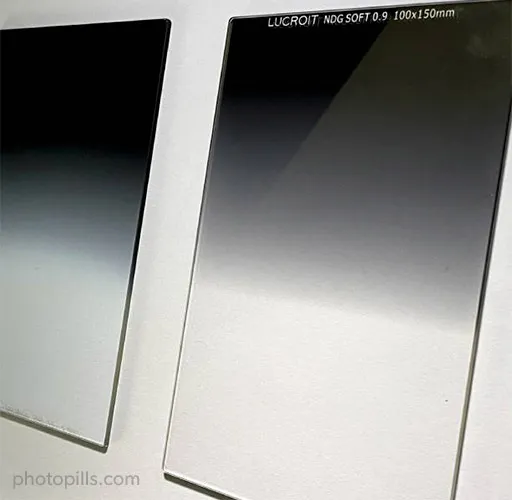
Soft graduated neutral density (GND) filters
In soft GND filters, on the other hand, the transition is gradual: the dark part gradually becomes transparent.
These filters are ideal when you have elements above the horizon. In other words, when you can't see a clearly visible straight line in the scene that separates the brighter tones from the darker ones.
A soft GND is also ideal to use it over the sky during Sunrise or Sunset. When you have soft clouds during Sunrise or Sunset, they are barely colored. Thanks to the graduated filter, you can have much more saturated clouds.
Unfortunately, filter manufacturers don't agree on standard gradient values (i.e. how fast the filter changes from dark to transparent). So the filter gradient can vary significantly from brand to brand.
Blenders (diffused graduated neutral density filters)
A blender GND filter is completely dark at the top (almost as if it were an ND filter) and completely transparent at the bottom. The difference with the previous two is that the density gradually changes along the entire length of the filter.
In other words, if you look closely you won't see a "border" or a "transition zone" between the darkest and brightest part.
This type of filter is not very popular, but is very useful in scenes where there is a wide dynamic range but the highlights and the shadows are not clearly separated.
If you're shooting in a forest, for example, this filter is ideal. The light is filtering through the treetops while the trunks completely stop the light from passing through.
What is the disadvantage of using graduated filters?
A graduated neutral density filter may limit your composition.
Alas, it can.
The problem is that all (or some) elements above the horizon may appear in the final image darker than the rest of the scene.
You can solve this problem with a post-processing software like Photoshop. But in order to do so, you must know how to use luminosity masks, for example.
However, you should ideally avoid, if possible, using additional tools. I don't think you'd rather spend more time in front of the computer than taking pictures.
The most popular brands of GND filters are Lucroit, NiSi, Lee, Benro, Hitech and Haida.
If you're interested in buying lens filters:
- You can find my suggestions on the must-have lens filters in section 3.
- I tell you everything about the best lens filters in section 4.
Reverse graduated neutral density (reverse GND) filter
What is a reverse graduated neutral density (reverse GND) filter?
The reverse graduated neutral density, or reverse GND filter, is a variation of the graduated filter.
Its peculiarity is that the darkest part, the one that determines the filter density, is in the middle of the filter, and it progressively brightens towards the top. On the contrary, the lower half is completely transparent (to avoid subtracting light in the foreground).
That's why it's called reverse.
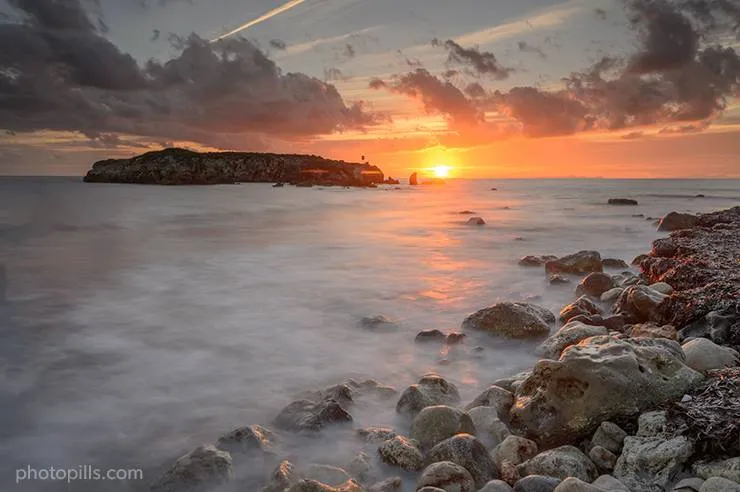
When to use a reverse GND filter?
You can mainly use it for photographing backlit Sunrises and Sunsets with a clean horizon (without elements above).
Imagine you're on a beach trying to capture a beautiful Sunset.
The Sun sets creating a strong light and you decide to adjust the exposure so that the highlights (i.e. the Sun) aren't blown out in the histogram.
As you can see, the problem is that the sky looks great but the rocks are very dark. Too dark...
So you can try to change the exposure and adjust it to the shadows so that they don't turn out so black.
And that's ok. The problem is that by making this decision you've decided to sacrifice the highlights and now they are completely blown out. Not even your favorite software is able to recover them: the RAW doesn't have that information and that area of the photo is completely white.
Can you solve the issue with the bracketing technique?
A bracketing can be incredibly useful on many occasions. But not always..
Unfortunately, in this case you have to take into account a small detail: the movement of the water. No matter how hard you try, you'll never get 2 (or 3 or whatever) totally identical shots whose only difference is the exposure.
So it will be very (very) difficult to merge them later in Photoshop without halos and other elements that distort the image.
Be careful. I'm not saying it's not possible. It's just complicated.
Can you use a soft (or hard) GND filter instead?
Another option can be to use a soft (or even hard) GND filter to balance the exposure of the scene and use the dark part to mitigate some of the highlights.
However, the resulting photo isn't exactly what you're looking for, is it?
The top of the sky is too dark while the Sun doesn't have enough detail. The overall exposure of the image still doesn't match what your eyes see.
Let's go back to the first shot you took and let's identify the bright and dark areas.
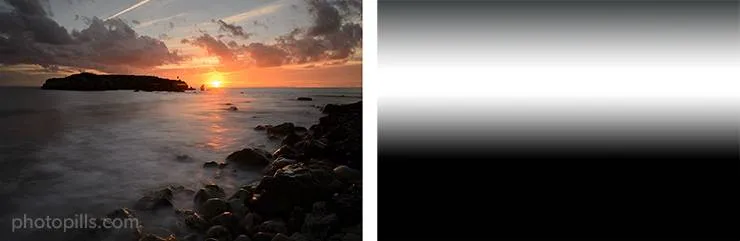
Using the light map as a reference, compare it with the effect of a soft GND filter and a reverse GND filter.
Can you see the problem?
In this case you're facing a scene where the horizon is almost straight and you have hardly any obstacles.
When you try to capture a Sunrise or Sunset, the brightest (or clearest) part of the scene is not at the top of your frame. If so, a soft GND filter would be perfect.
The brightest part of your scene is in the middle of your frame.
Now, look at the diagram above and have a close look at a reverse GND filter. You can clearly see that the darkest part of the filter (the one that helps you counteract the brightest part of the frame) is right in the middle.
And when you use it... it works like magic!
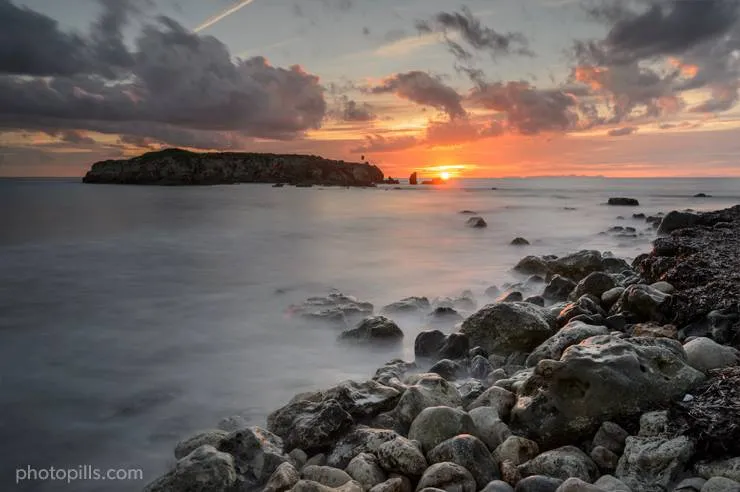
So as you can see, a reverse GND filter can be a very useful tool in certain situations.
The most popular brands of reverse graduated filters are Lucroit, Nisi, Benro, Lee and Haida.
If you're interested in buying lens filters:
- You can find my suggestions on the must-have lens filters in section 3.
- I tell you everything about the best lens filters in section 4.
Ultraviolet (UV)
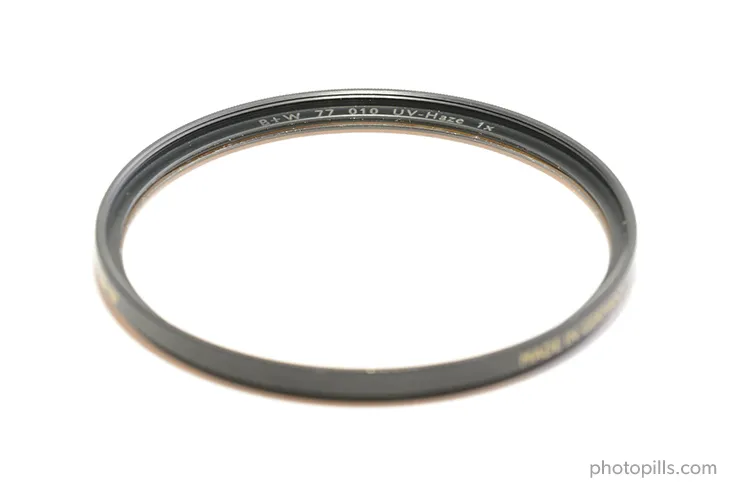
A few years ago, when most of us used film cameras, the ultraviolet (UV) filter had a very specific purpose.
Today, most photographers use it as a lens protection filter to prevent their lenses from breaking or scratches.
What is an ultraviolet (UV) filter?
An ultraviolet (UV) filter is a glass filter, usually circular, that you screw onto the front of the lens and blocks ultraviolet rays.
When to use a UV filter?
A UV filter is generally used, as I said before, to block ultraviolet rays. It's the equivalent to a sunscreen protection for your camera.
Back in the days of film photography some films were very sensitive to ultraviolet light. So if you didn't use a UV filter, you could end up with a blue cast affecting the exposure and color temperature of the pictures after developing them. Obviously, this problem was even worse if you took pictures on a very sunny day or at a relatively high location above sea level.
The fact is that modern films and digital sensors of any DSLR or mirrorless camera have a UV filter over them that protects them from this type of light. So the UV filter has become basically useless.
However, many photographers still use it as a protection for their lenses.
Does a UV filter really protect your lens?
If you drop your brand new €2,500 lens, the UV filter (which cost you €20) will break instead of the front glass of your lens. And, obviously, it would always be easier to buy a new filter than to send the lens to the official repair service to fix it, wouldn't it?
Yet, although it seems like a good idea, the truth is that in practice it's not quite like that.
The reality is that the glass of any UV filter is much more fragile than the front glass of any lens. So if your lens falls, the UV filter is going to crack while the front glass of your lens will remain safe and sound.
On top of it, if you hit or drop a lens strongly enough to damage the front glass, your lens will suffer some internal damage as well. So, even if the UV filter had protected the front glass, the lens would still be damaged.
In short, if you drop your lens with a UV filter and only the filter breaks but not the lens, all you did was breaking a filter. The lens would have survived in any case. And if you drop your lens without a UV filter and it breaks, an UV filter wouldn't have prevented it.
"But Toni, does that mean that UV filters offer no protection at all?"
No. The bottom line is that they offer no protection against impacts. But they do protect your lens from dust, scratches, sand and other small threats.
The negative effects of a UV filter
One last thing.
Don't forget that putting any glass in front of your lens will negatively affect the quality of the image.
A UV filter blocks a small percentage (between 0.1% and 5%) of the light that goes through it. The effect the filter has on the light slightly reduces the sharpness and contrast of your images. It's a barely noticeable effect that can be easily fixed with Lightroom or Photoshop, but you should be aware of it.
Unfortunately, that's not it...
A UV filter can also cause flare or halos if you're photographing a scene with a bright light source, especially in low ambient light or night photography. In these cases the flare is much more visible.
In addition to this, exposing your lens to UV rays helps to eliminate any fungus that may have grown. If you always have a UV filter screwed onto your lens, the chances of having fungus in your lens are much higher: moisture can slip between the lens front glass and the UV filter and fungus can create a great home XD
Should you use a UV filter?
Actually, it depends. Although I admit that I am not very fond of UV filters, I never use them.
Before you buy a UV filter and put it in front of your lens, keep in mind that:
- A UV filter will protect your lens from dust and scratches at best. It might be a good idea to use one on the beach or in the desert. But in most cases, it's best not to use it.
- UV filters have a small negative impact on your image quality. Most of the time, you won't notice the difference. But if you're looking for the best possible image quality, or if your photos show flares and halos, don't use a UV filter.
Light pollution filter
Sodium vapor bulbs are generally used in all types of public (streetlamps) and industrial lighting. They're one of the most frequent sources of light pollution.
This type of bulb has a yellow to orange glow that modifies the color temperature and significantly reduces the contrast of a night photography.
A light pollution filter allows you to prevent artificial lights in urban centres from affecting your night photography or astrophotography.
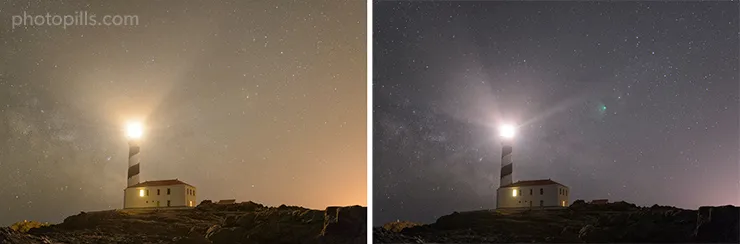
Can you notice the difference?
It's usually made of didymium glass. This material is capable of reducing the yellow and orange glow in such a way that the color temperature and contrast of your pictures are closer to reality.
If you've ever tried to take pictures of the Milky Way or Star Trails, you've seen the horrible effects of light pollution. I'm sure your photos have a sky with an orange cast that ruins everything, reduces contrast and doesn't let you perceive the real color of the stars.
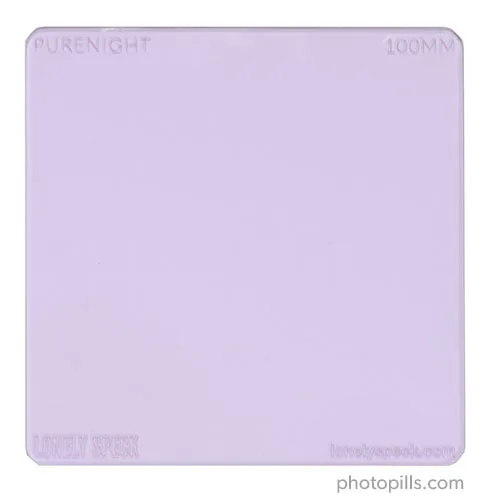
Once you use a light pollution filter you'll see the difference. I have the Pure Night filter designed by Ian Norman and since I bought it, I always carry it in my backpack whenever I go out to take pictures at night.
The introduction of LED street lights throughout the world over the last few years has brightened the sky up significantly. Unfortunately, energy-efficient LEDs are more difficult to block with a light pollution filter of the kind.
Even though the move to LED's is worrying, it would seem that the filter manufacturers still have a few methods of reducing this type of light...
Therefore, make sure you get a filter that does a better job of blocking the modern white LED lights found in the city.
Solar filter
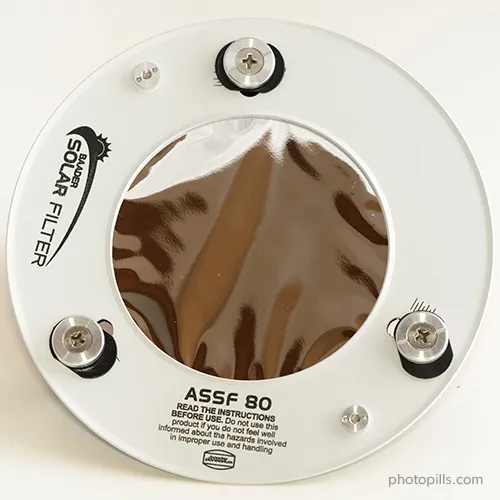
A solar filter is specially made to photograph the Sun or a solar eclipse.
Don't risk damaging your eyesight and equipment by using some cheap filter or one not designed for looking directly into the Sun.
Your filter must also block infrared (IR) and ultraviolet (UV) light as well which, though invisible, can also damage your eyes.
What are the different types of solar filters?
There are three types of solar filters for photography:
- Aluminized Mylar®
- Metal-coated
- Black-polymer (usually handheld)
All the filters can be:
- Circular or square.
- Mounted in a metal cell, making it very easy for you to clamp them over your lens and adjustable to different diameters.
How are you going to see the Sun through a solar filter?
Aluminized Mylar® filters are the most expensive ones. However, they provide a white Sun which is true to the Sun's real color (Surprise! It's not yellow).
Don't be deterred by their wrinkled surface. This surface tends to scatter light a little bit.
But these filters are actually very sharp. They're particularly good for highly magnified images.
Metal-coated glass filters and black polymer filters result in a saturated yellow Sun. Any of them will work fine, since you can always change the color of the Sun later on, in post-processing.
Finally, metal-coated glass filters offer you a sharper picture than black polymer filters which are more appropriate for naked eye observation and wide-angle images.
Don't use homemade filters!
According to NASA, the following materials should never be used to view a solar eclipse:
- Photographic polarizing filters
- Sunglasses of any kind
- Negative film (exposed or not)
- Smoked glass
- Space blankets and other forms of household Mylar, or silvery CD/DVD disks
- Medical X-ray film
- Floppy disks
You must avoid them because, while they dim visible light, they don't block infrared (IR) and ultraviolet (UV) light that can damage your retinas.
If you want to photograph a solar eclipse, I suggest you study 'Solar Eclipses: The Definitive Photography Guide'.
The only problem is that a total solar eclipse is not very frequent. But you can always capture a lunar eclipse: 'Lunar Eclipses: The Definitive Photography Guide'.
Black card
A black card is actually nothing more than that. It's literally a piece of black card or any dark element that has a smooth, flat surface.
What is it for?
Very simple: to cover (totally or partially) the lens during the shot.
You can do this either if the lens is "naked" or if it has one or more filters in front of it.
When to use a black card?
Basically when you want to block light :)
For example, if you're photographing a lighthouse, you can use a black card to cover the lens each time a beam of light hits the lens.
But you don't always have to cover the lens completely. With a bit of skill, a black card allows you to control the exposure of that specific area of the scene where the highlights are too bright. You'll avoid blowing them out and your camera's sensor will capture enough information in the RAW file.
What are the drawbacks of using a black card?
The first and most obvious one is the lack of precision. It's a task you'll have to do manually. Remember that you will be handholding the black card (without the help of a filter holder) in front of the lens.
What does that mean?
On the one hand, you'll have to use the "try and fail" method to know how long you have to cover the lens.
On the other hand, you'll have to adjust the position of the black card. In other words, which part of the frame you want to cover. And be careful, because you'll have to make sure you move the black card slightly during the exposure to avoid having a black strip in your photo.
Moreover, depending on the shutter speed you're using, you may need to cover two sections of your frame.
Actually, you set the limits ;)
The second drawback is that you'll only master this technique by spending time practicing.
It's a craft, not a scientific technique so the results are not guaranteed. You'll have to try and see the results.
Infrared filter
What is infrared photography?
Infrared photography produces very interesting, generally impressive and incredibly creative results, as the objects in a scene reflect infrared light very differently from normal light.
In order to get these results you need (surprise!) an infrared filter. This filter is specifically designed to block visible light. That is, the light your eyes see and the light your camera's sensor is able to capture.
So it only allows infrared light to go through the lens and reach the camera's sensor.
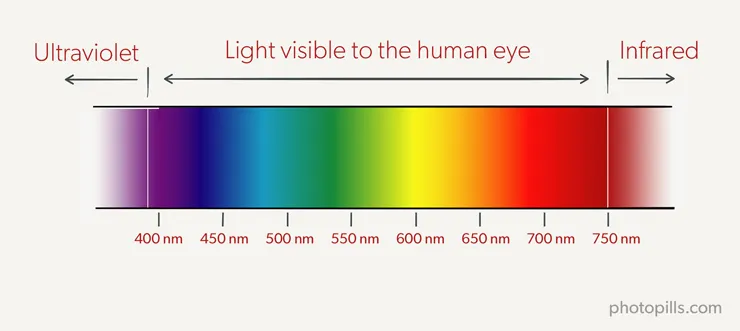
To give you a simple explanation, the light you're able to see with your eyes is between 390 nm and 750 nm within the electromagnetic spectrum. Everything outside that range is "invisible" to you. This includes infrared, gamma, X, ultraviolet, microwave and radio waves.
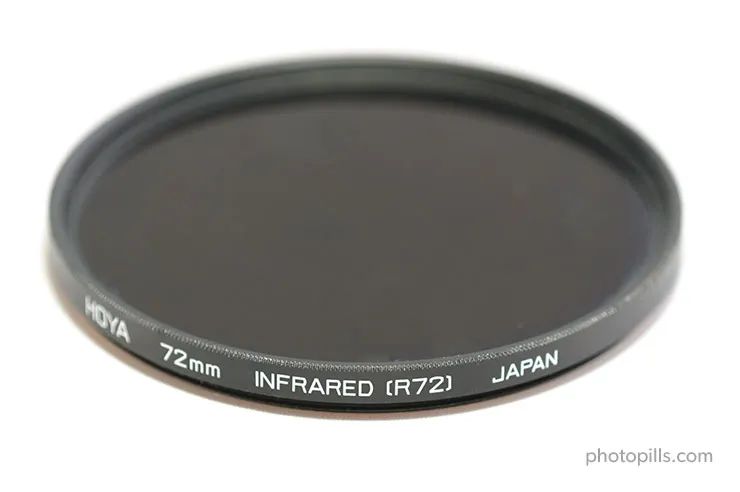
Types of infrared filters
Just like the other filters, an infrared filter can be circular screw-on or square. Here, we are talking about external filters.
There are many models of external infrared filters, although the most common one is the standard infrared 720 nm (RM72) which is the one I use.
But there are also internal infrared filters. That is, a filter that you can put directly on the sensor as I did with my Nikon D300.
Actually, I asked a professional to do it. The first time I tried to do it myself with a Nikon D70 and I broke it... XD
I learnt the lesson and decided to send my Nikon D300 to Lifepixel (a US company) to put in a standard internal infrared filter.
Check that your camera can take infrared photos
Before you buy an infrared filter, make sure your camera can take such pictures. You can do a very simple test to confirm it.
Turn on your camera and put it in Live View mode. Grab the remote of your TV, point it at your camera and press several buttons on the remote.
If you're able to spot a bright red dot on the LCD screen, your camera can capture infrared light correctly.
If the red light is dim, your camera can capture infrared light. But you will need a very slow shutter speed because the sensor has a very powerful filter against infrared light.
Finally, if you don't see any red dots on the LCD screen, your camera is not capable of capturing infrared light.
Check that your lens is suitable for infrared photography
One more thing.
Not all lenses are suitable for infrared photography. This is due to certain optical problems. But I don't want to go in depth in Optics and Physics matters, so I'll leave it here.
The only thing you need to know is if your lens is suitable or not. This complete database will help you solve the issue.
Other special lens filters
Apart from all the filters mentioned above, there are a few special lens filters that I would also like to talk about.
Who knows? You might be interested in using them as well.
SharpStar2 lens filter
I've been following the work and progression of Ian Norman for several years now. He's also a very good friend of mine and an amazing PhotoPills Master.
His passion for astrophotography has led him to create a very useful lens filter called SharpStar2.
This lens filter is basically a focusing aid, especially if you're having difficulty in achieving consistency in sharp, focused stars. All you have to do is to align the middle diffraction spike in the center of the two diffraction spikes on either side.
If you're tired of the lack of consistency in achieving sharp, focused stars using a manual focusing technique, this lens filter is for you.
In addition to this, focus can be achieved long before the sky gets dark if you have a bright enough star or planet.
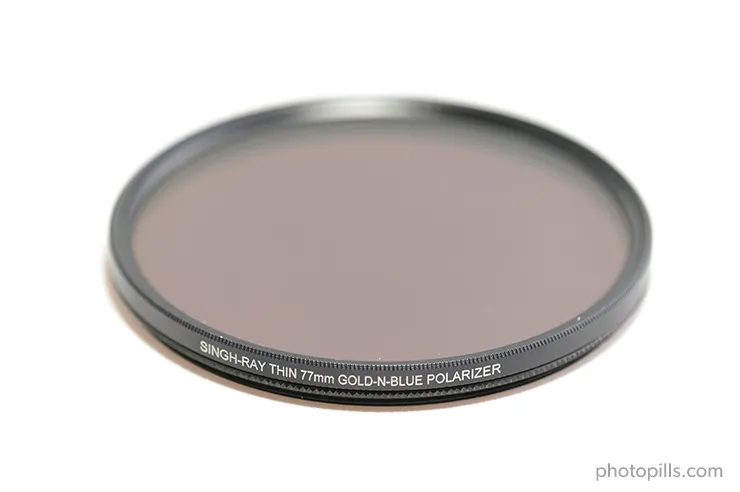
Gold-N-Blue (Singh-Ray) and Varicolor Blue/Yellow (Cokin) polarizer
What is a color CPL filter?
Now that you know what a circular polarizing filter is and what it's for, let me surprise you by explaining a few things about the Gold-N-Blue circular polarizing filter (Singh-Ray) and the Varicolor Blue/Yellow de Cokin.
At this point, you know that "regular" polarizers enhance color saturation on your images and also reduce or eliminate reflections (as long as they are not metallic).
But can you imagine that besides that the polarizer gave the sky or the water a warm and golden tone? Or a cold blue tone?
The difference in tonality will depend on the direction you rotate the filter. Instead of eliminating reflections, this filter colors them with an intense blue or yellow tone as you rotate the filter.
Can you get the same result with a color filter?
In case you don't remember, a color filter is used in analog photography, and more specifically in black and white photography. Depending on the color of the filter, greens, blues or reds are enhanced.
But they're also used in digital photography to change the color of a portion of the scene or the color temperature.
Back to the color circular polarizing filter...
The truth is that you don't get the same result with a color filter.
First of all because the materials' quality is not the same (a color filter is usually of low quality and very cheap compared to any polarizer), so the effect can hardly be the same.
And secondly, because any polarizer will always increase the contrast of the image, while a color filter will not.
However, you'll have to spend part of your savings in exchange for getting this nice effect on your photos...
What are the drawbacks of using a color polarizer filter?
- It's a (very) expensive filter compared to a high quality "regular" polarizer (the CPL I told you about in the previous section).
- It's not easy to use this filter. Because it's a screw-on filter, you can't use with any filter holder. If you also need to use an ND or GND filter at the same time, you'll have to handhold them in front of the lens.
- It produces a quite strong vignetting, so you shouldn't use it with other filters as you'll accentuate the vignetting.
- The filter has a strange effect on the color temperature of the photo. Don't use the auto white balance. Use the "try and fail" method and adjust the white balance manually. If you make a mistake, you can always correct it later on in post-processing.
Skylight lens filter
What is a Skylight filter?
A Skylight filter is a glass filter, almost always circular, that you screw onto the front of the lens. In addition to blocking ultraviolet rays, the filter has a faint orange-pink cast.
When to use a Skylight filter?
Like a UV filter, this filter is used with film cameras.
The effect of a Skylight filter is slightly warm. Thus, if you're using a film with a specific color temperature for outdoor day scenes, the filter counteracts the bluish cast that some scenes, especially indoor ones, may have.
Obviously, if you use this filter with a digital camera (although, in my opinion, it doesn't make much sense) and you have some color problem in your photos, you can always correct it in post-processing with a software like Lightroom or Photoshop.
The difference between a UV filter and a Skylight filter is that the first one is neutral (has no tint or color cast) while the second one is a basic color correction filter with a slightly magenta tint.
Perfect!
After this explanation on filters, which I hope you've used as a warm up, the fun is about to start!
Will you come with me?
It's time to figure out the lens filters you should always carry with you :D
3.What lens filters are essential?
If you're wondering...
"Should I use lens filters?"
The answer is YES.
There are tons of photography genres in which you need lens filters: landscape, night portraits, infrared, astrophotography, wildlife, black and white, outdoor, real estate...
So, basically, depending on the type of pictures you want to take, you'll need one filter or another.
"Great Toni. So, what are the must-have lens filters?"
Well, one question at a time... ;)
Let's start with the first one.
Why should you use lens filters in photography?
As a photographer I use these little pieces of glass for a multitude of reasons. Lens filters help me minimize glare and reflections, enhance colors, reduce light coming into the lens, and more.
Nevertheless, the most common one is for managing tricky lighting conditions when shooting.
In my opinion, lens filters are indispensable for capturing scenery in extremely difficult lighting conditions, especially when you want to include the Sun in your composition or when you want to photograph a high dynamic range scene.
When should you use a lens filter?
As I just mentioned, it actually depends on the type of photography you do.
For example, landscape photographers heavily rely on various filters, while street and portrait photographers rarely get to use them.
The following table is a summary of the options you have.
| Photography genre | Lens filters you can use |
|---|---|
| Daylight | CPL filter, ND filter, GND filter, reverse GND filter, infrared filter |
| Landscape | CPL filter, ND filter, GND filter, reverse GND filter |
| Sunrise | CPL filter, ND filter, GND filter, reverse GND filter |
| Sunset | CPL filter, ND filter, GND filter, reverse GND filter |
| Golden hour | CPL filter, ND filter, GND filter, reverse GND filter |
| Blue hour | CPL filter, ND filter, GND filter, reverse GND filter |
| Solar eclipse | Solar filter |
| Drone | CPL filter, ND filter |
| Milky Way | Light pollution filter, SharpStar2 filter |
| Star Trails | Light pollution filter |
| Meteor Showers | Light pollution filter |
| Night portrait | Light pollution filter |
| Night sky | SharpStar2 filter |
What lens filters are essential?
It all comes down to a simple question...
Which ND filter should I buy?
The best ND filter for daytime long exposure photography is the 6-stop ND filter (ND 1.8).
Why? A 6-stop ND filter is, in my opinion, perfect for taking shots in two time frames:
- From the Sunrise actually happens until 30 minutes after Sunrise.
- From 30 minutes before Sunset until the Sunset actually happens.
Other popular ND filters:
- 3-stop ND filter (ND 0.9)
- 8-stop ND filter (ND 2.4)
- 10-stop ND filter (ND 3.0)
Which GND filter should I buy?
The best GND filter for daytime long exposure photography is the 3-stop soft GND filter (GND 0.9).
Why? The 3-stop soft GND filter is certainly the GND filter I use the most. As for the transition (soft), this filter is perfect for landscapes (marine and non-marine) where the horizon line is straight (seascape) or nor (mountainscape).
Other popular GND filters:
- 4-stop soft GND filter (GND 1.2)
- 2-stop soft GND filter (GND 0.6)
- 3-stop soft reverse GND filter (reverse GND 0.9)
Which polarizer (CPL) filter should I buy?
The best polarizer (CPL) filter, in my opinion, is the 112mm Slim circular polarizer from Lucroit.
Why? This specific choice is based on the fact that quality-wise it is excellent and I can mount it on my Lucroit lens filter holder together with other three filters with no vignetting up to 14mm full frame equivalent.
4.The best lens filters in 2024
Here's the question I always get in my workshops:
"Toni, what lens filters should I buy?"
I have to admit that it's a difficult one.
There are tons of excellent lens filters in the market. So it's hard to pick one per category.
My first recommendation would be to buy the best quality lens filter glass you can afford. After all, adding a cheap lens filter in front of your expensive lens can have negative effects...
"OK Toni, let's get to the point. What is the perfect lens filter kit for beginners?"
Fine, fine...
Here are the best lens filters for beginners!
Best polarizing filters
These are what I consider the best CPL filters:
- The B+W Kaesemann Circular MRC 77mm polarizing filter.
- The 112mm Slim circular polarizer from Lucroit.
- The 165x165mm square polarizer from Lucroit.
Best ND filter for daylight long exposure photography
These are my favorite ND filters (choose the 100x100mm or the 165x165mm version depending on your lenses):
Best graduated neutral density filter
This is the best graduated nd filter or GND filter (get the 100x100mm or the 165x165mm version depending on your lenses):
- The Lucroit HQ 3-stop soft GND filter (GND 0.9).
- The Lucroit HQ 3-stop soft reverse soft GND filter (reverse GND 0.9). Perfect for clean horizons! ;)
5.How to use the polarizer filter
What is a polarizing filter?
Although I told you a few things about the polarizer in section 2, now I would like to explain to you in more detail how to use it.
You surely remember that in photography we use a circular polarizing filter (CPL).
To use it, all you have to do is rotate it and you'll see how part of the scene becomes "polarized". And if you rotate it in the opposite direction, it "depolarizes".
And I write "part" because it's a filter that partially acts on the scene. When you use it you have to decide which part of the scene you want to polarize.
Basically, a CPL filter helps you:
- Eliminate most of the light reflected in your scene. Therefore, the saturation and contrast of your photo increases.
- Reduce haze.
- Make reflections disappear (as long as they are non-metallic). Or enhance them.
How much light the polarizer (CPL) filter subtracts?
Like any other filter, the polarizer is a filter that subtracts some of the light that enters through the lens to the sensor.
How much light?
It depends on the manufacturer and the model, but it usually subtracts is between 1.5 and 2 stops.
When the CPL filter is polarizing at its maximum, it's subtracting the maximum number of stops. It actually subtracts light in the whole scene, although it does it more vividly in the areas where the non-metallic reflections are eliminated.
But if you haven't rotated it to its maximum, and you've left it at an intermediate point of polarization, the filter will be subtracting a little less light.
You can see its effect with the naked eye.
Take your circular polarizing filter and stand in front of a light source. Look through the polarizer filter. Now, rotate the ring very gently with the other hand. See how it gets darker?
Because it's so gradual, it's hard to tell exactly how many stops it subtracts. At the same time, this allows you to make very precise adjustments and polarize a lot, a bit, or just a tiny little bit (as much as you want!).
How to use the polarizer (CPL) filter
In this video, I show you how to use a polarizing filter.
But if you prefer reading, here is a step by step explanation.
Let's see the workflow you have to follow to use the polarizer.
1. Mount the polarizer in front of the lens
Depending on the system you use and the shape of the polarizer filter (circular or rectangular), the mounting system will be different:
- If it's a circular polarizer that matches the lens diameter, screw it on carefully and try not to leave fingerprints on the surface.
- If it's a circular polarizing filter that doesn't match the lens diameter, screw it into the filter holder ring. Be careful not to leave fingerprints on the surface. Then, put the ring in the filter holder. Depending on the brand you're using, the polarizer may be closer or further away from the sensor.
- If it's a rectangular polarizer, insert it into the corresponding slot on the filter holder. This is usually a slot, other than those enabled for ND and GND filters, or a specific holder.
2. Turn the filter carefully until you get the desired effect
If you have a mirrorless camera (with an electronic viewfinder) or a DSLR with this option, turn on the live histogram.
The key to using the CPL filter is the angle.
In other words, how much you have to rotate it to get what you want.
Fortunately, the procedure is very simple and much more intuitive than you imagine.
Once you're happy with your composition, all you have to do is rotate the filter gently. Do it little by little.
In the meantime, check the Live View LCD screen, or your electronic viewfinder if you have a mirrorless camera, to see if you're getting the effect you want. And if so, if the filter is doing it with the intensity you're looking for.
Imagine, for example, that you're photographing a seascape and you want to see the detail of the seabed in the area closest to the shore (foreground). Rotate the polarizer slowly. If you see the water becoming more and more opaque, rotate it in the opposite direction and you'll see how the rocks and sand of the bottom magically appear.
Now suppose you want to add contrast to the sky and highlight the volume of the clouds. In this case, the best moment is with the Sun at a 90º angle with respect to the direction you're pointing your camera to.
So you need to have the Sun either to your left or to your right. That's how you get the maximum possible polarization of the sky.
3. Meter the light to adjust the exposure and focus
Now that you've determined how, where and how much the polarizer affects the scene, it's time to meter the light in the key tone of the scene (with the polarizing filter on).
Remember that, depending on the polarization angle, the filter subtracts between 1.5 and 2 stops. So you'll have to adjust the exposure according to what you want to achieve.
If you have a mirrorless camera (with an electronic viewfinder) or a DSLR with this option, use the live histogram to help you adjust the exposure precisely.
Finally, focus. If you use the autofocus (and you're not using the back button focus), don't forget to change it to manual once you're done to avoid refocusing by mistake by pressing the shutter button...
4. Take the shot and check the result
If you didn't get the polarization effect you were looking for, carefully rotate the CPL filter ring (or the filter itself, if it is rectangular) back until you do.
If the photo doesn't have the exposure you were looking for, adjust one of the exposure triangle settings.
Before I finish, let me remind you a couple of things.
First, you should avoid using a polarizing filter if you're going to use a wide angle lens and/or if you're going to take a panoramic photo. Keep in mind that you'll be covering an extremely wide angle of the scene and the polarizer won't be able to cover it completely. You'll have halos or flares in the picture.
Second, no matter how powerful Lightroom and Photoshop are, they'll never manage to emulate the effect of a CPL filter.
Great!
You're ready for the next step: learning how to use your ND filter.
But before that you need to know how to calibrate it! ;)
6.How to find out the actual density of your ND filter with PhotoPills
The ND filter label never tells the truth
Sometimes when you buy an ND filter the density indicated by the manufacturer is not exactly the one the filter actually has. The manufacturer may indicate that the ND filter has a density of 10 stops, but in fact it's not. It may be 10 stops and 1/4!
This factory defect can be problematic when you're calculating the exposure, because despite applying the reciprocity law, correctly, you don't get the correct exposure while you're using the filter.
But don't worry, there's a way to fix it :P
To get the first exposure right, you should use PhotoPills to calibrate all your ND filters beforehand. That is, finding out exactly their density, or the stops that the filter actually subtracts.
In order to do this, just follow these steps.
Create constant light conditions in a room
Pick a room at home, close the door and the blinds (or curtains) and turn on the lights. You have to create constant light conditions.
Take a test shot with the correct histogram
Unfold your tripod and mount the camera on it. Without using the filter, take a test shot of the room with the correct histogram, where the picture is correctly exposed. Once you have it, write down the settings (aperture, speed and ISO). These will be the test settings that you'll use in PhotoPills.
In the test picture below I used an f/4 aperture, a shutter speed of 1 second and ISO 100.

Find the real density of the ND filter with the PhotoPills exposure calculator
You won't find a better and easier ND filter calculator than PhotoPills.
Here's a step by step explanation on how to use it to find the real density of your ND filter.
Open the PhotoPills ND filter calculator
Open PhotoPills and tap on Exposure (Pills menu). This takes you to the long exposure calculator. This ND filter calculator will help you to find the real density of your filter among other things.
In the long exposure calculator, tap on Calculate at the top of the screen, and choose Shutter speed as the setting you want to calculate.
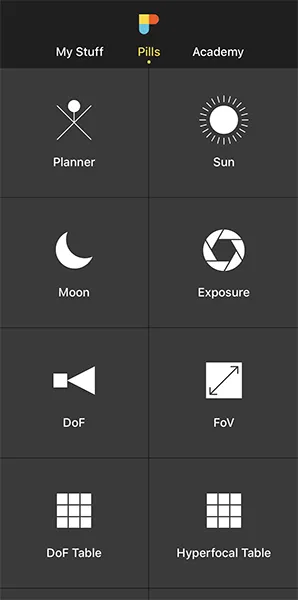
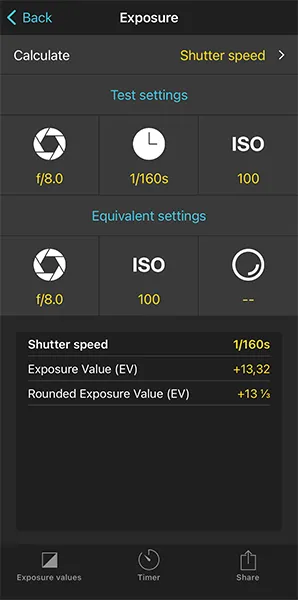
Enter the test settings in the PhotoPills ND filter calculator
In the exposure calculator, enter the Test settings. That is, the aperture (f/4), shutter speed (1s), and ISO (100) of the test shot (the correctly exposed picture of the room).
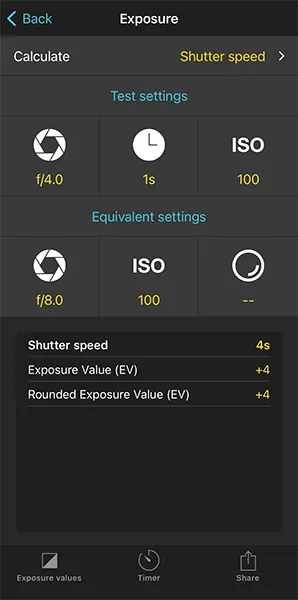
Enter the equivalent settings in the PhotoPills ND filter calculator
Now, in the Equivalent settings, enter the same aperture (f/4) and the same ISO (100) of the test shot. Finally, enter the stops that your ND filter subtracts according to the manufacturer. In this case, I used a 6-stop Haida ND filter.
Once you've entered the settings, the equivalent shutter speed (1min 4s) is the first result shown in the table below. This is the shutter speed you're going to use to take a second shot but this time with the filter on.

Put the ND filter and take a test shot
Place the filter holder on the lens and insert the ND filter you want to calibrate. Enter the aperture (f/4), ISO (100) and equivalent shutter speed (thanks to the long exposure calculator you know it's 1min 4s). Take a test shot.
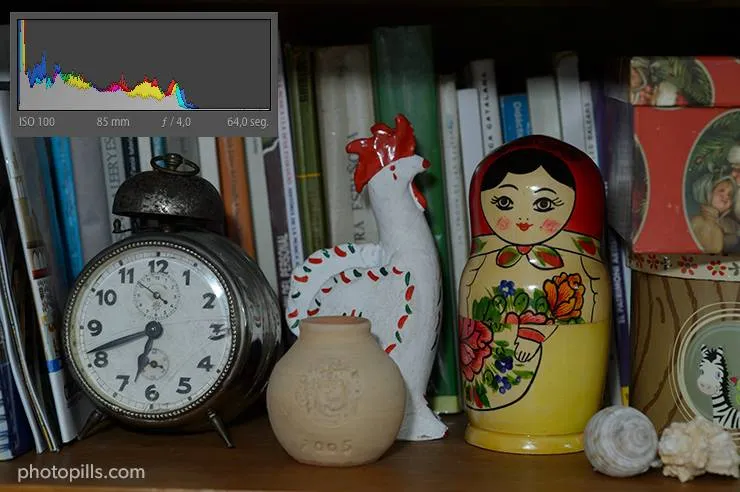
Look at the histogram of this last test shot, the one you took with the ND filter, and compare it with the one you took without the filter. If they're almost identical and you can overlap them, the ND filter density labeled by the manufacturer is valid.
If the second histogram has moved to the left compared to the first one (darker picture), your ND filter has a higher density than what the label says. Conversely, if the second histogram has moved to the right compared to the first one (brighter frame), your ND filter has a lower density than what the label says.
Modify the settings according to the exposure
Imagine that the second test shot is darker. In other words, the ND filter subtracts more stops than what the manufacturer indicates.
In that case, open again the PhotoPills long exposure calculator and add a fraction of stop to the ND filter density.
Add 3/4 to the 6-stop ND filter, for example. This will give you a new shutter speed (1min 48s).
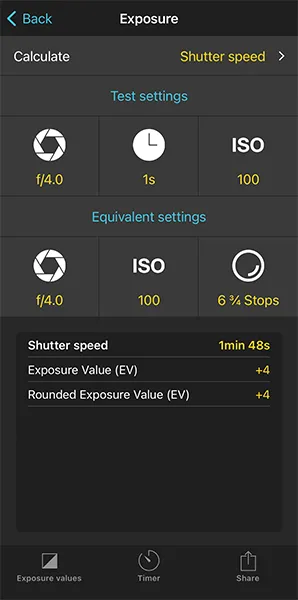
Take the picture
Take another picture with the new shutter speed you just calculated and repeat the process. Compare the resulting histogram with the initial test shot you got.
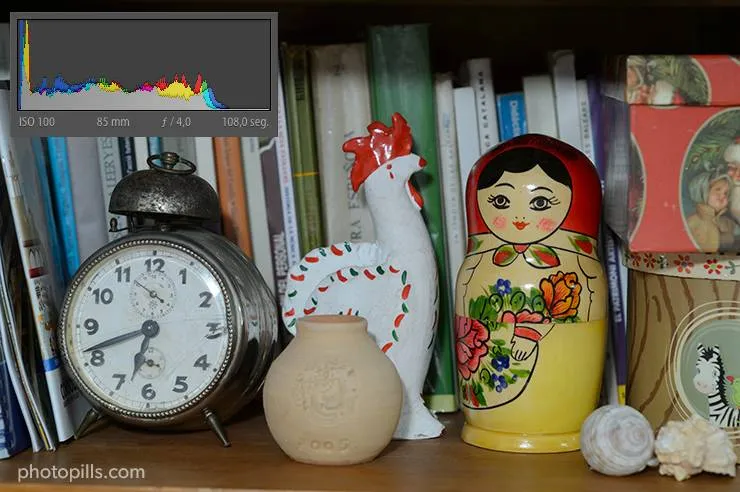
Bottom: Nikon D4s | f/4 | 108s | ISO 100 | ND 1.8 (6 stops) filter, actual density 6 3/4 stops
If they match, bingo! You now have the actual density of your ND filter.
Sometimes, as in this case, there may be a color temperature difference due to the ND filter color cast. But this has no impact when calibrating your ND filter. Remember that it's something you can easily correct in post-processing.
If they don't match, repeat the process by modifying the stops the ND filter subtracts in the long exposure calculator until you find the actual density of your ND filter.
Put the "try and fail" technique into practice!
And so you don't forget it, you should write down all the actual densities of your ND filters. You can do it on your smartphone. Or if you prefer, on a piece of paper, laminate it and put it in your filter bag (or in your backpack).
This way, you'll always have it with you when you're in the shooting location and you have to make the appropriate adjustments.
Calculate the shutter speed with the PhotoPills ND filter calculator
Finally, once you've determined the exact density of your filter, and whenever you want to use your filter, use the PhotoPills long exposure calculator to calculate the shutter speed you need to correctly expose your photos. You'll save a lot of time.
I'll explain it in detail in section 7.
7.How to use an ND filter (or several ones)
In section 6 I explained you in detail how you can use the PhotoPills long exposure calculator to calibrate your ND filter. That is, finding out the actual density of the filter.
So you can use it as an ND filter calculator.
Now let's see how to expose a photo when you use one or more ND filters.
But first, a brief reminder...
What is an ND filter?
Although you have all the details in section 2, let me quickly tell you about its main features.
A neutral density (ND) filter is a piece of glass or semi-transparent resin that you place in front of the lens.
The ND filter allows you to subtract the light that reaches the sensor evenly. By reducing the light, you can:
- Increase the exposure time (use a slow shutter speed).
- Use a very large aperture (small f-number).
This helps you capture certain effects without overexposing the scene.
In turn, the effect achieved depends on the number of stops the ND filter you're using is able to subtract (1, 2, 3 stops...).
A neutral density filter doesn't alter the contrast or sharpness of your image because it subtracts the light evenly.
Nor does it introduce any color cast. Or it shouldn't because, unfortunately, it's not always the case depending on the manufacturer.
If you add an ND filter in front of the lens, it's like putting a pair of sunglasses on it.
How to take a long exposure using an ND filter
You may be wondering... How do you calculate exposure time with an ND filter?
Well...
If you don't know where to start, watch this video!
In addition to this, here's a video where I show you how to use an ND filter.
But if you prefer reading, here is a step by step explanation.
When using an ND filter expose by following these steps:
1. Take a test shot without the ND filter
Unfold your tripod and mount the camera on it. If you have a mirrorless camera (with an electronic viewfinder) or a DSLR with this option, turn on the live histogram.
Cover the viewfinder to avoid light leaking. Otherwise, you risk ending up with strange purple lines and halos.
To do so, use a piece of black tape... Or any other thing that you can find, even if it's chewing gum! XD
Without using the ND filter, take a test picture of the scene you want to capture in which you get the correct histogram. That is, a photo that is correctly exposed. To do this, use the live histogram if you have it. If not, use the "try and fail" method.
Once you have it, write down the settings (aperture, speed and ISO). These will be the test settings that you'll use in the PhotoPills long exposure calculator.
By the way, if you need help exposing your photos, you should read the 'Exposure in Photography: The Definitive Guide' :P
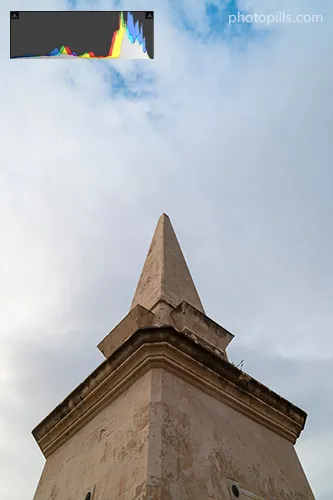
2. Open the PhotoPills long exposure calculator
Open PhotoPills and tap on Exposure (Pills menu). This takes you to the long exposure calculator or ND filter calculator.
In the calculator, tap on Calculate at the top of the screen, and choose that the setting you want to calculate is the Shutter speed.
3. Enter the test settings in the PhotoPills long exposure calculator
In the ND filter calculator, enter as Test settings the aperture (f/16), shutter speed (1/8s), and ISO (100) of the test shot, the correctly exposed picture of the scene (without the filter).

4. Enter the equivalent settings in the PhotoPills long exposure calculator
Now, enter in the Equivalent settings section the aperture (f/16) and ISO (100) you want to use in the final picture. This will depend on the depth of field you want and the level of noise you're willing to assume. Finally enter the stops of light that your ND filter actually subtracts, the actual density (ND 3.0 10 stops).
Once you enter the settings, the Equivalent shutter speed shows up as the first result in the bottom table. This is the shutter speed you should use to get the same exposure as in the test shot.
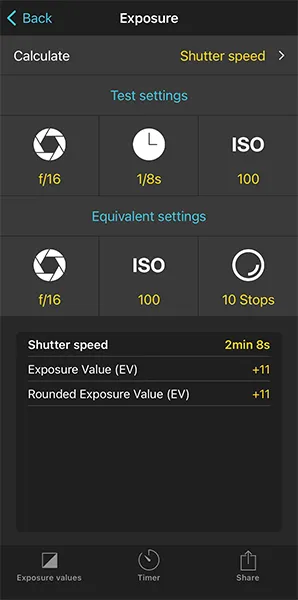
5. Take the picture and check the result
Place the filter holder on the lens and insert the ND filter (ND 3.0 10 stops). Enter the aperture (f/16), ISO (100) and equivalent shutter speed (you just calculated it with the long exposure calculator, in this example 2min 8s).
If you have a mirrorless camera (with an electronic viewfinder) or a DSLR with this option, use the live histogram to check the exposure. It's a great tool if you use ND filters of 6 stops or less. With denser (darker) filters the camera will most likely not be able to expose.
Then, take a picture.
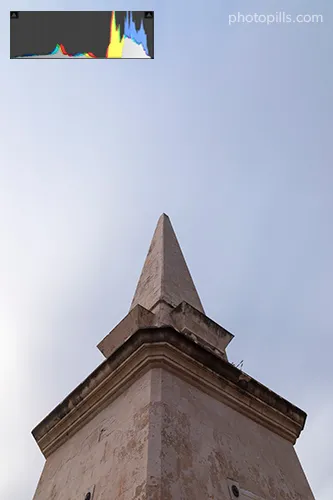
The histogram of the last picture should match the histogram of the test shot. Both are correctly exposed :)
Now look at the picture.
Did you get the effect you were looking for according to the shutter speed? Or regarding the depth of field?
6. Adjust the shutter speed if necessary
If you feel you need a slower shutter speed, go back to the PhotoPills long exposure calculator (or ND filter calculator).
In the equivalent settings, enter a smaller aperture or a lower ISO (always taking into account the depth of field you want and the noise you're willing to assume). These changes will give you a new (slower) shutter speed value.
If you use small apertures (large f-number), be careful with diffraction. Yes, when you set apertures larger than f/16 the exposure time is longer. But at the same time, you get a less sharper image, with less detail.
If you want a faster shutter speed, you can use a larger aperture or crank up the ISO.
7. Take a new shot and check the image
Finally, with the ND filter on, take a second shot with the new aperture, ISO and shutter speed settings...
If you got the picture you wanted, perfect!
If not, repeat the previous step and keep trying until you get the photo you're looking for.
Keep in mind that when you use an ND filter at Sunrise or Sunset, the light changes very quickly, sometimes in just a few seconds (especially in winter).
Suppose you want to take a picture with a shutter speed of, for example, 5 minutes at the time the Sun is near the horizon. During those 5 minutes the light that reaches the sensor will vary gradually.
Be cautious and try to compensate for the exposure depending on the density of the ND filter.
How to shoot a long exposure using two or more ND Filters
Shooting a long exposure using two or more ND filters is very simple.
Just follow the same workflow I just explained when using an ND filter... But use the sum of the filters' densities to calculate the equivalent shutter speed.
For example, if you use a 3-stop ND filter with a 6-stop ND filter, the effect will be the same as if you were using a 9-stop ND filter (3 + 6). Add the densities together.
So remember, when calculating long exposures with PhotoPills, use the sum of the densities of the filters you're going to use.
It's super easy!
8.How to use a GND filter (and a reverse GND)
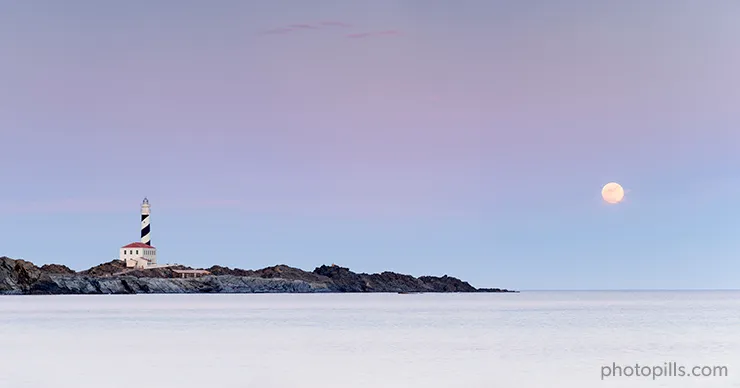
The exposure is so important in any photography genre that one day I took the plunge and ended up writing a several hundred pages long guide about it... :O
And if you want to take a photo with one or more GND filters, the exposure is even more important.
After all, that's what you're using the filters for, isn't it?
What are the features of a GND filter?
What is a GND filter (and a reverse GND)?
What is a graduated neutral density (GND) filter?
The graduated neutral density (GND) filter is a piece of glass or resin that you can place in front of your lens.
But unlike an ND filter, the density of the GND filter varies gradually along its surface. If you put it against a light source and you handhold it vertically, you'll see that the area near one of the short edges subtracts more light than the opposite area.
If you want to know more about the GND filter, take a look at section 2.
What is reverse graduated neutral density (reverse GND) filter?
The reverse graduated neutral density (GND) filter is a variation of the GND filter.
This filter has the darkest part (the one that determines the density of the filter) in the central portion. At the same time, this opaque part becomes progressively transparent towards the upper portion. On the other hand, the lower half is completely transparent.
That's why it's called reverse.
You'll find much more information about the reverse GND filter in section 2.
How to take a long exposure using a GND filter
Here's a video where I show you how to use an GND filter.
But if you prefer reading, here is a step by step explanation.
As I explained in section 2, GND filters are useful filters for high dynamic range scenes. That is, scenes where the highlights are very bright and the shadows are very dark.
The challenge with this type of scene is that your camera is not able to capture the whole scene in just one frame. You have to choose between exposing the highlights correctly, and so the shadows would be clipped. Or expose the shadows correctly and then blow out the highlights.
Another solution would be to use the bracketing technique: take several shots, each one with a different exposure, and then blend them in post-processing.
A GND filter reduces the dynamic range of the scene. By having a dark and a transparent area, you can darken the portion of the scene where there is more light while not touching the darker portion of the scene. Thus, the camera can capture detail in both the darkest and brightest areas.
To correctly expose the photo the first thing you need to find out is what GND filter you need.
To do this, you should divide your scene into two areas:
- The brightest area of the scene (where you'll place the darkest part of the filter).
- The darkest area of the scene (where you'll place the transparent part of the filter, where it doesn't have an effect).
Then, calculate the difference in light stops between these two areas. This stop difference corresponds to the density of the GND filter you need. You can use the PhotoPills long exposure calculator for all calculations.
Finally, take the picture with the settings (aperture, speed and ISO) that allow you to correctly expose the darkest area of the scene. Obviously, take it using the GND filter so you can capture detail in the brighter areas.
In short, follow these steps to take a long exposure using a GND filter:
1. Meter the light in the darkest area of the scene, where you will place the transparent part of the GND filter
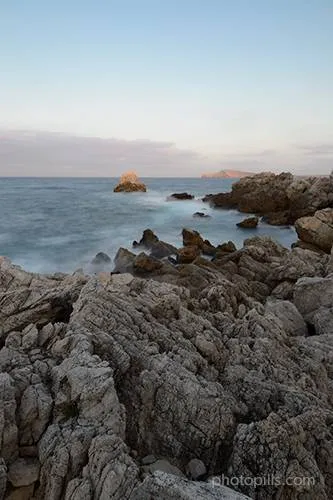
Unfold your tripod and mount the camera on it. If you have a mirrorless camera (with an electronic viewfinder) or a DSLR with this option, turn on the live histogram.
First, you have to visualize how you're going to place the GND filter. The scene has a darker area, where you want to place the transparent part of the filter, and a brighter area where you want the dark part of the filter to have an effect.
But wait. Don't put the GND filter in front of the lens yet.
Now it's time to look for the brightest tone in the darkest area of the scene. In other words, look at the area of the scene where the filter is not having any effect (transparent part), look for the brightest tone and meter the light right there.
Remember, meter the light of the brighter tone without the GND filter!
To do this, use the spot metering mode and meter with the Manual shooting mode (M). Adjust the aperture, speed, and ISO so that the light meter is centered at zero.
In the photo I'm using as an example, I metered the light in the sea foam of the waves, which was the brightest tone in the lower area of the scene. That is, the area where I wanted to place the transparent portion of the filter.
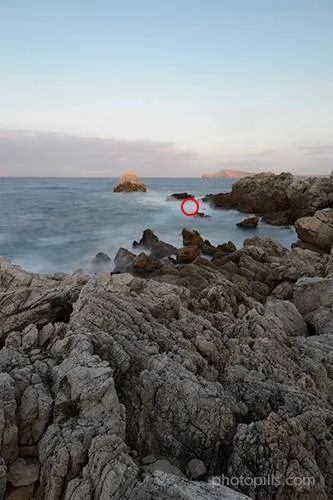
Once you have this first picture, write down the settings (aperture, speed and ISO). In the example above the settings are f/16, 6s and ISO 100.
It's important that you always use the spot metering mode and Manual exposure mode (M) to prevent the camera from compensating for the exposure. Otherwise, this would distort the result of your calculations.
2. Meter the light in the brightest area of the scene, where you will place the dark part of the GND filter
Repeat the first step, always without using the GND filter.
Take a second test shot, this time looking for the brightest tone in the brightest area of the scene. That is, look at the area that will be darkened by the GND filter (dark portion), look for the brightest tone and meter the light right there.
Again, remember that you have to meter the light without the GND filter ;)
Now, use the spot metering mode and meter with the Manual shooting mode (M). Adjust the aperture, speed and ISO so that the light meter is centered at zero.
Back to the photo in this example, I metered the light in the brightest part of the sky.

Once you have the second picture, write down the settings. Usually the aperture and ISO are the same and you only adjusted the shutter speed.
So in this example, the settings to expose for the (brighter) sky area are f/16, 1.6s and ISO 100.
3. Calculate the exposure values of both areas with the PhotoPills long exposure calculator
Now you need to know the exposure values (EV) of these two areas of the scene, the darkest and the brightest one.
Open PhotoPills and tap on Exposure (Pills menu). This takes you to the long exposure calculator.
In the long exposure calculator, enter the Test settings. That is the aperture, shutter speed and ISO of the first test shot in which you metered the light in the brightest tone in the darkest area of the scene: f/16, 6s and ISO 100.
Look at the results at the bottom of the screen. More specifically the Rounded exposure value (EV).
That value is the EV of the darkest area of the scene: 5 1/3.
Now, repeat the process by entering as Test settings (aperture, shutter speed and ISO) of the second test shot in which you metered the light in the brightest tone in the brightest area of the scene: f/16, 1.6s and ISO 100.
So now you have the Rounded exposure value (EV) of the brightest part of the scene: 7 1/3.
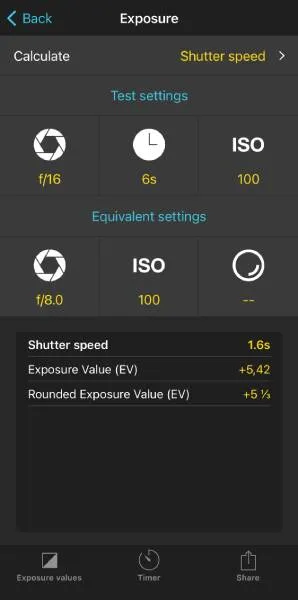
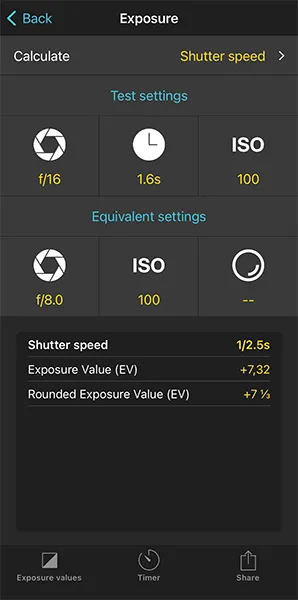
4. Find out the density of the GND filter you need
The difference in exposures (7 1/3 - 5 1/3 = 2) tells you the stops of light between the two areas (2 stops).
These stops are precisely the ones you should compensate for using a GND filter. In other words, they correspond to the GND filter density you need to match the exposure of the scene you want to photograph.
5. Select the GND filter you need
According to the meterings you've done in the scene and the calculations you've got with PhotoPills, now you know the GND filter density you need.
However, after years of experience photographing with filters, I recommend you to use a GND filter that has a density 1 or 2 stops lower if you want to get the most natural effect possible.
Another important thing is that the higher the density of the GND filter you apply to the sky, the brighter (or more illuminated) your foreground will be. You have to decide what you want depending on the specific effect you're looking for.
If you have a mirrorless camera (with an electronic viewfinder) or a DSLR with this option, use the live histogram to adjust the exposure, usually by adjusting the shutter speed, until you get the photo you're looking for.
Once you become an expert there will come a time when you won't need to do any calculations to find out the density of the GND filter you want to use. Just by looking at the contrast of light between the highlights and the shadows, you'll be able to estimate with enough precision the difference of stops between the two areas. After many years of taking pictures, that's my personal experience... :)
6. Take another test shot and check it
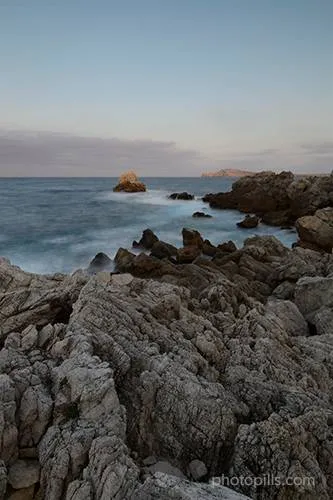
Finally, put in the GND filter.
Your camera is still in spot metering mode, so meter the brightest area of the scene you want in detail and overexpose it by 1 or 2 stops (+1EV or +2EV), or respecting your camera's overexposure limit.
Finally, recompose, focus and shoot. A little further on this guide, I'll detail these last three steps.
Let's go back to this second shot you're working on.
The GND filter will reduce the light that reaches the sensor in the brightest zone, reducing the dynamic range of the scene... If you got the photo you wanted, perfect!
Otherwise, repeat the previous step and keep trying until you get the photo you want.
If you use a reverse GND filter, the workflow is exactly the same as with a GND filter.
Calculate the density you need by metering the difference in light stops between the brightest tone of the darkest area and the brightest tone of the brightest area. Use PhotoPills to calculate the exposure values (EV). Remember that in a reverse GND filter, the darkest part is in the center of the filter.
Finally, put in the filter and expose taking into account the brightest area of the scene.
How to shoot a long exposure using a GND filter and a reverse GND filter
Sometimes you'll face certain scenes with quite challenging light conditions.
Imagine that you are on the coast, with a beautiful seascape in front of you. You have the beach and some rocks in the foreground, a clear horizon and the sky with some fantastic clouds in the background. In addition to this, the Sun is about to set.
In this case, you'll most likely have to use a GND filter to correctly expose the highlights in the sky.
At the same time, you'll need a reverse GND filter to balance out the strong highlights happening during the Sunset.
To expose using both a GND filter with a reverse GND filter follow the steps below:
- If you have a mirrorless camera (with an electronic viewfinder) or a DSLR with the live histogram option, turn it on. It will help you control the exposure when using filters.
- Determine the GND filter you need. Calculate its density by metering the difference in light stops between the brightest tone of the darkest area and the one of the brightest area (where you want to apply the filter). Use PhotoPills to calculate the exposure values (EV).
- Determine the reverse GND filter you need. Calculate its density by metering the difference in light stops between the brightest tone of the darkest area and the one of the brightest area (where you want to apply the filter). Use PhotoPills to calculate the exposure values (EV).
- Put the two filters in the filter holder and expose taking into account the brightest area of the scene.
- If you have the live histogram option, use it to adjust the exposure.
- Take a new shot and check the result.
- There will be a strip in the scene where the graduated part of both filters will overlap. So you will probably have to move the reverse GND filter with your hand during the exposure. You can learn this technique by reading section 11.
"Wait Toni, wait. What if I need to use two GND filters? How do I shoot in that case?"
Given the wide variety of GND filters on the market and, above all, the ability of sensors to capture an ever-increasing dynamic range it's highly unlikely that you'll be using two or more GND filters simultaneously.
However, if you can't compensate for the difference in light stops between the brightest and darkest area of the scene with a single filter, you'll need to use multiple GND filters.
Which ones? And how many?
The sum of the densities of the GND filters used has to be equal to the difference in light stops.
Imagine you need a GND 1.5 (5 stops) filter. If you don't have that particular filter, use two or more GND filters. You can combine for example a GND 0.6 (2 stops) filter and a GND 0.9 (3 stops) filter. So 0.6 + 0.9 = 1.5 (2 + 3 = 5).
But, as I was saying, considering how powerful the sensors are nowadays, you'll be able to capture the photo with the filter you have and then make some adjustments in post-processing.
9.How to stack lens filters (ND, GND and polarizer)
"Hey Toni, can I stack a circular polarizing filter with a filter holder and one or more square or rectangular filters?"
Yes, my friend, it's perfectly possible and highly recommended.
By stacking the polarizer with one or more ND filters and/or one or more GND filters, the benefits of each of the filters will be reflected in the photo... This will allow you to get truly spectacular images!
But always keep in mind that the more lens filters you place in front of the lens, the greater the loss of quality your image will suffer.
As always, photography is a constant decision-making process! ;)
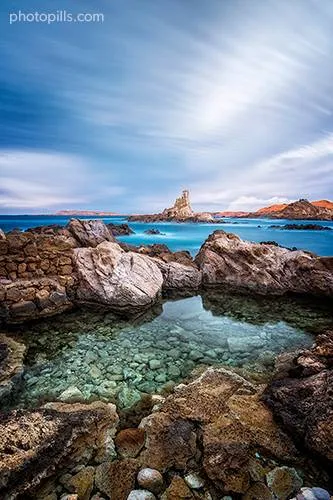
In the image above you can clearly see that the polarizer helped me to get more detail on the rocks of the bottom of the sea.
In addition to this, the ND filter allowed me to increase the exposure time to create a silky effect in the sea (at the bottom of the image) and in the clouds.
Finally, I applied the GND filter to the brightest part of the sky. This way my camera could capture the whole dynamic range of the scene and prevent the sky from being overexposed.
"Toni, please show me how to stack all the filters in front of the lens."
Here we go!
How to stack the polarizer with respect to the ND and GND filters
The mounting system depends on the manufacturer.
Some polarizers are screwed directly to the lens and so you mount the filter holder over it thanks to an adapter ring. Other systems allow you to screw the polarizer directly onto the filter holder and slide the filters on top of it using the corresponding slots.
When the CPL filter is rectangular, insert it into the filter holder like any other rectangular filter: sliding it through one of the slots. Which one? The furthest one from the sensor.
Similarly, depending on the manufacturer, the circular polarizing filter may be closer or further from the sensor. That is, in front or behind the rest of the filters (ND and GND).
"So, do I have to follow a specific order when stacking my filters to avoid surprises?"
The answer is "yes and no" XD
I'll explain it to you in depth below.
Regarding the polarizer, you must stack it in the first or the last position in front of the lens.
So you can use the following combinations indistinctly:
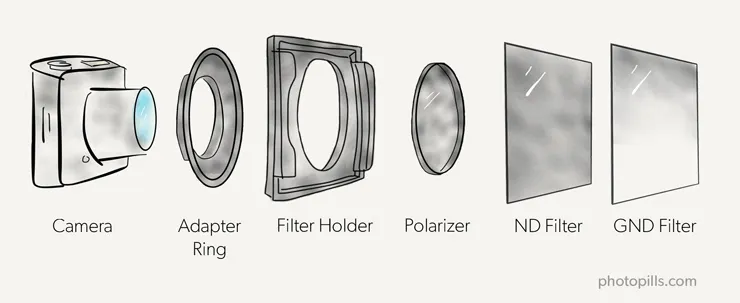
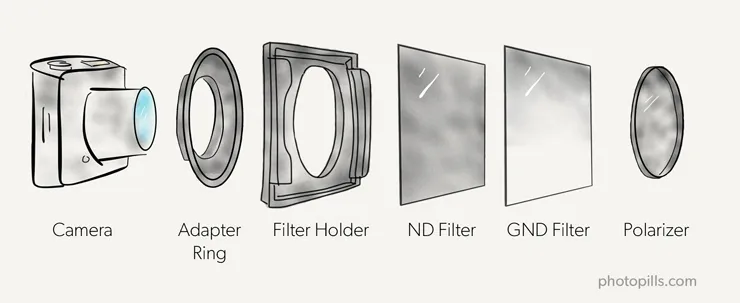
What order should you follow to stack the ND, GND and polarizing filters?
Actually, the order depends on the filter mounting system you use.
Suppose you use a square or rectangular filter system. This would be the right order.
Be careful! Always follow the direction in which light enters through the lens. That is, from the filter that is furthest away from the sensor to the closest one.
Polarizing or CPL filter. This way, the polarizer is the first to let the light through and its effect is not affected by that of other filters.
Graduated neutral density or GND filter(s). I recommend you to put them further away from the sensor because these are filters that you're going to remove and put back or adjust inside the filter holder. Also, if you use one or more GND filters and one is a reverse GND, put the latter at the end (furthest away from the sensor) because it's probably the one you'll need to adjust most precisely. Check that the darkest portion of the filter covers the area of the scene you want.
Neutral or ND filter(s). As this filter is even, once you slide it into the filter holder you won't need to move it anymore. Moreover, it's the most light sensitive filter. So make sure it sits snugly and that the light doesn't leak to avoid any surprises.
As I told you before, you can only follow this order if your filter holder lets you mount the polarizer in front with an adapter ring. This is the mounting system that manufacturers such as Lee or Lucroit, for example, offer.
However, there are other manufacturers, such as NiSi, whose mounting system is slightly different because the CPL filter is the one closest to the sensor.
Over the years I have tried many brands of filters and the truth is that I haven't noticed much difference between mounting the polarizer closer to the sensor or further away. But it's still a personal opinion. If you go to any photography online forum you'll find many discussions on this topic.
The most important thing is that the filter holder lets you insert and slide the GND filters with ease. After all, they're the ones you'll be spending more time with during the shooting preparation, and the ones you'll need to adjust more precisely to avoid unnatural dark stripes on the picture.
What are the effects of stacking and/or combining filters?
If you have, for example, more than one ND filter, you can stack two (or more) filters to increase the number of stops and allow less light going through the lens.
You'll understand it better with an example: if you have a 3-stop ND filter and you stack it with a 6-stop ND filter, you're simulating the effect that a 9-stop filter would have (6 + 3 = 9).
The problem you face when stacking filters is that for every filter you add, you're adding one more obstacle to light. That is, it has to go through more glass or resin objects until it reaches the sensor. So you have a higher chance of getting a less sharp image or with more chromatic aberration.
Moreover, most filters generate some color cast (resin ones do so more than glass ones). When stacking several filters, take a closer look at the effect it produces on the image because the more filters you put in, the more color cast your photo is likely to have.
Awesome!
Now that you know how to stack a number of different filters, it's time to learn how to actually take the shot ;)
In the following section I describe all the steps you should follow when taking a photograph with filters.
Here we go!
10.How to shoot a long exposure stacking several lens filters (ND, GND and polarizer)

If you still don't know what an ND filter, a GND filter or a CPL filter are, take a look at section 2.
I explained you how to use the polarizing filter (section 5), how to shoot with one or more ND filters (section 7) and how to shoot with one or more GNDs (section 8).
And if you're not sure how to stack several filters in front of the lens, you can read more about it in section 9.
Once you've learnt to use each filter separately, it's time to teach you how to shoot a long exposure when stacking them all.
Here's a video where I show you how to use a combination of an ND filter, a GND filter and the polarizer.
But if you prefer reading, here is a step by step explanation of how to shoot when using a combination of filters that includes one (or more) ND filter(s), one (or more) GND filter(s), and the CPL filter.
Step 1: Start working with the polarizer
You have all the details in section 5, but here's a brief summary in case you forgot:
- Put the polarizer in front of the lens.
- If your camera has it, turn on the live histogram option.
- Rotate the filter carefully until you get the desired effect.
- Meter the light to adjust the exposure. If you can, the live histogram will help you to do so. Then, focus.
- Take the picture and check the result.
Step 2: Determine the GND filter
The full explanation is in section 8, but here's a short list of the steps that you have to follow:
- Don't remove the polarizer. You have to meter the light with the CPL filter on. Don't forget that it also subtracts light.
- Meter the light in the darkest area of the scene (use the spot metering mode in the brightest tone of the darkest area). Thanks to this metering you'll get the base exposure for your final photo. Adjust the camera exposure according to this metering. This will give you the base exposure settings (aperture, speed and ISO).
- Meter the light in the brightest area of the scene (use the spot metering mode in the brightest tone of the brightest area).
- Calculate the exposure values of the two zones with the PhotoPills long exposure calculator.
- Find out the density of the GND filter you need.
- Select the GND filter you need. If you can, use the live histogram to adjust the exposure accurately.
- Put the GND filter in the filter holder, making sure it's in the correct position.
- Take a new photo exposing for the brightest area of the scene and overexpose 1 or 2 stops (+1EV or +2EV), or respecting your camera's overexposure limit.
- Check the exposure looking at the histogram.
Step 3: Choose the ND filter and calculate the final exposure
In section 7 you have a detailed description of the complete workflow. But here's a summary to calculate the shutter speed you need when using an ND filter:
- Open the PhotoPills long exposure calculator or ND filter calculator.
- Enter the Test settings in the long exposure calculator. These are the base exposure settings, that is the exposure allowing you to expose correctly using the GND filter. You calculated it in the previous step.
- Enter the Equivalent settings in the long exposure calculator. These are the settings you'll use in the final shot: aperture, ISO and the actual density of your ND filter.
- PhotoPills tells you the equivalent shutter speed when using the ND filter (and thus keeping the same base exposure).
Step 4: Take the picture with the polarizer, the ND filter, the GND filter and the final exposure
Now you have the equivalent aperture, ISO and shutter speed. Also, when doing the calculations, you should mount the filters in the corresponding order (section 9).
Remember that first you have to mount the CPL filter. Depending on the system you use, the polarizer will be the filter closest to or furthest from the sensor.
Then you have to slide the GND filter, adjusting its position to ensure that the darkest zone is exactly where you want it to be.
And finally, you have to slide the ND filter, always closer to the lens than the GND filter.
Now, if your camera has it, use the live histogram option to adjust the exposure accurately.
Finally, take the picture and use the histogram to check that you've got the correct exposure.
Oh!
And enjoy the stunning image you just captured!
11.How to move lens filters during the exposure
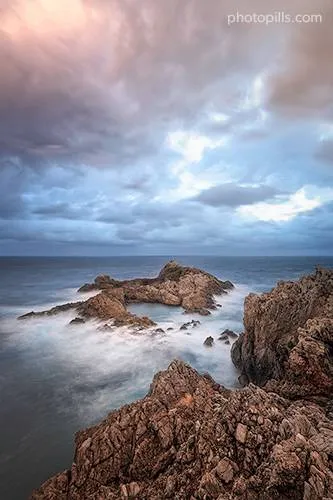
Sometimes it can be interesting to move the filter manually while the camera is taking the picture.
"But what are you talking about Toni? Are you saying that I should take a filter with my hand and shake it?"
Actually, not as far as shaking it! :D
But you'll have to take it with your hand. I'll explain to you how to do it in a minute.
Before this, let me tell you that this technique allows you to adjust the amount of light you subtract in each part of the scene. It also helps you to avoid the filter's transition line between the dark and bright areas in the photo.
However, it's not easy to put this technique into practice. It's very difficult to control how the final photo will look and it requires a lot of practice.
If you're interested in practicing this technique, I suggest you take a look at 'El uso de los filtros en movimiento', an article written by my friend José B. Ruiz in which he explains it in great detail. Unfortunately, this article is only available in Spanish.
Although I'm not going to be able to explain it as well as he does, I'm going to try my best. So keep reading to learn more about this technique.
What is this technique about?
What lens filters do you need
You'll usually apply this technique with hard GND filters and reverse GND ones.
But not exclusively.
As I said a few paragraphs above, this technique is a craft so there are no specific rules or red lines. As you'll have to practice a lot to master it, try all kinds of filters, experiment and observe the results.
This is the only way to find out what you like best, what suits you best or what produces the best results in your photos.
What conditions do you need
Throughout this article you've discovered how some filters allow you to control the dynamic range of the scene, subtracting light in the areas of the scene where it's very strong. For example, thanks to the GND filter you can selectively darken the highlights to avoid getting them overexposed in the photo.
So in order to move a GND filter during the exposure, you need a scene with a high dynamic range.
At the same time, you need the exposure time to be long enough to move the filter. To do this, you need a low-light scene or use an ND filter.
As you've learnt throughout this guide, you manage to subtract light from the scene thanks to the ND filter and thus, have a longer exposure time. In other words, you can use a slower shutter speed.
What is this technique about
It's very simple (to explain, applying it is not so easy).
From the moment you press the shutter and the exposure starts, you have a certain time (the time you've set yourself through the shutter speed) to move the filter.
How can you move it?
You can move the filter in two ways:
- Sliding it up or down while it's in the filter holder, without removing it.
- Holding it with your hand in front of the lens, always as close as possible.
"And how fast do I have to move it, Toni?"
Oh young padawan, that's the key question here!
That's where the "try and fail" technique comes in. You'll have to adjust your movements and the speed at which you perform them.
What is the moving filters technique for?
The main problem with a graduated neutral density filter (or a reverse one) is that it limits your composition.
Why?
Because all the elements that are above the horizon can look in the final image darker than the rest of the scene.
Depending on the scene and the shutter speed, the GND filter or the reverse GND can color cast that area of the frame. It looks much darker when it actually shouldn't be.
This is true for any soft GND filter. But imagine what can happen if you use a hard GND filter. You run the risk of getting a dark band that completely ruins your photo.
"I can fix that mess in a breeze in post!"
You're right.
This problem can be solved with a post-processing software like Photoshop. But in order to do this you must know how to use, for example, luminosity masks.
That's what filters are for. To prevent you from using additional tools that force you to spend more hours in front of the computer than taking pictures.
Look at these two pictures.
See that dark triangle in the image on the right? It's there because the part of the rock above the horizon is affected by the GND filter dark portion.
You can solve this problem while moving the lens filter during the exposure. Here, for example, you can move it up and down and even remove it from the filter holder at the end of the exposure. And you prevent that part of the rock from being underexposed.
Moving lens filters during the long exposure
As I told you before, this technique is not easy. The only way to master it is by using the "try and fail" method. And practice a lot, of course.
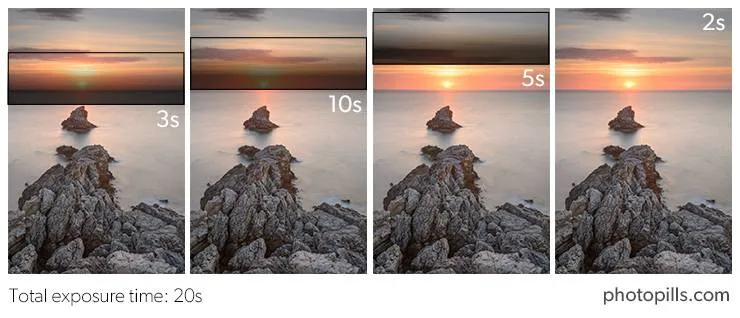
This diagram is perfect to show my workflow when I decide to move the GND filter during the exposure.
Have a look at the scene.
It's a beautiful Sunrise in Cabo de Cavallería (Menorca, Spain). I worked the composition in such a way that the rocks form a triangle whose vertex guides the viewer's eye into the Sun rising above the horizon.
And, as always during Sunrises and Sunsets, I had to face a scene with a high dynamic range.
Whenever there is a high dynamic range, I use a GND filter to avoid blowing the highlights out. In this case, the Sun (highlights) is very close to the horizon, in the central area of the frame. So I need a reverse GND filter.
But I don't want the filter to remain in the same position in the filter holder throughout the exposure. I would like to avoid getting a dark area in the photo. So I have to move it...
These are the steps you should follow to move the filter (a reverse GND, in this case):
- Insert the filter into the filter holder until the darkest area covers a small strip below the horizon.
- After a few seconds (one fifth of the total exposure time or a little less) slide the filter up until it's just above the horizon.
- After a few seconds (about half of the total exposure time) slide the filter a little higher. Leave it there for a few more seconds (also about a fifth of the total exposure time).
- During the last few seconds, slide it a little more or remove it from the filter holder.
This workflow is the result of my experience and the conditions of each photo. But it doesn't mean that it works in every single case. You'll have to learn on your own how to tweak the filter positions and estimate how long it needs to be in each one of them.
But, be careful, because if you leave the filter there and you don't move it at all or if you don't remove it before the end of the exposure, your sky will be too dark (underexposed) in the picture.
Back to the example of Cabo de Cavallería, you can see in the diagram where in the frame is the darkest portion of the reverse GND filter.
The total exposure time is 20s. During that time:
- I keep the filter 3s below the horizon, covering the Sun.
- I move the filter until the edge of the darkest zone overlaps the horizon and I keep it 10s in that position.
- I keep sliding the filter up, until the darkest zone is not covering the Sun anymore but it still covers part of the sky, and I keep it 5s in that position.
- Finally, I take the filter out of the filter holder. Then, I expose the last 2s without the filter.
As you can see in the final photo, there are no dark stripes anywhere in the frame.
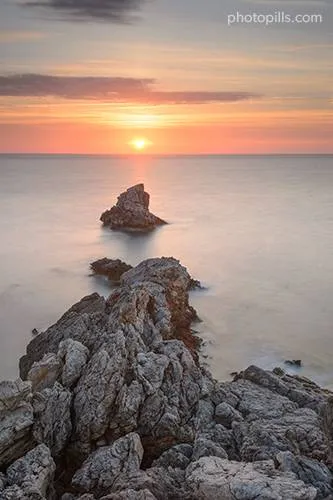
In addition to moving the GND or the reverse GND filter, you can cover the lens a certain number of times during the exposure.
So what you actually do is block the light in a very precise way with another filter, an ND for example, in that specific part of the frame that you consider necessary (to avoid a backlight, for example). By doing this, you subtract a bit more light in those areas that could be potentially blown out, while preserving all the detail in the shadows without clipping them.
You don't need to use another filter. You can also use a black card (section 2), a piece of black cloth, the lens cap or even your own hand.
Tips to move your lens filter while taking the shot
Finally, let me give you some suggestions that will help you apply and master this technique:
- Moving filters during the exposure is a difficult technique to learn. You'll need time and many attempts to master it – practice endlessly and whenever you can!
- As I told you in section 2, I recommend using glass filters whenever you can. It's a better quality material, gives better results and produces fewer side effects, although these filters are more expensive.
- Obviously, the higher the dynamic range of your camera, the better the result. But you already knew that, didn't you?
- Be careful and avoid light entering through the optical viewfinder to avoid light leaks (forget about it if you have a mirrorless camera).
- You'll often face difficult scenes. For example, when you have the light source in front of you and one or more irregular shaped elements are above the horizon. In these cases, try to combine some of the techniques I just explained to you.
- If you don't get the photo, don't get frustrated. Try again, persist and be patient. And if it's really impossible, it's ok. This technique is not infallible.
Great!
You now know how to shoot in any situation, no matter the type or the number of filters you use :)
You're becoming a master!
But don't stop here. Keep reading...
12.How to shoot a long exposure at night with a light pollution filter
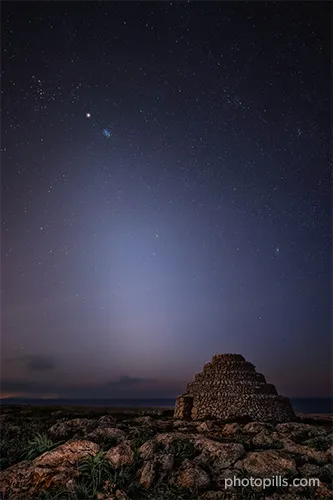
Now let's see how you can get the exposure you're looking for after putting a light pollution filter in front of the lens.
But before that...
What is a light pollution filter?
It's a specific filter for night photography and astrophotography. It helps to reduce light pollution caused by sodium vapor bulbs. They cast a very annoying orange glow on the scene and they reduce contrast and sharpness.
Read more about this filter in section 2.
How much light does the light pollution filter subtract
I can't give you an exact number of stops as it depends on the model. Manufacturers indicate the density of the filter.
But as with ND filters, it's best to check the actual filter density yourself (section 6).
How to shoot a long exposure at night with a light pollution filter
You shoot in exactly the same way as if you were shooting without a filter. Let me explain you the workflow step by step:
- Mount the filter holder carefully and try to avoid moving your tripod and camera. Slide the light pollution filter into the filter holder.
- Use the largest aperture you can (the smallest f-number) to capture as much light as possible, use the highest possible ISO depending on the noise your camera produces and determine the shutter speed depending on whether you want the stars as spots or not (use the NPF rule).
- Focus. You'll usually focus at the hyperfocal distance. If you've used the autofocus and you're not using the back button focus, don't forget to change it to manual mode. This way you'll avoid refocusing by pressing the shutter button inadvertently...
- Mount your camera on the tripod and work on your composition looking for the angle you like.
- Take a test shot and check the histogram.
- If necessary, adjust the exposure by modifying the ISO or shutter speed. Change the color temperature manually. The light pollution filter usually has a cool cast on the image.
There's one small detail you need to keep in mind.
You're using a filter in pitch black light conditions, so you have to be very careful with any light that comes directly into the lens (and the filter). It could generate flares that will ruin your photo.
This explanation is a quick cheat sheet that will help you to expose without trouble whenever you need to use a light pollution filter.
But if you want to become a master of night photography or astrophotography, I suggest you study the following guides in depth:
13.How to take photos with a solar filter
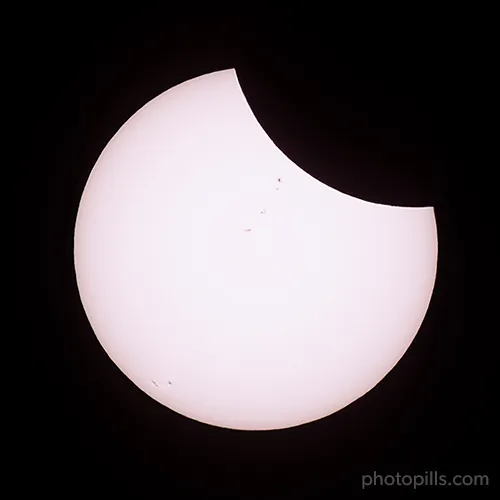
This type of filter is used to photograph the Sun. And you can also use it to photograph a solar eclipse. But not for all its phases, only in the partial phases of a solar eclipse.
What is a solar filter
You can use a solar filter to photograph the Sun or a solar eclipse only.
If you plan to capture this incredible phenomena, you must do so with a solar filter. If you don't, you risk damaging your camera severely: both the camera sensor and focusing system will be burnt by the Sun as soon as you shoot your first picture!
You can find more details about the solar filter in section 2 and in the list of the equipment you need to photograph a solar eclipse.
How much light the solar filter subtracts
A lot! XD
To give you an idea, the Baader solar filter I used to photograph the eclipse of August 21, 2017 in the US is the equivalent of an ND 5.0. So it subtracts 16.6 light stops...
How to take photos with a solar filter
Let's see what steps you have to follow to use the solar filter.
1. Use the mirror lock up
Obviously, this step applies only if you're going to take photos with a DSLR. If you plan to shoot with a mirrorless camera, forget about it.
2. Put the solar filter on
It's very easy, although it depends on the model.
In the case of my Baader solar filter, it has special hooks that allow me to anchor it to the lens hood.
3. Focus
Before the solar eclipse begins, select the manual focus mode on your camera.
Turn on the Live View option (or the Focus Magnifier option if your camera has it) and zoom in the image as much as you can around an area of the Sun that you can see with detail.
Focusing on the edge usually works very well. This will help you get a tack sharp Sun in your picture.
Once you see detail in that particular area of the Sun, focus.
4. Select the Manual (M) shooting mode and meter the light
To make sure you expose the photo correctly, meter the light directly on the surface of the Sun before the eclipse begins.
5. Determine the exposure
You have to use the solar filter during the partial phases of the eclipse. Here, I recommend the following settings:
- Aperture: Use a relatively small aperture to get the Moon and Sun out in perfect focus.
- Shutter speed: According to the Sun metering, the aperture and the ISO, adjust the shutter speed so that the light meter is centered at zero (and your photo is correctly exposed).
- ISO: Use the lowest ISO you can (100 or 200).
In addition, to make sure you get a properly exposed photo, it's best to do a bracketing starting with a base shutter speed.
6. Take the photo and check the result
If you didn't get a photo with the exposure you were looking for, adjust one of the exposure triangle settings.
If you want to know everything you need to know to successfully photograph a solar eclipse, I recommend you study in depth 'Solar Eclipses: The Definitive Photography Guide'.
14.How to take photos with an infrared filter
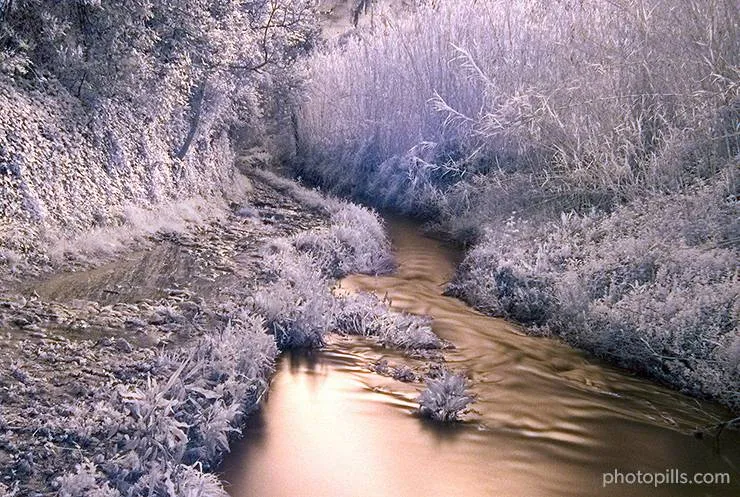
Let me show you how you can take photos using an infrared filter.
And to do that, let's start first by going over a couple of things.
What is an infrared filter?
An infrared filter has a very specific use: to block visible light. In other words, the light your eyes see and the light your camera's sensor is able to capture.
Therefore, the only light that it allows through the lens and reaches the camera's sensor is the infrared light.
There are two types of infrared filters:
- External. These are filters that you place in front of the lens.
- Internal. A filter that you can put directly on the sensor and that transforms your regular camera into an infrared one.
Check a couple of things before you start
Exposing with an infrared filter is not exactly easy as it depends on several factors such as the camera model and the density of the filter you're using.
First, the camera. You should know the tolerance of the low pass (or infrared blocking) filter of the sensor. This tolerance varies depending on the amount of infrared spectrum you let through. Not all cameras have the same ability to capture these types of images.
In other words, you need to know if your camera is capable of taking infrared pictures or not.
Finally, you also need to find out if your lens is suitable for infrared photography.
You can learn how to do it reading section 2.
How to take photos with an infrared filter
To take photos with an infrared filter you should follow the same workflow as when using an ND filter (section 7). However, in this case the exposure will depend on the low pass (or infrared blocking) filter of the camera and the infrared filter you use.
A small note before I go on.
The low pass filter is a filter that is placed in the sensor to avoid the effects of aliasing or moiré.
So before shooting, you should calculate the light stops that the combination of the infrared filter and your camera's low pass filter subtracts. To do this, follow the steps I explained in section 6.
And when you're facing a scene you want to photograph, follow these steps to capture it:
- Always shoot in RAW.
- Choose a lens that doesn't show hot spots. Infrared photography produces this effect on certain lenses. A hot spot is a circular area in the center of the image. Its size is more or less large depending on the aperture, and it has a much brighter or different color compared to the rest of the image. These circles are generated due to the anti-reflective coating that some lenses have. Take a look at this list to see if your lens suffers from an infrared hot spot.
- Don't put the infrared filter on yet. Select a maximum aperture of f/8 and focus. Infrared light has a longer wavelength than visible light, so your camera won't be able to focus and it will do so at a different spot in the scene. Using this aperture, you'll get all your photos in focus.
- Keep working without the infrared filter. Now, meter the light in the brightest tone of the scene and take a picture of the correctly exposed scene (check the histogram). Later on, during the post-processing, this shot will also be very useful for calibrating the white balance.
- Screw the infrared filter onto the lens. I almost always use the Hoya R72 which, together with my Nikon D4s camera, subtracts 15 light stops (its actual density). Use the workflow I explain in section 6 to calculate the light stops that both the infrared filter and your camera actually subtract.
- In order to avoid a completely red picture, use a cool white balance around 2300K. You'll get a light brown image on the LCD screen of your camera so you'll be able to see the detail and textures on the photo.
- Now that you've put the filter on, set the lowest possible ISO to get the effect you want.
- To calculate the exposure time (shutter speed) you need to get the correct exposure, use the PhotoPills long exposure calculator, as I explained in section 7. This result will actually be a first guess, but it won't be exactly right. When you put the filter on, the camera is no longer capturing visible light, but infrared light. So the correct exposure time will be determined by the amount of infrared light present in the scene.
- Take a second picture with the aperture, ISO and the exposure time you calculated in the previous step.
- Finally, check that the picture is in focus and correctly exposed (check the histogram).
If you have a mirrorless camera, you can check the histogram as you change the exposure triangle settings. And if you're using a DSLR camera, make sure you always have the viewfinder covered while you're taking the picture because the high density of infrared filters can produce light flares and ruin the shot.
As I said before, if this is your first time using an infrared filter, you should calculate its actual density (remember, follow the workflow I explain in section 6). That way, when you use it in future shooting sessions you can calculate the equivalent settings to adjust the exposure quickly and efficiently.
Oh, one last tip.
Whenever you can, take your photos during the central hours of a sunny day: that's when there's more infrared radiation.
15.10 lens filter tips to improve your technique
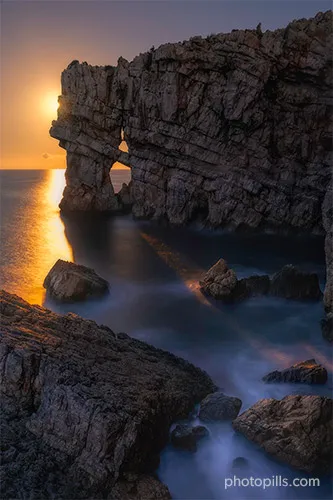
One of the things that make lens filters so important is that some of the effects that they allow you to capture in camera are difficult to replicate in post-processing.
Throughout this article you've learnt all the steps you should follow to successfully master the use of lens filters in your own photography.
But now, let me give some additional tips for using lens filters to capture some truly spectacular images.
Figure out your lens filter sizes (1)
Circular screw-on lens filters
Take a look at the end of the lens (ie. the end you point at subjects). If you look at the front of it, somewhere on there will be a ⌀ symbol – a circle with a line through it, followed by a number. It's usually either just inside the edge before the glass or just along the outside of it.
Let's say that you have a Sigma 35mm f/1.4 lens. Around the outside of the lens is a plastic bit where it says '35mm 1:1.4 DG Sigma'. In the case of Sigma 35mm, it should say 67mm.
That's the lens' diameter. That is, the size of the filter you should buy so you can attach it directly to the lens.
Some peculiar lenses don't accept filters, in which case you won't find any markings.
Be careful because the lens' diameter has nothing to do with the focal length!
And if you want to save some money, read my next lens filter tip! ;)
Square and rectangular lens filters
Square and rectangular lens filters come in a variety of shapes and sizes to suit a very wide selection of cameras and lenses.
Depending on whether you have a Micro 4/3, an APS-C or a full frame format sensor camera, and the lens you plan to use, you'll need a different size of lens filter.
Square and rectangular lens filters come typically in the 75mm, 100mm, 150mm and 180mm width sizes.
- The 75mm width filter system is designed for smaller compact and mirrorless APS-C cameras with standard lens thread sizes from 39mm up to 67mm.
- The 100mm width filter systems are designed for larger bodied crop sensor and mirrorless, and full frame cameras with lens threads from 49mm to 82mm, and focal widths typically up as wide as 16mm through to 200mm (and even up to 300mm).
- The 150mm width filter system is designed for ultra-wide lenses up to 12mm wide, and for lenses that have no thread, have a bulbous or protruding front glass element and for those with built in lens hoods.
- The 180mm width filter system is designed to suit a select few ultra-wide angle lenses that don't have a standard filter thread.
Get a step-up ring (2)
What is a step-up ring?
It's a metal ring that enables you to use a lens filter with a wider-diameter thread size than the lens on which you want to mount it.
Why and when would you need a step-up ring?
If you own a DSLR or a mirrorless interchangeable-lens camera system, chances are you own more than one lens. What's more, it's very plausible that the diameter sizes of one or more of your lenses differ from the other lenses. So the more lenses you own, the more different sized circular filters you'd need.
Or maybe not?
Here's where a step-up ring comes in handy... ;)
Saving money with step-up rings
As I was telling you in my previous tip, step up rings can save you a good amount of money.
In theory, if you're using circular lens filters, you should buy one filter per lens' diameter. Let's say you have 3 lenses, each with a different diameter – 58mm, 67mm and 77mm. In this case, you would buy 3 different lens filters according to your lenses' diameters.
However, there is a little trick that I'd like to share with you.
Buy your lens filters in the largest size (77mm usually). Then, get as many step-up rings as you need to bridge the gap. Going back to my example, if you buy 77mm lens filters and have a 58mm, 67mm and 77mm lens, you need 2 step-up rings: 58 → 77 and 67 → 77.
Considering a good polarizer costs over €200 and a good aluminum step-up ring costs about €15, you'd be saving lots of money :)
Pick a few filters of excellent quality (3)
Even the absolute best lens filters have 3 problems:
- They reduce image quality, though you may not notice it unless you do a lot of pixel-peeping.
- They can cause vignetting (darkened corners around the edge of the frame).
- They can produce flare.
That's why you should never buy filters for bargain prices. Unless you're purchasing from a reputable brand (section 4), you can easily end up ruining the image quality of your shots. Better to use no lens filter at all than to use a €20 budget online offering.
So always buy excellent quality lens filters. Just like your tripod, they're an investment, not a cost.
To give you an idea, use the following basic rule of thumb:
Get a filter that costs at least 10% of the price of your lens (new). So if you have a €1,000 lens, try to spend around €100 on a filter.
Another important thing is the amount of lens filters that you purchase.
It's not necessary (in fact it's almost wasteful) to have all types and gradations of ND and GND filters. The more filters you have in your backpack, the more difficult it will be to choose which one to use when shooting.
Therefore, as always, the advice is: few but excellent.
Make sure all your lens filters are perfectly clean (4)
Check your lens filters (and lenses) regularly to make sure that they are clean. You can always shine a torch from your mobile phone or some other bright light source onto the front element to see if there are stains.
As a rule of thumb you should:
- Avoid dust, salt film, grease, fingerprints, waterdrops.
- Always bring something to clean the dirt.
You can use a blower brush to remove dust and dirt or lens tissues with a lens cleaning solution. But my favorite and easiest solution is to always carry a big microfiber cloth in my backpack.
Test (and calibrate) your ND filters at home (5)
When you buy a 3, 6 or 10-stop ND filter, for example, you'll probably assume that your lens filter has the exact optical density to subtract light by 3, 6 or 10 stops.
Well, you shouldn't.
In practice, manufacturers are not entirely accurate. It's been ages since I started using lens filters (yes, ages, trust me) and I've never bought an ND filter with the exact density the manufacturer labels.
As you can imagine, the difference is usually small but even if it's only a third of a stop, this will affect the shutter speed you need to get the exposure you want.
So in order to avoid mistakes that you won't be able to correct in post-processing, I suggest you test and calibrate all your ND filters beforehand (section 6).
Use the PhotoPills long exposure calculator (6)
Use the PhotoPills long exposure calculator to calculate equivalent exposures when shooting long exposures with ND filters, in low light and at night.
It's an incredibly powerful tool that will do all the work for you :)
In addition to this, PhotoPills has the only long exposure calculator that allows you to convert the shutter speed for non-standard f-stop reductions.
If you want to learn how to use it, you have step by step explanation in section 7.
Follow the right order when putting the lens filters (7)
When stacking filters, your main goals should be to:
- Minimize the risk of light leak.
- Achieve a balanced exposure in a single frame for long exposures.
Start with the polarizer (CPL) filter
The polarizer (CPL) filter position depends on the system you're using:
- Manufacturers such as Lee or Lucroit, for example, produce a filter holder that lets you mount the polarizer in front with an adapter ring.
- There are other manufacturers, such as NiSi, whose mounting system is slightly different because the CPL filter is the one closest to the sensor.
Regardless of the system you're using, you should always start by mounting your CPL filter and polarizing the frame area that you're interested in.
Then, place the GND filter
Now that you have your circular polarizing filter in place, it's time to put the GND filter.
Select the most appropriate strength and gradation of GND filter for the scene (either soft, medium or hard) and put it in the outer slot of your lens filter holder. Make sure you leave one free slot like this:
- Lens > free slot > GND filter > Polarizer (e.g. Lee, Lucroit).
- Lens > Polarizer > free slot > GND filter (e.g. NiSi).
Finally, place the ND filter
Place the ND filter in the slot closest to the lens making sure that the foam gasket fits smoothly against the filter holder itself. This prevents light leak more effectively than if the ND filter was placed in the outer slots.
If you need to stack two ND filters in order to capture a long exposure with bright light conditions, make sure that the densest (ie. darkest) ND filter occupies the first slot. Darker ND filters tend to be the most prone to introducing reflections through light leak.
Make sure you place the transition area of your GND filter correctly (8)
This is one of the GND filter topics I get the most questions about and is crucial to getting the image exposed correctly.
Aside from your filter choice, there are 2 more factors that determine how hard or gradual the transition from light to dark will be:
- Your lens focal length.
- Your aperture (f number).
A longer focal length will make the transition smoother just as a more open aperture (small f number) will as well.
Oftentimes it's not easy to see where in the frame you've placed your GND filter. If this is the case, I suggest you'd lean towards placing it lower than the horizon rather than above it.
Think about it. If you place it too high you'll have a light band in the sky just above the horizon that is very obvious and very hard to fix later on in post-processing. On the contrary, if you over-darkening just a bit of the ground below the horizon it won't hurt much.
Whenever it's possible, try your best to place it precisely! ;)
Be careful when using a polarizer filter (9)
With an extreme wide angle lens
A circular polarizing filter can be an extremely useful photographic gadget, but you should use it with care on an extreme wide angle lens.
Unfortunately, CPL filters don't work well on extreme wide angle lenses. It has to do with physics.
As I told you in section 2, the polarizing effect is directly related to the angle from the light source. Extreme wide angle lenses can cover an extraordinarily wide field of view–up to 180° in some cases.
So if a large portion of your frame has negative space (e.g. a blue sky), you'll probably end up with dark bands across the area or dark corners.
Another problem is that you won't really see the full effect through the viewfinder. On top of that, it's not always easy to see it on the camera's LCD screen. So you might not notice it until you download your images at home and see them on your computer.
While taking a pano
In general, it's not a good idea to use a CPL filter when shooting panoramas.
Remember that the polarizing effect is not evenly applied across the frame. So if you have a blue sky in the frame it will be almost impossible to avoid banding across the sky.
If you need to darken the sky, use a GND filter, and make sure that the filter is perfectly horizontal and the edge is aligned with the horizon.
Avoid lens flare (10)
There are 2 ways in which you can get lens flare in your pictures:
- As scattered artifacts.
- As glare across various parts of the image.
The glare makes the image look washed out because it reduces contrast and saturation.
Unfortunately, adding a lens filter will increase the risk of getting flare in your pictures because you're adding one, two or even three extra glasses in front of the lens.
In order to avoid lens flare you can:
- Buy multi-coated lens filters.
- Keep your lens filters clean with a microfiber cloth.
- Shade the lens as much as possible (e.g. using your hand to cover the Sun).
- Try stopping down the aperture 1-2 stops less than the maximum available value in your lens.
16.12 photographers that master the use of lens filters
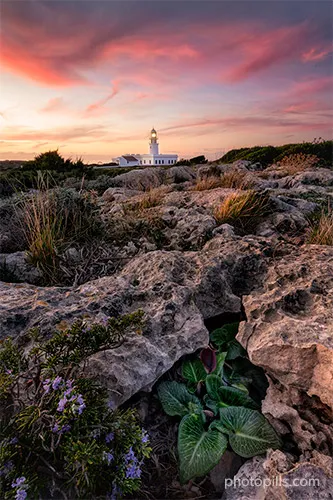
Here's the list of photographers that I love because they excel at shooting with lens filters. They're true masters.
In fact, some of them have already been PhotoPills Masters in one of our favorite events: the PhotoPills Camp.
I hope they inspire you.
If you have some other name in mind that you think is worth knowing, share it with the tribe by leaving a comment at the end of this guide :)
Francesco Gola
Francesco Gola loves two things: seascapes and Nutella. However, I still don't know which came first... ;)
He excels in seascape photography thanks to his expertise, a great photographic eye and an arsenal of lens filters! Of all the photographers I know, he has the most complete collection of lens filters.
He likes to confess being a slow shutter speed addict so using ND filters in his photography is a no-brainer. It's the perfect way to convey an ethereal feeling in his images, transforming every single picture into an hourglass.
José B. Ruiz
If you haven't heard of José B. Ruiz yet, you're missing out.
He's a great nature, portrait... and landscape photographer. As for the latter, José believes that a good landscape photographer must master the use of lens filters if he wants to capture good images.
After decades of using them and having tried many brands, models and types of filters, he's a true master when it comes to shooting with lens filters. And he even dares to move them during the exposure!
Daniel Kordan
Daniel Korzhonov, better known as Daniel Kordan, is a Russian landscape photographer with a special interest in mountains and seascapes.
One of his great strengths is the mastery of lens filters that help him capture mind-blowing long exposures. He likes using lens filters because they allow him to do a bit less work and participate in contests, which prohibit composite images (ie. submitting images produced with the bracketing technique).
Julia Anna Gospodarou
Julia Anna Gospodarou is a B&W fine art photographer whose work is mostly long exposure architectural and landscape photography.
She likes a photography style that shows a side of reality that one couldn't see without having seen it interpreted in the photograph. In other words, the kind of pictures that go beyond the evidence. Thanks to her fine art photography Julia Anna intends to show the world in a different way.
So as you can imagine, her collection of filters covers a quite wide range of ND filters, polarizing, and IR (infrared) filters.
Michael Sidofsky
Michael Sidofsky is an amazingly good photographer – and that is a vast understatement. Sidofsky captures the might and beauty of architecture in multiple ways – through scale, detail and even movement.
Through the use of lens filters and post-processing, Michael tries to give his images a dramatic feel to create an emotional connection between the subject and the viewer.
Ignacio Izquierdo
Ignacio Izquierdo is a nature and travel photographer based in Madrid, Spain. Completely self-taught, he has an innate ability to see what others don't and an amazing capacity to produce visual stories.
It's his desire to interact with the people and landscapes of our diverse world that motivates him to create images. He loves saturated colors and shooting with lens filters during the magic hours (golden hour and blue hour).
Mads Peter Iversen
Mads Peter Iversen is a Danish fine art landscape photographer.
In order to get a very soft and ethereal look to the photos he uses everything from Photoshop where he produces composites blending several shots to different lens filters when he's in the field.
His favorite filter has for years been the 6-stop ND filter. In most lighting conditions, it's perfect for giving the right shutter speed for moving water or clouds.
Brett Wood
Brent Wood is an Australian photographer. As you can see from his work. he's very passionate about landscape and nature photography.
His understanding of light and especially composition is remarkable. This adds up to his ability to adapt to current conditions very quickly and think on his feet. And he loves using lens filters!
He tends to keep his photography rather minimalistic, so he regularly uses a polarizer, a couple of ND filters (6-stop and 10-stop) and a couple of blender GND filters (3 and 4-stop).
Aditya Permana
Aditya Permana is a landscape, architecture and macro photographer based in Tangerang (Indonesia).
When photography came into his life, it completely changed the way he views the world. He ultimately strives not to just make pictures, but express thought and emotion through his work.
Living on an island, he enjoys photographing seascapes. As a result, Aditya often uses lens filters to capture the beauty of Indonesia within his picture frame.
Spencer Welling
Spencer Welling is a fine art landscape photographer and videographer. Growing up in Utah (US), he gained an appreciation for the outdoors at an early age.
After returning home from Hong Kong where he spent two years, he rediscovered the beauty of the night sky while camping in a remote area.
He has been chasing the Milky Way ever since, spending hundreds of hours under the night sky honing his craft. The idea behind every shot is to capture that same sense of awe and wonder that captivated him on that magical night.
Julien Grondin
Traveling and photography are Julien Grondin's two main passions. Better known as Beboy, his background in the graphics and design industry makes understanding color management, compositions, and editing photos an easy task for him.
Julien's compositions are very dynamic. Favoring long exposure times, bold framing and the best moment of the year, the photographer literally stages the landscape (urban or natural), placing it at the center of his work.
Moreover, it's when the Sun is against the frame that he expresses himself best photographically. His mastery of GND filters to integrate the Sun in his compositions is awesome!
Oleg Rest
Oleg Rest was born in Kazakhstan, the land of steps and severe climate. He's an adventurer and professional landscape photographer who has dreamt of travelling since early childhood.
The best shot for him is the one that needs minimal post-processing. That's why he uses lens filters for managing tricky lighting conditions when shooting.
17.It's your turn!
Now it's time for action...
It's your turn.
Put into practice what you've learnt.
Make a mistake!
And refer to this guide as many times as you need. It'll help you get around all the obstacles you encounter along the way.
A path that, without a doubt, will lead you to master lens filters and long exposure photography to capture amazing pictures...
And if you run into an obstacle that's not explained in this guide, let me know by leaving a comment below.
I'm here to help ;)
Oh!
One last thing.
Take a look at this article: 'Long Exposure Photography: The Definitive Guide'.
It's worth its weight in gold.
You'll learn how to shoot long exposures in all kinds of situations.
Never stop learning!
Note: Some links on this page are affiliate links. What does this mean? If you buy/rent using these links you're helping support us and it costs you nothing extra. Thank you for your support.
Get this ebook for free now!