Sunset Photography: The Definitive Guide
In this article, I'm going to show you how to capture amazing Sunset photos.
So...
Whether it's a tiny little Sun combined with a spectacular landscape or a huge Sun aligned with your favorite subject...
Once you've read this guide, you'll be able to successfully photograph all the types of Sunsets that you can imagine.
Trust me!
Here you'll find everything you need...
- Lots of Sunset photos to inspire you...
- How to use the PhotoPills app to find a powerful location, come up with a great Sunset photo idea and then plan it. So you can go and capture it...
- All the equipment you need to photograph a Sunset...
- How to actually photograph a Sunset step by step... Including the best camera settings for Sunset photography.
- How to make the most of natural light (golden hour, blue hour and twilights).
- The best Sunset apps I use.
- And tons of extra Sunset photography tips!
Ready?
Let's get to it.
"Call for the grandest of all earthly spectacles, what is that? It is the sun going to his rest." – Thomas de Quincey
Get this ebook for free now!
Content
- 14 Sunset photography ideas to boost your creativity
- Finding the perfect Sunset location
- 5 key things you should know before planning a Sunset
- How to plan a Sunset photo like a pro
- Predicting Sunset quality
- All the equipment you need to photograph a Sunset
- How to photograph a Sunset step by step
- 11 extra Sunset photography tips for amazing photos
- 20 Sunset landscape photographers you should follow
- 11 must have Sunset photography apps
- Do you need more help?
1.14 Sunset photography ideas to boost your creativity
Before you can start planning (section 4) and shooting (section 7) any kind of Sunset, you need to know what picture you want to take.
And for this, the location is key. You'll see why and how to find the best location later on (section 2).
But you also need a great Sunset photo idea...
So to nurture your inspiration and to help you create unique pictures, here are 14 Sunset photography ideas.
As you've probably guessed, all were planned with PhotoPills!
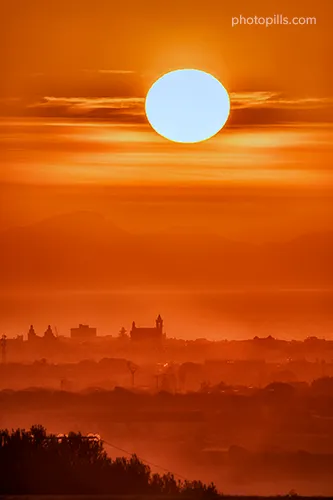
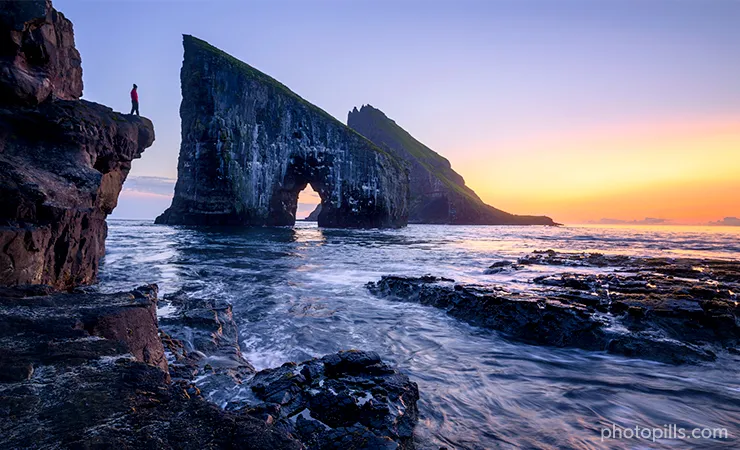
Little Sun (1)
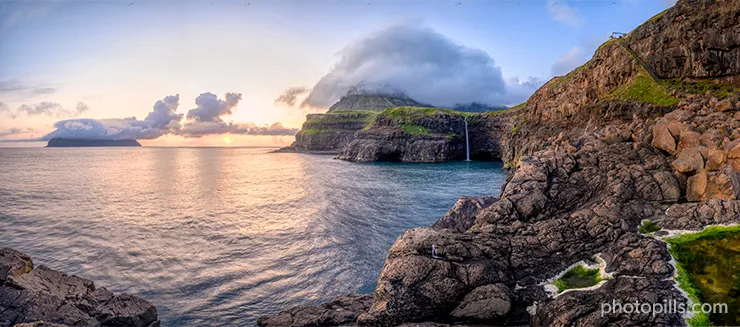
I've always been an advocate of shooting wide to convey the vastness of a landscape. And when I do so during a Sunset, the Sun is obviously very small in the frame.
There's no right or wrong. It's just an artistic decision depending on what I want to capture and the emotion I intend to convey to the viewer.
I took this photo during our expedition to the Faroe Islands. A tiny Sun is setting next to the village of Gásadalur.
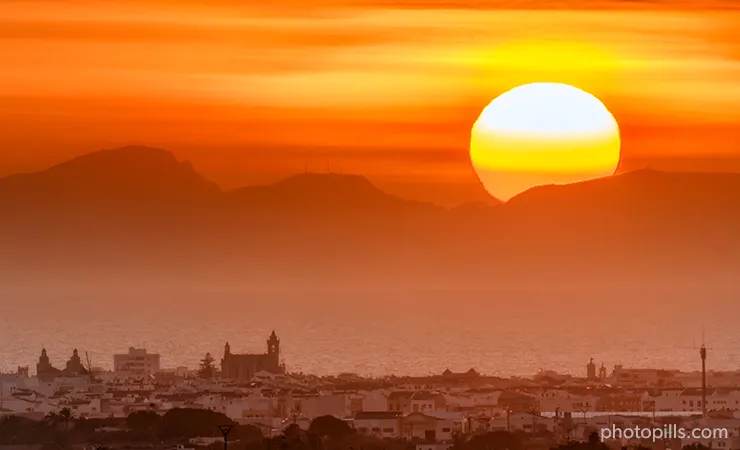
Big Sun (2)
The light's angle during golden hour is perfect for some backlight photography. This occurs when the light comes from behind your subject. And it gives you a lot of artistic possibilities.
Like the one you can see in the picture above. Thanks to the PhotoPills app I planned a shoot of a huge Sun, setting behind Ciutadella, the town where I live. Once I knew the shooting spot, the date and the time, all I had to do was to wait for the perfect light...
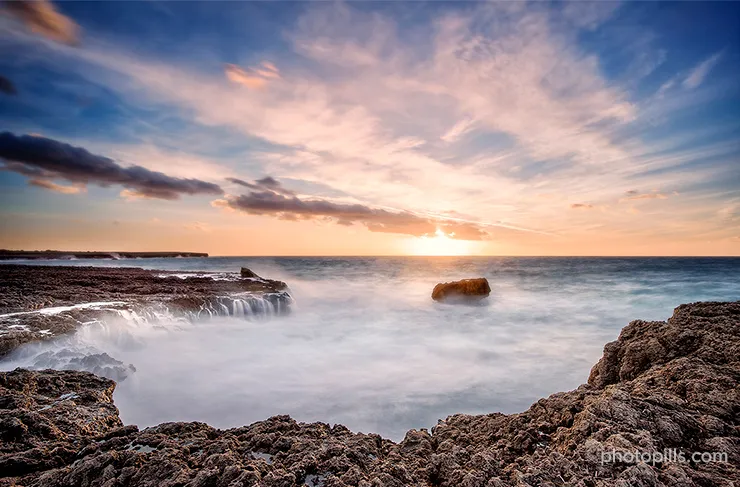
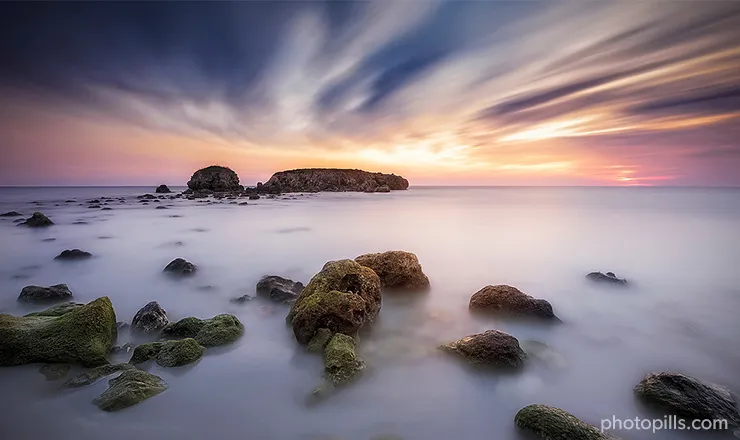
Long exposure (3)
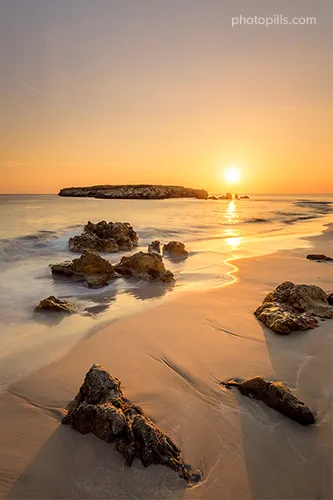
Capturing an inspiring and warm Sunset beach photography is always a great pleasure.
I consider myself an extremely lucky person for living where I live, on the beautiful island of Menorca (Spain), where seascapes are unique. The perfect place to take long exposures.
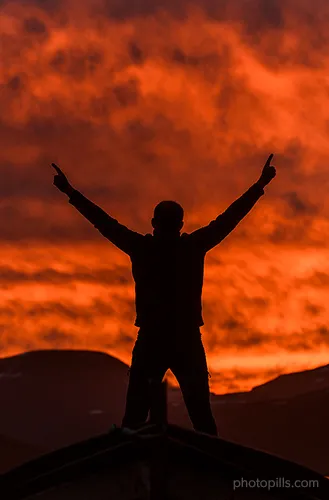
Sunset Silhouette (4)
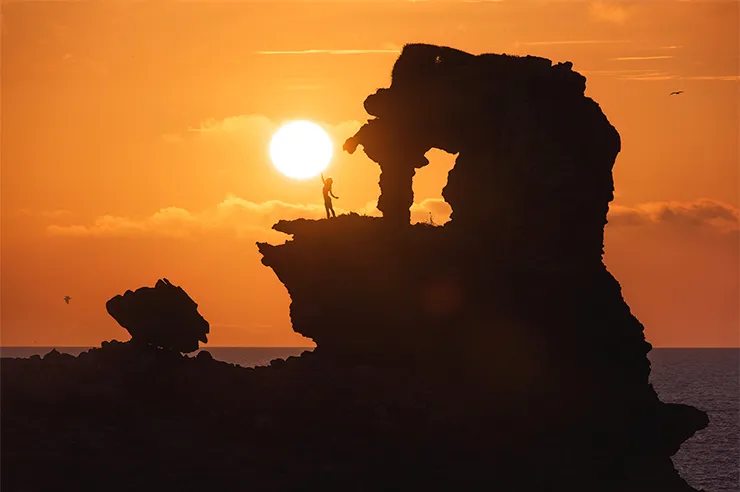
Photo by Eric Paré.
Elephant rock is an iconic location we visit every year during the PhotoPills Camp. This photo was taken by Eric Paré. The silhouette of Kim Henry touching the Sun while she's observed by the magnificent rock conveys a sense of fragility and protection. Don't you think?
I just love Sunset silhouettes.
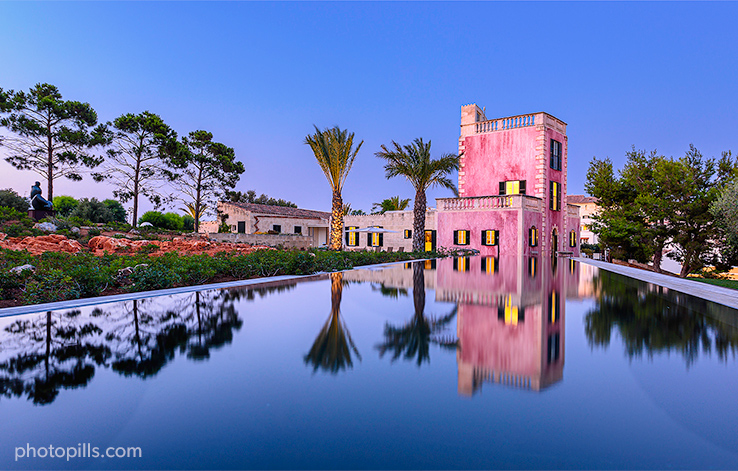
Reflection (5)
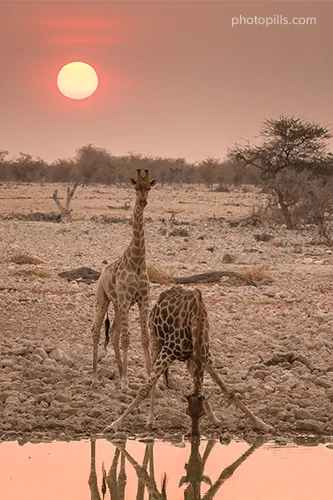
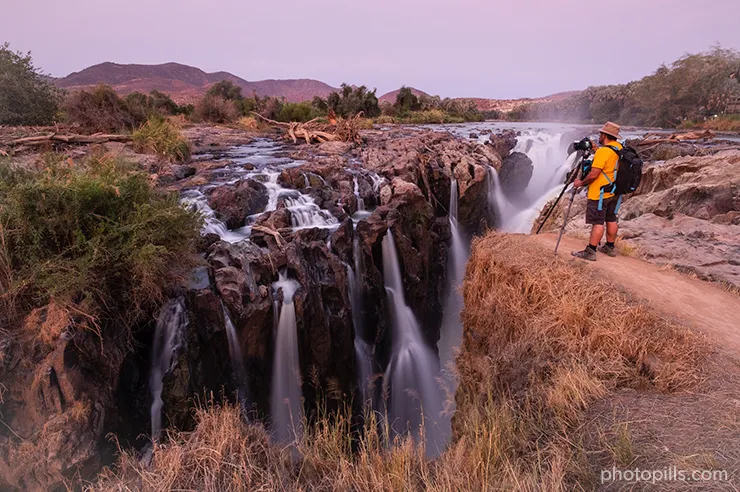
This was one of the most amazing moments we had the chance to live during the PhotoPills expedition to Namibia, a couple of giraffes drinking at dusk.
They were next to a waterhole, in Namibia, and the light during golden hour was just perfect. So I quickly took my camera with my telephoto lens mounted on and started shooting very low to capture a beautiful reflection of the animals as well.
Sunset portrait (6)
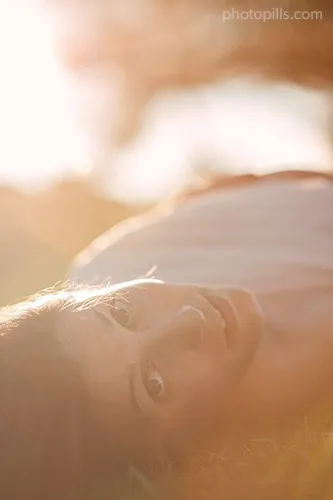
One of the main traits of the golden hour is its characteristic color palette: yellows, oranges, reds.
When shooting a Sunset portrait during the golden hour a very interesting option is backlighting. Placing the Sun behind your subject gives you that magical glow.
Golden hour (7)
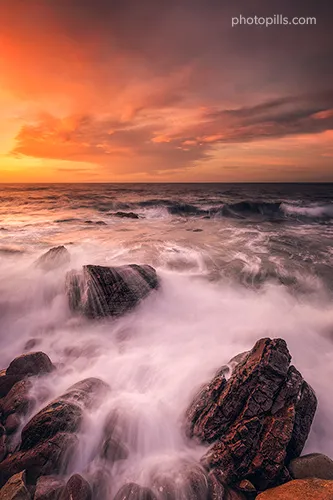
Imagine a warm, natural glow that makes any landscape look its best. That's the magic of golden hour photography.
In this particular seascape, I wanted to have the Sunset to the side. That way, it would cast an amazing red tone on the side of the rocks in the foreground. I was expecting a sky on fire so I decided to shoot a long exposure to add some motion to the water.
Sunburst (8)

This is a shot of the Sierra de Tramuntana, in Mallorca (Spain). I don't go there often, but when I do, the mountains are always willing to surprise me with something special.
In section 8 I'll go into more detail on how you can capture nice and warm Sunsets that include the sunburst effect.
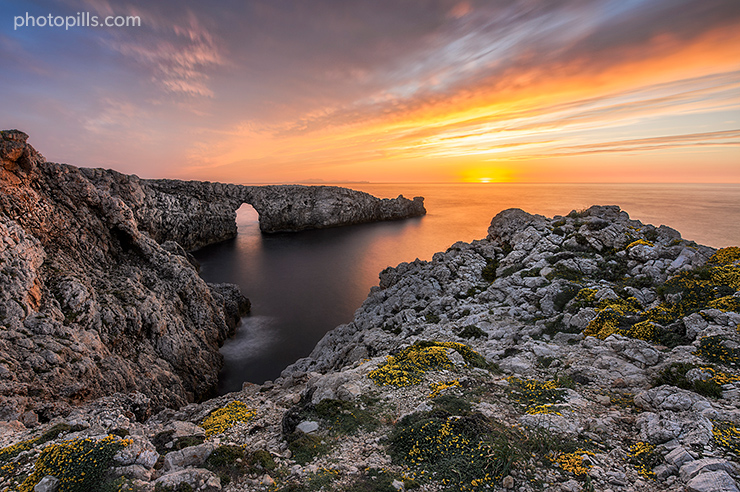
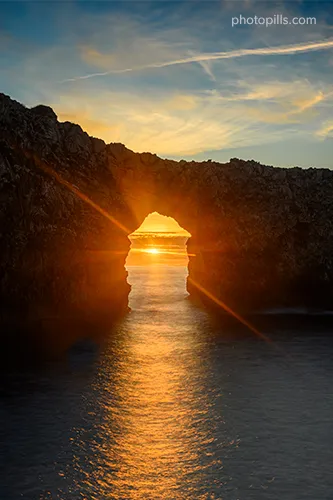
Framed Sun (9)
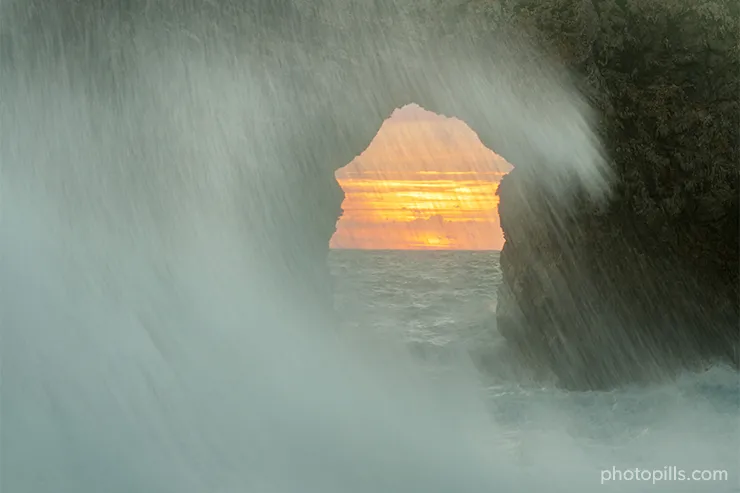
Twice a year, the Sun sets through a beautiful natural arch called Pont d'en Gil in Menorca (Spain).
To get this picture, I had to plan it with PhotoPills to know the exact date and time that this particular event would happen. Once on location, I decided to include a wave to add some drama to the picture.
In section 4 you'll learn how to plan any Sunset photo you imagine ;)
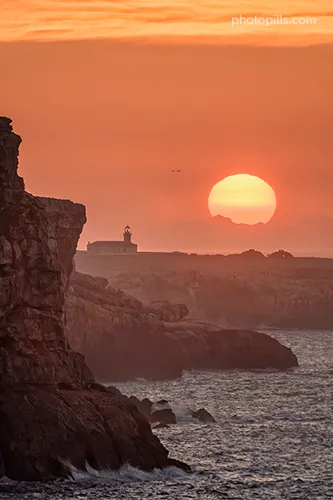
Sun aligned with subject (10)
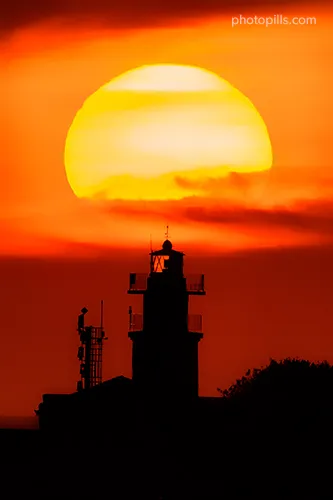
Getting a picture of the Sun aligned with a subject while it sets is a challenge. It's not difficult, but you need to plan it carefully and to prepare the shooting session in advance.
Here, I decided to align the Sun setting behind a lighthouse (I love them!). But you can also align it with a natural element.
Find a cool subject to play with the Sun.
Sunset with the Moon (11)
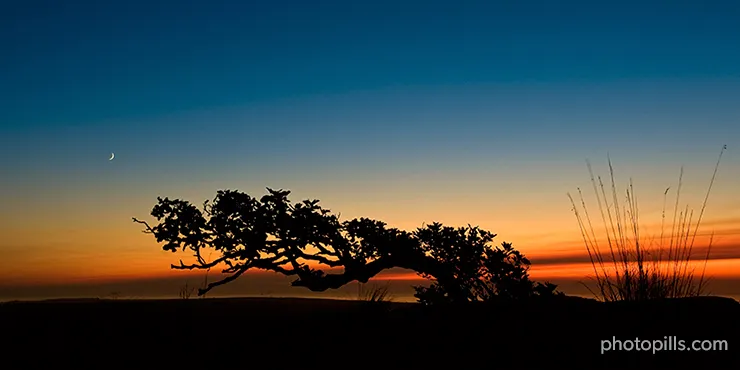
There's nothing like photographing the Moon when the Sun is setting. The light, the atmosphere and the emotions that you can convey are incredibly special.
In this case, in order to take advantage of the red colors and the Moon on the sky, I decided to create a Sunset silhouette picture with some small bushes in the foreground.
Sun aligned with a street (12)
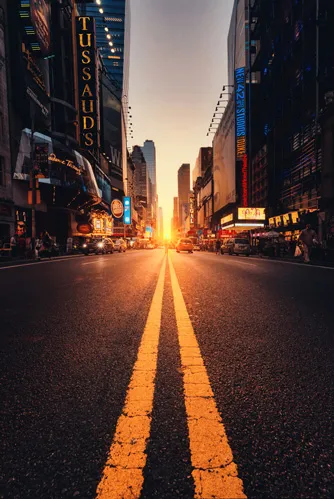
Nikon D610 | 15mm | f/11 | 1/80s | ISO 400
Ah! The Manhattanhenge!
It's been on my to-do list since Rafa (aka the Bard of PhotoPills) taught me how to plan it.
This a shot taken by another PhotoPiller, Javier del Cerro, who submitted it to the PhotoPills Awards and won a prize after being selected June 2017 PhotoPiller of the month.
Sun outside the frame (13)
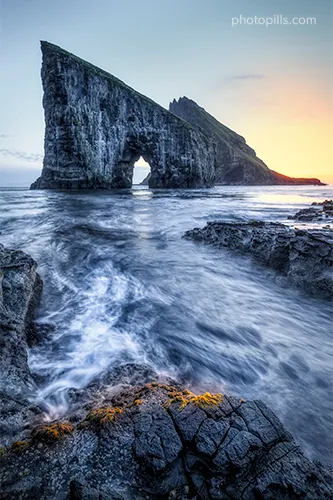
There's absolutely no obligation to include the Sun in your frame. Look at the picture above: the Sun is not in the composition. But it's casting a nice warm light on the side of the rocks.
The combination of the Sun's warmth along with the rocks and water cool tones creates a pleasant contrast. Add to this an interesting foreground (e.g. a few lower rocks and some moss) with the silky water and you've just created a magical picture.
Moon rising at Sunset (14)
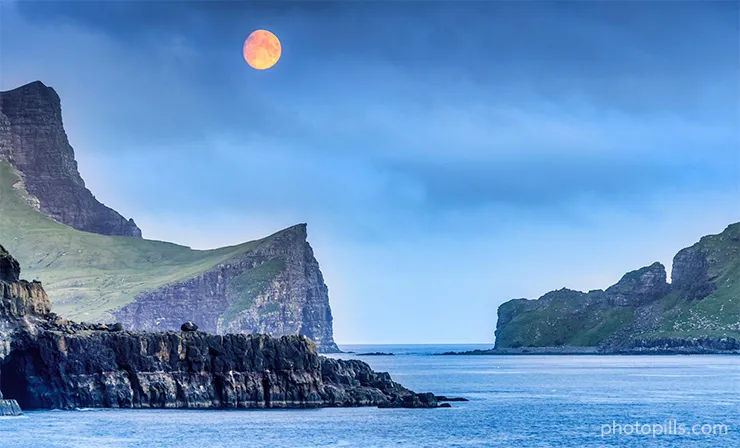
Again, this shot was taken during the Faroe Islands expedition, where the abrupt seascapes are mesmerizing.
The sky was completely overcast and there was no way to capture a colorful Sunset. So I waited until the Moon started to rise and ended up with this photo. That's why being flexible is so important in photography.
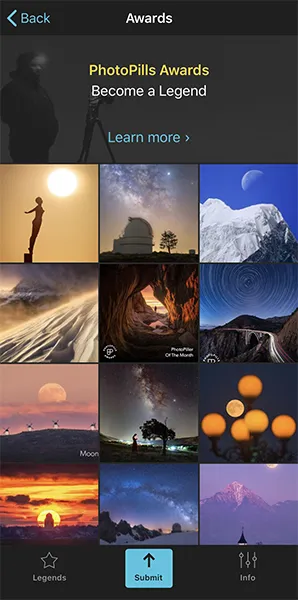
Photos by PhotoPillers (15) [bonus track]
So...
Do you feel inspired after seeing the previous examples?
If you're still struggling to get some creative ideas, you can get some inspiration with tons of pictures that PhotoPillers have imagined, planned and captured all over the world.
And if apart from seeing pictures of Sunrise, you could see pictures of golden hour, blue hour, Sunset, Moon, Milky Way, Star Trails, Meteor Showers, drone, lunar eclipses, solar eclipses...
That'd be pretty cool, huh?
Well...
You have tons of examples at the PhotoPills Awards submissions.
You'll find them in our Instagram account (follow us!) and in the PhotoPills app (My Stuff Menu > Awards).
And now that you have plenty of ideas to inspire you, let's move on to the next part of the plan: finding the best location.
Here we go!
2.Finding the perfect Sunset location
"Toni... How can I find the perfect location to photograph the Sunset?"
I get this question in my workshops over, and over, and over again...
And for a reason.
You won't find the answer in most books.
And there's no magical recipe either.
But there's a logic behind finding the perfect Sunset location.
Let me warn you: there is some work that you must do in advance. And it's worth doing it. Alter all, your images will look much better if you're shooting in a powerful location.
So here are the steps that you should follow to find the best location for your Sunset photo shoot.
Understand Sunset and light directions with PhotoPills (1)
This is key!
The first thing you need to know is where the Sun will be setting on a specific date.
By "where" I mean its exact location in the sky.
In other words, the Sunset direction relative to your position or the position you want to be.
"That is, where is the light going to come from considering the spot from which I‘ll be taking the picture, right?"
Correct!
Knowing the Sunset direction (light direction) will help you find a great Sunset spot.
But... How can you figure it out?
With PhotoPills of course!
Because PhotoPills tells you:
- The Sunset direction according to a specific location and date.
- The exact date and time at which the Sun sets in a specific direction on a certain location. I'll cover this in detail in section 4.
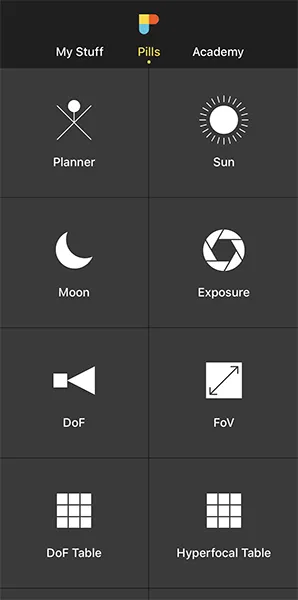
Let's see how you can easily use the PhotoPills app to figure out all this information!
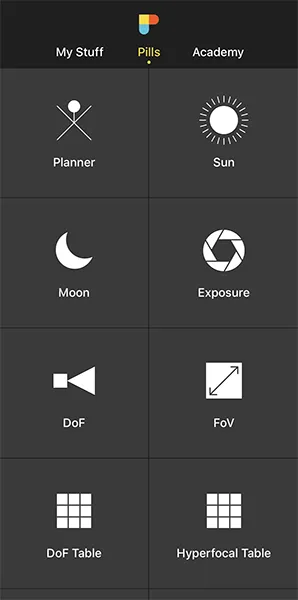
Open PhotoPills and tap Planner (Pills Menu).
Thanks to the map view, the workflow you should follow is super simple:
- Set the date you want to photograph the Sunset using the Time Bar – the colorful bar you see below the map. Swipe it to change time. Or tap it to access the Calendar. And double tap it to set the current date and time.
- Read the Sunset direction on the map (thick orange line). The thin orange line is the Sun direction at the selected date and time.
- Using the Sunset direction as a reference, move the Red Pin to a potential shooting spot, and figure out if that location works out for that particular Sunset.
- If it doesn't work out for that Sunset, try another location... And another one until you find the perfect Sunset location.
Let's have a look at an example.

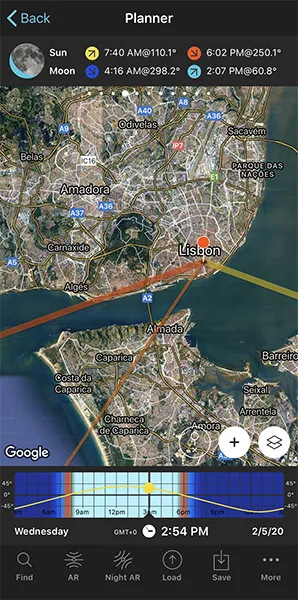
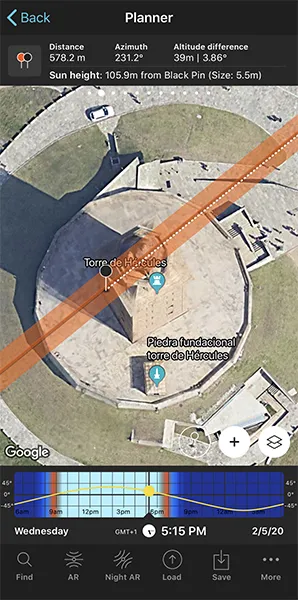
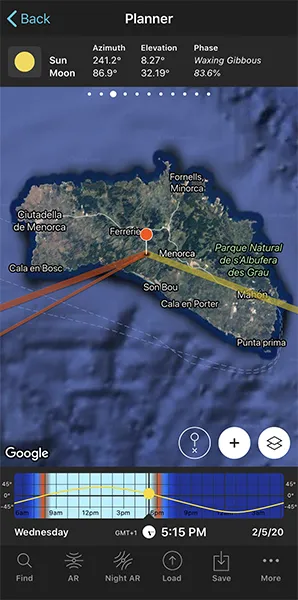
Imagine you're enjoying a nice and long holiday in Lisbon, Portugal. And you want to capture a beautiful Sunset for instance next Saturday March 7, 2020. On that particular day, in Lisbon the Sun sets at 06:36 pm (check Panel 4 above the map).
Observing the Sunset direction (thick orange line), notice that it points to the west, at an azimuth of 257.3º approximately according to Panel 3.
By the way, the azimuth is the angle measured from north to the Sun position. But I'll give you more details about the azimuth and the elevation of the Sun in section 3.
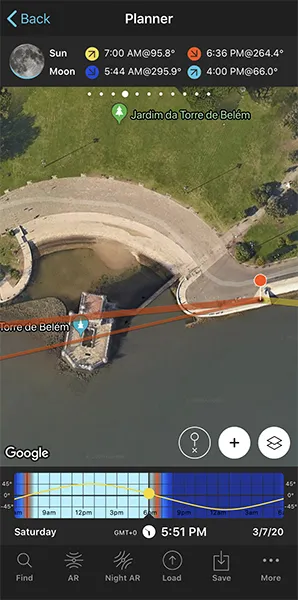
Now place the Red Pin on a tentative shooting spot. Let's say that you place it in Lisbon (Portugal), near the beautiful Torre de Belém. If you don't know how to do it, this video shows you how to move the Red Pin.
This is an interesting location because
- it's facing west,
- it's on the riverbed so there's plenty of space to move around,
- it has an interesting subject – the Torre de Belém,
- and the horizon is relatively free of obstacles so you can end up with a nice composition.
As you can see in the screenshot above, there are 3 lines originating from the Red Pin:
- The thick yellow line shows the direction of the Sunrise.
- The thick orange line shows the direction of the Sunset.
- The thin yellow line shows the position of the Sun.
All this information is for the selected date, time and Red Pin position. In this case, March 7, 2020 at 05:51 pm.
Have a look at the Time Bar that is below the map. If you swipe it to the left, you move time forward and the Sun information is updated. The same goes when you swipe the Time Bar to the right and move time backward.
So you can see how the Sun position (and light direction) changes as time goes by.
You can also change the date using the Calendar (Date & time screen). Tap the Time Bar once to access the Calendar.
A good starting point is to check the Sunset position on the solstices. That way, you can see how the Sunset position moves throughout the year.
Moreover, you can use the Find tool of the Planner to figure out when the Sun will set (or rise) in a determined position.
But I'll go deep into that in section 4.
Find beautiful landscapes (2)
Why is the landscape so important?
Well, it's going to be the stage of your story, the location where the scene (the jaw-dropping Sunset) is going to take place.
So you should be thorough when conducting your research. It's the only way to find the best place to photograph the Sunset.
Now, let's talk about the ingredients that your location should have.
It should be a landscape
It doesn't matter if it's a natural or an urban one. But look for a landscape so you can have room enough in your frame to:
- Include the Sun (or the light coming from it).
- Show where the Sunset takes place. Is it in the romantic Venice canals? In the middle of the savannah in Tanzania or around the impressive Torres del Paine National Park?
- Add a powerful subject. I'll get into this in the next section.
Pay attention to its orientation
In this case, you intend to photograph a Sunset. So you should:
- Take your shot from the east. That is, facing west.
- Try north-south directions to have light entering the frame from the side.
Search a location with space to move around
Having more space means more freedom to work on your composition.
Again, depending on the photo you want (backlight, light from the side, Sun in the frame...) you need to shoot from the east, north or south directions.
While you're deciding your framing, don't forget to turn around. Sometimes the best action happens in the opposite direction (180º from the Sunset location).
Alternatively, you can photograph from further away depending how big (or small) you want the Sun and/or the subject to look in the picture. I'll go into further detail in section 3.
Look for an interesting subject (3)
As you did searching for the location and a beautiful landscape, the idea here is pretty much the same.
Try to create a bond between the location, the subject and the light.
Look for a subject that you can photograph from the east if you want to include the Sun in the frame. Or you can capture it from the north or the south if you want the light to enter your frame from the side.
It all depends on the picture you have imagined and the atmosphere you want to create.
Make sure to include a point of interest in the composition
This point of interest is obviously going to be the subject of your picture – the main character of your story.
So pick it wisely... ;)
My advice is that you should always look for the simplest and cleanest composition possible. That way, it will be easier to convey all the emotions to the viewer and she will fully understand the story.
"Fine Toni... Could you give me some real examples?"
Sure!
A modern bridge, a snowy mountain, a lake acting as a mirror, a cabin in the woods, a cathedral in a riverbed, an isolated rock, a lonely tree, an old lighthouse,...
And you could go on with the list on your own.
Or you can do what I often do: have a look at the PhotoPills POIs database.
"The PhotoPills what?"
The PhotoPills Points of interest (POIs) database :)
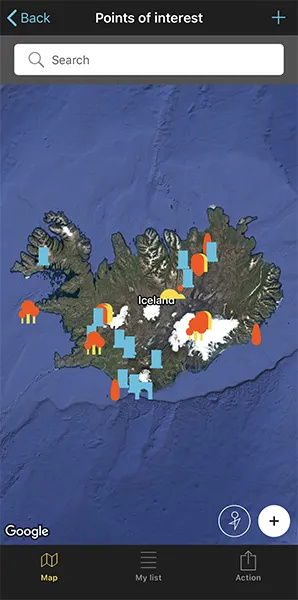
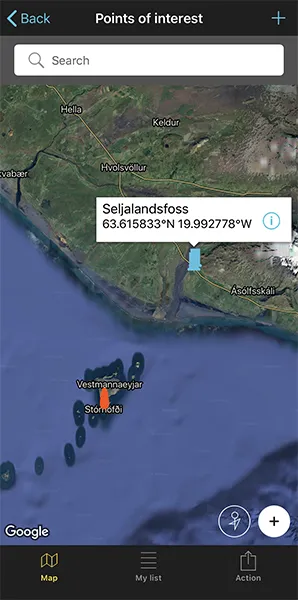
To find it, open PhotoPills and tap Points of interest (My Stuff Menu).
Tap Map (at the bottom of the screen) and navigate the map to travel around and discover new places thanks to our database of 10,000+ POIs all around the world!
Look for a nice foreground
The foreground is a key element in landscape photography, not only when capturing a Sunset.
"Why Toni?"
There are actually two reasons for that.
The first one is technical.
When shooting a landscape, you'll be using a wide angle lens in most cases. Although it's not mandatory. You can also capture amazing shots with a telephoto lens! ;)
But in the large majority of situations, you'll shoot with a wide angle lens.
The main drawback of this type of lens is that all the elements in the frame tend to get visually pushed away. So if you don't include a compelling foreground in your picture, the image will be flat and won't have any particular visual interest.
You need to catch the viewer's eye and lead it deeper into the picture. You should create interest, make her wonder and ask questions...
And the second reason is artistic.
Think of the foreground as the introduction to the image – it's the starting point of the story you want to tell.
But that's not it.
A visually compelling foreground implies a sense of depth and dimension. And it also helps the viewer to develop a stronger bond to the scene, to what's going on in the picture. You have to give her the impression that she's actually standing right there.
Conduct a thorough research (on and offline) (4)
There is no other way.
If you want to find the best location to capture this amazing Sunset that you have imagined, you have to spend as much time as necessary.
Research like crazy!
Although here are some ideas, check every single source of information that you can think of.
- Your main source of inspiration should be the photos of other photographers that draw your attention. Have a look at Instagram, Flickr, 500px, Unsplash, Getty Images, 1x.com, Viewbug, Pexels, Youpic, Shutterstock, Adobe Stock and Google Images.
- Learn from other photographers' discoveries and check the locations they have previously explored. Certain communities, such as Locationscout and ShotHotspot, offer this information.
- Analize publications like travel magazines (National Geographic, Condé Nast Traveler and Travel + Leisure), travel curated content (Exposure), travel guides (Lonely Planet) and the photography section of newspapers such as The Atlantic, The Guardian and The New York Times.
- Revisit your favorite photographers' websites and pay attention to their galleries. Have you checked the PhotoPills Masters' websites participating in the PhotoPills Camp?
- Don't forget the Wikipedia! It has tons of lists of interesting places. Let's say you're looking for lighthouses... Type in Google "lighthouse list Wikipedia" and you'll be surprised.
- A reliable and full of surprises source of information are the locals. No one knows the area better and provides greater advice.
- How long since your last visit to a library or a bookstore? Yes, books will tell you more about the local history and natural biodiversity of an area or town.
- Try to visit the nearest Town Hall or tourist office and look for first hand information.
- Again, check the Points of interest (POIs) included in PhotoPills.
- And finally, scout the area. It's usually the most effective strategy :)
Don't overlook the composition (5)
Once on location, find one or several elements and match them with the subject.
In addition to this, use some rules of composition and combine them with the Sunset direction.
Make sure that you incorporate something in the frame that's eye-catching. In other words, you need to attract the viewer's view and make her spend some time on your image, looking for details and unveiling the story you're telling her...
And for this, there's nothing more powerful than being more intentional about your compositions.
"That's wonderful Toni, but where do I start?"
By making decisions... ;)
Thanks to those decisions you make a great moment feel great, and gorgeous light feel gorgeous.
The decisions you have to take are actually pretty simple.
Just ask yourself:
"Should I include this element in my frame?"
And then ask yourself why it should be in (or not).
Each and every single one of the elements that are part of your composition should take the viewer to the emotional and storytelling heart of the image.
And they should literally serve as a visual roadmap for the viewer to follow as she observes the image.
I could go on for hours (and days!) about the composition but here are some examples that I'm sure will help you out.
- Use leading lines.
- Include triangles, circles and other shapes.
- Create volume.
- Implement the color psychology: reds, oranges and yellows are warm while green, blues and magentas are cold.
- Add some texture.
- Convey a sense of scale.
- Imply motion or rhythm.
- Play around with positive and negative space.
- Establish a balance between the different visual weights.
- Use a symmetry.
- Produce an atmosphere.
3.5 key things you should know before planning a Sunset
Now that you've found a powerful Sunset location with a cool subject, it's time to brainstorm!
The goal is to come up with a cool photo idea and plan it. And once everything is set and ready, you can go and take the picture.
So, decide what you want first:
- You may want to capture the scene lit from the side...
- You may want to photograph the whole scene with a beautiful Sunset in the frame...
- Or you may want to narrow the attention on your subject and photograph it with a big Sun.
And when you're ready, use the PhotoPills app to plan the photo. Use it to find the right shooting spot and right shooting date and time the Sunset you want to capture occurs.
Take into account this 5 essentials and you'll easily plan your photo idea (section 4).
The shooting spot determines the Sun size relative to the size of the subject (1)
One of the most common mistakes among photographers is to think that to get a huge Sun compared to the size of the subject you need a long focal length.
Well, let me tell you the truth.
It has absolutely nothing to do with it.
The fact is that the closer you are to your subject, the smaller the Sun looks to be compared to it. Conversely, the further away you are from your subject, the bigger the Sun is compared with it...
And that's because of the angular diameter of the Sun.
What is the angular diameter of the Sun
The angular diameter of the Sun is actually the diameter of the Sun measured in angle.
"And where can I find the angular diameter of the Sun?"
Easy peasy!
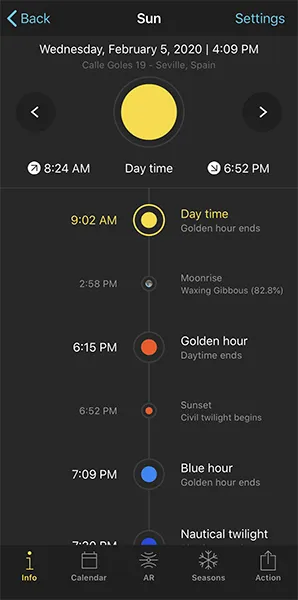
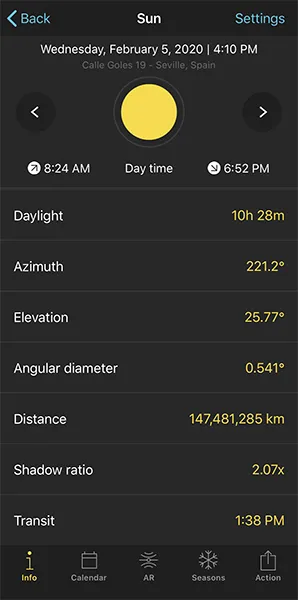
Open PhotoPills and tap Sun (Pills Menu). By default, the information that appears corresponds to your current location (according to your smartphone GPS) and the current date and time.
If you scroll down, you'll see that the angular diameter of the Sun is almost at the end.
Tip!
If you want to change the location and/or date and/or time, tap Settings (top right corner). On the new screen, you can change:
- The location by taping on Position. Slide the Autoupdate button to unlock the rest of the screen. You can use
- The search box if you want to type an address.
- The coordinates option if you know the latitude and longitude.
- The date by taping on Date. Slide the Current date and time button to unlock the rest of the screen. Tap
- Date to change the date.
- Hour to change the hour.
- You can also determine whether you want PhotoPills to automatically detect the time zone or not.
One more thing...
Did you know that from the Earth, the angular diameter of the Moon and the Sun are quite similar (roughly 0.5º)?
That's because of two facts:
- The Sun's physical diameter is 400 times bigger than the Moon.
- The Moon is approximately 400 times closer to the Earth.
Because of this combination, you have the impression that the Sun and the Moon have the same size.
So what works for the Sun, works for the Moon as well!
But let's get to the point...
How to determine the distance between the shooting spot and the subject to get a Sun of a certain size
Here comes a math alert!
But don't be deterred by that. I'm going to explain everything to you in a very simple way.
And if you still have questions, you can always ask me by posting a comment at the end of this guide ;)
Let's pretend that you want a Sun of a certain size compared to the subject size. And to get it, you obviously need to know how far away you have to be from your subject to capture it, right?
It's the same as finding out how far away must the Red Pin (shooting spot) be from the subject.
Are you still with me? Cool.
Solving the following equation answers your question:
Shooting distance = Sun diameter / [2 × tan(Sun angular diameter/2)]
In this case, the Sun diameter is the size (in meters, for example) you want the Sun to have.
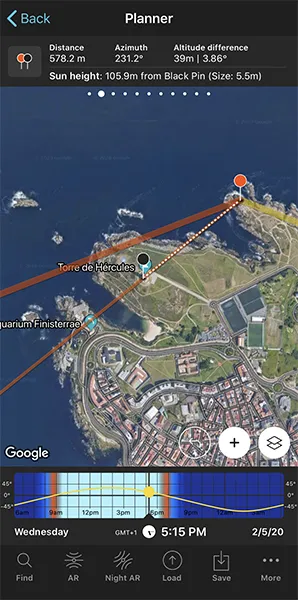
Now, imagine that you have found a great location with a powerful subject and you want to photograph the Sun setting behind the subject.
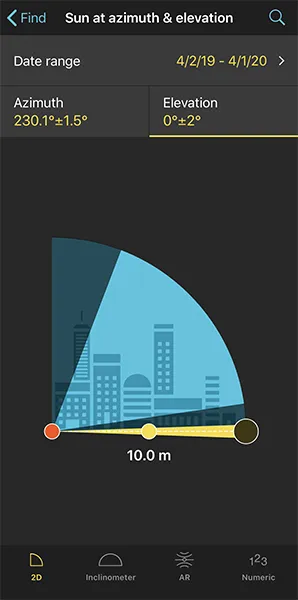
The photo you've imagined would look more or less like this:
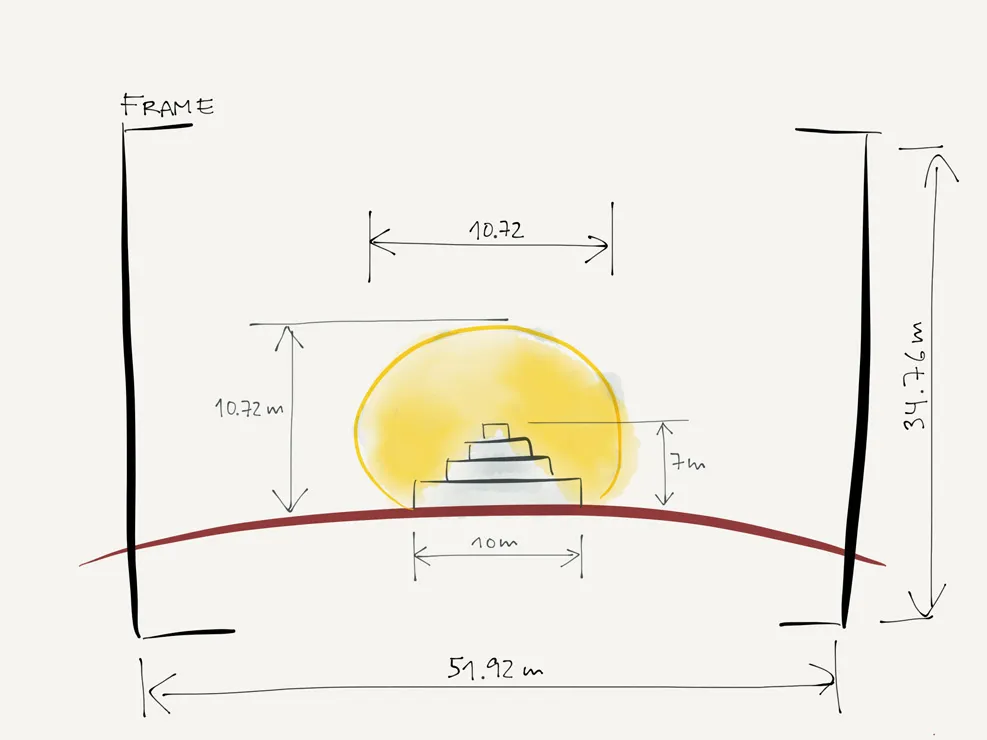
You're familiar with the spot and you know that the subject width is 10 meters. So the idea here is to capture a Sun with a size (diameter) of 10 meters.
And now, suppose the Sun angular diameter is 0.556º.
It's a number I picked randomly to use in this example. But you can know the angular diameter of the Sun for a specific location and date checking out the Sun pill.
Let's solve the equation:
Shooting distance = Sun diameter / [2 × tan(Moon angular diameter/2)]
Shooting distance = Sun diameter / 0.0097
Shooting distance = Sun diameter × 103.05
1030.49 = 10 × 103.05
Therefore, you have to be at a distance of 1,030.49 meters from the subject. Or a little more than 1 kilometre.
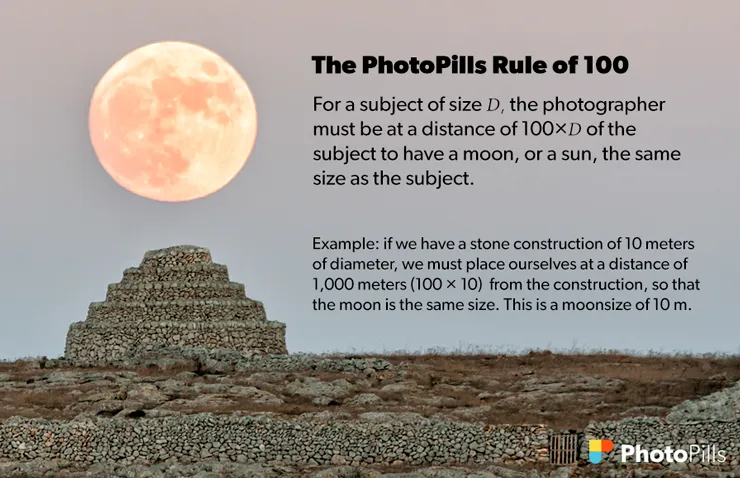
Apply the PhotoPills Rule of 100
In the equation, the multiplying factor (103.05) is roughly 100.
So, every time you calculate the shooting distance apply the PhotoPills Rule of 100.
Or better yet...
Forget any calculations and let PhotoPills do all the work for you! ;)
Determine the shooting distance and Moon size with PhotoPills
Open PhotoPills and tap Planner (Pills Menu). Then, place the Red Pin in the shooting spot. If you don't know how to do it, this video shows you how to move the Red Pin.
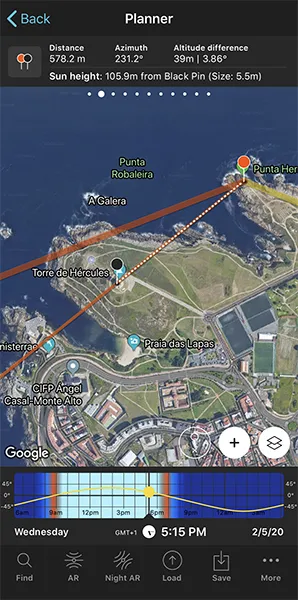
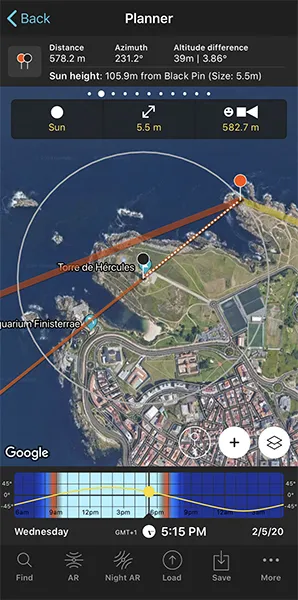
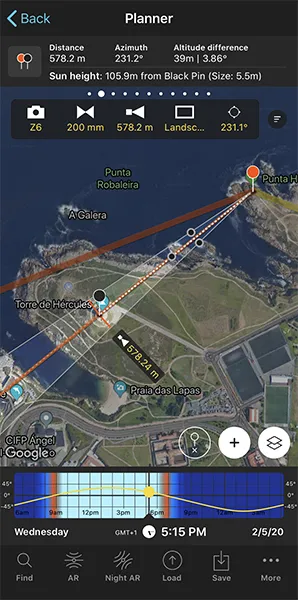
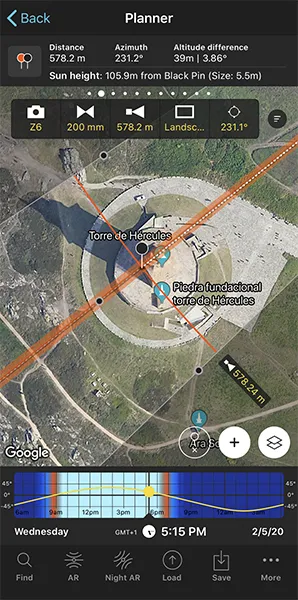
Now, slide the top panels to get to Panel 2, and tap the button to activate the Black Pin. Place it over your subject, where you want the Sun to be. Panel 2 tells you the shooting distance (the distance between the Red Pin and the Black Pin).
Slide your finger over the Time Bar and move time to align the Sun with the Black Pin. When doing so, you'll see that the size of the Sun is indicated in brackets in Panel 2 above the map.
Aaaaand... You can also see the size of the Sun on the map. Surprise!
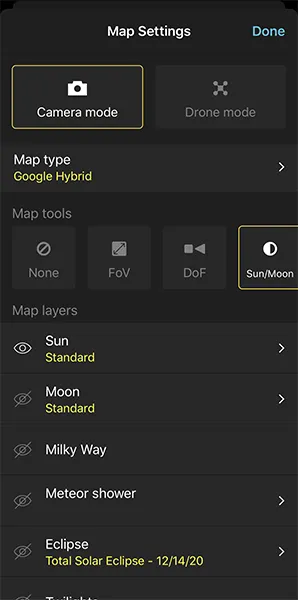
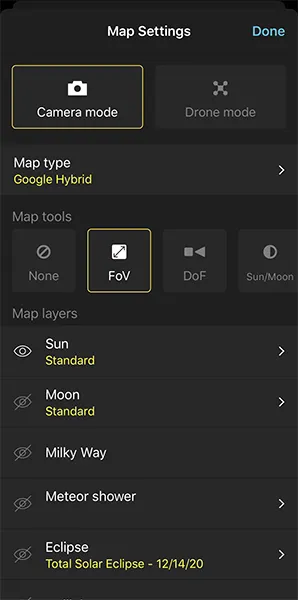
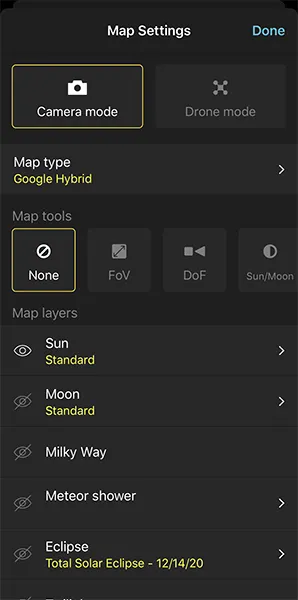
Simply tap the Map Settings button next to the (+) button on the map (lower right corner). Then tap the Sun layer and activate the Show Sun size option.
Go back to the map and zoom in on the Black Pin. The light orange line (the one showing the Sun azimuth) shows you the size of the Sun. That way you can visualize how big the Sun is going to be compared to the width of your subject.
Note: If you have the impression that PhotoPills is not showing the size of the Sun on the map, check that there is a considerable distance between the Red Pin and the Black Pin. If they are very close to each other, you'll hardly see the size of the Sun, as the Moon is very small in relation to your subject size. If you move the Red Pin away from the Black Pin following the direction (azimuth) of the Moon, you'll see that its size increases.
In addition to this, the Sun/Moon map tool helps you to calculate the shooting distance you need to get the Sun the size you want. To turn it on tap the Map Settings button next to the (+) button on the map. In the map tools section, select Sun/Moon.
It'll all make sense when you read section 4.
"I'm impressed Toni, I was totally wrong! So what determines the focal length?"
Keep reading and you'll know... ;)
The focal length determines the Sun size in the frame (2)
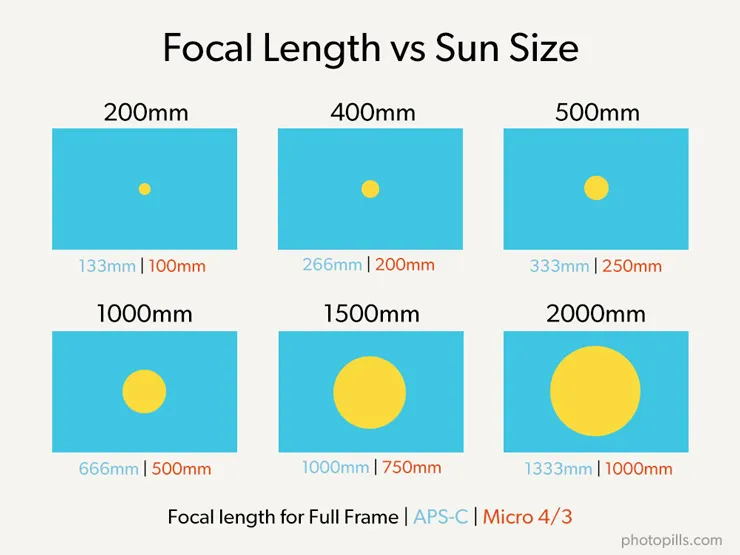
Every time you imagine the next Sunset picture you want to take, you should have in mind how big you want the Sun to be in the picture (in the frame).
And this, as you already know, depends exclusively on the focal length you'll use...
Sun as a dot
The best way to highlight the beautiful landscape around you is using a wide angle lens (10-35mm).
By doing this, the landscape will take most of the frame. I also recommend you to include a powerful foreground to link all the elements in the picture. To do this, get close to your subject and it will have a larger size in the photo.
But don't forget that the Sun will be very small... Just a tiny little spot of light in the sky.
Small Sun
A short to medium focal length (35-200mm) gives you a narrow field of view.
So you'll only be able to include a portion of the landscape in the frame. The cool thing about that is that you can lead the viewer's eye on a specific area, the most interesting one ;)
Depending on the focal length you use, the Sun will look more or less big in the frame.
Big Sun (or huge!)
Do you want the Sun to be the real subject of your photo?
If yes, use long focal lengths (>200mm). And if you don't have a very long lens, you can always use a teleconverter.
When using long focal lengths the field of view is very small. There will be little landscape in your composition. Most of the frame will be occupied by the Sun and the subject.
Determine the focal length with PhotoPills
Are you hesitating about which focal length you should use to capture a certain part of the landscape and/or to have a Sun of a certain size in the frame?
Fortunately, PhotoPills is always there to help you see:
- The Sun size on the map (depending on the shooting distance).
- The field of view on the map (depending on focal length, camera...).
Let's see how you can easily do it!
Open the PhotoPills app and tap Planner (Pills Menu).
Tap the Map Settings button. You have it on the map, next to the (+) button.
On the Map Settings screen, in the Map Tools section, tap the FoV (Field of View) button. Tap OK (top right corner) in iOS or the back arrow in Android.
You'll see a new panel on the map.
Imagine you're using a Nikon Z6 with a 200mm at f/8 and you're focusing right at the distance to the Black Pin.
The framing is in landscape mode (horizontal) and you want to frame towards the Black Pin position. Tap the Azimuth framing button (the last button). On the Azimuth screen, tap the Align with Black Pin option. The field of view is now aligned with the Black Pin.
Zoom in on the map around the Black Pin to see which part of the landscape fits into the frame.
And if you have the Show Sun size option activated, you will also be able to see how big the Sun will be relative to the frame.
To activate it, tap the Map Settings button next to the (+) button on the map. Then tap the Sun layer and activate the Show Sun size option.
Understanding natural light is essential (3)
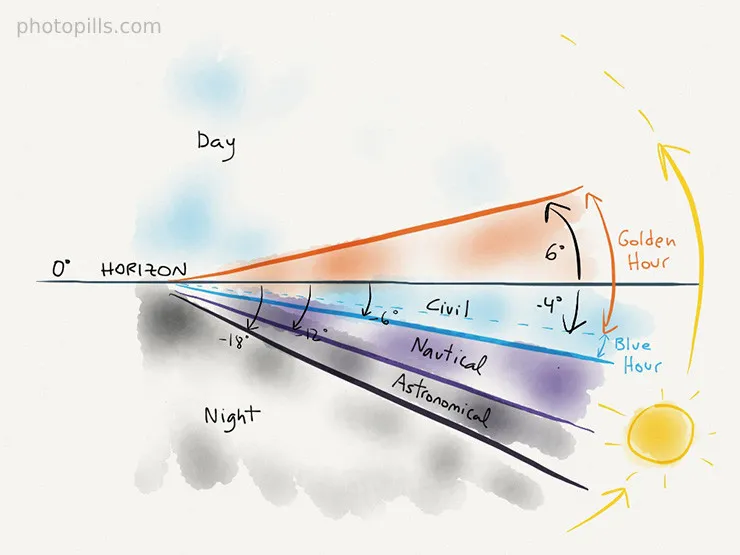
Natural light depends on the elevation of the Sun. Or if you prefer, how high the Sun is above the horizon.
As you can see in the diagram at the beginning of this section, there are different types of natural light depending on the Sun elevation:
- Day. Elevation higher than 6º.
- Golden hour. Elevation between 6º and -4º.
- Blue hour. Elevation between -4º and -6º.
- Civil twilight. Elevation between 0º and -6º.
- Nautical twilight. Elevation between -6º and -12º.
- Astronomical twilight. Elevation between -12º and -18º.
- Night. Elevation lower than -18º.
This is a brief summary of the different light phases as the elevation of the Sun changes.
In the following video Rafa explains in great detail the different types of natural light, when they occur and the type of photos you can take in each natural light type:
But if you want to read more on the subject, I suggest you check our super guide on natural light.
Whenever you plan to capture a Sunset, having the right type of natural light in the scene is essential. And there's no doubt that golden hour and blue hour offer the best light conditions.
During golden hour, the Sun creates a nice and warm light. And during blue hour the atmosphere has a deep, dark blue color.
So it's crucial to know exactly when both golden hour and blue hour will happen. And it's also crucial to know the direction the light will fall on the scene (light direction).
In section 2 you learnt how to find Sunset and light direction with the PhotoPills app.
Well, with PhotoPills you can also figure out in less than 30 seconds when the golden and blue hour occur in the desired location at a certain date.
Let's see how.
How to find out when the golden hour and blue hour happen with PhotoPills
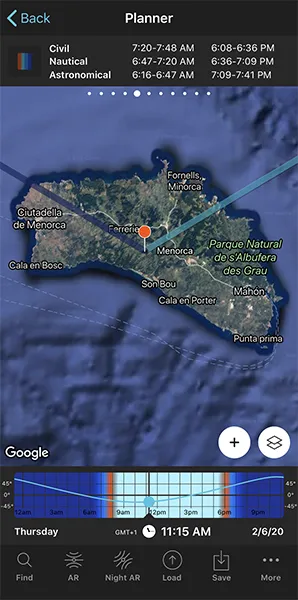
Open PhotoPills and tap Planner (Pills Menu). Place the Red Pin on the potential location. And then swipe the top panels until you find Panel 3. There you can see the elevation of the Sun.
Remember that:
- The golden hour occurs when the Sun elevation is between 6º and -4º.
- The blue hour occurs when the Sun elevation is between -4º and -6º.
Now swipe the top panels to Panel 6. This panel tells you the exact start and end times of the golden hour and the blue hour for the selected date and the Red Pin position.

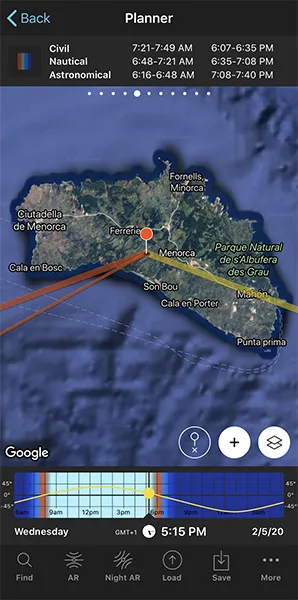
How to find out when the twilights happen with PhotoPills
Again, open PhotoPills and tap Planner (Pills Menu). Place the Red Pin on the potential location. And swipe the top panels to Panel 3. One of the data this panel gives you is the elevation of the Sun.
Remember that:
- The civil twilight occurs when the Sun elevation is between 0º and -6º.
- The nautical twilight occurs when the Sun elevation is between -6º and -12º.
- The astronomical twilight occurs when the Sun elevation is between -12º and -18º.
Now, swipe the top panels until you get to Panel 5. This panel tells you precisely the start and end times of the twilights (civil, nautical and astronomical) according to the selected date and the Red Pin position.
And now, I'll teach you how to figure out the position of the Sun in the sky which is key to understand light direction too.
The Sun position: azimuth and elevation (4)
Remember the PhotoPills motto?
Imagine. Plan. Shoot!
Usually you want to capture the Sun in a certain position in the sky and relative to the subject. Or the Sunlight hitting the scene in a particular direction.
That's why the planning work is so important, because knowing the position of the Sun ahead of time will allow you to pick the best shooting spot and best shooting date and time for the best photo possible.
But let's start from the beginning...
How the Sun position is defined
To find out the Sun position, you first need 3 starting points:
- A specific location on Earth. The position from where you'll take the photo.
- A date.
- And an exact time in hours and minutes.
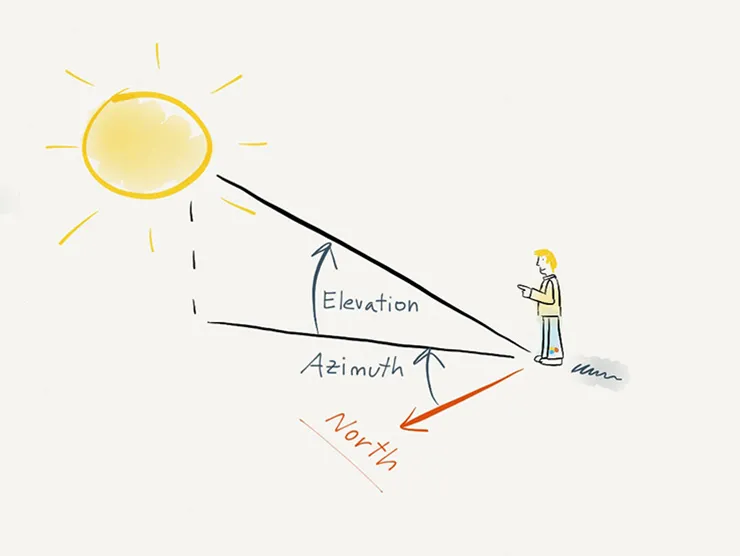
From there, PhotoPills helps you to determine the Sun position. And for that, you need to understand a couple more variables: the azimuth and the elevation.
The Sun position is defined by two coordinates:
- The azimuth. It's the angle formed by a celestial body (the Sun, in this case) and the North, measured in a clockwise direction around the observer's horizon (you, the photographer). It determines the direction of a celestial body.
- The elevation. It's the vertical angular distance between a celestial body and the observer's local horizon, also called the local plane of the observer. It determines the altitude in the sky of a celestial body.
Note: Both coordinates point out the position of the center of the Sun.
How to find out the Sun position with PhotoPills
Open PhotoPills and tap Planner (Pills Menu).
Then, tap the Map Settings button and activate the Sun layer. To do this, make sure the eye-shaped icon is not crossed out. If it is, tap it.
Finally, swipe the top panels to Panel 3 as you can see in the screenshots below.
On the map, the thin orange line indicates the direction where the Sun is (its azimuth). And Panel 3 shows the azimuth and elevation of the Sun and Moon for the Red Pin position and the selected date and time.
Once on location, make sure you're at the Red Pin position. Tap the AR button (bottom of the screen) to visualize the Sun position with the Augmented Reality view (AR) ;)
And if you want to master Sunset photography, you should definitely study our guide to azimuth and elevation thoroughly.
The Sun position in relation to the subject position (5)

Now you know the exact position of the Sun (its azimuth and elevation).
But, what about the Sun position relative to the subject position? Isn't that important in your composition?
Of course it is!
So, let's see how you can find this information out.
Sun azimuth relative to the subject
As you learnt in the previous section, everything is on the PhotoPills Planner. The thin orange line on the map shows you the Sun direction for a specific date and time.
Thus, aligning it with your subject is very easy.
Just swipe your finger on the Time Bar and adjust it until it's over or very close to your subject.
You can also move the Red Pin to align the Sun with your subject.
Sun elevation relative to the subject
Again, just rely on the PhotoPills Planner ;)
Swipe the top panels to Panel 2. Tap the button on the panel and the Black Pin will appear on the map.
Now place the Black Pin over your subject and move the time to align the Sun with the Black Pin.
Have a look at Panel 2. It provides all the information you need:
- The altitude of the center of the Sun above the Black Pin (ground level).
- The Sun size (apparent diameter).
Therefore, you know:
- How high the Sun is going to be compared to the subject.
- How big the Sun is going to be compared to the subject.
If you're at the Red Pin position, you can also tap the AR button (bottom of the screen) to visualize the Sun position with the Augmented Reality view (RA) ;)
Awesome!
Now you know the 5 essentials you need to nail your Sunset photo plan.
In the next section we're going to use them to plan 2 Sunset pictures – 2 real cases!
Here we go!
4.How to plan a Sunset photo like a pro
The goal of planning in Sunset photography is to get:
- A shooting spot, from where to take the picture,
- A shooting direction (framing) and
- A date and time of shooting...
So you can capture the Sunset photo you have in mind.
Planning a picture may seem like a lot of work, but you've nothing to worry about. With the PhotoPills app, it's a matter of a few minutes.
And to prove it, here you have a detailed explanation of the two most common cases:
- A Sunset plan for a certain date.
- A Sunset plan with the Sun in a certain position. In this case, you know the shooting spot and the photo you want, and you want to find out when it happens.
Let's go!
How to plan a Sunset for a certain date (1)
Imagine you want to photograph a cool Sunset picture on a given date (next Saturday, for example)... And you don't know where to go nor at what time.
In other words, you need to find out:
- The exact shooting spot from which you'll take the photo.
- The exact time the Sun will be where you want it to be.
And for this, there's no better tool than the PhotoPills Planner.
In the following video Rafa explains in great detail how to find a powerful Sunset photo when you know the date.
The secret is to understand where the Sun will set on that particular date and then check different locations until you find a great photo opportunity.
At the end of the video, you'll see how Rafa finds an epic photo opportunity: the Sun setting under the beautiful arch called Es Pont d'En Gil in Menorca, Spain (see the photo above).
If instead of watching the video, you prefer to read the workflow you should follow, here are the details.
So take your phone, make sure you have the PhotoPills app installed and follow these steps with me.
Place the Red Pin in a potential shooting area
As soon as you start planning, the first thing you should do is to place the Red Pin in a potential shooting area.
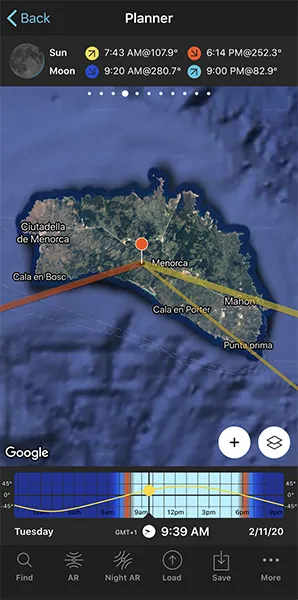
Open PhotoPills, tap Planner (Pills Menu).
Then, place the Red Pin somewhere on the planet. In this case, in Menorca, one of Spain's most beautiful islands. If you don't know how to do it, this video shows you how to move the Red Pin.
Set the date you're planning to photograph the Sunset
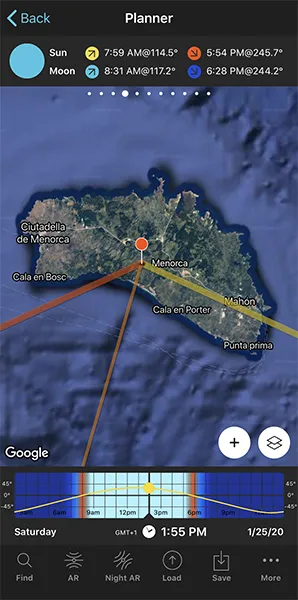
Now, double tap the Time Bar below the map to set your current date and time. Then, swipe it to the left to change the date and time until you get to the date when you want to take the picture, let's say January 25, 2020.
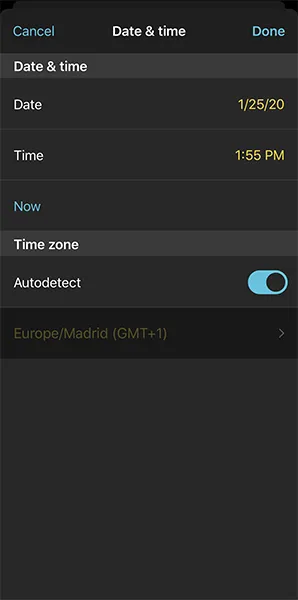
Alternatively, you can set the date using the Calendar. To do this, tap the center of the Time Bar. On the Date & time screen, tap Date to manually change the shooting date.
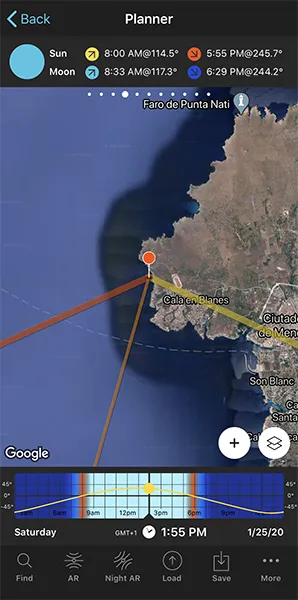
Find out the Sunset direction and time
On the Planner, swipe the top panels above the map to Panel 4. It's telling you that on January 25, 2020 the Sun sets at 05:54 pm according to the Red Pin position.
You can see on the map the Sun and the Sunset directions:
- The Sun direction is the thin orange line.
- And the Sunset direction is the thick orange line.
If you don't see these lines, activate the Sun layer. You can do this by tapping the Map Settings button. You will find it next to the (+) button on the map.
The Sunset direction line (thick orange line) is crucial to determine the perfect shooting spot.
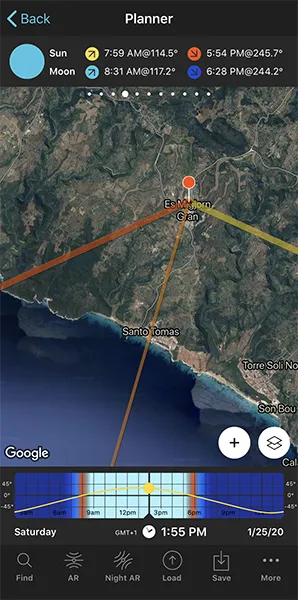
Check different locations until you find a photo you like
Now that you know where the Sun sets, all you need to do is to move the Red Pin to the cool locations you know until you find a great Sunset photo.
Obviously, the more locations you know the better.
But if you don't know any particular location, you need to do your research first as I explained in section 2.
In this particular case, after checking a few cool locations, I found a great photo opportunity in Pont d'En Gil, a fantastic natural arch that serves as the main subject.
The natural arch is relatively wide. And I'm very lucky, because on January 25, I can photograph the Sun setting through the natural arch. Spectacular!
Let me show it to you.
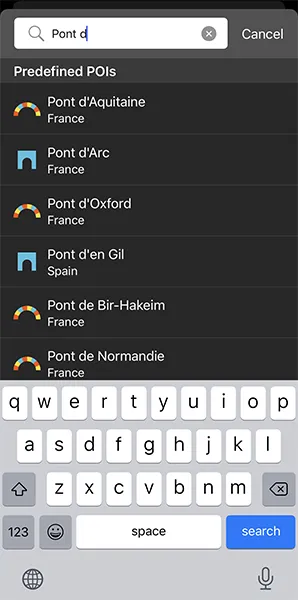
Tap the Load button (at the bottom) and type "Pont d'En Gil" in the search bar. Select the result and the Red Pin will be placed on the natural arch itself.
Now, zoom in on the area so you can have a closer look.
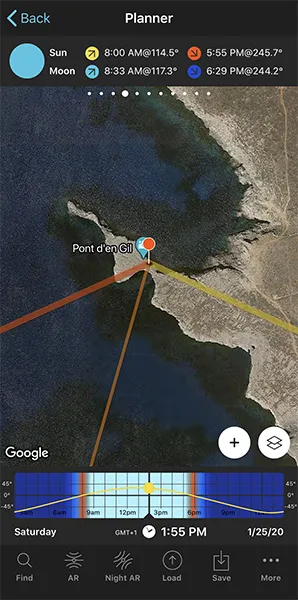
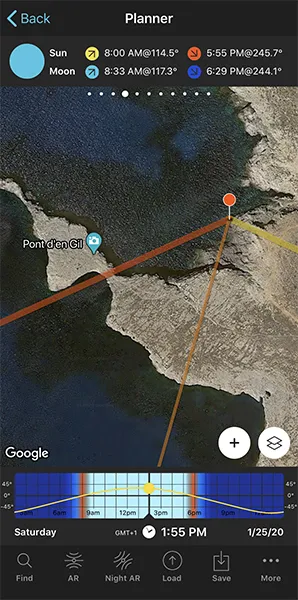
As you see, the Sunset is perfectly aligned with the natural arch!
Move the Red Pin around the cliffs that are in front of Pont d'en Gil. The easiest way is to drag and drop the Red Pin.
But make sure to place the Red Pin in the lower area of the cliffs, almost at sea level. You need to see the horizon through the arch to be able to photograph the Sunset.
Tip #1!
If you swipe the Time Bar to January 26, 2020, you'll notice that you can also capture the Sunset through the natural arch.
Keep swiping the Time Bar...
Yes! The shot is also possible on January 27, 28, 29... 2020 because you can shoot this photo for a week roughly.
So if one day is cloudy, go to the location the next one! ;)
PhotoPillers never give up!
Tip #2!
Use the Augmented Reality view (RA) on the Planner. Use it:
- At home, to visualize the Sun position relative to the horizon.
- At the shooting spot, to check that everything (ie. the Sun, the subject) is in place, and also to adjust your frame for the best composition before you shoot.
To sum up...
Depending on the location, you can move the Red Pin around and research the perfect Sunset spot according to your imagination and the elements of the scene.
Save the Plan
Now that you've finally found the location you were looking for to capture a cool Sunset photo, don't forget to save the plan!

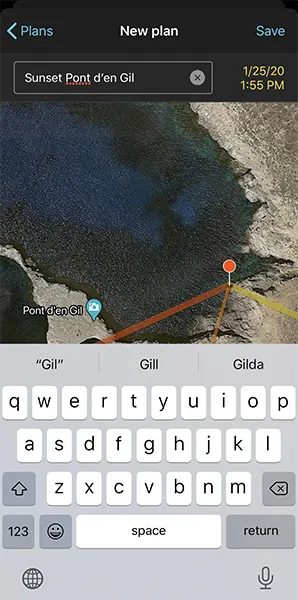
On the Planner, tap Save. On the Save as... screen, choose to save a Plan.
On the Plans screen, tap New plan. Type a name in the Plan name box, and tap Save.
Now, every time you want to look at it, you can do so by tapping the Load button. Then, tap Plan and scroll down through the results until you find it.
If you tap it, PhotoPills automatically loads it to the Planner.
Planning the Sunset when you know the date is super powerful... But finding the date the Sun is setting right where you want in the photo is priceless.
So keep reading!
How to plan a Sunset with the Sun in a certain position (2)
Long story short...
You want the setting Sun in a certain position in the photo but you don't know the shooting date ;)
In other words, you know the exact shooting spot from which you'll take the picture, the frame and the Sun position relative to the subject you want, but you need to find out:
- If that particular photo is possible.
- And if so, when exactly.
And the best way to do so is by using the Find tool in the PhotoPills Planner.
Here's a video in which Rafa explains in great detail how to plan a photo of the Sun setting through North Window and Turret Arch, in Arches National Park (USA).
Is it possible?
Watch the video to figure it out :P
But again, if you prefer to read, this is how to plan the photo.
So take your phone, make sure you have the PhotoPills app installed and follow these steps with me.
Place the Red Pin on the shooting spot
The first step is to place the Red Pin on the shooting spot you want.
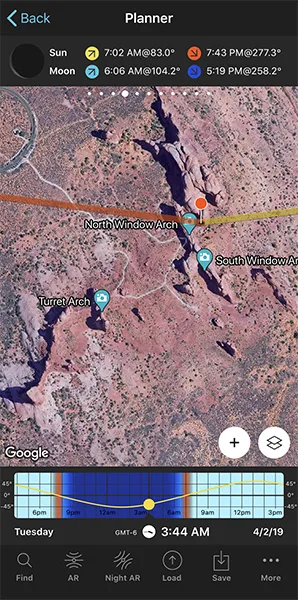
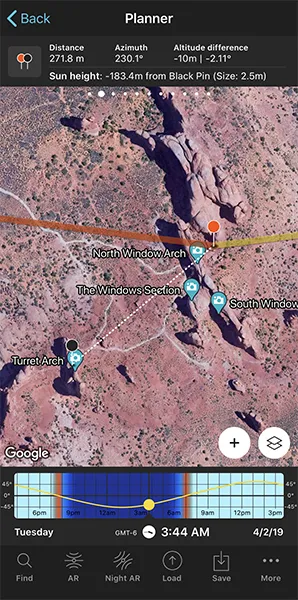
Open PhotoPills, tap Planner (Pills Menu) and then place the Red Pin on the shooting spot. For example, right in front of North Window in Arches National Park (USA). If you don't know how to do it, this video shows you how to move the Red Pin.
Place the Black Pin where you want the Sun to be
You're looking for the Sun to be setting through North Window and Turret Arch.
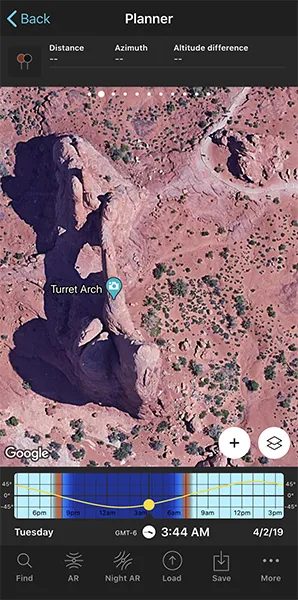
Zoom in on the map, until you can clearly see Turret Arch.
Swipe the top panels on the map until you find the Black Pin information panel (Panel 2). Tap the icon showing the Red Pin and the Black Pin to activate the Black Pin on the map.
Drag and drop the Black Pin in the center of the arch, right where you want the Sun to be.
Now, all you have to do is check if the photo is possible!
Find the dates when the photo is possible
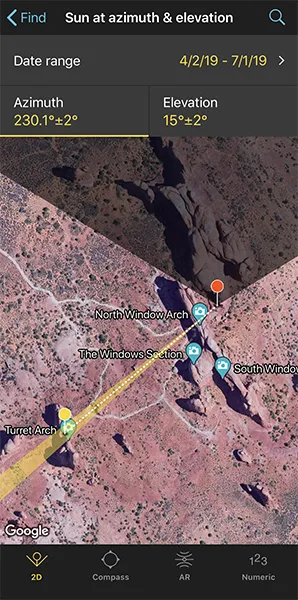
To do this, tap the Find button. It's located on the bottom left corner of the Planner. And then, select Sun at azimuth and elevation (Sun in Android).
On the new screen, you have to tell 3 things to PhotoPills:
- The date range you want to search for results (for example, 1 year starting from today).
- The Sun azimuth or direction (aligned with North Window and Turret Arch).
- The Sun elevation or altitude (set it to 0º for a Sunset).
Enter the date range

Tap Date Range, tap Start date, then Today and OK (back arrow on Android).
Next, tap End date. Now you can enter a certain date or range. To enter a range, tap the black area of the screen and the date options will change. Select 1 year, for example, and tap OK (back arrow on Android).
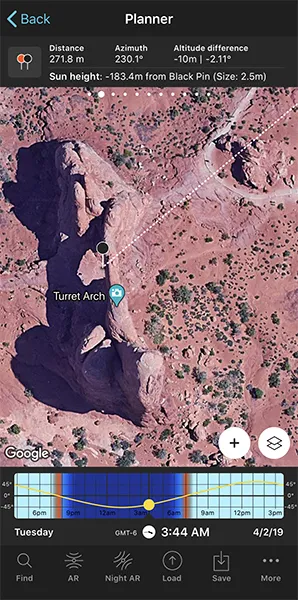
Enter the Sun azimuth
The Yellow Pin you see on the map is linked to the Black Pin, so now you have the Sun azimuth! :P
A quick reminder...
The azimuth is the angle formed by a celestial body (the Sun, in this case) and the North, measured in a clockwise direction around the observer's horizon (you, the photographer). It determines the direction of a celestial body. For example, the Sun is at azimuth 230.1º when it is situated at 230.1º measured clockwise from North.
The elevation is the vertical angular distance between a celestial body and the observer's local horizon, also called the local plane of the observer. It determines the altitude in the sky of a celestial body. For example, the Sun is at 12º of elevation when it is situated at 12º above your ideal horizon.
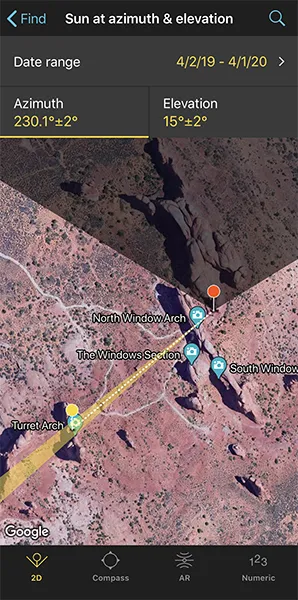
Well, the Sunset direction (the azimuth) changes every day by 0.5º approximately. So you'll have to adjust the shooting spot depending on the date and time at which the moment you have imagined occurs.
Back to our example, if you look at the top of the screen, the azimuth is 230.1º with a ±2º error represented by the yellow area on the map.
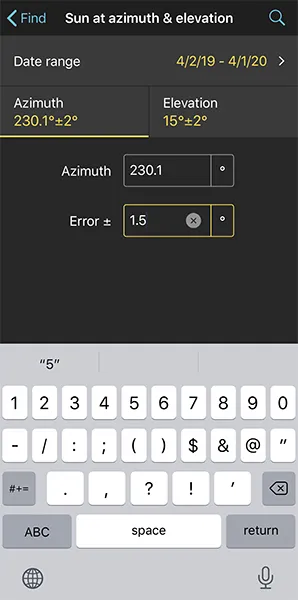
In this example, you want the Sun to be aligned with Turret Arch's hole so the error margin has to be smaller. To change it, tap Azimuth (a yellow line appears under the numeric value) and at the bottom, tap Numeric. In the new screen, select Error ±, type "1.5º" and tap the screen to accept.
You'll see that the yellow area adjusts to the width of Turret Arch.
Enter the Sun elevation

Tap Elevation (a yellow line appears under the numeric value) and on the diagram, drag the big yellow dot down until the elevation is 0º.
However, as you can see the big dot is now black. This means the Sun is now in a dark sector...
Oh no! The shot you're looking for is not possible! :(
But... There's a way. (There's always one.)
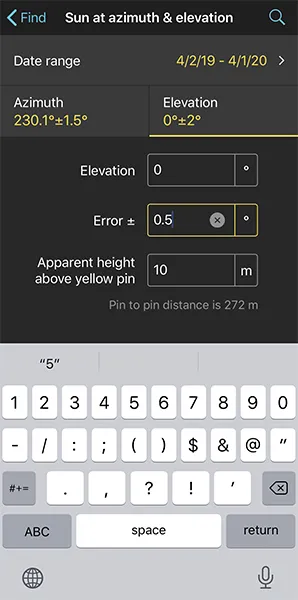
First, tap Numeric to change the error and be more precise with the elevation from which the Sun will be visible. In the new screen, select Error ±, type "0.5º" and tap the screen to accept.
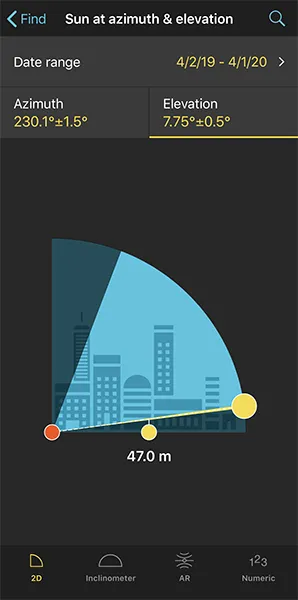
Set a higher elevation by dragging the black dot out of the dark area until it becomes yellow again.
So now the elevation is 7.75º with a ±0.5º error.
Again, if you want to change the error, tap Numeric and set the error you want.
Get the results table for the Sun
Great, you've just entered the date range and the Sun position you want (azimuth and elevation).
Tap Search (magnifying glass icon at the top right corner) to see the potential dates.
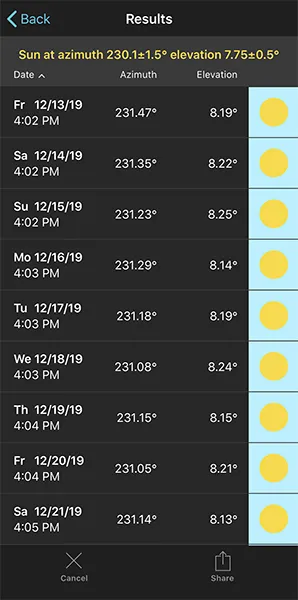
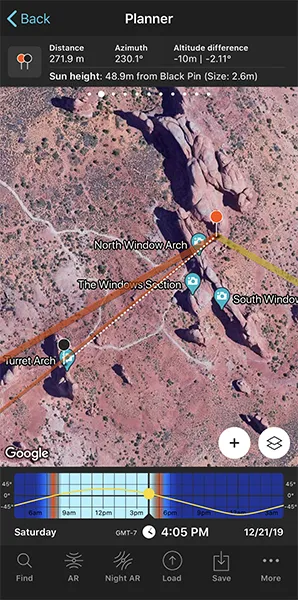
In the table, let's check at one of the dates. For example, December 21, 2019. Tap that result to return to the Planner map.
So, as you can see the Sun is not setting through Turret Arch, but it's setting next to it. It looks like a pretty cool shot!
And since the Sun's position doesn't change that much from one day to the next, the photo is also possible on December 22, 23, 24... This allows you to choose the day with the best weather forecast ;)
Simply swipe the Time Bar to change the day and adjust the shooting spot according to the new Sunrise direction.
In addition to this, use the Augmented Reality view (RA) on the Planner to check the Sun's elevation and set a frame as well.
Save the Plan
Now that you have finally found the location you were looking for to capture a cool Sunset photo, don't forget to save the plan!

On the Planner, tap Save. On the Save as... screen, choose to save a Plan.
On the Plans screen, tap New plan. Type a name in the Plan name box, and tap Save.
Now, every time you want to look at it, you can do so by tapping the Load button. Then, tap Plan and scroll down through the results until you find it.
If you tap it, PhotoPills automatically loads it to the Planner.
And now that everything is planned, all you have to do is wait for the perfect weather!
In the next section I'm going to explain to you how you can analyze the weather forecast and use it to your advantage predicting the Sunset quality.
5.Predicting Sunset quality
Look at the picture above. What makes it special?
That's right. The light and the clouds illuminated by it.
We all want to have a dramatic red sky in our Sunset shots. Or at least some clouds reflecting the warm colors present in the scene...
However, unless you're an extremely lucky person, this doesn't happen everyday. Actually, it can be very rare depending on the location and the time of the year.
But sometimes magic happens...
"That's a bit vague Toni... How do I know when an amazing Sunset will happen?"
Well, I can't predict the future (yet!).
But here are the steps you should follow and the elements you should definitely look for.
Check a 7-day weather forecast
The good news is that you can shoot the same Sunset for a week or so. During that period of time the Sun is roughly at the same position in the sky and relative to your subject. So that increases the chances of having favorable weather conditions to get that awesome light and clouds.
Once you've planned the photo (section 4), choose the day when the weather works best.
Check the weather forecast using different sources. My favorite ones are Windy and Ventusky. I'll talk about them in more detail in section 10.
Then, analyze the potential conditions that you'll have. You want to have clouds in the sky but not on the horizon. I'll give you more details about the type of clouds you need in a second.
Finally, establish the best possible day for a powerful Sunset knowing that you have a time range of a week or so.
If you're not 100% sure, go and shoot the same shot a few days in a row to capture it in different weather conditions. Then, keep the photo you like the most.
Look for a certain type of clouds
You read right, you definitely need some clouds...
But not an overcast sky!
As you have guessed, if the clouds are too thick, there won't be much to see. Similarly, dark clouds won't reflect the beautiful, fiery light that you crave for.
"OK Toni, some clouds. But, which ones?"
Let me start by saying that the presence of clouds in the sky changes throughout the year. As a rule of thumb, in winter the light is softer and there are more clouds while in summer the light is harsher light and there are fewer clouds.
Here's a good summary of the types of clouds that you can encounter and when the sunlight is going to color them.
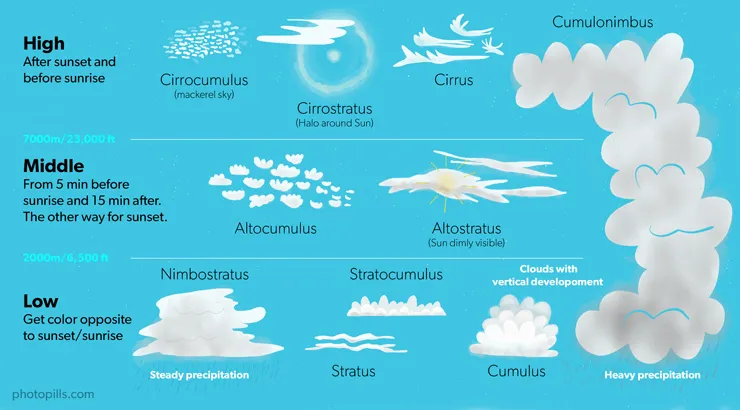
We can divide the types of clouds into 3 groups. Each of them is colored at a different time of Sunset:
- High clouds. They are colored after Sunset.
- Middle clouds. They can get color 15 minutes before Sunset and 5 minutes after Sunset.
- Low clouds. They are colored during Sunset. But only those that are in the opposite direction to the Sun.
Therefore, looking for the right type of clouds is important.
For instance, altocumulus clouds that are scattered throughout the sky will be more fun to photograph, and will make for some great images. But, in my opinion, the best clouds are wispy, high cirrus clouds or puffy cumulus clouds.
Interestingly, altostratus clouds can be great in a long exposure shot. Particularly if you study the wind direction in advance and predict their behavior ;)
Are you still here? Good!
Wind: yes or no?
You should definitely avoid any situation with strong gusts of wind.
First of all, it can be dangerous for your and for your gear (you tripod could fall, for example). And that's not the point of Sunset photography...
Secondly, you don't want your clouds to move away from your frame!
But let's say there is some wind at the location...
How fast are the clouds going to move?
The cool thing about this is that, depending on the wind strength and the type of clouds, you can capture a stunning image with a long exposure.
So you can not only capture amazing colors but also convey a nice sense of motion...
"Nice Toni... But now that you're talking about long exposures, what shutter speed should I use during the shooting?"
Good question!
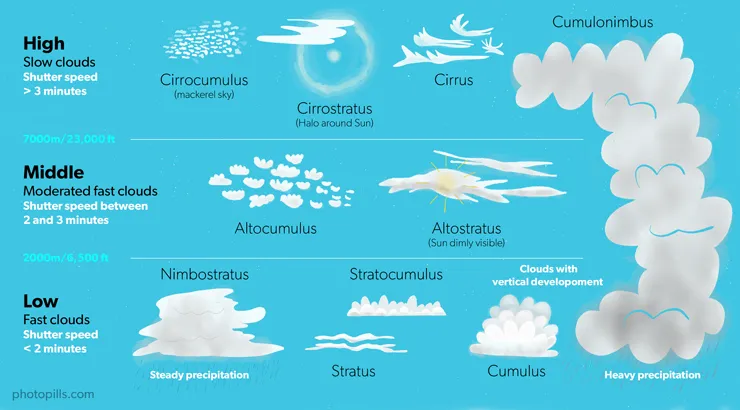
Well, the clouds' speed actually depends on how high they are in the sky.
We can divide the types of clouds into 3 groups. Each of them moves at a different speed:
- High clouds. They move very slowly. Use shutter speeds of 3 minutes or more.
- Middle clouds. Their speed is moderately fast. I recommend using shutter speeds between 2 and 3 minutes.
- Low clouds. They move very fast. Use shutter speeds of 2 minutes or less.
Obviously these are just estimates as everything will depend on how strong the wind blows.
For that, I use an app called Windy. It's very easy to use and it tells you in a straightforward interface the wind speed and direction (more details in section 10). Exactly what you should be checking when planning your shot ;)
Another factor that you should take into account is that clean air is very effective at scattering the blue light. Look for dramatic Sunsets right before or after a rain or wind storm.
Speaking about rain...
Humidity has an effect on light
Forget about shooting a dreamy Sunset if it's raining cats and dogs XD
But even if it's not raining, a high humidity mutes the colors because of the water content present in the atmosphere.
So, ideally, you're looking for a lower humidity scene to produce more vibrant colors.
In section 10 you can find a list with all the apps and websites that I use to "predict" a good Sunset.
I'm aware that Nature is rather capricious, but I always try to make the best out of it ;)
6.All the equipment you need to photograph a Sunset
Here's a complete list of the gear you'll need to photograph a Sunset.
It covers a wide range of options regardless of whether you're a beginner, an advanced or a pro photographer.
Camera
Believe it or not, you can take Sunset pictures with any camera, including smartphones...
Yes, you read it right.
All cameras on the market can be used for Sunset photography.
However, there are some limitations. The quality of the photos you take will depend on the type of camera you use. Actually, the resulting image will vary according to their technical features.
So be flexible and adapt your photography ideas (and expectations) to the type of camera you plan to use.
Smartphones
They can perform incredibly well these days...
But bear in mind that, except for some very specific models, your smartphone camera uses a short (wide angle) focal length. This limits your possible compositions. Since the Sun will look very small in the photo, almost like a dot (section 3).
In addition to this, as the Sun sets and the light fades away, your smartphone will have a hard time focusing and metering. This is due, of course, to its small sensor.
And since most smartphones don't allow you to change the aperture, it will automatically increase the ISO resulting in a photo with a lot of noise.
So my advice here is to fight technical limitations with artistic weapons (ie. work on a unique composition and take advantage of the moments of best natural light!).
Compact cameras
In the last few years, the market share of compact cameras has plummeted. They have been replaced by smartphones and few people use them nowadays.
That being said, if you still have one, you can capture a nice Sunset picture. Nevertheless, compact cameras have a number of limitations that prevent them from competing with DSLRs and mirrorless cameras.
Remember that the Sun size in the photo will depend on the focal range the compact camera has. Moreover, and because of its small sensor (1" at most), in low light conditions these cameras produce a lot of noise because of the high ISOs needed to get the exposure right.
Again, be creative, play with several compositions and the best light!
Low-end cameras
These are great cameras to start practicing with the Manual shooting mode (M) and to photograph the Sunset in an acceptable way.
They are basic cameras, but they allow you a good control of the exposure:
- Cameras with an APS-C sensor: Nikon Z30; Canon 4000D, 250D and M5; Sony a6600.
- Cameras with a Micro 4/3 sensor: Olympus OM-D E-M10 Mark IV and Panasonic G95.
- Compact camera (1" sensor): Sony RX100 VII.
Mid-range cameras
As the Sun fades away, there will be less light in the scene. This is particularly true during the blue hour, when you'll be forced to crank up the ISO to avoid using a slow shutter speed. Therefore, the less noise your camera produces, the better the quality of the image.
These cameras perform well in low light conditions and have a reasonable price.
- Cameras with an APS-C sensor: Nikon Z50, Zfc and D7500; Canon R10, R7, 850D, 90D and 6D Mark II; Fuji X-S20 and X-T30 II; Pentax KF; Sony a6700.
- Cameras with a Micro 4/3 sensor: Olympus OM-D E-M5 Mark III and Panasonic G9 II.
- Full Frame cameras: Nikon Z5 and D750; Canon RP; Sony a7C II.
High-end cameras
These are professional cameras and offer an excellent quality:
- Cameras with an APS-C sensor: Nikon D500; Fuji XH-2S, XT-5 and X-Pro3.
- Cameras with a Micro 4/3 sensor: Olympus OM-1 and Panasonic GH6.
- Full Frame cameras: Nikon Zf, Z6 II, Z7 II, Z8, Z9, D780, D850 and D6; Canon R8, R6 Mark II, R5, R3, 5D Mark IV, and 1D X Mark III; Panasonic S5 II, S5 II X, S1R and S1H; Pentax K-1 Mark II; Sony a7 IV, a7 CR, a7R V, a9 III and a1.
Lens
As I already told you in section 4, your lens and focal length choice will depend on the photo you have in mind, the composition you want and how big you want the Sun to look in your photos.
Go short if you wish to include the landscape in the frame. And go long if what you want is to center the attention of the viewer on the Sun and a particular subject.
The larger you go, the bigger the Sun will look in the frame.
As I always say, the lens choice is up to you.
You're the one taking the decisions here...
So, what's it going to be? ;)
You want to include part of the landscape and you don't care if the Sun looks like a dot.
Fine, use a wide angle like the Nikon 14-24mm f/2.8 or the Zeiss Milvus 18mm f/2.8, for example. They're my favorite wide angle lenses.
You want to include part of the landscape and a bigger Sun.
Cool, use a standard telephoto lens like the Nikon 70-200mm f/2.8 or the Canon 70-200mm f/2.8, for example.
And if you want to capture a really big big Sun, use a super telephoto lens. There are many good ones in the market.
Here are some recommendations: the Nikon 200-500mm f/5.6, the Canon 100-400mm f/3.5-5.6, the Fujifilm 100-400mm f/4.5-5.6, the Olympus Zuiko 300mm f/4 PRO, the Sony 100-400mm f/4.5-5.6, the Sony 400mm f/2.8, the Sigma 120-300mm f/2.8 for Nikon and Canon or the Sigma 150-600mm f/5-6.3 for Nikon and Canon.
And if necessary, use a teleconverter (1.4x or 2x) as well to shoot from even further away.
If you have a camera with a Micro 4/3 or APS-C sensor, use the cropping factor to your advantage. The Sun will be huge in the photo.
Filters
When photographing a Sunset, the sky is usually much brighter than the foreground, so if you don't want to do a bracketing of the scene, I recommend you to use a graduated neutral density filter (GND).
By putting a GND filter in front of the lens, you'll darken the sky to avoid overexposing it. And you'll allow the camera to get enough light to expose the landscape. Moreover, when darkening the sky you'll add color to the scene too.
In addition to this, you can always use a neutral density filter (ND) to shoot a longer exposure. During the Sunset, the Sun might be producing a lot of light and you won't be able to use a very slow shutter speed to get a really cool long exposure shot. So an ND filter comes in handy. Use it if you have one.
Finally, a circular polarizing filter (CPL) is an excellent tool for managing reflections off of glass and water surfaces and enhancing results with the sky and clouds in your photo.
Lens filters are great tools. I love to use them. This is the gear that I use:
- Depending on the lens, I have a 100mm and a 165mm Lucroit filter holders.
- A long list of ND and GND filters from Lucroit.
- The B+W Kaesemann Circular MRC 77mm polarizing filter. I also have the 112mm Slim circular polarizer from Lucroit and the 165x165mm square polarizer from Lucroit.
These are some quick thoughts about lens filters, but you should definitely have a look at our photography guide on lens filters to master this technique from A to Z!
Tripod and head
Yes, you do need a tripod. But not any tripod.
You can't imagine how many students come to my workshops with a superexpensive camera and lens and a cheap tripod and head... As soon as they begin shooting they realize their mistake: a cheap tripod doesn't provide any kind of stability!
So don't make the same mistake and invest in a sturdy and solid tripod.
This is particularly important if you plan to shoot long exposures during and after the Sunset because you have to make sure your gear doesn't move at all during the capture.
"OK Toni, I definitely need a good tripod, what should I get?"
Buy the Manfrotto 055XPRO3. It's probably the best seller tripod among advanced amateur photographers!
Have a look at the Travel line of Benro too.
If you want to (and can) spend a little bit more, have a look at carbon fiber tripods. They're much lighter than the aluminium ones and allow loads from 5 kg to over 25 kg (11-56 lb) depending on the model.
Brands like Gitzo, Benro, Manfrotto, Induro or Really Right Stuff offer tripods of great quality in both materials, carbon and aluminum.
"And I need a head as well..."
There are different types of heads but the most versatile, precise and easy to use is the ballhead. Look for one that can bear at least 5-7 kg (11-16 lb) of weight and that it includes a removable plate.
I'm madly in love with my Really Right Stuff BH-55! It allows me to work comfortably and with great precision. But I have to admit that it's a very expensive piece of gear.
Among my favorite ballheads are the Gitzo GH1382QD, the Kirk Enterprises BH-1 and the Arca Swiss Monoball Z1 SP, all robust and with very high endurance (minimum 13.5 kg or 30 lb).
And if you're looking for a good gimbal head, try the Benro GH2.
LED panels and other light sources (optional)
During golden hour, blue hour and the twilights, the natural light is less intense.
So if you plan to take a Sunset portrait you may need some additional lighting devices to add brightness to the scene.
For example, flashes, flashlights and LED panels are active elements that produce light and can be very helpful to illuminate the person you're photographing.
In addition to this, you may need passive elements (e.g. diffusers, filters, reflectors) that alter the harsh illumination a flash produces.
Although it's a bit more challenging, it's not really complicated: all you're trying to do is to control the scene light conditions to get the best possible Sunset portrait.
Intervalometer
During the Sunset the light fades away fairly rapidly. So using the right Sunset camera settings to get the exposure right is a real challenge because of the scene's high dynamic range.
Exposing for the sky allows your camera to capture the beautiful colors in the sky. However, your foreground will end up very dark (underexposed). That's why you may need to use a graduated neutral density filter (GND) to balance the exposure and capture a long exposure...
In any case, you'll need to use a relatively long shutter speed and avoid touching your gear no matter what.
That's why an intervalometer is so important on these occasions. You must prevent any vibration or you'll end up with a blurred shot.
I usually recommend these great intervalometers:
- Pro intervalometer: SMDV.
- For cheap intervalometers check the brands Neewer, Phottix and Vello.
A great alternative is a device called CamRanger. Right now it's available for Nikon, Canon, Fuji and Sony cameras.
It's a stand-alone device that you connect to your DSLR or mirrorless camera with a USB cable. It creates an ad hoc WiFi network to which you can connect your smartphone or tablet (iOS, Android and Windows). Thanks to the CamRanger application you can control your camera without a computer or an Internet connection.
Best of all, this device is independent. Therefore, if your mobile device loses its connection, the CamRanger has an internal memory to keep shooting. Imagine that you are making a timelapse, your sequence would be cut if the camera stops taking pictures in the time frame you've set...
So the CamRanger is great for many types of photos: timelapses (of the Milky Way, of Star Trails, of solar eclipses or lunar eclipses...), bracketing, focus stacking for macro and landscapes... and many more!
Memory cards
Buy the highest quality SD Cards (such as SanDisk or ProGrade) to minimize the risk of losing your photos and have the maximum transfer speed.
Today their price has dropped dramatically so even the highest capacity cards (64GB, 128GB or even 256GB) are very affordable.
Some photographers prefer to use medium capacity cards (16GB or 32GB) to limit the number of lost files if a card breaks or gets lost.
Although there are still cameras that use CompactFlash (CF) cards, it's a system that is slowly disappearing.
And to replace it, SanDisk, Nikon and Sony launched a new card format called XQD currently available for several Full Frame (Nikon D4, D4s, D5 and D850; Panasonic S1 and S1R), APS-C (Nikon D500) and mirrorless (Nikon Z6, Z6 II, Z7 and Z7 II) models. These cards
- Have a very high storage capacity (from 32GB to 256GB).
- Have a super fast reading and recording speed (400MB/s compared to 160MB/s for a CF card or 250MB/s for an SD card).
- Are very secure, resistant and with an incredible durability.
Later on, in 2017, CFexpress launched the latest standard memory card from the CompactFlash Association with 2 new form factors, Type A and Type C were announced, with the existing XQD form factor becoming Type B.
- Type A has, so far, only been adopted by Sony in all of its newest models.
- Type B is a far more common format offering a lower price. It has been widely adopted by Nikon in its Z series, Canon in some EOS R bodies, and Panasonic in the S1/S1R and GH6.
- Type C is not being produced yet.
And to complete the list of gear, don't forget...
The PhotoPills Light my way T-shirt!
The Sun will guide you along the way.
It's going to light up your path.
So, put your best clothes on, because the show is going to start :P
7.How to photograph a Sunset step by step

Finally... Here comes the Sunset! ;)
Or rather, the day to photograph it.
So before rushing to get your gear, read this. It'll help you capture that Sunset shot you've planned so carefully (section 4)...
In this section you'll find everything you need to successfully photograph the Sunset, including how to focus and the best camera settings for Sunset photography :)
Get to your planned shooting spot in advance
It's a crucial step that you should never skip.
Get to the location at least 2 or 3 hours before the planned shooting time.
This extra time allows you to scout the location in detail looking for references, identifying potential hazards and, eventually, working on different compositions.
In addition to this, this extra time allows you to prepare thoroughly the gear and get ready for the shot.
Finally, this extra time allows you to confirm that you're at the exact shooting point. And this is key to certain Sunset pictures, particularly the ones with a subject and a big Sun (section 1).
So once you're at the location, use the PhotoPills Planner to check that you're in the right place. This is the Red Pin Position.
There's an option to see your position on the map. To activate it tap the (+) button on the map. Then tap the eighth button on the toolbar that just showed up (it's the compass icon).
There should be a blue circle on the map now. It shows your current position.
Walk to the Red Pin location. Zoom in on the map and check that the blue dot is actually aligned with the base of the Red Pin (the exact spot where the stick is pinned). That's where you should be photographing the Sunset.
But, just in case, make sure that the terrain allows you to move a few meters to adjust the composition the moment the Sun starts to be right where you want it to be in the sky.
Another thing I like to do is to have a look at the PhotoPills Augmented Reality view (AR) to double check that I'm at the right spot and that the Sun will set at the right position.
Place the tripod, ballhead, camera, and lens
Open the tripod, unfold the legs and mount the ballhead on. Then, place the tripod on a solid surface. Press it against the ground and make sure it's stable.
Take your camera body and put on the lens that you're going to use during the shooting session (in section 5 I show you how to choose what focal length to use).
Now, mount the camera on the ballhead and check once again that everything is stable. You must avoid any vibration.
Finally, plug the intervalometer in and make sure that everything is working correctly.
Remove the UV filter
If you have it on, remove the ultraviolet (UV) filter.
In general, it's a completely useless filter.
Some photographers use it as a lens protection. The problem is that shooting with it results into a low quality image because you're adding a cheap extra piece of glass in front of your lens.
Prepare the filter(s)
Depending on the effect you want to get, you'll need one filter or another. Use the filter or the combination of lens filters you need:
- A circular polarizing filter (CPL): Eliminates non-metallic reflections. Eliminates or enhances fog and rainbows. Increases saturation and contrast.
- A neutral density filter (ND): Reduces evenly the light that reaches the sensor. Increases the exposure time.
- A graduated neutral density filter (GND) Gradually reduces the light that reaches the sensor with greater intensity on one of the edges of the filter. Successfully captures scenes with a high dynamic range.
Screw the adapter ring onto the lens and adjust the filter holder.
But wait... ;)
Don't slide any ND or GND filters into the slots of the filter holder yet. Even if you already have a certain idea of what you want to capture, you have to check some details beforehand.
In the case of the polarizer you have several options. You can screw it onto the corresponding adapter ring (if you're using a system like NiSi's, for example) or onto the front of the filter holder (if you're using a system like Lee's, for example). Or you can mount it later.
Don't miss the chance to master the use of lens filters, have a look at our photography guide on lens filters.
Turn off the lens stabilization system
You're using a tripod. Therefore, turn off the vibration reduction system or image stabilization system of your lens (VR/IS). This will prevent the lens from trying to eliminate vibrations that don't exist, and you'll end up with a less sharp image because of it.
Shoot in RAW
Always shoot in RAW!
The RAW file contains all the data from the image that the sensor has captured. Thus, you'll always have a higher quality base image that will allow you to post-process the image with a precision that would otherwise be impossible.
Keep in mind that the image you see on your LCD is a JPEG copy of the RAW file. So the histogram you're seeing in the camera is not exactly the RAW file one.
Select the spot metering mode
Thanks to the spot metering mode, you can determine the exposure in the key tone. In other words, the area of the scene where you want to know what kind of light you have and what settings for your Sunset picture you need to expose it correctly.
Don't worry if you need to take several test shots before you get what you're looking for. That's why you got to the location in advance! ;)
If you need the polarizer to work on your composition, mount it now and rotate it until you get the effect you're looking for.
Once this is done, meter the key tone without any ND or GND filters in front of the lens so they don't distort the image exposure.
My favorite mode is the spot metering mode because I can meter very precisely. Meter the brightest area of the scene you want in detail and overexpose by 1 or 2 stops (+1EV or +2EV) or respecting your camera's overexposure limit.
Remember that the light meter usually turns whites into grays. That's the reason I always overexpose the photo a bit, to capture the natural colors of the scene.
Determine the focal length you're going to use
Select the focal length depending on the composition you've imagined.
Remember what I told you in section 3, the focal length determines the Sun size in the photo.
So if you want a:
- Sun as a dot, use a wide angle lens (10-35mm)
- Small Sun, use intermediate focal lengths (35-200mm)
- Large (or huge!) Sun, select long focal lengths (>200mm)
Select the Manual shooting mode (M)
Thanks to the Manual shooting mode (M), you can choose the aperture, shutter speed and ISO to get the exposure you want.
That way, you get the perfect exposure for your photo.
Select the aperture
When photographing a Sunset, the aperture depends on two factors:
- The quantity of natural light in the scene.
- The depth of field you want to show in the image.
Let's say that you're photographing the Sunset during the blue hour so the absence of light forces you to use a wide aperture (f/4 for example). In this case, make sure you're still getting the depth of field you want. Otherwise, use a slower shutter speed or crank the ISO up to get the right exposure.
Now imagine you're shooting during golden hour, so the light in the scene allows you to use a relatively small aperture (f/8 or f/11 for instance). Moreover, a small aperture will give you a greater depth of field, so you can capture detail in both the Sun and the landscape.
In addition to this, you can close the aperture further down (to f/16 for example) to play with the starburst effect on any source of light present in the scene (section 8).
Focus
Wouldn't it be a pity to end up with a blurred photo after all this work? :(
That's why it's so important to master the depth of field concept.
These are the different focusing systems I use depending on the focal length.
Wide angle lens
Focus at the hyperfocal distance.
Actually, it's better if you focus at a slightly longer distance (1 m, for example). It's the best way to make sure everything is correctly focused from the foreground to the Sun. In this video I show you how to focus to the hyperfocal distance in less than 1 minute:
Intermediate/long focal lengths with foreground
Focus on the subject as long as the hyperfocal distance is shorter than the distance to the subject. By doing this, the Sun will also be in focus.
However, if the hyperfocal distance is greater than the distance to your subject, you have two options.
1. Look for an element to focus on that is further away than the hyperfocal distance
What element? Well, it can be anything (a tree, a rock...).
But when focusing, always make sure that the depth of field (DoF) near limit is closer to you than your subject. This way your subject will be within the area that will be acceptably sharp (focused). That is, between the depth of field near limit and infinity.
To be 100% sure, use the PhotoPills Planner and the Depth of Field (DoF) tool.
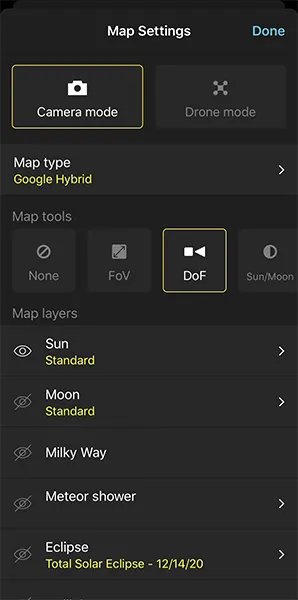
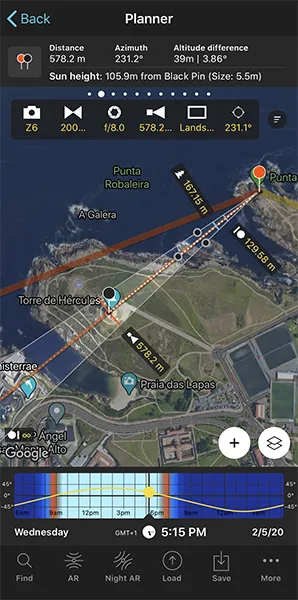
On the Planner, tap the Map Settings button, located next to the (+) button on the map (lower right corner).
Then, in the Map Setup screen, tap the DoF button to activate the Depth of Field tool.
Notice that a black box is now at the top of the map. Tap each of the sections to enter the shooting settings into the tool (camera, focal length, aperture, focus aligned with the Black Pin, etc.)
Then, instead of placing the Black Pin on your subject, place it on an element that is further away than the hyperfocal distance (it's marked on the map) and that you know it will be visible from the Red Pin position. This way you can visualize on the map what will be in focus and what won't (what's left between the depth of field near limit and infinity).
You should definitely do this work at home, before you go to the location. It's best to know in advance where you're going to focus during the shooting session.
2. Focus directly on your subject and leave the Sun slightly out of focus
Unless you have a superhero sight, you'll hardly notice that the Sun is slightly out of focus.
From an artistic point of view it's always better to have your subject tack sharp and the Sun (somewhat) out of focus, than the other way around.
Super long focal lengths with foreground
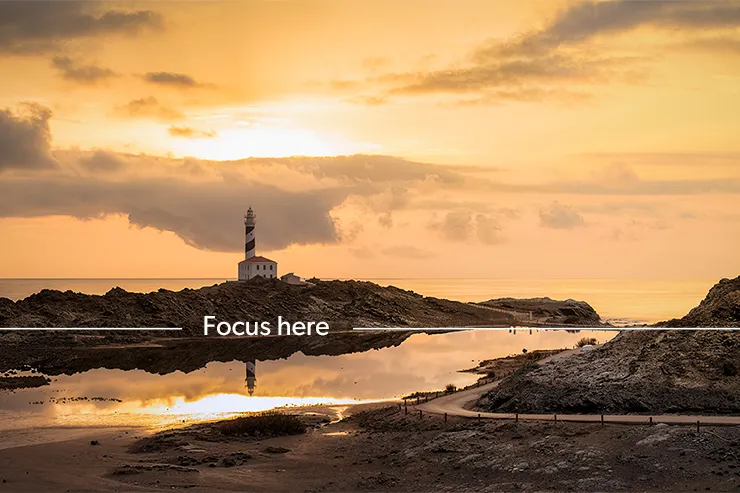
When you use super long focal lengths, the hyperfocal distance is very long. So much so that you may not be able to focus at that distance.
In this case, the alternative is to focus at the lower third of the frame (or scene).
"Thanks Toni. And now... How do I focus?"
This question is a favorite of mine ;)
You have two options: manual or autofocus.
Manual focus
First, select manual focus on your camera or lens.
Once you've decided where you want to focus, focus manually by slowly turning the focus ring on your lens.
Turn the Live View function on your camera's LCD screen. It's perfect to focus accurately.
Also, if your camera has the Focus Peaking and/or Focus Magnifier (Focus Magnifier) features, turn them on too. They'll help you to be even more accurate.
Then, zoom in on the LCD screen until you see the detail of the subject's surface.
And if you have
- The Focus Peaking activated, look at the areas that the camera has highlighted with color stripes: these are areas with more contrast and therefore in focus.
- The Focus Magnifier turned on, look at the magnified area on your framing and make sure it's in focus.
Finally, turn the focus ring of the lens slowly until the detail of the surface is tack sharp.
If you're not used to focusing manually, turn the focus ring very subtly and when you notice that your subject is focused, keep turning the ring until you go a little out of focus. Then, turn the ring in the opposite direction to get everything in focus again. It's the best way to adjust the focus.
Autofocus
If you're not used to focusing manually, you can use your lens' autofocus.
Once you know where to focus, press the shutter halfway until it focuses. Most cameras usually "beep" when they've focused correctly.
Then, change the focus mode of your lens from automatic to manual so the camera doesn't refocus when shooting.
Don't forget this step! ;)
Another way to lock the focus is to assign the focusing to a button other than the shutter button. With this option, focus by pressing with your thumb another button on the back of your camera. As soon as you release it, the focus holds on the spot you've chosen.
If you want to know how to set the back button focus, take a look at your camera's user manual.
Set the shutter speed
The shutter speed depends on the natural light you have at the time of the shooting.
In addition to this, if you're shooting with lens filters, remember that they will help you get the right exposure (allowing your camera to capture a high dynamic range scene), but also convey a sense of motion (e.g. silky water).
Here are some examples of shutter speeds according to the effect you want:
- Sea silky water: 1s.
- Slow water motion: 1/2s.
- Fast water motion: 1/8s.
- High clouds: 3 min or more.
- Middle clouds: between 2 and 3 min.
- Low clouds: 2 min or less.
And remember, you can use these shutter speeds as a reference to get the right exposure before inserting any neutral density filter (ND) or graduated neutral density filter (GND).
Fine tune the ISO
It's time to adjust the ISO considering:
- The exposure triangle. You already know the aperture and the shutter speed.
- How much noise your camera produces.
Ideally, you should use an ISO as low as possible. Start with ISO 100 and increase it depending on the light conditions and the lens filters you're using. Bear in mind the noise!
Put the filter(s)
The exposure calculation depends on the scene light you have in front of you, the photo you want to take and the lens filters you need to use to get it.
So far you've worked on the exposure without using any filter. Now is the time to put the lens filters on and adjust the exposure accordingly. So, depending on the lens filters you use you'll have to correct it one way or another.
Take as many test shots as necessary and use the histogram as your reference point to recalculate the exposure when putting the filter(s) in front of the lens and when the light changes.
To reduce the "try and fail", you can use the PhotoPills' Exposure calculator. Just take a test shot without the filter(s) that gives you the exposure you want. And then use the calculator to figure out the equivalent shutter speed you need to use to get the same exposure when you're using the filter(s).
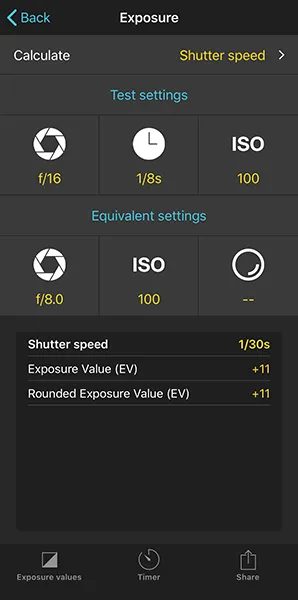
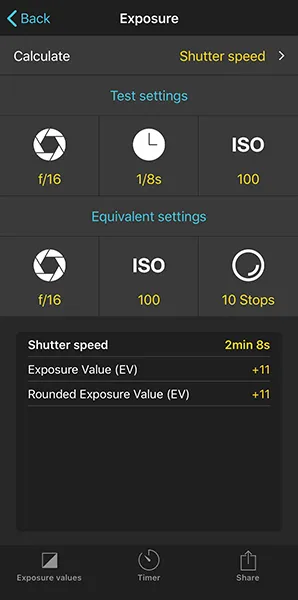
You can find all the information about how to recalculate the exposure with your filter(s) on in section 7 of our lens filters photography guide.
And you may not know this, but you can also move the filters while your camera is taking the shot!
Set the white balance manually
Set it between 6000 and 7500K to boost the golden tones if you're shooting during golden hour.
Alternatively, select a white balance between 3400K and 5000K to boost the blues if you plan to shoot during blue hour.
You can also leave the white balance on automatic and then correct it later on with Lightroom or Photoshop.
Take a test photo, check the histogram and adjust the exposure
If you have a DSLR, frame and take a test shot. Check the histogram. It's the tool that allows you to analyze the exposure on the camera's LCD.
If you have a mirrorless camera, check the histogram on the electronic viewfinder.
That histogram is the one that helps you make the necessary adjustments to achieve a correct exposure in the field.
Adjust your Sunset camera settings if needed to get the exposure you're looking for.
For example, if the photo is underexposed (darker than you want), I follow this workflow:
- First, I use a wider aperture (small f number), always checking that I get the depth of field I want. Although I try to avoid very wide apertures unless there's very little light in the scene.
- If the photo is still underexposed, I use a slower shutter speed (longer exposure time).
- And if the aperture and the shutter speed are not enough, I increase the ISO.
Do a bracketing to be sure
The light changes a lot (and fast!) while the Sun is setting. Be prepared to adjust the exposure during the photo shoot.
One way to make sure you don't clip the shadows or blow out the highlights is to do a bracketing. That way, once at home you can choose the photo with the best exposure as the base of your post-processing.
In my experience, a 1-stop bracketing of 3 shots will be enough in most situations. But you can always increase the stops' interval (to 1.5 or 2 for example) and the number of shots (e.g. 5, 7, 9).
Work fast!
The problem when photographing the Sunset is that the perfect light doesn't last long...
And to prepare your gear and shoot with lens filters, especially if it's a long exposure, you need a bit more time...
So you have to try to get it right the first time!
And if it doesn't, get it right as soon as possible. Otherwise, by the time you realize it, that magic light will be gone.
8.11 extra Sunset photography tips for amazing photos
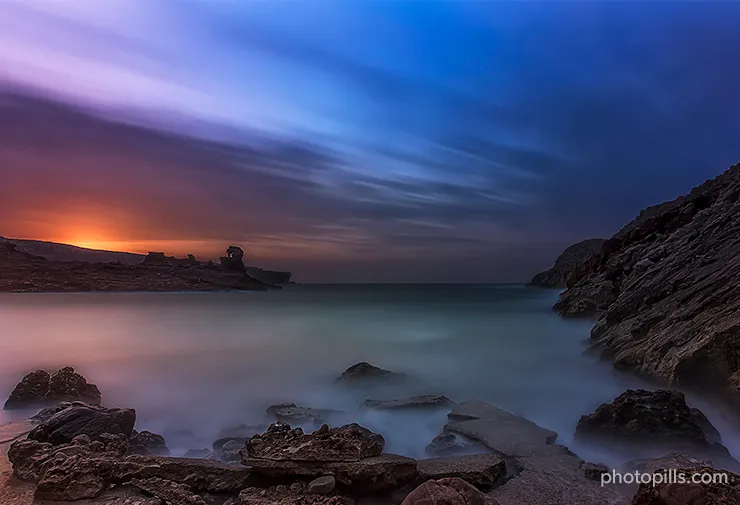
Ah... Sunsets...
They happen every single day.
Witnessing them is great, but photographing them might be an experience you'll never forget.
It happens from time to time. The sky turns red in a blast of color and emotions.
And if you have the chance to capture it, that's a lifetime experience, something you'll never forget and the resulting image will be proof of it. You'll relive this moment every time you look at this particular photograph.
Throughout this article you've been learning every single step that will help you successfully capture truly stunning Sunsets.
And here are some extra Sunset photography tips that will be the cherry on the cake...
Plan the shot (1)
There is only one way to get that photo you've been dreaming about for so long: planning it.
So study section 4 carefully, watch the videos and follow all the steps. If you use PhotoPills and establish a logical workflow, you'll successfully capture your photo.
Trust me...
You're just a plan away from getting the photo you dream about.
Plan it!
Scout the location in advance (2)
Believe it or not...
Many people fail with this one... and it's elemental.
They think they can get to a location they don't know and get an amazing shot.
Well... it might happen if they're lucky.
But scouting is crucial in landscape photography in general. And even more so in Sunset photography.
It helps you take better pictures. Period!
The more you know a location, the better.
You'll come up with a better composition, a better photo idea... And planning it will be much much easier.
So scout the location, get to know it well. Find cool compositions so you can take great photos.
Photography is fun, and scouting is a key part of it.
Avoid having the highlights overexposed (3)
If the highlights are overexposed or blown out (e.g. the Sun is too bright or even completely white) it's because the sensor has captured too much light.
You can solve it in several ways:
- Select a narrower aperture if you want to control motion (which means you don't want to change the shutter speed).
- Select a faster shutter speed if you want to control depth of field (which means you don't want to change the aperture).
- Reduce the ISO.
- Use the exposure compensation tool (±EV) by moving the bar to the left (negative scale) if you aren't shooting in Manual (M).
To deal with overexposed skies you can also do a bracketing, use lens filters or a combination of both. I'll give you more details further down this section (points 8 and 9).
Close the aperture (4)
A starburst is an incredibly cool photography technique and one that you can easily get without any special post-processing or editing tricks.
The only thing that you need to do to create a starburst is to use a narrow aperture (from f/16 onwards). By selecting a narrow aperture, you're closing down the blades inside your lens leaving a very small hole for light to pass through. This narrow hole creates a slight diffraction, which transforms an isolated source of light (e.g. the Sun) into a starburst.
That starburst is what the camera's sensor ultimately records.
Different lenses are built with different numbers of blades:
- Straight blades result in better defined rays compared to rounded ones.
- An even number of blades produces the same even number of rays. For instance, a lens with 8 blades produces an 8-pointed star. An odd number of aperture blades produces twice as many rays. For example, a lens with 9 blades produces an 18-pointed star.
You should also shoot at a fairly low ISO, around 100-200, to avoid having too much noise in your shot.
Finally, in low light conditions, you'll be forced to set a slow shutter speed so use a tripod to ensure a steady shot.
Focus properly (5)
As you learnt in section 7, where and how to focus depends on the type of shot you want to capture, the focal length you'll be using and how much depth of field you want.
- Wide angle lens: Focus at the hyperfocal distance. Or even better, at a slightly longer distance (1 m, for example) to make sure everything is correctly focused from the foreground to the Sun.
- Intermediate/long focal lengths with foreground:
- Focus on the subject as long as the hyperfocal distance is shorter than the distance to the subject. That way, you also make sure that the Sun is also in focus.
- When the hyperfocal distance is greater than the distance to your subject, there are two alternatives.
- Look for an element to focus on that is further away than the hyperfocal distance. But when focusing, always make sure that the depth of field (DoF) near limit is closer to you than your subject.
- Focus directly on your subject and leave the Sun slightly out of focus.
- Long focal lengths with foreground: Focus at about a third of the frame (or scene) starting from the bottom.
If you intend to use lens filters, focus before placing any filter (particularly the neutral density filter (ND)) in front of the lens. Considering the opacity of an ND filter, it'll be very difficult for your camera to focus.
And don't forget to change the focus to manual once you've used the autofocus and your photo is perfectly sharp.
If you use the back button focus, don't press it again. That will do it ;)
Turn around (6)
Sometimes the best picture is behind you.
So...
Turn around!
You never know what the light might be creating at your back...
The scene behind may be gorgeous and you risk missing it because you're too busy looking at the Sun. However, the Sunset produces beautiful warm light during golden hour and it may be bathing the scene with that beautiful light behind you. Look over your shoulder.
In addition to this, during golden hour you can use this soft and warm light as a front light. That is, leaving the Sun to your back and letting it illuminate your subject.
If you're shooting a portrait or a family photo at Sunset, position them facing the setting Sun. To avoid your subject squinting, tell your subject to close her eyes right up until the moment you take the photo. Problem solved!
Stay after the Sun is below the horizon (7)
Whenever I'm photographing the Sunset, whether on my own or during a workshop, I always notice the same thing... Once the Sun dips below the horizon, most people pack up their gear and head home.
A setting Sun is not the end of the shooting session. These people are missing so much!
Once the Sun disappears, the magic begins...
Remember what I told in section 3: understanding natural light is essential.
And twilights offer amazing photo opportunities. Most specifically, during civil twilight (when the Sun's elevation is between 0º and -6º) when my favorite time of the day happens – the blue hour (when the Sun's elevation is between -4º and -6º).
Be careful though, because the colors of the sky are going to change quickly. As time goes by they will transition from warm tones to a much cooler palette.
Also, the dynamic range of the scene is going to decrease drastically. Therefore, you must be able to adapt to the quickly changing conditions... And react fast by changing your camera settings to get the exposure right (section 7).
Use lens filters (8)
When shooting a Sunset, the 3 lens filters that are most relevant are a circular polarizing filter (CPL), a graduated neutral density filter (GND), and a neutral density filter (ND).
At Sunset, with a polarizer you can darken certain regions of the sky. More precisely, 90º away from the Sun in every direction, you'll see a significant reduction in brightness. However, be careful because you can end up with an unevenly-lit sky.
You can also prevent blowing out the highlights of the scene with a GND filter. They help you subtract more (or less) light in a specific area of the frame.
And if you're including water in the frame or you're capturing a seascape, use an ND filter to create a nice silk effect in the moving water.
To master the use of filters, study carefully our photography guide on lens filters.
Do an exposure bracketing (9)
This technique is great, since, in some cases, even if you're using lens filters, your camera can't replicate what you're seeing in the scene with just a single exposure. Even the most expensive camera sensors simply don't have enough dynamic range (although they're getting closer and closer).
A bracketing consists of taking a series of photographs of different exposures so that, when blended with an editing program (Lightroom, Photoshop, etc.), you get a photograph with detail in both the shadows and the highlights.
You can take as many shots as you want (e.g. 3, 5, 7...) but when capturing them make sure that:
- The tripod is perfectly steady and all your images are identical (they haven't shifted) so you can blend them later on in post-processing.
- The brightest shot doesn't have the highlights blown up.
- The darkest shot doesn't have the shadows clipped, nor noise in the dark areas.
Once at home, sit in front of the computer and blend the shots!
I go into much more detail about this technique in our exposure article.
Control lens flare (10)
Shooting directly into the Sun is a tricky process when doing Sunset photography, but it can often produce some beautiful results.
Nevertheless, the Sun can produce lens flare. But, should you keep it? Or is it better to remove it?
It really depends: you can use lens flare intentionally as an artistic enhancement, but you'll often want to prevent or avoid it.
To prevent it, you can use a lens hood to help block direct Sun rays from reaching the front of your lens. However, here's a technique you will find very helpful.
Mount your camera on a tripod, take the image that you intend to and see if there is lens flare. If there is, take a second image by blocking the source of the light with your thumb (or a finger, or anything). Later on, blend these two images together during post-processing using a layer mask.
Watch this video of Nick Page to learn how to remove lens flare with Photoshop.
Do a powerful post-processing (11)
There's a perpetual ongoing debate about how much is too much when it comes to post-processing Sunset images.
At the end of the day, you're the only one who has the right answer: it's up to you how much post-processing will help to restore the natural scene as you saw it, and how much will enhance that scene further.
So there's no magical recipe here. You're the one taking the decisions... ;)
My advice, try all sorts of techniques until you find what you really like.
If you want to enter the Sunset post-processing universe, here are a couple of tutorials that you may find inspiring.
In the following video, Joshua Cripps explain you how to use Lightroom to enhance his Sunset shot: How to Create an Amazing Landscape Photo: Part 3 - Post Processing.
Follow the steps that Elia Locardi teaches you in the following video to blend the shots in Photoshop: Photographing Horseshoe Bend with Elia Locardi and the GFX 50S (USA).
9.20 Sunset landscape photographers you should follow
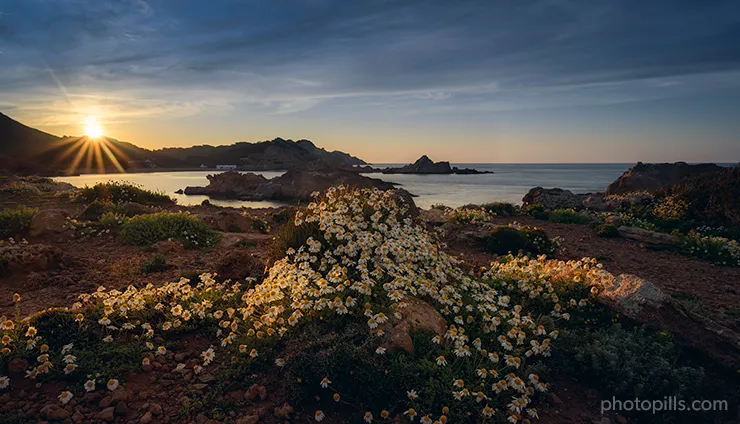
I've always been a proponent of the idea that self-learning is very important to improve your photography.
And there's no better way to do so than looking at (and analyzing) pictures of great photographers.
They are an amazing source of inspiration, and you can learn new compositions and techniques. After all, isn't that what photography is all about? Trying new things and learning along the way?
I like checking regularly on my favorite photographers' work. And I love finding new ones. There're so many people I have to keep learning from!
So I was thinking... Why not share a list of what I consider Sunset masters with you?
I've even been lucky enough to take pictures with some of them during my favorite photo event, the PhotoPills Camp.
Obviously, the list is far from being complete. As time goes by, it will grow with new photographers that I discover throughout time... and with those that you recommend to me as well.
Feel free to share with me and the rest of PhotoPillers your own Sunset masters! We'll all appreciate it. Leave a comment with your suggestions at the end of this guide.
Erin Babnik
Sunset photography is as much of an art form as any other genre; just ask Erin Babnik, one of the leaders in the genre in the present day. Erin is not only an incredibly talented artist, but also an educator, writer and speaker who is always in pursuit of compelling scenes across often difficult terrain.
Joshua Cripps
California-based landscape photographer, Joshua Cripps is a Sunset master. There's no doubt about that. But you may not know that Josh's sense of humor and storytelling skills are only surpassed by his fabulous landscape photography skills.
Catherine Simard
After ten years of modelling and a few years of styling, Catherine Simard realized that hiking and photography was the recipe for real happiness. And while she excels at capturing breathtaking landscapes, she has a special kind of magic when she photographs a Sunset. You have to see it for yourself.
Sean Bagshaw
Sean Bagshaw did a lot of climbing and mountaineering in his 20-30s. Now he photographs mountains instead of climbing them. And capturing Sunsets with some beautiful mountains is one of Sean's best skills!
Sarah Hatton
Thanks to her incredible talent, Sarah Hatton has made huge strides in a short time and was able to turn a hobby into a full time profession. She spends as much time possible outside behind the camera and produces incredible Sunset shots back home, in Australia, and in many other places around the world.
Jesús M. García
After many years learning new techniques and polishing a very personal style, Jesús M. García has become a master in Sunset photography. Have a look at his images and you'll learn how to convey tons of emotions in one single picture.
Rachel Jones Ross
Rachel Jones Ross found herself obsessed with photography after a trip to photograph the Milky Way... Her life has never been the same since, and she made the transition from the academic world of Psychology to becoming a professional photographer. Her ability to capture beautiful Sunsets is astonishing.
Michael Sidofsky
Michael Sidofsky is capable of portraying a unique perspective of places or things that may seem commonplace to the everyday eye. At the same time, his images trigger some sort of emotional reaction – I just can't stop staring at them.
Felix Inden
Felix Inden always strives to show images which create some kind of reaction in the viewer. He wants you to feel something. Most of his works are focused a lot on Arctic places where he loves to feel the energy of the weather (including magical Sunsets, of course).
Scott Kranz
It took years for Scott Kranz to fully transition from practicing lawyer to outdoors photographer. He would fit in hikes before and after work, chasing the Sunrise and Sunset. When he finally took the leap, he never looked back and nowadays he's a passionate outdoors storyteller.
İlhan Eroğlu
Based in Izmir, Turkey, İlhan Eroğlu studied Fine Arts at university. After having his own successful business for a few years, he decided to follow his passion for photography and started travelling around the world. He self-taught himself to be one of the most talented and well known landscape photographers in Turkey.
Harimao Lee
Harimao Lee defines himself as an "urban explorer", a person willing to share his unique viewpoint of the city, in which one does not usually take notice of. Despite being based in densely populated Hong Kong, he travels all over the world taking some of the most breathtaking Sunset photos that give me serious wanderlust...
Sarah Lyndsay
Sarah Lyndsay is a gifted photographer and adventurer currently based in Canada. She shoots a lot of nature, outdoor, lifestyle, and stunning landscape photography. It's always a pleasure to see her work and in particular her long exposure and Sunset photography.
Serge Ramelli
Serge Ramelli is a very talented photographer with a flair for the dramatic. He got his start shooting interiors for hotels, and later on became a landscape and urban photographer with a passion for creating beautiful photos and inspiring others to do the same. It's just impossible to summarize his track record and career in a couple of sentences, so look at his Sunset pictures for instance and enjoy...
Rach Stewart
Rach Stewart got into photography by taking photos on her iPhone while she walked the Sunset every night along the beach. Well, she's from New Zealand so you can imagine how pretty Sunsets are over there! From then on, the photography journey really began for her developing a unique style and voice.
Albert Dros
When you meet Albert Dros you realize that he is truly addicted to landscape photography and capturing the beauty of the world. Actually... He's obsessed with certain shots! His goal, to capture places and Sunsets in the best possible way.
Francesco Gola
Italian photographer Francesco Gola is no stranger to the sea. Having fallen in love with long exposure seascapes as soon as he started as a photographer, he now spends his time immersed in his passion, capturing seascapes along with beautiful Sunsets in some of the most iconic locations on the planet.
Marco Grassi
The love story between Marco Grassi and photography began in the best possible way: traveling for a year in New Zealand. Since then, he has been travelling around the world and capturing with his camera the beautiful Sunsets he has found along the way.
Michael Shainblum
Michael Shainblum has been creating art as a professional photographer/filmmaker since the age of 16. His stunning photography and timelapses have gained him international fame. That's why I consider him a Sunset photography master, he's one of a kind.
Daniel Kordan
Daniel Korzhonov, better known as Daniel Kordan, is a Russian landscape photographer with a special interest in mountainscapes and seascapes. He's passionate about travel and likes to explore the world capturing some crazy colors of the Sunset.
10.11 must have Sunset apps and websites
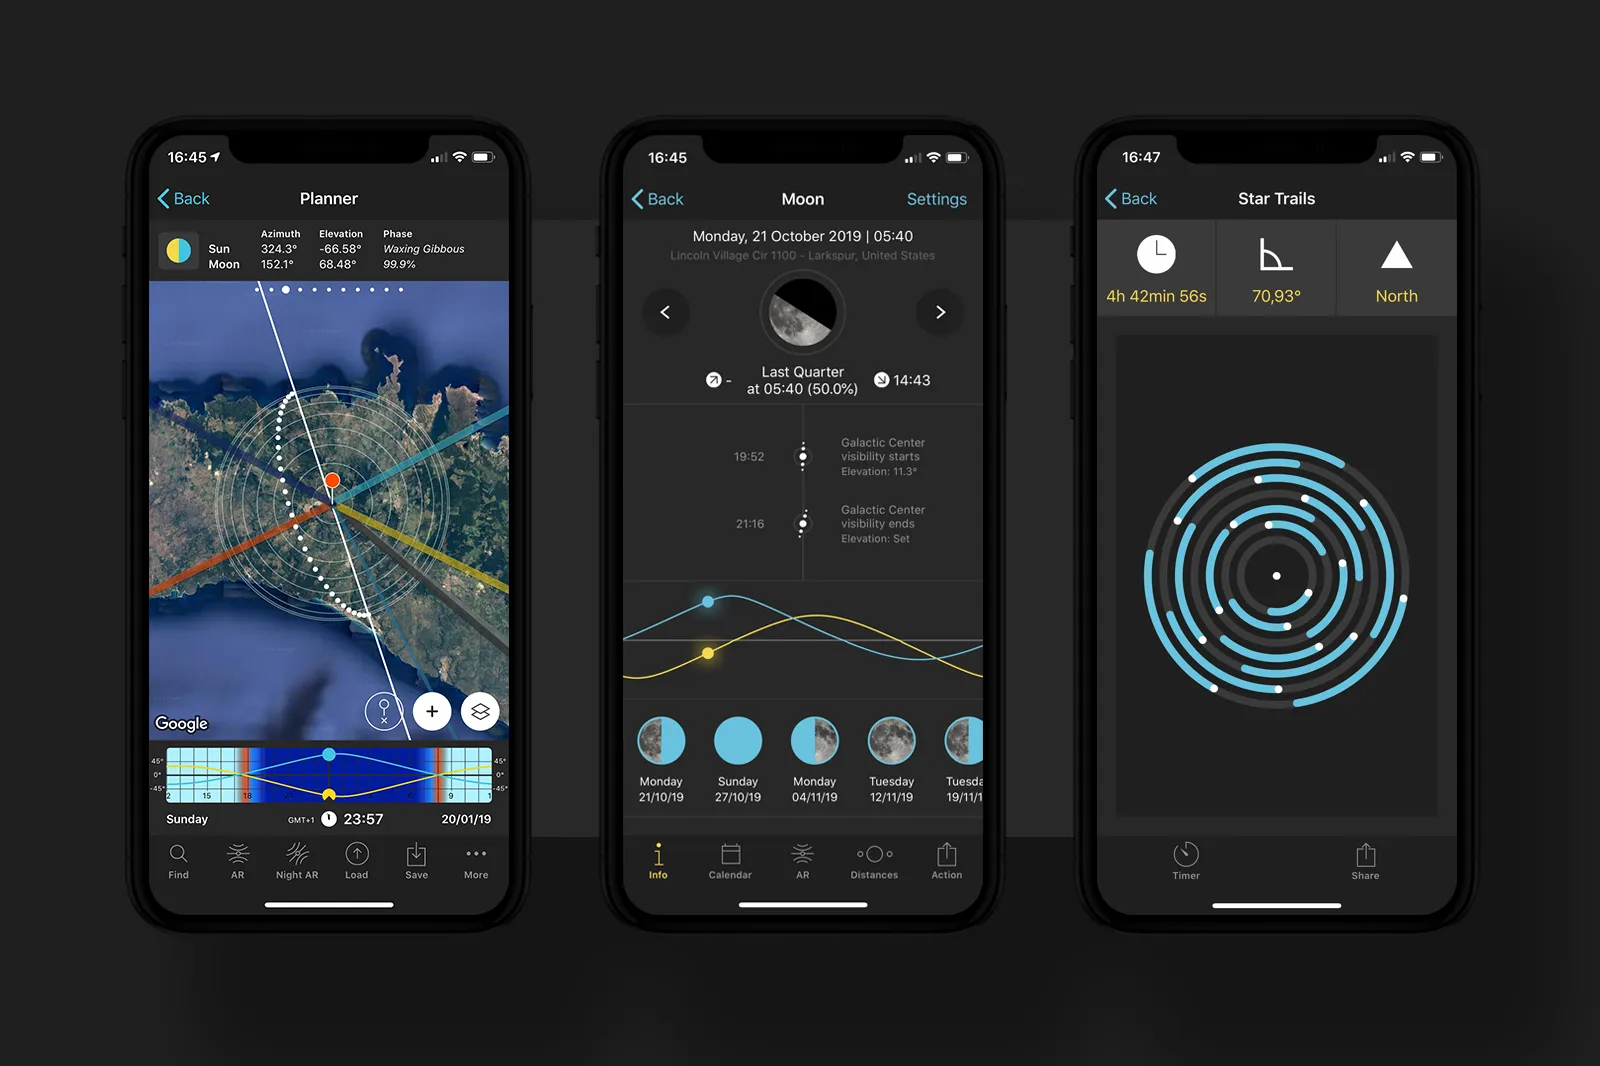
Along this article, I've been mentioning a handful of my favorite Sunset photography apps and websites.
I find them essential for my photography. They help me with the planning work, the location scouting, and the weather predictions.
Are you looking for useful apps to improve your Sunset photos?
Don't panic! I did all the research for you.
Below is a list of the Sunset apps and websites that you should definitely have and use.
PhotoPills (1)
What can I say? It's my lifesaver, my crystal ball... And my lightsaber!
PhotoPills is an app for everything in photography, or as some might like to define it, a true "Swiss knife for photographers". It has an endless amount of tools.
PhotoPills is your Sunset app (and also your Sunrise app, your Milky Way app, night photography app, Moon app, Meteor Showers app, depth of field app, time lapse app...).
But you already knew that, huh?
With PhotoPills you don't waste time scouting blindly and making complicated calculations! Your time is much better spent shooting :P
So use it to easily plan your Sunset photo ideas.
PhotoPills is available on iOS and Android.
Google Earth (2)
Google Earth is an extremely powerful tool to explore possible photography locations in any given area.
You can basically place yourself into any landscape on Earth and see what the topography looks like in that specific spot. Isn't that cool?
As you're exploring the location try changing your point of view, moving positions, and zooming in and out. This helps you determine potential shooting spots, different compositions in the same shooting spot, and of course finding your way to get there!
You can download Google Earth on your smartphone but also on your tablet, your laptop and desktop computer.
Google Earth is available on iOS and Android.
Location Scout (3)
Location Scout is a network of passionate photographers and travellers willing to share the most amazing places for photography around the world.
Every photography spot has a dedicated page on the site and photographers from all over the world are adding tips, photos and ratings. You can explore it for hours!
ShotHotSpot (4)
ShotHotSpot combines photos from Panoramio and Flickr and narrows them down to the more photogenic locations around the world. Of course, the success of ShotHotSpot depends on the willingness of photographers to share their locations.
To search a location is pretty easy. You just type in the search box the area or city you want to explore. Additionally, there is an advanced search to help you get more refined results.
These are presented in a map with waypoints that link to more in depth descriptions of the locations, including images provided by users.
SunsetWx (5)
Don't be deterred by the basic type of site that SunsetWx has. It's actually the best free Sunset and Sunrise predictor.
The idea behind it is pretty simple. At the homepage you can see a picture of the US (you can change this to Europe or the World) from a satellite view and the picture is overlaid with a heat map.
The heat map represents the probability of a good Sunset. The warmer (closer to red or higher percentage) the image gets, the higher chance of a mind-blowing Sunset. The cooler it gets, the higher chance for a poor Sunset.
Windy (6)
Windy is my favorite application when I want to know what kind of weather I'm going to find at the shooting location. I find it very useful because I can check a lot of information and it has a very nice interface.
For a specific location, you can check the current conditions: wind (direction and speed), rain, snow, temperatures, clouds (at different altitudes) and waves (direction, strength and water temperature).
In addition to this, you can also have a ton of super detailed information on the bar located on the bottom of the screen. It provides a 7-day forecast of all these elements with different displays (basic, meteogram and airgram) plus webcam links and satellite images for free. It's stunning.
You can download the Windy app on both your smartphone and your tablet. But you can also use it through the website on your laptop and desktop computer.
Windy is available on iOS and Android.
Ventusky (7)
As I said before, when it comes to checking weather forecasts, I like to be conservative and check multiple sources. And my plan B is always Ventusky which has a simple and easy to use interface.
The application uses several maps to give you lots of information on the weather forecast in a simple and easy to interpret interface. One of the most interesting features of the application is the possibility to see an animated weather forecast on the screen.
You can download the Ventusky app on both your smartphone and your tablet. But you can also use it through the website on your laptop and desktop computer.
Ventusky is available on iOS and Android.
Local weather services (8)
Gazillions of weather apps and sites aim to forecast the weather as accurately as possible, but, as you may have guessed, none of them are 100% reliable.
Official local weather services generally offer a comprehensive service that includes radar and satellite imagery for the whole country. They are usually operated and owned by the local government and their accuracy is higher than the information provided by a third party.
That's the case, for example of the US National Weather Service, the German Deutscher Wetterdienst, the Australian Bureau of Meteorology, the British Met Office, and the Spanish Aemet.
WorldCam (9)
A great resource to check real time weather are webcams. Obviously, this is a resource that you should use right before going to the shooting location and see if it's worth it to go there.
You'd be surprised how many locations have webcams. Simply search for them on Google typing in "[name of the location] webcam".
Alternatively, one of my favorite websites, WorldCam, has an incredibly long list of webcams around the world.
Nautide (10)
Nautide provides in-depth information about everything from weather on the high seas to expected water levels and marine life activity. This is particularly useful if you're planning to shoot a Sunset with a seascape and you need to know the tides.
Nautide pulls its data from buoys owned and maintained by the NOAA's National Ocean Service, and makes it easy to pick and choose among the more than 10,000 buoy stations from which you'd like to see data. The only drawback is that if you need to plan way ahead, you'll have to pay for an annual data pack.
But... The good news is that you can always use their website tides4fishing which is completely free! ;)
Nautide is available on iOS and Android.
Tide Charts Near Me (11)
Tide Charts Near Me is a good alternative to Nautide.
Its best feature is that the tides' information is not limited throughout time. And a multitude of pins give instant access to tide information in specific locations with one click. So you can have accurate information regardless of where you are on Earth.
I love how clear the graph is, showing how the tide will be rising and falling throughout the day and night. It also tells you the exact meters and centimeters (or feet and inches) at the moment with a little arrow pointing up or down for rising or falling tide.
Tide Charts Near Me is available on iOS and Android.
11.Do you need more help?
I'm curious...
Do you have any Sunset photography ideas in mind?
You do?
Awesome!
Don't waste any time and start planning it!
But if you don't, I'm sure you're avid to get some inspiration.
You can always check the PhotoPills Awards.
It's a contest that we, the PhotoPills team, run. Every day PhotoPillers like you and me send us their best shots, including Sunset pictures of course.
There you have tons of examples that will inspire you to imagine, plan and shoot a crazy Sunset picture.
And when you have it, submit it to the PhotoPills Awards!
You'll help thousands of PhotoPillers and...
You may win some incredible prizes ;)
As usual, if you have any problem, a question or need help, leave a comment at the end of this guide.
I'll be glad to help you get that picture you have in mind ;)
Now go and chase an awesome Sunset!
Note: Some links on this page are affiliate links. What does this mean? If you buy/rent using these links you're helping support us and it costs you nothing extra. Thank you for your support.
Get this ebook for free now!