Solar Eclipses 2024: The Definitive Photography Guide
"There you are, outdoors, wearing some goofy special eclipse glasses to protect your eyes. You don't look very classy but, you know, the least you want to hear once you get back home is your Mom all pissed off yelling at you "I told yaaaa!".
Everything is in place. The tripod, the camera and the lens are perfectly aligned, anxiously waiting for the Moon to completely cover the Sun... for the show to begin.
Only the show is not how you imagined it would be..."
Suddenly, I noticed how the skin on Daniel López's right arm was filled with bumps. "Are these goosebumps?" I asked myself.
The eyes of the astronomer stopped staring at me and got lost into his memories. Daniel wasn't with me anymore in that crowded assembly hall... He had been teleported to God knows where.
He continued speaking...
"It's hard to explain what you feel. The day becomes night without a warning. The Sun and the Moon merge into a black hole wrapped up in a crown of light and fire. Stars and planets flood the sky... Only the whispers of people surrounding you can break the spell.
I don't know. I've never lived anything like this. People become crazy, they do weird stuff... You are going to flip out.
Man, listen to me, as a friend and an astronomer, I know what I say. If you happen to be in the States this summer, you can't miss the August 21 total solar eclipse."
I had no plans to miss it... Neither I nor the rest of the PhotoPills team.
We had just added to PhotoPills a tool to plan that eclipse precisely (since then it has now been updated with the best upcoming solar and lunar eclipses)...
We weren't going to miss it, no matter what!
This guide is the result of that trip. Here, I'll give you everything you need to capture any solar eclipse photo you imagine.
Everything!
From photo examples to inspire you, a calendar of the best solar eclipses and how to use PhotoPills to plan them to the equipment you need and how to photograph a solar eclipse step by step.
There are many eclipses to come!
Are you ready?
It's going to be fun...
"Creativity is intelligence having fun." – Albert Einstein
Note: If you're interested in lunar eclipses, don't miss our guide to the best Moon eclipses ;)
Get this ebook for free now!
Content
- Solar eclipses calendar
- Understanding the different types of solar eclipses and their phases
- The solar eclipse photos that you should capture before you die
- Where to go (finding the perfect location)
- How to plan your solar eclipse pictures
- All the gear you need to shoot a solar eclipse
- 7 general tips for photographing a solar eclipse
- How to shoot a solar eclipse step by step
- Don't forget to use special eye protection!
- The 11 mistakes you should avoid when shooting a solar eclipse
- Imagine. Plan. Shoot!
1.Solar eclipse calendar
"Let's get to the point Toni. When is the next solar eclipse?"
I'm glad you asked me this question.
These are all the solar eclipses until 2033 along with their date, type, magnitude, duration and where they are visible.
Don't you know what the magnitude is?
Don't worry about that now, in section 2 I'll explain you what each of these concepts mean.
| Date | Type | Magnitude | Duration | Where |
|---|---|---|---|---|
| 2024, April 8 | Total | 1.057 | 04m28s | North America, Central America [Total: Mexico, central USA, east Canada] |
| 2024, October 2 | Annular | 0.933 | 07m25s | Pacific, south South America [Annular: south Chile, south Argentina] |
| 2025, March 29 | Partial | 0.938 | -- | Northeast Africa, Europe, north Russia |
| 2025, September 21 | Partial | 0.855 | -- | South Pacific, New Zealand, Antarctica |
| 2026, February 17 | Annular | 0.963 | 02m20s | South Argentina and Chile, south Africa, Antarctica [Annular: Antarctica] |
| 2026, August 12 | Total | 1.039 | 02m18s | North North America, west Africa, Europe [Total: Arctic, Greenland, Iceland, Spain] |
| 2027, February 6 | Annular | 0.928 | 07m51s | South America, Antarctica, west and south Africa [Annular: Chile, Argentina, Atlantic] |
| 2027, August 2 | Total | 1.079 | 06m23s | Africa, Europe, Middle East, west and south Asia [Total: Morocco, Spain, Algeria, Libya, Egypt, Saudi Arabia, Yemen, Somalia] |
| 2028, January 26 | Annular | 0.921 | 10m27s | East North America, Central America and South America, west Europe, northeast Africa [Annular: Ecuador, Peru, Brazil, Suriname, Spain, Portugal] |
| 2028, July 22 | Total | 1.056 | 05m10s | Southeast Asia, east India, Australia, New Zealand [Total: Australia, New Zealand] |
| 2029, January 14 | Partial | 0.871 | -- | North America, Central America |
| 2029, June 12 | Partial | 0.458 | -- | Arctic, Scandinavia, Alaska, north Asia, north Canada |
| 2029, July 11 | Partial | 0.23 | -- | South Chile, south Argentina |
| 2029, December 5 | Partial | 0.891 | -- | South Argentina, south Chile, Antarctica |
| 2030, June 1 | Annular | 0.944 | 05m21s | Europe, north Africa, Middle East, Asia, Arctic, Alaska [Annular: Algeria, Tunisia, Greece, Turkey, Russia, north China, Japan] |
| 2030, November 25 | Total | 1.047 | 03m44s | South Africa, south Indian Ocean, east India, Australia, Antarctica [Total: Botswana, South Africa, Australia] |
| 2031, May 20 | Annular | 0.959 | 01m51s | Asia, Australia, southeast Africa, Pacific, Atlantic, Indian Ocean [Annular: south Africa, south India, southeast Asia] |
| 2031, November 14 | Total | 1.011 | 01m08s | northwest South America, Pacific, Atlantic [Total: Pacific, south Panama] |
| 2032, May 9 | Annular | 0.996 | 00m20s | South Africa, South America |
| 2032, November 3 | Partial | 0.855 | -- | Asia |
| 2033, March 30 | Total | 1.046 | 02m37s | North America [Total: east Russia, Alaska] |
| 2033, September 23 | Partial | 0.689 | -- | south South America, Antarctica |
Source: NASA solar eclipse page
The table above gives you a generic view about the upcoming solar eclipses. But if you want to photograph them (section 8)... you'll need to go a little further and learn how to plan them (section 5).
And if you're one of us (you use the PhotoPills app), you'll be happy to know that we've added a full calendar of solar and lunar eclipses to PhotoPills (until 2050!) :)
But it's not just a calendar, you can also visualize the visibility zones of the eclipse on a map so you can easily plan it. That is, knowing where to go and when to go to be able to take the photo you're dreaming of :)
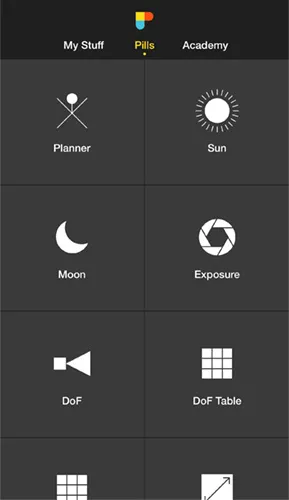
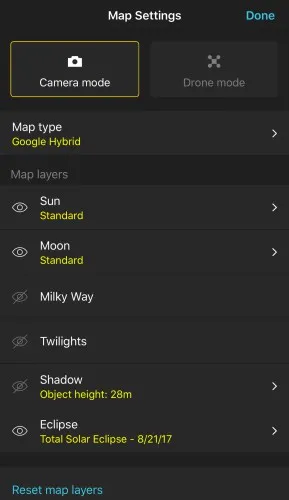
So open PhotoPills, go to the Planner (Pills Menu) and click on the Map Settings button. You'll find it in the lower right part of the map, just next to the (+) button on the map.
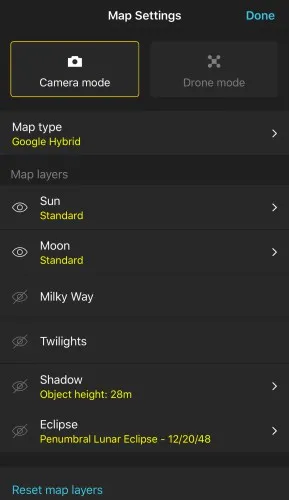
After tapping the Map Settings button, you'll see the Map Settings screen. In the Map layers section, look for the Eclipse layer.
To access the eclipse calendar, simply tap the little arrow you see to the right of the Eclipse layer.
If you are also interested in lunar eclipses, you can read the guide of the best lunar eclipses, but now we're going to focus only on solar eclipses.
So tap the word Object in the header of the table to see the solar eclipses first.
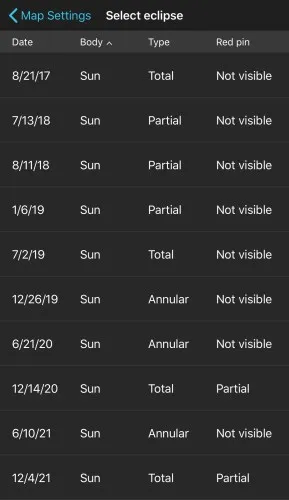
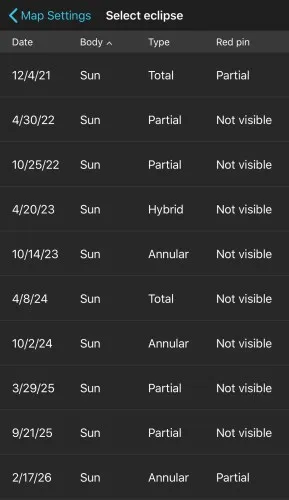
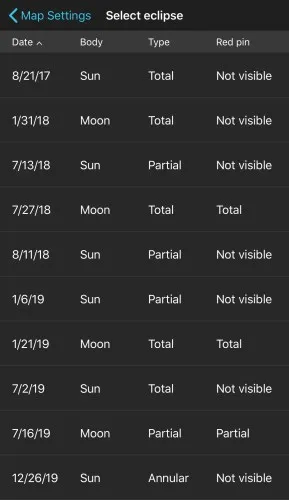
You can also sort the calendar by Date, eclipse Type or Red Pin.
The Red Pin column tells you, considering the position where you have placed the Red Pin in the Planner, if you are going to see a total, annular, partial eclipse or if the eclipse won't be visible.
Therefore, if you place the Red Pin near your house, you can quickly find out which eclipses are going to be visible in your area, and if you can see a total, partial or annular solar eclipse :D
The Type column indicates the type of eclipse: total, partial, annular and hybrid.
Don't worry if you don't know the differences between eclipses. In section 2 I'll explain you all the eclipse types with great detail.
Let's keep going...
To see the eclipse information on the Planner map:
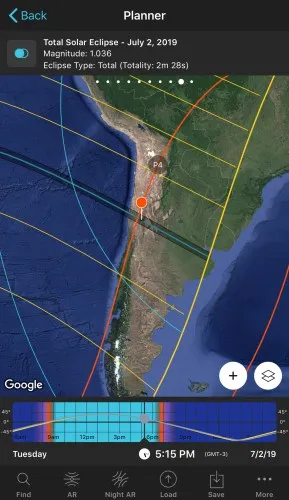
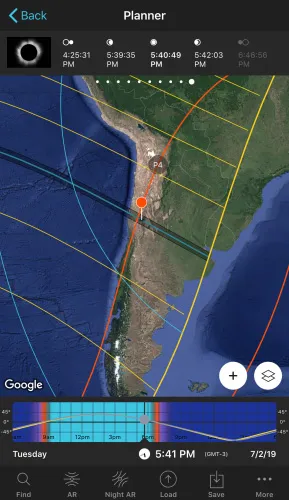
- In the eclipse calendar, tap the eclipse you wish to plan. For example, the total solar eclipse of July 2, 2019.
- On the Map Settings screen, activate the Eclipse layer. To do this, tap the eye icon to the left of the layer.
- Finally, tap OK in the upper right corner in iOS or the arrow to go back in Android.

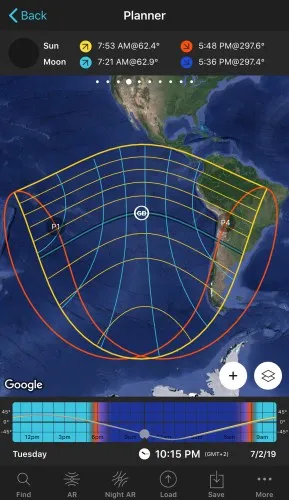
Look at the second screenshot. The visibility information of the eclipse is displayed on the map. Thus, it's easy to find out the areas of the planet where the eclipse won't be visible, where you'll only be able to see the partial eclipse and where you'll be able to enjoy the total eclipse.
Simply move the Red Pin over the map to get the eclipse information for that location in Panel 9 and Panel 10. Swipe the top panels to the left to find them.
The next step would be to understand the lines that you can see on the map and learn how to plan your photos of the solar eclipse (section 5)... But don't go so fast.
First, it's important to have a full understanding of the different types of solar eclipses.
Keep reading!
2.Understanding the different types of solar eclipses and their phases
Let's start from the beginning...
What is a solar eclipse?
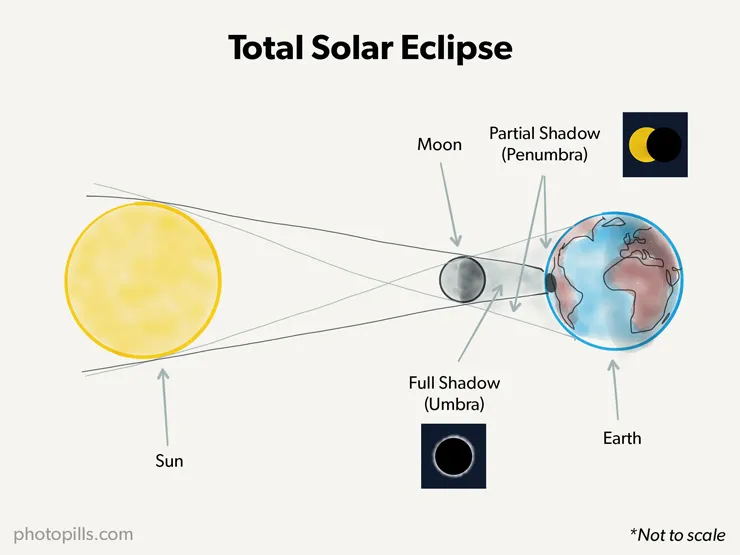
A solar eclipse happens when the Moon moves between the Sun and Earth, blocking out the Sun's rays and casting a shadow on parts of Earth.
The Moon is 400 times smaller than the Sun, but it is also 400 times closer. Therefore the two celestial bodies appear nearly the same size, an extraordinary coincidence!
Why does a solar eclipse only happen during New Moon?
As you would have expected, solar eclipses happen during the New Moon. Let me explain why.
Have you heard about an event astronomers call "syzygy"?
No?
This peculiar name comes from the ancient Greek word suzugos, meaning to be yoked together or conjoined. It defines the exact span of time during which the Sun, the Moon, and the Earth are aligned in a perfect (or near perfect) straight line. This happens around New Moon every lunar month.
Remember that the New Moon is the time when the Sun and the Moon are aligned, both on the same side of the Earth. That is, the Earth is not between the Sun and the Moon. Therefore, a solar eclipse occurs when the shadow of the Moon is projected onto the Earth.
However, there isn't an eclipse every New Moon. Why is that?
A solar eclipse doesn't happen every New Moon because of 2 reasons.
The first one is that the New Moon has to be near a lunar node.
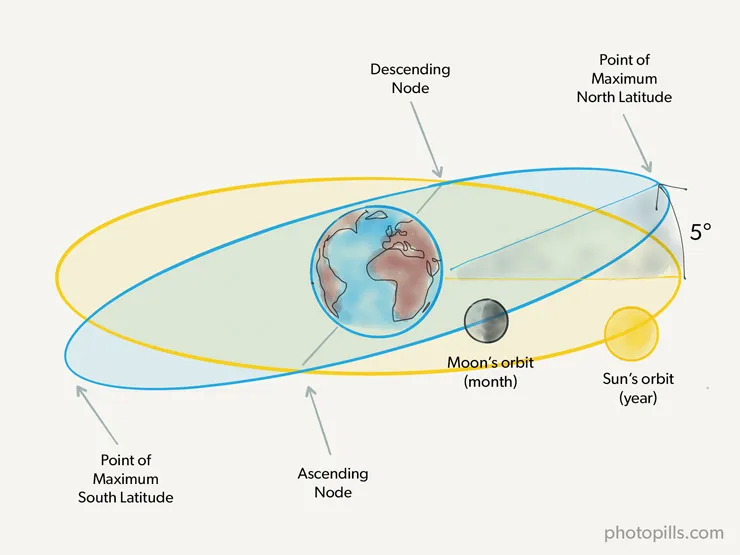
A lunar node is one of the two points where the plane of the Moon's orbital path around Earth meets Earth's orbital plane around the Sun. This plane, the Earth's orbital plane around the Sun, is named the ecliptic.
However, both planes (the Earth one and the Moon one) are not perfectly aligned. Actually, the plane of the lunar orbit around the Earth is inclined about 5° with respect to the ecliptic.
Therefore, as you can see in the diagram below, both planes intersect only at two points: the lunar nodes.
The second one is that the Sun must also be close to a lunar node in order to form a perfect or almost perfect line with the Earth and the Moon. This alignment occurs a little less than 6 months apart, and it lasts 34.5 days more or less.
Therefore, it's only during this time that eclipses can take place.
So, how often does a solar eclipse occur?
The easiest way to find it out is to have a look at the PhotoPills eclipse calendar :P
Most calendar years have 2 solar eclipses, but remember that not all are total.
Up to 5 solar eclipses can occur in the same year, but this is rare. According to NASA calculations, in the past 5,000 years only about 25 years have had 5 solar eclipses. The last time this happened was in 1935, and the next time will be in 2206!
What is the magnitude of a solar eclipse?
The magnitude is a number astronomers use to define how much of the Sun is covered by the Moon in a solar eclipse.
The magnitude represents the fraction of the solar diameter that is covered by the Moon. It has a value between 0 and 1 inclusive, where 1 is totally eclipsed.
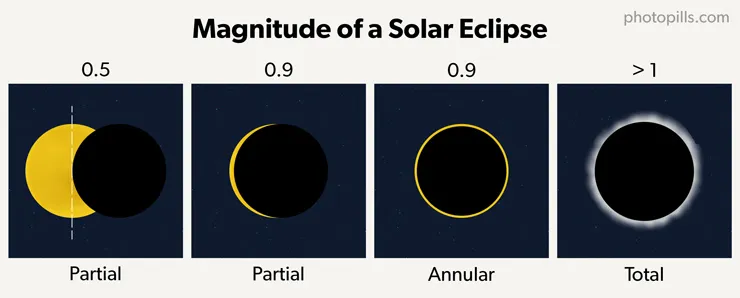
Sometimes, the eclipse magnitude can have a value greater than 1. This happens when the apparent size of the Moon is larger than the diameter of the Sun.
The eclipse magnitude is frequently confused with the eclipse obscuration.
The obscuration represents how much of the solar area (not the diameter), is covered by the Moon.
Each eclipse is defined by how much of the Sun is covered by the Moon. As I have just explained you, this is called magnitude and it depends on which part of the Moon's shadow falls on Earth.
Now, let's see the 4 different types of solar eclipses.
The total solar eclipse
A total solar eclipse happens when the Moon completely covers the Sun. This event can only take place when the Moon is near perigee, the point of the Moon's orbit closest to Earth.
But because the full shadow of the Moon (also called umbra) is not big enough to cover the Earth completely, it only covers a portion.
This area or path is called "the path of totality". In other words, it's the area from which the total solar eclipse can be seen.
If you are in the path of totality, you'll be able to enjoy all 5 phases of a total solar eclipse:
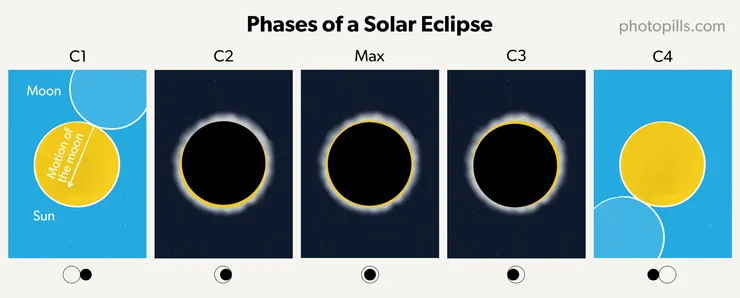
- Partial eclipse begins (1st contact - C1): The Moon starts to cover the Sun little by little. The Sun looks as if the Cookie Monster has bitten it.
- Total eclipse begins (2nd contact - C2): The Sun is almost entirely covered by the Moon. If you happen to be in the path of the Moon's umbra (its full shadow projected on Earth) you might see Baily's beads and the diamond ring effect, just before totality.
- Totality and maximum eclipse (Max.): The Moon covers the Sun completely. Only the Sun's corona (the outer atmosphere of the Sun) is visible. Aren't you excited? The sky is now dark! You also experience a fall in the temperatures and notice how animals go quiet. Again, if you happen to be in the path of the Moon's umbra you may be able to see Baily's beads and the diamond ring effect, just after totality ends.
- Total eclipse ends (3rd contact - C3): The Moon starts to move away from the Sun, allowing it to reappear.
- Partial eclipse ends (4th contact - C4): The Moon stops overlapping the Sun. The eclipse ends at this stage in this specific location.
The time each phase happens depends on the location (latitude/longitude). But don't panic! You can use PhotoPills to figure it out. I'll show you how to do it in section 5.
"OK Toni, but what can I photograph during a solar eclipse?"
You can capture a lot of pictures!
In section 3 I'll tell you all the photos you can take during a total solar eclipse. And in section 8 I'll explain you how to capture them step by step ;)
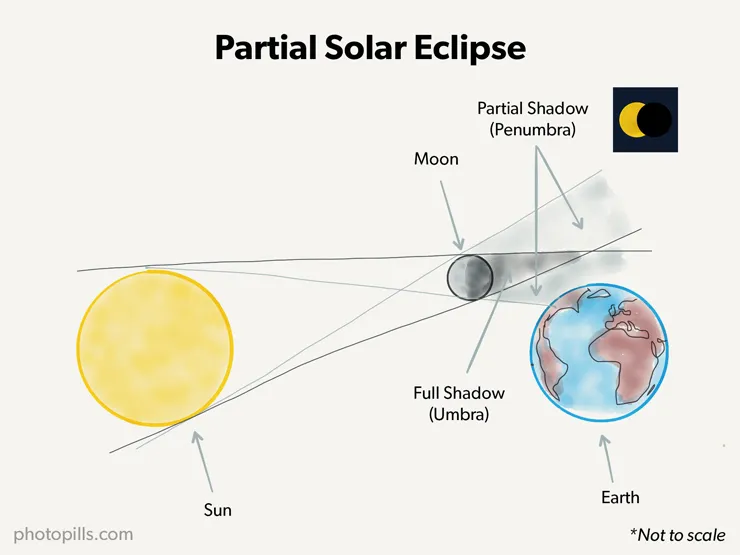
The partial solar eclipse
A partial solar eclipse occurs when the Moon partially covers the Sun and casts only its penumbra shadow onto Earth.
The partial solar eclipse takes place through 3 main phases:
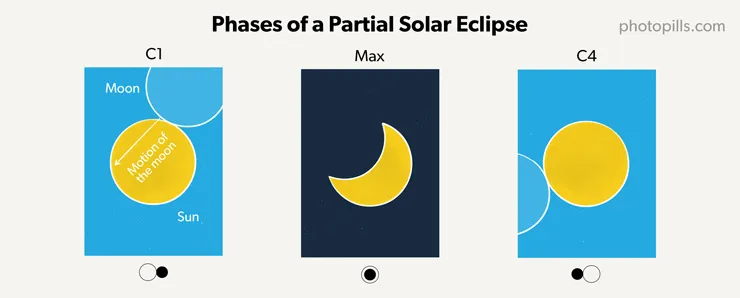
- Partial eclipse begins (C1): The Moon starts becoming visible over the Sun. The Sun looks as if the Cookie Monster has bitten it.
- Maximum eclipse (Max.): The eclipse reaches its maximum magnitude. The Moon covers more of the Sun's disk than at any other instant during the eclipse.
- Partial eclipse ends (C4): The Moon stops overlapping the Sun. The eclipse ends at this stage in this specific location.
The time at which each phase occurs depends on the location (latitude/longitude). Find it out quickly with PhotoPills (section 5) ;)
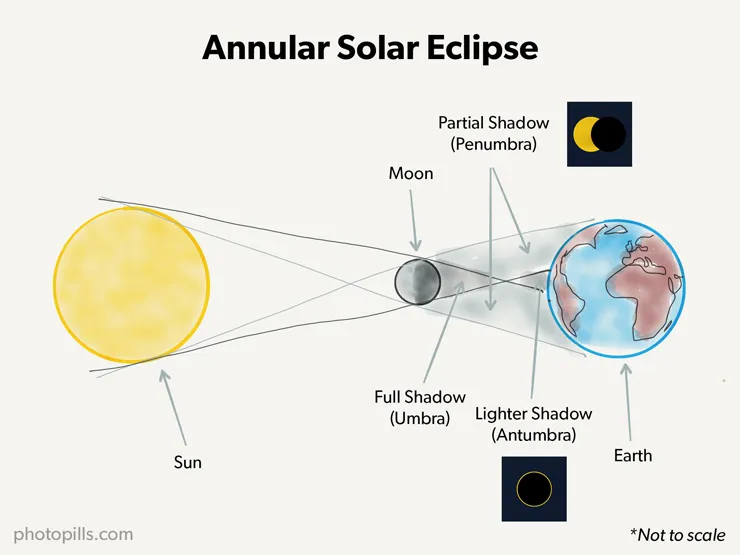
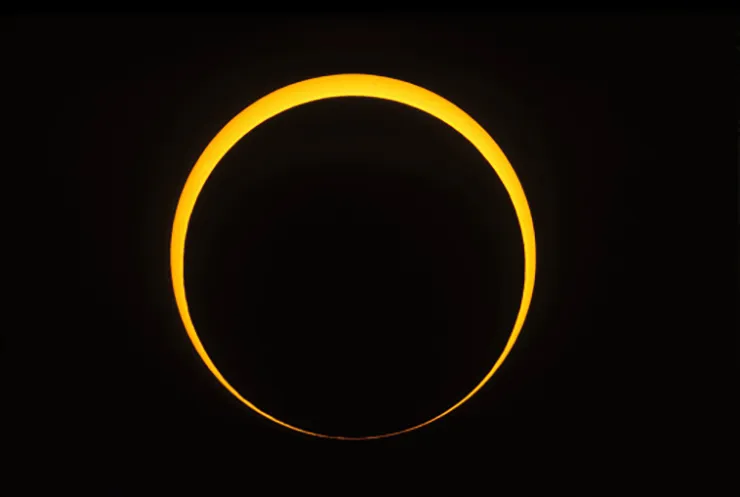
The annular solar eclipse
An annular solar eclipse takes place when the Moon is not big enough to cover the Sun completely.
In this case, the Sun's outer edges remain visible to form a ring of fire in the sky. An annular eclipse of the Sun takes place when the Moon is near apogee (the point of the Moon's orbit farthest from Earth), and the Moon's antumbra (its lightest shadow) falls onto the Earth.
The annular eclipse takes place through 5 main phases:
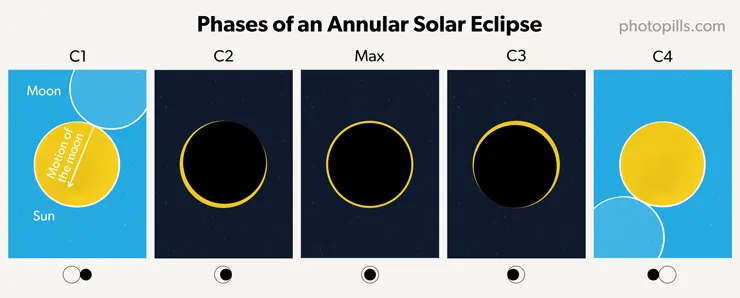
- Partial eclipse begins (1st contact - C1): The Moon starts to cover the Sun little by little. The Sun looks as if the Cookie Monster has bitten it.
- Total eclipse begins (2nd contact - C2): The Moon starts to be inside the Sun while creating a ring of fire around it. If you happen to be in the path of the Moon's antumbra (its full light shadow projected on Earth) you might see Baily's beads and the diamond ring effect, just before annularity.
- Totality and maximum eclipse (Max.): The Moon covers the center of the Sun completely. Before the annular eclipse finishes you may be able to see Baily's beads and the diamond ring effect.
- Total eclipse ends (3rd contact - C3): The Moon starts to move away from the Sun, allowing it to reappear.
- Partial eclipse ends (4th contact - C4): The Moon stops covering the Sun. The eclipse ends at this stage in this specific location.
The time at which each phase occurs depends on the location (latitude/longitude). You can easily find it out with PhotoPills (section 5).
The hybrid solar eclipse (or annular-total)
Finally, a hybrid solar (or annular-total) eclipse is extremely rare. It occurs when the same eclipse changes from an annular to a total solar eclipse (and/or vice versa) along the eclipse's path.
This means that there will be locations along the path of the eclipse where you can see a total eclipse and others where you can see an annular eclipse.
Are you still there? Yes?
Great, now you know what a solar eclipse is, as well as its different types and phases.
It's time to see some pictures, get some inspiration and let your imagination fly.
These are the eclipse photos you should take before you die...
3.The solar eclipse photos that you should capture before you die
Before you can start planning (section 5) and photographing the solar eclipse (section 8), you should know what kind of photo you want to capture.
Imagine. Plan. Shoot!
The idea always goes first ;)
And the best way to get some inspiration and to have some ideas is to see the types of photos you can capture during a solar eclipse.
Let's start with the first photo, one of the partial solar eclipse...
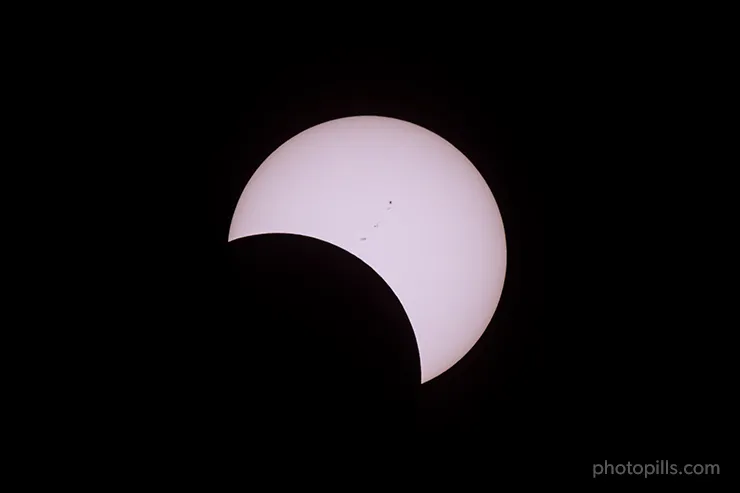
Partial eclipse (1)
The pictures of the partial eclipse are spectacular. I love the combination of the light Sun with the black Moon.
Video of a total eclipse (2)
When you're photographing a total solar eclipse from the path of totality, there are several phenomena that you can capture.
Make sure you don't miss them!
Take a look at this video and get inspired by all the photos we captured during the total solar eclipse of August 21, 2017 :)
This is the chronological order in which they happen.
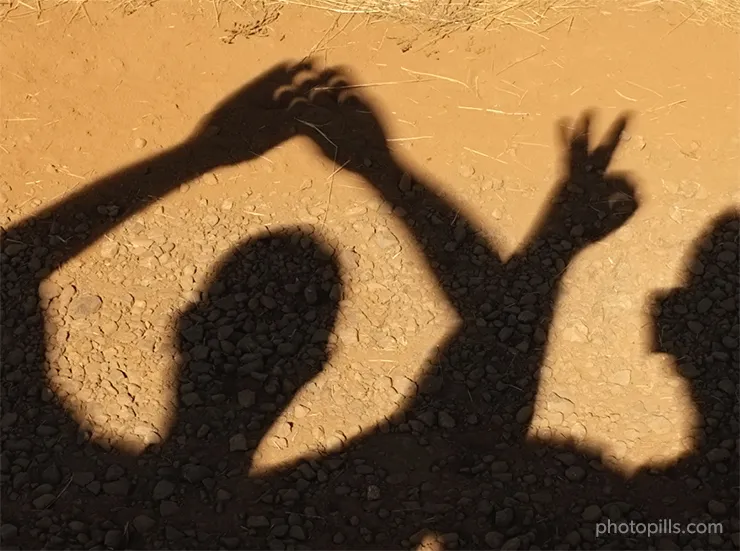
Shadow Bands (3)
This phenomenon happens in all solar eclipses (total, partial and annular).
During a total solar eclipse, about 1 or 2 minutes before totality, you may notice eerie bands of undulating shadows racing across the ground, along the sides of buildings or across other light-colored surfaces.
It's a pretty abstract effect that is very surprising.
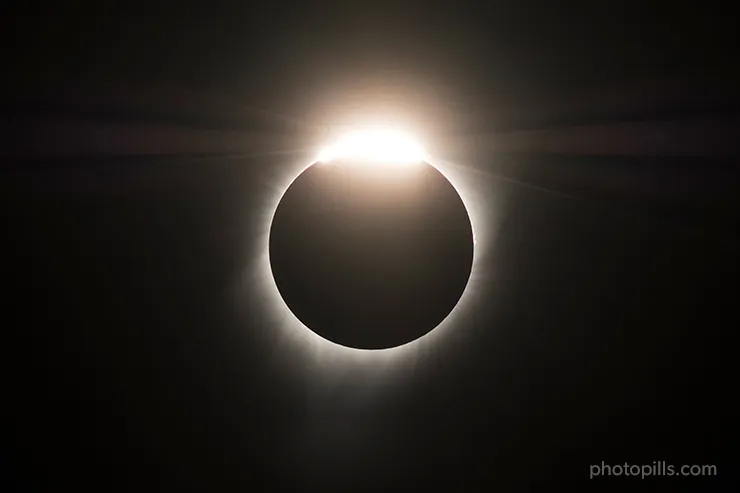
Diamond ring (4)
About 10 to 15 seconds before and after totality, the solar corona (the outer atmosphere of the Sun) becomes visible. As the last bits of Sunlight pass through the valleys on the Moon's surface, and the faint corona around the Sun is just becoming visible, it looks like a ring with glittering diamonds on it.
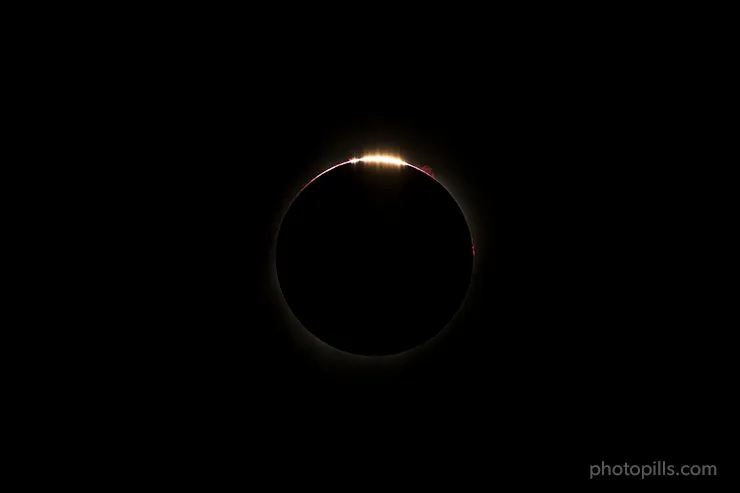
Baily's beads (5)
Approximately 5 seconds before totality, get ready to see the Baily's beads. They are an ensemble of brilliant beads of Sunlight caused by the Sun shining through valleys and depressions on the Moon's surface.
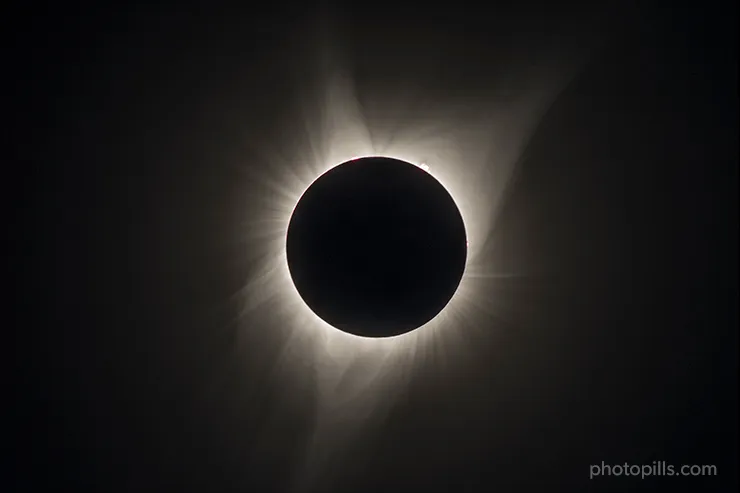
Sun's corona (6)
As the diamond ring fades away, you are now able to see the Sun's corona. Can you spot the faint rays that surround the silhouette of the Moon?
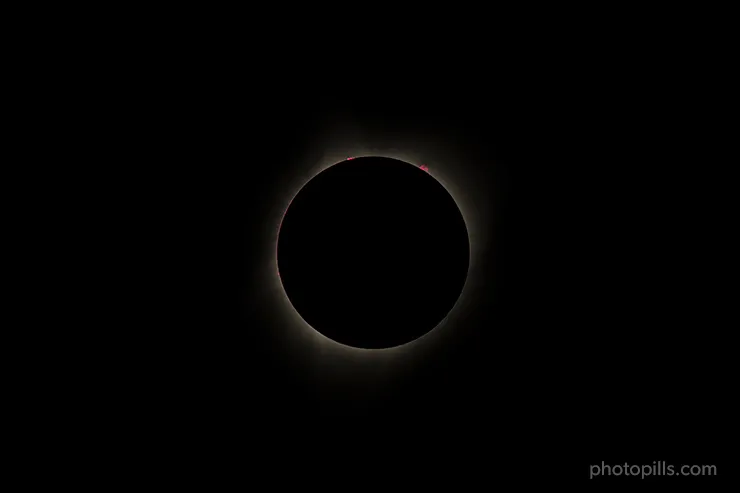
Sun's chromosphere (7)
The chromosphere is a low layer of the Sun's atmosphere. Just a few seconds after totality ends, you can notice a reddish glow – it's the chromosphere.
These phenomena also occur when the Moon uncovers the surface of the Sun.
Take advantage of them!
Capturing detail on the Moon (8)
With the appropriate camera settings and a slight editing later on, you can get images that show all the detail of the Moon covering the Sun. The effect is simply magnetic :)
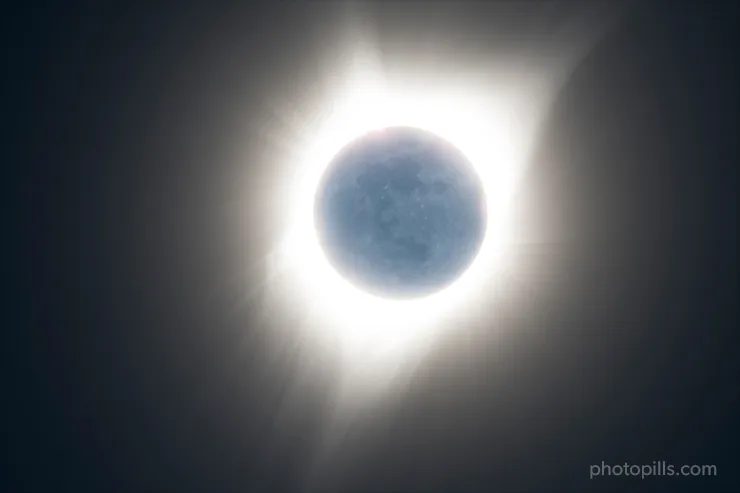
Earthshine: Nikon D500 | 500mm | f/8 | 2s | ISO 100 | 6450K
Annular eclipse ring of fire (9)
In annular solar eclipses, the Moon never covers the Sun completely, so you can see a ring of fire in the sky at its peak. It's an amazing show!
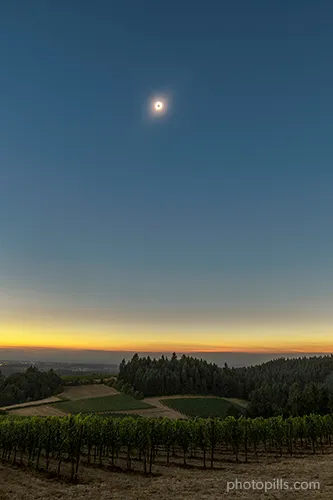
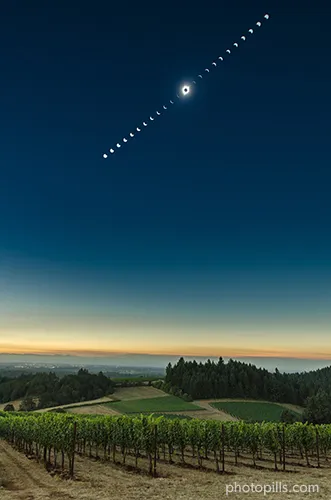
Include the landscape with a wide angle lens (10)
When you want to include the landscape in the photo, the planning and composition are a bit more complicated. As I'll explain in section 4, in these cases you should find a location with an interesting background and subject that, combined with the show happening in the sky, produce a unique image.
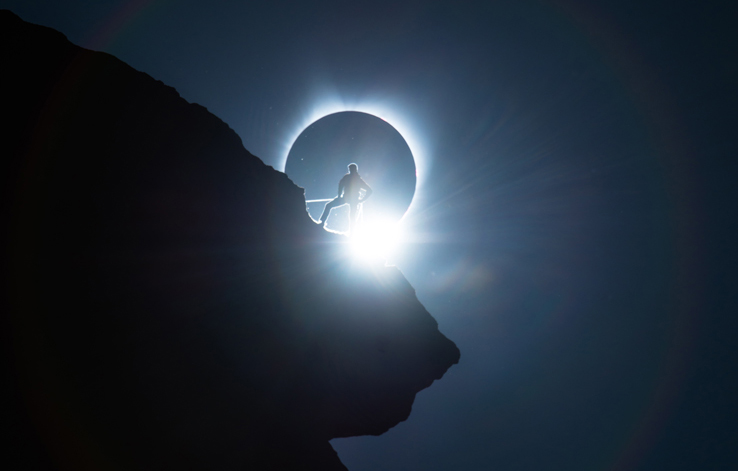
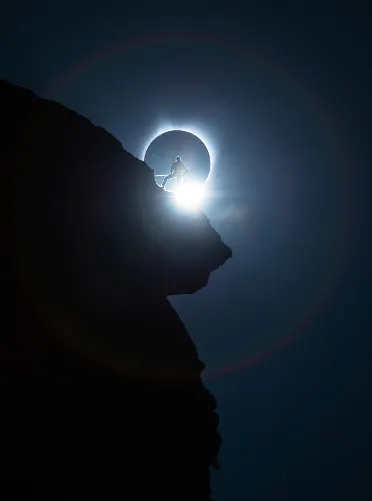
Include the landscape with a telezoom (11)
It's possibly one of the most difficult pictures to plan and capture. It requires scouting and knowing the locations extremely well, having advanced planning skills and not failing during the shooting key moment.
But don't worry, they're not impossible photos. In section 4 and section 5 I'll give you everything you need to plan this type of pictures.
A great example is the photo that Ted Hesser captured during the total solar eclipse of August 21, 2017. He was able to capture the silhouette of a climber inside the Sun's disk.
This photo turned him into a legend, becoming the PhotoPiller of the Year 2017, and winning $3,000 in cash with the PhotoPills Awards!
Don't be shy and participate!
Or get inspired by the photos of other PhotoPillers that we publish every day on our Instagram account.
Close-up and wide-angle composites of the solar eclipse (12)
This type of images are very attractive for the viewer. And it's another way to take advantage of the photos you've captured during the eclipse.
Simply take photos that you've taken during the eclipse and use your processing skills to create different images.
Let's have a look at two examples.
Multi-photo composites
Blend all phases of the eclipse in a photo of the scene (taken with a short focal length) to tell the whole story.
Solar eclipse base photo: 1.3s
Partial eclipse pictures: 1/25s | Solar filter
Layered composites
These images allow you to show in more detail the different phases of the eclipse. They are equally spectacular.

In short, the photographic (and creative) opportunities that an eclipse offers you are huge.
You should take advantage of them all!
But for this, you'll first need to find the perfect location...
4.Where to go (finding the perfect location)
One of the most important tasks when planning your photo shooting of the eclipse (section 5) will be to establish the location from which you'll take the pictures.
To help you choose the best possible location according to the photos you have imagined, here are some factors that you should take into account.
Try to be in the centerline of the path of totality (total eclipse)
As Daniel López, friend and astronomer told me, I tell you:
"When you are going to photograph a total solar eclipse, forget about photographing the partial eclipse, go to the path of totality. You must photograph the eclipse in its maximum splendor, when the Moon completely covers the Sun!"
Within the path of totality there is a line called the centerline. This is a very thin area where the Moon covers the Sun for the longest time.
Therefore, if you set your shooting spot there, you'll have more time to experience and capture totality.
So use PhotoPills to find out where on the planet you can enjoy totality (section 5) and go for it.
Find the maximum magnitude (partial eclipse)
When you're going to photograph a partial eclipse, you should find a location that allows you to capture the most spectacular eclipse possible. And this is usually when the eclipse has a great magnitude (more than 0.6 if possible). That is, when the Moon covers a large part of the Sun.
In section 5 you'll find everything you need to plan your partial eclipse.
Find a spot with lots of space to move around
You want to look for a place that has lots of space. So you can move around.
You should take this into consideration for two reasons.
First, because if you have more room to maneuver it will be easier to plan the photo. For example, if you want the eclipse to be in a certain position in the frame (aligned with your subject...).
The second reason is that you may not be alone in the location. Depending on the eclipse and where you're going, you're possibly going to be with a lot more people.
Considering the setup preparation and the gear you plan to use (section 6), the last thing you want is someone (or even you!) tripping with your tripod or backpack!
Therefore, look for a wide space.
Additionally, try to avoid dusty or sandy sites. As totality approaches and temperatures cool, the so called "eclipse winds" can start out.
That's something you definitely want to avoid at all costs.
Look for an interesting subject
If you decide not only to photograph the eclipse, but you want to include the landscape in the frame, look for a location that allows you to include an interesting subject.
As I explain in the articles of the Moon, the Milky Way or even of Star Trails, the subject plays a key role in the composition.
Would you like an example?
Let me include again here the photo that Ted Hesser captured during the total solar eclipse of August 21, 2017. Magnificent subject, and magnificent composition to capture a legendary photograph.
The shooting distance will determine the size of the Sun compared to the subject
If you're planning to use a long focal length to capture a big Sun with your subject, look for a location that allows you to shoot far away from the subject.
How far?
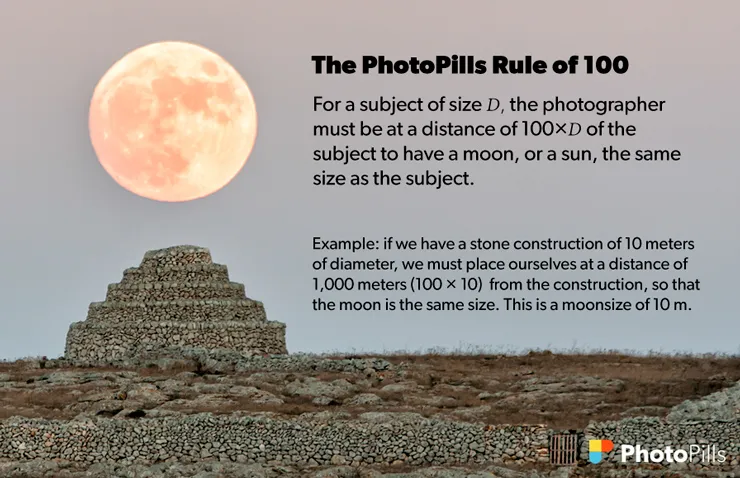
It depends on the size of the Sun you need compared to your subject. To calculate the shooting distance, apply the PhotoPills Rule of 100.
The rule is very simple, multiply by 100 the diameter of the Sun you want to capture.
For example, if your subject is 10 meters tall, and you want the solar eclipse to have a diameter of 10 meters (to be as big as the subject). Multiply 10 meters by 100 and you will get that the shooting distance must be 1,000 meters.
As simple as that!
You can learn more about this topic reading section 4 of our Moon photography guide.
Now, it's time to get down to work and plan your photos of the solar eclipse...
Let's plan!
5.How to plan your solar eclipse pictures
Do you want to learn how to plan a solar eclipse? Really?
Let's have a look at an example.
In this section, I'll explain you step by step how I planned the total solar eclipse of August 21, 2017 with PhotoPills.
Everything you'll learn here will also help you plan any solar eclipse, whether it's partial, annular or total.
But if you don't want to read, you can have a look at this video:
Ready?
Let's start from the beginning!
Select the eclipse you want to plan
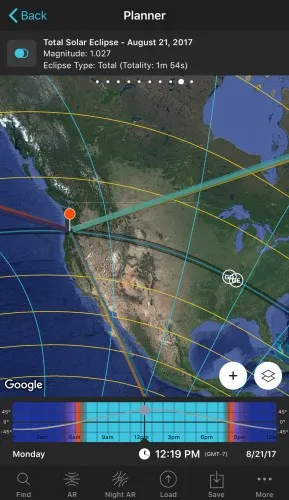
First, select the eclipse you want to plan. In this case, and as an example, select the solar eclipse of August 21, 2017.
Go to PhotoPills, tap Planner (Pills Menu) and then tap the Map Settings button. You will see it on the map, in the lower right corner, right next to the (+) button on the map.
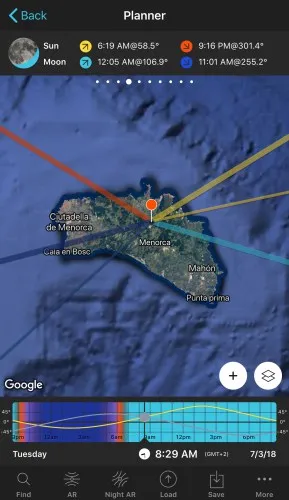
Look at the Red Pin on the map. Right now it's located on the island of Menorca, Spain (PhotoPills headquarters). The Red Pin is key to planning eclipses, since all the information the Planner displays is referenced to its position.
After tapping the Map Settings button, you'll see the Map Settings screen. To access the eclipse calendar, simply tap the little arrow you see to the right of the Eclipse layer.
The calendar displays all the solar and lunar eclipses, showing:
- Date
- Object (Sun or Moon)
- Type (total, partial, annular or hybrid)
- Red Pin, if it's visible or not from the Red Pin position. And if it's visible, it tells you the type of eclipse you'll see (total, partial or annular).
Note: Tap Date, Object, Type or Red Pin at the top to sort the table according to the criteria you prefer.
In the calendar, tap the eclipse of August 21, 2017 to select it. Once you've done it, you'll return to the previous screen (Map Settings).
Notice that now in the Eclipse layer the eclipse of August 21, 2017 is selected.
To see the eclipse information on the Planner map (visibility zones, etc.), click on the eye icon that you see to the left of the Eclipse layer to activate it. Finally tap OK (upper right corner) in iOS or the arrow to go back in Android.
On the map, zoom out to get a global view of the eclipse visibility information on August 21, 2017.
Right now, the Red Pin is still located on the island of Menorca. But to know the detailed information of the eclipse in a specific location, you'll have to place the Red Pin in that location. If you don't know how to do it, this video shows you how to move the Red Pin.
Remember that in order to place the Red Pin in a specific postal address, a point of interest that you have saved or in certain coordinates (latitude, longitude) you can use the Load button (located at the bottom, next to the Save button).
Great. You just selected the solar eclipse you want to plan!
Let's see where you have to go and at what time. In order to do this you should understand the information that is displayed on the map and the two top eclipse panels (Panel 9 and Panel 10).
Where to go and when (understanding the eclipse information on the map and top panels)
Where to go?
As I told you in section 3, if you're going to photograph a total solar eclipse, whenever possible you should go to a location within the path of totality... from where you can see (and photograph) the total eclipse :)
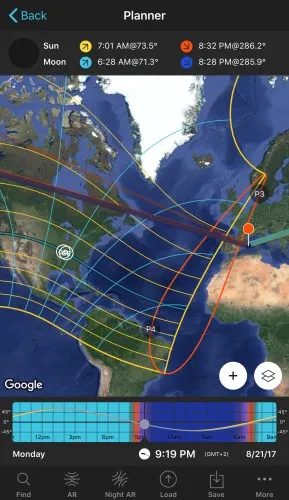
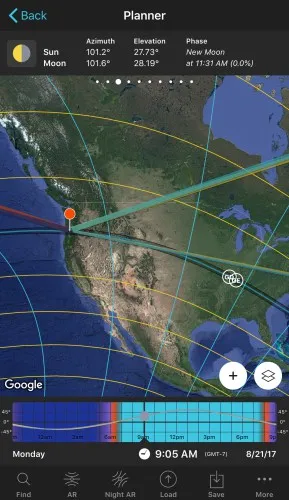
In the following screenshots, the Red Pin is within the path of totality (the dark strip crossing the United States). I have used the Load button to place the Red Pin in Salem (Oregon), the location where the PhotoPills team went in 2017 to photograph the eclipse.
When to go?
In other words...
At what time does the eclipse start at the Red Pin position?
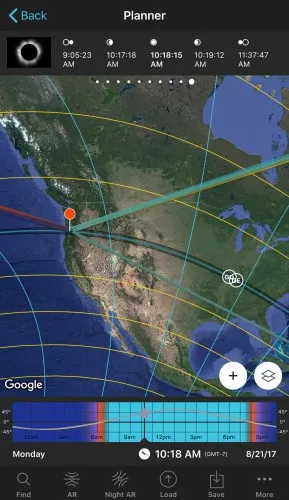
Swipe the top panels to the left until you find the two eclipse information panels (Panel 9 and Panel 10). They show you the times of the main phases of the eclipse (section 2), and other essential details.
Look at the second screenshot. The top panel indicates that, considering the Red Pin position, the eclipse of August 21, 2017 starts at 09:05:23 am.
But as I am foresighted and I like to work without any hassle, all my gear was set up one hour before that and ready to take action :)
This is the information you will find on the map that will help you decide where to go:
- Map central dark area: It's the path of totality (the area of total darkness). In other words, the area where you can observe how the Moon will completely cover the Sun.
- Map blue line within the path of totality: It's the centerline. The further away from the centerline you are (while being in the path), the shorter amount of time the Sun will be covered by the Moon. In other words, you will see a shorter totality duration.
- Map yellow lines: Outside the path of totality you'll be able to see a partial eclipse. The first yellow line on both sides of the path represents the locations where the Moon will cover 80% of the Sun. The next yellow line represents 60% and so on. The furthest from the path of totality, the more partial the eclipse will be.
- Map Greatest Duration Point (GD): The location where totality lasts longer, where the phase of total eclipse lasts longer. For the August 21 eclipse, the GD is located near Carbondale, IL where the duration of totality is 2 minutes and 41.6 seconds.
- Map Greatest Eclipse Point (GE): Don't confuse it with the Greatest Duration Point. The Greatest Eclipse Point is not where the total eclipse lasts longer. It is just a geometric point. GE wasn't a good name choice at all. It is actually the location where the shadow of the Moon is nearest to the center of the Earth. Sometimes, it falls very close to the GD point, but it's not always the case.
In Panel 9 (above the map) you'll find the basic information of the eclipse for the position of the Red Pin:
- Eclipse selector button: If the Eclipse layer is active on the map, you can deactivate it by tapping this button. Tap it again to access the eclipse calendar and select the eclipse you wish to plan.
- Selected eclipse: In this case, the total solar eclipse of August 21, 2017.
- Eclipse magnitude: Considering the Red Pin position, it represents the proportion of the solar diameter that covers the Moon. Its value is usually between 0 and 1, where 1 means total eclipse. But sometimes the apparent size of the Moon may be greater than that of the Sun. In that case, the magnitude may be greater than 1.
- Eclipse type: The type of eclipse that you can see from the Red Pin position (total, partial, annular or not visible). If the Red Pin is within the path of totality, it also indicates the duration of totality.
Finally, Panel 10 (above the map) will help you to quickly find out the exact time in which the different phases of the eclipse happen considering the Red Pin position:
- Eclipse phase picture: Image on the left of the panel. It shows the phase of the eclipse at all times as seen from the Red Pin position. Tap it to jump in time to the next phase. The time will be set in the Time Bar. Review section 2 to understand the different phases of a total solar eclipse.
- Eclipse phase time: The panel displays the times at which the eclipse phases occur. To select the time of a phase, tap and hold the time of the phase that is displayed on the panel. The time will be set in the Time Bar.
Perfect!
Now you know:
- How to select the eclipse you want to plan.
- Where you'll see the total eclipse (path of totality) and where you'll observe the partial eclipse (area between the yellow lines).
- How to move the Red Pin to place it in the location you want to study.
- When the different phases of the eclipse happen according to the Red Pin position (Panel 10).
The next step is to know where to frame the camera to get the shot.
Where to frame the camera to capture the total eclipse
To fine tune the plan (shooting spot and shooting time), you need to find out where the Sun will be during the eclipse.
In other words, you need to know the azimuth (direction) and the elevation of the Sun at all times.
Let's find it out quickly. Go back to PhotoPills and select the start time of the eclipse. Now look how the Sun moves from that hour onwards.
If you do it, you'll see the direction (azimuth) of the Sun on the map and the elevation on one of the top panels (Panel 3). I'll show you how to find this information in a moment.
How to set the date and time on the Planner?
You could obviously do it by changing the date and time using the Time Bar. But there is a better way to do it.
Work smarter, not harder! ;)
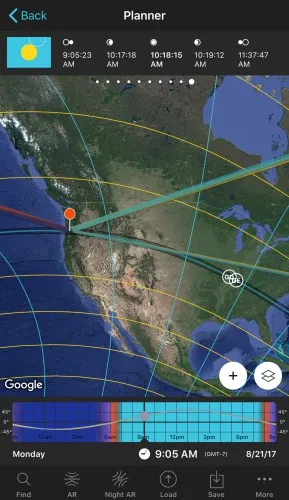
Go to the PhotoPills' Planner and tap the eclipse button you see on the second eclipse panel (Panel 10). You'll find it on the left side of the panel. It has a picture of the Sun (a yellow circle).
Tap the eclipse image until the date is set on August 21, 2017 and the time when the eclipse begins (09:05:23 am in this example). You can also do it by tapping and holding the time of the eclipse start phase that Panel 10 displays.
Notice that the icon of the button has changed. It is now showing you the phase of the eclipse for the selected time (at the beginning of the eclipse).
Where will the Sun be at the beginning of the eclipse?
Easy. The thin orange line that begins at the Red Pin is showing you the direction of the Sun for the selected date and time. In this example, at the beginning of the eclipse.
Note: The blue thin line indicates the position of the Moon, so the two lines practically overlap during the eclipse.
If you keep tapping the eclipse picture (Panel 10), you'll jump from phase to phase. And the thin orange line will show you the direction of the Sun at all times seen from the position of the Red Pin :)
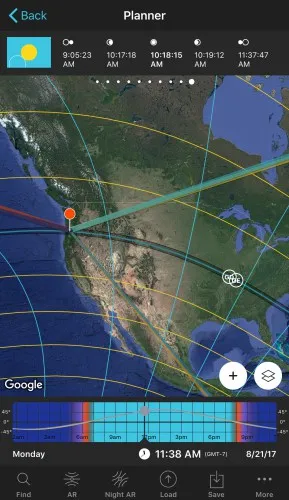
And the Sun's elevation?
In order to know how high the Sun will be in the sky, swipe the top panels to the right until you find the Sun/Moon azimuth and elevation panel (Panel 3).
According to the top panel, the Sun will have an elevation of 27.73º at the beginning of the eclipse (09:05:23 am). And its azimuth will be exactly 101.2º. This is the angle, measured clockwise around the observer's horizon, between the Sun and the north. It's represented on the map by the thin orange line.
Now you can change the time with the Time Bar (or with the eclipse Panel 10) and see how the elevation of the Sun changes during the eclipse (Panel 3).
The Planner hides a surprise that makes things much much simpler... :P
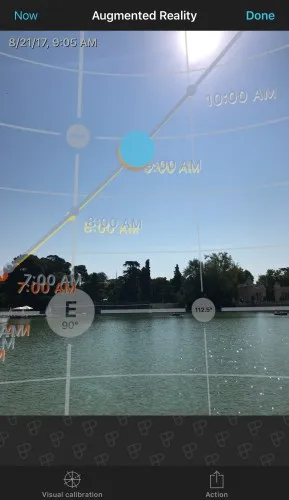
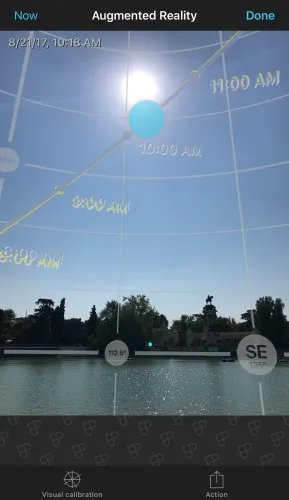
The Augmented Reality!
To visualize the position of the Sun, use the PhotoPills Augmented Reality tool. To do so, on the Planner tap the AR button (bottom) and you'll see through your phone the exact position and path of the Sun.
Remember that what you're seeing in the Augmented Reality view is what you'd see from the Red Pin position on the selected date and time. You should position yourself at the Red Pin position when using the AR view on the Planner.
And that's it!
This is how I planned the total solar eclipse of August 21, 2017. If you follow these simple steps you can plan any photo of eclipse that you resolve... Well, almost all.
We have yet to cover a more advanced planning case: when your goal is to capture a huge Sun with your subject...
Advanced planning (long distance picture with telezoom lens)
If you want to take a long distance photo in which the eclipse has a specific size with respect to your subject, as Ted Hesser did in 2017, planning becomes slightly more complicated (but not too much).
To plan the photo, you should:
- Find a location with an interesting subject that allows you to take the photo from the distance you need.
- Calculate the shooting distance with respect to the subject to get the eclipse size you wish (applying the PhotoPills Rule of 100 that I explained in section 4).
- Find the shooting spot and shooting time that allows you to align the eclipse with your subject.
Are you in?
In this article I explain step by step how to do it with the Moon (with a solar eclipse it's exactly the same): 7 Tips to Make the Next Supermoon Shine in Your Photos.
Imagining is fun...
Planning is fun...
But living the moment of capturing a solar eclipse... is priceless.
6.All the gear you need to shoot a solar eclipse
In this section, my goal is to describe everything you need to photograph the eclipse.
Everything!
From solar filters, camera and lens to tripod, intervalometer and more...
But first, let me tell you the equipment we brought to USA in 2017 for the total solar eclipse of August 21.
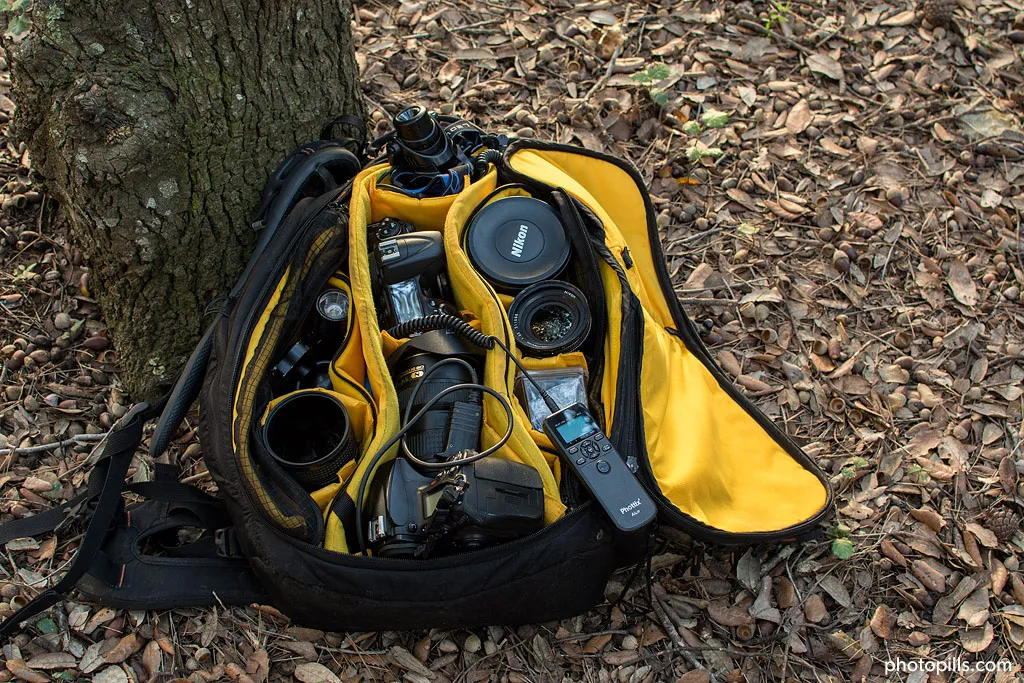
Our equipment for the eclipse
This is the gear we brought to the US.
Solar Filters
A 77mm Solar Filter "White light" by Thousand Oaks Optical and a Baader Solar Filter to be used on the telephoto lens.
To shoot the eclipse sequence and video
Nikon D500 + Nikon 200-500mm f/5.6 + Gitzo 4542 systematic tripod.
Also Olympus OM-D E-M1 + Olympus Zuiko 300mm f/4 + Manfrotto aluminium tripod.
To capture the foreground and the eclipse
Nikon D4s + Nikon 70-200mm f/2.8 + Manfrotto 055 XPROB tripod. Depending on the shooting spot, we also had the 35mm f/1.4 lens.
To shoot the full path of the elipse
Nikon D7000 + Nikon 17-35 f/2.8mm + Gitzo 1241 tripod.
To shoot the making of timelapse
Panasonic Lumix GX8 + Panasonic 14-140mm f/3.5-5.6 + Benro FTA18AB0 Travel Angel tripod.
And also GoPro + Gorillapod tripod.
To capture details, shadows and making of
Fuji X100 + Vanguard VEO 235AB tripod.
And a Pinhole camera. Medium format, Holga 120mm wide angle.
But this is just our gear. Let me give you a more general view of the equipment you'll need.
First, you need a solar filter
"Do I Toni?"
Yes! And it has to be one made for this specific purpose: to photograph a solar eclipse!
Do not risk damaging your eyesight and equipment by using some cheap filter or one not designed for looking directly into the Sun.
Your filter must also block infrared (IR) and ultraviolet (UV) light as well which, though invisible, can also damage your eyes.
What are the different types of solar filters?
There are three types of solar filters for photography:
- Aluminized Mylar®
- Metal-coated
- Black-polymer (usually hand-held)
All the filters can be:
- Circular or square.
- Mounted in a metal cell, making it very easy for you to clamp them over your lens and adjustable to different diameters.
How are you going to see the Sun through a solar filter?
Aluminized Mylar® filters are the most expensive ones. However, they provide a white Sun which is true to the Sun's real color (Surprise! It's not yellow).
Do not be deterred by their wrinkled surface. This surface tends to scatter light a little bit, but these filters are actually very sharp! They are particularly good for highly magnified images.
Metal-coated glass filters and black polymer filters result in a saturated yellow Sun. Any of them will work fine, since you can always change the color of the Sun later on, in post-processing.
Finally, metal-coated glass filters offer you a sharper picture than black polymer filters which are more appropriate for naked eye observation and wide-angle images.
Don't use homemade filters!
According to NASA, the following materials should never be used to view a solar eclipse:
- Photographic neutral density filters, no matter how dense they are
- Photographic polarizing filters
- Sunglasses of any kind
- Negative film (exposed or not)
- Smoked glass
- Space blankets and other forms of household Mylar, or silvery CD/DVD disks
- Medical X-ray film
- Floppy disks
You must avoid them because, while they dim visible light, they do not block infrared (IR) and ultraviolet (UV) light that can damage your retinas.
Where can you buy your solar filter?
Most telescope stores will sell solar filters to fit a variety of lenses and telescopes.
However, if you prefer to order yours online here are a few alternatives:
- Amazon
- B&H
- Orion Telescopes
- Baader Astro Solar (Europe)
- Kendrick Astro Systems (Canada)
- Seymour Solar Filters
- Thousand Oaks Optical
The camera
Just about any camera will work to capture a solar eclipse, but some will produce better pictures depending on your expectations.
Can you capture the solar eclipse with your smartphone?
Yes!
Nevertheless, since the camera on your smartphone has a wide-angle lens, don't photograph the eclipse itself. Focus on what people around you are doing while including the eclipsing Sun in the frame.
And while you are taking photos here and there, don't forget to wear eclipse glasses. Grab a second pair to use one of the glasses' filters in front of your smartphone's camera as well!
Compact cameras
In general, point-and-shoot type cameras all have an average image quality and are good value for money. Unfortunately, because of their limited zoom range, it'll be hard to capture a large Sun disk in the photo.
When shooting, use the LCD of your camera, put a solar sheet in front of the lens and wear the special eclipse glasses. Safety first!
These cameras have lenses that fully retract into the body of the camera when they fall asleep or when you turn them off. The problem here is that you won't be able to mount a solar filter. Without the solar filter, both the camera sensor and focusing system will be burnt by the Sun as soon as you shoot your first picture.
And please, don't try to tape or attach in any fancy manner some sort of filter to these type cameras. Chances are the filter will be ripped off, breaking your camera sensor and harming your retinas.
Low-end cameras
The following cameras allow full manual basic exposure:
- Cameras with an APS-C sensor: Nikon Z30; Canon 4000D, 250D and M5; Sony a6600.
- Cameras with a Micro 4/3 sensor: Olympus OM-D E-M10 Mark IV and Panasonic G95.
- Compact camera (1" sensor): Sony RX100 VII.
Mid-range cameras
These cameras deal acceptably in terms of noise at a reasonable price.
For eclipses it's less critical as the scene will never get very dark (the sky will be like at twilight) and even the eclipsed Sun and corona will be quite bright. However, the lesser noise, the better quality you get.
- Cameras with an APS-C sensor: Nikon Z50, Zfc and D7500; Canon R10, R7, 850D, 90D and 6D Mark II; Fuji X-S20 and X-T30 II; Pentax KF; Sony a6700.
- Cameras with a Micro 4/3 sensor: Olympus OM-D E-M5 Mark III and Panasonic G9 II.
- Full Frame cameras: Nikon Z5 and D750; Canon RP; Sony a7C II.
High-end cameras
On the higher price range (and higher quality), I recommend you these cameras:
- Cameras with an APS-C sensor: Nikon D500; Fuji XH-2S, XT-5 and X-Pro3.
- Cameras with a Micro 4/3 sensor: Olympus OM-1 and Panasonic GH6.
- Full Frame cameras: Nikon Zf, Z6 II, Z7 II, Z8, Z9, D780, D850 and D6; Canon R8, R6 Mark II, R5, R3, 5D Mark IV, and 1D X Mark III; Panasonic S5 II, S5 II X, S1R and S1H; Pentax K-1 Mark II; Sony a7 IV, a7 CR, a7R V, a9 III and a1.
The lens
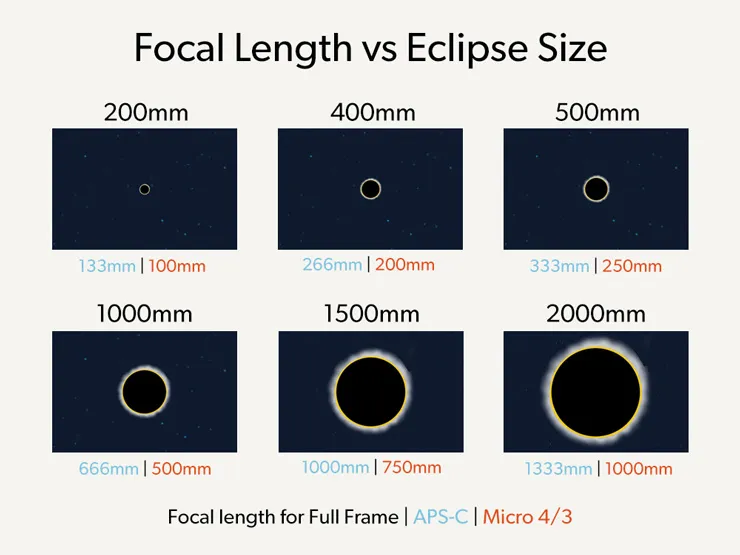
Your choice of lens and its focal length will depend on how big you want the Sun to appear on your photos.
Are you looking to include part of the landscape and don't mind having the Sun as a dot? Use a wide-angle lens, like the Nikon 14-24mm f/2.8, my favorite.
You don't worry about the landscape and it's ok to get a small Sun? Take a standard-length telephoto lens, like the Nikon 70-200mm f/2.8 or the Canon 70-200mm f/2.8.
Would you like to capture a big (or huge) Sun? Use a super telephoto lens. For example, the Nikon 200-500mm f/5.6, the Canon 100-400mm f/3.5-5.6, the Fujifilm 100-400mm f/4.5-5.6, the Olympus Zuiko 300mm f/4 PRO, the Sony 100-400mm f/4.5-5.6, the Sony 400mm f/2.8 or the Sigma 150-600mm f/5-6.3 for Nikon and Canon.
For the total eclipse, take advantage of crop sensor cameras when trying to capture a big Sun in the photo!
Alternatively, you can also use a catadioptric lens. It is smaller, cheaper and lighter than a regular super telezoom lens. In addition to this, diffraction is almost insignificant.
However, it doesn't come without its inconveniences...
Not only it has a fixed focal length, you won't be able to change the aperture either. In addition to this, the out of focus areas of the picture can result into a doughnut-shaped bokeh.
You can't expect to have everything!
The tripod and the head
For starters, you need a sturdy and solid tripod. In other words, a heavy tripod!
This is particularly important if you plan to shoot composites (section 8) because you must make sure that your framing doesn't change from one capture to the next.
In any case, you need to keep your camera steady in order to prevent vibrations that could blur your photos.
Do you have a basic tripod?
Basic tripods usually don't weigh too much, which makes them pretty unstable.
Use these easy but efficient tricks to prevent vibrations:
- Hang a bag filled with stones or even your camera bag from the hook located at the bottom of your tripod's center column. But don't do it when it's windy, you'll get the opposite effect!
- Don't raise the center column of the tripod if it has one, it will make it more unstable.
Are you looking for a great tripod at a reasonable price?
Get the Manfrotto 055XPRO3. Probably the best seller tripod among advanced amateur photographers!
Another suggestion that I usually make to the students of my workshops is the Travel line by Benro.
If you want to spend a little bit more, have a look at carbon fiber tripods.
These tripods are robust and weigh less than the aluminium ones. They allow loads from 5 kg to over 25 kg (11-56 lb) depending on the model.
Brands like Gitzo, Manfrotto, Benro, Induro or Really Right Stuff offer tripods of great quality in both materials, carbon and aluminum.
Should you get a specific tripod head?
Choosing your tripod head will depend on your taste, but make sure that it can bear at least 5/7 kg (11/16 lb) of weight and that includes a removable plate.
In my opinion, the tripod's best friend is a good ball head. The Really Right Stuff BH-55 is the one that I use. Supporting up to 23 kg (50 lb), it bears the weight of my gear with no problem. It allows me to work comfortably and with great precision.
Other heads we like are the Gitzo GH1382QD, the Kirk Enterprises BH-1 and the Arca Swiss Monoball Z1 SP, all robust and with very high endurance (minimum 13.5 kg or 30 lbs).
Additionally, if you are using a super telephoto lens you may want to use a gimbal head, such as the one I use, the Benro GH2.
Is a shutter release or an intervalometer necessary?
While shooting a solar eclipse, you should avoid vibrations. Otherwise, you risk ending up with a whole bunch of blurred photos. In order to do so, you need a way to trigger your camera without having to touch it.
Shutter releases and intervalometers will do the job. But, in my opinion, you should forget about the remote shutter release and get a good intervalometer.
Why?
Because remote releases are not programmable. You cannot shoot at regular intervals automatically.
The intervalometer is programmable. You can set the exposure time, the time interval between photos, the total number of photos to be taken and even the time delay of the first picture.
These are all great intervalometers:
- Pro intervalometer: SMDV.
- For cheap intervalometers check the brands Neewer, Phottix and Vello.
A great alternative is a device called CamRanger. Right now it’s available for Nikon, Canon, Fuji and Sony cameras.
It's a stand-alone device that you connect to your DSLR or mirrorless camera with a USB cable. It creates an ad hoc WiFi network to which you can connect your smartphone or tablet (iOS, Android and Windows). Thanks to the CamRanger application you can control your camera without a computer or an Internet connection.
Best of all, this device is independent. Therefore, if your mobile device loses its connection, the CamRanger has an internal memory to keep shooting. Imagine that you are making a timelapse, your sequence would be cut if the camera stops taking pictures in the time frame you’ve set...
So the CamRanger is great for many types of photos: timelapses (of the Milky Way, of Star Trails, of solar eclipses or lunar eclipses...), bracketing, focus stacking for macro and landscapes... and many more!
What type of memory cards should you use?
Buy the highest quality SD Cards (such as SanDisk or ProGrade) to minimize the risk of losing your photos and have the maximum transfer speed.
Today their price has plummeted so even the highest capacity cards (64GB, 128GB or even 256GB) have a good price.
However, I like to use medium capacity cards (16GB or 32GB). So if a card breaks or I lose it (let’s hope not!), the number of lost pictures is lower.
Although there are still cameras that use CompactFlash (CF) cards, it’s a system that is slowly disappearing.
And to replace it, SanDisk, Nikon and Sony launched a new card format called XQD currently available for several Full Frame (Nikon D4, D4s, D5 and D850; Panasonic S1 and S1R), APS-C (Nikon D500) and mirrorless (Nikon Z6, Z6 II, Z7 and Z7 II) models. These cards
- Have a very high storage capacity (from 32GB to 256GB).
- Have a super fast reading and recording speed (400MB/s compared to 160MB/s for a CF card or 250MB/s for an SD card).
- Are very secure, resistant and with an incredible durability.
Later on, in 2017, CFexpress launched the latest standard memory card from the CompactFlash Association with 2 new form factors, Type A and Type C were announced, with the existing XQD form factor becoming Type B.
- Type A has, so far, only been adopted by Sony in all of its newest models.
- Type B is a far more common format offering a lower price. It has been widely adopted by Nikon in its Z series, Canon in some EOS R bodies, and Panasonic in the S1/S1R and GH6.
- Type C is not being produced yet.
7.7 general tips for photographing a solar eclipse
You have spent weeks preparing for the solar eclipse shooting session. You brainstormed several ideas (section 3), you found a location (section 4) and a shooting spot thanks to PhotoPills (section 5).
You are ready for the adventure!
But first, let me tell you some general advice that is useful regardless of the type of pictures you plan capturing.
When to remove and replace your solar filter (1)
This is THE question you may have as a first-time total solar eclipse photographer.
"You are right Toni... How will I know when to remove the filter? And then, when do I have to replace it on my lens?"
Just to remind you, if for any reason you plan to view (not shoot) the eclipse using a telescope or a pair of binoculars, do not remove the solar filter until the last bit of the Sun is completely covered.
You risk damaging your retinas severely if you don't do so.
Now, If you want to capture the diamond rings and the Sun's corona you must remove the solar filter.
Contrary to your eyes, your camera is safe for the few seconds or even a minute before totality, and again afterwards for a short time.
When should you remove the solar filter?
Easy. When the Sun's crescent is an extremely thin line.
Once you've done so, do not look through the viewfinder of your camera while the solar filter is off!
Look at the image on the camera's Live View LCD screen instead.
Later on, when should you place again the solar filter on your lens?
This is even easier because you will see the edge of the Moon becoming brighter. So, once the diamond ring ends, put your filter back in place.
Avoid the curse of new gear and get familiar with it (2)
The solar eclipse approaches... Only a few weeks left!
And you are thinking about purchasing new gear (a camera, a lens, a telescope, a tripod, etc.) to capture it. Why not? After all, it's a once in a lifetime opportunity, isn't it?
If you decide to do so, try out the gear at home. Not once, not twice, but as much as you need to know it by heart and master it.
Rehearse the actions of setting up the tripod and the camera, aiming it high and adjusting exposures.
Trust me, during totality you'd be so surprised that you can get easily distracted... So much so that you can even forget to take pictures!
Use the following cheat sheet (3)
What you should test at home:
- Can you easily remove and replace your solar filter?
- How many frames per second (fps) can your camera shoot on Burst mode?
- How does the Auto Bracketing function of your camera works?
- Is your complete setup (body+lens+tripod) solid when aimed up high?
- Can you access all controls and the LCD screen with the camera aimed up high?
- Practice operating the camera and adjusting your settings on Manual.
- How long do your batteries last?
What you should test shooting at the Sun (during the partial phases the Sun will have the same brightness):
- Practice finding the Sun with the solar filter on.
- Practice focusing on the Sun's edge in bright daylight.
- Figure out the best exposure settings with your solar filter on.
- Check possible framings on a date and time in which the Sun will be at the same elevation as during the eclipse.
What you should test shooting in twilight (during totality the sky will be as dark as twilight):
- Figure out the best exposure settings (no solar filter here!)
- How do your photos come up in case you have to increase ISO?
What you should test shooting in Full Moon (it has the same brightness as the inner corona):
- Practice focusing on the Moon's edge.
- Figure out the best exposure settings.
- Check how fast the Moon moves across your frame.
What you should test shooting at the Waxing and/or Waning Crescent Moon (it has a similar brightness to the corona):
- Figure out the best exposure settings.
- Practice taking pictures while rapidly adjusting the exposure settings.
- Are your images sharp focused? No vibrations?
Practice with the Sun and the Moon! (4)
I won't stress it enough. You may have only one (yes, one) opportunity to shoot a total solar eclipse in your life.
Do you really want to improvise on the shooting day?
If you mess it up you'll have to wait until the next eclipse. And I don't think you want to wait that long :)
First, practice shooting the Moon.
As a first approach, practice shooting the Moon. It's there for you almost every day.
Aim to capture extremely sharp and well exposed photos of the Moon and you'd have done the hardest part!
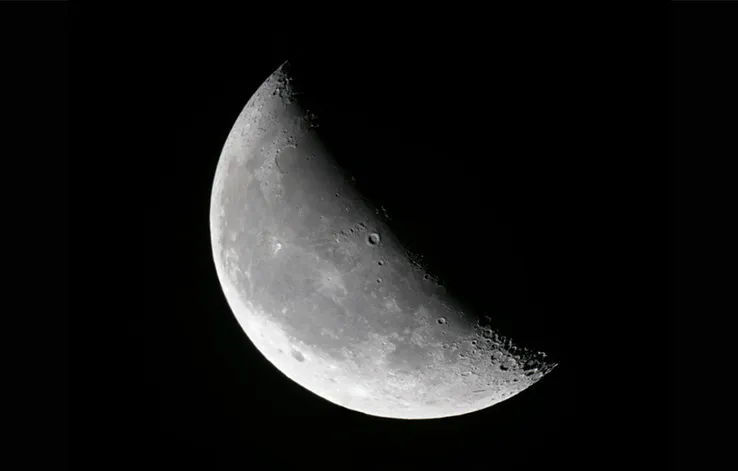
Shoot during the Crescent Moon (Waxing or Waning)
First things first...
The Waxing Crescent Moon is an intermediate Moon phase that comes after new Moon. During this period, the lit up portion of the Moon increases from 0.1% to 49.9%.
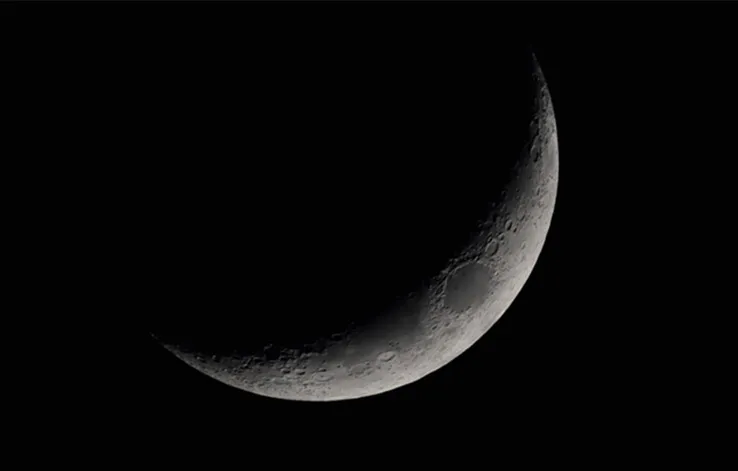
Waxing is a synonym of growing, while crescent refers to the curved shape the Moon has. It's similar to a banana, don't you agree?
As a rule of thumb, the Waxing Crescent Moon rises in the daytime before noon. You can easily spot it in the day sky, although it's easier to do so around Sunset. Later on, it usually sets before midnight.
The Waning Crescent Moon is an intermediate Moon phase that comes right before the following New Moon. During this period, the lit up portion of the Moon decreases from 49.9% to 0.1%.
As a rule of thumb, the Waning Crescent Moon rises after midnight. You can still see it in the morning before it sets in the afternoon.
Now, let's talk about your test shots.
As you can see from the pictures above, the (Waxing or Waning) Crescent Moon has a bright sunlit side, similar to the prominences and inner corona. Since it's really bright, you'll need a fast exposure (just a fraction of a second).
The dark side, lit by the Sunlight reflected off the Earth (known as Earthshine), is similar to the outer corona and nearby stars during totality. To expose for it, you will need a shutter speed of more than a second.
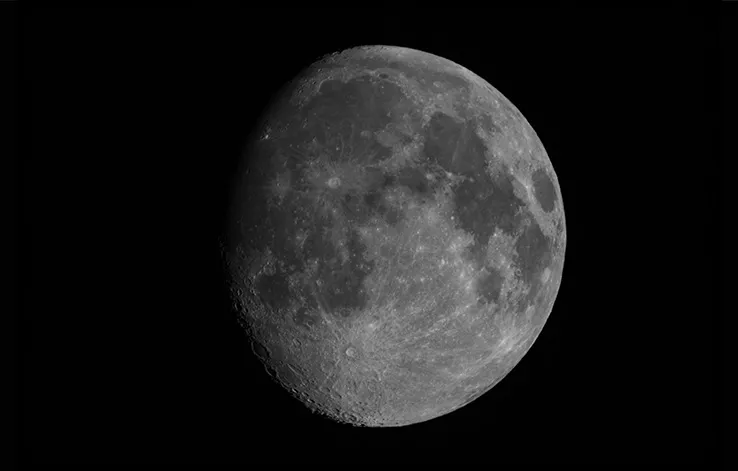
Shoot during the period in which the Waxing Gibbous Moon turns into Full Moon
"Toni, what's the Waxing Gibbous Moon?"
Again, Waxing means that the Moon gets bigger. Gibbous refers to the shape, and in this case it is less than the full circle (that would be Full Moon), but larger than the semicircle shape of the Moon at Third Quarter.
As a rule of thumb, the Waxing Gibbous Moon rises after noon. So you can see it during the afternoon and in the evening as it sets after midnight. During this period, the lit up portion of the Moon increases from 50.1% to 99.9%.
So, what about your test shots?
During twilight the Waxing Gibbous Moon has a similar brightness and size to the eclipsed Sun and its inner corona. So it's great to practice on your focusing using the Live View function on your LCD screen, and your exposure settings.
Additionally, it will also help you to establish how much the Moon's motion will affect your images.
Then, shoot the Sun as well (5)
Practice shooting the Sun as well to make sure that your filter works properly, you are able to focus sharply, and to expose correctly.
Take into account that the Sun will be very bright during most of the eclipse phases. So the idea here is to shoot at the same local time as the eclipse will take place.
Ideally, you should get to your shooting spot at least one of two days in advance. This extra time will allow you to scout the area, look for the best spot and practice some shots.
As I explained in section 5, use PhotoPills to find out about the azimuth and elevation of the Sun in that location on the previous days.
If you can't make it, practice at home!
How?
Easy, schedule a shooting session during the same frame of time in which the total solar eclipse will take place.
What I mean by same conditions is:
- A very strong Sun, forcing you to play with short exposures.
- An elevation of the Sun similar to the eclipse's, so you can have an idea of the composition you can work with.
Don't forget to remove the solar filter! (6)
How long does it take you? Try to do it as securely and as fast as you can.
Time yourself, and rehearse the procedure over and over until you master it.
Take into account the excitement you will have during eclipse day. So you may well be slower than the times you achieve at home.
However the most important thing is not speed. It's not forgetting to remove the filter a few seconds before totality starts!
If you don't do it and you keep shooting, your camera won't capture anything. It will be too dark and all your pictures will be underexposed.
The best trick to remember removing the solar filter is to set up an alarm on your smartphone to buzz a couple of minutes before the start of totality.
PhotoPills tells you exactly when totality will start at the location you are (section 5).
As soon as you figure it out, set the alarm. Don't procrastinate it or you will forget!
What type of photos of the eclipse can you capture? (7)
In section 3, I've showed you the eclipse photos you should take at least once in your lifetime:
- Partial eclipse.
- Shadow bands.
- Diamond ring in a total eclipse.
- Baily's beads in a total eclipse.
- Sun's corona in a total eclipse.
- Sun's chromosphere in a total eclipse.
- Earthshine in a total eclipse.
- Annular eclipse ring of fire.
- Including the landscape with a wide angle lens.
- Including the landscape with a telephoto lens.
- Close-ups and wide-angle composites of the eclipse.
Now that you know what type of photos of the solar eclipse you can imagine, let's see how you can actually take them!
8.How to shoot a solar eclipse step by step
Photographing a solar eclipse is a challenge.
A challenge you can get stuck with if you try to cover everything at once.
Truth is that each one of the photos you can take has its own secrets. Secrets you should know. That's why I've decided to split this section in shorter sections where I'll teach you how to take each of the pictures.
Divide and conquer!
So choose the photo you wish to take and study the corresponding section ;)
Allow me to begin with the easiest photo you can take.
Note: Check this article to learn how to expose your photos in any situation.
Shadow Bands (1)
When light goes through small holes (among the leaves of a tree for example), the shadows cast on the ground take the shape of the eclipse.
If you're near a tree, or any other subject that has small holes, get ready to capture this stunning effect in the shadows.
To take this photo follow these steps:
- Equipment: All you need is your camera and lens (no matter the type, even the camera of your smartphone works).
- Camera Settings: Shoot in RAW.
- Focal length: Not a short focal length. I recommend you a focal length between 35mm and 200mm.
- Metering mode: Spot metering mode. Meter in the brightest part of the scene you want to capture detail.
- Aperture: Use a narrow aperture so you can get a sharper detail in the shadows. For example f/5.6 or f/8.
- ISO: Keep the ISO as low as possible (nominal, that is 100 or 200).
- Shutter speed: Taking into account the metering, the aperture and the ISO, adjust the shutter speed to have the light meter centered at zero (correctly exposed).
- White balance: Manual. Nevertheless, you can always correct it in post-processing.
- Where to focus: Focus on the shadows projected by the eclipsed Sun to capture the effect of the shadows tack sharp.
Partial eclipse (2)
During the phase of partial eclipse, the Moon blocks part of the surface of the Sun. For this type of photos, I like to use a telephoto lens with a solar filter to lure all the attention to the remaining Sun, and capture how it disappears behind the Moon.
To take this photo follow these steps:
- Equipment: Your camera (the type of sensor doesn't really matter, although I recommend you an APS-C or Micro 4/3 sensor, because of the larger effective focal length you'll get). A telephoto lens or a super telephoto lens. A Baader 80mm solar filter (equivalent to an ND 5.0 filter, that is a 16.6-stop filter). If you photograph the total eclipse, don't forget to put the solar filter back on the lens after totality. A sturdy tripod and head. And an intervalometer (to avoid vibrations).
- Camera settings: Shoot in RAW. Turn off the image stabilization function if your lens has it.
- Focal length: Long focal length (300mm, 450mm, 600mm, etc.) to cover the area of the sky where the Sun and Moon are located so they take most of the frame.
- Metering mode: Spot metering mode. Meter on the Sun before the eclipse begins.
- Aperture: Use a relatively narrow aperture so the celestial bodies are perfectly in focus. Since this picture is a close-up, depth of field is not critical. In this case I shot at f/8 to get the maximum detail of the partial eclipse.
- Shutter speed: Taking into account the metering, the aperture and the ISO, adjust the shutter speed to have the light meter centered at zero (correctly exposed). During the partial eclipse I used a shutter speed base of 1/500s.
- ISO: Keep the ISO as low as possible (nominal, that is 100 or 200). I used ISO 100.
- Bracketing: To make sure you're getting at least one photo correctly exposed, bracket your exposure starting with a base shutter speed of 1/500s. For this photo I used an exposure bracketing of 3 stops.
- White balance: Manual. Nevertheless, you can always correct it in post-processing. In this photo I used a warm white balance (7460K) to capture the colors of the Sun through the Baader solar filter, which produces a neutral dominant (white).
- Where to focus: Put the solar filter in front of the lens. Focus at the edge of the Sun before the eclipse begins. To make sure the Sun is in focus, zoom in the image using your camera Live View on the LCD screen.
Diamond ring in a total solar eclipse (3)
The advantage of the partial eclipse is that you have a lot of time to capture it, contrary to what will happen right before, during and right after totality.
In those moments, light changes drastically. So you'll need to act quickly and remove the solar filter.
You won't have time to meter light either, so it's best to bracket the exposure starting with a base shutter speed. This way you'll be able to capture all the phenomena that are coming.
The diamond ring is the first one. And also the last one, the moment between the end of totality and the beginning of the partial eclipse.
The diamond ring appears when the Moon makes the final movement onto the Sun. You can also photograph it when totality ends, that is when the Moon begins to leave the surface of the Sun.
To take this photo follow these steps:
- Equipment: Your camera (the type of sensor doesn't really matter, although I recommend you an APS-C or Micro 4/3 sensor, because of the larger effective focal length you'll get). A telephoto lens or a super telephoto lens, but no solar filter. You must remove the filter a few seconds before the partial eclipse ends. A sturdy tripod and head. And an intervalometer (to avoid vibrations).
- Camera settings: Shoot in RAW. Turn off the image stabilization function if your lens has it.
- Focal length: Long focal length (300mm, 450mm, 600mm, etc.) to cover the area of the sky where the Sun and Moon are located so they occupy most of the frame.
- Metering mode: You don't have time to meter light. To work out the exposure, I used Fred Espenak's exposure table, and I bracketed my exposures taking the values of the table as a reference.
- Aperture: Keep the same aperture you've used for the partial eclipse. Use a relatively narrow aperture so the celestial bodies are perfectly in focus. Since this picture is a close-up, depth of field is not critical. In this case I shot at f/8 to get the maximum detail of the diamond ring.
- Shutter speed: Since you don't have time to meter to find out the shutter speed you need, the safest move is to use Fred Espenak's exposure table to choose a base shutter speed (here 1/30s) and then do an exposure bracketing of 9 photos.
- ISO: Keep the ISO as low as possible (nominal, that is 100 or 200). I used ISO 100.
- Exposure bracketing: To make sure you're getting at least one photo correctly exposed, bracket your exposure starting with a shutter speed base of 1/30s. For this photo I used an exposure bracketing of 9 photos from 1/2s to 1/500s. The best image was the one with a shutter speed of 1/125s.
- White balance: Manual. Nevertheless, you can always correct it in post-processing. In this photo I used a warm white balance (6450K) to capture the colors of the diamond ring.
- Where to focus: The first thing you have to do is to put the solar filter on your lens (this is essential if you don't want the Sun to scorch the sensor!). Focus at the edge of the Sun before the eclipse begins. To make sure the Sun is in focus, zoom in the image using your camera Live View on the LCD screen. Don't forget remove the solar filter at the end of the partial eclipse. Otherwise, all your photos will be underexposed.
Baily's beads in a total solar eclipse (4)
A few seconds before totality, you'll enjoy a phenomenon known as Baily's beads. These are bright flashes that occur when Sunlight passes through the valleys and depressions of the surface of the Moon.
Be careful with this photo, because you need to change the base shutter speed for the exposure bracketing.
To take this photo follow these steps:
- Equipment: Your camera (the type of sensor doesn't really matter, although I recommend you an APS-C or Micro 4/3 sensor, because of the larger effective focal length you'll get). A telephoto lens or a super telephoto lens, but no solar filter. You must remove the filter a few seconds before the partial eclipse ends. A sturdy tripod and head. And an intervalometer (to avoid vibrations).
- Camera settings: Shoot in RAW. Turn off the image stabilization function if your lens has it.
- Focal length: Long focal length (300mm, 450mm, 600mm, etc.) to cover the area of the sky where the Sun and Moon are located so they take most of the frame.
- Metering mode: You don't have time to meter light. To work out the exposure, I used Fred Espenak's exposure table, and I bracketed my exposures taking the values of the table as a reference.
- Aperture: Keep the same aperture you've used for the partial eclipse. Use a relatively narrow aperture so the celestial bodies are perfectly in focus. Since this picture is a close-up, depth of field is not critical. In this case I shot at f/8 to get the maximum detail of the Baily's beads.
- Shutter speed: Since you don't have time to meter light to work out the shutter speed you need, the safest move is to use Fred Espenak's exposure table to choose a base shutter speed (here 1/500s) and then do an exposure bracketing of 9 photos.
- ISO: Keep the ISO as low as possible (nominal, that is 100 or 200). I used ISO 100.
- Exposure bracketing: To make sure you're getting at least one photo correctly exposed, bracket your exposure starting with a shutter speed base of 1/500s. For this photo I used an exposure bracketing of 9 photos. The best image was the one with a shutter speed of 1/8000s.
- White balance: Manual. Nevertheless, you can always correct it in post-processing. In this photo I used a warm white balance (6450K) to capture the colors of the Baily's beads.
- Where to focus: The first thing you have to do is to put the solar filter on your lens (this is essential if you don't want the Sun to scorch the sensor!). Focus at the edge of the Sun before the eclipse begins. To make sure the Sun is in focus, zoom in the image using your camera Live View on the LCD screen. Don't forget remove the solar filter at the end of the partial eclipse. Otherwise, all your photos will be underexposed.
Sun's corona in a total solar eclipse (5)
The Baily's beads lead to the Sun's corona (the outer atmosphere of the Sun). The eclipse takes kind of a mystical look, don't you think?
To take this photo follow these steps:
- Equipment: Your camera (the type of sensor doesn't really matter, although I recommend you an APS-C or Micro 4/3 sensor, because of the larger effective focal length you'll get). A telephoto lens or a super telephoto lens, but no solar filter. You must remove the filter a few seconds before the partial eclipse ends. A sturdy tripod and head. And an intervalometer (to avoid vibrations).
- Camera settings: Shoot in RAW. Turn off the image stabilization function if your lens has it.
- Focal length: Long focal length (300mm, 450mm, 600mm, etc.) to cover the area of the sky where the Sun and Moon are located so they take most of the frame.
- Metering mode: You don't have time to meter light. To work out the exposure, I used Fred Espenak's exposure table, and I bracketed my exposures taking the values of the table as a reference.
- Aperture: Keep the same aperture you've used for the partial eclipse. Use a relatively narrow aperture so the celestial bodies are perfectly in focus. Since this picture is a close-up, depth of field is not critical. In this case I shot at f/8 to get the maximum detail of the Sun's corona.
- Shutter speed: Since you don't have time to meter light to work out the shutter speed you need, the safest move is to use Fred Espenak's exposure table to choose a base shutter speed (here 1/30s) and then do an exposure bracketing of 9 photos.
- ISO: Keep the ISO as low as possible (nominal, that is 100 or 200). I used ISO 100.
- Exposure bracketing: To make sure you're getting at least one photo correctly exposed, bracket your exposure starting with a shutter speed base of 1/30s. For this photo I used an exposure bracketing of 9 photos from 1/2s to 1/500s. The best image was the one with a shutter speed of 1/30s.
- White balance: Manual. Nevertheless, you can always correct it in post-processing. In this photo I used a warm white balance (6450K) to capture the colors of the Sun's corona.
- Where to focus: The first thing you have to do is to put the solar filter on your lens (this is essential if you don't want the Sun to scorch the sensor!). Focus at the edge of the Sun before the eclipse begins. To make sure the Sun is in focus, zoom in the image using your camera Live View on the LCD screen. Don't forget remove the solar filter at the end of the partial eclipse. Otherwise, all your photos will be underexposed.
Sun's chromosphere in a total solar eclipse (6)
The chromosphere is a reddish glow around the Moon, just an instant before totality ends. It's the lower layer of the Sun's atmosphere.
To take this photo follow these steps:
- Equipment: Your camera (the type of sensor doesn't really matter, although I recommend you an APS-C or Micro 4/3 sensor, because of the larger effective focal length you'll get). A telephoto lens or a super telephoto lens, but no solar filter. You must remove the filter a few seconds before the partial eclipse ends. A sturdy tripod and head. And an intervalometer (to avoid vibrations).
- Camera settings: Shoot in RAW. Turn off the image stabilization function if your lens has it.
- Focal length: Long focal length (300mm, 450mm, 600mm, etc.) to cover the area of the sky where the Sun and Moon are located so they take most of the frame.
- Metering mode: You don't have time to meter light. To work out the exposure, I used Fred Espenak's exposure table, and I bracketed my exposures taking the values of the table as a reference.
- Aperture: Keep the same aperture you've used for the partial eclipse. Use a relatively narrow aperture so the celestial bodies are perfectly focused. Since this picture is a close-up, depth of field is not critical. In this case I shot at f/8 to get the maximum detail of the Sun's chromosphere.
- Shutter speed: Since you don't have time to meter light to work out the shutter speed you need, the safest move is to use Fred Espenak's exposure table to choose a base shutter speed (here 1/500s) and then do an exposure bracketing of 9 photos.
- ISO: Keep the ISO as low as possible (nominal, that is 100 or 200). I used ISO 100.
- Exposure bracketing: To make sure you're getting at least one photo correctly exposed, bracket your exposure starting with a shutter speed base of 1/500s. For this photo I used an exposure bracketing of 9 photos. The best image was the one with a shutter speed of 1/1000s.
- White balance: Manual. Nevertheless, you can always correct it in post-processing. In this photo I used a warm white balance (6450K) to capture the colors of the chromosphere.
- Where to focus: The first thing you have to do is to put the solar filter on your lens (this is essential if you don't want the Sun to scorch the sensor!). Focus at the edge of the Sun before the eclipse begins. To make sure the Sun is in focus, zoom in the image using your camera Live View on the LCD screen. Don't forget remove the solar filter at the end of the partial eclipse. Otherwise, all your photos will be underexposed.
Earthshine in a total solar eclipse (7)
If you use the right exposure bracketing, you'll capture detail even in the Moon :)
To take this photo, you'll have to change the base shutter speed for the exposure bracketing again.
The image results from blending two photos, one of the Sun's corona and one of the Earthshine.
Earthshine: Nikon D500 | 500mm | f/8 | 2s | ISO 100 | 6450K
To take this photo follow these steps:
- Equipment: Your camera (the type of sensor doesn't really matter, although I recommend you an APS-C or Micro 4/3 sensor, because of the larger effective focal length you'll get). A telephoto lens or a super telephoto lens, but no solar filter. You must remove the filter a few seconds before the partial eclipse ends. A sturdy tripod and head. And an intervalometer (to avoid vibrations).
- Camera settings: Shoot in RAW. Turn off the image stabilization function if your lens has it.
- Focal length: Long focal length (300mm, 450mm, 600mm, etc.) to cover the area of the sky where the Sun and Moon are located so they take most of the frame.
- Metering mode: You don't have time to meter light. To work out the exposure, I used Fred Espenak's exposure table, and I bracketed my exposures taking the values of the table as a reference.
- Aperture: Keep the same aperture you've used for the partial eclipse. Use a relatively narrow aperture so the celestial bodies are perfectly focused. Since this picture is a close-up, depth of field is not critical. In this case I shot at f/8 to get the maximum detail of the Sun's corona and the Earthshine.
- Shutter speed: Since you don't have time to meter light to work out the shutter speed you need, the safest move is to use Fred Espenak's exposure table to choose a base shutter speed (here 1/2s) and then do an exposure bracketing of 7 photos.
- ISO: Keep the ISO as low as possible (nominal, that is 100 or 200). I used ISO 100.
- Exposure bracketing: To make sure you're getting at least one photo correctly exposed, bracket your exposure starting with a shutter speed base of 1/2s. For this photo I used an exposure bracketing of 7 photos from 1/15s to 4s. The best image of the Sun's corona was the one with a shutter speed of 1/8s. The best image of the Earthshine was the one with a shutter speed of 2s.
- White balance: Manual. Nevertheless, you can always correct it in post-processing. In this photo I used a warm white balance (6450K) to capture the colors of the Sun's corona and the Moon.
- Where to focus: The first thing you have to do is to put the solar filter on your lens (this is essential if you don't want the Sun to scorch the sensor!). Focus at the edge of the Sun before the eclipse begins. To make sure the Sun is in focus, zoom in the image using your camera Live View on the LCD screen. Don't forget remove the solar filter at the end of the partial eclipse. Otherwise, all your photos will be underexposed.
Annular eclipse ring of fire (8)
During an annular eclipse, the Moon will never completely cover the Sun. This allows you to capture a beautiful ring of fire around the Moon.
To take this photo, follow the same steps as the partial eclipse, as follows:
- Equipment: Your camera (the type of sensor doesn't really matter, although I recommend you an APS-C or Micro 4/3 sensor, because of the larger effective focal length you'll get). A telephoto lens or a super telephoto lens. A Baader 80mm solar filter (equivalent to an ND 5.0 filter, that is a 16.6-stop filter). A sturdy tripod and head. And an intervalometer (to avoid vibrations).
- Camera settings: Shoot in RAW. Turn off the image stabilization function if your lens has it.
- Focal length: Long focal length (300mm, 450mm, 600mm, etc.) to cover the area of the sky where the Sun and Moon are located so they take most of the frame.
- Metering mode: Spot metering mode. Meter light on the Sun before the eclipse begins.
- Aperture: Use the same aperture you've used for the partial eclipse. Use a relatively narrow aperture so the celestial bodies are perfectly focused. Since this picture is a close-up, depth of field is not critical. In this case I shot at f/8 is a great option.
- Shutter speed: Keep the same shutter speed you used for the partial eclipse. At ISO 100 and f/8, your shutter speed will probably be between 1/500s and 1/1000s.
- ISO: Keep the ISO as low as possible (nominal, that is 100 or 200). I used ISO 100.
- Exposure bracketing: To make sure you're getting at least one photo correctly exposed, bracket your exposure. For this type of photo I recommend an exposure bracketing of 3 stops.
- White balance: Manual. Nevertheless, you can always correct it in post-processing.
- Where to focus: The first thing you have to do is to put the solar filter on your lens (this is essential if you don't want the Sun to scorch the sensor!). Focus at the edge of the Sun before the eclipse begins. To make sure the Sun is in focus, zoom in the image using your camera Live View on the LCD screen.
Including the landscape with a wide angle lens (9)
For the August 21, 2017 total solar eclipse, I took two cameras and multiple lenses with me. On one camera, I mounted a telephoto lens to photograph all the phases of the eclipse. And with the other, I took the photo you see below: the eclipse during totality and a beautiful view of the winery where we were.
Besides, if you also take photos during the partial eclipse, you'll be able to combine them to create a beautiful composition. Have a look at example 11.
To take this photo follow these steps:
- Equipment: DSLR or mirrorless camera. A wide angle lens. A solar filter. A sturdy tripod and a head. And an intervalometer (to avoid vibrations).
- Camera settings: Shoot in RAW. Turn off the image stabilization function if your lens has it.
- Focal length: Your composition will determine the focal length you need. If you wish to capture as much landscape as possible, despite of the Sun appearing super small, choose a short focal length (8-35mm). If you have an interesting subject in the foreground, get close to it.
- Metering mode: Spot metering mode. To photograph the partial eclipse, put the solar filter on before the eclipse begins and meter on the Sun. To photograph the phases during totality, remove the filter, meter on the brightest spot in the scene and overexpose by 1 or 2 stops (+1EV o +2EV). Be careful not to move the camera when changing the settings so that you can then blend all the photos seamlessly.
- Exposure (aperture, shutter speed, ISO)
- The good news is that light is pretty stable until totality, so you can keep the same camera settings for most of the shooting.
- However, during totality light will drastically change, and you'll have to adjust your camera settings.
- One more time... Don't forget to take the solar filter out during totality!
- At totality, the settings you need to use are very similar to the ones you usually need at the beginning of the astronomical twilight. The sky is pretty dark, but not pitch black as during nighttime.
- Use an small aperture to increase depth of field (f/8, f/11) and get a better quality image.
- Keep the shutter speed between 1/125s y 1/4000s during the partial eclipse. It will depend on the solar filter you use and the weather conditions. Use a slower shutter speed during totality (probably about 1-2 seconds, but make sure it doesn't result under or overexposed).
- Keep the ISO as low as possible (nominal, that is 100 or 200).
- During totality, bracket your exposures to increase your chances of success.
- White balance: Manual. Nevertheless, you can always correct it in post-processing. But if you wish to capture the true colors of the Sun and the scene in camera, I recommend you to try with a white balance of 5200K, and adjust accordingly.
- Where to focus: Since you're using a short focal length, focus at the hyperfocal distance.
Including the landscape with a telephoto lens (10)
Capturing these types of photos is truly exciting.
Coming up with the idea you wish to capture, finding the location, planning every detail and finally capturing the moment is a process that can hardly be described with words.
That's what Ted Hesser probably thought when he captured the photo that would make him the PhotoPiller of the Year 2017... :P
To take this photo follow these steps:
- Equipment: Your camera (the type of sensor doesn't really matter, although I recommend you an APS-C or Micro 4/3 sensor, because of the larger effective focal length you'll get). A telephoto lens or a super telephoto lens, but no solar filter. You must remove the filter a few seconds before the partial eclipse ends. A sturdy tripod and head. And an intervalometer (to avoid vibrations).
- Camera settings: Shoot in RAW. Turn off the image stabilization function if your lens has it.
- Focal length: Long focal length (300mm, 450mm, 600mm, etc.) to cover the area of the sky and landscape where the Sun, Moon and subject are located so they take most of the frame.
- Metering mode: You don't have time to meter light. To work out the exposure, I used Fred Espenak's exposure table, and I bracketed my exposures taking the values of the table as a reference.
- Aperture: Keep the same aperture you've used for the partial eclipse. Use a relatively narrow aperture so the celestial bodies are perfectly focused. In this case Ted Hesser used an aperture of f/5.6.
- Shutter speed: Since you don't have time to meter light to work out the shutter speed you need, the safest move is to use Fred Espenak's exposure table to choose a base shutter speed of 1/30s (if you want to capture the diamond ring with your subject) and then do an exposure bracketing of 9 photos. Adjust your shutter speed to the phenomenon you wish to capture.
- ISO: Keep the ISO as low as possible (nominal, that is 100 or 200). Ted Hesser used ISO 100.
- Exposure bracketing: To make sure you're getting at least one photo correctly exposed, bracket your exposure starting with a shutter speed base of 1/30s. For this type of photos I recommend you to use an exposure bracketing of 9 photos 1/2s to 1/500s. Ted Hesser's best image was shot at 1/200s.
- White balance: Manual. Nevertheless, you can always correct it in post-processing. For this type of images, I like a cool white balance (5600K).
- Where to focus: Focus at your subject.
How to create close-up and wide-angle composites of the solar eclipse (11)
Tell the whole story in one image!
Close-up and wide-angle composites are a great way to show how the eclipse changes over time.
Solar eclipse base photo: 1.3s
Partial eclipse pictures: 1/25s | Solar filter
To create a composite image you need:
- To take as many photos as possible to capture the evolution of the whole eclipse. Use the techniques explained in the example 9 of this section depending on the focal length you want to use.
- To blend the photos in one image in post-processing.
You can create many different composites, but the most spectacular are the multi-photo composites and the layered composites.
Multi-photo composites
A multi-photo composite shows the Sun moving naturally along a static frame. So you won't need to move your camera during the entire eclipse.
Whether you are planning a close-up or a wide-angle image, make sure you follow these tips:
- Determine how the Sun will be drifting across your sensor at your shooting spot (use PhotoPills!).
- Compose your picture according to it.
- Determine the interval between shots.
Obviously, your goal is to orient your lens' field of view according to the Sun's movement and get the image of totality close to the center.
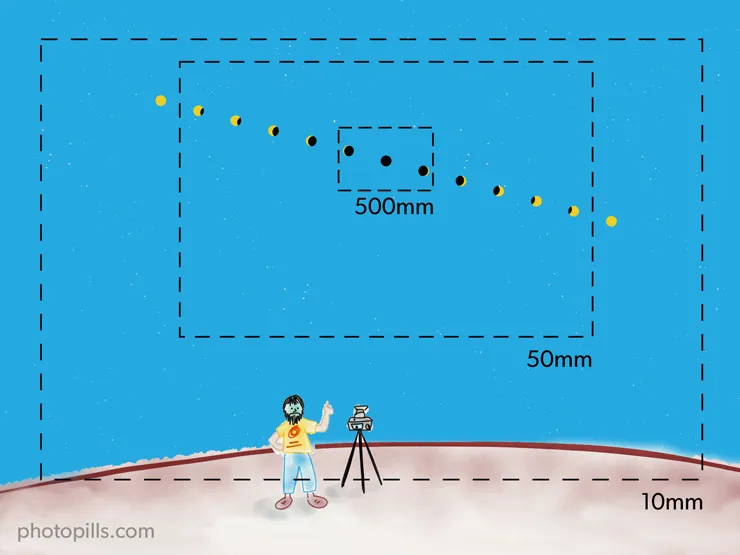
Before you frame the shot use the PhotoPills Augmented Reality tool to see where the Sun and the Moon will be during the eclipse according to your position.
Depending on the focal length you use, you can also add an interesting foreground or landscape into your frame.
Remember to shoot all the partial phases with you solar filter on and the total phases without it.
As for the time intervals, you can shoot as often as you like (especially if you are looking to produce a time lapse). As a rule of thumb, a composite still image looks best with frames taken no less than 5 minutes apart.
Again, your main concern should be framing the scene so the Sun moves nicely across the frame and ends up centered at totality.
Later on, in post-processing, blend your exposures into a single frame.
Layered composites
A layered composite is a combination of several shots taken during the eclipse that you blend into one single photo.
This type of composite is much easier to produce because you don't need to worry much about composition. You will only need a portion of the image and no landscape or foreground to appear in the frame.
In this case, all you have to do is use the images you already have shot and display them in a natural way to show the eclipse evolution.
Align and center each individual frame. Make sure that all the images are symmetric and that there is a constant distance between each one.
9.Don't forget to use special eye protection!

Never ever forget to protect your eyes during the whole solar eclipse with an approved ISO protection (e.g. eclipse glasses).
You must use them throughout the whole eclipse, except when totality occurs. A few seconds before it happens, take you eclipse glasses off and enjoy the views! Once it's done, put them on again.
Avoid looking directly at the Sun
On a regular day you don't happen to look directly at the Sun.
That's for two reasons.
First, because since you were a kid you've had the instinct not to look directly at it. It hurts and it's annoying. This instinct is called "aversion reflex".
Secondly, because there's nothing to see after all! The Sun is so bright and its light is so powerful that you are blinded.
So if that's what you do on a regular day, why would you expose your sight to potential damage looking at the Sun during a solar eclipse?
Because it's a unique event and you don't want to miss it. I get it.
In fact, you could be able to override your aversion reflex since your willpower can be extremely powerful (pun intended) and take you beyond the usual boundaries. After all, you could be thinking that "it's just going to be a couple of minutes".
To make things worse, you could look straight into the Sun with some comfort while it's partially covered by the Moon...
However, the consequences are fatal. You would suffer eclipse blindness, an eye damage that would negatively affect your sight forever and from which you might never recover.
The fatal consequence: eclipse blindness
As soon as you start looking at the Sun during an eclipse you are exposing yourself to suffer from eclipse blindness.
What is eclipse blindness exactly?
Well, your eyeballs get burned and your retinas can suffer a permanent damage. In other words, you can lose sight (partially or globally, depending on how much you expose your eyes).
Think about an excess of light applied to your retinas. They just can't bear it and this huge light destroys the retina's photoreceptors.
These photoreceptors are the cells allowing you to see in the dark, to view in color and to have sharp vision.
The problem with eclipse blindness is that you won't feel its effects until the next morning or even later. Some of the symptoms, affecting mainly your central vision, could be seeing blurry or not seeing at all (black image or black spots). Your peripheral vision is generally spared, but it really depends.
Nevertheless, once you suffer from eclipse blindness, you are considered a visually impaired person.
And to make things worse, your healing process is a mystery. According to the statistics, 50% of the people affected recover full vision in the next 6 months. The other 50% recover it only partially or are impaired for the rest of their lives.
So, please avoid any risk and view the eclipse taking some basic precautions!
How can you view the eclipse without going blind?
I can't stress it enough. Looking directly into the Sun during an eclipse can cause you blindness.
Avoid:
- Looking repeatedly at the Sun without any protection.
- Staring at the Sun for an extended time.
- Glancing through a camera, binoculars or telescope without solar filters.
- Using regular sunglasses as they will not provide enough protection.
I've repeated the word "protection" several times. So, what are the different tools that you can use to protect your retinas?
- Approved solar eclipse glasses.
- Specially designed solar telescopes or solar binoculars.
- Cameras, binoculars and telescopes with approved solar filters (section 6).
- A pinhole projector.
Wear a pair of approved solar eclipse glasses
Probably, the best and cheapest piece of protection that you can get is a pair of solar eclipse glasses or handheld views. Before purchasing yours, make sure that it complies with all the safety requirements.
Just because "it looks good", it doesn't mean it will serve its purpose. So check that yours are ISO-approved solar eclipse glasses. Look for an ISO (International Organization of Standardization) label; ISO 12312-2 is the U.S. standard, while ISO 12312-2:2015 is the UE standard.
In addition to this, make sure that the glasses' filters are pristine (no defects, such as scratches, bubbles and dents), and that they cover both eyes perfectly.
One more thing. Don't look up at the Sun without a pair of solar eclipse glasses. Always wear them before looking up at it.
Finally, don't make this mistake.
Most people believe that once they are wearing the solar eclipse glasses these are enough protection to look through any optics (such as your camera o your binoculars). You risk from damaging you retinas severely because of the magnifying glass effect!
Make sure you always put a solar filter in front of the glasses of your camera lens or binoculars.
You can get your approved pair of solar eclipse glasses of American Paper Optics, Rainbow Symphony or Thousand Oaks Optical on Amazon.
How do you make a pinhole projector?
You only need two white cards or pieces of cardboard.
First of all, use a needle to punch a small hole in one of the cards. Then, use this card to get the light through it and project it onto the second card, the blank one.
You will be able to see the eclipse perfectly.
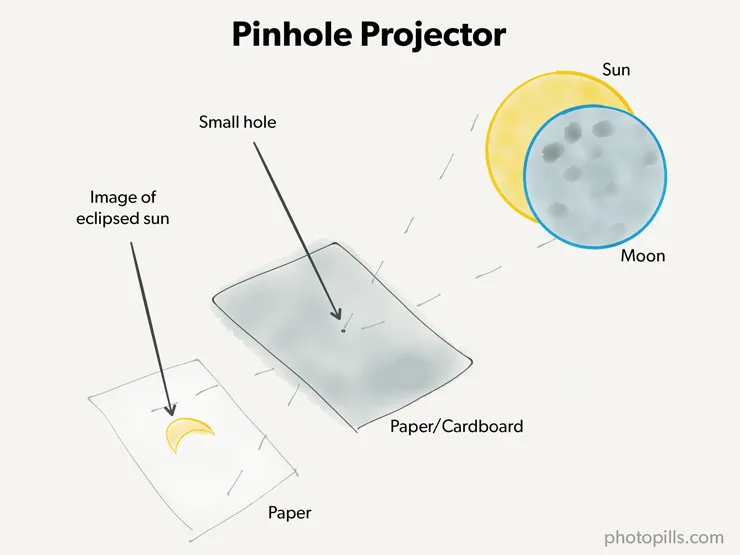
Don't use anything else as a protection!
According to NASA, the following materials should never be used to view a solar eclipse:
- Photographic neutral density filters, no matter how dense they are
- Photographic polarizing filters
- Sunglasses of any kind
- Negative film (exposed or not)
- Smoked glass
- Space blankets and other forms of household Mylar, or silvery CD/DVD disks
- Medical X-ray film
- Floppy disks
You must avoid them because, while they dim visible light, they do not block infrared (IR) and ultraviolet (UV) light that can damage your retinas.
This warning is very important in the case of regular sunglasses.
According to the experts, sunglasses typically let in between 10% and 20% of daylight. This is still too bright for your retinas.
The filters used on any approved solar eclipse glasses are generally 100,000 times darker.
Now that you know what to use to protect your eyes, let's see when it is safe to look.
When is it safe to look?
There is only one phase in which it is safe to look at the Sun and that's during totality, when the Sun is completely covered (100%) by the Moon.
At that moment, the Moon is blocking the Sun's rays and only the corona (the outer atmosphere of the sun) is visible.
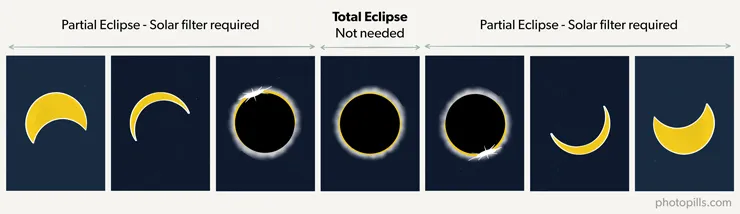
So, yes, remove your protection. Otherwise you won't see anything at all!
However, be extremely cautious because even when the Sun is almost completely covered (98-99%), this tiny crescent that remains is still bright enough to cause you eclipse blindness.
This is only valid if you are in a location from which you will see a total solar eclipse. If you are watching the partial or an annular solar eclipse from other parts of the U.S. or the rest of the world, you must keep your protection on the entire time.
Remember that you must use proper eye protection while viewing the total solar eclipse to prevent your eyes from suffering partial or total blindness.
And as soon as you have everything ready, practice using your protection and equipment before the eclipse actually happens.
Practice before the eclipse
Considering that a solar eclipse is a unique event, make sure you are sufficiently prepared.
Now that you have a proper eye protection, your gear is ready and you know where you will be admiring this amazing phenomenon, don't improvise!
First, make sure that you know exactly when and how it is safe to look.
Then, depending on the tool you plan to use to observe the eclipse (camera, binoculars or telescope), practice in advance how you will be using it.
In other words, don't play around with the solar filters during the eclipse. You should know exactly what to do and how to do it before it actually happens.
Please, take all the necessary precautions (especially if you will be accompanied by children) and enjoy the eclipse without having to regret it later on!
10.The 11 mistakes you should avoid when shooting a solar eclipse
You forget to remove the solar filter at totality (1)
This is the most common mistake.
You are so focused on the eclipse, setting your gear correctly, nailing the perfect shot... that you forget to remove the solar filter from the lens!
If you want to capture the Sun as the Moon covers it completely, you must remove the solar filter.
Remember that it will be almost dark and that a solar filter is much darker than a regular 10-stop neutral density filter. It only transmits 1/100,000th of the light while a 10-stop ND filter transmits 1/1,024th.
To avoid forgetting the solar filter removal you can do a couple of things.
The first one is setting an alarm on your smartphone. Thanks to PhotoPills you are able to predict exactly when totality will start at the location you are (section 5).
Take advantage of this and set an alarm on your smartphone to buzz a couple of minutes before totality happens.
And while you are at it, set another one to buzz before the end of totality so you don't forget to put the solar filter back!
The second is to ask people around you (you won't be alone, I'm sure) to remind you. It's probably less effective, but it's always good to have a backup.
Someone (or even you!) steps on your camera or trips over your tripod (2)
The first piece of advice to try to avoid this problem is to find a shooting spot in which you have enough space around you.
On eclipse day you will be dealing with a lot of people moving around you and your gear. And most of them won't be photographers so they might not be very careful with your tripod.
So, get to the shooting spot as early as possible.
Ideally, you would have scouted the area in advance (the day before, for example) so you already know the location and the exact spot from where you will be shooting.
Once you are there on eclipse day, my second piece of advice is to try to spread your gear around you and your tripod. That way, people will more likely step on your backpack or trip over your folding chair, not over your camera or your tripod.
Your tripod shifts resulting in a different frame, and you can't get back to the original one (3)
In this case, I have good news and bad news.
First, the good news.
If you are shooting a single shoot with a telephoto lens, chances are you will have enough negative space around both the Sun and the Moon to fix it in post-processing cropping the frame.
Even if you are shooting with a huge telezoom (or a telescope!), you might have a frame large enough for you to crop and adjust the Sun's position.
Now the bad news.
If you are shooting a single shoot with a wide angle lens, chances are your photo will be either ruined (let's hope not!) or different from what you initially composed.
If the former happens, who knows, you might end up with a nice result anyway. The problem is that you may not be able to create a multiple exposure composite.
So, I won't say it enough, make sure you have enough space around your setup so that you can move freely and no one else disturbs your shooting session.
You could even cause this yourself while removing the solar filter, especially if it's a screw one.
First, practice, practice and practice before eclipse day.
Then, remove it very carefully and slowly.
Oh, oh... You forgot something (e.g. memory card, intervalometer, battery, etc.) (4)
It's so disappointing when you are in the field excited about the shooting only to realize that you forgot something of capital importance...
The best solution to prevent this?
A checklist! (See section 6)
The more complete and detailed your checklist is, the more helpful you will find it.
And don't write it on a piece of paper, put it on your smartphone so it's always with you.
Your memory card, intervalometer, battery (you name it) fails (5)
This type of problem can be easily avoided and solved.
A few days before eclipse day, test all your gear and make sure that everything works.
While doing so you might find handy to write and go through a complete checklist like the one I suggested you in section 6.
When possible, bring two (or more like memory cards or batteries) of each. That way, if something goes wrong in spite of your previous check, you can always use your spare intervalometer, another battery or a different memory card.
Be prepared for everything!
You accidentally shifted focus and the Sun and the Moon are blurry (6)
Again, you can face two different situations depending on the type of shot you plan.
You are shooting with a wide angle lens
Therefore, you are including part of the landscape in you frame. Here, you clearly failed to focus at the hyperfocal distance.
Refocus again and make sure that you are focusing the lens at a slightly longer distance than the hyperfocal distance (e.g. 1 m). But most importantly, make sure not to fall short again!
You'll find how to focus at the hyperfocal distance in this video.
You are shooting with a telephoto lens
In this case, most of your photo is covered by both the Sun and the Moon. Here, you failed when focusing.
To refocus again accurately use the Live View option on your LCD screen and, if your camera has them, both the Focus Peaking and the Focus Magnifier.
You'll find how to use these tools in section 8.
All your images are blurred! Why? (7)
If your photo is completely blurred despite having focused correctly, it's either because you are getting vibrations in your camera and/or your lens.
- Use a sturdy tripod and make sure it's completely stable.
- Turn off the lens stabilisation system. You're using a tripod, and there is no need to use this function. Despite the absence of vibrations, it may try to correct inexistent movements causing the opposite effect!
- Use an intervalometer. Don't touch the camera unless it's strictly necessary.
- Check the lens autofocus is disabled.
- Double check the focal length is the right one. Make sure you don't touch the ring of the lens.
- Always take a test shot to double check that everything is in focus.
It's cloudy so you don't shoot at all (8)
Obviously, your best strategy is to move and change your location and shooting spot if the clouds appear.
Does that mean that if the clouds appear at the last minute and it's too late for you to move you shouldn't shoot?
No way!
A few clouds can become an interesting element in your scene.
And yes, it is possible to shoot the eclipsed Sun through some clouds. Sometimes the camera sees things your eye cannot.
You can shoot the partial phases of the eclipse and totality through clouds.
If the clouds are too dense, remove the solar filter (otherwise it would be too dark for the camera to capture anything) and start shooting.
If they're not, try the best you can while the solar filter is on.
Worst case scenario, if the Sun is completely blocked by clouds, you can always capture the lighting changes and the shadow of the Moon on the clouds...
Second contact (C2) comes too soon. You aren't ready, and blow out the exposures (9)
Your pictures are blown out because you continued shooting without replacing the solar filter on your lens.
When should you do this? As soon as you see the edge of the Moon becoming brighter. Put your filter back in place once the diamond ring ends.
Never look through the viewfinder of your camera while the solar filter is off! Look at the image on the camera's Live View LCD screen instead.
You just stare up during the eclipse and forget to do anything! (10)
That's a cool option too!
But weren't you the one who was asking how to shoot a solar eclipse?
Come on! Moooooove!!
You shoot in JPG and now you cannot edit! (11)
Always shoot in RAW, and edit the RAW file in Lightroom (or your preferred post-processing software).
The RAW file contains all the information captured by the sensor of your camera. So it's much easier to make adjustments later on in the image without risking losing of quality.
The JPEG format is a compression of the image. So a lot of information gets lost in this compression.
11.Imagine. Plan. Shoot!
Your turn!
It's time to take action, choose a solar eclipse and let your imagination fly.
Use PhotoPills to plan the photos that pop into your mind. So when the moment arrives, you're ready to live and capture a unique scene, a scene maybe you and only you have imagined.
Either way, it's going to be your moment.
It's worth trying!
And if you nail the photo, why not sharing it with the rest of the tribe?
Submit it to the PhotoPills Awards :P
We can't wait to see it :)
By the way, I almost forget... If you need help with your solar eclipses, don't hesitate to ask me leaving a comment below.
I'm here to help! :)
Good luck.
Note: Some links on this page are affiliate links. What does this mean? If you buy/rent using these links you're helping support us and it costs you nothing extra. Thank you for your support.
Get this ebook for free now!
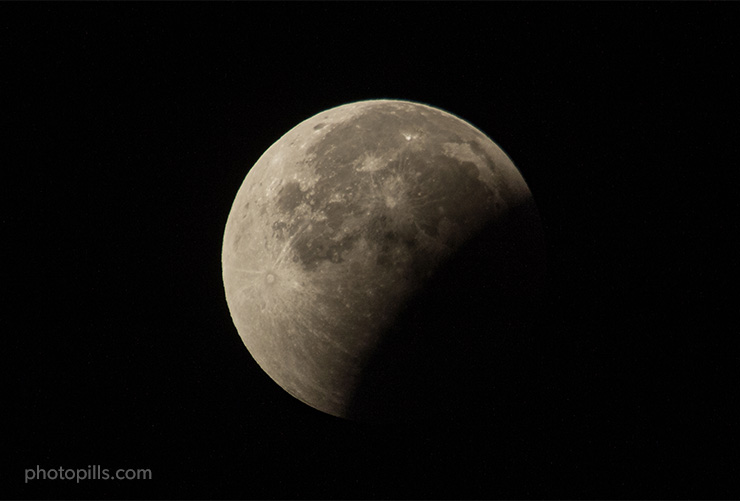
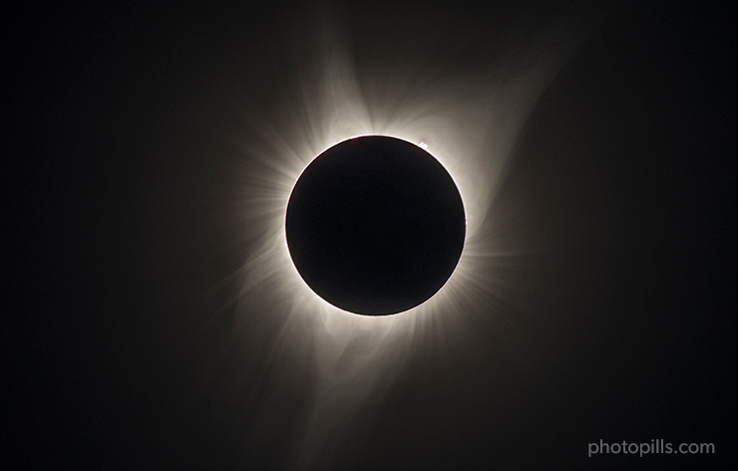
.jpg)