Drone Photography: The Definitive Guide (2024)

Let me guess...
You love drone photography...
And you'd love to learn how to capture better photos with your drone, right?
Photos capable of captivating hearts and minds...
You will!
The problem is, drone photography is hard.
Yes, you've been seduced by its magic (we've all been)... and rushed to try it.
Capturing the world from above is so exciting.
A completely different point of view... That opens up a new world of possibilities.
How to resist?
Impossible!
So, you give in to its charms...
And suddenly, frustration invades you.
Because taking good aerial photos is truly a challenge.
There is a long way to go from the photo you've just taken... to the one you're dreaming to take one day.
The good news is that you're here. You've started to walk the path of the drone photography ninja. You're one step closer to master its secrets.
And you'll get there. Trust me.
Read this guide, do your homework and you'll start taking better and better photos with your drone (sooner than you think!).
Here, you'll learn everything you need: from inspiring photos and epic drone locations to the drone you need (and the accessories). But also how to fly your drone, how to actually shoot your photo ideas (including panoramic and HDR images), the mistakes to avoid, all the essential apps for drone photography, a list of drone photographers you should follow, all the boring but essential legal stuff...
And even how you can use the PhotoPills' drone tool to plan your drone shots like a super pro (from your couch!).
Tell me, are you ready for the challenge?
If that's the case, run up and read as fast as you can!
Become a drone photography ninja.
Yann Arthus-Bertrand dream was to capture the whole world from above. What's yours?
"The Earth is art, the photographer is only a witness." - Yann Arthus-Bertrand, aerial photography ninja.
Get this ebook for free now!
Content
- What makes a great drone location (17 inspiring aerial images)
- How to plan your drone photos like a pro (from your couch!)
- Choosing the right drone
- How to successfully fly a drone
- How to shoot an incredibly powerful aerial image
- How to plan and shoot stunning panoramic images
- Why HDR images can save your life and how to shoot them
- Using filters with your drone: why and when?
- What are the best apps for drone photography?
- How to film breathtaking aerial shots
- Legal issues and other essential considerations before flying your drone
- The 12 mistakes you should avoid on your aerial photography
- 10 drone masters that will boost your creativity
- It's time to fly
1.What makes a great drone location (17 inspiring aerial images)
It all begins with a great drone location... A legendary one if possible!
Then, you scout the location until you find a great photo opportunity (planned with the PhotoPills drone mode of course, as I'll teach you in section 2).
You find the right shooting spot, the right framing and composition and the right shooting date and time the scene you've imagined happens.
Finally, you go and shoot it!
As we PhotoPillers say...
"Imagine. Plan. Shoot!"
We even have a T-shirt for this workflow :P
But again, the location goes first.
So, what makes a great drone location?
Just look for the following ingredients!
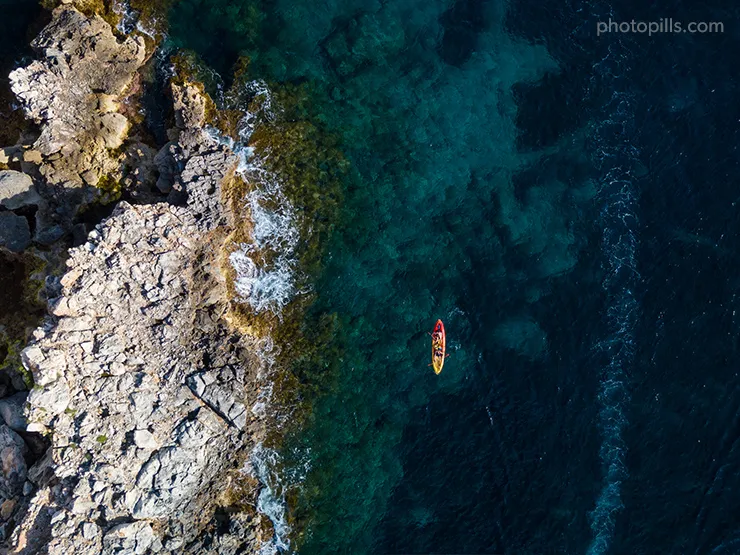
Shapes (1)
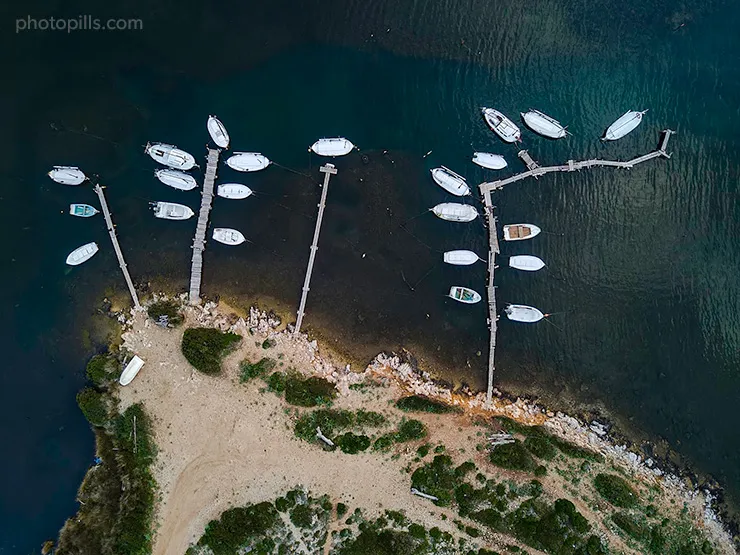
Boats that look like leaves in a tree...
As with patterns, shapes help you control the visual experience, whether you're looking for a pleasing or tension-driven image. From the air, you can see incredibly shapes pretty much everywhere.
So what is a shape?
A shape is an area with a visually recognizable boundary. And this boundary can be real... Or not.
Actually, the boundary isn't that important. What's crucial is how you combine these shapes to create a visual composition. And, of course, the effect you want to provoke on the viewer.
You can use shapes in a very effective way to:
- Connect or separate areas in your composition or your frame.
- Stress certain areas that you find more appealing.
- Lead your viewer through a certain path.
- Convey movement and depth.
- Structure and organize your composition or storytelling.
In addition to this, shapes can be divided into two:
- Primary: squares, circles and triangles.
- Secondary: variations of these primary shapes, such as rectangles, ovals, hexagons, and complex shapes like crescent moons, spirals and stars.
These are all geometric shapes but there are also natural (e.g. raindrops, leaves) and abstract shapes (e.g. icons, brand logos such as the "P" of PhotoPills).
Finally, shapes often lead the viewer to certain psychological associations on various levels of depth. Circles, for instance, represent completeness, energy and power. Triangles are two-folded – they can convey stability or conflict.
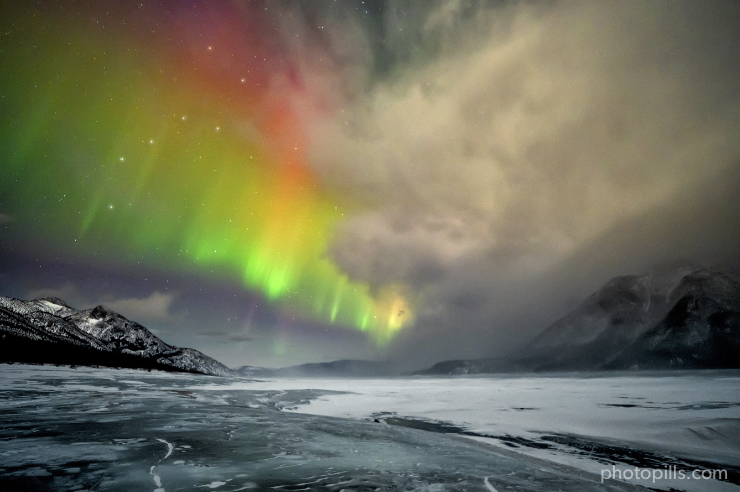
Symmetry (2)
Symmetry captivates the eye...
The photo above, taken by our friend and PhotoPills Master Donal Boyd, is a great example of symmetry as a composition tool.
What is symmetry in photography?
It's quite simple actually. If you can cut an image into two halves and both the left and right sides mirror one another, you've achieved a symmetrical picture.
However, don't be obsessed with perfection. You'll barely find a perfect symmetry anywhere in the world.
But as long is both halves look pretty much the same, the magic of the effect is there :)
Symmetry is a great example of balance in composition. That's why it's used so often.
Look for symmetrical lines, elements, shapes or patterns. And of course, don't forget the mirror effect.
Since symmetry is a very popular composition tool, try to capture symmetry where it's not expected and, from time to time, break up the symmetry in some way. By doing this you're introducing some kind of tension in the image producing a less expected result and a more authentic picture.
Lines (3)
This is such an amazing image by our friend and PhotoPills Master Javier del Cerro... Lines, texture, colors, what else do you see here?
The viewer's eyes are naturally drawn along lines and paths. And that's true for any image regardless of the photography genre you're practicing.
Including drone photography...
So use them!
Use them to draw your viewer's attention to a specific part of the frame, whether it's a person, an empty space or a vanishing point in the background of the frame.
Now, ask yourself an important question.
Where are your leading lines directing the viewer's eye?
In drone photography, or any other genre for that matter, leading lines are the pillars of storytelling.
You're taking the viewer on a journey along the frame. First, into the photograph itself. Then, from one part of the frame to another. And finally, to an object of interest, your subject.
The key is to grab the viewer's attention and keep her there as long as possible!
Leading lines can be curved, straight, diagonal or vertical. Your mission is to capture a line (or several ones) entering the frame through one of the edges so that it leads the eye to another area in the photo.
To help you achieve it you can use roads, rivers, creeks, boardwalks, trails, trees, electric poles, fences... The choices are endless.
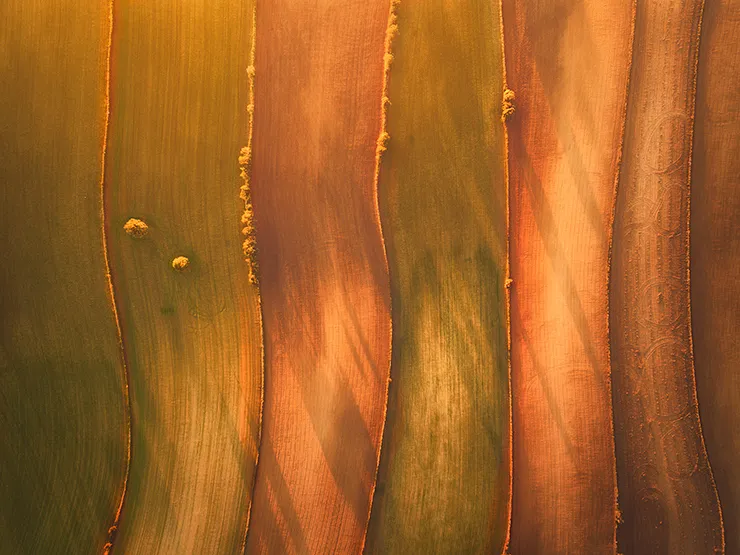
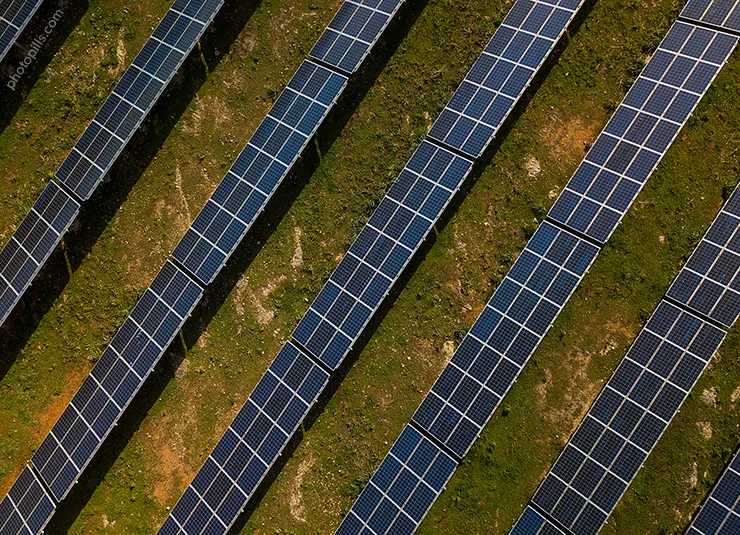
Patterns and repetition (4)
Patterns surround you in both natural and manmade forms, offering you hips of great opportunities to capture compelling and dramatic images.
But, what's a pattern exactly?
Patterns are simply repeated shapes, colors or objects, ordered in either regular or irregular formations. The value of a pattern is this repetition.
What's important when capturing patterns is the vantage point from which you shoot. If you want to get a small scale pattern, make sure that you fly your drone as close as possible in order to capture all the detail.
More often than not in aerial photography, patterns will emerge on a large scale. In this case, it's best to capture them from a bird's eye view, tilting down your camera.
Some of the most compelling patterns to shoot consist of shapes, lines or colors that repeat over and over in the exact same way. Try to fill a frame with clear-cut lines or a consistent geometric formation and you'll see for yourself how strong your photo is. It's this regularity of the objects' arrangement that makes is so strong.
On the other hand, you can also find irregular patterns. I know that it sounds a bit counterintuitive but with a good composition, you can create a pattern from a selection of objects themselves. In fact, despite being more difficult to shoot, you have a lot more freedom to create something amazing from what you see.
In terms of composition, a good idea is to fill the whole frame with the pattern. Since your viewer can't find any distraction in the frame, the drama of the shot is much stronger.
I also suggest you play around and change your angles to see what works best. Some shapes and lines might look great if you capture them straight. Other patterns may look better if you shoot them from a more inventive perspective.
Texture (5)
Look for textures!
Donal Boyd did such a great job capturing the textures in the photo above.
One of the challenges you face when taking a photo, any type of photo whether it's with a drone or not, is to try to capture depth and dimension. After all, you're shooting 3D subjects in a 2D medium.
To avoid flat-looking drone photos, look for opportunities to incorporate texture into the shot. The idea is to fool your viewer's eye into believing that it is looking at an object that exists in our regular 3-dimension universe.
Texture exists in the surface details of your subject.
It can be a wall made of brick, an incredibly dry land or the top of a northern forest.
Apart from the texture itself, you can combine it with lines, shapes or patterns and you'll get a uniform texture.
Let's take lines as an example.
Use a leading line to enhance texture. And finding this particular line within the texture will lead the viewer towards your focal point. It will also add to the image some additional interest by compelling the viewer to closely examine each part of the picture.
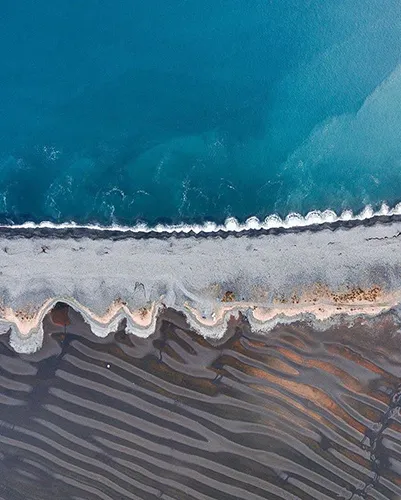
Contrast (6)
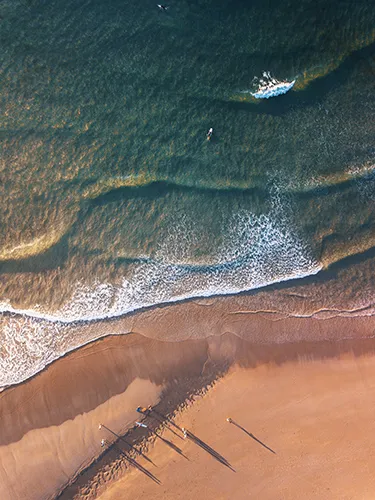
Sand and water. A powerful contrast that you can see in this example by Javier del Cerro.
One very simple and effective way to emphasize your subject is to create a high-contrast with other elements in your frame. And a perfect way to create a striking composition is to use color contrasts.
A contrast is a synonym of opposition. Find opposite colors (black and white), shapes (round and squared), textures (textured and smooth), size (big and small), natural elements (sea and land), light and shadows...
The options are infinite.
But here, I'll focus on color contrasts.
According to the color theory, a color contrast is made of pairs of opposing.
As you can see on the diagram below, you can use the primary with the complementary colors.
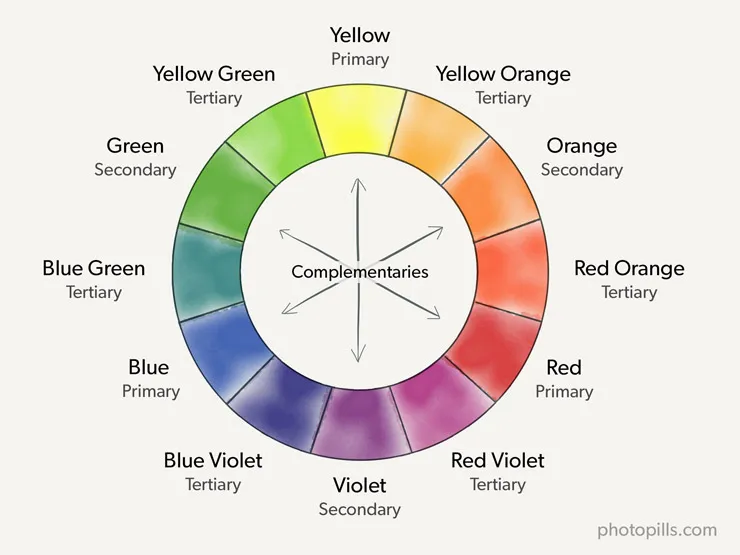
Colors can be divided into two groups:
- Warm: yellow, orange and red.
- Cold: green, blue and purple.
Depending on the colors you choose, your picture will have a certain mood. And as I explained with shapes, the message you're conveying will differ from one viewer to another.
On the one hand, warm colors can evoke comfort, closeness, and passion. On the other hand, cool can express sadness, remove, and calm. But that's quite subjective and it's always related to the viewer's interpretation: you can imply a mood, but you can't force the other person to feel it.
In addition to this, you can also affect the strength of your picture's atmosphere.
Do you want it to be strong? Use deep, saturated colors. On the contrary, do you want it to be subtle? Use pastel, faded colors.
Finally, color adds drama and dimension so use them wisely.
Obviously, the key is to keep the composition simple, and not to overwhelm it with too many hues. Otherwise you'll create a rather chaotic image and your viewer will be confused.
If you want to play at home with colors while planning your shots (section 2) a great tool is Paletton. And it's free!
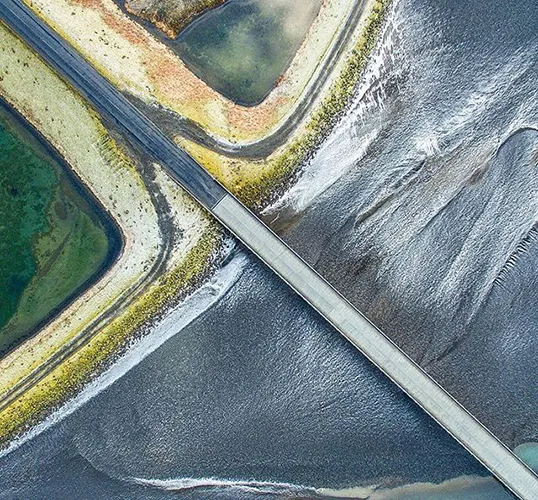
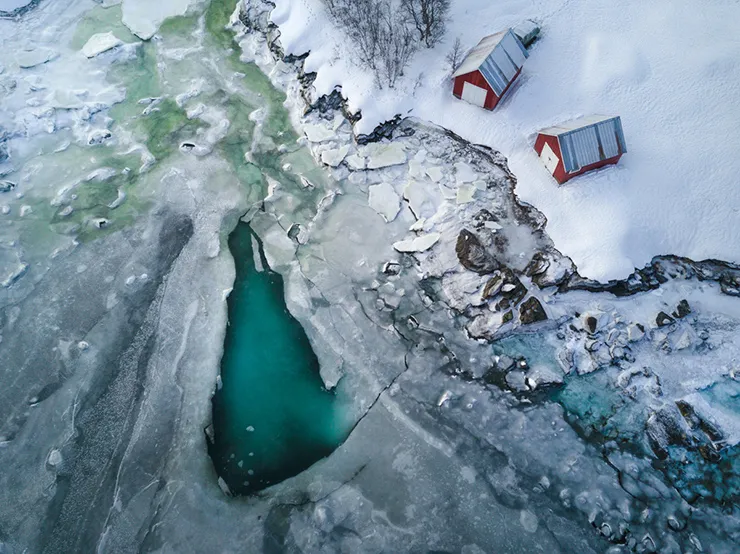
Abstract (7)
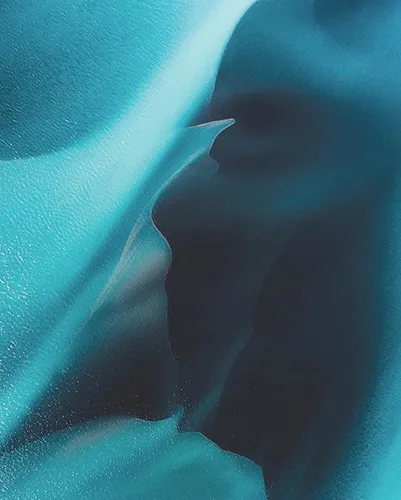
Donal Boyd is a true genius at capturing stunning images from above...
What do you see in the image above?
(Answer: the depth in color of an Icelandic glacier.)
One of the most appealing features of drone photography is that you can show others amazing locations from a unique perspective.
In other words, it completely changes the way the viewer sees something.
So try to offer a view of your surroundings (or an incredible place!) that is seldom seen.
Use shapes, forms, colors and lines to create compositions that push the brain away from the known world.
The more unreal looking colours, textures and patterns, the more bizarre your pictures will look.
Pareidolia (8)

According to Wikipedia, Pareidolia is a psychological phenomenon in which the mind responds to a stimulus, usually an image or a sound, by perceiving a familiar pattern where none exists.
Common examples are perceived images of animals, faces, or objects in the clouds, the landscape, the Moon and even in Mars (e.g. Face on Mars).
With the PhotoPills Drone tool, it's super fun to look for the Pareidolia phonomena. This is how I found the crocodile rock above. Located in the beautiful beach of Cala Barril in Menorca.
Have a look at section 2, there I explain in detail how to use PhotoPills to plan this drone shot :P
Imagine. Plan. Shoot!
Isolation (9)
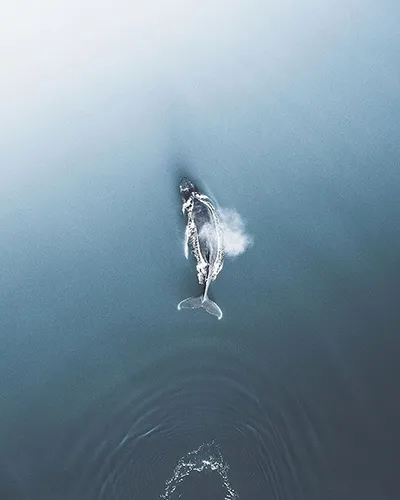
Again Donal Boyd, this time isolating a whale to create a legendary photo.
Here the idea is very clear: to produce an image that is as simple and minimalist as possible.
Less is more!
Push the viewer to focus on one and only one thing. What's the prominent element in your picture? Where should the viewer look at?
What are you trying to convey? What's the story behind?
And this last question is very interesting because there nothing more "itching" than curiosity. So let everyone that sees your picture come up with their own stories.
Shadows (10)
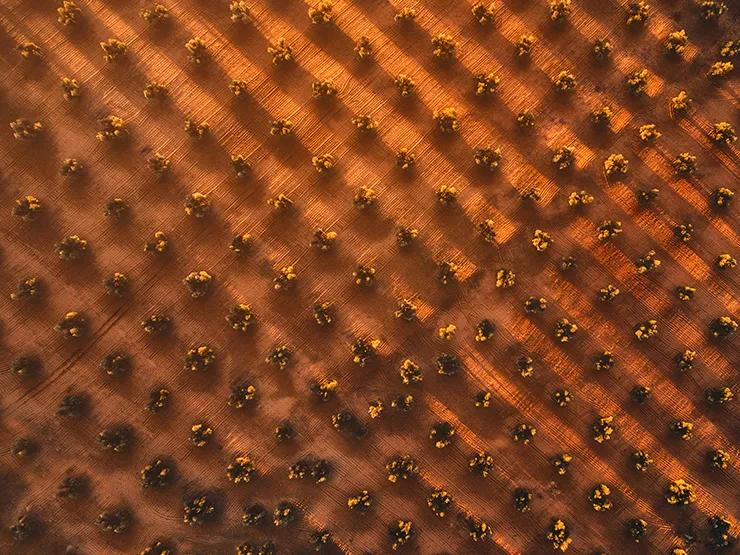
I love this shot!
With this photo, Javier del Cerro became the February 2018 Sunmaster of the Month in the PhotoPills Awards.
He proved how appealing the shadows can be when properly planned!
In this case, Javier used PhotoPills to plan the date and time the shadows would be aligned with the rows of trees.
As a photographer, you pay a great deal of attention to natural light, and for good reason. Light is the essence of all photography. It has an impact on what you see, and how you see it.
Often, light is what makes or breaks an image.
But what happens in the shadows?
You composition can benefit from combining light and darkness. Thus, mastering light (and the lack of it) can result in a truly spectacular image.
This combination results into an image with a high contrast. This is particularly effective in black and white photos since you won't be able to use color to add interest.
Moreover, shadows can help to direct attention to a specific point in the composition. Or you can even make shadows to be your main subject (focal point). Have you ever tried leaving the subject out of the image and focusing on the shadows instead?
Use them to hide features in the frame that may be better left unseen. Alternatively, you can play with them the other way round to reveal texture such as ripples in the sand on a dune, or the soft shape of a tea plantation rolling hills.
Finally, take into account the shadows' strength and length. Keep in mind that when the Sun is closer to the horizon, the shadows are longer but more diffused. On the contrary, during the central hours of the day the shadows are stronger and darker.
Go to section 2 to learn how to plan your shadows with PhotoPills.
Interesting subject (11)
Photographed by our friend (and PhotoPills Master) Marco Grassi, the traditional red cabins in Lofoten (Norway) make such interesting subjects, but...
What makes a great picture work?
When would you say that you've captured a superb shot?
What story are you trying to tell with your image?
Well, one great way of achieving all these is to include a powerful subject in your frame.
And that's for many reasons...
- A compelling image always works.
- When you draw the attention of your viewer to a specific area or element and make her stare at it for a few minutes.
- Awesome subjects make awesome stories.
Find a powerful subject and you have 90% of the job done! :P
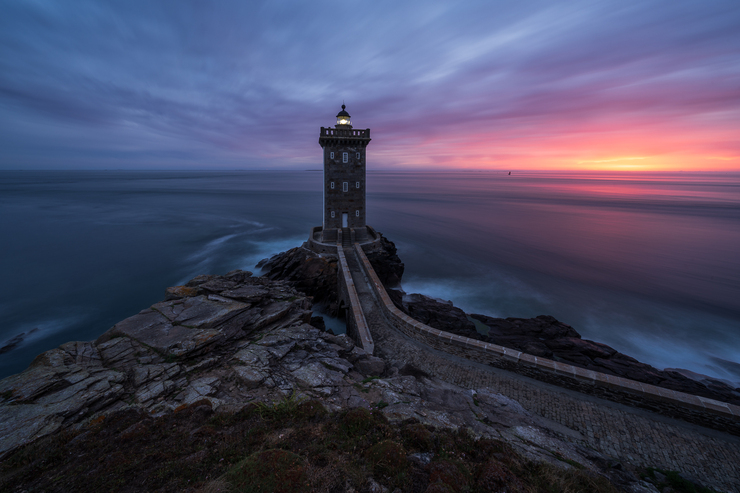
Powerful Sunrise or Sunset (12)
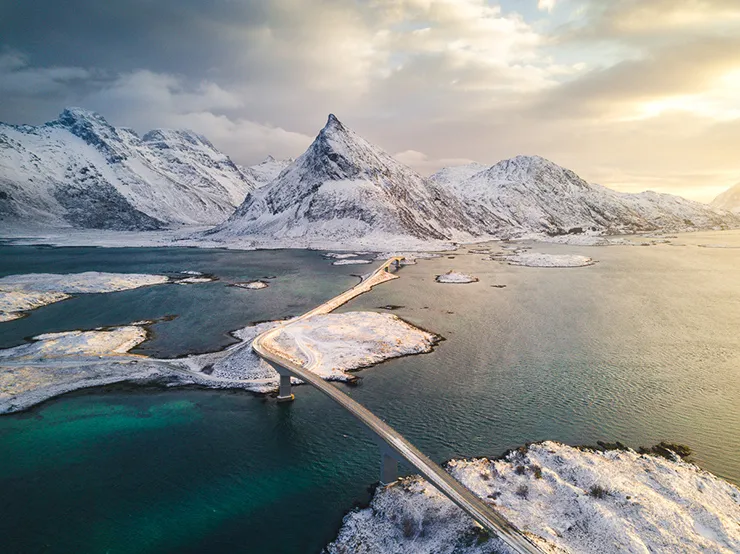
Marco Grassi is a master in composition (and light planning!).
No matter the type of image you're trying to capture, having the best light conditions is essential.
Some photographers prefer the golden hour. That is, the period of time the color of the sky goes from red and orange to yellow or, as its name suggests, golden tones, having a warm color temperature.
Others, like myself, rave with the blue hour because the sky has a deep blue hue with a cold color temperature and saturated colors.
In addition to this, everybody loves a good Sunset (or Sunrise)... Don't you?
Look for a location and a moment in time where the Sun can add to the composition and turn a great photo into a legendary one!
Moon (13)
[We'll include your Moon picture here! ;)]
This is my challenge for you. Capture a legendary Moon shot with your drone and we'll add it to this section :P
Capturing a great picture with the Moon is much trickier than one with the Sun... I'm still looking for a nice composition :)
The Moon position varies a lot throughout the days and months. So planning the right shot at the right location takes longer and is much harder.
Remember that there is no need to wait until it's completely dark to capture the Moon.
First, because you may not be allowed to fly during nighttime (have a look at section 11 to know more about your country's regulations).
Second, because depending on the light conditions and the date, the Moon may rise during golden hour and offer your a great opportunity.
Therefore, find a location and the right moment where you can introduce the Moon in the frame.
The results are a kind of magic.
Interested in the Moon? Read our Moon photography guide Moon ;)
Long exposures (14)
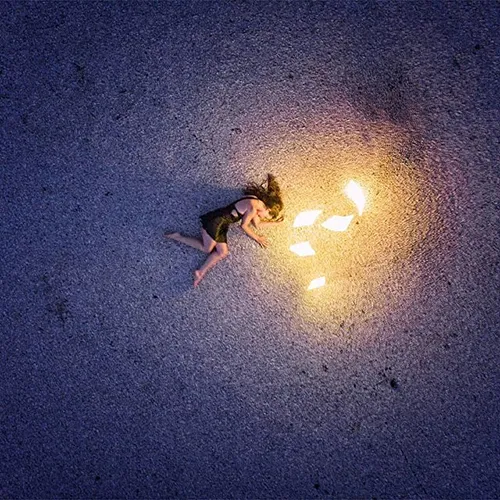
Eric Paré and Kim Henry are known by their stunning light painting images. They mainly shoot from the ground, but sometimes they love playing with their drone :P
Check this video to learn how they created the 1 second test image above. Their goal is to keep shooting from above, to always improve.
Long exposure photography has always been linked to a tripod, right?
But nowadays, thanks to an awesome gimbal stabilization technology that most drones have, you can capture amazing long exposures from almost any drone.
Look for a great location and show the action happening in the scene with a long exposure (1 second or more!).
Obviously, before flying your drone, make sure that it's not too windy (or no wind at all, if possible). Otherwise, the camera of your drone won't be steady enough and your shots may end up blurred.
Look for waves breaking onto the shore, waterfalls, running water of a river, and even the moving city lights at night. If you plan to take a long exposure at night, check section 11 for legal regulations about flying your drone during nighttime.
And if you need a step by step explanation about filters for your drone and how to use them to capture an artistic long exposure have a look at section 8.
Panoramas (including 360º) (15)
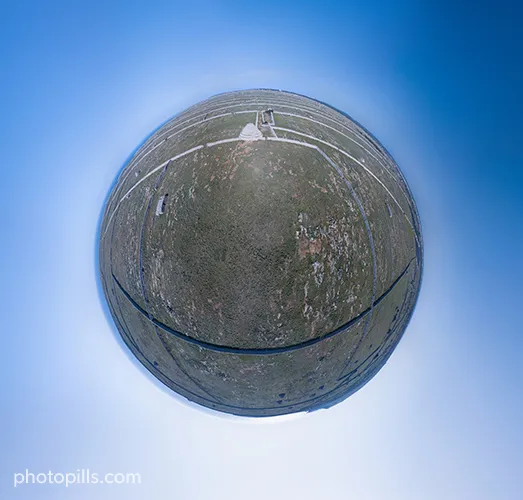
Find unique perspectives!
Cityscapes, seascapes, landscapes... Look for locations that give you a beautiful wide view, get the drone up in the air and shoot, rotate and shoot again.
And capture the whole scene with a panoramic image (or even an aerial 360º panorama).
See section 7 to learn how to plan and shoot panoramas.
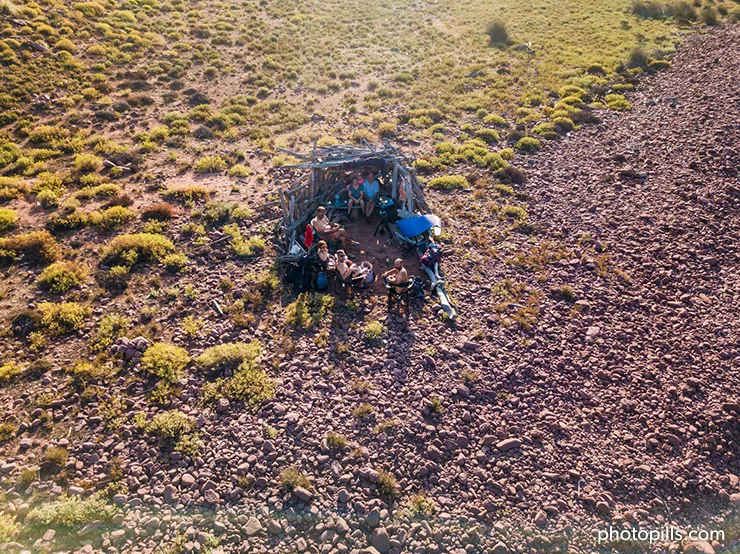
Human element in the frame (16)
By adding people to your drone photos, you achieve three things.
First, your viewer has an idea of the scale of the shot depending on the human element size. After all, we all know more or less how tall and big a person can be, right?
When you see a person in a desert picture you immediately know the size of everything in the frame. And that's what gives you the exact feeling that you're looking for. The wow factor.
Second, you give your viewer something with which to immediately connect or even relate. And that makes the image incredibly powerful because your viewer can feel she was there, too.
Finally, it adds story. The human element adds the story to a beautiful shot.
Your photography is now about emotion. So by working your composition, by carefully positioning your elements in the frame you can create very powerful images.
It's a real game changer.
Shots that include people make much more sense.
Don't get me wrong. I don't have anything against pictures with no people on them at all. To be completely honest with you, as a landscape photographer, I often take images like that.
However, I truly believe that your image can be top notch if you include the human element in your frame.
Dronie (selfie with drone) (17)
Reinvent the selfie!
A dronie is a selfie taken by drone.
In many ways, (video) dronies are more an art form than anything else...
It's basically a type of selfie that combines a geek gadget and a high end technique with the perpetual human desire to be seen.
And here is where your creativity has no limits.
Well, now that you've got a great location and a beautiful composition in mind, you need some action.
Fly your drone and shoot that image you've imagined and planned so hard!
"Toni, this is a great list. But it seems a lot of work, a lot of research... Show me the shortcut!"
One step after the other my dear friend...
Now that you know what you're looking for, it's time to jump right into the next section.
Let me show you how to quickly find awesome drone locations. And how to easily plan your drone shots :)
2.How to plan your drone photos like a pro (from your couch!)
Have you heard the following expression?
"Work smarter, not harder!"
Well, when it comes to drone photography... working smarter is not an option, it's the rule.
So, let me tell you what I don't do first:
- I don't pick a random location.
- I don't spend hours and hours flying my drone looking for possible shots.
- I don't pick a random time to go fly my drone, just to find out the light is crap.
What do I do?
I plan.
And you should do it too :)
I plan every single detail so when I leave home I know what result I'll get... saving myself lots of time, money and frustration.
I plan the shooting spot, the frame, the composition, and the date and time I need to shoot to get the right light direction, light quality, shadows, position of the Sun/Moon in the frame, etc...
I plan everything!
How do I do it?
I simply use the PhotoPills drone mode.
Let me show you how it works with an example.
Let's see how to plan the crocodile image that opens this section.
Switch on the PhotoPills drone view
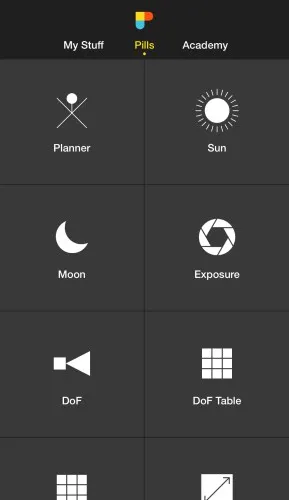
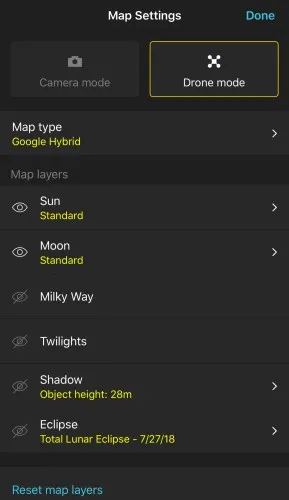
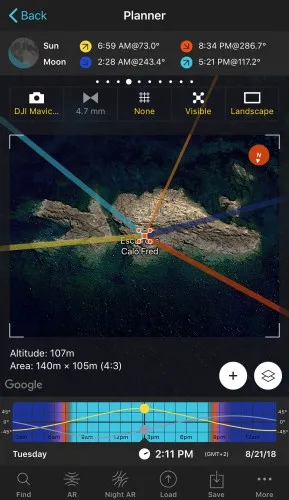
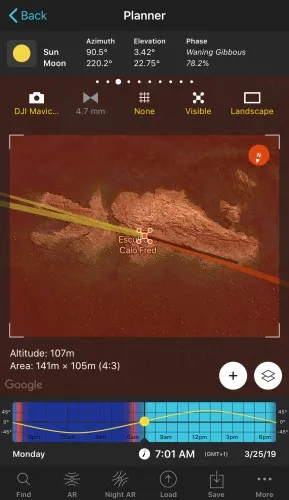
Take your PhotoPills app and tap on Planner (Pills menu). On the map, at the bottom right hand corner, next to the (+) Map button, you'll find the Map Settings button (layer icon). Tap this button to see the Map Settings screen.
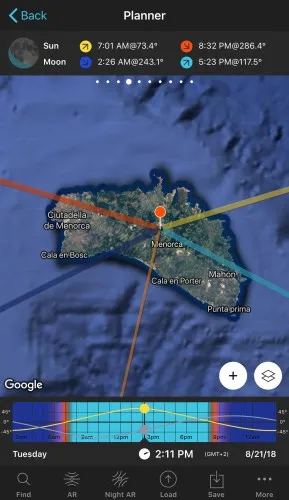
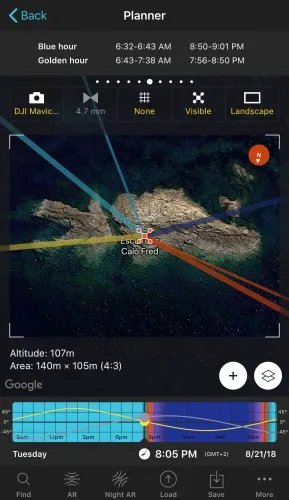
Note: If you're not familiar with PhotoPills, you should know that the color lines you see on the map displayed from the Red Pin give you the directions of the Sunrise (thick yellow), Sunset (thick orange), Sun position (thin orange), Moonrise (thick light blue), Moonset (thick dark blue) and Moon position (thin blue) for the selected date and time. Learn more about these lines watching this video or reading the PhotoPills user guide.
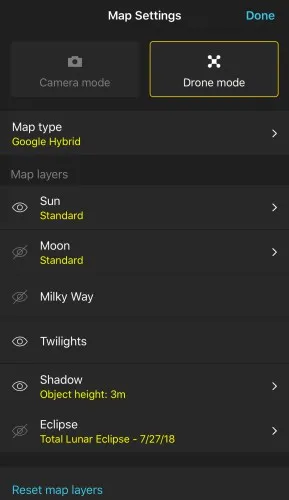
On the Map Settings screen (first screenshot below), set the Drone mode (top right hand corner). From this screen, you can also set back the mode to Camera mode, change the map type, choose the information layers you wish to see on the map (Sun, Moon, Milky Way, Meteor Showers, Eclipse, Twilights, Shadow, etc.) and more. Tap on Done to confirm your settings (top right hand corner) in iOS or the back arrow (top left hand corner) in Android.
Note: To enable/disable a layer, tap on the eye icon you see on the left of the layer.
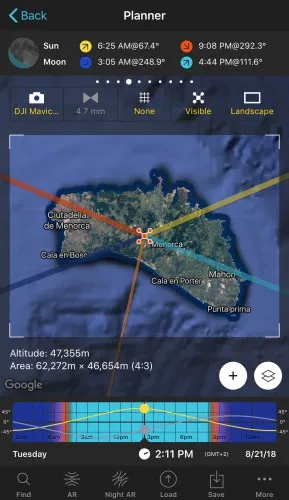
Have a look at the second screenshot above, now the Planner shows the Drone view, including:
- 5 Drone buttons:
- Drone selector: Select your drone or the camera you've attached to a drone. My drone is a DJI Mavic Pro.
- Focal length: Select the focal length you'll use with your done. If it's grey it displays the fixed focal length of your selected drone (4.7mm on my drone).
- Composition grid: Choose from different composition proportions (thirds, diagonal, triangle, golden ratio, golden spiral, etc.).
- Visible/Invisible: Hide the Sun, Moon and Milky Way map lines to enjoy a clean view of the map.
- Landscape/Portrait: Choose between landscape and portrait shooting orientation.
- Drone frame on the map: It shows what the drone is capturing in the frame based on its height. Zoom the map in and out to adjust the drone height and frame.
- Drone height: Approximate height of the drone needed to capture the frame you see on the map.
- Area: The field of view the drone is capturing.
- Grid: Only visible when you select a grid that has more than one position with the Composition Grid button (triangle, golden spiral, etc.). You can tap on the name of the grid to choose a different position of the same grid.
Are you still there? Yes?
Cool!
Make yourself comfortable.
Now you're ready to start planning your drone shot!
Let's begin by finding a great drone location to shoot.
Find an awesome drone location (to shoot straight down)
Shooting straight down is by far my favorite drone photography style.
I literally love navigating the PhotoPills map looking for eye catching patterns, lines, landmarks or any other of the ingredients I gave you in section 1.
It feels like you're flying your drone from home!
Just drag the map and zoom in and out looking for a great photo opportunity.
Oh! And you can also decide where on Earth you'd like to scout. On the Planner, just tap the Load button (at the bottom) and choose a location from an address, one of your saved points of interest, a latitude/longitude and more. Learn how to master the Load button with this video.
Let me give you an example.
Cala Barril is a beautiful rocky beach on the north coast of the island of Menorca, Spain. Menorca is where I live, our headquarters, and where we hold the PhotoPills Camp :P
It's a real game field for drone photographers. It's full of photo opportunities. A dream come true!
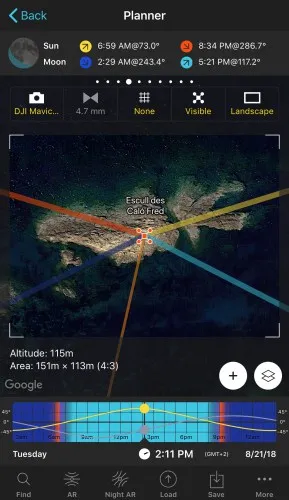
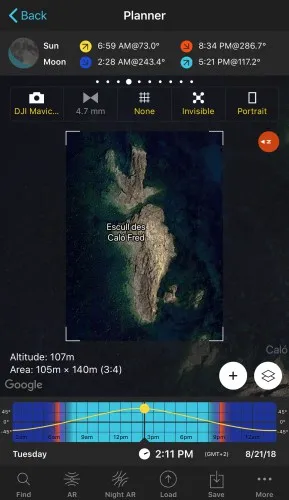
To find my shot, all I have to do is to navigate the PhotoPills map until I see something that catches my attention. For example the islet that looks like a crocodile (second screenshot below).
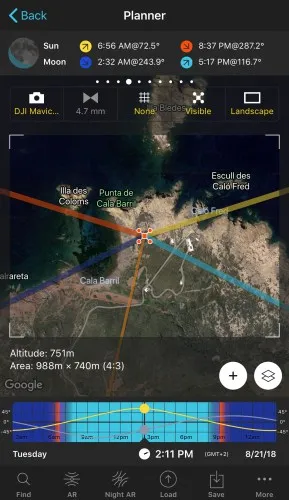
Capturing the crocodile is my goal...
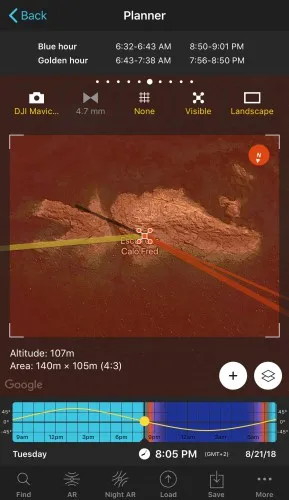
Now, to adjust the shot, I can rotate the map and also play a bit with the zoom, that is zooming in and out until I get the photo I want. The perfect shooting spot, frame and the drone height required – 107 meters in this case.
You can also tap the Visible button (above the map) to hide the red drone and Sun/Moon azimuth map lines. Pay attention to the second screenshot below. Notice that the button says Invisible now, and no lines are displayed on the map for a cleaner view of the photo.
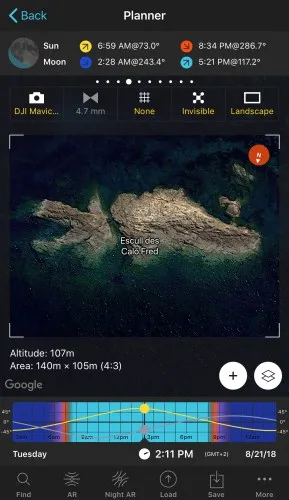
Note: Always check the local regulations on drone flying. You need to be sure you're flying your drone in a place where it's allowed (section 11).
Balance your composition (with the composition grids)
Composition is all about placing the right elements at the right place in the frame to tell the story you wish to tell.
But, what's this "right place"?
Since photography is art, what's right or wrong is subjective.
If it works for you, it's right! And if it doesn't... Well, you'd better try another thing.
Having said that, there are generally accepted proportions that can help you compose your images. The rule of thirds is the most known, but the number of possibilities is large: golden ratio, diagonal, triangle, golden spiral and crop proportions (1x1, 8.5x11, 4x5 / 8x10, 5x7, 2x3 / 4x6, 4x3, 16x9, 16x10).
The good news is that all these composition rules are included in the Composition Grid button of the PhotoPills drone mode. Look for the button with the Grid icon (above the map).
Tap this button and choose the grid you wish to display on the map. Finally, adjust the composition based on the grid (move or rotate the map, zoom in, zoom out, etc.).

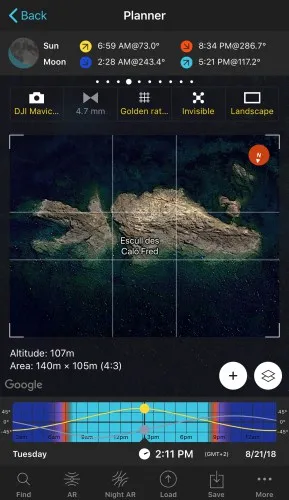
Note: There are composition grids that can be displayed in 2 or more positions on the map (golden spiral, triangle, etc.). You can change their position by tapping on their name. It appears in blue just below the Height and Area information (below the drone frame on the map).
Landscape vs portrait
There are compositions that work best in landscape orientation, and others in portrait mode.
Therefore, when I'm composing a shot, I always have in mind the orientation I'll be using while shooting (landscape or portrait). This is the reason I love the Landscape/Portrait button of the PhotoPills drone view. Because It allows me to visualize the final image right on the map.
Take advantage of it!
Plan light quality
Light changes throughout the day. It goes from daytime, golden hour, blue hour, civil twilight, nautical twilight, astronomical twilight to nighttime.
So depending on the time you choose for the shot, you'll have one type of light or another.
If you wish to learn more about these different light phases and the types of photos you can take during each one of them, have a look at the article 'Mastering golden hour, blue hour and twilights'.
Once you know the light you need for the shot you want, you can use PhotoPills to figure out the right time you have to be out there shooting.
Let's say you want to have a warm golden hue in the image. When does the golden hour begin?
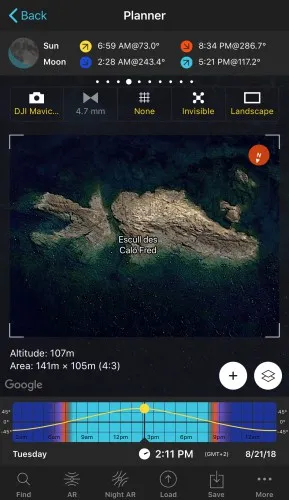
First, swipe the information panel above the map until you get to Panel 6. This panel gives you the golden hour and blue hour information for the selected date and selected Red Pin position (see the second screenshot below).
Now select the date you wish to shoot (using the Time Bar). Let's say August 21, 2018. And read the golden hour times on Panel 6 (between 06:43 am and 07:38 am, and between 07:56 pm and 08:50 pm on August 21, 2018).
Therefore, if you wish to shoot in the evening, now you know the golden hour begins at 07:56 pm and ends at 08:50 pm. That's your shooting time range. Get there on time!

Plan light direction (and shadows)
The time of the shooting will not only determine the type of light you'll have, but also the direction light is coming from and, thus, the direction and length of the shadows cast by the elements of the scene.
But don't panic!
PhotoPills has you covered ;)
Planning light direction and shadows for a given date and time
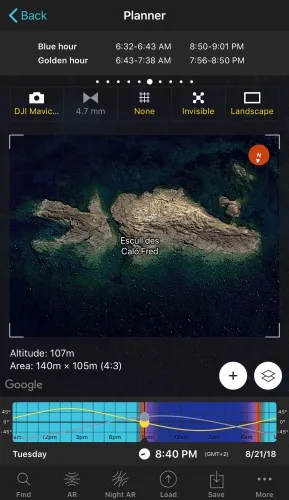
For any given date and time, you can use PhotoPills to visualize the light direction and the length of the shadow a subject will cast. To do so, first make sure that the button with the icon of a drone above the map indicates Visible (see screenshots below).

Second, make sure you have activated the Sun, Twilight and Shadow layers. To do so, tap the Map Settings button you see on the map, besides the (+) button.
Then, tap on the eye icon besides the layer you wish to activate. In the first screenshot below you can see the layers I've activated: Sun (standard), Twilights and Shadow (subject height of 3 meters).
To change the subject height, tap the arrow you see on the right of the Shadow layer (see second screenshot below). Alternatively, you can also set it using Panel 1 (Shadows panel) above the map (swipe the panels to the right to find it). Watch this video to learn how to use this panel.

When ready, on the Map Settings screen, tap Done in iOS or the back arrow in Android to go back to the map view.
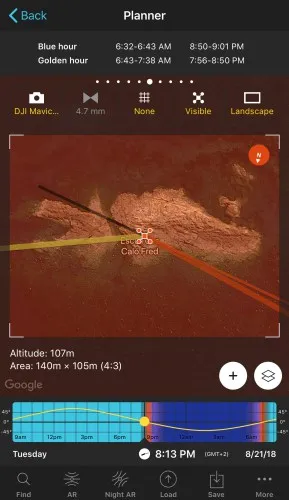
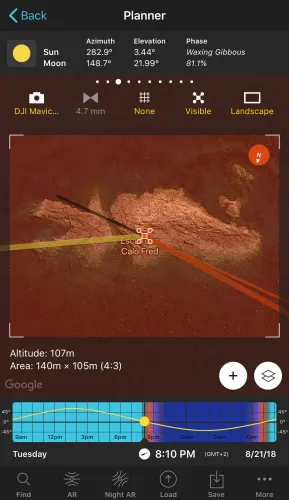
Have a look at the first screenshot below. The orange hue on the map points out that the selected date and time (August 21, 2018 at 08:05 pm) falls within the golden hour (Twilights layer). And the thin orange line is telling you the position of the Sun (from where the light will come) at the selected date and time (Sun layer).
On both screenshots, you can see the shadow cast by a subject of 3 meters at the selected date and time. Notice the dark segment starting right where the drone is (it's the shadow!).
And that's it!
This is how you can figure out the light direction and shadow for a given spot and at a desired date and time.
Let's see now how to work out the date and time you can get the shadow you need in your photo.
Planning for a desired shadow direction and length
What if that you could use PhotoPills to find the exact date and time your subject would cast the shadow you need for the shot (desired direction and length)... Would you believe it?
This is getting interesting, right?
Believe it or not, there is a way to do it in just a few seconds.
First, you need to figure out the elevation of the Sun that gives you the desired shadow length.
Tap the Map Settings button and enable the Shadow layer.
Then, tap on the Shadow layer row to set the subject height. You can also do it by using Panel 1 (Shadow panel), which also includes the shadow length (numeric value). Now, change the time using the Time Bar until you get the shadow length you need, for example 50 meters. Panel 1 gives you the numeric value of the shadow length.
Finally, go to Panel 3 (Sun/Moon azimuth panel) and read the elevation of the Sun (3.44º).

The second step is to look for the date and time the shadow will be in the direction you want and with the length you want.
Let's imagine that you need the 50-meter length shadow to be towards the west (azimuth 270º). This means that you need the Sun to be in the east (azimuth 90º). The light will come from the east, casting the shadow to the west.
Therefore, you need to look for the date the Sun will be at the elevation 3.44º and at an azimuth (90º in this example) creating the shadow towards the direction you want.
Summing up, you need to look for a Sun at a desired position in the sky (azimuth and elevation). So, you need to use the Find tool of the Planner.
Watch this video to learn how to use the Find tool.
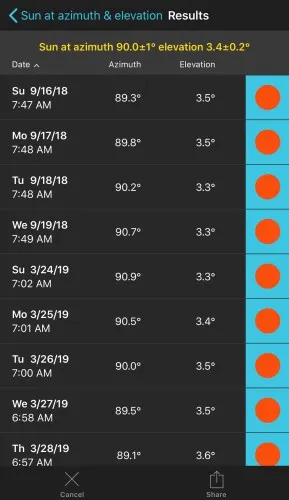
Following the steps explained in the video, you'll get a table with all the dates when your shot is possible (see the first screenshot below). Then, choose the date that better suits your needs from the table to see the resulting plan (March 25, 2019 at 07:01 am). This is the date and time of the shooting!
Note: I had previously rotated the map, so the north is not at the top of the map, but at the bottom of the map. Notice the red circle on the top right-hand corner of the map pointing the direction of the north.
Check the allowed flying height
When you plan a drone shot you need to take into account all the different legal regulations (I'll cover this topic in detail in section 11).
Among all the legal restrictions, the allowed flying height is a key one. So when you plan a shot, always take it into account.
Plan the flight course and time
When the height you get for a determined shot is above the allowed height, I recommend you to use a more specific software to plan the flight and course to cover the same area with multiple photos at a lower height.
There are a few solutions out there such as Maps Made Easy, DJI GS Pro, UGCS Pro and DroneDeploy to name just a few :)
Are you using any other app? Let me know it in the comments!
Save and share the photo plan
Great!
You've planned your drone shot.
Now you know the shooting spot, the frame, the drone height and the date and time.
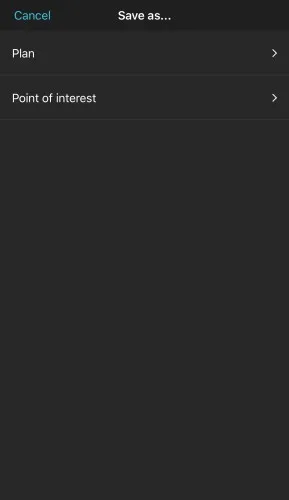
It's time to save it in your To-Do list of photo plans. On the Planner, tap on the Save button (at the bottom) and choose Plan. Now you're ready to plan another shot!
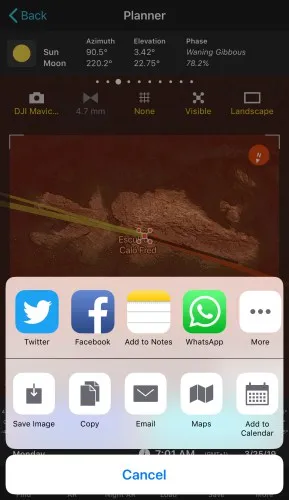
You can also send the photo plan to a friend via email. Tap the More button (at the bottom), choose Action and then email (see second screenshot). If your friend is also a PhotoPiller, then she will be able to import it to PhotoPills directly from the email.
Learn all you need to save and share your photo plans with this video.
What about including the horizon in the frame (and the Sun or the Moon!)?
Up to now, I've shared with you my workflow to plan drone shots when shooting straight down.
When I want to shoot a different perspective, including the horizon for example, I use a combination of tools.
First, I use Google Earth to find powerful locations, subjects and perspectives like the one you see in the image below.
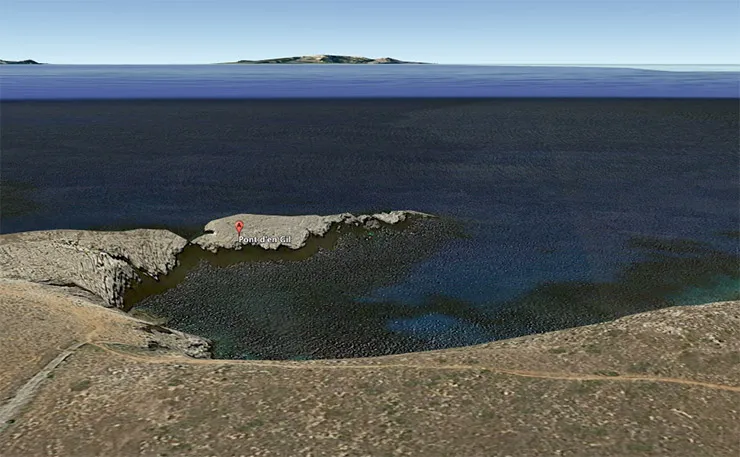
Es Pont d'en Gil is a beautiful natural arch again located in the island of Menorca. I know, I live in paradise... :P
At this stage, it's all about visualizing the location to determine whether it has potential for an epic shot or not.
Once I've found a nice location, I use PhotoPills to plan the rest of the details: the time of the shooting for a determined light, the shadows, and even the date and time the Sun or Moon will be where I want it to be in the frame.
For example, imagine that you want a drone shot with the Sun setting aligned with the natural bridge of Es Pont d'en Gil. You can use PhotoPills to easily figure out the exact date and time it happens. Just use the Find option of the Planner.
Watch this video to see how to do it!
Awesome!
You've found a great location, planned a great photo... Now you need a great drone!
Keep reading! ;)
3.Choosing the right drone
"Toni, what drone should I buy?"
Good question!
Nowadays, the drone market is so huge that after a few minutes searching on internet you'll be overwhelmed. The options are endless.
If you're in a hurry, at the end of this section you'll find the drones I recommend.
But if you have a bit of time, I'd like to start with the types of drones...
The different types of photography (and video) drones
The possibilities are endless!
But in order to simplify things a little bit, I've divided the photography (and video) drones into 3 categories:
- Beginner drones. These are drones for photographers who have no or little experience flying a drone. They are usually inexpensive but relatively easy to fly (keep a bare minimum of safety measures though!). The biggest downside is that the camera incorporated in these drones is far from being great and the quality of images may not be the best.
- Mid-range drones. If you already have some (or quite a lot) of experience as a pilot and as an aerial photographer, then these are the perfect drones for you. At a relatively affordable price, these drones are reliable, easy to fly and offer very good specs when it comes to their camera. All in all, the best quality/price ratio!
- Professional drones. You're a professional photographer or filmmaker, the size of your drone is not an issue, and you can definitely break the bank... Well, if that's your case, I wouldn't think twice if I were you. The market of professional drones offers a wide range of options, all of them providing nice features (e.g. longer flight times) and an amazing camera quality.
What will determine your final choice?
In my opinion, 3 main factors will determine the drone that you will buy: budget, size and technical requirements.
Budget
Yes... It's all about money!
As usually in photography, the type and quality of the gear you can afford will depend on how much you can spend. And drones are not an exception.
So your final decision will rely first and foremost on your budget.
Because, it doesn't matter if you are a novice pilot or a super pro. If you don't have enough money, you'll never purchase the drone of your dreams ;)
The good news is that nowadays the drone marketplace is so big that there are literally dozens of drones out there. So I'm sure that you'll find one that fits your needs (and those of your clients if you're a pro) and your pocket without giving up image quality!
Size
"Tell me Toni, are big drones better than small ones?"
Please don't kill me when you read my answer.
Do you promise? :)
Well, the answer is "it depends"...
Yes, it does. It depends on your needs.
For example, let's say that you are a travel photographer. Having the smallest possible drone is going to be crucial for you. It's going to be easier to transport (e.g. you won't need to put it in your checked luggage) and it will draw less attention when going through security at the airport.
Or, imagine that you are a professional landscape photographer that only works in the Netherlands. In this case, size is not an issue. You can easily carry your drone from one location to another while benefiting from the cool features of a large drone such as higher speeds, fly for longer, optical flow stabilization...
So, as you can see it's just a matter of answering the right question. And that is "what do you need?"
Technical requirements
Last, but not least, spend some time having a look at the drone's technical specs. Actually, do the same as you would when you're thinking about buying a camera, a lense or any other photography gear.
Make a list of the features you consider essential and those that you could live without.
But if you have no idea where to start, here is a short list of the specs that you should read about.
What technical requirements you should look for?
Here are the features you should have a look at before buying your drone:
- Camera. For best image quality, make sure the camera of the drone has enough photo resolution (e.g. 12MP sensor) and video resolution (e.g. 720p at 30fps, 1080p at 120fps, 4K at 30fps).
- Gimbal. If you want to take sharp pictures and videos, make sure your drone has a gimbal. It's the support that keeps the camera steady while the drone is flying and the camera is moving. Drones usually have 2-axis or 3-axis camera gimbals. The later are great because they allow to tilt, pan and roll the camera in most directions in order to maintain a silky smooth video.
- Battery life. No battery no fun! Unfortunately, even the most expensive drones enjoy a flight time rarely longer than 30 minutes. And there's only one solution for that – to carry an extra battery (or two!).
- Range. The range is another key factor. It determines how far you can fly your drone before you lose control of it. And you've guessed it, the more expensive the drone, the greater the range.
- Integrated GPS. Thanks to the integrated GPS you can use the "Return to home" button, which is extremely helpful because it commands the drone to automatically fly back to you. The GPS also improves the drone general stability and navigation allowing it to easily hover in one place.
- Obstacle avoidance. Considered a premium feature by many manufacturers, a drone with obstacle avoidance is not cheap. However, it will protect your drone from crashing into any kind of obstacle (e.g. wall, tree, etc.). Its performance varies a lot depending on the model, so check some reviews online to see if the obstacle avoidance tool of a particular drone actually works.
- Follow-me mode. With the "Follow-me" mode, the drone will track your position. It's a fantastic way to capture the action in the scene. Again, there are drones that perform better than others, so make sure you read some reviews online!
- Headless mode**. When you're using the headless mode, the drone's orientation is related to your position or to a selected heading. I'll explain you more about this feature in section 4.
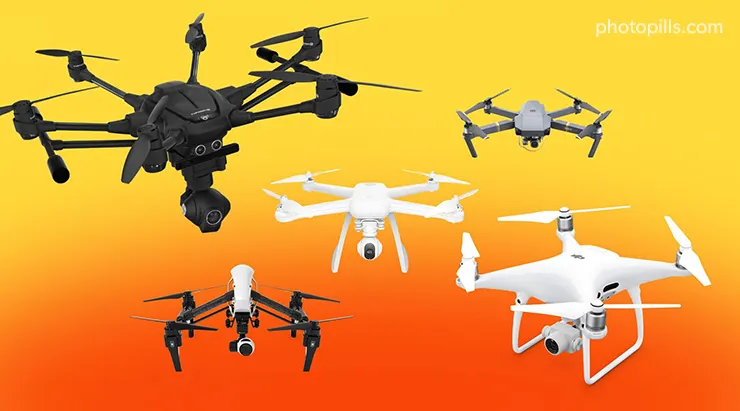
Here are my drone recommendations
There are lots of brands out there manufacturing great drones. But, for the moment, DJI models currently dominate my top picks, and there's a good reason for that. The company offers a wide catalog of products with very diverse models at differents prices.
In fact, all their drones are excellent choices whether you're looking to get started in aerial photography and video or you already have any drone experience. Having said that, you've probably guessed that the more money you spend, the better the features get...
So here are my top picks!
- Entry level: DJI Mini 4 Pro
- Mid-range: DJI Air 3
- Professional: DJI Mavic 3 Pro
Pick one and let the fun begin.
Now... Let's fly the drone!
4.How to successfully fly a drone
In this section you'll find everything you need to learn how to fly your drone.
First, I'll make sure you understand the remote controller and drone fly modes, and how to calibrate your drone.
Then, I'll give you 7 exercises you should definitely master to become a pro pilot.
Finally, you'll learn how to fly your drone in cold weather and even how to reduce the risk of losing it out there!
Ready?
Let's go!
Are you a beginner?
Have you ever flown a drone before?
No?
Well, if this is your first time or you don't have a lot of experience, I've put up a list with some basic recommendations. You should follow them at all times.
This is not a preflight checklist. I'll go in depth about this subject in section 11.
Here are my beginner tips while you learn how to fly a drone:
- Make sure the batteries are fully charged.
- Check that the propellers are properly balanced.
- Avoid flying out of line of sight, even with the "First person view" (FPV) gear on.
- Make sure to pick an open field with no people and no objects (trees, houses) around. A grass field is a better option for "softer" landings in case of a crash.
- If your drone crashes, immediately turn the throttle off. You'll minimize the damage to the propellers and motors of your drone. You'll also avoid hurting people or animals.
- Don't break any drone laws and regulations within the country you're flying in (section 11).
Understanding remotely monitoring: the transmitter controls
First things first.
Pick up your transmitter and study it. Here is an overview of a typical transmitter:
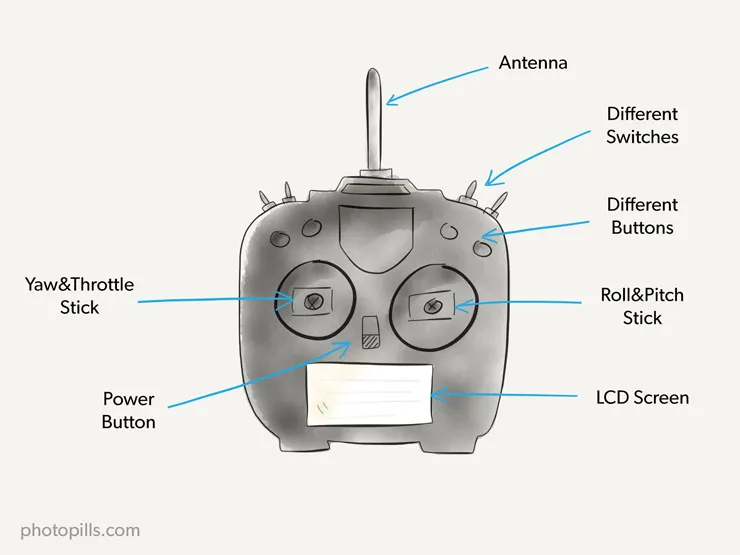
Your transmitter control positions may vary so have a look at your user manual.
The most important elements of your transmitter are the sticks.
Depending on how you have configured them to work, they will be set to do one movement or another. There are multiples modes: 1, 2, 3, 4... But Mode 2 is the default one that most manufacturers use.
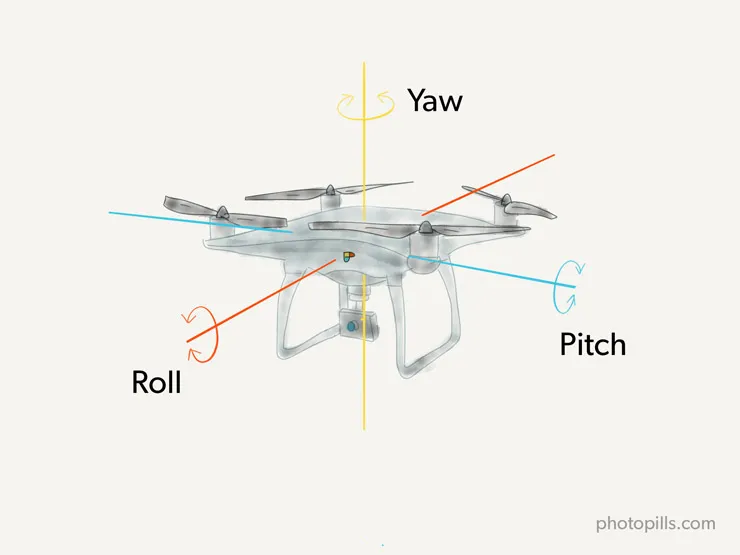
This is how how the sticks are set in Mode 2:
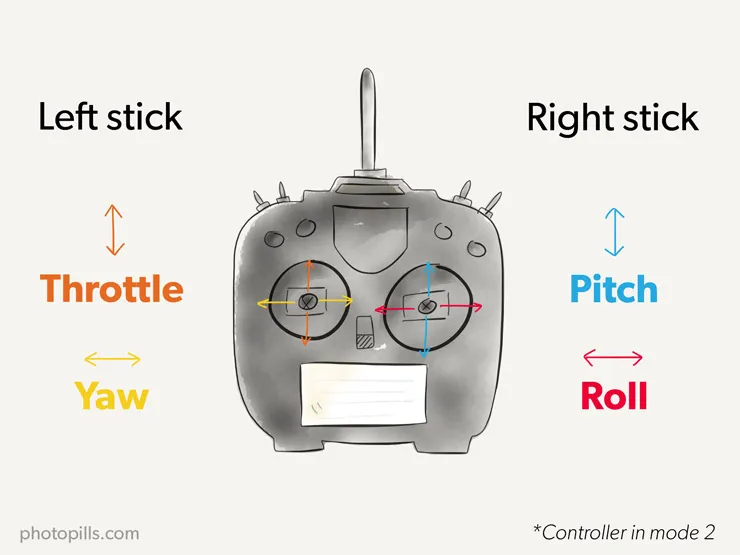
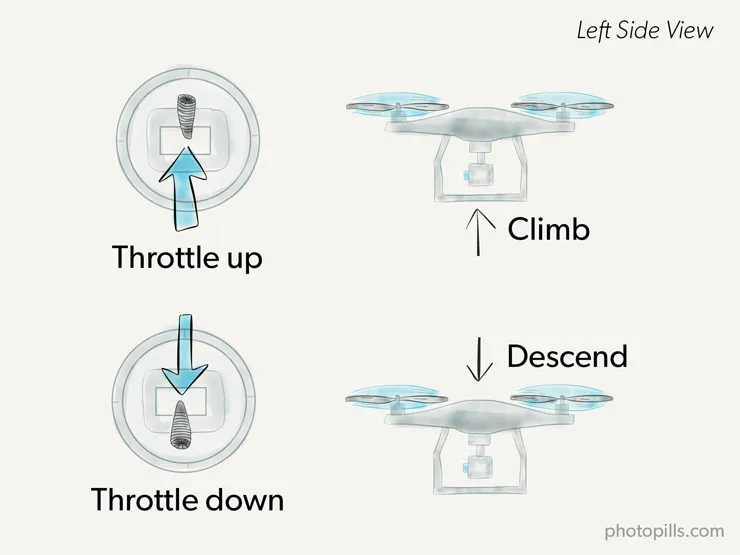
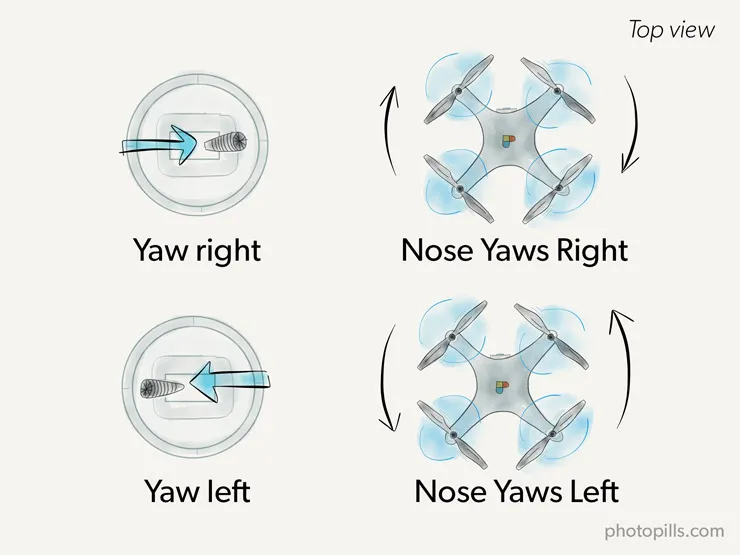
The left stick allows the drone to "Throttle" and "Yaw":
- "Throttle" determines how much total power is drawn by the motors, determining how much your drone climbs or descends.
- "Yaw" rotates the drone on its axis both left (counterclockwise) and right (clockwise).
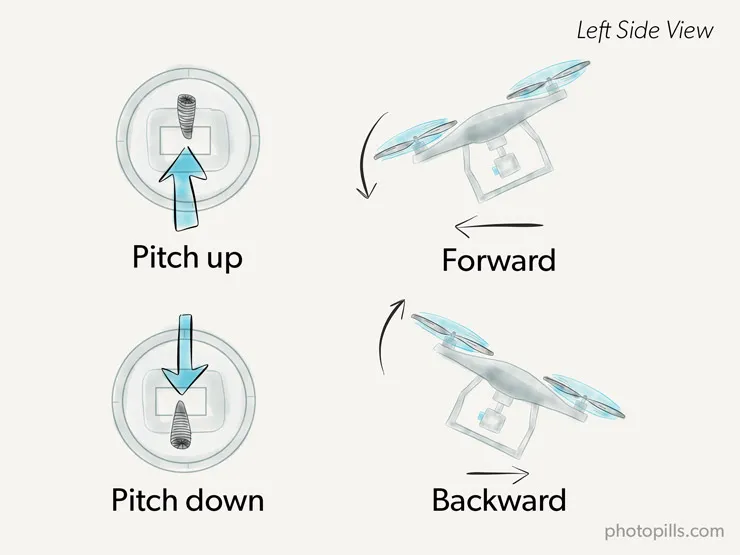
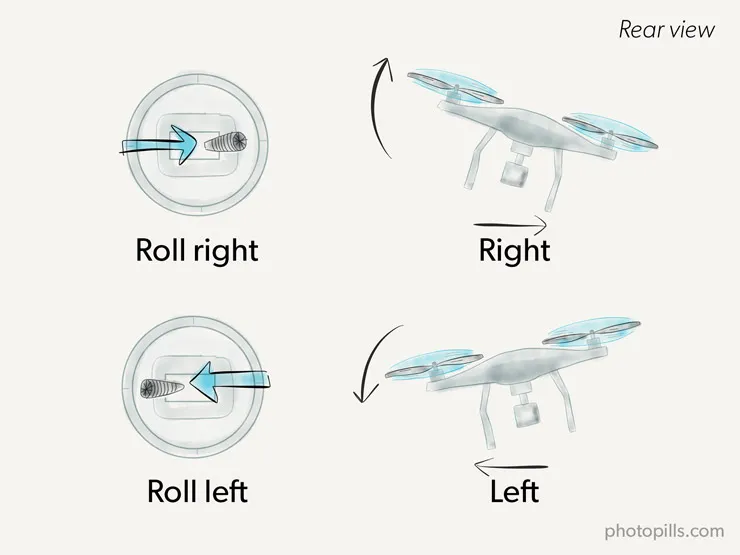
The right stick allows the drone to "Pitch" and "Roll":
- "Pitch" controls your drone forward and backward movement.
- "Roll" moves your drone left and right.
Calibrate your drone before flying
You should always have a close look at a drone preflight checklist before every flight. It's a safety measure that takes a couple of minutes and you can avoid several risks.
If you don't know where to start from, have a look at the drone preflight checklist on section 11.
Once you're done, it's time to calibrate your drone.
This step is essential and it's often overlooked. It's important to do this if you've never flown before or if you if you bring the drone to a new location.
Most drones have an internal GPS and compass. These tools allow the drone to hover in place and to know which way it's facing.
You definitely want to make sure that both are accurately set, so the drone doesn't get lost or disoriented.
To calibrate your drone, follow these simple steps.
Perform the calibration process away from any metal structures (e.g. large concrete parking lots, cellphone towers).
Turn on the transmitter and the drone. Both must be powered up.
Use your controller to calibrate the compass. On most drones, the lights on your remote control and your drone will change to yellow.
Hold the drone level with the ground. Rotate it 360º until the lights turn green.
Now, spin the drone so it's perpendicular to the ground. Rotate it 360º again until the lights turn off. The compass is now calibrated.
If your drone's lights turned red you made an error in the process. Repeat steps 4, 5, and 6 until the lights turn off.
Depending on the manufacturer, the lights behavior might be different than what I described here. Again, check your manual to follow the correct procedure.
If you're not sure how to do it, have a look at this video:
Your drone flight modes
All drones have different flight modes.
The default and most usual one is the manual flight mode. Here, you as a pilot control everything from the moment you turn on the drone: the take off, what is the drone doing in flight and the landing.
However, most drones have several semi automatic flight modes. These modes support different types of flight stabilization, a more or less sophisticated autopilot, a "Follow-me" system, a "Return to home" mode, etc.
Basically, these features are there to help you focus on one thing or to safely perform other tasks while the drone flies.
Because many manufacturers use different names for their flight modes, I've decided to use a generic name so you don't get confused. Nevertheless, in case of doubt, it's best to have a look at your drone's instruction booklet and learn how to use each flight mode on your specific remote controller.
As usual, I recommend you to always have with you a preflight checklist (section 11). That way you'll make sure that you've set the flight mode you plan to use before actually flying the drone.
Manual mode (M)
You'll use this mode primarily when you want to have a maximum control over your drone and decide every maneuver. So, here you'll decide everything your drone will do.
If you have a low cost drone, take into account that some basic flight controllers only operate in this mode.
As an aerial cinematographer you may want to use the manual mode if you are filming a moving object and need to rapidly vary the position of the drone during the flight.
Altitude hold
Do you have a high end drone? Most advanced flight controllers have barometric sensors that enable them to detect subtle changes in atmospheric pressure.
The altitude hold mode (or attitude mode or ATTI) helps you keep the drone at a precise height. Nevertheless, you drone may drift a bit during windy and gusty conditions.
Pay attention to the left stick (throttle). Increasing or decreasing the drone speed may still perform changes in heigh. As soon as you return the stick to the center, the drone should hold at the height you determine. This works on new drones, on older drones you may have to correct the throttle position in order to maintain aheight.
This is particularly interesting during aerial filming, if you need to hold a certain height or when GPS is unavailable (e.g. underneath bridges).
GPS position hold
This mode, also called loiter mode, maintains your drone's position both vertically (height) and horizontally (direction).
Before using this mode, make sure that your GPS works properly.
It's ideal for beginners because it allows you to move the drone around, but when you release the sticks its current position is maintained. So it will help you, for example, to start practicing the exercises I mention later on in this section. Once you start dominating your drone, practice the exercises in manual mode.
Obviously, this mode can also be very helpful if you plan to take some aerial shots. If you're working on a specific composition you can always maintain the drone on its current position while it's flying. Then, shoot for as long as you like without changing that particular composition.
Auto or waypoint programming mode
Use this flight mode if you want your drone to follow a specific flight path. In fact, it's an autonomous flight mode because you don't give any control input to the drone during its flight.
Instead, before flying you program with the GPS certain waypoints and heights into the drone. To do so, you can use softwares such as MapsMadeEasy or DroneDeploy on your laptop or tablet.
Once you've set the waypoints and programmed them into the drone, it transmits them to the remote controller.
Despite being an autonomous flight mode you still must maintain visual line-of-sight. Imagine the GPS signal is lost or the drone has any type of in-flight problems... If something happens, switch to manual flight mode and regain control of your drone.
You may use the auto flight mode to scout an unknown and potentially interesting shooting area or to survey it.
Moreover, if you intend to shoot a video and need to make repetitive flights over the same flight path this mode may be time saving.
Normal orientation mode
This is the default flight mode. You need to be aware of the front of the drone at all times because all the the controls are relative to the front of the drone.
If you're a beginner you can get easily confused because when the drone is facing you, the controls are reversed. Remember, you're always flying from the perspective of being in the pilot seat.
Free orientation or headless mode
Contrary to the normal orientation mode, in the headless mode, the drone's orientation of the multirotor is related to your position or to a selected heading.
Let's say that you set the reference point as your home position, for example. So if you move the right stick up, the drone will move away from you no matter the direction it's pointing to. And when you move the right stick down, it will return to your current position.
Another cool thing that you could do too, would be rotating the drone on its axis (spinning it) while simultaneously moving it forward (in a straight line). This would be super difficult to do in normal mode. But here it would be as easy as pressing the right stick to go "forward" (which would take the drone away from your position) and the left stick to rotate the drone.
If you lose orientation while you're flying your drone in normal orientation mode, select the free orientation mode to safely bring it to where you are (home).
Make sure your drone GPS knows where the home point is before taking off!
The DJI flying modes "Home Lock" and "Course Lock" are headless modes.
Return to home mode (RTH)
Most drones offer a feature that will command your drone to fly back to the place where it took off if you lose communication with it and can't control it using your transmitter.
This mode is called "Return to home" (RTH).
This is basically and advanced safety feature and to engage it, all you have to do is press the RTH button on your remote control.
If your transmitter doesn't have a specific RTH button, assign a switch that initiates a return to home (and/or land) procedure. It's a highly recommended safety feature for all multirotor operators.
Before engaging the "Return to home" mode, make sure that your drone has some sort of obstacle detection technology.
Auto return to home mode (auto RTH)
This same "Return to home" feature can be programmed to engage if certain (potentially dangerous) conditions arise. For example, if you lose the radio link or the transmitter loses power, the flight controller automatically enters the RTH mode.
This mode will only function properly if your drone GPS knows where the home point is before taking off!
One last thing. If your drone enters this mode automatically, there's something wrong... So make sure you carry on a thorough inspection of the drone after the flight to determine the reason why this mode was activated.
Intelligent flight modes (only DJI drones)
Whether you want your DJI drone to follow you, circle your subject, or just fly a preset path, using the intelligent flight modes can get you incredible shots without you even having your hands on the controls.
Have a look at the DJI website to learn more about this.
Time to fly!
Now that you're done with all the important, but let's admit it, boring stuff, it's time to fly your drone for the first time!
If you want to become a great drone pilot, you need to practice a lot to master your drone.
And to achieve this mastery degree you can find below some basic exercises to practice.
These 7 exercise patterns are arranged in increasing difficulty. So my advice is that you master each pattern before heading to the next one.
I can't stress it enough. Spend hours practicing and be patient. Also, it'll be easier practicing on a nice sunny day with a good temperature and with no wind if possible.
Your first flight
Put your drone on a flat surface. When putting it on the ground, make sure that the front of the drone is facing away from you. That way you won't get confused with the orientation.
And now... turn on the motors! :)
To do so, press both the right and left sticks down and towards the middle. That's on most drone models, but yours might be different so don't take this as a rule of thumb.
Start learning to control the left stick.
Press gently the left stick up and the drone will start to go up. To keep the drone from going higher, return the left stick to the neutral position.
Now pull the left stick down, and the drone will go lower.
Again, return the left stick to the neutral position.
Thanks to the left stick, you can also yaw the drone.
Push the left stick to the left so the drone begins to spin to the left. Push the left stick to the right so the drone begins to spin to the right.
Piece of cake!
Now, time to dominate the right stick.
Push the right stick up and the drone will begin to move forward. To bring it back, move the right stick down.
Move the right stick to the left so the drone flies left. Move the right stick to the right so the drone flies right.
And that's it! These are the basic movements to fly your drone.
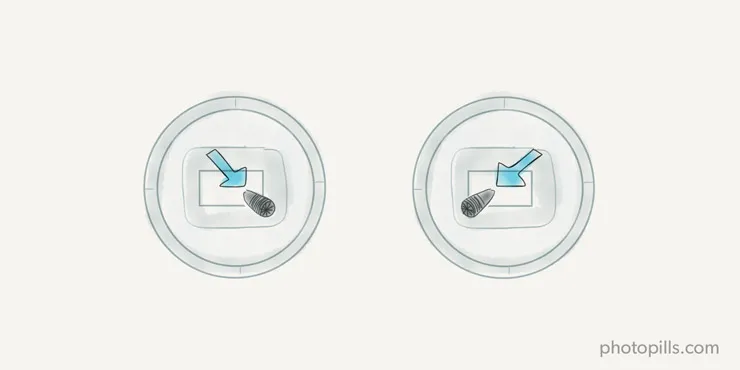
Your first landing
Finally, it's time to perform your first landing.
Slowly bring the left stick all the way down to land your drone. As soon as the drone touches the ground, pull the left stick all the way down and hold it until the motors shut off.
Be careful with your first landing. Practice as much as possible and be gentle with the controls. You don't want to have your very first drone crash right after your first flight! :(
Take off to eye-level (1)
The first exercise is easy. Take off the drone facing you and fly it to eye-level for about 10 seconds. Then, bring it down and land.
Translation (2)
Place the drone facing away from you, and take off. Push the right stick to the right to move the drone to the right around 10 meters (30 feet) and bring it back by moving the right stick to the left.
Repeat the exercise pushing the right stick to the left first and then to right, so the drone moves towards the other direction.
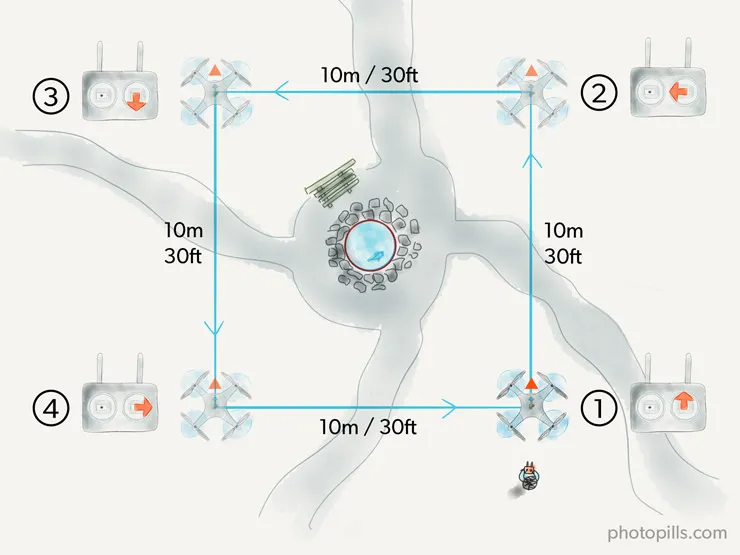
The Square (3)
Place the drone facing away from you, and take off. Using only the right stick, move the drone forward 10 meters (30 feet), then left another 10 meters (30 feet), then backwards 10 meters (30 feet) and finally to the right 10 meters (30 feet) to get to the original point.
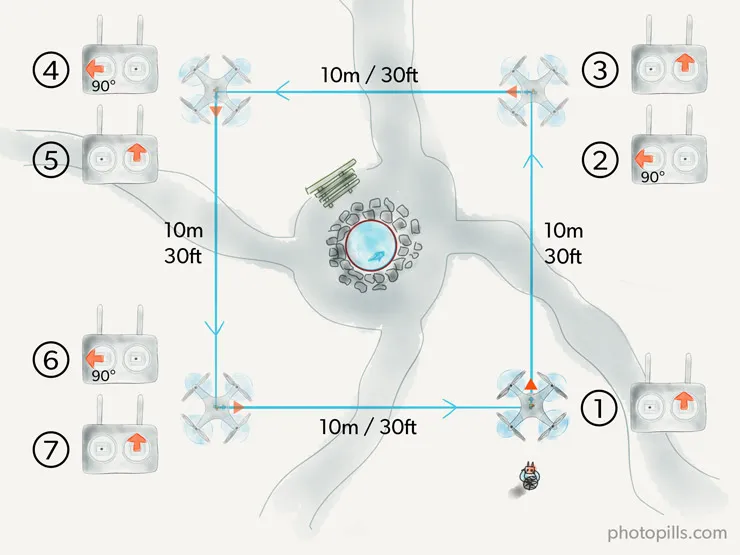
The Square using yaw (4)
Similar than the previous exercise, but your aim now is to make the drone turn 90 degrees at each square corner. This way you'll start to learn to yaw the drone using the left stick.
Move the drone forward 10 meters (30 feet). Then, rotate it 90 degrees left using the left stick. Move the drone forward 10 meters (30 feet) again. Now, rotate it 90 degrees left. Move the drone forward 10 meters (30 feet) again. Finally, rotate it 90 degrees left, and move it forward 10 meters (30 feet) to get to the original point.
As you can see it's a much harder exercise than the previous one. The reference changes once you rotate the drone, so you always need to know where the drone is facing in order to rotate it to the correct direction.
For example, if the drone is facing away from you and you push the right stick up, it will move away from you. But if the drone is facing you, it will move towards you.
You'll encounter the same problem when moving left/right. If the drone is facing away from you and you push the right stick to the right, the drone will move to your right. But if it's facing you, it will move to your left.
It seems easy, but you'll see that needs some practice... :)
The Circle (5)
Here, the idea is to fly in circle with the drone. In order to do so, you need to use both sticks simultaneously.
Start by pushing the right stick up to fly the drone away from you. Then, at the same time, start moving the left stick to the left. You'll see that the drone begins to yaw to the left, while moving in circle in counterclockwise orientation.
Repeat the exercise by flying the drone in circle in clockwise orientation. (Hint: move the left stick to the right.)

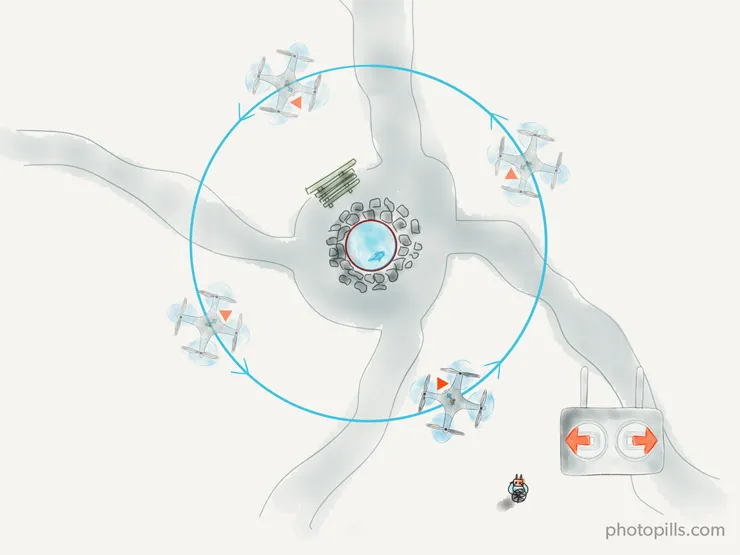
The Orbit (6)
This is a very popular and useful movement when recording video with a drone. So if you want to improve your videos, I suggest you to master it.
This exercise is called the orbit because the drone orbits (flies around) a subject while always facing it. Therefore, the subject is always at the center.
Now time to practice it!
Take off and face the subject you want to orbit. Then, move the drone towards the right with the right stick and, at the same time, move the left stick to the left. This way you'll move towards the right while yawing to the left, moving the drone in circle.
Repeat the exercise by orbiting the drone around the subject in clockwise orientation.
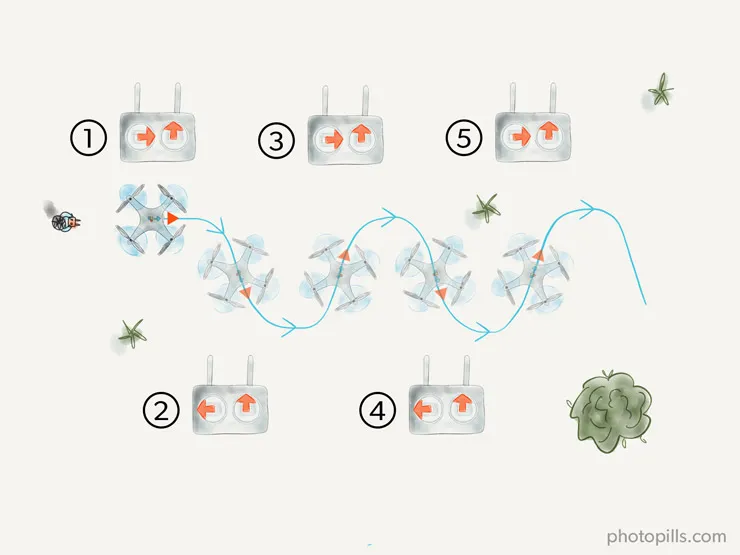
The S-Shape (7)
Now that you master the circle-shape and the orbit, let's try something a bit more complicated... ;)
Fly the drone while making 4 S-shapes. This is like linking half circles in counterclockwise orientation with half circles in clockwise orientation.
After doing the 4 S-shapes return the dron to the initial spot flying it backwards.
You can start to do it flying slowly and when you master the movement, repeat it while flying much faster.
At first, it will take you a while to master each exercise and you'll perform each pattern rather slowly. As you start to improve and become more confident, try to do each pattern flying the drone much faster.
How to reduce the risk of losing your drone
As an aerial photographer, losing a drone is one of the worst things that can occur to you. Your $1,000+ investment may fly away in a couple of minutes, never to be seen again just because you made a small error.
Ups!
That's usually called a flyaway.
However, it doesn't necessarily mean that your aircraft is never retrieved. It's usually an interruption or loss of the control link. Because of that loss you're unable to control the drone and, as a result, it's not operating in a predictable or planned manner.
Don't panic!
Not everything is lost, yet.
Have you lost connection with the drone? Relax!
No matter how much experience you have as a pilot or how expensive your drone is. Sooner or later you'll experience losing connection between the remote controller and the drone.
I've dealt with this unpleasant situation on countless occasions!
Most of the time my drone regains connection within a few seconds, but what if not?
Well, here are a few basic tips to help you deal with it.
- Stay calm and in control. Otherwise, you won't be able to make the right decisions.
- Use the "Return to home" button. This feature allows the drone to fly back to its take off location and land. You don't need to do anything, the drone will just fly on its own.
- Before taking off, make sure your GPS location is logged on your drone. Some manufacturers such as DJI, have set up this automatically. But make sure it does it correctly, just in case. Otherwise, the "Return to home" button will be useless.
How to avoid losing your drone
Most pilots blame the drone or the manufacturer after a flyaway and losing their aircraft. However, in most cases, drones get lost because of a human error.
Yes, it was the pilot's fault.
Fortunately, following this practical advice you'll reduce the chances of losing your drone.
Start practicing with a cheap drone (1)
If you happen to be a beginner pilot, why not buying a cheap drone to start practicing? Spend has many hours as needed to become an experienced pilot. Once you're a strong drone flyer the chances of losing a drone will be lower and you can then upgrade your aircraft.
Allow your drone to lock its current GPS coordinates (2)
As I explained before, some drones have a "Return to home" button. If yours doesn't, leave your drone on the ground for a couple of minutes before taking off so it can lock the GPS coordinates of its current location.
If you don't, your drone may head to the last location it registered as being "home", and who knows, it may be a completely different location that it's kilometers away.
Be careful not to lose orientation (3)
As the drone flies further and further away, it may become difficult to figure out what way the drone is facing. If you lose orientation you may struggle to make your drone return to where you are.
And, it comes as no surprise that it ends up in a flyaway!
Again, this is a good reason you should practice flying with an entry-level drone before using more advanced (and expensive) ones.
Make sure the drone software is always up to date (4)
A software glitch can also be a problem. You may lose connection with it while it's flying or it could have a negative impact on its GPS log.
Always keep your drone software updated to prevent a flyaway.
Avoid losing connection with your drone (5)
As we saw in the previous section, losing connection with your drone implies a high risk of losing it.
Before flying, make sure you know the range of your drone. Fly your drone beyond its range and you'll likely lose connection.
Oh! And avoid flying the drone behind any obstacle. If there's something between your remote controller and the drone, like a hill or a rock, the drone can lose connection as well.
Try to avoid areas with high electromagnetic interference (6)
Interference can make you lose control of the drone. Unfortunately, this could also cause the drone to perform erratic actions, and it may fly away or crash.
Ideally, you should be aware of any potential interference in the area you are flying in.
This is particularly true if you're flying in any city. Cities are full of tall buildings (sometime even skyscrapers) loaded with wifi, radio, TV and other antennas and signals.
And if you're outdoors, be cautious with power lines. High voltage power lines, and cell phone towers really can make your drone crazy flying. Or even worse, losing complete control of the aircraft.
Be extremely cautious when flying close to any object (7)
What objects? Well, bridges, towers, buildings...
Be cautious with them. If they're made of metal, the drone compass may go crazy from the magnetic interference of those metal constructions.
Or, even worse, your controller may no longer be effective. You may be directing your drone to go forward but it will fly to the right instead!
Be conservative when setting the "Return to home" height (8)
Remember the "Return to home" button?
It orders your drone to return to the last taking off spot. The same position from where you should be controlling it, right?
But, how safe is for your drone to fly back autonomously? Is there any risk of a mid-air collision? This might be particularly concerning if your drone doesn't have obstacle avoidance sensors on board.
If you can adjust the "Return to home" height, set it higher than the trees and buildings in the shooting area you plan to fly in.
If you own a DJI drone, take advantage of the obstacle avoidance feature. Your drone will fly around any object and will come back to you safely.
Keep all your flight logs (9)
In doing so you have every detail of the flight.
If the worst happens (your drone crashes or flies away), you can review the area where you flew your drone. You'll also know the direction and duration of the flight. Use these data along with Google Earth to try to locate the possible crash site.
Now that you know how to fly your drone, it's time to capture your shot!
5.How to shoot an incredibly powerful aerial image
You got an idea, planned it, maybe a few months ago, and finally you find yourself outdoors, in a gorgeous location that you can't help but capture through a powerful aerial photograph.
So you've done half of the work so far.
Because setting your drone camera right is the other half. If you fail to do so your final picture will be far from what you anticipate.
Let me show you step by step how to set up everything for the shoot, so everything is ready before you tap the shutter button!
Set RAW recording mode
Most drones offer three photo format options: JPEG, RAW, and JPEG+RAW.
Read the user guide of your drone and select the RAW option as the resulting file. For example, on a DJI drone you can do it going to Camera Settings > Camera icon > Image format.
It allows you to produce better pictures because a RAW file contains all the image data recorded by the camera sensor. So you can edit any RAW file without lowering the image's standard.
If you shoot in RAW, take into account that the histogram the camera shows you is produced using a JPEG file created from the original RAW.
Set the shooting (or photo) modes
Drones support various photo modes. These may change depending on the manufacturer so have a look at your drone's instruction manual.
- Single. Here, when you tap the shoot button you take a single image.
- Multiple. Also called Burst mode, it allows you to rapidly take several photos while keeping the shoot button pressed.
- Auto Exposure Bracketing (AEB). This mode takes multiple photos of the same composition at different exposures. You can set how many frames you want to take and the gap (number of stops) between the exposure value (EV) of each shot. It will help you shoot HDR images (more on this in section 7) that you'll later need to post-process and merge on your own.
- High Dynamic Range (HDR). Similar to the AEB mode, this mode takes several bracketed photos. But unlike the AEB mode, it automatically pulls the best parts of each frame and merge them to produce the final HDR image.
- Timed Shot. This mode allows you to take images at the set intervals automatically. It's an interesting option to produce time-lapse videos.
- Panorama. This mode helps you to capture panoramic shoots (section 6).
Go to the photo mode menu and select the one you want to work with.
Choosing the right exposure mode
A large majority of drones allow you to choose between two exposure modes: Auto and Manual (M) mode.
The difference between them is that in Auto mode the camera decides everything for you whereas in Manual mode (M) you can change almost all the settings.
Aperture
The diaphragm aperture (hole through which light travels through the lens) regulates the amount of light that goes through your lens to the camera's sensor.
Most drones have a fixed aperture camera, so you can't change this setting.
Shutter speed
The shutter is a sort of curtain that's in your camera. It allows you to let light pass through the sensor for a certain period of time. That period of time when the shutter is open is the shutter speed.
The slower the shutter speed the more light will be collected by the sensor.
ISO
Sensitivity (or ISO) is a setting that allows you to tell the sensor how much it has to amplify the signal it receives. The higher the ISO, the more the signal will be amplified and therefore the sensor will seem to have captured more light. The photo will be brighter.
High ISO allows you to shoot at fast shutter speeds or in low-light environments, but it also leads to increased noise.
If you're not sure about how to set the ISO, try using Auto ISO so that your camera will automatically select the ISO value.
Do you need some help with these concepts? I suggest you to read 'Understanding the exposure triangle'.
Fine tune the exposure with the exposure compensation (±EV)
The exposure compensation is a setting, measured in stops or in exposure values (EV), that brightens or darkens the picture depending on whether you do it positively or negatively.
If you use positive values you brighten the image (you overexpose it). Conversely, if you use negative values you darken it (you underexpose it).
If you use the camera in Manual mode (M), it doesn't make any sense to use the exposure compensation. Depending on the final image you're looking for, you can get the same result by increasing or decreasing a stop (or a fraction of a stop) the aperture, shutter speed or ISO.
Adjust the white balance
The white balance helps you adjust the colors in your images. You can leave in Auto or change it manually.
Different light sources have different color temperatures, measured in Kelvin (K).
By keeping the white balance in automatic, sooner or later you'll face a situation where your camera has failed to correctly capture the colors of your scene:
- If the colors in your photo are warm (there is a red, orange and/or yellow cast), cool down the colors by reducing the color temperature (select a lower Kelvin number).
- If the colors in your photo are cold (there is a purple, blue and/or green cast), warm up the colors by increasing the color temperature (select a higher Kelvin number).
Again, if you shoot in RAW, note that you can adjust the white balance without degrading the image quality later on in your favorite photo editor.
Focus
You have two focus settings:
- AF (Auto-Focus). The camera does the work for you. Tap on the screen and the camera will focus automatically. If don't tap on the screen your image may come up blurred.
- MF (Manual Focus). You do all the work! Tap on the screen to select the focal point. Then, move along the slider to focus. This slider would be the equivalent of a focus ring on a "regular" camera lens.
In addition to this, some drones have a function called focus peaking. The focus peaking tool locates all areas that are in focus and that match the peak contrast. These areas are highlighted on the live view display.
So the focus peaking is great tool to assist you to get accurate focus and the sharpest possible images.
Check the histogram and adjust the exposure
One last thing before you start taking photos like there's no tomorrow: check the camera's histogram.
The histogram allows you to check the exposure of the image on the LCD screen, and to adjust it at your will.
Just so you know, the left side of the histogram represents the maximum dark values that your camera can record and the right side the maximum white values.
- Underexposed. The histogram shows the peak touching the left side of the graph.
- Exposed to the left. The histogram shows the peak near the left side of the histogram window, slightly touching the left edge.
- Neutral exposure. The histogram shows peaks toward the center of the graph from left to right.
- Exposed to the right. The histogram shows the peak near the right side of the histogram window, slightly touching the right edge.
- Overexposed. The histogram shows the peak touching the right side of the graph.
Finally, I encourage you to read a bit more about the histogram.
6.How to plan and shoot stunning panoramic images
Have you ever been in an amazing lookout with an impressive landscape in front of you?
So huge that you had to span your head from left to right to see everything?
And, of course, even though you had your super wide angle lens with you, your camera wasn't able to capture it...
Well, fortunately here's when panoramic photography comes to rescue. I'm a big (big) fan of shooting panoramas. I love taking them in many locations because they give the viewer the impression that he's there, with me.
And this applies to aerial photography as well. Aerial panoramas are amazing because you can see so much of the scene. And the best part is that thanks to the drone and the gimbal, you can do it from any angle creating amazing images.
Keep reading and I'll show you how to do it...
Configuring your drone for panoramic images
First things first.
Before flying your drone and start shooting like crazy from left to right (or right to left, your call!), you have to set it up properly just like you would setup your tripod and a regular camera.
So here are the steps that you should follow.
Fly in GPS mode
One of the first things you should set up is enable your drone to fly in GPS mode.
Why?
Because, flying in GPS mode ensures that your drone can be completely still in the air. When you release the controllers, the drone will try to maintain the position as still as possible. Sometimes, when it's really windy, it can drift a little bit.
Shoot in Manual mode (M)
I keep repeating it over and over. I know, I know...
But I can't stress enough how important it is to shoot in Manual mode (M) depending on the image you want to capture.
And one of the epic fails when working on a panorama is to shoot in Auto mode. You start panning the drone camera, it faces the Sun for example, and boom... The exposure changes!
The drawback? That your images are now hard to stitch because one is fine, another one is brighter.
Ugh.
In the Manual shooting mode (M) on the contrary, you are in complete control of the drone camera. So you can set your aperture, shutter speed and ISO as you want.
Actually, you'd be adjusting your shutter speed and ISO most likely. Most drone cameras have a fixed aperture.
Adjust the white balance manually
Finally, there's one more thing that you need to adjust manually: the white balance.
Just like you did with the exposure settings, the color temperature of your scene can change from one frame to another. And that's going to be a problem when you stitch your images.
Drone cameras have the same presets that you can see on a DSLR or mirrorless camera (Auto, Sunny, Cloudy, Incandescent, and Fluorescent) and they can be useful depending on the scene. But you can also customize your own white balance selecting a specific color temperature.
Later on, I'll talk in more depth about how you can also capture HDR (high dynamic range) pictures. Once you master both techniques, you can actually combine the HDR and the panoramic shooting.
But for now, let's stick with single exposures.
Panorama shooting strategies
As I just explained, camera settings are very important when shooting panoramas with a drone.
And just like in "regular" photography, working on your composition before actually taking the frames is crucial. Plan your panorama by looking around and exploring your scene first (section 2).
What type of panorama are you planning to take?
- Partial panorama. You stitch multiple normal (horizontal or vertical) photos together side-by-side to create a photo with much wider angle than the one you would get with a normal lens.
- Cylindrical panorama. This 360-degree panorama captures the whole field of view in all directions around you, the photographer. It covers 360º around but not an up and down view. The only difference from a partial panorama is that you need to overlap the first and the last photos.
- Spherical panorama. It not only captures the 360-degree field of view but also an up and down view.
Some drones allow you to shoot panoramas automatically just by selecting the type of panorama you want: spherical, horizontal, vertical, 180 degrees...
But, if your drone doesn't have this option or you want to be in complete control, you have to shoot your panorama manually. During the shooting be particularly careful and overlap your shots. As you will read below, this procedure is key if you want to stitch correctly all the photos in post-processing.
Now that you've done all the planning, have a look at the following steps. They will help you to capture some breathtaking panoramas.
Are you ready?
Be very careful when overlapping
The rule of thumb is to overlap your frames by about 1/3. In other words, your second picture will mimic roughly 1/3 of the first picture. Your third picture will mimic roughly 1/3 of the second picture, and so on.
Since your drone (or the app you're using) shows degrees, each photo should be more or less between 25 to 30 degrees apart. But that depends on the Field of View of your drone.
Obviously, overlapping by 1/3 is not mandatory, you can define pretty much the overlap percentage that you want. But take into account that most softwares like Lightroom, Photoshop, or PTGui for instance will stitch you panorama much more easily and the result will be much more accurate with a high overlapping ratio. (More on stitching apps and software below.)
As for the number of frames you should take to create your panorama, there really is no magic number. It will depend on how wide and tall you want your final pano to be. You should take four to five shots – the number of shots depends on your focal length and the degrees between shots.
However, it's always better to have tons of shots and later crop your panorama than finding out that you left out part of the scene!
Finally, whenever you can (and light allows it) take at least two sets of shots in each location. There is nothing worse than returning home thinking you got a great pano, just to discover that one of the images is missing, over or underexposed, or even damaged.
That would be an epic fail...
Establish the right distance to the subject
Most beginners believe that the higher the drone flies, the better the picture will be.
Hmm...
Think about it. Is this really the best place to take a picture?
In my opinion, a great aerial picture includes a subject that appears on the frame larger than the size of a flea :P
And this is for two reasons.
The first one is that I want to convey a sense of proportion. And the second one is because I want you to actually see detail in the scene.
So you'll get a much more compelling panorama image flying relatively close to things.
Take into account how you can move the drone camera
In "regular" photography, to take a panoramic set of photos you need to rotate your camera. However, when you pan it, you have to make sure that the camera rotates around an "ideal" panning point that is located somewhere in the lens and not below the camera.
If you do so, there will be almost no distortion and your favorite software will stitch the panorama creating a non-distorted image.
This ideal rotation point is called no-parallax point.
Well, in aerial photography the challenge is the same.
Unfortunately, only some high-end and professional drones have the ability to pan the camera.
So if you can't pan the camera, you're going to have to rotate the whole drone. Obviously, you need to do so very carefully because the more you move the drone side to side the more distortion you'll end up with. Move it with the left stick, yawing to the left or right.
Decide the drone camera orientation
Some drones allow you to shoot in portrait or in landscape orientation. So, what orientation should you use when shooting a panorama?
Well, portrait orientation is my choice when shooting horizontal panoramas. This way I get a much larger and higher resulting image when stitching all the portrait images.
On the other hand, I recommend you to use the landscape orientation when shooting vertical panoramas. Capture as many rows as you need in order to get everything you want within the final image.
Decide the drone camera shooting angle
The best angle to start shooting the panorama is the one that gives you a leveled horizon, this way everything will be perfectly stitch. Tilt the camera up or down until the horizon is at the center of the image.
There's nothing worse than getting a crooked horizon. And while you could correct it in either Lightroom or Photoshop, it's always better to get right in camera.
If you want to capture a more complex panorama, you can do so with multiple rows. That is, tilting the camera up and down.
In order to do so, the most efficient way is to start with a simple panorama just like the one I was referring to a few paragraphs above.
Focus on the horizon, make sure it's leveled and start panning the drone (or the drone camera) from left to right. That way you'll make sure that every shot is lined up and it stitches correctly. Otherwise you'll end up with a weird looking curved image.
Once you've shot that single panorama, the main row, tilt the camera 15 to 30 degrees and shoot a new panorama from left to right. You can either tilt the camera down and capture a new row, or tilt it up and start again. Or, actually, both!
By doing this you capture a larger scene. You only have to decide how big you want it and how many shots or "tiles" you want your panorama to have.
Speaking of the size of the final stitched image, while you're panning, shoot a little wider than you need. Because of tilting the camera down or up the image is always going to be a little bit curved. So if you shoot wider than you need and you'll get an extra margin on the edges.
Obviously, for every row you capture, don't forget to overlap your shots at least by 1/3.
Decide if you'll be shooting a horizontal or a vertical panorama
So far I've talking about capturing horizontal panoramas, but you can also take vertical panoramas.
To capture a vertical panorama tilt the camera, facing down for example, and then taking pictures as the camera tilts up.
As usual, you just need to make sure to overlap 1/3 of the frames. Apply the same rule and overlap from left to right.
And if you want to shoot something different, you can always try this technique to capture an Inception-style photo ;)
Create a 360-degree panorama (bonus track)
You can go one step further and create 360-degree panoramas. And you can achieve that by either capturing horizontal or vertical photos. It doesn't matter, it really depends on how many pictures you want to take and the type of panorama you plan to create.
As I told you at the beginning of the section, you can create 2 types of 360-degree panoramas:
- Cylindrical panorama. This is a simple 360-degree panorama that a covers a 360-degree field of view around you, but not an up and down view.
- Spherical panorama. This is a more complex 360-degree panorama that captures the 360-degree field of view around you, but also an up and down view.
The shooting workflow for a cylindrical panorama is pretty straightforward as it's very similar to a simple panorama. You just need to make sure that all your shoots overlap, including the last one with the first one.
Once you have all the shots, stitch them together and process the resulting picture to get the final result.
As for the spherical panorama, the shooting workflow is very similar to shooting a panorama with multiple rows. You need to shoot several cylindrical panoramas until you complete the whole sphere.
Start with your camera parallel to the ground and shoot the first row, making sure the last photo overlaps with the first one. Then, tilt the camera up overlapping 1/3 of the image, and shoot another row. Repeat this process until you finish the upper area of the sphere.
Once you're done, repeat the same workflow tilting the camera down to complete to lower area of the sphere.
Again, get in front of your computer, stitch all the shots together and process the resulting picture to get the final result.
Now that you know how to set up your drone and how to shoot your panoramas, let me show you some useful apps and pieces of software.
The apps will help you with the shooting and the pieces of software will help you with the stitching.
Essential apps and pieces of software to capture awesome panoramic photos
Later on, in section 9, I'll give you a complete list of my favorite apps for drone photography.
However, creating a panorama implies an additional level of expertise and some additional tools.
That's why I've decided to talk about them here, apart from the rest.
I've split these tools into two: apps to help you shoot the frames that will create panoramas and pieces of software to allow you stitch the frames you shot.
Oh, one last thing. Some drones (e.g. certain DJI models) include a Panorama and a 360-degree panorama shooting (or photo) mode so it may be enough to shoot a nice pano.
Apps to shoot panoramic photos
Here is the list of my favorite panorama shooting apps.
DJI Go
Now DJI allows to shoot panoramas and spherical images only using the DJI Go app. For most of users that will be enough to capture stunning images.
Available on iOS and Android for DJI drones.
Litchi
Despite being an app that only works with DJI drones, Litchi is an extremely profitable investment if you intend to make the most out of your aircraft.
I'll tell you more about it in section 9. But right now, I'll focus only on its panorama features.
For photography, panoramas are very simple to set up and operate. Just set the number of images per row and the number of rows. Of course, you can also take 360-degree panos including two extra images either looking directly up (zenith) or looking directly down (nadir).
For videos, it ensures a downward gimbal angle and a smooth yaw (so you can solely focus on horizontal movements).
RCPano
With RCPano you can set the drone camera to three different shooting modes: Manual (M), Program (P) and Shutter Speed Priority mode (S or TV). In addition to this, you can set the white balance, shoot using the bracketing technique or AEB (section 7) and adjust the exposure compensation (EV values).
Another feature that I find very useful is that you can set the number of rows and columns you're ordering the drone camera to capture.
One of the main advantages of RCPano is that it takes care of the height, pitch, roll and yaw to keep you drone's position as accurate as possible. This helps you minimize drifting errors that would result in a complicated (or impossible) stitching.
Instead of rotating the drone with yaw commands (as you would do with the left stick on your remote control), RCPano uses pitch and roll to rotate the aircraft around the no-parallax point of the camera. Remember that shooting around the no-parallax point minimizes the distorsion.
Take into account that RCPano doesn't stitch the images. In order to do that you have to use an external piece of software (more on that below).
Unfortunately, the RCPano team has no plans of making an Android version and the app only works with certain DJI drones.
Available on iOS.
Dronepan
Dronepan is a free and very simple to use app.
Turn on your transmitter and drone as you normally would. Launch DronePan and use the FPV screen so the drone reaches the height you plan to shoot at. Then, click the "Play" button and the app will do its magic.
You camera drone will take 20 photos at the necessary yaw and pitch to create tiles that you can easily stitch together in order to get a 360-degree spherical panorama.
The main downside is that Dronepan only works with certain DJI drones.
Available on iOS.
Pieces of software to stitch panoramic photos
As I told you before, creating a panorama is a two-step process. First, you shoot the frames that you'll use to create the panoramic image. Later on, you need to stitch all these frames in your computer.
Photo stitching is basically combining several images that overlap (ideally by 1/3). And to do so, you need a specific piece of software.
Here's a list of some of the better options for panorama stitching software, starting with my favorite one.
PTGui
Short for Panorama Tools Graphic User Interface, PTGui is a leading editing software for stitching panoramic photos (including 360-degree panoramas).
The unique feature about PTGui is that it stitches most panoramas automatically, but also provides manual control over every single parameter. And for this you need to pay a price, of course.
So you can stitch multiple rows of images and both rotated and tilted images. Well, you can stitch pretty much anything!
If you're looking for a professional photo stitching software, PTGui should be your choice.
Lightroom
Chances are you already are a Lightroom user. After all, it's the most popular editing software.
Well, since 2015 all versions of Lightroom offer a tool called Panorama merge. It's basically a very accurate panorama stitching function.
The problem is that you don't get any control over the process. But in most cases the result is so incredibly good that you won't need anything else.
Photoshop
Photoshop is an incredibly powerful software, and one of its endless features is that you can stitch panoramas with a tool called Photomerge.
Obviously, it doesn't make sense to purchase a Photoshop subscription plan just for Photomerge. But if you already have Photoshop in your computer, you probably won't need anything else.
Photomerge works very similarly to the Panorama merge tool in Lightroom. Actually, if you're already a Lightroom user, and depending on the panorama you want to create, it can be easier to use the the Panorama merge tool.
However, if you don't usually use Lightroom, Photoshop's Photomerge provides very similar results while giving you more options. A very interesting one, for example, is the Content Aware Fill feature. While stitching the pictures, it fills in transparent areas and can provide very accurate results.
Hugin
Hugin is a free panorama stitching tool. However, take into account that it's not a polished program as it's still being developed and refined.
The underlying panorama stitching technology works fine, though Hugin is a program that may not be best suited for beginners. To get the most from the software, some prior understanding of panoramas will likely help.
Once you get to grips with the software and the process, you can create high-quality panoramas. The stitching works fantastically and the end quality of the merged photos is great.
PhotoStitcher
PhotoStitcher is one of the best panorama stitching programs for beginners, due to its affordable one-off purchase price and its user-friendly interface. It's available for both Windows and Mac users, and if you have minimal or no experience using panorama software, this is a great place to start.
Unfortunately, there are no advanced controls, so professionals may not find this software useful. You can, however, crop the final panorama.
7.Why HDR images can save your life and how to shoot them
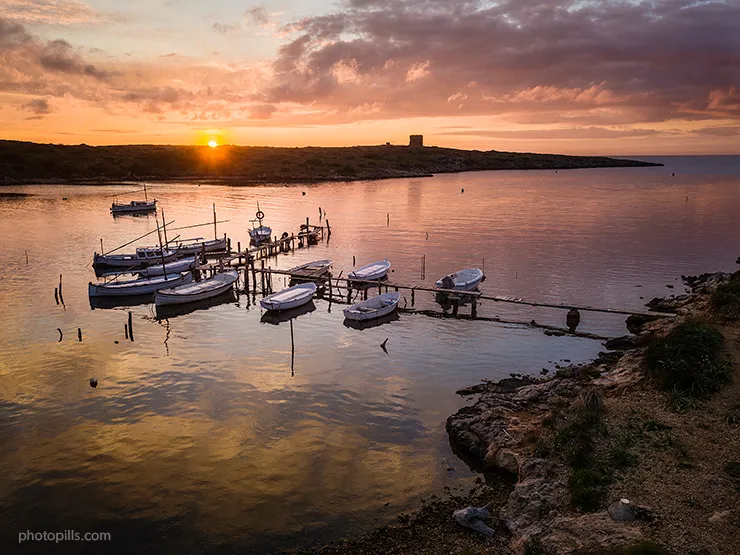
In aerial photography, just as in landscape photography, you'll often have to deal with some difficult contrast situations.
I'm sure that you've captured an amazing shot of a powerful Sunrise, only to find out that the ground looks too dark, or the sky looks too bright...
Sounds familiar?
Well, an HDR image, when captured properly using the bracketing technique, can help you balance this huge contrast, also called dynamic range.
That way, you'll preserve much more detail in both the shadows and highlights of the image.
What's the dynamic range?
The dynamic range shows the difference in light intensity between the darkest shadows and the brightest highlights of the scene.
When you're trying to photograph a scene, your eyes are incredibly proficient in perceiving all the details in these dark shadows and bright highlights. Actually, they are better than the sensor of any digital camera.
You'll often face a scene that your drone camera is not able to capture in a single exposure and with enough detail in both the darker and brighter areas. That's because the dynamic range of the scene you have in front of you surpasses that of the camera.
Fortunately, you can solve this issue using the bracketing technique and create an HDR image.
What's an HDR image?
Just as you would do with a regular camera, you can generate a high dynamic range (HDR) image using with your drone camera the bracketing technique that fits the dynamic range of the scene.
And what's this so called "bracketing technique"?
It consists of taking a series of photographs of different exposures so that, when blended with an editing program (Lightroom, Photoshop, etc.), you get a photograph with detail in both the shadows and the highlights.
That's why it can save you life, because it allows to capture a scene that the limited dynamic range of your drone camera wasn't able to.
Now, let's see how you can do it!
Configuring your drone for HDR images
As I said in section 3, nowadays DJI dominates the consumer drones market. So I'll assume that you have one to explain the configuration settings.
If you don't have a DJI drone, they'll surely be very similar.
To take an HDR, you'll be using the Auto Exposure Bracketing or AEB mode (section 7).
While the DJI Go app has a HDR setting too that you can also try, my impression is that you may get better results using the following configuration. Here, everything (the captures and the blending) are done in camera, resulting into an HDR JPEG file. So you have no control over the final result.
First, go into the "Camera settings" menu.
Set the aspect ratio to 4:3 to use the whole sensor.
When choosing the image format, make sure you shoot in RAW. You could get an HDR image using JPEG files. However, a JPEG file contains very little information compared to a RAW file.
As for the white balance, if you leave it in Auto mode you will get a good result most of the time. If not, you can always correct it in post-processing. But my advice is to set a custom white balance so all your images are consistent and blend perfectly. Your drone camera has the usual settings (Auto, Sunny, Cloudy, Incandescent, Fluorescent and Custom).
In "Photo" mode, click Menu > Photo > AEB (Auto Exposure Bracketing) and set it to take 5 shots. When you're using the bracketing technique, usually 3 shots are enough. Nevertheless, the DJI software doesn't let you choose the exposure stop between each shot (it defaults to a 0.66EV). So 5 shots will give you a better range to work with, that is -1.4EV, -0.7EV, 0EV, 0.7EV, and +1.4EV.
If you use Litchi (more details on this app in section 9), it has a ton of settings regarding the AEB mode which give you a lot more options: not only how many frames you can take in each bracketing, but also the EV difference between each one.
Additionally, when working on your composition and framing, you may like to turn on the grid (and the center crosshair, although this is something that I don't use often).
Now it's time to shoot!
Shooting strategies
Get your drone up in the air and compose your shot. Once you're in position, make sure you focus the camera drone by tapping on the screen. Click the shutter, and wait until it takes the 5 frames.
When you're using a drone camera, the bracketing technique works similarly as for a "regular" camera.
Try to keep your drone as stable as possible, just as you would do with a DSLR or mirrorless camera and a tripod. If you are experiencing strong wind currents, your shots could suffer from this motion and you could end up with frames that are hard (or even impossible) to blend.
In similar fashion, if you take photos of fast moving subjects you'll inevitably get some motion blur because there's a very short fraction of time between one shot and the next. It will be much easier to shoot fixed or slow moving subjects like landscapes or architecture and you'll get a much better HDR.
Finally, take into account your drone camera buffer. That is the time it takes to write the images to the memory card. In other words, while the buffer is full, you can't take a new shot or, as in the case of a bracketing, a series of shots.
However, you can move your drone once you've pressed the shutter, so you don't need to wait until the buffer is empty.
Once you're done with your shooting, go back home and sit in front of the computer to blend the pictures with an editing program.
One easy way to do it is with Lightroom. Just select the photos you want to blend and select Photos > Photo Merge > HDR.
You can also do it manually with Photoshop. Here's a video of Elia Locardi where he shows you how to do it:
8.Using filters with your drone: why and when?
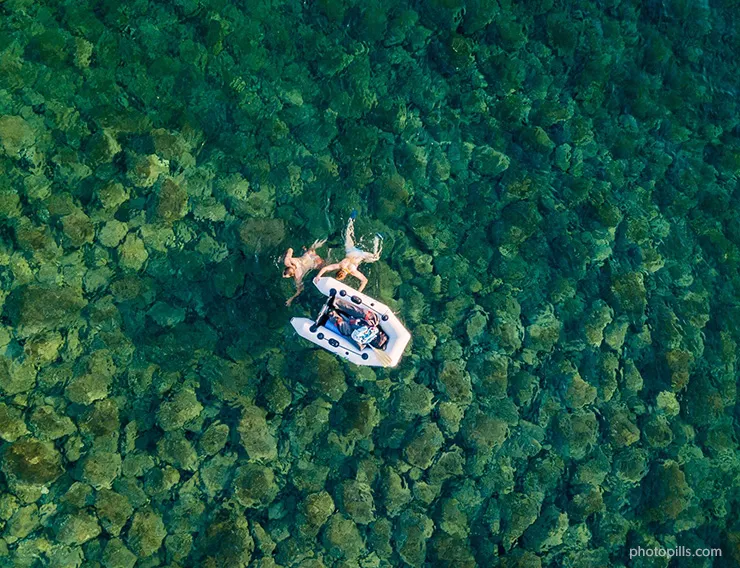
Depending on the light conditions, sometimes the shutter speed you need won't be enough to get a correct exposure.
Or you're not capturing the vibrant and saturated colors you'd like to get.
If you happen to face one of these scenarios, the solution is to use filters with your drone.
As a matter of fact, you can use filters with you drone, and with a regular camera (DSLR, mirrorless, etc.) as well. Actually, I wrote an article on how to use this type of filters.
And now, let's dive in!
What type of filters you can use with your drone?
Drone camera filters are semi-transparent glass accessories that can be attached to the outside of the camera. The main purpose of a filter is to control the light that enters the camera, thus the exposure of your picture.
If you have a "regular" DSLR or mirrorless camera, you know that you can use two types of filters: circular screw-on or square ones. Unfortunately, drone cameras allow screw-on filters only.
Circular screw-on filters have a major drawback. Since they should fit into the thread of your lens, they must have a specific diameter, so they are impossible to interchange between one lens and another. In other words, if you buy filters for a DJI Mavic 2 Pro and then you decide to upgrade your drone to a Phantom 4 Pro the filters won't fit.
You can use several types of filters with your drone camera:
- Neutral density filters (ND).
- Polarizing filters.
- Natural night filters.
- Hybrid filters.
Let me start by explaining in detail the ND filters.
Neutral Density filters (ND) and how you can use them
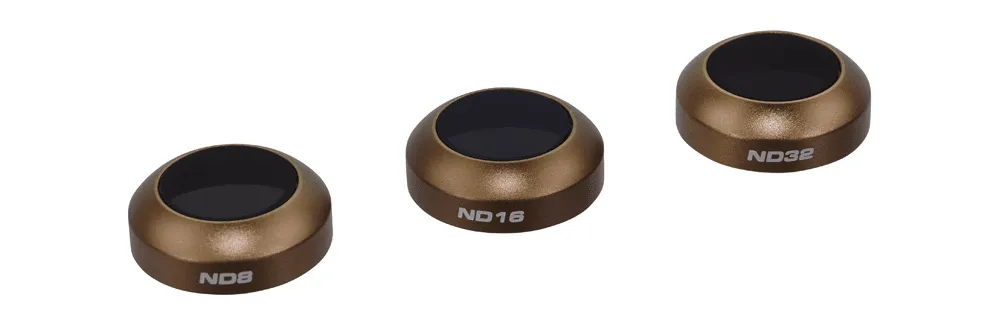
An ND filter allows you to reduce the light reaching the sensor evenly. This helps you capture certain effects without overexposing the scene:
- You can slow the shutter speed to create beautiful effects without overexposing the highlights. It allows you, for example, to capture the silk effect in the sea during a Sunset.
- You can use larger apertures (without overexposing the scene) to isolate your subject and create a strikingly artistic background blur. However, this is only an option if you can change the aperture on your drone, because most of them have a fixed aperture. Furthermore, it's quite difficult to blur the background if the drone camera has a small sensor.
The effect you get depends on the number of stops that the filter you use subtracts (1, 2, 3 stops...).
Another advantage of the neutral density filter is that it subtracts the light evenly. Therefore, it doesn't affect the contrast or the sharpness of your image. Nor does it produce any color cast (although, unfortunately, this isn't always the case depending on the filter manufacturer).
The adjective "neutral" refers to this lack of color cast.
In short, they are opaque sunglasses for your lens.
Types of ND filters according to their density
The filters' mission is to block some of the light entering through the diaphragm to the sensor. And to help you have a precise control over the light you want to "subtract", manufacturers offer a whole range of filters with different densities.
Here are some examples of the most common drone ND filters, depending on their density or reducing capacity.
| Stops | Light reduction | Density | Light transmission % |
|---|---|---|---|
| 2 | ND4 | 0.6 | 25% |
| 3 | ND8 | 0.9 | 12.5% |
| 4 | ND16 | 1.2 | 6.25% |
| 5 | ND32 | 1.5 | 3.125% |
| 6 | ND64 | 1.8 | 1.563% |
What ND filters you should buy
There are several brands that offer ND filters for drones: PolarPro, DJI, NiSi...
I recommend at least 3 NDs: 1 stop (ND2), 2 stops (ND4) and 3 stops (ND8). With these filters you can handle all the types of light and situations you'll encounter.
How you can use ND filters with your drone
When using an ND filter, ensure that your drone camera is set to Manual (M) shooting mode. That way you control all the settings and don't allow the drone camera to automatically correct the exposure level.
From here it's simply a case of playing around with the drone's camera settings (aperture, shutter speed and ISO) until you're happy with the image transmitted onto your device and ready to capture a great picture.
If you're not sure how to use an ND filter on a camera (whether it's a drone camera or a DSLR), make sure you learn how to use filters to successfully capture high contrast images.
Polarizing filters and how you can use them

A polarizing filter is a circular piece of glass or resin surrounded by a metal structure. On the one hand, the metal structure has a thread so you can screw the filter to your drone camera lens. On the other hand, when you turn the filter itself, it increases or reduces the filter's polarizing effect.
Most photographers believe that a polarizing filter is an accessory mainly for landscape photography. However, the benefits of this filter can be useful in all types of photography and videography, not only landscape.
So I encourage you to use a polarizing filter with your drone.
What they are used for
As a rule of thumb, a polarizing filter is designed to filter reflected light. The use of a polarizing filter simplifies your life!
It allows you to:
- Minimize any kind of reflective glare. Any specular highlights, especially those from the water (e.g. a waterfall or the sea), can have a negative impact on your image. It blows out the highlights of your image. In other words, you get an overexposed image, where histogram is touching the right edge of the graph. With polarizing filters, you can minimize reflective glare while still capturing reflections in the water from the surrounding scenery. A polarizing filter diminishes reflective glares from buildings and other objects in urban areas.
- Capture saturated colors. With a polarizing filter you can definitely get an image with a beautiful and dark blue sky and also incredibly vibrant colors.
- Reduce haziness. Even if you are shooting with clear weather conditions, your scene (or part of it) can look hazy. A polarizing filter reduces haziness.
A final consideration. A polarizing filter creates an effect that you can't replicate in post-production. No matter how much skilled you are using Photoshop, you won't be able to minimize reflective glares like a polarizing filter does.
What polarizing filters you should buy
Again, PolarPro or NiSi offer polarizer filters for drones.
I recommend you to get an hybrid filter, polarizer + ND filter at once.
In my case, own a PolarPro polarizer that's also an ND4. This filter allows me to shoot at lower shutter speeds while removing glares and saturate colors.
How you can use a polarizing filter with your drone
As you rotate the polarizer, it increases or reduces the filter's polarizing effect. The catch is you have to rotate the filter to the correct angle to achieve the desired effect. Too much of it and it looks wrong!
So pay attention at how the image looks through the lens (i.e. on your device' screen) and then rotate the polarizer until you see the effect and amount you're looking for. Then, fly the drone and take a few test shots to make sure you got the effect you want.
Obviously, the polarizing effect varies with depending on the camera's angle to the Sun.
Natural Night filters and how you can use them
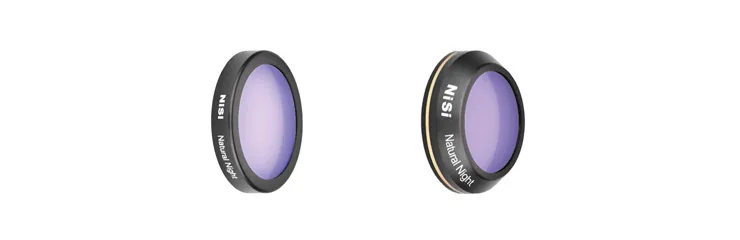
The Natural Night filter is a very specific filter created by NiSi. Its aim is to eliminate light pollution problems that you can encounter while shooting at night, whether it's a natural or an urban landscape. What this filter does is that it blocks light wavelengths from common sources of light pollution.
So yes, it's very useful if you happen to be an astrophotographer. But it's also a great tool for any kind of night scene.
Before I continue, a quick note on flying a drone at night. Please, make sure that you comply with the local regulations. Depending on the country in which you intend to fly the drone you may need a commercial licence or have a particular certificate (section 11).
To use it, the only thing you need to do is to screw the filter on your drone camera lens, fly the drone and start shooting!
Note: I haven't use this specific filter for drones. But I've used the Pure Night by LonelySpeck night filter to shoot astrophotography with my DSLR camera.
Hybrid filters and how you can use them
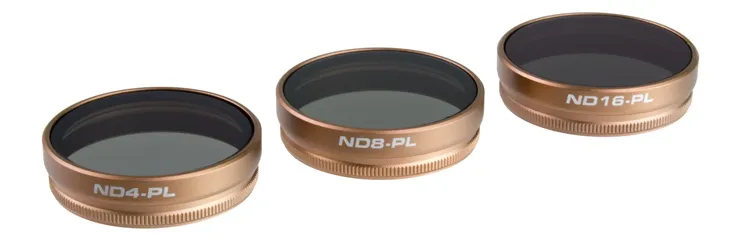
A hybrid or ND/PL filter is combination of an ND filter of a given strength with a polarizer.
To use one of them, all you have to do is screw it to the drone camera and make sure that the filter is rotated to get the polarizing effect you're looking for.
Have a look at the hybrid filters from PolarPro.
These filters are perfect to avoid stacking regular ones. And why is that?
Keep reading and you'll find out! :P
Don't stack filters!
Stacking filters, that is screwing several filters, to your drone camera lens is usually not a good a idea.
As I explained you in section 3, a drone camera is typically mounted on a gimbal. The gimbal is designed to keep your camera at the same angle regardless of the movement of the drone by automatically compensating it using calibrated and often remotely controlled electric motors. So in order to work properly, your drone gimbal needs to be precisely balanced.
If you stack several filters, you're breaking the gimbal's balance. Even if the gimbal seems to operate normally, this incorrect balance can damage the remotely controlled electric motors. You could ruin your drone gimbal forever.
Therefore, I recommend you to only use one filter at a time on your drone camera. Alternatively, you can use hybrid filters.
Finally, stacking filters results into another problem. Most drone cameras use wide-angle lenses. So if you stack a couple of filters you can end up with vignetting (a darkening towards the corners of the frame) on all your images.
9.What are the best apps for drone photography?
Are you looking for useful apps in order to become a better and more skilled drone pilot and aerial photographer?
A quick search proves that the list of apps related to drones is endless. Thus, with so many options you're probably having a hard time deciding what's worth downloading (and paying for it).
Don't panic! I did all the research for you.
Below is a list of the best smartphone apps for drone photography.
PhotoPills (1)
What can I say? It's my lifesaver, my crystal ball... And my lightsaber!
PhotoPills is an app for everything in photography, or as some might like to define it, a true "swiss knife for photographers". It has an endless amount of tools as you probably know.
And now, as you've seen in section 2, it also includes a cool Drone view. This feature helps you plan from home your drone shots in a quick and intuitive way (regardless of where your location is!).
With PhotoPills you don't waste time scouting and making calculations and you spend as much time as possible shooting :P
PhotoPills is available on iOS and Android.
DroneMate (2)
Knowing local regulations is essential. Not only when flying home, but also when trying to do so abroad. It can also save you from potential hassles at customs as many countries (even major tourist destinations) won't let you bring a drone into the country.
DroneMate is a regularly updated map of the recreational drone laws for every country in the world. Countries are coded by color into four categories:
- Green: Drone use is generally allowed.
- Yellow: Drone use is limited or may require a registration process.
- Red: The importing or use is prohibited or otherwise heavily restricted.
- Grey: No data or there are no defined or applicable UAV laws.
The map is available offline so you don't need any connection to use DroneMate when you're traveling.
DroneMate is available on iOS and Android.
UAV Forecast (3)
One of the basics of planning a drone flight and a shooting session is checking the weather forecast for that particular location. You definitely want to make sure that the sky is in the best possible conditions.
One of my favorite free apps to do so is UAV Forecast.
The app displays a clear breakdown of all the information you need regarding you location: wind speeds, rain probability, cloud cover, visibility and local temperature. A nice touch is that you can check hourly forecasts so you have a more precise information.
UAV Forecast is available on iOS and Android.
Windy (4)
In addition to UAV Forecast, I always use Windy to double-check the shooting location weather conditions. I absolutely love the plethora of data it provides in a visually beautiful way.
For a specific location, you can check the current conditions: wind (direction and speed), rain, snow, temperatures, clouds (at different heights) and waves (direction, strength and water temperature).
In addition to this, you can also have a ton of super detailed information on the bar located on the bottom of the screen. It provides a 7-day forecast of all these elements with different displays (basic, meteogram and airgram) plus webcam links and Airfield Satellite photos for free. It's stunning.
And there's more. Windy gives you the ability to create custom maps with your color preferences. You can also watch the forecast evolution as time progresses through a range of days.
You can download the Windy app on both your smartphone and your tablet. But you can also use it through the website on your laptop and desktop computer.
Windy is available on iOS and Android.
Google Earth (5)
Google Earth is an extremely powerful tool to explore possible photography locations in any given area.
You can basically place yourself into any landscape on Earth and see what the topography looks like in that specific spot. Isn't that cool?
Google Earth allows you to search a specific area from a bird's eye view, just like you would see it through your drone. In ground view you'll be able to cruise along the landscape, seeing perspectives that are as close as it gets to a live camera. You can also switch between 2D view and orbiting 3D view.
As you're exploring the location try changing your angle of view, moving positions, and zooming in and out. This helps you determine potential shooting spots, different compositions in a same shooting spot, and of course finding your way to get there!
I always use Google Earth when I am planning an aerial photography session with my drone. This tool is particularly helpful because it allows me to have a 3D representation of the area or location well in advance of accessing it in real life.
You can download Google Earth on your smartphone but also on your tablet, your laptop and desktop computer.
Google Earth is available on iOS and Android.
Hover (6)
Hover is a very simple but powerful app. Thanks to the GPS on your smartphone, the app projects your location onto an up-to-date map. You can then search around the area to find out where it's legal to fly and where it isn't.
Standard No-Fly zones, such as airports, and temporary flight restrictions, such as those over sporting events, are highlighted on the map. From my experience, the Hover map provides more helpful, accurate and extensive data than the information provided by the map tools built into native apps from the main drone manufacturers. And that's because it uses information provided by Airmap (see below).
In addition to this, Hover displays all the information you need to make informed decisions on where to fly, including the latest weather and wind forecasts on your current location. This key information is displayed together on a summary page and establishes if your drone is "Ready to fly".
Finally, Hover goes a step further and allows you to have a digital flight log. In other words, you can store information related to your flights. You can input locations where you're flying, the duration of a flight, battery usage, etc. Then, Hover generates a report that you can email to yourself and keep as a database.
Hover is available on iOS and Android.
Airmap (7)
Airmap gives you the most extensive information about where you can and cannot fly. In other words, has your location any flight restrictions?
These restrictions include controlled airspace, airports, heliports, and caution areas (such as Temporary Flight Restrictions, prohibited and restricted airspace, wildfires, national parks, and marine protected areas).
Airmap is available on iOS and Android.
Flightradar24 (8)
Flightradar24 is a superb global flight tracking app that provides you with real-time information about thousands of aircraft around the world.
Not that you intend to crash your drone against an airplane... But, just in case, make sure that there are no potential hazards while you're flying your drone.
Flightradar24 is available on iOS and Android.
Litchi (9)
The DJI Go app offers a range of intelligent flight modes. If you're not a DJI user and don't have it, Litchi can be a good replacement.
In fact, it goes even further: you can program your drone flight path in Google Earth before you even leave home. Once on site, let your drone do all the work!
Litchi various flight modes include Panorama, Orbit me, Follow me, Ground station and Waypoints, VR Mode (Virtual Reality) and Focus. This app features one of the most powerful waypoint mission engines and it seamlessly syncs across all your devices.
As I said, it's a sound investment if you're not a DJI owner.
Litchi is available on iOS and Android.
I'm always researching and trying apps that can help me improve my drone photography skills. So if you believe that I missed a great app the PhotoPillers tribe could really benefit from that's not included above, please leave a comment below and tell us about it!
10.How to film breathtaking aerial shots
It's easy to buy a drone. It's obviously harder to shoot stunning videos with it.
It takes a lot of practice (and a few crashes?) to learn how to capture visually compelling drone footage.
However, here are the shortcuts and the tips you need to get best possible videos with your drone.
Use the same workflow as in drone photography
I started this article with the PhotoPillers' war cry:
"Imagine. Plan. Shoot!"
This philosophy is also applicable to drone videography.
So everything I've explained so far applies (including safety & regulations). And you should use the same workflow we've gone through together:
Find a great drone location and work on your composition (section 1).
Plan your drone shots and takes in advance (section 2).
Shoot your aerial photography (well, video here!).
The only difference from aerial photography is the artistic execution. In other words, that you need to fly your drone in a different manner and move it around while filming.
That takes me to your next step: how to choose the shot types you'll be using in your movie.
Keep reading!
Take advantage of numerous drone shot types
Although drones are capable of capturing awe-inspiring videos, they aren't necessarily easy to film.
By mastering the essentials of aerial cinematography, you'll be able to capture some amazing drone videos.
How can you achieve that?
Taking advantage of some (or all!) the drone video shots I'm about to explain below.
I won't lie to you. You'll be able to easily film most of these shots the first time you try.
But mastering them is another story...
So there's only one thing to do: practice, practice, and practice a little more. That's how you'll make sure each move is smooth and perfectly controlled.
Let me go through each drone shot type, from the easiest one to the hardest one.
The super high pan
Fly your drone as high as you feel comfortable (and you're allowed to by local regulations) and start slowly rotating your dron, panning your camera around.
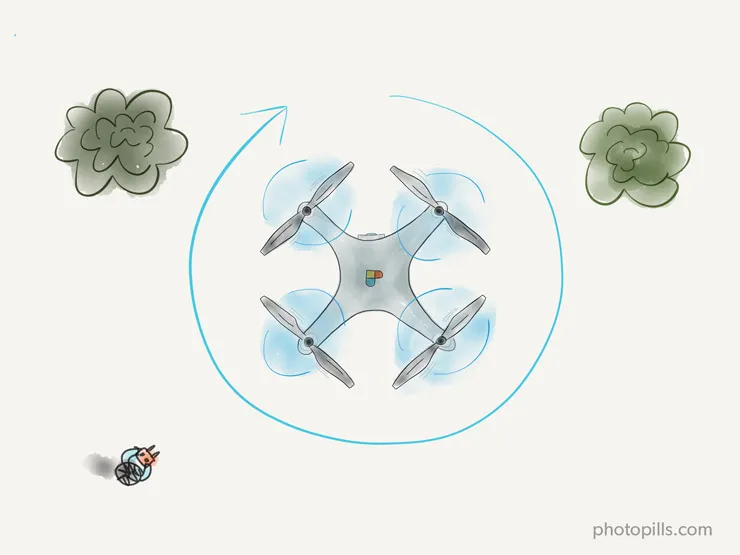
If you want to have several options to include in post-processing, I suggest you to pan from both left to right and right to left, and also pan a full 360º.
This shot is perfect as a beginning shot because it will give the viewer a first aerial view. Actually, it's a great way of showing off the surroundings in which the rest of the video takes places.
The best part of this shot is its simplicity. And I love it because it's panoramic and majestic.
The gentle rise
Place your drone on the ground, face your drone camera downward, and start slowly flying the drone directly upward without moving the camera.
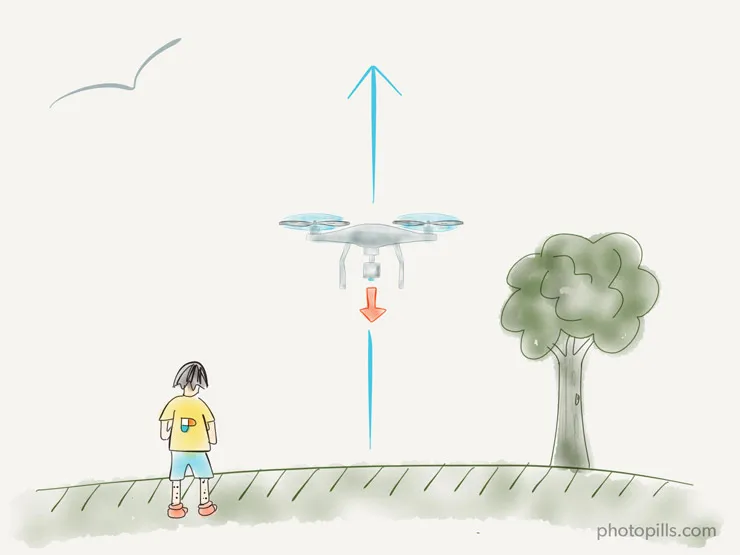
Similarly to the super high pan, this type of shot can become a very interesting establishing shot. Start with an abstract view while your drone is close to the ground. Then, as your drone gets higher, the aerial views will unveil the rest of the surroundings.
The neverending crane (or pedestal)
Place your drone on the ground, face the camera forwards, and begin flying upwards... Until you want or you're allowed to by local regulations.
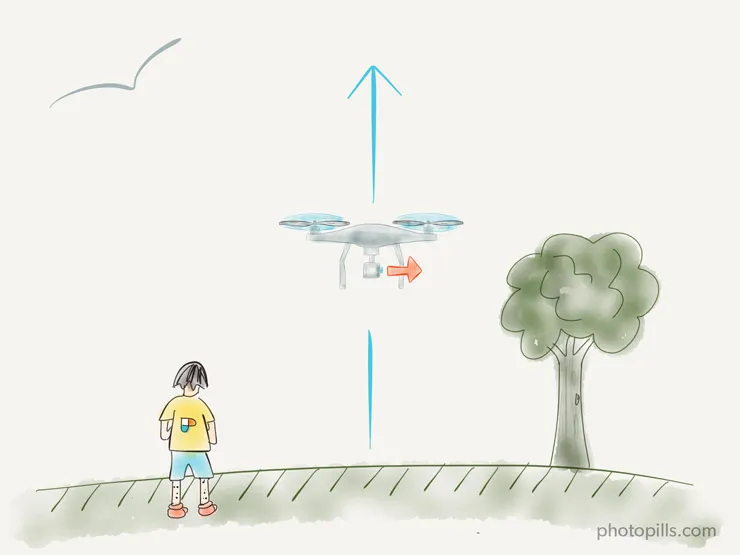
Start recording at the bottom of your subject and then have your drone fly straight up, easing to a gentle stop when arriving at the top. Once there, you can transition to another move.
The unveiling (or revealing)
Start recording while flying low so you only show the foreground. Then, go higher little by little until you show the whole background or your main subject.
You can also use the terrain or another obstacle to hide your main subject, and reveal it while your drone flies higher in the sky.

This is a simple shot to execute. If you use it smartly it can create a very powerful effect since you're first creating an expectation and then, you're providing an answer.
The overtake (or fly-by)
Fly past close to your subject (from the top or the side) to reveal a landscape or any other kind of background.
As drones have usually a wide angle lens, the effect is really cool because it seems like the drone is going to crash against the subject.
But remember, safety first. Avoid flying extremely close to the subject or you will have a great chance of crashing your drone :)
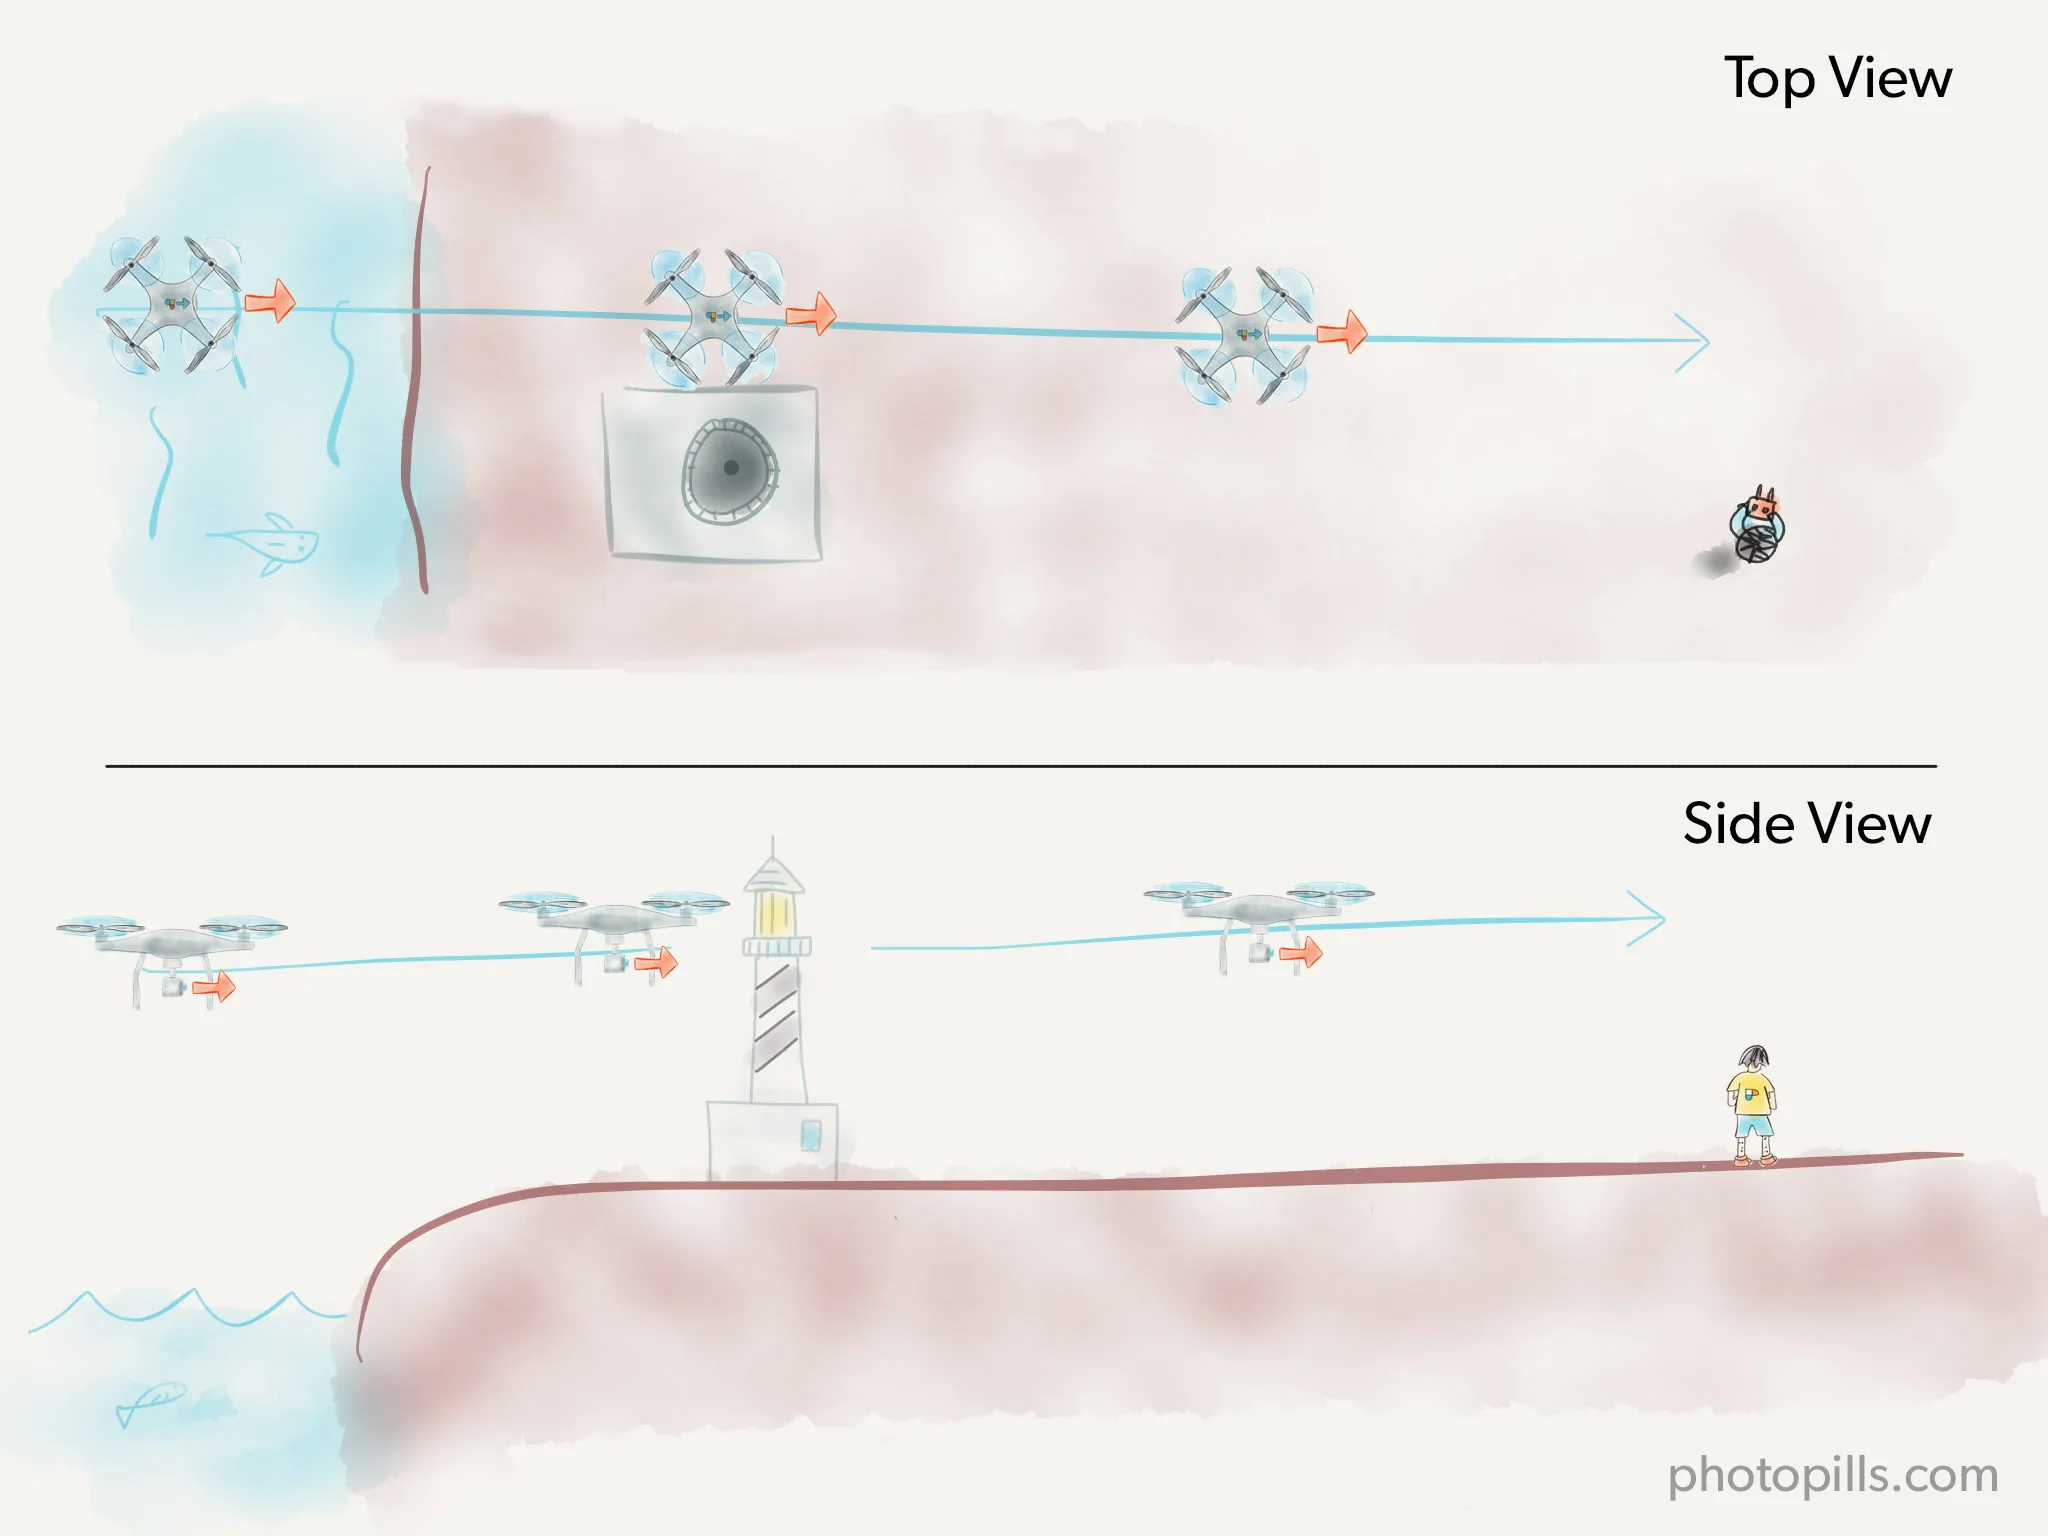
The advantage of this shot is that it doesn't matter if your subject is in motion or stationary. Nevertheless, integrate a pan or tilt for best composition as the drone is flying by. Oh, and keep your subject nicely framed in the shot.
Obviously, the overtake only works when you have a foreground element to fly past, and when you have a beautiful background to reveal.
In terms of storytelling, this is a variation of the revealing shot. It creates a separation between the main subject and the background while showing depth.
The tilt revealing
Point your camera down, and then slowly move your camera's gimbal up while moving forwards (easier) or backwards (be careful!) to reveal your subject or the rest of landscape.
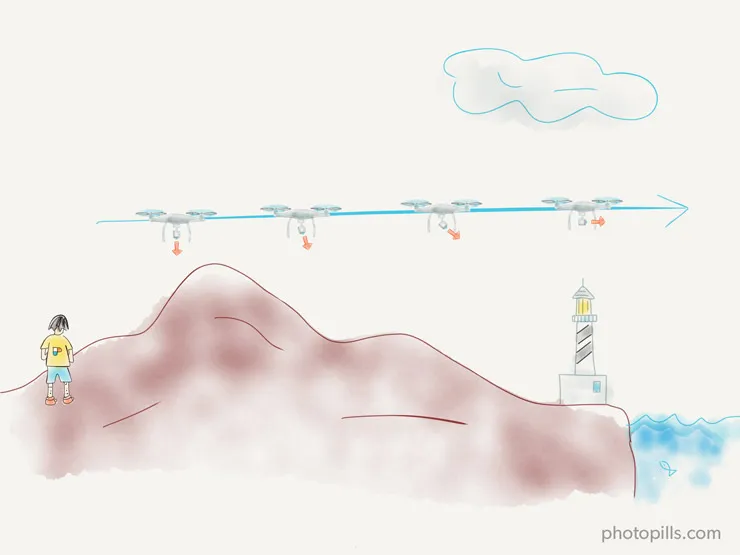
The success of this shot depends on how you frame your shot and what you plan to reveal. Before flying the drone do your homework and think about that first.
The super-dolly
Fly your drone as close to the subject as possible, then, start flying backwards, always focusing on the subject. As the drone flies away from the subject, do it so increasing the height to reveal the surroundings in spectacular fashion.
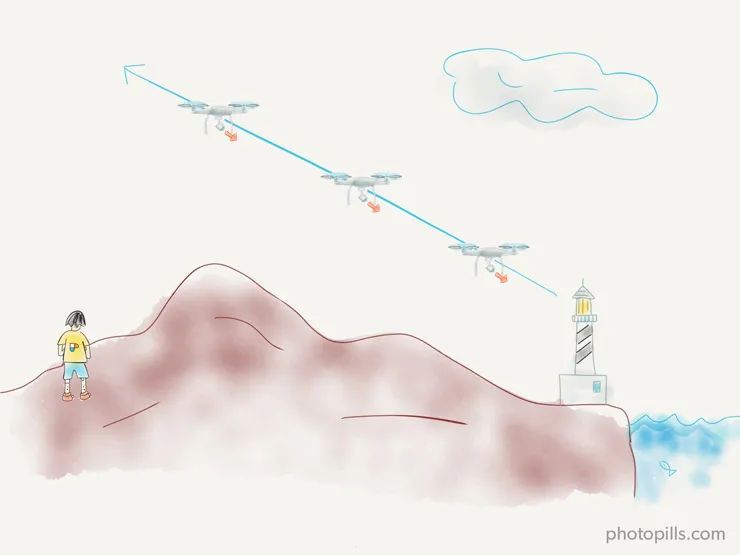
The follow
Follow the subject with your drone while your subject is moving.
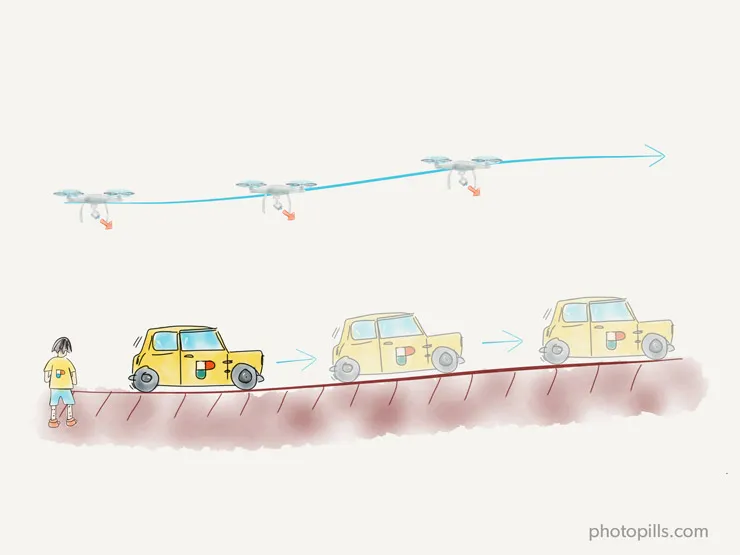
This shot requires a lot of coordination. Start with slow and short follow shots to build your confidence. Then, go faster and record while you fly a longer distance.
Moreover, the timing involved might be difficult to determine. So plan the shot carefully.
Many drones, such as DJI ones, now offer an autonomous mode where you can select the subject to follow. So here, filming a follow shot is easier.
The side follow
Fly the drone parallel to your main subject while tracking the subject.

The idea here is to track your subject the whole time. So it requires some practice. My advice here is that you should start by learning to keep your subject in the same spot on the screen (frame) for as long as you can.
For obvious reasons, this will get harder as you move further away from your subject or when the subject changes directions.
The side follow shot looks like a never ending slider. The footage changes if you keep your drone low to the ground or high in the air. So do some tests to have different options in post-processing.
The orbit
Slide left or right from your subject while rotating the drone so it always faces the point of interest.
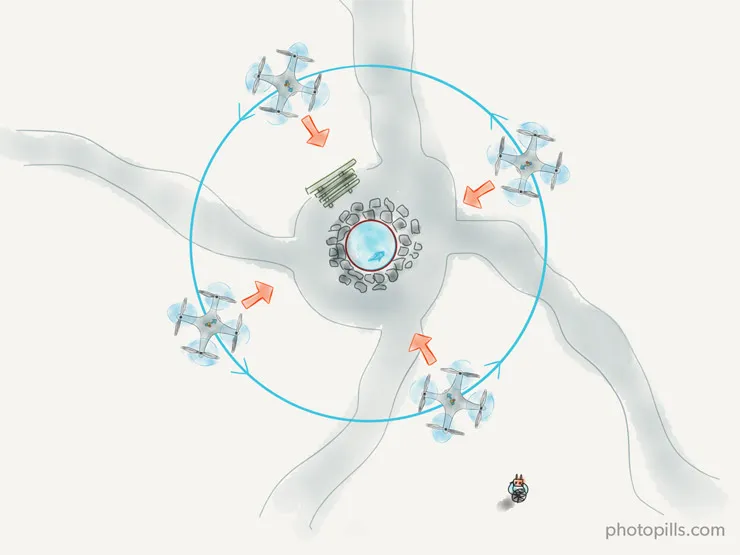
However, you're not obliged to do a full 360-degree circle around your subject. Think if it might become boring for the audience or not.
Basically it's the same exercise you should have practised in section 4. So if you practiced enough as I recommended, you should be able to do it manually after a while.
If not, some drones have an automatic smart flying mode that helps you out. If you have a DJI drone like a Spark, a Mavic or Phantom use the intelligent flight mode called "Point of Interest" and play around with it. You'll get a perfect orbit in a few minutes.
The fly-through
Fly your drone through a tight space (e.g. a door, a window, below a bridge) while recording the move.
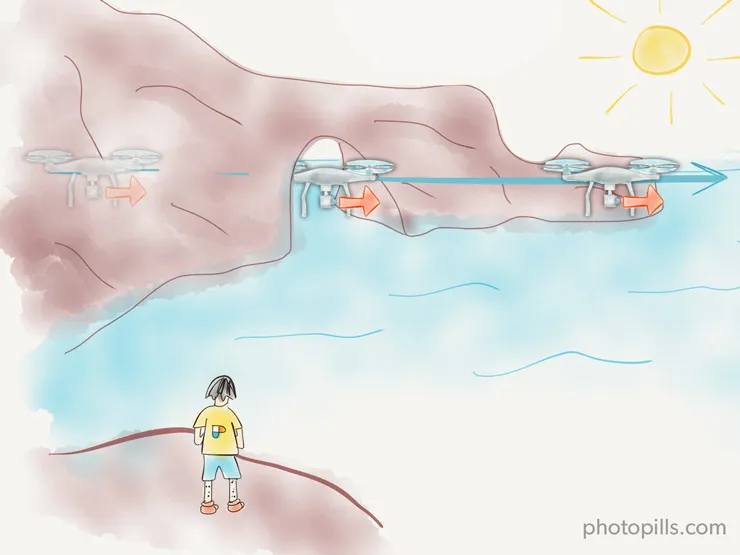
However, fly-through shots come with a level of risk. So be extremely careful even if your drone has an obstacle avoidance system.
The bird's eye
Fly your drone up, then, tilt down the camera and fly in any direction without moving the camera.
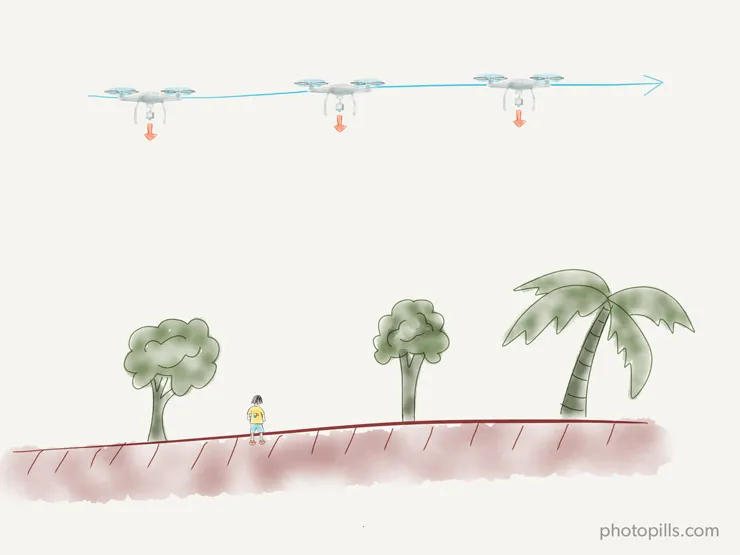
You can also just stay in place and let the action unfold down below, or just slowly move forward, or backward, or side to side.
The bird's eye is another type of shot that works perfectly for establishing shots. While it has a purposefully limited vantage point, this footage shows a perspective rarely seen by the viewer.
So take advantage of it and don't fly too high. That way you'll keep the vantage point limited to what's in the frame directly beneath the drone.
How to shoot an appealing and cinematic drone video
Drones can be used to shoot stunning videos. But how do you shoot aerial video with professional aesthetics on a hobbyist drone?
Let's find it out!
Set the video resolution
Do you just want to get your drone up in the sky and start shooting fantastic footage?
I know! I've been there too...
But first, you should understand video (drone) resolution. This is a generic piece of information that will also help you:
- 720p is a resolution where 1,280 pixels are displayed across the screen horizontally and 720 pixels down the screen vertically (or 1280 x 720). This yields 720 horizontal lines on the screen, which are, in turn, displayed progressively (each line is displayed following another).
- 1080p is a resolution where 1,920 pixels are displayed across the screen horizontally and 1,080 pixels down the screen vertically (or 1920 x 1080). This yields 1,080 horizontal lines on the screen, which are, in turn, displayed progressively (each line is displayed following another).
- 4K refers to one of two high definition resolutions: 3840 x 2160 pixels (used in commercial digital cinema) or 4096 x 2160 pixels (well established in 4K TVs).
Always shoot in Manual mode (M)
To get good quality results, forget about automatic stuff and manually control all camera settings!
Have faith in your histogram
The histogram is your best friend. Use it to set the exposure as it will help you know if all the information of the scene is within the dynamic range of the drone camera.
Use the lowest possible ISO
I recommend you use the base ISO value (the lowest value your drone camera has) whenever possible to avoid noise. Unfortunately, noise in video is hard to correct in post-processing.
Decide your shutter speed
As I suggested in 'Exposure in Photography: The Definitive Guide', set the shutter speed according to the 180 degree rule. This is a basic rule in the world of video that comes from the time when 35mm film cameras were used.
For a detailed explanation, click on the link above.
Back to your shutter speed, let's see why the 180 degree rule is linked it.
Basically, because it helps your recording to have natural motion and it looks the way you see it in the movies.
So, the shutter speed is determined by the frames per second (fps) you're recording. Therefore, select a shutter speed equal to one divided by the double of fps you use:
shutter speed = 1/(2 × frames per second)
For example, if you record at 24 fps (frames per second) your shutter speed should be 1/50s. Instead, if you record at 50 fps, use a shutter speed of 1/100s.
Here you have the most frequent shutter speeds:
- at 24 fps use 1/48
- at 25 fps use 1/50
- at 30 fps use 1/60
- at 50 fps use 1/100
- at 60 fps use 1/120
Shooting at half the frame rate gives each frame a bit of motion blur, resulting in cinematic motion. This is how to get your video to have a "natural look".
Consider using ND filters
Most drones have a camera with a fixed aperture (usually at f/2.8).
Remember that I recommended you to put all the settings in manual so you could fine tune the exposure? There's one problem though: you can't control the aperture on your drone.
I also told you that slower shutter speeds create a more cinematographic movie. But if you can't control the aperture and you plan to use the lowest possible ISO how can you use very slow shutter speeds?
Here is when the use of neutral density (ND) filters comes in handy. I already explained you quite a few things about ND filters in section 8.
But here's a quick summary.
ND filters block light in allowing you to use longer exposure times (slower shutter speeds).
Imagine that your drone camera is shooting at f/2.8 and ISO 100 and you want to set a shutter speed of 1/60s. Because of the reciprocity law, you may need an ND16 filter that cuts out 4 stops in order to use 1/60s and keep a correctly exposed image.
Again, if 1 stop = 2x the light then 4 stops = 24 or 16x the light.
Use a flat image color profile
Color and white balance will set the mood of your video and how cinematic it is.
By filming in the flattest image color profile possible (e.g. called "D-Log" in DJI drones), you should get the most dynamic range, keeping more detail in the highlights and shadows. This profile will make your video file flat in terms of color and contrast.
"Toni, why on earth would I want that?"
Because shooting in this profile makes the editing process more flexible.
If you don't intend to spend some time editing your video, pick the image color profile that suits you best, according to the mood you want to convey.
Be extremely cautious with the white balance
When taking pictures and shooting in RAW, there's no need to worry too much about the white balance. It's a setting that we can work with while shooting or that you can easily modify in post-processing.
Unfortunately, in video this is completely different.
As with the exposure, it's essential that you adjust the white balance as accurately as possible before you start recording. This way you'll avoid complicated corrections in post-processing and losing image quality.
And now it's time to dive into the boring stuff...
I know, I know.
It's not exactly what you're looking forward to, but it's necessary if you want to become a cautious and proficient pilot and aerial photographer!
11.Legal issues and other essential considerations before flying your drone
Over the last five years drones, sometimes referred to as Unmanned Aerial Vehicles (UAVs) and Unmanned Aerial Systems (UAS), have gone from a niche geek gadget to a mass consumption Christmas gift.
So back in the day, when early adopters such as Elia Locardi started to amaze the world with their incredible images, the sky was theirs!
There were almost not regulations so they could pretty much fly and photograph from whenever they imagined (and planned!).
Alas, things have changed dramatically. Nowadays, there are a lot of rules and regulations you need to be aware of before you fire up your drone. And that's if we're speaking locally.
But what about traveling? Yep, taking a drone abroad involves some planning.
First, you need to know if local regulations allow you both to fly the drone and take pictures with it. Then, you have to choose the right equipment. Finally, you must get it through airport security...
And that's before you've even landed in your destination!
But I shouldn't get ahead of myself.
Be careful with the regulatory limitations!
By far, the biggest challenge is complying with local regulations, mainly because they might be different from your country's (or state).
You can spend hours reading complicated legislation documents on government websites and national aviation bodies and don't have a clue if you can (or not) or how to fly your drone according to local laws.
In this section I've compiled in one place everything you need to know.
What are the current drone regulations of [insert country name here]?
Since commercial drones are still a relatively young industry, the regulations across the world are a rapidly changing patchwork of national laws and local ordinances.
If you're not sure about your own country's regulations or you plan to fly your drone and take pictures with it somewhere in the world, you can find complete and updated information on droneregulations.info.
If you live in the European Union or plan to travel here, dronerules.eu is the official EU website that provides all the information concerning the regulation for Light Remotely Piloted Aircraft Systems (RPAS).
In addition to this, you can also have a look at this Google map. According to the author, he "got in touch with the appropriate governing bodies in every country in the world to put together this map of official laws for recreational droning worldwide".
He has also developed an app called DroneMate (section 9).
However, you should take into account that the content of these websites is offered only as public general information. I can't guarantee that the information is accurate, complete or up-to-date.
Remember, regulations are evolving rapidly in almost all countries. In case of doubt, always check with the local authorities to make sure you comply with the current regulations!
Some generic regulations
Although I've already warned about the need to check local regulations, here are some generic regulations that apply in most countries.
They can be useful for a first quick check.
- Don't fly your drone higher than 120 meters (400 feet).
- Your drone must be in eyesight at all times.
- Don't fly within 8 kilometers (5 miles) to airports.
- Don't fly over stadiums, national parks and any sensitive infrastructure or property such as government facilities, water treatment facilities, power stations, correctional facilities, heavily traveled roads or freeways, etc.
- Respect the privacy of other people.
- Don't fly above or closer than 100 meters (330 feet) to gatherings of people.
- Respect controlled airspace and no-fly zones.
- Always check to make sure that you're outside of a no-fly zone (use the Hover app, see section 9 for more details).
- You can't fly at night without license.
Security: respect no-fly zones
What is a no-fly zone?
As its name states, it's an area where flying a drone is completely forbidden. These areas are usually established by the aviation authorities, the army and the local authorities.
If you ignore these zones, you insurance is likely to be void and you can get into a lot of trouble.
Always check to make sure that you're outside of a no-fly zone. Do so before each flight because temporary no-fly zones can be established at any time.
Before each flight, I look at the no-fly zones on Air Map if I'm at home or on Hover if I'm at the shooting location (more about them in section 9).
But you can also download the B4UFLY app (developed by the US FAA).
Do you need a pilot license?
Actually, depending on the country, it may also be called remote pilot certificate.
But for education purposes I'll use the expression "pilot license" so you can understand what I'm referring to.
Back to your question...
First, you should ask yourself the purpose of your flights and pictures.
- Do you intend to fly a drone and take pictures for recreational purposes?
- Or do you plan to fly a drone commercially?
Your answer to each of these question will determine, in most countries, whether you need a license or not.
Again, the best way to confirm that you are (or will be in a future trip) complying with local regulations is to check it on a case by case basis.
That's particularly true if you plan to fly your drone for recreational purposes. In case you plan to do commercially, you'll most probably need a license.
Once again, I suggest you to have a look at:
- droneregulations.info (worldwide)
- faa.gov/uas (USA only)
- dronerules.eu (EU only)
- this Google map (worldwide)
Do you need an insurance?
Although you may think your drone is a super cool and fun toy, well...
The reality is these machines are far more sophisticated than your average toy. In fact, most authorities classify most of them as aircraft.
Actually, you may be surprised with what I'm about to say. Or not.
Unfortunately, nowadays there are more and more drone related accidents documented worldwide. Many of them involve issues such as drones running out of power, or incidents where the pilot has lost control of the drone.
Moreover, even if you're are an experienced and responsible pilot... Who knows? You could experience a dangerous situation that could injure people, the property of other people, or cause damage to public property.
All this could result in high costs, medical expenses and personal injury.
So if you're still asking yourself
"Do I need to insure my drone?"
The answer is that it depends on the country where you plan to fly your drone.
It also depends if you intend to fly a drone for recreational purposes (e.g. taking pictures or filming videos for you). If you plan to have any kind of commercial activity related to drones, I suggest you seek legal counsel contacting a professional.
Actually, the best piece of advice I can give you is that you do your homework, and find out whether you need to insure your drone or not. Ask a local or find out researching on the web.
Take the weather conditions into account
I have repeated it over and over along the article. But I'll say it once more.
Every time you plan to fly and do some shots with your drone, you should check the weather forecast.
Even when you start shooting with a perfect blue sky, this can suddenly change to rain and you'll have to land your drone and stop your shooting session.
In addition to this, checking the forecast to anticipate the weather conditions not only helps you to schedule accordingly, but also to adjust your camera settings in case the conditions change.
Besides checking the forecast before you get out the door, I suggest you to keep a weather app (I've listed my favorite ones in section 9) open on your smartphone while you're on location.
Avoid flying your drone when it's raining
Whether it's light or heavy, rain is still water. It's not acid, I know.
Unfortunately, rain is harmless for you but electronics such as drones don't like water very much. Alas, water can damage your drone, potentially causing an electric failure and even to crash of fall in the middle of the flight...
On top of it, if you happen to have an accident with your drone because you were flying it while it was raining you could be held accountable. It could be considered reckless flying... And your insurer won't cover you for it...
Finally, if it's raining the lens of your drone camera will be full of water drops and most of your images will end up with tons of water droplets. And after all the time spent in planning and getting to the location, it would be a pity to miss the shot because of a few water spots.
So, by all means, don't take the risk. Don't fly your drone when it's raining, even if it's just a fine drizzle.
Be careful with the wind
"Toni, how windy is too windy?"
Excellent question young padawan!
Knowing the wind direction and its speed is crucial to have a safe flight.
Now my first advice is: if you don't feel safe and confident, don't fly. Gusting winds will make it incredibly hard to control the drone, not to mention taking pictures whatsoever!
Another consideration that you should always keep in mind is that wind speed will affect battery life. If your drone is battling a headwind, it will take more battery to get home or to continue flying along the route you've planned.
In section 9, you have all the details about Windy and UAV Forecast, my favorite apps. They provide all the information your need about wind conditions (present and future) in any location around the world.
Don't lose your drone in the fog!
Let me say in 5 words: don't fly in the fog!
Remember that most regulations oblige you as a pilot to maintain a constant line of sight with your drone.
Fog can confuse your and, for obvious reasons, it can easily and quickly obscure your line of sight. Again, in case of any incident, your flight will be considered unsafe and illegal.
On top of it, fog is one of your drone's worst enemies because of something very important: moisture. Actually, fog can be just as dangerous as rain. And your drone's electronics don't cope well when there's moisture in the air.
The drone components will be wet sooner than you think.
"Yeah, well, Toni you're exaggerating a little bit here because of some moisture."
Mmm. Don't be so confident. You might get away with it on this shooting session but what if your drone fails on the next one?
So whenever there's fog, flying is a no-no.
Can you fly your drone at night?
First of all, is it even legal to fly drones at night?
The answer: it depends on the country!
So, again, make sure you are fully aware of your chosen location regulation and comply with it!
Preflight checklist
As all other things in aerial photography, getting into a good routine is a good idea.
Following the same steps before each and every flight is the best way to make sure that everything is in place and to avoid potential issues or a crash. The last thing you want is to smash your $1,000 drone, or worse!
That's why a preflight checklist is essential.
It will help ensure you bring all of your equipment to your flight and you're ready to go. You're basically minimizing the chance of anything going wrong and prepare both yourself and your drone for the flight.
I've put up a preflight checklist to get you off the ground quickly and safely.
Before heading to the drone shooting location
- Check the weather forecast.
- Make sure the firmware is updated.
- Make sure the app is updated.
- Check the location you plan to fly at is not in a no-fly zone (use Airmap, more information in section 9).
- Plan your flight route/area.
- Scout the site and checked potential obstacles.
- Draft a list of shots or a storyboard (video only).
- Get the required permissions.
- Check the NOTAMs (notice to airmen).
- Carry out all pre-notification requirements.
- All the drone batteries are fully charged.
- The remote controller is fully charged.
- The device (smartphone or tablet) is fully charged.
- All the SD cards are empty and formatted.
- The rest of the gear is clean and packed (e.g. filters).
- The first aid kit is packed.
Prior to flying your drone
- Verify the weather meets the expected conditions.
- Check the wind speed (use Windy, more information in section 9).
- Check you've brought all your gear.
- Ensure the batteries aren't suffering from extreme temperatures.
- Check any possible interference.
- Make sure there are no large metal surfaces (electrical wires, radio or mobile towers, etc.).
- Double check any potential obstacle (e.g. powerlines, trees, buildings, antennas, etc.).
- Establish safe take off and landing spots.
- Inspect the drone for possible faults.
- Check the propellers and install them correctly.
- Make sure the propellers are tightened and move freely.
- Warn people around you.
- Set "Home" point and "Return to home" (RTH) height.
- Remove lens cover.
- Remove gimbal guard.
- Insert SD card into the drone.
- Make sure you have the proper filter screwed and it's clean.
- Insert a fully charged battery into the drone.
- Mount your device (smartphone or tablet) and plug it in.
- Switch your device to flight mode.
- Position your antennas properly.
- Check the signal strength.
- Check the satellite strength.
- Calibrate the compass.
- Select the correct flight mode (section 4).
- Check your camera settings.
During the drone take off
- Turn on the remote controller.
- Turn on the drone.
- Press "Record" (video only).
- Hover for 3 meters (10 feet) for 15 seconds to monitor behavior.
- Check all controls are responsive.
12.The 12 mistakes you should avoid on your aerial photography
Not having a flight plan (1)
I can't stress enough the importance of planning your drone photos beforehand. And this is for two reasons:
- As I've established before in the article (section 2), planning your shots allows you to maximize the chances of capturing great pictures, images that are exactly like those you've imagined.
- It also reduces the chances of crashing your drone. Make sure you spot any potential hazards such as power lines, buildings, trees or any other large object.
Of course, use PhotoPills to establish the perfect flight plan. You can also use Google Earth to get additional information, especially if you use the 3D simulation.
Not shooting in RAW (2)
I say it countless times in each and every article that I write... And this guide won't be an exception! You should always (always) shoot in RAW.
If you shoot in JPEG, which is a compressed format, you won't be able to correct some aspects of the image such as the exposure or the white balance (just to name a few!) :(
No matter the purpose of your shooting flight (practice, scouting, etc.), shoot in RAW because you might capture one great photo. What if this picture was a JPEG? You would have lots of constraints to post-process it or to print it in a large format.
Forget to check the weather forecast (3)
You should check the weather twice to make sure the skies are in the best possible conditions. Once when you're planning the shooting session (section 2). And twice before you head to the shooting location.
Don't head out in a hurry with your drone because a storm is about to start and the sky looks spectacular... If it's windy, rainy or snowy, avoid flying your drone.
Ignoring so can result into a drone crash, or even worse, losing it for good!
Have a look at section 9 where I've listed some weather forecast apps that you might find useful.
Ignore the local regulations (4)
As you read in section 11, the drone market has grown so fast in the last years that local regulators are having a hard time to come up with updated and accurate drone laws. For obvious reason, not all countries regulate drones in the same manner.
Before even considering buying a drone, you should learn as much as possible of your country's drone regulations. And make sure you stay updated on the current laws because they are fast changing.
Don't act like a naughty teenager who claims to be cooler and smarter that the rest because "I never follow rules and nothing ever happened". Chances are one day or another you'll get into trouble.
Not shooting in Manual mode (M) (5)
As I explained in detail in 'Exposure in Photography: The Definitive Guide' I almost always shoot in Manual mode (M). That way I can choose both the shutter speed and the ISO settings according to the light conditions.
Remember, there are many situations in which your drone camera is wrong or cannot automatically set some of the exposure triangle values you need to get a particular photo.
Unfortunately, certain drones don't tell you if your image is under or overexposed like you would know with the histogram on a DSLR or a mirrorless camera.
But don't feel hopeless. The important thing is to capture the photo you have in your head and know how to decide the settings. After carrying out a few tests (trial and error photos), you can't fail.
If you happen to have a DJI drone, the DJI Go App can help you thanks to the "histogram" tool. If you want to read more about the histogram, take a look at our exposure guide.
Shooting extremely long exposures (6)
All drones, including the most expensive and stable ones, shake even in low wind conditions. And of course, the higher your drone goes, the windier it gets and the more it shakes.
Actually, wind can cause your drone shake, but also your gimbal shake.
So, even though some drones allow you shutter speeds as long as 8 seconds, do some tests. See what shutter speed works best according to the light and wind conditions you have on location. It would be a pity to return home after a great session only to find out in front of the computer that all your pictures came up blurred!
Not calibrating your drone compass when you get to a new location (7)
Whenever you are in a new location or if you've changed locations since the last time you flew your drone, calibrate the drone compass before taking it up. It's the best way to prevent your drone from acting weird.
Most drones have an internal GPS and compass that allow the it to hover in place. Both tools also tell the drone its current location and which direction it's actually facing. Confirm that the GPS and the compass are accurately set, so your drone knows exactly where it is.
Checking in your drone and batteries (8)
A drone is not a toy, it's an expensive and fragile piece of gear. When catching a flight, you should avoid checking in your drone.
That is, of course, if the airline rules doesn't specifically require it. Some airlines, like Emirates, require you to check in both your drone and all the batteries. So in doubt, always confirm with the airline what their policy is regarding drones.
As for the batteries, the issue is pretty much the same than with your camera lithium ion ones. All these batteries have internal components so follow the airline rules regarding their transportation and the number of items you can carry on board. If you want to travel with some extra safety, a good idea is to store each of your batteries in a fireproof charging bag.
Forget to bring extra batteries (9)
In most cases, a battery allows you a maximum autonomy of 30 minutes to fly. If you think it, that's not a lot. So chances are you'll need more than one battery for a shooting session.
Don't forget to bring a couple of extra batteries with you, especially if you plan to shoot on a remote location with no electricity access. Obviously, before you leave home, make sure that all the batteries are fully charged. Alternatively, you can always have a car inverter for charging the drone batteries in your vehicle.
And don't forget that most drones are only designed to operate in temperatures above freezing. If you plan to visit a cold location like Iceland, Alaska or Patagonia, be extremely careful and bring additional batteries.
First, cold temperatures drain your batteries super fast. Even if the battery is fully charged, the maximum flight time of your drone may be shorter. Secondly, if your drone gets too cold the sensors can confuse this temperature drop with a lack of battery and it can literally drop from the sky!
Fly over crowds or animals (10)
I've already insisted about the importance of respecting the local regulations regarding flying drones (section 11), but I won't do it enough times. Most drone laws prohibit flying above people.
My advice is that, as a general rule of thumb, you should avoid flying over people, especially in places where you'll know there will be crowds (e.g. popular monuments or natural highlights such as waterfalls). It's important not only to respect these people's privacy, but also for your own security. If your drone injures anyone, you'll be liable for any damage caused.
The same applies to animals. The noise of the drone propellers can disturb them. And be extremely cautious when flying to avoid birds or landing next to any animal on the surface.
Flying when there is a ton of magnetic interference (11)
One of the major problems that you can face when flying a drone in a new destination is the presence of magnetic interference, that is radio signals that interfere with drone communications. For example, this is a very common problem in Hong Kong.
In order to avoid interference and lose signal, fly your drone far away from any large antennae or industrial areas. As you can imagine, magnetic interferences can cause your drone to crash so make sure you have lots of wide open space.
For example, DJI drones warn you of magnetic interference before taking off. Please, don't take off if you get this message.
Not carrying a basic drone repair kit (12)
As you have read, it's relatively easy to crash your drone. Usually, the first damaged parts are the propellers. Always carry a few extra propellers and, while you're at it, bring with you some basic repair tools for your drone.
You don't need anything super fancy, but a basic repair kit can be priceless after a minor crash. Your kit should include some extra propellers, duct tape, a couple of small screwdrivers (check your drone's screw heads to make sure you have the right ones!), hot glue sticks and a lighter.
13.10 drone masters that will boost your creativity
As time goes by, drone photography becomes more and more popular. Not only that, "regular" photographers are in many cases becoming fascinated by drones and incorporating them into their work.
Thus the number of incredibly talented people that become a drone master is growing dramatically!
But, with so many of them to browse through, it can be difficult to know where to start.
So to make things easy for you, I've done the hard work and picked 10 of the top drone photographers around the world that are definitely worth a look...
Elia Locardi
What can I say about Elia Locardi? He was one of the pioneers of drone photography.
As a lover of aerial photography, he started like many others: shooting from a helicopter. But as soon as he had his first experience with a drone, he was hooked and he admits that "there was no turning back".
From there on he has been traveling the world, capturing it with a drone and checking off places of his drone photography bucket list.
Stian Klo
Stian Klo is a professional and award winning fine art landscape photographer from Harstad in Northern Norway. He used to be a professional house DJ and producer but decided to retire at 26 and developed a passion for photography.
He's always been the creative type, so a "regular" camera wasn't enough... and he started exploring aerial photography as soon as he could. Growing up in Northern Norway has its advantages in terms of esthetic and dramatic landscapes and light, and this is what he tries to capture on his numerous winter adventures. That's right, he rarely photographs in the summer...
His work has been featured by Apple and Lonely Planet, as well as being published in lots of magazines such as National Geographic, Outdoor Photographer Magazine, Landscape Photography Magazine, N-Photo and more.
Joshua Foo
Joshua Foo is a photographer based in Sydney but currently travelling around South East Asia. He's interest in all sorts of photography from Street to Portraits.
However, he chose aerial photography because of what he calls "the wow factor". He admits that whenever his drone lifts off in a new location, he's always in awe with what comes up on his screen.
His images are always vibrant and full of colours, and you'll soon notice how he often looks for both Sunrises and Sunsets with nice clean light in order to play with the shadows.
Michael Matti
Photographer Michael Matti was born in Indonesia, and spent the majority of his childhood moving around the lush tropics of Southeast Asia. Then, his family moved to the US where he currently lives.
Michael has been creating stunning photography for years. But in 2015 he added a drone to his gear and has become addicted to aerial photography. Add to this his passion for travel and you've got the perfect combo.
JP and Mike Andrews
JP and Mike Andrews are behind Abstract Aerial Art, a website where they showcase bizarre photographs of rarely seen places and structures captured with a drone.
It all started in late 2016 where they were discussing about investing in a drone. Two weeks later they brought a one-way ticket to Sydney and decided to capture as much as possible of this amazing country from the air.
The original plan was to find, photograph and film beautiful and conventional landscapes of planet Earth from an aerial perspective. But as the trip went by they pointed the camera directly down towards Earth more and more often. After looking through the collection of images they had, they came up with a new idea: abstract aerial art.
Henry Do
Born and raised in Saigon, Vietnam, Henry Do immigrated to the United States at the age of 12 with his aunt to pursue the American dream. Although based in Las Vegas (US), he travels the world thanks to his love for seeking out new destinations and to his passion for photography.
He first picked up a drone in the summer of 2015 and he immediately fell in love of flying because it allows him to see and capture things from new perspectives.
Having prior experience in photography helped him a lot in understanding aerial photography. Nevertheless, very few photographers master the art of composition, how to frame the light, and post-production as he does.
Jarrad Seng
It's hard to define Jarrad Seng's work. This Australian photographer and filmmaker has a clear passion for travel, music and creativity in general.
A few years ago, during a road-trip through Iceland, he tried his hand at some aerial photography. The effort of flying a drone almost blindly definitely paid off – Jarrad created a series of stunning images of volcanic rivers and lava wastelands that could pass as abstract paintings.
He travels around the globe to capture magnificent landmarks as well as remote places and as you can see from his images, he likes putting himself in crazy situations.
Gabriel Scanu
Gabriel Scanu, or Gab as he likes to call himself, is a photographer, filmmaker and artist from Sydney (Australia). He started shooting on his father's DSLR at the age of 12 and has been taking photos ever since.
As you can imagine, most of his photography involves drones and other "operating small aviation devices" to capture the jaw-dropping images that you can see on his portfolio.
And it should come to you as no surprise that a lot of work goes into setting up his incredible aerial photography shots. That's why big brands such as Samsung, Lexus, Louis Vuitton, Disney or Google have worked with him all over the world.
Cuma Çevik
Cuma Çevik is an incredibly talented travel photographer currently based in Ankara, Turkey.
Initially interested in oil painting, the art academy proved too costly unfortunately. After graduating in college, he began traveling the world to shoot stunning outdoor photography.
Among travel photography, Cuma focuses on landscaping, but he also shoots beautiful nature, cityscape and aerial photography. Despite being a self-taught photographer, Cuma has clearly used his love of the arts to help compose dramatic and reflective scenes.
Benjamin Lee
"There is so much unnoticed beauty in the world and everything that surrounds us – if only you take the time to look for it", says Benjamin Lee a Sydney resident who left his office job a few years ago to pursue photography full time.
After quitting, he spent the next six months learning photography. From there, he expanded his horizons and entered the world of the drones. And oh boy what he'd accomplished so far!
He has a passion for exploring as many new places as possible – hopefully places that people haven't seen before. As you can see from his work, he has a special connection with the ocean and water in general so he likes to shoot along the coast. In addition to this, his ability to capture amazing cityscapes and playing with the streets geometry and lights is stunning.
14.It's time to fly
"The journey of a thousand miles begins with one step." - Lao Tzu
If you're here reading these final words, it means that you went through more than 28,000 words on drone photography...
You're a hero!
Yes, drone photography is not an easy thing.
But you've taken the first step.
Now you have all the tools you need to imagine, plan and shoot amazing photos with your drone.
Nothing can stop you.
Just keep taking one step after the other.
Apply what you've learnt.
When you come across an obstacle, come back to this guide and learn all it takes to overcome it.
And if you don't find the solution here, just post a comment below. I'm ready to help!
PhotoPillers never walk alone :P
Your journey has just begun.
It's time to fly!
Note: Some links on this page are affiliate links. What does this mean? If you buy/rent using these links you're helping support us and it costs you nothing extra. Thank you for your support.
Get this ebook for free now!