Moon Photography: The Definitive Guide (2026)
Today I'm going to show you how to take truly legendary Moon photos...
Actually, I'm going to teach you the same techniques I used to successfully capture 14 types of Moon pictures, such as...
- The Moon lit by Earthshine (the light of the Sun reflected by the Earth) is very special because it's the reflection of a reflection: the reflection of the Earth reflected on the surface of the Moon.
- The Full Moon, origin of stories and legends, is a moment that captivates you and can hypnotize your camera. Be careful because taking pictures of it is addictive.
- The Supermoon, which has become so popular lately, is a bit bigger than a regular Moon. And with a few tricks, you can make it look even bigger.
- Moon silhouettes... Sometimes you can use the Moon as a stage to create a beautiful spectacle: one or more silhouettes walking in front of it... And in front of your camera.
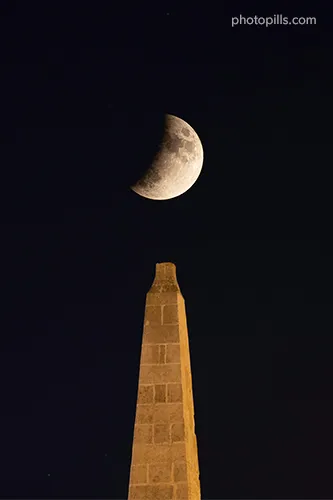
- The Moon partially eclipsed. During a partial eclipse the Moon becomes shy and hides, just a bit, behind the shadow of the Earth.
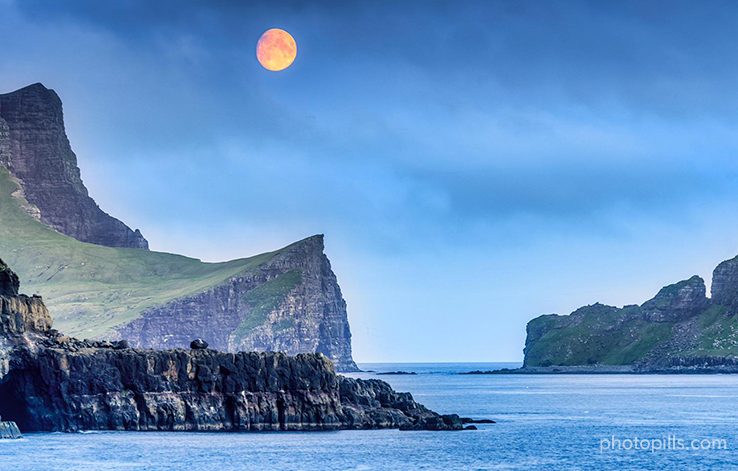
- The Blood Moon, when the Moon turns into a reddish color. It's an incredible moment that occurs during the totality of a lunar eclipse and something that you can't miss it.
Whether it's a huge Moon aligned with your favorite subject or a small Moon as a dot along with a spectacular landscape...
Once you've read this guide, you'll be able to successfully photograph all the types of Moons I have just listed (and many more) no matter the size, position and location you imagine.
I promise!
Here you'll find everything you need...
A Moon calendar with all the key dates, examples of photos to inspire you, how to use PhotoPills to plan your photo ideas, all the equipment you need and how to photograph each type of Moon step by step.
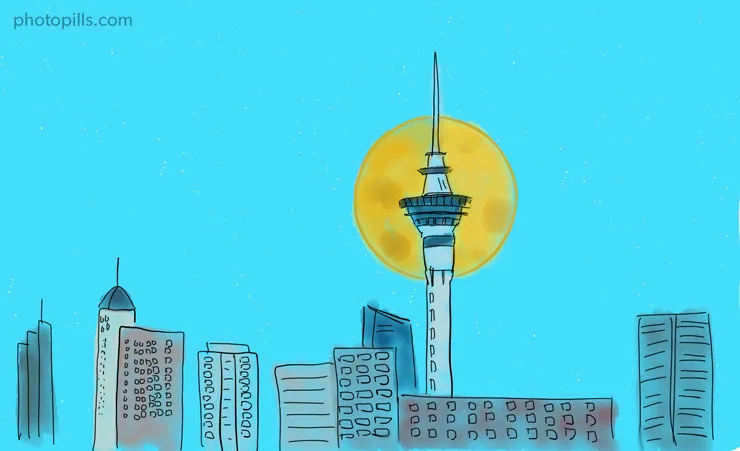
So get ready to create images like the cover of this article or the ones you'll find in section 2.
Ready?
Let's get to it.
"Shoot for the Moon; you might get there." - Buzz Aldrin
Get this ebook for free now!
Content
- 2026 Moon calendar (including eclipses and Supermoons)
- 14 Moon pictures that will captivate you
- Find the perfect location to photograph the Moon
- The 5 essentials you should know before planning the Moon
- How to plan your Moon photos step by step
- All the gear you need to photograph the Moon (beginner, advanced and pro)
- How to photograph the Moon step by step
- The 11 most frequent errors when photographing the Moon
- 6 Moon photography masters that you should follow
- Your turn...
1.2026 Moon calendar (including eclipses and Supermoons)
| Date | Event |
|---|---|
| January 3 | Full Moon |
| January 18 (or 19) | New Moon |
| February 1 (or 2) | Full Moon |
| February 17 (or 18) | New Moon |
| March 3 (or 4) | Total lunar eclipse, Full Moon |
| March 19 (or 18) | New Moon |
| April 2 (or 1) | Full Moon |
| April 17 | New Moon |
| May 1 (or 2) | Full Moon |
| May 16 (or 17) | New Moon |
| May 31 | Full Moon |
| June 15 (or 14) | New Moon |
| June 29 (or 30) | Full Moon |
| July 14 | New Moon |
| July 29 (or 30) | Full Moon |
| August 12 (or 13) | New Moon |
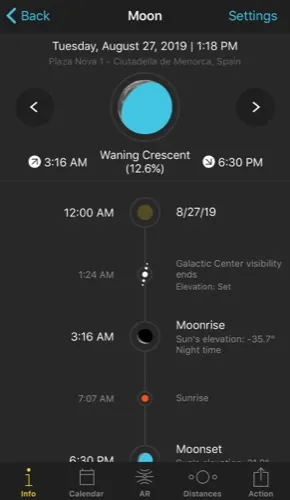
| August 28 (or 27) | Partial lunar eclipse, Full Moon |
| September 11 (or 10) | New Moon |
| September 26 (or 27) | Full Moon |
| October 10 (or 11) | New Moon |
| October 26 (or 25) | Full Moon |
| November 9 (or 8) | New Moon |
| November 24 (or 25) | Full Moon, Supermoon |
| December 9 (or 8) | New Moon |
| December 24 (or 23) | Full Moon, Supermoon |
In the calendar you have the dates of the lunar events that you shouldn't miss (Full Moons, lunar eclipses and Supermoons). You'll even find the dates of the New Moons if you like to photograph the Milky Way...
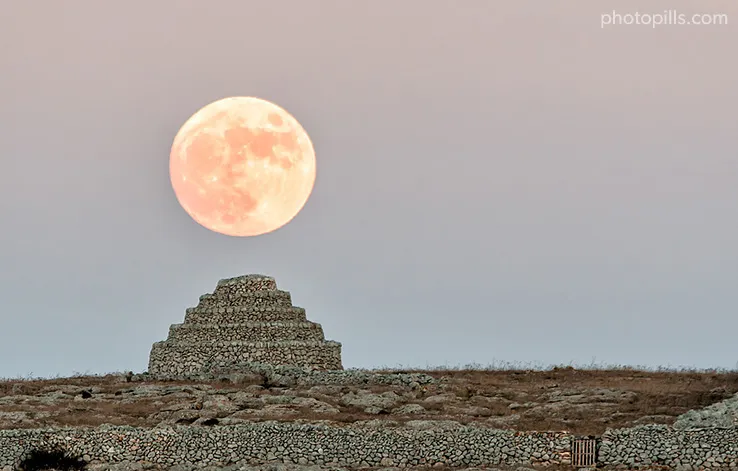
Full Moon
The Full Moon night is a magical moment that happens every month. Its light illuminates everything and while it rises or sets, its color changes depending on the type of natural light that there is in the scene. In 2026 there are 13 Full Moons, so you're going to have tons of opportunities.
However, the best time to photograph is not always the exact Full Moon date. Everything will depend on the photo idea you have and the natural light you want in the scene. In section 5, I'll show you how to use PhotoPills to plan the Moon and check the natural light you'll have at the time of the photo.
Supermoon
A Supermoon occurs when a Full Moon coincides with the Moon perigee or very close to it. The perigee is the point of the lunar orbit closest to Earth.
In addition to this, 2026 is a regular year with 2 Supermoons. The next time a year has 3 Supermoons will be in 2028.
Blue Moon
A Blue Moon is the second Full Moon that occurs in the same month or the third of 4 Full Moons in a single season. The latter occured on 08/31/2023. The next time there are 2 Full Moons in the same month will be May 2026 and the Blue Moon will be 05/31/2026.
Lunar eclipse and Blood Moon
A lunar eclipse occurs when the Earth moves between the Sun and the Moon, blocking the Sun's rays and casting its shadow on the Moon.
There are 3 types of lunar eclipses: total, partial and penumbral. If you want to know more about the types of lunar eclipses and their phases, you should take a look at our super guide to lunar eclipses.
Of all the phenomena that occur during a lunar eclipse, the most spectacular and the most interesting to photograph is the Blood Moon. The intensity and color of the Moon depend on the Earth's atmospheric conditions during the eclipse, but you'll get spectacular results.
It always occurs during the totality phase of a total lunar eclipse.
In 2026, there is a total lunar eclipse (March 2-3), and a partial lunar eclipse (August 27-28).
Earthshine
It's a phenomenon you can easily observe and capture with your camera. It occurs a few days before and after the New Moon, in the dark area of the visible face of the Moon.
Actually that area is not directly illuminated by the Sun. That light is the result of the sunlight reflected by the Earth and illuminating (indirectly) that part of the Moon.
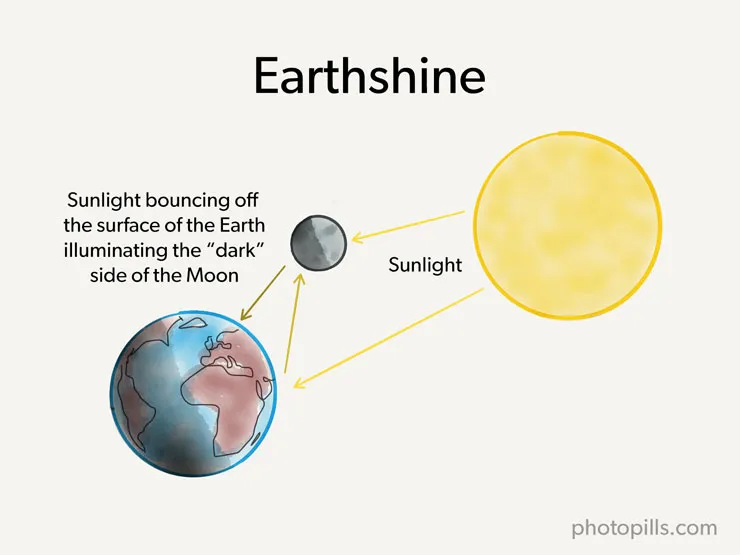
As a photographer, it's a very interesting phenomenon. You can capture a thin crescent of the Moon perfectly illuminated while the rest of the Moon is illuminated much more dimly.
New Moon
"Toni, New Moon? ¿Are you serious? ¿What's the point of not having any Moon in the sky if what I actually want is to photograph it?"
Of course the New Moon has a point!
Otherwise, I wouldn't mention it in this guide...
Think.
What photography genre doesn't need light? Or rather, which one can be ruined by the Moonlight?
Exactly!
Night photography.
So if you want to photograph the Milky Way or capture Star Trails, you'd better avoid Moonlight.
Actually, there's no need to wait for the New Moon. You can capture the Milky Way when the Moon is below the horizon or even above it. Sometimes you can use the Moonlight to illuminate the foreground. It all depends on the photo you've imagined.
But if you're starting in night photography, I suggest you take your first pictures of the Milky Way on the New Moon night or a couple of nights before or after.
In 2026 there are 12 New Moons, although depending on where you are, you may not always be able to capture the Galactic Center...
All the information at your fingertips
That's right.
If you're one of us (you use PhotoPills) you can access all the information you need in a few seconds.
To find out the dates of any Full Moon, Supermoons, Blue Moon and New Moon, use the Moon pill.
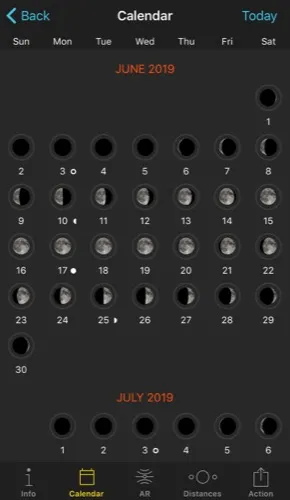
Open PhotoPills and tap on Moon (Pills Menu). Then tap on the Calendar button at the bottom of the screen.

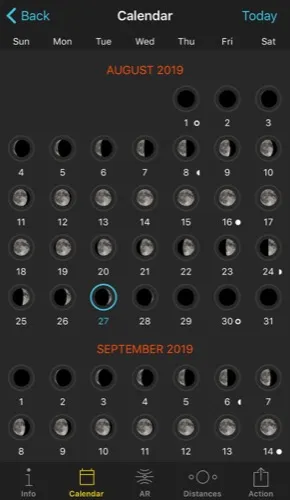
In the calendar,
- The current date is marked with a blue circle.
- New Moon dates have a white circle underneath.
- Full Moon dates have a white dot underneath.
- Supermoon dates are marked with a yellow circle.
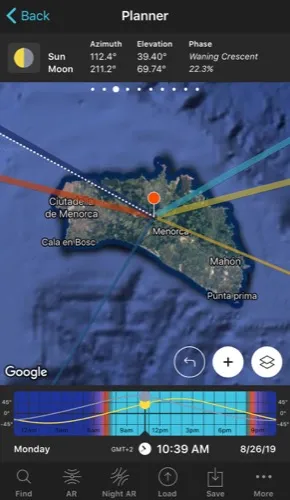
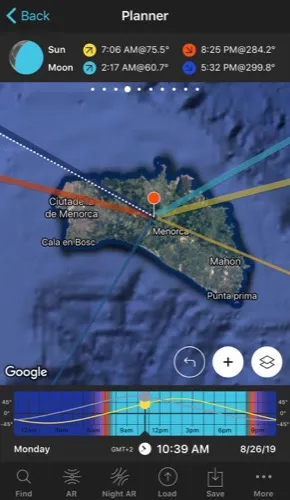
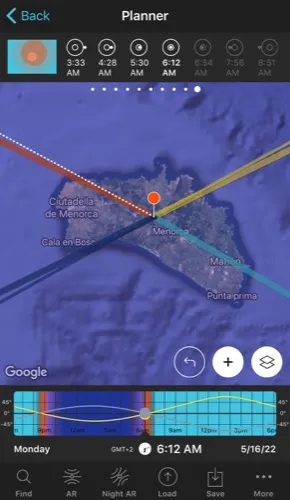
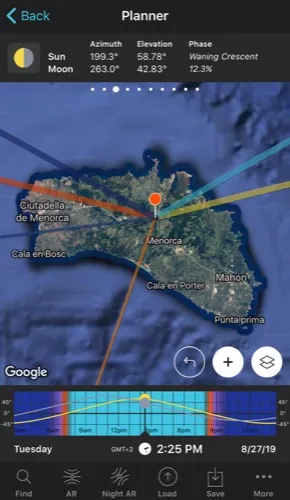
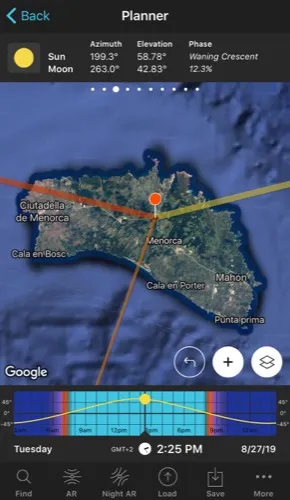
If you want specific information about the Moon for a certain date and a certain location you can have a look at 2 of the Planner's top panels (the panels that are just above the map).
To do so, open PhotoPills, tap on Planner (Pills Menu), place the Red Pin in the location you want (watch this video to learn how to move the Red Pin) and set the date with the Time Bar below the map.
- On Panel 3 you can see the Moon phase, as well as the coordinates (azimuth and elevation) of the center of the Sun and the Moon.
- On Panel 4 you can see when the Moon (and the Sun) rises or sets. Moreover, the Moon icon you see at the top shows you the Moon phase and how you would see the Moon considering the selected date, time and location (Red Pin position). If you tap on the Moon icon, time will jump to the next relevant Moon phase. If you tap twice on the Moon icon, time will go backwards to the previous Moon phase.
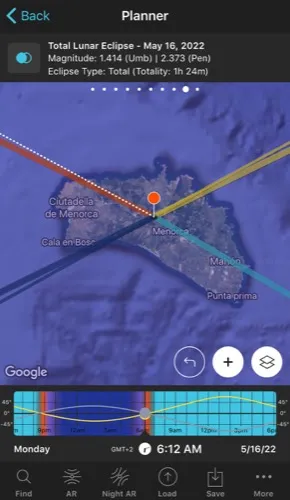
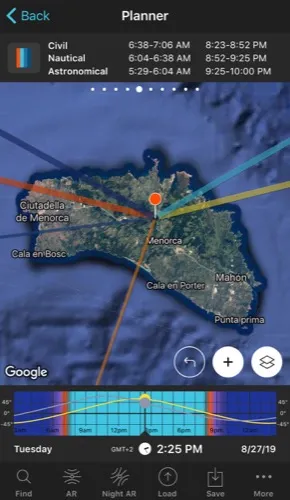
On the other hand, to find out the dates and times of the lunar eclipses, check the 2 eclipse top panels of the Planner. To do so, open PhotoPills, tap on Planner (Pills Menu) and swipe the top panels above the map:
- On Panel 9 you can select your preferred lunar (and solar) eclipse and load all the information on the map. Simply tap on the button above the panel to access the calendar. You can also access it by tapping on the Map Settings button next to the (+) button on the map. And then tapping on the Eclipse layer.
- On Panel 10 you can see the time of all the phases of that particular eclipse for the Red Pin position.
The Planner is key. It's going to be the tool you're going to use to plan your Moon photos down to the last detail. I'll explain how to use it in section 5.
Well...
Now you know the dates of the Moons that are worth photographing... But before you choose one of them and start planning like crazy, close your eyes and let your imagination fly.
The idea comes first... and there is a lot to decide ;)
What subject are you going to photograph the Moon with?
How big do you want the Moon to be in the photo?
With what type of natural light?
The possibilities are endless ;)
Take a look at the pictures in the next section. Some of them may inspire you to create (and plan) your own Moon photo ideas.
2.14 Moon pictures that will captivate you
Before you can start planning (section 5) and shooting (section 7) the Moon, you need to know what picture you want to take.
Remember that the idea goes always first. It's that spark that lights in your imagination and makes the machinery ignite.
And what better way to inspire you and help you come up with a lot of ideas than to see the types of Moon pictures you can capture...
Oh...
I almost forgot to tell you that all these photos were planned with PhotoPills ;)
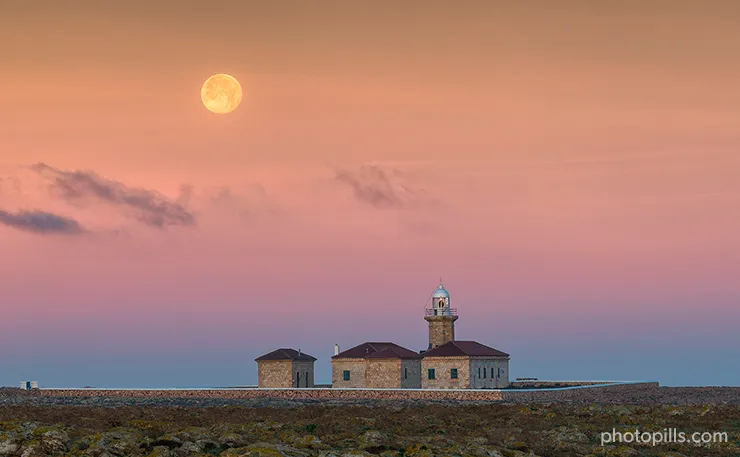
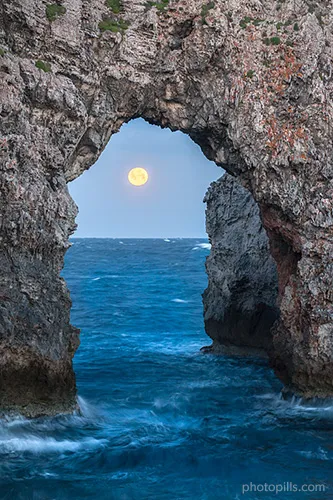
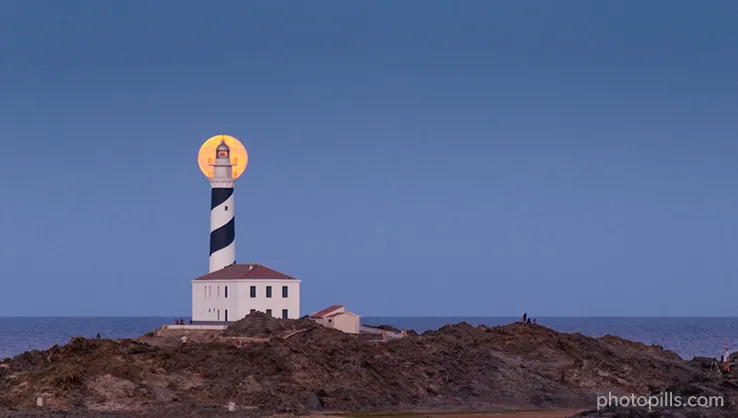
Moon with earthshine (1)
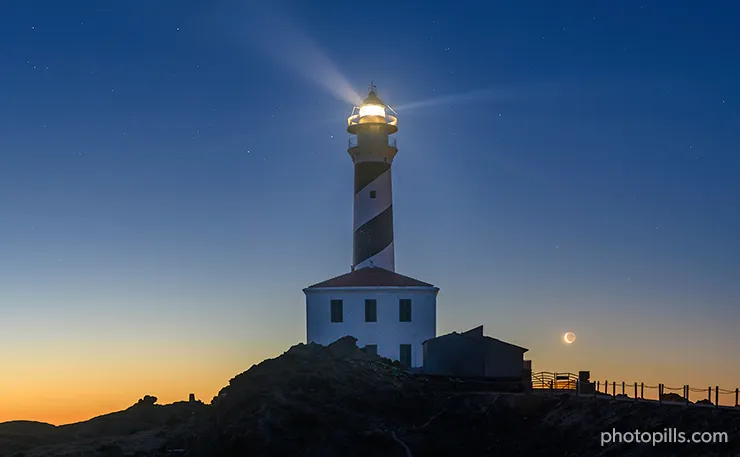
I admit it: I love to photograph the Moon with earthshine.
And if I'm lucky enough to be able to combine it with the stars and a lighthouse, I know for sure that that night I'll return home with a photo that I'll fall in love with.
Silhouette (2)
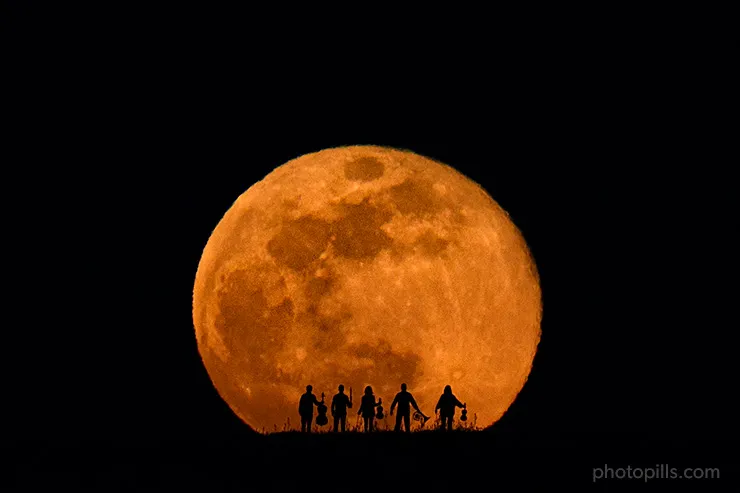
I love it when I can use the Moon as a backdrop and magically combine it with people.
In this case I decided to gather a group of musicians and align them with their backs to the Moon. As soon as the Moon began to rise, I asked them to raise their instruments to form part of the silhouette and the story.
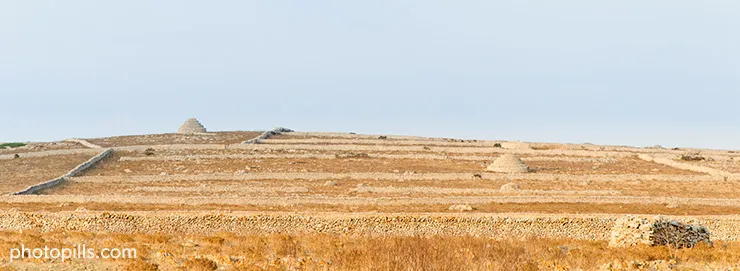
Rock formations (3)
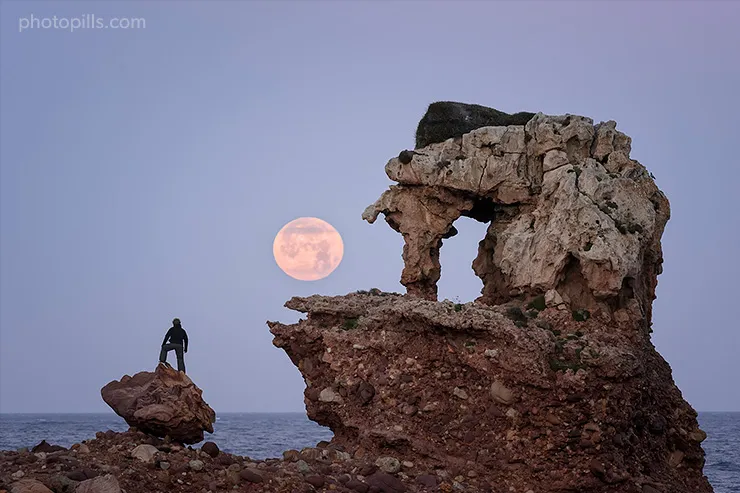
As time goes by, and because of the effect of erosion, the rocks mute into some very weird shapes. Like the one that you can see in the picture above, known by the Minorcans as "Sa punta de s'Elefant" or "The Elephant Rock" in English.
With such a gift from nature, it was almost mandatory for me to find a composition in which The Elephant Rock, Rafa (better known as the PhotoPills Bard) and of course the Moon, would tell a legendary story.
Reflections (4)
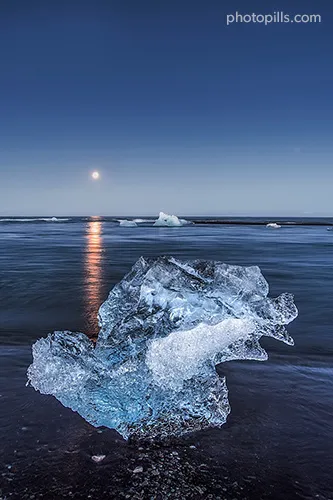
Iceland is the land of fire... and ice.
So in this photo the main subject is this huge block of ice whose shape and texture stands out above everything else.
However, there is another element that attracts attention irremediably: the Moon. Despite being in the background and its tiny size, its luminosity, its orange cast and the reflection in the water are tremendously hypnotic.
Panorama (5)
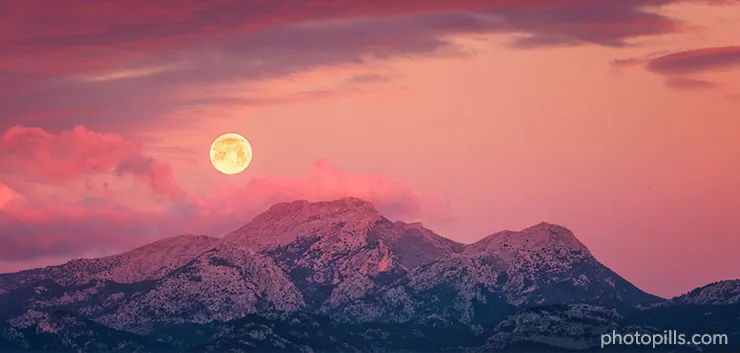
Sometimes, especially when you're in front of a mountain landscape, it's difficult to cover everything in a single frame.
Fortunately, there is always the option of making a panorama in which each element takes its place. In this case, I wanted the mountains, the clouds and the Moon to each have their part in the picture.
During golden hour (6)
Photographing the Moon during golden hour is a challenge.
However, when you do it, the results can be as spectacular as the ones you see in this photo. The bright yellow Moon stands out among the roses and oranges of the sky as if it were a ball of fire.
Alone (7)
Sometimes keeping it simple is best.
Why would you ask for more when the rest is redundant?
Partial Moon eclipse (8)
As the eclipse goes on, the shadow projected by the Earth gradually covers the lunar surface... It's as if the Moon wanted to play hide-and-seek.
And although the Moon itself is interesting enough to capture it alone, combining an event like this with an interesting subject makes the photo much more powerful.
Lunar eclipse with landscape composite (9)
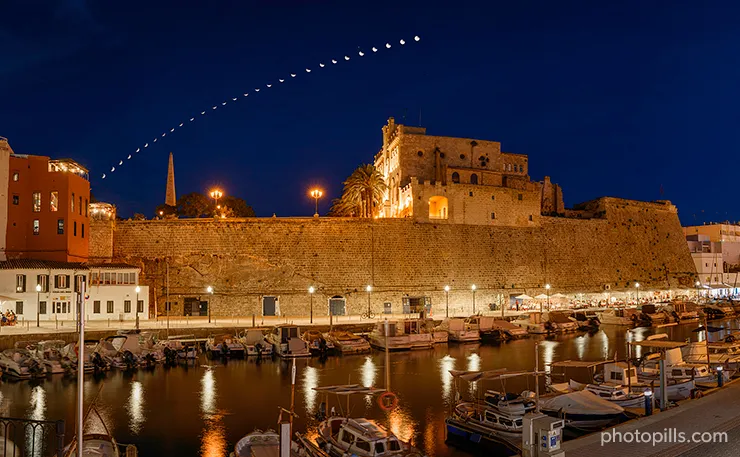
A great alternative to the previous photo is to find a landscape (natural or urban) and capture the eclipse during all its phases.
Then, as if it were a puzzle, you put all the pieces together... et voilà!
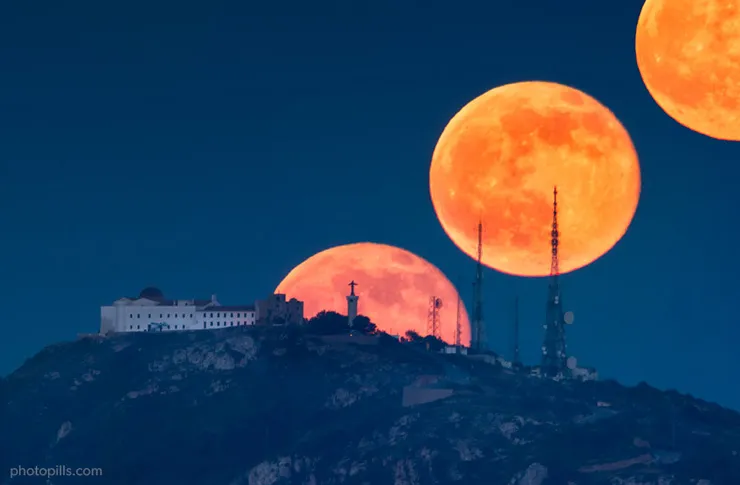
Total lunar eclipse or Blood Moon (10)
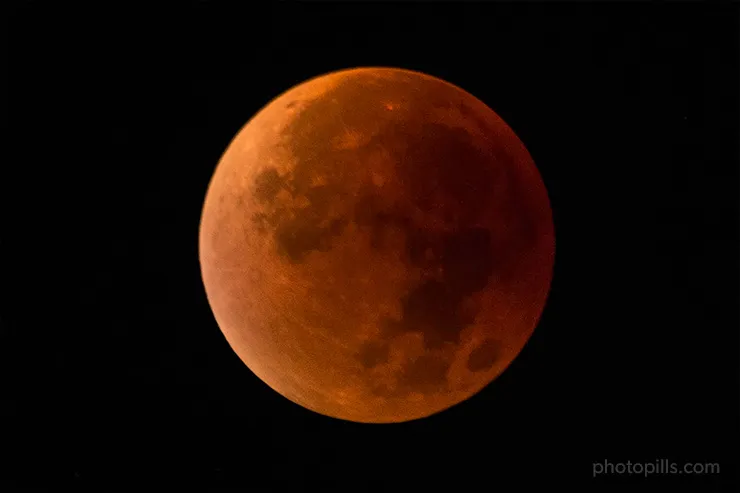
During the total lunar eclipse my favorite phase occurs: totality, that brief instant when the shadow of the Earth completely covers the Moon.
At that moment, she (I'm not sure if involuntarily or on a whim) decides to wear red and dress up.
Lunar eclipse phases composite (11)

And if in addition to photographing the Blood Moon, you patiently capture all phases of the total lunar eclipse, you can make a beautiful composite like this one.
Do you like it?
Aligned with a street of your hometown (12)
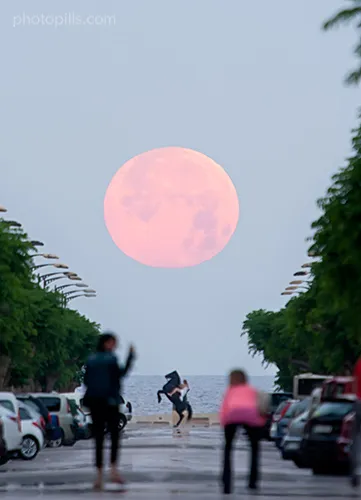
Initially, this photo was going to be the result of a placid session between the rider, her horse, the Moon and myself. The idea was to align the Moon with the avenue while the models at the end were performing the acrobatics.
But when you do a photo shoot early in the morning, you run the risk of crossing all kinds of night creatures... Like the two blurry girls who, in a slight state of drunkenness, decided that the photo I had in mind was not possible and that I was teasing them.
Trapped (13)
Use whatever natural shape you find in your surroundings. It will be the perfect setting for the Moon to be both subject and prisoner at the same time.
Silhouette video (14)
Shooting this video wasn't easy.
First, we got together to write the script. Then, we had to plan it and start the logistics. Finally, we had to trust that the weather would be good and carry out the filming.
As you can see, the result speaks for itself.
If you also want to create your own silhouette videos, I recommend that you carefully study our guide on how to create Full Moon silhouette videos step by step.
PhotoPillers pictures (15) [bonus track]
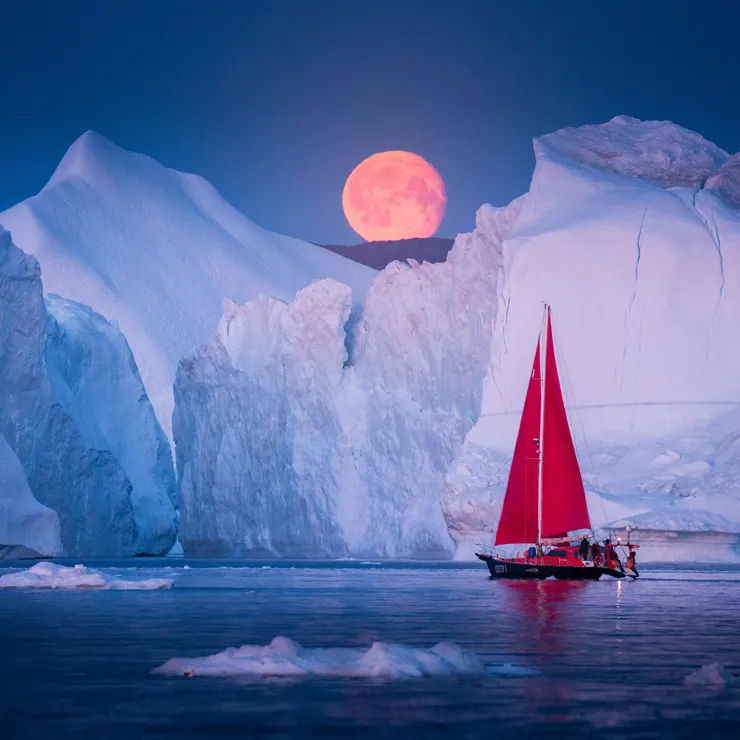
Photo by Albert Dros.
Finally, get some inspiration with all the Moon pictures that PhotoPillers have imagined, planned and captured all over the world... And that they share with us through the PhotoPills Awards.
You'll find them in our Instagram account (follow us!) and in the PhotoPills app (My Material Menu > Awards).
And now that you have plenty of ideas to inspire you, let's move on to the next part of the plan: finding the perfect location.
Let's get to work!
3.Find the perfect location to photograph the Moon
Every plan starts from the same place. From the beginning! :P
Jokes aside, that beginning is always the location.
Location is key. It's the stage where the action will take place: the event you're waiting for and the moment you'll capture it.
And the more amazing and spectacular that scenario is, the more amazing your Moon photo will be. That's why it's best if you find the perfect location.
And to be perfect for photographing the Moon, that location must have...
An interesting subject (1)
Mixing a spectacular landscape with a point of interest that you can use as a subject is always a winning combination.
That way you'll easily link the landscape (stage), the point of interest (subject) and the sky (Moon). So you'll tell the story you want to tell and in the way you want to tell it.
Include one or several points of interest
I'm always in favor of simple compositions. As a general rule, the fewer elements you include in the frame, the easier it will be for the viewer to understand the story and sensations the photo conveys. That's why I like to include only one subject.
But that doesn't mean you can't include one or more subjects in your composition. Actually, it all depends on the location, the frame and how you want to tell the story.
"Toni, what can I use as a subject?"
The subject can be a rock, a tree, a lighthouse, a building...
Your imagination sets the limits!
Research using all available sources of information
"And how do I find this point of interest?"
One of the main tasks during any planning is research. That means you have to spend as much time looking around until you find what you need.
And for that, I suggest you use any available source of information.
- Seeing photos of other photographers is the best source of inspiration. You can check Instagram, Flickr, 500px, Unsplash, Getty Images, 1x.com, Viewbug, Pexels, Youpic, Shutterstock, Adobe Stock and Google Images.
- Take advantage of locations other photographers discovered and explored. There are communities, such as Locationscout and ShotHotspot, where this information is shared.
- Thoroughly study publications such as travel magazines (National Geographic, Condé Nast Traveler and Travel + Leisure), travel curated content (Exposure), travel guides (Lonely Planet) and the photography section of newspapers such as The Atlantic, The Guardian and The New York Times.
- Search the galleries of your favourite photographers' websites. A good example is the PhotoPills Masters' websites participating in the PhotoPills Camp.
- Wikipedia and its lists of interesting places is an endless source of information. Are you looking for lighthouses? Type in Google "lighthouse list Wikipedia" and analyze the results.
- Ask the locals, they are the ones who know the area best and who will give you good advice.
- Books can also help you learn about the local history and natural biodiversity of an area or town.
- Don't forget to visit the Town Hall or the tourist office of that city or town. I'm sure you'll be surprised.
- Check the Points of interest (POIs) included in PhotoPills.
- And finally, most importantly, scout the area. It's often the most effective strategy :)
Look for a slightly elevated subject
Ideally, your subject should be slightly elevated from the horizon. It may be on a hill, for example.
Although it's not essential, it helps you:
- Avoid clouds that may be at the horizon (and that could cover the Moon).
- Have a cleaner sky behind the subject. In other words, there are fewer particles that cloud the background.
- Capture more detail on the Moon.
- Prevent any other element from visually blocking the subject.
Once you have a potential location with an interesting subject, it's very easy to check whether the subject is slightly elevated or not.
Just use Panel 2 located on the top of the PhotoPills Planner... ;)
Place the Red Pin in the shooting spot and tap the button on Panel 2. A Black Pin will appear on the map. Now you only have to place this pin on the hill to observe the terrain altitude difference considering the Red Pin position.


Tons of space to move around (2)
It sounds silly, but it's not.
Moreover, in order for the location to be perfect, there must be enough space for you to move around.
Successfully photographing the Moon requires a lot of precision. Especially if you want to align it with your subject or if you want it to be in a specific position compared to your subject.
A couple of meters away from the right shooting spot and... Ups! The photo you take will no longer be the same as you had planned.
That's why space is so important. So that you can correct your position quickly if at the shooting you realize that the composition is not what you had imagined and planned (section 5). That way you'll have enough room for maneuver to recompose the shot.
Also, remember that the Moon moves much faster than it seems. So a couple of minutes can be vital.
On the other hand, the more space you have, the more shooting spots you'll have. This multiplies your compositional options.
Finally, keep in mind that Moon always rises in the east and sets in the west. But every day it does it in a different direction (azimuth), so you'll have to adjust the shooting spot depending on the date and time at which the moment you have imagined occurs.
Imagine you want a Full Moon coming out behind a lighthouse. Having space to move may help you get the alignment you want even every month of the year :P
Alternatives so you can photograph towards the east or the west (3)
As I said in the previous section, the Moon behaves in the same way as the Sun: it rises in the east and sets in the west.
During your research, look for locations with spectacular landscapes (natural or urban) towards the
- East if you want to photograph a Moonrise.
- West if you prefer to capture a Moonset.
This way, even if that location doesn't have a lot of space to move around, you'll be able to align the Moon with something interesting.
Let's see an example...
Suppose you want to align the Moon with a street in your city. In the next video, Rafa will show you how to align the Moon with a street in Manhattan (New York, USA).
Space enough to be far away from the subject (4)
Another thing to keep in mind when looking for a perfect location is that the further away you are from the subject the bigger the Moon will be compared to it.
Don't worry, it's not hard to understand. Besides, I'll explain it to you in detail in the next section.
This is key when planning your photo and working on your composition. Think that if you have a lot of flexibility to choose the shooting distance, you'll have more freedom to decide the size of the Moon compared to your subject.
In other words, what do you want the Moon to be like? Small? Huge?
What about your subject with respect to it? Medium? Minuscule?
It's a matter of taste! ;)
Great!
Now you know what a location needs to have in order to be an ideal place to capture the photo you want.
But don't rush because before you take PhotoPills and start planning in that idyllic location there's something else you need to know...
Keep reading!
4.The 5 essentials you should know before planning the Moon
You have put all your effort in imagining a unique photo and a story that you've been wanting to tell for some time.
You've spent hours searching, reading and researching to find the perfect location to capture that image with the Moon that you can't get out of your head.
And now, you're ready to take PhotoPills and plan the photo down to the last detail so that on the shooting day everything goes smoothly.
But...
Before you do that, let me tell you a couple of things. Or to be more precise, the 5 essentials you should know before planning any Moon picture.
Let's get on with it!
The shooting spot determines the size of the Moon relative to the subject size (1)
Whenever I teach a workshop on Moon photography, I like to ask this question:
"Does anyone know how to get a huge Moon with respect to the subject?"
And in each workshop, invariably, a student answers that it depends on the focal length you use when taking the photo.
"Of course Toni! That's how it is, it depends on the focal length."
No.
Mistake.
Get that out of your head.
Actually, it's the distance between the shooting spot and the subject that determines the size of the Moon relative to the subject size.
And this is so because of the angular diameter of the Moon.
What is the angular diameter of the Moon
The angular diameter of the Moon is actually the diameter of the Moon measured in angle.
"And how can I find out the angular diameter of the Moon?"
Very easy...
Open PhotoPills and tap Moon (Pills Menu). By default, the information that appears corresponds to your current location (according to your mobile GPS) and the current date and time.
If you scroll down, you'll see that the angular diameter of the Moon is almost at the end.
Tip!
If you want to change the location and/or date and/or time, tap Settings (top right corner). On the new screen, you can change:
- The location by taping on Position. Slide the Autoupdate button to unlock the rest of the screen. You can use
- The search box if you want to type an address.
- The coordinates option if you know the latitude and longitude.
- The date by taping on Date. Slide the Current date and time button to unlock the rest of the screen. Tap
- Date to change the date.
- Hour to change the hour.
- You can also determine whether you want PhotoPills to automatically detect the time zone or not.
There is something important that I'd like to tell you.
From the Earth, the angular diameter of the Moon and the Sun are quite similar (roughly 0.5º).
That's because of two facts:
- The Sun's physical diameter is 400 times bigger than the Moon.
- The Moon is approximately 400 times closer to the Earth.
The combination of both factors means that the Sun and the Moon seem to have the same size when you look at them from the Earth.
So what works for the Moon, works for the Sun (during Sunrise and Sunset) as well!
And now, let's get to the heart of the matter... :)
How to determine the distance between the shooting spot and the subject to get a Moon of a certain size
Watch out...
Math alert!
Remember that you want a Moon of a certain size compared to the subject size. So you need to know how far away you have to be from your subject to capture it.
In other words, how far away must the Red Pin (shooting spot) be from the subject.
So far so good, right?
Well, you'll find the answer to your question by solving the following equation:
Shooting distance = Moon diameter / [2 × tan(Moon angular diameter/2)]
Here, the diameter of the Moon is the size you want the Moon to have in meters for example.
Imagine that you have found a great location in the middle of Menorca (Spain) and want to photograph the Moon rising from behind a hut. This particular hut is an old building used by shepherds to keep sheep.
And you want the Moon to be not only behind the hut but also perfectly aligned with it. Just like that:
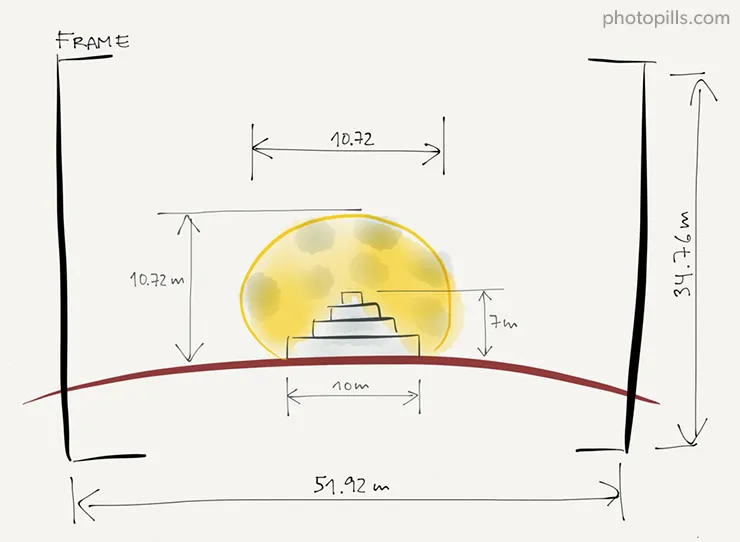
Notice that the hut width is 10 meters. So it would be great if the Moon had a size (diameter) of 10 meters.
And now, suppose the Moon angular diameter is 0.556º.
It's a random number that I'm using for the sake of this example. But if you need to know the angular diameter of the Moon for a specific location and date, check out the Moon pill.
The result of the equation would be as follows:
Shooting distance = Moon diameter / [2 × tan(Moon angular diameter/2)]
Shooting distance = Moon diameter / 0.0097
Shooting distance = Moon diameter × 103.05
1030.49 = 10 × 103.05
Therefore, you have to be at a distance of 1,030.49 meters from the subject. Or a little more than 1 kilometre.
Apply the PhotoPills Rule of 100
If you look at the equation, you can see that the multiplying factor (103.05) is pretty close to 100.
So, when making your calculations, it's much easier if you apply the PhotoPills Rule of 100.
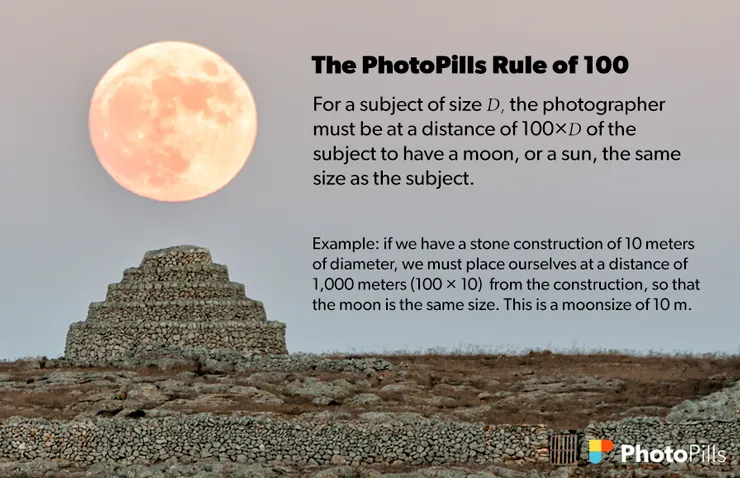
Or better yet...
Forget any calculations and let PhotoPills do all the work for you! ;)
Determine the shooting distance and Moon size with PhotoPills
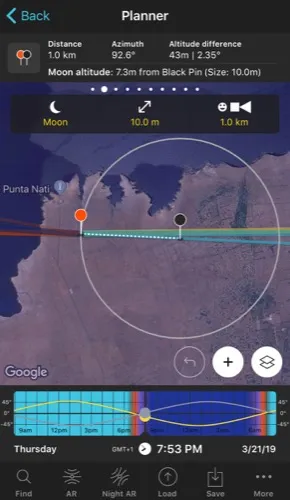
Go to the Planner and place the Red Pin in the shooting spot. In Panel 2, tap the button to activate the Black Pin and place it over your subject, where you want the Moon to be. Panel 2 indicates the shooting distance, that is, the distance between the Red Pin and the Black Pin.
Now, move time by sliding your finger over the Time Bar to align the Moon with the Black Pin. When doing so, you'll see that the size of the Moon appears in parentheses in Panel 2 above the map.
You can also see the size of the Moon on the map!
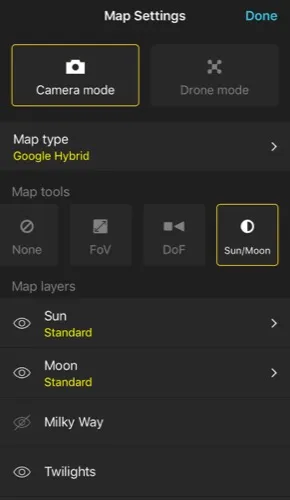
Simply tap the Map Settings button next to the (+) button on the map (lower right corner). Then tap the Moon layer and activate the Show Moon size option.
Go back to the map and zoom in on the Black Pin. You'll now see that the light blue line (the one showing the Moon azimuth) shows you the size of the Moon. So it's very easy to know how big the Moon is going to be compared to the width of your subject.
Note: If you have the impression that PhotoPills is not showing the size of the Moon on the map, check that there is a considerable distance between the Red Pin and the Black Pin. If they are very close to each other, you'll hardly see the size of the Moon, as the Moon is very small in relation to your subject size. If you move the Red Pin away from the Black Pin following the direction (azimuth) of the Moon, you'll see that its size increases.
On the other hand...
You can use the Sun/Moon map tool to calculate the shooting distance you need to get the Moon the size you want. Activate it by tapping the Map Settings button, you'll find it next to the (+) button on the map. And in the map tools section select Sun/Moon.
Everything will make sense when you read section 5.
"Okay, my mistake. So what determines the focal length?"
That's what you're going to learn in the next section ;)
The focal length determines the Moon size in the frame (2)
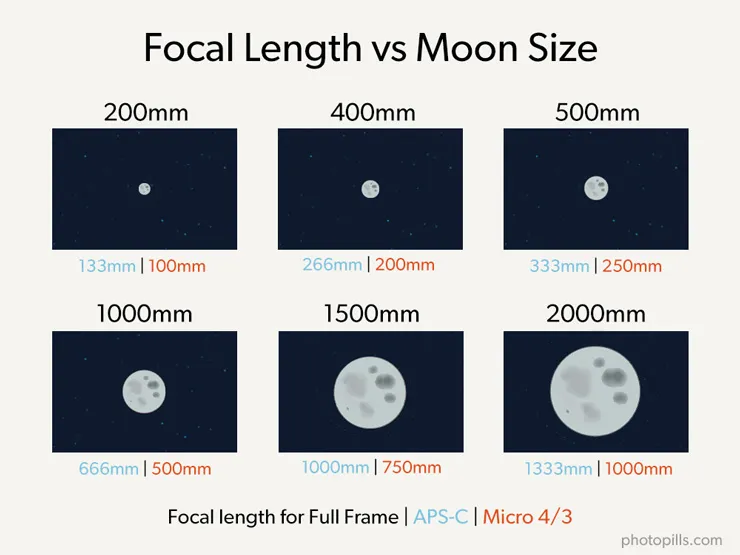
When I think about the next Moon picture I want to take, I always have in mind how big I want the Moon to be in the picture (in the frame).
This will depend exclusively on the focal length I use...
Moon as a dot
Do you want to highlight the beautiful landscape around you?
In that case, use a wide angle lens (10-35mm).
That way the landscape will take most of the frame. Also, include a powerful foreground. To do this, get close to your subject and it will have a larger size in the photo.
On the other hand, the Moon will appear very small. It will be a tiny spot of light in the sky.
Small Moon
If you prefer to use a short to medium focal length (35-200mm), keep in mind that you'll have a narrow angle of view.
Therefore, the landscape you can include in the frame will also be narrow. So you can lead the viewer's eye on a certain area, the most interesting one ;)
Depending on the focal length you use, the Moon will appear more or less big in the frame.
Big Moon (or huge!)
If you actually want the Moon to be the real subject of your photo, use long focal lengths (>200mm). In fact, if you don't have a very long lens, consider using a teleconverter.
So you'll have a very small viewing angle. In other words, there will be little landscape in your composition. Only the Moon and the subject will be in the frame.
Determine the focal length with PhotoPills
To get a much clearer and more concrete idea of which focal length you should use to capture a certain part of the landscape and/or to have a Moon of a certain size in the frame, you can use PhotoPills to see:
- The Moon size on the map (depending on the shooting distance).
- The field of view on the map (depending on focal length, camera...).
So open PhotoPills and tap Planner (Pills Menu).
Tap the Map Settings button. You have it on the map, next to the (+) button.
On the Map Settings screen, in the Map Tools section, tap the FoV (Field of View) button. Tap OK (top right corner) in iOS or the back arrow in Android.
You'll see that a new panel has appeared on the map.
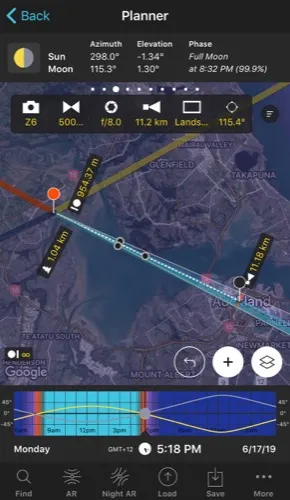
Imagine you're using a Nikon Z6 with a 500mm at f/8 and you're focusing right at the distance to the Black Pin.
The framing is in landscape mode (horizontal) and you want to frame in the direction in which the Black Pin is located. Tap the Azimuth framing button (the last button). And on the Azimuth screen, tap the Align with Black Pin option. The field of view is now aligned with the Black Pin.
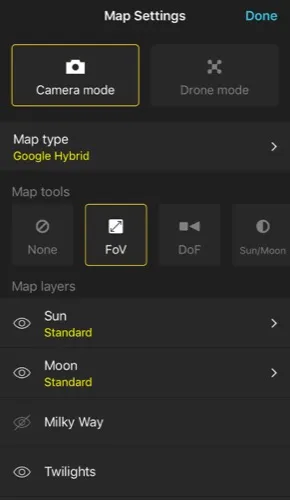
Zoom in on the map around the Black Pin to see which part of the landscape fits into the frame.
And if you have the Show Moon size option activated, you will also be able to see how big the Moon will be relative to the frame.
To activate it, tap the Map Settings button next to the (+) button on the map. Then tap the Moon layer and activate the Show Moon size option.
Natural light is key (3)
There's another key element you need to keep in mind before you start planning a Moon shot.
You know that without light, photography wouldn't exist.
And in these types of pictures, natural light plays a key role.
First, from a compositional point of view.
The fact is that depending on the type of natural light in the scene, the color of the Moon will change. So depending on the color (white, yellow, orange, pink, red) it will be more or less powerful in the image.
Second, from a technical point of view.
The type and quantity of natural light in the scene will also affect the exposure. In other words, depending on the light, you'll be able to capture the Moon and the landscape in a single exposure. Or not.
"Toni, what makes natural light change?"
Very simple.
Natural light depends on the elevation of the Sun. Or if you prefer, how high the Sun is above the horizon.
Obviously, it also depends on the weather you have that day or if there are particles in suspension in the air. But this is out of your control. Check the weather forecast on the days before and on the shooting day.
In the following video Rafa explains in depth how natural light behaves and the type of photos you can take at each moment of the day:
Let's see all the types of natural light, one by one...
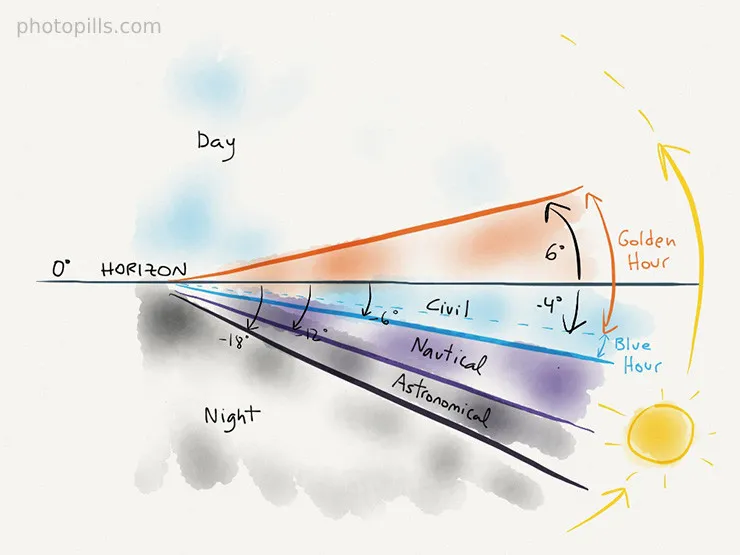
Day
We say it's daytime when the Sun has an elevation higher than 6º.
Considering that the Sun shines brightly and the natural light is very harsh, the color of the Moon is bluish, although very faint.
But you'll be able to capture the Moon and the rest of the scene in a single exposure.
Golden hour
The golden hour occurs when the Sun has an elevation between 6º and -4º.
Therefore, the brightness of the Sun is weaker and produces a much warmer (or golden) light.
Thanks to this type of light, the Moon takes a spectacular tone, which varies between pink and yellow as the Sun goes down. It's in the last part of the golden hour when the color of the Moon is more powerful (Sun elevation between -1º and -4º).
During the golden hour you can photograph a landscape and the Moon in a single exposure.
Blue hour
The blue hour occurs when the Sun has an elevation between -4º and -6º.
The Sun is below the horizon and the strength of its rays makes the last lights dye the sky blue. Hence the name of blue hour :P
The Moon takes on a spectacular yellow color.
If you hurry, you can still capture the landscape and the Moon in a single exposure.
Civil twilight
Civil twilight occurs when the Sun has an elevation between 0º and -6º. That is, from when it sets until it is at -6º of elevation below the horizon.
This twilight overlaps with the end of the golden hour and the entire blue hour.
And it's not a mistake. The concepts of golden hour and blue hour are photographic concepts, too diffuse for scientists... That's why they prefer to use the concept of twilight, each of them defined in a totally scientific way.
As I said, the beginning of the civil twilight (the end of the golden hour) is the best time to photograph the Moon. That is, when the elevation of the Sun is between -1º and -4º.
Nautical twilight
We speak of nautical twilight when the Sun has an elevation between -6º and -12º.
From that moment on the first stars begin to appear, but you're still able to distinguish the horizon. The light fades little by little...
The Moon loses those magical tones as it goes from yellow to white.
And obviously, the lack of light won't allow you to capture the landscape and the Moon in a single exposure. From now on the landscape is too dark and the Moon too bright so your camera is not able to cope with the high dynamic range of the scene.
However, this is an ideal time for Moon silhouettes.
Astronomical twilight and night
The astronomical twilight occurs when the Sun has an elevation between -12º and -18º, and the night when the elevation is below -18º.
The natural light disappears completely, so the sky is too dark and the Moon too white.
Just like during nautical twilight, you can no longer capture the Moon and the landscape in the same exposure.
However, this is the perfect time to photograph the surface of the Moon with a super telephoto lens.
Well...
This is a brief summary of the different light phases as the elevation of the Sun changes. But if you want to read more on the subject, I suggest you check our super guide on natural light.
How to find out when the golden hour and blue hour happen with PhotoPills
Open PhotoPills and tap Planner (Pills Menu). Then swipe the top panels to Panel 3. One of the data this panel gives you is the elevation of the Sun.
Remember that:
- The golden hour occurs when the Sun elevation is between 6º and -4º.
- The blue hour occurs when the Sun elevation is between -4º and -6º.
Now swipe the top panels to Panel 6. This panel tells you the exact start and end times of the golden hour and the blue hour for the selected date and the Red Pin position.

How to find out when the twilights happen with PhotoPills
Again, open PhotoPills and tap Planner (Pills Menu). Then swipe the top panels to Panel 3. One of the data this panel gives you is the elevation of the Sun.
Remember that:
- The civil twilight occurs when the Sun elevation is between 0º and -6º.
- The nautical twilight occurs when the Sun elevation is between -6º and -12º.
- The astronomical twilight occurs when the Sun elevation is between -12º and -18º.
Now, swipe the top panels until you reach Panel 5. This panel tells you precisely the start and end times of the twilights (civil, nautical and astronomical) for the selected date and the Red Pin position.
The Moon position: azimuth and elevation (4)
At the beginning of the article I told you that a photo always starts with the imagination, with your desire to photograph something special that happens at a certain moment.
And in the case of a Moon picture, the mission is clear: to capture it when it's in a specific position compared to the subject (a lighthouse, for example) and the rest of the elements that are in the frame.
Therefore, the Moon position is essential.
And knowing the position the Moon when you observe it from a specific spot at a specific date and time will allow you to plan your Moon shots with great precision.
How the Moon position is defined
To find out the Moon position, you first need 3 starting points:
- A specific location on Earth. The position where you are going to be to take the photo.
- A date.
- An exact time in hours and minutes.
From there, PhotoPills helps you know the Moon position. But to know precisely where it will be in the sky you need to understand a couple more variables: the azimuth and the elevation.
The Moon position is defined by two coordinates:
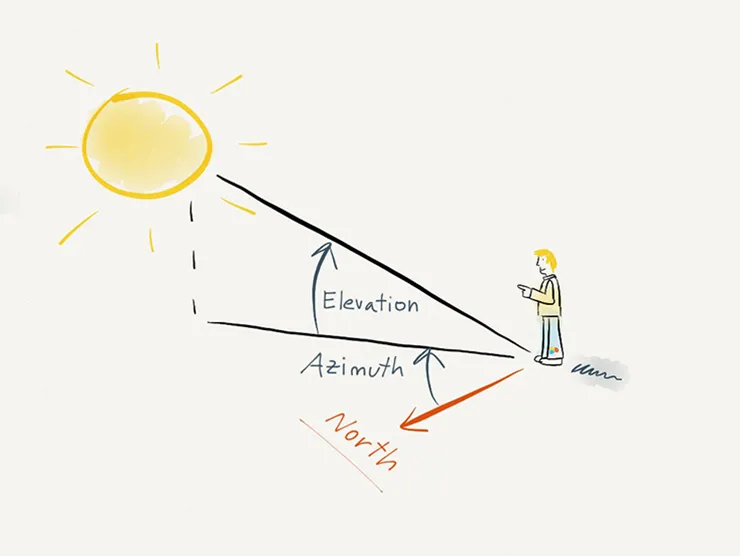
- The azimuth. It's the angle formed by a celestial body (the Moon, in this case) and the North, measured in a clockwise direction around the observer's horizon (you, the photographer). It determines the direction of a celestial body.
- The elevation. It's the vertical angular distance between a celestial body and the observer's local horizon, also called the local plane of the observer. It determines the altitude in the sky of a celestial body.
Note: Both coordinates point out the position of the center of the Moon.
How to find out the Moon position with PhotoPills
If you want to know where the Moon is at all times, use the PhotoPills Planner.
Open PhotoPills and tap Planner (Pills Menu).
Then tap the Map Settings button and activate the Moon layer. To do this, make sure the eye-shaped icon is not crossed out. If it is, tap it.
Finally, swipe the top panels to Panel 3 (see screenshots below).
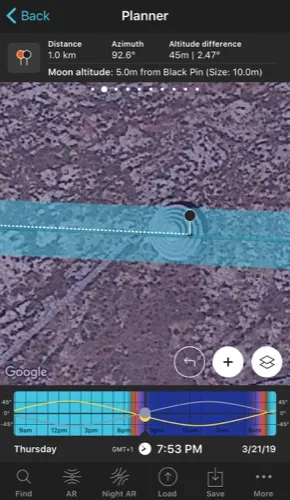
On the map, the thin blue line indicates the direction where the Moon is (its azimuth). And Panel 3 shows the azimuth and elevation of the Sun and Moon for the Red Pin position and the selected date and time.
As you'll see in the planning section (section 5), understanding how the Moon and Sun positions are represented on the map and top panels is key.

If you're at the Red Pin position, you can also tap the AR button (bottom of the screen) to visualize the Moon position with the Augmented Reality view ;)
Finally, if you want to master Moon photography, I recommend that you study our guide to azimuth and elevation carefully.
The Moon altitude over the terrain and buildings (5)
Now you know how to define the Moon position considering the exact spot where you are. You know:
- The azimuth (direction) in which it is.
- The elevation (altitude) it is at.
But, in your composition, the subject is equally important.
Therefore, finding out the Moon position relative to the subject is essential to know if the photo is possible and, if so, when it will occur.
In other words, you need to define the Moon position relative to the terrain and/or height of your subject, for example, the height of a building.
Let's start with the easy one: the azimuth.
As I explained in the previous section, thanks to PhotoPills it's very easy to find out the azimuth of the Moon. The thin blue line on the map shows you the Moon direction for a specific date and time.
Therefore, aligning it with your subject is very easy.
Just swipe your finger on the Time Bar and adjust it until it's above or very close to your subject.
You can also move the Red Pin to align the Moon with your subject.
Now comes the not so simple one: the elevation (relative to the terrain or your subject).
Fortunately for you (and me), PhotoPills is always there to help you and make your life so much easier.
Open PhotoPills and tap Planner (Pills Menu).
Then swipe the top panels to Panel 2. Tap the button on the panel and the Black Pin will appear on the map.
Now place the Black Pin over your subject. If you move the time to align the Moon with the Black Pin, you'll see that Panel 2 tells you everything you need:
- The Moon altitude above the Black Pin. More specifically, it's the center of the Moon altitude above ground level where you have placed the Black Pin.
- The Moon size. Therefore, you know how big it's going to be compared to the subject.
Both will help you better understand how the elements you want to capture are positioned and get the composition you've imagined.
If you're at the Red Pin position, you can also tap the AR button (bottom of the screen) to visualize the Moon position with the Augmented Reality view ;)
Well...
These 5 concepts are key to know how to plan the Moon.
Everything will be clearer as you read the next section, in which we're going to use them to make two real cases of Moon planning.
Ready?
Hold on to your hats!
5.How to plan your Moon photos step by step
If we compare them with the Milky Way or with the Sun, the Moon plans require more work and more accuracy.
But that's what PhotoPills is for: to help you make what's difficult easy.
And to prove you that it's not so complicated and that you can plan any Moon picture you imagine, here you have a detailed explanation of the two most common cases:
- A plan for a certain date, as for example, when you want to plan the next Full Moon.
- A plan with the Moon in a certain position. In this case, you know the shooting spot and the photo you want, and you want to find out when it happens.
How to plan the Moon on a certain date (1)
In this case, you want to photograph the Moon on a specific day.
In other words, you know the date when you want to take the picture but you need to find out:
- The exact shooting spot from which you'll shoot the photo.
- The exact time the Moon will be where you want it to be.
Imagine you want to photograph the next Full Moon, a Supermoon or a lunar eclipse. You know when they're going to happen, but... from where will it be better to take the picture? And at what time?
As I was saying, to find the answers to these questions it's best to use the main PhotoPills tool: the Planner.
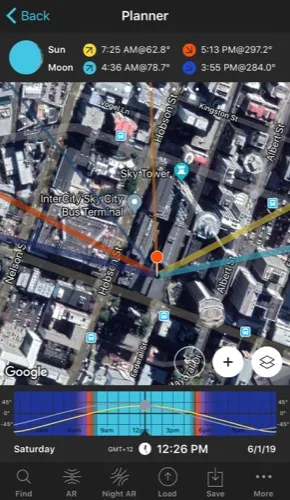
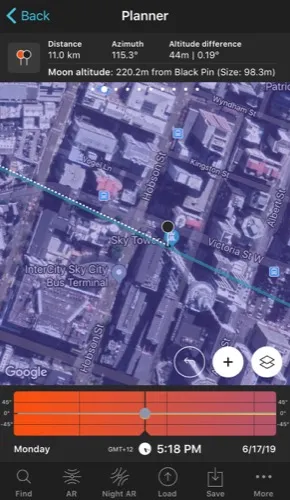
Here's a video in which Rafa explains in great detail how to plan a photo of a huge Full Moon just behind the imposing Sky Tower, a 328-meter high tower in Auckland, New Zealand.
More specifically, the aim is to capture the Moon just behind the top floor of the tower, which is about 220 m above ground level.
But if instead of watching the video, you prefer to read the workflow you should follow, here are the details.
So take your phone, open PhotoPills and follow these steps with me.
Place the Red Pin near the subject
As soon as you start planning, the first thing is to place the Red Pin near your subject.
In this particular case, you'll plan a photo in Auckland, New Zealand's most populated city. There is the Sky Tower, a fantastic tower that will serve as the main subject.
The building is 328 m high, although it has a huge antenna. So it might be interesting to capture a photo of the Full Moon (as big as possible) passing just behind the top floors where the top observation deck is and which are illuminated at night. The main observation deck is called Skydeck and is at 220 m, just below the antenna.
Obviously, the idea is that the Moon is also aligned with the tower... Spectacular!
Well...
Open PhotoPills, tap Planner (Pills Menu) and then place the Red Pin near your subject, the Sky Tower. If you don't know how to do it, this video shows you how to move the Red Pin.
For example, tap the Load button (at the bottom) and type "Sky Tower" in the search bar. Select the result and the Red Pin will be placed on the tower itself.
Select the Moon date you want
Now you're going to find out when the next Full Moon is.
In the Planner, tap twice on the center of the Time Bar to set the current date and time.
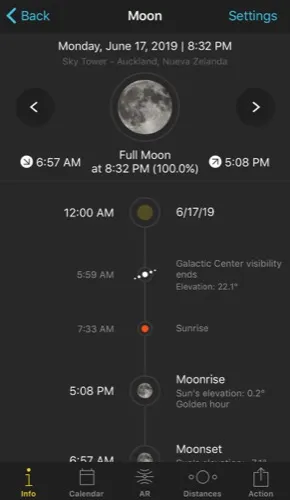
Then swipe the top panels to Panel 4. Once there, tap the Moon icon to jump in time to the next important phase. Keep tapping until you get to the next Full Moon.
This happens on June 17, 2019.
Although you can also use the following tricks...
Here's the first one.
If you know the date, tap once the Time Bar. In the Date and time screen, you can set the date directly.
And here's the second one.
Exit the Planner by tapping on Back, and then tap Moon (Pills Menu). Then, tap the Calendar button. Full Moons have a white dot below the date.
Tap, for example, on June 17, 2019 Full Moon. On the Moon screen, tap the Action button (bottom right) and select Send to planner. The date of the Full Moon will be set in the Planner.
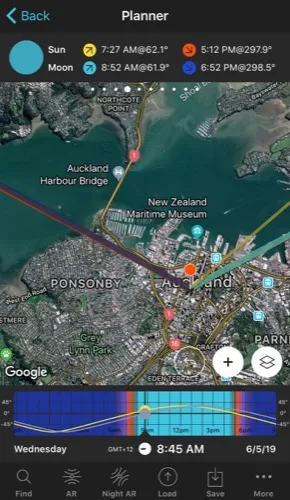
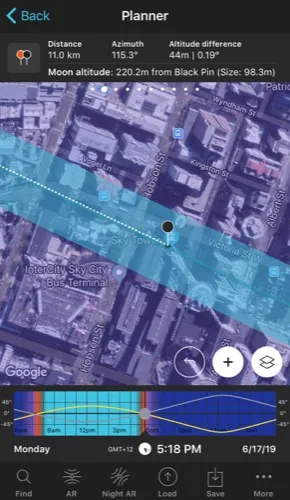
Place the Black Pin where you want the Moon
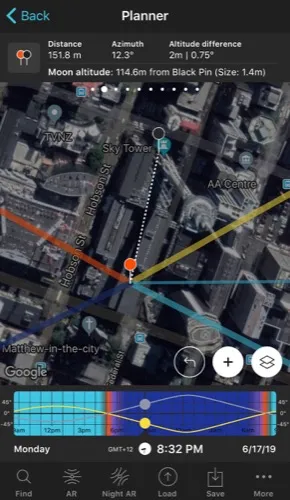
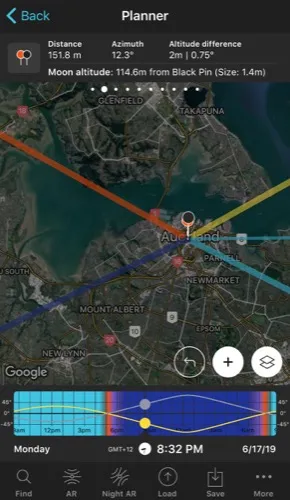
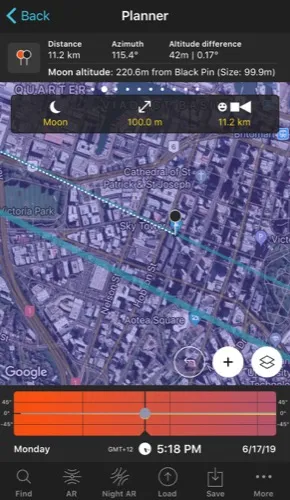
Now that you have the selected date, zoom in on the map until you've enlarged the Sky Tower as much as possible.
Swipe the panels above the map until you find the Black Pin information panel (Panel 2). Tap the icon showing the Red Pin and the Black Pin to activate the Black Pin on the map. Drag the Black Pin to the centre of the ground floor of the Sky Tower, right where you want the Moon to be aligned.
Don't place the Black Pin on the roof. Keep in mind that what you're seeing on the map is a projection of the buildings, not a 3D representation. That's why you should always place the Black Pin at the base of the building, right where you want to align the Moon with the tower.
Also, the Black Pin helps you to have your subject perfectly located on the map at all times.
Understand the Moonrise/set directions
Zoom out on the map to get an overview of the area where you want to take the photo.
Once you have selected the date (06/17/2019), you can see on the map the Moonrise/set directions:
- The Moonrise direction is the thick light blue line.
- And the Moonset direction is the thick dark blue line.
If, for some reason, you don't see these lines, you may not have the Moon layer activated.
Activate it!
Tap the Map Settings button. You'll find it at the bottom right corner of the map, right next to the (+) button on the map.
On the Map Settings screen, activate the Moon layer. To do this, tap the eye-shaped icon to the left of the layer.
All right, let's get back to the Moonrise and Moonset lines. These lines are key to guide you when choosing the shooting spot.
If you plan a:
- Moonrise. Choose your shooting spot (Red Pin) so that the Moonrise line (thick light blue line) is close to the subject (Black Pin). So when the Moon rises, it goes behind the subject.
- Moonset. Choose your shooting spot (Red Pin) so that the Moonset line (thick dark blue line) is close to the subject (Black Pin). So when the Moon sets, it goes behind the subject.
Choose the shooting spot, find the time of the photo and determine the Moon size
When the location limits the shooting distance
By now you should know that the shooting distance determines the Moon size relative to your subject (section 4). And in many cases, the locations will allow you to move away from the subject to a certain point.
In this example, the idea is to determine a shooting spot as far away as possible to capture a huge Moon. And, at the same time, the Sky Tower has to be visible, with no obstacles in between.
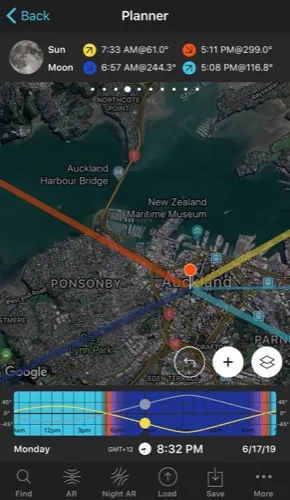
Exploring the map while considering the Moonrise direction, you'll notice that there's a beach (west of the Sky Tower) from which the photo might be possible.
Move and zoom in on the map in the area around the beach. Then, tap and hold right on the beach to place the Red Pin. Zoom in on the map again to tweak the Red Pin position.
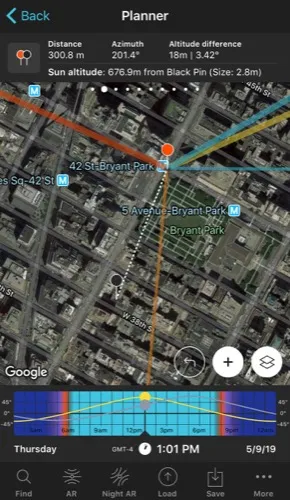
When moving the Red Pin, always move it in such a way that the Moonrise line (thick light blue line) is below the Sky Tower position (Black Pin). This way, when the Moon rises, it will move behind the tower. Remember that you're planning a photo in the Southern Hemisphere and the Moon moves north.
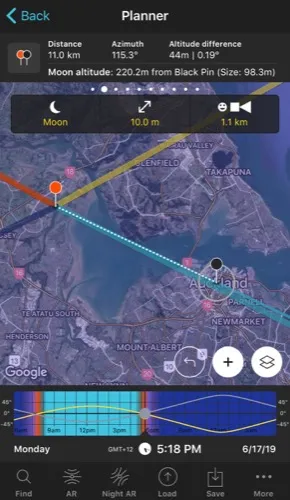
Now, move the time precisely to align the Moon with the Black Pin.

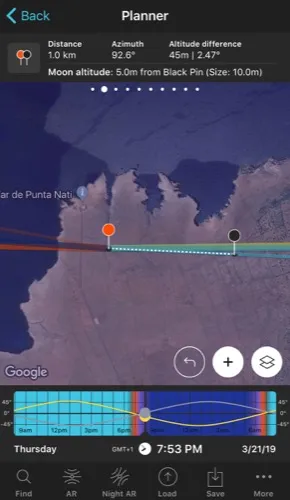
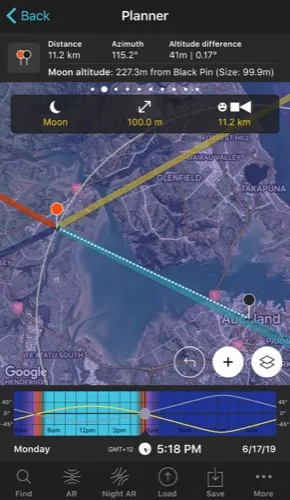
To move time accurately, tap for a few seconds on the center of the Time Bar. It expands so you can now adjust the time minute by minute. Swipe the Timeline slightly until the Moon line (light blue thin line) is aligned with the Black Pin. This happens at 05:17 pm.
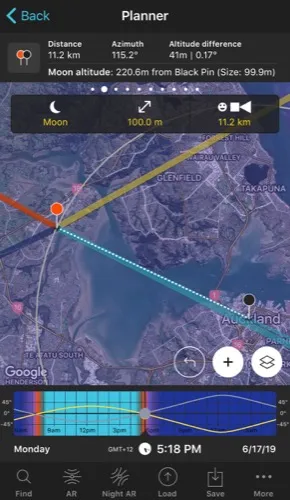
In Panel 2 you can see that at that time the Moon altitude above the Black Pin is 185.7 m. That means that it is slightly below the altitude you want in your photo (the 220 m of height at which the top observation deck is).
Therefore, move the time forwards until the Moon altitude above the Black Pin is 220 m. This happens at 05:18 pm.
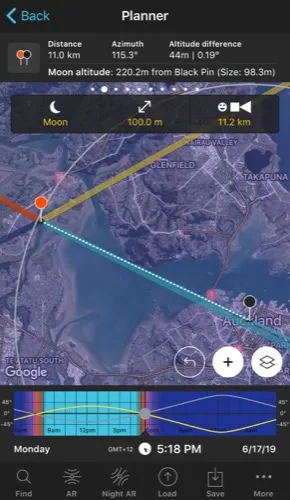
If you zoom in on the map around the Black Pin, you'll see that the Moon (light blue thin line) is no longer aligned with the Black Pin.
Therefore, you have to move the Red Pin on the beach so that the 3 elements (shooting spot, subject and Moon) are aligned again.
Whenever you move the Red Pin, check in Panel 2 that the Moon altitude above the Black Pin is the same (220 m in this case) because the elevation of the terrain may change. And also check that there are no obstacles blocking the shooting direction ;)
Now, check the Moon size you're going to get for the resulting shooting distance.
You can see the Moon size in Panel 2. The Moon size is 98.3 m... Pretty cool!
You can also see the Moon size on the map. To activate this option, tap the Map Settings button. You'll find it at the bottom right corner of the map, right next to the (+) button.
On the Map Settings screen, tap the Moon layer and activate the Show Moon size option. Finally, tap OK (top right corner) in iOS or the back arrow in Android.
Zoom in on the map over the Black Pin to see that the width of the thin light blue line shows you the Moon diameter at that date and time. This allows you to compare its size to the Sky Tower one.
Well, in this case, you've chosen the ideal shooting spot (the beach) thus determining the shooting distance and, obviously, the Moon size as well.
But if you want to find out where to place the Red Pin to get a specific Moon size, you should definitely read the next section.
You want a specific Moon size compared to the subject
If you want the Moon to have a specific size relative to the subject, you're going to depend on the location because it has to allow you to move away to the right distance at which the Moon is exactly that size (section 4).
Imagine that you want the Moon to be 100 m relative to the subject (the Sky Tower).
How can you determine the shooting spot?
Tap the Map Settings button. You have it on the map, next to the (+) button.
On the Map Settings screen, in the Map Tools section, tap the Sun/Moon button. Then tap OK (top right corner) in iOS or the back arrow in Android.
On the map, you can now see a grey circle. It shows the shooting distance you need to place the Red Pin to get the size of Moon you want.

In the top box that just appeared, type the Moon size you want (100 m, for example). You'll see that the diameter of the grey circle changes according to the size you type.
Place the Red Pin on the grey circle, so that the Moonrise line (thick light blue) is not too far from the Black Pin. So, when the Moon rises, it'll go behind your subject.
Now, you have to take into account the Moon altitude relative to the Sky Tower.
Remember that the building is 328 m high, although it has a huge antenna. And that the Skydeck, the top observation deck, is 220 m high, just below the antenna.
Look at Panel 2, it tells you the Moon altitude compared to the Black Pin. Therefore, you need to find out at what time the Moon will be at about 220 m above the Black Pin. Move the Time Bar around the Moonrise until you find the time it happens.
Now adjust the Red Pin position on the grey circumference, taking into account the direction in which the Moon will move, so that the white dotted line (between the Red Pin and the Black Pin) and the blue thin line (Moon direction) overlap.
When moving the Red Pin, the topography may have changed, so check the Moon elevation above the Black Pin on Panel 2.
If it hasn't changed, great, you just have planned the photo...
If you go to the Red Pin position on June 17, 2019 at 05:18 pm, the Moon will be aligned (and centered) with the Sky Tower top observation deck...
And its size will be 100 m!
On the contrary...
If the topography has changed, repeat the workflow.
Check the natural light
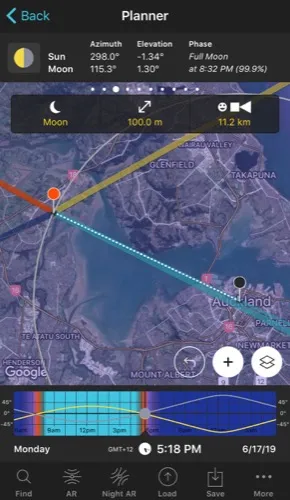
When you photograph the Moon, the natural light you have at the time of shooting is super important (section 4). Therefore, it's essential to check the conditions you're going to have.
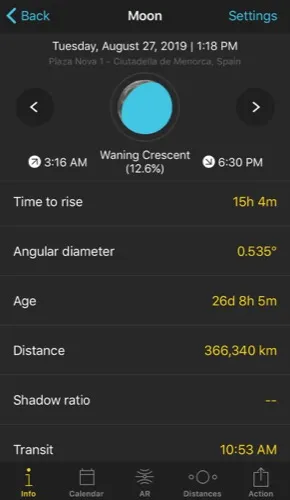
To do this, swipe the top panels until you get to Panel 3. Here you can see the Sun elevation at the time of the photo. In the example we are studying it's -1.34º.
This means that the Sun is below the horizon and that it's golden hour. Remember that the golden hour occurs when the Sun has an elevation between 6º and -4º.
The light will be fantastic to photograph both the Moon and the tower in one exposure.
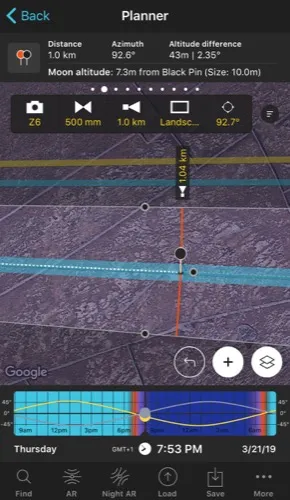
Plan the field of view and the depth of field
Finally, check the field of view (what will be inside the frame) and the depth of field of your photo (what is in focus and what isn't) depending on the camera settings you use.
To do this, tap the Map Settings button. You have it on the map, next to the (+) button.
On the Map Settings screen, in the Map Tools section, tap the DoF (Depth of Field) button. Tap OK (top right corner) in iOS or the back arrow in Android.
You'll see that a new panel has appeared on the map.
Now enter the camera settings.
Imagine you're using a Nikon Z6 with a 500mm at f/8, focusing right at the distance from the Black Pin (i.e. the subject).
You shoot in portrait mode (vertically) and want to frame in the Black Pin direction. Tap the Azimuth framing button (the last button) and on the Azimuth screen, tap the Align with Black Pin option. The field of view is now aligned with the Black Pin.
On the map you can also see that the hyperfocal distance is 1.04 km, less than the shooting distance (11.2 km). So by focusing on the Black Pin, on your subject, both the Sky Tower and the Moon will be in perfect focus.
If you zoom in on the map in the Black Pin area, you can see the field of vision and, thus, what will be in your frame.
And if you have activated the Moon size on the map, you can also see how big the Moon will be in your frame ;)

How to plan the Moon in a certain position (2)
In this case, you know exactly the photo you want...
That is, you know the exact shooting spot from which you'll take the picture, the frame and the Moon position relative to the subject you want, but you need to find out:
- If that particular photo is possible.
- And if so, when exactly.
So it's best to use the Find tool in the PhotoPills Planner.
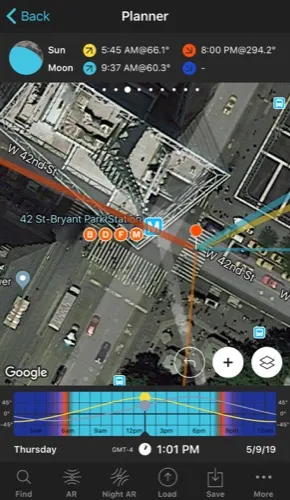
Here's a video in which Rafa explains in great detail how to plan a photo of a big Full Moon aligned with one of the streets of Manhattan in New York (USA).
But if you prefer to read, this is how to plan the photo.
So again, take your phone, open PhotoPills and follow these steps with me.
Place the Red Pin on the shooting spot
The first step is to place the Red Pin on the shooting spot you want.
Open PhotoPills, tap Planner (Pills Menu) and then place the Red Pin on the shooting spot. For example, at the intersection of 6th Ave. and 42nd St. If you don't know how to do it, this video shows you how to move the Red Pin.
Place the Black Pin where you want the Sun or the Moon
Planning a photo with the Sun is easier than doing it with the Moon. So to help you understand the concepts, I'm going to explain to you how to plan the photo with the Sun first. And then I'll explain to you how to plan it with the Moon.
Let's start...
You want the Sun aligned with 42nd Street, so you need to find out if there are any obstacles blocking the horizon.
To do this, open Google Maps and place the marker at the end of 42nd Street. Then, use the Street View tool to observe the horizon.
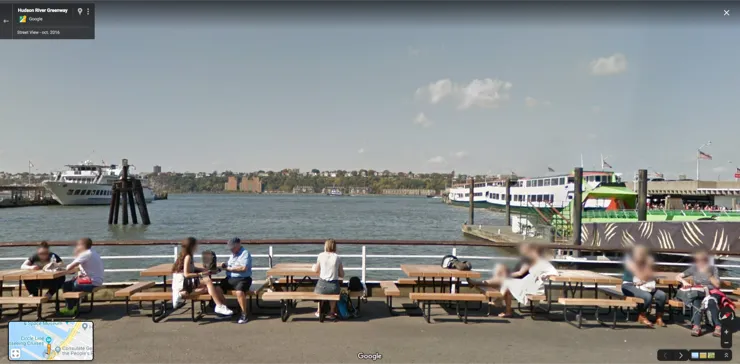
As you can see, there's a hill across the Hudson River that blocks the horizon. Therefore, you'll have to take it into account when planning: you need the Sun to be above it to prevent the hill from hiding it.
Swipe the top panels on the map until you find the Black Pin information panel (Panel 2). Tap the icon showing the Red Pin and the Black Pin to activate the Black Pin on the map.
Drag the Black Pin across the Hudson River, over the hill, and always aligned with 42nd Street.

Panel 2 tells you the altitude difference between the Red and the Black Pin. You have the information in meters (altitude) and in degrees (elevation). If you move the Black Pin along the hill, you'll be able to find out its highest point, that is, the one that has the biggest altitude difference relative to the Red Pin (36 m or 0.60º).
Find out the Sun elevation you need
Once you have the Black Pin placed at the top of the hill, you can find out the Sun elevation you need.
In this case, you want the Sun to be just above the hill, almost touching it with the bottom.
Well...
Panel 2 also tells you the size of the Sun and Moon (when aligned with the Black Pin). In spite of their different sizes (the real ones), the Sun and the Moon have a very similar apparent size (the size they'll have in your picture): about 31-32 m.
Therefore, if you want the Sun (or Moon) to touch the top hill, the center of the Sun has to be about 16 m (its radius) above the hill.
Great, you know where you want the Sun. Now you have to figure out when it happens.
Find the dates when the photo is possible
In other words, you need to find those dates when the Sun is aligned with 42nd Street and at the altitude in the sky you want: kissing the hill. That is, about 16 m above the hill. In other words, you have to check that the photo is possible ;)
To do this, tap the Find button. It's located on the bottom left corner of the Planner. And then, select Sun at azimuth and elevation (Sun in Android).
On the new screen, you have to tell 3 things to PhotoPills:
- The date range you want to search for results (for example, 1 year starting from today).
- The Sun azimuth or direction (aligned with 42nd Street).
- The Sun elevation or altitude (at a height of 16 m above the hill).
Enter the date range
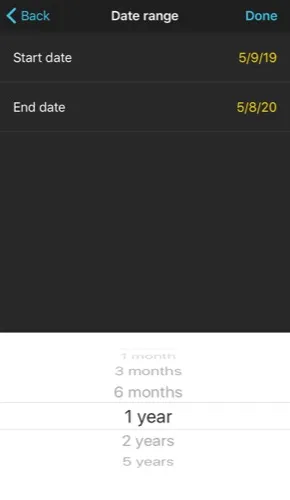
Tap Date Range, tap Start date, then on Today and on OK (back arrow on Android).
Next, tap End date. Now you can enter a certain date or range. To enter a range, tap the black area of the screen and the date options will change. Select 1 year, for example, and tap OK (back arrow on Android).
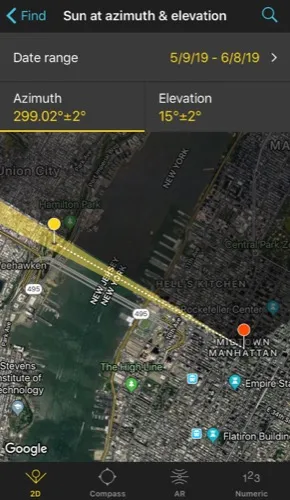
Enter the Sun azimuth
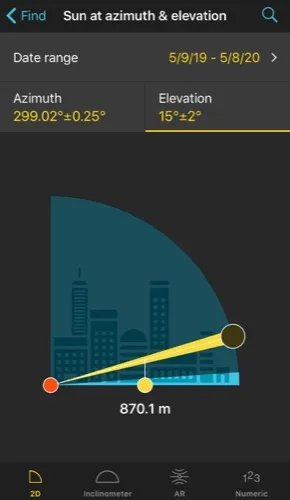
The Yellow Pin you see on the map is linked to the Black Pin, so you now have the Sun azimuth! :P
If you look at the top, the azimuth is 299.02º with a ±2º error represented by the yellow area on the map.
In this example, you want the Sun to be aligned with 42nd Street so the error margin has to be much smaller. To change it, tap Azimuth (a yellow line appears under the numeric value) and at the bottom, tap Numeric. In the new screen, select Error ±, type "0.25º" and tap the screen to accept.
You'll see that the yellow area adjusts to the width of 42nd Street.
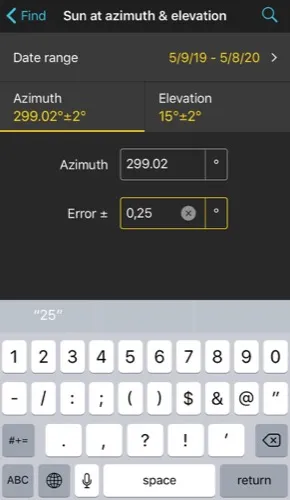
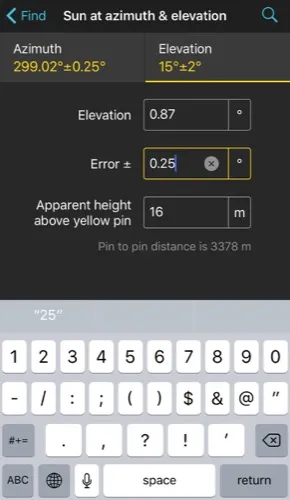
Enter the Sun elevation
Tap Elevation (a yellow line appears under the numeric value) and at the bottom, tap Numeric. In Apparent height above the Yellow Pin, type 16 m, which is the altitude you need for the Sun to be kissing the hill.
The elevation is calculated automatically: 0.87º.
Since you want the Sun to be about 16 m above the hill, you need exact results. So set the elevation error to 0.25º.
Get the results table for the Sun
Great, you've just entered the date range and the Sun position you want (azimuth and elevation).
Tap Search (magnifying glass icon at the top right corner) to see the potential dates.
In the table, the closest result to a 0.87º elevation is the 07/12/2019 (elevation 0.86º) one. Tap that result to return to the Planner map.
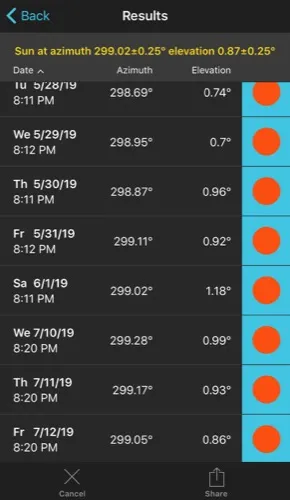

Have a look at Panel 2 and check the Sun altitude. If it's not 16 m, fine tune the time on the Time Bar until Panel 2 tells you exactly that the Sun is 16 m above the Black Pin.
To do this, tap and hold the center of the Time Bar until it expands. This way, by swiping it, you'll be able to move the time minute by minute and be more precise.
Finally, make sure that at that exact time the Sun is perfectly aligned with 42nd Street.
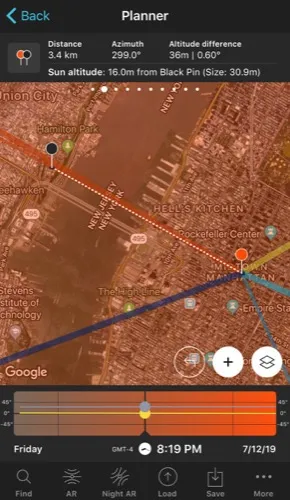
Perfect!
You've just planned the photo :)
If you go to the Red Pin position on July 12, 2019 at 08:19 pm, you'll be able to photograph the Sun aligned with 42nd Street just kissing the hill.
Now that you know when the Sun will be exactly where you want it to be...
It's time to find out when the Moon will be at that very same spot!
Plan the same shot with the Moon
Once you've planned the Sun shot, planning the Moon one is very simple.
In the Planner, tap Find (located at the bottom left corner of the screen) and then on Cancel (x-shaped icon) to cancel the previous search.
Tap again on Find and select Moon at azimuth and elevation (Moon in Android).
Extend the date range
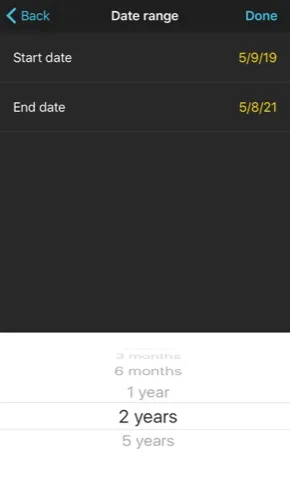
Since the Moon is much more unpredictable than the Sun, extend the search date range to 2 years, for example. Tap first on Date Range and then on End date. Select 2 years and tap OK (back arrow on Android).
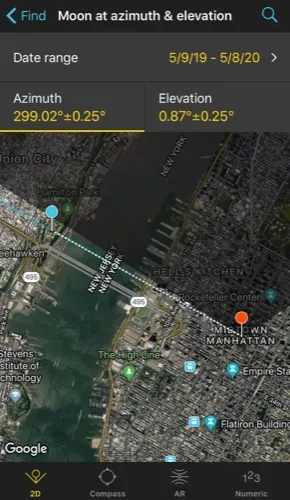
Keep the azimuth and the elevation
Since you want the Moon to be in exactly the same position as the Sun, keep the same azimuth and elevation values. Remember that the apparent size of the Sun and the Moon are very similar, so they'll have more or less the same size in the photo ;)
Tap Search (magnifying glass icon in the top right corner).
Get the results table for the Moon
In the results table, tap twice on Phase to sort the results according to the Moon phase. This will give you the Full Moons first.
Look at the first result, on 01/28/2021. In the phase, the orange background indicates that it occurs during the golden hour. Natural light is key in Moon photography, so it's shown in the table with different colors. Have a look at this section of the user guide for a more detailed explanation of the different colours.
Tap the result (01/28/2021) to see it on the Planner map.
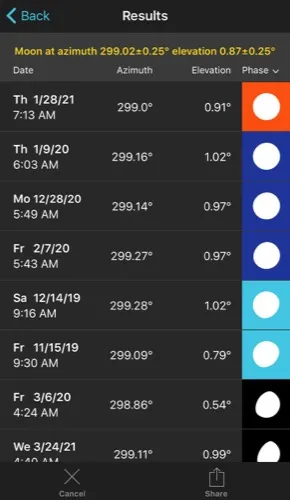
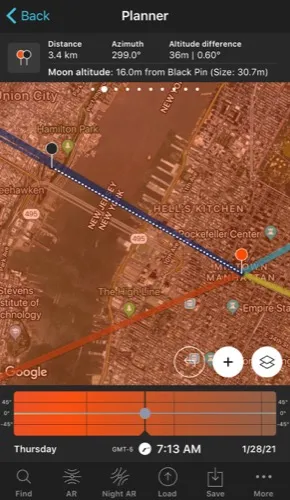
Swipe the top panels to Panel 2 and check the Moon altitude. If it's not 16 m, fine tune the time on the Time Bar until Panel 2 tells you that the Moon is 16 m high.
To do this, tap and hold the center of the Time Bar until it expands. This way, by swiping it, you'll be able to move the time minute by minute and be more precise.
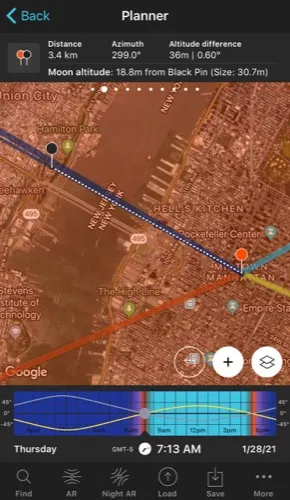
Finally, check that at that exact time (January 28, 2021 at 07:13 am), the Moon is perfectly aligned with 42nd Street.
Moreover, you can check the Moon size relative to the width of 42nd Street. To do this, tap the Map Settings button. You have it on the map, next to the (+) button.
On the Map Settings screen, in the Map Layers section, tap Moon. In the new screen, activate the Show Moon size option using the slider and tap OK.
Once you return to the Planner, the Moon azimuth blue line has widened to show you the Moon apparent size in the photo relative to the width of 42nd Street.
Finally, don't forget to check the type of natural light you'll have in the scene. To do this, look at the Sun elevation on Panel 3.
In this case, the elevation of the Sun is 0.35º, so the time when the Moon will be exactly where you want it to be will occur during the golden hour.
If you want to check other dates, tap Find to return to the results table.
Perfect!
Now you know how to plan any kind of Moon photo you can imagine.
Now let's see all the equipment you're going to need to photograph it...
Keep reading!
6.All the gear you need to photograph the Moon (beginner, advanced and pro)
It's time to focus on the equipment you'll need to photograph the Moon... from the most basic to the most advanced gear.
Let's do it!
Camera
Believe or not, you can take Moon pictures with any camera. But that doesn't mean there aren't any limitations.
As you may have guessed, depending on the type of camera you use, the quality of the photos you take will depend to a great extent on their technical features. Therefore, you'll have to adjust your photographic ideas to the type of camera you have or want to use.
Smartphones
Actually, yes, you can photograph the Moon with your smartphone.
Yes, keep in mind that, except for some very specific models, your smartphone camera uses a short (wide angle) focal length. Therefore, the Moon will appear very small in the photo, almost like a dot (section 4).
On the other hand, the most spectacular Moon photos are taken during the last part of the golden hour and during the blue hour, when the Sun is already below the horizon. In that time frame the amount of light in the scene is decreasing (section 4) and as the smartphone camera has a very small sensor, it will most likely be unable to capture it successfully. And if it does, the quality of the photo will be very limited.
Nowadays, the vast majority of smartphones don't allow you to change the aperture, so the smartphone will automatically increase the ISO. That means your photos will have a lot of noise.
Here, use your creativity to fight against technical limitations.
Play with unusual compositions. Try to include interesting elements in your composition. And, of course, take great care when picking your subject as in this case the Moon will play a secondary role.
Compact cameras
Compact cameras have moderate image quality and are very good value for money.
However, it's a product in decline. On the one hand, the performance of smartphone cameras is getting better and better. On the other hand, compact cameras have a number of limitations that cannot compete with DSLRs and mirrorless cameras.
In this sense, as they're not interchangeable lens cameras, the Moon size in the photo will be limited to the focal range of each camera. They don't usually have a very large sensor (at most 1") so at high ISOs they produce a lot of noise.
As I said before, don't get discouraged and use your imagination. Sometimes limitations help you to be more creative and to get images that you would otherwise never have tried to capture.
Low-end cameras
If you're ready to jump into the Manual shooting mode (M) and don't want to spend a lot of money, these cameras will allow you to photograph the Moon in an acceptable way.
They are basic cameras, but they allow you a good control of the exposure:
- Cameras with an APS-C sensor: Nikon Z30; Canon 4000D, 250D and M5; Sony a6600.
- Cameras with a Micro 4/3 sensor: Olympus OM-D E-M10 Mark IV and Panasonic G95.
- Compact camera (1" sensor): Sony RX100 VII.
Mid-range cameras
When photographing the Moon, you'll face scenes that have (very) little light. In those cases, you'll be forced to crank up the ISO to avoid using a slow shutter speed and thus having a blurred Moon. Therefore, the less noise your camera produces, the better the quality of the image.
These cameras noise performance is very good at a reasonable price.
- Cameras with an APS-C sensor: Nikon Z50, Zfc and D7500; Canon R10, R7, 850D, 90D and 6D Mark II; Fuji X-S20 and X-T30 II; Pentax KF; Sony a6700.
- Cameras with a Micro 4/3 sensor: Olympus OM-D E-M5 Mark III and Panasonic G9 II.
- Full Frame cameras: Nikon Z5 and D750; Canon RP; Sony a7C II.
High-end cameras
These are professional cameras and offer an excellent quality:
- Cameras with an APS-C sensor: Nikon D500; Fuji XH-2S, XT-5 and X-Pro3.
- Cameras with a Micro 4/3 sensor: Olympus OM-1 and Panasonic GH6.
- Full Frame cameras: Nikon Zf, Z6 II, Z7 II, Z8, Z9, D780, D850 and D6; Canon R8, R6 Mark II, R5, R3, 5D Mark IV, and 1D X Mark III; Panasonic S5 II, S5 II X, S1R and S1H; Pentax K-1 Mark II; Sony a7 IV, a7 CR, a7R V, a9 III and a1.
Lens
As I already told you in section 4, your lens and focal length choice will depend on how big you want the Moon to appear in your photos.
Do you want to include part of the landscape and you don't care if the Moon looks like a dot?
Use a wide angle. For example, the Nikon 14-24mm f/2.8 or the Zeiss Milvus 18mm f/2.8, my favorites.
Do you want to include part of the landscape but want a bigger Moon?
Take a standard telephoto lens. For example, the Nikon 70-200mm f/2.8 or the Canon 70-200mm f/2.8.
Do you want to capture a big Moon?
Use a super telephoto lens. For example, the Nikon 200-500mm f/5.6, the Canon 100-400mm f/3.5-5.6, the Fujifilm 100-400mm f/4.5-5.6, the Olympus Zuiko 300mm f/4 PRO, the Sony 100-400mm f/4.5-5.6, the Sony 400mm f/2.8, the Sigma 120-300mm f/2.8 for Nikon and Canon or the Sigma 150-600mm f/5-6.3 for Nikon and Canon.
And if necessary, use a teleconverter (1,4x or 2x) as well to shoot from even further away.
If you have a camera with a Micro 4/3 or APS-C sensor, use the cropping factor to your advantage. That way, you'll have more options to get a huge Moon in the photo.
Another interesting option is to use a catadioptric lens. It's smaller, cheaper and lighter than a regular super telezoom lens. In addition to this, diffraction is almost insignificant.
But it's a lens that has several drawbacks. The first one is that you can't change the aperture. And the second one is that all the out of focus areas of the picture can result into a doughnut-shaped bokeh.
As always in photography, in the end it's all about getting the best possible photo with the equipment you have :)
Tripod and head
As I told you in section 4, photography depends on natural light. Or rather, the lack of it... In other words, in many occasions you're going to shoot with little light (end of the golden hour and during the blue hour).
So you need a stable tripod allowing you to shoot at a shutter speed:
- Slow enough to capture the (little) light in the scene and take a picture of the Moon, the subject and the rest of the scene.
- Fast enough so that the Moon is not blurry due to the rotation of the Earth.
Low-end tripod and head
I know you always have to start with something. But it always amazes me how many students come to my workshops with equipment worth thousands of dollars and who want their $100 tripod and head to be stable and sturdy.
Don't make the same mistake.
A good tripod and a good head can last many years if you take care of them.
So invest in high quality gear. Avoid tripods with a central column because their instability can produce vibrations and your photos will be blurred.
Mid-range tripod and head
The Manfrotto 055XPRO3 is probably the best-selling tripod among advanced amateur photographers. It's good value for money and it's a very robust aluminum tripod.
I also really like the Travel line by Benro.
Although if you have a slightly bigger budget, you should invest in a carbon fiber tripod. They offer the same strength and stability as an aluminum tripod. But they're much lighter and your back will thank you for it.
I mentioned Manfrotto. Have a look also at the tripods from Gitzo, Benro, Induro or Really Right Stuff. They are fantastic brands as well.
Oh, and make sure they can bear at least between 5 and 25 kg.
High-end tripod and head
Obviously, the lighter the tripod, the more expensive it will be. But from a certain price range up, all the carbon fiber tripods of the brands I just mentioned are very good.
Do you want to invest a little more? Buy yourself a good head.
Most brands sell tripod legs and head packs.
But if you're looking for a specific head, you don't have to keep the one included in the pack. Make sure it's a ballhead that bears between 5 and 7 kg and that it has a removable plate.
My favorite ballhead is the Really Right Stuff BH-55.
Although I also like the Gitzo GH1382QD, the Kirk Enterprises BH-1 and the Arca Swiss Monoball Z1 SP. All of them are extremely solid, reliable and allow you to work with great precision.
And when I use a super telephoto lens I use a Benro GH2 gimbal head.
Intervalometer
Whenever you photograph the Moon, try to avoid any contact with the camera. The slightest vibration will make you ending up with a blurred photo.
Many photographers use a shutter release (with cable or remote). But I recommend that you buy an intervalometer instead.
In the case of Moon photography, you're only going to use the basic shooting function. But if you feel like making a timelapse or you want to photograph some Star Trails, you will need to shoot at certain intervals.
So investing in an intervalometer you add a versatile tool to your equipment.
I usually recommend these great intervalometers:
- Pro intervalometer: SMDV.
- For cheap intervalometers check the brands Neewer, Phottix and Vello.
A great alternative is a device called CamRanger. Right now it's available for Nikon, Canon, Fuji and Sony cameras.
It's a stand-alone device that you connect to your DSLR or mirrorless camera with a USB cable. It creates an ad hoc WiFi network to which you can connect your smartphone or tablet (iOS, Android and Windows). Thanks to the CamRanger application you can control your camera without a computer or an Internet connection.
Best of all, this device is independent. Therefore, if your mobile device loses its connection, the CamRanger has an internal memory to keep shooting. Imagine that you are making a timelapse, your sequence would be cut if the camera stops taking pictures in the time frame you've set...
So the CamRanger is great for many types of photos: timelapses (of the Milky Way, of Star Trails, of solar eclipses or lunar eclipses...), bracketing, focus stacking for macro and landscapes... and many more!
Flashlights and headlamps
Whenever you're shooting the Moon, you'll need a small piece of lighting equipment. If your shooting session is at Sunrise, Sunset or twilight, you'll be in the dark at some point. Before, during or after taking photos... ;)
There are all kinds of models of headlamps. But you should get a RED Night Vision Light headlamp in case you need to check your camera settings.
The human eye needs 20 minutes to get used to seeing in the dark. It would be a shame to waste that precious time because of a strong white light...
My favorite ones are the Petzl Tikka XP, the Pelican 2750 and the Pelican 2760.
If you prefer a powerful headlamp without RED Night Vision Light, try the Led Lenser SEO5, the H14R or the H7R.2.
And if you prefer to use a flashlight, my favorites are the Coast TX-10, the Led Lenser L7 or the Maglite Mini.
At night, make sure you don't disturb the other photographers around you by turning on your headlamp or flashlight. Any additional light sources will blow out the exposure of their photos.
Memory cards
Buy the highest quality SD Cards (such as SanDisk or ProGrade) to minimize the risk of losing your photos and have the maximum transfer speed.
Today their price has plummeted so even the highest capacity cards (64GB, 128GB or even 256GB) have a good price.
However, I like to use medium capacity cards (16GB or 32GB). So if a card breaks or I lose it (let's hope not!), the number of lost pictures is lower.
Although there are still cameras that use CompactFlash (CF) cards, it's a system that is slowly disappearing.
And to replace it, SanDisk, Nikon and Sony launched a new card format called XQD currently available for several Full Frame (Nikon D4, D4s, D5 and D850; Panasonic S1 and S1R), APS-C (Nikon D500) and mirrorless (Nikon Z6, Z6 II, Z7 and Z7 II) models. These cards
- Have a very high storage capacity (from 32GB to 256GB).
- Have a super fast reading and recording speed (400MB/s compared to 160MB/s for a CF card or 250MB/s for an SD card).
- Are very secure, resistant and with an incredible durability.
Later on, in 2017, CFexpress launched the latest standard memory card from the CompactFlash Association with 2 new form factors, Type A and Type C were announced, with the existing XQD form factor becoming Type B.
- Type A has, so far, only been adopted by Sony in all of its newest models.
- Type B is a far more common format offering a lower price. It has been widely adopted by Nikon in its Z series, Canon in some EOS R bodies, and Panasonic in the S1/S1R and GH6.
- Type C is not being produced yet.
And the PhotoPills DaeMOONized T-shirt!
What were you thinking?
That you didn't have to dress up for the occasion?
Yes... You have to be elegant for your date with the Moon.
Dressing formally is mandatory! :P
7.How to photograph the Moon step by step
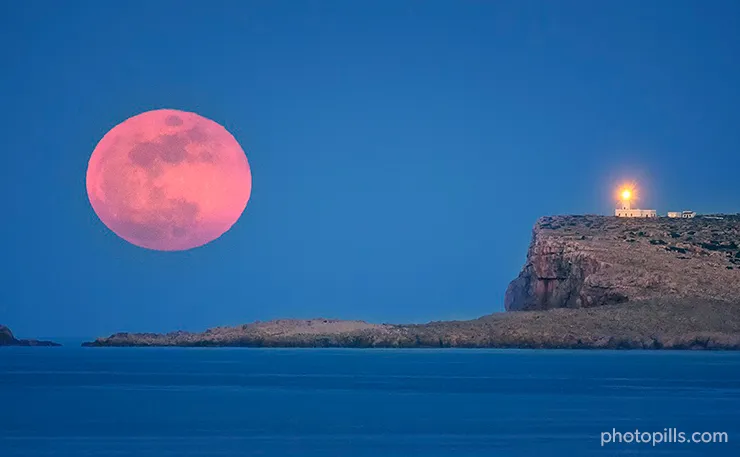
The day has come!
It's finally time to grab your gear and capture that Moon shot you've planned so carefully...
In this section you'll find everything you need to successfully photograph the Moon, including how to focus and camera settings :)
If you want to photograph a lunar eclipse, take a look at our super guide to lunar eclipses. There you'll find a lot of examples explained step by step.
Ready?
Let's start from the beginning...
Get to your shooting spot in advance
This step is essential when taking any photograph. It allows you to scout the location in detail and gives you enough time to prepare the gear.
More importantly, you can make sure you're at the exact shooting point. And that, dear PhotoPiller, is the key to any Moon picture.
The slightest mistake, a metre to the left or right and...
Oops!
The Moon won't be where you wanted it to be! :(
Use the PhotoPills Planner to check that you're in the right place.
You can activate the option to see your position on the map by tapping on the (+) button on the map. Then tap the eighth button on the toolbar that just showed up (it's the compass icon).
Do you see a blue circle on the map? Good, it shows your current position.
Walk to the Red Pin location. To do this, it's important that you zoom in on the map and check that the blue dot is actually aligned with the base of the Red Pin (the exact spot where the stick is pinned).
Anyway, you should always be able to move a few meters to adjust the composition the moment you see the Moon.
Place the tripod, ballhead, camera, and lens
Place the tripod along with the ballhead on a solid surface and make sure it's stable.
Put on the lens that you're going to use during the shooting session and mount the camera and lens on the ballhead. Finally, plug the intervalometer in and check that everything is working correctly.
Once again, make sure all the equipment is stable. The slightest vibration will cause the Moon to come out of focus.
It would be a real shame...
Remove the UV filter
If you have it on, remove the ultraviolet (UV) filter.
It's a completely useless filter in this type of photography. It's going to cause you problems when shooting the picture and you'll end up with a low quality image.
Turn off the lens stabilization system
Some lenses include a function to stabilize vibrations. Canon, for example, calls it Image Stabilization (IS), while Nikon calls it Vibration Reduction (VR), and Sigma, Optical Stabilizer (OS). Other brands, such as Sony, Olympus and Pentax have been pushing for in-camera stabilization.
If your lens has an image stabilization system, turn it off.
Since the equipment is stable on the tripod and ballhead, the system may try to compensate for non-existing vibrations... and the Moon could end up blurry.
Shoot in RAW
Yes, I know that a RAW file takes up much more memory than a JPEG file.
But there's a reason for everything: the RAW file contains all the data from the image that the sensor has captured.
Therefore, you'll always have a higher quality base image that will allow you to develop, post-process and correct errors that would otherwise be impossible.
Keep in mind that the image you see on your LCD is a JPEG copy of the RAW file. So the histogram you're seeing in the camera is not exactly the RAW file one.
Determine the focal length you're going to use
Select the focal length depending on the composition you've imagined.
Remember what I told you in section 4, the focal length determines the Moon size in the photo.
So if you want a:
- Moon as a dot, use a wide-angle lens (10-35mm)
- Small Moon, use intermediate focal lengths (35-200mm)
- Large (or huge!) Moon, select long focal lengths (>200mm)
Select the Manual shooting mode (M)
Thanks to the Manual shooting mode (M), you can precisely control the aperture, shutter speed and ISO.
That way, you get the perfect exposure for your photo.
Select the aperture
When photographing the Moon, the aperture depends on two factors:
- The quantity of natural light in the scene.
- The depth of field you want to show in the image.
Let me give you a couple of examples.
Imagine that you're photographing the Moon during the astronomical twilight so the absence of light forces you to use a wide aperture (f/2.8 or f/4 for example). At the same time, depth of field matters little since the foreground won't be illuminated. So you can focus on having a tack sharp Moon.
Now suppose you're shooting during golden hour, so the light in the scene allows you to use a relatively small aperture (f/8 or f/11 for example). Moreover, a small aperture will give you a greater depth of field, so you can capture in detail both the Moon and the landscape.
Focus
Obviously, to get the focus you want, you must master the depth of field concept ;)
The way you focus depends entirely on the focal length you've determined and what you want to be perfectly in focus.
Wide angle lens
Focus at the hyperfocal distance. Or even better, at a slightly longer distance (1 m, for example) to make sure everything is correctly focused from the foreground to the Moon. In this video I show you how to focus to the hyperfocal distance in less than 1 minute:
Intermediate/long focal lengths with foreground
Focus on the subject as long as the hyperfocal distance is shorter than the distance to the subject. That way, you also make sure that the Moon is also in focus.
When the hyperfocal distance is greater than the distance to your subject, there are two alternatives.
1. Look for an element to focus on that is further away than the hyperfocal distance
For example, it can be a building, a rock...
But when focusing, always make sure that the depth of field (DoF) near limit is closer to you than your subject. This way your subject will be within the area that will be acceptably sharp (focused). That is, between the depth of field near limit and infinity.
To look for this element use the Planner and the Depth of Field (DoF) tool.
Enter the shooting settings in the tool (camera, focal length, aperture, focus aligned with the Black Pin, etc.). Then, instead of placing the Black Pin on your subject, place it on an element that is further away than the hyperfocal distance (it's marked on the map) and that you know will be visible from the Red Pin position. This way you can visualize on the map what will be in focus and what won't (what's left between the depth of field near limit and infinity).
I suggest you do this work at home, before you go to the location. That way you'll know in advance where you're going to focus during the session.
2. Focus directly on your subject and leave the Moon slightly out of focus
In most photos, you'll hardly notice that the Moon is slightly out of focus.
It's always best to have your subject tack sharp and the Moon (somewhat) out of focus, not the other way around. There's nothing worse from an artistic point of view than having the Moon perfectly focused and your subject completely out of focus.
Long focal lengths without foreground
Focus directly on the Moon.
Use the Live View function on your camera's LCD to focus accurately. Zoom in on the image using your camera Live View on the LCD screen, until you see the detail of the Moon's surface. Then, turn the focus ring of the lens slowly until the detail of the surface is tack sharp.
If you're not used to focusing manually, turn the focus ring very subtly and when you notice that the Moon is focused, keep turning the ring until you go a little out of focus and then, turn the ring in the opposite direction to get everything in focus again. This way you'll see very clearly how everything is now in focus again.
And if your camera has the Focus Peaking and/or the Focus Magnifier functions, turn them on because they will help you to be even more precise.
Regardless of the focal length you're using, take a test picture to check that the framing and focusing are right.
Set the shutter speed
The shutter speed depends on the natural light you have at the time of the shooting (and on the photo you want to capture).
However, there is a limitation: the Earth rotation.
In other words, when you're facing a scene with very little light or completely dark, you can't use a shutter speed too slow because the Moon will be blurry. So you have to find a balance.
As a rule of thumb, use a shutter speed up to 1s.
Fine tune the ISO
It's time to adjust it considering:
- The exposure triangle. You already know the aperture and the shutter speed.
- How much noise your camera produces.
Ideally, you should use an ISO as low as possible. Start with ISO 100 and increase it depending on the light conditions (usually between 100 and 1600).
Set the white balance manually
Set it between 3400 and 5000K to boost the blues or between 6000 and 7500K to boost the golden tones.
Check the histogram and adjust the exposure
Frame and take a picture.
Check the histogram. It's a tool that allows you to analyze the image exposure on the LCD screen of the camera, and adjust the settings if needed to get a correct exposure in the field.
If necessary, adjust the exposure until you get the one you're looking for.
For example, if the photo is underexposed (darker than you want), I follow this workflow:
- First, I use a wider aperture (small f number), always checking that I get the depth of field I want. Although I try to avoid very wide apertures unless there's very little light in the scene.
- If the photo is still underexposed, I use a slower shutter speed (longer exposure time). However, never exceed 1s to avoid a blurry Moon due to its motion.
- And if the aperture and the shutter speed are not enough, I increase the ISO.
Do a bracketing to get the perfect shot
The light changes a lot while the Sun is rising or setting. Therefore, the Moon brightness will also change over time.
You should be prepared to adjust the exposure during the photo shoot. But one way to make sure you don't blow out the Moon is to do a bracketing.
A 1-stop bracketing of 3 shots will be enough in most situations. That way, once at home you can choose the photo with the best exposure as the base of your post-processing.
The most important thing is to avoid blowing out the Moon: shadows are easy to recover, but highlights are not. As long as you have the Moonlight under control, you can recover the rest of the picture.
Get ready to move around
Ah, the Moon!
It can be so treacherous...
Nailing the plan down to the last detail is not easy. In general, there are many factors that you have to take into account, especially if you want to take a picture with a huge Moon. That is, a photo from a very long distance.
You may not be right where the Red Pin is...
Perhaps when you see the Moon showing up, even though you've already captured the picture you wanted, you want to recompose the scene and take a second shot. Or even a third one...
And on top of it, the Moon moves extremely fast in the frame!
Knowing when to change your position quick and nimble is essential to make the most out of the moment :)
Oh, and here's a little trick... ;)
The Moon will always "follow" you.
In other words, if you see that the Moon stays to the right of your subject and you want to align it again, walk to your left so that the Moon "moves" to the left as well and aligns again. If the Moon stays to the left of your subject, move to the right.
It seems simple but with the stress of the session you'll see that it's not so obvious to know where to go :)
So, always be ready to take action :P
Well...
Now that you know what steps you have to take to capture the photo, be careful not to make any of the following mistakes!
8.The 11 most frequent errors when photographing the Moon

You haven't planned your photo (1)
Really?
Did you think that organizing a random photo shoot you were going to get that photo you've been dreaming about for so long?
Well, not at all.
So study section 5 carefully, watch the videos and follow all the steps. If you use PhotoPills and establish a logical workflow, you'll successfully capture your photo.
Believe me...
You're just a plan away from getting the photo you dream about.
Plan!
You haven't scouted the location during the day (2)
Oops...
This step is fundamental in landscape photography. And even more so in Moon photography.
On the one hand, it's very important to be able to find the shooting spot exact location. That is, the Red Pin position according to your plan (section 5).
On the other hand, keep in mind that many times it will be dark before, during or after the photo shoot. And at night everything is much more difficult. Scouting the area beforehand helps you find your way around, find references and avoid potential dangers (a ditch, a cliff, etc.).
So avoid risks that jeopardize your photo session or your safety.
You're not exactly at the Red Pin position (3)
Throughout the article, I've told you many times that Moon photography is a genre that needs precision. In order to get the Moon in an exact position in the sky relative to the subject, you'll have to be at a specific shooting spot.
If you don't do it, if you're not at the Red Pin position, you'll hardly get the photo.
Here's how you can avoid it:
- Scout the location during the day and a few days before the selected Moon date. Look for references to help you identify the shooting spot.
- If you don't have physical references, use PhotoPills.
When choosing the last option, follow these steps:
In the Planner, tap the (+) button on the map (lower right corner) and activate your position on the map (by tapping on the button with the GPS icon or arrowhead). A blue circle will appear on the map indicating the exact location you're in.
Now walk to where the Red Pin is. And make sure the blue circle is centered with the end of the Red Pin stick.
And remember, you should always be ready to move around and to adjust the composition as soon as you see the Moon show up.
The Moon moves very fast and you don't get the shot (4)
When you're using a telephoto lens, the Moon moves very fast within the frame.
That's why you must be quick and nimble when deciding the camera settings and when shooting.
Shutter speed is particularly key. If it's too fast, you risk getting an underexposed (too dark) photo. If it's too slow, the Moon may be blurred.
So practice whenever you can. Shoot the Moon even if it's not the phase you want (Full Moon, for example). This way, you'll learn how it behaves and to adjust the exposure triangle quickly enough.
You don't focus correctly and the subject is blurred (5)
Depending on the type of photo you have in mind, you can focus in different ways (section 7).
You include a large part of the landscape (wide angle lens)
That means you're using a wide angle lens to include part of the landscape in your frame. So make sure you focus at the hyperfocal distance.
Or better, at a slightly longer distance to be absolutely sure that everything is in focus (both the landscape and the Moon).
If you have any doubts, in this video I show you how to focus to hyperfocal distance.
You only include the Moon and the subject in the frame (telephoto lens)
In this case, the focusing will depend on the situation you're in:
- If the subject is further away than the hyperfocal distance, focus directly on the subject.
- If the subject is closer than the hyperfocal distance and you can focus at the hyperfocal distance because it's not too far away, focus on something further away than the hyperfocal distance. Always check that the depth of field near limit keeps the subject focused. That way, both the subject and the Moon will be acceptably focused.
- If the subject is closer than the hyperfocal distance and you cannot focus at the hyperfocal distance because it's too far away, focus on the subject. Even if the Moon isn't focused, you'll make sure you have the subject tack sharp.
- If you photograph only the Moon, focus directly at the Moon.
When shooting at such distant distances, it's very easy to miss the focusing.
To check that the subject and/or the Moon are perfectly sharp, use the Live View tool on your LCD screen and, if your camera has them, also use Focus Peaking and/or Focus Magnifier functions.
The Moon comes up blurred (6)
When checking the photo, if you notice that the Moon is blurred, don't be confused: a blurry Moon is not the same as an out of focus Moon even though in both cases the photo isn't completely sharp.
When it's out of focus, it's because you've had a problem when focusing. In that case, take a look at the previous section in which I explain how to solve it.
On the other hand, when the Moon is blurred, the problem is probably because your camera and/or your lens have been affected by some minor vibration.
- If you use a DSLR camera and slow shutter speeds (between 1/20s and 1s), the mirror produces vibrations when it lifts up. So lock the mirror up.
- Use a sturdy tripod and check that your equipment is in a stable position. Press the tripod well against the ground if it's dirt or sand. If you don't, the tripod may start sinking as you take pictures and they'll come up blurred.
- If it's very windy, turn on your lens image stabilization system (if it has one). Even if you're using a tripod, it will help avoid any destabilization because of the lens heavy weight.
- Use an intervalometer, avoid touching the camera when shooting.
The Moon turns out overexposed (7)
Depending on the type of natural light in the scene, or rather the lack of it, the Moon may be the only light source in the scene. So the scene has a high dynamic range.
Be careful when deciding the exposure you need.
If you overexpose the Moon (i.e. if it's brighter than it should be), it means that the highlights are blown out. In other words, the camera hasn't been able to capture all the information in the whites. Therefore, there is no detail in that area of the photo.
And, unfortunately, that can't be solved either in post-processing. So make sure you expose correctly by studying the histogram.
A good solution to this problem is doing a bracketing. With 3 photos you'll be able to solve most of the high dynamic range situations. But if the dynamic range difference is too high, try with 5 shots (or more, it's your call).
It's cloudy so you don't shoot at all (8)
The forecast isn't good at all: clouds are expected during your photo shoot... :(
My advice is to ignore them and go take the picture anyway.
Maybe the weather forecast is wrong or there's a last minute window and you get the shot.
Never give up!
In addition, clouds may confer the scene another atmosphere and you may capture something spectacular you never imagined.
Part of your equipment fails (9)
A few days before the photo session, check all your equipment (section 6) and make sure everything is working properly. Allow plenty of time in case you need to replace something on your gear.
Don't rush. Be thorough and spend as much time as necessary to do it properly.
Finally, if possible, take two of each (camera, lens, intervalometer). Or even more in the case of batteries or memory cards. If something goes wrong, you'll always have a plan B.
And while you're at it, write down a list of everything you'll need on the day of the shooting. That way you'll avoid forgetting something that might be important.
You forgot something at home (10)
In section 6 we saw in detail all the necessary gear to take your Moon picture.
While you're reviewing what you're going to take with you and that everything works perfectly, make a list.
Write a complete and detailed list on your smartphone. That way you only have to do it once and you'll always have it with you, in your pocket.
You don't shoot in RAW (11)
It's a beginner's mistake we've all made. I did.
So the sooner you stop doing it, the better. Always shoot in RAW.
This type of file contains all the information captured by your camera's sensor. Therefore, they're original files. And they're the only ones that allow you to post-process the image later on without losing quality.
A JPEG file is just a compressed format of the RAW file. And obviously, that compression involves losing a lot of the information and any quality.
9.6 Moon photography masters that you should follow
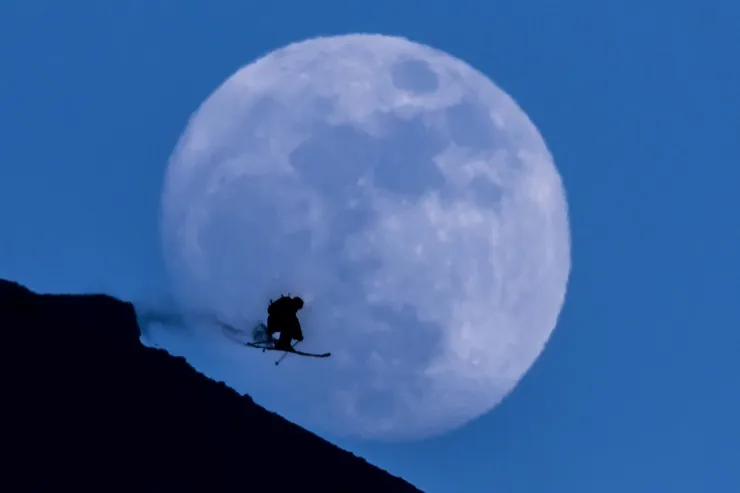
Photo by Philipp Schmidli, PhotoPiller of the Year (2016).
One way to learn photography is by seeing (and studying) pictures of great photographers.
In addition to being an endless source of inspiration, it can also help you experiment with new compositions and techniques. Because that's what it's all about: trying new things and learning along the way.
That's why I always like to pay attention to what my favorite photographers publish. There're so many people I have to keep learning from!
And I thought that the best thing I can do for you is to share with you a list of what I consider Moon masters: photographers who capture spectacular images of the Moon.
I've even been lucky enough to take pictures with some of them during my favorite photo event, the PhotoPills Camp.
Obviously, the list is neither complete nor exhaustive. As time goes by, it will grow with new photographers that I discover along the way... and with those that you recommend to me as well.
Feel free to share with me and the rest of PhotoPillers your own Moon masters! We'll all appreciate it. Leave a comment with your suggestions at the end of this guide.
Albert Dros
This award winning photographer has been published amongst some of the biggest media channels in the world, like Time, Huffington Post, Daily Mail and National Geographic.
Five minutes talking to Albert Dros is more than enough to realize that he's addicted to landscape photography and capturing the beauty of the world. In fact, I'd say he's obsessed.
His goal: to capture spectacular photos that no one has ever taken before.
And that includes Moon shots that he's spent days or even weeks planning. He's a huge fan of planning and loves to have everything perfectly under control. That's why his Moon images are truly amazing...
Mark Gee
Mark Gee became the Astronomy Photographer of the Year in 2013. He's an expert timelapse photographer, has given talks in TEDx and has been a PhotoPills Master for several years now.
Within his photography and videos, his strong suits are the Moon and the Milky Way. Nobody tells stories with those two elements like him. Maybe you've seen one of his viral videos, "Full Moon Silhouettes", or one of his fabulous Moon pictures.
All his photos have an enormous composing and planning work behind them. His efforts to find the right location and combine the Full Moon with a powerful subject (silhouettes, a lighthouse, a wind turbine,...) always produce incredible results.
Chris Burkard
If you're still not part of the millionaire crowd of Chris Burkard's Instagram followers, stop right now everything you're doing (even reading this article) and open the app to start viewing his images right away.
His sense of adventure, his passion for taking pictures in hidden places and his photographic eye are the right qualities to get what you're seeing...
And photos like his image of highliner Garrison Rowland and the Supermoon in the background at Joshua Tree National Park (USA) prove his talent and persistence.
Jennifer Khordi
I find it hard to believe that you've never seen any of Jennifer Khordi's picture of the Statue of Liberty with the Moon back. They're iconic...
In fact, Jennifer started taking pictures following her passion for nighttime. But the Moon ended up conquering her. And that has led her to publish her work in many media (CNN, ABC...) .
When you put in a mixer the talent of a photographer like her, New York City and the Moon, it's impossible not getting a jaw-dropping result.
Javier Martínez Morán
Javier Martínez Morán has been photographing the 4 towers of Madrid (Spain) for years. Almost always at night and along an amazing Moon. Obviously, it's not the only subject that he captures with the Moon, but it's a magical place for him.
As a matter of fact, his talent has even been spotted by NASA, who chose his picture of the Moon rising between the 4 towers of Madrid as the March 23, 2019 astronomy picture of the day or @apod.
Philipp Schmidli
Philipp Schmidli became the first PhotoPiller of the Year back in 2016, when we decided to create the PhotoPills Awards to reward the creativity of the PhotoPills community.
Phillip took the $3,000 first prize with a picture of a skier jumping from a hill and crossing a gorgeous Full Moon. Actually, it's the photo that illustrates this section.
A risky shot that only a few chosen can imagine and capture. With it, he showed some skills that impressed me. And motivated me to face harder challenges! ;)
I hope you feel the same seeing his work and dedication.
10.Your turn...
Tell me!
What do you plan to shoot first?
A Full Moon? A SuperMoon? A lunar eclipse maybe?
The main factor to get a unique photo is your imagination. A good proof of that are the images that PhotoPillers like you and me send every day to the PhotoPills Awards.
There you have tons of examples that will inspire you to imagine, plan and shoot a wild Moon shot.
And when you have it, submit it to the PhotoPills Awards!
You'll help thousands of PhotoPillers and...
You may become the next Moonmaster of the month!
Or the next PhotoPiller of the Year!
Yeah, I know you can't wait to open PhotoPills and start planning the next Full Moon. So do I.
But if you have any problem, a question or need help, leave a comment at the end of this guide.
It'll be a pleasure to help you get that picture you have in mind ;)
Chase the Moon!
Note: Some links on this page are affiliate links. What does this mean? If you buy/rent using these links you're helping support us and it costs you nothing extra. Thank you for your support.
Get this ebook for free now!