PhotoPills User Guide (II)
(Updated to iOS v2.12, Android v1.7)
Get this ebook for free now!
Content - Part I
Section 1: Getting Started
The first thing you should do when downloading PhotoPills: Enable the Widgets!
How to approach PhotoPills? Set a goal first!
The three PhotoPills Menus (My Stuff, Pills and Academy)
Tell us your pain and we’ll tell you the pill to take (problem vs. solution)
Section 2: Planner - Introduction
Introduction to planning
The 4 parts of the Planner
Section 3: Planner - Top Panels
Panel 1: Shadow length calculator
Panel 2: Pin to pin geodetic info (Black Pin)
Panel 3: Sun/Moon position (azimuth and elevation)
Panel 4: Sun/Moon rise and set times
Panel 5: Twilights
Panel 6: Golden hour and blue hour
Panel 7: Galactic Center visibility (Milky Way)
Panel 8: Milky Way quality and position
Panel 9: Eclipse selector and info
Panel 10: Eclipse phase times
Panel 11: Meteor shower info
Section 4: Planner - Map
Red Pin
Black Pin
Map buttons: (+) Map button and Map settings button
Map tools (Field of View, Depth of Field)
Map information: Sun, Moon, Milky Way, Meteor Showers, Eclipses, Twilights and Shadows
Section 5: Planner - (+) Map button (toolbar)
Section 6: Planner - Map Settings button
Planner modes: Camera mode and Drone mode
Map type
Map tools overview
Field of View tool
Depth of Field tool
Sun/Moon tool
Map layers overview
Sun layer
Moon layer
Milky Way layer
Meteor Shower layer
Eclipse layer
Twilights layer
Shadow layer
Reset Map layers
Section 7: Planner - Time Bar
How to change date and time with the Time Bar
Section 8: Planner - Bottom options
Find
AR (Augmented Reality)
Night AR (Night Augmented Reality)
Load
Save
More > Date
More > Altitudes
More > Horizon
More > Action
Content - Part II
Section 9: Sun
Info
Calendar
AR (Augmented Reality)
Seasons
Action
Section 10: Moon
Info
Calendar
AR (Augmented Reality)
Distances
Action
Section 11: Exposure
Long exposure calculator (ND filters, Star Trails, low light and at night)
Exposure values
Timer
Share
Section 12: Depth of Field (DoF)
Classic depth of field calculator
Inverse
Advanced
To field of view (FoV)
AR (Augmented Reality)
Share
Section 13: Field of View (FoV)
Classic field of view calculator
Inverse
AR (Augmented Reality)
To depth of field (DoF)
Share
Section 14: Depth of Field Table
Depth of field table
Visual
AR (Augmented Reality)
Share
Section 15: Hyperfocal Table
Hyperfocal table
Visual
AR (Augmented Reality)
Share
Section 16: Night Augmented Reality (AR)
Night AR
Settings
Visual calibration
Action
Section 17: Meteor Showers
Section 18: Star Trails
Star Trails calculator
Timer
Share
Section 19: Spot Stars
Spot Stars calculator
AR (Augmented Reality)
Timer
Share
Section 20: Time lapse
Time lapse calculator
Interval table
Timer
Share
Section 21: Timer
Section 22: Subject distance
Subject distance calculator
To depth of field (DoF)
To field of view (FoV)
AR (Augmented Reality)
Share
Section 23: Focal Length Match
Focal length match calculator
Share
Section 24: My Stuff (Menu)
Awards
Plans
Points of Interest
Backup
Settings
Section 25: Academy (Menu)
User Guide
Video Tutorials
"How To" articles
T-Shirts
The Team
Rate the app
Feedback
Glossary
Section 26: This is just the beginning
Part II
9.Sun
You’ll find the Sun Pill in the Pills menu. And it works offline!
It gives you quick access to all the Sun information, including: Sunrise and Sunset times, Sun path view in augmented reality (AR), golden hour, blue hour and twilight times, Moonrise and Moonset times, Moonphase, Galactic Center visibility times and more.
Use it in the field to have a fast look to the daily information or to visualize the Sun position and path with the augmented reality view (even offline).
Info
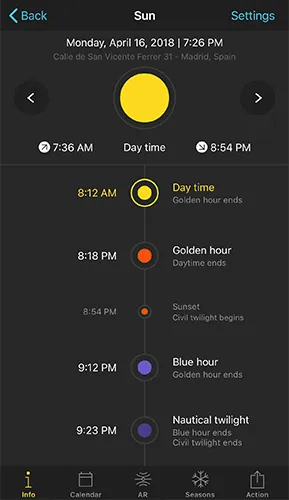
Location, date and time
Right above the big Sun picture you’ll see the date, time and location the Sun Pill is using to display all the information.
Settings: change location and time
By default, the Sun Pill gives you the information relative to your current position, date and time. But you can choose a different location, date and time by tapping on the Settings button (top right-hand corner).
There is another way to change the date and time. We’ll show it to you in the following section.
Change date and time shortcut
To jump to the next day, tap the arrow you see on the right-hand side of the big Sun picture.
To jump to the previous day, tap the arrow you see on the left-hand side of the big Sun picture.
To change time forward, swipe the big Sun picture to the left.
And to change time backwards, swipe the big Sun picture to the right.
Big Sun Picture, rise and set times and light
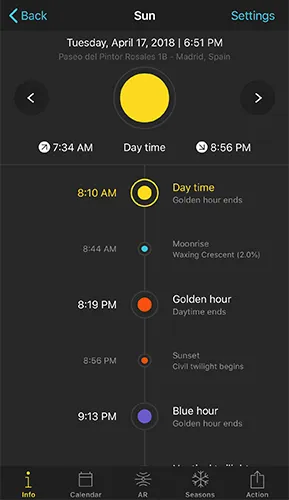
The big picture of the Sun will change its color as the light changes: yellow (daytime), orange (golden hour), purple (blue hour), dark purple (nautical twilight), dark blue (astronomical twilight), and gray-yellow (nighttime).
Below the big picture of the Sun you have the Sunrise and Sunset times for the selected date. And also the name of the type of light you have at the selected date and time (daytime, golden hour, blue hour, nautical twilight, astronomical twilight and nighttime).
Daily Light, Sun, Moon and Milky Way events
The Sun > Info gives you all the key day events displayed in order from midnight to midnight, including:
- Sunrise and Sunset times.
- Moonrise, Moonset times and Moon phase. Next to the time, you’ll see a small Moon picture showing the Moon phase. The background color of the Moon picture tells you the light, daytime (blue), nighttime (black), golden hour (orange), blue hour (dark blue)...
- Galactic Center visibility times. Next to the time, you’ll see a line of white dots that shows you the inclination of the Milky Way at that time. This way it’s easy to know whether the Moon will be out when shooting the Milky Way.
- Golden hour times (morning and evening).
- Blue hour times (morning and evening).
- Civil, nautical and astronomical twilight times (morning and evening).
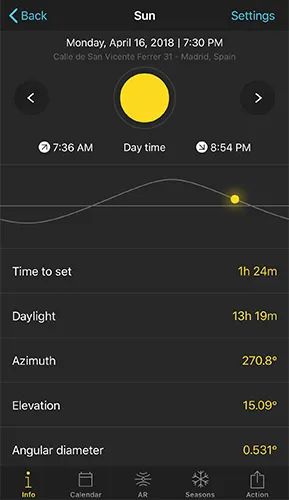
Elevation of the Sun path
If you keep scrolling down, you’ll find the elevation path of the Sun. Change the time and see how the Sun changes the elevation. To change the time just swipe right or left the Sun path.
Sun information table
Below the elevation path of the Sun you’ll find a table with key information for the selected date:
- Time to rise/Time to set: Hours left for Sunrise or Sunset (relative to the date and time you have set).
- Daylight: Number of hours between Sunrise and Sunset.
- Azimuth: Position of the Sun measured in angle from the north. Read the article Understanding azimuth and elevation.
- Elevation: Position of the Sun measured vertically. Read the article Understanding azimuth and elevation.
- Angular diameter: The diameter of the Sun measured in angle. It’s useful when planning long distance shots of the Sun and you wish to control how big the Sun will be compared to your subject. You can do the same thing with the Moon. Read the article The shooting spot determines the size of the Moon relative to your subject.
- Distance: Distance between the Sun and Earth.
- Shadow ratio: The ratio of an object’s height to its shadow length. Multiply the height of any object by the shadow ratio to calculate the length of the object's shadow.
- Transit: The time when the Sun reaches its highest position in the sky.
Calendar

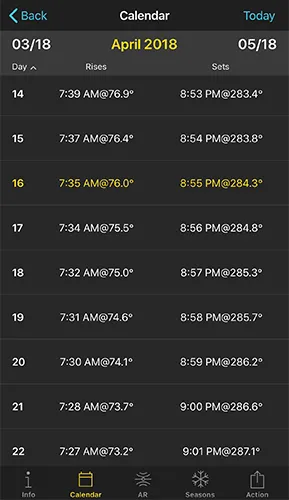
For the selected month, Sun > Calendar gives you a table with the daily Sunrise and Sunset times. And also the azimuths the Sun is rising and setting: Time@azimuth (7:45 [email protected]º).
To change the month, swipe the calendar right or left. Or tap the month you see on top of the table (on the sides).
Tap on the date you wish to see the Sun information.
To go back to the current month, tap Today (on the top right-hand side corner).
Augmented Reality (AR)
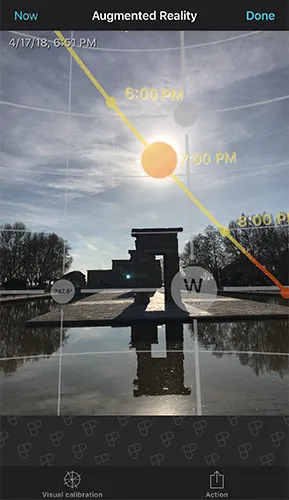
Imagine that you’re in the field about to shoot the Sunrise. Tap on Sun and use the AR view to see where the Sun will rise.
Information on the AR view
The augmented reality view gives you the position and path of the Sun for the selected location (by default where you are), date and time.
You’ll see the selected date and time on the top left-hand corner of the AR view.
Use it when planning your Sun shots in situ, to adjust your frame and shooting spot for the best composition before you shoot.
 | Sun path |
 | Horizon |
 | Elevation (10-degree steps) and azimuthal lines |
Change date and time
Swipe the AR view to the left to move time forward. Swipe it to the right to move time backwards. See how the Sun moves on the AR view!
Tap on the right-hand side of the AR view to jump to the next day.
Tap on the left-hand side of the AR view to jump to the previous day.
Tap on Now (top left-hand corner) or double tap on the center of the screen to come back to your current date and time.
Calibrating the AR view
The quality of the information displayed in the AR view is good enough to work, but it strongly depends on the limitations of the sensors of your device (GPS, Accelerometer, Gyroscope). This is an issue we cannot control but, as technology advances, manufacturers improve the quality of sensors too.
Make sure you are away from any electronic device or magnetic field because they may interfere with the sensors of the device. It is recommended to wait a few seconds to let the system become stable.
And always calibrate the AR view. Doing the 8-figure gesture four or five times to ensure that the compass is as accurate as possible. You can also use the calibration button (bottom left-hand corner of the AR view) to visually calibrate this view with the real Sun, Moon or Milky Way. Watch this video tutorial: Calibrating the Augmented Reality views.
Note: iPod Touch users or Android devices without compass sensor! These devices do not have a magnetometer. Therefore, it is not possible to draw in augmented reality (AR) the information of the Sun, Moon, Milky Way, celestial equator and celestial poles. That’s why the AR is not available.
Seasons

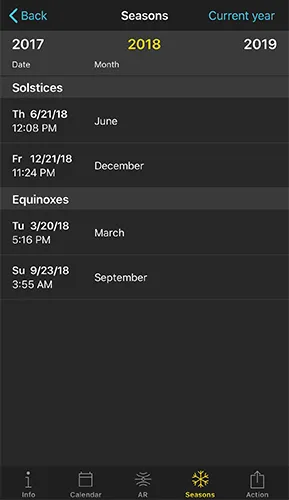
For the selected year, Sun > Seasons gives you a table with the solstices and equinoxes dates.
Tap on the desired date to see Sun > Info.
To change the year, swipe the table right or left. Or tap the year you see on top of the table (on the sides).
To go back to the current year, tap Current year (on the top right-hand side corner).
Action

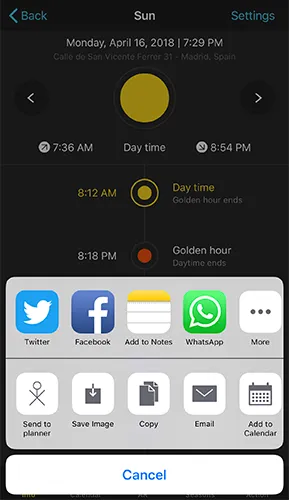
Tap on the Action button (bottom right-hand corner) to share a screenshot of the Sun option you’re using (Info, Calendar, AR or Season) on Facebook, Twitter, or by email. And to save it to your camera roll.
When you’re using Sun > Info, the action button allows you to send the date and time to the Planner, and even to add an alert to your device calendar.
10.Moon
You’ll find the Moon Pill in the Pills menu. And it works offline!
It gives you quick access to the main Moon information (even offline), including: Moonrise and set times, Moon phase, Moon path view in augmented reality, Moon calendar and SuperMoon dates.
Use it in the field to have a fast look to the Moon information or to visualize the Moon position and path with the augmented reality view (even offline).
Oh!
And the Moon calendar is super useful!
Info
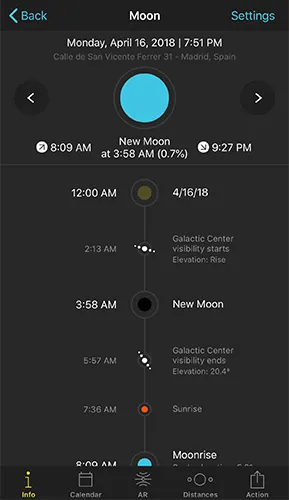
Location, date and time
Right above the big Moon picture you’ll see the date, time and location the Moon Pill is using to display all the information.
Settings: change location and time
By default, the Moon Pill gives you the information relative to your current position, date and time. But you can choose a different location, date and time by tapping on the Settings button (top right-hand corner).
There is another way to change the date and time. We’ll show it to you in the following section.
Change date and time shortcut
To jump to the next day, tap the arrow you see on the right-hand side of the big Moon picture.
To jump to the previous day, tap the arrow you see on the left-hand side of the big Moon picture.
To change time forward, swipe the big Moon picture to the left.
And to change time backwards, swipe the big Moon picture to the right.
Big Sun Picture, rise and set times and light
The big picture of the Moon you see at the top shows you the Moonphase and how you would actually see the Moon for the selected date, time and location.
 | Daytime |
 | Night-time |
 | Moonset in daytime |
 | Moonset in night-time |
Below the big picture of the Moon you have the rise and set times for the selected date. And the Moonphase name and percentage for the selected date and time.
Daily Moon, Sun and Milky Way events
All the key day events relative to the Moon displayed in order from midnight to midnight, including:
- Sunrise and Sunset times
- Moonrise, Moonset times and Moon phase. Next to the time, you’ll see a small Moon picture showing the Moon phase. The background color of the Moon picture tells you the light, daytime (blue), nighttime (black), golden hour (orange), blue hour (dark blue)...
- Light information and elevation of the Sun at Moonrise and Moonset.
- Galactic Center visibility times. Next to the time, you’ll see a line of white dots that shows you the inclination of the Milky Way at that time. This way it’s easy to know whether the Moon will be out when shooting the Milky Way.
Elevation of the Moon path and the Sun path
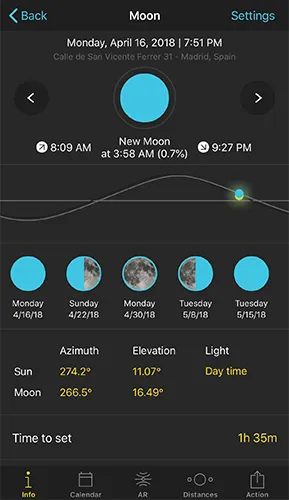
If you keep scrolling down, you’ll find the elevation path of the Moon and the Sun. Change the time and see how the Moon and Sun change the elevation. To change time just swipe right or left the Sun/Moon path.
Main Moon phase dates
Here you have access to the next 5 important Moonphase dates. Tap on the desired Moonphase to see the Moon info.
Swipe the Moonphase row to the left to seen more dates.
Moon and Sun azimuth and elevation (and light!)
This table shows you the Sun and Moon position (azimuth and elevation) for the selected date and time. It also tells you the light you’ll have depending on the elevation of the Sun.
Moon information table
A table with key Moon information for the selected date:
- Time to rise/Time to set: Hours left for the Moonrise or Moonset (relative to the date and time you have set).
- Angular diameter: The diameter of the Moon measured in angle. It’s useful when planning long distance shots of the Moon. It allows you to control how big the Moon will be compared to your subject. Read the article The shooting spot determines the size of the Moon relative to your subject.
- Age: The time that has elapsed since the last preceding conjunction of the Sun and Moon (New Moon).
- Distance: Distance between the Moon and Earth.
- Shadow ratio: The ratio of an object’s height to its shadow length. Multiply the height of any object by the shadow ratio to calculate the length of the object's shadow.
- Transit: The time when the Moon reaches its highest position in the sky.
Calendar

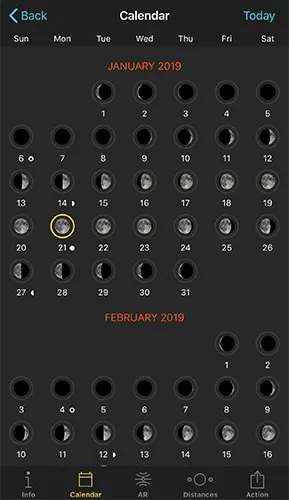
A cool Moon calendar to quickly find the Moonphase dates you need and the SuperMoon dates.
The current date appears with a blue circle. And the SuperMoon dates appear in a yellow circle.
Scroll up and down to navigate through the months and find the SuperMoons!
Tap on the desired Date of the Calendar to see the Moon > Info.
To go back to the current month, tap Today (on the top right-hand side corner).
Augmented Reality (AR)

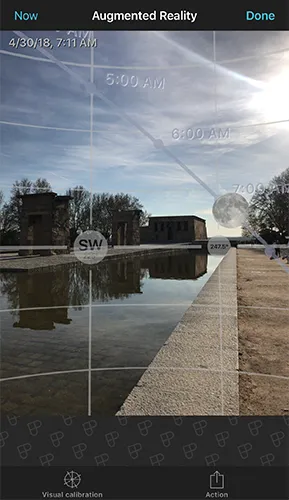
Imagine that you’re in the field about to shoot the Moonset. Tap on Moon and use the AR view to see where the Moon will set.
Information on the AR view
The augmented reality view gives you the position and path of the Moon for the selected location, date and time.
You’ll see the selected date and time on the top left-hand corner of the AR view.
Use it when planning your Moon shots in situ, to adjust your frame and shooting spot for the best composition before you shoot.
 | Moon path |
 | Horizon |
 | Elevation (10-degree steps) and azimuthal lines |
Change date and time
Swipe the AR view to the left to move time forwards. Swipe it to the right to move time backwards. See how the Moon moves and the Moon phase changes!
Tap on the right-hand side of the AR view to jump to the next day.
Tap on the left-hand side of the AR view to jump to the previous day.
Tap on Now (top left-hand corner) or double tap on the center of the screen to come back to your current date and time.
Calibrating the AR view
The quality of the information displayed in the AR view is good enough to work, but it strongly depends on the limitations of the sensors of your device (GPS, Accelerometer, Gyroscope). This is an issue we cannot control but, as technology advances, manufacturers improve the quality of sensors too.
Make sure you are away from any electronic device or magnetic field because they may interfere with the sensors of the device. It is recommended to wait a few seconds to let the system become stable.
And always calibrate the AR view. Doing the 8-figure gesture four or five times to ensure that the compass is as accurate as possible. You can also use the calibration button (bottom left-hand corner of the AR view) to visually calibrate this view with the real Sun, Moon or Milky Way. Watch this video tutorial: Calibrating the Augmented Reality views.
Note: iPod Touch users or Android devices without compass sensor! These devices do not have a magnetometer. Therefore, it is not possible to draw in augmented reality (AR) the information of the Sun, Moon, Milky Way, celestial equator and celestial poles. That’s why the AR is not available.
Distances

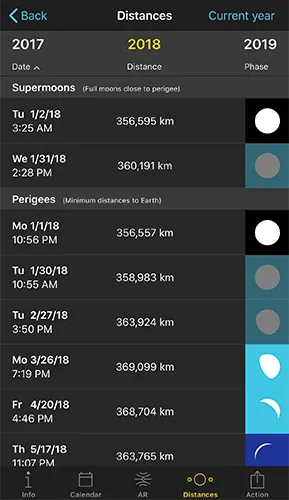
Find out the SuperMoon dates!
For the selected year, Moon > Distances gives you the SuperMoon dates (Full Moons close to perigee), perigees (Moon is closer to Earth) and apogees (Moon is farthest from Earth).
Tap on the desired date to see Moon > Info.
To change the year, swipe the table right or left. Or tap the year you see on top of the table (on the sides).
To go back to the current year, tap Current year (on the top right-hand side corner).
The Moon picture you see on the right-hand side of the table tells you if the perigee/apogee will happen in daytime, golden hour, blue hour, nautical twilight, astronomical twilight or nighttime. Furthermore, the picture shows you how you'd see the Moon (phase and orientation) from the selected location.
 | Moon in daytime |
 | Moon in golden hour |
 | Moon in blue hour |
 | Moon in nautical twilight |
 | Moon in astronomical twilight |
 | Moon in night-time |
Action

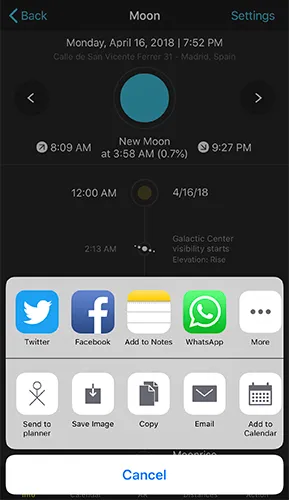
Tap on the Action button (bottom right-hand corner) to share a screenshot of the Moon option you’re using (Info, Calendar, AR or Distances) on Facebook, Twitter, email. And also to save it to your camera roll, etc.
When you’re using Moon > Info, the action button allows you to send the date and time to the Planner, and even to add an alert to your device calendar.
11.Exposure
Long Exposure photography is something that can take your breath away when you get it right. Put all your energy in the creativity part, leave all calculations to PhotoPills!
Long exposure calculator (ND filters, Star Trails, low light and at night)
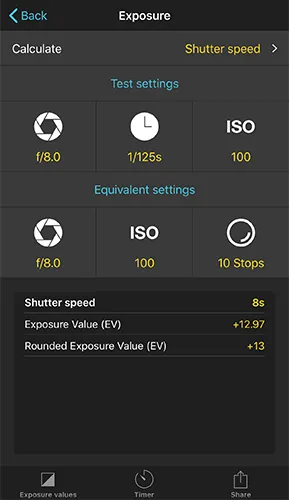
Use the Exposure Pill to calculate equivalent exposures when shooting long exposures with ND filters, in low light and at night.
Check these two tutorials to learn how to use the Exposure Pill for your:
- Long exposures with ND filters: Use filters to successfully capture high contrast images.
- Single shot Star Trails: How to shoot a single exposure Star Trails.
Let’s see how the Exposure Pill works.
Setting to calculate
Tap on Calculate (at the top) and choose the camera setting you wish to calculate: shutter speed, aperture or ISO.
Usually, the parameter you need to calculate is the shutter speed (exposure time).
Now, the Exposure Pill uses the reciprocity law to calculate different camera setting that give the same exposure.
It all begins by working out the test settings.
Test settings
You’re out there, facing the scene. It’s the moment to take a test shot that gives you a photo correctly exposed.
The camera settings (aperture, shutter speed and ISO) you’re using for the test shot are not the ones you want for the final photo. But they’ll help you quickly find the right exposure.
For a single Star Trails shot, as a test settings you’ll probably use a wide aperture (f/2.8-f/4.0) a high ISO (3200-6400 or more) and an exposure time under 30s (20-30s). You wish to use the shortest exposure time possible to spend the least time testing.
For a long exposure with a ND filter, as a test settings (without the ND filter) you’ll use the settings that give you the right exposure based on the light you have in the scene.
So, take the test shot, check the histogram and make sure the photo is correctly exposed. :)
Now introduce the Test Settings in the Exposure calculator. These are the aperture, shutter speed and ISO that gives you a test photo correctly exposed.
Equivalent settings
Next step is to introduce the camera settings you wish to use in the final photo.
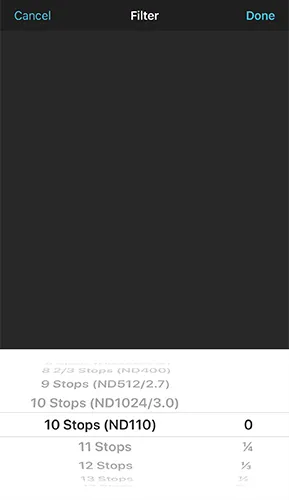
For example, if you have decided to calculate the shutter speed, these settings are the aperture, the ISO and the ND filter when needed.
In this case, these settings will be used to calculate the shutter speed that gives you the same exposure value as the test shot and, therefore, the photo will be exposed correctly too.
Results
The table of results gives you the calculated setting (shutter speed, aperture or ISO) and the exposure value (EV).
Exposure values

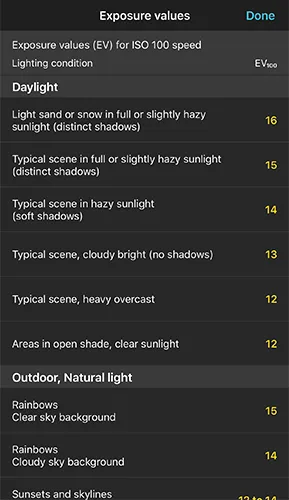
It’s a table that contains the exposure values (EV) for ISO 100 related to different types of light situations.
Tap an exposure value (EV) on the table to set it to the Exposure calculator.
Timer

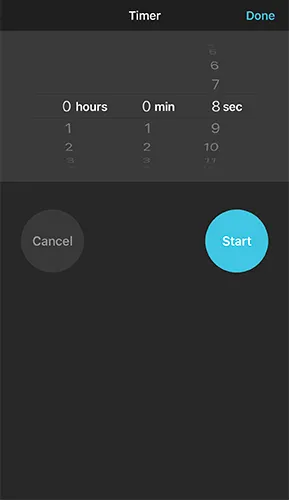
Once you’ve calculated the exposure time you need, use the Timer to be notified when the exposure time ends. So you know when to stop the camera.
Share

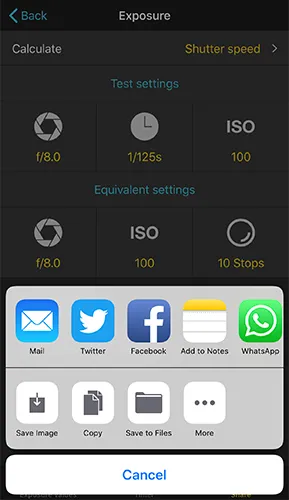
Share your exposure calculations on Facebook, Twitter or by email. Save your calculations as an image to your camera roll.
12.Depth of field (DoF)
With Depth of field (DoF), you get the creative control on the design of your photos. Decide the zone of sharpness you need to tell the story you want and get your message across.
Reduce trial and error, have the calculations done for the result you desire. So you can calculate a certain DoF using the camera settings (Classic) or get the camera settings according to a certain DoF (Inverse).
Learn and improve, quickly understand the relations among aperture, focal length, subject distance and DoF/hyperfocal distance.
Classic depth of field calculator
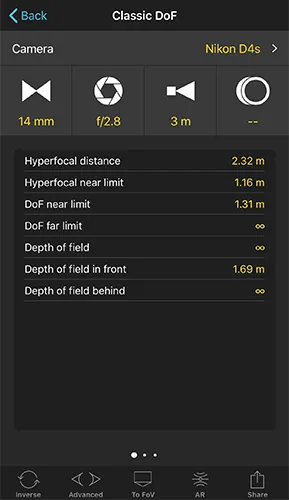
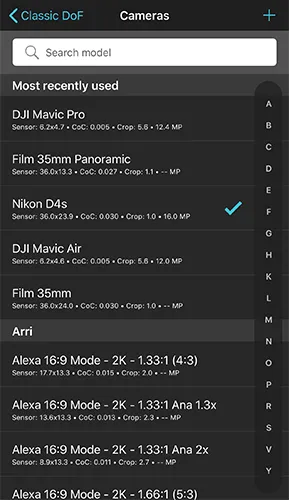
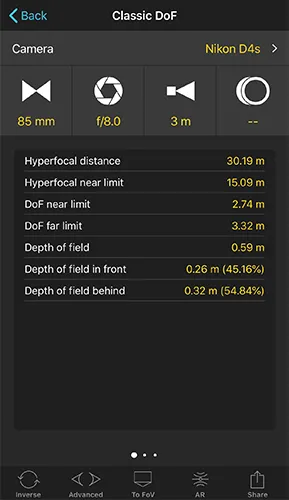
Use the Classic depth of field calculator to work out the depth of field parameters for a given camera and camera settings (focal length, aperture, subject distance and teleconverter).
Let’s see how it works.
Camera
Set your camera.
If your camera has a crop factor, it’ll be taken into account.
Settings
Introduce the focal distance (the real one, not the 35mm equivalent), aperture, subject distance (focus distance) and teleconverter factor to calculate DoF information.
DoF information
Get the following DoF information: hyperfocal distance, hyperfocal distance near limit, DoF near limit, DoF far limit, total depth of field, depth of field in front and behind.
Swipe left the DoF information table to see it on a picture. Swipe left again to see the Hyperfocal information on a picture.
Note: Tap on the AR button (at the bottom) to see the DoF information in the real world.
Inverse
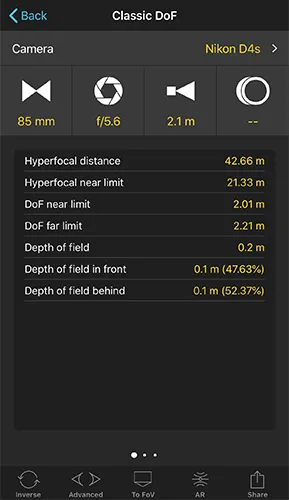
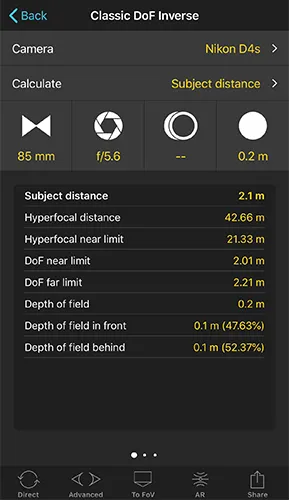
Use the Inverse depth of field calculator to work out the camera settings that give you a desired depth of field.
Let’s see how it works.
Camera
Set your camera.
If your camera has a crop factor, it’ll be taken into account.
Setting to calculate
Choose the setting you wish to calculate: focal length (the real one, not the 35mm equivalent), aperture or subject distance (focus distance).
Settings
Depending on the camera setting you wish to calculate you must introduce the rest of the camera settings and DoF information.
For example, if you have decided to calculate the subject distance, you need to introduce the aperture, focal length, teleconverter factor and desired DoF.
In this case, these settings will be used to calculate the subject distance you need to focus at that gives you the depth of field you wish to have in the photo.
Calculated Setting and DoF information
Get the calculated setting (focal length for example) and following DoF information: hyperfocal distance, hyperfocal distance near limit, DoF near limit, DoF far limit, total depth of field, depth of field in front and behind.
Swipe left the DoF information table to see it on a picture. Swipe left again to see the Hyperfocal information on a picture.
Note: Tap on the AR button (at the bottom) to see the DoF information in the real world.
Advanced
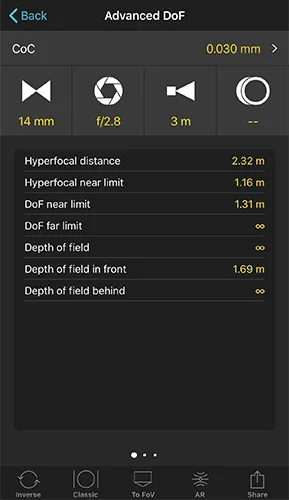
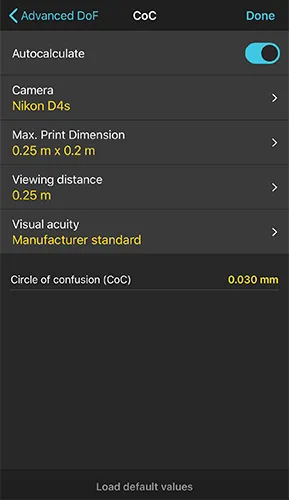
Use the Advanced DoF calculator to get more control over what is "acceptably sharp". Take into account your camera sensor size, print size, viewing distance and visual acuity to adjust your camera CoC that will be used in your DoF calculations.
Let’s see how it works.
CoC
Set the desired Circle of Confusion.
Calculate the adjusted Circle of Confusion (CoC) taking into account your camera sensor size, print size, viewing distance and visual acuity.
Note: Tap Load default values at the bottom to load the default CoC settings values: print size 8x10 inch (0.25x0.2 meters), viewing distance of 1 foot (0.25 meters) and manufacturer standard visual acuity.
If you use the default values, Advanced DoF and Classic DoF calculators give the same results.
Settings
Introduce focal distance (the real one, not the 35mm equivalent), aperture, subject distance (focus distance) and teleconverter factor to calculate DoF information.
DoF information
Get the following DoF information: hyperfocal distance, hyperfocal distance near limit, DoF near limit, DoF far limit, total depth of field, depth of field in front and behind.
Swipe left the DoF information table to see it on a picture. Swipe left again to see the Hyperfocal information on a picture.
Note: Tap on the AR button (at the bottom) to see the DoF information in the real world.
To field of view (FoV)
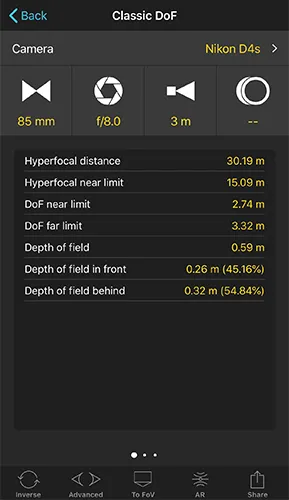
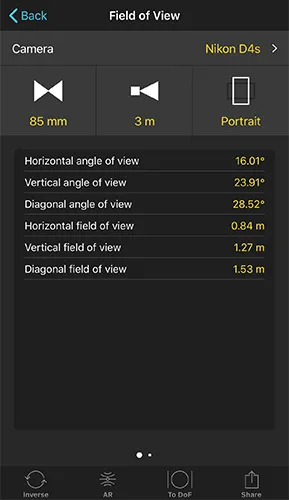
Tap To FoV to send the settings to the Classic FoV calculator.
Augmented Reality (AR)

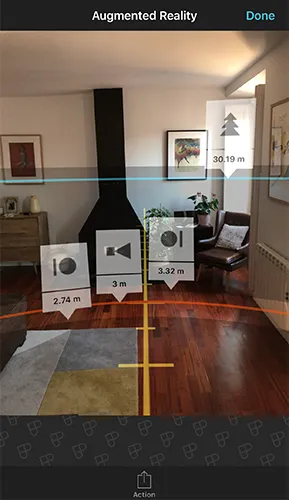
Visualize the Depth of Field on the reality!
Once you've done all the DoF calculations that give you the desired depth of field effect, use the AR view to visualize and measure in situ the following distances: subject distance, DoF near limit, DoF far limit and hyperfocal distance.
 | DoF near limit |
 | Subject distance (focus distance) |
 | DoF far limit |
 | Hyperfocal distance |
All lines are drawn on the ground. It is assumed that your device is situated 1.35 meters over the ground level. This height can be customized from the PhotoPills Settings button located in My Stuff menu.
You can use the ruler to measure distances. If you are using the Metric units system, each separation measures 0.5 meters. If you are using the Imperial units system, each separation measures 1 foot.
Share

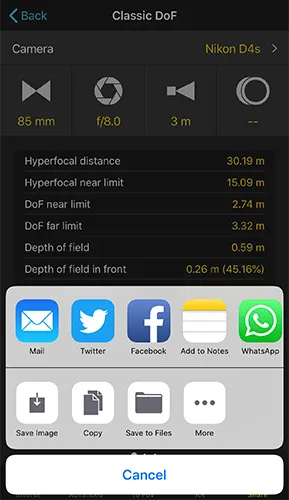
Share your DoF calculations on Facebook, Twitter or by email. Save your calculations as an image to your camera roll.
13.Field of View (FoV)
Digital director's viewfinder. Perfect for location scouting or making storyboards. Preview what would be captured in your frame. Reduce trial and error.
Have the calculations done for the result you desire. So you can calculate a certain FoV using the camera settings (Classic) or get the camera settings according to a certain FoV (Inverse).
Learn and improve. Quickly understand the relations between camera sensor, focal length, subject distance and field of view.
Classic field of view calculator
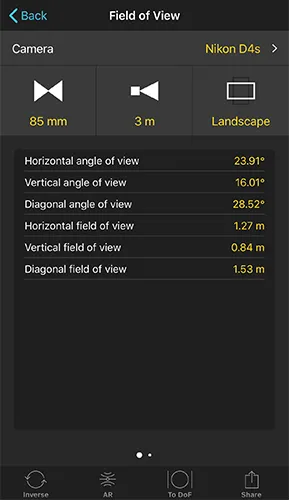
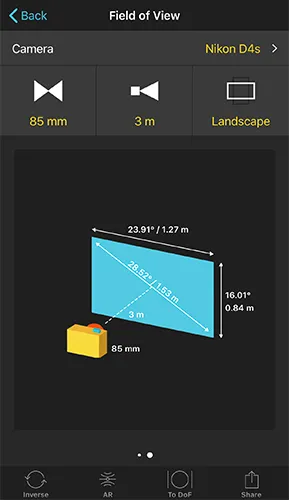
The FoV calculator helps you to predetermine a proper rectilinear lens selection and subject distance for the desired framing.
Let’s see how it works.
Camera
Set your camera.
If your camera has a crop factor, it’ll be taken into account.
Settings
Introduce focal length (the real one, not the 35mm equivalent), aperture, subject distance (focus distance) and camera orientation (portrait or landscape).
FoV information
Get the following FoV information: horizontal, vertical and diagonal angle of view and field of view.
Swipe left the FoV information table to see it on a picture.
Note: Tap on the AR button (at the bottom), and then tap on the AR view to see the frame in the real world.
Inverse

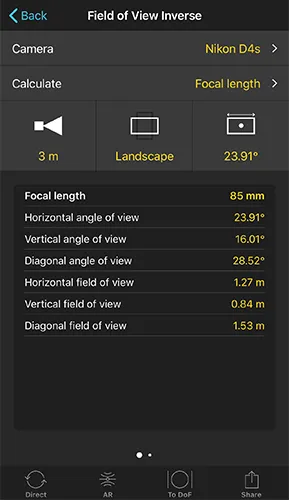
Use the Inverse FoV calculator to calculate the camera settings you need for a certain field of view.
Let’s see how it works.
Camera
Set your camera.
If your camera has a crop factor, it’ll be taken into account.
Setting to calculate
Choose the setting you wish to calculate: focal length (the real one, not the 35mm equivalent) or subject distance (focus distance).
Settings
Depending on the setting you wish to calculate you must introduce the rest of camera settings and FoV information.
For example, if you have decided to calculate the focal length, you need to introduce the subject distance, camera orientation and desired FoV.
In this case, these settings will be used to calculate the focal length that gives you the field of view you wish.
Calculated setting and FoV information
Get the calculated setting (focal length for example) and the following FoV information: horizontal, vertical and diagonal field and angle of view.
Swipe left the FoV information table to see it on a picture.
Note: Tap on the AR button (at the bottom), and then tap on the AR view to see the frame in the real world.
Augmented Reality (AR)


For a given camera, focal length, subject distance and camera orientation, you can visualize in augmented reality what you would capture in the photo.
Tap on the screen and position your frame where you want. Reduce trial and error. Make sure you take the photo you want.
To depth of field (DoF)

Tap To DoF to send the settings to the Classic DoF calculator.
Share

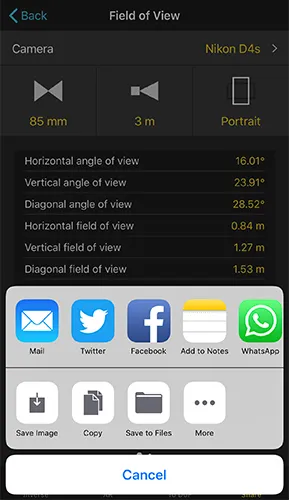
Share your FoV calculations in Facebook, Twitter or by email. Save your calculations as an Image to your camera roll.
14.Depth of field Table
The fastest way to have your Depth of field (DoF) and Hyperfocal calculations done.
Depth of field Table
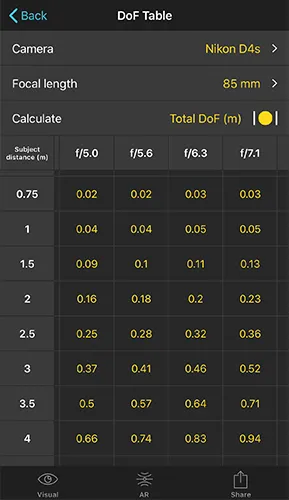
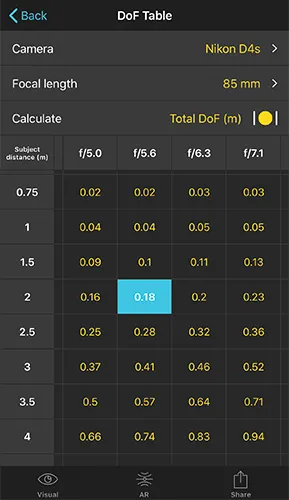
Use the DoF table to visualize how depth of field changes according to the aperture and subject distance for a given focal length.
Learn and improve. Quickly understand the relations between aperture, focal length, subject distance and DoF/hyperfocal distance.
Let’s see how it works.
Camera
Set your camera.
If your camera has a crop factor, it’ll be taken into account.
Focal length button
Introduce the focal length you wish to use. The real one, not the 35mm equivalent.
DoF options
Tap on the Calculate button to switch the values on the table between total DoF or DoF limits.
Table of results
Browse the table to find out the combination of subject distance and aperture that gives you the sharpness you need in your photo.
Tap the result you wish to select it. Then tap on Visual to see it on a picture. Or tap on AR to see it in augmented reality.
Note: You’ll find the hyperfocal distance in the first row.
Visual

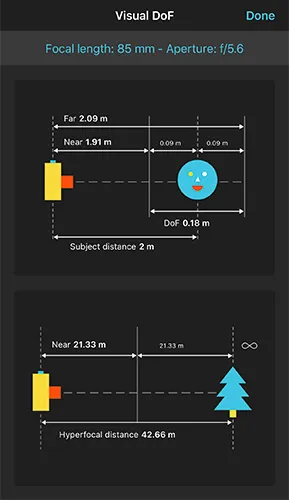
Select a cell from the DoF table and tap on the Visual button to see the depth of field information on a picture.
Augmented Reality (AR)

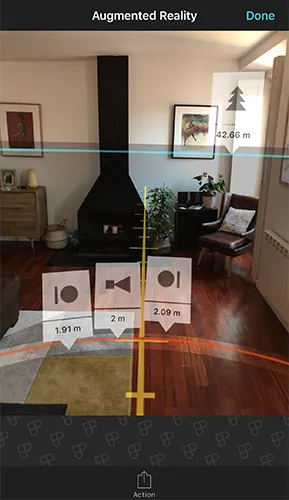
Visualize the depth of field on the reality!
Select a cell from the table and tap on the AR button to visualize and measure in situ the following distances: subject distance, DoF near limit, DoF far limit and hyperfocal distance.
 | DoF near limit |
 | Subject distance (focus distance) |
 | DoF far limit |
 | Hyperfocal distance |
All lines are drawn on the ground. It is assumed that your device is situated 1.35 meters over the ground level. This height can be customized from the PhotoPills Settings button located in My Stuff menu.
You can use the ruler to measure distances. If you are using the Metric units system, each separation measures 0.5 meters. If you are using the Imperial units system, each separation measures 1 foot.
Share

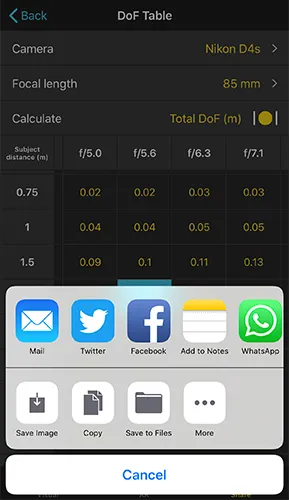
Share your Depth of Field table on Facebook, Twitter or by email. Save the table as an image to your camera roll.
15.Hyperfocal Table
The fastest way to have your Hyperfocal calculations done.
If you wish to understand the hyperfocal distance and learn how to use it, take a look at our depth of field article.
Hyperfocal table
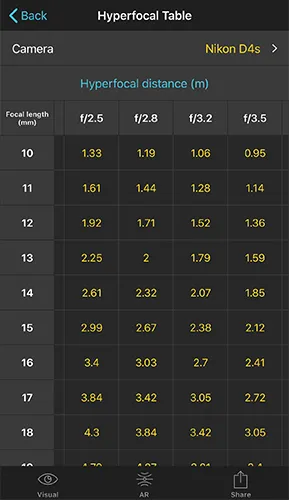
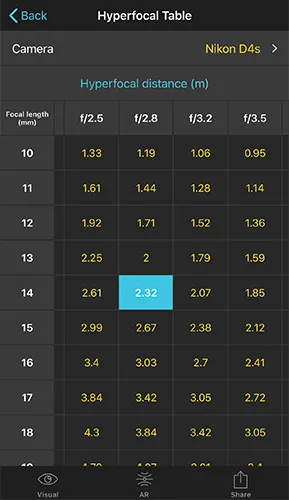
Use the Hyperfocal table to visualize how the hyperfocal distance changes according to the aperture and focal length.
Learn and improve. Quickly understand the relations between aperture, focal length and hyperfocal distance.
Let’s see how it works.
Camera
Set your camera.
If your camera has a crop factor, it’ll be taken into account.
Table of results
Browse the table to find out the combination of focal length (the real one, not the 35mm equivalent) and aperture to get the hyperfocal distance.
Visual

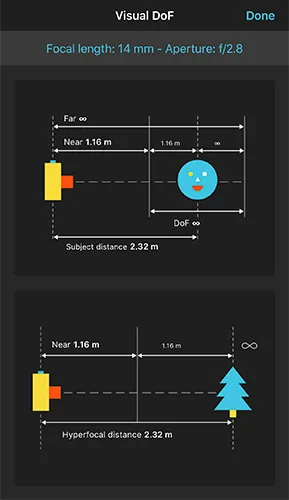
Select a cell from the Hyperfocal table and tap on the Visual button to see the Hyperfocal information on a picture.
Augmented Reality (AR)

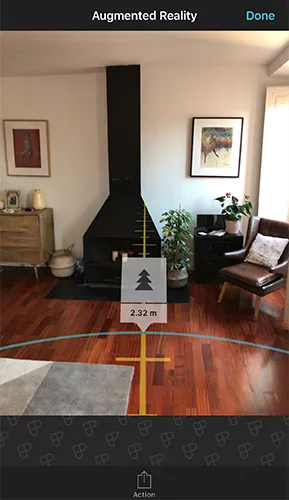
Visualize the Hyperfocal distance on the reality!
Select a cell from the table and tap on the AR button to visualize and measure in situ the hyperfocal distance.
 | Hyperfocal distance |
The Hyperfocal distance is drawn on the ground. It is assumed that your device is situated 1.35 meters over the ground level. This height can be customized from the PhotoPills Settings button located in My Stuff menu.
You can use the ruler to measure distances. If you are using the Metric units system, each separation measures 0.5 meters. If you are using the Imperial units system, each separation measures 1 foot.
Share

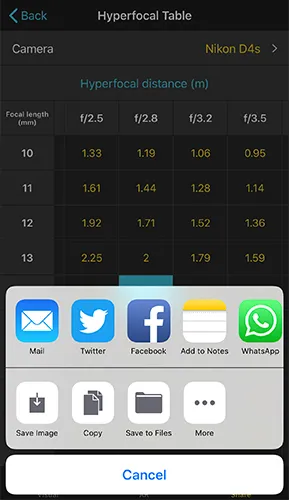
Share your Hyperfocal table on Facebook, Twitter or by email. Save the table as an image to your camera roll.
16.Night Augmented Reality (AR)
Point your device at the sky and visualize all the key night information on the real world with the augmented reality view, including: Milky Way position, Galactic Center position, Moon Position, Moon path, Moon phase, Polaris, south celestial pole and Star Trails patterns.
Night Augmented Reality (AR)
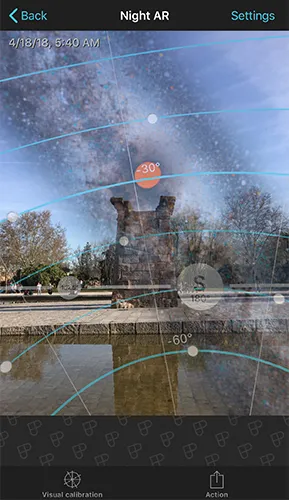
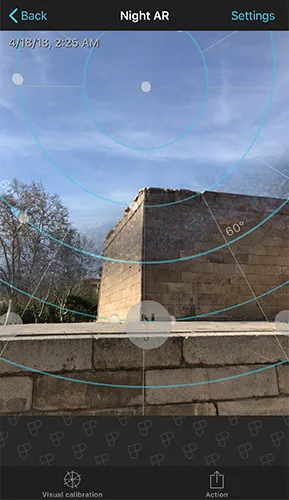
Use the Night Augmented Reality to plan your night shots in situ and adjust your frame for the best composition before you shoot.
Just tap on Night AR (Pills menu) and visualize in augmented reality for the selected date, time and position: Milky Way, celestial equator, Polaris, north/south celestial pole, circumpolar stars path and sense of rotation, Moon position, Moon path, Moonrise/set directions, and the Star Trails patterns.
The blue curved lines you see on the Night AR represent the Star Trails pattern you'll get when framming in that direction. With the Night AR, planning your Star Trails photos is super easy :)
The selected date and time is displayed on the top left-hand corner of the Night AR view.
Notice that you can change the date and time directly from the Night AR view:
- Swipe the Night AR view to the left to move time forwards. Swipe it to the right to move time backwards.
- Tap on the right-hand side of the Night AR view to jump to the next day.
- Tap on the left-hand side of the Night AR view to jump to the previous day.
- Double tap on the center of the screen to come back to your current date and time.
On the Night AR you'll see:
 | Milky Way and Galactic Center (Red dot on the image) |
 | Celestial equator |
 | Moon path |
 | Horizon |
 | Right ascension and declination lines (10-degree steps) |
 | North celestial pole |
 | South celestial pole |
Note: The stars in movement show you the sense of rotation around the celestial poles.
Settings (change location, date and time)


By default, the Night AR Pill gives you the information relative to your current position, date and time. But you can choose a different location, date and time by tapping on the Settings button (top right-hand corner).
You’ll see the selected date and time on the top left-hand corner of the Night AR view.
Visual calibration

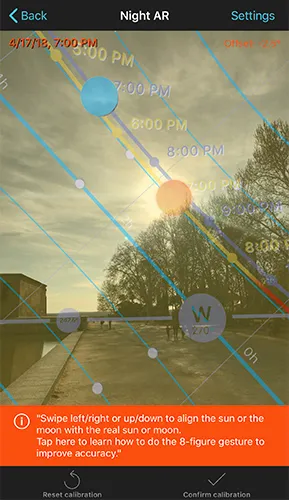
The quality of the information displayed in the Night AR view is good enough to work, but it strongly depends on the limitations of the sensors of your device (GPS, Accelerometer, Gyroscope). This is an issue we cannot control but, as technology advances, manufacturers improve the quality of sensors too.
Make sure you are away from any electronic device or magnetic field because they may interfere with the sensors of the device. It is recommended to wait a few seconds to let the system become stable.
And always calibrate the Night AR view. Doing the 8-figure gesture four or five times to ensure that the compass is as accurate as possible. You can also use the calibration button (bottom left-hand corner of the Night AR view) to visually calibrate this view with the real Sun, Moon or Milky Way. Watch this video tutorial: Calibrating the Augmented Reality views.
Note: iPod Touch users or Android devices without compass sensor! These devices do not have a magnetometer. Therefore, it is not possible to draw in augmented reality (AR) the information of the Sun, Moon, Milky Way, celestial equator and celestial poles. That’s why the AR is not available.
Action

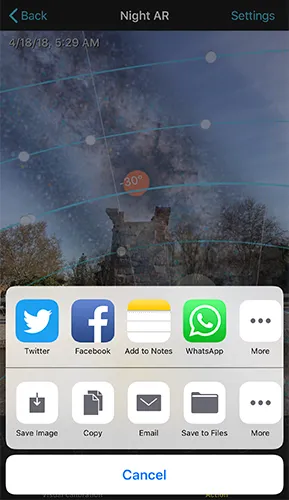
Tap on the Action button (bottom right-hand corner) to share a screenshot of the Night AR view on Facebook, Twitter or by email. And to save it to your camera roll.
17.Meteor Showers
The Meteor Shower Pill gives you instant access to the key information of the most important Meteor Showers. And it works offline!
Here you’ll find:
- A Meteor Shower calendar.
- Dates and local times of meteor shower peaks for the selected location.
- Meteor Shower visibility and quality for your location (taking into account Moonlight and daylight).
- Radiant information and position in the Augmented Reality view.
- Detailed information for each Meteor Shower, Sunrise and Sunset times, Moonrise and Moonset times, number of hours with no Moon, and Galactic Center visibility times (Milky Way).
Use it in the field to visualize the Meteor Shower radiant position and path with the Augmented Reality view (even offline).
Info
Location, date and time
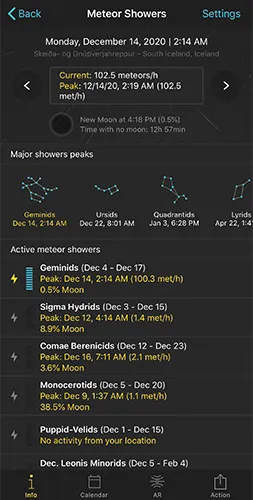
At the top, right above the big box, you’ll see the date, time and location the Meteor Shower Pill is using to display all the information.
Settings: change location, date and time
By default, the Meteor Shower Pill gives you the information relative to your current position, date and time. But you can choose a different location, date and time by tapping on the Settings button (top right-hand corner).
There is another way to change the date and time. We’ll show it to you in the following section.
Change date and time shortcut
To jump to the next day, tap the arrow you see on the right-hand side of the big box. To jump to the previous day, tap the arrow you see on the left-hand side of the big box. To change time forward, swipe the big box to the left. To change time backwards, swipe the big box to the right. To come back to your current date and time, double tap the big box. To set the time to the peak time for the selected date, tap once on the big box.
Key Meteor Showers information
The information in the big box is telling you the meteors/h for the selected location, date and time (taking into account all active Meteor Showers). For the selected date, it also tells you the peak time and peak meteors/h. Below the big box, you find the Moon phase and the amount of time you can enjoy the Meteor Shower with no Moon. Major Meteor Showers peaks
The dates and times of the major Meteor Showers peaks. Swipe the showers to the left to discover more. And tap a Meteor Shower peak to select it and see all the key information.
Active Meteor Showers
A list of the active Meteor Showers for the selected date and location. It includes the name, period of activity, peak date, peak time, peak meteors/h and peak Moon phase.
It also includes an energy bar showing you how good is the Meteor Shower in terms of the number of meteors you could potentially capture. The more filled the energy bar is, the better the Meteor Shower is expected to be.
Tap a Meteor Shower to set the date to the peak date and time of this particular meteor shower.
Upcoming Meteor Showers
A list of meteor showers that are happening soon. It includes the name, period of activity, peak date, peak time, peak meteors/h and peak Moon phase.
It also includes an energy bar showing you how good is the Meteor Shower in terms of the number of meteors you could capture. The more filled the energy bar is, the better the Meteor Shower is expected to be.
Tap a Meteor Shower to set the date to the peak date and time of this particular meteor shower.
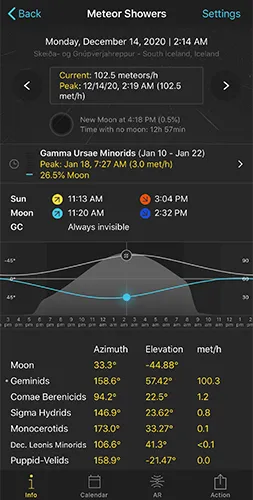
Sun, Moon and Milky Way info
Sunrise and set times, Moonrise and set times and the Galactic Center visibility times are key when you’re planning a Meteor Shower shooting. Maybe you’re planning a Milky Way shot with a few meteors… That would be cool :)
Peak of intensity, radiant path and Moon path
If you keep scrolling down, you’ll find a cool graph. This graph is great to quickly understand when is the time of meteors maximum intensity and how intense the shower will be. Moreover, visualizing the radiant and Moon path gives you valuable inputs on how the Moon and the radiant will affect the shooting session.
Position and activity of the Moon and active meteor showers
The azimuth and elevation of the Moon and the radiant of all the active Meteor Showers for the selected date and time. It also includes the number of meteors/h of each shower.
Calendar
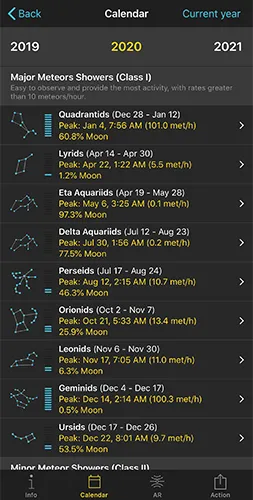
For the selected year, Meteor Showers > Calendar gives you the most important Meteor Showers according to 4 different classes.
- Class I: Easy to observe, they produce the greatest activity, with rates higher than 10 meteors/hour.
- Class II: More difficult to distinguish and with a rate of around 2 to 10 meteors/hour.
- Class III: Can produce strong activity on rare occasions, but they usually have a rate of 1 meteor/hour.
- Class IV: Too weak for your naked eye, with rates rarely greater than 2 meteors/hour.
The calendar includes the name, period of activity, peak date, peak time, peak meteors/h and peak Moon phase.
It also includes an energy bar showing you how good is the Meteor Shower in terms of the number of meteors you could capture. The more filled the energy bar is, the better the Meteor Shower is expected to be.
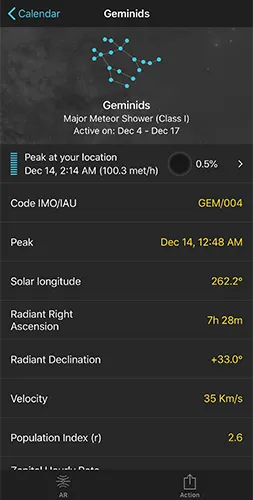
Tap a Meteor Shower to see the Meteor Shower information sheet. And then, tap the first row of the table to see the Meteor Shower in the main information screen.
Augmented Reality (AR)
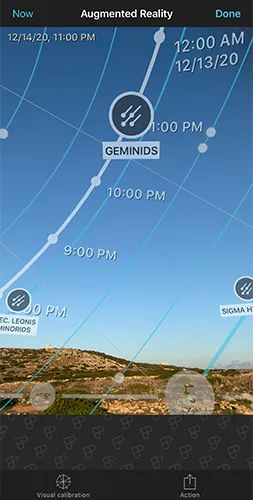
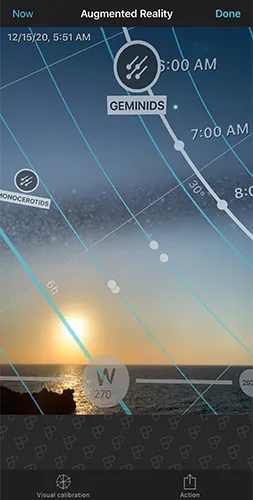
The AR view will help you visualize the radiant position and path in the sky. This will help you decide the shooting spot and where to frame your camera, depending on the image you wish to capture:
- You want the radiant in the frame if you intend to create an image in post-processing where all the meteors appear to converge in one spot in the sky. Like I did to create the cover image of our Meteor Shower Photography guide. It’s a cool effect. You can create it too in post-processing by using the technique described in this video by David Kingham.
- The further away a meteor appears from the radiant, the longer its tail might be. So to increase the odds of capturing longer tails, frame an area of the sky that is away from the radiant.
- Also, to capture the maximum number of meteors, use the shortest possible focal length (wide angle lens). The more sky you include in the frame the more meteors you’ll potentially capture.
- But don’t forget to include an interesting subject in the foreground. Connecting the action in the sky with a powerful foreground will make your image shine!
Imagine that you’re in the field about to shoot the Meteor Shower and you want to include the radiant in the frame to create a image where all meteors appear to converge in one single point.
Open PhotoPills, go to the Meteor Shower Pill and choose the Meteor Shower from the calendar.
Now tap the AR view and swipe the AR view from left to right to move time backwards and set the time to the beginning of the shooting session. Look for the radiant too.
Then, swipe the AR view from right to left to move time forward and visualize how the radiant moves across the sky. This way you’ll know where the radiant will be at the beginning and at the end of the shooting session. This is key to know where to frame your camera.
Information on the AR view
The Augmented Reality view shows you the position and path of the radiant of the selected Meteor Shower, for the selected location (by default where you are), date and time.
You can also visualize: the radiants of other active Meteor Showers, the Milky Way, the celestial equator, the Polaris, the north/south celestial pole, the circumpolar stars path and sense of rotation, the Moon position, the Moon path, the Moonrise/set directions, and the Star Trails patterns.
The blue curved lines you see on the AR represent the Star Trails pattern you'll get when framing in that direction. With the AR, planning your Star Trails photos is super easy :)
The selected date and time is displayed on the top left-hand corner of the AR view.
On the AR you'll see:
 | Radiant position and path of the selected Meteor Shower |
 | Radiants of other active Meteor Showers |
 | Milky Way and Galactic Center (Red dot on the image) |
 | Celestial equator |
 | Moon path |
 | Horizon |
 | Right ascension and declination lines (10-degree steps) |
 | North celestial pole |
 | South celestial pole |
Note: The stars in movement show you the sense of rotation around the celestial poles.
Change date and time
Swipe the AR view to the left to move time forward. Swipe it to the right to move time backwards. See how the Meteor Shower radiant moves across the sky on the AR view!
Tap the right-hand side of the AR view to jump to the next day.
Tap the left-hand side of the AR view to jump to the previous day.
Tap Now (top left-hand corner) or double tap the center of the screen to come back to your current date and time.
Visual Calibration
I recommend you to arrive to the location before Sunset and calibrate the AR view. This way you’ll make sure that what you’re seeing through your smartphone is accurate when planning the shot.
The quality of the information displayed in the AR view is good enough to work, but it strongly depends on the limitations of the sensors of your device (GPS, Accelerometer, Gyroscope). This is an issue we cannot control but, as technology advances, manufacturers improve the quality of sensors too.
Make sure you are away from any electronic device or magnetic field because they may interfere with the sensors of the device. It is recommended to wait a few seconds to let the system become stable.
And always calibrate the Night AR view. Doing the 8-figure gesture four or five times to ensure that the compass is as accurate as possible. You can also use the calibration button (bottom left-hand corner of the Night AR view) to visually calibrate this view with the real Sun, Moon or Milky Way. Watch this video tutorial: Calibrating the Augmented Reality views.
Note: iPod Touch users or Android devices without compass sensor! These devices do not have a magnetometer. Therefore, it is not possible to draw in augmented reality (AR) the information of the Sun, Moon, Milky Way, celestial equator and celestial poles. That’s why the AR is not available.
Action

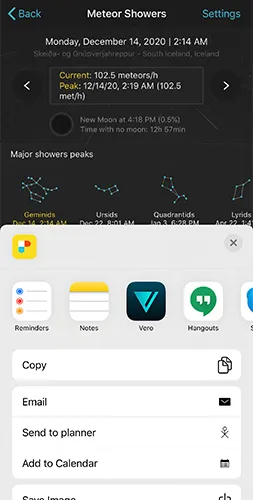
Tap the Action button (bottom right-hand corner) to share a screenshot of the Meteor Shower option you’re using (Info, Calendar or AR) on Facebook, Twitter, email. And also to save it to your camera roll, etc.
When you’re using Meteor Showers > Info, the action button allows you to send the date and time to the Planner, and even to add an alert to your device calendar.
18.Star Trails
Long exposure photos of circumpolar stars are spectacular. Make your own simulations of Star Trails. Visualize how stars rotate and the angle they make in a given exposure time.
Star Trails calculator
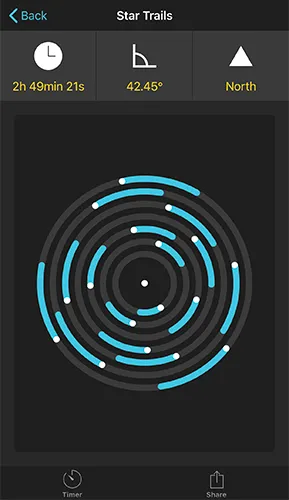
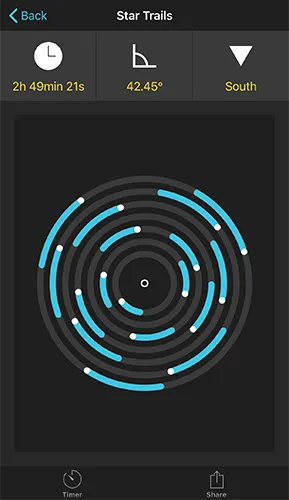
Use the Star Trails Pill to calculate the exposure time you need for a desired Star Trails length, and vice versa.
Let’s see how it works.
Star Trails settings
Introduce your desired exposure time or rotation angle and the hemisphere, to visualize a simulation of the Star Trails.
Star Trails picture
A simulation of the Star Trails for the given exposure time and hemisphere.
Timer

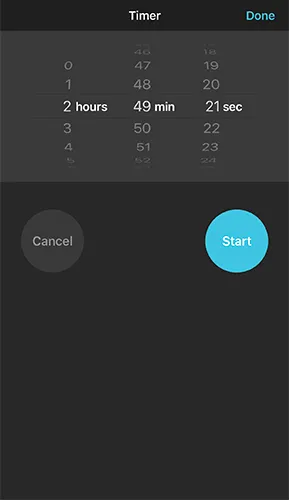
Tap on the Timer (at the bottom left-hand corner) and keep control on the exposure time left.
Share

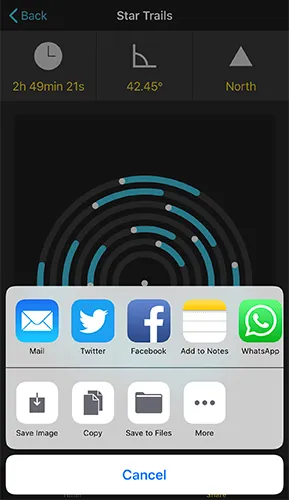
Share your Star Trails calculations on Facebook, Twitter or by email. Save the diagram as an image to your camera roll.
Recommended tutorial: Star Trails Photography - The Definitive Guide
19.Spot Stars
Useful for Milky Way photography. Calculate the maximum exposure time to get stars as big bright spots in your Milky Way photos. Avoid trails! The calculator will take into account the camera sensor size and megapixels to calculate the exposure time. It includes a timer.
Spot Stars calculator
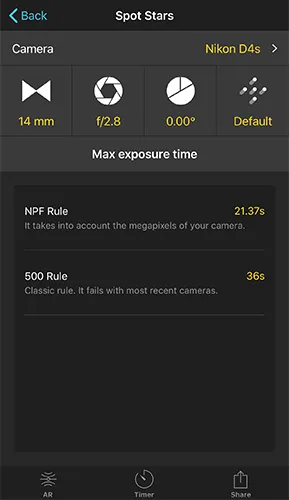
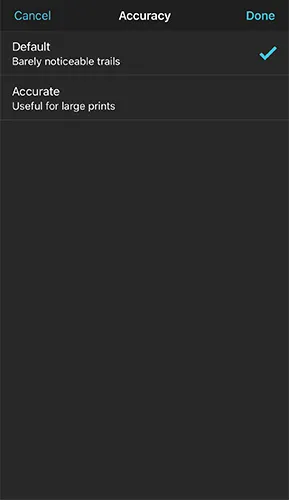
Use the Spot Stars Pill to calculate the maximum exposure time you can use in your Milky Way shots to prevent stars from trailing, that is to capture stars as big bright dots.
This is how it works.
Camera
Set your camera.
If your camera has a crop factor, it’ll be taken into account.
Camera settings
Introduce focal length (the real one, not the 35mm equivalent), aperture, declination and accuracy (Default, Accurate).
Declination
If you know the minimum declination of the star that is captured in your frame, set it.
If you don’t know what the declination is or you’re in doubt, just set the declination of the stars to 0 degrees. That’s the worst scenario (i.e. the celestial equator enters in your frame), so the exposure time will work for any shooting direction.
You can also use the AR button (bottom) to calculate it. Point your device where you wish to frame the shot, and the declination and the maximum exposure time will be automatically calculated.
Accuracy
Choose the accuracy. Default is the recommended value for most cases, and it will allow you to shoot longer exposure times (slower shutter speeds). This will allow you to keep the ISO relatively low.
However, if you wish to print in a very large format, set this value to Accurate. You’ll get a super short exposure time (fast shutter speed). Notice that this will force you to push the ISO to get the right exposure, getting noisy images on most cameras. That’s why I suggest you to use the Default value when possible.
Exposure values
Despite the app will display both the 500 and the NPF rule results, use the exposure time (shutter speed) you get with the NPF Rule from the table of results. It’s more accurate.
Use this value as a starting point, take a test shot and adjust accordingly.
Augmented Reality (AR)

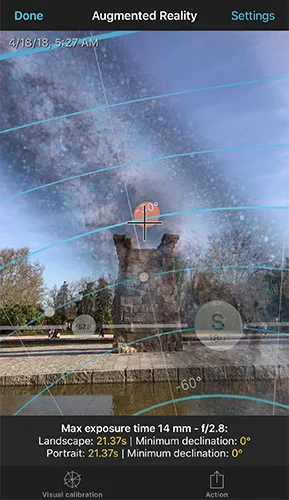
Use the AR button to have the exposure time in the Augmented Reality view. Tap on it, point your device where you wish to frame the shot, and the declination and the maximum exposure time will be automatically calculated.
Notice that you get the values for both, when shooting in landscape mode and portrait mode.
Timer

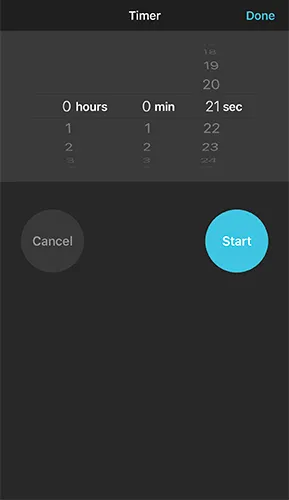
Tap on the Timer (at the bottom of the screen) and keep control on the exposure time left.
Share

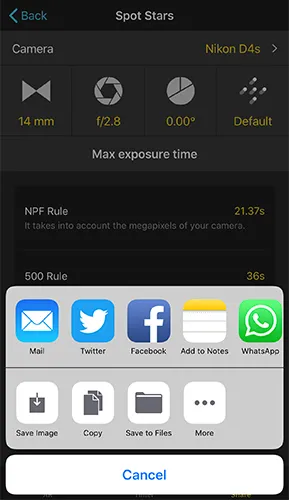
Share your Spot Stars calculations in Facebook, Twitter or email. Save your calculations as an image to your camera roll.
Recommended tutorial: Milky Way Photography - The Definitive Guide
20.Time lapse
Time lapse helps us understand the world by visually showing changes that we cannot normally perceive. Put all your efforts into the creative part. PhotoPills does all the time lapse maths and calculations for you.
Time lapse calculator
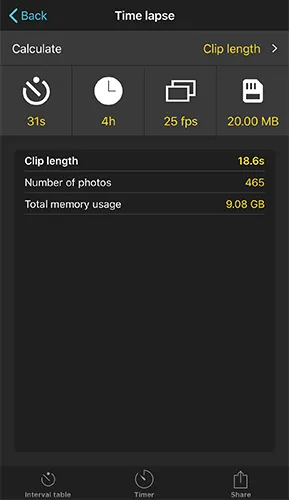
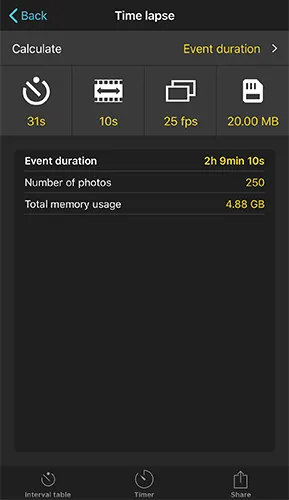
Use the Time lapse Pill to make all your time lapse calculations in seconds: clip length, shooting interval, number of photos, total memory usage, etc. It includes a timer and an shooting interval table.
This is how it works.
Setting to calculate
Tap on Calculate and choose the setting you wish to calculate: shooting interval (time between two consecutive photos), clip length (duration of the resulting time lapse video) or event duration (total shooting time).
Time lapse settings
Introduce the settings you wish to use to make the time lapse. For example, if you have decided to calculate the shooting interval, these settings are: clip length, event duration, frames per second and image size (MB of one photo).
Results
Get the setting you needed (Clip length for example), the number of photos you need to take and the total memory usage.
Interval table

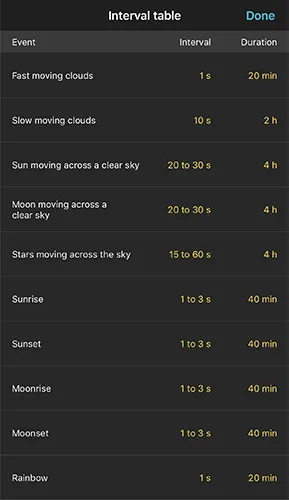
Don’t know what shooting interval to use? Check the Interval Table for recommended shooting intervals for typical events.
Timer

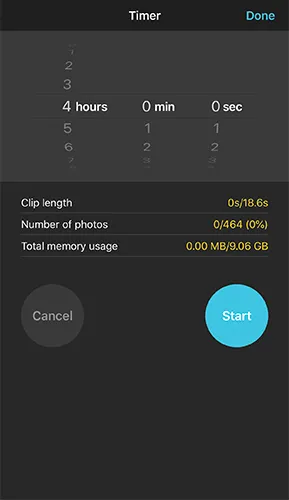
Tap on the Timer (at the bottom of the screen) and keep control on the time lapse progress and time left.
Share

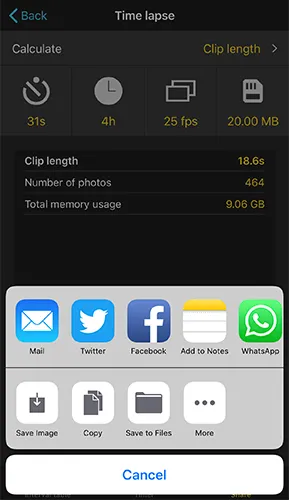
Share your Time lapse calculations in Facebook, Twitter or by email. Save your calculations as an image to your camera roll.
21.Timer
Keep track of time!
Timer
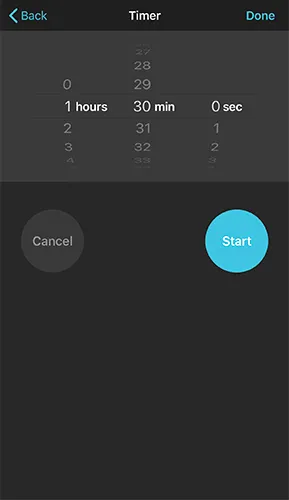
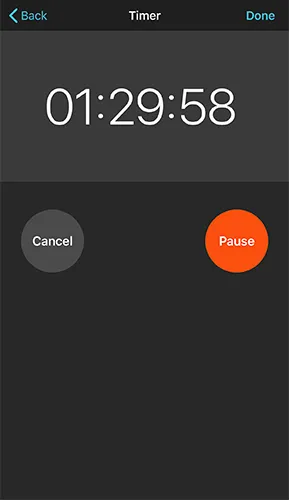
Use it when shooting Star Trails, time lapse and long exposures in low light or with ND filters. Get a notification when the exposure time or total shooting time ends.
22.Subject distance
Make sure your subject fits in your frame.
Subject distance calculator
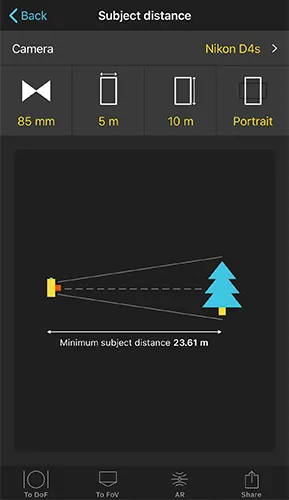
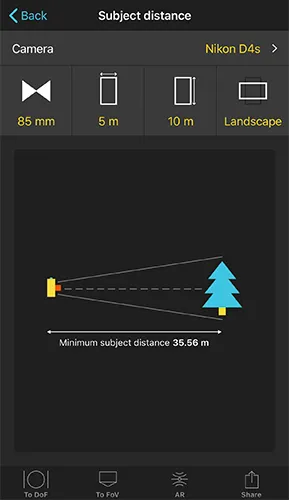
Use the Subject Distance Pill to calculate the minimum shooting distance to fit your subject in the frame.
Let’s see how it works.
Camera
Set your camera.
If your camera has a crop factor, it’ll be taken into account.
Settings
Introduce focal length (the real one, no the 35mm equivalent), subject dimensions and camera orientation (landscape, portrait).
Subject distance information
Visualize on a picture the calculated minimum subject distance.
To depth of field (DoF)

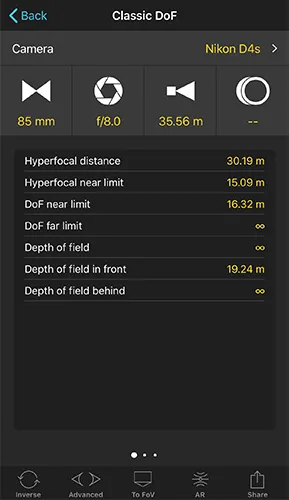
Tap To DoF to send the settings to the Classic DoF calculator.
To field of view (FoV)

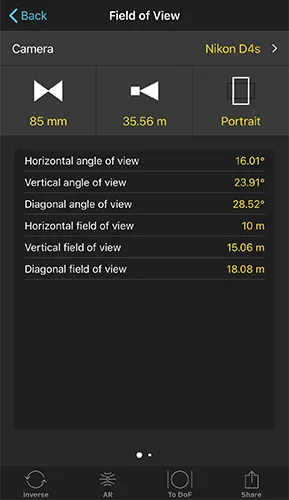
Tap To FoV to send the settings to the Classic FoV calculator.
Augmented Reality (AR)

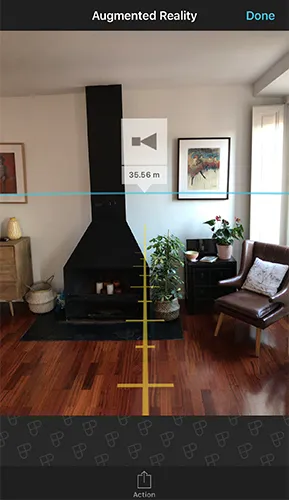
Visualize and measure in situ the calculated minimum subject distance.
 | Subject distance (focus distance) |
The subject distance is drawn on the ground. It is assumed that your device is situated 1.35 meters over the ground level. This height can be customized from the PhotoPills Settings button located in My Stuff menu.
You can use the ruler to measure distances. If you are using the Metric units system, each separation measures 0.5 meters. If you are using the Imperial units system, each separation measures 1 foot.
Share

Share your Subject Distance calculations on Facebook, Twitter or by email. Save the table as an image to your camera roll.
23.Focal Length Match
Focal length match calculator
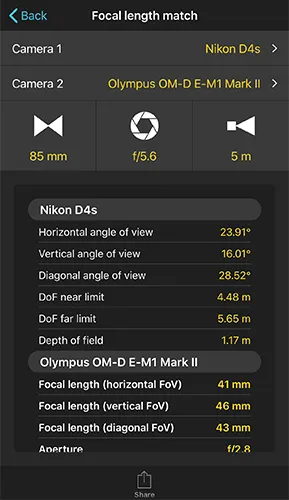
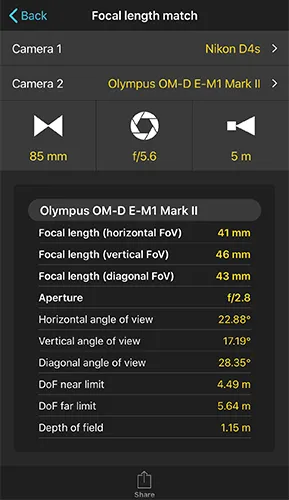
Compute the equivalent lens focal length and aperture to produce the same field of view and depth of field between two cameras with different sensor sizes.
Let’s see how it works.
Camera 1
Set your camera (sensor 1).
If your camera has a crop factor, it’ll be taken into account.
Camera 2
Set the camera (sensor 2) you wish to calculate the focal length and aperture.
Settings
Introduce focal length (the real one, not the 35mm equivalent), aperture and subject distance (focus distance) you used for the photo with Camera 1.
Focal length match information
For Camera 1, get the angle of view and depth of field information.
For Camera 2, get the focal length and aperture to match the field of view and depth of field you got with Camera1. Also get the angle of view and depth of field information.
Share

Share your Focal length match calculations on Facebook, Twitter or by email. Save the table as an image to your camera roll.
24.My Stuff (Menu)
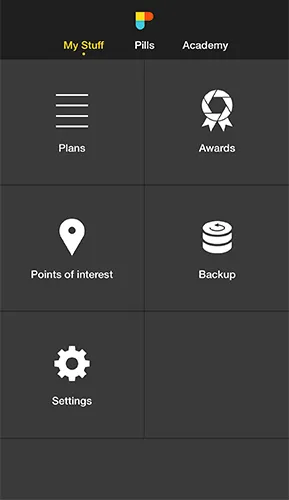
In My Stuff you’ll find inspiration (Awards), your saved Plans and Points of Interest and a way to backup them. And also a Settings menu to personalize PhotoPills.
Awards
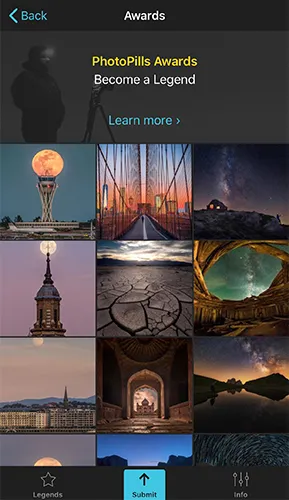
Welcome to the PhotoPills Awards!
Because we know the huge amount of time, energy and love you put in your photos. We want to HONOR them, SHOW them to the world, and REWARD you with up to $6,600 in cash prizes.
Get inspired by other PhotoPillers
Everyday, we feature one photo taken by a PhotoPiller both on PhotoPills > My Stuff > Awards and on our PhotoPills Instagram.
It’s a cool way to see the photos PhotoPillers imagine, plan and shoot across the globe!
Tap on the image you like to learn how it was taken (we also share the EXIF data).
Submit your legendary photos
Submit your photos (Awards > Submit), get featured, win amazing rewards (6,600$) and become a Legend.
Submit unlimited photos in 3 categories (past photos allowed):
- Night: Proof your skills under the dark sky. Send us your Milky Ways, Star Trails, meteor showers, planet conjunctions, ISS, northern lights, light painting photos...
- Moon: It’s all about the Moon! Send us your full Moons, thin Moons, SuperMoons, Moon Silhouettes, Moonrises, Moonsets, lunar eclipses...
- Sun: Any photo that does not involve the Moon nor the night sky. Send us your Sunrises, Sunsets, golden hours, blue hours, twilights, solar eclipses, Sun silhouettes or any photo where you carefully planned the natural light.
And get amazing rewards!
- Daily winners: Every day, get featured as PhotoPiller of the Day on Instagram. And, at the end of the year, the 365 featured photos will be included in the PhotoPills Awards Book, joining the PhotoPillers’ legacy.
- $300 every month: Every month, in each category, we’ll choose the best photo from all the featured ones on Instagram. Each category winner will be awarded with $100 in cash. We’ll also choose the best photo of the month. The photographer will be awarded with the PhotoPiller of the Month title and will enter our Hall of Legends.
- Become the PhotoPiller of the Year and get $3,000: Every year, we'll choose the best photo from all the featured ones on Instagram as PhotoPiller of the Day. The winner will be awarded with the PhotoPiller of the Year title and $3,000 in cash.
Learn more here: PhotoPills Awards.
Plans
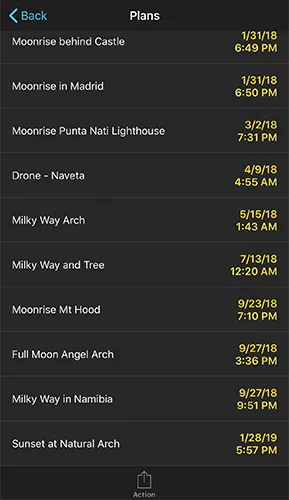
Never miss an unmissable scene again!
Manage your Plans in a comfortable way and get on the spot at the right time. Add photos and notes to better describe the photo. Share your Plans with your colleagues. Enjoy!
Your to-do list of Plans
Tap on Plans to see all the photo Plans you’ve saved with the Planner.
Backup your Plans
If you wish to backup all your Plans, tap on Action (at the bottom) and then Backup all by email.
Delete a Plan
Swipe left on a Plan to delete it on iOS and press and hold on Android.
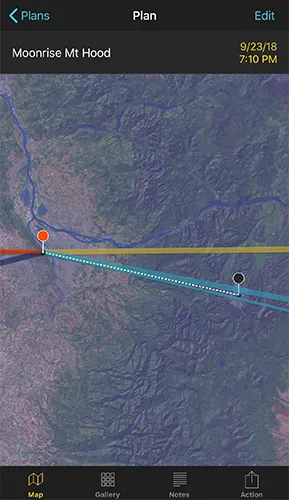
See Plan information sheet
Tap on one of your Plans to consult the location of the photo, the Sun/Moon/Milky Way conditions and the information you collected when doing the field work (photos and notes).
From this screen you can:
- Edit Plan name: On the Plan information sheet, tap on Edit (top right-hand corner) to edit the Plan name.
- Add photos to the Plan: On the Plan information sheet, tap on the Gallery option (at the bottom) and add photos to the Plan. Just tap on the camera icon at the top right-hand corner.
- Add notes to the Plan: On the Plan information sheet, tap on the Notes option (at the bottom) and add notes to the Plan.
- Actions you can do with your Plan: On the Plan information sheet, tap on the Action option (at the bottom) to send the Plan to the Planner, send it to a friend by email (KMZ file), add an alert to your calendar, send the position of the Red Pin to Maps (to calculate the route), share the Plan on Facebook and Twitter and more.
- Import a Plan from Email (KMZ file): If a friend sends you a Plan by email (KMZ file), you’ll be able to import it to PhotoPills. Once you have opened the email, do a long press on the KMZ file until a window shows up. Choose Open in PhotoPills. The file will be stored in your Plan list (My Stuff > Plans).
Points of Interest
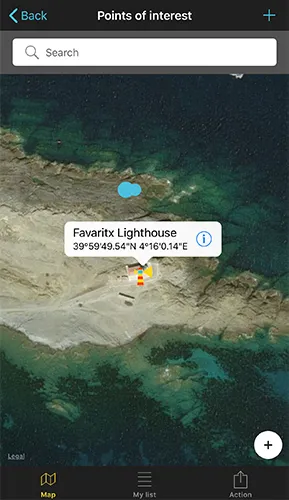
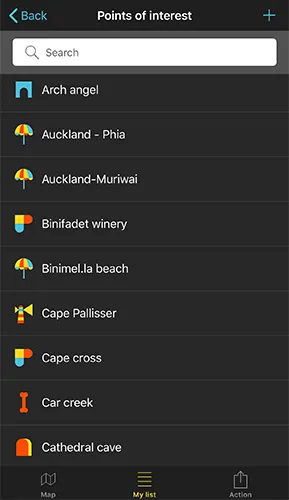
Create your own database of Points of Interest (POI). Add photos and notes to describe them. Share your Locations with your colleagues.
And travel and discover new places with our database of more than 10,500 Points of Interest all around the world. Enjoy!
Find Points of Interest on a Map
Tap on Map (at the bottom) and navigate the Map to find your points of interest (and the 10,500 included in PhotoPills).
On iOS you’ll see a (+) button on the Map. This button includes some of the options included in the (+) Map button of the planner. See section 5.
Your list of Points of Interest
Tap on My list (at the bottom) to see all the Points of Interest you’ve saved with the Planner.
Backup your Points of Interest
From My list, if you wish to backup all your Points of Interest, tap on Action (at the bottom) and then Backup all by email.
Delete a Point of Interest
From My list, swipe left on a Point of Interest to delete it or tap and hold on Android.
See Point of Interest information sheet
From My list, tap on one of your Points of Interest. The screen will change to the Map view centered on your Point of Interest. Now, to see the information sheet, tap on the “i” you see in the Point of Interest information box.
From this screen you can:
- Edit the Point of Interest name and position: On the Point of Interest information sheet, tap on Edit (top right-hand corner) to edit the name or adjust its position by moving the Red Pin.
- Add photos to the Point of Interest: On the Point of Interest information sheet, tap on the Gallery option (at the bottom) and add photos to the Point of Interest information. Just tap on the camera icon at the top right-hand corner.
- Add notes to the Point of Interest: On the Point of Interest information sheet, tap on the Notes option (at the bottom) and add notes to the Point of Interest.
- Actions you can do with your Point of Interest: On the Point of Interest information sheet, tap on the Action option (at the bottom) to send the Point of Interest to the Planner, send it to a friend by email (KMZ file), send the position of the Red Pin to Maps (to calculate the route), share the Point of Interest on Facebook and Twitter and more.
- Import a point of interest from Email (KMZ file): If a friend sends you a Point of Interest by email (KMZ file), you’ll be able to import it to PhotoPills. Once you have opened the email, do a long press on the KMZ file until a window shows up. Choose Open in PhotoPills. The file will be stored in your Points of Interest list (My Stuff > Points of Interest > My list).
Backup
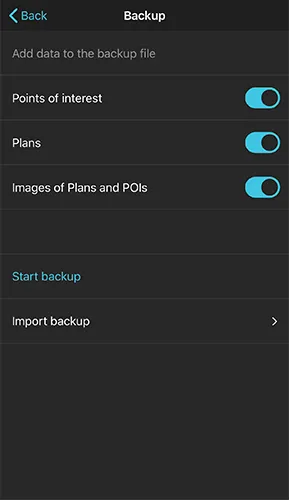
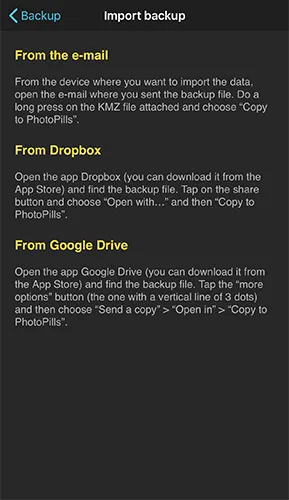
Create your backups
Backup your Plans and Points of Interest by creating a KMZ file you can send to yourself by email.
Import your backups
Learn how to import your backup from the email, Dropbox and Google Drive.
Settings
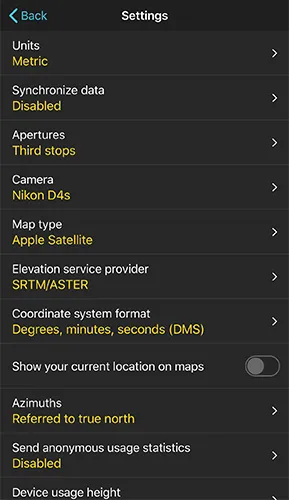
Personalize PhotoPills to your convenience.
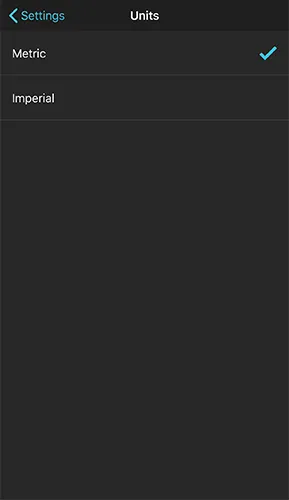
Units
Choose between Metric and Imperial units system.
Synchronize data (only on iOS)
Synchronize your Plans and Points of Interest across devices with iCloud.
Apertures
Set the aperture stops you wish to use in the calculations: full stops, half stops and thirds of a stop.
Camera
Set your default camera.
Map type
Choose the Map type you wish to use.
Elevation service provider
By default PhotoPills uses SRTM/ASTER datasets. But, if you are a Moonhunter and you need really accurate altitude information set the Google Elevation API.
Coordinate system format
Choose the Latitude/Longitude format you wish to use: Decimal degrees (DDD), Degrees, decimal Minutes (DMM) or Degrees, Minutes and Seconds (DMS).
Your current position
Activate to show your current position on the Map. It's the best way to visualize if you are right on the shooting spot of a saved Plan.
Azimuths
Choose to have the azimuth information referred to Magnetic north or True north.
Send anonymous usage statistics
Would you like us to continuously improve PhotoPills? You can easily help us with no effort. Just activate this option to share data on how you use the app. Data collection is anonymous. No personally identifiable information is included. Stay tuned for updates! Thanks.
Device usage height
Enter the height at which you normally use the device in order to correctly represent the augmented reality (AR).
Use Camera2 API (only in Android)
Enabled by default. Only disabled if the AR views crash or are not displayed correctly. This can happen on old devices which in theory should support Camera2 API but they actually don’t.
Show compass accuracy warning in AR views (only in Android)
Enabled by default. Only disable it if your device never hides the accuracy warning in the AR views, even though you do the 8-figure gesture to calibrate the compass sensor. Some devices always report that the compass sensor is not calibrated, although the AR view is spot on. If you disable the warning remember to always do the 8-figure gesture when using the AR views.
Use gyroscope in the AR views (only in Android)
Enabled by default. Disable it if the AR views doesn’t move correctly or doesn’t move at all. If the gyro sensor is damaged or doesn’t work correctly it can affect the AR view performance.
Calendar
Choose the Calendar you wish to use by default to add alerts for your photo Plans.
Delete cached eclipse KML files
When you load an Eclipse onto the Planner, a KML file will be stored in your device. To delete all KML files just tap Delete cached eclipse KML files.
Acknowledgements
Here you’ll find the sources of information we’re using.
Version
The PhotoPills version you’re using.
25.Academy (Menu)
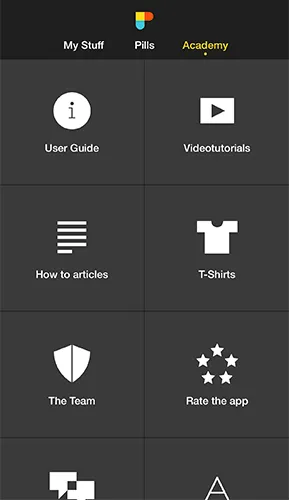
In the Academy menu you’ll find lots of learning material about PhotoPills and photography in general.
Never stop learning!
User Guide
Access the PhotoPills user guide online and download it in PDF format.
Video tutorials
Watch the following video tutorials on PhotoPills:
The first thing you need to do when downloading PhotoPills: Enable the Widgets
Calibrating the Augmented Reality views (AR)
Planner: How to move the Red Pin of the Planner
Planner: How to find and plan the Milky Way
Planner: Understanding the (+) Map button of the Planner (Toolbar)
Planner: How to save, share and import plans and locations
Planner: Mastering the Load button of the Planner
Planner: How to plan August 21 2017 total solar eclipse
Planner: How to plan any Star Trails shot you imagine
Planner: Managing the Map
Planner: Sun and Moon info
Planner: The Time Bar
Planner: Twilights and magic hours
Planner: Geodesic information
Planner: Shadow information
Planner: Find Sunrises and Sunsets
Planner: Find Moonrises and Moonsets
Planner: Find a Sun or a Moon at a determined position
Planner: Find a Sun or a Moon over a mountain
Plan 1. Total lunar eclipse January 21st 2019 with the Giza pyramids, Cairo (Egypt)
Plan 2. Supermoon rising behind our favorite stone hut in Punta Nati, Menorca (Spain)
Plan 3. Milky Way arching above the Vingerklip, Damaraland (Namibia)
Plan 4. Sun setting through North Window and Turret Arch, Arches National Park (USA)
Plan 5. Manhattanhenge with the Sun and with the Moon, New York (USA)
Plan 6. Full Moon at the top of the Sky Tower, Auckland (New Zealand)
Plan 7. July 2nd Total Solar Eclipse in Chile and Argentina
Plan 8. Sun and Moon rising aligned with the Giant and the Witch, Faroe Islands
“How To” articles
Build your photography skills with our detailed guides on:
Milky Way
Moon
Moon silhouettes videos
Astronomical events
Solar eclipses
Lunar eclipses
Star Trails
Meteor showers
Exposure
Depth of field (DoF)
Golden hour, blue hour and twilights
Azimuth and elevation
Lens filters and long exposure
T-Shirts
Our funny T-Shirts!
The Team
Meet the four friends behind the PhotoPills Team: Germán Marquès (the Developer), Joan Pons (the Designer), Antoni Cladera (The Photographer) and Rafael Pons (the Bard).
Rate the app
Rate PhotoPills on the App Store or on Google Play.
Feedback
Send us suggestions, bugs, complaints... We’re continuously improving PhotoPills. We need your feedback!
Glossary
The glossary contains all the terms used in PhotoPills, including: azimuth, elevation, angular diameter, depth of field, etc.
26.This is just the beginning
What’s next?
Answer: We’ll keep writing photography guides and improving PhotoPills as much as we can!
We have a long, long, long to-do list... that grows and grows. :)
So get ready for more cool updates!
This is just the beginning...
Oh!
And remember...
You have the power to imagine, plan and shoot legendary photos!
Get this ebook for free now!
