Lunar Eclipses 2024: The Definitive Photography Guide
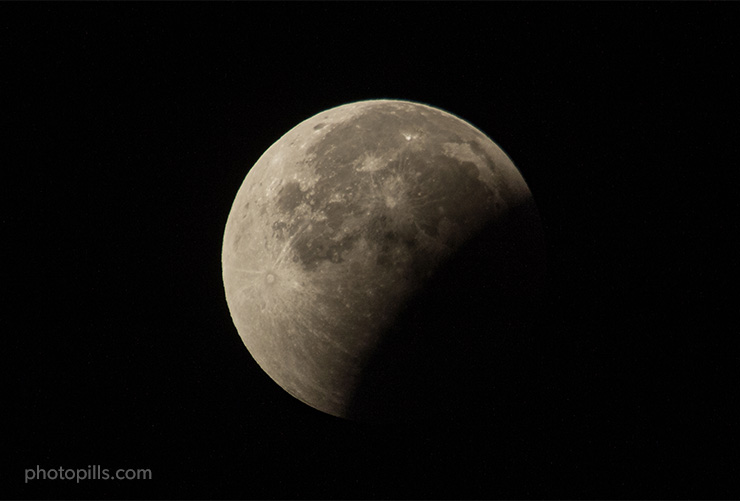
A total lunar eclipse is an astronomical phenomenon by which the Sun, the Earth and the Moon align. The Earth interposes between the Sun and the Moon, covering the latter with its shadow.
I was hypnotized the first time I saw a Moon eclipse. So much that now I spend my spare time checking PhotoPills to find out when the next one will happen...
After seeing a lunar eclipse, living it and photographing it... you will also fall in its spell.
It's impossible not to do so.
Surrounded by stars, the color of the Moon during totality is something extremely surprising. Something you should see with naked eyes and capture with your camera... at least once in your life.
This guide will help you capture any photo you imagine of any Moon eclipse that you can think of. Study it thoroughly and I promise you'll learn everything you need to take amazing photos.
And when I write "everything", I mean absolutely everything!
I'll give you examples of photos to inspire you, a calendar of the best lunar eclipses, and I'll show you how to use PhotoPills to plan them, the gear you'll need and how to photograph a lunar eclipse step by step.
Unlike solar eclipses, lunar eclipses occur much more often.
So don't miss the next opportunity and embark with me in this adventure.
Ready?
Set?
Go!
"The Moon lives in the lining of your skin" - Pablo Neruda
Note: If you're interested in solar eclipses, don't miss our guide to the best solar eclipses ;)
Get this ebook for free now!
Content
- Lunar eclipse calendar
- Understanding lunar eclipses and their phases
- The lunar eclipse images that you should capture before dying
- Where to go (in search of the perfect location)
- How to plan your lunar eclipse photo ideas
- The best equipment for lunar eclipses photography
- 7 general tips for photographing a lunar eclipse
- How to shoot a lunar eclipse step by step
- The 7 mistakes you should avoid when shooting a lunar eclipse
- It's time to make your dreams come true!
1.Lunar eclipse calendar
In the table below you have all the lunar eclipses until 2033. In it, you will find the date, the type, the magnitude, the duration and where they are visible.
You don't know what a penumbral eclipse is?
You'll find the answer in section 2, where I'll give you a complete description of each of these concepts.
| Date | Type | Magnitude | Duration | Where |
|---|---|---|---|---|
| 2024, March 25 | Penumbral | -0.132 | -- | Americas |
| 2024, September 18 | Partial | 0.085 | 01h03m | Americas, Europe, Africa |
| 2025, March 14 | Total | 1.178 | 03h38m 01h05m | Pacific, Americas, west Europe, west Africa |
| 2025, September 7 | Total | 1.362 | 03h29m 01h22m | Europe, Africa, Asia, Australia |
| 2026, March 3 | Total | 1.151 | 03h27m 00h58m | East Asia, Australia, Pacific, Americas |
| 2026, August 28 | Partial | 0.930 | 03h18m | East Pacific, America, Europe, Africa |
| 2027, February 20 | Penumbral | -0.057 | -- | Americas, Europe, Africa, Asia |
| 2027, July 18 | Penumbral | -1.068 | -- | East Africa, Asia, Australia, Pacific |
| 2027, August 17 | Penumbral | -0.525 | -- | Pacific, Americas |
| 2028, January 12 | Partial | 0.066 | 00h56m | Americas, Europe, Africa |
| 2028, July 6 | Partial | 0.389 | 02h21m | Europe, Africa, Asia, Australia |
| 2028, December 31 | Total | 1.246 | 03h29m 01h11m | Europe, Africa, Asia, Australia, Pacific |
| 2029, June 26 | Total | 1.844 | 03h40m 01h42m | Americas, Europe, Africa, Middle East |
| 2029, December 20 | Total | 1.117 | 03h33m 00h54m | Americas, Europe, Africa, Asia |
| 2030, June 15 | Partial | 0.502 | 02h24m | Europe, Africa, Asia, Australia |
| 2030, December 9 | Penumbral | -0.163 | -- | Americas, Europe, Africa, Asia |
| 2031, May 9 | Penumbral | -0.881 | -- | Americas, Atlantic, west Africa |
| 2031, June 5 | Penumbral | 0.129 | -- | Australia, New Zeland, Pacific |
| 2031, October 30 | Penumbral | 0.716 | -- | Pacific, Americas |
| 2032, April 25 | Total | 1.191 | 05h43m 01h05m | South/East Europe, Asia, Africa, North America |
| 2032, October 18 | Total | 1.103 | 05h15m 00h47m | Europe, Asia, Australia, Africa, North America, North/East South America |
| 2033, April 14 | Total | 1.094 | 03h35m 00h49m | Europe, Africa, Asia, Australia |
| 2033, October 8 | Total | 1.350 | 03h22m 01h19m | Asia, Australia, Africa, Pacific, Americas |
Source: NASA
Note: The hours in bold indicate the duration of totality.
Thanks to the previous table you can know at a glance when the next lunar eclipses will take place. Now that you have specific dates, you can start planning your photos (section 5).
This planning work will allow you to determine what kind of photos you want and can take (section 8).
And this is the best part...
Because you're a real PhotoPiller, right?
Great!
Because PhotoPills includes a lot of tools that will be super useful to plan your dream eclipse photos.
Are you curious to see PhotoPills in action?
In the following video you'll learn how to plan the total lunar eclipse of November 8, 2022 and capture it from a location in New York (USA) ;)
Talking about the tools PhotoPills includes...
One of them is a complete calendar of Sun and Moon eclipses (until 2050!).
This calendar allows you to choose the lunar eclipse you're interested in and load all the key data (date, time, hours of each phase) in the Planner. In addition, you can also visualize the areas of visibility of the eclipse on the map so you can plan it easily.
So you'll always have all the information on your smartphone :)
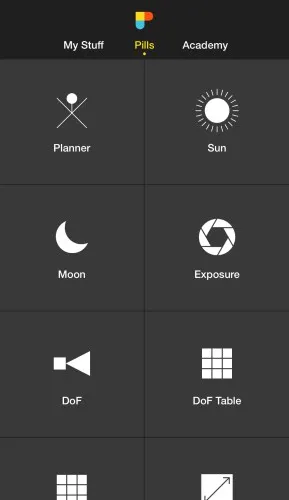
Open PhotoPills, tap Planner (Pills Menu) and then tap the Map Settings button. You will find it in the lower right part of the map, just next to the (+) button on the map.
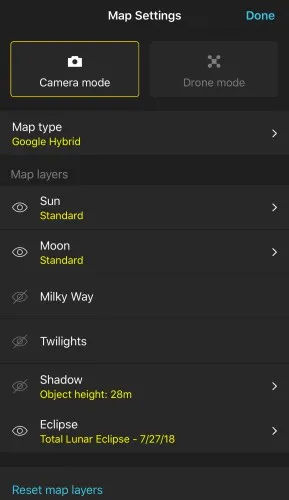
After tapping the Map Settings button, you'll see the Map Settings screen. In the Map layers section, look for the Eclipse layer.
To access the eclipse calendar, simply tap the little arrow you see to the right of the Eclipse layer.

If you are also interested in planning and capturing a solar eclipse, I suggest you to read the guide of the best solar eclipses.
But let's go back to the lunar eclipses...
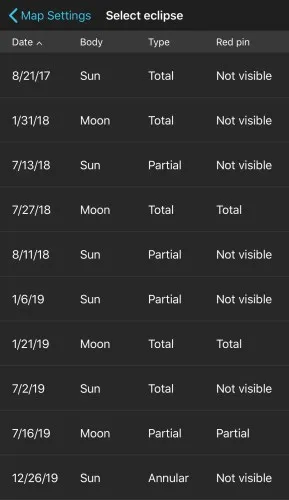
Tap once the word Object in the header of the table to see the solar eclipses first. If you tap it again, you'll see the lunar eclipses first.
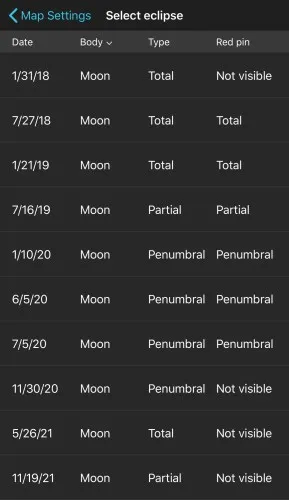
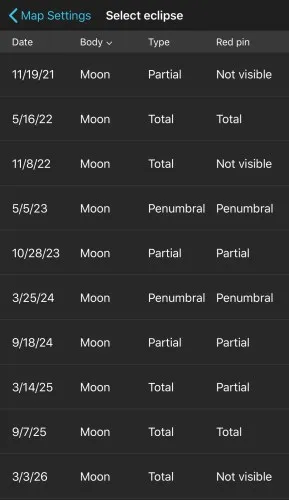
You can also sort the calendar by Date, eclipse Type or Red Pin.
The Red Pin column tells you, considering the position where you have placed the Red Pin in the Planner, whether you are going to see a total, partial eclipse or wether the eclipse won't be visible.
Therefore, if you place the Red Pin near your house, you can quickly find out which eclipses are going to be visible in your area, and if you can see a total, partial or penumbral lunar eclipse :D
The Type column indicates the type of eclipse: total, partial and penumbral.
"But Toni, what's the difference between each of these lunar eclipses?"
Don't worry! In section 2 I'll explain you all types of eclipse in a simple and detailed way so you can learn to distinguish them.
Let's keep going!
To see the eclipse information on the Planner map:
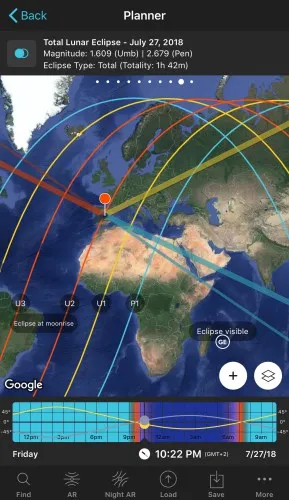
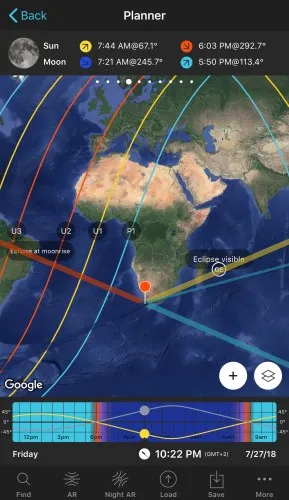
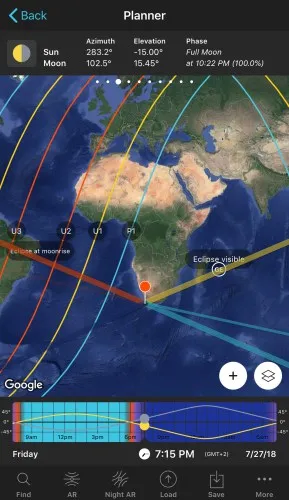
- In the eclipse calendar, tap the eclipse you wish to plan. For example, the total lunar eclipse of July 27, 2018.
- On the Map Settings screen, activate the Eclipse layer. To do this, tap the eye icon to the left of the layer.
- Finally, tap OK in the upper right corner in iOS or the arrow to go back in Android.
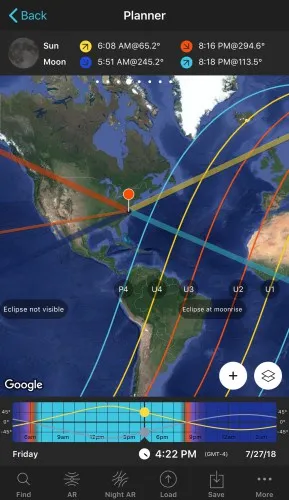
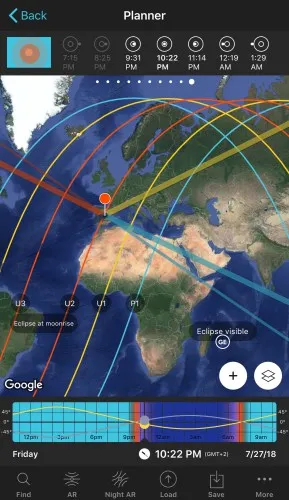
Look at the second screenshot. The visibility information of the eclipse is displayed on the map. Thus, it's easy to find out the areas of the planet where the lunar eclipse won't be visible, where you'll only be able to see the partial eclipse and where you'll be able to enjoy the total eclipse.
As you move the Red Pin over the map, you'll get all the eclipse information you need for each location. You'll find all the information in Panel 9 and Panel 10. Swipe the top panels to the left to find them.
Alright, let's move to the next step: understanding the meaning of the different colored lines displayed on the map and planning photos of your favorite Moon eclipse (section 5)... But let's go one step at a time.
Before you start planning photos as if there were no tomorrow, you should clearly understand the different types of lunar eclipses...
Let's go for it!
2.Understanding lunar eclipses and their phases
Before you start playing with PhotoPills and dreaming of photos you've wanted to capture for years, let me explain some basic stuff...
What is a lunar eclipse?
The Moon, like the rest of satellites and planets, doesn't emit its own light. Actually, it shines because its surface reflects Sunlight.
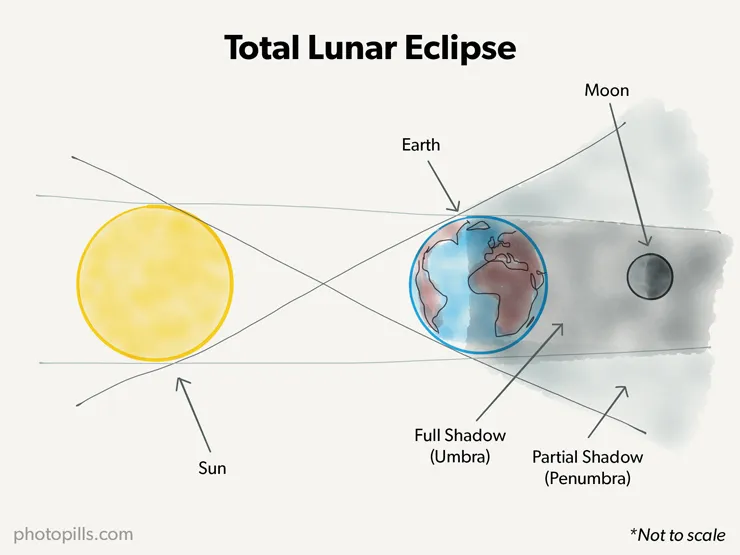
A lunar eclipse occurs when the Earth moves between the Sun and the Moon, covering the Sun's rays and casting its shadow on the Moon.
The shadow projected by the Earth has 2 parts, the umbra and the penumbra, causing different types of eclipses.
What is the Earth's umbra?
Just like the Moon casts a shadow over the Earth during a solar eclipse, the Earth casts a shadow over the Moon. This shadow or, rather, the darkest part of this shadow is called umbra.
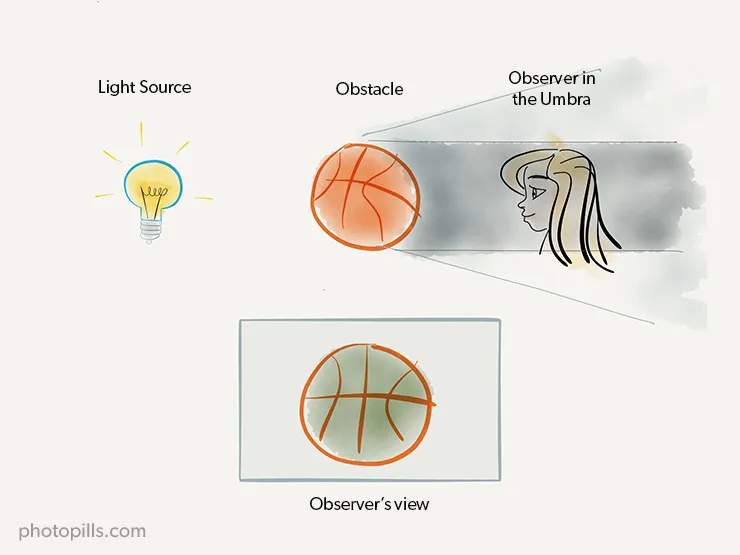
In the umbra, the light source (the sunrays) is completely blocked by the object that causes the shadow (the Earth).
Actually, this shadow is a phenomenon that should sound you quite familiar because it happens frequently. Most of us call it "night"... ;)
Conversely, a lunar eclipse (total or partial) doesn't happen as often because the Moon has to enter the Earth's umbra. Later on, I'll explain you the reasons why this happens rarely.
When the totality of the Moon enters the terrestrial umbra, a total lunar eclipse occurs.
When only a part of the Moon enters the terrestrial umbra, a partial lunar eclipse occurs.
What is the Earth's penumbra?
Just like the Moon does, the Earth casts a shadow over the space called penumbra.

In the penumbra, the source of light (sunrays) is only partially blocked by the object that causes the shadow (the Earth).
When the Moon enters the Earth's penumbra, a penumbral lunar eclipse occurs.
Why does a lunar eclipse only happen during Full Moon?
That's right, lunar eclipses happen during the Full Moon.
Well, during the Full Moon there's an event that astronomers call "syzygy".
Have you heard about it?
This peculiar name comes from the ancient Greek word suzugos, meaning to be yoked together or conjoined. It defines the exact span of time during which the Sun, the Moon, and the Earth are aligned in a perfect (or near perfect) straight line. This happens around Full Moon every lunar month.
Remember that the Full Moon is the moment when the Earth is exactly between the Sun and the Moon. Therefore, a lunar eclipse occurs when the shadow of the Earth is cast onto the Moon.
However, there isn't an eclipse every Full Moon. Why is that?
A lunar eclipse doesn't happen every Full Moon because of 2 reasons.
The first one is that the Full Moon has to be near a lunar node.
A lunar node is one of the two points where the plane of the Moon's orbital path around Earth meets the Earth's orbital plane around the Sun. This plane, the Earth's orbital plane around the Sun, is named the ecliptic.
However, both planes (the Earth one and the Moon one) are not perfectly aligned. If you take the ecliptic as a reference, the plane of the lunar orbit around the Earth is inclined about 5° with respect to it.
As you can see in the diagram below, both planes only intersect at two points: the lunar nodes.
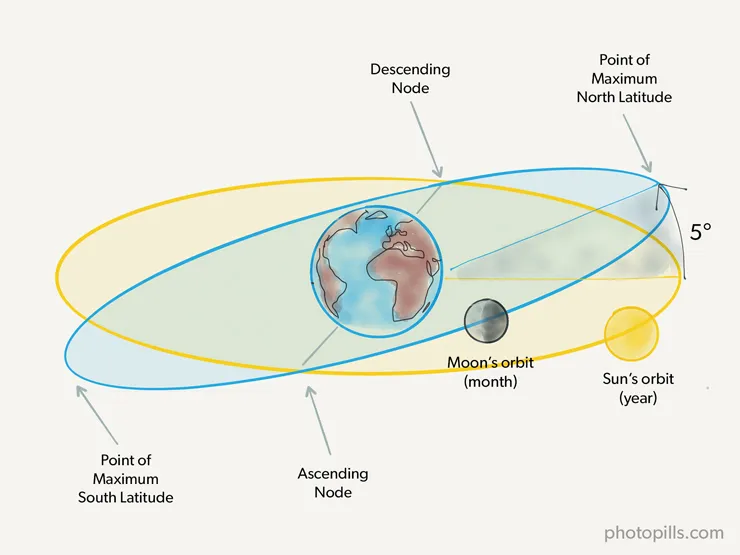
And the second one is that the Sun must also be close to a lunar node in order to form a perfect or almost perfect line with the Earth and the Moon. This alignment occurs a little less than 6 months apart, and it lasts 34.5 days more or less.
Therefore, it's only during this time that lunar eclipses can take place.
So, how often does a lunar eclipse occur?
Good question!
PhotoPills always has the answer. You only have to consult the full calendar of eclipses :P
Most calendar years have 2 lunar eclipses, but remember that not all of them are total.
Up to 5 lunar eclipses can occur in the same year, but this is rare. According to NASA calculations, in the past 5,000 years only about 33 years have had 5 lunar eclipses. The last time this happened was in 1879, and the next time will be in 2132!
What is the magnitude of a lunar eclipse?
Unlike solar eclipses, lunar eclipses have two magnitudes.
The umbral magnitude
The umbral magnitude allows astronomers to establish what proportion of the Earth's umbra covers the Moon during a lunar eclipse.
To be more precise, the umbral magnitude represents the fraction of the lunar diameter covered by the Earth's umbra.
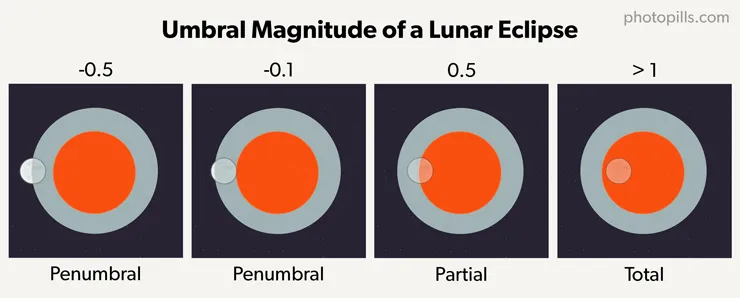
This is how the umbral magnitude varies according to the type of eclipse:
- Total lunar eclipse: 1 < umbral magnitude.
- Partial lunar eclipse: 0 < umbral magnitude < 1.
- Penumbral lunar eclipse: umbral magnitude < 0.
The penumbral magnitude
The penumbral magnitude indicates which part of the diameter of the Moon is covered by the Earth's penumbra. Remember that the penumbra is the brightest part of Earth' shadow.
This is how the penumbral magnitude generally varies according to the type of eclipse:
- Total lunar eclipse: penumbral magnitude > 2.
- Partial lunar eclipse: 1 < penumbral magnitude < 2.
- Penumbral lunar eclipse: penumbral magnitude < 1.
Now that you know all the concepts related to a lunar eclipse and what causes one to occur, let's see the 3 types of lunar eclipses.
The total lunar eclipse
The total lunar eclipse occurs when the Earth's umbra completely covers the Moon.
The period during which the Earth's umbra completely covers the Moon is called "totality" and it can last from a few seconds to 3+ hours.
What are the phases of a total lunar eclipse?
If you're lucky enough to be in a location from which you can see a total lunar eclipse, you'll be able to enjoy the following 7 phases:
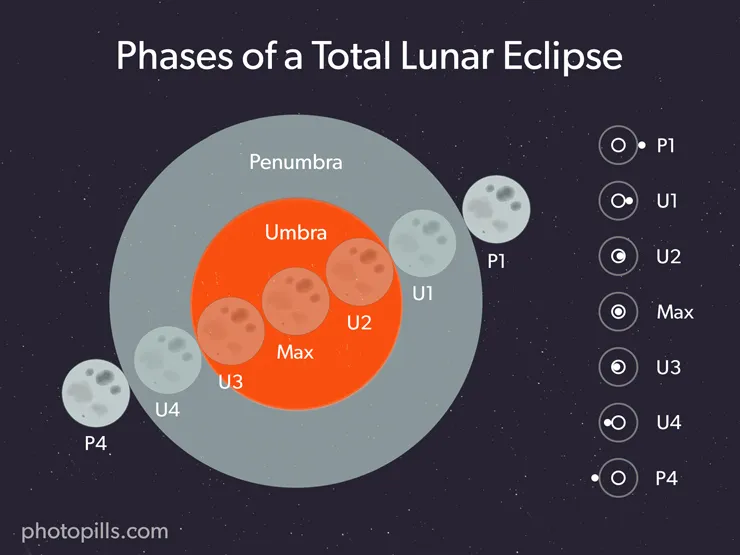
- Penumbral eclipse begins (P1): The penumbral part of Earth's shadow starts moving over the Moon. This phase is very difficult to observe with the naked eye.
- Partial eclipse begins (U1): The Earth's umbra starts covering the Moon, and the eclipse becomes more and more perceptible.
- Total eclipse begins (U2): The Earth's umbra completely covers the Moon. The Moon turns into red, brown or yellow. Later on, I'll explain you more about these colors.
- Greatest eclipse (Max): This is the central moment of the total eclipse.
- Total eclipse ends (U3): The Earth's umbra starts moving away from the Moon so it's visible again.
- Partial eclipse ends (U4): The Earth's umbra completely leaves the Moon allowing the lunar surface to be visible again.
- Penumbral eclipse ends (P4): The Earth's penumbral shadow moves away from the Moon. It's the end of the eclipse.
Considering the Red Pin position (latitude/longitude), PhotoPills tells you the exact time at which each phase occurs. This shouldn't come as surprise to you, does it?
No, of course not.
In section 5 I'll explain you step by step how to easily find all that information in the app.
"OK Toni, but what can I photograph during a lunar eclipse?"
A ton of stuff!
In section 3 I'll detail all the photos you can take during a total lunar eclipse. And in section 8 I'll explain you how to capture them step by step ;)
Deal?
Why does the color of the Moon change during a total lunar eclipse?
When a total eclipse of the Moon occurs, the Moon can take on different shades of red, orange, brown or even yellow.
Is this magic?
No way! Actually, the color of the Moon depends on the atmospheric conditions of the Earth during the eclipse.
As the Earth blocks the Sunlight the Moon receives, the short light waves (coming from the Sun and casting on the Earth) are dispersed, while the longer waves (that are, you've guessed it, red) are cast on the Moon.
That said, the amount of dust particles, water droplets, clouds and fog can have an impact on the reddish hue of the Moon.
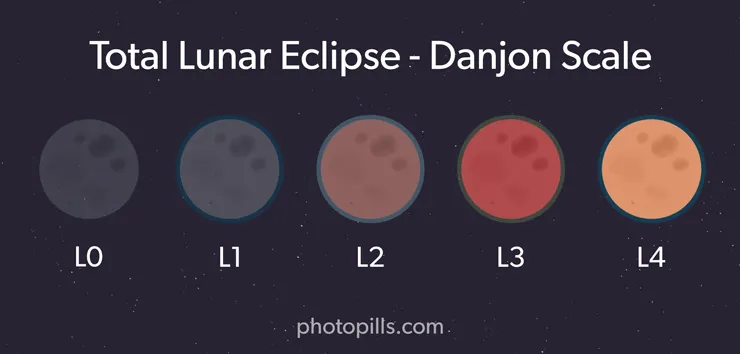
Thanks to French astronomer André-Louis Danjon (1890-1967) scientists have a scale to measure the "Earth brightness". In other words, the light cast by the Earth that illuminates the dark zone of the Moon.
The Danjon scale consists of five degrees ranging from 0 to 4, being 0 very dark and 4 very bright:
- 0 = Very dark eclipse in which the Moon is barely visible.
- 1 = Dark eclipse with a gray or brown Moon. The surface details are hardly noticeable.
- 2 = Red or brownish eclipsed Moon with a very dark central shadow and relatively bright edges.
- 3 = Brick-red eclipsed Moon where the umbra has a bright or yellow edge.
- 4 = Coppery red or even orange eclipsed Moon with the umbra's edge bright and bluish.
Yes, in many eclipses the Moon becomes red!
And that's why they're popularly known as "Blood Moon". A little gloomy, don't you think?
To complicate matters even further, a lunar tetrad can occur.
The lunar tetrad
"Excuse me Toni? A tetrad what?"
Let me say it again: a lunar tetrad.
That is to say, a series of 4 consecutive total lunar eclipses (with no partial or penumbral eclipses in between) that happen approximately every six months.
Do you want to know how often a lunar tetrad occurs?
Set? Ready? Go!
It depends... :D
Actually, it depends on the century you analyze. Italian astronomer Giovanni Schiaparelli (1835-1910) calculated that lunar tetrads don't happen regularly. Some centuries have several lunar tetrads and others have none.
To give you an idea, there will be 8 tetrads in the 21st century (from 2001 to 2100). The first one was in 2003-2004, the second one in 2014-2015 and the next will be in 2032-2033.
And although PhotoPills tells you all the eclipses, I'll put them below so you can quickly know when they happen, in case you want to plan a lunar eclipse a few years in advance... ;)
- 2032, April 25 and 26
- 2032, October 18 and 19
- 2033, April 14 and 15
- 2033, October 8
But remember that the lunar tetrad won't be visible from all corners of the planet.
So depending on where you are, you may have to travel... Use PhotoPills to know where to go :P
Note: Do you share with us the dream of taking photos from the Moon? Maybe one day we'll be together on the Moon during a lunar eclipse. If so, we'll see a reddish ring around the Earth. In reality we'll be seeing all the Sunrises and Sunsets that are occurring on Earth at that precise moment... Amazing!
The partial lunar eclipse
A partial lunar eclipse occurs when the Earth partially covers the Sun and casts its umbra on part of the Moon.
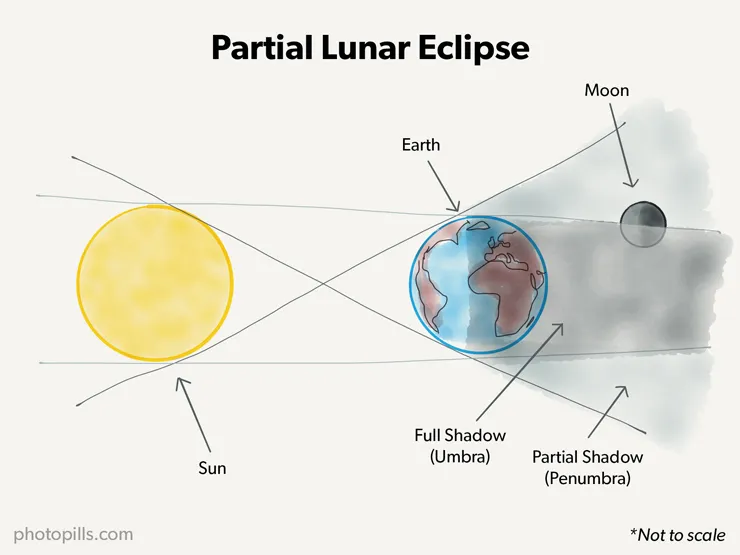
The partial lunar eclipse takes place in 5 main phases:
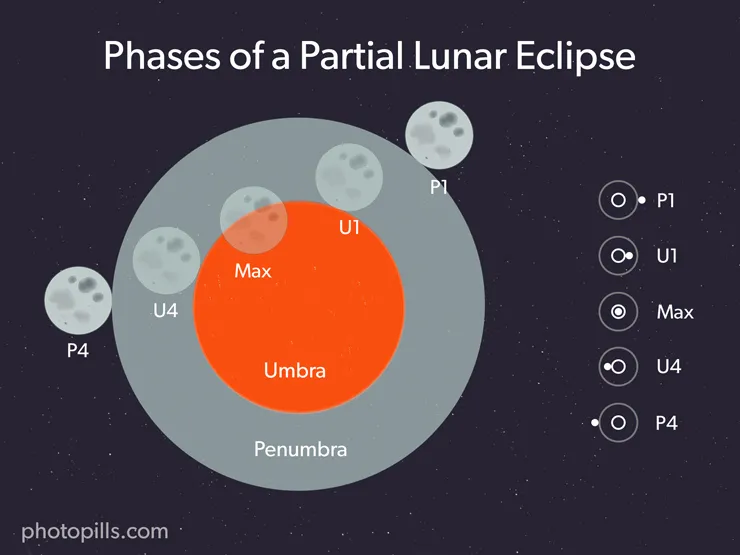
- Penumbral eclipse begins (P1): The penumbral part of Earth's shadow starts moving over the Moon. This phase is very difficult to observe with the naked eye.
- Partial eclipse begins (U1): The Earth's umbra starts covering the Moon, and the eclipse becomes more and more perceptible.
- Greatest eclipse (Max): This is the central moment of the partial eclipse. The umbra covers more of the Moon's surface than at any other instant during the eclipse.
- Partial eclipse ends (U4): The Earth's umbra completely leaves the Moon allowing the lunar surface to be visible again.
- Penumbral eclipse ends (P4): The Earth's penumbral shadow moves away from the Moon. It's the end of the eclipse.
The time at which each phase occurs depends on the location (latitude/longitude). You can quickly find out all the details thanks to PhotoPills (I'll tell you more about it in section 5).
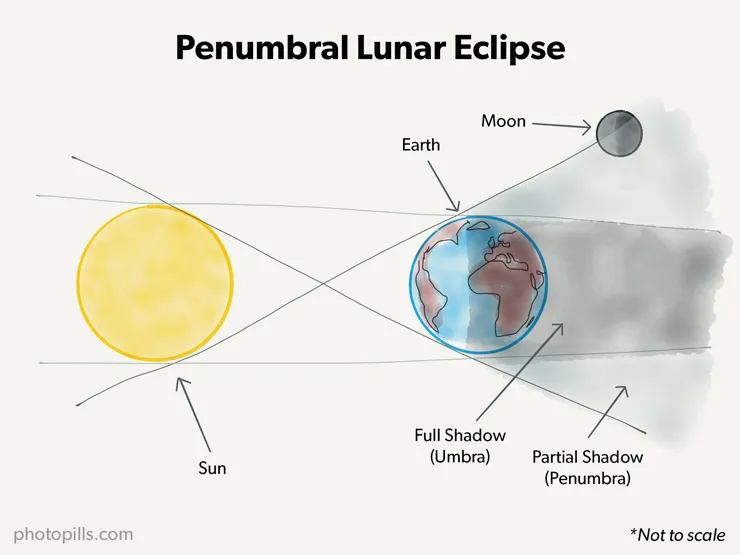
The penumbral lunar eclipse
A penumbral lunar eclipse occurs when the Moon moves through the penumbral shadow of the Earth. And always outside the umbra.
Since the penumbra is a shade much lighter than the umbra, it only causes a subtle darkening on the lunar surface. Moreover, you may not be able to perceive a penumbral lunar eclipse at first sight since it depends on the portion of the Moon that enters the penumbral shadow.
Obviously, the smaller the proportion of Moon that enters the penumbra, the more difficult it will be to observe the eclipse with the naked eye.
To give you an idea, you'll be able to see the penumbral lunar eclipse as long as more than half of the Moon enters the penumbra area. That is when it has a penumbral magnitude of at least 0.6.
This type of eclipse is, therefore, a partial penumbral lunar eclipse.
But the penumbral lunar eclipse can also be total. In this case, the Moon enters completely into the penumbra, without going through the umbra.
This type of eclipses is very unusual, occurring between 0 and 9 times in the same century. And like the rest of lunar eclipses, its frequency is not regular either.
As I was saying, it's very difficult to see a penumbral lunar eclipse. Moreover, it's impossible to see the beginning and the end, even if you were using a telescope.
From a photographic point of view, it's a real challenge. Sometimes you have the impression that the eclipse is not even happening... :/
And since we're talking about photos, and now that you know what a lunar eclipse is and what its different types and phases are...
How about having a look at some pictures?
I'm sure many of them will inspire you to create (and plan) your own ideas.
3.The lunar eclipse images that you should capture before dying
Being a good PhotoPiller like you are, you should know by now that our war cry is "Imagine. Plan. Shoot!".
So it's time to fully enter into the creative process.
Having a good idea is not always easy and that's why it never hurts to see photos of others to inspire you and transform that inspiration into your own idea – a unique and original idea that leads you to capture a legendary photo.
The idea comes first... :)
Then, use PhotoPills to plan (section 5) and capture (section 8) the photo.
Let's dive in!
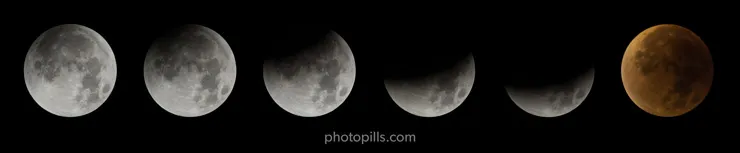
Photograph the phases of the lunar eclipse (1)
If photographing the Moon is fascinating, capturing the different phases of a lunar eclipse is simply amazing. It's as if a veil were covering little by little the surface of the Moon.
These are mysterious and intriguing photos...
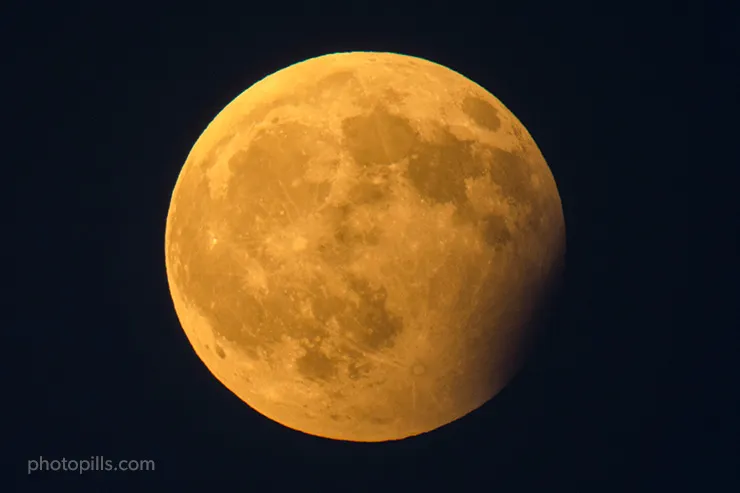
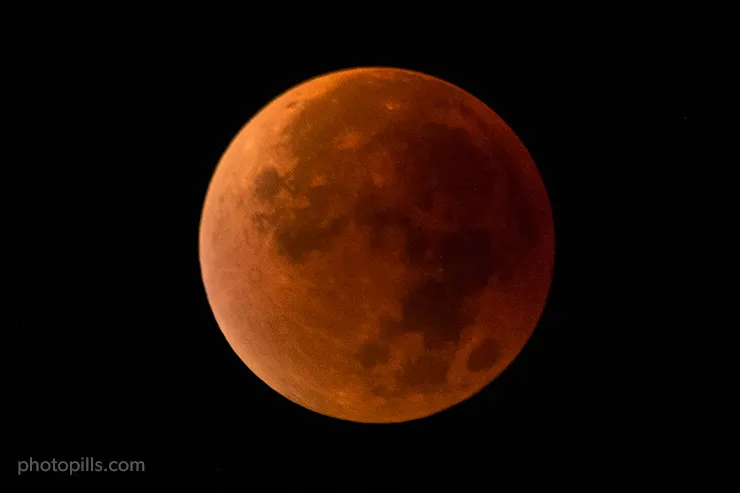
Don't forget the "Blood Moon"! (2)
Seeing with your own eyes how the Moon goes from gray (or white) to a vivid red is something you won't easily forget. But if you think you may do so, the best way to remember that unique moment is to take a picture of the "Blood Moon".
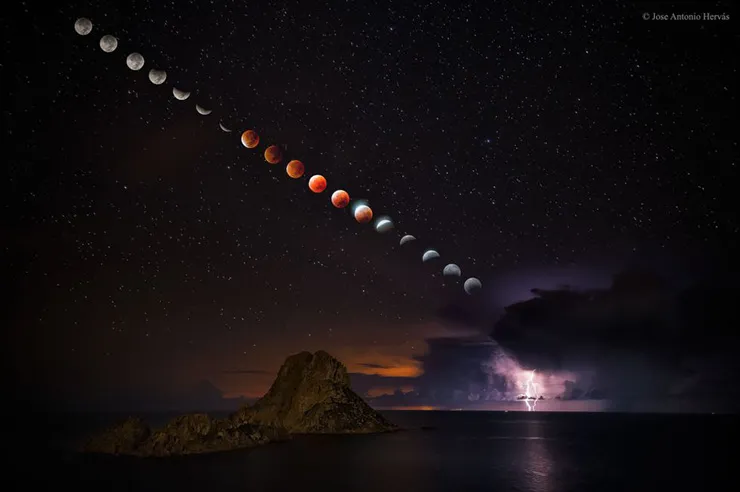
Capture the lunar trail (3)
If you like photographing Star Trails, you'll love capturing the trail left by the Moon throughout the eclipse.
The Moon will slowly move through the field of view of your camera as the Earth rotates, creating a "lunar eclipse trace".
This technique consists in capturing, in a single image, not only the Moon trace but also all the intensity and brightness changes happening during the eclipse.
Thanks to one of these images, Sébastien Chaurin became March 9, 2016 PhotoPiller of the Day at the PhotoPills Awards.
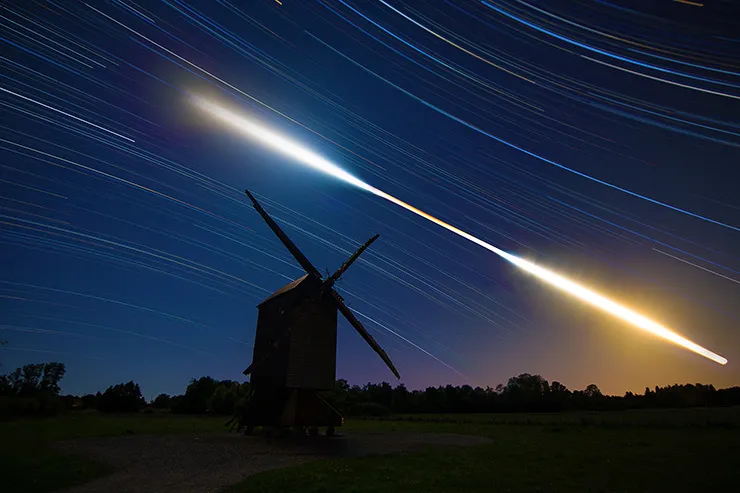
Photo by Sébastien Chaurin.
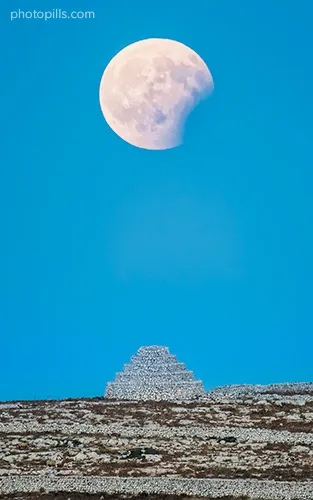
Include the landscape using an angular, standard or short telephoto lens (4)
If you want to include both the Moon and the landscape, you'll have to work a little more on your planning and composition. As you will see in section 4, the ideal is to find a location with both an interesting background and subject that, combined with the show happening in the sky, produce a surprising image.
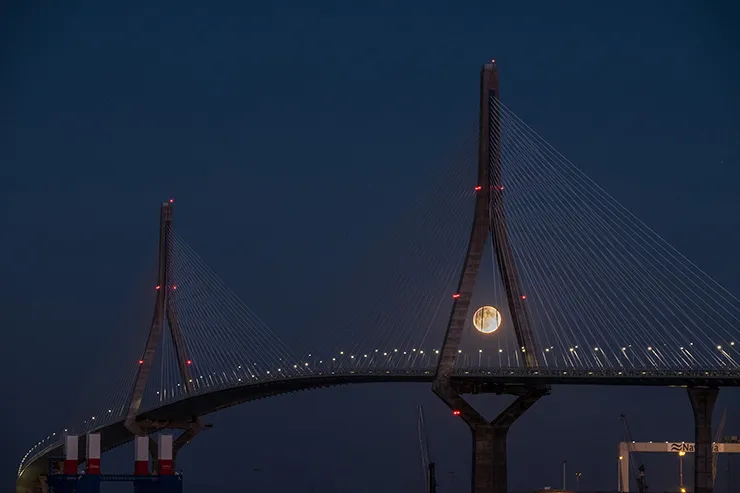
Photo by Joaquín Márquez.
Include the landscape using a long telephoto lens (5)
This type of picture is a real challenge: they're hard to plan and capture.
To successfully carry out your mission, you need to know the location very well, be able to do advanced planning and not fail during the photo shoot.
Don't panic. They are photos that you are perfectly capable of taking. Moreover, in section 4 you'll learn to choose the best locations and in section 5 I'll show you step by step how to plan any photo you imagine, regardless of how crazy or complicated it may be.
Create close-up and wide-angle composites of the lunar eclipse (6)
Why not telling the whole story in one image?
Close-up and wide-angle composites are a great way to show how the eclipse evolves over time.
To create a composite you need photos that show the evolution of the whole eclipse. Then, blend them into a single image in post-processing.
Multi-photo composites
Superimpose all phases of the eclipse on a photo that also shows the scene (use a short focal length). That way you'll tell the story from beginning to end.
Layered composites
A layered composite is a combination of several shots made during the eclipse that you blend realistically even though they don't represent what actually happened.
In short, the photographic (and creative) opportunities that an eclipse offers you are huge.
You should take advantage of them all!
Make a video or a time lapse of the eclipse (7)
Another great option that can produce amazing results is to record a video of the event or create a time lapse.
If you intend to create a time lapse, be sure to take enough frames to capture the entire event (as long as the clouds allow it!).
And be careful when composing if you are going to leave your camera and your tripod static. If you plan to use a slider or a motorized ballhead, double check that the Moon is always in the right place within the frame.
Perfect!
Now you know everything you need to get down to work and think of possible locations and photo ideas.
In section 5 I'll explain how to use PhotoPills to explore your favorite locations (or others that you don't know yet). So you'll find the photo you're looking for.
But first, let me give you some tips that will help you determine the perfect location.
4.Where to go (in search of the perfect location)
The thrilling moment of planning your picture is here (section 5)!
And to do this, it's essential to establish the location from which you'll be taking the shots (section 8).
If you want to choose the best possible location to take the pictures you have imagined, these are some of the factors that you should consider.
Look for a spot in the area where the eclipse will be visible
If you want to enjoy the show to the fullest and photograph the Moon changing its color (or even a "Blood Moon"!), look for a location where the eclipse will be visible. That is, where the phase of total eclipse or that of maximum partial eclipse will be visible.
When you're planning a lunar eclipse (section 5), make the most of PhotoPills and look for a location that is in the area of visibility.
Find a location with a lot of space around
Find a place that has a lot of space to move around.
And you should do it for two reasons.
The first one is that having more room to maneuver will make it easier to plan the photo. For example, if you want the eclipse to be in a certain position in the frame (aligned with your subject...).
The second one is that a large part of your shooting session may take place at night or in twilight. So you'll have to work in the dark and with your headlamp (which can be a bit challenging sometimes).
Therefore, look for an open space.
In addition to this, don't ever go shooting at night alone and tell someone where you are going. Always go with someone, regardless if he or she is a photographer or not. You'll enjoy a good conversation (a lunar eclipse can last several hours!), and you'll help each other in case of need.
Oh, and of course, scout the location in advance and during the day. Many years ago a learnt a rule that I still follow nowaways and that it goes:
"Work during the day to succeed at night."
Trust me, it works! ;)
Avoid light pollution
Whenever it's possible, try to stay away from any town or city that generates a ton of light pollution. The idea is that you should be in a location as dark as possible.
However, when you have to deal with light pollution, you can always use the urban environment as a landscape and framing of what's happening in the sky.
Don't give up and be creative!
Sometimes, the craziest ideas turn out to be the best ones... :)
Make sure that nothing blocks the Moon
I know it seems pretty obvious but obstacles are another factor that you'll have to take into account when planning your photo shoot.
Think of the elevation that the Moon will have as the eclipse takes place. You can see that information taking into account the position of the Red Pin, the date and time in Panel 3 of the Planner.
Compare the Moon elevation with that of your obstacle (mountain). Go to Panel 2, tap the icon of the mountain icon and place the Black Pin that is now displayed on the map on the obstacle. Panel 2 will tell you its elevation.
So, as the Moon rises (or descends) you'll know if any element, such as a mountain, will block the view of the Moon during the eclipse.
Finally, check the weather forecast! If the sky is full of clouds or completely covered, you may not see (or photograph) the eclipse :(
Include an interesting subject in your frame
If you decide to include the landscape in the frame, look for a location where there are one or several interesting subjects.
If you've read the Moon, the Milky Way or even the Star Trails article, you should already know that the subject plays a key role in the composition.
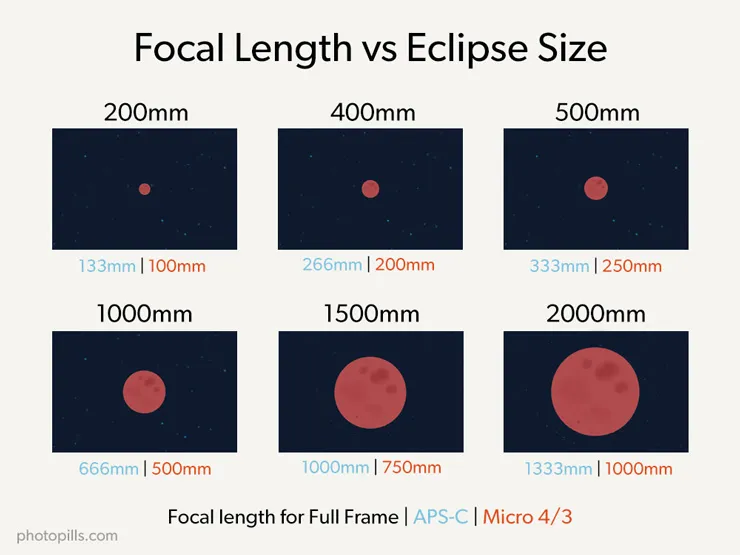
The shooting distance will determine the size of the Moon compared to the subject
Many photographers believe that the size of the Moon relative to the size of a subject depends on the focal length. The truth is that the focal has nothing to do.
In fact, the focal length determines how large the Moon will appear in the photo with respect to the frame (field of view). But, it's the distance between the shooting spot (that is, the exact spot where you are) and the subject that determines how big the Moon will be with respect to the subject. This is due to the angular diameter of the Moon.
Therefore, depending on the photo you have in mind, you should calculate the distance where you have to be so that the Moon has the size you want compared to the subject.
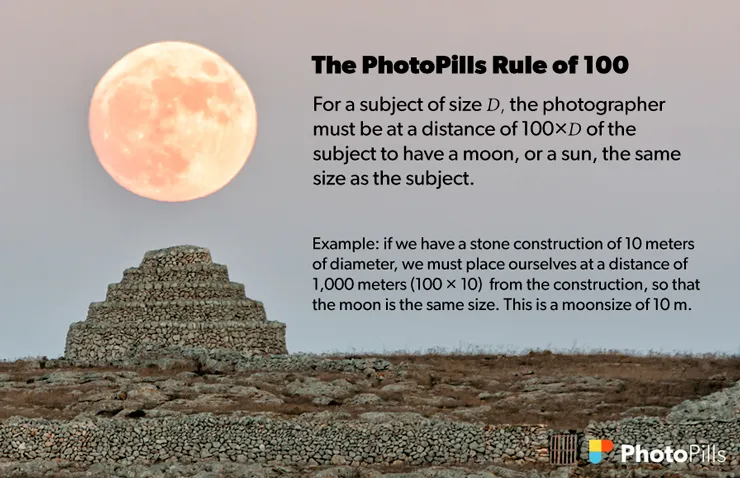
In order to do so, apply the PhotoPills Rule of 100.
It's a very simple rule.
I'll give you an example and you'll understand it better.
Imagine your subject is 10 meters tall, and you want the lunar eclipse to have a diameter of 10 meters (to be as big as the subject). Multiply 10 meters by 100 and you'll get that the shooting distance must be 1,000 meters.
As simple as that!
You have much more information about this rule in section 4 of our Moon photography guide.
And finally, the time you've been waiting for has arrived.
It's time to plan your photos of the lunar eclipse!
5.How to plan your lunar eclipse photo ideas
What are you saying?... You have no idea how to plan a lunar eclipse and you don't know where to start?
Don't stress out!
As you saw in the example I shared with you in section 1...
The one where Rafa is planning the total lunar eclipse of November 8, 2022 in New York (USA)...
It's much easier than it seems.
But let me give you another example!
Together, we're going to plan a real Moon eclipse with PhotoPills, step by step.
Everything that I'm going to teach you in this section will be equally useful if you want to plan any lunar eclipse, whether it's total, partial or penumbral.
And if you want to master PhotoPills from A to Z, you should study the super user manual in detail and take a look at these video tutorials :P
Are you ready?
Let's do it!
Select the eclipse you want to plan
The first thing you have to do is to select the eclipse you want to plan. Select, for example, the total lunar eclipse of July 27, 2018.
Open PhotoPills, tap Planner (Pills Menu) and then tap the Map Settings button. You will see it on the map, in the lower right corner, right next to the (+) button on the map.
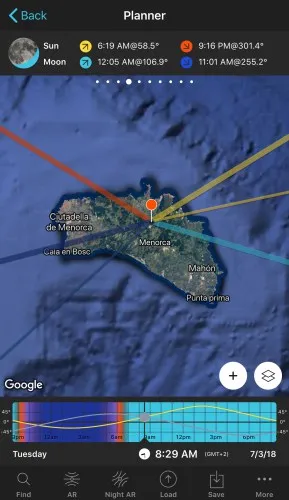
Look at the second screenshot you have right below: it shows the Planner and the Red Pin is positioned in Cape Town, South Africa. The Red Pin is an essential element to plan the eclipses, since all the information on the Planner is referenced to its position.
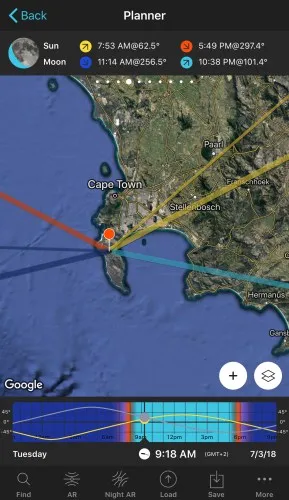
Tap the Map Settings button to access the Map Settings screen. If you want to see the calendar of eclipses, you just have to tap the little arrow that you see to the right of the Eclipse layer.
The calendar displays all the solar and lunar eclipses, showing:
- Date
- Object (Sun or Moon)
- Type (total, partial, annular or hybrid)
- Red Pin, if it's visible or not from the Red Pin position. And when visible, if it's total, partial or penumbral.
Note: Tap Date, Object, Type or Red Pin at the top to sort the table according to the criteria you prefer.
When you are in the Calendar, tap the total lunar eclipse of July 27, 2018 to select it. After doing so, you will return to the previous screen (Map Settings).
In the screenshot below, you can clearly see that in the Eclipse layer, the eclipse of July 27, 2018 is selected.
To see the eclipse information on the Planner map (visibility zones, etc.), tap the eye icon that you see to the left of the Eclipse layer to activate it. Finally tap OK (upper right corner) in iOS or the arrow to go back in Android.
On the map, zoom out to get a global view of the eclipse visibility information on July 27, 2018.
Right now, the Red Pin is still located in Cape Town. But to know the detailed information of the eclipse in a different location, you'll have to place the Red Pin in that location. This video will teach you how to move the Red Pin.
Remember that in order to place the Red Pin in a specific postal address, a point of interest that you have saved or in certain coordinates (latitude, longitude) you can use the Load button (located at the bottom, next to the Save button.
That's it. You just selected the lunar eclipse you want to plan!
Now you have to find out where you should go and at what time you should photograph it. In order to do this you need to understand the information that is displayed on the map and the two top eclipse panels (Panel 9 and Panel 10).
Where to go and when (understanding the eclipse information on the map and top panels)
Where to go?
You'll find the answer on the map.
In the screenshots below, I've used the Load button to place the Red Pin in Cape Town (South Africa), the location I'm using as an example. You'll soon notice that it's not a coincidence.
In the screenshots you can also see two top panels above the map: Panel 9 (first screenshot) and Panel 10 (second screenshot). To find them, simply swipe the panels to the left.
Although I already told you in section 3, I'll say it again. If you're going to photograph a total or partial lunar eclipse, whenever possible you should go to a location from where you can see (and photograph) the total eclipse phase or the of maximum partial eclipse :)
Just look at the map so you can quickly find out the areas of the planet where the total eclipse is visible.
Considering the different phases of the lunar eclipse (section 2), this is the information you will find on the Map:
- Eclipse visible area: The Map label Eclipse visible shows you the map area where all phases of the Moon eclipse are visible (P1, U1, U2, Total, U3, U4, P4). This is the area between the blue lines (P1 and P4).
- Eclipse visible at Moonrise area: The Map label Eclipse visible at Moonrise shows you the map area where at least one of the eclipse phases is visible during Moonrise. This is the area between the two blue lines (P4 and P1) which also contains the yellow and red lines.
- Eclipse visible at Moonset area: The Map label Eclipse visible at Moonset shows you the map area where at least one of the eclipse phases is visible during Moonset. This is the area between the two blue lines (P4 and P1) which also contains the yellow and red lines.
- Eclipse not visible area: The Map label Eclipse not visible shows you the map area where the eclipse is not visible (because the eclipse happens when the Moon is under the horizon). This is the area between the blue lines (P1 and P4).
- Map Greatest Eclipse Point (GE or o Greatest Eclipse Point ): It's the moment when the Moon passes closest to the axis of Earth's shadow.
For the eclipse Moonrise area:
- Area between the blue and yellow lines (P4 and U4): It represents the locations where the Moon rises during the penumbral eclipse, after the end of the total eclipse. It's visible until the end of the penumbral eclipse (P4).
- Area between the yellow and red lines (U4 and U3): It represents the locations where the Moon rises during the partial eclipse, after the end of the total eclipse. The end of partial eclipse (U4) and end of penumbral eclipse (P4) phases are visible.
- Area between the two red lines (U3 and U2): It represents the locations where the Moon rises during the total eclipse, and the end of total eclipse (U3), end of partial eclipse (U4) and end of penumbral eclipse (P4) phases are visible. Depending on the location within this area, the maximum eclipse phase may or may not be visible.
- Area between the red and yellow lines (U2 and U1): It represents the locations where the Moon rises during the partial eclipse. All phases are visible except for the penumbral eclipse (P1) and the beginning of the partial eclipse (U1).
- Area between the yellow and blue lines (U1 and P1): It represents the locations where the Moon rises during the penumbral eclipse. All phases are visible except for the beginning of the penumbral eclipse (P1).
For the eclipse Moonset area:
- Area between the blue and yellow lines (P4 and U4): It represents the locations where all the Moon eclipse phases are visible except for the final of the penumbral eclipse (P4).
- Area between the yellow and red lines (U4 and U3): It represents the locations where all the Moon eclipse phases are visible except for the end of the partial eclipse (U4) and the end of the penumbral eclipse (P4). When the Moon sets, the eclipse is partial.
- Area between the two red lines (U3 and U2): It represents the locations where the beginning of the penumbral eclipse (P1), the beginning of the partial eclipse (U1) and the beginning of the total eclipse (U2) phases are visible. When the Moon sets, the eclipse is total. Depending on the location within this area, the maximum eclipse phase may or may not be visible.
- Area between the red and yellow lines (U2 and U1): It represents the locations where only the beginning of the penumbral eclipse (P1) and the beginning of the partial eclipse (U1) phases are visible. When the Moon sets, the eclipse is partial.
- Area between the yellow and blue lines (U1 and P1): It represents the locations where only the beginning of the penumbral eclipse (P1) phase is visible. When the Moon sets, the eclipse is penumbral.
Therefore, in order to enjoy a total lunar eclipse, you should go to the areas displayed on the map as:
- Eclipse visible.
- Eclipse at Moonrise, only between lines P1 and U3.
- Eclipse at Moonset, only between lines P4 and U2.
Cape Town is located in the area of the map where the eclipse is visible. Therefore it's a great place to enjoy all the phases of the total eclipse. But there are many other areas where you can see the total eclipse: all of Europe, Africa and the Middle East, east of South America, much of Asia, Australia and almost all of New Zealand. Not bad :)
When to go?
In other words...
At what time does the eclipse start at the Red Pin position?
The answer is in the top panels above the map.
Swipe the top panels to the left until you find the two eclipse information panels (Panel 9 and Panel 10).
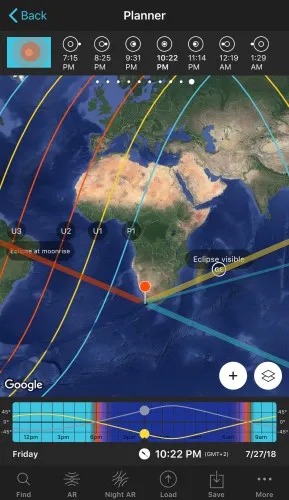
Look at the second screenshot above (Panel 10). Considering the Red Pin position, the penumbral phase of the July 27, 2018 eclipse starts at 07:15 pm. And the total eclipse starts at 09:31 pm.
Let's look at the panels in more detail...
In Panel 9 (above the map) you'll find the basic information of the eclipse for the position of the Red Pin:
- Eclipse selector button: If the Eclipse layer is active on the map, you can deactivate it by tapping this button. Tap it again to access the eclipse calendar and select the eclipse you wish to plan.
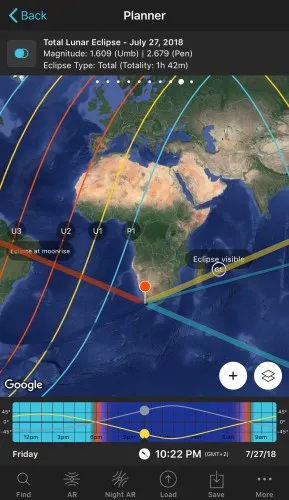
- Selected eclipse: In this case, the total lunar eclipse of July 27, 2018.
- Eclipse magnitude: A lunar eclipse has two magnitudes (section 2).
- The umbral magnitude represents the fraction of the lunar diameter covered by the Earth's umbra. In a partial lunar eclipse it always has a value greater than 0 and less than 1, where 1 means total eclipse. A total lunar eclipse always has an umbral magnitude higher than 1. Finally, a penumbral lunar eclipse always has an umbral magnitude of less than 0.
- The penumbral magnitude is the fraction of the diameter of the Moon that is covered by the Earth's penumbra. In a total lunar eclipse, the penumbral magnitude is usually greater than 2. In a partial lunar eclipse it's always greater than 1 and, as a rule, less than 2. In a penumbral lunar eclipse, the magnitude is less than 1.
- Eclipse type: The type of eclipse that you can see from the Red Pin position (total, partial, penumbral or not visible). If the Red Pin is within the area of totality, it also indicates the duration of totality.
Finally, Panel 10 (above the map) will help you to quickly find out the exact time the different phases of the eclipse happen considering the Red Pin position:
- Eclipse phase picture: Image on the left of the panel. It shows the phase of the eclipse at all times as seen from the Red Pin position. Tap it to jump in time to the next phase. The time will be set in the Time Bar. Take a look at section 2 if you need to refresh your memory and know the different phases of a total lunar eclipse.
- Eclipse phase time: The panel displays the times at which the eclipse phases occur. To select the time of a phase, tap and hold the time of the phase that is displayed on the panel. The time will be set in the Time Bar..
Good job!
Now you know:
- How to select the eclipse you want to plan.
- Where you'll see all the phases of the lunar eclipse (area of eclipse visible), where you'll observe only a certain number of phases and where the eclipse won't be visible.
- How to move the Red Pin to place it in the location you want to study.
- When the different phases of the eclipse happen according to the Red Pin position (Panel 10).
The next step is to know where to frame the camera to get your dreamed photo.
Where to frame the camera to capture the total eclipse
You've already done most of the work, but you have to fine tune the planning a bit more.
You should determine as accurately as possible the shooting spot and the shooting time. And in order to do that you have to find out where the Moon will be during the eclipse.
In other words, you need to know the azimuth (direction) and the elevation of the Moon at all times.
And thanks to PhotoPills you can quickly find it out. Go back to the app and select the start time of the eclipse. Now, by moving the Time Bar, you can see how the Moon moves from that hour onwards.
On the map, the thin blue line tells you the direction (azimuth) of the Moon. And you can see the elevation in Panel 3. I'll show you how to find this information in a second.
How to set the date and time on the Planner?
You could obviously do it by changing the date and time using the Time Bar. But there is a better way to do it.
Work smarter, not harder! ;)
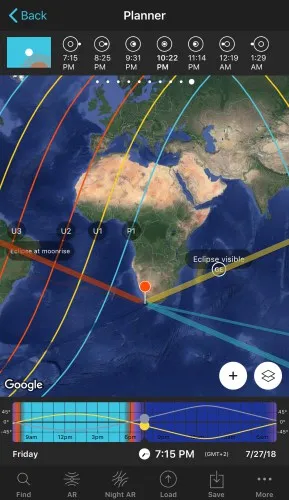
Go to the PhotoPills' Planner and tap the eclipse button you see on the second eclipse panel (Panel 10). You'll find it on the left side of the panel. It has a picture of the Moon (a white circle).
Tap the eclipse image until the date is set on July 27, 2018 and the time when the eclipse begins (07:15 pm in this example). You can also do it by tapping and holding the time of the eclipse start phase that Panel 10 displays.
Notice that the icon of the button has changed. It's now showing you the phase of the eclipse for the selected time (at the beginning of the eclipse).
But... Where will the Moon be at the beginning of the eclipse?
That's the key to all the planning!
If you look at the map, you'll see the position of the Moon right away. Several lines come out from the Red Pin. Well, the thin blue line that comes out of the Red Pin is the one that indicates the direction of the Moon for the date and time selected in the Time Bar, which in this example is the start time of the eclipse.
Note: The thin orange line indicates the position of the Sun, so it disappears as soon as it's nighttime (the Sun has set and is below the horizon).
If you keep tapping the eclipse picture (Panel 10), you'll jump from phase to phase. And the thin blue line will show you the direction of the Moon at all times seen from the position of the Red Pin :)
And what about the Moon's elevation?
If you want to know how high the Moon will be in the sky, swipe the top panels to the right until you find the Sun/Moon azimuth and elevation panel (Panel 3).
According to the top panel (second screenshot below), the Moon will have an elevation of 15.45º at the beginning of the eclipse (07:15 pm). And its azimuth will be exactly 102.5º. This is the angle, measured clockwise around the observer's horizon, between the Moon and the north. It's represented on the map by the thin blue line.
Move forward or backward in time using the Time Bar (or with the eclipse Panel 10) to see how the elevation of the Moon changes during the eclipse (Panel 3).
But you still have an ace in your sleeve. Because the Planner has a surprise for you that makes everything much (much, seriously much) easier... :P
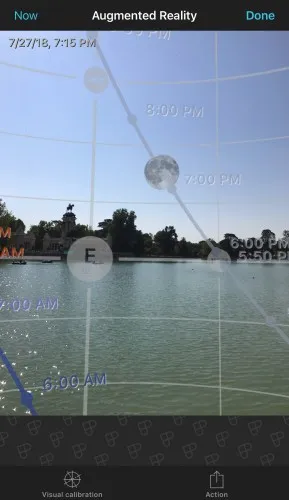
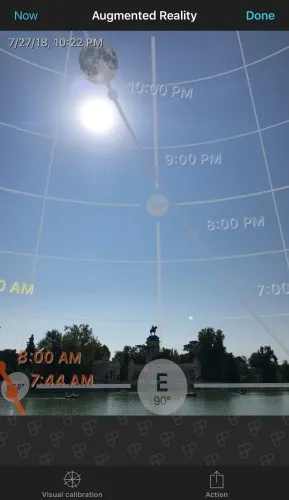
The Augmented Reality!
You can visualize the position of the Moon over reality. You just have to place yourself where the Red Pin is and use the PhotoPills Augmented Reality (AR) tool. On the Planner, tap the RA button (bottom of the screen) and you'll be able to see through your smartphone the exact position of the Moon and its path.
Remember that what you're seeing in the Augmented Reality view is what you'd see from the Red Pin position on the selected date and time. You should position yourself at the Red Pin position when using the AR view on the Planner.
And that's the end of the planning!
This is how I planned the total lunar eclipse of July 27, 2018. If you follow these simple steps you can plan any photo of the eclipse that you imagine... Well, almost all.
I wrote "almost" because there is a more advanced planning case scenario: when you intend to photograph a huge Moon next to your subject...
Advanced planning (long distance picture with telezoom lens)
If you want to make a long distance photo in which the eclipsed Moon has a specific size compared to your subject, you'll have to do some advanced planning.
But there's nothing to worry about. It's easier than it seems.
To plan the photo, you should:
- Find a location with an interesting subject that allows you to take the photo from the distance you need.
- Calculate the shooting distance with respect to the subject to get the eclipse size you wish (applying the Rule of 100 of PhotoPills that I explained in section 4).
- Find the shooting spot and shooting time that allows you to align the eclipse with your subject.
Ready for the challenge?
In this article I explain step by step how to do it with the Moon (with a lunar eclipse it's exactly the same): 'Moon Photography: The Definitive Guide'.
You won't regret it! It's something that everyone should live (and photograph) at least once.
And now let's see what equipment you need to get those great shots, right? :)
6.The best equipment for lunar eclipses photography
This section is a complete list of everything you need to photograph a lunar eclipse.
And when I write "complete" I mean that I'm going to detail everything.
From camera and lens to tripod, intervalometer and other stuff...
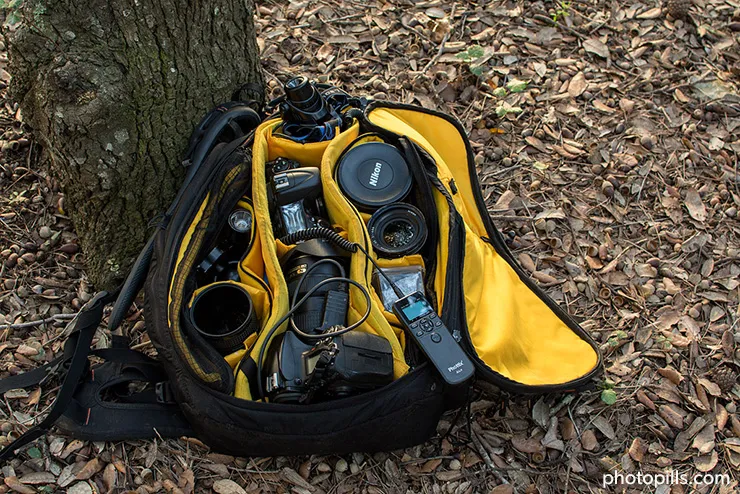
Actually, I'm going to tell you about the gear I use to photograph a lunar eclipse, for example, the lunar eclipse on July 27, 2018.
My equipment for the eclipse
In addition to my DaeMOONized PhotoPills t-shirt... this is the gear I use.
To shoot the eclipse sequence and video
Nikon D500 + Nikon 200-500mm f/5.6 + Gitzo 4542 systematic tripod.
To capture the foreground and the eclipse
Nikon D4s + Nikon 70-200mm f/2.8 + Manfrotto 055 XPROB tripod. Depending on the shooting spot, we also had the Nikon 35mm f/1.4 lens.
To shoot the full path of the eclipse
Fujifilm X-T2 + Fujinon XF 18-55mm f/2.8-4 + Gitzo 1241 tripod.
To shoot the making of timelapse
Panasonic Lumix GX8 + Panasonic 14-140mm f/3.5-5.6 + Benro FTA18AB0 Travel Angel tripod.
And also GoPro + Gorillapod tripod.
But this is just my gear. Let me give you a more general view of the equipment you'll need.
The camera
Any camera will work to photograph a lunar eclipse. But, depending on the type of camera you use, some photos will be better than others depending on your expectations and technical limitations.
Can you capture the lunar eclipse with your smartphone?
Yes!
However, your smartphone camera has a wide angle, so don't expect to get the best picture you've ever shot.
Also, keep in mind that most of the time you will be taking pictures at night so the limitations of your smartphone camera will be there. Since you can't change the aperture, the smartphone will automatically crank up the ISO. So your photos will have a lot of noise.
Be creative and don't just photograph the eclipse. Try to include other interesting elements in your frame. Or capture photos of behind the scenes.
Compact cameras
In general, point-and-shoot type cameras all have and average image quality and are good value for money.
That said, your artistic abilities will be driven by your camera's performance. For example, if the range of your zoom is limited, it will be difficult for you to capture a huge Moon in your photo. Or if it performs badly at high ISOs, your photos will have a lot of noise.
Once again, try to get the most out of the tools you have and don't give up. Try and experiment because you never know. You can still get an amazing picture!
Low-end cameras
- Cameras with an APS-C sensor: Nikon Z30; Canon 4000D, 250D and M5; Sony a6600.
- Cameras with a Micro 4/3 sensor: Olympus OM-D E-M10 Mark IV and Panasonic G95.
- Compact camera (1" sensor): Sony RX100 VII.
Mid-range cameras
- Cameras with an APS-C sensor: Nikon Z50, Zfc and D7500; Canon R10, R7, 850D, 90D and 6D Mark II; Fuji X-S20 and X-T30 II; Pentax KF; Sony a6700.
- Cameras with a Micro 4/3 sensor: Olympus OM-D E-M5 Mark III and Panasonic G9 II.
- Full Frame cameras: Nikon Z5 and D750; Canon RP; Sony a7C II.
High-end cameras
- Cameras with an APS-C sensor: Nikon D500; Fuji XH-2S, XT-5 and X-Pro3.
- Cameras with a Micro 4/3 sensor: Olympus OM-1 and Panasonic GH6.
- Full Frame cameras: Nikon Zf, Z6 II, Z7 II, Z8, Z9, D780, D850 and D6; Canon R8, R6 Mark II, R5, R3, 5D Mark IV, and 1D X Mark III; Panasonic S5 II, S5 II X, S1R and S1H; Pentax K-1 Mark II; Sony a7 IV, a7 CR, a7R V, a9 III and a1.
The lens
Your choice of lens and its focal length will depend on how big you want the Moon to appear on your photos.
If you want to include part of the landscape, regardless of the Moon being a dot, use a wide angle. For example, the Nikon 14-24mm f/2.8 (it's my favorite!).
If you don't care about the landscape and you don't mind capturing a small Moon, take a standard telephoto lens. For example, the Nikon 70-200mm f/2.8 or the Canon 70-200mm f/2.8.
If you want to capture a large Moon (or even a super large Moon), use a super telephoto lens. For example, the Nikon 200-500mm f/5.6, the Canon 100-400mm f/3.5-5.6, the Fujifilm 100-400mm f/4.5-5.6, the Olympus Zuiko 300mm f/4 PRO, the Sony 100-400mm f/4.5-5.6, the Sony 400mm f/2.8 or the Sigma 150-600mm f/5-6.3 for Nikon and Canon.
Also, take advantage of crop sensor cameras when trying to capture a huge Moon in the photo!
Alternatively, you can also use a catadioptric lens. It's smaller, cheaper and lighter than a regular super telezoom lens. In addition to this, diffraction is almost insignificant.
However, it doesn't come without its inconveniences...
Not only it has a fixed focal length, you won't be able to change the aperture either. In addition to this, the out of focus areas of the picture can result into a doughnut-shaped bokeh.
You can't expect to have everything!
The tripod and the head
You need a sturdy and solid tripod. In other words, a heavy tripod!
This is particularly important if you plan to shoot composites (section 8) because you must make sure that your framing doesn't change from one capture to the next.
In any case, you need to keep your camera steady in order to prevent vibrations that could blur your photos.
Do you have a basic tripod?
Basic tripods usually don't weigh too much, which makes them pretty unstable.
Use these easy but efficient tricks to prevent vibrations:
- Hang a bag filled with stones or even your camera bag from the hook located at the bottom of your tripod's center column. But don't do it when it's windy, you'll get the opposite effect!
- Don't raise the center column of the tripod, it will make it more unstable.
Are you looking for a great tripod at a reasonable price?
Get the Manfrotto 055XPRO3. Probably the best seller tripod among advanced amateur photographers!
Another suggestion that I usually make to the students of my workshops is the Travel line by Benro.
If you want to (and can) spend a little bit more, have a look at carbon fiber tripods.
These tripods are robust and weigh less than the aluminium ones. They allow loads from 5 kg to over 25 kg (11-56 lb) depending on the model.
Brands like Gitzo, Manfrotto, Benro, Induro or Really Right Stuff offer tripods of great quality in both materials, carbon and aluminum.
Should you get a specific tripod head?
Choosing your tripod head will depend on your taste, but make sure that it can bear at least 5/7 kg (11/16 lb) of weight and that includes a removable plate.
In my opinion, the tripod's best friend is a good ball head. The Really Right Stuff BH-55 is the one that I use. Supporting up to 23 kg (50 lb), it bears the weight of my gear with no problem. It allows me to work comfortably and with great precision.
Other heads I like are the Gitzo GH1382QD, the Kirk Enterprises BH-1 and the Arca Swiss Monoball Z1 SP, all robust and with very high endurance (minimum 13.5 kg or 30 lbs).
Additionally, if you are using a super telephoto lens you may want to use a gimbal head, such as the one I use, the Benro GH2.
Is a shutter release or an intervalometer necessary?
While shooting a lunar eclipse, you should avoid vibrations. Otherwise, you risk ending up with a whole bunch of blurred photos. In order to do so, you need a way to trigger your camera without having to touch it.
Shutter releases and intervalometers will do the job. But, in my opinion, you should forget about the remote shutter release and get a good intervalometer.
Why?
Because remote releases are not programmable. You cannot shoot at regular intervals automatically.
The intervalometer is programmable. You can set the exposure time, the time interval between photos, the total number of photos you want to take and even the time delay of the first picture.
These are all great intervalometers:
- Pro intervalometer: SMDV.
- For cheap intervalometers check the brands Neewer, Phottix and Vello.
A great alternative is a device called CamRanger. Right now it’s available for Nikon, Canon, Fuji and Sony cameras.
It's a stand-alone device that you connect to your DSLR or mirrorless camera with a USB cable. It creates an ad hoc WiFi network to which you can connect your smartphone or tablet (iOS, Android and Windows). Thanks to the CamRanger application you can control your camera without a computer or an Internet connection.
Best of all, this device is independent. Therefore, if your mobile device loses its connection, the CamRanger has an internal memory to keep shooting. Imagine that you are making a timelapse, your sequence would be cut if the camera stops taking pictures in the time frame you’ve set...
So the CamRanger is great for many types of photos: timelapses (of the Milky Way, of Star Trails, of solar eclipses or lunar eclipses...), bracketing, focus stacking for macro and landscapes... and many more!
Use a headlamp or a flashlight during most of the eclipse
Remember that during most of a lunar eclipse it will be night!
Since our eyes take 20 minutes to get used to being in the dark, I recommend you to use a headlamp with a Red Night Vision Light just in case you need to check your camera settings.
When using your headlamp, make sure you're not annoying the photographers around you. This is key!
Headlamps with Red Night Vision Light are best – they allow to avoid white flash lights that ruin your night vision. I like the Petzl Tikka XP, the Pelican 2750 and the Pelican 2760.
Other powerful LED headlamps are the Led Lenser SEO5, the H14R or the H7R.2.
Alternatively, you can use a flashlight such as the Coast TX-10, the Led Lenser L7 or the Maglite Mini.
What type of memory cards should you use?
Buy the highest quality SD Cards (such as SanDisk or ProGrade) to minimize the risk of losing your photos and have the maximum transfer speed.
Today their price has plummeted so even the highest capacity cards (64GB, 128GB or even 256GB) have a good price.
However, I like to use medium capacity cards (16GB or 32GB). So if a card breaks or I lose it (let’s hope not!), the number of lost pictures is lower.
Although there are still cameras that use CompactFlash (CF) cards, it’s a system that is slowly disappearing.
And to replace it, SanDisk, Nikon and Sony launched a new card format called XQD currently available for several Full Frame (Nikon D4, D4s, D5 and D850; Panasonic S1 and S1R), APS-C (Nikon D500) and mirrorless (Nikon Z6, Z6 II, Z7 and Z7 II) models. These cards
- Have a very high storage capacity (from 32GB to 256GB).
- Have a super fast reading and recording speed (400MB/s compared to 160MB/s for a CF card or 250MB/s for an SD card).
- Are very secure, resistant and with an incredible durability.
Later on, in 2017, CFexpress launched the latest standard memory card from the CompactFlash Association with 2 new form factors, Type A and Type C were announced, with the existing XQD form factor becoming Type B.
- Type A has, so far, only been adopted by Sony in all of its newest models.
- Type B is a far more common format offering a lower price. It has been widely adopted by Nikon in its Z series, Canon in some EOS R bodies, and Panasonic in the S1/S1R and GH6.
- Type C is not being produced yet.
And the PhotoPills DaeMOONized T-shirt!
Oh! This is the most important thing! You'll be under the spell of the Moon! :P
7.7 general tips for photographing a lunar eclipse
You've spent weeks preparing for the lunar eclipse shooting session. You brainstormed several ideas (section 3), you found a location (section 4) and a shooting spot thanks to PhotoPills (section 5).
Everything is set and you're about to live a great experience (and photograph it)!
But before learning how to capture such a special moment, I'd like to give you some general tips. They'll be useful no matter what type of eclipse photo you want to capture.
Have you added something new to your photo gear? Practice to get familiar with it (1)
The lunar eclipse that you've been dreaming of is approaching... A few weeks left and you'll live a very cool experience!
And of course, the temptation is huge... You've spotted something (a camera, a lens, a telescope, a tripod, etc.) that will complete your equipment and help you to better photograph the eclipse. Won't it?
Come on, don't look at me like that. I got you ;)
As soon as you add something new to your gear, try it at home. But not once, not twice: as many times as it takes to master it.
Practice as much as you can. Remember that you will have to take most of the pictures in the dark and the excitement could make you fail.
Try to internalize the process as much as possible and you'll avoid mistakes and distractions that could potentially ruin the shooting session.
Check the following cheat sheet (2)
What you should test at home:
- How many frames per second (fps) can your camera shoot on Burst mode?
- How does the Auto Bracketing function of your camera works?
- Is your complete setup (body+lens+tripod) solid when aimed up high?
- Can you access all controls and the LCD screen with the camera aimed up high?
- Practice operating the camera and adjusting your settings on Manual.
- How long do your batteries last?
What you should test shooting at the Moon during the partial phases:
- Practice focusing on the Moon's edge.
- Figure out the best exposure settings.
- Check possible framings on a date and time in which the Moon will be at the same elevation as during the eclipse.
What you should test shooting to help you capture the Moon during totality:
- Figure out the best exposure settings.
- How do your photos come up in case you have to increase ISO?
What you should test shooting in Full Moon:
- Practice focusing on the Moon's edge.
- Figure out the best exposure settings.
- Check how fast the Moon moves across your frame.
What you should test shooting at the Waxing and/or Waning Moon:
- Figure out the best exposure settings.
- Practice taking pictures while rapidly adjusting the exposure settings.
- Are your images sharp focused? No vibrations?
Practice with the Moon on a regular night! (3)
Although lunar total eclipses are much more frequent than total solar eclipses, they don't happen every month (not even every year).
Do you really think it's worth improvising on the shooting day?
If something goes wrong, you'll have to wait until the next eclipse. And I'm sure you do don't want to wait for so long... :)
So practice photographing the Moon.
When?
Any night when the sky is clear!
Your top priority should be to capture tack sharp and correctly exposed photos of the Moon. If you get them you'd have done the hardest part.
Shoot during the Crescent Moon (Waxing or Waning)
What is the Waxing Crescent Moon? Well, it's an intermediate Moon phase that comes after New Moon. During this period, the lit up portion of the Moon increases from 0.1% to 49.9%.
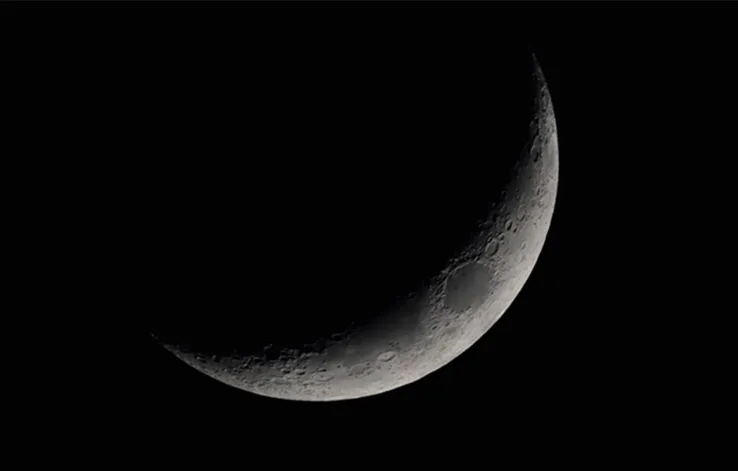
Waxing is a synonym of growing, while crescent refers to the curved shape the Moon has. Does the Moon remind you of something in the photo above? I see a celestial banana! :D
As a rule of thumb, the Waxing Crescent Moon rises in the daytime before noon. You can easily spot it in the day sky, although it's easier to do so around sunset. Later on, it usually sets before midnight.
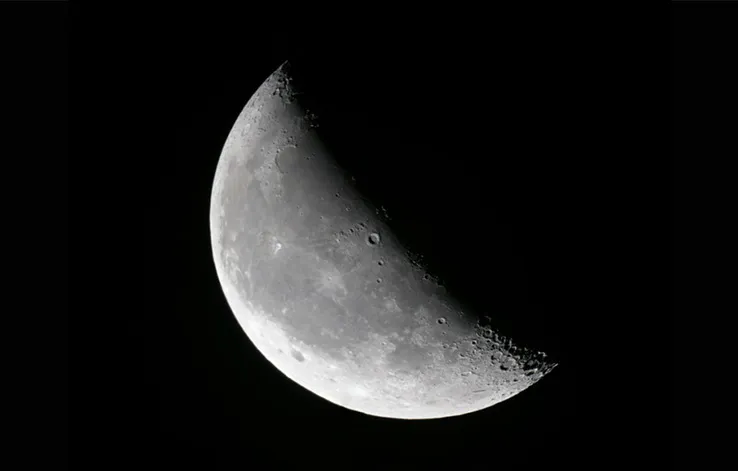
The Waning Crescent Moon is an intermediate Moon phase that comes right before the following New Moon. During this period, the lit up portion of the Moon decreases from 49.9% to 0.1%.
As a rule of thumb, the Waning Crescent Moon rises after midnight. You can still see it in the morning before it sets in the afternoon.
And now let's see what your homework is: the test shots that you should nail to avoid bad surprises on the day of the eclipse.
As you can see from the pictures above, the (Waxing or Waning) Crescent Moon has a bright sunlit side. Since it's really bright, you'll need a fast exposure (just a fraction of a second).
To expose for the dark side, lit by the Sunlight reflected off the Earth (known as Earthshine), you will need a shutter speed of more than a second.
Shoot during the period in which the Waxing Gibbous Moon turns into Full Moon
"Toni, what's the Waxing Gibbous Moon?"
Again, Waxing means that the Moon gets bigger. Gibbous refers to the shape, and in this case it is less than the full circle (that would be Full Moon), but larger than the semicircle shape of the Moon at Third Quarter.
As a rule of thumb, the Waxing Gibbous Moon rises after noon. So you can see it during the afternoon and in the evening as it sets after midnight. During this period, the lit up portion of the Moon increases from 50.1% to 99.9%.
And how can you take your test shots?
During twilight, the Waxing Gibbous Moon is pretty bright. The bright area of the Moon is the one that allows you to practice your focusing. Use the Live View function on your LCD screen, and your exposure settings.
Additionally, it will also help you to establish how much the Moon's motion will affect your images. Does the Moon move fast? Or is it slower than you thought?
Then, scout the location (4)
Ideally, you should go to your shooting location at least one or two days before the lunar eclipse occurs. During this time you can scout the area, look for the best shooting spot and take some test photos.
As I explained in section 5, use PhotoPills to find the azimuth and elevation of the Moon at that location a few days before the eclipse.
You can't go to the location in advance?
No worries! Practice at home!
Schedule a photo shooting on a day that you know the Moon will be more or less at the same elevation as the day of the eclipse. So you can have an idea of the composition you want to work on.
Check the weather forecast (5)
Be cautious and check the weather forecast taking into account the location (section 4) that you have determined during the planning (section 5)!
Do it several times. First, a few days before the eclipse. Then, a few hours before, while you are at home or in your accommodation. And finally, on the spot, when you're at the location.
Take a look at different sources such as
- Windy, my favorite weather app (available on iOS and Android).
- Ventusky, a weather app that I use as a plan B (available on iOS and Android).
- The shooting location's local weather service (e.g. the US National Weather Service, the German Deutscher Wetterdienst, the Australian Bureau of Meteorology, the British Met Office, and the Spanish Aemet).
Also note that a lunar eclipse occurs over a relatively long period of time. It can actually take several hours. So the weather may change during that time.
Don't give up if it's cloudy, it may clear up at some point and you could be able to capture all (or some) phases of the eclipse or even totality, when the Moon is completely red...
Be patient and get ready for any unexpected event... (6)
As I said in the previous section, you'll have to be (very) patient. It can take you several hours to capture the Moon from the beginning to the end of the eclipse.
Fortunately, PhotoPills tells you exactly how long the lunar eclipse will last (total or partial). You have all the details in Panel 10 of the Planner. To see it, you just have to swipe the top panels to the left.
As you will be outdoors part of the night, when you check the weather forecast, check the temperatures too.
Wear appropriate clothing that protects you in case the temperatures drop dramatically. Wear several layers, and take a hat and gloves with you if necessary.
If it's going to be windy, be careful with the stability of your tripod. Place it in a relatively protected place so the wind doesn't move it or even worse, throw it to the ground!
Finally, although I already suggested it in section 6, bring several spare batteries.
When temperature drops dramatically, cold quickly drains your camera batteries. To avoid this, try to place them in some inner pocket of your jacket where they can absorb some of your body heat. It's not an infallible solution but it helps.
What type of photos of the lunar eclipse can you capture? (7)
In section 3, I've showed you the eclipse photos you should take at least once in your lifetime:
- The different phases of a lunar eclipse.
- A "Blood Moon".
- The lunar trail.
- Including the landscape with a wide angle lens.
- Including the landscape with a telezoom lens.
- Close-ups and wide-angle composites of the lunar eclipse.
These are the lunar eclipse pictures you can imagine and plan.
It's time to actually capture them!
8.How to shoot a lunar eclipse step by step
You've learnt what an eclipse is about and we've planned a picture together.
You've also chosen a cool location according to the photos you dream of and you've determined the equipment you'll use to take the shots.
Well...
It's the moment! It's your moment!
The eclipse is there, now, waiting for you.
Are you ready?
Note: Check this article to learn how to expose your photos in any situation.
The different phases of a lunar eclipse (1)
As the eclipse progresses, the shadow cast by the Earth will cover the lunar surface.
These photos usually work very well if the Moon is going to be your main subject and you want to show the veil that covers its surface. To do this, capture tons of close ups, trying to get a lot of detail out of the irregularities of the Moon.
To take this photo follow these steps:
- Equipment: Your camera (the type of sensor doesn't really matter, although I recommend you an APS-C or Micro 4/3 sensor, because of the larger effective focal length you'll get). A telephoto lens or a super telephoto lens. A sturdy tripod and head. And an intervalometer.
- Camera settings: Shoot in RAW. Turn on the image stabilization function if your lens has it. Although it's mounted on the tripod it can shift because of its weight.
- Focal length: Long focal length (300mm, 450mm, 600mm, etc.) to cover the area of the sky where the Moon is located so it takes most of the frame.
- Metering mode: Spot metering mode. Meter on the Moon's surface before the eclipse begins.
- Aperture: Use the maximum aperture that your lens allows. This way you can use faster shutter speeds to avoid the movement of the Moon and any trepidation, getting a sharper picture. If the shutter speed and ISO allow you so, close the aperture by one stop to avoid vignetting and optical aberrations.
- Shutter speed: Use 1/125s as a base, taking into account that using lower shutter speeds (no more than 1s) and with your camera well stabilized, you can capture the brightest part of the Moon correctly exposed. However, as the eclipse progresses, you'll have to change the exposure to get more detail in the shadows (assuming the risk of overexposing the brightest part). So you should use slower speeds (1/2s for example).
- ISO: The minimum possible to get a correct exposure, always taking care not to blow out the brightest part. The shutter speed is limited to a maximum to avoid a blurred Moon (because of the trepidation that you may have and by the motion of the Moon itself). You already set the maximum possible aperture, so the only parameter that you can change is the ISO. It will be between 800 and 1600.
- Bracketing: To make sure you're getting at least one photo correctly exposed, you should use an bracketing of 1 or 2 stops between each shot.
- White balance: Manual. Nevertheless, you can always correct it in post-processing.
- Where to focus: Focus directly on the Moon. Use the Live View function on the LCD screen of your camera to focus accurately. And if your camera has the Focus Peaking and/or the Focus Magnifier functions, turn them on because they will help you to be even more precise. Zoom in the image using your camera Live View on the LCD screen, until you see the detail of the Moon's surface. Then, turn the focus ring of the lens slowly until the detail of the surface is tack sharp. If you're not used to focusing manually, turn the focus ring very subtly and when you notice that your subject (the Moon) is focused, keep turning the ring until you go a little out of focus and then, turn the ring in the opposite direction to get everything in focus again. This way you'll see very clearly how everything is now in focus again.
The "Blood Moon" (2)
Don't be deterred by those with a weird sense of humor who will tell you that your picture of the "Blood Moon" is the result of your Photoshop skills ...
Prove them wrong!
To take this photo follow these steps:
- Equipment: Your camera (the type of sensor doesn't really matter, although I recommend you an APS-C or Micro 4/3 sensor, because of the larger effective focal length you'll get). A telephoto lens or a super telephoto lens. A sturdy tripod and head. And an intervalometer.
- Camera settings: Shoot in RAW. Turn on the image stabilization function if your lens has it.
- Focal length: Long focal length (300mm, 450mm, 600mm, etc.) to cover the area of the sky where the Moon is located so it takes most of the frame.
- Metering mode: Spot metering mode. Meter on the Moon's surface before the eclipse begins.
- Aperture: Use the maximum aperture that your lens allows. This way you can use faster shutter speeds to avoid the movement of the Moon and any trepidation, getting a sharper picture. If the shutter speed and ISO allow you so, close the aperture by one stop to avoid vignetting and optical aberrations.
- Shutter speed: Use 1/2s as a base, but don't use shutter speeds slower than 1s to avoid capturing the Moon's trail. However, there will be very little light so you will have to adjust the shutter speed depending on the aperture and the ISO you selected.
- ISO: The minimum possible. But, considering that you shutter speed cannot be slower than 1s, you may have to crank it up to 1600 or more. If the light meter is not centered on the zero, increase the ISO gradually while being careful of the potential noise.
- Bracketing: To make sure you're getting at least one photo correctly exposed, you should use an bracketing of 1 stop between each shot.
- White balance: Manual. Nevertheless, you can always correct it in post-processing. In this case, a warm temperature can reinforce the orange or reddish color of the Moon.
- Where to focus: Focus directly on the Moon. Use the Live View function on the LCD screen of your camera to focus accurately. And if your camera has the Focus Peaking and/or the Focus Magnifier functions, turn them on because they will help you to be even more precise. Zoom in the image using your camera Live View on the LCD screen, until you see the detail of the Moon's surface. Then, turn the focus ring of the lens slowly until the detail of the surface is tack sharp. If you're not used to focusing manually, turn the focus ring very subtly and when you notice that your subject (the Moon) is focused, keep turning the ring until you go a little out of focus and then, turn the ring in the opposite direction to get everything in focus again. This way you'll see very clearly how everything is now in focus again.
The lunar trail (3)
This type of photography is a variation of a regular Star Trails picture. It shows the light trail left by the Moon throughout the eclipse.
There are two techniques to capture the lunar trail:
The final decision is yours, by all means...
But in my opinion, it's less risky to take multiple exposures. This technique allows you to better control the exposure of each shot and prevent anything from ruining your shot (clouds, tripod vibration, lack of battery, and so on).
Once at home, you can blend all the shots to show in a single image not only the Moon trail but also all the intensity and brightness variations that happened during the eclipse.
Obviously, if you use long focal lengths, make sure that the Moon doesn't fall out of your frame during the eclipse using the PhotoPills Night augmented reality view!
Photo by Sébastien Chaurin.
To take this photo follow these steps:
- Equipment: Your camera (the type of sensor doesn't really matter, although I recommend you an APS-C or Micro 4/3 sensor, because of the larger effective focal length you'll get). A telephoto lens or a super telephoto lens. A sturdy tripod and head. And an intervalometer.
- Camera settings: Shoot in RAW. Turn on the image stabilization function if your lens has it.
- Focal length: You can use both short and long focal lengths depending on how big you want the Moon trail in your photo.
- Metering mode: Spot metering mode. Meter on the Moon's surface before the eclipse begins.
- Aperture: Use the maximum aperture that your lens allows (f/2.8, f/4, etc.). If you want to keep the real color of the Moon and the stars, reduce the aperture one stop (f/2.8 -> f/4).
- Shutter speed: Shoot short exposures, between 5 and 15 seconds. It's important that the Moon isn't too overexposed and that the stars are visible. So you have to find the balance between visible stars and an overexposed Moon that occupies a large portion of the frame.
- ISO: The ISO depends on how much noise your camera produces. If you want to capture the color of the stars, don't use ISOs higher than 1600. Use the lowest possible ISO that allows you to get a correctly exposed photo.
- White balance: Manual. Nevertheless, you can always correct it in post-processing.
- Where to focus: If you are going to use a short focal length and include some interesting elements in the foreground as well as the sky, focus at the hyperfocal distance. Check out this 1-minute video to learn how to do it. If you prefer a close-up of the sky and focus on the Moon trail, focus directly on the Moon. Use the Live View function on the LCD screen of your camera to focus accurately. And if your camera has the Focus Peaking and/or the Focus Magnifier functions, turn them on because they will help you to be even more precise. Zoom in the image using your camera Live View on the LCD screen, until you see the detail of the Moon's surface. Then, turn the focus ring of the lens slowly until the detail of the surface is tack sharp. If you're not used to focusing manually, turn the focus ring very subtly and when you notice that your subject (the Moon) is focused, keep turning the ring until you go a little out of focus and then, turn the ring in the opposite direction to get everything in focus again. This way you'll see very clearly how everything is now in focus again.
Include the landscape with a wide angle, standard or short telezoom lens (4)
Do you want to include in your frame the Moon along with part of the landscape that surrounds you?
If that's the case, during the planning you should find a location with both an interesting background and an interesting subject (section 4).
Thus, the result of the combination of the landscape and the eclipse will be spectacular.
Photo by Joaquín Márquez.
To take this photo follow these steps:
- Equipment: A DSLR or a mirrorless camera. A short focal length lens, standard or short telephoto lens. The faster the better. A sturdy tripod and head. And an intervalometer.
- Camera settings: Shoot in RAW. Turn on the image stabilization function if your lens has it. Although it's mounted on the tripod it can shift because of its weight.
- Focal length: A focal length that allows you to cover the maximum possible landscape and the right Moon size. The longer the focal length the greater the Moon, but the smaller the landscape that fits in the frame. You can use a lens with a focal length from 10mm to 200mm.
- Metering mode: Spot metering mode. Meter on the Moon's surface before the eclipse begins.
- Aperture: Use the maximum aperture that your lens allows. This way you can use faster shutter speeds to avoid the movement of the Moon and any trepidation, getting a sharper picture. If the shutter speed and ISO allow you so, close the aperture by one stop to avoid vignetting and optical aberrations.
- Shutter speed: Use 1/125s as a base, taking into account that using slower shutter speeds (no more than 1s) and with your camera well stabilized, you can capture the brightest part of the Moon correctly exposed. However, as the eclipse progresses, you'll have to change the exposure to get more detail in the shadows (assuming the risk of overexposing the brightest part). So you should use slower speeds (1/2s for example).
- ISO: The minimum possible. But, considering that you shutter speed cannot be slower than 1s, you may have to crank it up to 1600 or more. If the light meter is not centered on the zero, increase the ISO gradually while being careful of the potential noise.
- Bracketing: To make sure you're getting at least one photo correctly exposed, you should use an bracketing of 1 stop between each shot.
- White balance: Manual. Nevertheless, you can always correct it in post-processing.
- Where to focus: If you're going to use a short focal (8-35mm) length and include some interesting elements in the foreground as well as the sky, focus at the hyperfocal distance. Check out this 1-minute video to learn how to do it. If you use a standard lens or a mid range telezoom (35-200mm), and the landscape covers a large area of the frame, focus the lens on the lower third of the scene (starting from bottom to top of the frame). But if the frame is mostly covered by the Moon and the subject, then, focus on the subject. The key is having the subject perfectly in focus.
Include the landscape with a telephoto lens (5)
These pictures are a bit more challenging and you'll need some extra super powers.
This implies that you must know the location very well, be able to do an advanced planning and, above all, not fail when deciding the shooting settings.
To take this photo follow these steps:
- Equipment: Your camera (the type of sensor doesn't really matter, although I recommend you an APS-C or Micro 4/3 sensor, because of the larger effective focal length you'll get). A telephoto lens or a super telephoto lens. A sturdy tripod and head. And an intervalometer.
- Camera settings: Shoot in RAW. Turn on the image stabilization function if your lens has it. Although it's mounted on the tripod it can shift because of its weight.
- Focal length: A medium or long focal length. It's better if it's stabilized.
- Metering mode: Spot metering mode. Meter on the Moon's surface before the eclipse begins.
- Aperture: Use the maximum aperture that your lens allows. This way you can use faster shutter speeds to avoid the movement of the Moon and any trepidation, getting a sharper picture. If the shutter speed and ISO allow you so, close the aperture by one stop to avoid vignetting and optical aberrations.
- Shutter speed: Use 1/125s as a base, taking into account that using slower shutter speeds (no more than 1s) and with your camera well stabilized, you can capture the brightest part of the Moon correctly exposed. However, as the eclipse progresses, you'll have to change the exposure to get more detail in the shadows (assuming the risk of overexposing the brightest part). So you should use slower speeds (1/2s for example).
- ISO: The minimum possible to get a correct exposure, always taking care not to blow out the brightest part. The shutter speed is limited to a maximum to avoid a blurred Moon (because of the trepidation that you may have and by the motion of the Moon itself). You already set the maximum possible aperture, so the only parameter that you can change is the ISO. It will be between 800 and 1600.
- Bracketing: To make sure you're getting at least one photo correctly exposed, you should use an bracketing of 1 stop between each shot.
- White balance: Manual. Nevertheless, you can always correct it in post-processing.
- Where to focus: If the landscape covers a large area of the frame, focus the lens on the lower third of the scene (starting from bottom to top of the frame). But if the frame is mostly covered by the Moon and the subject, then, focus on the subject. The key is having the subject perfectly in focus.
Close-ups and wide-angle composites of the lunar eclipse (6)
Why not tell the whole story in a single image?
Close-ups and wide-angle composites are great because you can show how the eclipse changes over time.
Just like PhotoPills Master and friend José Antonio Hervás did. The NASA selected his photo!
To create a composite image you need:
- To take as many photos as possible to capture the evolution of the whole eclipse. Depending on the focal distance that you're going to use, you'll need to apply some of the techniques that I have explained in this section.
- To blend the photos in one image in post-processing.
You can create many different composites, but in my opinion the most spectacular are the multi-photo composites and the layered composites.
Multi-photo composites
A multi-photo composite shows the Moon moving naturally along a static frame. So you won't need to move your camera during the entire eclipse.
Whether you are planning a close-up or a wide-angle image, make sure you follow these tips:
- Determine how the Moon will be drifting across your sensor at your shooting spot (use PhotoPills!).
- Compose your picture according to it.
- Determine the interval between shots.
Obviously, your goal is to orient your lens' field of view according to the Moon's motion and get the Moon completely eclipsed close to the center of the picture.
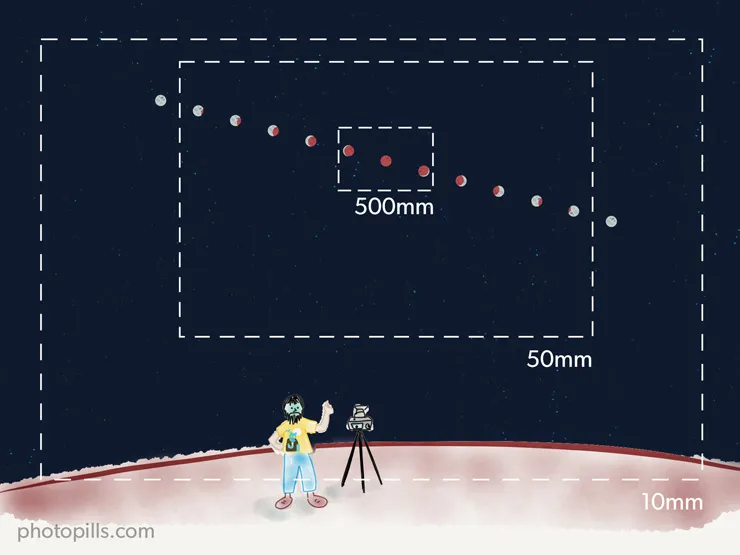
Before you frame the shot use the PhotoPills Night Augmented Reality view tool to see where the Moon will be during the eclipse according to your position.
And if you have decided to use a relatively short focal length (less than 35mm in a full format sensor) make sure you include an interesting close-up or part of the landscape in your frame.
As for the time intervals, you can shoot as often as you want (especially if you want to do a time lapse). As a general rule, a multi-photo composite is better if you have longer intervals between shots. But how long? It will depend on the total duration of the eclipse and each of its phases. Fortunately, you can see that information in Panel 9 and in Panel 10 of the Planner.
Let me insist. You should frame the scene so that the Moon moves regularly across the frame and is at the center during totality.
Later on, turn your computer on and use an editing program to blend all your shots into a single image.
Layered composites
"Toni, what's a layered composite?"
A layered composite is a combination of several shots taken during the eclipse that you blend into one single photo. But unlike the previous composite, the blending of these shots doesn't represent the eclipse as it actually happened.
It's a more or less realistic composite. And that "more or less" detail is what makes it much easier to produce. In this case, the composition is not really important because you don't have to include too many elements in the frame. Actually, it's the contrary – the more isolated the Moon is, the better.
Once you have photographed all the phases of the eclipse (or those that interest you most), use a photo editing program like Photoshop to place them as you want (in a straight line, in a circle, vertically...) and show the evolution of the eclipse.
Make sure that all the pictures are aligned and centered. It's best if all the images are symmetrical and that there distance between them is the same.
9.The 7 mistakes you should avoid when shooting a lunar eclipse
Your tripod shifts, your frame changes and you are unable to return to the original frame (1)
Before you throw up your hands in horror, I have good and bad news.
First, the good news.
Imagine you're taking a single photo with a telephoto lens. You'll surely have enough negative space around the Moon to correct it on the computer, cropping the frame.
Even if you're taking pictures with a super telephoto lens (or a telescope!), you may have a frame wide enough to crop it and adjust the position of the Moon.
I can't help but tell you the bad news as well.
Are you taking a single photo with a wide angle? Surely your picture ends up blurred (hopefully not!) or the frame is different from your initial composition.
If this happens, the photo may be good nonetheless. Just forget about creating a multiple exposure composite.
Let me insist one more time.
Make sure your tripod (and the rest of your gear) is super stable and that nothing will make it lose its balance. Also look for a shooting spot where you have enough space around your equipment. You need to move freely and that nobody bothers you during the shooting.
Ideally, you should go to your shooting location at least one or two days in advance to scout the area and look for the best shooting spot.
You accidentally shifted focus and the Moon is blurry (2)
Depending on the type of photo you plan, you will find yourself facing two different situations.
You are shooting with a wide angle lens
Therefore, you are including part of the landscape in you frame. Here, you clearly failed to focus at the hyperfocal distance.
Hmm... Are you sure you didn't fail?
Refocus again and make sure that you are focusing the lens at a slightly longer distance than the hyperfocal distance (e.g. 1 m). But most importantly, make sure not to fall short again!
You'll find how to focus at the hyperfocal distance in this video.
You are shooting with a telephoto lens
The idea is that the Moon covers a large part of your photo, right? My guess is that you haven't focused properly manually.
It's fine.
Use the Live View option on your LCD screen and, if your camera has them, both the Focus Peaking and the Focus Magnifier.
You'll find how to use these tools in section 8.
Why are all your images blurred?! (3)
You have focused correctly. And despite this, your photo is completely out of focus.
Your camera and/or lens are suffering from vibrations.
- Use a sturdy tripod and make sure it's completely stable.
- Turn off the lens stabilisation system. You're using a tripod, and there is no need to use this function. Despite the absence of vibrations, it may try to correct inexistent movements causing the opposite effect!
- Use an intervalometer. Don't touch the camera unless it's strictly necessary.
- Check the lens autofocus is disabled.
- Double check the focal length is the right one. Make sure you don't touch the ring of the lens.
- Always take a test shot to double check that everything is in focus.
Crap! You forgot something (memory card, intervalometer, battery, etc.) (4)
You are in the field completely excited to be there, in a special place, waiting for something exceptional to happen. And suddenly you realize that you have left home an essential part of your equipment...
What a mess!
Fortunately it's something that you can solve very easily.
Make a list of all the equipment you will need. Take a look at section 6 to learn how to do it.
Obviously, if you put a little effort and make a complete and detailed list, the chances of forgetting something will be minimal.
And of course, we're in the 21st century! Don't write your list on a random piece of paper, do it on your smartphone to make sure you always carry it with you.
Your memory card, intervalometer, battery (you name it) fails (5)
This type of problem can be easily avoided and solved.
Check in advance all your equipment and make sure everything works. But not 5 minutes before leaving home. Check everything thoroughly a few days before the eclipse.
As you go through your equipment, make the list that I mentioned in section 6.
In addition to this, and as a precaution, carry two (or more in the case of batteries or memory cards) each. This way, if you have any problem or something fails even after checking it at home, you always have a spare memory card or a spare battery.
You'll never be cautious enough!
It's cloudy so you don't shoot at all (6)
If the forecast expects a cloudy sky during the eclipse, you should try to move and change your location and your shooting spot. Use PhotoPills as I show you in section 5 to plan a new shooting session.
But what happens if the clouds show up at the last minute? Have your chances of capturing the lunar eclipse gone to hell?
No way!
Clouds can play an important role in your composition and help you tell the story in a different way. Depending on how dense they are and how the wind blows, you can capture the partial and total phases through the clouds.
Because sometimes the camera is able to see what your eyes can not...
You shot in JPG and now you cannot edit! (7)
I suggest you to always shoot in RAW. That way you'll be able to edit the RAW file in Lightroom (or your preferred post-processing software).
The RAW file contains all the information captured by the sensor of your camera. So it's much easier to make adjustments later on in the image without risking losing of quality.
The JPEG format is a compression of the image. So a lot of information gets lost in this compression.
10.It's time to make your dreams come true!
A Moon eclipse is approaching...
Are you ready for the challenge?
Of course you are!
That's why you're a photographer and a PhotoPiller. Because what's important is having fun and enjoying the experience. And because there is no impossible challenge!
So don't wait any longer.
Imagine photos you've been dreaming about for a while. It doesn't matter how crazy or absurd they are. They're your ideas and you're about to make them come true!
Grab your mobile, open PhotoPills and let yourself be carried away by a world of possibilities.
Play with the different options. Find a dreamy location. Prepare your gear.
And leap into the void!
Capture that photo that will leave everyone (including yourself) dumbstruck.
Oh, and when you have it, don't forget to send it to the PhotoPills Awards :P
Share it with the rest of PhotoPillers and... who knows? Maybe you'd become PhotoPiller of the Year!
One last thing before leaving you with your plans.
Do you have any questions related to Moon eclipses? Need help?
Leave a comment below this article and I'll do my best to help you out. I'd love to take part in making your dreams come true... :)
Note: Some links on this page are affiliate links. What does this mean? If you buy/rent using these links you're helping support us and it costs you nothing extra. Thank you for your support.
Get this ebook for free now!
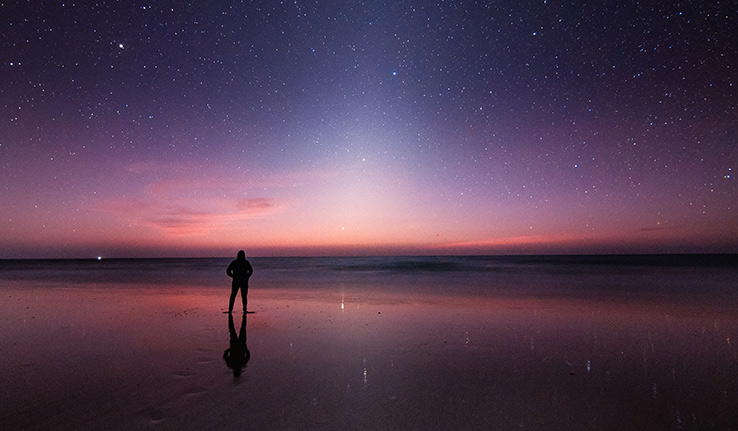
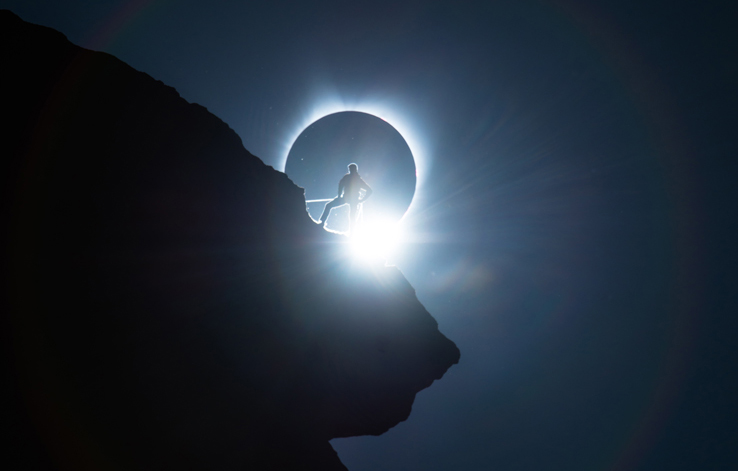
.jpg)