Milky Way Photography: The Definitive Guide (2026)
What if I told you that you're more than capable of imagining, planning and shooting Milky Way pictures that will put people into what I call a sharing trance? Would you believe it?
Nowadays, almost everyone can take photos of the night Sky, even very good ones. Night sky photography in general, and MIlky Way photography in particular, have become very popular.
You see it every day, social networks are filled up with multiple great Milky Way photos, published by great photographers hoping that their work will be massively shared.
Unfortunately, the truth is that just a few achieve to go viral. Why? One possible answer is: inner remarkability.
Social transmission expert, Jonah Berger, in his New York Times Bestseller book 'Contagious: why things catch on', maintains that:
"Remarkable things provide social currency because they make the people who talk about them seem, well, more remarkable [...] Sharing extraordinary, novel, or entertaining stories or ads makes people seem more extraordinary, novel, and entertaining [...] Not surprisingly then, remarkable things get brought up more often."
Therefore, how can you make photos so that people will share and talk about? The same inner remarkability principle applies. Taking great photos is not enough, they need to be truly remarkable.
The idea behind this article is to help you tell better stories through your Milky Way photography, so your message reaches more people.
In the age when Whatsapp, social networks and television are fighting for our attention - and when more photographs than you can possibly view in your whole life are published every day - you must learn how to make truly remarkable photos that your friends and followers can't avoid sharing and talking about... They will spread your story, your message ;)
So...
In this guide, I'll cover everything you need to turn your Milky Way photo ideas into truly legendary images...
Everything!
Lots of Milky Way pictures to inspire you, a complete Milky Way viewing calendar for 2026 (with the best months of the year you can photograph the Milky Way) and how to use the PhotoPills app to plan any Milky Way photo you imagine...
In other words, to find the right shooting spot and right date and time the Milky Way scene you imagine actually happens. So you can go and capture it!
But also all the equipment you need and how to use it to photograph the Milky Way step by step.
And of course, this includes the most used Milky Way camera settings!
All of this will become clear as you read through this guide.
Are you ready?
"You cannot teach a man anything; you can only help him find it within himself." - Galileo Galilei
Get this ebook for free now!
Content
- Mark Gee proves everyone can take contagious images
- Believe in the impossible, brainstorm for remarkability
- Add enigma to your composition, include the Milky Way
- Milky Way viewing calendar 2026
- Where to photograph the Milky Way (how to find a powerful Milky Way location)
- The 3 crucial tips you should know before you start planning the Milky Way
- How to plan your Milky Way ideas step by step
- All the gear you need to successfully photograph the Milky Way
- How to photograph the Milky Way step by step
- How to post-process the Milky Way RAWs (with these 5 great free tutorials)
- 10 inspiring Milky Way pictures
- Don't give up!
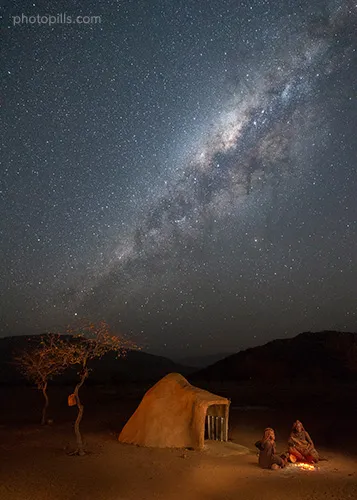
1.Mark Gee proves everyone can take contagious images
Do you know Mark Gee? Maybe not. He's an extraordinary photographer based in Wellington, New Zealand.
Let me share his extraordinary story with you.
Mark Gee's imagination and persistence has no limit. You may not believe it, but this is the simple cause of his successful career in both film and photography industry.
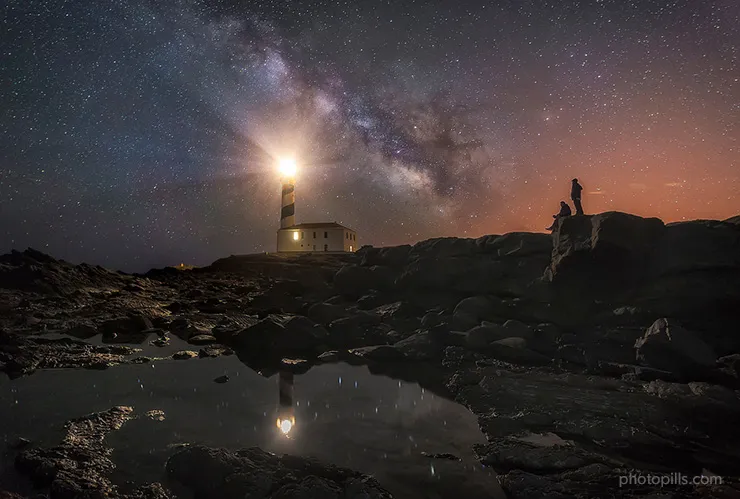
Having worked on movies like 'The Hobbit', 'The Lord of the Rings' or 'Avatar', the highlight of his photography career happened only a few years ago. He not only won two categories in the prestigious competition Astronomy Photographer of the year 2013, but he also won it overall with his unique image 'Guiding Light To The Stars'.

Canon 5D Mark III | 24mm | f/2.8 | 30s | ISO 3200 | 10-photo panorama
'Guiding Light To The Stars' is a fantasy story.
Every time I look at this contagious image, I can't avoid immersing myself in an imaginary world...
What if the stars owe all their beauty to a little lighthouse lost somewhere in New Zealand?
Am I crazy? Maybe a little... Don't blame me for that!
From the composition side, it's a stunning panorama of the Milky Way arching over New Zealand's North Island coast. Look how the Milky Way seems to spring up from the lighthouse, connecting the stars and the landscape. In the middle of the image you see the Galactic Center, by far the brightest part of our galaxy.
But the idea that got his work out there and noticed was his viral video 'Full Moon Silhouettes'. Mark explains here what happened:
"I wanted to video the Moon rising and revealing silhouettes up on a lookout in Wellington, New Zealand. This idea proved a lot harder than I had anticipated, and there were a lot of failed and frustrating attempts. But finally after a year of trying, I managed to pull off something that exceeded my expectations.
I stayed up until 03:00 am the next morning finding suitable music for my newly captured clip which I put together and uploaded it to Vimeo. I called it 'Full Moon Silhouettes' (even though technically it was captured a day after the Full Moon) and when I awoke later that day, my email was full of hundreds of emails from people all over the world writing to me and thanking me for making the video.
It had touched the hearts of people in ways I could have never imagined, and here they were sharing those moments with me. This was certainly a very humbling experience for me, and one I will never forget."
For a detailed explanation on how Mark imagined, planned and shot the 'Full Moon Silhouettes' video, have a look at the article 'To the Moon and Back'.
Now, if I told you that Mark started his photography career in 2009, would you believe it? I bet you wouldn't!
Well, it's true... With a 4-year photography career only, Mark Gee proved that you don't need to be a Master with ages of experience to shoot contagious images. The truth is you only need to have a remarkable story to tell and tons of motivation.
So, believe in yourself. You can do it too!
Oh! By the way... If you wish to learn how to shoot the Milky Way face to face with PhotoPills Masters like Mark Gee, the PhotoPills team and a selected group of PhotoPillers like you, you should definitely attend the PhotoPills Camp! ;)
During the Camp you'll learn how to use PhotoPills, an app that has become key in night photography.

2.Believe in the impossible, brainstorm for remarkability
"Image quality is not the product of a machine, but of the person who directs the machine, and there are no limits to imagination and expression." - Ansel Adams
Think big!
As it turns out, if you want your photos to become viral, you need people to freak out with them, to fall in love with them. The good news is you have all you need: your creative side.
Yes, of course you need to master all the photography technique involved but, as Mark Gee proved, creativity makes the difference.
Where should you start?
Don't let the critic that dwells in you, your analytic mind, take over and get in control... Think big, focus and let your imagination fly.
Immerse yourself in the creative process, look for a special location and do your research. Find the story hidden within, the emotion that evokes. Your goal is to come up with a unique story to tell, a deep emotion to convey, a remarkable message you'll try to get across combining a powerful technique, composition and location.
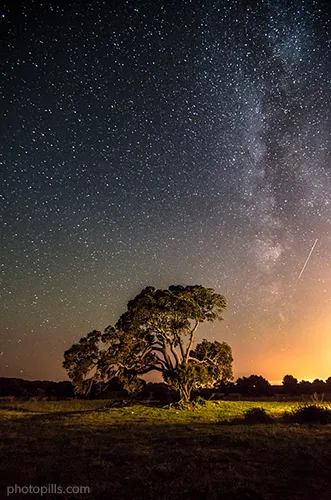
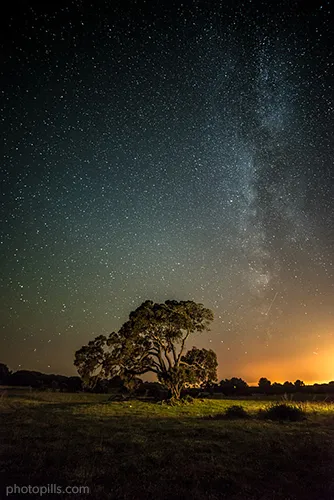
3.Add enigma to your composition, include the Milky Way
The Sun and the Moon are powerful photographic elements you can use in your image to help you get the message across while adding interest and mystery...
But the Milky Way multiplies the possibilities. Take advantage of it!
The Milky Way moves in the sky following the Earth's rotation as the stars move.
In other words, you'll have different compositions at different times of the night. You can get the complete Milky Way arching over the landscape, which is great to capture a panorama. Or you can get part of the Milky Way in vertical, diagonal and horizontal orientation.
Sure, you'll come up with multiple ideas of different compositions. Usually, you know the exact position you want the Galactic Center to be in your image, but you don't know whether the scene is possible or when it occurs. There is no secret: the key to photographing stars is planning.
Thanks to technology, the old times when you had to work out all the calculations by hand or use the trial and error approach are over. Nowadays, you have incredibly powerful tools like the PhotoPills app at your fingertips that will do all the planning for you.
Here are 2 complete tutorials to help you easily plan any photo of the Milky Way you imagine:
- How To Plan The Milky Way Using The PhotoPills 2D Milky Way Planner
- How To Plan The Milky Way Using The Night Augmented Reality view
No excuses now!
You can also check section 6 to learn how to plan the Milky Way with PhotoPills. There you'll find a detailed explanation with a real example, where I use the Planner along with the Milky Way layer and the Night Augmented Reality view.

4.Milky Way viewing calendar 2026
When should you start looking for the Core of the Milky Way? When will it be visible? Or even better, when is the best time of the year to shoot the Milky Way?
Actually the Milky Way is visible everyday at night. That is if you're not in a heavily light polluted area, of course...
However, its Core, the brightest part of the Milky Way, the most spectacular area... Summing up, the portion of the Milky Way you want to have in your photos, is not always visible :(
So we say that there is a hunting season for the Milky Way!
During part of the year, the Core of the Milky Way is not visible because it's blocked by the Sun.
Why is that?
Because the Galactic Genter is only above the horizon during daylight hours.
When planning to shoot the Milky Way, you should
- Find out the period of the year in which the Galactic Center is visible during nighttime, and then
- Check the PhotoPills Moon calendar (and Moonrise and Moonset times) to choose the date where there is no Moon at night. Or, if you want the Moon to help you light the foreground, choose the date of the Moon phase that suits your needs.
To narrow the search and get faster results, you need to know the starting and ending dates of the best period of the year to shoot the Milky Way.
So, when is this?
Check the following Milky Way calendar :)
Northern Hemisphere Milky Way viewing calendar
In the Northern Hemisphere, the Core begins to be visible at the end of January, although for a very short time. Depending on where you are, you'll have to wait until February or even March.
The Core is not visible in November, December and early January.
At the beginning of the Milky Way season, the Core becomes visible in the pre-dawn hours just before Sunrise, and remains above the horizon during daylight hours. As months go by, the Core becomes visible for a longer and longer period of time each night, being June and July the months with longer visibility. During this time of year, the Core is be visible all night.
From July on, the Core visibility begins to decrease and the best viewing time moves towards after dusk, until it becomes totally invisible again in winter (November).
Now, pay attention. This is important!
Like the Sagittarius constellation, the Galactic Center can only be visible from latitudes between +55º and -90º.
If you live in latitudes above +55º, you won't be able to see the Galactic Center.
You'll be able to see only part of the Core of the Milky Way. The best time to see it is before and after summer. Notice that during the summer the astronomical twilight never ends, so you won't have a completely dark sky.
Southern Hemisphere Milky Way viewing calendar
In the Southern Hemisphere, the Core is also visible from the end of January to October.
But here you can enjoy better conditions than in the Northern Hemisphere. Most of the Milky Way season falls in winter, when the cold temperatures will help you get crispy stars.
Again, the Core is not visible from November to January.
If you live in the Southern Hemisphere, you can enjoy a longer visibility because the peak occurs in winter, when days are shorter and nights are longer.
All these visibility facts for the Northern and Southern Hemisphere are just qualitative, not exact figures.
If you want to know how the Galactic Center visibility time and direction change throughout the year in a determined location, you should enable the Milky Way layer on the Planner and move time continuously to see how the visibility evolves. Go to section 7 to learn how to plan the Milky Way ;)
To better understand what I mean, watch the following video. It shows how the Galactic Center visibility time and direction change throughout 2015 at Delicate Arch, in the Arches National Park, UTah (USA).
Even if the data corresponds to 2015 figures, they're still valid because the pattern is the same every year.
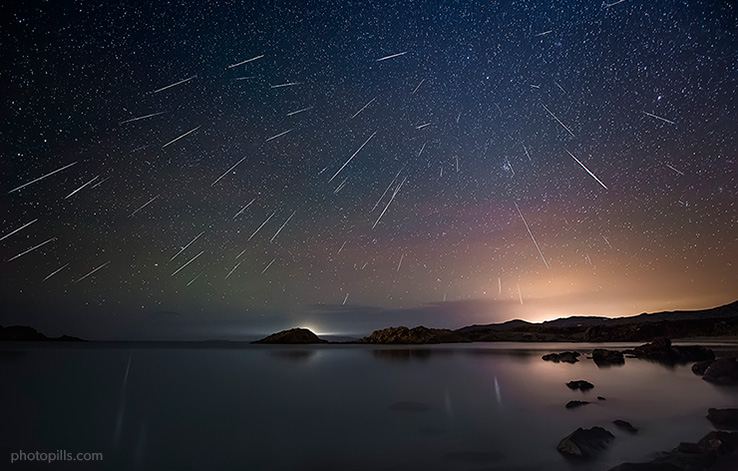
Delicate Arch 2015 Galactic Center visibility calendar (38.743611º, -109.499444º):
- Total visibility time: 988.31 hours
- Visibility peak: 5.63 hours, May 27th
- Minimum visibility azimuth: 127.8º
- Maximum visibility azimuth: 232.2º
- Hunting season:
| January | 7.38 hours |
| February | 44.62 hours |
| March | 87.94 hours |
| April | 118.9 hours |
| May | 159.16 hours |
| June | 157.63 hours |
| July | 156.64 hours |
| August | 119.06 hours |
| September | 82.1 hours |
| October | 47.89 hours |
| November | 6.99 hours |
| December | 0.0 hours |
5.Where to photograph the Milky Way (how to find a powerful Milky Way location)
The reason most photographers keep their best locations secret is that an unexploded location, rich of unique photogenic elements, can help you take an award winning image, as simple as that.
A second reason is that location scouting can be very time consuming and expensive. I've been living on a little island lost in the Mediterranean Sea for 20+ years now and, although I've thoughtfully explored most of it, finding pretty unique locations on the way, I feel like the best location is yet to come.
So, what makes a great location in night sky photography?
It's light pollution free
Unless you're willing to include artificial city lights in your composition, you'll need to do some research and find out where the nearby dark sky locations are.

Depending on where you live, it can be very challenging to find a location with limited light pollution. These are some resources that can help you find dark sky locations:
- NASA's Blue Marble: The site uses a Google Maps interface with NASA's most recent Night Lights image. You can browse the maximum resolution of 4 pixels per km², as well as a slightly coarser night-lights map, enhanced by town names and national borders.
- The World At Night (TWAN): It has one of the largest collections of global categorized astronomic landscape images sorted by region.
- International Dark Sky locations: I love these guys' movement. The International Dark Sky Association promotes the preservation and protection of night skies across the globe for future generations. You'll find 5 types of designations in their database: communities, parks, reserves, sanctuaries, and urban places. These areas are home to some of the darkest and most pristine skies in the world.
- Wikipedia Observatories list: Observatories are located in completely dark skies. It's a good idea to check where they are to find black crystal skies.
- Look for Local Astronomy Clubs: There are amateur astronomers everywhere. Make sure you ask them for suggestions. Most of them enjoy sharing their love for astronomy and would be happy to point you in the right direction.
- Light Pollution Map (also available on iOS and Android) helps you locate nearby dark skies to take a telescope, watch Meteor Showers, or simply relax under the stars. See light pollution maps of the entire world, along with dots that indicate good observing locations.
Do you wonder how does an unspoiled night sky look like?
Make sure you don't miss the following Christoph Malin's work of art. You'll discover the amazing dark sky of the Atacama Desert and the outstanding European Southern Observatory... Men's outpost to space observation.
It includes a point of interest
Choose a location which has at least one interesting element that inspires you.
Including it in your composition will help you connect landscape and sky in a creative way, which will capture the viewer's attention.
These are some of my favorite Points of Interest. Try to experiment with them!
Rocks
Being some of the most amazing and beautiful pieces of nature, rocks convey a sense of power, isolation, and challenge.
Rock formations were slowly created by strong elements such as heat, wind, rain, and other erosional forces, over millions of years.
You can find them in many different positions. I personally prefer those that are isolated because they convey a sense of drama.
I guess it's not difficult to find a nice rock in your area. But if that's not the case, have a look at the list of best rock formations on Wikipedia.
Natural arches and bridges
These marvelous giant stone structures, carved by nature, are doors to Heaven... And sometimes doors to Hell as well.
Natural bridges are formed by running water. This makes them even more special and rarer than arches, which result from a combination of other erosional forces.
Again, if you're not lucky to live near one of these natural wonders, do your research on the net. Check the list of longest natural arches on Wikipedia.
If you live in the USA, you can't miss Arches National Park (Utah). With over 2,000 classified arches, massive monoliths and towering walls, it's a dream come true for all night photographers.
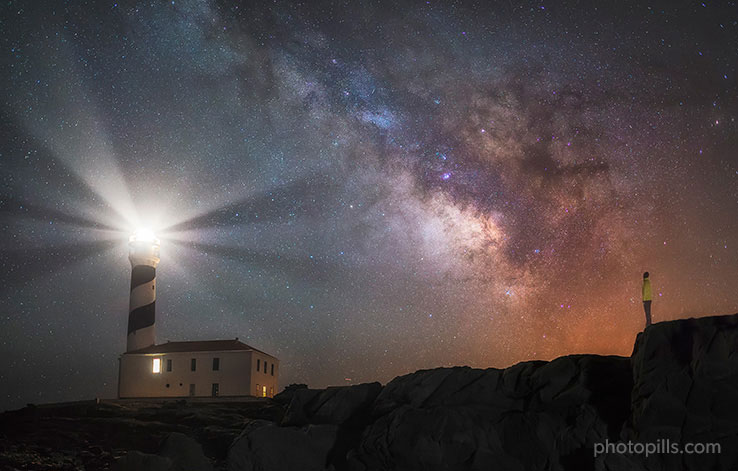
Lighthouses
Some of the world's most picturesque buildings are lighthouses. Some of them have been crucial in many wars, suffering dramatic consequences from being in the battlefield.
If you look into their past, you'll find enigmas and surprising stories hidden behind the walls. Go, discover the mystery around a nearby lighthouse or check the list of lighthouses on Wikipedia to find one that interests you.
Trees
Just two words: captivating organisms. They are powerful structures that add interest to your image and become dominant when photographed on their own.
Look for an isolated tree. It will help you break the horizon line and give a sense of scale to the shot.
Trees can be unusual either because of their biology or because humans have changed them in some way. Here is a list of particularly unusual trees on Wikipedia.
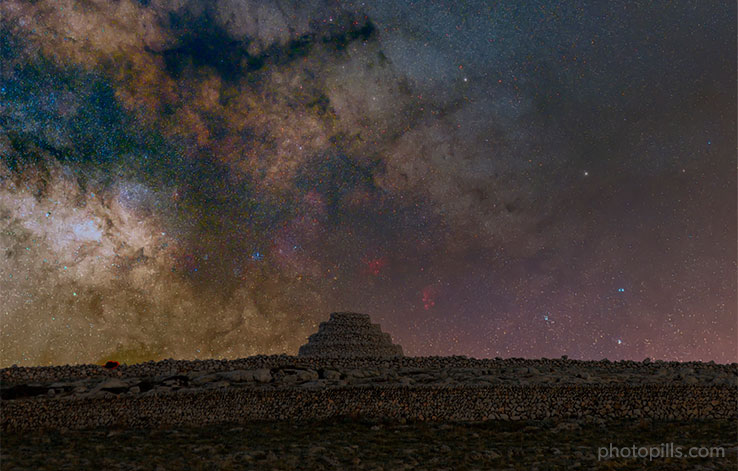
Ancient constructions
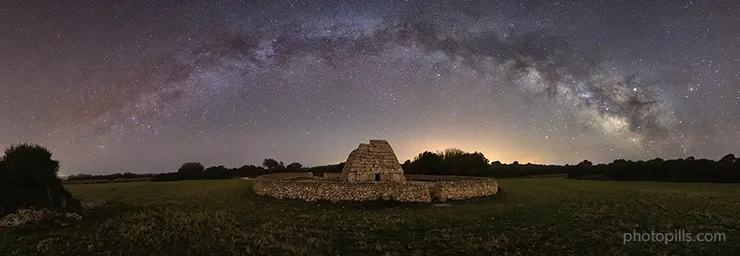
Some people say these old stone constructions were built by ancient civilizations. Others, more skeptical about men's technological capabilities, that they were built by aliens.
I ignore your opinion on these theories but the truth is that all these constructions will make your photos trap everyone's attention. It's like connecting two worlds: ancient cultures and alien nations.
Among the types of old constructions, the megalithic ones are my favorite.
A megalith is a very large usually rough stone used in prehistoric cultures as a monument or building block. The word "megalithic" describes structures made of such large stones, using an interlocking system instead of mortar or cement.
Stonehenge in the UK and the Naveta d'Es Tudons in our beautiful island of Menorca (Spain) are great examples of megalithic constructions. You can find more examples on the list of the oldest known surviving buildings on Wikipedia.
Models
Adding a model in the mix can be challenging but also very rewarding. Sometimes, the story you want to tell needs the help of a human character to make it complete.
These are just a few ideas to inspire you, but you can use other elements such as windmills, lakes to create reflections, abandoned vehicles or machines... Take advantage of what you have nearby.
Find a place with a hidden story
Cemeteries, battlefields, ghost towns, volcanos, craters and deserts have a kind of hypnotic atmosphere that attracts the attention of many brave photographers looking for something new to invigorate their photographic creativity. Sometimes visiting the same old haunts or taking the same types of pictures can get stale.
Why not trying something new?
Use any available source of information
One of the main tasks during any planning is research. That means you have to spend as much time looking around until you find what you need.
And for that, I suggest you use any available source of information.
- Seeing photos of other photographers is the best source of inspiration. You can check Instagram, Flickr, 500px, Unsplash, Getty Images, 1x.com, Viewbug, Pexels, Youpic, Shutterstock, Adobe Stock and Google Images.
- Take advantage of locations other photographers discovered and explored. There are communities, such as Locationscout and ShotHotspot, where this information is shared.
- Thoroughly study publications such as travel magazines (National Geographic, Condé Nast Traveler and Travel + Leisure), travel curated content (Exposure), travel guides (Lonely Planet) and the photography section of newspapers such as The Atlantic, The Guardian and The New York Times.
- Search the galleries of your favourite photographers' websites. A good example is the PhotoPills Masters' websites participating in the PhotoPills Camp.
- Wikipedia and its lists of interesting places is an endless source of information. Are you looking for lighthouses? Type in Google "lighthouse list Wikipedia" and analyze the results.
- Ask the locals, they are the ones who know the area best and who will give you good advice.
- Books can also help you learn about the local history and natural biodiversity of an area or town.
- Don't forget to visit the Town Hall or the tourist office of that city or town. I'm sure you'll be surprised.
- Check the Points of interest (POIs) included in PhotoPills.
- And finally, most importantly, scout the area. It's often the most effective strategy :)
What are you waiting for?
Go and find an unexplored location!
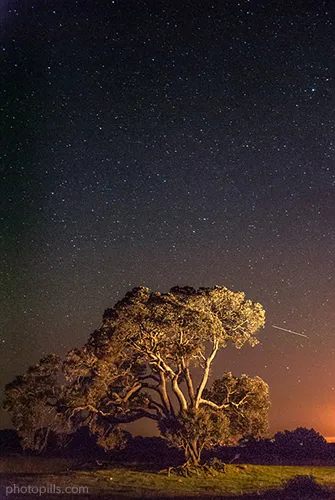
Add a shooting star
Meteors will turn a good Milky Way picture into a memorable one. So, when a Meteor Shower is coming up, make sure you're ready to take action.
Take a look at our Meteor Showers photography guide. You'll find information about both the upcoming Meteor Showers and how to shoot them.
During a Meteor Shower, meteors are observed to radiate from one point in the night sky. These meteors are caused by streams of cosmic debris entering the Earth's atmosphere at extremely high speeds. Smaller fragments burn in the atmosphere producing a "shooting star", but the bigger ones can really produce an amazing big fireball.
Produced by comet Swift-Tuttle, the Perseids are one of the best Meteor Showers that can be observed, with up to 100 meteors per hour. The shower runs annually from mid July to the end of August. But there are many more great Meteor Showers during the year.
Which ones? Again, check our Meteor Showers photography guide.
If you are lucky enough to capture many meteors, you can use the technique described in this Meteor Showers Masterclass with Ian Norman for image post-processing and to get a stunning effect.
6.The 3 crucial tips you should know before you start planning the Milky Way
Let's say that after having checked many locations, you've finally found one that inspires you. And you're ready to plan a cool Milky Way picture...
But hey! Don't hurry...
Before you use your Milky Way app to find and plan that Milky Way photo you have in mind, there are 3 crucial tips about the Milky Way you should know.
You'll find the Core in the southern skies (1)
Knowing the direction where you will find the Core of the Milky Way is mandatory. Don't waste your time planning images that are not possible.
These are the general rules depending on the hemisphere you are:
- Northern Hemisphere. Look towards the southern skies to see the Galactic Core. The Core will start to be visible to the southeast (spring), to the south (summer), or to the southwest (fall).
- Southern Hemisphere. Also look towards the southern skies to see the Galactic Center. In this case, the Core will start to be visible to the southwest (spring) or to the southeast (fall and winter).
In addition to this, in the Northern Hemisphere the Core is pretty close to the horizon, even when it's at its maximum elevation. And the further you go towards the south, the higher in the sky you'll find it. You can have the whole Core above the horizon, and even above your head.
That's the reason some of the best Milky Way pictures are taken in the Southern Hemisphere, because you can come up with many more compositions.
Therefore, don't look for the Core of the Milky Way towards the north. When brainstorming, think about different compositions with the Galactic Center in the southeast, south or southwest.
Another way to find the Center of our galaxy and the brightest part of the Milky Way is to look for the Sagittarius constellation.
But don't worry to much about it, PhotoPills is a great Milky Way finder app. With its augmented reality views and map views it's super easy to find the Milky Way.
Same location, same direction, same elevation (2)
"For a given location and direction (azimuth), the Galactic Center will always be at the same elevation in the sky."
To put it simple, if you go to the same location on two different dates, look towards the same direction and wait until the Galactic Center is in that direction, you'll see it at the same elevation in the sky.
No matter the date, for a given location, when the Galactic Center is in one direction, it always has the same elevation.
Thus, given a location, the Galactic Center always rises in the same direction. Also, it always sets in the same direction.
Surprised?
The practical application of this fact is easy. For example, once you know the azimuth in which the Galactic Center rises, just choose the shooting spot in a way that the azimuth of the Galactic Center is just where you want it relative to the main subject of your photo (rock, tree, lighthouse, building, etc.).
In other words, when you find a location you like, proceed as follows:
- Decide the position of the Galactic Center in the sky. Oftentimes your initial shooting spot won't be right. You'll have to move around the location.
- Use the Milky Way app tools included in PhotoPills, either the Planner or the Night Augmented Reality tool, to find out the azimuth in which the Galactic Center is at the desired elevation and orientation.
- Again, use these tools to choose the shooting spot that gives you the composition you want.
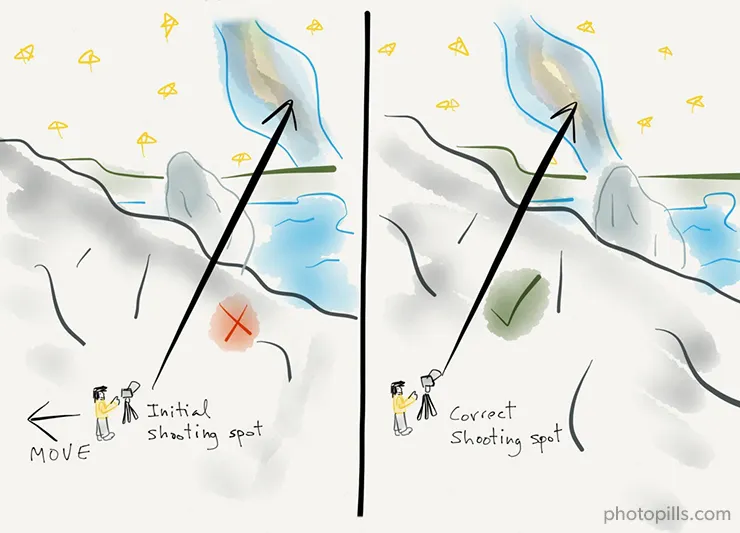
Step 2. Move around the location to find the right shooting spot for the composition you want.
Check the Moon phase (3)
Most times, you'll want to be in complete darkness when shooting the Milky Way. Therefore, when planning, you have to take into account the phase of the Moon. There should be no Moon!
As a result, when planning all your Milky Way shots you should make sure they happen during New Moon and the 4 days before and after it.
In this case, you'll need artificial light sources to capture the beauty of the landscape under the Milky Way.
But the presence of a Full Moon is not always detrimental. You can still use the Moonlight (from first quarter to last quarter) to photograph the landscape while capturing the Milky Way at the same time.
Look for the dates when the Moon falls outside your desired frame, preferably forming an angle between 60º and 90º with the direction you're pointing your camera at. The light will be more prominent on one side, and more shadows will be cast on the opposite side of the landscape elements. So, in this case, side lighting is ideal to highlight textures.
Direct front Moonlight shows the pattern of the landscape elements in a flat, uninformative way, but side lighting creates shadows in every little rock. This can give an almost 3D effect to a photograph.
The light is best starting about one to two hours after the Moon rises. It's when the Moon will illuminate the landscape completely, creating beautiful shadows that give volume to the elements.
To help you with the Moon, use the Moon calendar included in the PhotoPills app ;)
7.How to plan your Milky Way ideas step by step
"A goal without a plan is just a wish." - Antoine de Saint-Exupéry
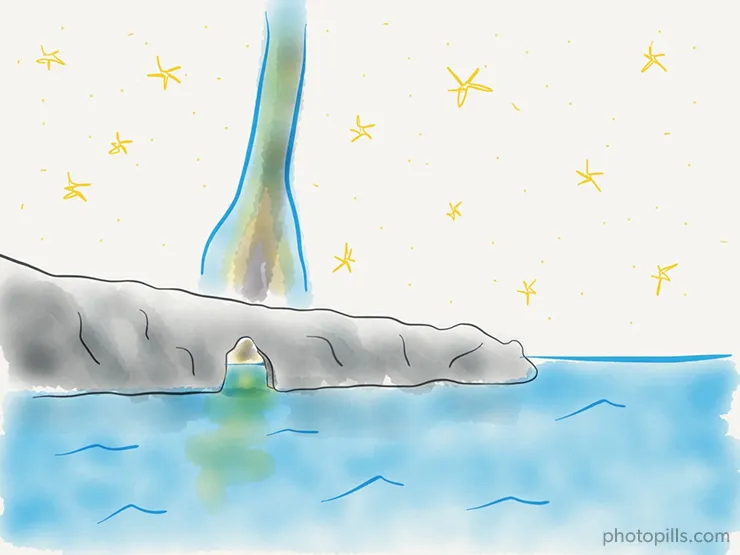
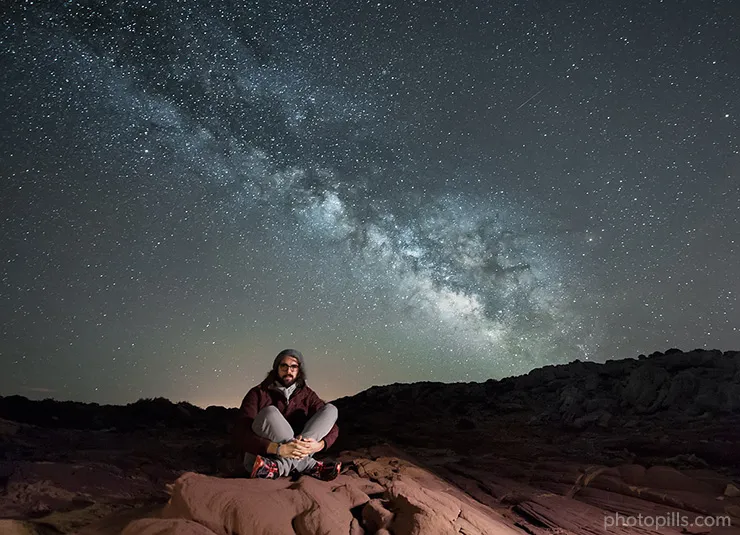
I love the mystery surrounding Es Pont d'En Gil, a natural bridge located in Menorca, a little island lost in the Mediterranean Sea... My home.
What I like about this natural bridge and makes it special is that behind it, 32 km (20 mi) away, is the crowded island of Mallorca. And its heavy light pollution paints red the arch of the bridge during the nights. It makes my imagination fly...
[Danger - flying mode on]
Imagine the red bridge... It's like a door to Hell, once you come in you can't come out, cursed for eternity... I've heard stories spoken by the elders... Stories about seamen who sailed never to return again... All vanished but one... There was one who returned... On a New Moon day... This is how the legend goes:
"Only in the nights of New Moon, when the stars dig deep into the very bowels of Hell, the brave will find the star way back to the human world."
I've always been fascinated by old sea stories and legends. The truth is that too many seamen have been swallowed by the sea leaving their wife and children behind. All these real life dramas have inspired me to look for a spark of hope. This is how I came up with the idea of connecting Hell and Heaven with a stair made of stars... Connecting them with the majestic Milky Way... In a New Moon night.
"... Only when the stars dig deep into the very bowels of Hell..." could be decrypted as "only when the Milky Way falls straight into the bridge"... I imagine the Milky Way completely vertical digging into the natural bridge... That's definitely an hypnotic shot!
[You're safe now - flying mode off]
So, how did I calculate the exact date and time the Milky Way would be vertical and aligned with the bridge?
Yes, you're right... I used my favourite Milky Way app: PhotoPills!
In the following video, you'll learn how to use the PhotoPills app to find and plan any Milky Way photo you imagine in just seconds. It's so powerful!
Do you want more videos?
Check our YouTube channel for more cool planning examples and videos on how to master the PhotoPills app!
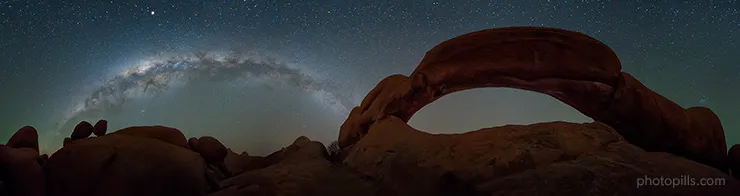
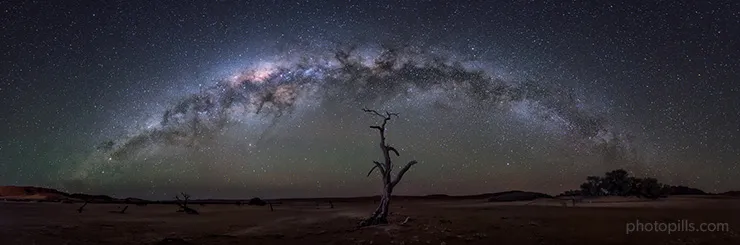
For instance, you'll see Rafa (aka the Bard) plan a cool Milky Way photo with the Vingerklip, an amazing rock formation in Namibia.
And this is exactly how I used the PhotoPills Planner to plan the shot:
Place the Red Pin on the shooting spot
Go to PhotoPills and tap on Planner (Pills menu).
The first step is always the same one: place the Red Pin near your subject. In this case, the natural bridge of Es Pont d'En Gil in Menorca.
To do it, you can navigate the map or tap on the Load button and
- Use the Search bar to find a location.
- Load a Plan or Point of Interest you've previously saved.
- Type the latitude and longitude.
- Or use a geotagged photo.
In this example, tap on Load, choose Latitude/Longitude an type these coordinates: (40.010673ºN, 3.794610ºE).
The Red Pin will be placed near the bridge.
There are only two spots from where you can see the horizon through the bridge, but there is only one that is perfect for a Milky Way shoot.
Once you've found your desired shooting spot, move the Red Pin right on the position from where you want to take the photo. Then tap the Map Settings button and switch on the Milky Way layer.
You'll find the Map Settings button on the map, at the bottom right corner, next to the (+) button.

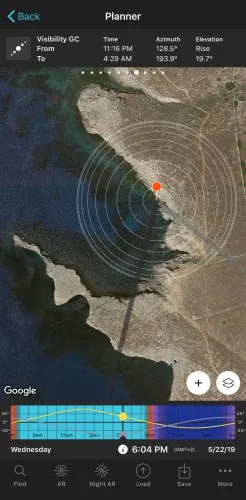
Notice the panel that is just above the map. Panel 7 is telling you that:
- The Galactic Center will become visible at 11:16 pm (on May 22) at an azimuth of 128.5º when it rises.
- Then, it will become invisible at 04:29 am (on May 23) when it sets at an azimuth of 193.9º and an elevation of 19.7º.
Have a look at the two azimuth lines on the map. The light gray line is showing the direction where the Galactic Center will become visible (at an azimuth of 128.5º) and the dark gray one, where it will become invisible (at an azimuth of 193.9º) for the selected date.
The white circumferences are a sort of contour lines that will help you visualize the position of the Milky Way in the sky. You'll see what I mean in a second.
Keep reading!
Check all the New Moons until you find the right date and time
I'd like to have the Milky Way (and the Galactic Center) completely vertical and aligned with the natural bridge. It's time to find when it happens...
On the one hand, for a given month, every year you'll be able to get the same shots. The Milky Way position in the sky will be the same.
This means that once you've planned a shot, you'll be able to repeat the photo every year during the same month (and even during a few months!).
And on the other hand, you want to have a perfect dark sky...
Therefore, to find the date and time the photo you want happens, I recommend you to check the possible compositions you can get in each one of the New Moons of the year...
So in the blink of an eye, you know the possible shots you can get in a location depending on the month, and to figure out when the shot you want actually happens.
It'll take you a few minutes to do it the first time. And just a few seconds the second time ;)
So, this is the workflow you need to follow:
- Double tap the center of the Time Bar to set the date to today and the time to right now.
- Swipe the panels above the map until you get to Panel 8 (see screenshot below).
- Tap the Milky Way picture on Panel 8 to jump in time to the next New Moon.
- Finally, change the time with the Time Bar to see where the Milky Way (and the Galactic Center) will be during the night.
If the shot you want doesn't happen during that New Moon, tap again the picture of the Milky Way on the top panel to jump in time to the next New Moon. If necessary, keep repeating the process until you get the shot you want. Until you find the Milky Way in the position you need.
Following these steps I figured out that the photo I want happens both in August and September 2019. So let's check August's New Moon (August 30th).
Have a look at the first screenshot. The Milky Way is represented by a white dotted arc. The biggest white dot represents the Galactic Center, and marks the crossing point between the Galactic Center azimuth line and the Milky Way arc. This way, you can easily distinguish the Galactic Center on the Milky Way arc.
The top panel tells you that at 09:56 pm the Galactic Center will be at an azimuth of 194.0º and an elevation of 19.7º. When the Milky Way arc maximum elevation is 71.9º, the arc will be forming a diagonal in the sky.
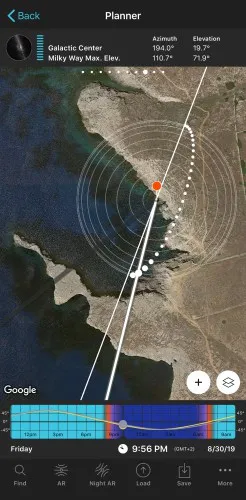
Now, you want to have the Core of the Milky Way vertical and aligned with the bridge.
To find out when it happens, move time until the maximum elevation of the Milky Way arc is 90º (read the top panel ot confirm it) and check whether the Milky Way is aligned with the bridge.
If it's not aligned, readjust the position of the Red Pin. Additionally, you can jump to the next New Moon day and check it again.
That's it!
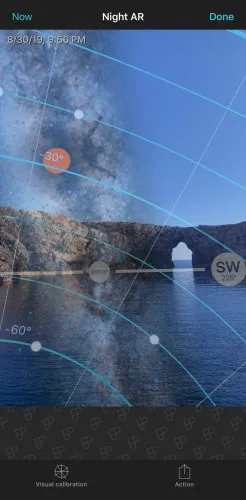
Now the Planner tells you that if you go where the Red Pin is placed on August 30th at 11:46 pm, you'll get the scene you imagined.
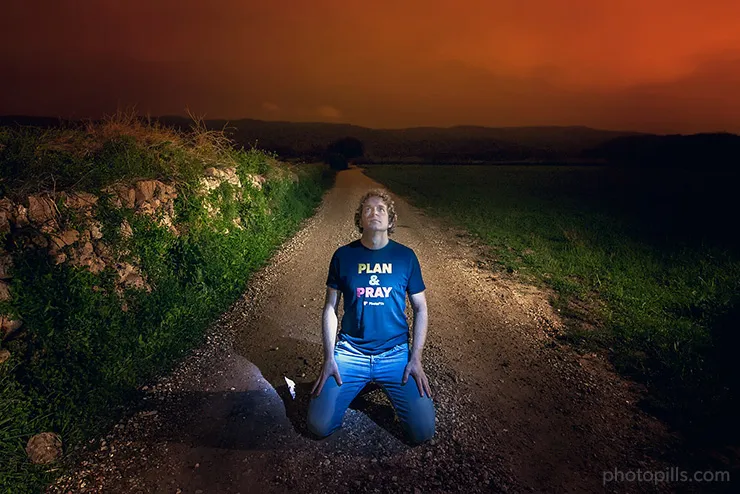
Now, after the planning work it's time to pray for nice weather conditions.
This is the name of the game PhotoPillers play: Plan & Pray.
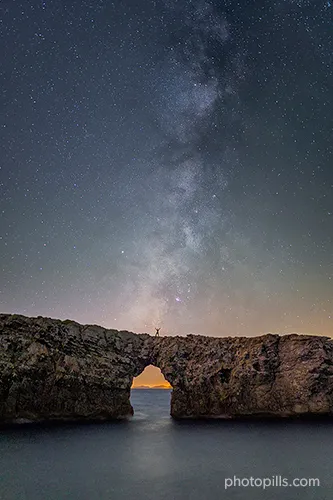
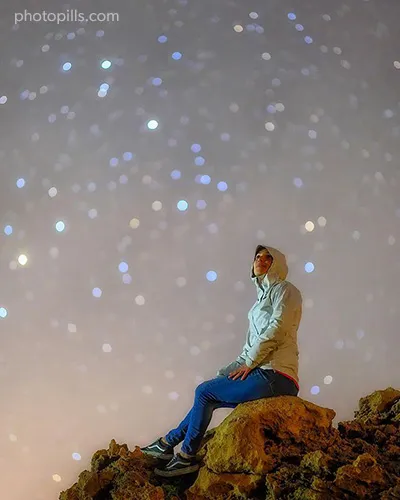
The photo
And here you have the resulting image :)
I decided to shoot it in portrait mode and to ask Germán Marquès, the developer of the PhotoPills app, to go and pose for me under the stars.
It adds interest and scale to the photo, don't you think?
This is just a quick explanation on how to plan the Milky Way using PhotoPills.
For a complete step by step guide, have a look at the following video and articles:
- Video: How To Plan The Milky Way With The Vingerklip, Namibia.
- Video: Milky Way Photography Masterclass with Alyn Wallace.
- Video: Milky Way Photography Post Processing Masterclass with Nick Page.
- Article: How To Plan The Milky Way Using The 2D Map-Centric Planner.
- Article: How To Plan The Milky Way Using The Augmented Reality.
8.All the gear you need to successfully photograph the Milky Way
I always recommend those of my students who are willing to take photography seriously to start playing hard since the beginning and buy the best equipment possible they can afford, including second hand gear, because, at the end of the day, it's a way to save money.
If you spend your savings in a basic equipment, you'll soon find out that it's far too limited to take the images you want and you'll finally end investing in a better one, spending twice as much money. Besides, good equipment lasts for many years when treated well and, in case you decide to sell it, you'll always find a buyer in the secondhand market.
What is the ideal equipment for night photography? In my opinion, these are the general features your camera (either DSLR or mirrorless) should have:
- Full manual exposure controls of aperture, shutter speed, ISO and focus.
- Full Frame sensor. One of the advantages of using a Full Frame camera is that, typically, noise performance is much better than in APS-C cameras, allowing you to use higher ISO values, collect more light and, thus, take better Milky Way pictures. This is due to the fact that the larger sensor of a Full Frame camera has larger photosites (pixels). Larger photosites can collect more light per unit of time allowing the camera not to have to amplify the signal that much, reducing noise, achieving a greater dynamic range and minimizing heat in the sensor. To sum up, for a given number of megapixels, Full Frame cameras generally produce less noise in the image than APS-C cameras.
- Good noise performance when cranking up the ISO to 3200 or higher.
- Full manual control of the white balance.
- Most of the settings (ISO, white balance, etc.) are directly accessible through external buttons, without having to dig into the camera menu.
- Shoots in RAW.
- A perfectly sealed camera body with optimal construction to withstand the effects of wind, water, rain, humidity, sand, dust, etc.
- Good heat dissipation system to prevent the sensor to heat up and, thus, avoid thermal noise in the picture. Besides the noise, if the sensor temperature is too high, the sensor might start vignetting with a magenta color.
- A built-in intervalometer. It comes very handy when you forget to bring the external intervalometer or when it runs out of battery.
- The option to use non-CPU lenses.
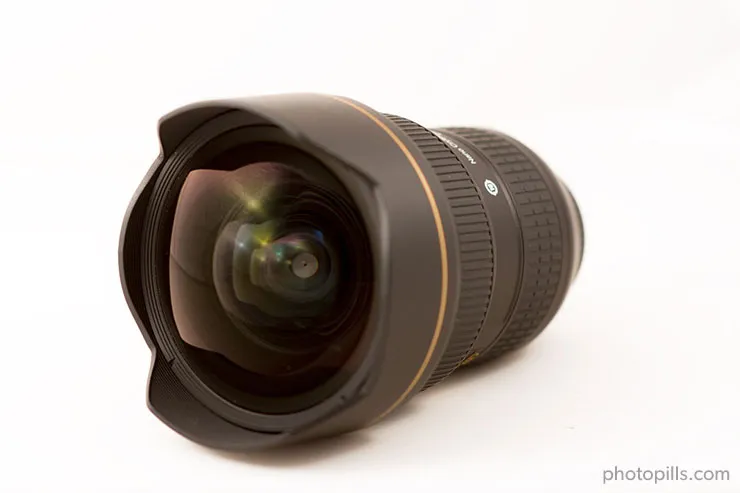
Regarding the lens, for a given exposure time when shooting the Milky Way, you need your lens to collect as much light as possible to capture the maximum number of stars as big bright spots.
Also, you want to make sure you capture as much of the Milky Way as you can. Therefore, you need to use the fastest (f/number) and widest-angle (short focal length) lens you can afford to collect as much light as possible and also frame the larger area of the sky. A 14mm for Full Frame cameras or 11mm for cropped sensors would be ideal.
Lenses that allow these short focal lengths are called ultra wide angle lenses. Unfortunately, due to the complexity of its construction, the wider the lens the more expensive it is.
Pros and cons of the beginner's equipment... and workarounds!
You obviously don't need to spend a fortune in a professional equipment to capture nice compositions of the Milky Way, it's all about your imagination.
And yes, you and I are aware that with a basic equipment your images won't look as good as they should to well trained eyes.
But... Shhhh... Keep this as a secret...
The good news is that most of your friends and social media followers will hardly make out the difference between your image and a professional one... So, why not trying to photograph the Milky Way?
The most common equipment in my beginner's class consists of:
Camera
- Cameras with an APS-C sensor: Nikon Z30; Canon 4000D, 250D and M5; Sony a6600.
- Cameras with a Micro 4/3 sensor: Olympus OM-D E-M10 Mark IV and Panasonic G95.
- Compact camera (1" sensor): Sony RX100 VII.
These cameras allow full manual exposure and manual white balance (or, at least, choosing a white balance preset).
Unfortunately, basic DSLR and mirrorless cameras don't allow you to use ISOs of 3200 and higher without producing noise. One possible way to work around these cameras' limitations is to shoot at 800 ISO and use a noise reduction tool in post-processing. Depending on the results you get, try to push your ISO higher and see what happens.
However, be aware, noise reduction does smooth the fine detail in your images, making them softer to the eye, which can be problematic.
These cameras are usually part of a kit that includes a basic 18-55mm lens.
18-55mm lens
The lens makes the image, the camera records it.
Therefore, your lens is a crucial part of your equipment. You should definitely invest in quality lenses.
Most DSLRs, like the Nikon D3500 or the Canon 4000D, come in a basic kit with an 18-55mm lens. These lenses have been designed to give acceptable results when shooting daytime pictures and using an aperture of f/8.
But, of course, they don't perform as well as professional zoom lenses (like the Nikon 14-24mm f/2.8 and Canon 16-35mm f/2.8L III) when shooting at night and in low light conditions. In these light conditions, use a focal length of 18mm or less (if your lens is capable) and the widest aperture available, usually f/3.5.
Keep in mind that, due to the cropped sensor of these cameras and that you have to shoot with a focal length of 18mm (equivalent in 35mm format to 27mm for Nikon, and 28.8mm for Canon), your exposure time has to be pretty short to prevent stars from trailing (more or less 17-18 seconds depending on the camera).
Furthermore, as you are using an aperture of f/3.5 and ISO 800, the amount of light collected will also be very limited, getting an underexposed image. As a result, you'll end up with noise when post-processing the image.
To sum up, this is not the ideal equipment for shooting the Milky Way but, if it's all you have, make the most of it and work on your post-processing to reduce the noise level.
If you're looking for an affordable wide angle lens, I'd recommend the Rokinon 14mm f/2.8 with AE chip and the Irix 15mm f/2.4 Firefly.
With this basic equipment, one alternative is to shoot longer exposures (5 minutes or more depending on the Moon phase) using the nominal ISO of your camera (usually ISO 100 or 200) to avoid noise. You won't get stars as big bright spots, but you'll capture the Star Trails of the Milky Way, which can make a pretty stunning picture.
Another way to create stunning Star Trails is by merging a series of short exposure photos into a single image using softwares like StarStaX (Mac, Windows and Linux) or Startrails (Windows). Here, the relative motion of the stars creates structures similar to Star Trails. The advantage is that you prevent your sensor from overheating...
If you want to learn everything about Star Trails, have a look at our super photography guide.
Basic travel tripod
Long exposures are the name of the game in night sky photography.
Therefore, when choosing a tripod, weight matters. The last thing you want in your photos is blur caused by any vibration due to wind or running water. You need to keep your camera steady and still.
Basic tripods usually don't weigh too much and are pretty unstable, so you'll probably have blur problems when shooting long exposures. Add to this the risk of damaging your photography equipment because of a fall.
To prevent vibrations and, thus, reduce blurring, you can load the tripod with extra weight by hanging a bag filled with stones or even your camera bag from it.
In addition to this, if your tripod has a center column, don't raise because it'll make it more unstable. If you raise it, you're also raising the mass center of the system formed by tripod, head, camera and lens, which results into a more unstable system. The lower the mass center the more stable the system will be...
It's all about physics.
Basic headlamp
Since you'll be in the dark, a headlamp is pretty much a necessity. But, it won't work properly if you intend to do some light painting.
If you've planned to have interesting foreground elements, a good flashlight is compulsory.
Remote shutter release or basic intervalometer
A remote shutter release allows you to trigger your camera remotely without touching it. This is particularly nice to prevent vibration resulting into motion blur or streaks in your images.
The problem with remote releases is that they are not programmable, so you cannot shoot at regular intervals automatically. It's a much better idea to buy a cheap intervalometer. Nowadays you can even find cameras that include it.
An intervalometer is a programmable remote shutter that you can use to set the exposure time, the time interval between each shot, the total number of photos you want to take and even the time delay of the first picture.
If you're using the Bulb mode, you'll be able to shoot exposures of 30+ seconds. This is particularly useful when shooting timelapses and Star Trails.
These are all great intervalometers:
- Pro intervalometer: SMDV.
- For cheap intervalometers check the brands Neewer, Phottix and Vello.
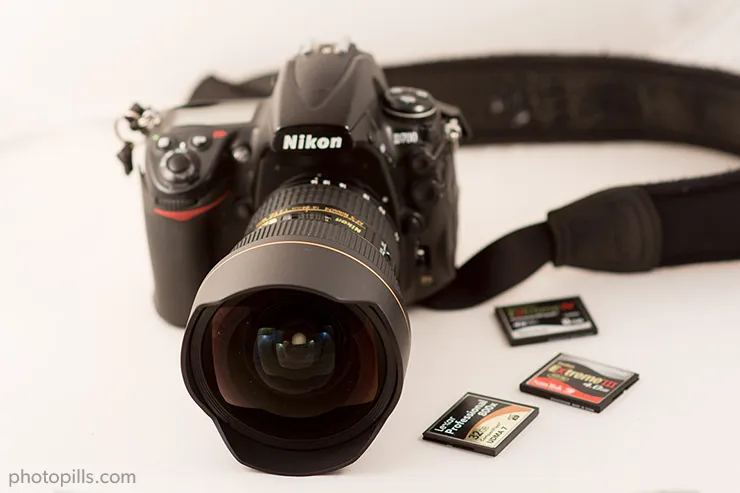
Memory cards
There are many different types of SD Cards (Secure Digital) depending on capacity and data transfer speed.
Buy a memory card with a high transfer rate from SanDisk or ProGrade (my favorite brands), because it allows each picture to be saved into the memory card quicker.
Nowadays, the price of SD cards has dropped so much and it's so cheap to purchase a fast card that you shouldn't purchase anything with less specifications.
Finally, I recommend you to use several small capacity cards rather than a few large capacity ones. That way, if you lose a card or spoil it, fewer pictures will be lost. By using several small capacity cards you decrease the risk of losing your photos.
While there are still cameras that can work with CompactFlash (CF) cards, this system is slowly disappearing.
Minimum equipment for admissible image quality (mid-range gear)
If you want to take photos of the Milky Way with an acceptable quality, this is the equipment you need:
Camera
Depending on your budget and goals, you may be interested in jumping into the Full Frame universe or staying with a camera with a cropped sensor.
In both cases, there are cameras with great noise performance.
- Cameras with an APS-C sensor: Nikon Z50, Zfc and D7500; Canon R10, R7, 850D, 90D and 6D Mark II; Fuji X-S20 and X-T30 II; Pentax KF; Sony a6700.
- Cameras with a Micro 4/3 sensor: Olympus OM-D E-M5 Mark III and Panasonic G9 II.
- Full Frame cameras: Nikon Z5 and D750; Canon RP; Sony a7C II.
If you already have a Full Frame camera or you want to make the leap, congratulations!
Two of the main advantages of using a camera with a Full Frame sensor is that
- it produces less noise in the image, and
- it has a greater dynamic range than an APS-C with the same megapixels, allowing you to work with higher ISOs, collect more light and, thus, take better Milky Way pictures.
All these cameras will allow you to use ISO 1600, 3200 or even 6400 with acceptable noise performance while getting images properly exposed.
Wide angle lens
As we're talking about Milky Way photography, I'm going to focus on wide angle and ultra wide angle lenses, because they allow you to capture the largest amount of stars.
For Micro 4/3 cameras all the following lenses are great for night photography:
- Olympus M.Zuiko Digital ED 7-14 mm f/2.8
- Olympus M.Zuiko Digital ED 12-40mm f/2.8 PRO
- Olympus M.Zuiko Digital ED 12mm f/2.0
One of the brands with best price/value balance is Rokinon (also known as Samyang, Pro-Optic, Bower, Falcon, Wallimex, etc.). They have models available for both Full Frame and APS-C sensors. Another brand that also provide great lenses for night sky photography is Tokina.
For APS-C cameras, I'd like to highlight the following lenses:
- Rokinon 12mm f/2.0 or Samyang 12mm f/2.0
- Rokinon 16mm f/2.0 or Samyang 16mm f/2.0
- Tokina 11-16mm f/2.8
- Sigma 10-20mm f/3.5
- Sigma 18-35mm f/1.8 Art
- Sigma 17-70mm f/2.8 Macro
For Full Frame cameras, these prime lenses are great:
Keep in mind that these lenses also work on APS-C cameras, but you need to take into account the crop factor. For example, on a camera with a crop factor of 1.5x, the Rokinon 14mm would be equivalent to 21mm on a Full Frame camera.
Besides highlighting the competitive price of these lenses, it's also noteworthy that, especially in the case of the Rokinon/Samyang lenses, they almost don't have coma at their maximum aperture, a fact that you need to consider in night photography.
"Toni, what's this coma thing about?"
Coma is an optical aberration that distorts the stars in the corners of the lens. Stars appear in the image as trails instead of appearing as dots.
A more complex explanation would be that the visible phenomenon is a point image on the picture trailing toward the exterior or the center of the image, like a comet, which is where the name comes from. Coma spreading radially from the optical axis forms a teardrop-shaped flare, usually called a meridional coma flare. A sagittal coma flare occurs concentrically, often for flying birds, forming a diamond-shaped flare.
Coma can be reduced by stopping down the lens.

Photo by Christoph Malin
Photo by Christoph Malin
With the combination of any camera body and lens listed above, you'll be able to take great pictures of the Milky Way. You might have noise problems when shooting long exposures at ISOs over 3200, but you can minimize them by using the Long Exposure Noise Reduction mode of your camera.
One word on durability...
You need to be very careful when working under extreme rain, high humidity, low temperatures or with sand or dust in the air. The sealing of the camera is not as good as the one of professional cameras. You should protect your gear as much as possible.
Lighting equipment
A good LED headlamp is recommended when you get seriously into night photography. Its light is very powerful, allowing you to see in the dark and to focus at the hyperfocal distance.
When using your headlamp, make sure you're not annoying the photographers around you. This is key!
Headlamps with Red Night Vision Light are best – they allow to avoid white flash lights that ruin your night vision. I like the Petzl Tikka XP, the Pelican 2750 and the Pelican 2760.
Other powerful LED headlamps are the Led Lenser SEO5, H14R or H7R.2.
If you're shooting in a day with a thin Moon or New Moon, you'll need to artificially illuminate the foreground (the ground, a tree, a rock, etc.). To do so, you would ideally complement the headlamp with a LED flashlight, LED panels or flashes.
You can use a LED flashlight such as the Coast TX-10, the Led Lenser L7 or the Maglite Mini to add volume and texture to certain elements that you want to appear in the photo. Its advantage is that it allows you to work with more accuracy. Similar to a brush, you can paint with light the exact areas that interest you.
Unfortunately, it covers a small area.
To cover a larger area you can use either LED panels or a flash. LED panels have the advantage of continuous light, so it will be easier to control light. The good thing is that you can find them at a very reasonable price.
The advantage of flashes is their power. They allow you, for example, to take a portrait of a model while capturing the Milky Way with a single exposure.
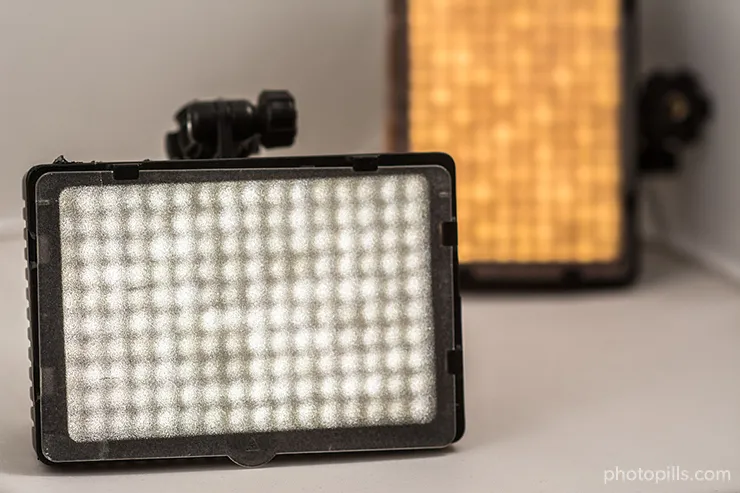
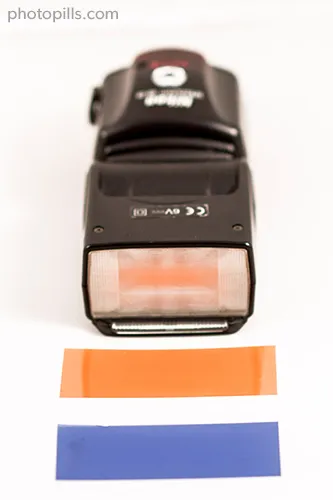
Both LEDs and Flashes will give you a daylight color temperature of about 5500K, this is white. In order to change its temperature, it's very interesting to use colored gels.
"Toni, what's a colored gel?"
A gel is a colored plastic sheet that you can place in front of the light source to color its light.
Ideally, you should always have in your bag at least a couple of color correction gels. In most sessions, a CTO gel (Color Temperature Orange) and a CTB gel (Color Temperature Blue) will do the job. They're not expensive and last for a long time.
A CTB gel converts tungsten light (3200K) to 'daylight' color (5500K), so it can be used to cool your scene. While a CTO gel performs the reverse, it converts 'daylight' color (5500K) to tungsten (3200K), allowing you to warm the scene.
Gels are available in different intensities. You can find them with an intensity or strength of 1/4, 1/2, 3/4, etc. The lower the intensity the less the color temperature is corrected.
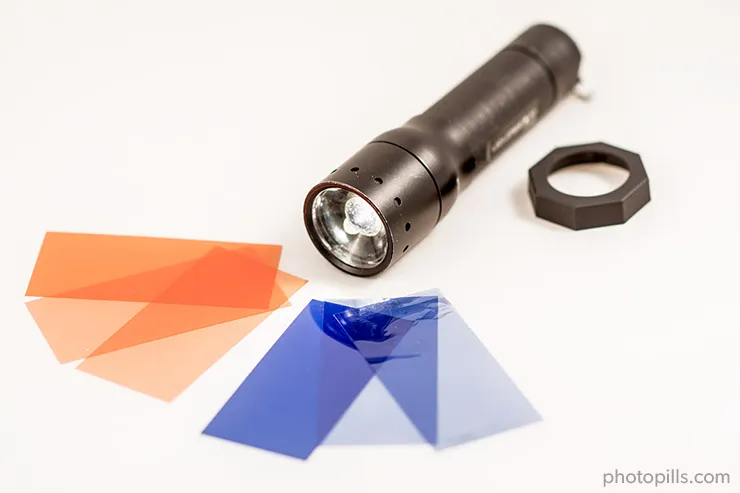
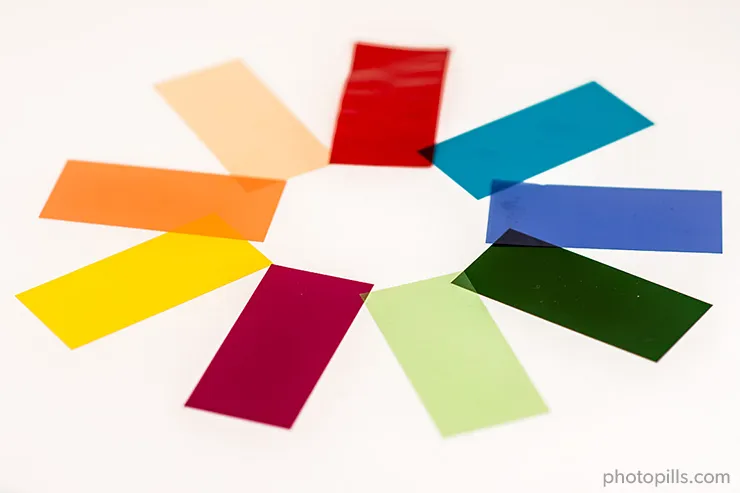
In addition to color correction gels, there are the so called color gels. These are used to allow color lighting accents and unnatural effects. There is a huge number of colors available from several manufacturers: red, yellow, green, dark blue, etc.
Tripod and head
As I already mentioned in the beginner's section, weight is key. The more the tripod weighs, the better the stability is. Obviously, you're looking for a tripod with a weight that you can comfortably carry without hurting your back.
The most popular tripod brands for advanced amateur photographers are Gitzo, Manfrotto, Benro, Induro or Really Right Stuff.
The Manfrotto 055XPRO3 is probably the best seller tripod in the mid-range bracket. I also really like the Travel line by Benro.
Here, you should look for a tripod that can bear the camera body and the lens, but that also has a good stability against wind for a reasonably price. An aluminium tripod that can bear at least 5-7 kg (11-16 lb) of weight would be ideal. Again, remember not to raise the center column of the tripod because it will make it more unstable.
Besides the tripod, you need to acquire a head suitable for night sky photography. There are many different heads in the market. The most commonly used in this type of photography are the ballhead and the pan/tilt head. The type of head depends on your taste, but make sure that it can bear at least 5-7 kg (11-16 lb) of weight and that it includes a removable plate.
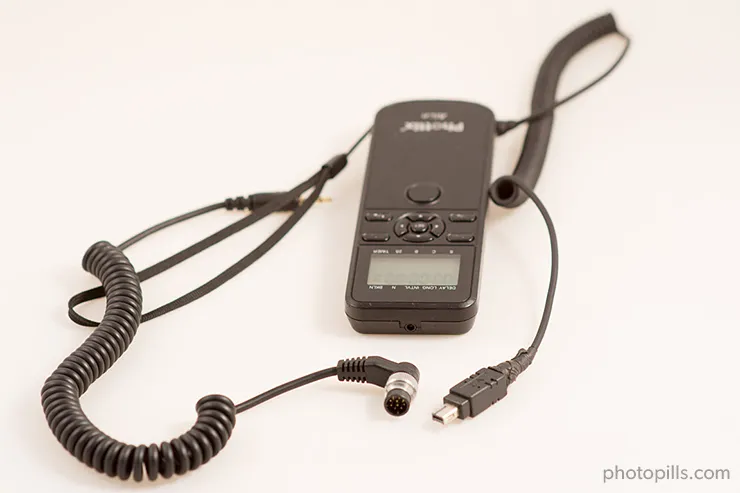
Intervalometer
Every advanced photographer should have an intervalometer. The remote shutter release can do the job in many cases, but if you want to shoot a timelapse, Star Trails or simply shoot continuously during one of the Meteor Showers, having an intervalometer is compulsory.
Furthermore, even when you only want to photograph the Milky Way, continuous shooting will increase the likelihood of capturing a shooting star, which will definitely add interest to the image.
These are all great intervalometers:
- Pro intervalometer: SMDV.
- For cheap intervalometers check the brands Neewer, Phottix and Vello.
A great alternative is a device called CamRanger. Right now it's available for Nikon, Canon, Fuji and Sony cameras.
It's a stand-alone device that you connect to your DSLR or mirrorless camera with a USB cable. It creates an ad hoc WiFi network to which you can connect your smartphone or tablet (iOS, Android and Windows). Thanks to the CamRanger application you can control your camera without a computer or an Internet connection.
Best of all, this device is independent. Therefore, if your mobile device loses its connection, the CamRanger has an internal memory to keep shooting. Imagine that you are making a timelapse, your sequence would be cut if the camera stops taking pictures in the time frame you've set...
So the CamRanger is great for many types of photos: timelapses (of the Milky Way, of Star Trails, of solar eclipses or lunar eclipses...), bracketing, focus stacking for macro and landscapes... and many more!
Memory cards
There are many different types of SD Cards (Secure Digital) depending on their capacity and data transfer speed.
Both SDHC and SDXC Class 10 cards from SanDisk or ProGrade (my favorite brands) are ideal for advanced amateur photographers. Their writing performance is good enough to have an acceptably short time interval between two consecutive exposures.
It might seem this is not that important, but it's vital when shooting timelapses at night or low light conditions, as you want to take the maximum number of photos possible.
The cards can have a capacity of 16GB, 32GB, 64GB or even more. If you plan to shoot timelapses, I recommend you to get a 64GB card or with a higher capacity, to make sure you have enough space to store all the photos.
While there are still cameras that can work with CompactFlash (CF) cards, this system is slowly disappearing.
Professional equipment (high-end gear)
There is almost no limit to how much you can spend on equipment... But I assure you that with the following equipment your photography won't be limited either.
Camera
When you seek the highest quality standard in your photography a mid/high range Full Frame camera is the best option (but not the only one). It should have a sensor with great noise performance in low light conditions and that it doesn't overheat.
Furthermore, it's also very important that the body is perfectly sealed to withstand bad weather conditions, sand, dust, humidity and water.
The following are great cameras for professional night photographers:
- Cameras with an APS-C sensor: Nikon D500; Fuji XH-2S, XT-5 and X-Pro3.
- Cameras with a Micro 4/3 sensor: Olympus OM-1 and Panasonic GH6.
- Full Frame cameras: Nikon Zf, Z6 II, Z7 II, Z8, Z9, D780, D850 and D6; Canon R8, R6 Mark II, R5, R3, 5D Mark IV, and 1D X Mark III; Panasonic S5 II, S5 II X, S1R and S1H; Pentax K-1 Mark II; Sony a7 IV, a7 CR, a7R V, a9 III and a1.
All have a wonderful noise performance when using high ISOs. Furthermore, they include external buttons for every important setting (ISO, white balance, etc.) allowing you to easily change them.
Of course, you should use these bodies with a great lens if you want to make the most of it.
Wide angle lens
You should look for a sharp, fast, wide angle lens with no coma distortion at the edge nor other chromatic aberrations.
One of the best lenses due to its quality and proven results is the Nikon 14-24mm f/2.8.
It's not only used by Nikon photographers, but also by photographers using other camera brands like Canon. In this case, you need to use a top quality adapter ring like the Novoflex EOS NIK NT. It's an incredibly sharp lens with very little coma and vignetting.
If you'd like to find more about it, you can have a look at a great review on David Kingham's website.
If the price is not an issue for you, another lens you might consider is the Zeiss 15mm f/2.8. This lens is also very sharp and it has not coma.
But aside its outstanding optical and mechanical quality it has a serious problem: over contrasting glass. This not an issue during the day, but it's definitely a problem at night.
Zeiss glass is not good at night. A Nikon 14-24mm f/2.8 set at 15mm vs the Zeiss 15mm still shows details in the darkest shadows and blacks. With the Zeiss, the blacks are completely clipped.
Do you have a dark forest in the background along with the Milky Way? In post-production, you can recover detail in the trees on an image shot with the Nikon but not with the Zeiss.
If you're looking for a very sharp lens, try the Tokina 16-28mm f/2.8.
Similarly, the Rokinon 14mm f/2.8 and the Samyang 14mm f/2.8 give exceptional results. Both lenses have little coma.
On the Canon side, you have the Canon 16-35mm f/2.8L III.
Other awesome lenses are:
- Tamron 15-30mm f/2.8
- Canon 11-24mm f/4L
- Canon 14mm f/2.8L II
- Sigma 14mm f/1.8 Art
- Sigma 14-24mm f/2.8 Art
Lighting equipment
A powerful LED headlamp is essential, such as the Led Lenser SEO5, the H14R or the H7R.2. They are light, small, have a great autonomy and allow you to see and focus in the dark.
Headlamps with included RED Night Vision Light are the best choice to avoid white flash lights at night. Proven good headlamps with built in red light option are the Petzl Tikka XP, the Pelican 2750 and the Pelican 2760.
In addition to the headlamp, it's advisable to have at least two flashlights from strong brands such as Coast, Led lenser, Maglite or Surefire.
On the one hand, you need a powerful flashlight to illuminate subjects over long distances, such as Coast HP7 or Led Lenser M7.
On the other hand, you need a second less powerful flashlight, such as the Coast TX-10, the Led Lenser L7 or the Maglite Mini to illuminate foreground subjects.
In addition to this, you should have at least 2 LED panels. These panels are crucial since they provide continuous light and cover a large area, allowing you to easily illuminate the entire foreground, even in panoramas. Sometimes, you'll need or want to combine LED with flashlights.
Finally, it's necessary to own a few flashes. Flashes will provide a light source to shoot portraits, lighting inside buildings, etc. If your intention is to make a portrait, it's ideal to also use stands/tripods for flashes and softboxes/octoboxes.
One of the portraits I took during the 2019 PhotoPills Camp (Model: Jessica Lancia).
Don't forget to add a few color correction gels to your bag. CTO and CTB gels of different intensities are essential. Colored gels are also necessary if you want to create effects, such as adding red or yellow light inside a building.
Tripod and head
A carbon fiber tripod is ideal for both supporting the weight of the gear and to be easily carried everywhere you go. These tripods are robust and allow heavy loads (5-25 kg or 11-56 lb) depending on the model.
Obviously, you should choose a tripod that can support the weight of the tripod head, the camera and the heaviest lens you have. But always leave a marge de manoeuvre just in case you decide to buy heavier gear in the future.
Be very careful when working with your carbon fiber tripod during thunderstorms. These tripods can conduct electricity, so they can work as a small lightning rod. Under these weather conditions it's preferably not to use them and to keep them folded in the bag.
Brands like Gitzo, Manfrotto, Benro, Induro and Really Right Stuff offer tripods of great quality in both materials, carbon and aluminum.
In my opinion, the tripod's best friend is a good ballhead. The Really Right Stuff BH-55 is the one that I use. Supporting up to 23 kg (50 lb), it bears the weight of my gear with no problem. It allows me to work comfortably and with great precision.
Other ballheads that I like are the Gitzo GH1382QD, the Kirk Enterprises BH-1 and the Arca Swiss Monoball Z1 SP, all robust and with very high endurance (minimum 13.5 kg or 30 lb).
Intervalometer
Surely, the wired intervalometers that I've mentioned in the mid-range gear section are a great tool for night photographers, but I love wireless ones.
And you're probably wandering why this is such a big deal... Well, because it allows me to comfortably start and stop the camera while I'm lighting the scene or when the camera is in a difficult-to-access place (on a tree).
I use the Phottix AION, which has the additional advantage of being connected by wire to any type of camera just by changing the connector jack.
A great alternative is a device called CamRanger. Right now it’s available for Nikon, Canon, Fuji and Sony cameras.
It's a stand-alone device that you connect to your DSLR or mirrorless camera with a USB cable. It creates an ad hoc WiFi network to which you can connect your smartphone or tablet (iOS, Android and Windows). Thanks to the CamRanger application you can control your camera without a computer or an Internet connection.
Best of all, this device is independent. Therefore, if your mobile device loses its connection, the CamRanger has an internal memory to keep shooting. Imagine that you are making a timelapse, your sequence would be cut if the camera stops taking pictures in the time frame you’ve set...
So the CamRanger is great for many types of photos: timelapses (of the Milky Way, of Star Trails, of a solar eclipses or lunar eclipses...), bracketing, focus stacking for macro and landscapes... and many more!
Memory cards
Get the best quality SD Cards possible (like SanDisk or ProGrade) to minimize the risk of losing your photos and to get the maximum transfer speed.
Minimizing the delay between photos is very important when shooting consecutive pictures at high speed.
The SDXC UHS-II Class U3 cards are ideal for professional photographers. Their writing performance is excellent and they have an incredibly short time interval between two consecutive exposures.
Furthermore, you should use high capacity cards (64GB, 128GB or even 256GB) to avoid running out of memory space right in the middle of a timelapse session or when shooting Meteor Showers.
While there are still cameras that can work with CompactFlash (CF) cards, this system is slowly disappearing.
And to replace it, SanDisk, Nikon and Sony launched a new card format called XQD currently available for several Full Frame (Nikon D4, D4s, D5 and D850; Panasonic S1 and S1R), APS-C (Nikon D500) and mirrorless (Nikon Z6, Z6 II, Z7 and Z7 II) models. These cards
- Have a very high storage capacity (from 32GB to 256GB).
- Have a super fast reading and recording speed (400MB/s compared to 160MB/s for a CF card or 250MB/s for an SD card).
- Are very secure, resistant and with an incredible durability.
Later on, in 2017, CFexpress launched the latest standard memory card from the CompactFlash Association with 2 new form factors, Type A and Type C were announced, with the existing XQD form factor becoming Type B.
- Type A has, so far, only been adopted by Sony in all of its newest models.
- Type B is a far more common format offering a lower price. It has been widely adopted by Nikon in its Z series, Canon in some EOS R bodies, and Panasonic in the S1/S1R and GH6.
- Type C is not being produced yet.
Oh, and here's a little trick... ;)
You can use the PhotoPills timelapse calculator to work out the total memory space you need, so you make sure you bring enough memory cards.
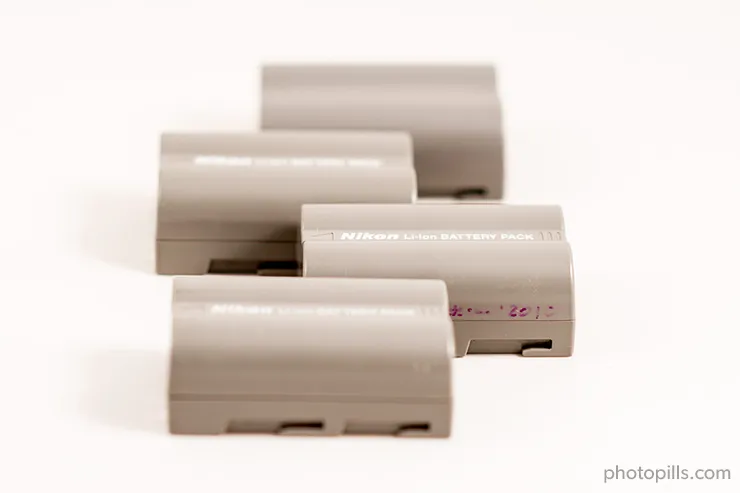
Batteries
Battery charging is one of the rituals every photographer must go through before a shooting session. You need to check and fully charge all the batteries of your different cameras and a few more just in case. Depending on the type of camera and of photography, the number of batteries will vary from 2-3 (DSLR) to 6 or more (mirrorless).
However, be aware that cold temperatures shorten battery power performance. Therefore, if you plan to run a long shooting session in the cold, you should use a grip with extra batteries. You will minimize the chances of running out of battery power in the middle of a cold winter night.
I use a Nikon D4s or a Nikon Z6. Both allow me to shoot long timelapse sessions and Meteor Showers without any battery problem.
If you don't have a grip, but you still want to spend several hours shooting a timelapse, you'll have to replace the battery as quickly as possible.
Make sure that you don't move the camera in the process, it would be a pity to arrive at home and find out that the whole timelapse has been ruined. At this point, a sturdy tripod and a good headball come into play more than ever... They will allow you to change the battery without moving the camera.
Before leaving home, don't forget to check that the batteries of flashlights, LED panels, flashes and headlamp are also fully charged.
Finally, it's a good idea to take a portable power bank for your smartphone or tablet.
Dollies and sliders (for timelapsers)
You only need these accessories to make a timelapse.
Dollies and sliders are wonderful tools that provide motion in a timelapse, either by physically moving the camera along a rail, rotating it around one or more axis or a combination of all movements. As a result, the footage is more dynamic compared with a static timelapse.
Depending on your budget, you can purchase sliders that allow different camera movements:
- 1 Axis: The camera slides along a rail from one end to the other.
- 2 Axis: In addition to slide movement, pan or tilt camera movements are allowed, just one of them, not both.
- 3 Axis: The system allows for pro level pan, tilt and slide camera movements.
The video 'Ibiza Lights III' produced by Jose Antonio Hervás is a great example of how sliders can be used to create stunning timelapses. Besides, it includes many scenes planned with the PhotoPills app.
Dynamic Perception, Syrp, PocketSlider and mSlider are great brands to consider when buying a slider.
Equipment against moisture
One of the most annoying aspects of night photography is dealing with dew. Moisture in the air can condense on the cold front surface of your lens, and ruin the photos.
These are some of the existing solutions to fight against dew.
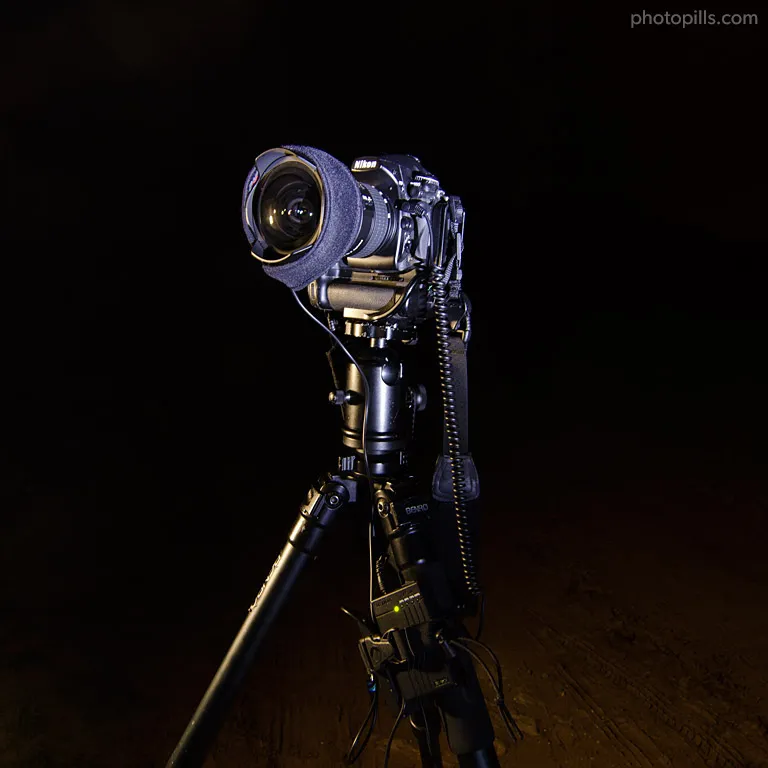
Hood
This is the first element you should use as a protection against dew. The hood is not only great for day use to avoid unwanted reflections of light, it's also very important in night photography. By using a hood, moisture will take longer to condense on the surface of your lens and the lens will be better protected in case it accidentally falls on the ground.
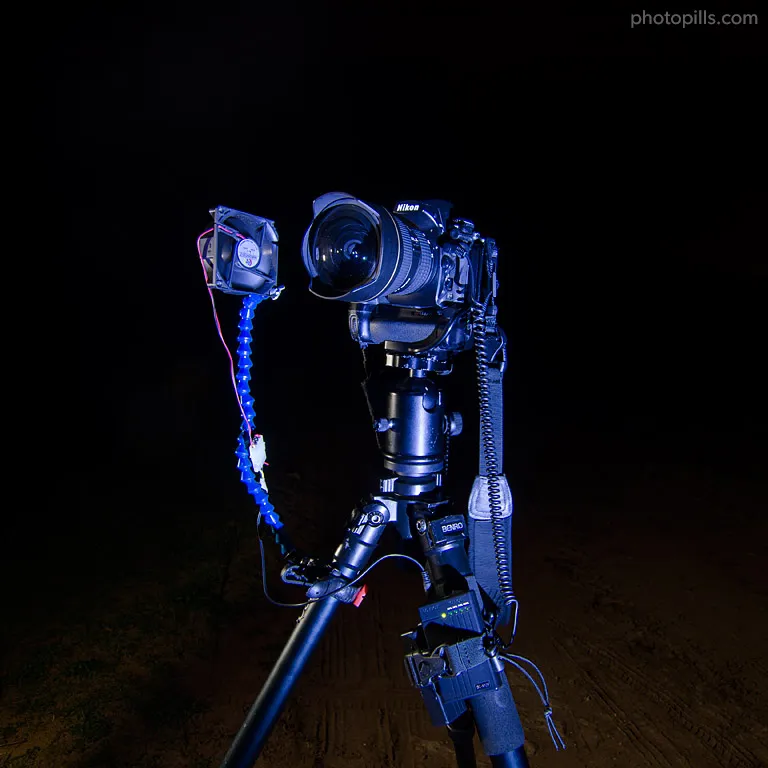
Fan
A simple PC fan can help you keep the lens dry and without moisture condensation thanks to the steady stream of air generated. It's an ideal solution for nights that are not too wet. Of course, you'll need a power supply that has enough capacity to keep the fan working the whole night shooting session and a support system to guide the fan towards the lens. The good news is that these fans have a very low power consumption.

I particularly use a small portable rechargeable Li-ion 12V 3800mAh battery with a 5.5mm barrel jack and USB connectors. Here, I had to adapt a 5.5mm barrel jack connector to the wire of the fan. Finally, I put the fan onto a flexible loc-line hose adhered to a clamp so it can be attached to the tripod.
Dew heater
The idea behind this tool is to heat the lens to a temperature above the dew point, avoiding moisture condensation. You should look for a heater that is light to avoid carrying more weight than necessary as, quite often, reaching points with little light pollution involves long walks.
The existing commercial solutions are composed by a heater, a battery and a controller. With the controller you adjust power in order to keep the temperature of the heater above the dew point.
On the one hand, the controller gives you the advantage of managing more efficiently the battery power. But, on the other hand, it's another gadget you have to charge and carry. Sometimes it just doesn't pay off to carry so many things.
I prefer a cheaper and lighter solution. I use a heater without a controller connected directly to a portable battery. I know, I can't adjust power, but I've tested that this system can provide power for nearly 5 hours. If you need the battery to last longer or you forecast a cold night, just bring an extra battery with you.
Summing up, all you need is a heater strip, a battery and a cable to connect the heater to the battery.
- Heater strip. Perhaps, the two most popular heater strip brands are Dew-Not and Kendrick. I use a Dew-Not 3" DN004, which perfectly fits my Nikon 14-24mm f/2.8. This model has a length of 33cm (13"), long enough to cover the diameter of the lens. Make sure you buy a strip that can go around the entire circumference of the lens.
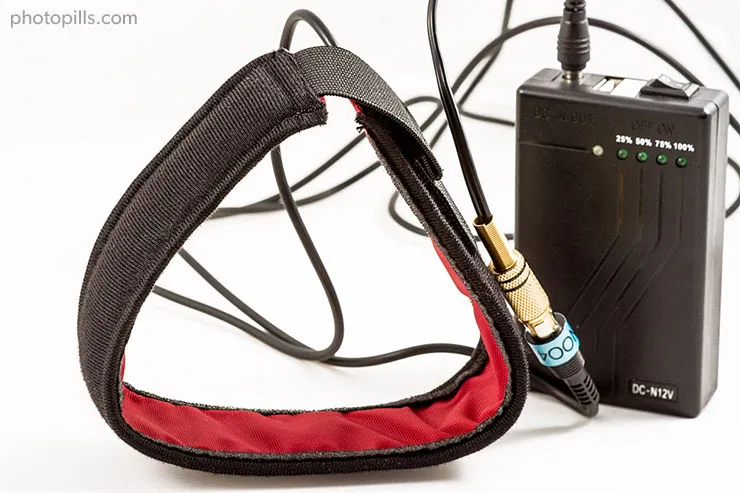
- Battery. As for the power supply for the heater strip, I use a 12V 3800mAh battery. The same battery I use to power the PC fan described in the previous section serves well. Bringing a spare battery is always a good idea.
- Cable connector. Most heater strips have a male RCA connector, while portable batteries have a 5.5mm barrel jack connector. Therefore, you need to purchase a RCA/Jack 5.5mm adapter. I built mine from a RCA cable and a 5.5mm barrel jack.
Another great heater is the multi-bodywarmer by TheHeatCompany.
These heaters are used by photographers, film crews and athletes all over the world, and you'll never run into battery problems with them. Just tape one on the bottom of your lens. That's it.
Finally, make sure you also bring with you a comfortable chair, drinks, snacks, your favorite music (Pink Floyd in my case) and a portable battery charger to keep all electronic equipment charged, including the speakers!
Starting a night shooting session with "Shine On Crazy Diamond" is priceless... ;)
Comparing basic, advanced and professional equipment performance
Above, I've explained the different types of equipment (basic, advanced and pro) you can find in the market. Now, I'd like to show you how these equipments perform when you try to shoot the Milky Way.
For this test, I used the following gear:
- Sony RX-100 III (compact camera with 1" sensor)
- Nikon D3000 (basic APS-C sensor) + 18-55mm f3.5-5.6
- Nikon D7000 (advanced APS-C sensor) + Tokina 11-16mm f2.8
- Nikon D600 (advanced Full Frame sensor) + Samyang 14mm f2.8
- Nikon D700 (pro Full Frame sensor) + Nikkor 14-24 f2.8
To compare the quality of these different combinations of cameras and lenses, I shot the following images from the same spot and kept (almost) the same framing.
All pictures were shot at a white balance of 3800K or at tungsten white balance (WB) when the camera didn't allow to set the white balance manually. The post-processing is exactly the same in all images. To do so, I created a preset in Lightroom which I applied to all the images.
To sum up, the best option for photographing the Milky Way regardless of the gear you have is the combination of a Full Frame camera and a wide angle lens (with a focal length of 14mm for instance), and as fast as possible, (such as f/2.8).
9.How to photograph the Milky Way step by step
You got an idea.
You planned it, maybe a few months ago.
And finally, you find yourself in a beautiful outdoor location with dark skies.
You've worked out all the Milky Way camera settings... And you're ready to make a photograph.
You might prefer enjoying the scene alone, but why not sharing the adventure with some friends for a change?
I believe in associationism as a way of helping others and sharing knowledge, enriching each one's photography. When I'm with my students, they make the shooting both more interesting and challenging.
In any case, getting to the location well in advance is key!
Let's see how to set up everything for the shooting session, step by step.
Get to your shooting spot in advance
You can use the PhotoPills Night Augmented Reality view to double-check you're at the right spot and that you'll have the Milky Way where you want.
Place the tripod, ballhead, camera, and lens
Place your tripod on a solid surface, right on the shooting spot you thoughtfully planned.
Then, make sure the tripod is stable and attach the fastest and widest lens you have to your camera. Basically what you want here is a wide angle lens to maximize your exposure time, and with a wide aperture to capture as much light as possible.
To photograph the Milky Way and the natural bridge, I used my Nikon D700 Full Frame camera and a Nikon 14-24mm f/2.8 lens on my Benro A4580T tripod legs with a Kirk Enterprises BH-1 head.
Remove the UV filter
If you usually use a ultraviolet (UV) filter to protect your lens, remove it as soon as you start preparing the equipment.
I don't like adding an extra glass to the lens if it's not going to give me a better control of the light.
In night photography, a ultraviolet (UV) filter can even ruin your photos. This type of filter slightly reduces the sharpness and contrast of your images. But it can also cause reflections, halos and flares.
Use a light pollution filter (optional)
If there is light pollution in your scene from sodium vapor light sources, you should use a light pollution filter to remove in camera the yellowish glow they usually produce.
Turn off the lens stabilization system
Some lenses include a function to stabilize vibrations. Canon, for example, calls it Image Stabilization (IS), while Nikon calls it Vibration Reduction (VR), and Sigma, Optical Stabilizer (OS). Other brands, such as Sony, Olympus and Pentax have been pushing for in-camera stabilization.
The lens stabilization system allows you to shoot handheld in low light conditions at shutter speeds slower than usual without getting a blurred image. This is possible because the lens compensates the vibrations you produce.
When using a tripod, you should turn off this function. Even without camera vibrations or movement, the image stabilization system (made of small gyroscopes) might try to correct nonexistent movements, causing vibrations that may negatively affect the sharpness of the image, especially when shooting at shutter speeds between 1/15s and 1s.
Therefore, as a precaution, I recommend you to switch the lens stabilization system off when using a tripod.
Long exposure noise reduction: on or off?
Noise is the biggest enemy of night sky photography.
Whatever camera you use, you'll suffer from noise problems in the shadows, especially when using high ISOs or in warm temperatures. Try to get the camera with better noise performance that you can afford.
These are the different types of noise that you can see in a long exposure:
- Luminance noise. It occurs when there is not enough light reaching the sensor. It's a fixed pattern noise and it's easier to observe in the darker areas.
- Chromatic noise. This type of noise alters the color of pixels but not its luminance. Hence its name. The temperature of the sensor is the one to blame. This kind of noise spreads on the whole image and not only in the shadows, contrary to what happens with luminance noise.
- Thermal noise. It appears in very long exposures due to the heat in the sensor. It can provoke magenta, green, or even blue banding and vignetting in the corners of the frame. The only way to overcome this noise is by framing a larger area, adding to the image the portion affected by the banding. Later on, you can crop it in post-processing. You can also reduce it cooling off the sensor (turning off the camera for a few minutes) or by limiting the exposure time.
- Hot pixels. These are red, blue and green spots that appear on the image due to sensor overheating. The advantage here is that these spots always show up in the same position in the image. So it's easy to spot and remove them with an editing software such as Lightroom or Photoshop.
Almost all cameras include an option that enables noise reduction in long exposures. This system is based on the concept that two consecutive exposures with the same parameters (shutter speed, ISO and sensor temperature) will produce almost the same noise.
If you turn this function on, after taking a long exposure, the camera automatically takes a second photo with the same settings but without letting any light to reach the sensor. This way, the camera only records noise. Finally, the camera detects the noise in this second picture and removes it from the first one.
One of the main drawbacks of the long exposure noise reduction function is that it takes twice the exposure time to take a single photo. That is, if you are shooting a 30-second exposure, the camera takes then another 30-second picture to eliminate the noise.
So if you're looking to take as many pictures as possible, for example when shooting a timelapse, Meteor Showers or Star Trails, you should definitely turn it off.
I personally never use it.
I prefer making a quick preview on my LCD to check if the Milky Way is bright enough, the lighting of the foreground is correct or the image is in focus so I can tweak accordingly. I don't like waiting for another 30 seconds, I prefer to shoot again.
Later on, if necessary, I remove hot pixels and noise in post-processing.
Finally, there's an alternative which is to turn it on when it's time to take the final picture, the good one. That is, you should work without this option when taking the test photos and activate it when you get a photo correctly exposed.
I also recommend you to use it if you have a camera with poor noise performance. It's a way of making the most of your equipment before post-processing the image.
Shoot in RAW
RAW image files contain all the image data recorded by the sensor. So this image file format allows you to produce higher quality images, and correct in post-production problems that would be unrecoverable if you shot in JPEG format. That is because if you shoot in JPEG, a lot of the image information is compressed and lost.
One important thing you should know is that the image you see on the LCD is a JPEG version of the RAW file. Therefore, the histogram displayed by the camera is not exactly the histogram of the RAW file.
Use the shortest focal length you can
Set the shortest focal length you can (14mm, 18mm, 24mm, etc.)
Try to keep it under 35 mm for two reasons:
- To maximize the field of view and capture as much sky as you can.
- To maximize the exposure time (set the lowest possible shutter speed) to collect as much light as possible and, eventually, capture stars as big bright spots.
I'll explain it better in a section below, when going deeper into the shutter speed (exposure time).
Select the Manual shooting mode (M)
If you use your camera's auto mode you won't be able to capture the Milky Way.
The Manual shooting mode (M) gives you total control over the exposure by setting aperture, shutter speed, ISO and white balance adjustments at your will. You'll need to use it to collect as much light as possible to capture stars as big bright spots while getting a photo correctly exposed.
Use the largest aperture you can
When it comes to the camera settings you need to photograph the Milky Way, I like to start with the aperture.
Go as wide as you can to capture the most light. Set the lens to its widest aperture (the smallest f/number), for example f/1.4, f/2.8 or f/3.5, depending on your lens.
Focus
When it comes to focusing you have two options:
- Focusing at the hyperfocal distance.
- Focusing at one star.
Depending on your taste, choose one or the other.
Focusing at the hyperfocal distance
When photographing the Milky Way, you want everything sharp from the front to the back of the scene. Since focusing your camera at the hyperfocal distance ensures maximum sharpness from half this distance all the way to infinity, forget about other manual methods like "setting focus to infinity with Live View" or "turning the focus ring to infinity". You only need to calculate the hyperfocal distance for the focal length and aperture you want to use.
There is only one problem...
Doing the math!
If you love photography but hate math, you're on my side. Select your camera, focal length and aperture on the PhotoPills depth of field (DoF) calculator to automatically get the hyperfocal distance.
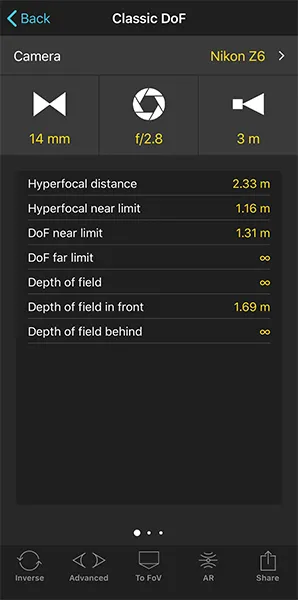
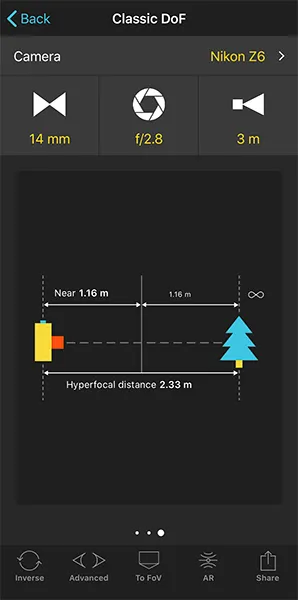
Once you've calculated the hyperfocal distance, you just need to focus at it.
It's impossible to focus exactly at the hyperfocal distance, so focus at a slightly larger distance. This way, you'll have the stars tack sharp in the photo.
In the following video I show you how to focus at the hyperfocal distance step by step:
Going back to my Milky Way image, I shot it with my Nikon D700 using a focal length of 14mm and an aperture of f/2.8. So, according to the PhotoPills depth of field (DoF) calculator my hyperfocal distance was 2.32 m.
The next thing you need to do is to use a flashlight to illuminate a spot at the hyperfocal distance (in this example, 2.32 m or at a bit longer distance). Then, use your camera's autofocus system to focus. Finally, set manual focusing so nothing changes.
Put the camera on a tripod, and be careful not to touch the focus setting.
If your lens includes the distance scale, you can mark the focus distance on it. Calculate the hyperfocal distance, set the maximum aperture, focus at the hyperfocal distance and make a mark on the lens. This way, you won't have to focus before shooting, it will be enough to match the mark.
Again, focusing exactly at the hyperfocal distance is very difficult. Therefore, make sure you're focusing at a distance that is a bit longer than the hyperfocal one. Otherwise, if you focus at a shorter distance, the depth of field far limit will not be at infinite, and the stars will end up blurred.
By focusing at a larger distance, the depth of field near limit will be a bit further from the camera, but the stars will be perfectly in focus.
If you're going to shoot a timelapse, don't forget to double check that the camera is in focus before you trigger it. It occurred to me once that I accidentally touched the lens and I spent 3 hours in the cold to finally get a completely blurred timelapse... It wasn't funny at all!
So that's it. This is how you'll make the most of your depth of field, getting a more detailed final print.
"Wait a minute Toni... Imagine I have an interesting subject in the foreground, let's say a rock, that is close to my camera, just before the near hyperfocal limit (half the hyperfocal distance). What if I want it to also be in focus?"
Roughly speaking, when you focus at the hyperfocal distance, the depth of field near limit lays at half of the hyperfocal distance. This means that everything that is between your camera and half the hyperfocal distance will be blurred.
For example, if the hyperfocal distance is 2.32 m, it means that everything between my camera and 1.16 m, such as the rock you mention, will be blurred in the image. In addition to this, everything from 1.16 m to infinity will be in focus, in this case, the landscape and the stars.
The solution to this problem is to shoot a double exposure and apply the focus stacking technique in post-processing.
In the first picture, focus at the hyperfocal distance to get everything that is between half the hyperfocal distance and infinity in focus. In the second image, focus at the foreground subject, the rock in this example, to shoot a second exposure. Then, in post-processing, merge these two images using masking layers, selecting the areas in focus of each photo.
If you want to learn more about focus stacking, have a look at this tutorial of Dave Morrow.
Focusing at one star
If you want the stars to be tack sharp, but you don’t mind losing a bit of sharpness in your subject, then focus at one star.
Set the camera and lens to manual focus.
Now, find a star and zoom in on it to magnify it (or use the Focus Magnifier option). Then, turn the focus ring to make focus on it. Turn it until you see the star as a tiny little dot (actually, the smallest possible dot).
Frame at night craking up the ISO
ISO is a key Milky Way photography setting.
At the beginning of the shooting session you've accomplished the most difficult task: finding the right shooting spot. You know the image you want, from where to shoot and the position of the Milky Way you'll have.
However, now you need to fine tune your composition and get the framing you want. And you need to do so even if it's pitch black...
Thus, you need to use the highest ISO available in your camera (25600, 12800, 6400, 3200).
Why?
Because you want the camera to take the shot as fast as possible. You're working on your composition, so noise is not an issue here. You don't want to wait 20 or 30 seconds between each test shot to adjust your framing, right?
Once the camera is attached to the tripod, take as many test shots as you need to see if you're getting the framing you want and adjust accordingly.
Great!
Now that everything is set and all the elements are in the right position in your frame, make sure all your gear is stable and your camera is strongly attached to the tripod head.
Set the shutter speed and avoid Star Trails with the 500 rule or with the NPF rule
The second Milky Way camera setting I'd like to set is the shutter speed.
For Milky Way photography, the longer you keep the shutter open the better.
There's only one limitation: Star Trails.
You need to collect as much light as possible to capture stars as big bright spots. But you don't want to get motion blur because of the Earth's rotation. In other words, you don't want to see any trails left by the stars.
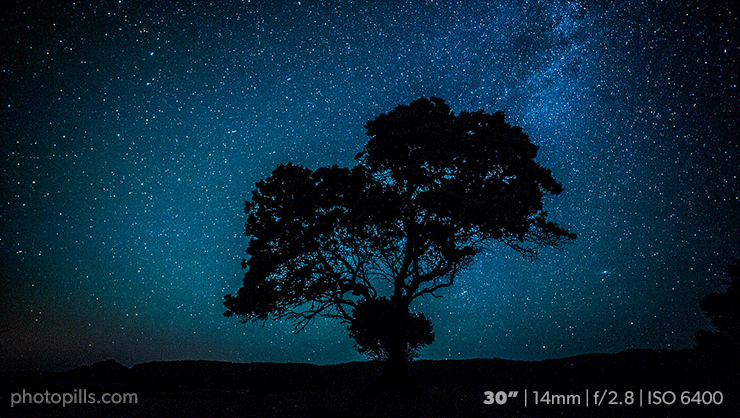
So how long can you keep the shutter open and avoid Star Trails?
One easy way to estimate the maximum shutter speed (or exposure time) is to use what's called the 500 rule.
Basically, to determine the optimal exposure time, take 500 and divide it by the effective focal length of the lens:
exposure time = 500/(crop-factor × focal length)
Thus, the shorter the focal length the longer the shutter speed, and the better images you'll get.
Unfortunately, the 500 rule has proven to fail in most of the cases.
Why? Because it gives you a longer exposure time (a shutter speed too low) than what you would need. So you end up getting trails in your photos.
That's why we've implemented a more accurate formula in the PhotoPills Spot stars calculator: the NPF rule.
To satisfy your curiosity:
- N is the aperture symbol.
- P is the photosite of your camera sensor.
- F is the focal length.
But before I tell you more about it... I have to thank Aaron Priest for letting us know about this new formula!
Developed by Frédéric Michaud and La Société Astronomique du Havre, the NPF rule takes into account three new variables in addition to the focal length:
- The aperture.
- The pixel pitch of your camera.
- And the minimum declination of the stars that are captured in the frame.
Let's see why these variables are important and why you should take them into account.
On the one hand, if you like astronomy and Star Trails photography, you'll know that, for the same exposure time, the trails left by stars near the celestial equator are longer than those left by stars near the Polaris.
And the declination is the variable that tells you how far a star is from the celestial equator. A star at the celestial equator has 0º of declination (it moves faster), and a star near the north celestial pole, like the Polaris for example, has 90º of declination (it doesn't move).
So, depending on the area of the sky you're shooting at (near or far from the celestial equator) you'll be able to use a shorter or longer exposure time (faster or slower shutter speed) to prevent trails.
On the other hand, the smaller the pixel pitch of your camera, the shorter the exposure time has to be to avoid trails. This is because the higher the resolution of the sensor the more detail is captured in the photo, and thus the movement of the stars is more perceptible. The pixel pitch depends on the sensor size and the megapixels of your camera.
Finally, the aperture is also important.
In the Accurate mode (accuracy value) and when calculating the exposure time, the NPF rule allows the star to move its radius on the final image. This will assure that the stars still look like a circle (the ratio between length and height is lower than 1.5).
Note that this is a very restrictive approach that will give you very short exposure times (fast shutter speeds). Use it only for large prints!
"Cool Toni... But how does the aperture affects the exposure time (or shutter speed)?"
Well, the size of the stars in the photo depends, among other factors, on the aperture.
The larger the aperture, the smaller the star. On the contrary, the smaller the aperture, the bigger the star. Therefore, if the diameter of a star increases, the star can move along a longer distance before the trail is perceptible, and the exposure time can be longer (slower shutter speed).
In the Default mode (accuracy value), the NPF rule allows the star to move its diameter. You'll get longer exposure times if you decide to use this mode. This is the mode I usually use, and I'm very happy with the values I get!
Math alert!
Diffraction increases as the aperture gets smaller, so the Airy disk gets bigger. Thus, the star gets bigger when closing the aperture.
In conclusion, if you really wish to prevent Star Trails in your photos, take into account the aperture, the pixel pitch and minimum declination to calculate the exposure time.
Are you still there?
Don't panic! the PhotoPills app does all the calculations for you.
Let's see how it works.
Go to PhotoPills, tap on Spot Stars (Pills menu) and then:
Choose your camera. The calculator will take into account the sensor size and megapixels to calculate the pixel pitch.
Set the focal length and aperture.
If you know the minimum declination of the star that is captured in your frame, set it.
If you don't know what the declination is or you're in doubt, just set the declination of the stars to 0º. That's the worst scenario (i.e. the celestial equator enters your frame), so the exposure time will work for any shooting direction.
You can also use the AR button at the bottom of the screen to calculate it. Point your smartphone where you wish to frame the shot, and the declination and the maximum exposure time will be automatically calculated.Choose the accuracy. Default is the recommended value for most cases, and it will allow you to shoot longer exposure times (slower shutter speeds). This will allow you to keep the ISO relatively low.
However, if you wish to print in a very large format, set this value to Accurate. You'll get a super short exposure time (faster shutter speed). Notice that this will force you to push the ISO to get the right exposure, getting noisy images on most cameras. That's why I suggest you to use the Default value when possible.Despite the app will display both the 500 and the NPF rule results, use the exposure time (shutter speed) you get with the NPF Rule from the table of results. Use this value as a starting point, take a test shot and adjust accordingly.
Have a look at the following PhotoPills screenshots.
The first one shows the main screen of the Spot stars calculator. And the second one the Augmented Reality view.

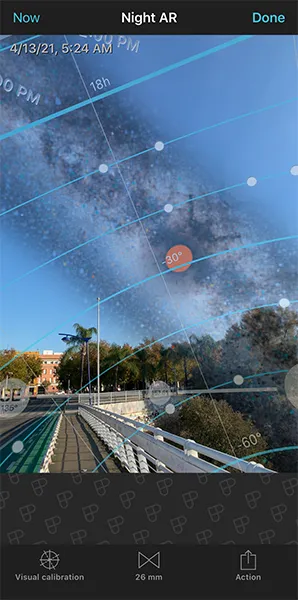
In addition to the NPF rule calculator, there is another great calculator you can use to assess the exposure time you need: The Advanced Exposure Calculator by Ian Norman.
It's really cool. You should check it out!
When calculating the exposure time, Ian has come up with a very clever system that allows you to establish the pixel tolerance you're willing to accept.
What's the pixel tolerance? The number of pixels a star can cover before you notice a trail.
For example, a pixel tolerance of 7 pixels means that the stars in the frame are allowed to move along a maximum distance of 7 pixels for the recommended shutter speed (exposure time).
Notice that using a 7 pixel tolerance in Ian's formula is pretty similar than using the Default accuracy mode in the NPF rule.
And with a 3 pixel tolerance, you get a result quite similar to the Accurate mode.
Now, before moving to the next section, I'd love to say one last word about photographing the Milky Way using relatively long focal lengths (like a 50mm or a 85mm).
It's more challenging to do so because the lens narrow field of view will force you to use shorter exposure times to avoid Star Trails, due to the rotation of the Earth. And if you want to avoid them, you'll have to use extremely high ISOs, meaning that you'll get noise on the final image.
The workaround is to use an equatorial mount, which allows you to compensate the rotation of the Earth. In this case, if you wish to include the landscape, you'll need to shoot a double exposure, one for the sky and another for the foreground.
But an equatorial mount or star tracker has many more advantages. This is how star photography expert Christoph Malin describes their positive effect on Milky Way photography:
"Tracking a Milky Way shot, using a tracker like the Vixen Polarie, has a lot of advantages, we all have seen nightscape photos of the Milky Way or constellations in the sky, which are full of stars, but many of these images lack one point, which is the dynamic range, natural colors, and natural contrast.
When we are not using the method of longer exposure (provided by a star tracker) and boost to higher ISOs and widest open aperture then the image quality becomes poor and in processing you might end up with a lot of white saturated stars, caused by the high ISO.
That's why many of these high contrast night sky images over a landscape have captured a lot of white stars at almost equal brightness, and this is unfortunately not the natural look of the sky. Stars appear at various brightnesses (magnitude) and in various colors.
To a degree the D700 was able to show this, and the D3s as well due to its large sensor diodes. Unfortunately I can't use a tracker often for timelapse, but if I can I do. Milky Way images are so much better with a tracker and an exposure of 1 Minute or even a bit more."
Fine tune the ISO
And the last Milky Way camera setting to adjust is... the ISO!
Remember that you've been using an extremely high ISO to take your test shots.
Now it's time to adjust it depending on:
- The exposure triangle.
- How much noise your camera produces.
You want to get the correct exposure and you've already set the aperture and the shutter speed. So, you only need to adjust the ISO according to the other two settings.
"But how much?"
I love this question. Thanks for asking it! :D
Again, the shutter speed (or exposure time) has to be limited to avoid Star Trails.
Therefore, to avoid an underexposed image you have no choice but to crank up the ISO. The higher the ISO the brighter the Milky Way.
Increasing the ISO amplifies the signal in the photosites (pixels) of the sensor. In other words, you're increasing the sensitivity of the sensor. The amount of light collected will be the same but it will be amplified increasing the exposure. So push your camera to the limit.
Now, it's time to fine tune the ISO.
The ISO you'll use in the final shot strongly depends on the noise performance of your camera.
Start with a relatively high ISO (e.g. 6400, 3200, 1600) and continue taking test shots. After each test shot (or while you're taking it, if you have the live histogram option), have a close look at the histogram and zoom in the image in your LCD to check how much noise your camera has produced. Then, adjust the ISO accordingly.
It's a game of try and fail, but it gets easier with a bit of practice! ;)
One thing, if your camera has these options, always avoid using ISOs that are amplifications by software instead of hardware, such as H1 and H2 levels.
There are lots of techniques to reduce noise in post-processing, so don't be afraid to use a high ISO. But, at the same time, keep in mind that reducing noise in post-processing will soften your image and reduce sharpness. You will need to find the balance that gives you both a clean image and a sharp image. That's why you need to get it right on camera in the first place.
Set the white balance manually
Regarding the white balance, the goal is to set the right color temperature to capture a realistic Milky Way, showing the beauty of nature as pure as possible.
"What's the color temperature of the Milky Way?"
For many photographers that's around 4840K (pale yellow). But it actually depends on several factors, so tweak the white balance until you get a more natural Milky Way.
Light pollution or Moonlight will definitely affect your white balance selection. But don't worry too much about it because you're shooting in RAW, so you can adjust the white balance later on in post-processing.
One tip I learnt from Christoph Malin, and that can help you get the right color of the Milky Way, is to use notable stars as a reference. Make sure the colors you capture match their individual temperature range. For example, if you capture red giant superstars such as Antares or Mars and they turn out blue in your picture, you need to adjust your white balance until they turn out red.
Let's go back to my Milky Way picture and the natural bridge...
There was heavy light pollution in the scene, coming from behind the natural bridge. So I decided to set the white balance to 3400K to get white stars and light pollution with a reddish hue.
As a rule of thumb, I usually set the white balance to 3400-3900K and adjust from here.
If you're shooting a timelapse, don't use the auto white balance. When shooting in auto white balance, the camera might change the color temperature from one photo to another, modifying the tone of the image. This will produce a very annoying flicker in your clip.
To avoid it, select the Manual shooting mode (M). Set the white balance manually to 3900K or use the tungsten preset mode (about 3200K). This way, you'll make sure that the color temperature remains constant throughout the sequence.
Light paint the landscape (optional)
If you want to give your Milky Way images a sense of place, add depth and shadows, you should light paint the foreground. To have a more natural looking images, make sure the artificial light is subtle and has a low intensity. This is absolutely necessary on New Moon or thin Moon days.
On the contrary, as the Moon phase reaches Full Moon, the Moonlight might be enough to light the landscape.
Pictures made with side lighting usually have harsh shadows and more contrast. To brighten the shadows and reduce the contrast, you may want to use a fill-in-flash, flashlights or LEDs, whichever is more convenient.
"Toni how did you manage to light paint the natural bridge?"
It was thanks to a great teamwork!
This is how we did it:
- Equipment. We used one LED panel with a CTO gel filter.
- Lighting spot. Germán (aka the Developer) took the LED and walked away from my camera to apply sidelight to the bridge. The idea was to add visible shadows and depth to the image.
- LED in movement. If you keep the LED still you'll overexpose one portion of the landscape. In this case, I continously moved the LED across the scene. Move it slower when applying light to the further subjects and then speed up when painting the closer ones. Always keep in mind the inverse-square law of light.
- Light painting time. After some try and fail, we found out that we needed to lightpaint for 10s to get the right exposure. Trial and error takes time and consumes battery. So, every time you run a test, make sure you count the seconds or user a timer to be able to adjust time accordingly.
Check the histogram and adjust the exposure
One last thing before you start taking photos like there's no tomorrow: check the camera's histogram.
The histogram allows you to check the exposure of the image on the camera's LCD screen, and to modify the camera settings (apeture, shutter speed and ISO) to adjust it at your will.
You know that the left side of the histogram represents the maximum dark values that your camera can record and the right side the maximum white values. On the left end of the histogram light is black, being white on the right end. In both cases, light values contain no detail.
To help you understand it better, have a look at the following exposure vs histogram examples:
- Underexposed. The histogram shows the peak touching the left side of the graph. You're capturing only dark tones. Correct it by opening the aperture, using a slower shutter speed or setting a higher ISO.
- Exposed to the left. The histogram shows the peak near the left side of the histogram window, slightly touching the left edge. Results can be acceptable, but you'll suffer from noise problems when post-processing. Again, try to lower the f/number, use a slower shutter speed or increase the ISO.
- Neutral exposure. The histogram shows peaks towards the center of the graph from left to right. It shows that the majority of the pixels in the image are mid-tones, and that fewer pixels makeup the shadows and highlights. It's a great histogram, so you don't need to adjust anything.
- Exposed to the right. The histogram shows the peak near the right side of the histogram window, slightly touching the right edge. Working with this histogram means that you increase the exposure of an image in order to collect the maximum amount of light and thus get the optimum performance out of the digital image sensor. It will help you to reduce noise, but be careful not to overexpose. Don't use a ISO excessively high ISO because your camera will end up producing noise, and thus, reducing the image quality.
- Overexposed. The histogram shows the peak touching the right side of the graph. You're capturing only bright tones. You might be forced to lower the ISO to get a properly exposed image.
Most of the time, you'll want a histogram that gives you a neutral exposure, with both edges of the histogram just touching the edges of the histogram window.
However, this really depends on the colors of your scene.
This is the histogram I got from my Milky Way image:
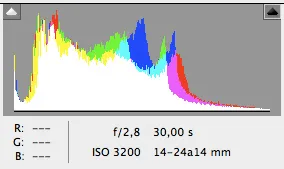
In night photography, you usually get an histogram with more mid to dark tones, and less bright tones...
Don't expect a Gauss bell shaped curve!
Well, now that you know what Milky Way photography settings you need to use. Let's have a look at the Milky Way post-processing workflow.
10.How to post-process the Milky Way (with these 5 great free tutorials)
Why do you think Henri-Cartier Bresson never processed and developed his own film by himself? He just had someone else to do the job...
The reason is simple. This allowed him to spend more time doing what he really loved: shooting.
I have the impression that nowadays us photographers are all a bit too much concerned about post-processing when we should focus on getting the image right in camera. If you shoot a bad photo, there's no way Lightroom or Photoshop will do the magic trick and make this picture any better.
In my opinion, the best post-processing is the one you don't need to do. So, get your image correctly exposed and you won't have to invest much time in front of the computer.
Besides, pushing the exposure too much in post-processing increases noise and reduces the picture quality. Try to properly expose your photographs in camera in the first place.
Having said that, I must admit that post-processing will always be part of our workflow. Even purists use post-processing to remove photographic imperfections like dust, scratches, etc. Of course, some of you will surely argue that the creative process doesn't stop when pressing the shutter, that's just the beginning.
Well, this is the beauty of rules, everyone can break them.
Study these awesome 5 tutorials and learn from the best
Like everything in life, learning from the best is key. So let me suggest you to watch these 5 free video tutorials created by several excellent Milky Way photographers. Thanks to them you'll be able to learn how to make the most of your Milky Way images:
- Milky Way Photography Masterclass with Alyn Wallace
- Milky Way Photography Post-Processing Masterclass with Nick Page
- Milky Way Panoramas Masterclass with Adam Woodworth
- How to Photograph the Milky Way in Really Heavy Light Pollution Using ETTR (Expose to the Right) by Ian Norman
- How to process the Milky Way - Adobe Lightroom CC tutorial by Michael Shainblum
If you're looking for something more advanced and are willing to invest a bit of money, I recommend you these awesome resources:
- Michael Shainblum's video tutorial: Premium Night Sky, Milky Way Tutorial
- Adam Woodworth's video tutorial: Milky Way Master Class
- Nick Page's video tutorial: Astrophotography Post Processing Course
- Dave Morrow's ebook: Photograph the Night Sky
- David Kingham's ebook: Nightscape
Remember, when editing, make sure the colors of notable stars you capture (Antares, Mars, etc.) match their individual temperature range.
The importance of noise reduction
As I've already said, I don't use the camera noise reduction mode. I prefer to preview the image immediately rather than waiting for another 30s.
To remove hot pixels you can use the clone tool in either Lightroom or Photoshop. But I personally prefer to use the following workflow in Photoshop:
- Use the lasso tool to select the hot-pixels.
- Go to Edit > Fill...
- Select "Content-Aware" in the field "Use".
- Press OK.
If you create a custom action in Photoshop and a keyboard shortcut, you can remove hot pixels very quickly.
There are different techniques to reduce the noise level.
Typical photo editing softwares such as Lightroom and Photoshop include tools to remove chromatic and luminance noise.
But be careful because when using any noise reduction tool. If you go way too far, it will soften the image and reduce sharpness. In night photography, it can even remove stars from the image.
In addition to this, there are other noise reduction specialized softwares that give even better results. Photo Ninja (the noise reduction tool is called Noise Ninja), DxO's Nik Collection Dfine, and Noiseware are great tools.
In Photoshop I use DxO's Nik Collection Dfine, but not too much. I prefer to have a bit of noise and more stars rather than losing sharpness and stars. Then, I apply a masking layer to restore areas where the software has unnecessarily removed noise.
Another method you could use is stacking and averaging images in Photoshop. It's a great way of controlling noise with high ISO images. Here you have a great video tutorial by Ian Norman.
11.10 inspiring Milky Way pictures
Let's go back now to the purpose of this article. So open your mind, get inspired and brainstorm for a truly remarkable Milky Way picture.
Sure, you'll find inspiration in Mark Gee's winning image - 'Guiding Light to The Stars'. In the same way, I'm sure that the following photos will boost your creativity.
Photo by Mark Gee.
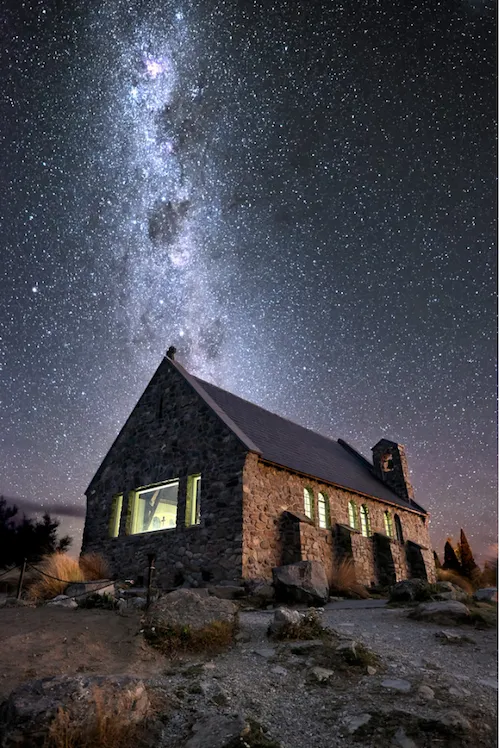
Photo by Elia Locardi.
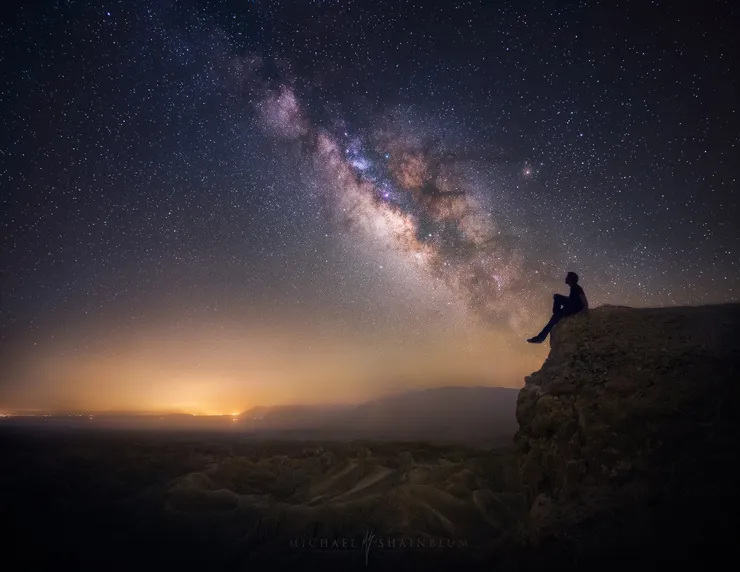
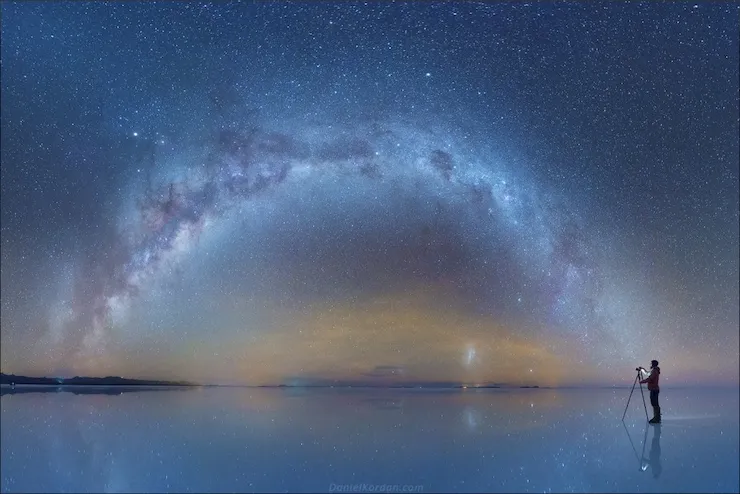
Photo by Daniel Kordan.

Photo by Eric Paré.
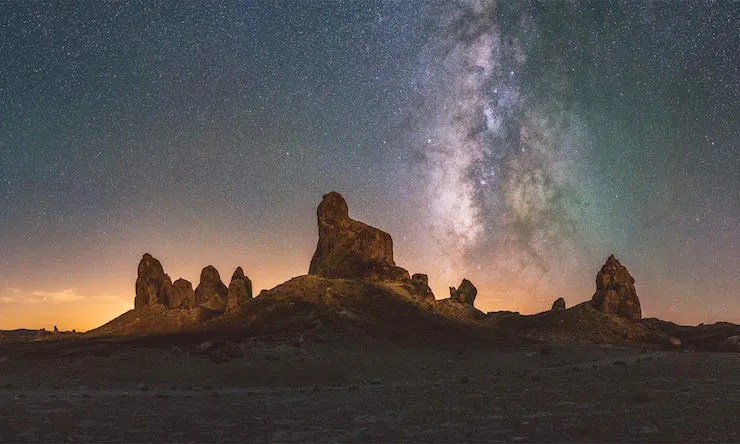
Photo by Ian Norman.
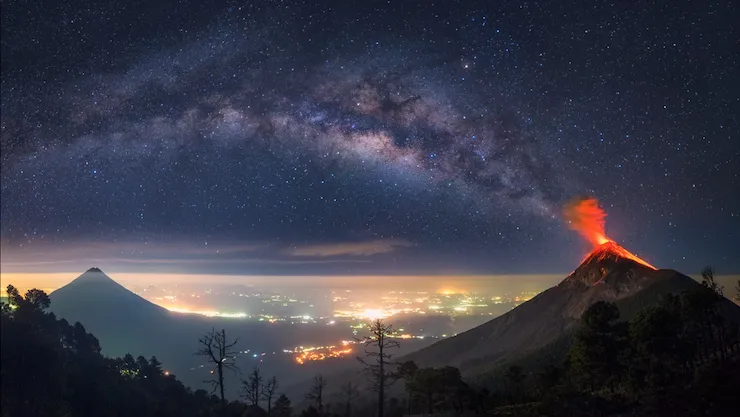
Photo by Albert Dros.
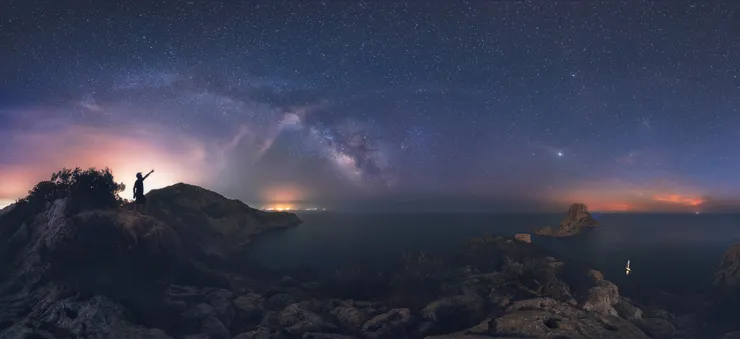
Photo by José Antonio Hervás.
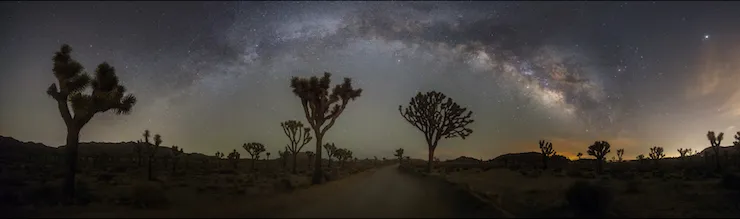
Photo by Sean Parker.
Photo by Aaron D. Priest.
12.Don't give up!
Sometimes I feel like a Goonie.
I share the same spirit, the need for exploring the unknown, looking for a true adventure. I feel the necessity of living the challenge of chasing a dreamed scene.
Nobody says it's easy!
If you want to be one of us, you'll have to survive to bad weather, accidental falls and equipment failures among many other obstacles that will surely ruin your images. But, don't give up and chase your goals with all your energy. Sooner or later, you'll start shooting truly contagious Milky Way pictures.
Remember... PhotoPillers never give up... And I am definitely one of them.
Are you too?
Imagine. Plan. Shoot!
Note: Some links on this page are affiliate links. What does this mean? If you buy/rent using these links you're helping support us and it costs you nothing extra. Thank you for your support.
Get this ebook for free now!