Long Exposure Photography: The Definitive Guide
Long exposure photography is a technique in which setting a (very) slow shutter speed helps you produce magical and dreamy pictures.
You can actually use it for many purposes, but it's commonly applied in both urban and natural landscapes.
Contrary to what most people believe, long exposure photography is not a difficult technique. In fact, with a bit of practice and time you can become a true expert.
So, do you want to know how to master it?
Well, keep reading because in this guide I will teach you everything you need to take amazing long exposure shots.
From daytime dreamy photos of silky waterfalls and beautiful seascape Sunset to night photography images capturing the Milky Way and Meteor Showers or creating stunning Star Trails.
Oh... And you'll also learn how to find the best locations, how to plan the perfect shot, what long exposure settings you should use and the gear you need to nail your long exposure shots (including all sorts of lens filters like the polarizing filter, the ND filter and even the GND filter).
And, as you might have guessed, you'll discover the best long exposure app: PhotoPills.
Why don't you join the party?
"I am not interested in shooting new things – I am interested to see things new." - Ernst Haas
Get this ebook for free now!
Content
- 16 long exposure photography ideas that will inspire you
- What is long exposure photography?
- The perfect location for long exposure photography (and how to find it)
- How to plan your long exposure shots like a pro
- Most used lens filters in long exposure photography
- All the equipment you need to take long exposures
- How to take daytime long exposures photos
- How to take a long exposure at night
- How to take long exposure photos of cars (and other moving objects) using the panning technique
- 16 long exposure photography examples explained step by step
- How to create a long exposure photo using the exposure stacking method
- How to take a long exposure shot applying the bracketing technique
- 15 long exposure photography tips to improve your technique
- 12 photographers that excel at shooting long exposures
- What's next?
1.16 long exposure photography ideas that will inspire you
All photographs start with an idea.
"But where do you get so many ideas Toni?"
Well, I could lie to you and tell you a fairy tale of my endless imagination. But that wouldn't be honest.
The truth is that I look for a lot of sources of inspiration. And one of the things that helps me the most during the creative process is seeing photos of other photographers.
That's why I thought that my photos could inspire you and make your imagination take off.
I hope to succeed!
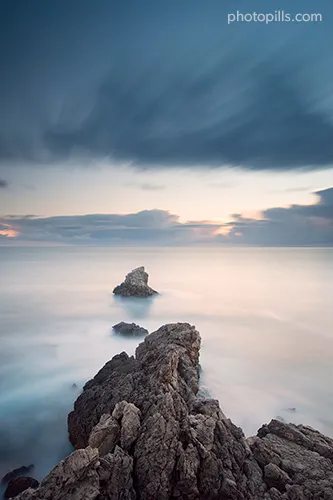
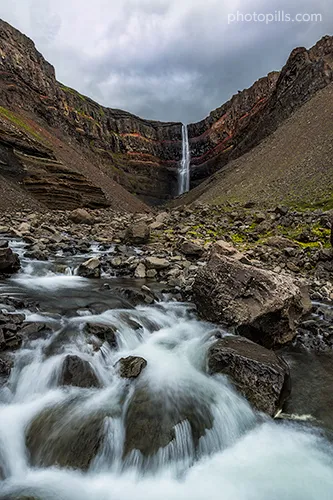
Waterfall (1)
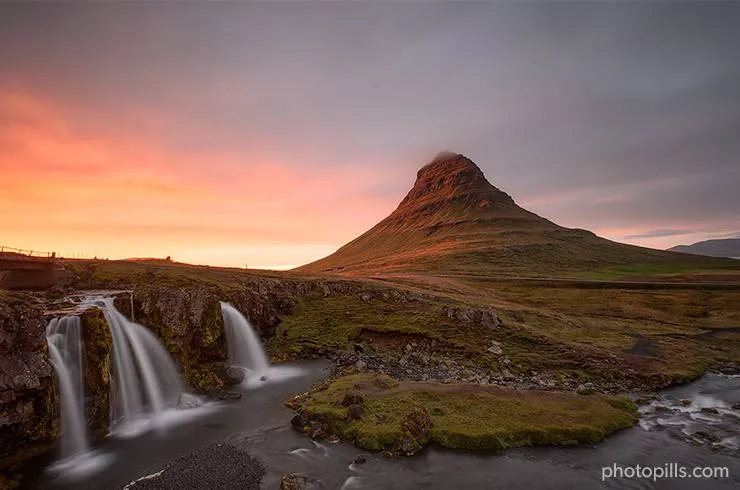
Waterfalls are a very popular subject for landscape photographers, so I get asked how to take long exposure waterfall pictures on a regular basis.
Waterfalls are often in forests or deep canyons, so as long as the whole waterfall is in the shade, you can achieve a long exposure. If it's cloudy, you'll have a nice even light.
Then, you need an ND filter. But what ND filter is best for waterfalls?
Well, you need to read the waterfall.
In other words, how much water it has and how fast it falls down. For example, a big waterfall with a lot of water will need a faster shutter speed than one with little water and falling from not very high.
So, ideally a 6-stop ND filter will do the job.
And now, the key question: what is the best shutter speed for waterfalls?
Every waterfall is different, and there's no single "correct" shutter speed. A good rule of thumb is to start with a speed of 1 second and take a test shot.
However, it will also depend on the light you have on your scene like the golden hour I shot in the example above! ;)
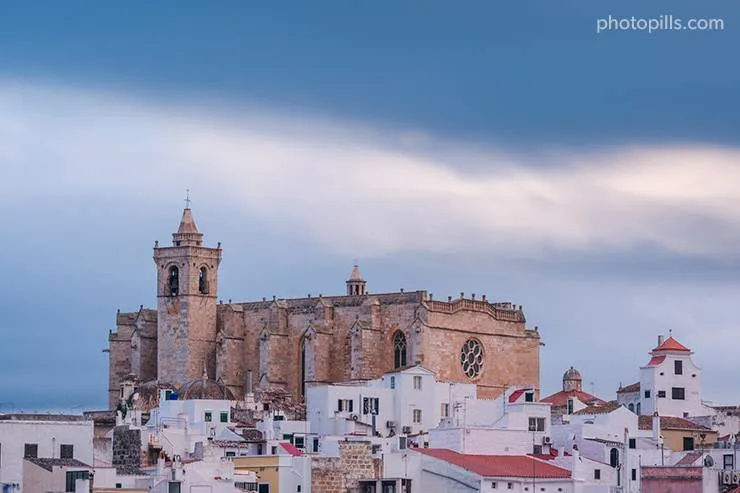
Daylight (2)

Have you ever heard about the daytime long exposure (DLE) technique?
You take a photo in the central hours of the day, when the light is quite harsh, and you slow down the maximum shutter speed (from a couple of minutes to... let's say... infinity?) using one or more ND filters.
Therefore, the sky and water (if any) have a very exaggerated silky effect and no texture whatsoever.
In addition to this, most of these pictures are turned into black and white, to exaggerate the contrast and accentuate the blacks and whites so that the architectural elements have a lot of detail. This, in turn, counteracts the lack of clarity of the clouds (and water).
As you can see in the photo, the idea is to convey a slightly distorted and somewhat dreamy scene or a set of elements that would look quite vulgar in any other type of image.
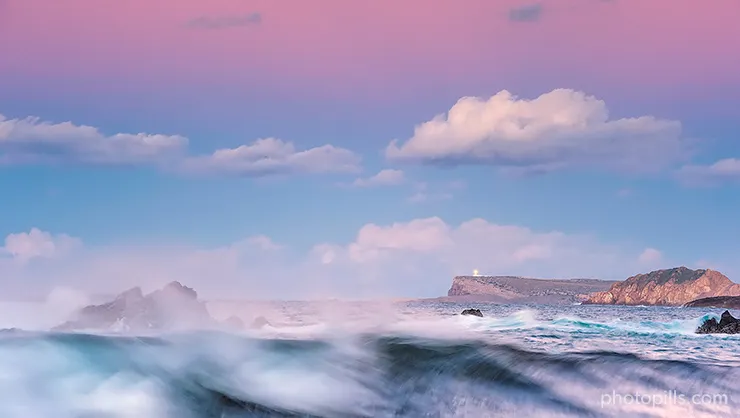
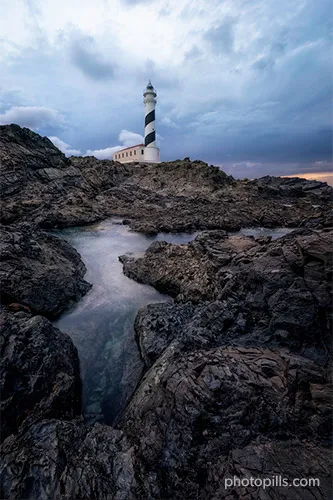
Sunrise (3)

I remember this Sunrise as if it were yesterday. It was one of the most powerful Sunrises I have ever witnessed and photographed.
Amazing. It left me speechless.
I was in Cala Presili, an ideal location for Sunrises, Moonrises and also for Sunsets and Moonsets. In the background you can see the Favàritx Lighthouse, which you can photograph next to the Sun, the Moon, or as in this photo during the blue hour, just before the Sun rises.
Blue hour (4)
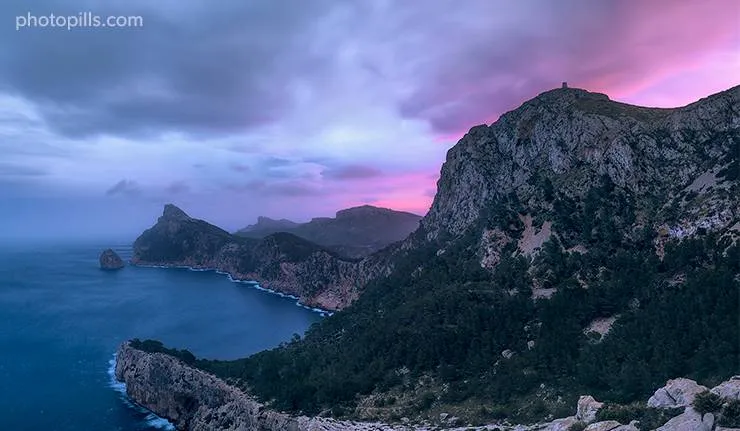
I had planned to capture the Sunrise at the Formentor lighthouse along with my friend Jaume Llinás.
But when we were halfway there, we had to change our mind. It was impossible to take pictures on the coast because of the gusts of wind and the heavy rain. So we had to seek shelter in the car and wait...
After a while, the rain stopped and we were able to reach the Mirador des Colomer. From there we captured this beautiful and well-known landscape of the Mallorcan coastline during the blue hour. This scene occurred minutes before the Sun rose behind the mountains.
Golden hour (5)
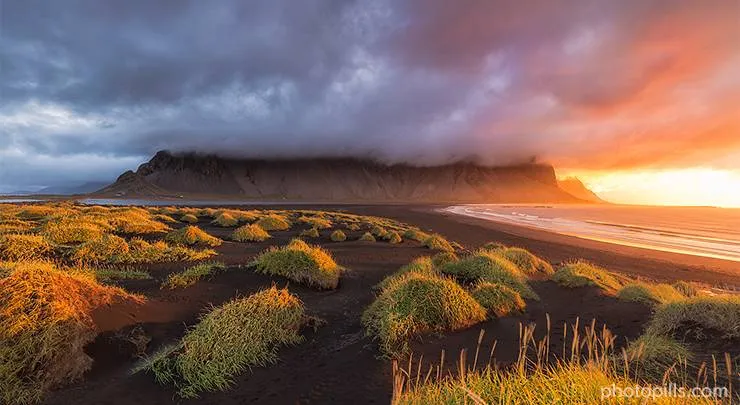
This photo reflects a very special moment I shared with a group of PhotoPillers during our expedition to Iceland.
We were on the beach of the Stokksnes peninsula, enjoying a beautiful Sunrise and some spectacular views of the wonderful and imposing Vestrahorn mountain range.
I took this photo during the golden hour, just as the Sun was rising on one side of the mountains. The Sun was coming out strongly so I decided not to include it in the frame. The idea was to avoid problems with the dynamic range and use the lateral light to fill the foreground with golden tones.
Moreover, I used two elements to guide the eye towards the Vestrahorn and towards the light: the seashore and some bushes that create a contrast with the black and volcanic sand.
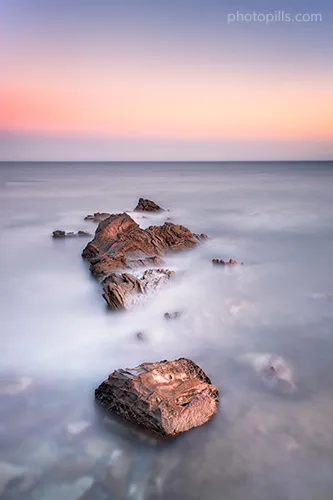
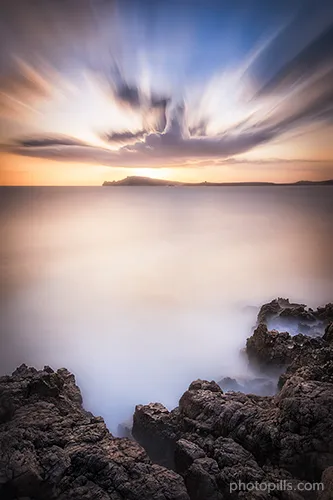
Sunset (6)
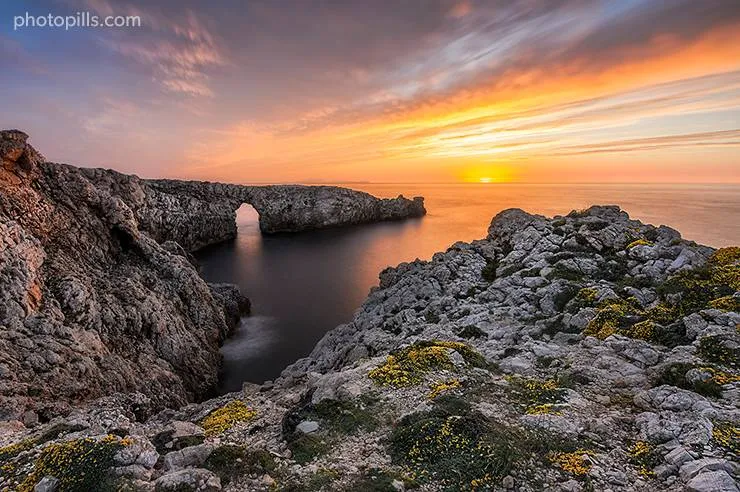
Es Pont d'en Gil is a beautiful natural arch located on the island of Menorca. I know, I live in paradise... :P
Once I've found a good location, I use PhotoPills to plan the rest of the details: the shooting time to get a certain light, the shadows and even the date and time when the Sun will be where I want it to be in the frame.
In this case I wanted to photograph a Sunset with the Sun setting to the right of the arch, illuminating the scene and the cliffs from the side.
Total solar eclipse (7)
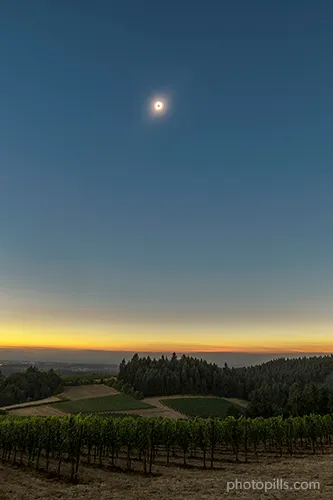
When planning a total solar eclipse shot, keep in mind that the light won't change drastically until the eclipse approaches totality. Therefore, you can easily determine the exposure and then keep the same settings for almost the whole event.
But when the eclipse reaches its apogee (totality), the light will change very fast... You'll have to quickly change your camera settings.
Although you'll have to check it on the spot, here are some tips. In my experience, during totality the settings of a correctly exposed image are the same as what you need at the beginning of the astronomical twilight. The sky is dark blue, but not completely black as it is at night.
Oh, and don't forget to remove the solar filter during totality!
Light trails (8)
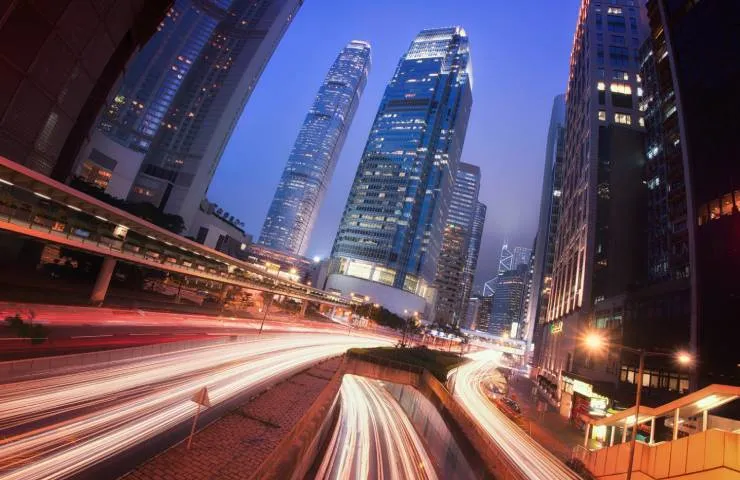
Photo by Albert Dros
Hong Kong is a fascinating destination...
The footbridge over Connaught Road Central is a pretty good location to capture busy traffic on three roads with the majestic IFC building as background.
A weekday night is the best time for light trail photography. With busy traffic and more vehicles on the streets after work hours, you can capture stunning photos with ample trails of light easily.
The photo above, captured by my dear friend Albert Dros, is a great example.
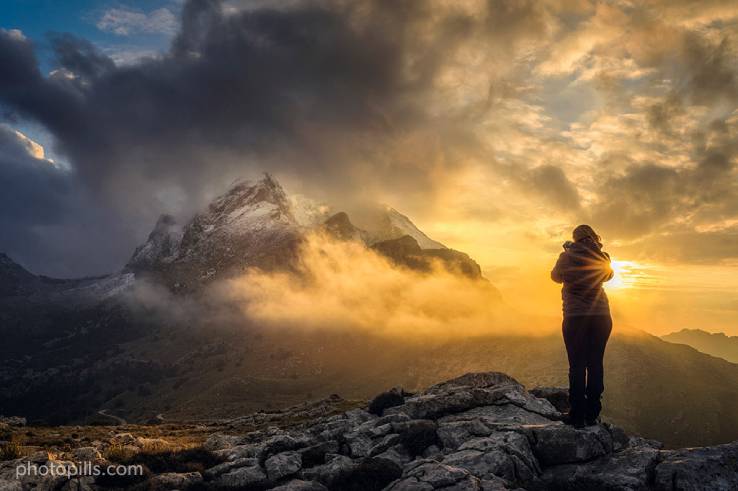
Night portrait (9)
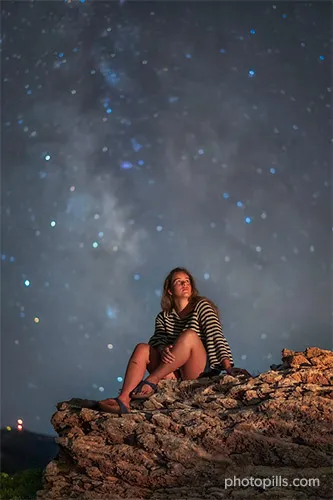
Most portrait photography is done during the daytime, with golden hour generally considered the ideal time of day for the best light.
However, getting out of the comfort zone can lead to interesting and creative results. So after starting my night photography with astrophotography, I decided to give night portraits a try. And let me tell you this: I love it!
In 2019 Menorca was credited as a Starlight Reserve, and that's for a reason: the quality of its night skies is absolutely amazing.
That's why whenever I can, like in the picture above, I look for an interesting subject and try to combine it with a beautifully rugged landscape and a starry sky as the background. As you can see, the result is spectacular.
Milky Way (10)
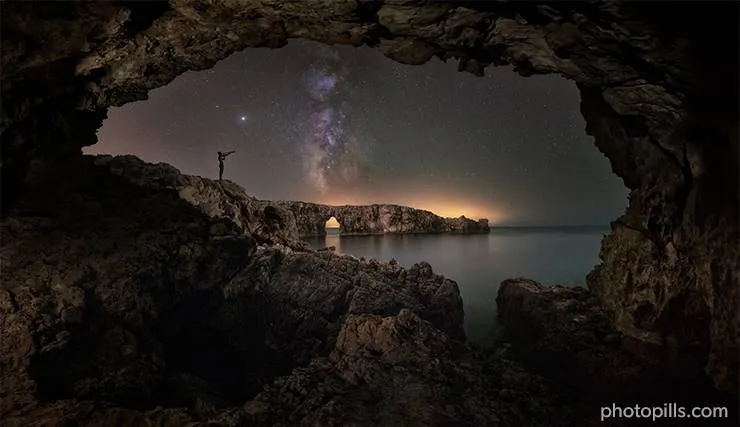
This photo tells a very powerful story.
And the story of how I took this photo is also worth telling.
The idea came from a photo of Daniel Viñé, a PhotoPiller who discovered this cave for me near one of my favorite locations in Menorca (Spain): the natural arch of Es Pont d'en Gil. Since I saw it, I knew that it could be used in many ways.
I thought that I could take a panorama from that cave on a night when the Milky Way would be completely vertical above the arch.
I called my friend Enric Gener, one of my favorite underwater photographers, to pose for me and help me complete the photo.
It was quite a challenge. But looking at the result, I think it was worth it.
Star Trails (11)
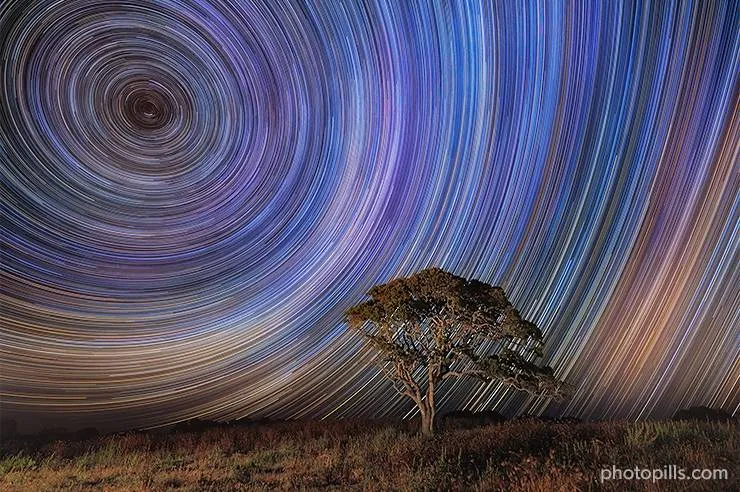
As I explain in the Star Trails photography guide, you have two ways to take this photo:
I captured the above image using the second technique.
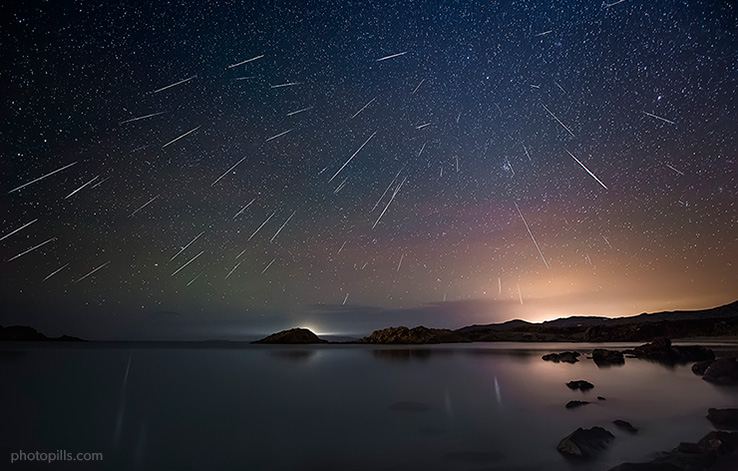
Meteor Showers (12)
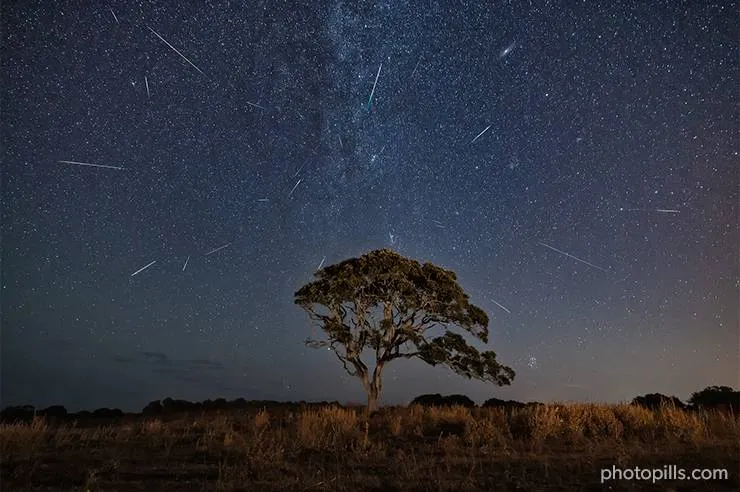
You should use the PhotoPills Augmented Reality view included in the Meteor Showers pill whenever you're going to capture this kind of shot.
This tool is very useful and allows you to visualize the Meteor Shower radiant position at the beginning and at the end of the shooting session.
Auroras (13)
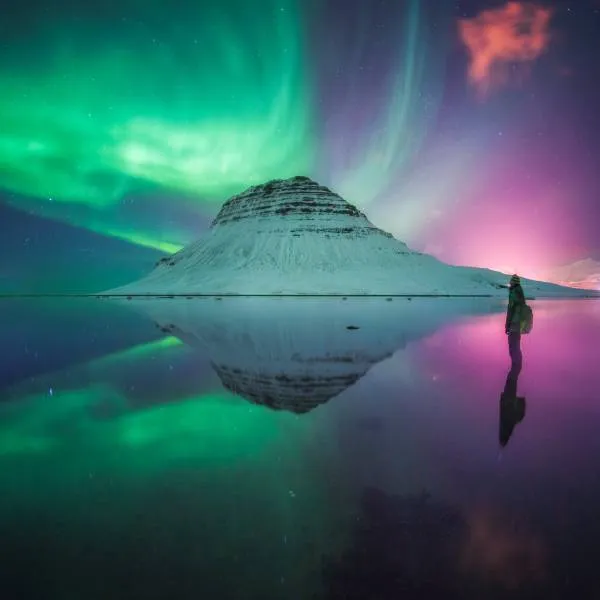
Photo by Albert Dros
Iceland is booming.
The author of the photo above, my good friend Albert Dros, has visited the country quite some times over the years and the beauty of this destination is simply out of this world.
The moment you step out of Reykjavik is the moment you enter a fantasy movie with beautiful scenery on every corner. And of course, Iceland has the Northern Lights in the winter months!
In this case, it was a beautiful night at the side of Kirkjufell with some green and even pink auroras. And the best of it all is that no one was around but Albert himself! :O
Fireworks (14)
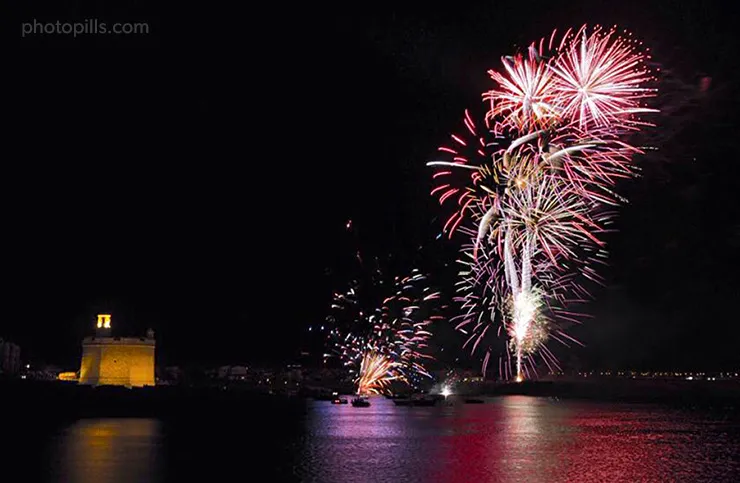
New Year's Eve is a good opportunity to shoot fireworks.
To get a spectacular picture, try to include more than one crackling palm tree in the frame. The challenge is to do it in a single frame.
The most common way to do this type of photography is shooting in Bulb mode. Keep the shutter open and, as fireworks appear, cover the lens intermittently (ideally with a black card or, if you don't have one, with a black t-shirt). If you don't cover it, your image will be overexposed.
In addition to this, there is another system. Actually, it's the one I have used in this image: the Live Composite function that some Olympus cameras have. This program allows you to see in real time (live) how the photo is generated by adding the different lights. In the image above you can see how the Live Composite has been adding all the new lights (fireworks) while keeping those of the castle.
Lightning (15)
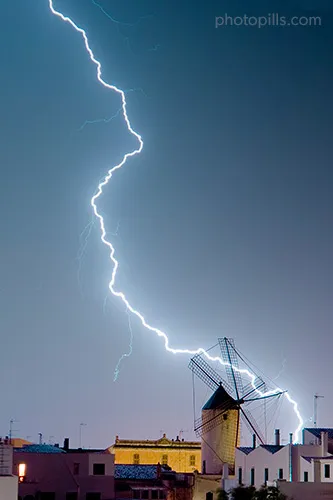
A night with a lead colored sky can be attractive if you see a storm. Lightning is both fascinating and dangerous, so you have to be safe to photograph them. In the case of the photo above, I took it from the window of my bedroom.
Lightning is pretty unpredictable. Be extremely patient and have the camera ready at all times. In addition, your priority is to capture the maximum of lightning, so it's best to opt for a long exposure.
That day I wanted to capture lightning no matter what. First, I calculated the exposure for the mill. Then I set the intervalometer to shoot an 8s picture every 2s. The camera spent 2 hours working while I quietly read a novel lying on the bed.
Panning (16)

I took this picture during a practice session with some students while a rally was held in Menorca.
One of the exercises was to practice the panning technique (section 9). You shoot using a relatively slow shutter speed as you follow the subject along its path with your camera. In this case, you follow the car from right to left.
As you can see, the car seems frozen and the background and/or foreground blurred.
To get a good image you need patience and lots of practice. Also, you have to be careful when deciding the shutter speed you're going to use: it can't be too short. If so, you would freeze the whole scene and your photo wouldn't convey any motion.
Depending on the element you want to photograph (runner, bike, motorcycle, car...), I suggest you try using different shutter speeds. Always slower than the one you would use to freeze your subject.
Photos by PhotoPillers (17) [bonus track]
My goal with this section was to inspire you.
To show you a lot of examples that you can use as a photography idea.
Hopefully I did.
And if not, it's fine.
I have another suggestion: to inspire you by looking at the thousands of photos other PhotoPillers have imagined, planned and captured across the globe.
You'll see pictures of all types of landscapes. And also of Sunrise, golden hour, blue hour, Sunset, Moon, Milky Way, Star Trails, Meteor Showers, drone, lunar eclipses, solar eclipses and other astronomical events...
You could spend hours and hours looking at mind-blowing images!
Would you like that?
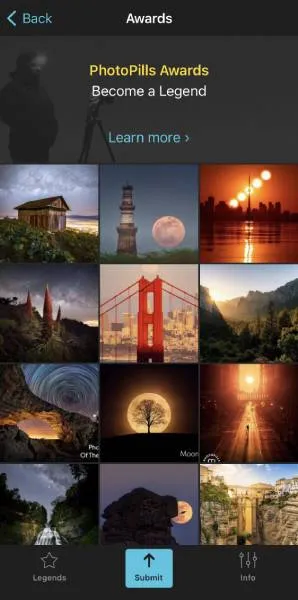
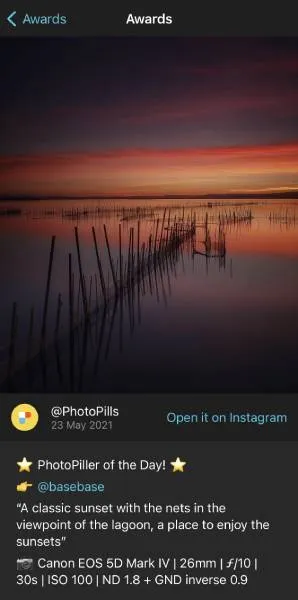
Well, they are compiled in our Instagram account (follow us!) and in the PhotoPills application (Menu My stuff > Awards).
And if you want to inspire other PhotoPillers while participating in our contest, the PhotoPills Awards, send us your photo and you may win some cool prizes!
OK, let's keep going.
It's time to start learning more about long exposure photography.
So let's go for it!
2.What is long exposure photography?
Let's keep it short and sweet.
Here's my long exposure photography definition:
Long exposure photography is a technique in which you want to convey a specific idea (ie. motion) using a certain effect (ie. a much longer shutter speed).
"Toni, you just mentioned a much longer shutter speed. So how long is a long exposure?"
Well...
I can't tell you the exact transition point at which a shutter speed becomes slow enough to define your shooting as "long exposure photography".
Nevertheless, as a rule of thumb, you could think of it as the exposure time defined in terms of seconds, rather than fractions of a second. But that's a very personal approach.
And as I will explain to you later on, the ideal technique for urban and nature landscape long exposure photography actually depends on whether you plan to practice it at day or at night.
But let's go back to the basics...
What is long exposure photography?
Long exposure photography is a technique in which you keep the camera shutter open for a relatively long period of time.
So as you can see, it involves 2 elements:
- The shutter speed.
- Time.
The shutter speed
OK, let's start with the first one.
What is shutter speed?
As you can read in our exposure photography guide, the shutter speed is, along with the aperture and the sensitivity, part of the exposure triangle.
The shutter speed is the time period during which the shutter is open, and it's measured in seconds, minutes, or hours.
Therefore, the longer you have the shutter open, the more light you allow to reach the sensor. On the contrary, the less time, the less light reaches the sensor.
Time
Now, let's examine the second element.
How long should you keep the shutter open?
Well, it depends...
But as a rule of thumb, a long exposure begins when the shutter speed is too slow to capture a sharp handheld image.
And how can you capture a sharp handheld picture?
To capture sharp handheld images the rule of thumb to follow is to avoid using a shutter speed that is lower than the equivalent focal length of your lens.
For example, if you are using a 24mm focal length, then your shutter speed should not go below 1/24th of a second. Similarly, with a 300mm focal length, you shouldn't allow your shutter speed to fall below 1/300th of a second.
To capture a long exposure you can use:
- A tripod to keep your gear completely still and avoid blur.
- The panning technique (section 9).
When should you use long exposure photography?
Natural light is a key element in long exposure photography.
From a technical point of view, without it there's no photo.
From an artistic point of view, it's the ingredient that marks the picture's emotional impact. That is, the feeling that the photo conveys to the viewer (strength, fear, calm, silence, speed, etc.).
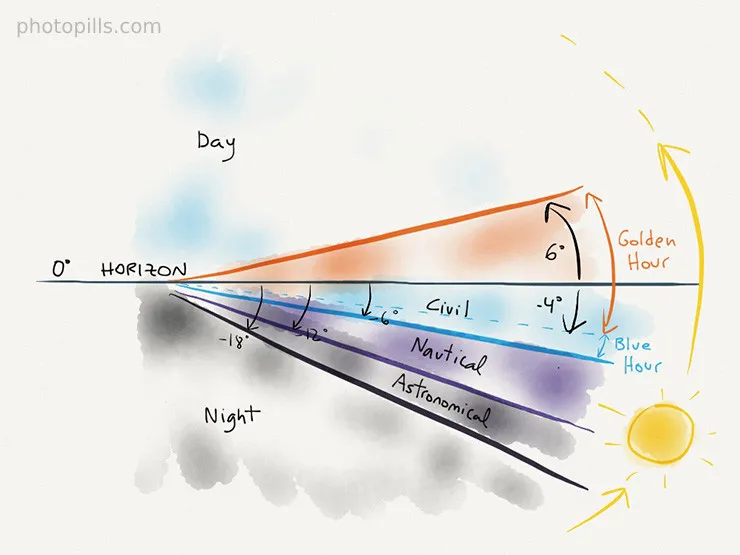
In the diagram above you can see the different types of natural light depending on the Sun elevation:
- Day. Elevation higher than 6º.
- Golden hour. Elevation between 6º and -4º.
- Blue hour. Elevation between -4º and -6º.
- Civil twilight. Elevation between 0º and -6º.
- Nautical twilight. Elevation between -6º and -12º.
- Astronomical twilight. Elevation between -12º and -18º.
- Night. Elevation lower than -18º.
If you want more details on the subject, take a look at our superguide on natural light.
Can you take long exposure photos in daylight?
Sure!
Here are the main reasons to take long exposures in daylight:
- Capture motion (e.g. water, clouds).
- Remove elements (fast-moving objects and people become almost invisible).
You can use it in all photography types in a creative way (landscape, portrait, architecture, with your drone), and to photograph moving objects (panning).
Can you take long exposure photos at night?
Of course!
Here are the main reasons to take long exposures a night:
- Allow the sensor to capture as much light as possible despite an insufficient lens aperture.
- Get as many and as bright stars when capturing the Milky Way.
- Capture motion (e.g. artificial light trails, Star Trails, Meteor Showers).
- Capture detail in the foreground at night. You'll need to if the foreground is too dark or too noisy with a single exposure.
Long exposure photography in daylight
I'm sure that most of the time, 99% of your daytime shots are taken with a short exposure.
Why would you do otherwise?
There's plenty of light during the day!
However, with the right gear (section 6), daytime long exposure photography can be super fun! It's the best way to get some really unique and surreal-looking shots of otherwise ordinary scenes.
What is day long exposure photography?
It's the fact of taking a long exposure shot in daylight, when the Sun's elevation is above 0º.
With a day long exposure photography you achieve an artistic purpose – to create a different looking image than what the viewer is used to seeing in a photo.
It can help you:
- Modify reality.
- Create a minimalist image.
- Reduce a scene to its essence.
- Explore a new way of artistic expression.
How to take daytime long exposures
Every scene is different.
And it's almost impossible to summarize in a series of steps a method that serves to successfully capture all of them.
In addition to this, there is not a unique way of capturing daytime long exposures.
It all relies on:
- Your own workflow. Don't worry if you don't have an established routine yet. I'll share mine with you ;)
- The natural light that you have in the scene.
So this is my step by step workflow to take daytime long exposures
- In daylight.
- Around Sunrise.
- Around Sunset.
- During the golden hour
- During the blue hour.
- During a solar eclipse.
However, if you want to go into detail on how to do daytime long exposure photography, read section 7.
Long exposure photography at night
Have you ever tried long exposure photography at night?
Not yet?
Well, you're missing an amazing experience my friend!
Thanks to long exposure night photography you can capture everything that your eyes are unable to see: the magic of the dark sky.
You're well aware that I'm a passionate landscape photographer. And whenever I find an amazing location I try to shoot it both during the day and at night. I love night photography and astrophotography.
What is night long exposure photography?
It's the fact of taking a long exposure shot at nightime, when the Sun's elevation is below 0º.
The world looks different at night.
With a night long exposure photography you can capture all its magic – the always amazing Milky Way, vehicle light trails, Meteor Showers, some hypnotic Star Trails, fireworks, the Moon rising above a lighthouse...
Photographing at night allows you to see night in all its wonderful color.
It can help you:
- See a different reality.
- Create a dreamy image.
- Explore a new way of artistic expression.
How to do long exposure night photography
I know that shooting in the middle of nowhere at night sounds creepy, but there's nothing to be afraid of!
First of all, you should never shoot alone. But most importantly, the final shot and the experience are so rewarding that you'll forget the fear and cold that you may feel.
So this is my step by step workflow to take daytime long exposures of
- The Milky Way.
- Star Trails.
- Meteor Showers.
- A person (night portrait).
- The zodiacal light.
- The Northern lights (auroras).
Nevertheless, if you want to go into detail on how to do long exposure night photography, jump to section 8.
Perfect!
After this explanation on long exposure photography, which I hope you've used as a warm up, the fun is about to start!
Will you come with me?
It's time to search for the perfect location :D
3.The perfect location for long exposure photography (and how to find it)
Location is key.
Without a good location, it will be more difficult to get a photo that has an impact, tell a story, convey an emotion...
And even more so when we talk about long exposure locations, as certain locations will give you better results than others.
When you're looking for a location, look for the following ingredients...
The ingredients of the perfect location
Choose the type of landscape (scene) you want to photograph
As I explain to you in the landscape photography guide, you can choose between two large groups of landscapes: natural or urban.
Natural landscape
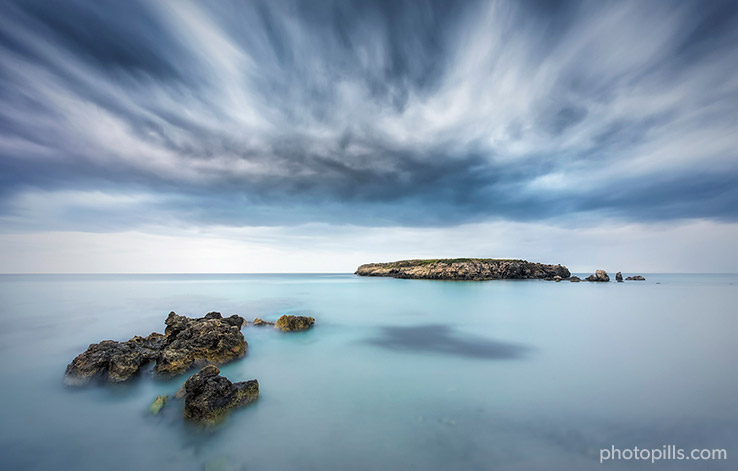
- To produce a long exposure out of a mountain landscape, look for clouds and wind. Spotty clouds and wind create motion in the sky and produce a more dramatic image.
- Photographed normally, choppy seascapes are full of detail – there are all the dips and ridges on the surface, the foaming waves, the spray and any floating debris. But with a longer shutter speed all of this disappears, transforming those busy, distracting details into a silky-smooth surface.
- There's nothing more soothing than a silky, smooth flowing waterfall. When shooting with water, think of what direction the water is flowing and give it room within your frame.
- If you have a keen interest in shooting Star Trails and epic images of the Milky Way, wait for a clear night, without clouds. The clearer the sky, the better the chance of capturing long exposures at night (section 8).
Urban landscape
- Long exposure landscape photography can be done in the city too. Light trails can come from the taillights and headlights of passing vehicles on a busy street, or any other moving element (e.g. subway, train, escalator, Ferris wheel).
- You can create a city's smooth reflections in blue hour thanks to a long exposure shot.
- To reinforce the idea of motion, create a contrast using stillness and movement (e.g. a still person waiting for a train to stop).
- If you want to photograph a crowded area, having too many people can ruin the story you want to tell. In this case, if you take a long exposure with an ND filter for example, you can transform a crowded place into a ghost town :)
Make sure that you'll have enough room in your frame

Once you have determined the type of location, you should check that you'll have enough room in your frame to:
- Include the Sun, the light that comes from it, the Moon, the Milky Way, Star Trails...
- Show where that particular moment takes place. Is it a view of Mount Fuji with a pagoda? Have you gone to Hong Kong to photograph the bay or have you freaked out while capturing a view of Mount Cook?
- Include a powerful subject. I'll give you more details about this in the next section.
Check its orientation
Remember, it's important to include in the frame all the elements you have imagined.
It can be the Sun setting near some rocks in the sea, the Moon rising from behind a skyscraper or the Milky Way aligned with a tree in a mountain landscape...
And if you want that what you imagined happens exactly the way you want so you can photograph it, take into account:
- The position of some of these elements (the Sun, the rocks, the Moon, the skyscraper, the Milky Way, the tree).
- Your own position with respect to them. In other words, where you have to position yourself and where you have to point the camera to.
Try to make sure there's plenty of room to move around
As I just told you, it's important that you can freely move around the location.
On the one hand, the more space you have, the more compositions you can get. When moving around you can look for different points of view, check that you are in the position that you like the most and make sure that everything is under control (the tripod is stable, you don't risk falling or slipping, etc.).
On the other hand, perhaps the photo you imagined has only one possible composition. It's not frequent, but it can happen. So if you have more room you can make small corrections so that all the elements are in the frame exactly where you want.
Include an interesting subject in your composition
As in any other type of photography (Milky Way or Star Trails, for example) it's important to include an interesting subject in your composition.
It's the best way to tell a story (your story) because that subject will be the main element. And it will also be the magnet to attract your viewer's eye.
What do you need to look at when you're scouting a location?
Look for any element in the landscape that stands out: a rock formation, a tree, a unique construction (such as a lighthouse, a ruin, a building, a bridge, etc.), a monument, the remains of a shipwreck...
As you can see, there are a lot of possibilities.
Only your imagination sets the limits! :)
Nevertheless, don't fall into the trap of thinking a good subject will make a good photo.
To produce the best photo, whether or not your subject is impressive, you need to:
- Expose it correctly.
- Planning it ahead with PhotoPills as you'll learn in section 4.
- Choose the best natural light.
- Compose it carefully.
- Tell a story.
Use basic composition elements
Your location has a special element that is the soul of your story.
Great!
But don't just stop there.
Go a little further and explore other possibilities that you'll find in the field (or from the couch thanks to the Internet) and that can help you emphasize the story or tell it better.
Go deeper and your image will have a much greater impact.
Use elements so you can "paint" in the frame. What elements? Lines, triangles, patterns, textures, an isolated element.
The idea here is to guide the viewer's eye so that it moves along the frame in the direction you want, emphasizing or creating an effect such as a symmetry, a certain balance or a strong contrast.
Don't be shallow and avoid what's already obvious!
It's the only way to create a completely original image.
Convey motion effectively
Capturing motion and conveying motion are two different things.
When you capture motion, you're able to get the shot into the frame, making sure that the technicalities of exposure and composition are intact by using the right camera techniques.
On the contrary, when you convey motion, you focus on storytelling. It depends on your ability to show motion in a way that you would want the viewer to understand.
But see, whether you like it or not, most viewers perceive photographs intuitively rather than technically. So you'll be a good storyteller if you're capable of conveying a message without having to explain yourself.
To convey motion you need... something that's moving!
It can be a water element (a waterfall, the sea, a river, a lake, a canal, etc.), clouds, lights such as car lights... or even people moving around.
There are really only two camera techniques used to show movement:
- Motion blur is created by the use of a slow shutter speed.
- Freeze motion uses the opposite – a fast shutter speed.
How to find the perfect location
If you want to find the best location for long exposure photography, all you need is time.
That time will allow you to search what landscapes you're going to find, what the ideal location you want to capture must have and where it is.
This is my work methodology.
Revisit the same photography location again and again
I'll repeat it over and over again, and that's why I'm writing this first. I've always got my best images in locations I know like the back of my hand, that I love, and that I've been photographing for a long time.
When you find a location you're passionate about, come back.
Come back again and again. Explore every single corner and work on different compositions, during different times of the year and with different weather conditions.
Little by little you'll be taking better pictures, trust me.
And if you don't, listen to Marcel Proust :P
"The real voyage of discovery consists not in seeking new landscapes, but in having new eyes."
Get inspiration from external resources
Once you decide where and at what time of year you're going to take photos, check all the sources of information that you can think of. Here are some ideas that can help you:
- Your main source of inspiration should be the photos of other photographers that draw your attention. Have a look at Instagram, Flickr, 500px, Unsplash, Getty Images, 1x.com, Viewbug, Pexels, Youpic, Shutterstock, Adobe Stock and Google Images.
- Learn from other photographers' discoveries and check the locations they have previously explored. Certain communities, such as Locationscout and ShotHotspot, offer this information.
- Analize publications like travel magazines (National Geographic, Condé Nast Traveler and Travel + Leisure), travel curated content (Exposure), travel guides (Lonely Planet) and the photography section of newspapers such as The Atlantic, The Guardian and The New York Times.
- Revisit your favorite photographers' websites and pay attention to their galleries. Have you checked the PhotoPills Masters' websites participating in the PhotoPills Camp?
- Don't forget the Wikipedia! It has tons of lists of interesting places. Let's say you're looking for lighthouses... Type in Google "lighthouse list Wikipedia" and you'll be surprised.
- A reliable and full of surprises source of information are the locals. No one knows the area better and provides greater advice.
- How long since your last visit to a library or a bookstore? Yes, books will tell you more about the local history and natural biodiversity of an area or town.
- Try to visit the nearest Town Hall or tourist office and look for first hand information.
- Again, check the Points of interest (POIs) included in PhotoPills.
- And finally, scout the area. It's usually the most effective strategy :)
Go on an adventure and use your legs!
The traditional system never fails XD
Sometimes I like to choose an area on the map and just scout it. I love to walk around the location looking for photos, but without carrying all the gear on my back.
You can't imagine how much I enjoy spending time at the location, looking for subjects, compositions, framing... In short, spending hours imagining, visualizing and exploring potential photography opportunities on the ground is key to my photography.
It helps me a lot to create, plan and prepare the shot.
I challenge you to do the same!
In short, these are the tools I use. I hope you find them as useful as I do.
And if you have any other sources of inspiration that you consider key, share them with me and the rest of PhotoPillers by leaving a comment at the end of this guide :)
In photography sharing always makes things funnier!
Great!
You're almost there...
So far you've decided your location. If you haven't, hurry, pick one because we're going to plan a photo.
You're not far away from capturing the photo of your dreams.
Let's get to work!
4.How to plan your long exposure shots like a pro
Planning is essential in landscape photography.
Planning your photo you'll find out:
- A shooting spot from where to take the photo,
- A shooting direction (the frame) and
- A shooting date and time...
Thanks to this information you'll know exactly where you have to go, what day you have to go and at what time you have to shoot.
Moreover, planning a photo is much easier and faster than it seems. With PhotoPills it's a matter of minutes.
In this video you'll learn how to plan any landscape photo you imagine:
Although if you want to learn a specific tool of the app, take a look at the PhotoPills YouTube channel where you will find dozens of tutorials ;)
And to make it easier for you, below you‘ll find real planning examples to get straight to the point...
Understand and plan the light: golden hour and blue hour
Why are all landscape photographers obsessed with the magic hours? What are they and when do they occur?
Magic hours include two times of the day:
- The golden hour. The light has reddish, orange, yellow tones or, as its name suggests, golden tones. It occurs when the Sun has an elevation between 6º and -4º.
- The blue hour. The light has a deep blue hue, with a cool color temperature and saturated colors. It occurs when the Sun has an elevation between -4º and -6º.
Both offer the best lighting conditions to take landscape pictures.
Here's a video in which Rafa explains everything you need to know about natural light.
Plan the golden hour
Planning a photo that happens during golden hour is very simple. You can do it in 7 steps:
Place the Red Pin on a potential location.
Select the date you want to photograph the golden hour.
Find out the Sunrise/Sunset direction. Check the thick yellow line (Sunrise) or the thick orange line (Sunset).
Find out the Sunrise/Sunset time on Panel 4.
Check different locations until you find a photo that you like.
Check at what time the golden hour starts on Panel 6.
Save the plan using the Save button.
You have a complete step by step guide in section 4 of our golden hour photography guide.
Plan the blue hour
Planning a photo that happens during blue hour is very simple. You can do it in 7 steps:
Place the Red Pin on a location that you like.
Select the date you want to shoot the blue hour.
Find out the Sunrise/Sunset direction. Check the thick yellow line (Sunrise) or the thick orange line (Sunset).
Find out the Sunrise/Sunset time on Panel 4.
Check different locations until you find a photo that you like.
Check at what time the golden hour starts on Panel 6.
Save the plan using the Save button.
You have a complete step by step guide in section 4 of our blue hour photography guide.
Plan a Sunrise or Sunset on a certain date
Imagine you want to photograph the next Sunrise or Sunset. You know the date of the photo, but... from where would it be better to take the photo? And at what time?
You'll get the answers to these questions using PhotoPills main tool: the Planner.
Here's a video in which Rafa explains in great detail how to plan spectacular Sunrise and Sunset photos.
To plan a Sunrise/Sunset photo for a certain date you have to follow 6 steps:
Place the Red Pin on a location that you like.
Select the date you want to photograph the Sunrise/Sunset.
Find out the Sunrise/Sunset direction. Check the thick yellow line (Sunrise) or the thick orange line (Sunset).
Find out the Sunrise/Sunset time on Panel 4.
Check different locations until you find a photo that you like.
Save the plan using the Save button.
You have a complete step by step guide in
Plan a Sunrise or Sunset in a certain position
Imagine that you want the Sun rising or setting in a certain position in the photo but you don't know the shooting date ;)
In other words, you need to find out:
- If that specific photo is possible.
- And if it is, when exactly does it happen.
And for this, the best tool is the PhotoPills Planner.
In the following video Rafa explains in great detail how to find a powerful Sunset photo without knowing the exact date in which you want to take the photo.
To plan a Sunrise/Sunset photo when you don't know the date of the photo you have to follow 9 steps:
Place the Red Pin on the shooting spot.
Place the Black Pin where you want the Sun.
Find the dates on which the photo is possible with the Search option.
Enter the date range.
Set the azimuth of the Sun.
Set the elevation of the Sun.
Get the results table with the days when the photo is possible.
Choose the date that best suits what you need.
Save the plan using the Save button.
You have a complete step by step guide in
Plan the Milky Way
I suggest you try using PhotoPills to plan any photo of the Milky Way that you imagine. It's a very powerful app!
In the following video you'll learn
- How to easily plan the best possible Milky Way photo for a given date with PhotoPills.
- And if you know the photo you want to take but don't know when it happens, you'll learn to determine the exact date and time that the Milky Way will be exactly where you want it to be.
To plan a photo of the Milky Way you have to follow 6 steps:
Place the Red Pin on a potential location.
Set the date of the photo.
Activate the Milky Way layer.
Change the time with the Time bar until the Milky Way is in the position you want.
Move the Red Pin to adjust the shooting spot.
Save the plan using the Save button.
You have a step by step guide in section 7 of our Milky Way photography guide.
Plan Star Trails
What Star Trails pattern can I capture? Will I have moonlight on the scene? Where will the Polaris be? Where will the celestial equator be? What time do I have to start taking photos?
You'll need to answer these questions (and much more) during the planning.
Luckily, PhotoPills has all the answers.
And if you don't believe me, check out this video where Rafa teaches you how to plan a Star Trails photo from start to finish.
To plan a Star Trails photo you have to follow 3 steps:
Go to the location and stand in front of the subject.
In PhotoPills, tap Night RA from the Pills menu.
Use the Night Augmented Reality (AR) to find the Polaris, the celestial equator, and every possible star trail pattern. Look at the blue circles.
You have a step by step guide in section 5 of our Star Trails photography guide.
Plan a Meteor Shower
The key to successfully photographing a Meteor Shower is knowing the position of the radiant at all times.
What is the radiant?
It's the point in the sky from which meteors converge.
How can you locate it?
Easy...
Find it out with the help of PhotoPills.
In this video Rafa shows you how to plan any Meteor Shower photo.
To plan a photo of Meteor Showers you have to follow 3 steps:
Select the Meteor Shower.
Find out the key Meteor Shower information.
Find your shooting spot and framing (locate the radiant in the sky).
You have a step by step guide in section 12 of our Meteor Shower photography guide.
Plan a solar eclipse
This type of planning lets you know where to go, and when to go, to capture every phase of the eclipse. And also how to find the right shooting spot to capture the eclipse aligned with your favorite subject.
In this video Rafa teaches you to plan a total solar eclipse. Although his explanations will help you plan any solar eclipse, whether it's partial, annular or total.
To plan a photo of a solar eclipse you have to follow 8 steps:
Select the eclipse you want to plan.
Place the Red Pin in a location within the path of totality.
Find out when the eclipse phases occur on Panel 10.
Find out where in the sky the eclipse will occur.
Place the Black Pin on your subject.
Find the shooting spot.
Check the size of the eclipse on Panel 2.
Plan the field of view and the depth of field with the map tools.
You have a step by step guide in section 5 of our solar eclipse photography guide.
Don't forget to check the weather forecast
Only a few days left until the big moment... The shooting time.
You feel that you have everything under control. That nothing can fail.
Are you sure?
Think about it... :P
That's right, no one can control the weather... That's why we PhotoPillers like to say "Plan and Pray". We even designed a t-shirt with the Plan & Pray motto!
Whenever you're planning to take photos outdoors, it's important to take into account the weather forecast.
By doing this, you can anticipate what you'll find in the location. And also check if the conditions you're looking for are there.
Sometimes you're lucky enough to have the clouds you want and the wind direction you need to reinforce the composition.
Checking the forecast, especially regarding clouds and wind direction (and strength) is key!
My weather apps
Whenever possible, I like to check first the location's national meteorology service. It usually provides the most accurate and reliable information.
But when meteorology comes into play, I'd rather be cautious and check several sources of information in order to have the most reliable data.
So here you have the two sources that I use to contrast the information the location's national meteorology service provides.
Windy
Windy is my favorite application when I want to know what kind of weather I'm going to find at the shooting location. I find it very useful because I can check a lot of information and it has a very nice interface.
The application tells you, for a specific location, the following data: wind (direction and speed), rain, snow, temperatures, clouds (at different altitudes) and waves (direction, strength and water temperature).
The bar at the bottom of the screen also offers a lot of information. It gives you, for example, a 7-day forecast of all these elements and you can choose to see them in different formats (basic, meteogram and aerogram). Also, I love the option to see satellite images.
With Windy you can create your own custom maps including the data and colors you prefer. And, of course, you can see how the forecast changes over several days.
You can download the Windy application on your smartphone and tablet. You can also go to the website on your laptop and desktop computer.
Windy is available on iOS and Android.
Ventusky
As I said before, when it comes to checking weather forecasts, I like to be conservative and check multiple sources.
And my second favorite option is Ventusky, an app that uses multiple maps to give you tons of weather information.
By default, the main interface is a map of your local area that allows you to see, at a glance, what the weather is like in your location. Thanks to a color code you can see the temperature and the wind direction lines that move over the earth. Of course, you can change the units in the configuration settings.
To see the weather nationwide, zoom out the map. To see it internationally, zoom out even further.
You can also see an animated weather forecast on the screen. Tap the Play button (lower left corner) and you'll see the weather evolution in the next hours or days. You can see a 7-day forecast or go back in time.
You can download the Ventusky application on your smartphone and on your tablet. But you can also use it through the website on your laptop and desktop computer.
Ventusky is available on iOS and Android.
Study the clouds (and the wind)
From a composition point of view, clouds, along with wind direction and speed, are an essential element. Their presence, color and the direction (and speed) in which they move will make your image more or less dramatic.
So if weather forecasts indicate that on the shooting time there will be clouds in your scene, you should study them. That's how you'll be able to anticipate their behavior and get the most out of them when you're doing your long exposure.
How fast are they going to move?
Don't panic because this isn't an "Advanced Meteorology" course... XD
I just want to draw your attention to some features so that you become familiar with the different types of clouds you may encounter.
Since we're talking about long exposures, and as long as there is wind in the location, the clouds will be one of the main elements that will help you convey motion.
But how much motion?
In other words, how fast do those clouds move? And what shutter speed do you need during the shooting?
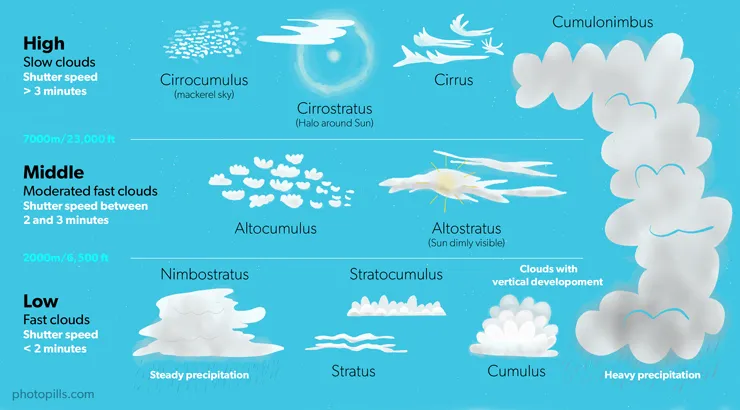
We can divide the types of clouds into 3 groups. Each of them moves at a different speed:
- High clouds. They move very slowly. Use shutter speeds of 3 minutes or more.
- Middle clouds. Their speed is moderately fast. I recommend using shutter speeds between 2 and 3 minutes.
- Low clouds. They move very fast. Use shutter speeds of 2 minutes or less.
Obviously these are just estimates as everything will depend on how strong the wind blows.
What color can they have?
Clouds convey other emotions on a long exposure picture. They can also leave the viewer speechless depending on the color they have.
That's why it's important to know when the sunlight is going to color them.
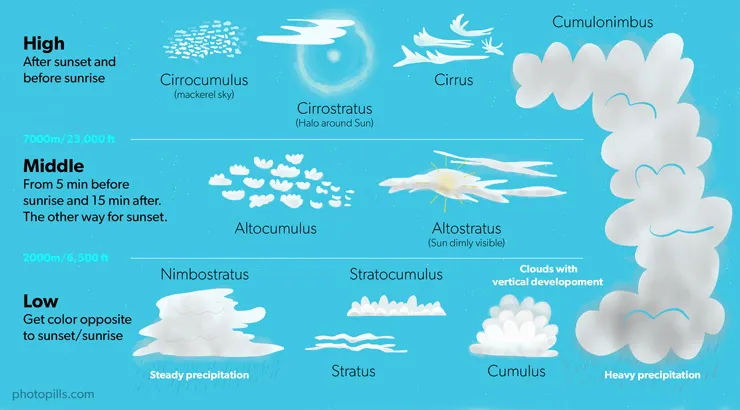
Again, we can divide the types of clouds into 3 groups. Each of them is colored at a different time of Sunrise or Sunset:
- High clouds. They are colored before Sunrise or after Sunset.
- Middle clouds. They can get color between 5 minutes before Sunrise and 15 minutes after Sunrise. Conversely, they can get color 15 minutes before Sunset and 5 minutes after.
- Low clouds. They are colored during Sunrise and Sunset. But only those that are in the opposite direction to the Sun.
Predict the tides
If you're planning a photo in a tidal zone... Don't forget to check the high and low tide hours!
There are countless websites and applications for it, but my favorite is tides4fishing.
As a safety precaution
Don't take it as a joke. Capturing long exposures with filters on the coastline can be dangerous.
As you move around and take pictures on the seashore, you'll surely be surrounded by stones and rocks. And if they're wet or damp, they can be very slippery.
In addition to this, don't forget to take the tides into account and how they affect the strength of the waves.
That's why it's essential to scout the location in advance and (bingo!) know when the tides will happen on the shooting day. Depending on where you are, the difference between low tide and high tide can be considerable.
Be cautious and avoid bad surprises.
To get a better composition
In addition to safety, you should learn about the movements and height of the sea in your shooting location. Tides can cause significant changes in the surroundings.
Imagine, for example, that a group of rocks you want in the frame may be covered or uncovered depending on sea level. If at the shooting time the rocks are under the water... you've screwed up your shooting session!
Another example. The reflections you get when the tide is going down and leaves a very thin layer of water on the sand. If you add a nice light to that ingredient, such as the light during golden hour, you can get amazing results.
So it's crucial that you take tides into account when choosing your location and determining the shooting time in your planning.
And protect your gear
Water is one of the main enemies of your photography gear.
Be cautious and:
- Determine if your tripod can get wet or not. Chances are you'll have to put it somewhere where its legs will get wet. And if it risks rusting or breaking...
- Take several microfiber cloths with you. When you put the filters in front of the lens, that surface is a magnet for water droplets. If you don't clean them regularly, your photos will have lots of stains and dirt.
- Wear water boots or appropriate footwear. Make sure that the sole doesn't make you slip when you're walking over rocks full of moisture or moss. And make sure you keep your feet dry :)
One more thing.
When you're back at home, don't forget to rinse your gear in fresh, warm water, especially the tripod. Salt can be devastating in the medium term if you're not careful enough.
5.Most used lens filters in long exposure photography
Many landscape photographers consider lens filters to be an essential tool. Using the right filters at the right times can make a huge difference for the final picture, especially when photographing long exposure.
That's why a while ago I wrote a full guide on lens filters.
There you will find everything you need to become an expert in using different lens filters to create amazing effects and how to use the PhotoPills ND filter calculator.
But here's a short recap.
What is a lens filter?
A lens filter is a piece of gear that you place in front of the lens of your camera and allows you to achieve a series of effects that otherwise would not be possible (or almost impossible).
A lens filter can be made of polyester, resin or glass, the latter being the best quality material (and the most expensive).
The most used lens filters in long exposure photography are:
- The polarizer (CPL) filter.
- The neutral density (ND) filter.
- The graduated neutral density (GND) filter.
- The reverse graduated neutral density (GND) filter.
I'll give you more information on each one below.
I use Lucroit glass filters. I like them because, although they are more expensive than those of other brands, they allow me to produce higher quality images. So it's worth spending a bit more money on them.
In section 6 you'll find specific recommendations on what I consider the best lens filters.
Lens filter systems (or mounting methods)
There are several filter systems:
- The square or rectangular (my favorites).
- The circular screw-on.
- The drop-in for some telephoto lenses.
- The square gel lens filter for some wide angle lenses
The last two are very rarely used so I won't go into detail.
Square and rectangular lens filters
Certain lens filters can be square (usually neutral density or ND) or rectangular (graduated neutral density or GND ones):
- Square lens filters can come in many different sizes (70, 75, 100, 150, 165 and 180mm), although the most common one is 100mm.
- Rectangular ones can be 67x85, 75x90, 70x100, 100x150, 150x170, 165x200 and 180x210mm, although the most used size is 100x150mm.
Advantages of using square and rectangular lens filters
- You need a filter holder to use them, that is a piece of plastic or metal that you attach to your lens.
- The filter holder has several slots where you can slide several filters at the same time.
- As these lens filters are not circular, nor do they depend on a specific lens size, they are perfectly interchangeable. Therefore, you can use the same filters with different lenses.
- It's easy to slide the GND filters very precisely to position the transition exactly where you need.
- You won't get any vignetting.
Drawbacks of using square and rectangular lens filters
- They are bigger than a circular filter and much more fragile. If you drop one of your lens filters on the ground, it will most likely break.
- You need a filter holder to be able to use them, so you'll need to carry more equipment. The filter holder is not essential, you could hold the filter with your hand depending on the shutter speed, but I highly recommend you to use one because it will make your life easier.
Circular screw-on lens filters

A circular filter is a piece of glass, resin or polyester in the shape of a circle that has a metallic edge so you can screw it onto the lens thread.
Some of the common sizes for circular lens filters are 43mm, 49mm, 52mm, 44mm, 58mm, 62mm, 68mm, 72mm, and 77mm.
Advantages of using circular lens filters
- You can leave them screwed onto your lens so mounting them is very simple and fast.
- It's very easy to stack them as you only have to screw one on top of the other.
- They are relatively small and thin so they are easily stored and transported.
- They are more resistant than other types of filters.
Drawbacks of using circular lens filters
- Because they have to fit into the thread of your lens, they must have a specific diameter. So it's complicated to interchange between one lens and another. However, there's a turnaround – using a step-up ring.
- Circular lens filters can be difficult to unscrew. Sometimes they get stuck and are hard to handle in cold and low temperature situations.
- When you want to apply several filters, placing them on top of each other produces vignetting (darkening of image corners when compared to the center).
In my opinion, these reasons are enough to recommend you to use square and rectangular filters. They are the lens filters I use and I love them.
Polarizer (CPL) filter

A circular polarizing filter (CPL) is a piece of glass that reduces the amount of reflected light entering through the lens of your camera and captured by the sensor.
With a polarizer you can remove:
- Non-metallic reflections. It's very useful for example to make the water more transparent and show more detail on the background.
- Glitter on the surface of an object.
- Part of the mist in the scene.
It's something that you can't achieve with Lightroom or Photoshop.
Another interesting thing that you can get with this filter is to increase the saturation and contrast of your photo.
Unfortunately, polarizing filters have a number of disadvantages and problems.
Here are some things you should be aware of:
- A polarizing filter can ruin the sky in your shot. If you use a polarizer with a wide angle lens during a Sunrise or a Sunset it can make the sky appear unnaturally dark in certain areas. This is also true for panoramas. Be very careful when making panoramas: any problem or effect caused by the polarizer will be almost impossible to correct in post-processing.
- A polarizing filter subtracts light from the scene. Depending on the model, it can be between 1 and 3 stops so you need to take this into account when setting the shutter speed.
- A polarizer can cause vignetting. This is especially true if you use a wide angle lens because vignetting will affect the corners of the frame. To avoid this, you shouldn't stack too many filters and only buy slim or nano polarizing filters.
- A CPL filter may produce flare or halos in the final image.
Despite these drawbacks, I believe that a circular polarizing filter is an essential accessory in the backpack of any photographer (especially landscape ones). With a high quality filter and a little practice you can get spectacular results.
Neutral density (ND) filters

A neutral density (ND) filter is a piece of glass or semi-transparent resin that you place in front of the lens.
The ND filter allows you to evenly reduce the light that reaches the sensor. It allows you to subtract light (always evenly, remember). This helps you capture certain effects without overexposing the scene:
- You can slow down the shutter speed to create beautiful effects without overexposing the brightest tones. It allows you, for example, to capture a silk effect in the sea during a Sunset.
- You can use larger apertures (without overexposing the scene) to capture a shallower depth of field. This is useful, for example, if you want to separate the backlit subject from the background.
- The effect you get depends on the number of stops you're able to subtract according to the filter you're using (1, 2, 3 stops...).
But... Be careful!
The density indicated by the manufacturer is not always the real one, so I suggest you calibrate your ND filters.
By "calibrate" I mean "find out the actual density of the ND filter". It's a very simple process that I explain in detail in our lens filters guide (section 6).
Graduated neutral density (GND) filters
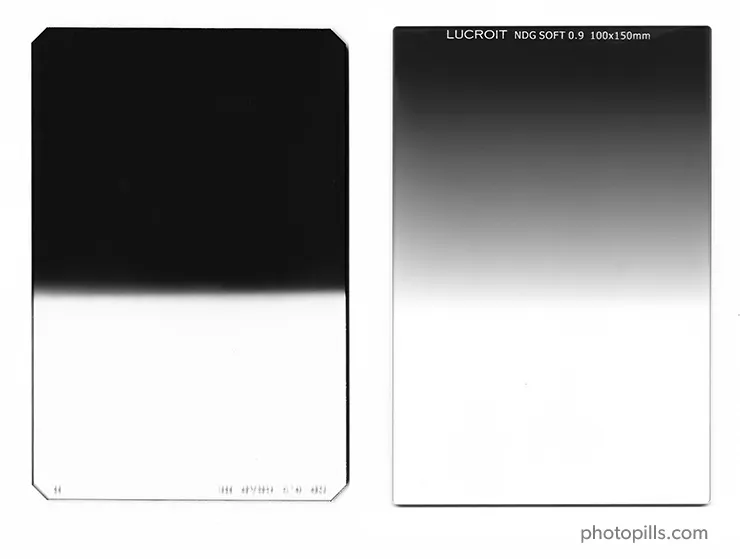
A graduated neutral density (GND) filter is a piece of glass or resin that you can place in front of your lens.
It's called graduated neutral density filters because:
- Its density varies gradually, subtracting light gradually.
- From the bottom edge of the filter to the center, this gradual variation goes from transparent to a neutral gray tone.
- From the center to the top edge of the filter, this gray's density gradually increases, subtracting more and more light.
It allows you to:
- Reduce the exposure difference (dynamic range) in the frame. In other words, remove light just in a specific area of the image, like the sky, for instance.
- Increase local contrast. That is, the detail and color of the image are improved.
Not all filters have the same transition (or gradient) from the darkest part to the clearest or more translucid part.
The transition can be hard, soft or diffused.
- In hard filters the transition between the dark and the transparent part is clearly marked with an almost perfectly defined horizontal line.
- In soft filters, on the other hand, the transition is gradual: the dark part gradually becomes transparent.
- A blender filter is completely dark at the top (almost as if it were an ND filter) and completely transparent at the bottom. The difference with the previous two is that the density gradually changes along the entire length of the filter.
Reverse graduated neutral density (reverse GND) filters
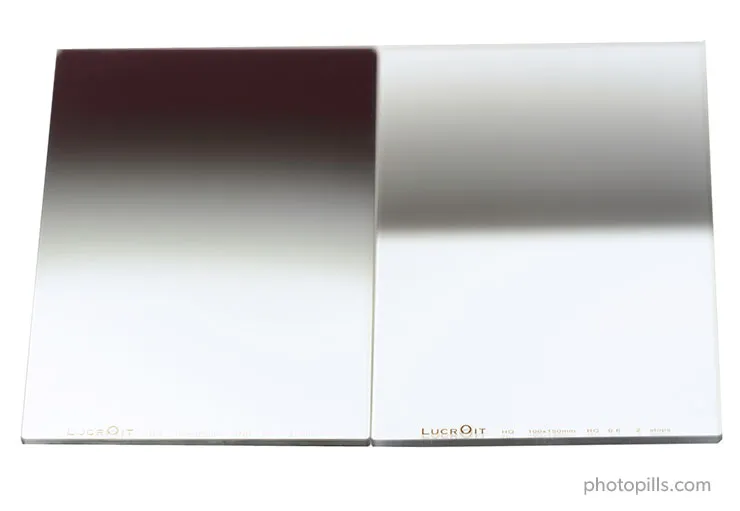
The reverse graduated neutral density, or reverse GND filter, is a variation of the graduated filter.
Its peculiarity is that the darkest part, the one that determines the filter density, is in the middle of the filter, and it progressively brightens towards the top. On the contrary, the lower half is completely transparent (to avoid subtracting light in the foreground).
That's why it's called reverse.
You can mainly use it for photographing backlit Sunrises and Sunsets with a clean horizon (without elements above).
Other types of filters
Special lens filters are often reserved for more whimsical photos.
Here are some examples that you should take into consideration.
- An ultraviolet (UV) filter is a glass filter, usually circular, that you screw onto the front of the lens and it blocks ultraviolet rays.
- A light pollution filter allows you to prevent artificial lights in urban centres from affecting your night photography or astrophotography.
- A solar filter is specially made to photograph the Sun or a solar eclipse.
- A black card is actually nothing more than that. It's literally a piece of black card or any dark element that has a smooth, flat surface.
- An infrared filter is specifically designed to block visible light. So it only allows infrared light to go through the lens and reach the camera's sensor.
- The Star Glow lens filter is designed to make bright stars glow and bloat whilst also accentuating their natural color. It simultaneously hides the fainter stars making constellations pop and stand out.
- The SharpStar2 lens filter is basically a focusing aid, especially if you're having difficulty in achieving consistency in sharp, focused stars.
- The Gold-N-Blue (Singh-Ray) and the Varicolor Blue/Yellow (Cokin) circular polarizing filters are special polarizers. Instead of eliminating reflections, these filters colors them with an intense blue or yellow tone as you rotate the filter.
- A Skylight filter is a glass filter, almost always circular. In addition to blocking ultraviolet rays, the filter has a faint orange-pink cast.
Are you still here? Yeah?
That's great!
Now you know what a lens filter is and the different types of lens filters that you can use to get a spectacular long exposure photo.
It's time to prepare the equipment you're going to use :)
6.All the equipment you need to take long exposures
Camera gear matters. And when it comes to long exposure photography, it matters even more.
Recently, a lot of people have been asking me about how I take long exposures. But, more specifically, their question is always the same:
"OK Toni, what do you need for long exposure photography?"
Well, here's a detailed description of all the equipment you need to take long exposures.
Camera
Your long exposures depend on the type of camera you use and their technical limitations.
And what are the basic requirements?
A reasonably good camera to take long exposure shots should
- Allow to shoot in RAW.
- Have a Manual (M) and Bulb (B) mode.
- Produce relatively low noise.
How take long exposures with your iPhone (or any other smartphone)
"Wait Toni, is that even possible?"
Believe it or not, the answer is... Yes!
And now, let's see how you can shoot long exposures with your iPhone (although this is possible with any other smartphone).
Option #1: Use a dedicated app
You can get a specific app to achieve some seriously fun long exposure effects. As long as you can more or less hold your smartphone steady, it will produce a very sharp photo with part of the scene blurred out.
- iPhone (Apple Store): Spectre is an AI-powered shutter, letting you create amazing long exposures.
- Android (Google Play Store): Camera FV-5. Despite being a shooting app, it features a long exposure mode that lets you create low-light photos and light trails.
Option #2: Use specific lens filters for smartphones
Some manufacturers have specific filters for mobiles, just like the ones you would use on your DSLR or mirrorless camera:
- Square and rectangular lens filters. NiSi offers a wide range of lens filters for smartphones (e.g. polarizer, ND, GND, light pollution). Their size is obviously smaller and you will need a filter holder and a smartphone clip.
- Circular lens filters. Several manufacturers, such as PolarPro or Singh, have many models of circular lens filters.
In addition to this, you'll need a shooting application that allows you to shoot in manual (M) or using a semiautomatic mode (A/Av or S/Tv).
Here are some examples, although you can find many more:
- iPhone (Apple Store): Camera+, ProCamera, and Halide Mark II.
- Android (Google Play Store): HD Camera, ProCam X, and Camera ZOOM FX Premium.
And don't forget to use some sort of tripod!
Keep in mind that you're going to shoot at relatively slow shutter speeds so you'll need some kind of tripod or support to keep it stable. Otherwise, handholding your smartphone will produce blurred pictures.
Point-and-shoot cameras
In general, all point-and-shoot cameras offer an average image quality and are very good value for money.
That said, your artistic capabilities will depend on your ability to find a filter system that fits your camera.
Here are a couple of examples:
- The Lensmate circular filter adapter for the Sony RX100 (all versions).
- Or my favorite option, the MagFilter magnetic filters.
And if not, you can always try to handhold the filters yourself or move the lens filters during the exposure.
Try and experiment because you never know. You can still get an amazing picture!
Low-end cameras
The following cameras allow full manual and semiautomatic basic exposure, which, in turn can help you control your long exposure:
- Cameras with an APS-C sensor: Nikon Z30; Canon 4000D, 250D and M5; Sony a6600.
- Cameras with a Micro 4/3 sensor: Olympus OM-D E-M10 Mark IV and Panasonic G95.
- Compact camera (1" sensor): Sony RX100 VII.
Mid-range cameras
In the mid-range price (and quality), I recommend you the following cameras:
- Cameras with an APS-C sensor: Nikon Z50, Zfc and D7500; Canon R10, R7, 850D, 90D and 6D Mark II; Fuji X-S20 and X-T30 II; Pentax KF; Sony a6700.
- Cameras with a Micro 4/3 sensor: Olympus OM-D E-M5 Mark III and Panasonic G9 II.
- Full Frame cameras: Nikon Z5 and D750; Canon RP; Sony a7C II.
High-end cameras
On the higher price range (and higher quality), I recommend you these cameras:
- Cameras with an APS-C sensor: Nikon D500; Fuji XH-2S, XT-5 and X-Pro3.
- Cameras with a Micro 4/3 sensor: Olympus OM-1 and Panasonic GH6.
- Full Frame cameras: Nikon Zf, Z6 II, Z7 II, Z8, Z9, D780, D850 and D6; Canon R8, R6 Mark II, R5, R3, 5D Mark IV, and 1D X Mark III; Panasonic S5 II, S5 II X, S1R and S1H; Pentax K-1 Mark II; Sony a7 IV, a7 CR, a7R V, a9 III and a1.
Lens
What lens is best for long exposure?
Your choice of lens and focal length will depend on which part of the scene you want to capture in your photos.
If you want to include a large part of the landscape, use a wide angle lens. For example, the Nikon 14-24mm f/2.8 (it's my favorite!).
If you prefer to focus on a smaller area, use a mid range lens.
Finally, if you like to photograph more specific details, bring a standard telephoto lens. For example, the Nikon 24-120mm f/4 or the Canon 24-105mm f/4.
Lens filters
Lens filters are part of the essential gear for long exposure photography.
But, with all the lens filters available in the market, what is the perfect lens filter kit for beginners (or advanced photographers)?
Well, I wrote an in-depth photography guide on lens filters.
But here is a summary of my recommendations...
Which ND filter should I buy?
The best ND filter for daytime long exposure photography is the 6-stop ND filter (ND 1.8).
Why? A 6-stop ND filter is, in my opinion, perfect for taking shots in two time frames:
- From the Sunrise actually happens until 30 minutes after Sunrise.
- From 30 minutes before Sunset until the Sunset actually happens.
Other popular ND filters:
- 3-stop ND filter (ND 0.9)
- 8-stop ND filter (ND 2.4)
- 10-stop ND filter (ND 3.0)
Which GND filter should I buy?
The best GND filter for daytime long exposure photography is the 3-stop soft GND filter (GND 0.9).
Why? The 3-stop soft GND filter is certainly the GND filter I use the most. As for the transition (soft), this filter is perfect for landscapes (marine and non-marine) where the horizon line is straight (seascape) or nor (mountainscape).
Other popular GND filters:
- 4-stop soft GND filter (GND 1.2)
- 2-stop soft GND filter (GND 0.6)
- 3-stop soft reverse GND filter (reverse GND 0.9)
Which polarizer (CPL) filter should I buy?
The best polarizer (CPL) filter, in my opinion, is the 112mm Slim circular polarizer from Lucroit.
Why? This specific choice is based on the fact that quality-wise it is excellent and I can mount it on my Lucroit lens filter holder together with other three filters with no vignetting up to 14mm full frame equivalent.
Filter holder

Again, there are two types of filters: circular screw-on and square or rectangular filters.
You have two ways of working with square or rectangular filters:
- Handhold them in front of the lens.
- Using a filter holder.
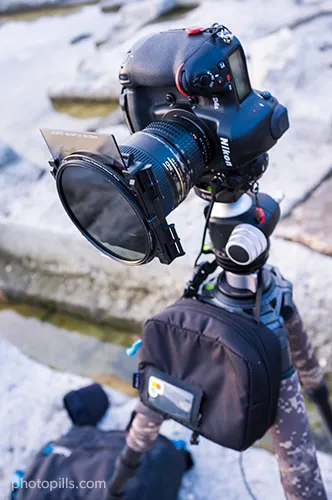
A filter holder is exactly that – a holder. It's usually made of plastic, and you mount it to the front of the lens using an adapter ring (more details about the latter in the next section). The filter holder has a series of slots in which you can slide different filters. The number of slots depends on the manufacturer, although a regular filter holder usually has three slots.
Obviously, the size of the filter holder you need depends on the size of the filters.
So if you have determined that you need 100mm filters for your lenses, the filter holder will have to be the same size.
I use a 100mm Lucroit filter holder for my Zeiss Milvus 18mm f/2.8, Nikon 17-35mm f/2.8, Sigma 35mm f/1.4, Nikon 70-200mm f/2.8, among other lenses.
I also use a 165mm Lucroit filter holder with my Nikon 14-24mm f/2.8 lens. Remember that this system can be used on smaller diameter lenses with an adapter.
The filter holders are made by the filter brands themselves. The most popular ones are: Lucroit, Nisi, Haida, Lee, Formatt-Hitech and Benro.
Adapter rings
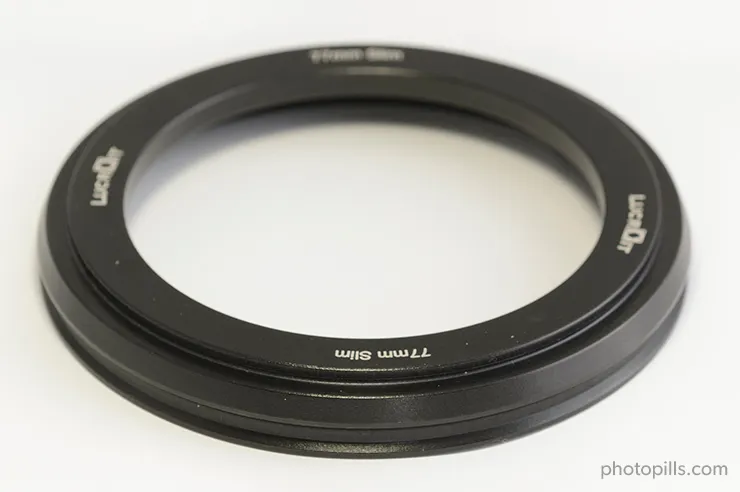
You need an adapter ring to attach the filter holder to the front of the lens.
It usually has a thread on the back that holds it to the lens. The front usually has a click system that allows you to hook the filter holder by pressing it a little bit.
But the most important feature of an adapter ring is not its front or rear attachment system.
It's its size.
So the first thing you have to take into account is the diameter of your lens. If you don't, the ring thread won't fit the lens... ;)
Imagine you have two lenses: a 77mm one and a 58mm one. If you want to use your filter holder with both you need two adapter rings: a 77mm one and a 58mm one. That was an easy guess... XD
There are adaptor rings that have all the sizes you can imagine, and they're usually very cheap.
Tripod and ballhead
You definitely cannot have a successful long exposure without a solid tripod.
This is particularly important if you plan to shoot long exposures because you have to make sure your gear doesn't move an inch during the capture.
In any case, you need to keep your camera steady in order to prevent vibrations that could blur your photos.
"Toni, I have a basic tripod. Can I use it for my long exposures with filters?"
Basic tripods don't usually weigh much and that makes them pretty unstable.
Use these simple yet useful tricks to avoid vibrations:
- Hang a bag filled with stones or even your camera bag from the hook located at the bottom of your tripod's center column. But don't do it when it's windy, you'll get the opposite effect!
- Don't raise the center column of the tripod if it has one, it will make it more unstable.
"If I had to buy a good tripod, what would you recommend?"
Get the Manfrotto 055XPRO3. It's probably the best seller tripod among advanced amateur photographers!
Have a look at the Travel line of Benro too.
If you want to (and can) spend a little bit more, have a look at carbon fiber tripods.
These tripods are robust and weigh less than the aluminium ones. They allow loads from 5 kg to over 25 kg (11-56 lb) depending on the model.
Brands like Gitzo, Manfrotto, Benro, Induro or Really Right Stuff offer tripods of great quality in both materials, carbon and aluminum.
"Great! What about the ballhead?"
Choosing your tripod head will depend on your taste, but make sure that it can bear at least 5/7 kg (11/16 lb) of weight and that it includes a removable plate.
In my opinion, the tripod's best friend is a good ballhead. The Really Right Stuff BH-55 is the one that I use. Supporting up to 23 kg (50 lb), it bears the weight of my gear with no problem. It allows me to work comfortably and with great precision.
Other ballheads that I like are the Gitzo GH1382QD, the Kirk Enterprises BH-1 and the Arca Swiss Monoball Z1 SP, all robust and with very high endurance (minimum 13.5 kg or 30 lb).
Additionally, if you're using a super telephoto lens you may want to use a gimbal head, such as the one I use, the Benro GH2.
Intervalometer
While shooting long exposures, you should avoid vibrations. Otherwise, you risk ending up with a whole bunch of blurred photos. In order to do so, you need a way to trigger your camera without having to touch it.
Shutter releases and intervalometers will do the job. But, in my opinion, you should forget about the remote shutter release and get a good intervalometer.
Why?
Because remote releases are not programmable. You cannot shoot at regular intervals automatically.
The intervalometer is programmable. You can set the exposure time, the time interval between each shot, the total number of photos you want to take and even the time delay of the first picture.
These are all great intervalometers:
- Pro intervalometer: SMDV.
- For cheap intervalometers check the brands Neewer, Phottix and Vello.
A great alternative is a device called CamRanger. Right now it's available for Nikon, Canon, Fuji and Sony cameras.
It's a stand-alone device that you connect to your DSLR or mirrorless camera with a USB cable. It creates an ad hoc WiFi network to which you can connect your smartphone or tablet (iOS, Android and Windows). Thanks to the CamRanger application you can control your camera without a computer or an Internet connection.
Best of all, this device is independent. Therefore, if your mobile device loses its connection, the CamRanger has an internal memory to keep shooting. Imagine that you are making a timelapse, your sequence would be cut if the camera stops taking pictures in the time frame you've set...
So the CamRanger is great for many types of photos: timelapses (of the Milky Way, of Star Trails, of solar eclipses or lunar eclipses...), bracketing, focus stacking for macro and landscapes... and many more!
Memory cards
There are many different types of SD Cards (Secure Digital) depending on capacity and data transfer speed. There are many brands on the market but my favorites are SanDisk and ProGrade.
For beginners, 32GB SD cards class 10 or U1 (from €12) are enough. They are great, cheap and the amount of photos stored is fine.
But... Its main drawback is that the transfer speed (how fast data is written to the card) is not the best in the world.
Buy a memory card with a high transfer rate, because it allows each picture to be saved into the memory card quicker.
Nowadays, the price of SD cards has dropped so much and it's so cheap to purchase an SDHC speed class 10 16GB card that you shouldn't purchase anything with less specifications.
Finally, I recommend you to use several small capacity cards rather than a few large capacity ones. That way, if you lose a card or spoil it, fewer pictures will be lost. By using several small capacity cards you decrease the risk of losing your photos.
While there are still cameras that can work with CompactFlash (CF) cards, this system is slowly disappearing.
And to replace it, SanDisk, Nikon and Sony launched a new card format called XQD currently available for several Full Frame (Nikon D4, D4s, D5 and D850; Panasonic S1 and S1R), APS-C (Nikon D500) and mirrorless (Nikon Z6, Z6 II, Z7 and Z7 II) models. These cards
- Have a very high storage capacity (from 32GB to 256GB).
- Have a super fast reading and recording speed (400MB/s compared to 160MB/s for a CF card or 250MB/s for an SD card).
- Are very secure, resistant and with an incredible durability.
Later on, in 2017, CFexpress launched the latest standard memory card from the CompactFlash Association with 2 new form factors, Type A and Type C were announced, with the existing XQD form factor becoming Type B.
- Type A has, so far, only been adopted by Sony in all of its newest models.
- Type B is a far more common format offering a lower price. It has been widely adopted by Nikon in its Z series, Canon in some EOS R bodies, and Panasonic in the S1/S1R and GH6.
- Type C is not being produced yet.
Microfiber cloth
I suggest you always carry several microfiber cloths in your backpack. Microfiber is the perfect fabric to clean both the front glass of your lens and your filters. It doesn't damage, stain or leave residue on any glass surface.
You can easily leave handprints or grease while manipulating the filters. And if you're doing a photo shooting on the coast, the sea may splash and leave drops on the filter. Or it could rain...
Anyway, the chances of getting stains on your filter are very high. They are dirt magnets.
And if you don't clean it, that dirt will show up in your images.
So if you don't want to spend hours in front of your computer cloning black spots, always carry several microfiber cloths with you!
Before I finish, let me give you some basic tips on cleaning your filters:
- Don't clean a filter with any fabric other than microfiber. You could scratch it.
- If the filter gets stained with salt water, don't forget to rinse it when you get home. Rinse it under fresh, warm water and dry it well with the microfiber cloth.
- When washing your cloth don't use bleach (it ruins the fabric). Avoid washing them with cotton towels (the microfiber collects all the particles) and don't use fabric softener because it will eliminate the static electricity that the microfiber needs to work properly.
And now that we've seen in detail all the key pieces of gear that you can or, rather, you should include into your equipment, there's no time to waste.
It's time to learn how to take long exposure photos :)
7.How to take daytime long exposure photos
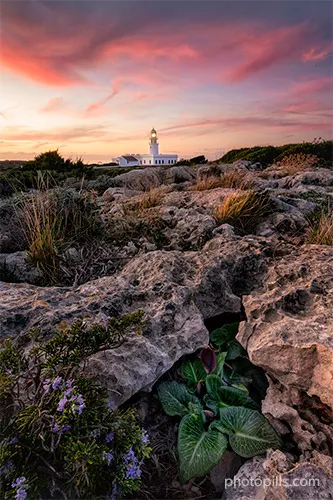
As I told you in section 2, every scene is different. So there is not a unique way of capturing daytime long exposures.
Don't worry if you don't have an established routine yet. I'll share mine with you ;)
This is my step by step workflow to take daytime long exposures
- In daylight.
- Around Sunrise.
- Around Sunset.
- During the golden hour
- During the blue hour.
- During a solar eclipse.
However, if you want to go into detail on how to do daytime long exposure photography, keep reading.
What daytime long exposure settings should you use?
Your settings will depend on 2 things: the light conditions of the scene and the subject that you're photographing.
It's just a matter of getting the "right" exposure and using the exposure triangle to get it.
Here are what I consider the best settings to take daytime long exposure shots:
Aperture
My favorite is f/8, which is the sweet spot of most of my lenses. But make sure you keep it between f/8 and f/16. Never go over f/16 to avoid diffraction.
ISO
You should always use the lowest possible ISO to avoid noise. Therefore, use ISO 100 or the native ISO in your camera.
Shutter speed
It depends on the lens filter(s) you're using to create the effect you want!
- Polarizer (CPL) lens filter. Remember it subtracts an average of 1 stop. You can learn how to use this lens filter reading section 5 of our lens filters guide.
- One or several ND filters. Use the PhotoPills Long Exposure calculator to know the equivalent shutter speed. You have all the details in section 7 of our lens filters guide.
- One or several GND filters. Depending on the number of GND filters you use, add up each filter’s density. You have a detailed explanation of all the workflow you need to follow to find out the shutter speed in section 8 of our lens filters guide.
Here are some examples:
- Waterfall silky water: 1s.
- Sea silky water: 1s.
- Show people moving, slow cars: 1/15s.
- Slow water motion: 1/2s.
- Fast water motion: 1/8s.
- People walking: 1/4s.
- Short star trails: 1min - 10min.
- Long star trails: 30min - 4h.
How to take daytime long exposure photos step by step
The time has come.
The shooting day of the photo that you've planned with so much effort is here.
Everything is ready. Your pulse accelerates and you get butterflies in your stomach...
So, from PhotoPiller to PhotoPiller, let me give you my best piece of advice: the exact workflow that I follow on each of my daytime long exposures.
To give you all the information, let's imagine I'm shooting a daytime long exposure for which I need:
- A polarizer (CPL) filter. More on how to shoot with it in section 5 of our lens filters guide.
- An ND filter. More on how to shoot with it in section 7 of our lens filters guide.
- A GND filter. More on how to shoot with it in section 8 of our lens filters guide.
You can also read a shortcut.
Get to your shooting spot in advance
You should always arrive well in advance to the location (2 or 3 hours at least). The last thing you want is to have to run to get the shot.
Patience is a virtue.
So you'll avoid making mistakes.
Get there early and scout the location so you can:
- Confirm your plan with PhotoPills. Adjust the shooting spot and even the shooting time.
- Check that you can access it easily and that there are no potential dangers.
- Discover different corners or spots that offer a different and/or complementary point of view to the one you had in mind.
- Work on your composition. It takes time, calm and patience to find the perfect composition. Or at least the one that is perfect for you.
Regarding this last bullet point, you should learn to work with your imagination: a photograph shot with filters can show a scene in a very different way than how your eyes see it. Therein lies the power of its magic ;)
That's why it's so important to try to anticipate how the silky water will look, in which direction the clouds will move... And anything else that can help you create a composition that enhances the image.
Place the tripod, ballhead, camera, and lens
Once in the field, place the tripod on the planned shooting spot (section 3) and make sure it's stable.
Mount the camera along with the lens on the ballhead. Check that all the gear is securely mounted to avoid any vibrations during the long exposure.
It's time to work on your composition.
Include the elements of the scene you want to include in your composition:
- Do you want a wide frame? Use a wide angle lens and a focal length of 14mm, 18mm or 24mm for example.
- Would you prefer to narrow the scene a bit more? Choose a longer focal length: 85mm or 105mm for example.
These decisions will help you determine if the lens you have on your camera is the right one. If it isn't, or you've changed your mind about the composition, remove the lens and put another one.
Remove the UV filter
Using a ultraviolet (UV) filter doesn't make any sense.
This type of filter slightly reduces the sharpness and contrast of your images. But it can also cause reflections, halos and flares.
If you usually have a ultraviolet (UV) filter screwed onto your lens, remove it as soon as you start preparing the equipment.
Turn off the lens stabilization system
You're using a tripod. Therefore, turn off the vibration reduction system or image stabilization system of your lens (VR/IS). This will prevent the lens from trying to eliminate vibrations that don't exist, and you'll end up with a less sharp image because of it.
Shoot in RAW
Always shoot in RAW!
The RAW format lets you take advantage of all the information captured by the sensor to produce better images. Make the most out of it.
Put the camera in manual (M) or semi-automatic (A/Av or S/Tv) mode
It's time to choose the shooting mode.
If you select the Manual (M) mode, you have total control over the exposure of your photos. You can choose the exposure time, aperture and ISO to get the exposure you want.
If you prefer the camera to help you, select one of the semi-automatic modes. Remember that with the Aperture Priority mode (A or Av) you choose the aperture and the camera decides the shutter speed. Conversely, with the Shutter Speed Priority mode (S or Tv) you set the shutter speed and the camera decides the aperture.
Select the spot metering mode
Thanks to the metering mode, you can determine the exposure in the key tone. That is to say, in that area of the scene where you want to know what kind of light you have and what settings you need to expose the photo correctly.
You don't have to get it right on the first attempt, so it's okay if you need to take several test shots before you get what you're looking for.
My recommendation is that, whenever it's possible, always use the spot metering mode.
If you're facing a scene where the light doesn't change too much, you can use the center-weighted metering mode.
Choose the focal length and work on your composition
To do this, adjust the focal length until you get the one that suits you, depending on the frame you want.
If your lens has a fixed focal length, move the tripod making sure you anchor it in a stable place and move the knobs on the ballhead so you point the camera in the direction you want.
Then, work thoroughly on your composition.
Attach the filter holder to the camera
Screw the lens adapter ring onto the lens and adjust the filter holder.
Wait... ;)
Don't insert any lens filters into the filter holder slots yet, even if you know how you want to use them. You will do this later.
Set the ISO
The ISO setting depends on how much noise your camera produces. Start with the lowest ISO available on your camera (100 or 200).
If you're forced to work at too slow shutter speed, crank up the ISO gradually until you reach the balance between the noise produced and the shutter speed you need.
Set the aperture
The aperture lets you control the depth of field, the area of the scene that's in focus in the picture.
- Imagine you want to show the viewer what's happening in a larger area of the scene (increase depth of field). In that case, close the diaphragm (reduce the aperture to f/8, f/11, f/16).
- On the other hand, if you open the diaphragm (increasing the aperture to f/1.4, f/2.8, f/4), the depth of field decreases. It helps you to direct the attention of the viewer to a specific point or area of the scene.
Focus
In photography, focusing is critical.
So remember: don't put any lens filter in front of the camera yet. The camera will be "blinded" by the lens filter and it will be very hard to focus. If you manage to focus, you'll probably do so in the wrong area of the frame.
"Yeah, but where do I focus?"
It depends! XD
It depends on which area of the scene you want to be perfectly focused and which area you prefer to be out of focus. In other words, it depends on where you want to position the depth of field in the scene.
You have several alternatives...
Maximize the depth of field with short focal lengths (focus at the hyperfocal distance)
When you're using short focal lengths (8-35mm) and you want to maximize the depth of field, focus at the hyperfocal distance.
For example, when you want the whole scene to be in focus, from the foreground to infinity.
The hyperfocal distance is just that, a distance.
When you focus at the hyperfocal distance, all the elements of the scene that are from half that distance to infinity are in focus.
I use it a lot for landscape photography, night photography, architecture...
In this video I show you how to focus at the hyperfocal distance.
Note: If the main subject is at a greater distance than the hyperfocal distance, you should focus directly on the subject. You will lose some depth of field in the foreground but everything that is at infinity will remain focused and the subject will be tack sharp.
You can calculate the hyperfocal distance very easily with the PhotoPills depth of field calculator.
That's all you need.
But if you're a nerd like me, you may want to know more about the hyperfocal distance...
Its value depends only on the size of your camera's sensor, the focal length and the aperture... Well, okay, it also depends on the Circle of Confusion (CoC) ;)
You'll find all the details and a thorough explanation in 'Depth of Field: The Definitive Photography Guide'.
Maximize depth of field with long focal lengths (focus on a point within the lower third of the scene)
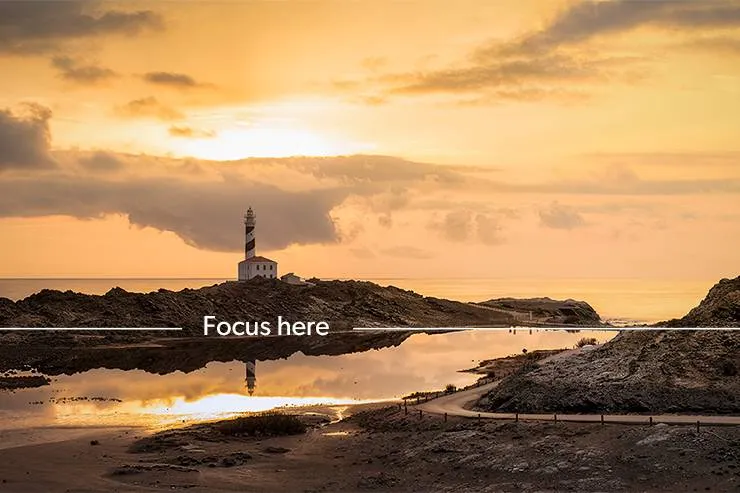
When you use long focal lengths, the hyperfocal distance is very long. So much so that you may not be able to focus at that distance.
In this case, the alternative is to focus at about a third of the frame (or scene) starting from the bottom.
You want a shallow depth of field
When you want a shallow depth of field to attract the viewer's eye on a point of the scene, focus on that point. You'll usually focus on your main subject.
How can you get a shallow depth of field?
As a rule of thumb, by opening the diaphragm (wider apertures), getting closer to the subject (smaller focusing distances) and using longer focal lengths.
"Perfect Toni. And now that I know where to focus, how do I do it?"
I love this question.
You have two alternatives: manual or autofocus.
How to focus using the manual focus
Select manual focus on your camera or your lens.
Once you've decided where you want to focus, focus manually by slowly turning the focus ring on your lens.
To do this, use the Live View function on your camera's LCD screen to focus accurately. And if your camera has the Focus Peaking and/or Focus Magnifier options, turn them on as well as they will help you to be even more accurate.
Zoom in while the Live View is on, until you see the detail of your subject's surface.
Then, turn the focus ring of the lens slowly until the detail of the surface is tack sharp.
If you're not used to focusing manually, turn the focus ring very subtly and when you notice that your subject is focused, keep turning the ring until you go a little out of focus. Then, turn the ring in the opposite direction to get everything in focus again. This way you'll see very clearly how everything is now in focus again.
How to focus using the autofocus
If you're not used to focusing manually, you can use your lens' autofocus.
Decide where to focus and press the shutter halfway until it focuses. Most cameras usually "beep" when they've focused correctly.
Then, change the focus mode of your lens from automatic to manual to prevent the camera from refocusing when shooting.
This is crucial. Don't forget to do this and you'll save yourself some trouble.
Another way to lock the focus is to assign the task of focusing to a button other than the shutter button. This way, you focus by pressing another button on the back of your camera with your thumb. And when you release it, the focus holds on the point you've chosen.
If you want to know how to set back button focus, take a look at your camera's user manual.
Take a test shot
Adjust the shutter speed so that the light meter is centered at zero (and your photo is correctly exposed).
Take a test shoot to double-check your focus and the histogram.
Once your focus is fine (ie. your subject is tack sharp) and the exposure is correct (ie. you aren't blowing out the highlights or clipping the shadows), remember the shutter speed you just set.
Start working with the polarizer (CPL) filter
Here's a brief summary of the steps you should follow.
But if you need a more detailed explanation on how to use the polarizing filter, read section 5 of our lens filters photography guide.
Mount the polarizer (CPL) filter on the filter holder
The polarizer (CPL) filter position depends on the system you're using:
- Manufacturers such as Lee or Lucroit, for example, produce a filter holder that lets you mount the polarizer in front with an adapter ring.
- There are other manufacturers, such as NiSi, whose mounting system is slightly different because the CPL filter is the one closest to the sensor.
Regardless of the system you're using, you should always start by mounting your CPL filter and polarizing the frame area that you're interested in.
Rotate the polarizer (CPL) filter
Once you're happy with your composition, all you have to do is rotate the filter gently. Do it little by little.
In the meantime, check the Live View LCD screen, or your electronic viewfinder if you have a mirrorless camera, to see if you're getting the effect you want. And if so, if the filter is doing it with the intensity you're looking for.
Meter the light in the key tone of the scene
Now that you've determined how, where and how much the polarizer affects the scene, it's time to meter the light in the key tone of the scene (with the polarizing filter on).
Adjust the shutter speed and take a test shot
Remember that, depending on the polarization angle, the filter subtracts between 1.5 and 2 stops. So you'll have to adjust the shutter speed so that the light meter is centered at zero.
If you have a mirrorless camera (with an electronic viewfinder) or a DSLR with this option, use the live histogram to help you adjust the exposure precisely.
Take a test shot, check the histogram and verify that everything is ok.
Place the GND filter (or the reverse GND filter)
Here's a brief summary of the steps you should follow.
But if you need a more detailed explanation on how to shoot with one or more GNDs, read section 8 of our lens filters photography guide.
Meter the light in the darkest and brightest area of the scene
Now that you have your circular polarizing filter in place (don't remove it!), it's time to find out the GND filter (or reverse GND filter) you need to use.
- Meter the light in the darkest area of the scene, where you will place the transparent part of the filter.
- Meter the light in the brightest area of the scene, where you will place the dark part of the filter.
- Calculate the exposure values of both areas with the PhotoPills Long Exposure calculator.
- Find out the density of the GND filter you need.
Select the GND filter (or the reverse GND filter) you need and insert it
Now, select the most appropriate strength and gradation of GND filter (or the reverse GND filter) for the scene (either soft, medium or hard) and put it in the outer slot of your lens filter holder.
Make sure you leave one free slot like this:
- Lens > free slot > GND filter > Polarizer (e.g. Lee, Lucroit).
- Lens > Polarizer > free slot > GND filter (e.g. NiSi).
Adjust the shutter speed and take a test shot
Your camera is still in spot metering mode.
Now meter the brightest area of the scene you want in detail.
Then, overexpose it by 1 or 2 stops (+1EV or +2EV), or respecting your camera's overexposure limit.
Take a test shot and check the histogram to verify that the exposure is correct.
If not, rinse and repeat.
If necessary, adjust the position of the graduated filter (GND and/or reverse GND)
And here comes the key moment: adjusting the filter position.
Where do you want to place the transition (the filter portion that goes from dark to light)?
If you take a GND filter with your hand and look through it, you'll see the transition zone more or less clearly. The problem is that by placing it in front of the lens, the transition is much less obvious when you look through the viewfinder.
Obviously, you'd like to slide the filter by placing the transition so that it matches the horizon of the photo (or the line that separates bright tones from the dark ones). But surprisingly, you'll get a more realistic photo by placing the transition slightly below the horizon.
In fact, the main problem is that if you place the filter, for example, with the transition too high relative to the horizon, the photo will have a very annoying bright strip just above the horizon.
You can see it in the next photo.
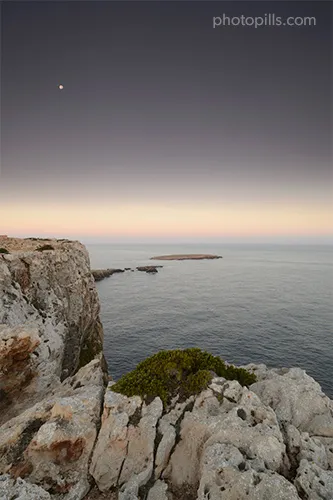
Conversely, if you place the filter too low, your background or foreground elements will be too dark in the picture. Be particularly careful with those elements that are above the horizon such as trees, rocks or mountains.
Here's an example.

Here's the final photo in which you can see how the filter position doesn't negatively affect the photo. The dark stripes have disappeared.

Bonus: using a GND filter AND a reverse GND filter
If you intend to use a GND filter AND a reverse GND filter:
- Calculate the GND filter you need by metering the difference in light stops between the brightest tone of the darkest area and the one of the brightest area (where you want to apply the filter). Use the PhotoPills Long Exposure calculator to calculate the exposure values (EV).
- Calculate the reverse GND filter you need by metering the difference in light stops between the brightest tone of the darkest area and the one of the brightest area (where you want to apply the filter). Use the PhotoPills Long Exposure calculator to calculate the exposure values (EV).
- Put the two filters in the filter holder and expose taking into account the brightest area of the scene.
Cover the viewfinder
Cover the viewfinder when shooting long exposures with ND filters, or if there's a bright light behind the viewfinder.
To do so, use a piece of black tape... Or any other thing that you can find, even if it's chewing gum! XD
Do it carefully so you don't move your camera or the focus ring of your lens while placing your filters.
Place the ND filter
Here's a brief summary of the steps you should follow.
But if you need a more detailed explanation on how to shoot with one or more NDs, read section 7 of our lens filters photography guide.
Insert the ND filter in the filter holder
Place the ND filter in the slot closest to the lens making sure that the foam gasket fits smoothly against the filter holder itself. This prevents light leak more effectively than if the ND filter was placed in the outer slots.
If you need to stack two ND filters in order to capture a long exposure with bright light conditions, make sure that the densest (ie. darkest) ND filter occupies the first slot. Darker ND filters tend to be the most prone to introducing reflections through light leak.
Enter the Test settings in the PhotoPills Long Exposure calculator
These are the base exposure settings, that is the exposure allowing you to expose correctly using the GND filter. You calculated it previously.
Enter the Equivalent settings in the PhotoPills Long Exposure calculator
These are the settings you'll use in the final shot: aperture, ISO and the actual density of your ND filter.
PhotoPills tells you the equivalent shutter speed when using the ND filter (and thus keeping the same base exposure).
Note: If you are photographing a Sunrise or a Sunset, be aware that the light changes very fast. If you use an ND filter, the exposure time given by PhotoPills may be too long and you may run out of light or the photo may be too dark. In that case, try using a lower density ND filter or no ND filter at all.
Take the picture with the polarizer, the ND filter, the GND filter and the final exposure
Now, if your camera has it, use the live histogram option to adjust the exposure accurately.
Finally, take the picture and use the histogram to check that you've got the correct exposure.
One more thing...
Work fast!
Light is the soul of photography, whether you're shooting with filters or not.
Light is the essential ingredient to capture a spectacular image. And in order to do that, you should be very careful when choosing the shooting time.
Using filters during a long exposure allows you to take photos at virtually any time of day. And if you don't believe me, I recommend you take a look at the work of Julia Anna Gospodarou (I'll tell you more about her in section 14).
But the vast majority of photographers, both beginners and experienced, generally use filters during dawn and dusk. In those moments of the day the light has a special color. Try taking pictures with filters during the golden hour, the blue hour and twilights, you'll see the difference compared to other times of the day.
The problem is that the perfect light doesn't last long...
And the amount of time you need to prepare your gear and shoot with filters, especially if it's a long exposure, is a bit longer than that of other types of photos...
So you have to try to get it right the first time!
And if it doesn't, get it right as soon as possible. Otherwise, by the time you realize it, that magic light will be gone.
8.How to take a long exposure at night
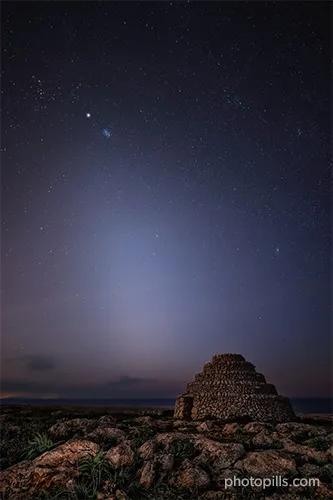
As I told you in section 2, you may not be very keen about shooting in the middle of nowhere at night. Fortunately, there's nothing to be afraid of!
My first piece of advice is that you should never shoot alone. And the second one is that you should enjoy the experience. Both the final shot and the sensations will be so rewarding that you'll forget everything else!
Depending on what you plan to shoot, your workflow may vary a bit.
So to get you started, this is my step by step workflow to take nighttime long exposures of
- The Milky Way.
- Star Trails.
- Meteor Showers.
- A person (night portrait).
- The zodiacal light.
- The Northern lights (auroras).
However, if you want to go into detail on how to do night long exposure photography, keep reading.
What long exposure settings should you use at night?
Your settings will depend on 2 things: the light conditions of the scene and the subject that you're photographing.
It's just a matter of getting the "right" exposure and using the exposure triangle to achieve it.
Here are what I consider the best settings to take a long exposure shot at night.
Aperture
You need to collect as much light as possible during the exposure time. So use the widest aperture possible (f/2.8, f/4, depending on your lens). The more light the sensor collects, the more stars, meteors or light trails you'll get and the brighter they'll be.
Moreover, it helps you keep the ISO within the limits of your camera so you can control noise.
ISO
Don't be afraid to crank up the ISO. Set the ISO to the maximum value for which your camera doesn't produce excessive noise (ISO 1600, 3200, 6400 or higher).
The idea here is to play with the ISO to tweak the exposure according to the exposure triangle.
Shutter speed
It's the key setting to night long exposure photography. Set your shutter speed depending on your subject:
- The Milky Way. Use the PhotoPills Spot Stars calculator. On the table of results, pick the NPF rule value. Depending on the camera and settings you use, you should use a maximum exposure time between 12-30s.
- Star Trails. You have two options: taking an ultra-long exposure of 2 to 5 hours to capture the star’s movement in one photo, or my favorite one, stacking multiple exposures of 20-30 seconds of the stars.
- Meteor Showers. Use the PhotoPills Spot Stars calculator. On the table of results, pick the NPF rule value. Depending on the camera and settings you use, you should use a maximum shutter speed between 10-25s.
- A person (night portrait). You should use a maximum exposure time between 3-4s, and make sure that your subject is completely still.
- The zodiacal light. You want to get stars as big bright spots, so you should use a maximum shutter speed between 10-20s.
- Light trails. Use a shutter speed between 10-20 seconds to capture long light trails. Just as you can do with Star Trails or fireworks, stack several images in post-processing to add different light trails to the same photo.
- Fireworks. Use a shutter speed between 2-10 seconds to capture long light trails. Just as you can do with Star Trails or a vehicle’s light trails, stack several images in post-processing to add different fireworks to the same photo.
- The Northern lights (auroras). Set your shutter speed between 1-25 seconds depending on the Northern Lights activity.
- Faint and static aurora: 10-25 seconds.
- Vibrant aurora: If you can see the aurora and notice some movement, set a shutter speed between 3-10 seconds.
- Very strong aurora: If the aurora is very active and it moves very quickly, set a shutter speed between 1-3 seconds. Your goal is to freeze its movement and avoid blowing out the highlights.
How to take a long exposure at night step by step
You got an idea.
You planned it, maybe a few months ago.
And finally, you find yourself in a beautiful outdoor location with dark skies.
You've worked out all the night long exposure camera settings... And you're ready to take a photograph.
Let's see how to set up everything for the shooting session, step by step.
Get to your shooting spot in advance
This step is crucial in photography, no matter the type of picture you plan to take. It allows you to scout the location in detail and to have enough time to prepare the gear.
More importantly, you can make sure you're at the exact shooting point. And that is the key to any night long exposure picture!
If you've planned your shot with PhotoPills (I hope you did), then you need to be right where the Red Pin is.
To do so, you can use the PhotoPills Night Augmented Reality view to double-check you're at the right spot and that you'll have your subject (e.g. the Milky Way) where you want.
Place the tripod, ballhead, camera, and lens
Place the tripod along with the ballhead on a surface as solid as possible and make sure it's stable.
Put on the lens that you're going to use during the shooting session and mount the camera and lens on the ballhead. Finally, plug the intervalometer in and check that everything works fine.
I have to insist... Double check all the equipment is stable. The slightest vibration will cause your subject to come out of focus. And that would be a pity!
Remove the UV filter
If you usually use a ultraviolet (UV) filter to protect your lens, remove it as soon as you start preparing the equipment.
In night photography, a ultraviolet (UV) filter can even ruin your photos. This type of filter slightly reduces the sharpness and contrast of your images. But it can also cause reflections, halos and flares.
Turn off the lens stabilization system
Some lenses include a function to stabilize vibrations. Canon, for example, calls it Image Stabilization (IS), while Nikon calls it Vibration Reduction (VR), and Sigma, Optical Stabilizer (OS). Other brands, such as Sony, Olympus and Pentax have been pushing for in-camera stabilization.
Since the equipment is stable on the tripod and ballhead, the system may try to compensate for non-existing vibrations... and the meteors could end up blurry.
Therefore, as a precaution, I recommend you switch the lens stabilization system off when using a tripod.
Long exposure noise reduction: on or off?
Noise is the biggest enemy of long exposures at night.
Nowadays, almost all cameras include an option to automatically reduce noise in the final image: the long exposure noise reduction function.
How does it work?
Well, when this function is enabled, right after taking the photo, the camera takes a second exposure with the same parameters (shutter speed, ISO and aperture) but without letting any light into the system. This second photo has almost the same noise as the first one.
Finally, the camera detects the noise of this second picture and removes it from the first one.
In my opinion, this function is not useful in long exposure photography because:
- It's preferable if you shoot much shorter single exposures and if you avoid waiting for so long to see the picture.
- It consumes battery. You could even run out of battery in the middle of the process and end up without your photo.
- When shooting multiple short exposures (to do an image stacking later on), you don't want to have such a big gap between two consecutive photos. It halves the number of photos you can take (so it reduces by 50% the chance to capture meteors). In this case, try to take a dark frame at the end of the shooting. Put the cap on the lens and shoot to capture noise only. Then, use this frame to reduce noise in post-processing.
Summing up...
When photographing the Milky Way, Star Trails, Meteor Showers, and even when photographing light trails, it's better to turn the long exposure noise reduction off.
Shoot in RAW
Always shoot in RAW!
That way you'll always have a higher quality base image that will allow you to develop, post-process and correct errors that would otherwise be impossible.
Keep in mind that the image you see on your LCD is a JPEG copy of the RAW file. So the histogram you're seeing on camera is not exactly the RAW file one.
Use the shortest focal length you can
Set the shortest focal length you can (14mm, 18mm, 24mm, etc.)
Try to keep it under 35 mm for two reasons:
- To maximize the field of view and capture as much sky as you can.
- To maximize the exposure time (set the lowest possible shutter speed) to collect as much light as possible and, eventually, capture stars as big bright spots.
I'll explain it better in a section below, when going deeper into the shutter speed (exposure time) settings.
Select the Manual shooting mode (M)
If you use your camera's auto mode you won't be able to capture a long exposure at night.
The Manual shooting mode (M) gives you total control over the exposure by setting the aperture, shutter speed and ISO adjustments at your will.
You'll need to use it to collect as much light as possible while getting a photo correctly exposed.
Use a light pollution filter (optional)
If there is light pollution in your scene from sodium vapor light sources, you should use a light pollution filter to remove in camera the yellowish glow they usually produce.
Screw the lens adapter ring onto the lens and adjust the filter holder. Then, insert the light pollution filter into the filter holder.
Set the aperture
If you want to capture the largest number of stars, you need to collect as much light as possible during the exposure time. So use the widest aperture possible (f/2.8, f/4, depending on your lens).
The more light the sensor collects, the more stars and the brighter.
Moreover, it helps you keep the ISO within the limits of your camera so you can control noise.
Notice that this is the workflow you should follow in Milky Way, Star Trails and Meteor Showers photography.
Select the ISO
Don't be afraid to crank up the ISO. Set the ISO to the maximum value for which your camera doesn't produce excessive noise (ISO 1600, 3200, 6400 or higher).
The idea here is to play with the ISO to tweak the exposure according to the exposure triangle. I'll show you how in a second ;)
Focus
When it comes to focusing you have two options:
- Focusing at the hyperfocal distance.
- Focusing at one star.
Depending on your taste, choose one or the other.
Focusing at the hyperfocal distance
The easiest way to have everything in the scene acceptably in focus is to focus at the hyperfocal distance.
How to calculate the hyperfocal distance
Once you've decided the focal length and aperture, use the PhotoPills Depth of Field calculator to calculate the hyperfocal distance for your camera settings.
As an example, using my Nikon Z6 together with an aperture of f/2.8 and a focal length of 14mm, the hyperfocal distance is 2.33 m.
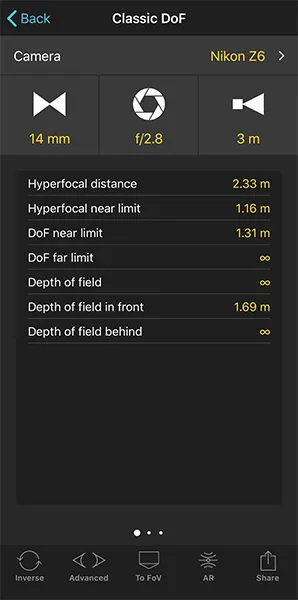
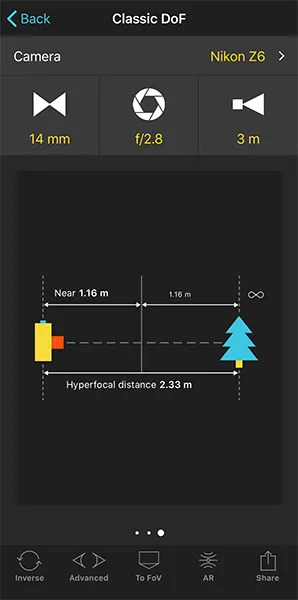
How to focus at the hyperfocal distance
Watch this video to learn how to focus at the hyperfocal distance:
Once you have the hyperfocal distance (2.33 m in this example), make sure you're not focusing at a shorter distance. If you do, you'll get the stars completely blurred, even if you miss the hyperfocal by one inch (or a couple of cm).
It's much better to make focus exceeding the hyperfocal distance by 2 feet (or half a meter) rather than falling short. I'm serious, don't fall short!
You can learn all you need to know about the hyperfocal distance and the depth of field with our extremely detailed DoF Guide.
Lock the focus
After using the automatic focus mode to focus at the hyperfocal distance, set it back to manual focus. It's the best way to ensure your focus doesn't change.
Always check whether the stars are in focus before starting the shooting.
Finally, you need to take a test shot.
Use the Live View function on the LCD of your camera to focus accurately. And if your camera has the Focus Peaking and/or Focus Magnifier functions, turn them on too because they will help you to be even more precise.
Now, find a star and zoom in on it to magnify it (or use the Focus Magnifier option). Then, turn the focus ring to make focus on it. Turn it until you see the star as a tiny little dot (actually, the smallest possible dot).
Once the camera is attached to the tripod, take as many test shots as you need to see if everything is in focus and adjust accordingly.
The last thing you want is to spend the whole night in the cold and find out at the end that your stars are out of focus.
Focusing at one star
If you want the stars to be tack sharp, but you don't mind losing a bit of sharpness in your subject, then focus on one star.
Set the camera and lens to manual focus.
Now, find a star and zoom in on it to magnify it (or use the Focus Magnifier option). Then, turn the focus ring to make focus on it. Turn it until you see the star as a tiny little dot (actually, the smallest possible dot).
Set the shutter speed (exposure time)
You have two conditions that define your shutter speed:
- You need to keep the shutter open as much as possible to capture as much light as possible, and thus get more stars in the photo.
- You need to limit the exposure time to prevent stars from trailing, and thus get the stars as big bright spots.
To work out the exposure time you need, use the PhotoPills Spot Stars calculator.
To do so, go to PhotoPills and open the Spot Stars calculator.
Once there, choose your camera and set
- The focal length,
- The aperture,
- The minimum declination of the stars, and
- The accuracy mode (default is the best option in most cases).
If you don't know the minimum declination of the stars you need to set, tap the AR button, point your smartphone where you're framing the camera and let PhotoPills automatically calculate the exposure time you need... ;)
Alternatively, if you're in doubt, just set the declination of the stars to 0º.
On the table of results you get two values: the NPF rule and the 500 rule.
The NPF rule gives you a more accurate value than the 500 rule. It even takes into account the megapixels of your camera.
If you want to learn more about the NPF rule and the 500 rule, you should read section 9 of our Milky Way photography guide.
Depending on the camera and settings you use, you should use a maximum exposure time between 10-25s.
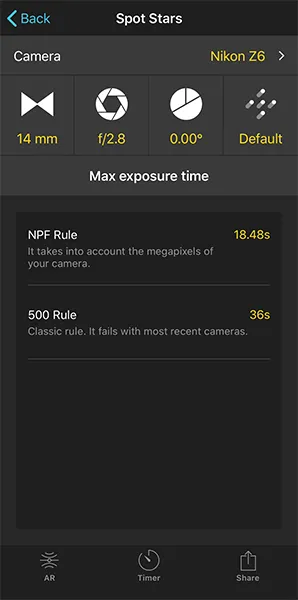
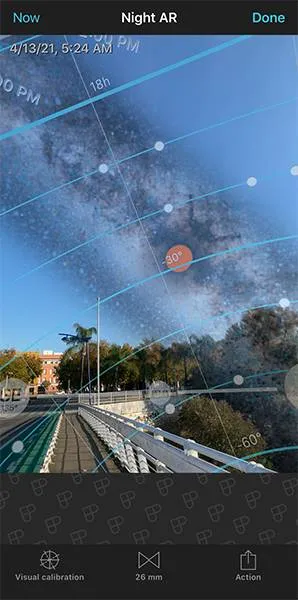
Fine tune the ISO
And the last night long exposure setting to adjust is... the ISO!
Remember that you've been using an extremely high ISO to take your test shots.
Now it's time to adjust it depending on:
- The exposure triangle.
- How much noise your camera produces.
You want to get the correct exposure and you've already set the aperture and the shutter speed. So, you only need to adjust the ISO according to the other two settings.
The ISO you'll use in the final shot strongly depends on the noise performance of your camera.
Start with a relatively high ISO (e.g. 6400, 3200, 1600) and continue taking test shots. After each test shot (or while you're taking it, if you have the live histogram option), have a close look at the histogram and zoom in the image in your LCD to check how much noise your camera has produced. Then, adjust the ISO accordingly.
It's a game of try and fail, but it gets easier with a bit of practice! ;)
Set the white balance manually
If you're shooting in RAW, white balance is something you can adjust in post-processing.
But, since I'm sure you would like to capture the real colors of the stars right in camera, use the following values as starting points and then adjust it from there:
- If the scene has a dark sky: 3900K
- If there is light pollution in the scene: 3400K
Review the composition, the focus, and the exposure
You're almost set.
Now, take a test shot. Use it to check the composition, that the focus is right and that the exposure is the one you're looking for (don't forget to examine the histogram).
You may need to make some adjustments. Maybe you'll have to recompose the shot a bit, or make focus again, or crack the ISO up (or down) to get the histogram you're looking for as I was suggesting earlier...
But after a few quick test shots, you should be ready to go :)
Light paint the foreground (optional)
If you want to give your night long exposure images a sense of place, add depth and shadows, you should light paint the foreground.
To have more natural looking images, make sure the artificial light is subtle and has a low intensity. This is absolutely necessary on New Moon or thin Moon days.
When light painting the foreground, test your exposure (check the histogram). You may have to take a few test shots to adjust the amount of artificial light you add to the scene.
Take a shot and check the histogram
One last thing before you start taking photos like there's no tomorrow: check the camera's histogram.
The histogram allows you to check the exposure of the image on the camera's LCD screen, and to modify the camera settings (aperture, shutter speed and ISO) to adjust it at your will.
OK, let's keep going.
There's another cool long exposure technique that I want to talk about: panning.
9.How to take long exposure photos of cars (and other moving objects) using the panning technique
The cool thing about the panning technique is that you can tell a story with a sense of movement.
All you need to do is capture a moving subject on a blurred background.
But let's start from the beginning...
What is panning?
Panning is a photography technique to create a sense of speed around a moving object.
The idea is to keep your subject in focus while blurring your background. And in order to do so, you have to combine a slow shutter speed while moving your camera.
Therefore, panning is the following of a moving subject along its plane of motion.
Oftentimes it's a horizontal plane with a moving subject (e.g. a rider, an animal running, a motorcyclist, a flying bird, a race car...). But you may want to convey motion along a vertical plane (e.g. someone jumping up and down, a diver going from the board to the water).
Camera settings
The first thing my workshop students ask me is what shutter speed they should use to make their pans.
Well, that's the last setting you will decide because it will depend on your subject's speed. Often, it will be the result of applying the try & fail method.
Here are my recommendations.
Shooting mode
Select your camera's continuous shoot mode or burst mode.
Focus
Continuous autofocus
For subjects moving in unpredictable ways, track them using the continuous autofocus mode.
That is AI Servo AF (Canon) or AF-C (Nikon, Sony, Fujifilm).
Back button focus
Alternatively, as you get more experience, you can pre-focus on a specific area, lock focus on that area and then press the shutter as the subject arrives in that area.
What is back button focus?
Once enabled, back button focus means that you won't focus half-pressing the shutter. Once you fully press the shutter button you'll only fire the shutter.
Instead, you'll focus with a button on the back of the camera – usually the AF-On button. All you have to do is touch the button, achieve focus and then by taking your thumb off the button, lock the focus.
ISO
Try to use the lowest ISO possible. But don't be afraid to crank it up if necessary.
It will depend on the light you'll find in the scene.
Aperture
Use the largest f-stop possible (smallest f number) – the smaller the f-stop, the harder it is to nail the focus.
If you intend to do a panning in bright lighting situations, you may have to stop down the aperture so that you can have a slow enough shutter speed.
However, bear in mind that shooting with very small aperture settings, like f/16 or smaller, makes any dust or dirt on your sensor increasingly visible.
Shutter speed
As you may have guessed:
- The shutter speed setting will depend on your subject's speed.
- The slower the shutter speed, the harder it is to keep steady during the exposure.
Start using a shutter speed between 1/60s to 1/30s. Using this range of shutter speeds should help you practice the feel and motion.
Sometimes a panning shot with everything blurry is annoying to people – something has to be sharp to hold the viewer's eyes in the picture. In this case, choose a shutter speed a bit faster (e.g. 1/125s) and focus on the face (e.g. a runner) or front (e.g. a bus) of your subject.
Let's say you're photographing a runner. At 1/125 his face will likely be pretty sharp, but his arms and legs will be a blur of motion, as will the background.
From there on, experimentation and experience have a lot to do with your shutter speed choices.
How to pan?
Let me start by saying that nothing can guarantee perfect pans. But if you keep practicing, shoot with patience and get a grasp of the basics, you'll definitely capture dramatic images of subjects in motion.
In theory, panning is easy: set your shutter speed to freeze motion or blur it, move your camera according to the action your subject is doing and snap the shutter. But it's how you handle the details of the concept that will determine the success of your images.
Choose your moving subject.
Adjust your camera setting just like I explained above.
Focus on your subject.
Move your body and camera at the same pace as the moving subject.
Keep pressing the camera shutter to continuously shoot frames as you move along with the subject.
Keep shooting as long as you're still following your subject with the camera.
Stop moving the camera after you pressed the shutter button.
Check the results and adjust the shutter speed if necessary.
How to stabilize yourself while panning
The way you stand is one of the most important factors in creating panning shot success.
Good stance is key! ;)
Follow these simple tips to get the best stabilization while panning:
Start from a standing or kneeling position, depending on the point of view and composition you have in mind.
If you decide to do your panning standing out, do so with your feet about a shoulder's distance apart. You may also bend your knees.
Hold your camera comfortably, in a position allowing you to move the camera and capture the subject accurately.
Firmly press your elbows into your rib cage.
Don't move your feet while you pan.
Follow your subject in the viewfinder as they move closer to you.
Rest your index finger lightly on the shutter button.
Rotate your entire upper body while panning, not just your hands; everything from the hips up should rotate. Make sure to do so at the same speed of the subject, in the same direction, while keeping your feet planted firmly.
Inhale, hold, and press the shutter as the subject crosses in front of you while continuing to follow them with your camera.
Keep shooting and don't stop moving the camera until you've finished pressing the shutter button.
While you are moving, don't tilt or wobble the camera. The more locked-in and compact your position is, the steadier your rotation will be.
7 tips for better camera panning
Here are a few tips for perfecting your technique of panning to show motion.
- Start by practicing this technique on a relatively slow moving subject (e.g. a person walking).
- Then, challenge yourself by panning with faster moving objects (e.g. a motorbike, a galloping horse).The faster the subject moves, the faster you have to move.
- Really push your ability to freeze a moving object while completely blurring everything around it. Try shooting just one frame rather than a continuous stream.
- Use a smaller f-stop, giving you a shallower depth of field and more extreme background blurs.
- Press the shutter button only when the subject is parallel to your camera. It will help you get a focused and sharp subject, while your background is blurred.
- If you're shooting in bright sunlight, use a polarizing filter or a neutral density (ND) filter in order to get your shutter speed low enough.
- Try using a monopod to get an extra help of stabilization. You may find that a tripod is too cumbersome. Nevertheless, use what feels comfortable to you.
10.16 long exposure photography examples explained step by step
Every scene is different.
And it's almost impossible to summarize in a series of steps a method that serves to successfully capture all of them.
The theory is fine, but the best way to learn is by looking at examples and practicing while replicating them.
That's why I thought that I could help you by showing you a lot of examples, real photos that I've shot myself.
The idea is that you learn the logic and decision workflow that led me to capture the long exposure I wanted. So you'll be able to capture any scene, no matter how hard it looks.
Keep reading!
Waterfall (1)
The steps you should follow to take the photo are:
- Gear: Camera (the type of sensor doesn't really matter). A wide angle lens if you want a broad landscape. An intervalometer. A sturdy tripod and a ballhead.
- ND filter: ND 3.0 (10 stops) filter to reduce the amount of light captured by the sensor (increase the exposure time) and get a slight movement in the low clouds. Take a look at section 7 of our lens filters photography guide to learn how to choose the ND filter you need and how to take a long exposure with it.
- GND filter: Soft GND 0.9 (3 stops) filter to reduce the dynamic range between the sky and the foreground and capture the scene in a single shot. Check section 8 of our lens filters photography guide to learn how to choose the GND filter you need and how to take a long exposure with it.
- Camera settings: Shoot in RAW. Turn off the image stabilization function if your lens has it.
- Focal length: It depends on the type of landscape you want to do. You can use from a small focal length (10mm, 14mm, 24mm) to cover as much of the landscape and sky as possible to a telephoto lens (85mm, 200mm, 300mm) or a super telephoto lens (500mm, 600mm). Here I chose a wide angle lens in a low position.
- Exposure mode: Manual (M).
- Metering mode: Spot metering mode. If you have doubts on how to expose, follow the steps indicated in section 10 of our lens filters photography guide.
- Don't insert the GND filter yet. Meter the light in the darkest area of the scene (use the spot metering mode in the brightest tone of the darkest area). Adjust the camera exposure according to this metering and get the base exposure settings (aperture, speed and ISO). Then, meter the light in the brightest area of the scene (use the spot metering mode in the brightest tone of the brightest area), and calculate the exposure values of the two zones with the PhotoPills Long Exposure calculator.
- Now insert the GND filter. Meter the brightest area of the scene you want in detail and overexpose by 1 or 2 stops (+1EV or +2EV).
- Aperture: Use a small aperture to get a deep depth of field. Don't go over f/16 to avoid diffraction. Here I set f/8.
- ISO: You'll always use a tripod to shoot long exposure landscapes. Use the lowest possible ISO.
- Shutter speed: Since you're shooting in Manual mode (M), the shutter speed is determined by the aperture, ISO and filters combination you select.
- Open the PhotoPills Long Exposure calculator or ND filter calculator.
- Enter the Test settings in the Long Exposure calculator. These are the base exposure settings, that is the exposure allowing you to expose correctly using the GND filter. You calculated it when metering.
- Enter the Equivalent settings in the Long Exposure calculator. These are the settings you'll use in the final shot: aperture, ISO and the actual density of your ND filter.
- PhotoPills tells you the equivalent shutter speed when using the ND filter (and thus keeping the same base exposure). Now you can insert the ND filter.
- White Balance: Manual. It depends on the time of day and the quality of natural light. Nevertheless, you can always correct it in post-processing.
- Where to focus: Focus at the subject or at the hyperfocal distance to maximize the depth of field. It depends on your composition. Here I focused on my subject.
- Take the picture and check that everything is in focus. Make sure the photo is correctly exposed (check the histogram). Otherwise, adjust the exposure triangle.
Daylight (2)
The steps you should follow to take the photo are:
- Gear: Camera (the type of sensor doesn't really matter). A wide angle lens if you want a broad landscape. An intervalometer. A sturdy tripod and a ballhead.
- ND filter: ND 3.0 (10 stops) filter to reduce the amount of light captured by the sensor (increase the exposure time) and get a slight movement in the low clouds. Check section 7 of our lens filters photography guide to learn how to choose the ND filter you need and how to take a long exposure with it.
- Camera settings: Shoot in RAW. Turn off the image stabilization function if your lens has it.
- Focal length: It depends on the type of landscape you want to do. You can use from a small focal length (10mm, 14mm, 24mm) to cover as much of the landscape and sky as possible to a telephoto lens (85mm, 200mm, 300mm) or a super telephoto lens (500mm, 600mm). Here I chose a wide angle lens in a low position.
- Exposure mode: Manual (M).
- Metering mode: Spot metering mode. Meter the brightest area of the scene you want in detail and overexpose by 1 or 2 stops (+1EV or +2EV). If you have doubts on how to expose, follow the steps indicated in section 8 of our lens filters photography guide.
- Aperture: Use a small aperture to limit as much as possible the amount of light captured by the sensor. Don't go over f/16 to avoid diffraction. Here I set f/16.
- ISO: You'll always use a tripod to shoot long exposure landscapes. Use the lowest possible ISO.
- Shutter speed: Since you're shooting in Manual mode (M), the shutter speed is determined by the aperture, ISO and filters combination you select. Here, you first need to take a test shot without the ND filter, but with a correct histogram. Then, use the PhotoPills Long Exposure calculator to calculate the equivalent settings. Finally, insert the ND filter to use a slow shutter speed.
- White Balance: Manual. It depends on the time of day and the quality of natural light. Nevertheless, you can always correct it in post-processing.
- Where to focus: Focus at the subject or at the hyperfocal distance to maximize the depth of field. It depends on your composition. Here I focused on my subject.
- Take the picture and check that everything is in focus. Make sure the photo is correctly exposed (check the histogram). Otherwise, adjust the exposure triangle.
Sunrise (3)
The steps you should follow to take the photo are:
- Gear: Camera (the type of sensor doesn't really matter). A wide angle lens if you want a broad landscape. An intervalometer. A sturdy tripod and a ballhead.
- GND filter: Soft GND 0.9 (3 stops) filter to reduce the dynamic range between the sky and the foreground and capture the scene in a single shot. Check section 8 of our lens filters photography guide to learn how to choose the GND filter you need and how to expose with it.
- Camera settings: Shoot in RAW. Turn off the image stabilization function if your lens has it.
- Focal length: It depends on the type of landscape you want to do. You can use from a small focal length (10mm, 14mm, 24mm) to cover as much of the landscape and sky as possible to a telephoto lens (85mm, 200mm, 300mm) or a super telephoto lens (500mm, 600mm). Here I chose a wide angle lens in a low position.
- Exposure mode: Manual (M).
- Metering mode: Spot metering mode. If you have doubts on how to expose, follow the steps indicated in section 10 of our lens filters photography guide.
- Don't insert the GND filter yet. Meter the light in the darkest area of the scene (use the spot metering mode in the brightest tone of the darkest area). Adjust the camera exposure according to this metering and get the base exposure settings (aperture, speed and ISO). Then, meter the light in the brightest area of the scene (use the spot metering mode in the brightest tone of the brightest area), and calculate the exposure values of the two zones with the PhotoPills Long Exposure calculator.
- Now insert the GND filter. Meter the brightest area of the scene you want in detail and overexpose by 1 or 2 stops (+1EV or +2EV).
- Aperture: Use a small aperture to get a deep depth of field. Don't go over f/16 to avoid diffraction. Here I set f/16 because I was close to the foreground.
- ISO: You'll always use a tripod to shoot long exposure landscapes. Use the lowest possible ISO.
- Shutter speed: Since you're shooting in Manual mode (M), the shutter speed is determined by the aperture, ISO and filters combination you select. Here, your personal style comes into play depending on how much depth of field, motion or light (brightness) you want in the photo. Although, in general, I recommend you to use slow shutter speeds.
- White Balance: Manual. It depends on the time of day and the quality of natural light. Nevertheless, you can always correct it in post-processing.
- Where to focus: Focus at the hyperfocal distance to maximize the depth of field. At f/16 I made sure I had the whole scene in focus, from the hyperfocal near limit that is at 0.69 m to infinity.
- Take the picture and check that everything is in focus. Make sure the photo is correctly exposed (check the histogram). Otherwise, adjust the exposure triangle.
If you want to learn how to photograph a unique Sunrise, check out our Sunrise photography guide.
Blue hour (4)
The steps you should follow to take the photo are:
- Gear: Camera (the type of sensor doesn't really matter). A wide angle lens if you want a broad landscape. An intervalometer. A sturdy tripod and a ballhead.
- ND filter: ND 1.8 (6 stops) filter to increase the exposure and get a silky sea and a slight movement in the low clouds. Take a look at section 7 of our lens filters photography guide to learn how to choose the ND filter you need and how to take a long exposure with it.
- GND filter: Soft GND 0.9 (3 stops) filter to reduce the dynamic range between the sky and the foreground and capture the scene in a single shot. Check section 8 of our lens filters photography guide to learn how to choose the GND filter you need and how to expose with it.
- Camera settings: Shoot in RAW. Turn off the image stabilization function if your lens has it.
- Focal length: It depends on the type of landscape you want to do. You can use from a small focal length (10mm, 14mm, 24mm) to cover as much of the landscape and sky as possible to a telephoto lens (85mm, 200mm, 300mm) or a super telephoto lens (500mm, 600mm). Here I chose a wide angle lens.
- Exposure mode: Manual (M).
- Metering mode: Spot metering mode. If you have doubts on how to expose, follow the steps indicated in section 10 of our lens filters photography guide.
- Don't insert the GND filter yet. Meter the light in the darkest area of the scene (use the spot metering mode in the brightest tone of the darkest area). Adjust the camera exposure according to this metering and get the base exposure settings (aperture, speed and ISO). Then, meter the light in the brightest area of the scene (use the spot metering mode in the brightest tone of the brightest area), and calculate the exposure values of the two zones with the PhotoPills Long Exposure calculator.
- Now insert the GND filter. Meter the brightest area of the scene you want in detail and overexpose by 1 or 2 stops (+1EV or +2EV).
- Aperture: Use a small aperture to get a deep depth of field. Don't go over f/16 to avoid diffraction. Here I set f/11.
- ISO: You'll always use a tripod to shoot long exposure landscapes. Use the lowest possible ISO.
- Shutter speed: Since you're shooting in Manual mode (M), the shutter speed is determined by the aperture, ISO and filters combination you select.
- Open the PhotoPills Long Exposure calculator or ND filter calculator.
- Enter the Test settings in the Long Exposure calculator. These are the base exposure settings, that is the exposure allowing you to expose correctly using the GND filter. You calculated it when metering.
- Enter the Equivalent settings in the Long Exposure calculator. These are the settings you'll use in the final shot: aperture, ISO and the actual density of your ND filter.
- PhotoPills tells you the equivalent shutter speed when using the ND filter (and thus keeping the same base exposure). Now you can insert the ND filter.
- White Balance: Manual. You can cool down the scene to add drama to the blue hour. Nevertheless, you can always correct it in post-processing.
- Where to focus: Focus at the hyperfocal distance to maximize the depth of field. At f/11 I made sure I had the whole scene in focus, from the hyperfocal near limit that is at 0.50 m to infinity.
- Take the picture and check that everything is in focus. Make sure the photo is correctly exposed (check the histogram). Otherwise, adjust the exposure triangle.
As soon as you read our blue hour photography guide you'll be able to capture nature and urban landscapes during blue hour and get amazing photos.
Golden hour (5)
The steps you should follow to take the photo are:
- Gear: Camera (the type of sensor doesn't really matter). A wide angle lens if you want a broad landscape. An intervalometer. A sturdy tripod and a ballhead.
- ND filter: ND 0.9 (3 stops) filter to increase the exposure and get a silky sea and a slight movement in the low clouds. Take a look at section 7 of our lens filters photography guide to learn how to choose the ND filter you need and how to take a long exposure with it.
- GND filter: Soft GND 0.9 (3 stops) filter to reduce the dynamic range between the sky and the foreground and capture the scene in a single shot. Check section 8 of our lens filters photography guide to learn how to choose the GND filter you need and how to take a long exposure with it.
- Camera settings: Shoot in RAW. Turn off the image stabilization function if your lens has it.
- Focal length: It depends on the type of landscape you want to do. You can use from a small focal length (10mm, 14mm, 24mm) to cover as much of the landscape and sky as possible to a telephoto lens (85mm, 200mm, 300mm) or a super telephoto lens (500mm, 600mm). Here I chose a wide angle lens in a low position.
- Exposure mode: Manual (M).
- Metering mode: Spot metering mode. If you have doubts on how to expose, follow the steps indicated in section 10 of our lens filters photography guide.
- Don't insert the GND filter yet. Meter the light in the darkest area of the scene (use the spot metering mode in the brightest tone of the darkest area). Adjust the camera exposure according to this metering and get the base exposure settings (aperture, speed and ISO). Then, meter the light in the brightest area of the scene (use the spot metering mode in the brightest tone of the brightest area), and calculate the exposure values of the two zones with the PhotoPills Long Exposure calculator.
- Now insert the GND filter. Meter the brightest area of the scene you want in detail and overexpose by 1 or 2 stops (+1EV or +2EV).
- Aperture: Use a small aperture to get a deep depth of field. Don't go over f/16 to avoid diffraction. Here I set f/11 because I was close to the foreground.
- ISO: You'll always use a tripod to shoot long exposure landscapes. Use the lowest possible ISO.
- Shutter speed: Since you're shooting in Manual mode (M), the shutter speed is determined by the aperture, ISO and filters combination you select.
- Open the PhotoPills Long Exposure calculator or ND filter calculator.
- Enter the Test settings in the Long Exposure calculator. These are the base exposure settings, that is the exposure allowing you to expose correctly using the GND filter. You calculated it when metering.
- Enter the Equivalent settings in the Long Exposure calculator. These are the settings you'll use in the final shot: aperture, ISO and the actual density of your ND filter.
- PhotoPills tells you the equivalent shutter speed when using the ND filter (and thus keeping the same base exposure). Now you can insert the ND filter.
- White Balance: Manual. It depends on the time of day and the quality of natural light. Nevertheless, you can always correct it in post-processing.
- Where to focus: Focus at the hyperfocal distance to maximize the depth of field. At f/11 I made sure I had the whole scene in focus, from the hyperfocal near limit that is at 0.50 m to infinity.
- Take the picture and check that everything is in focus. Make sure the photo is correctly exposed (check the histogram). Otherwise, adjust the exposure triangle.
As soon as you study our golden hour photography guide your photos of landscapes and cities during the golden hour will become amazing images.
Sunset (6)
The steps you should follow to take the photo are:
- Gear: Camera (the type of sensor doesn't really matter). A wide angle lens if you want a broad landscape. An intervalometer. A sturdy tripod and a ballhead.
- ND filter: ND 1.8 (6 stops) filter to increase the exposure and get a silky sea and a slight movement in the low clouds. Take a look at section 7 of our lens filters photography guide to learn how to choose the ND filter you need and how to expose with it.
- GND filter: Soft GND 0.9 (3 stops) filter to reduce the dynamic range between the sky and the foreground and capture the scene in a single shot. Check section 8 of our lens filters photography guide to learn how to choose the GND filter you need and how to expose with it.
- Camera settings: Shoot in RAW. Turn off the image stabilization function if your lens has it.
- Focal length: It depends on the type of landscape you want to do. You can use from a small focal length (10mm, 14mm, 24mm) to cover as much of the landscape and sky as possible to a telephoto lens (85mm, 200mm, 300mm) or a super telephoto lens (500mm, 600mm). Here I chose a wide angle lens in a low position.
- Exposure mode: Manual (M).
- Metering mode: Spot metering mode. If you have doubts on how to expose, follow the steps indicated in section 10 of our lens filters photography guide.
- Don't insert the GND filter yet. Meter the light in the darkest area of the scene (use the spot metering mode in the brightest tone of the darkest area). Adjust the camera exposure according to this metering and get the base exposure settings (aperture, speed and ISO). Then, meter the light in the brightest area of the scene (use the spot metering mode in the brightest tone of the brightest area), and calculate the exposure values of the two zones with the PhotoPills Long Exposure calculator.
- Now insert the GND filter. Meter the brightest area of the scene you want in detail and overexpose by 1 or 2 stops (+1EV or +2EV).
- Aperture: Use a small aperture to get a deep depth of field. Don't go over f/16 to avoid diffraction. Here I set f/13 because I was close to the foreground.
- ISO: You'll always use a tripod to shoot long exposure landscapes. Use the lowest possible ISO.
- Shutter speed: Since you're shooting in Manual mode (M), the shutter speed is determined by the aperture, ISO and filters combination you select.
- Open the PhotoPills Long Exposure calculator or ND filter calculator.
- Enter the Test settings in the Long Exposure calculator. These are the base exposure settings, that is the exposure allowing you to expose correctly using the GND filter. You calculated it when metering.
- Enter the Equivalent settings in the Long Exposure calculator. These are the settings you'll use in the final shot: aperture, ISO and the actual density of your ND filter.
- PhotoPills tells you the equivalent shutter speed when using the ND filter (and thus keeping the same base exposure). Now you can insert the ND filter.
- White Balance: Manual. It depends on the time of day and the quality of natural light. Nevertheless, you can always correct it in post-processing.
- Where to focus: Focus at the hyperfocal distance to maximize the depth of field. At f/13 I made sure I had the whole scene in focus, from the hyperfocal near limit that is at 0.87 m to infinity.
- Take the picture and check that everything is in focus. Make sure the photo is correctly exposed (check the histogram). Otherwise, adjust the exposure triangle.
Thanks to our Sunset photography guide you'll take photos of amazing Sunsets. I promise!
Solar eclipse (7)
The steps you should follow to take the photo are:
- Gear: Camera (regardless of its sensor size). A wide angle lens. An intervalometer. A sturdy tripod and a ballhead. A solar filter.
- Camera settings: Shoot in RAW. Turn off the image stabilization function if your lens has it.
- Focal length: Your composition will determine the focal length you need. If you want to capture as much landscape as possible, despite the Sun looking super small, choose a short focal length (10mm, 14mm, 24mm). If you have an interesting subject in the foreground, get close to it.
- Metering mode: Spot metering mode. To photograph the partial eclipse, put the solar filter on before the eclipse begins and meter on the Sun. To photograph the phases during totality, remove the filter, meter on the brightest spot of the scene and overexpose by 1 or 2 stops (+1EV o +2EV). Be careful not to move the camera when changing the settings so that you can then blend all the photos seamlessly.
- Aperture: Use a small aperture to increase depth of field (f/8, f/11) and get a better quality image.
- Shutter speed: Keep the shutter speed between 1/125s y 1/4000s during the partial eclipse. It will depend on the solar filter you use and the weather conditions. Use a slower shutter speed during totality (probably about 1-2 seconds, but make sure the shot isn't under or overexposed).
- ISO: Keep the ISO as low as possible (nominal, that is 100 or 200).
- White balance: Manual. Nevertheless, you can always correct it in post-processing. But if you want to capture the true colors of the Sun and the scene in camera, you should start with a white balance of 5200K, and adjust accordingly.
- Where to focus: Since you're using a short focal length, focus at the hyperfocal distance.
- Take the picture and check that everything is in focus. Otherwise, refocus at the hyperfocal distance.
- Make sure the photo is correctly exposed (check the histogram). Otherwise, adjust the exposure triangle.
If you need more details, check our photography guide on solar eclipses.
Light trails (8)
Photo by Albert Dros
The steps you should follow to take the photo are:
- Gear: Camera (the type of sensor doesn't really matter). A wide angle lens if you want a broad landscape. An intervalometer. A sturdy tripod and a ballhead.
- ND filter: ND 1.8 (6 stops) filter to reduce the amount of light captured by the sensor (increase the exposure time) and get a slight movement in the low clouds. Check section 7 of our lens filters photography guide to learn how to choose the ND filter you need and how to take a long exposure with it.
- Camera settings: Shoot in RAW. Turn off the image stabilization function if your lens has it.
- Focal length: It depends on the type of landscape you want to do. You can use from a small focal length (10mm, 14mm, 24mm) to cover as much of the landscape and sky as possible to a telephoto lens (85mm, 200mm, 300mm) or a super telephoto lens (500mm, 600mm). Here Albert chose a wide angle lens in an elevated position.
- Exposure mode: Manual (M).
- Metering mode: Spot metering mode. Meter the brightest area of the scene you want in detail and overexpose by 1 or 2 stops (+1EV or +2EV). If you have doubts on how to expose, follow the steps indicated in section 8 of our lens filters photography guide.
- Aperture: Use a small aperture to limit as much as possible the amount of light captured by the sensor. Don't go over f/16 to avoid diffraction. Here Albert set f/8.
- ISO: You'll always use a tripod to shoot long exposure landscapes. Use the lowest possible ISO.
- Shutter speed: Since you're shooting in Manual mode (M), the shutter speed is determined by the aperture, ISO and filters combination you select. Here, you first need to take a test shot without the ND filter, but with a correct histogram. Then, use the PhotoPills Long Exposure calculator to calculate the equivalent settings. Finally, insert the ND filter to use a slow shutter speed.
- White Balance: Manual. It depends on the time of day and the quality of natural light. Nevertheless, you can always correct it in post-processing.
- Where to focus: Focus at the subject or at the hyperfocal distance to maximize the depth of field. It depends on your composition. Here Albert focused on his subject.
- Take the picture and check that everything is in focus. Make sure the photo is correctly exposed (check the histogram). Otherwise, adjust the exposure triangle.
Night portrait (9)
The steps you should follow to take the photo are:
- Gear: Camera (full frame is best). A wide angle lens. An intervalometer. A sturdy tripod and a ballhead. Flashlights, LEDs and anti-moisture systems (take a look at the gear to photograph the Milky Way).
- Camera settings: Shoot in RAW. Turn off the image stabilization function if your lens has it.
- Focal length: Short focal length (10mm, 14mm, 24mm, etc.) to cover as much landscape and sky as possible.
- Exposure mode: Manual (M).
- Metering mode: You can't meter the light because there is none. Determine the exposure by taking test pictures and checking the histogram to see if it's correct.
- Aperture: The widest that your lens allows you (f/2.8 is great). You need to capture as much light as possible during the exposure. Remember that a large aperture allows you to capture more stars, and that they are larger and brighter.
- Shutter speed: The maximum possible but avoiding Star Trails. Calculate it with PhotoPills applying the NPF rule. Usually below 30-35s.
- ISO: Use the highest ISO possible (1600, 3200, 6400) at which your camera doesn't produce too much noise. As for the aperture, you need a high ISO to capture more light.
- White balance: Manual. Start with 3900K if there is no light pollution or with 3400K if there is, and then adjust according to the result. Nevertheless, you can always correct it in post-processing.
- Where to focus: Focus on the subject. Here I focused on the eyes of the person.
- Illumination: Illuminate the subject if necessary. You can use your headlamp, a flashlight or a LED panel.
- Take the picture, check that everything is focused and with the lighting you want. Otherwise, refocus at the hyperfocal distance and/or correct the illumination.
- Make sure the photo is correctly exposed (check the histogram). Otherwise, adjust the ISO accordingly.
Milky Way (10)
The steps you should follow to take the photo are:
- Gear: Camera (full frame is best). A wide angle lens. An intervalometer. A sturdy tripod and a ballhead. Flashlights, LEDs and anti-moisture systems (take a look at the gear to photograph the Milky Way).
- Camera settings: Shoot in RAW. Turn off the image stabilization function if your lens has it.
- Focal length: Short focal length (10mm, 14mm, 24mm, etc.) to cover as much landscape and sky as possible.
- Exposure mode: Manual (M).
- Metering mode: You can't meter the light because there is none. Determine the exposure by taking test pictures and checking the histogram to see if it's correct.
- Aperture: The widest that your lens allows you (f/2.8 is great). You need to capture as much light as possible during the exposure. Remember that a large aperture allows you to capture more stars, and that they are larger and brighter.
- Shutter speed: The maximum possible but avoiding Star Trails. Calculate it with PhotoPills applying the NPF rule. Usually below 30-35s.
- ISO: Use the highest ISO possible (1600, 3200, 6400) at which your camera doesn't produce too much noise. As for the aperture, you need a high ISO to capture more light.
- White balance: Manual. Start with 3900K if there is no light pollution or with 3400K if there is, and then adjust according to the result. Nevertheless, you can always correct it in post-processing.
- Where to focus: Focus at the hyperfocal distance to maximize the depth of field.
- Illumination: Illuminate the foreground if necessary. If you dare, you can use the light of the Moon as a lighting system. Plan your shooting session so that the Moon has a little elevation and brings light to the scene from the side.
- Take the picture, check that everything is focused and with the lighting you want. Otherwise, refocus at the hyperfocal distance and/or correct the illumination.
- Make sure the photo is correctly exposed (check the histogram). Otherwise, adjust the ISO accordingly.
If you want to learn how to capture amazing photos of the Milky Way, study our Milky Way photography guide.
Star Trails (11)
The steps you should follow to take the photo are:
- Gear: Camera (regardless of its sensor size). A wide angle lens. An intervalometer. A sturdy tripod and a ballhead. Flashlights, LEDs and anti-moisture systems (take a look at the gear to photograph Star Trails).
- Camera settings: Shoot in RAW. Turn off the image stabilization function if your lens has it.
- Focal length: Short focal length (10mm, 14mm, 24mm, etc.) to cover as much landscape and sky as possible. Also, turn off the long exposure noise reduction, if your camera has this function. The reduction is applied while you're taking the picture, so in a 20s image, on most cameras you will have to wait another 20s for the camera to process the image trying to eliminate noise.
- Exposure mode: Manual (M).
- Metering mode: You can't meter the light because there is none. Determine the exposure by taking test pictures and checking the histogram to see if it's correct. You can do reciprocity calculations with the PhotoPills exposure calculator.
- Aperture: If you use the widest aperture (for example f/2.8), you can capture many stars.
- Shutter speed: It depends on how you want the final photograph to look like. You can take pictures using the NPF rule to have the stars as big bright spots or use a slower shutter speed if you don't mind minor Star Trails. After all, you'll use a software to stack the photos and get the final Star Trails image. You can use the PhotoPills Star Trails calculator to calculate the total shutter speed you need to get a certain Star Trails length.
- ISO: If you take multiple exposures to obtain Star Trails long enough, both the shutter speed and noise set the aperture and ISO settings you can use. The biggest problem you have is noise. So, keep the ISO between 400 and 1600, depending on how much light you work with. If you want to capture the color of the stars, don't go over ISO 1600. By doing so you'll preserve the colors of the stars. If you crank up the ISO too much you'll overexpose them and you'll have white trails.
- White balance: Manual. Start with 3900K if there is no light pollution or with 3400K if there is, and then adjust according to the result. Nevertheless, you can always correct it in post-processing.
- Where to focus: Focus at the hyperfocal distance to maximize the depth of field.
- Illumination: Illuminate the foreground if necessary. If you dare, you can use the Moon to illuminate the scene. Plan your shooting session so that the Moon has a little elevation and brings light to the scene from the side. In this type of photography you just need to illuminate, if necessary, the first and last image. Then, decide which one you like best and use it as the base shot.
- Take the picture, check that everything is focused and with the lighting you want. Otherwise, refocus at the hyperfocal distance and/or correct the illumination.
- Check that everything is focused on the first photo. Do all the tests at the beginning because, once you start the shooting, you can't change anything. Make sure the photo is correctly exposed (check the histogram). Otherwise, adjust the ISO accordingly.
If you want to take jaw-dropping photos like this one, you'll find all the secrets in our Star Trails photography guide.
Meteor Showers (12)
You should use the PhotoPills Augmented Reality view included in the Meteor Showers pill whenever you're going to capture this kind of shot.
This tool is very useful and allows you to visualize the Meteor Shower radiant position at the beginning and at the end of the shooting session.
The steps you should follow to take the photo are:
- Gear: Camera (regardless of its sensor size). A wide angle lens. An intervalometer. A sturdy tripod and a ballhead. Flashlights, LEDs and anti-moisture systems (take a look at the gear to photograph Star Trails).
- Camera settings: Shoot in RAW. Turn off the image stabilization function if your lens has it.
- Focal length: Short focal length (10mm, 14mm, 24mm, etc.) to cover as much landscape and sky as possible. Also, turn off the long exposure noise reduction, if your camera has this function. The reduction is applied while you're taking the picture, so in a 20s image, on most cameras you will have to wait another 20s for the camera to process the image trying to eliminate noise.
- Exposure mode: Manual (M).
- Metering mode: You can't meter the light because there is none. Determine the exposure by taking test pictures and checking the histogram to see if it's correct. You can do reciprocity calculations with the PhotoPills exposure calculator.
- Aperture: If you use the widest aperture (for example f/2.8), you can capture many stars.
- Shutter speed: It depends on how you want the final photograph to look like. You can take pictures using the NPF rule to have the stars as big bright spots or use a slower shutter speed if you don't mind minor Star Trails. After all, you'll use a software to stack the photos and get the final Star Trails image. You can use the PhotoPills Star Trails calculator to calculate the total shutter speed you need to get a certain Star Trails length.
- ISO: If you take multiple exposures to obtain Star Trails long enough, both the shutter speed and noise set the aperture and ISO settings you can use. The biggest problem you have is noise. So, keep the ISO between 400 and 1600, depending on how much light you work with. If you want to capture the color of the stars, don't go over ISO 1600. By doing so you'll preserve the colors of the stars. If you crank up the ISO too much you'll overexpose them and you'll have white trails.
- White balance: Manual. Start with 3900K if there is no light pollution or with 3400K if there is, and then adjust according to the result. Nevertheless, you can always correct it in post-processing.
- Where to focus: Focus at the hyperfocal distance to maximize the depth of field.
- Illumination: Illuminate the foreground if necessary. If you dare, you can use the Moon to illuminate the scene. Plan your shooting session so that the Moon has a little elevation and brings light to the scene from the side. In this type of photography you just need to illuminate, if necessary, the first and last image. Then, decide which one you like best and use it as the base shot.
- Take the picture, check that everything is focused and with the lighting you want. Otherwise, refocus at the hyperfocal distance and/or correct the illumination.
- Check that everything is focused on the first photo. Do all the tests at the beginning because, once you start the shooting, you can't change anything. Make sure the photo is correctly exposed (check the histogram). Otherwise, adjust the ISO accordingly.
In our Meteor Shower photography guide you'll find all the information you need to learn how to capture this type of shots.
Auroras (13)
Photo by Albert Dros
The steps you should follow to take the photo are:
- Gear: Camera (full frame is best). A wide angle lens. An intervalometer. A sturdy tripod and a ballhead. Anti-moisture systems (take a look at the gear to photograph the Milky Way).
- Camera settings: Shoot in RAW. Turn off the image stabilization function if your lens has it.
- Focal length: Short focal length (10mm, 14mm, 24mm, etc.) to cover as much landscape and sky as possible.
- Exposure mode: Manual (M).
- Metering mode: You can't meter the light because there is none. Determine the exposure by taking test pictures and checking the histogram to see if it's correct.
- Aperture: The widest that your lens allows you (f/2.8 is great). You need to capture as much light as possible during the exposure. Remember that a large aperture allows you to capture more stars, and that they are larger and brighter.
- Shutter speed: The Aurora Borealis is unpredictable. As a rule of thumb, the stronger, more dynamic, and brighter the aurora is, the faster the shutter speed you need to freeze the shape and movement of the Northern Lights:
- Faint and static aurora: 10-25 seconds.
- Vibrant aurora: If you can see the aurora and notice some movement, set a shutter speed between 3-10 seconds.
- Very strong aurora: If the aurora is very active and it moves very quickly, set a shutter speed between 1-3 seconds. Your goal is to freeze its movement and avoid blowing out the highlights.
- ISO: Use the highest ISO possible (1600, 3200, 6400) at which your camera doesn't produce too much noise. As for the aperture, you need a high ISO to capture more light.
- White balance: Manual. Start with 3900K if there is no light pollution or with 3400K if there is, and then adjust according to the result. Nevertheless, you can always correct it in post-processing.
- Where to focus: Focus at the hyperfocal distance to maximize the depth of field.
- Take the picture and check that everything is focused. Make sure the photo is correctly exposed (check the histogram). Otherwise, adjust the exposure accordingly.
Fireworks (14)
The steps you should follow to take the photo are:
- Gear: Camera (regardless of its sensor size). A wide angle lens if you want a general landscape or a telephoto if you want to capture an abstraction of it. An intervalometer. A robust tripod and ballhead. Sometimes, depending on the terrain you can use a bean bag that gives a lot of stability.
- Camera settings: Live Composite. If your camera doesn't have the Live composite mode, set the RAW one.
- Focal length: It depends on the type of landscape you want to capture. You can use a small focal length (10mm, 14mm, 24mm, etc.) to cover as much landscape and sky as possible, a telephoto or a super telephoto lens.
- Exposure mode: Live Composite. If your camera doesn't have the Live composite mode, set the Manual (M) one.
- Metering mode: If your camera has the Live composite mode, you don't have to meter. Otherwise, set the spot metering mode and meter on the key subject. Here, the castle.
- Aperture: Since I was using a Nikon lens with the Olympus adapter, I shot at f/8 to take advantage of the lens sweet spot, considering that it could lose quality because it's not a lens adapted to the Micro 4/3 system.
- Shutter speed: The advantage of using the Live Composite mode is that the shutter can remain open for a long time as it will only add new lights to the frame. If your camera doesn't have the Live Composite mode, select the Bulb mode and cover the lens intermittently. It's the only way to prevent the photo from being overexposed. Do several tests to determine the gap between covering and uncovering the lens.
- ISO: Use the lowest ISO possible.
- White balance: Manual. It depends on the fireworks color (if there is any). Nevertheless, you can always correct it in post-processing.
- Where to focus: Focus at the hyperfocal distance to maximize the depth of field.
- Take the picture and check that everything is focused. Make sure the photo is correctly exposed (check the histogram). Otherwise, adjust the exposure accordingly.
Lightning (15)
The steps you should follow to take the photo are:
- Gear: Camera (regardless of its sensor size). A wide angle lens if you want a general landscape or a telephoto if you want to capture an abstraction of it. An intervalometer. A robust tripod and ballhead.
- Camera settings: RAW.
- Focal length: It depends on the type of landscape you want to capture. You can use a small focal length (10mm, 14mm, 24mm, etc.) to cover as much landscape and sky as possible, a telephoto or a super telephoto lens.
- Exposure mode: Manual (M).
- Metering mode: Spot metering mode on the white buildings that are to the right of the mill to then overexpose them so as not to blow out the whites.
- Aperture: It depends on the depth of field you're looking for, although it will usually be enough for you to focus the lightning and what's around it. In this case I used an aperture of f/5.6 to be able to have a good depth of field.
- Shutter speed: Each case is very particular. I recommend you try out various shutter speeds until the buildings are correctly exposed. In the case of photography, the shutter speed for the buildings and the mill to be correctly exposed was 8s.
- ISO: Use the minimum ISO you can.
- White balance: Manual. It depends on the time of day and the quality of light. Nevertheless, you can always correct it in post-processing.
- Where to focus: Focus at the hyperfocal distance to maximize the depth of field.
- Take the picture and check that everything is focused. Make sure the photo is correctly exposed (check the histogram). Otherwise, adjust the exposure accordingly.
Panning (16)
The steps you should follow to take the photo are:
- Gear: Camera (regardless of its sensor size). A wide angle lens if you want a general scene or a telephoto if you want to capture a detail or a close-up.
- Camera settings: RAW.
- Focal length: It depends on the type of picture you want to capture. You can use any focal length from a short one (10mm, 14mm, 24mm, etc.) to cover as much of the scene as possible to a long one (85mm, 200mm) if you want to isolate the subject from the background.
- Exposure mode: Manual (M).
- Metering mode: Spot metering mode. Meter the brightest area of the scene you want with detail and overexpose it by 1 or 2 stops (+1EV or +2EV). Then recompose, focus and shoot.
- Aperture: In this type of photo the shutter speed is crucial so the aperture is the last thing you set, applying the reciprocity law. In this case I shot at f/22. I'm not a fan of such small apertures, but the time of the day and the light forced me to close it to get a slower shutter speed.
- Shutter speed: Since you're shooting in Manual mode (M), the shutter speed is determined by the aperture-ISO combination you select. Here, you decide how much motion you want to show. In this case, the PhotoPills exposure calculator suggested a shutter speed of 1/125s.
- ISO: Use the minimum ISO you can.
- White balance: Manual. It depends on the time of day and the quality of light. Nevertheless, you can always correct it in post-processing.
- Where to focus: Always focus on your subject, the vehicle in this case, with AF-C (AF-continuous or servo mode) to make sure it's sharp in the photo.
- Take the picture and check that everything is focused. Make sure the photo is correctly exposed (check the histogram). Otherwise, adjust the exposure accordingly.
11.How to create a long exposure photo using the exposure stacking method
Throughout this article we've seen that an ND filter allows you to increase the exposure time to create spectacular effects...
Well, when I explain the use of ND filters in my workshops, I always get the same question...
"Toni, why do I need an ND filter? I can get the same effect by stacking shots with a shorter shutter speed."
And I always answer the same thing.
Whenever possible, I'd rather use an ND filter and have the photo "almost" finished straight on camera. Call me romantic, but I like to face the scene and capture it with the tools I have instead of depending too much on the computer.
Having said that, if I forget my lens filters at home (or I break one of them), I do take several exposures and then stack them in post-processing.
Sometimes I capture certain scenes by shooting multiple exposures, always using an ND filter in each of them, and then stack them at home. These images require a very long exposure time that could produce a lot of noise. To avoid this, I combine the use of lens filters with the exposure stacking technique and so I can control the potential noise.
Let's delve into the exposure stacking technique, its advantages and drawbacks compared to ND filters and how you can get the most out of combining both techniques...
Keep reading!
What is exposure stacking in post-processing
First, you have to take several pictures. You don't need to shoot them with a specific shutter speed.
At home, load all the shots onto a post-processing software (Photoshop, for example) and stack them.
The resulting image is the equivalent of a long exposure photo with a total exposure time equal (or almost equal) to the sum of each individual shot.
That's why, when I told you that each shot doesn't have to have a specific exposure time, you can decide between two options:
- Take a lot of long exposure shots (imagine you take 12 photos) with a relatively short shutter speed (10 seconds for example).
- Take a few long exposure shots (let's suppose you take 4 photos) with a relatively long shutter speed (30 seconds for example).
As you can see, after stacking them you get in both cases an image with an exposure time of 120 seconds. But you haven't captured it exactly the same way.
The way you capture it is really up to you. There is no single formula or way to do it.
Basically, this technique allows you to get a very similar result to what you would get if you had taken a single 120-second shot.
If you want to learn how to stack several long exposures, I suggest you take a look at this two videos:
- Landscape Astrophotography Noise Reduction with Image Stacking in Photoshop CC or CS6 Extended.
- Milky Way Exposure Stacking with Manual Alignment (Noise Reduction) in Adobe Photoshop.
You can also do the whole process straight on camera.
Some cameras have a function called multiexposure that stacks your pictures directly without using your computer.
Imagine you take 10 photos of 30 seconds each with an ND filter. Once you've captured the last shot, your camera stacks them. The result is a 300-second photo that has a noise very similar to that of a 30-second photo taken with a higher-density ND filter.
Advantages and drawbacks of stacking exposures
Like any other photography technique, stacking exposures has its advantages and inconvenients over using an ND filter.
Its advantages are:
- You can increase the exposure time as much as you want... Don't be afraid of noise.
- You have a lot of flexibility to determine the intensity of the effect you get thanks to that very long exposure (movement, silk effect, blur, etc.). In astrophotography, when shooting the Milky Way, Star Trails or Meteor Showers, for example, stacking exposure gives you much more control. You can align precisely the exposures to avoid the Earth's rotation effect. You can also reduce the noise your sensor produces (when working for a longer time) and avoid hot pixels.
- You aren't going to use an ND filter to take pictures. Or if you do, it will have a low density. Therefore, each image will have much less vignetting (dark corners in the frame).
- You reduce shooting risks (tripod shifting, light changing suddenly, etc.).
- If you forget your ND filter(s) at home, stacking can be a good solution.
And now, let's look at the drawbacks:
- There are certain effects that you can't replicate in post-processing, such as conveying motion by taking a longer single exposure (with a higher density ND filter).
- Stacking exposures forces you to spend time post-processing in front of the computer.
- At the end of the photo shoot, you'll end up with a lot of 20, 24, 50MB (depending on your camera) RAW files instead of a single RAW. Obviously, after stacking them the final image will have a much bigger size.
Don't choose: combine both techniques if necessary
As I always say, in photography you set the limits.
Think out of the box and try different ways of shooting. And in this case, don't force yourself to choose one technique or another. Depending on the situation you're in, combining both (use an ND filter and then stack the shots) can give you just the result you're looking for.
Here are some cases when combining both techniques may be the best solution:
You want a photo with a very long exposure time and you don't have enough ND filters to get it.
Your camera produces a lot of noise and you want to limit it as much as possible.
You're not sure how long you want the exposure to be. Thanks to the stacking exposures technique you can extend the exposure time as much as you want. That is, you can add or subtract shots until you get the photo you want.
You're in a location with terrible weather conditions (rain, wind, cold, snow, blizzard,...). Using both techniques you spend less time outdoors and avoid risks during the shooting. Or you may even not be able to take any pictures at all!
You want to avoid missing the moment you were waiting for or a special light that lasts a very short time, or even ruin the shooting session because you find yourself in a very changing light situation. Imagine, for example, a dawn in winter with some clouds and a strong wind.
These are just a few examples. You may face many different situations.
As I was saying, the most important thing is to be flexible and use all the tools and techniques you have and know to adapt to any situation and get the photo you dream of.
12.How to take a long exposure shot applying the bracketing technique
In section 5 you learnt what a GND filter is and why it's extremely useful to photograph scenes with a high dynamic range.
And in section 7 you learnt how to expose your images using one or several GND filters.
But the use of GND filters is not the only way to capture a scene with a high dynamic range. You can also use a technique called bracketing.
What is the bracketing technique?
Bracketing is a technique where you take a certain number of shots (generally an odd number such as 3, 5, 7 or 9) of the same image using different camera settings.
The cool thing about this is that you get multiple variations of the same image that you can use partially or combine to ensure that you get the perfect shot. In other words, you can blend them with a post-processing software (Lightroom, Photoshop, etc.) to get a picture with detail on both the shadows and the highlights.
The most common type of bracketing is exposure bracketing.
For example, if you want to do a 3-shot bracketing you'll take:
- One picture that reads as the correct or base natural exposure.
- One picture that's underexposed.
- One picture that's overexposed.
In other words, when you take several bracketed shots you can produce a high dynamic range (HDR) image where the dynamic range of the scene fits.
Advantages and drawbacks of bracketing
Like any other photography technique, bracketing has its advantages and disadvantages compared to using a GND filter.
Advantages of bracketing
There are still major benefits to bracketing even when shooting RAW:
- You don't need to carry extra equipment (filters, filter holders and rings) so you save space, weight and money.
- Since you're not using a GND filter, you can easily photograph scenes where dark and light tones are not separated by a straight line. So you avoid having dark areas in the photo because of the filter.
- The quality of the image remains intact because you're not adding any element between the scene and the lens.
- It's a technique that allows you to work faster. You don't have to choose filters, nor do calculations to find out equivalent settings (section 10), nor place them accurately.
Drawbacks of bracketing
And now, let's look at the cons:
- By blending the photos automatically, you'll surely get an image that lacks contrast, with very bright shadows. So you need to correct the contrast in post-processing.
- Each shot must be identical to the others (except for the exposure) so all the elements of your scene must be static.
- You have to spend time in front of the computer to blend the shots and get the result you're looking for. Depending on the image, you may have to learn how to use luminosity masks.
- At the end of the photo shoot, you'll end up with a lot of 20, 24, 50MB (depending on your camera) RAW files instead of a single RAW.
Don't choose: combine both in a long exposure bracketing
As I told you at the end of section 11, use all the tools and techniques you have and know to get the photo you dream of.
Because that's what it's all about, isn't it?
I'll give you some cases in which the combination of both techniques can be the best solution:
Although PhotoPills helps you with all the calculations and the results are accurate, if you're learning to use GND filters or you're facing a scene with a very high dynamic range, a bracketing ensures you have the whole scene perfectly exposed. It can be a safety net.
You're in front of a scene where the water is moving. If you only do a bracketing, you'll hardly get two or several identical shots (except for their exposure, of course). The water will never come out the same. But if you use a GND filter you can get a very nice silky effect on the water. This way, the shots will be identical and you won't have any problems blending them.
13.15 long exposure photography tips to improve your technique
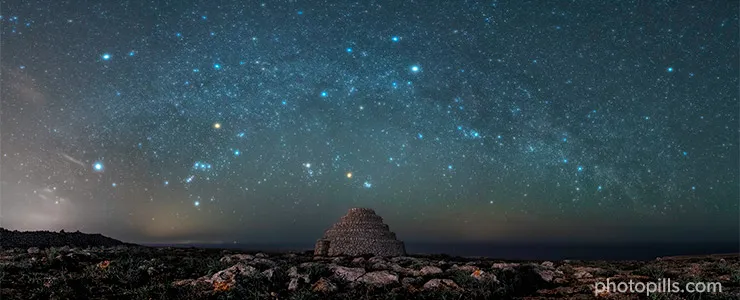
Long exposure photography shouldn't just stop at tripods, shutter speed, and waterfalls – and it doesn't. You can bet photographers like Francesco Gola don't just put their camera on a tripod and choose a long shutter speed.
You should go beyond the basics to capture some truly stand-out images.
Here are several long exposure photography tips for getting started with this timeless technique.
Test (and calibrate) your ND filters at home (1)
When you buy a 3, 6 or 10-stop ND filter, for example, you'll probably assume that your filter has the exact optical density to subtract light by 3, 6 or 10 stops.
Well, you shouldn't.
In practice, manufacturers are not entirely accurate. It's been ages since I started using lens filters (yes, ages, trust me) and I've never bought an ND filter with the exact density that the manufacturer labels.
As you can imagine, the difference is usually small but even if it's only a third of a stop, this will affect the shutter speed you need to get the exposure you want.
So in order to avoid mistakes that you won't be able to correct in post-processing, I suggest you test and calibrate all your filters beforehand.
Use the PhotoPills Long Exposure calculator (2)
As you learnt in section 7, the PhotoPills Long Exposure calculator helps you quickly calculate long exposure times when using ND filters.
It's incredibly easy to use it, and you'll nail the exposure in a few seconds.
This is a quick recap on how to use it:
Take a test shot and set your light meter centered at 0.
Check the histogram to ensure everything is correctly exposed.
In the PhotoPills Long Exposure calculator, set that you want to find out the shutter speed.
Enter your test settings.
Enter the equivalent settings: Set the ND filter you want to use. If necessary, change the aperture or ISO.
And that's it! PhotoPills has done the numbers for you and it displays the shutter speed that you need.
Bye bye trial and error... ;)
Take into account the Sun in your composition (3)
Plan your picture!
And above all, anticipate the position where the Sun will be, taking into account the direction in which you're going to frame and shoot. To do this, use PhotoPills ;)
If you're going to do a very long exposure (several minutes), avoid including the Sun in the frame. Keep in mind that the Sun "moves" much faster than it seems. And if the Sun is in your frame, after a couple of minutes its position will have changed significantly in the composition.
Take into account the Moon when planning the shot (4)
Check the Milky Way calendar to nail the shot
During part of the year, the Core of the Milky Way is not visible because it's blocked by the Sun.
Why is that?
Because the Galactic Genter is only above the horizon during daylight hours.
When planning to shoot the Milky Way, you should
- Find out the period of the year in which the Galactic Center is visible during nighttime, and then
- Check the PhotoPills Moon calendar (and Moonrise and Moonset times) to choose the date where there is no Moon at night. Or, if you want the Moon to help you light the foreground, choose the date of the Moon phase that suits your needs.
To narrow the search and get faster results, you need to know the starting and ending dates of the best period of the year to shoot the Milky Way.
So, when is this?
Check the following Milky Way calendar :)
- Northern Hemisphere Milky Way viewing calendar.
- The Galactic Center is visible from March to October and not visible from November to February.
- You have a good chance of seeing the Core of the galaxy from anywhere south of +55º northern latitude. Above that latitude the core of the Milky Way will never rise above the horizon.
- Southern Hemisphere Milky Way viewing calendar.
- The Galactic Center is visible from March to October and not visible from November to February.
- You can see the Core of the galaxy regardless of the latitude of your location.
To shoot Star Trails or Meteor Showers, check the Moon calendar
If you're a beginner, I'd recommend you start planning your Star Trails and Meteor Showers shots with no Moon. And once you nail your shots, go one step further and try to include Moonlight in the foreground, or even the Moon in the frame (Moon trail).
As I mentioned in section 3, if there is Moon, it's much easier to get great results by using the image stacking technique. Shooting multiple shorter exposures gives you the absolute control over light and, thus, exposure.
The best way to plan the Moon is by using the PhotoPills Moon pill or the Planner.
I prefer using the Planner because it shows me all the information I need in one single screen: Moon phase, Moon elevation and Moon direction (on a map).
Plan for a Moon which:
- Phase is between 30-50% (if you plan to stack your pictures) and up to 30% (if you plan to take one shot).
- Elevation is between 5º to 20º.
- Direction is perpendicular to the shooting direction, so you get some side lighting.
Use an intervalometer or remote shutter release (5)
Any camera is incredibly sensitive to the slightest movement and vibration.
If, on top of it, (i) you're using a slower shutter speed (because of the filters), (ii) the camera is on a tripod in a definitely unstable terrain and (iii) it may be windy at the location... You have the perfect ingredients to have a blurred photo.
Using a remote shutter release prevents you from touching the camera.
But I suggest you go one step further and use an intervalometer. It has the same advantages as a remote shutter release and you can also program it so that the shutter is open for as long as you need (just set the Bulb mode) without having to constantly watch your clock.
If you use a remote shutter release, take advantage of the PhotoPills Timer to know when the exposure is over. You'll find the Timer both at the end of the Pills menu and in the Exposure and Time lapse pills.
A little reminder. When you're using the Bulb mode, once you press the shutter button, the camera keeps the shutter open as long as you want (seconds, minutes...) and doesn't close it until you stop pressing it.
Imagine pressing the shutter button with your finger for 2 minutes and 45 seconds!
So that's a no no, because of the hassle and because you risk shaking the camera.
Use an intervalometer (or a remote shutter release). You'll thank me... ;)
Turn off the stabilization system (6)
Most camera and lens manufacturers offer a stabilization system that reduces the risk of getting blurred pictures when you're shooting in low light conditions and at a slow shutter speed.
This tool can be integrated in the lens (Nikon and Canon, for example) or in the body (Sony, Fuji, Olympus, Panasonic, Pentax, for example).
It's basically a series of motion sensors that detect any vibration that occurs and try to correct it.
If you're shooting a long exposure, you'll surely have your camera mounted on your tripod (if you haven't forgotten it at home). Use a sturdy tripod to prevent any vibration or movement.
The problem is that if you leave the stabilization function turned on, your camera can assume at any time that there was a vibration (although there wasn't). And it could have the opposite effect: create a slight movement that will blur the photo.
So turn off the stabilization function of your camera or lens as a precaution. It may not happen if you leave it turned on. But just in case, I always turn it off.
Make sure you adjust the ISO (7)
You're super excited with what you're witnessing. And you can't help but be nervous as well. You want everything to be perfect because you know you don't have a lot of chances...
And of course, between working the composition, placing the filters and choosing the settings, you forget that you can play with the ISO!
The ISO can help you a lot to successfully get your shot.
So make sure that you fiddle with the ISO setting until you get the exposure you're really looking for.
Don't use a f/22 aperture to slow the shutter speed (8)
It's one of the basic rules of photography: if you close the aperture to f/22, you slow the shutter speed. That is, you increase the exposure time.
So, if you shoot at f/11 for 30 seconds and change the aperture to f/22, you'll have to shoot for 2 minutes to keep the same exposure (same histogram).
And it actually makes sense. In theory...
In practice, an optical phenomenon known as diffraction usually occurs from f/16 onwards. In short, your image is not sharp anymore and certain parts may be blurred.
So, if you're shooting at f/11 and need a slower shutter speed, I suggest you two options: either lower the ISO or use lens filters (or a darker filter than the one you're using)!
Focus before setting up the ND filter (9)
In my experience it's often possible to achieve autofocus with a relatively strong ND filter attached to the lens.
However, I've also found that in some cases the performance can be slow or the results can be inaccurate.
That's why I always recommend composing and taking your test shots without the ND filter attached to the lens. Once you're done, attach the lens filter and adjust the exposure settings using the PhotoPills Long Exposure calculator.
When using the autofocus, change it to manual after focusing! (10)
It's very important to focus before placing the ND filter in front of the lens. Considering the opacity of an ND filter, it'll be very difficult for your camera to focus.
And since we're talking about focusing, don't forget to change the focus to manual once you've used the autofocus and your photo is perfectly sharp.
If you forget to change it, you risk half pressing the shutter release button (if you don't use the back button focus)... The camera will try to refocus and may change the focus point. So part or the whole photo will be blurred.
And believe me, when you wake up at 4:30 am to shoot a Sunrise and you get soaked because of the wind and rain, the last thing you want to do when you get home is to check that your photos aren't sharp...
If you use the back button focus, don't press it again. That will do it ;)
Follow the right order when putting the lens filters (11)
You may need to use more than one lens filter at a time to get the photo you want.
In fact, most filter holders let you insert up to a maximum of 4 lens filters. But the question is, in what order do you have to place them?
Actually we have to differentiate between the order of insertion of the lens filters and their final position or order of position.
On the one hand, you have the order of insertion. That is, the order in which you insert each of the different filters:
First the polarizer,
Then the GND filter,
And finally the ND filter.
On the other hand, you have the order of position. In other words, the order in which the filters are placed with respect to the sensor.
The polarizer can be in the position nearest or furthest from the sensor depending on the system you use.
The ND filter should be as close to the sensor as possible.
Finally, the GND filter is the one furthest from the sensor, ahead of the ND filter.
If you use more than one ND filter, always place the darkest filter closest to the sensor. The same applies if you use more than one GND filter.
If you don't follow this order, you may get color banding in certain areas of the photo or may end up with diffraction in the brighter parts of the photo.
In addition to this, some light may enter through the cracks in the filter holder, ruining the exposure.
Note: Don't worry about the order if you use screw-on filters.
Cover the viewfinder to avoid light leaks (12)
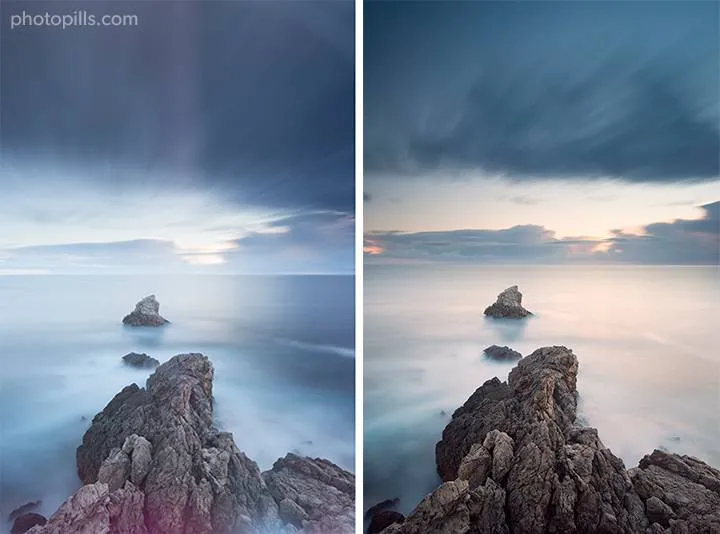
Light is a tremendously powerful element that manages to slip through any crack unless you put all your effort into avoiding it. And now you know that when you're shooting with filters, controlling the amount of light that reaches the sensor is crucial to get a properly exposed photo.
The filter allows you to control the light that enters through the lens. But there are other nooks and crannies through which light can get through. And the easiest one is... You've guessed it: your camera's viewfinder.
So the best thing you can do is cover it up as soon as you've finished working on your composition.
How?
Very easy.
Many high-end cameras have a lid that you can easily open and close or a small plastic piece that you can slide over the viewfinder. But if that's not your case, you can use almost anything: a piece of gaffer's tape, a cloth (the same one you use to clean your lenses), a bit of play dough or even a piece of gum! XD
If you don't cover it completely, you'll probably get halos and faded purple lines in your photo.
Moreover, if you use a filter holder, the light can also slip between one filter and another. In that case, the best thing you can do is cover those gaps with a piece of gaffer's tape.
Note: If you have a mirrorless camera, you won't make this mistake ;)
Take into account the wind direction and speed (13)
Ah! The wind... What would us photographers do without it in our long exposures?
Without wind you wouldn't capture the movement of the clouds or of the sea hitting the rocks.
That would be a shame!
First, for safety reasons
Unfortunately, besides being very aesthetic, the wind can also be very treacherous. And when you're shooting outdoors, your camera will be exposed to its whimsical behaviour.
So even if you've chosen a safe spot and use a sturdy tripod, make sure your gear is safe and the wind won't be able to move it (or worse, throw it to the ground!).
If necessary, hang your backpack from the hook at the bottom of the central column of your tripod. But make sure the wind doesn't hit the backpack. Otherwise, it'll be even worse.
And of course, don't raise the center column. If you do, you'll change the center of gravity of your gear and it'll be less stable.
Then, for aesthetic reasons
As I mentioned in section 4, clouds are an essential composition element in long exposure photography.
Their presence, color and movement (their direction and speed) will make your image more or less dramatic.
So if you want to convey motion in your photo, study the wind direction and speed. That's how you'll be able to anticipate the clouds' behaviour and get the most out of them when you're doing your long exposure.
Lock the mirror up (14)
In a DSLR, light goes through the lens and reaches the viewfinder after being reflecting off a mirror. Thanks to an internal mechanism, when you press the shutter, the mirror is lifted. Therefore light reaches the sensor, and the sensor is able to capture it.
Unfortunately, for shutter speeds between approximately 1/15s and 1s, the vibration produced by the movement of the mirror will affect the final image. Without a doubt the photo will be slightly blurred. After 1s, this vibration no longer affects your photo.
To avoid this problem, turn the mirror lock-up feature of your camera on.
Once you do so, the first time you press the shutter button, the mirror will lift and lock. The second time, the shutter will open. So all you have to do is wait for a couple of seconds between the first and second time you press the shutter and you'll avoid any vibration.
Note: If you have a mirrorless camera, you won't make this mistake ;)
Trust the histogram (15)
You should never use the image on your LCD screen to set the exposure you're looking for. And this is for two reasons:
- Your camera's LCD screen is very bright and that distorts how you assess your exposure.
- In addition to this, the image shown on the LCD screen is not a RAW file, it's a JPG that the camera has produced after applying a series of adjustments. It's not a neutral image.
So always (always) use the histogram to check your shot's exposure.
Thanks to the information provided by the histogram you can quickly determine if you have adjusted the shutter speed correctly. Or if you need to make any other adjustment (either the shutter speed or any other setting).
14.12 photographers that excel at shooting long exposures
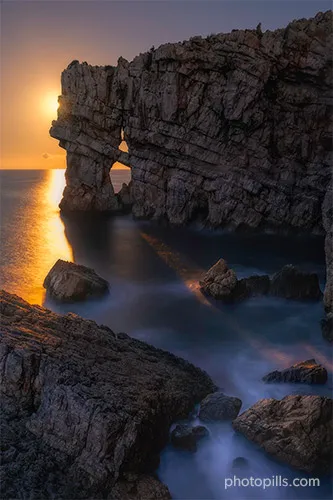
One of my favorite exercises to train my eye is to see photos of other people, photographers that excel at a particular technique or have a unique style.
So I thought that sharing a list of my favorite long exposure photographers could be a good source of inspiration.
Some of them have already been PhotoPills Masters in one of our favorite events: the PhotoPills Camp. So you can learn from them too while being on the field!
I hope they help you improve your long exposure technique.
If you have some other name in mind that you think is worth knowing, share it with the tribe by leaving a comment at the end of this guide :)
Albert Dros
Albert Dros lives and breathes landscape photography and thinks only of capturing the beauty of the world. Actually, it's almost an obsession.
He has a special weakness for urban landscapes, but his pictures of nature landscapes are equally impressive.
The time and effort he invests into planning translates into breathtaking long exposure images.
Francesco Gola
Francesco Gola loves two things: seascapes and Nutella. Although I'm not sure which goes first... ;)
He found his world in seascapes, and his style in long exposures. He loves this technique, because working with long exposures he realized that he doesn't freeze just a moment, but an entire period of time. He can transform his picture into an hourglass, where reality is mixed with emotions.
Francesco has an extreme talent for these long exposure, gorgeous, vivid seascape shots. Each little bit of every picture is perfect.
Daniel Kordan
Daniel Korzhonov, better known as Daniel Kordan, is a Russian landscape photographer. And within landscape photography, he has a special interest in mountainscapes and seascapes.
Although he's passionate about travel and likes to explore the world, he also enjoys returning again and again to a number of destinations: the Lofoten Islands, Patagonia, Lake Baikal or Kamchatka. Daniel says he feels "at home" there.
Daniel's photographs have been published extensively around the world in a wide variety of media. One of his great strengths is the mastery of lens filters that help him capture mind-blowing long exposures and some amazing night shots.
José B. Ruiz
If you haven't heard of José B. Ruiz yet, you're missing out.
He's one of Spain's leading nature photographers and has a long career. He's a great nature, portrait... and landscape photographer. As for the latter, José believes that a good landscape photographer must master the use of lens filters if he wants to capture good long exposures.
After decades of using them and having tried many brands, models and types of lens filters, he's a true master. And he even dares to move his filters during the exposure!
Sarah Hatton
Sarah Hatton calls herself a "long exposure photographer" because it's one of her favorite techniques. In fact, she admits that since she discovered this way of taking photos, she's been hooked. Because it's full of surprises: you never know what's going to come out until you see the final result on the screen...
Although her home is in Melbourne (Australia) she's passionate about nature and likes to photograph the wild landscapes of Australia, New Zealand, British Columbia and Alberta (Canada), Oregon and Washington (USA), Patagonia (Chile and Argentina) and a long list of destinations around the world.
I'm sure her photos will be a great source of inspiration.
Dany Eid
Dany Eid is a photographer with an interest in architecture, landscape (natural and urban) and travel. Lebanese by birth, he studied interior design and painting. His passion for photography started in 2003, while living in Egypt, although he decided to become a professional photographer after moving to Dubai in 2013.
Despite his versatility, he's a photographer who regularly shoots long exposures with lens filters. It's the best way to get those silky waters, a pinch of contrast and the clouds dancing around the skyscrapers. I'm sure many of his photos will leave you in awe.
And he's a fantastic aerial photographer thanks to his drone!
Marco Grassi
The love story between Marco Grassi and photography began in the best possible way: traveling for a year in New Zealand.
Since then he has been travelling around the world and capturing with his camera the beauty he has found along the way. Although his heart is in the Faroe Islands...
In addition to being a spectacular natural environment, it's one of his favorite spots and the perfect place to practice long exposures using his lens filters. And the results are (you guessed it) impressive.
Julia Anna Gospodarou
Julia Anna Gospodarou is an architect and photographer who lives in Athens (Greece).
She is best known for her long exposure black and white photographs of buildings and other architectural elements. So since most of her pictures are daytime long exposures, she definitely needs to use lens filters during the capture.
Her work stands out for being a very personal and artistic vision of the scene that she's facing.
Felix Inden
Although he was born in Santiago de Compostela (Spain) where he lived for some years, Felix Inden is a German photographer whose main interests are nature landscape photography, especially in very cold environments, and urban landscape.
His passion for photography began in 2011, after his wife Maria lent him a camera during a trip to Paris. Since then he hasn't stopped learning and improving his style shooting long exposure with filters, among others.
He's a self-taught photographer and his intention is to create images that provoke some kind of reaction in the viewer. He likes to call it "emotional landscape photography".
And yes, he definitely manages to convey an emotion with each one of his pictures.
Sean Bagshaw
For many years Sean Bagshaw was a science teacher until one day he decided to take the leap and become a landscape and travel photographer. As you can imagine, his passion for photography didn't just happen overnight.
Sean started taking pictures at university. Little by little he refined his technique (including shooting long exposures, which is something he regularly does) and his style.
For him, the most important thing has always been to find, and later develop, his own way of capturing a scene. That constant quest is what makes him a unique photographer.
Erin Babnik
Erin Babnik likes to define herself as a "professional adventure photographer", which is a very broad term encompassing landscape, travel and nature photography. And she also loves teaching.
Her professional career began in a very different world: for many years she was an art historian, photographing archaeological excavations and museums for educational and research purposes. Subsequently, she was a commissioned photographer for several years before finally becoming a natural landscape photographer with a special interest in mountains and deserts.
If you take a look at her images, you'll notice that she has a penchant for capturing long exposures using lens filters.
Paul Zizka
Although he was born in Quebec City, his love of the mountains led him to move to Banff where one of Canada's most impressive national parks is located. There, Paul Zizka is mainly focused on landscape and adventure photography.
But, as a good adventurer, Paul's work is not limited solely to photographing Canada. He has been to 7 continents capturing places as impressive as Antarctica, Norway, Svalbard, Nepal, Greenland, several Caribbean islands, Niue, French Polynesia, Namibia and the Faroe Islands.
He's an incredibly skilled long exposure photographer that produces dreamy, otherworldly scenes.
15.What's next?
Well, it's time to start practicing.
So practice, practice, and keep practicing until there's no tomorrow.
It's the only way to learn this craft and shoot long exposures in all kinds of situations.
But if you still have any kind of trouble on the matter and you can't find the answer in this guide, let me know by leaving a comment below.
I'm here to help ;)
Oh!
One last thing.
Take a look at this article: 'Lens Filters: The Definitive Guide'.
It's worth a king's ransom.
You'll learn how to master lens filters to capture amazing pictures.
Never stop learning!
Note: Some links on this page are affiliate links. What does this mean? If you buy/rent using these links you're helping support us and it costs you nothing extra. Thank you for your support.
Get this ebook for free now!