Mastering Golden Hour, Blue Hour (Magic Hours) and Twilights | Natural Light Photography
Natural light photography uses the Sun as a light source.
And since the available light from the Sun varies with the time of day, we can differentiate 5 periods of time: golden hour, blue hour, twilights (civil, nautical and astronomical), daytime and nighttime.
Natural light is a crucial element in photography.
Use natural light creatively, and it will help you improve your storytelling as well as communicate your emotions and evoke emotions in others.
So understanding how it behaves and the factors that influence it are the foundation of mastering photography.
Now, do you want to know how to master it?
Well, keep reading because in this guide I will teach you everything you need to take amazing shots using natural light.
From all the relevant information on light (its attributes and the different types) to identify the best light for taking photos and lots of tips on natural light.
Oh... And you'll also learn how to use PhotoPills to know when and where the golden hour, the blue hour, the Sunrise, the Sunset, the Moonrise and the Moonset occurs.
As a matter of fact, the natural light phases are defined according to the elevation of the Sun. Moreover, the starting time and duration of these light phases depend on the location you are. So you need to plan everything in advance! ;)
In order to do so, you'll discover how to use PhotoPills to find each phase of natural light and how to know the exact position of the light source (the Sun or the Moon) in a certain location.
Enjoy the ride!
"In almost all photography it's the quality of light that makes or breaks the shot. For professional photographers, chasing the light, waiting for it, sometimes helping it, and finally capturing it is a constant preoccupation – and for some an obsession." - Michael Freeman
Get this ebook for free now!
Content
- What is natural light?
- The 4 attributes of light
- Types of natural light in photography
- How to find when the golden hour, blue hour and twilights occur
- How to know the exact natural light direction
- How atmospheric conditions affect natural light photography
- What is the ideal or best light for taking photos?
- 10 photography tips on natural light
- Light will guide your way...
1.What is natural light?
OK, let's start with the basics!
Light, whether it's natural or artificial, is essential in photography – no light, no photos! :P
Natural light vs. artificial light
I've just mentioned two kinds of light: natural and artificial.
But what exactly is natural light?
Natural light is any available light, such as that produced by the Sun or the Moon :)
And what about artificial light?
Well, artificial light is any other light not created by Sunlight or Moonlight. That is constant lights (e.g. a lamp or a torch) and flashes (e.g. your camera's pop-up flash, a studio flash or a speedlight) for instance.
"And which is better? Natural light or artificial light?"
Let's compare both.
Advantages of natural light
- Very easy to find, free, and abundant. No need to invest in a lot of gear!
- Depending on location, season, weather, and time of the day, natural lighting can produce differing colors and contrast in your images, helping you with the narrative and the mood you want to convey.
- Requires skills that are easy to learn and put into practice.
Inconvenients of natural light
- No control whatsoever on its color, intensity, quality, or direction (more on this attributes in section 2).
- It can be challenging to shoot with it for the simple fact that it varies greatly.
- Being at the constant mercy of the weather means that it's (almost) totally unpredictable.
Advantages of artificial light
- Versatile because you can use a whole bunch of tools to get a vast array of creative results.
- Total control on its color, intensity, quality, or direction so it's quite reliable.
- Convenient as it's constantly available throughout the day and night, thus allowing you to skip planning your shoot around factors like the time of day and the weather.
- Can mimic some of the features of natural light, giving the impression that you worked with natural light... when you really didn't.
Inconvenients of artificial light
- Requires a bigger investment in money, time and planning.
- It's complicated to master and requires lots of practice to achieve exceptional results.
Why is natural light important in photography?
After the camera, your most powerful photographic tool is natural light.
Actually, it's an essential factor regardless of the photography genre you're practicing.
Think about it. Whether you are a landscape, a wildlife or a travel photographer for example, you'll need natural light during your shooting sessions. Otherwise, you won't be able to capture anything!
Even to capture the Milky Way you'll need some sort of light!
(Hint: the stars themselves ;))
What can you achieve with natural light?
Here are just a few things that you can achieve by mastering natural light:
- Communicate mood and emotion more powerfully through every shot.
- Make the most of every photographic opportunity, no matter what the setting or time of day.
- Use the inter-connectivity of light and color into your storytelling.
- Unleash new creative possibilities with your existing equipment.
To sum it up...
When you take pictures of the same scene, shot from the same shooting spot but with a different natural light, that scene takes on an entirely different emotion.
It's an incredibly powerful tool.
That's why it's so important to study it and learn to use it as a creative tool.
So let's dive in and analyze the different attributes of light.
2.The 4 attributes of light
Your DSLR or mirrorless camera captures light, records it, and stores it in such a way that allows you to play it back so everyone can see what your camera saw – the final image.
That's all it does and, more importantly, that's all it knows. It's a dumb piece of gear.
The person behind the camera is the one responsible for controlling the light that's about to be captured.
And... That's you, of course.
So, let's look at the 4 attributes that are used to categorize light:
- Color.
- Intensity.
- Quality.
- Direction.
Color
Color was an element the Old Masters knew well.
From an early age, they learnt that color can deeply affect how we experience the world around us.
Colors affect how we feel, and this is precisely why understanding color is so important to you as a photographer.
And what is color exactly?
Well, color is the aspect of any object that may be described in terms of hue, saturation and lightness or luminance.
Hue, saturation and luminance
Despite the fact that each one of us sees colors slightly differently, there is a standard way to define a color. And that's according to a certain set of properties:
- Hue. It defines a color or shade to make it discernible from another (e.g. yellow vs. red). It ranges from 0º to 359º when measured in degrees.
- Saturation. It defines a range from pure color (100%) to gray (0%) at a constant lightness level. A pure color is fully saturated.
- Luminance. It defines a range from dark (0%) to fully illuminated (100%). Any original hue has an average lightness level of 50%.
However, these technicalities are out of the scope of this guide so let's keep it simple.
Color temperature
In photography you can easily define a color using the color temperature.
This standard is measured in degrees Kelvin. Does the "K" symbol displayed in your White Balance menu ring a bell? ;)
- Higher color temperatures mean that the light source is closer to the blue end of the spectrum.
- Lower color temperatures mean that the light source is closer to the red end of the spectrum.
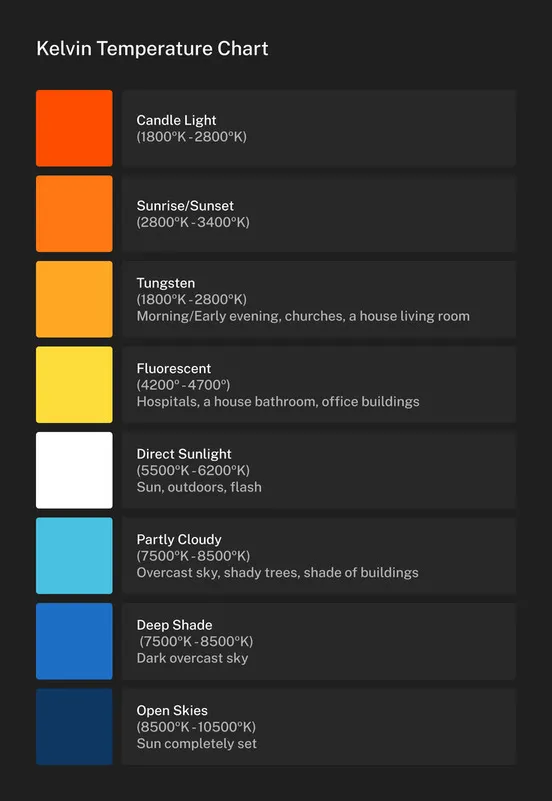
Color temperature changes throughout the day, depending on the time and the amount of clouds in the sky.
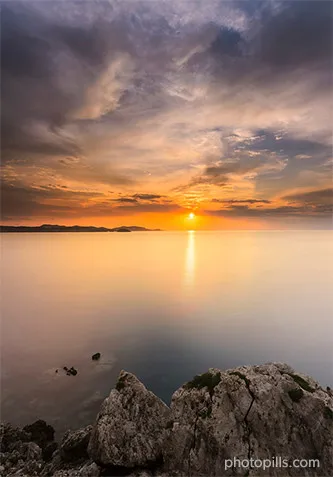
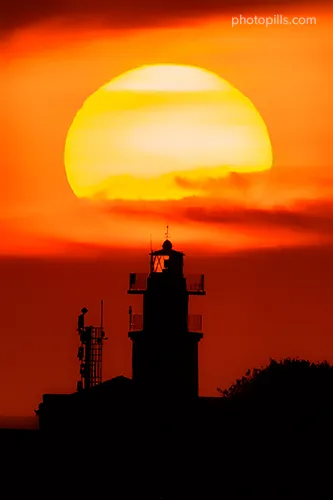
Golden light (around 3500K)
- When: At Sunrise and at Sunset the sky appears orange, producing a beautiful golden light.
- Emotion: The scene is tinted with soft, pastel-like warm colors of red and yellow. Images seem almost magical.
- Intention: Create silhouettes and add rim light around your subject.
- Warning: Plan it carefully with PhotoPills to know exactly when it happens.
Midday light (between 5000-6500K)
- When: In the central hours of the day.
- Emotion: This light seems neutral in color to the eye, even though it's considered a cold color in terms of Kelvin degrees. The contrasts caused by midday light amplify objects' colors. So, vibrant objects seem even more vibrant and vice versa.
- Intention: Use the high contrast to your advantage and play with the shadows to create negative space and produce a compelling composition.
- Warning: The highlights and shadows may lack detail.
Diffused light on a cloudy day (about 7000K)
- When: When the sky is heavily overcast.
- Emotion: The mood can be melancholic, threatening or even somber.
- Intention: Use this light to enhance the details of the scene that are important to the story.
- Warning: Your storytelling needs to be reinforced with a strong, interesting and emphatic subject as some kind of action takes place.
Pale blue light (around 10000K)
- When: At dawn and dusk, the sky appears light blue. It depends on your location on earth, but usually between 15-30 minutes before Sunrise and 15-30 minutes after Sunset.
- Emotion: It conveys moodiness and an ethereal atmosphere.
- Intention: If you are in an urban location, mix the intense blue light of the sky with the artificial orange light from street lamps. Both are complementary colors and the cool of the blue with the warmth of the orange create depth and highlight details.
- Warning: Plan it carefully with PhotoPills as this light doesn't last long (unless you're at high latitudes). Be quick and nimble.
Violet-blue light (around 12000K)
- When: At twilight, the sky appears violet-blue.
- Emotion: It helps you convey a gloomy and mysterious ambience, with a sense of coldness.
- Intention: Take advantage of that element of other-worldliness that only appears during that brief moment between day and night.
- Warning: Because of the low intensity of this particular light, be careful with your shutter speed to avoid blurry images.
A final warning!
Even though both are measured with the same Kelvin scale, the color temperature is not equivalent to your camera's white balance setting!
Note that...
- Color temperature is the color of the light source. So lower color temperature sources appear warmer and more orange while higher color temperature sources appear cooler and more blue.
- White balance is the camera's way to neutralize the color temperature so that whites appear white. Therefore, it works in the opposite direction to color temperature (higher white balance settings for warmer images, lower white balance setting for cooler images).
Intensity
Intensity is simply a measure of how much light you have in the scene. In other words, it's the quantity of light.
The intensity determines your shooting – what ISO, aperture and shutter speed settings you should use to get an image correctly exposed. That is, not too bright and not too dark.
How to identify the light intensity
"Toni, how can I estimate how intense light is in a particular scene?"
You have two options.
Option #1: With the naked eye
Have a look at the contrast of your scene.
The contrast is the balance between shadows (the darker areas of your scene) and highlights (the lighter areas of your scene).
When you start in photography, this task can seem daunting as it's not particularly intuitive. However, with a little bit of practice and implementing the try & fail strategy you'll become proficient in a breeze!
That's why it's so important to identify the key tone in your scene.
Because you'll capture all the detail in the elements of the scene that have that tone.
Therefore, it's crucial to determine the exposure, and thus your camera settings using the exposure triangle.
Option #2: With the your camera's light meter
In photography, the light meter is a device built into your camera that uses a light meter to measure (or meter) the intensity of light in the scene. Thanks to it, the camera helps you determine the right exposure to take the picture.
I won't go into much detail here on how the light meter works, but if you want to read more on the subject study section 11 of our exposure photography guide.
Nevertheless, here's a quick recap on your camera's light metering modes.
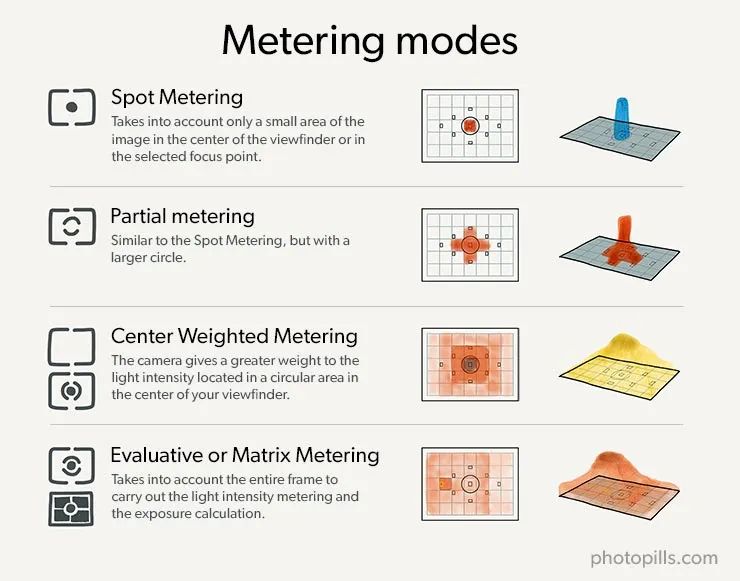
You can actually achieve a correct exposure with any of the available modes.
Some of them might excel more than others in specific situations, but in practice, your proficiency will depend on what you're used to, and on what system makes the most sense to you.
The gist of it comes down to familiarize yourself with different metering modes, but don't obsess about them to the point where they become a distraction.
If you're new to photography, my suggestion is to shoot using the Evaluative or Matrix mode.
What is the ideal intensity?
Light is usually most intense at central hours of the day, when the Sun is directly overhead.
Therefore, contrast at midday is high and tends to make shadows more pronounced.
On the other hand, light and contrast are less intense early in the morning or evening.
That's why it's preferable to shoot during the magic hours:
- The light during golden hour makes all the colors very vivid and vibrant. It's perfect for creating an image with a positive, dramatic, and inspirational ambience.
- The light during blue hour is deep blue and works very well to convey serenity, peace, or even sadness.
Having said that, it doesn't mean that you can't produce a compelling image with midday light! ;)
Quality
The quality of a light source affects how the highlights and shadows look in your scene.
Unlike intensity, there's no device to measure light quality.
The two common terms used to describe light quality are hard (or direct) and soft (or diffused):
- The smaller the light source is compared to a subject, the harder the quality.
- On the contrary, as the light spreads and becomes bigger, the quality becomes softer.
Hard (or direct) light
Hard light is produced by a small light source. It creates crisp, sharp transitions between highlights and shadows.
When can you find it?
- It depends on the weather. The sky should be clear, with no clouds covering the Sun.
- It depends on the location. Lower latitudes mean the Sun has to travel a shorter distance through the atmosphere, so less light is scattered.
- It depends on the date. The Sun's elevation is much higher in summer than in winter, for example. So in summertime the light will be harsher and the shadows darker.
- Considering the previous factors, you can encounter harsh lighting situations during the central hours of the day.
Main challenge: The incredibly high contrast!
Problem # 1: Contrary to your sophisticated eyes, the camera is (still) not able to cope with this difference. So, the result will be the loss of details in your image, as they become too bright or too dark.
Changing the aperture, shutter or ISO, won't help correct it. You can only mitigate it when post-processing the image.
Problem #2: Dull colors will seem even more so.
To mitigate it you can use a circular polarizing filter (CPL) or correct it when post-processing the image.
Soft (or diffused) light
Soft light is produced by a large light source. It produces diffused, gradual transitions between highlights and shadows.
When can you find it?
- It depends on the weather. The sky should be cloudy or overcast, with clouds covering the Sun.
- It depends on the location. Higher latitudes mean the Sun has to travel a longer distance through the atmosphere, so more light is scattered.
- It depends on the date. The Sun's elevation is much higher in summer than in winter, for example. So in wintertime the light will be softer and the shadows brighter.
- Considering the previous factors, you can encounter harsh lighting situations at the beginning and final hours of the day. These are the so called magic hours that include golden hour and blue hour.
Main challenge: The intensity of light may be too low.
Be careful with your shutter speed. Use a tripod if necessary.
Which one is better?
In reality, bad light does not exist – the light is either suitable or not suitable for you.
Therefore, if you're searching for good quality of light, you just need to determine the kind of images you want to create and then decide if you want to work with soft or hard light.
Direction
The direction or angle of the light is the spot towards it points to.
Light direction has a dramatic influence on the subject. It has some control over the subject's shape and also over the length of shadows, and thus in creating depth.
In the case of natural light, the light direction depends on the time of the day as the Sun's position in the sky changes.
In this situation, it's essential to be aware of the Sun's position, or where it hits the subject relative to where you are. If you want to learn how to use PhotoPills to find out the Sun's exact position in your shooting location, go to section 5.
There are typically 3 directions that you can look at when discussing the direction of light.
Front light
Front lighting typically comes from a source that is behind you and the camera and shining directly onto the subject. So your subject is facing the light source, such as a rising or setting Sun.
In other words, when the Sun is behind you, a front light is illuminating your subject.
- Advantages:
- It evenly illuminates your subject so metering is fairly straightforward.
- It's a great tool to emphasize colors.
- Inconvenient: It tends to flatten a subject.
Side light
Side lighting is light that falls on a subject at roughly 90º to the camera. So one side of the subject will be lit and the other one will be in shadow.
It enhances any contour detail by creating shadows and highlights, giving a three-dimensional quality to the scene.
- Advantages:
- It's the best way to define the three-dimensional characteristics of your subject.
- It's a great tool to emphasize textures.
- Inconvenient: It can be a little over dramatic.
Backlight
Backlighting is caused when the light source is behind the subject shining towards the camera.
Usually, you can use the backlighting technique to enhance a silhouette or to provide a little separation in combination with other light sources.
Since most of the light is hitting the side of the subject, it makes it brighter, which creates a more distinctive and dramatic photo.
- Advantages:
- It's a great tool to emphasize shape.
- A very effective technique to enhance the shape is creating a silhouette.
- Inconvenient: Silhouettes look flat. You remove all the detail from the scene.
How to change the light direction
There is a small trick that you can use while on the field where you can change the direction of light in a scene without waiting for conditions to change at all.
"But Toni, you can't change the Sunlight direction!"
Yes you can.
This is a very common tactic among landscape photographers, although it's not the most frequently discussed tip:
Turn around.
All you need to do is turn around and face another direction. Take a look at what you have on your back and look around because sometimes the best action happens in the opposite direction (180º from where the Sun is).
Not every location will give you a full 360º of freedom, but many of them will. You can easily find this information out with PhotoPills while planning your photo.
And now, it's time to learn the different types of natural light that you can work with to make your scenes look the way you intend.
Here we go!
3.Types of natural light in photography
Natural light is a key element in photography.
From a technical point of view, without it there's no photo.
From an artistic point of view, it's the ingredient that marks the picture's emotional impact. That is, the feeling that the photo conveys to the viewer (strength, fear, calm, silence, speed, etc.).
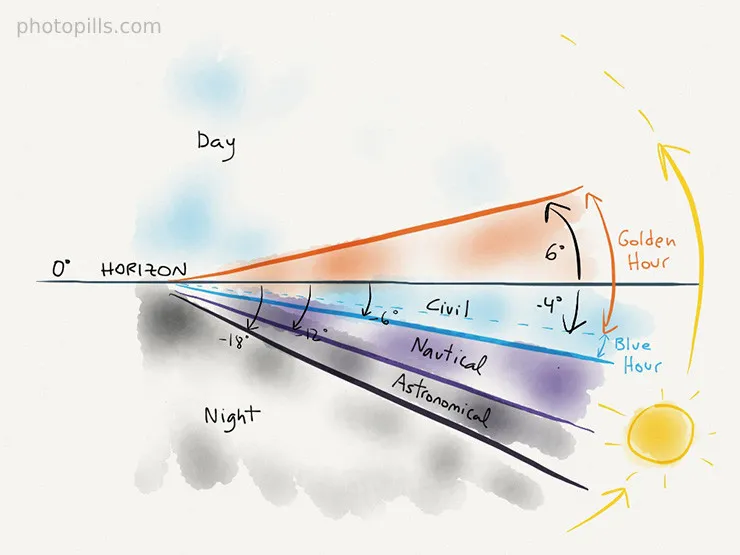
In the diagram above you can see the different types of natural light depending on the Sun elevation:
- Day. Elevation higher than 6º.
- Golden hour. Elevation between 6º and -4º.
- Blue hour. Elevation between -4º and -6º.
- Civil twilight. Elevation between 0º and -6º.
- Nautical twilight. Elevation between -6º and -12º.
- Astronomical twilight. Elevation between -12º and -18º.
- Night. Elevation lower than -18º.
And in the following video Rafa (aka the PhotoPills Bard) explains in depth how natural light behaves and the type of photos you can take at each moment of the day:
What is the elevation?
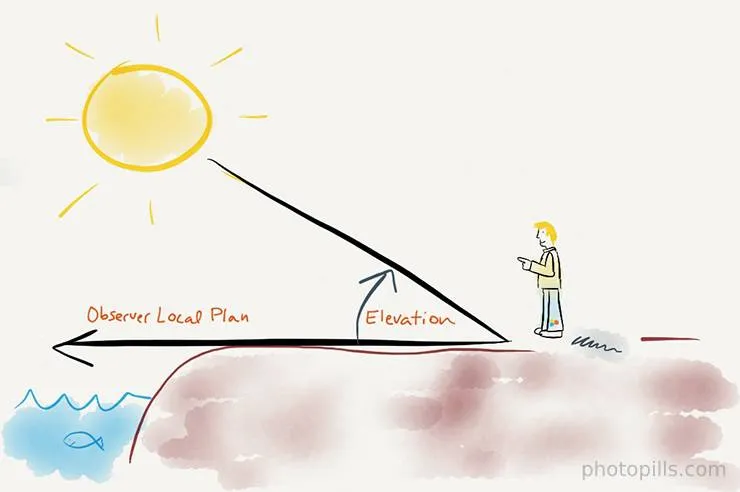
The elevation is the vertical angular distance between a celestial body (Sun, Moon, ...) and the observer's local horizon, also called the observer's local plane. For visible objects it's an angle between 0º and 90º.
Therefore, the elevation of the Sun is the angle between the direction of the geometric center of the Sun's apparent disk and the observer's local horizon.
The observer's local horizon is your current position. That is the current position of your camera or the Red Pin in the PhotoPills planner.
For instance, the Sun is at an elevation of 12º when it's situated at 12º above your local horizon. That is, when the Sun is 12º above the camera or the Red Pin position.
In the following video Rafa explains in depth what the azimuth and the elevation are, and how to use PhotoPills to find out both according to the Red Pin position and a certain date and time:
If you want to learn more about the elevation, have a look at our guide 'Understanding azimuth and elevation'.
Day or daytime
When does the day or daytime occur?
Daytime is the period of time happening between morning and evening golden hours, when the center of the Sun is above 6º of elevation.
What type of light you can find at day
Depending on the weather conditions, you can have 2 different scenarios:
- A sunny day.
- A cloudy or overcast day.
Sunny day
On a clear day, when the Sun is high in the sky, the light is extremely bright and harsh with only a little color. It produces a high contrast between light and shadow.
Many photographers consider this type of natural light and this time of the day the worst shooting conditions.
However, I consider that there is no right or wrong time of day to take photos. And my advice is that you should always be flexible and try to make the most out of the available conditions (light and weather) present in the scene.
For example, this is a good time to look for shadows or photograph in the shade.
Alternatively, you can spend this time of the day scouting one or several locations. Look for new locations and points of interest. Then, brainstorm and plan with PhotoPills. Finally, shoot during the golden hour, the blue hour, the twilights and nighttime (e.g. Milky Way, Star Trails, Meteor Showers).
Cloudy or overcast day
On a cloudy day, you'll have a diffuse light with little color and no shadows. Therefore, you can continue to create beautiful photos all day.
An overcast day provides even light across a waterfall, which prevents bright highlights and dark shadows from creating dappled light.
Alternatively, you can go to a forest and use the leaves as a diffuser to soften up the light. If you have strong dark shadows in the scene, your shot will lack any smoothness and fluidity. Concentrate on textures, colors and tonal perspective instead.
In addition to this, an overcast sky also brings out the rich colors in moss and fall colors.
But one of the best things about overcast skies is the ability to use longer shutter speeds without lens filters.
If there is any texture to the clouds in the sky, take advantage of it. But if the sky is pure white, eliminate it from the frame.
How the day or daytime is represented in PhotoPills
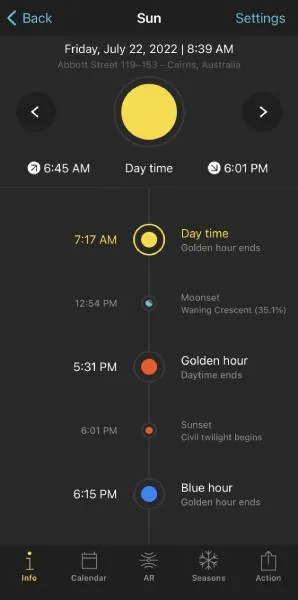
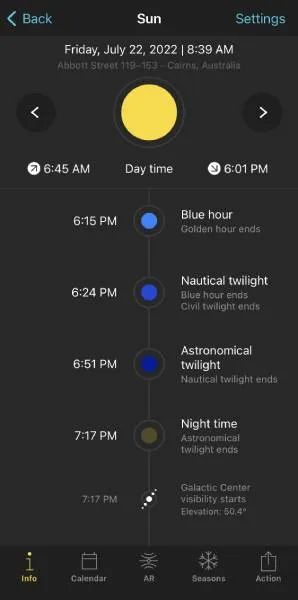
PhotoPills lets you know when it's daytime with 2 Pills:
- The Sun Pill, that you should use when you are at the location. By default, the information displayed corresponds to your current location (according to the GPS on your smartphone) and the current date and time.
- The Planner's map, where you can see the daytime, the golden hour, the twilights and the nighttime. In addition to this, Panel 5 indicates the end and start times of the civil twilight before Sunrise and after Sunset for the selected date, time and Red Pin position, which marks the beginning and the end of the day.
Note: To see the daytime, the golden hour, the twilights and the nighttime on the Planner's map, tap the Map Settings button (bottom right-hand corner, next to the (+) button). Then, tap the Twilights layer.
Magic hours
Magic hours are a more diffuse concept than twilights because there is no mathematical definition.
In fact, both the golden hour and blue hour, also known as the magic hours, overlap with civil twilight.
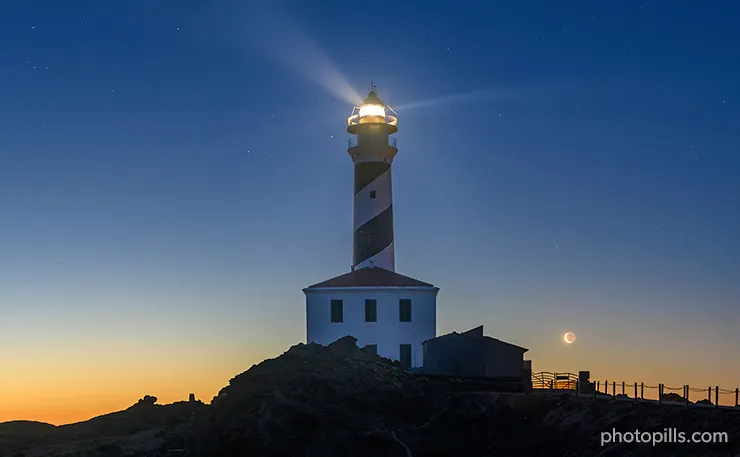
Golden hour
When does the golden hour occur?
The golden hour occurs twice during the day:
- In the morning, it begins when the Sun is at -4º of elevation and it ends when the Sun is at 6º above the horizon. It matches the end of the civil twilight, just after the blue hour.
- In the evening, it begins when the Sun is at 6º of elevation and it ends when the Sun is at -4º above the horizon. It matches the beginning of the civil twilight, right before the blue hour.
What type of light you can find during golden hour
It actually depends on weather conditions and large particles in suspension (section 6).
The golden hour is the period of time the color of the sky goes from red and orange to yellow or, as its name suggests, golden tones, having a warm color temperature. Lighting is soft, diffused and with little contrast, since the Sun is low in the sky and it creates that warm, glowy effect.
Due to the type of light that exists during this period of time, that doesn't produce strong shadows and harsh lighting, it's ideal for landscape photography.
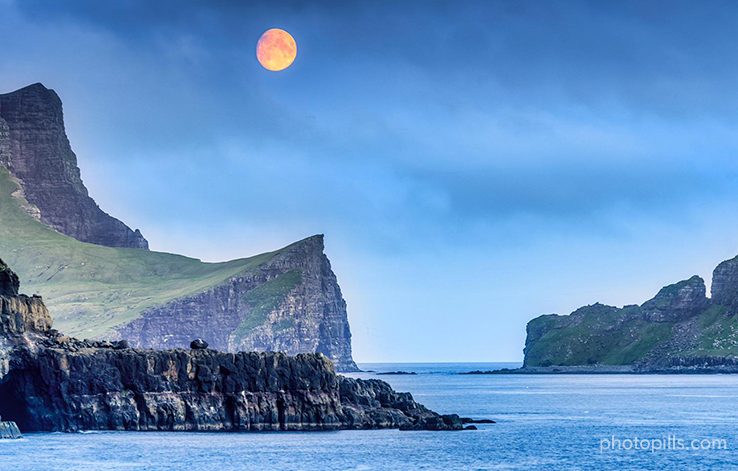
If you are a Moon photography lover, look for days the Full Moon rises or sets when the Sun is at an elevation between 0.5º and -6º.
When the Sun's elevation is below 0.5º, it's a great moment to shoot the Moon with a single exposure. If the Sun's elevation is above 0.5º, the Moon will be less visible and, therefore, less interesting.
How the golden hour is represented in PhotoPills
PhotoPills lets you know when it's golden hour with 2 Pills:
- The Sun Pill, that you should use when you are at the location. By default, the information displayed corresponds to your current location (according to the GPS on your smartphone) and the current date and time.
- The Planner's map, where you can see the daytime, the golden hour, the twilights and the nighttime. In addition to this, Panel 6 indicates the start and end times of the golden hour before Sunrise and after Sunset for the selected date, time and Red Pin position.
Note: To see the daytime, the golden hour, the twilights and the nighttime on the Planner's map, tap the Map Settings button (bottom right-hand corner, next to the (+) button). Then, tap the Twilights layer.
Blue hour
When does the blue hour occur?
The blue hour occurs twice during the day:
- In the morning, it begins when the Sun is at -6º of elevation and it ends when the Sun is at -4º above the horizon. It matches the beginning of the civil twilight, just before the golden hour.
- In the evening, it begins when the Sun is at -4º of elevation and it ends when the Sun is at -6º above the horizon. It matches the end of the civil twilight, right after the golden hour.
What type of light you can find during blue hour
It actually depends on weather conditions and large particles in suspension (section 6).
During the blue hour the sky has a deep blue hue with a cold color temperature and saturated colors. At the beginning (evening) and at the end (morning), you can notice a gradient of colors, going from blue to orange.
Since the Sun is below the horizon, the scene is illuminated by a soft and cool light. And the light direction attribute doesn't apply here (section 2).
Combine this type of light with a long exposure to emphasize the soft feeling if you have any moving elements like water or clouds.
If you happen to have an urban landscape in front of you, buildings are lit and streetlights on, making it an ideal time to create a nice contrast between the orange of the city lights and the blues of the sky.
This time of the day is also perfect for nature landscape photography because of the different shades of the sky and color saturation.
Because the blue hour occurs during civil twilight, it can also be a good time for Moon photography.
How the blue hour is represented in PhotoPills
PhotoPills lets you know when it's blue hour with 2 Pills:
- The Sun Pill, that you should use when you are at the location. By default, the information displayed corresponds to your current location (according to the GPS on your smartphone) and the current date and time.
- The Planner's map, where you can see the daytime, the golden hour, the twilights and the nighttime. In addition to this, Panel 6 indicates the start and end times of the blue hour before Sunrise and after Sunset for the selected date, time and Red Pin position.
Note: To see the daytime, the golden hour, the twilights and the nighttime on the Planner's map, tap the Map Settings button (bottom right-hand corner, next to the (+) button). Then, tap the Twilights layer.
Twilights
Twilights are the time intervals happening between night and day, before Sunrise and after Sunset. The Sun is below the horizon, but its light is visible because it illuminates the upper layers of the atmosphere.
To be more mathematical and precise, we are in the twilight phase when the center of the Sun has an elevation between -18º and 0º.
Both morning and evening twilight are subdivided into 3 phases:
- Civil twilight.
- Nautical twilight.
- Astronomical twilight.
Civil twilight
When does the civil twilight occur?
The civil twilight occurs twice during the day:
- In the morning, it begins when the Sun is at -6º of elevation and it ends as soon as the Sunrise starts.
- In the evening, it begins as soon as the Sunset ends and it ends when the Sun is at -6º above the horizon.
What type of light you can find during the civil twilight
It actually depends on weather conditions and large particles in suspension (section 6).
During the civil twilight, there's still enough natural light to see and distinguish objects perfectly.
The sky is very bright and the clouds can have a tint going from red, orange and yellow to magenta and blue. These colors are going to become cooler in temperature as time goes on and it's important to be able to adapt to the quickly changing conditions.
Clouds in the west are illuminated by orange-red Sunlight, while the ones in the east remain in blue and indigo.
Due to diffused light and different shades of color in the sky, civil twilight is ideal for portrait and natural landscape photography. Urban landscape photography is also a good option because the sky will have an intense blue color and the first street lights will appear in the scene.
It's also a good time for Moon photography. During civil twilight, the landscape is illuminated by Sunlight and the Full Moon is not too bright. Under these conditions, you'll get the correct exposure for both landscape and Moon with a single shot.
How the civil twilight is represented in PhotoPills
PhotoPills lets you know when the civil twilight occurs with 2 Pills:
- The Sun Pill, that you should use when you are at the location. By default, the information displayed corresponds to your current location (according to the GPS on your smartphone) and the current date and time.
- The Planner's map, where you can see the daytime, the golden hour, the twilights and the nighttime. In addition to this, Panel 5 indicates the start and end times of the civil twilight before Sunrise and after Sunset for the selected date, time and Red Pin position.
Note: To see the daytime, the golden hour, the twilights and the nighttime on the Planner's map, tap the Map Settings button (bottom right-hand corner, next to the (+) button). Then, tap the Twilights layer.
Nautical twilight
When does the nautical twilight hour occur?
The nautical twilight occurs twice during the day:
- In the morning, it begins when the Sun is at -12º of elevation and it ends when the civil twilight begins, when the Sun's elevation is -6º.
- In the evening, it begins just after civil twilight, when the Sun is at -6º of elevation and ends when the Sun's elevation is at -12º.
What type of light you can find during the nautical twilight
It actually depends on weather conditions and large particles in suspension (section 6).
During nautical twilight, the sky begins to darken considerably, getting a dark blue hue. Moreover, you can still distinguish the horizon line and many more stars are visible.
This period of time is ideal for urban and city photography. Taking advantage of the artificial lights of civilization can give you stunning results.
Landscape photography is also a good choice thanks to the diffused and soft light that you can find in the scene.
In addition to this, long exposure photography is an interesting choice. Dim Sunlight allows you to shoot long exposures without using an neutral density filter (ND).
You can also capture the Full Moon at the horizon, just when rising or setting. It's an interesting choice because, even though you can't get a correct exposure of the Moon and the landscape in a single exposure, you can still create beautiful Moon silhouettes.
How the nautical twilight is represented in PhotoPills
PhotoPills lets you know when the nautical twilight occurs with 2 Pills:
- The Sun Pill, that you should use when you are at the location. By default, the information displayed corresponds to your current location (according to the GPS on your smartphone) and the current date and time.
- The Planner's map, where you can see the daytime, the golden hour, the twilights and the nighttime. In addition to this, Panel 5 indicates the start and end times of the nautical twilight before Sunrise and after Sunset for the selected date, time and Red Pin position.
Note: To see the daytime, the golden hour, the twilights and the nighttime on the Planner's map, tap the Map Settings button (bottom right-hand corner, next to the (+) button). Then, tap the Twilights layer.
Astronomical twilight
When does the astronomical twilight hour occur?
The astronomical twilight occurs twice during the day:
- In the morning, it begins when the Sun is at -18º of elevation and it ends when the nautical twilight begins, when the Sun's elevation is -12º.
- In the evening, it begins just after nautical twilight, when the Sun is at -12º of elevation and ends when the Sun's elevation is at -18º.
What type of light you can find during the astronomical twilight
It actually depends on weather conditions and large particles in suspension (section 6).
During the astronomical twilight the sky becomes even darker.
The light starts to dissipate quickly and silhouettes are going to be more prevalent in your shots. Details will be harder to make out during this time but there is still some remaining solar light on the horizon.
You can still do long exposure photography, both urban and landscape. And, of course, you can start doing night photography, always taking into account the Moon phase, as Sunlight is replaced by Moonlight.
How the astronomical twilight is represented in PhotoPills
PhotoPills lets you know when the astronomical twilight occurs with 2 Pills:
- The Sun Pill, that you should use when you are at the location. By default, the information displayed corresponds to your current location (according to the GPS on your smartphone) and the current date and time.
- The Planner's map, where you can see the daytime, the golden hour, the twilights and the nighttime. In addition to this, Panel 5 indicates the start and end times of the astronomical twilight before Sunrise and after Sunset for the selected date, time and Red Pin position.
Note: To see the daytime, the golden hour, the twilights and the nighttime on the Planner's map, tap the Map Settings button (bottom right-hand corner, next to the (+) button). Then, tap the Twilights layer.
Night or nighttime
When does the night or nighttime occur?
Nighttime is the period of time happening between the evening and the morning astronomical twilight, when the center of the sun is below -18º of elevation.
There is a total absence of Sunlight. It's when Moonlight comes into play.
What type of light you can find at night
Depending on the weather conditions, you can have 2 different scenarios:
- A clear dark night.
- A cloudy or overcast night.
Clear dark night
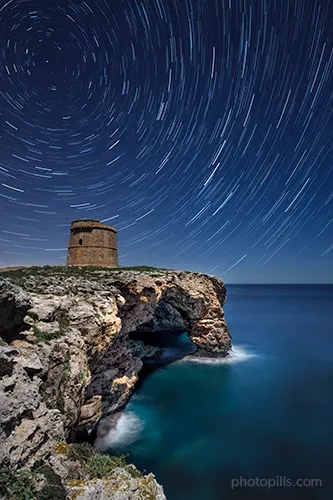
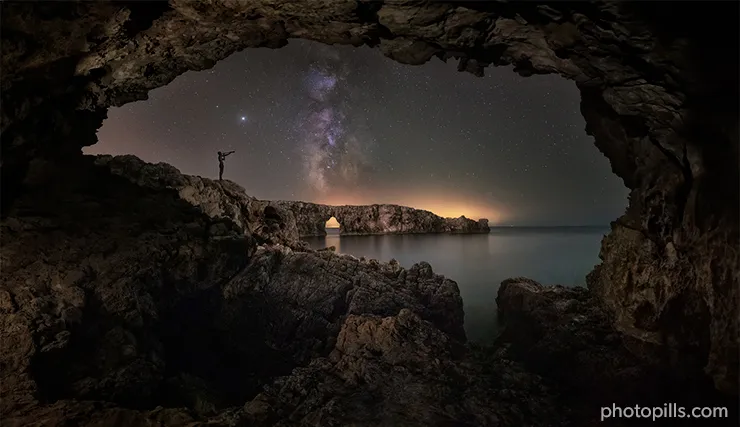
A clear dark night offers the best conditions to practice astrophotography (ie. shooting the Milky Way, Star Trails, Meteor Showers).
New Moon days are especially suited for night photography and in particular, to capture the Milky Way. Knowing when astronomical twilight ends is vital for this type of photography.
During New Moon days, the end of the astronomical twilight is particularly important. If you are lucky to live near an area without light pollution, you'll be in total darkness. This is the ideal time to start photographing and observing all types of astronomical objects: planets, galaxies (like our own one, the Milky Way), nebulae, etc.
However, you can also use the Moonlight to illuminate your foreground while capturing the dark sky.
So the Moon can play an important role in your shot.
Cloudy or overcast night
Clouds are astrophotography's worst enemy.
They interfere with the visibility of the sky and ruin any potential photo opportunity.
Unfortunately, there's not much you can do on a cloudy or overcast night, other than plan & pray for the clouds to go away! ;)
In this case, the Moon phase doesn't really matter because the clouds are covering any astronomical subject.
The same goes for humidity – water particles in the air amplify light pollution and skyglow while blocking the light from the stars.
However, it's possible to do astrophotography in humidity, especially if the level of light pollution is low. Be careful with your lens temperature though, as you quite possibly may have to fight with dew forming on the surface of your lens.
Take a look at the gear to photograph the Milky Way.
How the night or nighttime is represented in PhotoPills
PhotoPills lets you know when it's nighttime with 2 Pills:
- The Sun Pill, that you should use when you are at the location. By default, the information displayed corresponds to your current location (according to the GPS on your smartphone) and the current date and time.
- The Planner's map, where you can see the daytime, the golden hour, the twilights and the nighttime. In addition to this, Panel 5 indicates the start and end times of the astronomical twilight before Sunrise and after Sunset for the selected date, time and Red Pin position, which marks the end and the beginning of the night.
Note: To see the daytime, the golden hour, the twilights and the nighttime on the Planner's map, tap the Map Settings button (bottom right-hand corner, next to the (+) button). Then, tap the Twilights layer.
Awesome!
Now that you know the types of natural light that you can find throughout the day, let's find out when they occur.
Ready?
4.How to find when the golden hour, blue hour and twilights occur
This is crucial.
If you want to take pictures during golden hour, blue hour or any of the twilights, you have to know when it starts (and ends).
And the easiest way to find out is by using the PhotoPills app. It gives you all the information you need.
In your current position (when you're in the field)
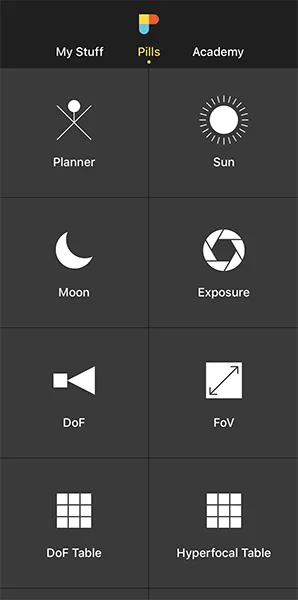
You can use 2 Pills to your advantage:
- The Sun Pill.
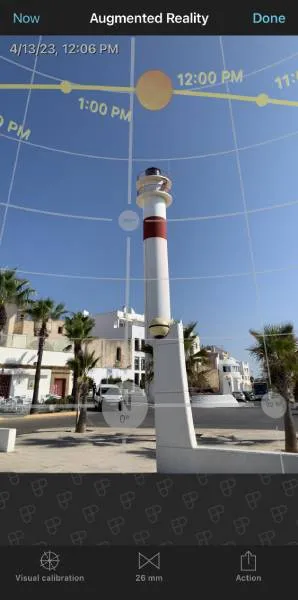
- The Augmented Reality views:
- The AR view inside the Sun Pill.
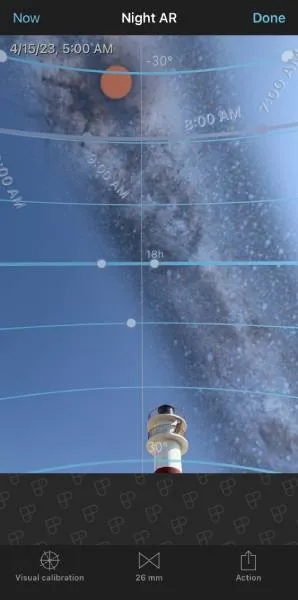
- The Night AR Pill.
Use the Sun Pill
Let's say you're already at the location where you'll take photos during the golden hour. You got there in time (2-3 hours) to explore the terrain and confirm your plan.
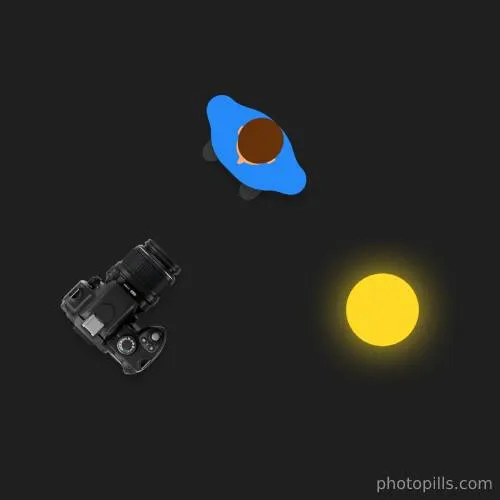
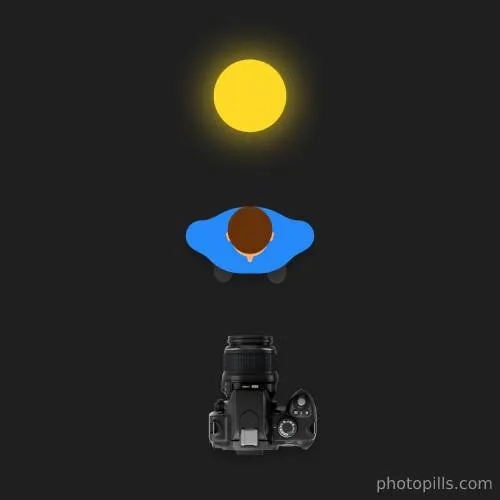
Stand near the shooting spot, open PhotoPills and tap Sun (Pills Menu). By default, the information displayed corresponds to your current location (according to the GPS on your smartphone) and the current date and time.
If you scroll the screen up and down, you'll see the start time of all the natural light phases on a specific date from midnight until 11:59 pm.
Tip!
If you want to change the location and/or date and/or time, tap Settings (top right corner). On the new screen, you can change:
- The location by taping on Position. Slide the Autoupdate button to unlock the rest of the screen. You can use
- The search box if you want to type an address.
- The coordinates option if you know the latitude and longitude.
- The date by taping on Date. Slide the Current date and time button to unlock the rest of the screen. Tap
- Date to change the date.
- Hour to change the hour.
- You can also determine whether you want PhotoPills to automatically detect the time zone or not.
Use the Augmented Reality views
You can find two types of Augmented Reality views in PhotoPills:
- The AR view inside the Sun Pill (also available in the Planner).
- The Night AR Pill.
Information on the Sun Pill's AR view
The Augmented Reality view gives you the position and path of the Sun for the selected location (by default where you are), date and time (by default the current ones).
Use it in situ, when planning any shot involving the Sun shots, to adjust your frame and shooting spot for the best composition before you shoot.
You'll see the selected date and time on the top left-hand corner of the AR view.
Notice that you can change the date and time directly from the AR view:
- Swipe the AR view to the left to move time forwards. Swipe it to the right to move time backwards.
- Tap on the right-hand side of the AR view to jump to the next day.
- Tap on the left-hand side of the AR view to jump to the previous day.
- Double tap on the center of the screen to come back to your current date and time.
Information on the Night AR view
The Night Augmented Reality view gives you the position and path of the following elements for the selected location (by default where you are), date and time: Milky Way, celestial equator, Polaris, north/south celestial pole, circumpolar stars path and sense of rotation, Moon position, Moon path, Moonrise/set directions, and the Star Trails patterns.
Use it in situ to plan your night shots and adjust your frame for the best composition before you shoot.
You'll see the selected date and time on the top left-hand corner of the Night AR view.
Notice that you can change the date and time directly from the Night AR view:
- Swipe the Night AR view to the left to move time forwards. Swipe it to the right to move time backwards.
- Tap on the right-hand side of the Night AR view to jump to the next day.
- Tap on the left-hand side of the Night AR view to jump to the previous day.
- Double tap on the center of the screen to come back to your current date and time.
In any other location (when you're at home)
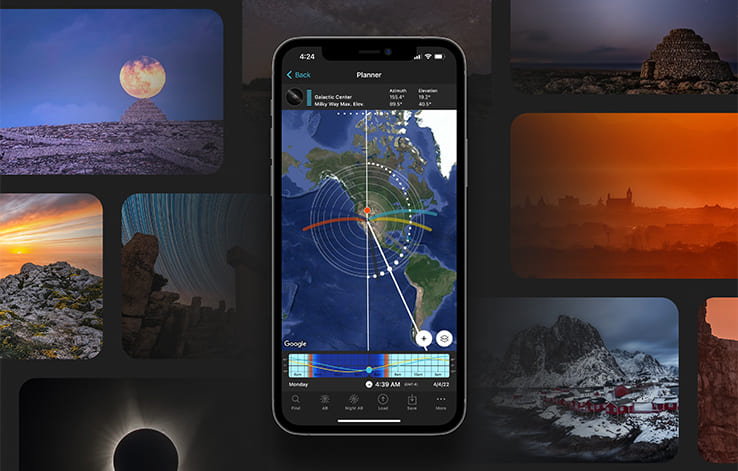
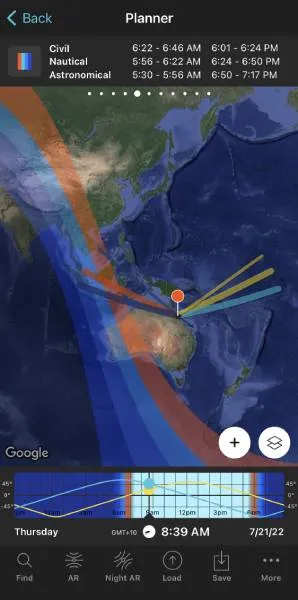
Imagine you're at home planning your blue hour photo. And you want to find out when it happens in a certain location.
Open PhotoPills and tap Planner (Pills Menu).
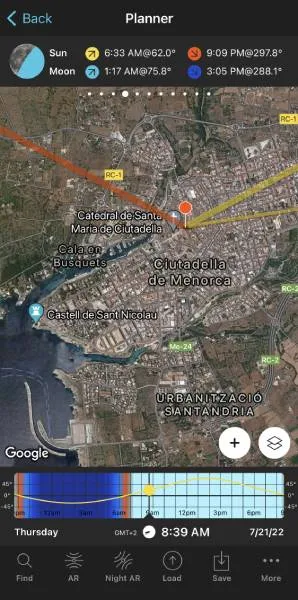
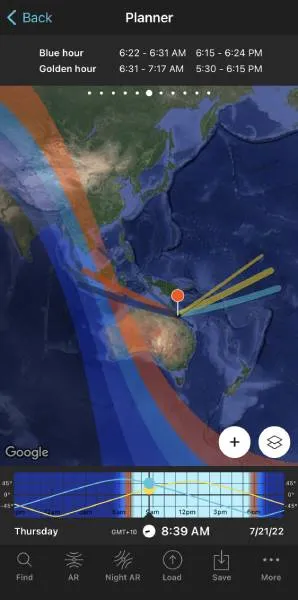
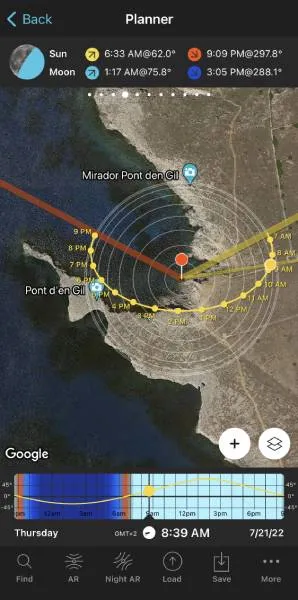
Then, place the Red Pin somewhere on the planet. Wherever you want to photograph the blue hour.
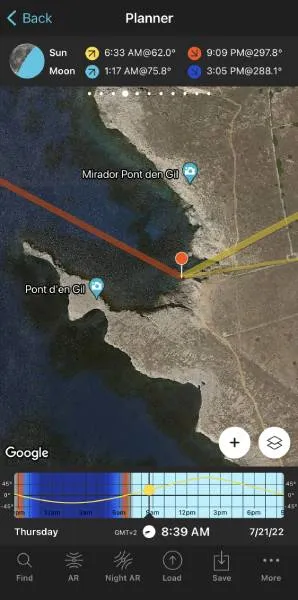
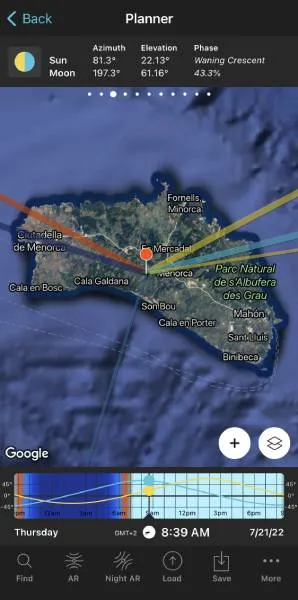
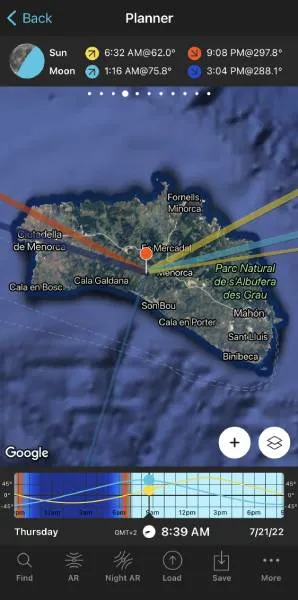
In this example I have placed it in Menorca, one of the most beautiful islands in Spain. More specifically, I have placed it right in a spot from where you can photograph the spectacular city walls and old town of Ciutadella during the blue hour.
If you don't know how to move the Red Pin, this video shows you how to do it.
Now, select the date you want to shoot the blue hour.
Double tap the center of the Time bar to set the current date and time. Then swipe it to the left to change the date and time until you set the date you want to take the picture, say July 21, 2022.
Alternatively, you can set the date using the Calendar. To do this, tap the center of the Time bar. In the Date & Time screen, tap Date to change the shooting date manually.
Finally, swipe the top panels until you reach Panel 6. This panel shows you the exact start and end times of the golden hour and the blue hour for the selected date and Red Pin position.
If you need to know the exact start and end times of the twilights (civil, nautical, astronomical) for the selected date and Red Pin position, swipe the top panels until you reach Panel 5.
Cool!
You've just found out when the golden hour, the blue hour and the twilights occur.
Now let me explain to you how to find out the exact natural light direction in a certain location.
5.How to know the exact natural light direction
As I explained to you in section 2, one of the natural light attributes is direction.
Light direction has a dramatic influence on the scene in general and particularly on the subject. It has some control over the subject's shape and also over the length of shadows, and thus in creating depth.
In the case of natural light, the light direction depends on the time of the day as the Sun's position in the sky changes.
And I explain in detail in section 7 that you should also be aware of the Moon's position in the sky if you plan to shoot at night.
But how can you know where the Sun (or the Moon) is going to be in the sky?
You know the answer...
With PhotoPills!
Understanding the Sun and Moon Standard layers on the Planner
Open PhotoPills and tap Planner (Pills Menu).
Then, tap the Map Settings button (bottom right-hand corner, next to the (+) button):
And now, tap either
- The Sun layer.
- The Moon layer.
Finally, on the new screen, select the Layer style. In this case, tap Standard.
After doing this, you'll see several lines on the Map:
- The thin orange line tells you the position of the Sun for the selected date and time.
- The thin blue line tells you the position of the Moon for the selected date and time.
- The thick lines show the Sunrise (yellow), Sunset (orange), Moonrise (light blue) and Moonset (dark blue) directions.
All these directions are, obviously, according to the Red Pin position.
In addition to this,
- On Panel 3 you have the Sun and the Moon position coordinates (azimuth and elevation).
- On Panel 4 you have the Sunrise, Sunset, Moonrise and Moonset times.
Understanding the Sun and Moon Path layers on the Planner
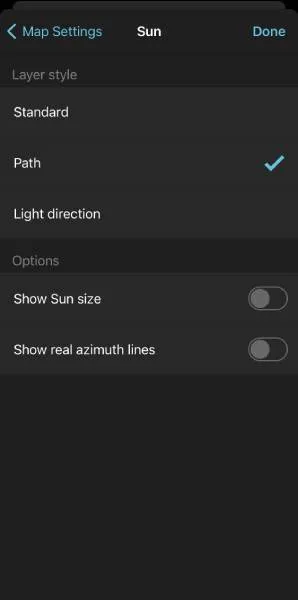
Alternatively, you can use the Sun and Moon Path layers.
Open PhotoPills and tap Planner (Pills Menu).
Then, tap the Map Settings button (bottom right-hand corner, next to the (+) button):
And now, tap either
- The Sun layer.
- The Moon layer.
Finally, on the new screen, select the Layer style. In this case, tap Path.
This layer shows the same info as the Standard layer plus the Sun/Moon path for the selected date.
So working together with the Sun/Moon Path and the contour circumferences you can quickly assess the position of the Sun/Moon in the sky (azimuth and elevation).
It's an incredibly useful tool!
Understanding the Sun and Moon Light direction layers on the Planner
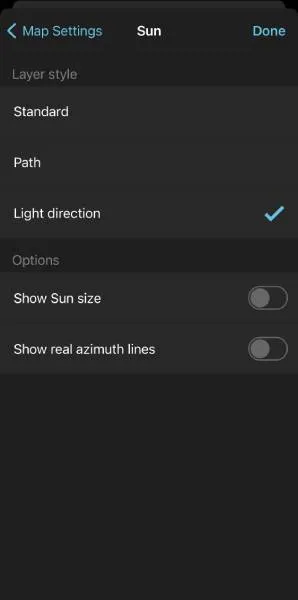
Finally, you can use the Sun and Moon Light direction layers.
Open PhotoPills and tap Planner (Pills Menu).
Then, tap the Map Settings button (bottom right-hand corner, next to the (+) button):
And now, tap either
- The Sun layer.
- The Moon layer.
Finally, on the new screen, select the Layer style. In this case, tap Light direction.
The Sun/Moon Light direction layer shows the direction of light throughout the selected date.
Notice that:
- The thin yellow lines showing the direction of light will only appear during daytime. Sunlight matters only throughout the day.
- The thin blue lines showing the direction of light will only appear during nighttime. That's because Moonlight is only important at night.
So if you want to figure out how Sunlight/Moonlight will hit your subject on a given date, this is your layer!
Plan the Magic Hours: the golden hour and the blue hour
Just a quick reminder that with this video you can easily learn the different types of natural light, when they occur and the type of photos you can take in each natural light type.
Plan the golden hour
Planning a photo that happens during golden hour is very simple. You can do it in 7 steps:
Place the Red Pin on a potential location.
Select the date you want to photograph the golden hour.
Find out the Sunrise/Sunset direction. Check the thick yellow line (Sunrise) or the thick orange line (Sunset).
Find out the Sunrise/Sunset time on Panel 4.
Check different locations until you find a photo that you like.
Check at what time the golden hour starts on Panel 6.
Save the plan using the Save button.
You have a complete step by step guide in section 4 of our golden hour photography guide.
Plan the blue hour
Planning a photo that happens during blue hour is very simple. You can do it in 7 steps:
Place the Red Pin on a location that you like.
Select the date you want to shoot the blue hour.
Find out the Sunrise/Sunset direction. Check the thick yellow line (Sunrise) or the thick orange line (Sunset).
Find out the Sunrise/Sunset time on Panel 4.
Check different locations until you find a photo that you like.
Check at what time the golden hour starts on Panel 6.
Save the plan using the Save button.
You have a complete step by step guide in section 4 of our blue hour photography guide.
Plan a Sunrise or Sunset on a certain date
Imagine you want to photograph the next Sunrise or Sunset. You know the date of the photo, but... from where would it be better to take the photo? And at what time?
You'll get the answers to these questions using PhotoPills main tool: the Planner.
Here's a video in which Rafa explains in great detail how to plan spectacular Sunrise and Sunset photos.
To plan a Sunrise/Sunset photo for a certain date you have to follow 6 steps:
Place the Red Pin on a location that you like.
Select the date you want to photograph the Sunrise/Sunset.
Find out the Sunrise/Sunset direction. Check the thick yellow line (Sunrise) or the thick orange line (Sunset).
Find out the Sunrise/Sunset time on Panel 4.
Check different locations until you find a photo that you like.
Save the plan using the Save button.
You have a complete step by step guide in
Plan a Sunrise or Sunset on a certain position
Imagine that you want the Sun rising or setting in a certain position in the photo but you don't know the shooting date ;)
In other words, you need to find out:
- If that specific photo is possible.
- And if it is, when exactly does it happen.
And for this, the best tool is the PhotoPills Planner.
In the following video Rafa explains in great detail how to find a powerful Sunset photo without knowing the exact date in which you want to take the photo.
To plan a Sunrise/Sunset photo when you don't know the date of the photo you have to follow 9 steps:
Place the Red Pin on the shooting spot.
Place the Black Pin where you want the Sun.
Find the dates on which the photo is possible with the Search option.
Enter the date range.
Set the azimuth of the Sun.
Set the elevation of the Sun.
Get the results table with the days when the photo is possible.
Choose the date that best suits what you need.
Save the plan using the Save button.
You have a complete step by step guide in
Plan a Moon shot
As I explained you in section 3, the Moon can be a great source of light, so you can use it to illuminate a certain area of your frame.
Or it can be the subject of your picture ;)
In any case, planning a Moon shot requires more work and accuracy than a Sunrise or a Sunset shot.
The two most common cases are:
- A plan for a certain date, as for example, when you want to plan the next Full Moon.
- A plan with the Moon in a certain position. In this case, you know the shooting spot and the photo you want, and you want to find out when it happens.
Plan the next Full Moon
In this case, you want to capture the Moon on a specific day.
That is, you know the date you want to take the photo but you need to find out:
- The exact shooting spot from which you'll be shooting.
- The exact time the Moon will be where you want it to be.
Here is a video in which Rafa explains step by step how to plan this type of landscape photography.
To plan this type of Moon shot you have to follow 8 steps:
Place the Red Pin close to the subject.
Select the date of the Moon you want.
Place the Black Pin where you want the Moon.
Understand the Moonrise and Moonset directions. Check the thick light blue line (Moonrise) or the thick dark blue line (Moonset).
Move the Red Pin. Choose the shooting spot, find the time of the photo and determine the size of the Moon. Panel 2 helps you find out if the Moon is at the height you want and the size you need.
Check the natural light on Panel 3. The Sun elevation tells you the type of natural light.
Plan the field of view and the depth of field with the map tools.
Save the plan using the Save button.
You have a step by step guide in section 5 of our Moon photography guide.
Plan the Moon in a certain position
You know exactly the photo you want: you know the exact shooting spot from which you'll be taking pictures, the frame and the Moon position with respect to the subject you want.
Now you just need to find out:
- If that specific photo is possible.
- And if it is, when exactly does it happen.
Here is a video in which Rafa explains how to use PhotoPills to plan a photo in which the Moon rises in a certain position in the frame.
To plan a Moon shot when you don't know the date of the photo you have to follow 10 steps:
Place the Red Pin on the shooting spot.
Place the Black Pin where you want the Moon.
Find out the elevation of the Moon you need.
Find the dates in which the photo is possible with the Search option.
Enter the date range.
Enter the azimuth of the Moon.
Enter the elevation of the Moon.
Get the results table with the days when the photo is possible.
Choose the date that best suits what you need.
Save the plan using the Save button.
You have a step by step guide in section 5 of our Moon photography guide.
Plan the Milky Way
While there is no right Moon phase to shoot under, there are distinct advantages and disadvantages to shooting under different phases.
As you may have guessed, the big advantage of shooting without Moonlight is that your camera can capture more stars, because Moonlight obscures fainter stars.
However, you can use Moonlight to illuminate your foreground when shooting at night.
Either way, I suggest you try using PhotoPills to plan any photo of the Milky Way that you imagine. It's a very powerful app!
With the following video you'll learn
- How to easily plan the best possible Milky Way photo for a given date with PhotoPills.
- And if you know the photo you want to take but don't know when it happens, you'll learn to determine the exact date and time that the Milky Way will be exactly where you want it to be.
To plan a photo of the Milky Way you have to follow 6 steps:
Place the Red Pin on a potential location.
Set the date of the photo.
Activate the Milky Way layer.
Change the time with the Time bar until the Milky Way is in the position you want.
Move the Red Pin to adjust the shooting spot.
Save the plan using the Save button.
You have a step by step guide in section 7 of our Milky Way photography guide.
6.How atmospheric conditions affect natural light photography
One way to make your images appealing and dramatic is to look for different views on already known locations, or to find new locations altogether.
Another way is to seek out unique light, which can reveal a familiar location in a new way or make an unfamiliar location into something jaw-dropping.
Understanding atmospheric optics will help you enormously in your search for beautiful natural light.
The uniqueness of the Earth's atmosphere
If the Earth had no atmosphere, there would be no colorful Sunrises or Sunsets. No twilight either.
The sky would be black, not blue, both day and night. And when the Sun set, complete darkness would occur almost instantly.
Can you imagine?
That's because light travels in a straight line. So without the Earth's atmosphere to deflect Sunlight from its straight-line path, no light could reach any elements once the Sun hid below the horizon.
Why?
There's a very simple reason: the Earth would block the rays of the Sun.
The different particles in the atmosphere
Fortunately for us, landscape photographers, the Earth has an atmosphere full of molecules of nitrogen, oxygen and water (in the form of vapor), as well as dust and water droplets of all sizes.
Depending on their size, we can divide particles into 3 groups:
- Particles smaller than the wavelength of visible light (e.g. molecules of nitrogen and oxygen).
- Particles roughly equal in size to the wavelength of visible light (e.g. smoke particles).
- Particles bigger than the wavelength of visible light (e.g. dust particles).
Why is the particle size relevant?
Because the light's behavior when it strikes a particle depends solely on whether this particle is smaller or bigger than the light's wavelength.
The Sunlight wavelength
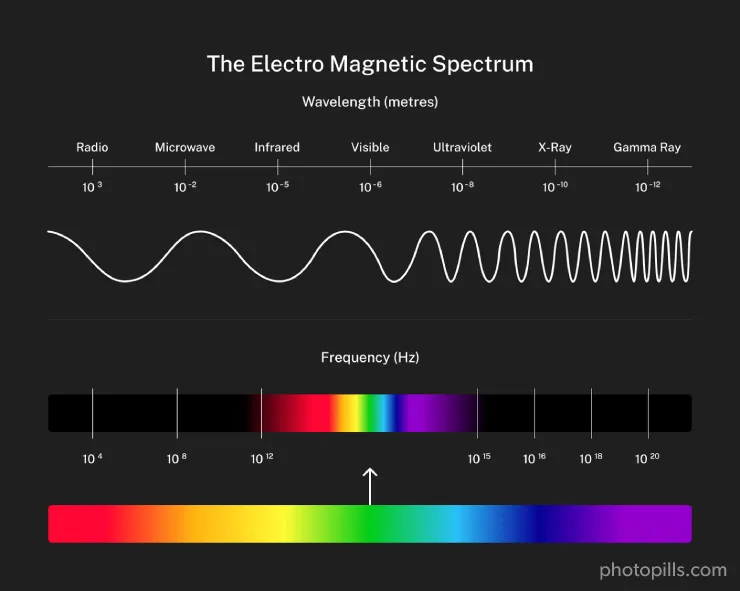
The electromagnetic spectrum is the term used by scientists to describe the entire range of light that exists.
Before entering the Earth's atmosphere, the Sun emits what's called solar radiation.
It includes:
- Corpuscular radiation, which is a stream of atomic or subatomic particles (ie. protons, electrons, neutrons, atomic nuclei, ions, and atoms) emitted at high speed from a star or other object, as for example in the solar wind. When the solar wind is strong enough and hits the particles in the Earth's atmosphere, they release energy – and this is what causes the Northern Lights (Aurora Borealis).
- An electromagnetic radiation including Sunlight, which is actually a portion of the total light the Sun emits and it's composed of all the wavelengths of visible light. As you can see from the diagram above, from infrared waves to ultraviolet waves.
So what we call "Sunlight" is the portion of the Sun we can see.
Just like there are sounds we can't hear (but other animals can), there is also an enormous range of light that our eyes can't detect. As a matter of fact, from radio waves to gamma rays, most of the light in the universe is invisible to us!
Why?
To give you a simple explanation, the light you're able to see with your eyes is between 390 nm and 750 nm within the electromagnetic spectrum. Everything outside that range is "invisible" to you. This includes infrared, gamma, X, ultraviolet, microwave and radio waves.
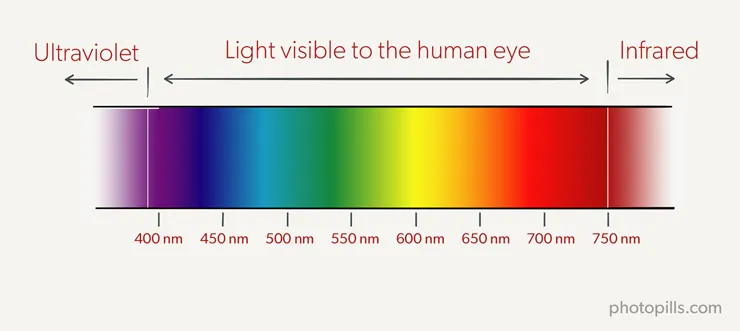
Our brain interprets the various wavelengths of light as different colors.
So the shortest wavelength that we perceive (390 nm) corresponds to violet, and the longest one (750 nm) corresponds to red.
Blue, turquoise, green, yellow and orange are between.
If you combine them all together, we see the mixture as white light.
How the particles in the atmosphere affect natural light
Now let's go back to our little friends in the atmosphere: the particles.
What happens when light travels through the atmosphere?
It collides with the particles present at that moment of time in the atmosphere. And, as I told you before, their effect on natural light depends on whether this particle is smaller or bigger than the light's wavelength.
Therefore...
- If the particle is smaller than the light's wavelength (e.g. molecules of nitrogen and oxygen), the light is scattered in all directions: forward, backward and, seldomly, at right angles to the original direction. This is called Rayleigh scattering. Here, blue light is scattered much more effectively than red light.
- If the particle is roughly equal in size to the wavelength of visible light (e.g. smoke particles), the scattering effect is much less pronounced than it is for air molecules. Here, blue light is still scattered more effectively than red light but to a lesser extent.
- If the particle is bigger than the wavelength of visible light (e.g. dust particles), the light is scattered evenly, primarily forward. Here, all lights (blue, red, etc.) are scattered equally.
How does this translate into photography?
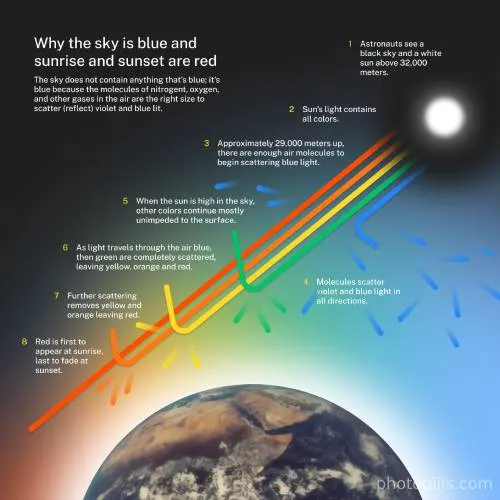
The power of blues in nature
When you see a blue sky, you're actually seeing the blue component of the white Sunlight that's been diverted from its original path by small particles present in the atmosphere. This blue component is what has traveled to your naked eye.
In similar fashion, Rayleigh scattering causes the shadows on sunny days to have a cooler tone than areas illuminated directly by the Sun. The light doesn't come directly from the Sun, it comes from the sky. That's why the shadows have a bluish tone.
The power of reds in nature
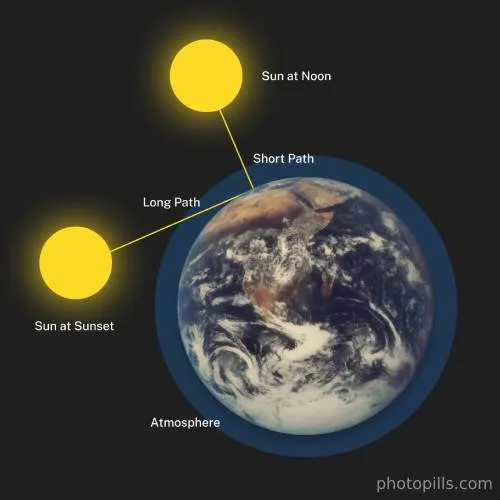
At noon, the distance Sunlight has to travel through the atmosphere is relatively short. So even though blue light scatters to produce a blue sky, we perceive the remaining light as white.
However, at Sunrise and Sunset, Sunlight takes a much longer path through the atmosphere. This increase means there are far more particles to scatter the light, so the violet and blue light is completely scattered away. Now yellow, orange and red light can be scattered, causing the sky to take on these colors.
Therefore, the more atmosphere the light from the Sun must go through, the redder the Sunrise or Sunset appears.
In addition to this, pollutants in the air caused by industry can add to the number of scattering particles, so areas with high levels of air pollution may experience more vibrant Sunrises and Sunsets.
In similar fashion, because the Sunlight takes on an orange or red cast at Sunrise or Sunset, this light scattered by clouds takes on the same color as the incoming light. So clouds will appear orange or red at Sunrise or Sunset.
Twilights and magic hours happen in the morning and in the evening, but this doesn't mean that the same conditions of light are repeated exactly. It will depend not only on the elevation of the sun, but also on weather conditions, pollution, large particles in suspension (water droplets, dust), etc.
Are you still there?
Yes?
Great!
Let's continue. It's time to find out which light is best for photography.
7.What is the ideal or best light for taking photos?
I've been a professional landscape, nature, and wildlife photographer for almost 30 years, and I often get asked this question during my workshops:
"What are the best times of day for taking outdoor pictures?"
The answer, of course, depends in large part on what you are photographing.
When you like being outdoors shooting as I do myself, you may spend weeks in the field hoping for incredible displays of natural light to fully bring a subject to life.
That's why understanding natural light, how it changes during the day, and how you can best use the light to your advantage are all critical aspects to become a successful outdoor photographer.
So let's analyze together each type of light (section 3) to see how to make the most out of them.
Harsh daylight
What is harsh daylight
Harsh daylight is the light produced outdoors, on bright sunny days.
It happens between morning and evening golden hours, when the center of the Sun is above 6º of elevation (section 3). In other words,during the brightest part of the day.
Harsh daylight attributes
Many photographers believe harsh daylight is a terrible kind of light to work with. In my opinion, it can be a powerful tool if you're fully aware of its characteristics.
Color:
- It has a neutral effect on colors before/after the Sun is close to its zenith (peak).
- At the zenith of the Sun's path the light begins to bleach colors, making them less vivid and saturated. For example, the sky starts to lose some of its blue.
Intensity:
- This type of light is extremely bright and very harsh.
- It creates deep shadows and very strong contrasts at all times.
Quality:
- This light helps you create a sense of volume. While this effect is not as strong as during the magic hours (golden hour and blue hour) or in window light, the harsh daylight is definitely not flat.
- This is not a magical or evocative kind of light. Because of its brightness and casting of shadows, textured surfaces will look rougher in the photo than what they really are.
Direction:
- This light can be directed to an extent, particularly before/after the Sun is at its zenith.
- To direct it, simply move yourself and/or your subjects around whenever it's possible.
- You'll notice the effect by observing the shadows, which become more or less strong.
How to use harsh daylight in your storytelling
This light works very well when you want textures to look rough. For example, it accentuates every wrinkle and imperfection on the human skin or the rugged terrain in a landscape.
Harsh daylight is ideal for when you want to show something in a very authentic and genuine manner. It's perfect to convey authenticity, the sense that something or someone is real and original.
This type of light produces a bleaching of the color palette washing out any special mood. So you can capture a moment with tension, inspiration, and emotions.
Harsh daylight issues and solutions
Let's see what issues you can face when shooting with harsh daylight and the potential solutions you can apply in the field.
Issue #1
At the zenith of the Sun's path the light begins to bleach colors.
Potential solutions
If you use the Sunlight as the key light, the trick is to place it like you would any other key light:
- When it's above and behind you, it will look like butterfly light (a lighting pattern used in portrait photography where the key light is placed above and pointing down on the subject's face).
- If it's on the sides, it can work as a split light which involves "splitting" the face into two proportional halves, with one side being in the shadow and the other side being in the light.
Other than fully lighting the subject with the Sunlight, you can experiment with the shadows as well. This will add a bit of depth to the shot.
My preferred option is to pop up the color palette using some post-processing software like Lightroom or Photoshop. A simple increase in vibrance or saturation can make a big difference on your final image.
Issue #2
Because of the very high contrast there's a loss of detail in the shadows or the highlights.
Potential solutions
Try using a graduated neutral density filter (GND) or a circular polarizing filter (CPL). Both can darken the sky, and reduce the contrast in landscapes.
If the contrast is too great and your subject is stationary, a bracketing is the only effective solution.
Alternatively, use some post-processing software. In Lightroom you can recover the shadows and/or the highlights. In Photoshop you can work with layer masks.
Golden hour light
What is the golden hour light
The first and last hour of daylight are both often referred to as the golden hour. Along with the blue hour, both are also known as the magic hours.
The golden hour occurs twice during the day (section 3):
- In the morning, it begins when the Sun is at -4º of elevation and it ends when the Sun is at 6º above the horizon. It matches the end of the civil twilight, just after the blue hour.
- In the evening, it begins when the Sun is at 6º of elevation and it ends when the Sun is at -4º above the horizon. It matches the beginning of the civil twilight, right before the blue hour.
Golden hour light attributes
Its name comes from the fact that everything this golden light illuminates the scene creating a warm glow that looks magical.
For this reason, the large majority of photographers find it the best natural light to shoot in.
But, be careful, because despite its name it doesn't last an hour. Its duration depends on the location you're in and the time of year your plan to shoot in.
Color:
- The golden hour light casts some nice colors:
- Deep orange when the Sun is closest to the horizon.
- Lighter orange when the Sun is a little above the horizon.
- Shades of yellow when the Sun is at its highest point (almost at the end of the Sunrise and at the beginning of the Sunset).
- This natural light makes all colors look very vivid and lively.
Intensity:
- It's soft, diffused and with little contrast as the Sun approaches the horizon.
- It creates long and distinct shadows, which you can use to create a visually pleasing image.
Quality:
- It's very versatile due to the changing effect on color.
- Take advantage of the warm golden glow across the scene – it brings any landscape to life.
- Look for shadow areas to contrast against those with an orange glow in your composition – the long shadows make objects stand out.
Direction:
You can direct the golden hour light in various ways:
- Benefit from backlighting and rim lighting for perfect silhouettes, semi-silhouettes, and a progression of light–dark tones. Sculpt your subject with natural light to evoke a sense of volume and depth.
- Golden hour sidelight is fantastic for capturing drama in your photos. When the light comes from the side, it illuminates part of the subject while the rest is shrouded in shadow.
How to use golden hour light in your storytelling
As the Sun moves quickly toward the horizon, you see a rapid change in the angle, color, and intensity of the light. This allows for a diversity in photographic possibilities that might not occur at other times of day.
Golden hour light is a powerful way to convey emotion. The warmth of the Sun translates to the emotional warmth of a moment. The mood from within the frame can feel uplifting and cheerful.
Take advantage of the way golden hour light illuminates the subject drawing attention to what's important. In this sense, pockets of light can feel dramatic and theatrical.
Use this light to make details and textures pop out of the frame. You'll create a sense of volume and an intense atmosphere.
A golden hour hazy backlight can feel dreamy and nostalgic. So when you transform your subject into a silhouette, your intention becomes more ambiguous, minimalist, and mysterious.
Nevertheless, be cautious because the golden hour light tends to romanticize and beautify everything it illuminates.
Golden hour light issues and solutions
Let's see what issues you can face when shooting with golden hour light and the potential solutions you can apply in the field.
Issue #1
Shadows can be cast in the wrong areas of the scene.
Potential solutions
Be conscious of where the shadows are within your frame and position yourself and/or the subject accordingly.
There's no need to try to avoid shadows in every single scene. The interplay of shadows and light can result in a very powerful image, where you can use shadows as negative space and to hide elements that don't add to the storytelling.
Issue #2
Light changes fast and you have little time to shoot.
Potential solutions
Plan what you shoot beforehand with PhotoPills. It's the only way to be where you need to be before the golden hour begins.
Have specific ideas of what you can expect to shoot:
- When the Sun is very close to the horizon, capture silhouettes.
- When it's a little higher, use the progression of light–dark tones to sculpt the subjects with light or shoot a semi-silhouette.
Learn how to adapt, and be ready to react.
Twilights (including blue hour)
What is twilight light
Twilight is that magical time between daylight and darkness. It occurs twice during the day.
As I explained you in section 3, astronomers recognize 3 twilights:
- Civil twilight. Elevation between 0º and -6º. It includes the blue hour which occurs when the Sun has an elevation between -4º and -6º.
- Nautical twilight. Elevation between -6º and -12º.
- Astronomical twilight. Elevation between -12º and -18º.
Twilight light attributes
Twilight produces a number of distinct and atmospheric lighting scenarios. Therefore, it's a flexible kind of light.
Depending on which stage of twilight you shoot in or in which specific scenario, this natural light is capable of making your subjects look beautiful, mysterious or even mystical.
Color:
- Twilight has a tinting effect on colors. The tint can be cool mauvish or bluish, when there are no lit-up clouds in the sky, to the various colors of the clouds, when they are present in the scene, as they act as reflectors.
- The presence of scattered clouds can sometimes result in a spectacular show. The clouds may be painted with colors ranging from deep red to bright purple.
Intensity:
- Twilight light is always soft – it either produces no shadows or very faint ones.
Quality:
- Twilight light can lack power – the further the Sun is below the horizon, the weaker the light.
Direction:
- Twilight light can be directional, especially with illuminated clouds in the sky. In such cases the bright cloudy sky becomes the light source.
- In other cases, when there aren't illuminated clouds in the sky, the side where the Sun is about to rise or has just set can still be a little brighter than elsewhere, which means that the light will be more intense from that direction.
How to use twilight light in your storytelling
Ideally, a sky with scattered clouds is the perfect scenario to combine with the effect of the twilight light. Oftentimes it will light up with bright colors – first the warm ones (red, orange) and then cool ones (pink, purple).
Contrary to the golden hour which conveys a sense of joy and happiness because of its warmth, twilight light is generally associated with a mystical and magical atmosphere. As a result, the viewer becomes speechless and inept by the beauty of what she has in front of her.
Later on, when the clouds lose their amazing tint, use the cool colors present in the scene to transmit calmness and tranquility.
As light fades out, be careful with your shutter speed.
- If you have a still subject in your scene, use a tripod and a long exposure to take advantage of the last sunrays and create an ethereal scene.
- If your subject is moving, focus on the shapes and outlines to draw the viewer's attention and use a faster shutter speed to convey motion.
Finally, make the most out of the blue hour.
When you're outdoors in the wild, this light is particularly beautiful if you're by the sea or a lake as the water reflects the colors in the sky. But any landscape will work as this is a wonderful, magical time for landscape photography.
When you're shooting an urban landscape, take advantage of the combination between natural and artificial light. I simply love how it sets up an evocative color contrast between the deep blue sky and the orange light.
Another approach is to photograph buildings by water. If you get the timing right you'll capture the reflections of lights in the water, with enough light in the sky so it comes out deep blue rather than black.
From a photographic point of view, it's a pity that LED bulbs have become so popular... :(
Twilight light issues and solutions
Let's see what issues you can face when shooting with twilight light and the potential solutions you can apply in the field.
Issue #1
During twilight, the intensity of natural light can be fairly weak so you risk ending up with a dark and/or blurred shot.
Potential solutions
Use a fast lens, which allows you to open up the aperture (e.g. f/2.8, f/2.2, f/1.8 or more).
Set:
- The largest possible aperture (the smallest f-stop value).
- The highest ISO depending on how much noise your camera produces.
- The fastest possible shutter speed before you lose too much detail in the shadows.
Use a wide-angle lens, which produces less blurred images.
Use a sturdy tripod.
If you don't have one, stabilize yourself, hold your breath, and fire off a few consecutive shots. Following these steps will allow you to capture at least one sharp image, even at shutter speeds as slow as 1/5s.
Issue #2
When you're shooting during twilight and your subject is moving, it will end up blurred in the photo.
Potential solutions
If the movement is very subtle, follow the steps above and you may end up with a fairly sharp image.
However, it's impossible to avoid blurring when there is distinct movement. Instead, use it to your advantage as a creative tool to convey motion.
Issue #3
You may have a hard time trying to capture tones during the darker stages of twilight.
Potential solutions
You need to allow as much light into the sensor as possible.
So if your subject is still, the best solution is to use a sturdy tripod and set the camera to take a long exposure.
However, it's not possible to capture detail effectively in moving subjects as part of them will appear blurred with movement.
An alternative solution is to turn the limitation into a creative decision. I recommend you to look for scenes where the subject still works well with less visible detail or even as a silhouette.
Issue #4
When lit-up, a cloudy sky can strongly reflect the Sunlight turning into a high dynamic range part of the frame.
Potential solutions
When metering, protect the highlights even if the shadows seem way too dark in the histogram. You'll recover them later on in post-processing.
In a scene with a still subject, shoot a bracketing.
When none of the above is possible, assume that you'll have an image with less detail and consider the possibility of shooting silhouettes.
Light diffused by clouds
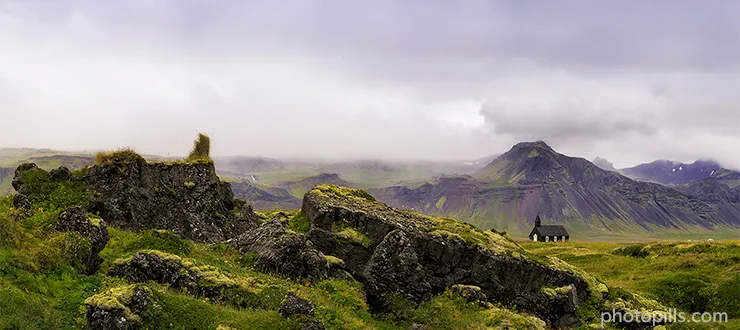
What is light diffused by clouds
It's the light resulting from the sunrays entirely blocked by clouds.
As a result, the natural light becomes diffused, soft and evenly distributed from every direction.
Light diffused by clouds attributes
This light is well suited for situations when the entire scene needs to be lit evenly. So it can be a great opportunity to capture any type of scene, from landscapes to wildlife.
While many photographers consider this light to be dull and lacking life, I find it incredibly appealing. Furthermore, it's less challenging than some of the more dramatic types of light.
You should definitely use this type of light when shooting people (e.g. in street photography or portraits) and wildlife. The soft shadowless light captures fine detail in the skin (or hair, feathers, etc.) and eyes. If you photograph any person or animal in bright Sunlight, harsh shadows hide some of the details that make your subject photogenic.
Color:
- Generally cloud-diffused light has a neutral effect on colors.
- Nevertheless, in a scene with heavy clouds this type of natural light can also make colors appear dull, darken them, or give them a grayish tint.
Intensity:
- It's a soft light that does not create shadows. As a result the contrast is relatively soft.
- This type of natural light can be rather weak. Be careful as your subject may look dark in your photo if the clouds are very heavy.
Quality:
- Light diffused by clouds is the most consistent kind of light.
- It's an even and balanced light so everything in the scene looks virtually the same from all angles. In other words, there are no strong shadows or highlights that can hide or enhance certains areas of the scene.
Direction:
- It does not change direction.
- It cannot be directed either.
How to use light diffused by clouds in your storytelling
You can't imagine how many photographers I know that tend to shy away from overcast weather.
And, honestly, I still don't understand why.
A cloudy day is an excellent time for stunning photography!
First of all, use the clouds themselves to add sky definition and create unique compositions. Clouds add texture, shape, and form.
Capture them with a long exposure to add movement to your scene. The results are abstract and painting-like effects.
Since the clouds act as a huge diffuser that dims light down, the light becomes nicer and softer. And your scene won't have a high dynamic range.
Instead, you can create a serious, melancholic, or somber mood, using a combination of the natural light in the scene and other details in the scene such as cloudy skies or stormy seas. The mood is strengthened even more if the subject is mysterious, gloomy or melancholic.
Colors do look better under soft light, than under the harsh bright daylight. Overcast skies and diffused light give a more neutral color base to work with than the yellows and blues of a clear-sky day.
Moreover, a great strategy is to use complementary colors. Since the light diffused by clouds lacks contrast, it can help you emphasize certain elements in your composition and reinforce your storytelling.
Keep an eye on your foreground. With the light on overcast days, no details get lost in the shadows. So you can use them to your advantage and maximize their visual impact.
Oh, and if the sky of your scene is a large area of undefined white clouds, minimize it. Don't eliminate it completely, keep the horizon at least.
Light diffused by clouds issues and solutions
Let's see what issues you can face when shooting with light diffused by clouds and the potential solutions you can apply in the field.
Issue #1
Your photo can look flat and boring.
Potential solutions
Always shoot in RAW and use some post-processing techniques.
You can increase the contrast of the image by tweaking the shadows and blacks sliders in Lightroom. You can try adjusting the highlights and whites too.
It's a very powerful tool that can add a lot of impact to an image that might otherwise appear dull and lifeless.
Issue #2
Be careful when shooting the sky as you may encounter exposure problems.
When the sky is white or light gray, you may overexpose it and blow out the highlights.
On the other hand, if you try to protect the sky keep an eye on your subject and the shadows in the scene because you may underexpose them. They'll appear too dark and won't have any detail at all.
Potential solutions
Since the contrast is not as strong as it would be under harsh daylight, it's a relatively easy problem to overcome.
Unfortunately, you may have to make a compromise. So in this case, I'd always recommend you to expose for the highlights, even if the subject may look very dark in your RAW.
It's always easier to recover detail in the shadows than in the highlights. Thus, later on, you can lighten up the shadows in Lightroom or Photoshop.
Remember that the subject is the most important element in your scene. Therefore, you need to get a well defined shape and bring out as much detail as possible so the viewer can easily identify it and focus on it.
Window and dappled light
What is window and dappled light
Natural light can be diffused:
- Indoors when natural light indirectly penetrates the interior (e.g. through a window, a door, a skylight). It can also be called window light.
- Outdoors when you're shooting in the shade cast by any element in the scene (e.g. a tree canopy, a building). It's also known as dappled light.
Window and dappled light attributes
Both are very soft natural types of light. However, indoors lighting scenarios offer much more creative opportunities than outdoors ones.
Color:
- In darker, closed spaces colors can appear more saturated and vivid thanks to a more directed light.
- Yes, the light is still diffused and has a neutral effect on color. Nevertheless, the relative darkness of the space and the dullness of the less illuminated elements make that colors getting more light much more lively.
Intensity:
- In closed spaces with narrow light sources, shadows become prominent. Use the light progression from bright to dark tones to boost shapes and volumes.
- Outdoors, dappled natural light eliminates almost any shadow in the scene.
Quality:
- Dappled light can be beautiful, especially when it helps create beautiful bokeh.
- Find the patches of even light and use the uneven light around it to add interest in the shadow patterns.
Direction:
- Window light is usually at least a little bit directional. The darker and closed the spaces with a distinct, narrow light source the greater your capacity to direct it and play with it.
- In open spaces dappled light is much less directional – it's almost flat.
How to use window and dappled light in your storytelling
Improve your storytelling with window light
Let's start talking about window light.
You can create intense, dramatic, dynamic, or even mysterious atmospheres if you direct window light intentionally.
In similar fashion, directing window light can help you to use the progression from bright to dark tones to create a sense of volume and three-dimensionality. Take advantage of all the arising opportunities:
- Accentuate textures, details and colors.
- Transform mediocre subjects into fascinating ones.
- Make interesting subjects look particularly dramatic.
Finally, an indoors scene with multiple light sources opens up tons of creative possibilities. Use them wisely to convey a sense of volume and depth. That way the scene will feel more intense.
Improve your storytelling with dappled light
And now, let's talk about dappled light.
As I told you before, dappled light is soft and doesn't cast shadows. Therefore, you'll have a hard time trying to create any kind of mood in your shot.
If you intend to convey any specific mood, focus on a visually strong and dramatic subject, rather than on the natural light. Another interesting option is to look for some kind of action taking place.
Dappled light can be particularly effective when details are important to your story.
Thanks to the spread and the softness of the light, everything is illuminated evenly. So the viewer can easily spot those details and easily understand the story.
Window and dappled light issues and solutions
Let's see what issues you can face when shooting with a window or a dappled light and the potential solutions you can apply in the field.
Issue #1
Both the window and dappled light might not be very intense. Thus, you can end up with a blurred photo because of motion in the scene or from camera shake.
Potential solutions
Use the same tricks as when shooting during twilight: a sturdy tripod, a large aperture (small f number), a relatively fast shutter speed, and a relatively high ISO.
With moving subjects, once again there's not much you can do:
- If you're taking a portrait, ask your subject to stay as still as possible.
- Use the blur to convey motion (e.g. clouds, water, vehicles, people working).
When shooting indoors, try to position the subject as close as possible to the light source, or wait until the subject gets closer to it. You'll benefit from a brighter light.
Issue #2
Mixed light sources can be a problem because of their different intensity and the diverse contrasts in the scene. Imagine, for example, a composition where natural Sunlight is combined with artificial light or firelight.
Potential solutions
One option is to get closer to the natural light source (less intense) to overpower the artificial one (more intense).
However, unless the artificial light is impossible to manage, try to effectively balance all the light sources.
Issue #3
Window and dappled light can produce high contrasts leading to a mild or complete loss of detail in either the dark or the bright areas, depending on what you've exposed for.
Potential solutions
When an area of your picture is somehow under or overexposed due to its position in relation to the light source, try to adjust or direct the light by moving yourself or the subject, or waiting for the subject to move to a different spot in relation to the light source.
You can also solve it in post-processing by decreasing the exposure and/or playing with the highlights and the shadows.
However, when you have a complete loss of detail the best solution is generally to accept the existing light and try to minimize the impact in the troubled areas.
The line between what's acceptable can be thin and subjective. So it's up to you to decide what's best for your shot and how you can convey a more powerful message.
Alternatively, you can also shoot a bracketing and then blend the different captures in post-processing.
Light in fog
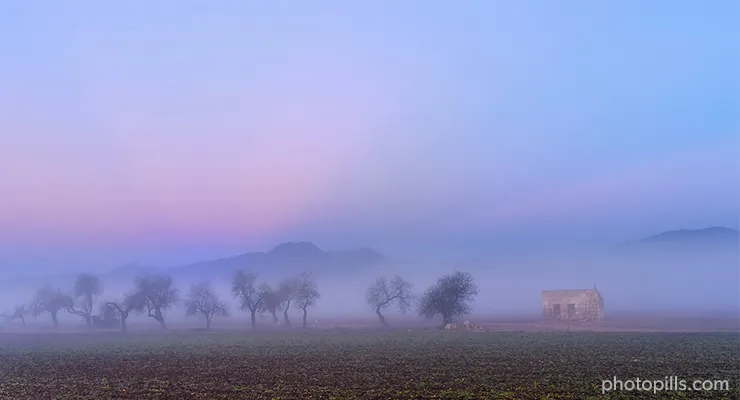
What is light in fog
There are 2 main types of lighting scenarios involving fog. They usually occur in the morning although not exclusively:
- A foggy day with heavy clouds and a total absence of direct rays from the Sun.
- A day when the fog is close to the ground and not very thick, while above the fog the sky is free of clouds. Here the Sun rays can interact with the fog creating a spectacular effect.
Light in fog attributes
Photography in fog, mist or haze can produce a wonderfully moody and atmospheric feel to your subject. Nevertheless, you may also end up with photos that look washed out and flat.
Color:
- Fog fades colors. How much? Well, it depends on how strong the fog is and how far away you're shooting from. For instance, in heavy fog or when your subject is relatively far from your camera, you may have a very limited color palette, almost a couple of tones.
- Fog can give colors a very distinct tint. In regular fog, it can produce a gray or even blue tint. When the fog interacts with rays of the Sun, it can produce an orange or yellow tint.
Intensity:
- When the Sun is blocked out by clouds, light in fog is very soft. The contrast is also very soft.
- When the fog interacts with rays of the Sun (usually during the Sunrise), the light remains soft, but the contrast is higher. It's stronger from the side of the Sun, so some parts of a scene may be brighter than others.
Quality:
- Fog causes a fading effect on the elements of the scene. They lose detail and contrast the further away they are from the camera and also when the fog is stronger.
- This fading effect emphasizes the appearance of more or less visible layers within a scene. Use these layers to add a real sense of depth and mystery to your picture.
Direction:
- When the Sun is blocked out by clouds, light in fog is not directional at all.
- When the fog interacts with rays of the Sun (usually during the Sunrise), the light becomes directional.
How to use light in fog in your storytelling
Fog can be a powerful and valuable tool for emphasizing the depth, lighting, and shape of your subject. These traits can even make scenes feel mysterious and uniquely moody.
The cool thing about this type of light is that almost any subject is great to produce an engaging photograph. Even if the subject isn't very interesting, the sense of mood is very strong and the image engages the viewer.
When Sun rays interact with the fog, the dramatic effect becomes awe-inspiring and the sense of mood is even stronger.
In addition to this, the attention is usually diverted away from anything else. In this case try not to depend on textures and details. Focus on shapes and outlines instead.
When the fog doesn't interact with Sun rays, you can create effective images where details are an important part of the story. Just make sure that the subject is relatively close to the camera and there's some visibility in the scene.
On the other hand, when your subject is further from the camera and deeper in fog, or when fog interacts with the Sunrise rays, any details will be lost.
Light in fog issues and solutions
Let's see what issues you can face when shooting with light in fog and the potential solutions you can apply in the field.
Issue #1
Light can be quite weak. So you'll face the same challenges as when shooting in twilight light or light diffused by clouds.
Potential solutions
Follow the same steps as you would when shooting in twilight light.
Use a fast lens, which allows you to open up the aperture (e.g. f/2.8, f/2.2, f/1.8 or more).
Set:
- The lowest possible aperture (the smallest f-stop value).
- The highest ISO depending on how much noise your camera produces.
- The fastest possible shutter speed before you lose too much detail in the shadows.
Use a wide-angle lens, which produces less blurred images.
Use a sturdy tripod.
If you don't have one, stabilize yourself, hold your breath, and fire off a few consecutive shots. Following these steps will allow you to capture at least one sharp image, even at shutter speeds as slow as 1/5s.
Issue #2
Exposure can be tricky and it's very easy to over or underexpose in such light conditions.
Remember that your naked eye perceives a much wider tonal range than the camera, so the scene contrast can be quite deceiving.
Potential solutions
Apply the try & fail strategy – take a few test shots and set your camera settings according to what you can to achieve.
If you intend to photograph a moving subject use the try & fail method at the beginning of your shooting session.
Moonlight
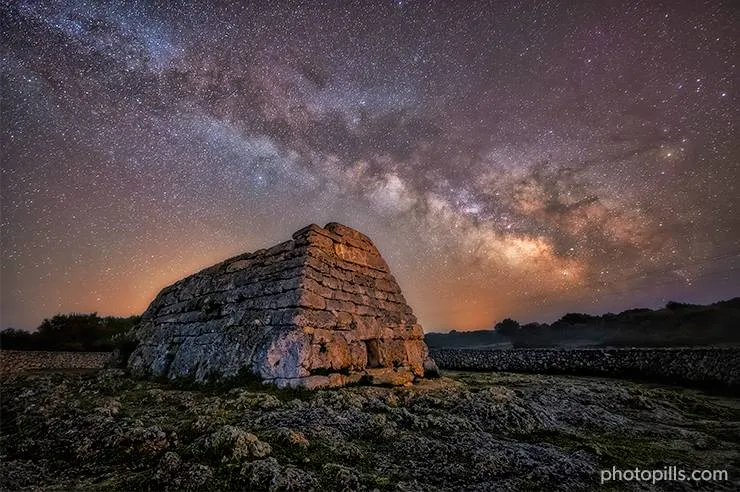
You can use the Moon as your primary source of light for your night photos, just like you do with the Sun during the day.
As you may have guessed, photographing under a Full Moon can produce dramatically different results than shooting under no Moon.
So it's time to start making decisions... ;)
Moonlight or no Moonlight at all?
When you're considering shooting at night, the first question you should ask yourself is:
"Do I want to shoot with Moonlight or with no Moonlight at all?"
If your answer is no Moonlight at all, try to plan your session during the New Moon day and the 4 days before and after.
So it's best to know what the Moon phase will be before you go out to shoot.
And the best tool for that is PhotoPills ;)
How to use PhotoPills to find out the Moon phase
In your current position (when you're in the field)
Use the Moon Pill to your advantage.
Let's say you're already at the location where you'll take photos during the nighttime. You got there in time (2-3 hours) to explore the terrain and confirm your plan.
Stand near the shooting spot, open PhotoPills and tap Moon (Pills Menu). By default, the information displayed corresponds to your current location (according to the GPS on your smartphone) and the current date and time.
At the top of the screen, you'll see the Moonrise and Moonset times and the Moon phase (%).
If you scroll the screen up and down, you'll see the start time of the Sunrise and Sunset, the Moonrise and Moonset and the Galactic Center visibility (if it's visible) on a specific date from midnight until 11:59 pm.
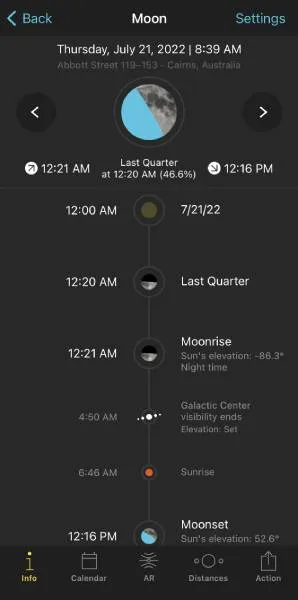
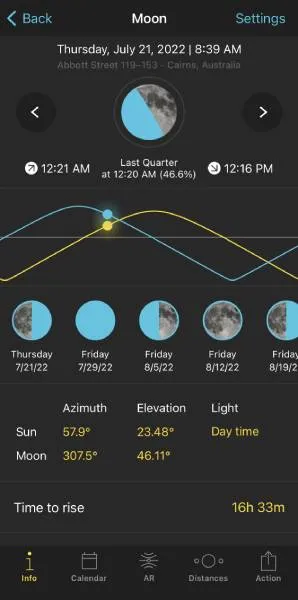
Tip!
If you want to change the location and/or date and/or time, tap Settings (top right corner). On the new screen, you can change:
- The location by taping on Position. Slide the Autoupdate button to unlock the rest of the screen. You can use
- The search box if you want to type an address.
- The coordinates option if you know the latitude and longitude.
- The date by taping on Date. Slide the Current date and time button to unlock the rest of the screen. Tap
- Date to change the date.
- Hour to change the hour.
- You can also determine whether you want PhotoPills to automatically detect the time zone or not.
In any other location (when you're at home)
Use the Planner!
Imagine you're at home planning your Milky Way photo. And you want to shoot during the New Moon phase, but you don't know when it happens in a certain location.
Open PhotoPills and tap Planner (Pills Menu).
Then, place the Red Pin somewhere on the planet. Wherever you want to photograph the Milky Way.
In this example I have placed it in Nambung National Park (Australia). More specifically, I have placed it right in a spot from where you can photograph some rock formations known as the Pinnacles along with the Milky Way arch.
If you don't know how to move the Red Pin, this video shows you how to do it.
Now, on the Planner, make sure you have the Moon and Milky Way map layers turned on. Tap on the Map Settings button, it's on the map, next to the (+) button.
On the Map settings screen, check that the eye icon on the Moon and Milky Way map layers is not crossed out. If it is, tap on it to turn the layer on. Tap OK (upper right corner) in iOS or the arrow to go back in Android. If you want to have a cleaner view on the Planner, you can turn off the rest of the layers (tap on the eye icon to cross it out).

Swipe the top panels to the left until you find the two Milky Way information panels (Panel 7 and Panel 8).
On Panel 7 you can see when the Galactic Center becomes visible or not and the light grey line shows the direction in which it shows up.
Take into account the Moon phase. It's easier to photograph the Milky Way if you avoid any light source. So try to plan your session during the New Moon day and the 4 days before and after.
Tap on the center of the Time bar twice to set the current date and time. Then, tap on the Milky Way icon on Panel 7. The date will jump to the next New Moon.
Now it's time to play with the Time bar and the Milky Way layer to see if you can capture the Milky Way slightly above the horizon, forming a nice diagonal or completely vertical. Swipe the time forwards (to the left) or backwards (to the right) until the white dotted arch is where you want it to be in the sky. Then, adjust the position of the Red Pin depending on the composition you want.
Tap on the RA Night button to check the position of the Milky Way and the Galactic Center. You can also use Panel 8 to check the inclination angle of the Milky Way and the height of the energy bar: the higher and bluer, the more visible the Milky Way is (less impact of the Moon).
To double-check it, swipe the top panels until you reach Panel 3. This panel shows you the exact Moon phase and its percentage for the selected date, time and Red Pin position.
Alternatively, if you need to know the exact start and end times of the Moonrise and Moonset for the selected date and Red Pin position, swipe the top panels until you reach Panel 4.
How Moonlight affect your night photos
While there is no right Moon phase to shoot under, there are distinct advantages and disadvantages to shooting under different phases.
Shooting with no Moonlight
- Advantage: Your camera can capture more stars, because Moonlight obscures fainter stars.
- Inconvenient: Less light enters your camera, so more noise will be visible in your pictures.
Shooting with a Full Moon
- Advantage: The Moon illuminates the foreground and brings out the color and detail in the scene.
- Inconvenient: The Moon obscures the light from the stars, and the skies will not look as impressive.
When shooting with a Full Moon, take into account:
- The Moon azimuth (position) so you can shoot with front light, side light or backlight. Just like you would do with the Sun (section 2).
- The Moon elevation to know if the Moon is going to be high or low in the sky. It's the same principle that I explain you for the Sun in section 3.
Shooting with a waning/waxing crescent Moon
- Advantages:
- A crescent Moon with a 15-35% phase provides just enough light to illuminate the foreground, while only somewhat obscuring the stars.
- It sets fairly early in the night, so if you also want to take shots with no Moonlight, you can do so after it sets.
- Inconvenient: If the Moon phase is more 50%, it starts to drown out the light from the stars too much.
However, it's really a matter of personal taste and the story you want to tell with your picture.
You can decide to use the Moon to help you light the foreground. Or you can choose to shoot a completely dark sky.
Your imagination has no limits! ;)
8.10 photography tips on natural light
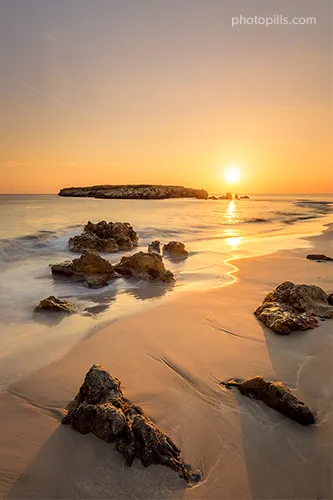
The best and most memorable photos are often those which have an element of visual drama, a certain feel to them.
Sometimes the impact of these images doesn't even have much to do with the subject. Rather, it's the light and how it affects whatever you include into your frame.
This is where natural light comes in. It's one of the most powerful creative tools we photographers have at our disposal.
Of course, the real tool is the knowledge on how to work with natural light.
So let me give you some ideas and tips on how to create dramatic photographs with natural light.
Find out with PhotoPills when the golden hour, the blue hour and the twilights happen (1)
Planning is essential. It increases the chance of successfully capturing your photo.
So, don't underestimate the power of planning.
On the contrary, make the most out of it!
And there's no better planning tool than the PhotoPills app.
It allows you to find out:
- If the photo is possible, if the event you're waiting for is going to happen. For example, a photo during golden hour with the Sun in a certain position in the sky.
- At what time the twilights, golden hour and blue hour occur in a certain location and on a certain day.
- How long each of the twilights, the golden hour and the blue hour last in a certain location and on a certain day.
If you want to learn how to do it, go to section 4.
Learn to see as your camera does (2)
Learning how the camera sees the light's effect is essential to become a skilled photographer.
And there's only one way to do that: experimenting.
The results might not have a wow effect, but they'll gain you invaluable photographic knowledge. This experience will eventually lead you to produce compelling images.
How is the camera capturing the light?
Which angle is best?
From which shooting spot is the effect most dramatic?
These are some of the key questions that you should answer almost automatically. Even if your answers aren't precise, you should have a close enough idea not to fiddle with the camera settings for too long, or the moment will be gone!
That's why practicing is so important. Your eye and brain need to be trained to a point where you can quickly:
- Identify how the camera is going to interpret the light you have in the scene.
- Determine the best settings to get the result you're looking for.
Shoot during magic hours and twilights (3)
Why?
Because magic hours (golden hour and blue hour) and twilights are the times of the day when you'll potentially find a great light.
During these moments the light has a particularly distinct effect on colors.
As I mentioned in section 3, you need to find the perfect ingredients for a dramatic photograph that has impact.
- During golden hour (right after Sunrise and little before Sunset) the colors start to look more vivid and lively. A tint that ranges from deep red to light orange casts on the scene.
- During blue hour and the twilights everything gains a cool tint. The sky may even be painted with shades that range from red to purple. Your shots will potentially be very atmospheric conveying a certain sense of mystique and drama.
Use bad weather to your advantage (4)
Don't think that you can't go out shooting when it's raining or overcast.
This is a myth – you can get amazing shots every single day of the year.
Always check the weather forecast before going out shooting. Apart from the location's national meteorology service, my favorite apps are:
By doing this, you can anticipate what you'll find in the location. And also check if the conditions you're looking for are there.
Checking the forecast, especially regarding clouds and wind direction (and strength) is key!
Use shadow and contrast to create dramatic images (5)
In the right circumstances, the interplay of shadow and light can transform the usual and the everyday into something fascinating and dramatic.
A shadow can punctuate what is visible and can lend a sense of mystery to what isn't. This is good – it leaves something to the viewer's imagination.
It creates an attention grabbing contrast. The shadows help focus the viewer's attention by removing detail from the less important parts of the image.
It can also create the perception of volume and space, revealing forms or texture.
And of course, if you have an interesting subject as I always recommend, the results can be even stronger.
Above all, use shadows and contrast taking creative risks.
Be unconventional. The really special images are often the ones that show something in a different way, often rarely seen before.
Direct natural light (6)
OK, fine... I'll admit it, the tip is a bit tricky ;)
You cannot physically direct a natural light source. However, you can change its direction in relation to yourself and your subject.
Simply move yourself and/or the subject around the light source and notice the difference:
- By positioning your subject between your camera and the Sun rising, you can create a silhouette.
- When the Sun is a little higher and to the side, you can create rim light around your subject.
- When you're indoors, diffused light from the window to the side or at an angle can create a visually compelling progression of light-to-dark tones. Another option is to try to find a long window so that the natural light isn't only coming from above.
Obviously, you need to do some planning before (section 5) and choose the right location. Use PhotoPills and spend a good amount of time picking locations that will work with available light.
Seek multiple light sources (7)
Having multiple light sources in a scene can produce dramatic and surprising results in your photos.
Most typically, you'll find a scene with multiple light sources indoors, with light coming from multiple windows or other openings or from a cave hole and a bunch of candles, for example.
If you happen to be outdoors, you may face a fairly usual scene involving light coming from the Sun and from something reflective, like water or snow.
To make the most of multiple light source scenarios, it's important that you learn how natural light affects everything it illuminates.
At the same time, study how you should position your camera towards the light source. As I explained in tip (3), the way the light sources illuminate the scene and your subject can convey one emotion or another.
Moreover, depending on how you play with the light sources, you can even increase or decrease this emotion's weight in your final image. That's why experimenting on the field is so important!
Shoot natural light interacting with the elements (8)
When natural light interacts with other elements present in the scene, the results can be truly spectacular.
"Toni, what do you mean by other elements?"
I'm talking about things like...
- Beams of light coming through a window while illuminating dust particles floating in the air.
- Fog creating a ghostly atmosphere in a dark forest.
- Incense sticks burning with smoke inside an Asian temple.
Don't believe coming across these magical scenes is a matter of pure luck. By thinking this way you're never going to be really prepared. More often than not you'll miss out on creating truly powerful images.
While there is an element of luck involved, a lot of the phenomena can be predicted and hence planned for. To do this, take mental notes when you see a dramatic interaction between natural light and one or several elements.
Once you've taken enough of these notes over time, you'll be able to recognize the ingredients for a spectacular lighting scenario and to think ahead creatively.
Use a polarizer (CPL) filter (9)
Shooting in the middle of the day with harsh light and a circular polarizing filter (CPL) will help you get much sharper images with stronger color and contrast.
Polarizers work to filter out mixed polarization in the light and cut down on glare (diffused light) and flare as well.
However, use it with caution and practice.
A circular polarizing filter (CPL) is not a magical solution to harsh light. Your colors may still turn out washed out and your shadows will still have no detail whatsoever.
Use a polarizing filter when the light is at an angle. It won't do much for you otherwise.
So the best piece of advice that I can give you is to experiment. It will take you a bit of time to really understand the formula for when and how to use one.
Expose with post-processing in mind (10)
Your DSLR or mirrorless camera really struggle with high dynamic range scenes. There's just too much contrast.
The issue here is that when the contrast between the shadows and the highlights is strong, exposing for either of the extremes will result in loss of detail.
Post-processing softwares like Lightroom or Photoshop can help mitigate the loss of detail. So, if you expose while thinking ahead to post-processing the image and you know the limits of your camera's dynamic range and the potential of these pieces of software, you can end up with a nice final image
However, you need to make a compromise:
Will you slightly overexpose the brightest part of the scene (ie. highlights)?
Or would you rather slightly underexpose the darkest part (ie. shadows)?
You can only choose one or the other. So you have to expose prioritizing whichever element is more important to your image.
Therefore, exposing with post-processing in mind effectively will ensure you get the most out of your images in the more challenging lighting scenarios.
9.Light will guide your way...
Good job!
You've completed the mission of reading this guide.
Now you're on the right path to become a master in natural light photography.
So it's time to put all your knowledge into practice on the field!
And for that you may need some inspiration, don't you?
Spend some time looking at the photos that other PhotoPillers like you have submitted to the PhotoPills Awards. There you'll find hundreds of ideas!
And don't forget to submit your own photos! Your image may be one of the winners we choose once a month... ;)
Oh, one final question...
Is there anything in this guide you didn't understand?
I want to make sure you get everything.
So if there is anything you don't understand or don't know, please leave a comment at the end of this guide and I'll get back to you as soon as possible.
And now, it's time to get going.
Only practice and experience will allow you to master natural light photography.
Practice and you'll become a master!
Note: Some links on this page are affiliate links. What does this mean? If you buy/rent using these links you're helping support us and it costs you nothing extra. Thank you for your support.
Get this ebook for free now!