Photography Planning: The Definitive Guide - Chapter 2

Get this ebook for free now!
Content
Chapter 1
- Find creative inspiration with these 20 planned photos
- How to come out with amazing photography ideas
- How to find the perfect location to plan your shots
- 8 things you must know before start planning your photos
- How to plan a specific natural light
Chapter 2
- How to plan Sunrises (and Sunsets)
- How to plan a Big Sun aligned with a subject
- How to plan Moonrises (and Moonsets)
- How to plan a Big Moon aligned with a subject
Chapter 3
- How to plan a Milky Way shot
- How to plan a Star Trails shot
- How to plan a Meteor Shower shot
- How to plan an architecture shot
- How to plan a portrait outdoors
- How to plan a wedding photo in natural light
Chapter 4
- How to plan a drone shot
- How to plan the tides in a seascape
- How to plan a photo of a lunar eclipse
- How to plan a photo of a solar eclipse
- How to plan the field of view and depth of field
- How to plan the weather
- How to plan a shoot during a certain season
- How to scout the location before the shooting date
- Check the weather forecast
- Prepare and check your photography gear
- Be prepared to throw the plan out of the window
- 10 photography planning tips
- 10 photographers that master photography planning
- Planning is everything
Chapter 2
6.How to plan Sunrises (and Sunsets)
The goal, when you plan a Sunrise or Sunset photo is to come up with:
- A shooting spot, from where to take the picture,
- A shooting direction (framing) and
- A date and time of shooting.
This is all you need to capture the photo you want to capture.
The good news is that planning a Sunrise or Sunset picture is much simpler and faster than it seems. With the PhotoPills app it's a matter of minutes.
And to prove it, here's a detailed explanation of the two most common cases:
- A Sunrise/Sunset plan for a certain date.
- A Sunrise/Sunset plan with the Sun in a certain position. In this case, you know the shooting spot and the photo you want, and you want to find out when it happens.
In both scenarios the Sun will be relatively small because you will be shooting somehow close to the subject. So take into account that you'll need to imagine the Sun as a dot in the composition.
If you envision a composition including a big Sun with a subject you like, go to section 7.
Now take your smartphone and, if you haven't already done so, install the app.
Let's dive into it!
How to plan a Sunrise (or Sunset) on a certain date (1)
Planning your Sunrise and Sunset photos happening on a certain date is pretty simple.
To make things even easier, here's a video in which Rafa explains how to do it step by step:
But if you prefer to read, here's a full explanation of all the steps you need to follow to plan your Sunrise and Sunset photos on a given date.
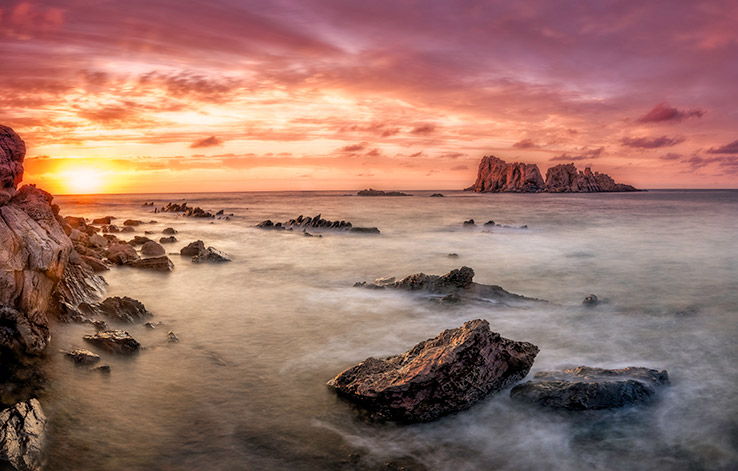
In this case, you're going to plan a photo of an iconic lighthouse at Sunrise – the beautiful Portland Head Light, located in Cape Elizabeth near Portland, Maine (USA).
The idea is to shoot a long exposure to create the silky water effect, and use the rocks as leading lines to the lighthouse. Let's hope that the sky has enough clouds to capture a red flame Sunrise. It would be a great bonus!
OK, let's start planning.
Place the Red Pin in a potential location
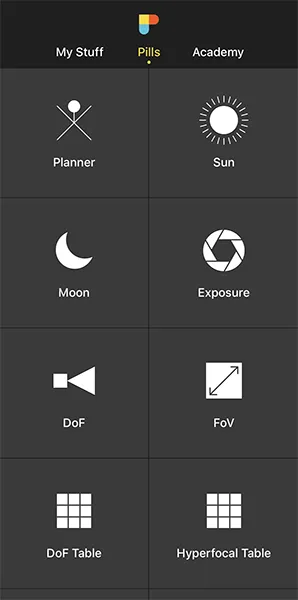
Open PhotoPills, tap Planner (Pills Menu).
Usually, when you plan a photo, the first thing you need to do is to place the Red Pin in a potential location that is photographically attractive during the Sunrise. It can be a beach, a town... You choose.
At this stage, don't be obsessed with precision. Pick an area you like. You'll have time later to determine the exact shooting spot.
For example, place the Red Pin in Maine (USA), where the coast faces east, a perfect place for Sunrises. If you don't know how to do it, this video shows you how to move the Red Pin.
Now that you have the Red Pin in the location you want, it's time to set the date you would like to go shooting.
Set the date you're planning to photograph the Sunrise (or Sunset)
There are several ways to set the date in PhotoPills.
If it's a date close in time, let's say next Saturday, then double tap the Time bar below the map. Then, move time forward by swiping the Time bar to the left until you get to the date you want to take the photo.
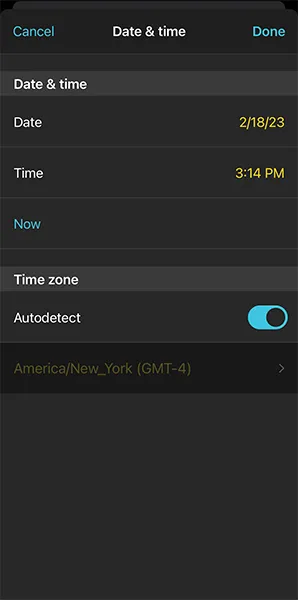
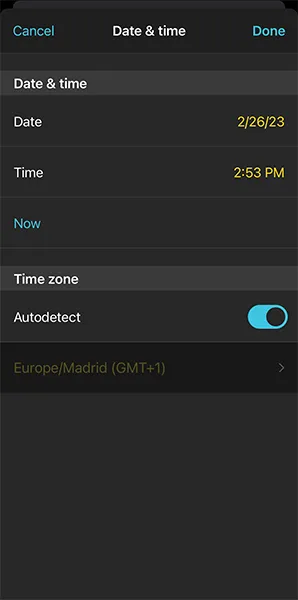
You can also set any date using the calendar. Tap the center of the Time bar and the calendar will pop up. Finally, on the Date & time screen, tap Date to manually change the shooting date.
Now, suppose you want to take the Sunrise photo on February 18, 2023.
Set it in the Planner using the Time bar.
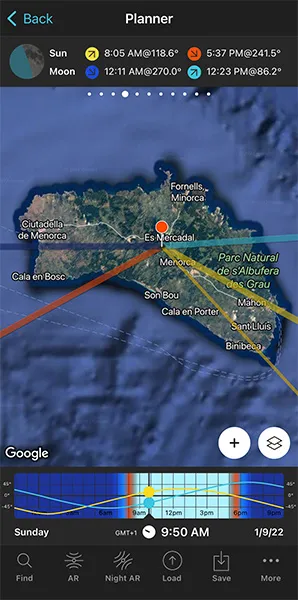
Find out the Sunrise (or Sunset) direction and time
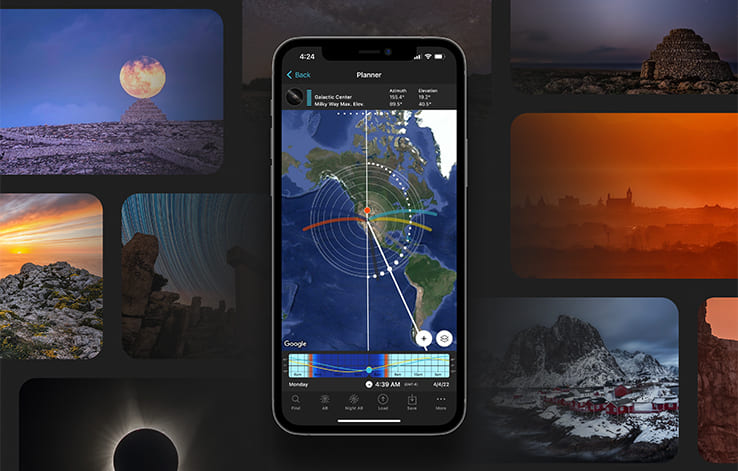
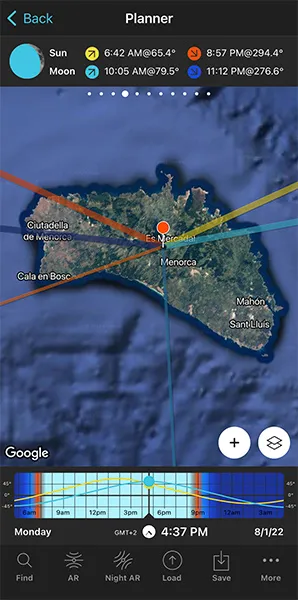
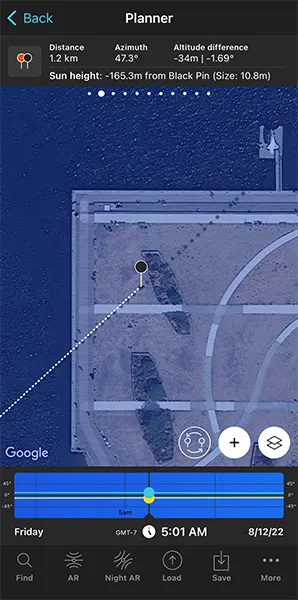
Now that you've set the shooting date, use the information on the panels above the map and the lines on the map to plan your shot.
Make sure that you have Panel 4 selected above the map. If not, swipe the top panels until you get to it.
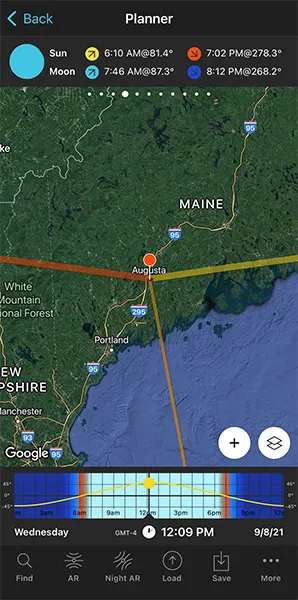
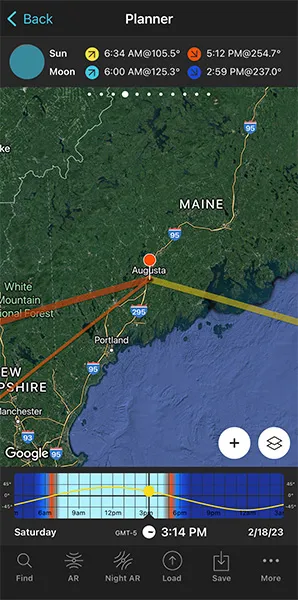
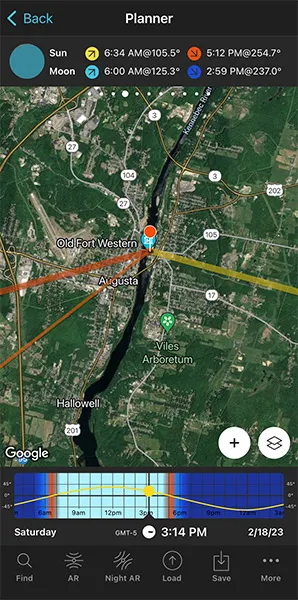
Have a look at the screenshots above.
Panel 4 is telling you that on February 18, 2023 the Sun rises at 06:34 am according to the Red Pin position. So you know the time you should be ready to press the shutter.
On the map, you have the Sun, the Sunrise and the Sunset directions for the selected date (02/18/2023):
- The Sun direction at the selected time (03:14 pm) is represented by the thin orange line.
- The Sunrise direction is represented by the thick yellow line.
- The Sunset direction is represented by the thick orange line.
Note: If you don't see these lines, activate the Sun layer. You can do this by tapping the Map Settings button. You will find it next to the (+) button on the map.
The Sunrise direction line is crucial to determine the perfect shooting spot.
Great! Let's move on.
Check different locations until you find a photo you like
Now that you know where the Sun will rise and the time it will rise, it's time to move the Red Pin to several cool locations you know. Do it one by one until you find the one where your Sunrise photo fits your idea.
Obviously, even if it takes longer, the more locations you can think of that might work, the better.
If you don't have any location in mind, find them, follow the methodology I explained in section 2.
For this example, I found a fantastic area called Cape Elizabeth, located near Portland, Maine (US). There, you can find an incredibly iconic lighthouse – Portland Head Light.
Cape Elizabeth has three characteristics that make it a perfect location for taking photos at dawn:
- There's a long coastline where you can move freely and play with several shooting directions.
- The coastline and the lighthouse can be photographed by shooting to the east, in the Sunrise direction.
- The rocks are the main element in the foreground and are the viewer's entrance gate to the image, although the main subject and real visual anchor point is Portland Head Light located in the background.
It's a great location. So let's go back to PhotoPills and complete the plan...
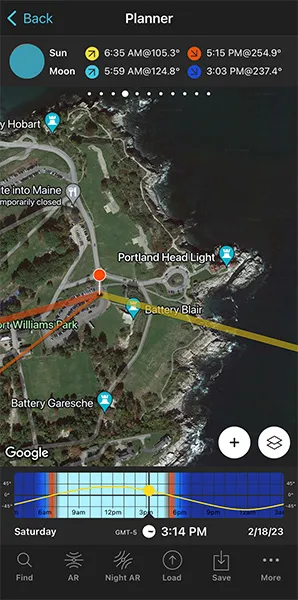
Place the Red Pin in a spot near your subject, next to Portland Head Light.
Tap the Load button (at the bottom) and type "Portland Head Light" in the search bar. Then, select it and the Red Pin will be placed next to it.
Now zoom in on the map and move the Red Pin to a place that works great as a shooting spot based on the Sunrise direction (thick yellow line), and the composition you want.
For example, move it to the small cove located to the left hand side of Portland Head Light. From this shooting spot the Sun will rise next to the lighthouse creating a beautiful scene. Besides, the coastline will act as a guiding line, luring the viewer's attention towards the lighthouse and the Sun.
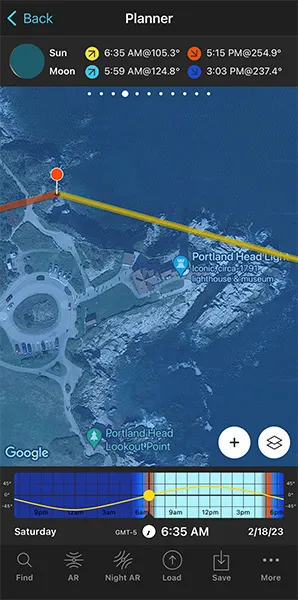
In addition to this, when you're in the field, at the Red Pin position, use the Augmented Reality view (AR) on the Planner to visualize through your phone where the Sun will rise.
You could also follow the steps I show you in section 20 to plan the photo to the very last detail. This includes planning the field of view (the focal length) and the depth of field (to make sure you get everything in focus).
And that's it!
This is how you can easily plan your Sunrise and Sunset shots when you know the date.
What do you think? Easy, isn't it?
Save the Plan
This is a key step.
The last thing you want is to plan a cool photo, and then forget about it.
So save your Sunrise plan to your to-do list!
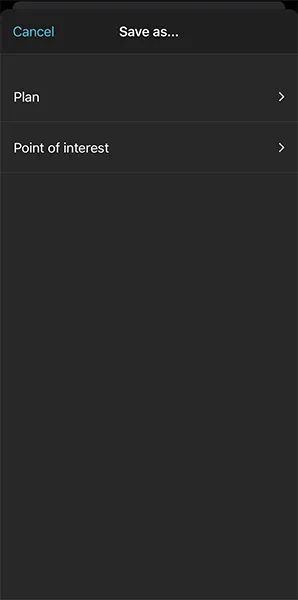
On the Planner, tap Save (at the bottom). Then tap Plan.
On the Plans screen, tap New plan. Type a name in the Plan name box, and tap Save.
Now, every time you want to review the plan, you can do so by tapping the Load button (next to Save). Then, tap Plan and scroll down through the list of plans until you find it.
If you tap the plan, PhotoPills automatically loads it to the Planner.
How to plan a Sunrise (or Sunset) with the Sun in a certain position (2)
To sum it up quickly...
You have a great shooting spot, you love the view in front of you. And you want the Sun to rise in a certain position in the frame but you don't know when it happens. You don't know the shooting date or shooting time ;)
You need to find out:
- If that particular photo is possible.
- And if so, when exactly.
How do you do it?
Easy!
Use the Find tool in the PhotoPills Planner.
Follow the very same steps Rafa uses to plan a photo of the Sun rising above Punta Nati lighthouse and two stone constructions located next to the cliffs.
Do you want more?
Let's have a look at another example.
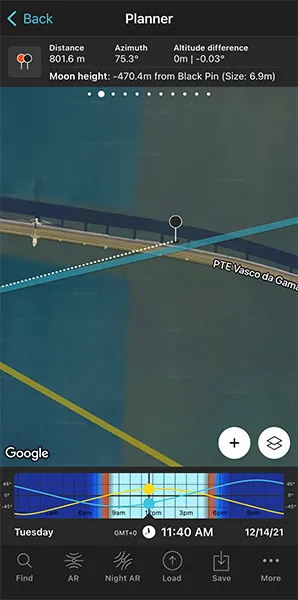
Imagine that you want to photograph the Sun rising behind the beautiful and elegant Vasco da Gama bridge in Lisbon (Portugal).
Let's see when it happens! :)
Place Red Pin on the shooting spot
Open PhotoPills, tap Planner (Pills Menu) and place the Red Pin right on the shooting spot you want.
If you don't know how to do it, this video shows you how to move the Red Pin.
For example, at the end of the Caminho das Gaivotas. There's a pier at the end of the path, located over the Tagus River. From the lookout at the edge, called Miradouro da Vasco da Gama, you get a great view of the river and the bridge.
Also, this is a great spot because you can move along the pier to get the best composition considering the Sunrise direction.
To quickly place the Red Pin, tap the Load button (at the bottom) and type "Vasco da Gama Bridge" in the search bar. Then, select it and the Red Pin will be placed next to it.
Now, do a long press on the spot where you want to place the Red Pin, somewhere on the Caminho das Gaivotas pier.
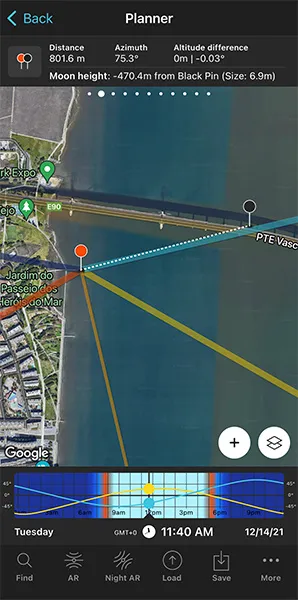
Place Black Pin where you want the Sun to rise (or set)
Now you need to place the Black Pin right on the spot you want the rising Sun to be, this is right behind the Vasco da Gama Bridge.
So zoom in on the map, until you can clearly see the Vasco da Gama Bridge.
Swipe the panels above the map to the right until you find the Black Pin information panel (Panel 2). Tap the icon on the panel that's showing the Red Pin and the Black Pin to activate the Black Pin on the map.
Drag and drop the Black Pin on the Tagus River behind the Vasco da Gama Bridge, right where you want the Sun to rise.
Find the dates and times when the photo is possible
Now it's time to find out if the photo is possible. If yes, when will it happen?
To do it, tap the Find button. It's located on the bottom left corner of the Planner. And then, select Sun at azimuth and elevation (Sun on Android).
On the new screen, you have to tell 3 things to PhotoPills:
- The date range you want to search for results. For example, 1 year starting from today.
- The Sun azimuth or direction. In this case, just behind the Vasco da Gama Bridge.
- The Sun elevation or altitude. In this case, set it to 0º for a Sunrise.
Enter the date range
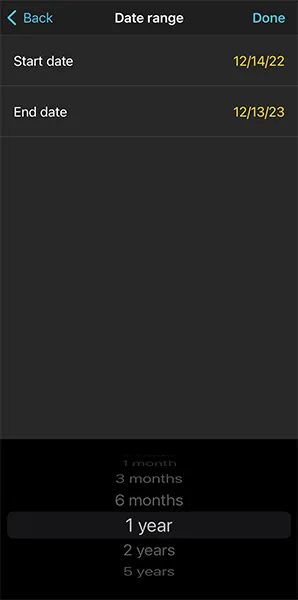
Tap Date Range, tap Start date, then Today and OK (back arrow on Android).
Next, tap End date. Now you can enter a certain date or range. To enter a range, tap the black area of the screen and the date options will change. Select 1 year, for example, and tap OK (back arrow on Android).
Enter the Sun azimuth
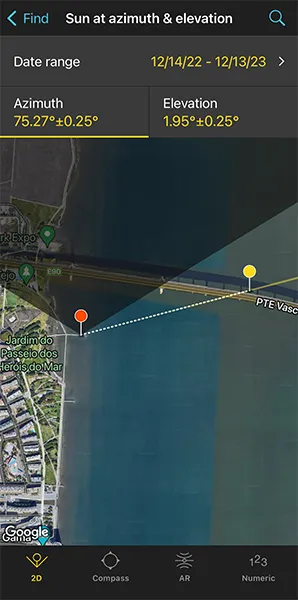
To set the azimuth you want the Sun to rise, you can drag and drop the Yellow Pin you see on the map. But the good news is that the Yellow Pin is linked to the Black Pin. So the azimuth of the Sun is already set (75.27º), behind the Vasco da Gama Bridge.
Don't you know what the azimuth and the elevation are?
Well, don't worry. You have a quick reminder in section 4.
Let's get back to our example.
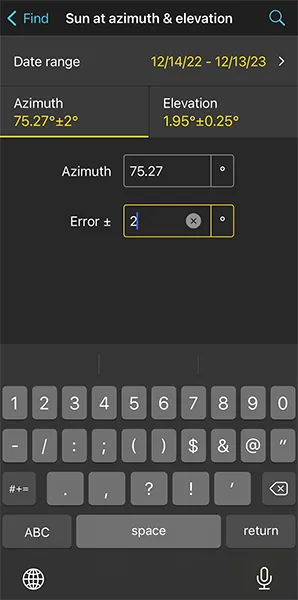
OK! You've set the azimuth. But what about the error or tolerance defined by the yellow sector you see on the map?
Now take a look at the first screenshot above: the azimuth is 75.27º with a ±0.25º error represented by the yellow area on the map.
For this shot, you want the Sun to rise behind the Vasco da Gama Bridge, but you don't need the azimuth (75.27º) to be super precise. This location allows you to move around to adjust the shooting spot, so I recommend you to set a relatively high azimuth error. This will give you more possible dates to shoot.
Set a higher error, for example ±2º. To change it, tap Numeric (at the bottom).
Enter the Sun elevation
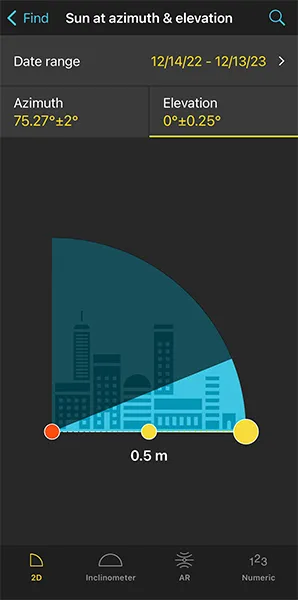
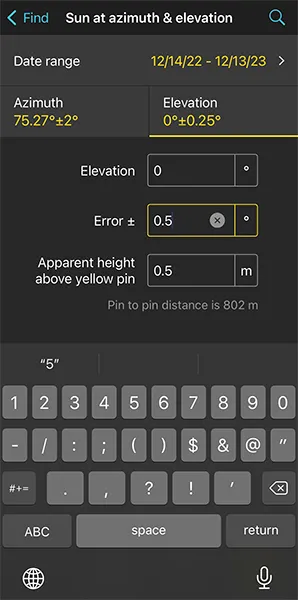
Tap Elevation to set the elevation of the Sun.
In this case, you're looking for a Sunrise. So you have to set an elevation of 0º.
You can do this by dragging the yellow dot in the diagram until it touches the horizon. You can also do this by tapping Numeric and typing "0º" in the Elevation field of the new screen.
Also increase the elevation error (or tolerance) to 0.5º. Again, this will give you more possible dates to shoot. Because at the end of the day, you can always adjust the shooting spot and shooting time.
Get the possible dates on a table
Tap Search (magnifying glass icon at the top right corner) to see the potential dates.
Pick one of the dates in the table. For example, April 19, 2023. Tap it to review the Plan.
As you can see on the second screenshot above:
- The thick yellow line indicates the Sunrise direction for the selected date (04/19/2023).
- And if you swipe the top panel to Panel 4, you'll see the Sunrise time: 06:55 am.
Cool!
You have your plan :)
You know the shooting spot, the Red Pin Position and the shooting time, around Sunrise (06:55 am), when the Sun will rise where you want relative to the Vasco da Gama Bridge.
And since the Sun's position doesn't change that much from one day to the next, the photo is also possible on April 17, 18, 20, 21, 22... This allows you to choose the day with the best weather forecast ;)
Simply swipe the Time bar to change the day and adjust the shooting spot according to the new Sunrise direction.
In addition to this, when you're in the field, at the Red Pin position, use the Augmented Reality view (AR) on the Planner to visualize through your phone where the Sun will rise.
You could also follow the steps I show you in section 20 to plan the photo to the very last detail. This includes planning the field of view (the focal length) and the depth of field (to make sure you get everything in focus).
Finally, don't forget to save the Plan using the Save button! ;)
7.How to plan a Big Sun aligned with a subject
Another cool photography idea is to capture a huge rising or setting Sun aligned with an iconic subject (or any subject you like if you can get far enough from it).
The results are truly spectacular and you can imagine dozens of pictures!
You can create this type of pictures by going far away from the subject and by using a telephoto lens (e.g. 300mm, 400mm, 500mm...). This will allow you to capture a close up of the Sun and your subject.
Before you keep reading, make sure to check section 4 and learn how the shooting distance and the focal length define the size of the Sun compared to the size of the subject and the size of the frame (photo). Understanding this is key to help you plan your photos.
As usual, PhotoPills will help you find out if the photo you're thinking of is possible and when (or where) it will happen.
In the previous section (section 6) you learnt how to plan a Sunrise or a Sunset, but you weren't considering the size of the Sun.
And we want a big Sun here!
So let's add this little detail into your plans...
The two most common planning cases are:
- A plan for a big Sun on a certain date. This is when you know the shooting date, and need to find a cool subject that aligns with the sun, the shooting spot and the shooting time.
- A plan for a big Sun in a certain position. In this case, you know the shooting spot and the photo you want (where you want the Sun to be in the frame), and you need to find out when it happens (shooting date and time).
Let's jump right in!
How to plan a big Sun on a certain date (1)
When you know the date you want to go shooting, you need to base your planning on the Sunrise or Sunset directions.
So have to:
- Find a cool subject that you can align with the rising or setting Sun, and in a location where you can go far enough from it (1 km, 2 km, 5 km...). The further away you go, the bigger the Sun will be compared with your subject.
- Find the shooting spot and shooting time the Sun aligns with the subject, or in any other position you like in the frame.
The trick here is to check different subjects you like until you find a cool photo.
To sum up...
Based on the Sunrise or Sunset directions, you need to come up with a great plan for a great photo.
But don't panic!
Planning a big rising or setting Sun occurring on a certain date is much easier than you think.
To prove it, here's a video in which Rafa explains how to do it step by step:
Would you prefer to read a full explanation?
Fine. Here are all the steps you need to follow.
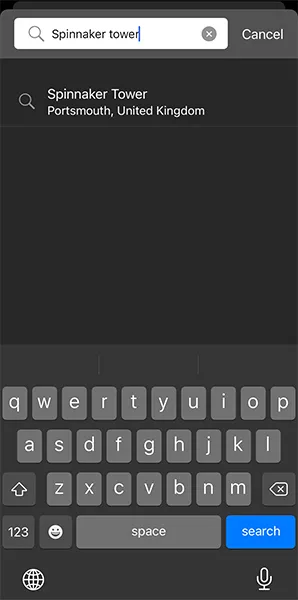
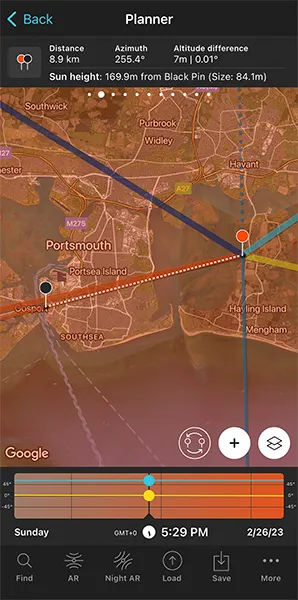
In this case, we're going to plan a photo of a huge Sun aligned with the top of the amazing 170-meter tall Spinnaker Tower, located in Portsmouth (UK).
Let's see together how you can plan it.
Set the shooting date
Open PhotoPills and tap Planner (Pills menu).
No matter where you have the Red Pin, since you know the date you want to take the picture, tap the Time bar once. And set the date on the Date and time screen.
Let's say February 26, 2023.
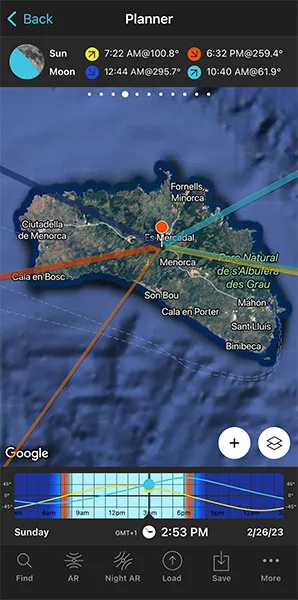
On the map you can see the Sunrise direction (yellow thick line) and Sunset direction (orange thick line) for the Red Pin position and the selected date, February 26, 2023. On the panel above the map you have the rise (07:22 am) and set (06:32 pm) times.
Now, you need to find a cool subject that you can align, for example, with the Sunset direction, in a location where you can go far away to photograph it.
Place Red Pin next to your subject
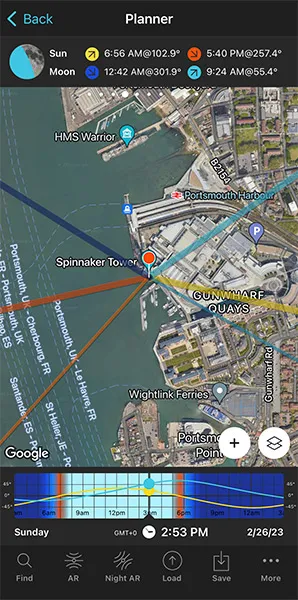
Imagine that after testing a few subjects, you found one you love and that the setting sun aligns with it: the Spinnaker Tower in Portsmouth, UK.
It's a 170-meter tall building and you can photograph it from far away. Cool!
So the next step is to place the Red Pin near your subject, the Spinnaker Tower. If you don't know how to do it, this video shows you how to move the Red Pin.
For example, tap the Load button (at the bottom) and type "Spinnaker Tower" in the search bar. Select the result and the Red Pin will be placed on the tower itself.
Place Black Pin on the subject
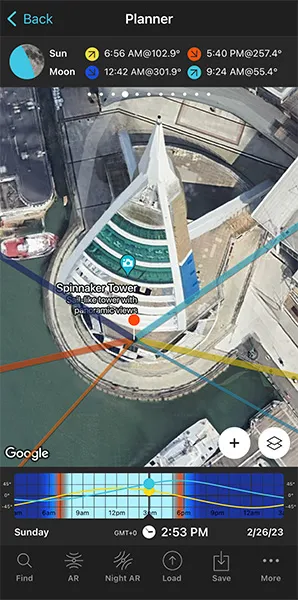
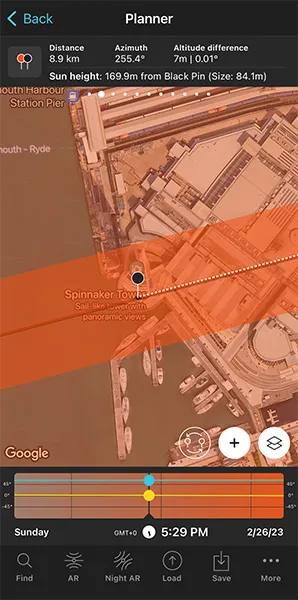
Zoom in on the map, until you can clearly see the Spinnaker Tower.
And swipe the panels above the map to the right until you find the Black Pin information panel (Panel 2). Tap the icon on the panel that's showing the Red Pin and the Black Pin to activate the Black Pin on the map.
Drag and drop the Black Pin at the center of the base of the Spinnaker Tower, right where you want the Sun to be.
Both the Black Pin and Panel 2 are key. They'll help you understand how high the center of the Sun is relative to the ground level (you can see Sun elevation on the panel) so you can compare it to the height of the building.
In addition to this, they help you understand how big the Sun is (you can see Sun size in brackets) so you can compare it to the width and height of the building.
Find the initial shooting spot and shooting time
Remember, we're looking for a spot from which to photograph a big Sun aligned with the top of the Spinnaker Tower (170 m).
Zoom out on the map to get an overview of the area where you want to take the photo.
On the map, you have the Sun, the Sunrise and the Sunset directions for the selected date (02/26/2023):
- The Sun direction at the selected time (02:53 pm) is represented by the thin orange line.
- The Sunrise direction is represented by the thick yellow line.
- The Sunset direction is represented by the thick orange line.
These lines are crucial to find your initial shooting spot.
To continue with this example, let's imagine you want to shoot at Sunset.
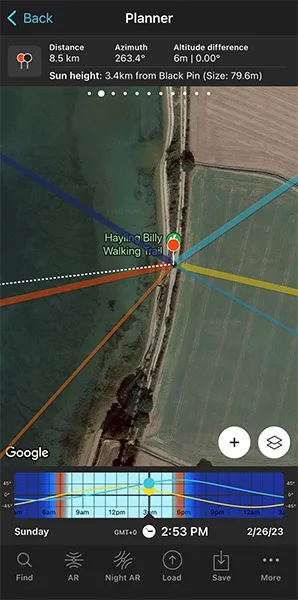
Keep zooming out the map while keeping an eye on the Sunset direction (thick orange line). You'll soon find out that to capture a big Sun setting aligned with the Spinnaker Tower you need to go to Hayling Island.
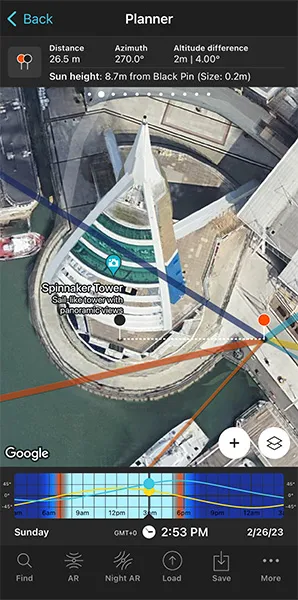
Put the Red Pin somewhere along the Hayling Billy Walking Trail, at around 8.5 km away from the tower according to the Panel 2 above the map. To do so, make a long press right where you want to put the Red Pin.
Also, on the panel you have the size (apparent diameter) of the Sun, 79.6 m, which is a cool size considering that the tower is 170 m tall.
Let's move on!
As you can see from the second screenshot above, the thick orange line is south (above) the Black Pin white dashed line. This means that the Sun will set before it reaches the Spinnaker Tower if you shoot from this spot (the Red Pin is in the Northern Hemisphere).
So you need to choose a new shooting spot making sure that the thick orange line is north (above) the Black Pin white dashed line. This way, when the Sun sets, it will go behind the tower.
Note: In the Southern Hemisphere it's the other way around of course.
Keep moving the Red Pin until you find a spot.
Great!
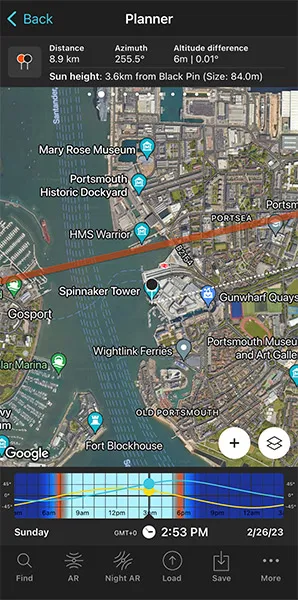
According to Panel 2, from this new shooting spot the shooting distance is 8.9 km and the size of the Sun is 84 m, slightly larger than the previous shooting spot.
Now there's one more thing you need to do: align the Sun with your subject, the Spinnaker Tower, and check the elevation of the Sun.
Remember that you want the Sun aligned with the top of the tower. So you need the center of the Sun to have an elevation of 170 m.
To do it, swipe the Time bar to move time forward or backward. In this example, swipe it to the left to move time forward.
If you need to move time accurately, make a long press on the center of the Time bar. It will expand so you can adjust the time minute by minute.
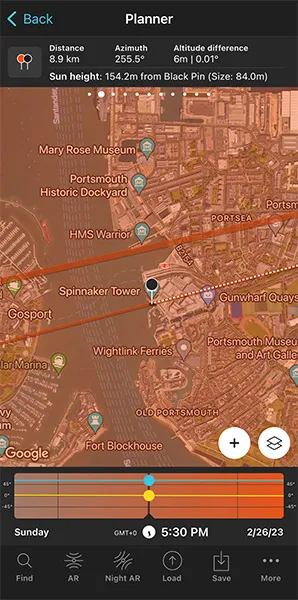
Now you have the Sun line (orange thin line) aligned with the Black Pin. This happens at 05:30 pm.
Cool, but is the Sun at the right elevation? Is it aligned with the top of the Spinnaker Tower (170 m)?
Take a look at Panel 2. It's telling you that the center of the Sun is at an elevation of 154.2 m above the Black Pin. So the Sun is not where you want it to be... :(
You need it to be higher in the sky, so you need to find a new shooting spot and shooting time!
Adjust the shooting spot and shooting time


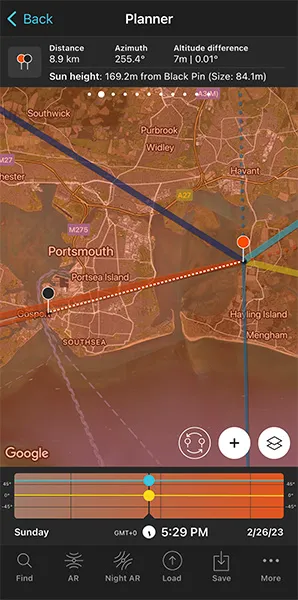
Move time backward until the Sun elevation above the Black Pin is 170 m. To confirm it, have a look at Panel 2.
Once you get it, check the Time bar again. The Sun is 170 m above the Black Pin at 05:29 pm.
But now the Sun and the Black Pin are not aligned, so you need to adjust the Red Pin position to realign them.
Where should you move the Red Pin? There's a cool way to find it out.
Tap the (+) button, and then look for the Expand azimuth lines button. It's the 7th button starting from the left.
Tap it and the azimuth line of the Sun is expanded (orange dashed line).
Then, tap the (+) button again, and look for the Swap pins button. It's the 6th button starting from the left.
Tap it and the Black Pin will be now at the Red Pin position and vice versa. Now, all you need to do is move the Black Pin where the orange dashed line is (see second screenshot above).
Finally, tap again the Swap pins button so the Black Pin and the Red Pin return to their initial positions.
Now the Sun is perfectly aligned with the Spinnaker Tower! :)
Because you changed the position of the Red Pin, topography also changes, therefore, as you can see on Panel 2, the Sun's elevation is now 168.3 m, not 170 m.
So it's just a matter of repeating the previous process:
- Adjust time on the Time bar until the height of the Sun is 170 m.
- Tap the Swap pins button.
- Zoom in on the area where the Black Pin is and adjust its position until it's right on the orange dashed line.
- Zoom in on the area where the Black Pin is to check that the orange dashed line and the white dashed line are exactly one over the other.
- Tap the Swap pins button again.
There you go!
Your plan is done. You know now that if on February 26, 2023 at 05:29 pm, you are at the Red Pin position (shooting spot), you'll be able to photograph a big Sun (84.1 m) aligned with the top of the Spinnaker Tower (170 m).
But there is more!
Check the Sun size on the map

One final tip.
As you can see on Panel 2, the Sun's size is 84.1 m (diameter).
But if you want to see it on the map, tap the Map Settings button. You'll find it at the bottom right corner of the map, right next to the (+) button.
On the Map Settings screen, tap the Sun layer and activate the Show Sun size option. Finally, tap OK (top right corner) in iOS or the back arrow in Android.
Zoom in on the map over the Black Pin to see that the width of the thin orange line shows you the Sun diameter at that date and time. This allows you to compare its size to the Spinnaker Tower.
In addition to this, when you're in the field, at the Red Pin position, use the Augmented Reality view (AR) on the Planner to visualize on your smartphone where the Sun will set.
Now, it's also a good idea to use the steps I show you in section 20 to plan the photo to the very last detail. This includes planning the field of view (the focal length) and the depth of field (to make sure you get everything in focus).
Finally, don't forget to save the Plan using the Save button! ;)
How to plan a big Sun in a certain position (2)
This is one of my favorite ways of planning. It opens a door to a whole new world of creative possibilities.
In this type of shot you know the shooting spot and the position of the Sun you want relative to your subject, but you need to figure out the shooting date and shooting time.
In this planning workflow, you'll use the Find tool included in the PhotoPills Planner.
Let's see a few examples.
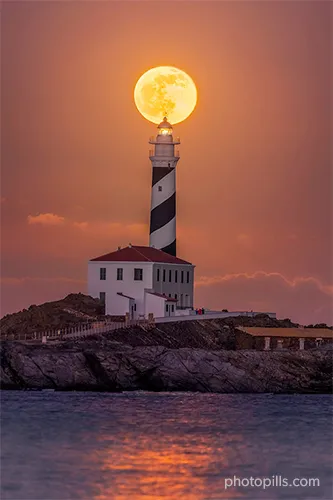
The first one is a video in which Rafa explains how to plan a photo of a big Sun aligned with the beautiful lighthouse of Sa Farola in Menorca.
The second one is a step by step explanation that you can start reading below.
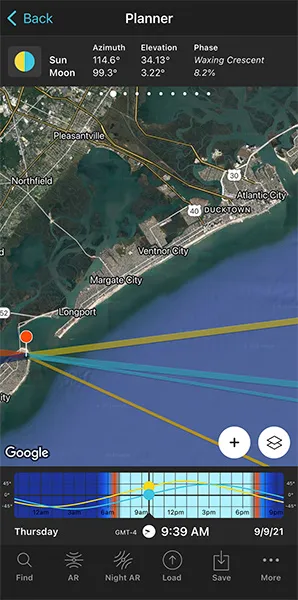
I'll show you how to photograph a picture you've been dreaming about – a huge Sun aligned with the center of the Ferris wheel located on the Steel Pier in Atlantic City, New Jersey (USA).
You've done your scouting work, and you've found a cool shooting spot located southwest of the Ferris wheel, at the far end of Ocean City and next to the Ocean Drive Bridge, and that is 13.5 km away from your subject.
Very quickly, you apply the PhotoPills Rule of 100 I explained in section 4, and come up with the conclusion that you'll be able to photograph a Sun with a diameter of 135 m approximately. You'll fine tune the size of the Sun in a minute.
Given that the Ferris wheel has a diameter of 70 m (227 ft), the Sun will be huge!
Fantastic!
Let's plan the photo.
Place Red Pin on the shooting spot
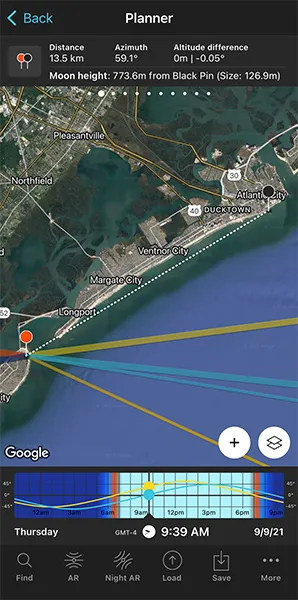
Open PhotoPills, tap Planner (Pills Menu) and place the Red Pin right on the shooting spot you want, on a beach located southwest of the Ferris wheel, at the far end of Ocean City and next to the Ocean Drive Bridge.
If you don't know how to do it, this video shows you how to move the Red Pin.
First step accomplished!
Place the Black Pin where you want the Sun to be
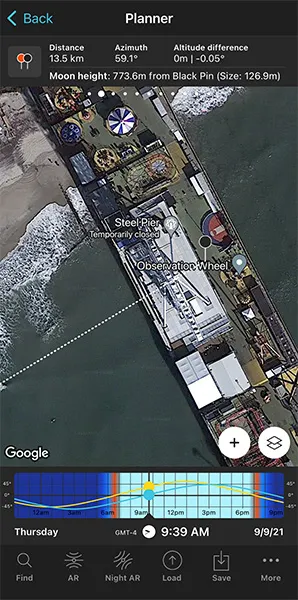
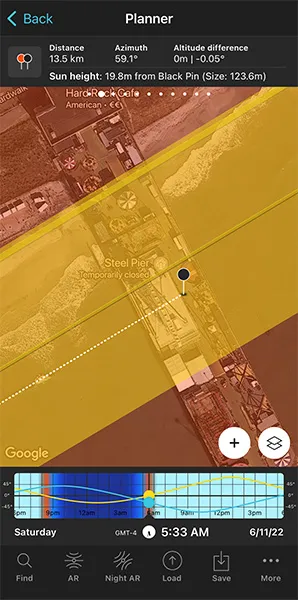
Step two is to place the Black Pin right on the spot you want the Sun to be. That is, aligned with the Ferris wheel located on the Steel Pier.
So zoom in on the map, until you can clearly see the Ferris wheel.
And swipe the panels above the map to the right until you find the Black Pin information panel (Panel 2). Tap the icon on the panel that's showing the Red Pin and the Black Pin to activate the Black Pin on the map.
Drag and drop the Black Pin at the center of the base of the Ferris wheel, right where you want the Sun to be, right at the center of the wheel.
Notice that the top panel is also telling you (see second screenshot above):
- The shooting distance between pins (13.5 km).
- The elevation of the center of the Sun above the Black Pin ground level (773.6 m), so you can compare it with the height of your subject.
- The apparent diameter of the Sun (126.9 m), so you can compare it with the size of your subject, the Ferris wheel (70 m).
Cool! It's time to check whether the photo is possible or not. And if it's possible, you need to figure out the date and time it occurs.
Find the dates and times when the photo is possible

Remember that you want to photograph a big Sun aligned with the Ferris wheel.
OK! Let's figure out when the photo occurs.
Tap the Find button. It's located on the bottom left corner of the Planner. And then, select Sun at azimuth and elevation (Sun on Android).
On the new screen, you have to tell 3 things to PhotoPills:
- The date range you want to search for results. For example, 1 year starting from today.
- The Sun's azimuth or direction. In this case, you want it aligned with the Ferris wheel.
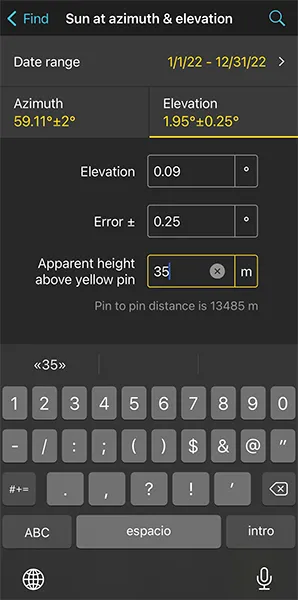
- The Sun's elevation or altitude. Imagine that your creative decision is to have the center of the Sun at a height of 35 m above the pier. This is right at the center of the wheel, which has a diameter of 70 m.
Let's begin by setting the date range.
Enter the date range
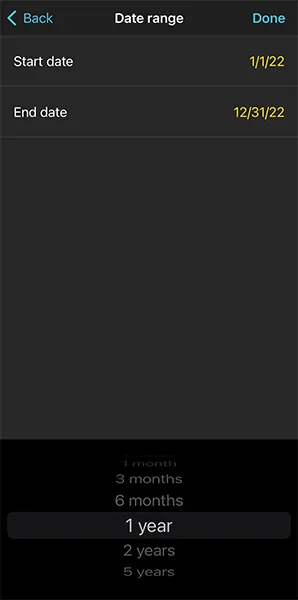
Tap Date Range, tap Start date, then Today and OK (back arrow on Android).
Next, tap End date. Now you can enter a certain date or range. To enter a range, tap the black area of the screen and the date options will change. Select 1 year, for example, and tap OK (back arrow on Android).
Enter the Sun azimuth
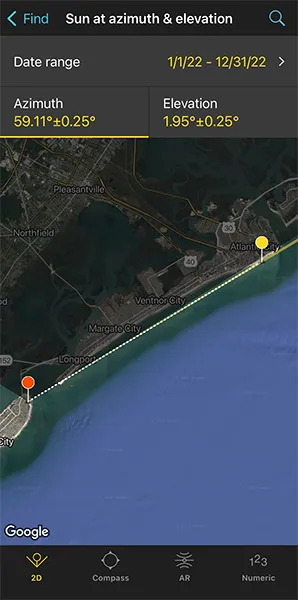
To set the azimuth at which you want the Sun to rise, you can drag and drop the Yellow Pin you see on the map.
But... Good news! The Yellow Pin is linked to the Black Pin. So the azimuth of the Sun is already aligned with the Ferris wheel.
So you have the azimuth set ;)
But what about the error (or tolerance) defined by the yellow sector you see on the map?
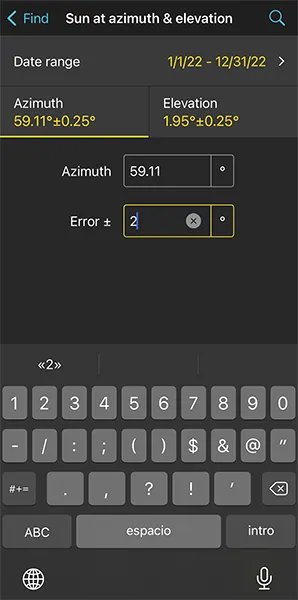
This yellow sector represents all the directions PhotoPills will look for results. In this example, these are all the directions within the azimuth 59.11º±2º.
For this shot, you want the Sun to rise aligned with the Ferris wheel exactly at azimuth 59.11º. So it's a good idea to use a smaller error like for example ±2º to narrow down the results. To change it, tap Numeric (at the bottom).
If your shooting spot allows you to move around, I recommend using a relatively large error (2º, 3º or even more) to get more possible shooting dates. Because at the end of the day you can always adjust your shooting spot.
Enter the Sun elevation
Tap Elevation to set the elevation of the Sun.
In this case, you want the center of the Sun aligned with the center of the Ferris wheel.
Remember, the Ferris wheel is 70 m tall (227 ft approximately). So the center of the Sun should have an elevation of 35 m.
So, drag the yellow dot in the diagram until it shows 35 m above the horizon. Or tap Numeric and type "35" in the Apparent height above yellow pin field.
Also, in the Numeric, set a small error (or tolerance) to be more precise with the elevation. For example "0.25º".
Get the possible shooting dates and times
Great, you've just entered the date range and the Sun position you want (azimuth and elevation).
Let's calculate when the photo occurs.
Tap Search (the magnifying glass icon at the top right corner) to see all the possible dates and times the Sun will be within the search parameters. In other words, when the Sun will be aligned with the Ferris wheel.
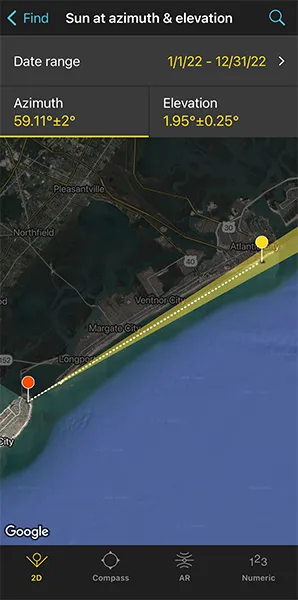
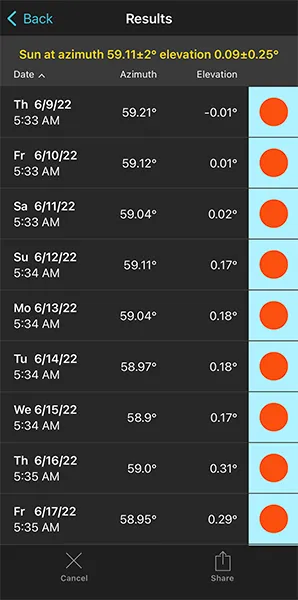
And tap the date you want on the table, for example June 11, 2022, to check the plan (second screenshot above).
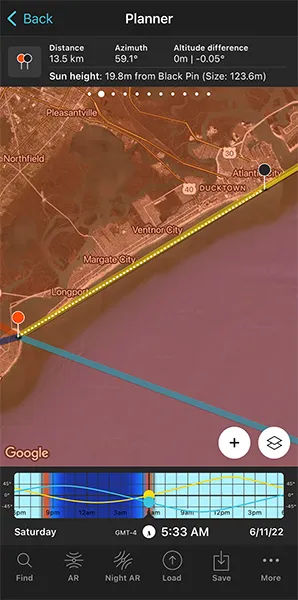
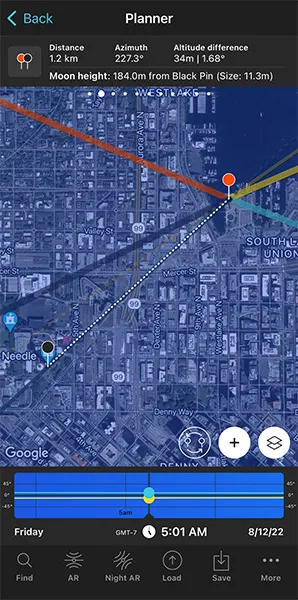
On the map:
- The thick yellow line indicates the Sunrise direction for the selected date (06/11/2022).
- And the thin yellow line shows you where the Sun will be at the time you have to take the photo, at 05:33 am.
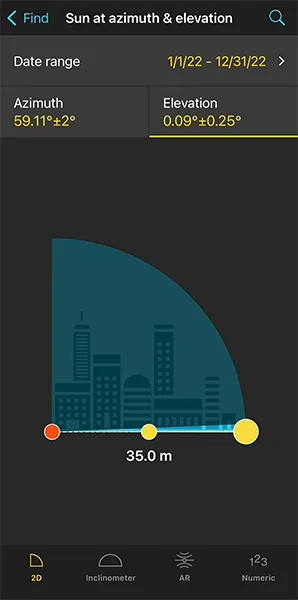
As you can see, the thin yellow line is not exactly aligned with the center of the Ferris wheel (Black Pin position). So the Sun is not aligned. You need to fix this.
Also, Panel 2 tells you that the center of the Sun will be 19.8 m above the pier (Black Pin ground level). And you need it to be at 35 m.
So, what you have to do next is to change the time using the Time Bar until the elevation of the Sun on Panel 2 shows 35 m. Then, move the Red Pin to align the thin yellow azimut line of the Sun with the Black Pin (the Ferris wheel).
You might need to repeat this workflow a few times until you get what you want.
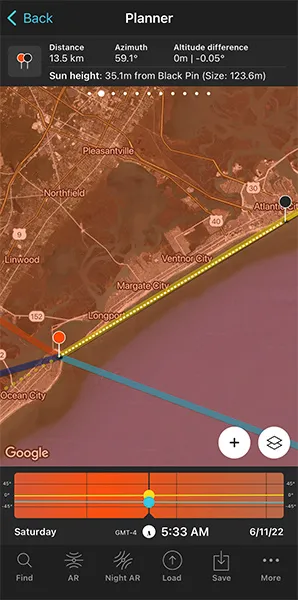
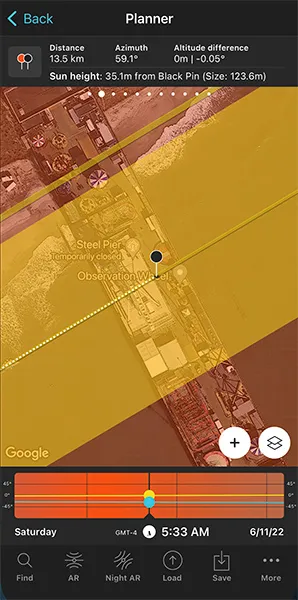
Now, if on June 11, 2022 at 05:33 am, you're at the Red Pin position, you'll be able to photograph a huge Sun (123.6 m) aligned with the Ferris wheel (70 m).
Congrats! You have made a cool plan.
Just a few final tips:
- To see the size of the Sun on the map (123.6 m), tap the Map Settings button. You'll find it at the bottom right corner of the map, right next to the (+) button. Then, on the Map Settings screen, tap the Sun layer and activate the Show Sun size option.
- Also, when you're in the field, right at the shooting spot (Red Pin position), use the Augmented Reality view (AR) on the Planner double check that the Sun will be where you want it to be.
- It's also a good idea to use the steps I show you in section 20 to plan the photo to the very last detail. This includes planning the field of view (the focal length) and the depth of field (to make sure you get everything in focus).
- And finally, as always, don't forget to save the plan to add it to you to do list by tapping the Save button! ;)
If you want to master this type of photography, read carefully the following articles:
8.How to plan Moonrises (and Moonsets)

Just like you did when planning a Sunrise or Sunset photo (section 6), you need to find:
- A shooting spot, from where to take the picture,
- A shooting direction (framing) and
- A date and time of shooting.
That's it!
And with PhotoPills you can do it in a breeze.
Hard to believe?
Well, here's a detailed explanation of the two most common planning situations:
- A Moonrise/Moonset plan for a certain date.
- A Moonrise/Moonset plan with the Moon in a certain position. In this case, you know the shooting spot and the photo you want, and you want to find out when it happens.
In both scenarios the Moon will be relatively small because you will be shooting somehow close to the subject. So take into account that you'll need to imagine the Moon as a dot in the composition.
If you envision a composition including a big Moon with a subject you like, go to section 9.
Keep reading!
How to plan a Moonrise (or Moonset) on a certain date (1)
Planning a Moonrise or a Moonset shot when you know the date you want to take the picture is extremely easy.
You need to follow the same steps I showed you when planning Sunrises and Sunsets in section 6.
To prove it, here's a video in which Rafa explains how to do it step by step:
If you don't like videos or you prefer to read, no problem!
Here's a full explanation of all the steps you need to follow.
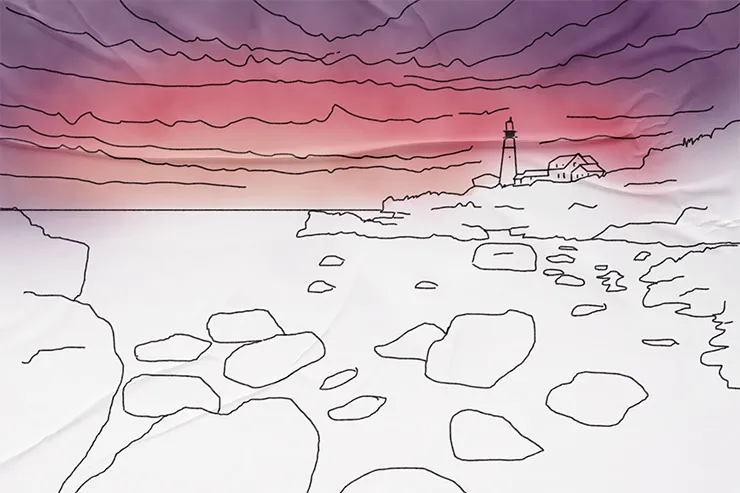
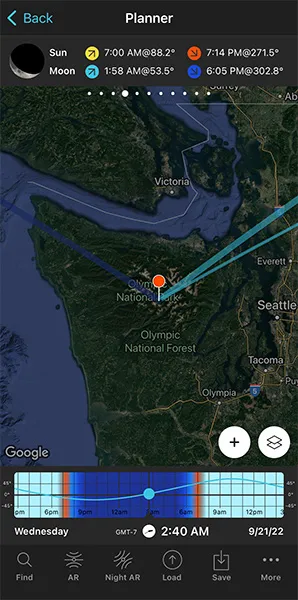
In this case, you're going to plan a photo of a Full Moon setting with some sea stacks in the beautiful Point of Arches, located in Olympic National Park, Washington (USA).
The idea is to shoot a long exposure to create the silky water effect, using the sea stacks as the main subject and the Moon as a bright dot in the composition, to add more interest to the picture. Let's hope that the sky is clear!
OK, let's start planning.
Place the Red Pin in a potential location
Open PhotoPills, tap Planner (Pills Menu).
In this case, you want to photograph the setting Moon, so the first thing you need to do is to place the Red Pin in a potential location that is photographically attractive during the Moonset. It can be a beach, a mountain... Whatever you prefer.
Remember that the Moon rises in the east and sets in the west.
Right now there's no need to be very precise. You only need to decide on a shooting area. Later on, you'll determine the exact shooting spot.
For example, place the Red Pin in Olympic National Park, Washington (USA), somewhere along the Pacific coast, where you'll have a clear horizon in the west. Great for a Moonset shot.
If you don't know how to do it, this video shows you how to move the Red Pin.
Now that you have the Red Pin in the location you want, it's time to set the date you would like to go shooting.
Set the date you're planning to photograph the Moonrise (or Moonset)
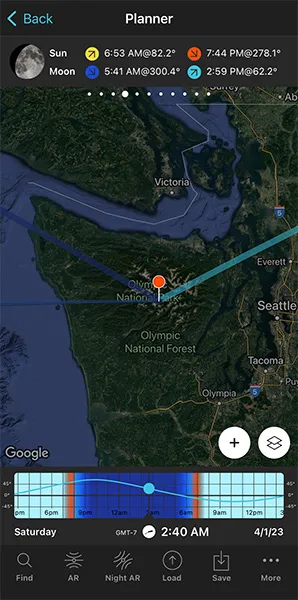
Let's say you want to capture the Full Moon of April 2023.
There are several ways to set the date in PhotoPills.
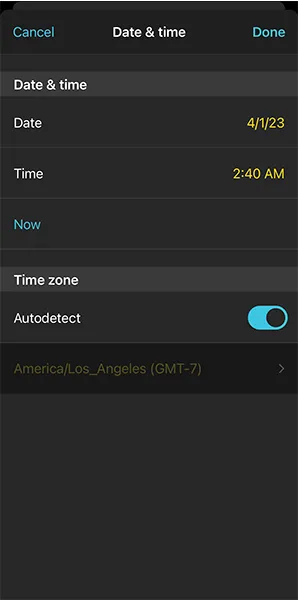
You can set any date using the calendar. So tap the center of the Time bar and the Calendar will pop up. Finally, on the Date & time screen, tap Date to manually change the shooting date. In this case, select April 1, 2023.
Then swipe the top panels to Panel 4. Once there, tap the Moon icon to jump in time to the next important phase. Keep tapping until you get to the next Full Moon.
Here, this happens on April 5, 2023.
Find out the Moonrise (or Moonset) direction and time
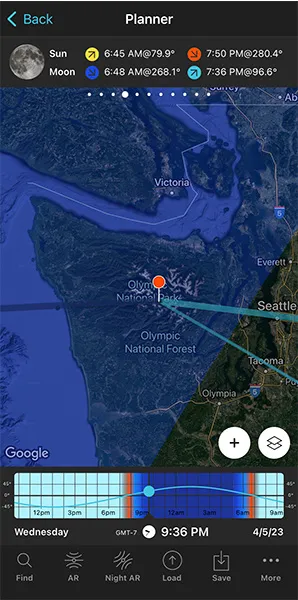
Now that you've set the shooting date, the Full Moon date (April 5, 2023), use the information on the panels above the map and the lines on the map to plan your shot.
This is to find:
- A cool subject that aligns with the Moonset direction.
- The shooting spot and shooting time to get a cool composition considering the subject and the position of the Moon.
Make sure that you have Panel 4 selected above the map. If not, swipe the top panels until you get to it.
Have a look at the screenshots above.
Panel 4 is telling you that on April 5, 2023 the Moon sets at 06:48 am according to the Red Pin position. So you know the time you should be ready to press the shutter.
On the map, you have the Moon, the Moonrise and the Moonset directions for the selected date (04/05/2023):
- The Moon direction at the selected time (06:37 am) is represented by the thin dark blue line.
- The Moonrise direction is represented by the thick light blue line.
- The Moonset direction is represented by the thick dark blue line.
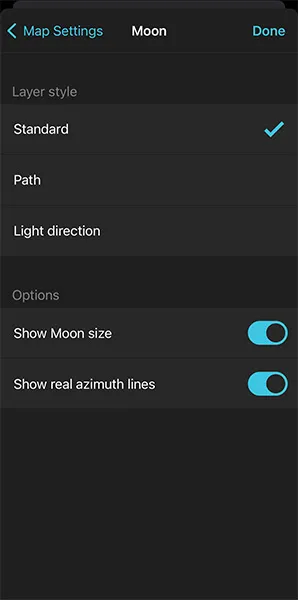
Note: If you don't see these lines, activate the Moon layer. You can do this by tapping the Map Settings button. You will find it next to the (+) button on the map.
The Moonset direction line is crucial to determine the perfect subject and the perfect shooting spot.
Great! Let's move on.
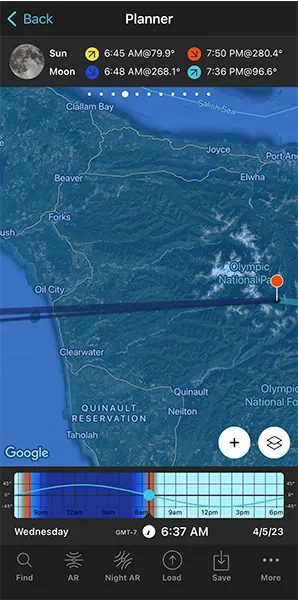
Check different locations until you find a photo you like
Now that you know where and when the Moon will set, it's time to move the Red Pin to several cool locations you know. Do it one by one until you find the one where your Moonset photo corresponds to the idea you have in mind. Or until you find a great photo opportunity.
If you can't think of any location, do your homework, and find at least one following the workflow I explained in section 3.
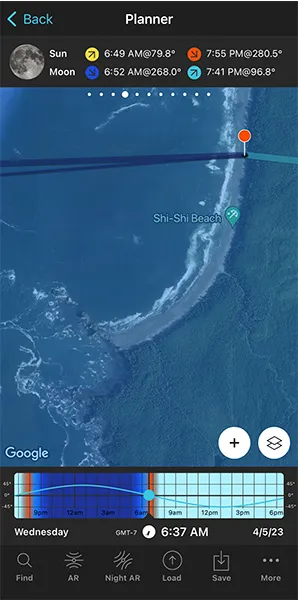
For this example, I found a fantastic beach called Shi-Shi Beach, located in Olympic National Park, Washington (US). There, you can find several interesting sea stacks very close to the seashore.
Shi-Shi Beach has 3 characteristics that make it a perfect location for taking photos at dawn:
- There's a long coastline where you can move freely and play with several shooting directions.
- The coastline and the sea stacks can be photographed by shooting to the west, in the Moonset direction.
- The combination of the water, the sea stacks and the Moon offer you lots of possibilities to find a cool composition.
It's a great location. So let's go back to PhotoPills and complete the plan...
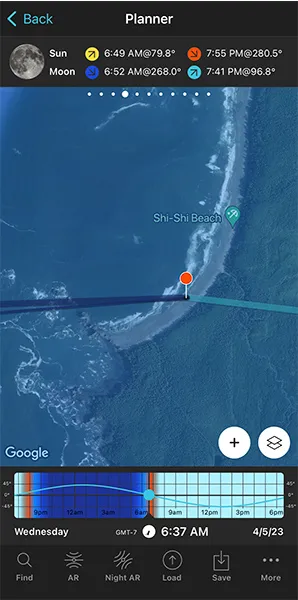
Place the Red Pin in a spot near your subject, next to the sea stacks.
To do it, tap the Load button (at the bottom) and type "Shi-Shi Beach" in the search bar. Then, select it and the Red Pin will be placed next to it.
Now zoom out a bit on the map and move the Red Pin to a place that works great as a shooting spot based on the Moonset direction (thick dark blue line), and the composition you want.
Check the second screenshot above. The Red Pin is right on the beach to get the Moon setting next to the sea stacks. The idea is to photograph a long exposure (a 1-second shutter speed more or less) of the sea stacks, the moving water and the setting Full Moon.
Now you have your shooting spot (Red Pin position), your shooting date (04/05/2023) and your shooting time around Moonset (06:37 am).
But there is still a key thing to check: natural light.
Check the natural light at the time of the shooting
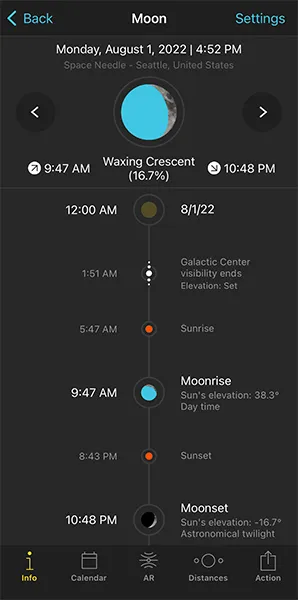
In Moon photography, you definitely need to check the type of natural light you'll get at the planned shooting time.
The color of the Moon will vary dramatically depending on the natural light you'll find at a certain time. It's not the same to photograph the Moon in daylight (weak Moon), during golden hour (strong yellow Moon), during blue hour (strong orange-red Moon) and at nighttime (white Moon).
Furthermore, during daytime, golden hour and blue hour, you can correctly expose both the Moon and the foreground (your subject) in a single exposure. However, that's not possible at night (unless your subject is artificially lit, like for example in a city).
So let's check natural light!
Swipe the top panel to the right, until you get to Panel 3, and check the elevation of the Sun at the time of the shooting (06:37 am): -2.07º.
This is good news because it's golden hour!
As we saw in section 4, the type of natural light is linked to the elevation of the Sun:
- Day. Elevation higher than 6º.
- Golden hour. Elevation between 6º and -4º.
- Blue hour. Elevation between -4º and -6º.
- Civil twilight. Elevation between 0º and -6º.
- Nautical twilight. Elevation between -6º and -12º.
- Astronomical twilight. Elevation between -12º and -18º.
- Night. Elevation lower than -18º.
My favorite time to photograph the Moon is during the Civil twilight, because it happens during a certain part of the golden hour and the whole blue hour. It's when the Moon has a super intense color.
And because it's when you can correctly expose the Moon and the foreground in a single exposure.
Good!
In addition to this, when you're in the field, at the Red Pin position, use the Augmented Reality view (AR) on the Planner to visualize on your smartphone where the Moon will set.
Now, if you want, you could keep planning. You could use the steps I show you in section 20 to plan the field of view (the focal length) and the depth of field (to make sure you get everything in focus).
Also, don't forget to save your plan so you can come back to it at any time. To do so, tap Save and then Plan.
And you're done!
This is the easiest and fastest way to plan your Moonrise and Moonset shots when you know the date.
Let's see what happens when you want the Moon in a certain position but you don't know the date it will happen.
How to plan a Moonrise (or Moonset) with the Moon in a certain position (2)
In this case, you need to follow a similar workflow as for a Sunrise or a Sunset with the Sun in a certain position.
You need to use the Find tool in the PhotoPills Planner.
And how can you use this tool?
Easy!
In this video Rafa explains in depth how to plan a photo of the Moon setting inside the Arc de Triomphe, the famous arch located in Paris (France).
Let me show you how it works with another example.
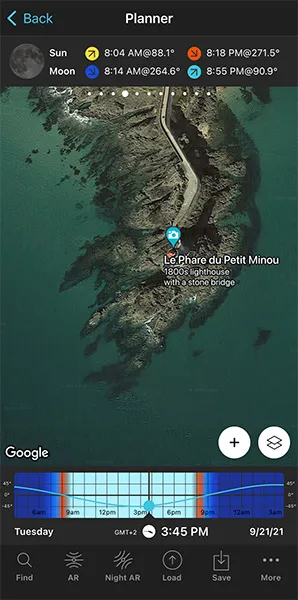
Imagine that you want to photograph the Moon rising behind the amazing Phare du Petit Minou, a beautiful lighthouse located not far away from Brest (France).

Let's see when it happens! :)
Place Red Pin on the shooting spot
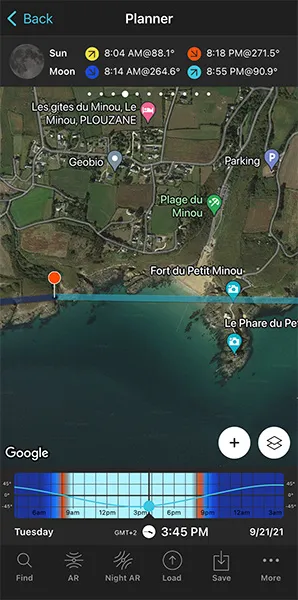
Open PhotoPills, tap Planner (Pills Menu) and place the Red Pin right on the shooting spot you want.
For example, a cliff located to the west of the Phare du Petit Minou. South of the small town of Plouzane, there's a path starting from Route de la Corniche leading to the sea. From the edge of the cliff, you get a great view of the sea and the lighthouse.
Also, this is a great spot because you can move along the area to get the best composition considering the Moonrise direction.
To quickly place the Red Pin, tap the Load button (at the bottom) and type "Phare du Petit Minou" in the search bar. Then, select it and the Red Pin will be placed next to the lighthouse.
Now, do a long press on the shooting spot, on the cliff, from where you want to take the photo.
Place Black Pin where you want the Moon to rise (or set)
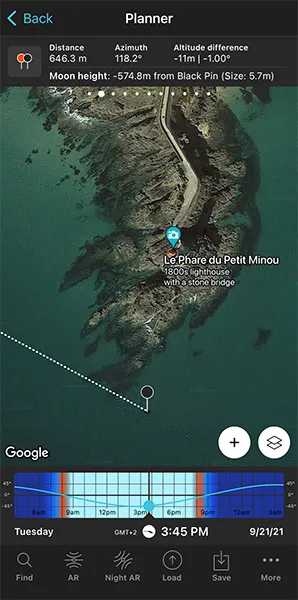
Remember that you want to photograph the Moon rising next to the Phare du Petit Minou. That is, a bit to the south from the lighthouse.
So the next step is to place the Black Pin right on the spot you want the rising Moon to be.
To do it, zoom in on the map, until you can clearly see the Phare du Petit Minou.
Swipe the panels above the map to the right until you find the Black Pin information panel (Panel 2). Tap the icon on the panel that's showing the Red Pin and the Black Pin to activate the Black Pin on the map.
Drag and drop the Black Pin right where you want the Moon to rise relative to the Phare du Petit Minou.
Find the dates and times when the photo is possible
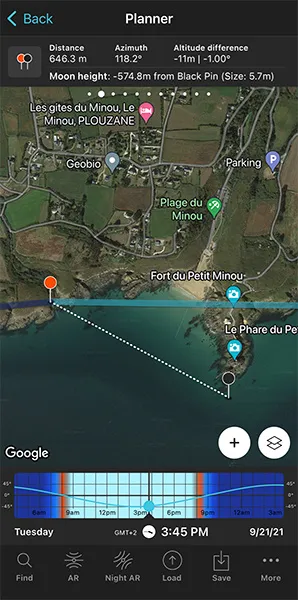
Now it's time to find out if the photo is possible. And if yes, when will it happen?
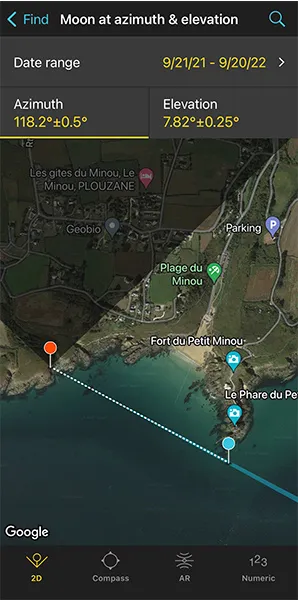
To do it, tap the Find button. It's located on the bottom left corner of the Planner. And then, select Moon at azimuth and elevation (Moon on Android).
On the new screen, you have to tell 3 things to PhotoPills:
- The date range you want to search for results. For example, 1 year starting from today.
- The Moon azimuth or direction. In this case, to the right of the Phare du Petit Minou.
- The Moon elevation or altitude. In this case, set it to 0º for a Moonrise.
Enter the date range
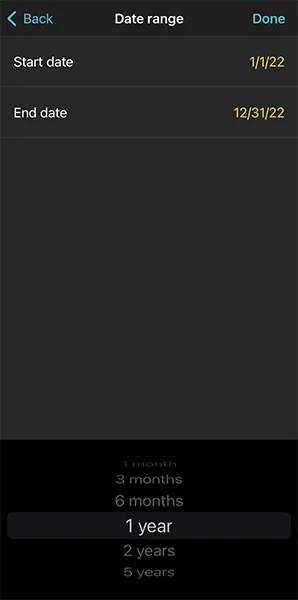
Tap Date Range, tap Start date, then Today and OK (back arrow on Android).
Next, tap End date. Now you can enter a certain date or range. To enter a range, tap the black area of the screen and the date options will change. Select 1 year, for example, and tap OK (back arrow on Android).
Enter the Moon azimuth
To set the azimuth you want the Moon to rise, you can drag and drop the Blue Pin you see on the map. But the good news is that the Blue Pin is linked to the Black Pin. So the azimuth of the Moon is already set (118.2º), to the south of the Phare du Petit Minou.
Don't you know what the azimuth and the elevation are?
Well, don't worry. You have a quick reminder in section 4.
Cool, now that you have the azimuth set you need to decide the error (tolerance) defined by the blue sector you see on the map.
Take a look at the first screenshot above: the azimuth is 118.2º with a ±0.5º error represented by the blue area on the map.
For this shot, you want the Moon to rise to the right of the Phare du Petit Minou, but you don't need the azimuth (118.2º) to be super precise. This location allows you to move around to adjust the shooting spot, so I recommend you to set a relatively high azimuth error. This will give you more possible dates to shoot.
Set a higher error, for example ±2º. To change it, tap Numeric (at the bottom).
Enter the Moon elevation
Tap Elevation to set the elevation of the Moon.
In this case, you're looking for a Moonrise. So you have to set an elevation of 0º.
You can do this by dragging the blue dot in the diagram until it touches the horizon. You can also do this by tapping Numeric and typing "0º" in the Elevation field of the new screen.
Also increase the elevation error (or tolerance) to 0.5º. Again, this will give you more possible dates to shoot. Because at the end of the day, you can always adjust the shooting spot and shooting time.
Get the possible shooting dates and times
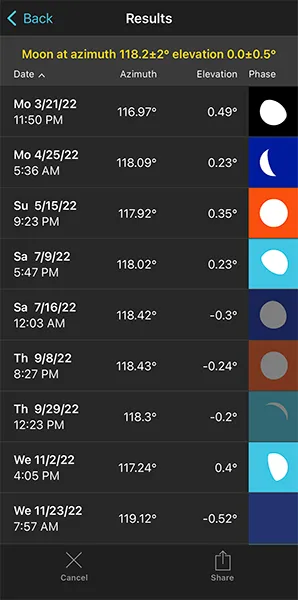
Tap Search (magnifying glass icon at the top right corner) to see the potential dates.
On the table, you can also see the Moon phase and the type of natural light (background color) for every shooting date and time:
OK!
Pick one of the dates of the table. Tap it to review the Plan.
For example, May 15, 2022.
Why this date? Well, for 2 reasons.
The first one is that it's almost Full Moon (97.4%).
The second one is that you'll be shooting during golden hour. You know this thanks to the orange Moon icon.
Thanks to this type of light, the Moon takes a spectacular tone, which varies between pink and yellow as the Sun goes down. On top of it, during golden hour you can photograph the landscape and the Moon in a single exposure.
As you can see on the second screenshot above:
- The thick light blue line indicates the Moonrise direction for the selected date (05/15/2022).
- And if you swipe the top panel to Panel 4, you'll see the Moonrise time: 09:18 pm.
Cool!
Your plan is ready to be executed :)
You know the shooting spot, the Red Pin Position and the shooting time, around Moonrise (09:18 pm), when the Moon will rise where you want relative to the Phare du Petit Minou.
In addition to this, when you're in the field, at the Red Pin position, use the Augmented Reality view (AR) on the Planner to visualize on your smartphone where the Moon will rise.
Now, it's also a good idea to use the steps I show you in section 20 to plan the photo to the very last detail. This includes planning the field of view (the focal length) and the depth of field (to make sure you get everything in focus).
Finally, don't forget to save the Plan using the Save button! ;)
9.How to plan a Big Moon aligned with a subject
In Moon photography...
Size matters!
I mean, don't get me wrong. As I showed you in section 8 I love including a small Moon in the frame when photographing a beautiful landscape. It adds a lot to the images.
But what I like the most is to drive the viewers attention to the Moon and the subject.
How do I do it?
Well...
I go far away from the subject and use a long lens to take a close up view of the subject along with a big Moon.
Here, understanding how the shooting distance affects the size of the Moon relative to the subject is key. So I recommend you to read section 4 before you start planning your Moon shots.
If you have already read it, good. Let's move on.
As usual, when planning the Moon, the two most common cases are:
- A plan for a certain date, as for example, when you want to plan the next Full Moon.
- A plan with the Moon in a certain position. In this case, you know the shooting spot and the photo you want, and you want to find out when it happens.
How to plan a big Moon on a certain date (1)
In this case, you want to capture the Moon on a specific day.
That is, you know the date you want to take the photo but you need to find out:
- A cool subject that can be aligned with the Moon.
- The exact shooting spot from which you'll be shooting to get the size of the Moon you need. Or, if the location limits the shooting distance, then, at least get a large enough Moon.
- The exact time the Moon will be where you want it to be.
Imagine you want to photograph the next Full Moon, a Supermoon or a lunar eclipse.
You know when they're going to happen, but... What subject can be aligned? Where will it be better to take the picture from? And at what time?
To find the answers to these questions it's best to use the main PhotoPills tool: the Planner.
Here's a video in which Rafa explains in great detail how to plan a photo of a huge Full Moon just behind the imposing Empire State Building, the iconic 381-meter high skyscraper in New York City, New York (USA).
More specifically, the aim is to capture the Moon just behind the top floor of the tower, which is about 220 m above ground level.
But if instead of watching the video, you prefer to read the workflow you should follow, here is another example.
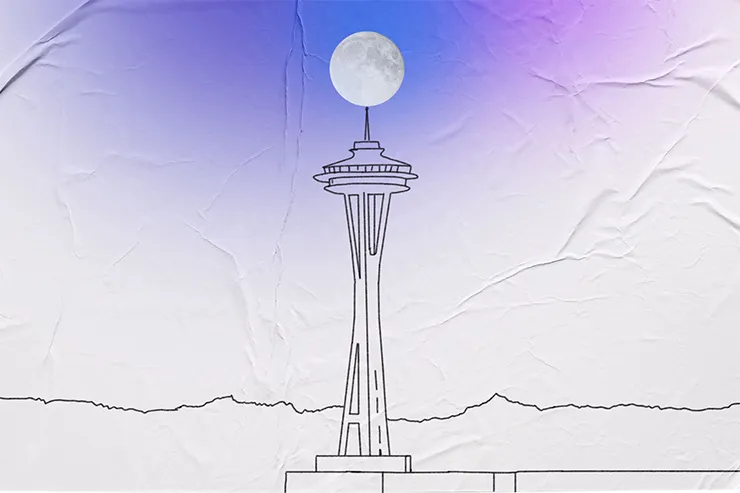
Let's imagine that you want to plan a photo of the Full Moon aligned with a cool subject in Seattle, Washington (US). After doing your research, you find the Space Needle, a fantastic tower that will serve as the main subject.
The building is 184 m high, including its antenna. It's visible from many locations. So you would like to capture a photo of the Full Moon (as big as possible) aligned with the top of the Space Needle, and behind the antenna spire.
Spectacular!
Let me show you how you can plan the photo.
Set the shooting date
As soon as you start planning, you need to find out when the next Full Moon is.
Open PhotoPills, and tap Planner (Pills Menu).
In the Planner, tap twice on the center of the Time bar to set the current date and time.
Then swipe the top panels to Panel 4. Once there, tap the Moon icon to jump in time to the next important phase. Keep tapping until you get to the next Full Moon.
Let's imagine that the next Full Moon occurs on August 11, 2022.
There are 2 more ways to set the date...
Here's the first one.
If you know the date, tap the Time bar once. In the Date and time screen, you can set the date directly.
And here's the second one.
Exit the Planner by tapping on Back, and then tap Moon (Pills Menu). Then, tap the Calendar button. And choose the Full Moon you want. Full Moons have a white dot below the date.
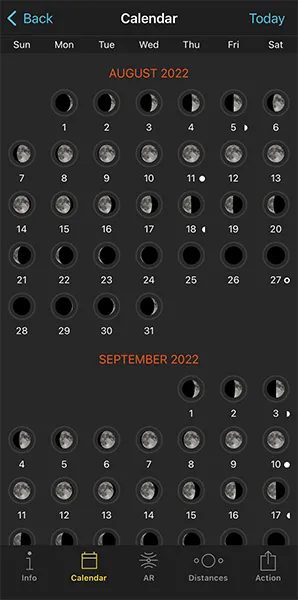
Tap, for example, the August 11, 2022 Full Moon. And on the Moon screen, tap the Action button (bottom right) and select Send to planner. The date of the Full Moon will be set in the Planner.
Place the Red Pin near the subject

Now, place the Red Pin near your subject, the Space Needle. If you don't know how to do it, this video shows you how to move the Red Pin.
For example, tap the Load button (at the bottom) and type "Space Needle" in the search bar. Select the result and the Red Pin will be placed on the tower itself.
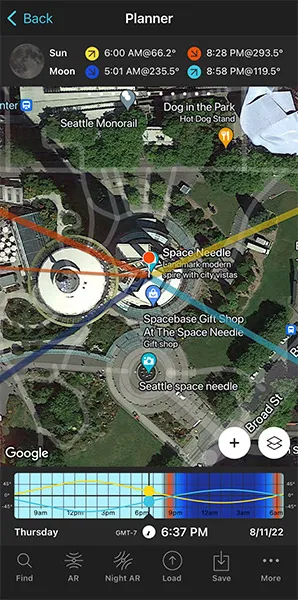
Now that you have the Red Pin near your subject, and the Full Moon date set in the time bar (08/11/2022), you can see the Moonset (5:01 am) and Moonrise (8:58 pm) times on Panel 4.
And on the map you have:
- The Moonrise direction is the thick light blue line.
- And the Moonset direction is the thick dark blue line.
As you'll see in a second, these lines are key to plan the shot.
If, for some reason, you don't see these lines, you may not have the Moon layer activated.
Activate it!
Tap the Map Settings button. You'll find it at the bottom right corner of the map, right next to the (+) button.
On the Map Settings screen, activate the Moon layer. To do this, tap the eye-shaped icon to the left of the layer.
Place the Black Pin on the subject
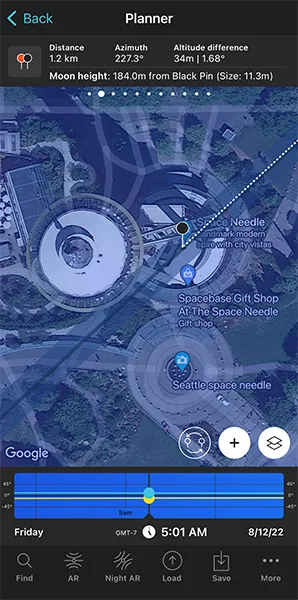
Now move the Red Pin a bit away from the tower and zoom in on the map until you've enlarged the Space Needle as much as possible.
Swipe the panels above the map until you find the Black Pin information panel (Panel 2). Tap the icon showing the Red Pin and the Black Pin to activate the Black Pin on the map. Drag the Black Pin to the center of the ground floor of the Space Needle, right where you want the Moon to be aligned.
Don't place the Black Pin on the roof. Keep in mind that what you're seeing on the map is a projection of the buildings, not a 3D representation. That's why you should always place the Black Pin at the base of the building, right where you want to align the Moon with the tower.
Also, the Black Pin helps you to have your subject perfectly located on the map at all times.
Find the initial shooting spot and shooting time

As I said, the Moonrise (thick dark blue) and Moonset (thick light blue) lines are key to guide you when choosing the shooting spot.
The Space Needle is 184 m high, including its antenna. Since you want to capture a photo of the Full Moon (as big as possible) aligned with the top of the Space Needle, you need the Moon to have an elevation of 184 m when aligned with the needle.
Let's find the shooting spot and shooting time.
Zoom out the map while keeping an eye on the Moonset and Moonrise directions. You'll soon find out that to capture a big Moon aligned with the Space Needle you need to go to the east, to Lake Union Park. From this spot you have a clear view of the tower and the setting Moon.
So let's go for a Moonset.
Put the Red Pin somewhere in Lake Union Park. To do so, make a long press right where you want to put the Red Pin.
As you can see from the first screenshot below, the thick dark blue line is above (north) the Black Pin. This means that the setting Moon will go behind (or above) the Space Needle if you shoot from this spot.
If the Moonset direction is below (south) the Black Pin, it would mean that the Moon would set before reaching the subject. So you would need to choose a new shooting spot making sure that the thick dark blue line is above the Black Pin.
Note: In the Southern Hemisphere it's the other way around of course.
If that's the case, keep trying until you find it.
Great!

Now, the next step is to align the Moon with your subject, the Space Needle, and check its height.
To do it, swipe the Time bar to move time forward or backward. In this case, swipe it to the left to move time forward.
If you need to move time accurately, make a long press on the center of the Time bar. It will expand so you can adjust the time minute by minute.
Now you have the Moon line (blue thin line) aligned with the Black Pin. This happens at 04:56 am.
Cool!
But is the Moon at the right height?
Remember, you want it aligned with the top of the Space Needle, which is 184 m high.
Take a look at Panel 2. It tells you that the center of the Moon is at an elevation of 195.2 m above the Black Pin (the Space Needle ground level). So the Moon is not where you want it to be... :(
You need it at 184 m, so you need to find a new shooting spot and shooting time!
Adjust the shooting spot and the shooting time
OK!
Let's fine tune the shooting spot and shooting time to get the Moon aligned and at a height of 184 m.
Move time backward until the Moon height above the Black Pin is 184 m. To confirm it, have a look at Panel 2.
Once you get it, check the Time bar again. The Moon is 184 m above the Black Pin at 05:01 am.
But now the Moon and the Black Pin are not aligned, so you need to adjust the Red Pin position to realign it.
Where should you move the Red Pin? There's a cool way to find it out.
Tap the (+) button, and then look for the Expand azimuth lines button. It's the 7th button starting from the left.
Tap it and the azimuth line of the Moon is expanded (dark blue dashed line).
Then, tap the (+) button again, and look for the Swap pins button. It's the 6th button starting from the left.
Tap it and the Black Pin will be now at the Red Pin position and vice versa. Now, all you need to do is move the Black Pin where the dark blue dashed line is (see second screenshot above).
Finally, tap again the Swap pins button so the Black Pin and the Red Pin return to their initial positions.
Now the Moon is perfectly aligned with the Space Needle! :)
Because you changed the position of the Red Pin, topography also changes, therefore, as you can see on Panel 2, the Moon's elevation is now 184 m.
There you go!
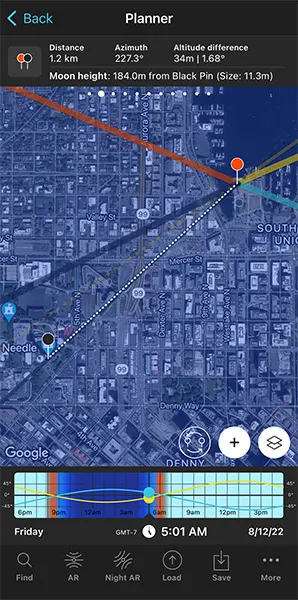
Your plan is done. You know now that if on August 12, 2022 at 05:01 am, you are at the Red Pin position (shooting spot), you'll be able to photograph a big Moon (11.3 m) aligned with the top of the Space Needle (184 m).
But there is more!
Check the Moon size on the map
One final tip.
As you can see on Panel 2, the Moon's size is 11.3 m (diameter).
But if you want to see it on the map, tap the Map Settings button. You'll find it at the bottom right corner of the map, right next to the (+) button.
On the Map Settings screen, tap the Moon layer and activate the Show Moon size option. Finally, tap OK (top right corner) in iOS or the back arrow in Android.
Zoom in on the map over the Black Pin to see that the width of the thin blue line shows you the Moon diameter at that date and time. This allows you to compare its size to the Space Needle.
What do you think? Is it big enough?
If you want to have a larger Moon, all you have to do is to find a shooting spot that's further away from your subject. And repeat the process that I just explained to you in this section.
Check the natural light
When you photograph the Moon, the light you have at the time of shooting is super important.
As you read in section 4, natural light is crucial because it will determine the color of the Moon you'll get and whether you'll need to take one or two exposures to expose the scene correctly.
Therefore, it's essential to check the conditions you're going to have.
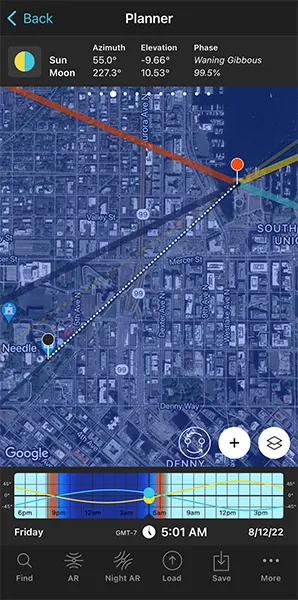
To do this, swipe the top panels until you get to Panel 3. Here you can see the Sun elevation at the time of the photo. In this example, -9,66º.
This means that the Sun is below the horizon and that it's nautical twilight. Remember that the nautical twilight occurs when the Sun has an elevation between -6º and -12º.
During nautical twilight, there is not enough natural light to photograph both the Moon and the landscape (subject) in one exposure. But in this case, being a city, and because the tower is lit, you'll be able to nail your shot in a single exposure.
Moreover, when you're in the field, at the Red Pin position, use the Augmented Reality view (AR) on the Planner to visualize on your smartphone where the Moon will set.
Have a look at section 20 and plan your Moon shot to the very last detail. This includes planning the field of view (the focal length) and the depth of field (to make sure you get everything in focus).
Finally, don't forget to save the Plan using the Save button! ;)
How to plan a big Moon in a certain position (2)
You know exactly the photo you want: you know the exact shooting spot from which you'll be taking pictures, the frame and the Moon position relative to the subject you want.
Now you just need to find out:
- If that specific photo is possible.
- And if it is, when exactly it does happen and the size of the Moon you'll get.
Here's a video in which Rafa explains how to use the Find tool of PhotoPills to plan any Moon alignment you imagine:
But let me give you another example. Let's plan a picture together.
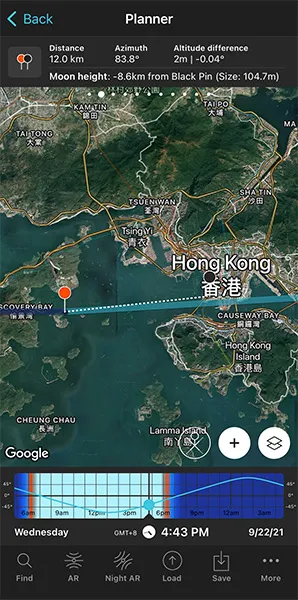
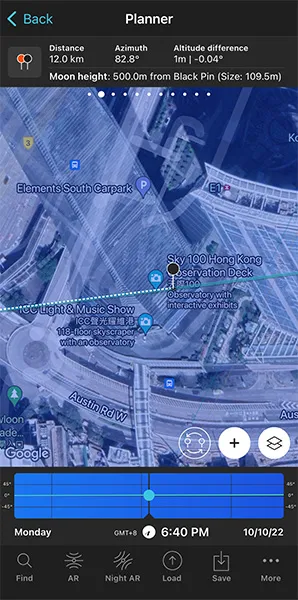
Imagine that you want to capture a big Moon aligned with the top of the huge International Commerce Centre (ICC) in Hong Kong. It's a beautiful skyscraper 484 m tall (1,588 ft approximately).
You've found a cool shooting spot in Peng Chau, a small island located off the north-eastern coast of Lantau Island, in Hong Kong. It's located 12 km away from your subject.
You can quickly use the PhotoPills Rule of 100 explained in section 4 to find out that you may be able to photograph a Moon with a diameter of 120 m approximately. So big, so cool!
Now...
The question is:
Is the photo possible?
And if yes, when will it happen?
Well, let's find out!
Take your phone, open PhotoPills and follow these steps with me.
Place the Red Pin on the shooting spot
The first step is to place the Red Pin on the shooting spot you want.
Open PhotoPills, tap Planner (Pills Menu) and then place the Red Pin on the shooting spot. For example, at Peng Chau, a small island located off the north-eastern coast of Lantau Island, in Hong Kong. If you don't know how to do it, this video shows you how to move the Red Pin.
To quickly place the Red Pin, tap the Load button (at the bottom) and type "Peng Chau" in the search bar. Then, select it and the Red Pin will be placed on the island.
Now, do a long press on the shooting spot, on the coast, from where you have a beautiful view of your subject to the east – the International Commerce Centre (ICC).
Place the Black Pin where you want the Moon

Zoom in on the map, until you can clearly see the International Commerce Centre (ICC).
Now swipe the top panels on the map until you find the Black Pin information panel (Panel 2). Tap the icon showing the Red Pin and the Black Pin to activate the Black Pin on the map.
Place the Black Pin right on the spot you want the Moon to be relative to your subject. In this case, right where the building is. Remember that you want the Moon to be aligned with the top of the International Commerce Center (484 m).
Now Panel 2 is also telling you:
- The shooting distance between pins (12 km).
- The elevation of the center of the Moon above the Black Pin ground level (-8.6 km), so you can compare it with the height of your subject.
- The apparent diameter of the Moon (104.7 m), so you can compare it with the height of your subject, the International Commerce Centre (ICC) (484 m).
Find the dates and times when the photo is possible
Let's find out if the photo is possible and when it occurs.
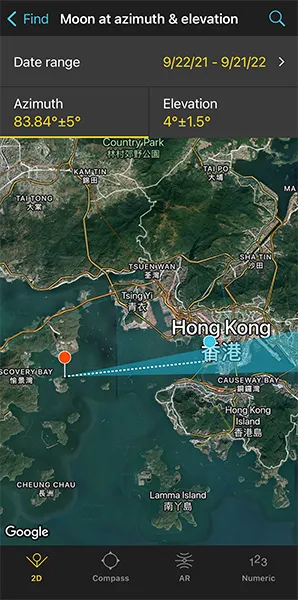
Tap the Find button. It's located on the bottom left corner of the Planner. And then, select Moon at azimuth and elevation (Moon on Android).
On the new screen, you have to tell 3 things to PhotoPills:
- The date range you want to search for results. For example, 1 year starting from today.
- The Moon's azimuth or direction. In this case, you want it aligned with the International Commerce Centre (ICC).
- The Moon's elevation or altitude. Imagine that you want to have the center of the Moon at a height of 500 m above the International Commerce Centre (ICC). This is a little bit above the tower, which has a height of 484 m.
Let's begin by setting the date range.
Enter the date range

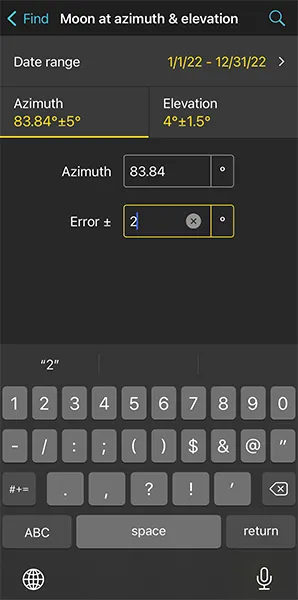
Tap Date Range, tap Start date, then Today and OK (back arrow on Android).
Next, tap End date. Now you can enter a certain date or range. To enter a range, tap the black area of the screen and the date options will change. Select 1 year, for example, and tap OK (back arrow on Android).
Enter the Moon azimuth

To set the azimuth at which you want the Moon to rise, you can drag and drop the Blue Pin you see on the map.
But because the Blue Pin is linked to the Black Pin the azimuth of the Moon is already aligned with the International Commerce Centre (ICC).
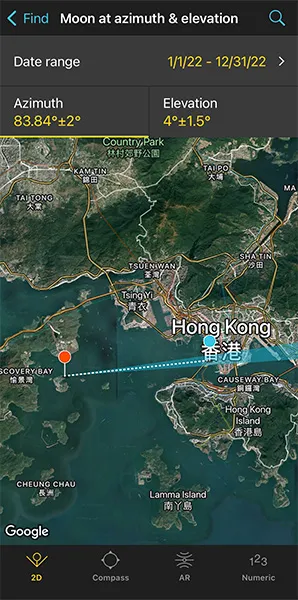
Now that the azimuth is set, it's time to decide the error (or tolerance) defined by the blue sector you see on the map.
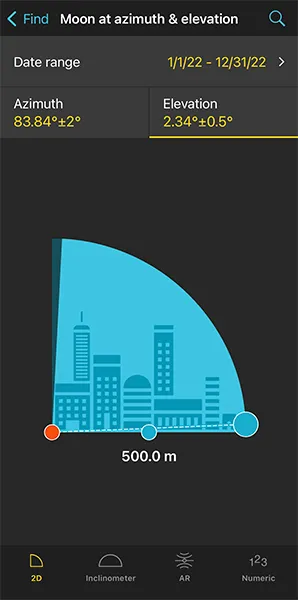
This blue sector represents all the directions PhotoPills will look for results. In this example, these are all the directions within the azimuth 83.84º±2º.
If you want to change the error, tap Numeric (at the bottom).
If your shooting spot allows you to move around, I recommend using a relatively large error (2º, 3º or even more) to get more possible shooting dates. Remember that you can always adjust your shooting spot.
Enter the Moon elevation
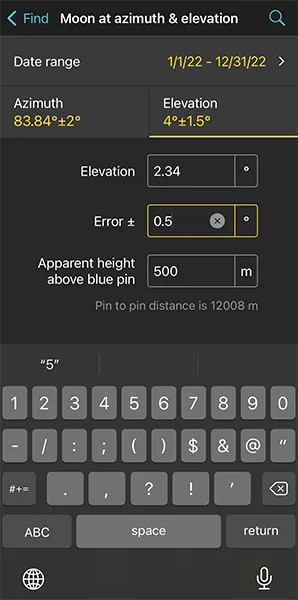
Tap Elevation to set the elevation of the Moon.
In this case, you want the center of the Moon aligned with the top of the International Commerce Centre (ICC). Slightly above it.
Remember, the International Commerce Centre (ICC) is 484 m tall (1,588 ft approximately). So the center of the Moon should have an elevation above 484 m, let's say 500 m.
So, drag the blue dot in the diagram until it shows 500 m above the horizon. Or tap Numeric and type "500" in the Apparent height above blue pin field.
Also, in the Numeric, set a small error (or tolerance) to be more precise with the elevation. For example "0.5º".
Get the possible shooting dates and times
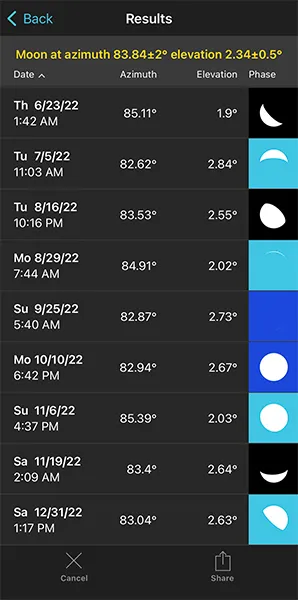
Now that you've set the date range and the Moon position you want (azimuth and elevation), let's calculate when the photo occurs.
Tap Search (the magnifying glass icon at the top right corner) to see all the possible dates and times the Moon will be within the search parameters. In other words, when the Moon will be aligned with the International Commerce Centre (ICC).
On the results table, you can also see the Moon phase and the type of natural light (background color) for every shooting date and time:
The idea is to photograph a Full Moon, so October 10, 2022 looks great:
- It's almost Full Moon (99.5% which is something you can check using the Moon pill).
- You'll be shooting during the nautical twilight. You know this thanks to the dark blue Moon icon.
So tap the date to see the plan (second screenshot above).
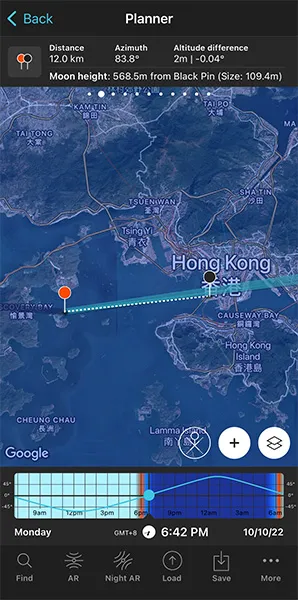
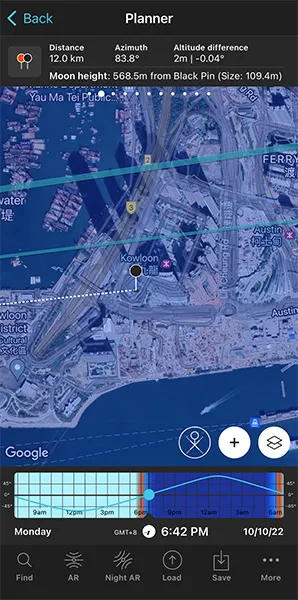
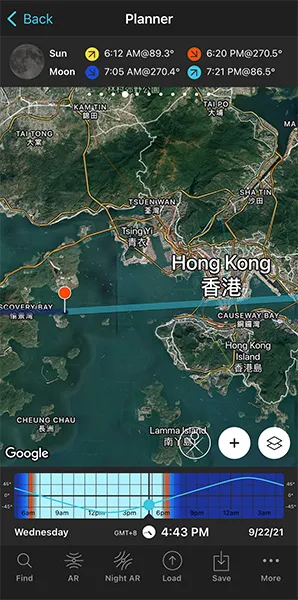
On the first screenshot above you see:
- The thick light blue line indicates the Moonrise direction for the selected date (10/10/2022).
- And the thin blue line shows you where the Moon will be at the time you have to take the photo, at 06:42 pm.
As you see in the second screenshot above, the thin light blue line is not exactly aligned with the International Commerce Centre (ICC) (Black Pin position). In other words, the Moon is not exactly aligned with your subject.
So you need to fix it...
Moreover, Panel 2 tells you that the center of the Moon will be 570.2 m above the building (Black Pin ground level). However, you want it to be 500 m.
Adjust the shooting spot and the shooting time
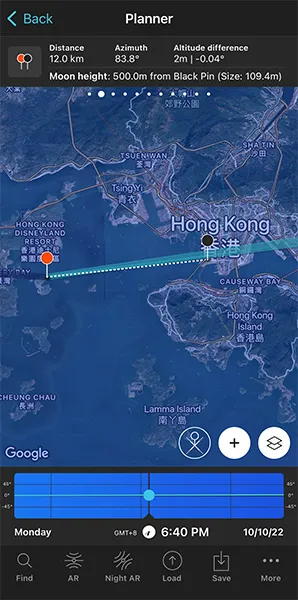
Now you need to change the time using the Time bar until the elevation of the Moon on Panel 2 shows 500 m.
Check the Time bar again. The Moon is 500 m above the Black Pin at 06:40 pm.
But now the Moon and the Black Pin are not aligned, so you need to adjust the Red Pin position to realign them.
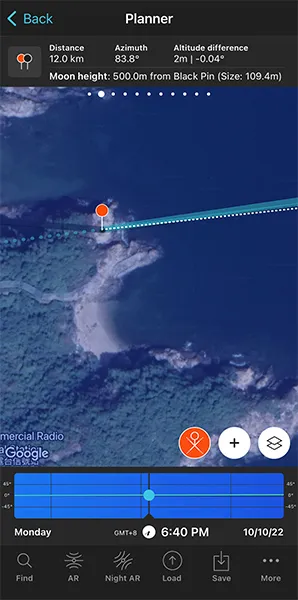
Where should you move the Red Pin? There's a cool way to find it out.
Tap the (+) button, and then look for the Expand azimuth lines button. It's the 7th button starting from the left.
Tap it and the azimuth line of the Moon is expanded (dark blue dashed line).
Then, tap the (+) button again, and look for the Swap pins button. It's the 6th button starting from the left.
Tap it and the Black Pin will be now at the Red Pin position and vice versa. Now, all you need to do is move the Black Pin where the dark blue dashed line is (see second screenshot above).
Finally, tap again the Swap pins button so the Black Pin and the Red Pin return to their initial positions.
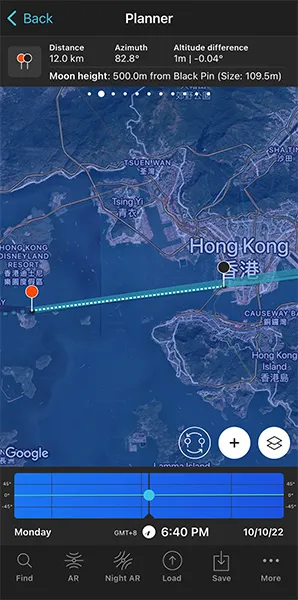
Now the Moon is perfectly aligned with the International Commerce Centre (ICC)! :)
You might need to repeat this workflow a few times until you get what you want.
And you have the plan!
Now, if on October 10, 2022 at 06:40 pm, you're at the Red Pin position, you'll be able to photograph a huge Moon (109.5 m) aligned with the top of the International Commerce Centre (ICC), at a height of 500 m.
Check the Moon size on the map

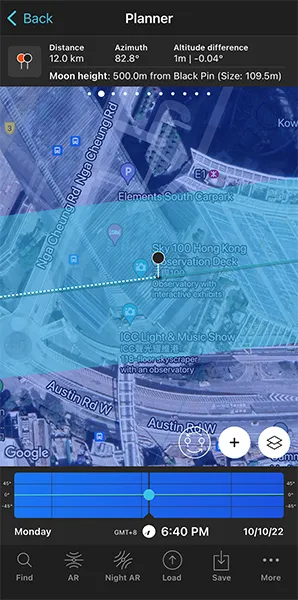
Moreover, there is a way to visualize the size of the Moon (109.5 m) on the map, so you can compare it with the width of the International Commerce Centre (ICC).
To see the Moon size on the map, tap the Map Settings button. You have it on the map, next to the (+) button.
On the Map Settings screen, in the Map Layers section, tap Moon. In the new screen, activate the Show Moon size option using the slider and tap OK.
Once you return to the Planner, the Moon azimuth blue line has widened to show you the Moon apparent size in the photo relative to the width of the International Commerce Centre (ICC).
The Moon looks huge!
Check the natural light
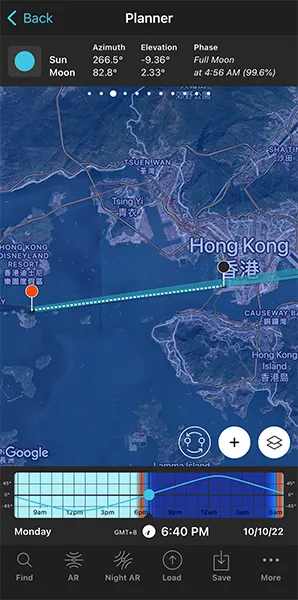
Next step is to check the type of natural light you'll have in the scene at the time of the photo.
As I mentioned before, when photographing the Moon, knowing the natural light you'll have is key. Have a look at section 4 to learn why.
To do this, look at the Sun elevation on Panel 3. In this case, the elevation of the Sun is -9.36º.
This means that the Sun is below the horizon and that it's nautical twilight. Remember that the nautical twilight occurs when the Sun has an elevation between -6º and -12º.
During nautical twilight, there is not enough natural light to photograph both the Moon and the landscape (subject) in one exposure. But in this case, being a city, and because the tower is lit, you'll be able to nail your shot in a single exposure.
And now a few final tips!
When you're in the field, at the Red Pin position, use the Augmented Reality view (AR) on the Planner to visualize on your smartphone the position of the Moon.
Also, have a look at section 20 and plan your Moon shot to the very last detail. This includes planning the field of view (the focal length) and the depth of field (to make sure you get everything in focus).
Oh!
And don't forget to tap the Save button and save the plan to your to-do list.
Would you like to become a Moonmaster? Then, check our Moon photography guide.
Get this ebook for free now!