Northern Lights Photography: The Definitive Guide
Hey!
So, you want to capture the northern lights with your camera? Awesome choice.
The northern lights, or aurora borealis, are pretty much one of nature's coolest light shows. There's something magical about them, right?
They dance across the sky in colors you wouldn't believe unless you saw them yourself. That's what makes capturing photos of the northern lights so unique. It's not just about pointing and shooting; it's about catching a fleeting, mesmerizing moment that's never quite the same twice.
In this guide, I'm going to walk you through everything you need to know to get those dreamy aurora shots.
From the basics of understanding what the northern lights are, to finding the best locations to see them, and of course, all the camera settings and gear you'll need. And because I know you're aiming for shots that stand out, I'll also dive into some advanced techniques that'll really bring your photos to life.
Now, let's talk about PhotoPills.
This app is a game-changer. Think of it as your photography Swiss Army knife.
Planning when and where to shoot the aurora can be tricky, but PhotoPills makes it a whole lot easier. I'll show you how to use it to nail the timing and location for your northern lights photography. It's like having a personal assistant that tells you the best times and places to set up your tripod and get those breathtaking shots you've been dreaming of.
Oh, and before I forget it, once you've read this guide, you should definitely watch this Masterclass on how to photograph the northern lights with my dear friend Rachel Jones Ross. Learning from her is a privilege! ;)
So, grab your gear, and let's get started. By the end of this guide, you'll be ready to capture the northern lights in all their glory, and trust me, it's going to be epic!
"The first time you see the northern lights, it is as if you have entered a magical realm where the impossible doesn't just happen – it dances across the sky." - Joanna Lumley
Get this ebook for free now!
Content
- 11 stunning northern lights pictures to captivate your imagination
- Understanding the northern lights
- Where is the best place to see the northern lights?
- When is the best time to see the northern lights?
- 7 essential steps for planning your aurora photos
- All the equipment you need to nail your northern lights photos
- How do you photograph the aurora?
- Experiment with these advanced northern lights shooting techniques
- 15 aurora photography tips to succeed
- 11 aurora photographers to learn from
- Get out into life and take magical aurora photos
1.11 stunning northern lights pictures to captivate your imagination
Ever find yourself scrolling through photo after photo, just looking for that spark of inspiration?
You're not alone. We've all been there, especially when trying to kick our own photography up a notch.
This section is like your personal gallery walk, showcasing shots from some super talented photographers. These aren't just any photos; they're the kind that make you stop scrolling and just stare. And yeah, while these are here to wow you, they're also here to light a fire under your creativity.
Think of it as a treasure hunt.
As you check out these pictures, ask yourself what grabs you. Is it the lighting, the angles, or something else?
It's not about copying what you see. It's about letting these images open your mind to new possibilities for your own shots.
So, take a look, get inspired, and then go out there and experiment with your camera. Mix in a little bit of what you've seen here with your own style.
Can't wait to see what you come up with!
Mountains (1)
This is an image that Rachel Jones Joss captured during one of the PhotoPills expeditions to the Canadian Rockies.
I've had the chance to share the magic of the arctic light together with her and a bunch of PhotoPillers!
"There are few places in the world where it is possible to capture both the galactic centre of the Milky Way and the Aurora Borealis at the same time.
However, with the mid latitude position of the Canadian Rockies, it is possible to have your cake and eat it too, as the Milky Way core is visible as early as February in the mountains, and the Aurora is visible when the sun is actively storming.
During this shooting session, the sun erupted with multiple solar flares, and two of them impacted our atmosphere for a back-to-back aurora display of a lifetime!
The colours were the most varied and intense that I have ever seen in an aurora including the typical green and red, but also blue, purple and orange! I set my camera to shoot in interval mode with one second between frames, and shot over 15,000 images on one camera!
I left my Sony a7S III to shoot the same composition as a timelapse all night long. It was a perfect composition for catching the riding Milky Way to the right of the mountain and aurora on the left. But by 6:00 am, it became abundantly clear that the aurora was so bright it washed out the stars in the Milky Way. For the first time in my life, I turned to my group and said: I'm sorry, the Milky Way is cancelled due to excessive light from the Aurora!"
Rock formation (2)
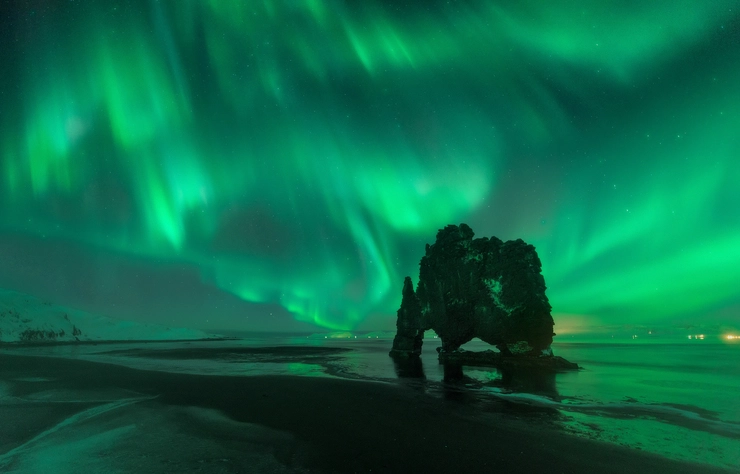
Photo by Javier de la Torre
Javier de la Torre shot this picture in Húnaflói Bay (Iceland). There you can find the imposing Hvítserkur, otherwise known as the Troll of Northwest Iceland, which is a 15 m (49 ft) tall basalt rock stack.
This impressive rock formation is the perfect subject as Hvítserkur stands as a singular sentinel against the elements. The towering rock formation, resembling a mythic creature or an ancient castle, extends its form into the sea, creating an iconic silhouette that has become synonymous with the rugged beauty of Iceland's coastal landscapes.
"In 2012, I decided that I wanted to see and photograph the northern lights. Waiting for 3 hours at -15ºC (5ºF) was worth it when the sky filled up with dancing green lights everywhere... What you feel in that moment is something that cannot be explained by words, you need to live it to understand it.
After this first experience, I discovered something that I keep saying over and over...
From the moment you start hunting northern lights for the first time you're in trouble. If you don't see them, you're in trouble because you'll try again (and again) until you do. And finally, when you manage to see them, you're in trouble because you want more and more."
Foreground (3)
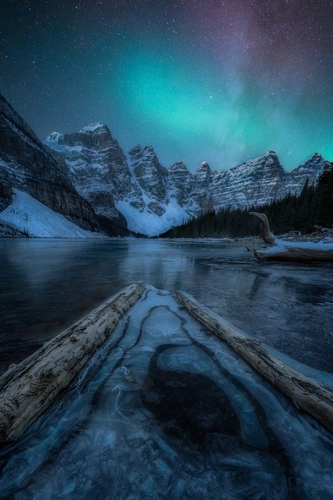
This picture of Rachel Jones Joss was taken at Moraine Lake (Canada).
It's a clear example of how powerful a foreground can be in an image. Here, apart from the beautiful northern lights dancing in the sky, the viewer is immediately drawn to the trunks and their texture in the ice.
As a bonus, you can see a vertical Milky Way on the right hand side of the frame... ;)
"This is a shot I had imagined for a very long time. The thing is, it's almost impossible to get.
The road to Moraine Lake closes just after Canadian Thanksgiving every year, typically after the first big snowfall. This year it closed a few days early. After the road closes it's a 25 km hike out and back.
The second big obstacle is that at this latitude (51º N), aurora activity must be very strong (Kp 6 or higher) to see the bands of light and colour when looking toward the valley of the ten peaks. And, when the lake does begin to freeze, chances are it will quickly become snow covered.
It was a gamble to hike here on a night when it would have been a spectacular show looking north (the aurora was forecasted to hit Kp 6) but I'm so glad we took the chance. There was no ice on the lakeshore when we arrived. By morning the entire lake had a layer of ice on it and bubbles!!! Pinch me, I can't believe this is real!!
The aurora was only strong enough to move south for about an hour. Although the lights were more brilliant looking north, this sky captured the experience of the night perfectly. It was cold, but not uncomfortably so. The air was crisp, fresh snow lay on the peaks, and we were overwhelmed with the excitement and brilliance of it all.
Moments like this are what keep me up at night, imagining what tomorrow's adventures will be."
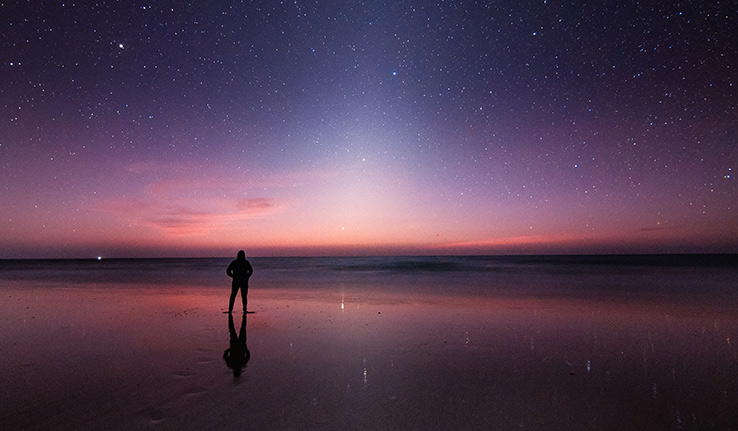
Human figure (4)
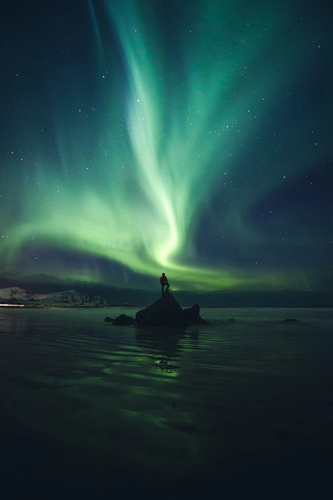
Including a person in your landscape shot is one of the easiest ways to convey scale. The viewer instinctively knows the approximate size of a human, which provides an instant reference. This technique works especially well with grand landscapes such as mountains, canyons, or vast fields.
And this is exactly what Marco Grassi did here.
By positioning a person at the top of a group of rocks, Marco is also drawing your attention to a recognizable subject and to the center of the frame, where the aurora is dancing.
Reflections (5)
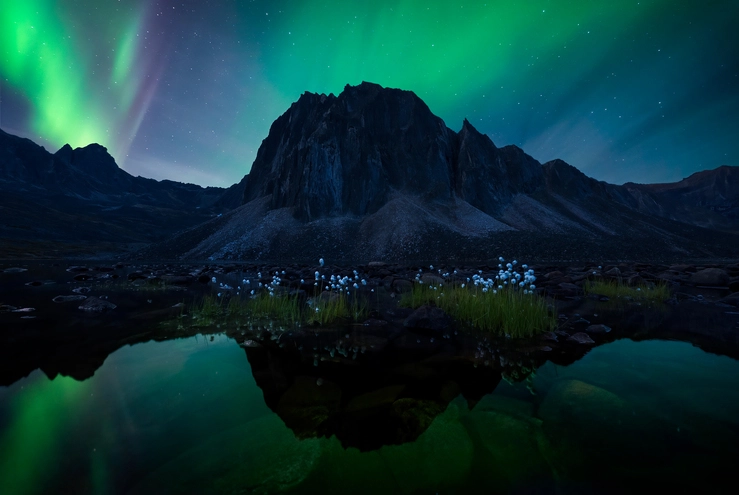
”The 21-hour drive passed in blur. I picked up my friend Mark in Whitehorse, he gave me a break from driving as we made our way to Dawson.
The first leg of the trip was nine nights of camping.
We packed and re-packed our hiking bags in the hotel room. My hiking pack was 32 kg (70 lb). That's definitely more than a third of my body weight, but I felt like I had everything down to essentials only. A lot of that weight was trying to make sure I had enough food for nine days. I hesitated when I looked at the small bag of my dad.
Mark nudged me. “You need this. If you can't carry him I will do it for you.” With some reluctance, I found a space for his ashes in my pack.*
It was a rainy day with a lot of low clouds which made it difficult to fly in. The heli was delayed for hours. I bought “one last oat milk latte” a few times, until I finally got word from the pilot that it was time.
We landed in the sunshine. The valley hadn't started to turn fall colours yet. We slowly made our way with our heavy packs to camp and got set up.
That night I saw a little bit of Aurora! It was colder than I expected though.
My field notes from the day read:
Aug 18 Field Notes
- Explored the upper and lower tarn near Talus. Interesting but nothing drew me in. There's lots of shale that's not so pretty
- So many comps around the Lake!
- Alaskan cotton is perfect
- It doesn't get darker than astro twilight until September 2nd!
- Clear overnight. It was bitterly cold. My water bottle froze, my boots froze, the lake edges froze, and I froze...”
The most important lesson that you can learn from Rachel Joss Jones' experience is that all the efforts are worth it if you get the picture you have in mind.
Aren't these reflections absolutely jaw-dropping?
Waterfall (6)
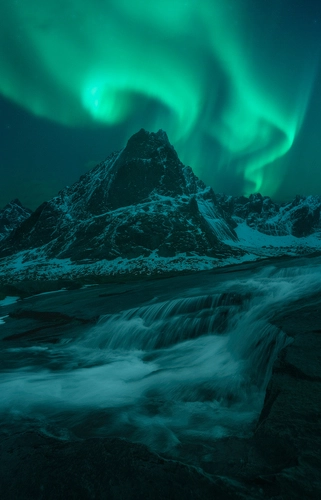
Photo by Javier de la Torre
Spectacular natural waterfalls make a perfect scene for shooting northern lights.
And that's exactly what Javier de la Torre did during a trip to Lofoten Islands (Norway).
The long exposure technique used in this image allows for a stunning display of nature's wonders.
Towering above the landscape is one of the many mountains you can find in Lofoten Islands. Its majestic presence is enhanced by the ethereal glow of the aurora borealis dancing in the night sky. The vibrant green hues of the northern lights create an otherworldly atmosphere, contrasting against the dark backdrop dotted with countless stars.
The reflection of this celestial spectacle on calm waters adds a sense of serenity to the scene, inviting viewers to immerse themselves in its tranquility.
Colors (7)
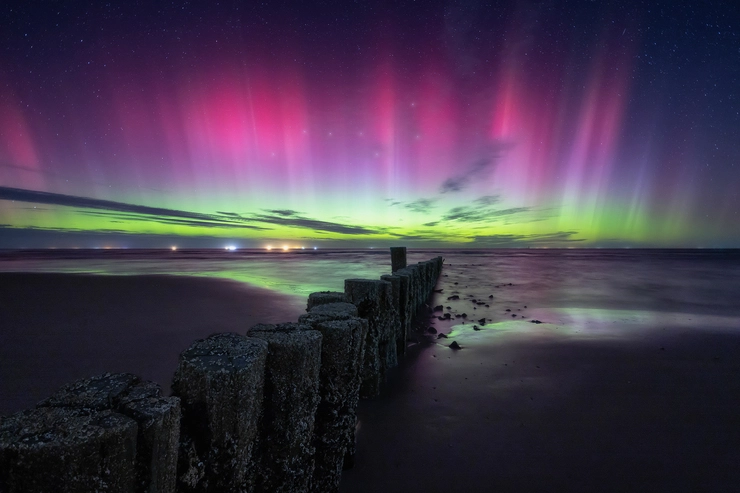
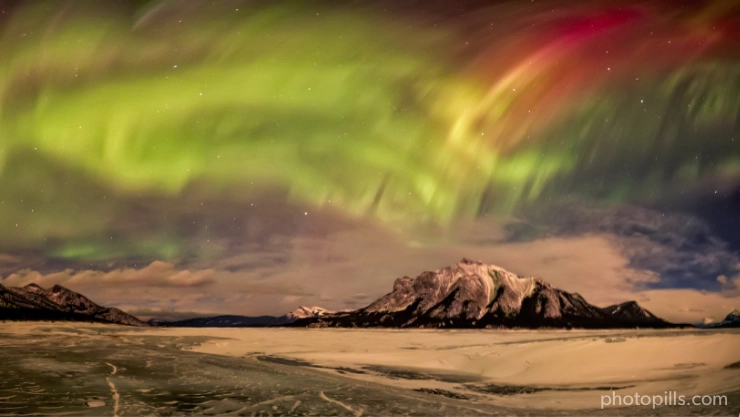
Photo by Laura Oppelt
As you can see from this picture, with an intense solar activity you can capture out of this world colors, like Laura Oppelt did here...
"What a crazy night it was in Northern Germany on September 25th!
It's still hard to believe that I witnessed such a strong aurora show this far South from the polar circle. It began with a faint glow on the horizon around 22:00 and intensified over time. The live view of my camera displayed the greens quite well, though they weren't visible to the naked eye.
Later, as the reds and pinkish/purple tones emerged, the colors became clearly visible to the human eye. At a certain point, everything in the sky seemed to explode, and I couldn't help but scream out loudly on the beach in pure excitement and disbelief!
Experiencing such an intense show in Germany was truly awesome. I'm still astonished while writing down these words, and I'm grateful to have witnessed this special event in my home country on a small island in the North Sea. The photograph's composition might not be original, and the horizon is illuminated by lots of ships anchoring nearby overnight, but the clearly visible aurora makes this image special and meaningful to me."
Interesting places (8)
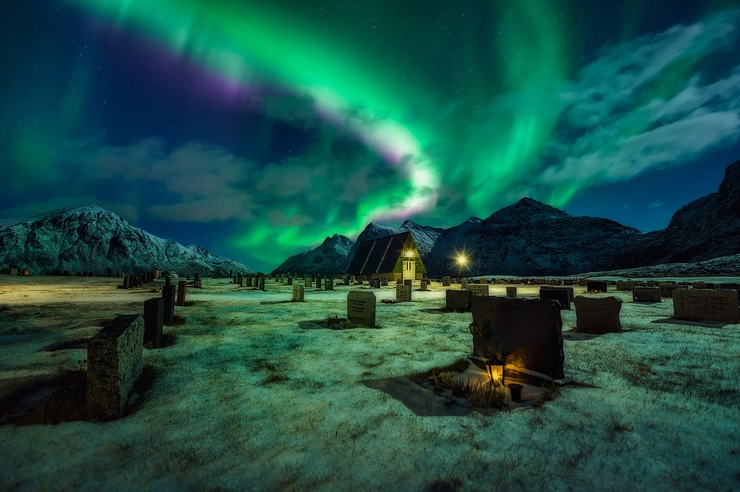
Photo by Javier de la Torre
Javier de la Torre has traveled to Lofoten Islands (Norway) on many occasions.
During one of his trips he went to Flakstad cemetery, where he was able to capture this ethereal image. Combining an interesting place, such as an old cemetery, with the beauty of auroras delivers a fascinating result.
"The first time I visited Lofoten it was an incredible experience. I was really lucky and I was able to join two passions, northern lights and cemeteries ... yes, cemeteries drive me almost as crazy as auroras do... XD"
Ice patterns (9)
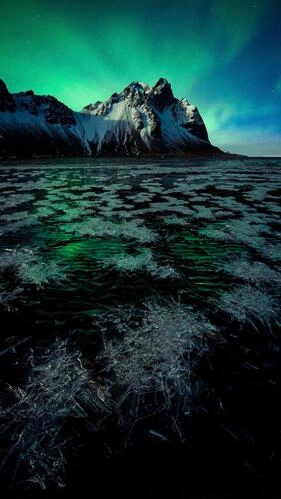
Photo by Rachel Jones Joss
Considering you'll be in a very cold environment, ice can be an incredibly powerful element to include in your composition.
In the photo you see above, Rachel Jones Joss played with the ice patterns to add an interesting foreground. It's the perfect strategy to balance the composition between the dancing auroras in the background and the floating ice stars that you can see in the water.
"This shot was taken on my trip to Iceland in March. It was shot on my Sony A9 with the 12-24 mm f/4 (yes, I shot the aurora at f/4!)."
Ice cave (10)
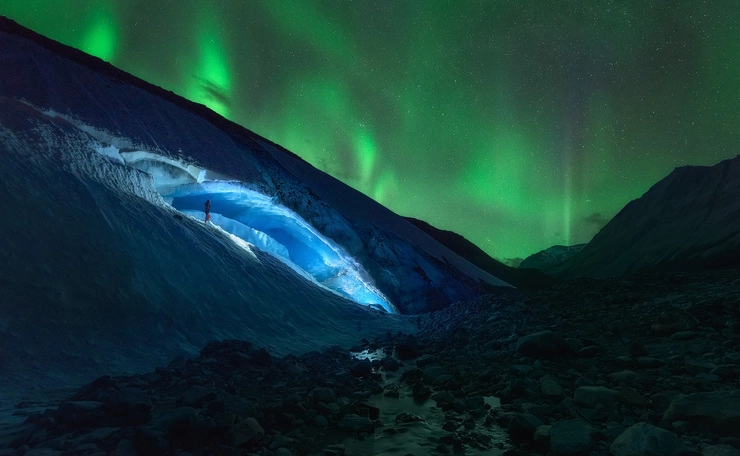
Photo by Javier de la Torre
During a trip to the Canadian Rockies, Javier de la Torre had the idea of photographing an artificially illuminated glacier while the sky was covered with auroras.
As you can see, the color contrast and the appealing shape of the ice cave is a magnet to the eye.
"The sky turned green over the Athabasca Glacier..."
Panorama (11)

Photo by Giulio Cobianchi
Giulio Cobianchi captured this digital composite of 20 images in mid-November 2022 over the Lofoten Islands in Norway.
"This is the magic of the Arctic, walking on a frozen fjord under a colorful sky. During that January night the emotion was very strong, my heart was beating fast and while I was shooting I kept repeating: this is the Arctic!
What are these two giant arches across the sky?
Perhaps the more familiar one, on the left, is the central band of our Milky Way Galaxy. This grand disk of stars and nebulas here appears to encircle much of the southern sky. Visible below the stellar arch is the rusty-orange planet Mars and the extended Andromeda galaxy.
But this night had more! For a few minutes during this cold arctic night, a second giant arch appeared encircling part of the northern sky: an aurora. Auroras are much closer than stars as they are composed of glowing air high in Earth's atmosphere.
Visible outside the green auroral arch is the group of stars popularly known as the Big Dipper.
At the end of this work, I was there looking at that sky for at least another hour."
Photos by PhotoPillers (12) [bonus track]


I created this section with the hope of sparking your creativity, offering numerous examples to fuel your photographic imagination.
If I've succeeded in inspiring you, that's fantastic.
If not, no worries, I have another idea.
Why not draw inspiration from the myriad of photos captured by fellow PhotoPillers around the world?
Our Instagram account (do follow us at Instagram) and the PhotoPills app (navigate to Menu > My Stuff > Awards) are treasure troves of stunning images. They feature diverse landscapes, moments of Sunrise, golden hour, blue hour, Sunset, and astronomical events like the Moon, Milky Way, Star Trails, Meteor Showers, drone captures, lunar eclipses, solar eclipses, and more.
Prepare to be amazed for hours!
Plus, if you're keen on inspiring others and want to participate in our PhotoPills Awards, send us your photo for a chance to win exciting prizes.
Now, let's continue our journey into the world of seascape photography.
Let's dive in!
2.Understanding the northern lights
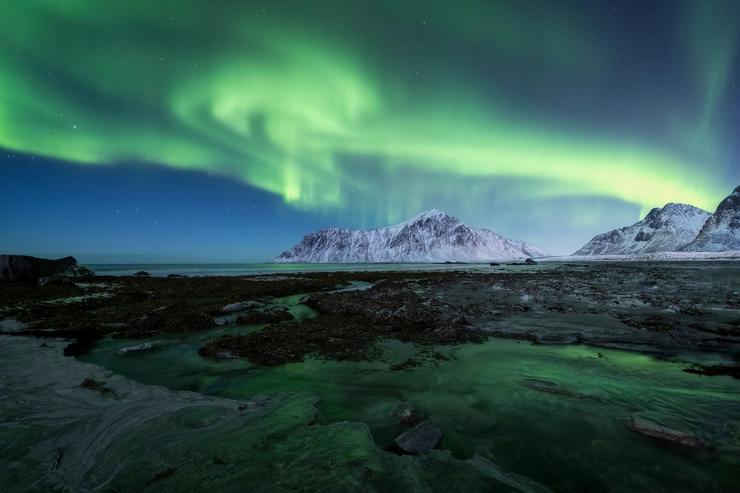
Photo by Laura Oppelt
The northern lights, or aurora borealis, are one of nature's most spectacular displays. But what exactly are these mesmerizing lights that draw travelers from around the globe to the far reaches of the north?
In this section, we'll explore the science and wonder behind this natural phenomenon. From the basic question of what the northern lights are, to the colors they can produce, and how they change throughout the night, I'll cover the essential aspects that make the aurora borealis a bucket-list experience that you should experience at least once in your lifetime.
What are the northern lights?
The northern lights, or aurora borealis, are like a magical light show in the sky.
Imagine the sky at night suddenly lighting up with swirls of green, sometimes mixed with blues, pinks, yellows and reds, dancing like curtains fluttering in the wind.
They can be seen from long distances, stretching in the sky many hundreds of kilometers far.
They can have different:
- Shapes. Arcs and rays of colored light are the most common. The light may also look like shimmering curtains, bands, waves, or clouds.
- Intensities. Depending on the solar activity (more on this below), the light may brighten and fade.
These lights aren't just random; they're connected to the Earth's magnetic field, which guides them to the poles, so they occur in Earth's far northern and far southern regions:
- In the northern hemisphere such a display is known as aurora borealis, or the northern lights.
- In the Southern Hemisphere it is called aurora australis, or the southern lights.
Note: I'll mostly use the terms "northern lights" and "aurora borealis" as they are most common. However, all the below applies to the "southern lights" and "aurora australis".
What causes the northern lights?
But what makes these lights appear?
It all starts with the Sun.
The sun is always sending out a breeze of tiny particles into space, which we call the solar wind. This isn't like the wind we feel on Earth; it's made of protons and electrons, tiny bits that are too small to see.
When these tiny particles from the sun travel all the way to Earth, they meet our planet's magnetic field. This magnetic field is like an invisible shield that protects us, and it has a superpower: it can guide these particles towards the North and South Poles.
As these particles from the Sun get closer to the Earth, they start bumping into the gasses in our atmosphere, like oxygen and nitrogen. When the particles "bump" into the gasses, they light up, creating the beautiful colors of the northern lights.
Sometimes, the Sun gets extra active and sends out more particles in big bursts, which we call solar storms. When one of these storms reaches Earth, it's like the Sun is turning up the volume on the northern lights, making them even brighter and more colorful.
What color are the northern lights?
Auroras can appear green, pink, dark red, blue, purple and even yellow!
But have you ever wondered why they come in different colors? It all has to do with the Earth's atmosphere and how it interacts with particles from the Sun.
The colors of the northern lights depend on two main things:
What kind of gas the solar particles are hitting.
How high up in the atmosphere this light show is happening.
Most of the action takes place between 100 and 400 kilometers above the Earth, where the gasses in our atmosphere get excited by the particles and light up the night sky.
Let's see why each color happens:
- Green. This is the color you'll see most often. It happens when those particles from the sun meet oxygen about 100 to 300 kilometers up in the sky. Our eyes are really good at seeing green, which is why it stands out so much to us.
- Red. Red lights are a bit more of a rare treat. They show up when the particles go even higher, around 300 to 400 kilometers up, and bump into oxygen there. Since there's less oxygen up that high, it takes a stronger solar storm to make red lights appear.
- Blue and purple. These colors are the shy ones in the aurora family, showing up less often and hanging out lower in the sky, around 100 kilometers down. They come to life when the solar particles dance with nitrogen instead of oxygen.
- Yellow and pink. Seeing yellow or pink in the northern lights is like finding a hidden gem. These colors mix in when green auroras blend with red or blue, creating a stunning display.
How do auroras change throughout the night?
The northern lights change all through the night because of a lot of activity happening way above us in the sky.
Sometimes, the aurora might start off shy, with thin, delicate green lines that gently twist and turn among the stars. But then, as if the sky decides to throw caution to the wind, the aurora can suddenly burst into life. You might see big, bright waves of green and red that stretch across the sky, moving as if they're alive.
The dance of the aurora depends on how active the Sun is.
Sometimes, the Sun has big explosions called solar flares, which send lots of particles our way. When these particles get here, they meet the Earth's magnetic field, which is like a big, invisible shield that surrounds our planet. The magnetic field is weaker at the poles, so some of the Sun's particles sneak through there and hit the gasses in our atmosphere.
It's this meeting that creates the lights. When that happens, the aurora can get really lively, dancing more wildly across the sky.
Do the northern lights happen every night?
The northern lights are happening 24 hours a day, seven days a week, 365 days a year. But that doesn't mean they're easy to spot; you need to be at the right place at the right time.
- They can only be seen at night because their light is not as strong as the light of day.
- The sky needs to be dark and clear of any clouds.
How long do the northern lights last?
Depending on the magnitude of the incoming solar wind, a good display may last between 15 and 30 minutes. Although if you're really lucky, it could extend to a couple of hours or longer.
However, there is no guarantee that it will be around for long. It can appear anytime during the night, so you need to be prepared or you might miss out!
Can you see the northern lights with the naked eye?
Yes.
The northern lights usually glow in shades of green or white, but if the sky puts on a really strong show, you might also catch glimpses of pink and red dancing among the stars.
But, seeing the aurora can be a bit tricky and depends on a couple of things.
First, how good you are at seeing in the dark can make a big difference. Everyone's eyes are a bit different, and some people might find it easier to spot the lights than others. It's not just about being young or old; it's more about how sensitive your eyes are to light.
The second thing that can make the northern lights hard to see is light pollution. This can come from city lights making the sky brighter or even from the Moon shining too brightly, especially when it reflects off snow. If the aurora is faint, these lights can steal its spotlight, making it harder to see.
So, while the northern lights are definitely visible to the naked eye, finding the best conditions to see them can make all the difference.
3.Where is the best place to see the northern lights?
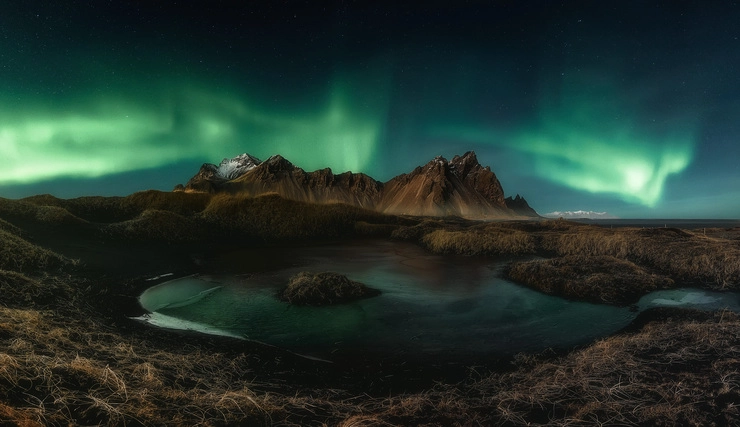
Photo by Javier de la Torre
In 2024, the northern lights promise to put on a spectacular show, and there are several prime locations around the globe where you can witness this awe-inspiring natural phenomenon. From the remote icy landscapes of Iceland and Canada to the enchanting northern regions of Scandinavia, each destination offers a unique vantage point to observe the dazzling auroral displays.
So let me guide you through the 12 best places to see the northern lights in 2024...
Whether you're a seasoned aurora chaser or planning your first northern lights adventure, these destinations are sure to offer unforgettable experiences under the magical night skies.
If you don't want to read the whole thing, here are the 12 best places to see northern lights:
- Southern Iceland
- Whitehorse, Canada's Yukon
- Tromso, Norway
- Fairbanks, Alaska
- Rovaniemi, Finland
- Kiruna, Sweden
- Murmansk, Russia
- Ilulissat, Greenland
- Dunedin, New Zealand
- Tasmania, Australia
- Healy, Alaska
- Yellowknife, Canada
And if you don't want to travel alone and learn from the best how to photograph auroras, join one of our PhotoPills Expeditions!
Where is the best place to photograph the northern lights?
Capturing the northern lights is a photographer's dream.
So let's explore the prime locations for photographing this natural wonder in both the northern and southern hemispheres. From the aurora borealis' vibrant displays across the Arctic skies to the aurora australis' elusive dance in the southernmost reaches of the world, I'll guide you to the best spots.
As soon as you've picked your destination, you can start planning your shots (section 5) and your trip!
But...
Wouldn't it be awesome to share the thrill of capturing auroras while having a blast with like-minded photographers?
You'll have the chance of producing jaw-dropping pictures of the aurora borealis, like the one you see above. I took it during our first PhotoPills Expedition to the Canadian Rockies, where I spent incredible adventures and unique experiences with my good friend and PhotoPills Master Rachel Jones Joss.
Then, don't think twice and embark on a PhotoPills Expedition to one of the best locations to see the northern lights (Canada, Iceland, New Zealand...).
You'll take part in an exciting and unique adventure that will take you to amazing locations. The PhotoPills team has carefully hand-picked them to have the best chances to see and photograph the dancing green lights of the aurora!
Where is the best place to photograph the aurora borealis (northern hemisphere)?
If you're dreaming of capturing the magical aurora borealis, or northern lights, with your camera, you'll want to head towards the far north.
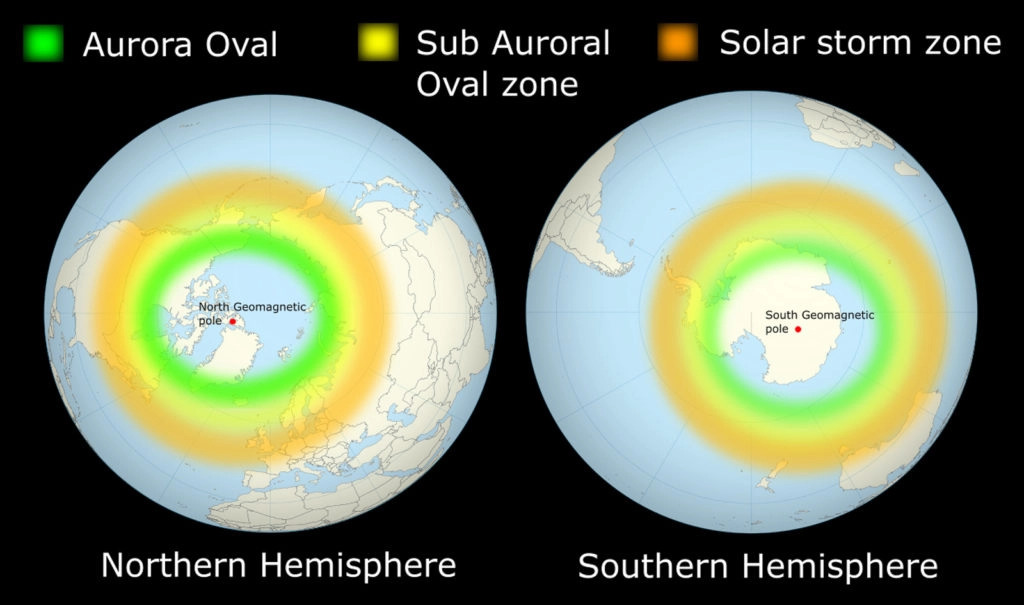
1. Go to a location inside the auroral oval.
The best places to photograph the aurora borealis are within a special area called the "auroral oval." This oval is like a big ring around the North Pole and includes parts of several countries.
"Toni... What parts of the world does the auroral oval cover?"
This oval covers latitudes between 60º and 75º. It includes places like Iceland, parts of Sweden, Finland, Norway, Russia, Canada, Alaska, and southern Greenland. Imagine a big, glowing ring that circles the top of the world – that's where you'll find the northern lights most often.
However, the aurora borealis isn't always in the same place. The oval moves around a bit, like a floating ring. So, just because the lights are putting on a big show in Sweden doesn't mean they'll be doing the same in Canada at the same time.
That's why it's so important to be flexible when planning your shot (section 5).
2. Have a look beyond the auroral oval.
Sometimes, when there's a really strong solar storm, the northern lights can be seen even further south. Places like Scotland and northern England might get a glimpse of these lights, but this is pretty rare. Most of the time, the northern lights stick to their favorite spot within the oval.
3. Travel to the best spots.
For the highest chances of seeing and photographing the aurora borealis, aim for places near the Arctic Circle and nearby areas. Think of the far north, where the nights are long and dark – places like Scandinavia, northern Canada, and Alaska. These spots are right under the auroral oval, making them prime locations for aurora chasers.
Where is the best place to photograph the aurora australis (southern hemisphere)?
Capturing the aurora australis, also known as the southern lights, is an adventure that takes you to the remote and beautiful landscapes of the southern hemisphere. Just like their northern counterpart, the aurora australis lights up the night sky with a mesmerizing display of colors, but they're a bit more elusive due to the locations where they're visible.
1. The auroral oval in the south.
The southern lights dance within an area known as the "auroral oval" in the southern hemisphere. This oval is similar to the one in the north but is located around the South Pole. It covers high-latitude regions in the southern part of the globe (between 60º and 75º).
2. Photographing the aurora australis is a challenge.
Seeing the aurora australis can be more challenging than the northern lights. This is partly because there are fewer accessible land areas under the southern auroral oval, and many of these places are quite remote. The southern lights are also less frequently reported due to the lower population in these regions compared to the northern hemisphere.
3. Go to a prime location.
Considering what I just explained, the best locations to photograph the aurora australis are located beyond the aurora oval.
Some of the best places to witness and photograph the aurora australis are in parts of Antarctica, the southern coast of Tasmania in Australia, the South Island of New Zealand, and the southernmost regions of South America, like Patagonia in Argentina and Chile.
What are the 12 best places to see the northern lights in 2024?
The northern lights are a breathtaking natural phenomenon, and 2024 is expected to be an exceptional year for viewing them.
Here are the top 12 destinations across the globe where you can witness this spectacular show:
Southern Iceland: Known for its accessibility and high chances of aurora sightings, Southern Iceland offers stunning locations like Skógafoss, Jökulsárlón, Stokksnes, and Reykjanesviti.
Whitehorse, Canada's Yukon: As the northern lights capital of Canada, Whitehorse offers a high percentage of aurora nights per year, making it a top destination for enthusiasts.
Tromsø, Norway: Tromsø is a renowned location in Norway for northern lights viewing, with a wide range of tours and accommodations available.
Fairbanks, Alaska: The best place to see the northern lights in the United States, Fairbanks offers clear skies and big aurora shows, especially in March.
Rovaniemi, Finland: Located in Finnish Lapland, Rovaniemi is famous for its frequent displays of northern lights and winter activities.
Kiruna, Sweden: As the biggest city in Swedish Lapland, Kiruna offers accessible viewing of the aurora borealis, with numerous tours and lodging options.
Murmansk, Russia: The biggest port city in the Russian Arctic, Murmansk is an excellent location for aurora viewing, with landscapes like ice forests and the Barents Sea coast.
Ilulissat, Greenland: Known for the Ilulissat Icefjord and Disko Bay, this UNESCO World Heritage site offers mesmerizing views of the aurora reflected in icebergs.
Dunedin, New Zealand: The best place to see the aurora australis in New Zealand, Dunedin offers high southern latitude and spectacular landscapes.
Tasmania, Australia: The most southern state in Australia, Tasmania provides intense auroras due to its high latitude and beautiful natural scenery.
Healy, Alaska: Close to the aurora oval and Denali National Park, Healy offers clear views of the northern lights in a stunning natural setting.
Yellowknife, Canada: Located at the center of the aurora oval's most active area, Yellowknife offers one of the most intense northern lights scenes with minimal light pollution.
Which country has the most northern lights?
When it comes to witnessing the mesmerizing display of the northern lights, two countries stand out in their respective hemispheres. Both countries offer unique and breathtaking experiences!
In the northern hemisphere, Canada reigns supreme with its vast landscapes under the Auroral Oval, offering countless opportunities to observe the aurora borealis.
Meanwhile, in the southern hemisphere, New Zealand captures the imagination with its stunning vistas and clear skies, making it the prime location for viewing the aurora australis.
Northern hemisphere: Canada
When it comes to capturing the awe-inspiring aurora borealis in the northern hemisphere, Canada stands out as a premier destination. As the second-largest country in the world, Canada offers an expansive territory under the auroral oval, making it an ideal location for witnessing and photographing the northern lights.
Canada's vast and varied landscape means you can experience the northern lights in both remote wilderness areas and more accessible locations near cities.
Much of Canada's northern region lies beneath the northern hemisphere's auroral oval, a prime spot for aurora activity. This includes areas like the Northwest Territories, Yukon, and parts of northern provinces such as Alberta and Manitoba.
These are the best viewing locations in Canada:
- Yukon: Whitehorse, known as the capital of the northern lights in Canada, boasts a high frequency of aurora sightings. It's a popular choice for its accessibility, lodging options, and organized aurora tours.
- Northwest Territories: Yellowknife is another accessible location for aurora viewing, offering spectacular displays.
- Manitoba: Churchill is not only famous for its polar bears but also offers great opportunities for northern lights viewing, especially from October to November.
- Canadian Rockies: While at a lower latitude, the Rockies can still provide rare but stunning displays during strong solar activity.
The northern lights in Canada are particularly dramatic in winter, set against the backdrop of a frozen landscape. However, they can be seen throughout the year, with peak visibility during the colder months.
Southern hemisphere: New Zealand
For those seeking the southern counterpart of the aurora borealis, known as the aurora australis or Southern Lights, New Zealand is the go-to destination. This country offers some of the best opportunities to witness this stunning natural light show in the southern hemisphere.
However, catching the aurora here requires strong solar activity, so it's important to manage expectations and keep an eye on aurora forecasts.
These are the best viewing locations in New Zealand:
- Dunedin: Dunedin is a prime spot for aurora enthusiasts. Located at a high southern latitude, it's not only accessible but also surrounded by breathtaking landscapes, like Moeraki, that provide a perfect backdrop for the lights.
- South Island: The South Island of New Zealand, including places like Queenstown and Invercargill, is another great location for aurora sightings. The Otago Peninsula, east of Dunedin, offers popular viewpoints like Sandfly Bay, where the aurora can be enjoyed in the company of local wildlife.
- Stewart Island: Recently designated a Dark Sky Sanctuary, Stewart Island is even closer to the South Pole than the South Island. With minimal light pollution, it's an ideal spot for observing the Southern Lights amidst pristine wilderness.
Again, it's important to remember that traveling solely to see the aurora australis can sometimes lead to disappointment due to their unpredictable nature. Instead, consider these destinations as beautiful travel experiences in their own right, with the potential sighting of the Southern Lights as an added bonus.
4.When is the best time to see the northern lights?
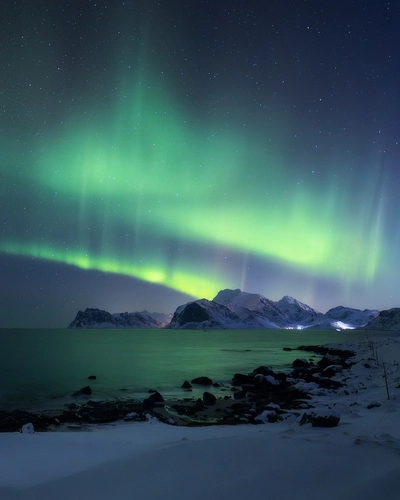
Photo by Laura Oppelt
The northern lights have fascinated observers for centuries. Determining the best time to witness this natural wonder is key to a successful photography session.
Whether you're planning a trip to the Arctic Circle or hoping to catch a glimpse from lower latitudes during a solar storm, understanding the timing of the northern lights is crucial.
Let's have a look at the optimal periods for observing auroras, considering factors like darkness, clear skies, and solar activity. From the dark winter nights to the equinoxes, you'll learn when these lights are most likely to dance across the polar skies.
6 key factors determine the best time to see the northern lights
The northern lights actually occur all year long. Yes, you read that right.
"But Toni... Why can't we see them all year long?"
It's because visibility of the aurora borealis (and australis) is dependent on other factors, too.
- Your location.
- The time of the year.
- The time of the day.
- The Moon phase.
- The solar activity.
- The weather.
Where is the best place to see the northern lights?
I suggest you go back to section 3. There, I tell you everything about the best areas on Earth and countries to see the northern lights.
But if you need a quick summary:
- In the northern hemisphere, travel to a location whose latitude is in the aurora oval (between 60º and 75º N).
- To photograph auroras in the southern hemisphere, you'll need to go beyond the aurora oval (between 60º and 75º S) because it mainly covers Antarctica.
In addition to this, you need to find a location with
- Little or no pollution at all.
- An interesting subject.
What month is best to see the northern lights?
Seeing the northern lights is challenging; they don't just appear whenever you want them to. You can only see auroras at certain times when everything in the sky is just right. So, if you really want to see them, you have to plan your trip carefully and choose the right time of year (section 5).
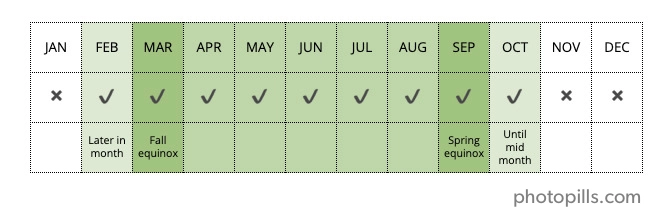
Regardless of the hemisphere you plan to travel to, spring and autumn generally provide more stable weather conditions and milder temperatures plus there is greater aurora activity around the equinoxes.
That is...
- The second and third week of March.
- The last two weeks of September.
"Toni... Why is aurora activity stronger around the equinoxes?"
During equinoxes, Earth's magnetic poles (north and south) are at right angles to the flowing solar wind, two times a day. During these times, the solar wind is effectively stronger, enhancing magnetic storms. As the seasons change, the poles either point more toward or away from the Sun reducing this effect.
Northern hemisphere

You can see the aurora borealis best when the sky is really dark, from the end of August until the middle of April. It's important that the sky is clear and doesn't have clouds covering it up.
Even though these lights are always there, you can't see them in the summer months like May, June, July, and most of August because the Sunlight is too bright and hides them.
The best time to see these lights is from November to February. During these months, the nights are really long and dark, which makes it easier to see the beautiful lights dancing in the sky.
Southern hemisphere
To see the aurora australis the best time is during the fall and winter, from March to September. That's when the nights are really long and super dark.
You know, the Southern Lights are actually always there, every single day of the year! But you can't see them when it's too bright outside, like during the day or in places with lots of lights, like big cities.
In the winter, the nights are longer, which is perfect for seeing these lights. But remember, winter in places like New Zealand is different from winter in places like the United States or Europe. In New Zealand, winter is from May to October, when it gets colder and the nights get longer.
When is the best time to see the northern lights?
You can see auroras at any time of the day as long as it is dark, there are clear skies, and solar activity.
However,
- The strongest lights tend to appear between 21:00 and 2:00, though the best sightings often occur between 23:00 and midnight. That's because, even after the Sun goes down, there's still a little bit of light left in the sky for a while.
- Between 4:00 and 17:00 there is generally too much daylight to see the aurora.
- Exceptions are the darkest months of the year and higher latitudes, where it is dark 24/7:
- Northern hemisphere: from mid-November to the end of January.
- Southern hemisphere: from mid-May to the end of July.
Take the phase of the Moon into account
Scientifically speaking, the Moon doesn't make the northern lights stronger or weaker. In other words, you can actually photograph auroras in any Moon phase.
So don't restrict your travel dates based on the Moon cycles.
Having said that, the Moon can affect how much light there's in the scene and, thus, how you see (and your camera captures) the aurora in the sky, the stars and the foreground:
- Around New Moon or with no Moon at all (after Moonset).
- With Moon (phase less than 50%).
- Around Full Moon.
Around New Moon or with no Moon at all (after Moonset)
When there's a New Moon or no Moon at all (you're shooting after Moonset) it's really dark.
In these conditions, a strong solar activity will create bright northern lights. On the other hand, a faint aurora may be difficult to see even if there is no Moon visible.
When the scene is really dark your foreground will be quite dark too. So take this into account when creating your composition.
With Moon (phase less than 50%)
A bright Moon may wash away the details of a faint aurora and stars, but you can still see the aurora easily.
Since the Aurora is dependent on solar activity and shifting weather patterns, a Moon with a phase less than 50% has no effect on the intensity or color of the northern lights.
Depending on the Moonlight conditions, you may have enough light to capture detail in the foreground.
Around Full Moon
When the Moon is full and bright, it's like having a big flashlight in the sky, which can make the northern lights look less bright.
But seeing the big, bright Moon and the northern lights together can be really cool, like a special light show. The contrast is not as great but it tends to make the sky appear a dark indigo blue.
If you're taking pictures, the Moon can help by lighting up things on the foreground, making your photos look nicer because you can include part of the landscape in your composition.
Plan your shot using PhotoPills
As a quick recap, remember that how good the northern lights are depends on other things:
- Your location.
- The time of the year.
- The time of the day.
- The Moon phase.
- The solar activity.
- The weather.
So, whether you like seeing the northern lights with the Moon or without it is up to you.
And the best way to determine the Moon phase and its position in the sky is using PhotoPills
How to determine the Moon phase


If you want specific information about the Moon for a certain date and a certain location you can have a look at 2 of the Planner's top panels (the panels that are just above the map).
To do so, open PhotoPills, tap on Planner (Pills Menu), place the Red Pin in the location you want (watch this video to learn how to move the Red Pin) and set the date with the Time Bar below the map.
- On Panel 3 you can see the Moon phase, as well as the coordinates (azimuth and elevation) of the center of the Sun and the Moon.
- On Panel 4 you can see when the Moon (and the Sun) rises or sets. Moreover, the Moon icon you see at the top shows you the Moon phase and how you would see the Moon considering the selected date, time and location (Red Pin position). If you tap on the Moon icon, time will jump to the next relevant Moon phase. If you tap twice on the Moon icon, time will go backwards to the previous Moon phase.
How to determine the Moon's position in the sky


If you want to know where the Moon is at all times, use the PhotoPills Planner.
Open PhotoPills and tap Planner (Pills Menu).
Then tap the Map Settings button and activate the Moon layer. To do this, make sure the eye-shaped icon is not crossed out. If it is, tap it.

Finally, swipe the top panels to Panel 3 (see screenshots below).
On the map, the thin blue line indicates the direction where the Moon is (its azimuth). And Panel 3 shows the azimuth and elevation of the Sun and Moon for the Red Pin position and the selected date and time.
If you're at the Red Pin position, you can also tap the AR button (bottom of the screen) to visualize the Moon position with the Augmented Reality view ;)
What solar activity is best for northern lights?
The brightness of the aurora borealis is determined by the amount of solar activity in the location.
The solar activity is measured with the Kp index, the solar wind speed and intensity, and the interplanetary magnetic field strength and direction.
I'll explain each of these factors in detail in section 5.
But for now, let's start with the Kp index.
"OK Toni... Never heard of it... What is the Kp index?"
The Kp index is based on how the solar wind and Earth's magnetic field are interacting at the moment.
It helps you guess where and how well you'll see the northern lights. In other words, it's like a weather forecast but for the northern lights.
It measures how much the solar wind is shaking Earth's magnetic field, on a scale from 0 to 9. A low number means not much is happening, but a high number means a big light show might be coming.
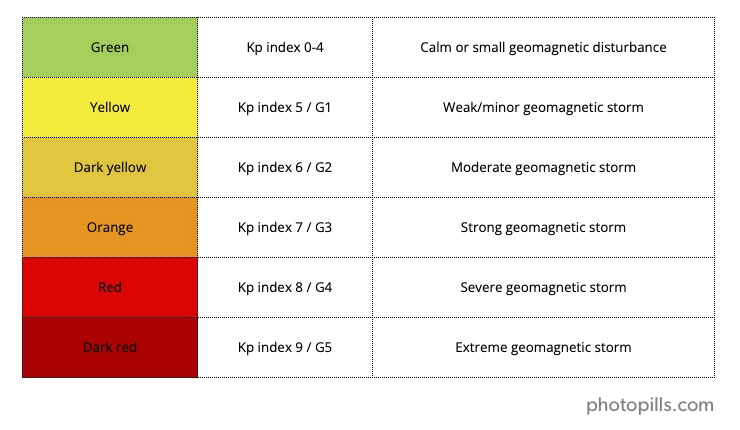
- 0 to 4: The northern lights might be quiet and faint, mostly green, and you might need a camera to really see them well.
- 5 to 6: Things get exciting! The lights move more and might show off colors like yellow, pink, or even purple. If you're lucky, you might see a special kind of northern light called a corona, where the lights swirl directly overhead.
- 7 to 9: This is when the northern lights go all out. They can fill the sky, show rare colors like red, and be seen much further south than usual.
In places like Alaska, Canada or Iceland, a Kp 3 means a good chance of seeing the lights. But to see them in places further south, like the US or the UK, you'd need a Kp 5 or more.
A Kp 5 or more means a solar storm of grade G1 is happening. The higher the Kp number, the stronger the storm. A Kp 9 is a very big deal and means the maximum possible storm (grade G5) is happening.
Nevertheless, the Kp-index gives you an idea of what the auroras might do, but it's not perfect. It's always a bit of a guess, so it's good to check the forecast and hope for clear skies.
Why do auroras depend on the weather forecast?
No matter how big the solar storm, if there are clouds covering the sky, you won't see auroras.
That's why having the most accurate weather forecast is essential to enjoy northern lights photography.
Us PhotoPillers have a saying for this: "Plan and Pray". We even have a t-shirt emblazoned with the 'Plan & Pray' slogan to remind us of this reality!
Always remember to check the weather forecast when you're planning to shoot auroras.
Windy: my preferred weather app
Windy is my favorite weather application.
You can download the Windy application on your smartphone and tablet. You can also go to the website on your laptop and desktop computer.
Windy is available on iOS and Android.
SpotWx: my backup weather website
As I said before, when it comes to checking weather forecasts, I like to be conservative and check multiple sources.
And my second favorite option is SpotWx, a website that uses multiple maps to give you tons of weather information.
5.7 essential steps for planning your aurora photos

Photo by Laura Oppelt
To see the northern lights you have to plan carefully. This includes choosing the right time, place, and weather.
You need three main things:
To be in a place that's under the auroral oval.
It has to be really dark.
The sky must be clear.
"Great Toni. Can you tell me what is the best app for northern lights photos?"
PhotoPills and Space Weather Live are essential for this type of photos. But there are a few more that I'll show you below.
Remember that all the planning is done with respect to a specific location. That's what you need to find out first.
Once you've determined it, you'll know the hemisphere (when the equinoxes and the seasons of the year happen) and the latitude (the closer to the poles, the better).
Let's see the steps you need to follow to plan your northern light pictures from beginning to end.
Use PhotoPills to find the time of the year with less hours of light
Use PhotoPills to decide if you want to shoot without any Moon
Use Space Weather Live to find out the aurora forecast
Check the auroral oval position and size
Set an alert on My Aurora Forecast
Use Windy to check the weather forecast
Use SpotWx to double-check the weather forecast
And now, let's dive into the details!
Step #1. Use PhotoPills to find the time of the year with less hours of light


To find out the number of hours of light of any date, use the Sun pill.
Open PhotoPills and tap on Sun (Pills Menu). Then tap on the Calendar button at the bottom of the screen.
There you can see the Sunrise and Sunset time for a specific location (usually your current location). If you need to, you can go forward in time by swiping to the left.
To change the location, tap the Info button at the bottom. Then, tap Settings.
In the Settings screen, turn off the Autodect slider and use the Search box to type in the exact location you're looking for. Once you have it, tap Done and all the information will be updated for this particular location.
Step #2. Use PhotoPills to decide if you want to shoot without any Moon


To find out the dates of any Full Moon and New Moon, use the Moon pill.
Open PhotoPills and tap on Moon (Pills Menu). Then tap on the Calendar button at the bottom of the screen.
In the calendar,
- The current date is marked with a blue circle.
- New Moon dates have a white circle underneath.
- Full Moon dates have a white dot underneath.
You need to have the Moon layer turned on to see all the specific information about the Moon for a certain date and a certain location for the Moon.
To do so, open PhotoPills, tap on Planner (Pills Menu)
Then tap the Map Settings button and activate the Moon layer. To do this, make sure the eye-shaped icon is not crossed out. If it is, tap it.
If you want specific information about the Moon for a certain date and a certain location you can have a look at 2 of the Planner's top panels (the panels that are just above the map).
Place the Red Pin in the location you want (watch this video to learn how to move the Red Pin) and set the date with the Time Bar below the map.
- On Panel 3 you can see the Moon phase, as well as the coordinates (azimuth and elevation) of the center of the Sun and the Moon.
- On Panel 4 you can see when the Moon (and the Sun) rises or sets. Moreover, the Moon icon you see at the top shows you the Moon phase and how you would see the Moon considering the selected date, time and location (Red Pin position). If you tap on the Moon icon, time will jump to the next relevant Moon phase. If you tap twice on the Moon icon, time will go backwards to the previous Moon phase.
Now you've got all the information you need:
- Moon phase during the next few months (Calendar on the Moon Pill).
- Moon phase on a specific date date and time (Panel 3 on the Planner).
- Moon position on a specific date date and time (Panel 4 on the Planner).
So you can decide if you want no Moon at all, or if you want the Moon to be in a certain phase and low in the sky to have enough light to illuminate the foreground.
Oh, and before I forget it, an Aurora Forecast pill will be included in PhotoPills in the future ;)
Step #3. Use Space Weather Live to find out the aurora forecast
How do you actually know when you're going to get an Aurora and of how to read the different indicators?
I use what I consider the best northern lights photography app.
It's called Space Weather Live (available on iOS and Android) which is my go to.
I believe it's a really great resource, because you get to see real time data and forecasts.
The app uses a very simple color code:
- Green: Low aurora activity.
- Yellow: Medium aurora activity.
- Red: The redder the plots get, the better is for aurora activity!
Check the long term Kp forecast (1)
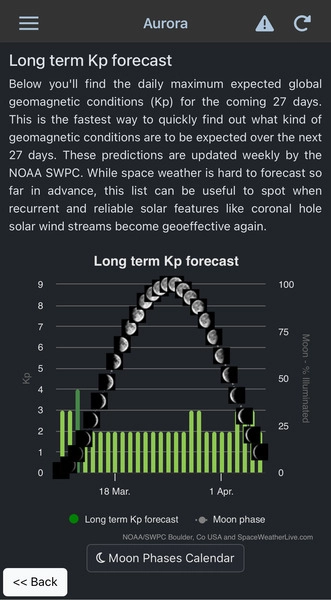
Open the app up.
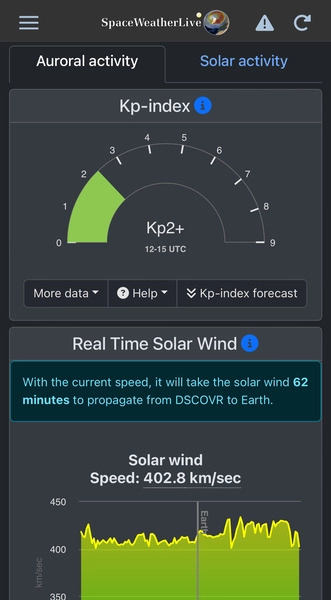
The first thing you see on the homepage is the Kp index, which is basically a measure of
- The size of the auroral oval.
- The strength of the solar storm.
It's a 3-hour average and it's a global average. So Kp is an interesting indicator, because it's a mean, an average.
However, it's a very basic indicator. It doesn't tell you about little sub storms that happen which could be stronger.
That's why I like to look at the solar wind indicators. But I'll tell you more about them in a minute.
For now, you should have a look at a long term forecast. And that one will show you kind of maybe what's expected over the next month.
To check it, tap More data > Aurora forecast.
Then, scroll down to the Long term Kp forecast chart.
However, take it with a grain of salt, because what the experts are basing that on is if you have an area of really high activity, like a coronal hole.
"Mmm... What is a coronal hole?"
Coronal holes are the source of high speed solar wind streams. When these high speed streams arrive at Earth, they can produce active auroras.
The interesting thing is that a coronal hole can make more than one rotation. So as the sun rotates, you might see that again and again.
Check the short term Kp forecast (2)
Now, go back to the homepage.
There, again, you can see the short term expected forecast for the next 3 days.
The app gives you a projected Kp forecast for a minimum and a maximum. And it also breaks it down into higher latitudes and mid latitudes.
And while the Kp index gives you a quick indication of the strongest observed geomagnetic activity over a 3-hour period, I prefer to look at the real time solar wind indicators.
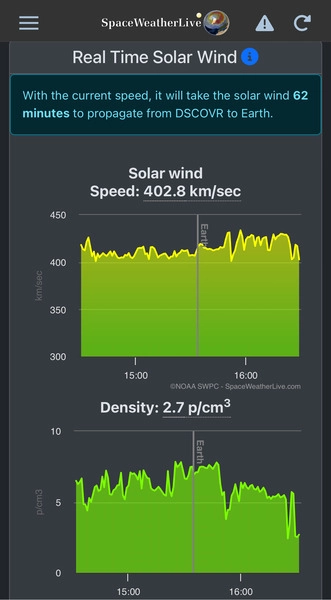
Real time solar wind speed (1)
As I told you in section 2, the origin of northern lights is basically gusts of solar wind.
Therefore, the solar wind is the first piece of the puzzle that you need to know about to predict whether there will be aurora activity or not at a certain date and time of the day.
In this sense, Space Weather Live has a solar wind chart indicating the speed. The higher the speed, the higher chances of having aurora activity.
But to make things easier, you don't need to remember any numbers or ranges. Just look at the color!
Quick recap of Space Weather Live's color code:
- Green: Low aurora activity.
- Yellow: Medium aurora activity.
- Red: The redder the plots get, the better is for aurora activity!
Real time solar wind density (2)
The second piece of the puzzle you need to know about is the density of the solar wind.
The density of the solar wind is basically the number of solar wind particles per square centimeter.
But in terms of aurora activity, which is what matters to you, the higher the solar wind density, the higher the aurora activity.
Again, when looking at the Space Weather app, look at the color code ;)
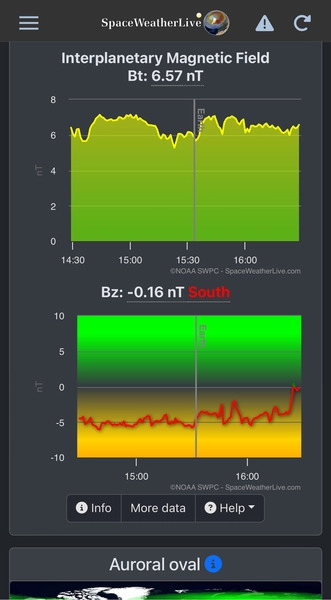
Real time interplanetary magnetic field (3)
The third piece of the puzzle you need to know about is the magnetic field of the Sun, also called interplanetary magnetic field (IMF).
"Another scientific name Toni! What is the interplanetary magnetic field?"
OK, here's a simple explanation:
Charged particles can hold both an electric current and create a magnetic field. So as you can imagine, the charged particles given off by the Sun also hold a magnetic field. The particles stretch the magnetic field of the Sun around the planets. And this is what astronomers call the interplanetary magnetic field (IMF).
The IMF value is a combined measure of the magnetic field strength in the north-south, east-west, and towards-Sun vs. away-from-Sun directions.
The see the best possible auroras you want that:
- The total strength of the interplanetary magnetic field (indicated with Bt) to be as high as possible and,
- The Z-component (Bz) of the interplanetary magnetic field towards the south.
In other words,
- Look for a high as possible Bt number.
- The longer the Bz stays south, the better.
To me, these are the 2 key indicators for me as to whether or not I should go out and shoot.
Step #4. Check the auroral oval position and size

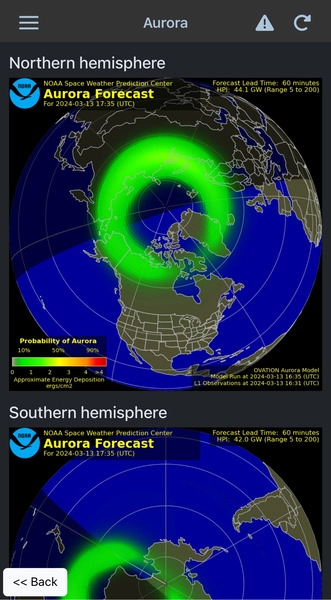
Don't forget that the auroral oval is not a concentric circle – it's pulled and twisted by our magnetic field lines.
So it actually moves around the Poles throughout time. And its size changes as well.
At Space Weather Live, you can have a look at NOAA ‘s auroral oval model. It gives you a short-term forecast of the intensity of the auroral oval for both the northern and the southern hemisphere.
So if a solar storm grows in intensity, that oval will actually get bigger and bigger.
Step #5. Set an alert on My Aurora Forecast
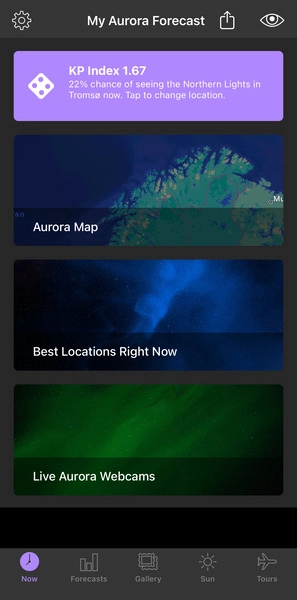

There's another aurora photography app that I love. It's called called My Aurora Forecast (available on iOS and Android)
And the reason why I do so is because you can ask it to notify you when aurora activity reaches storm levels in your location.
All you have to do is open the app, tap the settings icon (gear) and adjust the notifications.
Step #6. Use Windy to check the weather forecast
Windy is my favorite application when I want to know what kind of weather I'm going to find at the shooting location. I find it very useful because I can check a lot of information and it has a very nice interface.
The application tells you, for a specific location, the following data: wind (direction and speed), rain, snow, temperatures, clouds (at different altitudes) and waves (direction, strength and water temperature).
The bar at the bottom of the screen also offers a lot of information. It gives you, for example, a 7-day forecast of all these elements and you can choose to see them in different formats (basic, meteogram and aerogram). Also, I love the option to see satellite images.
With Windy you can create your own custom maps including the data and colors you prefer. And, of course, you can see how the forecast changes over several days.
You can download the Windy application on your smartphone and tablet. You can also go to the website on your laptop and desktop computer.
Windy is available on iOS and Android.
Step #7. Use SpotWx to double-check the weather forecast
As I said before, when it comes to checking weather forecasts, I like to be conservative and check multiple sources.
And my second favorite option is SpotWx.
This is a spot weather forecasting tool leveraging several sites, both government and private, which display weather maps from various sources.
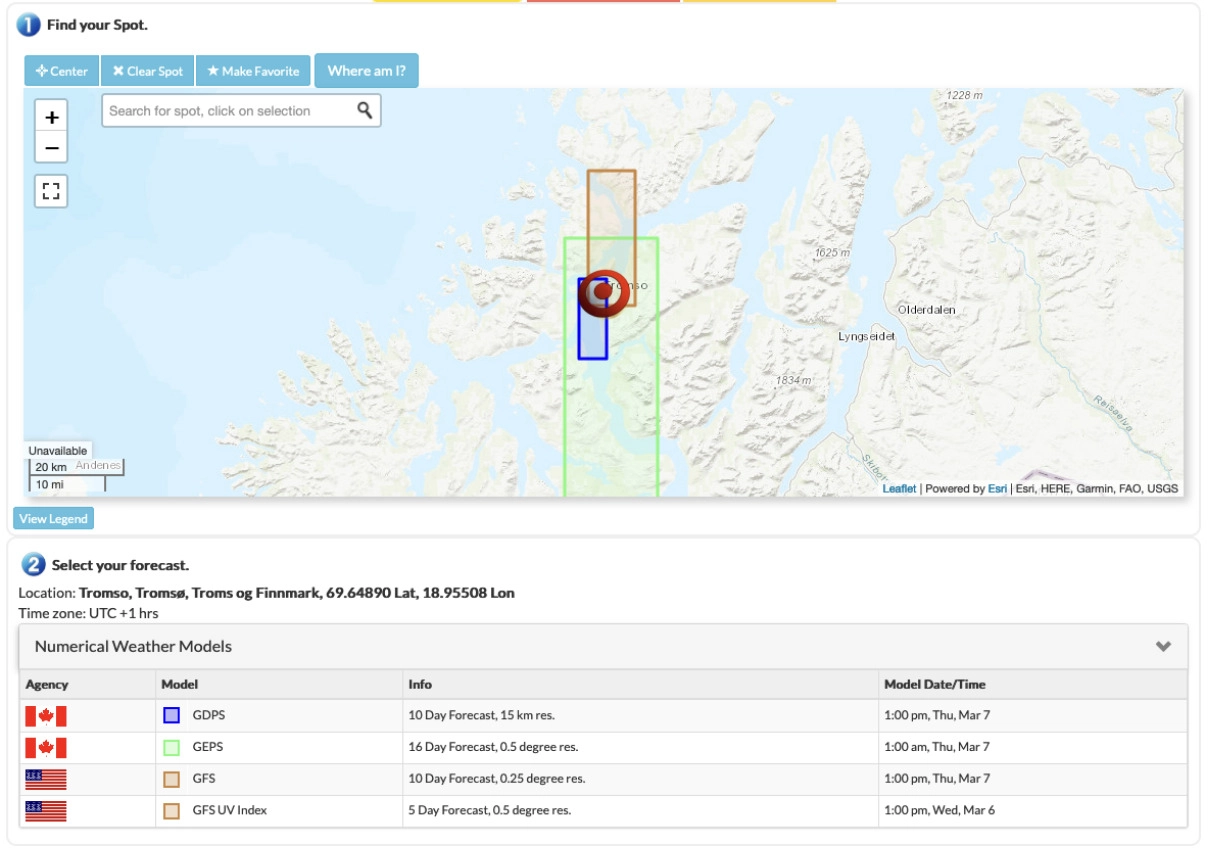
All you have to do is drop a pin anywhere on the planet, or type your location, and you can see the raw modeling forecasts for that point.
There are between 8 and 20 forecasts available of varying resolution, depending on where you're looking.
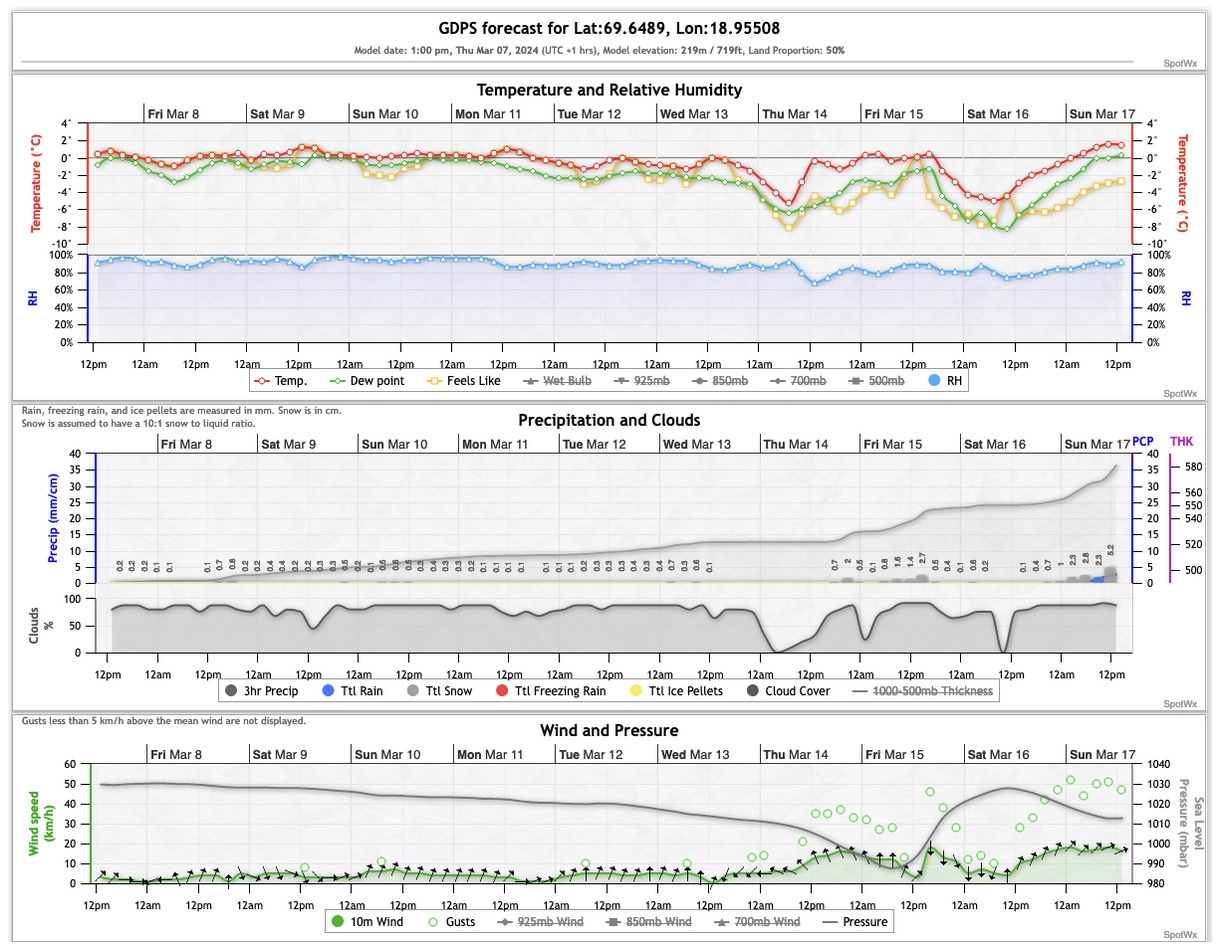
Then, select one of the models to access the forecast charts for temperature, humidity, and most importantly, precipitation and clouds.
Weather and aurora forecast key indicators
As a summary from what you've just read, here are the weather and aural forecast key indicators:
- Number of night hours. To capture auroras, you need a dark sky. This indicator tells you how long you can be shooting.
- Moon phase. The less light in the scene, the brighter you'll see the northern lights. So shoot on a night around New Moon. If you want some Moonlight to illuminate the scene and your foreground, try to shoot with some Moon or even a Full Moon.
- Kp index. The higher the Kp index, the stronger the geomagnetic event (that is, the probability of having auroras).
- Solar wind speed. Again, the higher the solar wind density, the higher the aurora activity.
- Solar wind density. Same thing here. The higher the solar wind density, the higher the aurora activity.
- Interplanetary magnetic field (Bt and Bz). You need both of these to be true:
- The total strength of the interplanetary magnetic field (indicated with Bt) to be as high as possible. Look for a high as possible Bt number.
- The Z-component (Bz) of the interplanetary magnetic field towards the south. The longer the Bz stays south, the better.
- Auroral oval. The bigger and brighter, the better.
- Weather forecast (precipitation and clouds). You need clear skies!
6.All the equipment you need to nail your northern lights photos
This section includes all the aurora photography gear that you need to capture the dancing northern lights. I'll recommend some items and share what I use, and I'll even throw in some bonuses about what outdoor gear and clothing is handy!
Essential gear checklist for aurora photography
Capturing the northern lights requires some specific gear to ensure you can photograph them with clarity and detail.
"Toni... Do I need a tripod to photograph the northern lights?"
Yes.
But that's only one piece of gear...
Here's a comprehensive yet concise checklist of all the equipment you'll need for successful aurora photography:
Camera. A DSLR or mirrorless camera capable of shooting in Manual mode (M), allowing you to adjust settings like ISO, aperture, and shutter speed.
Wide angle lens. A fast, wide-angle lens (f/2.8 or wider) to capture expansive landscapes and let in enough light for the aurora.
Tripod. A sturdy tripod to stabilize your camera during a long exposure, preventing any blur from hand movement.
Extra batteries. Cold weather drains batteries quickly, so bring extras and keep them warm in your pockets.
Memory cards. High-capacity memory cards to store all your high-resolution images without running out of space.
Intervalometer. To minimize camera shake when taking photos, especially during a long exposure.
Headlamp. Choose one that has a dimmer function, so you can lower the brightness of it. Too bright and your eyes have a hard time adjusting back and forth from the bright light to the dark night. You'll need your night vision for shooting.
Microfiber cloths. To keep your lens free from moisture and fogging.
Powerbank. To keep your phone and camera batteries charged during long nights in remote locations.
Warm clothing and accessories. Insulated layers, gloves, hats, and boots to keep you warm during long nights outside. I'll go into more detail below.
Choosing the best camera for northern lights photography
Choosing the right camera for photographing the northern lights involves understanding which features are most important for capturing this unique natural phenomenon.
Key features
Based on many years of experience shooting auroras, here are the key features to look for in a camera for northern lights photography:
1. Low-light performance. The camera should excel in low-light conditions, allowing you to capture the aurora borealis with minimal noise. Cameras with larger sensors, such as full-frame models, typically perform better in these conditions.
2. High ISO capability. A camera with a high ISO range offers more flexibility in adjusting sensitivity to light, enabling you to shoot in very dark environments without compromising image quality.
3. Manual mode (M). The ability to manually adjust settings like shutter speed, aperture, and ISO is crucial for aurora photography, giving you complete control over how the camera captures the light show.
4. Long exposure support. Since capturing the northern lights often requires long exposure times to gather enough light, your camera should be capable of exposures of several seconds to several minutes.
5. Durability and weather sealing. Given the cold and potentially wet conditions in which you'll be shooting, a camera that's weather-sealed and built to withstand the elements is essential.
6. Battery life. Cold weather can drain batteries quickly, so a camera with good battery life – or the option to use an external battery pack — is important for long shooting sessions.
7. RAW format. While this might sound obvious, it's always good to remember it. Shooting in RAW format allows you to capture all the data from your sensor, giving you more flexibility in post-processing to bring out the best in your aurora images.
Low-end cameras
The following cameras allow full manual and semiautomatic basic exposure, which, in turn can help you control your long exposure:
- Cameras with an APS-C sensor: Nikon Z30; Canon 4000D, 250D and M5; Sony a6600.
- Cameras with a Micro 4/3 sensor: Olympus OM-D E-M10 Mark IV and Panasonic G95.
- Compact camera (1" sensor): Sony RX100 VII.
Mid-range cameras
In the mid-range price (and quality), I recommend you the following cameras:
- Cameras with an APS-C sensor: Nikon Z50, Zfc and D7500; Canon R10, R7, 850D, 90D and 6D Mark II; Fuji X-S20 and X-T30 II; Pentax KF; Sony a6700.
- Cameras with a Micro 4/3 sensor: Olympus OM-D E-M5 Mark III and Panasonic G9 II.
- Full Frame cameras: Nikon Z5 and D750; Canon RP; Sony a7C II.
High-end cameras
On the higher price range (and higher quality), I recommend you these cameras:
- Cameras with an APS-C sensor: Nikon D500; Fuji XH-2S, XT-5 and X-Pro3.
- Cameras with a Micro 4/3 sensor: Olympus OM-1 and Panasonic GH6.
- Full Frame cameras: Nikon Zf, Z6 II, Z7 II, Z8, Z9, D780, D850 and D6; Canon R8, R6 Mark II, R5, R3, 5D Mark IV, and 1D X Mark III; Panasonic S5 II, S5 II X, S1R and S1H; Pentax K-1 Mark II; Sony a7 IV, a7 CR, a7R V, a9 III and a1.
Remember, while the camera is a critical piece of gear, pairing it with a fast, wide-angle lens and using the right settings (section 7) are just as important for capturing the stunning beauty of the northern lights.
Choosing the best lenses for northern lights
Choosing the right lens is crucial for capturing the breathtaking beauty of auroras.
Selecting the best lens for northern lights photography depends on your camera system, budget, and preferences. Whether you're shooting with a full-frame or APS-C camera, the key is to choose a lens that allows you to capture the aurora's beauty with clarity and detail.
Based on my experience, here are the key features to look for in a lens for aurora photography, along with some top picks for both full frame and APS-C sensors.
Key features for northern lights lenses
- Wide angle. A wide-angle lens is essential to capture the vastness of the night sky and the aurora's expanse. Look for lenses with a focal length of 14mm to 24mm.
- Fast aperture. Lenses with a wide aperture (f/2.8 or wider) are ideal. A fast aperture allows more light to hit the sensor, crucial for low-light conditions.
- Sharpness and clarity. Opt for lenses known for their sharpness and ability to reduce aberrations, ensuring clear images of the aurora.
- Durability. Considering the cold and potentially harsh conditions, a lens that's well-built and possibly weather-sealed is a good investment.
Full frame sensor lens recommendations
- Sony 14mm f/1.8 GM: Offers exceptional low-light performance, sharpness, and compactness, making it a top choice for Sony users.
- Sigma 14mm f/1.8 DG HSM: A versatile wide-angle lens with excellent luminosity, suitable for Nikon, Sony, and Canon cameras.
- Rokinon 14mm f/2.8: An affordable option that doesn't compromise on quality, available for most camera mounts.
- Nikkor Z 20mm f/1.8 S: A fast and reliable option for Nikon Z mirrorless users, offering excellent low-light capabilities.
- Canon RF 15-35mm f/2.8: A versatile ultra-wide zoom for Canon mirrorless cameras, perfect for capturing dynamic aurora scenes.
APS-C sensor lens recommendations
- Tamron 11-20mm f/2.8 Di III-A RXD: Without a doubt, this is the best wide angle lens for photographing the northern lights on APS-C cameras that I can recommend to you.
- Rokinon 12mm f/2.0: Light, sharp, and affordable, making it an excellent choice for APS-C mirrorless cameras.
- Sigma 16mm f/1.4 DC DN: Offers autofocus and some weather sealing, compatible with Sony E mounts and Micro Four Thirds cameras.
How to stay warm while photo shooting the northern lights
Photographing the northern lights is an unforgettable experience, but the cold can be a real challenge.
Use a layer clothing system
The key is to layer your clothing to trap warm air close to your body while ensuring you can still operate your camera effectively:
Base layer. It's the first layer of clothes that you'll take directly on your body. The base layer needs to be breathable, keep you warm, and wick moisture away quickly to keep you dry.
Mid-layer. The mid-layer is worn over your base layer. It adds an extra barrier against cold without making you too bulky. It should be smooth on the outside for easy layering.
Outer layer. The outer layer is extremely important because it's your main shield against the cold environment. It should be windproof because wind will make a cold temperature feel even colder, and you don't want that cold air to pass through your outer layer.
Insulation layer (optional). The insulation layer is best at keeping an extra layer of air, the best insulator. A down sweater vest is always a great choice.
What to pack to not freeze during the aurora photoshoot
To ensure you stay warm and comfortable while capturing the beauty of the aurora, here's what you should pack:
- Warm clothes. Opt for skiing gear, including merino undergarments, for their excellent insulation. A warm hat and a balaclava are essential to protect your head and face from the biting cold, often reaching -10ºC (14ºF) or -20ºC (-4ºF).
- Footwear. After-ski boots are your best bet. They're designed to keep your feet warm and dry, crucial for long nights outdoors. In addition to this, microspikes will help you get around on the ice. Just so you know, microspikes are lightweight and flexible ice and snow traction devices that you pull over your winter hiking boots, hiking shoes, hiking boots, trail running shoes, or ordinary winter boots.
- Thick Gloves and inner gloves: Inner gloves are thin enough to allow for easy manipulation of your camera's settings, which can be tricky with thick gloves. However, keep a pair of thick gloves handy to warm up when you're not using the camera.
- Hot drink and snack: Keeping your body fueled is important in the cold. Pack hot drinks and snacks to give yourself an extra energy boost.
- Lip balm and moisturizers. The cold and dry conditions can be harsh on your skin. Pack lip balm and hand and face moisturizers to protect against the cold.
7.How do you photograph the aurora?
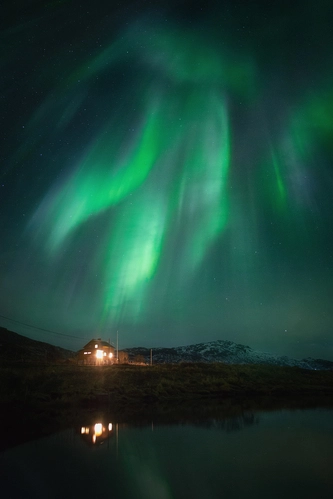
Photo by Laura Oppelt
"Can we start with a simple question? Are the northern lights hard to photograph?"
No, they're not.
Once you've planned your shot following the steps detailed in section 5, the shooting is about enjoying the experience you're seeing up in the sky.
Just follow a simple workflow, use PhotoPills to help you with the settings and that's it!
"But Toni... What settings should I use for aurora Australis photography?"
Alright, let me give you a quick overview of the best northern lights photography settings.
Cheat sheet of best settings for northern lights photography
The northern lights can vary in intensity, movement, and color, so having a starting point can be incredibly helpful.
Here's a cheat sheet that you can adjust based on specific conditions:
1. Image format: RAW. This format captures more detail and allows you more flexibility in post-processing.
2. Stabilization: Off. Turn off any image stabilization when using a tripod to avoid unintended blurring.
3. Camera mode: Manual (M). This gives you complete control over all settings.
4. Aperture: f/2.8 to f/4. Use the widest aperture (lowest f-number) your lens allows to capture as much light as possible.
5. Focus: Manual, set to the hyperfocal. Autofocus can struggle in the dark. Focus manually on a distant light before the shoot located a bit further away from the hyperfocal distance. Watch a video that will help you focus to the hyperfocal distance in the dark.
6. Shutter speed: 1 to 10 seconds. Use the PhotoPills Spot Stars pill to avoid star trailing, especially if you want to capture the Milky Way as well. Begin with 5 seconds. Shorten for more intense auroras or to capture finer details and lengthen for fainter auroras.
7. ISO: 3200 to 8000. Start with ISO 3200 as a baseline. Increase for weaker auroras or decrease for stronger ones.
8. White Balance: Auto, Fluorescent (0 or -1) or 4300K. Auto usually works well since you're shooting in RAW, but Fluorescent (around 4300K) can help maintain the natural colors of the aurora.
9. Shutter delay: 2s (optional). You'll avoid any possible vibrations when you press the shutter button. This is only necessary if you won't be using an intervalometer.
Remember, experimentation is key, as conditions can vary greatly. So don't take these settings for granted and change them if necessary.
Use the best northern lights photography settings
"Toni... How do I photograph the northern lights?"
Easy. You follow the cheat sheet above ;)
"That's cool but... How do you photograph the aurora? I want to learn the steps you follow yourself."
OK, I understand that apart from the cheat sheet above, you need more details about my workflow.
Let's go through the best northern lights photography settings one by one!
1. Image format: RAW
Choosing the RAW image format for northern lights photography is a strategic decision that significantly impacts the post-processing flexibility and overall quality of your final images:
- Unlike JPEG or other compressed formats, RAW files capture all the data from the camera's sensor without any in-camera processing or compression.
- The dynamic range in a RAW file is significantly higher than in a JPEG file, meaning it can store more information about shadows and highlights. This is crucial when photographing the northern lights, as you can recover more detail from dark foregrounds and bright auroral displays during post-processing.
- You can adjust the white balance post-shooting to accurately represent the colors you saw, or creatively enhance them for artistic effect.
This choice is particularly advantageous for the challenging lighting conditions and dynamic range found in aurora borealis scenes.
2. Stabilization: Off
Image stabilization, whether optical (OIS) or sensor-shift (IBIS), is designed to compensate for camera shake, making it invaluable for handheld shooting. However, when your camera is securely mounted on a tripod, keeping stabilization activated can inadvertently introduce blur.
That's why turning off any form of image stabilization (IS) when your camera is mounted on a tripod is a nuanced yet essential practice in northern lights photography, as well as in other scenarios requiring a long exposure.
3. Camera mode: Manual (M)
Using Manual mode (M) on your camera is crucial for northern lights photography due to the unique and variable lighting conditions you'll encounter.
Here's why you should use Manual mode (M) for your aurora photography:
- Complete control. Manual mode (M) hands you full control over aperture, shutter speed, and ISO. The aurora's brightness can fluctuate rapidly, and Manual mode allows you to respond to these changes immediately without relying on your camera's guesswork.
- Consistency. It helps maintain consistency across your shots. Automatic modes might produce varying exposures due to the camera's metering getting confused by the dark sky and bright aurora. Manual settings ensure that once you find the perfect exposure, it stays consistent across your shots.
- Creative freedom. You can decide the visual outcome of your shot. Whether you're aiming for a perfectly exposed aurora against a dark sky or wanting to capture the landscape's silhouette against the aurora, Manual mode (M) allows you to make these creative decisions.
By controlling every aspect of the lightness, you can adapt to the aurora's variability and express your creative vision.
As usual, I recommend you practice with these settings before your aurora shoot, so you're comfortable adjusting them in the field.
4. Aperture: f/2.8 to f/4
"OK Toni... What is the best aperture for the aurora?"
Choosing the right aperture is critical in northern lights photography for maximizing the amount of light captured by your camera's sensor, especially in the dark conditions under which the aurora borealis typically occurs.
I recommend you to set an aperture within the range of f/2.8 to f/4.
This range strikes a balance between allowing enough light to enter the camera for a well-exposed image and maintaining a sufficient depth of field to keep both the foreground and the aurora in focus.
5. Focus: Manual, set to the hyperfocal
Autofocus often fails due to the low light conditions.
Instead, focus manually on a distant light located a bit further away from the hyperfocal distance.
Check out this video where I show you how to focus at the hyperfocal distance.
Note: If the main subject is at a greater distance than the hyperfocal distance, you should focus directly on the subject. You will lose some depth of field in the foreground but everything that is at infinity will remain focused and the subject will be tack sharp.
You can calculate the hyperfocal distance very easily with the PhotoPills depth of field calculator.
If your camera has a live view feature, use it to focus manually. Do as I teach you in the previous video and:
Aim at a bright star or distant light.
Zoom in using the live view's digital zoom feature.
Adjust the focus until the star or light is as small and sharp as possible.
Setting the focus to infinity is especially effective when you want everything from the foreground to the aurora itself in sharp focus, maximizing the depth of field and capturing the expansive nature of the landscape under the night sky.
If you have interesting foreground elements you wish to include and they are not at infinity, consider using a technique called focus stacking. Take multiple images with different focus points—from the foreground to the aurora—and blend them in post-processing to achieve an image that's sharp throughout.
6. Shutter speed: 1 to 10 seconds


"Fine but... What shutter speed should I use for aurora photography?"
Use the PhotoPills Spot Stars pill to avoid star trailing, especially if you want to capture the Milky Way as well.
For calculating the necessary exposure time, use the PhotoPills Spot Stars calculator by following these steps:
- Open the PhotoPills app and navigate to the Spot Stars calculator.
- Enter your camera model, the lens focal length, the aperture setting, the minimum declination of the stars you're capturing, and select the accuracy mode (with the default usually being sufficient).
If you're unsure of the stars' minimum declination, use the AR feature in PhotoPills. Point your phone in the direction you're planning to shoot, and let the app calculate the exposure time for you. If in doubt, you can default the declination to 0º.
The results will show two values based on the NPF rule and the 500 rule. The NPF rule provides a more precise exposure time, considering your camera's megapixel count, while the 500 rule offers a general guideline.
If you want to learn more about the NPF rule and the 500 rule, you should read section 9 of our Milky Way photography guide.
Now, use the shutter speed based on the NPF rule as a starting point. You'll make sure that your stars are shiny bright spots.
Then, work your way down from there:
- If the aurora starts really moving, and PhotoPills told you to shoot at, let's say, 8s you need to use a faster shutter speed (shorter exposure time). Otherwise you'll miss all the detail of the moving aurora and all you'll get is a blob in the frame.
- On the contrary, if the northern lights start to slow down and stop dancing, you can shoot at 8s.
Depending on the camera and settings you use, you should use a maximum exposure time between 1-10s.
7. ISO: 3200 to 8000
"Toni... What's your recommended ISO setting for aurora borealis?"
Setting an ISO range between 3200 and 8000, you're aiming to capture the aurora borealis in conditions where light is scarce, possibly aiming for faster shutter speeds to capture more detail or to photograph under weaker aurora conditions.
Here's a detailed look at how to effectively use this ISO range:
1. Enhanced lightness. A high ISO allows a good lightness from a small exposure, which is crucial in dark environments where the aurora is visible. This allows you to capture the faint colors and details of the aurora that might not be visible at lower ISOs.
2. Faster shutter speeds. Using a higher ISO you can set faster shutter speeds. This is beneficial for capturing the dynamic, fast-moving shapes of the aurora with less blur, preserving the details and structures of the lights.
3. Compensate for dim conditions. In situations where the aurora is faint or you're shooting in particularly dark locations without much ambient light, raising the ISO helps you achieve a balanced lightness without overly a long exposure that can lead to motion blur from the moving lights.
Before your aurora shooting session, test your camera's performance at ISO 3200 to 8000 in low light conditions to understand its limitations and optimal settings.
While starting in the 3200 to 8000 range is a good baseline, constantly monitor your results and adjust as necessary:
- If the aurora becomes brighter, you might lower the ISO to reduce noise.
- Conversely, if the aurora is faint or you're aiming to freeze its motion more sharply, you may need to push the ISO higher.
Finally, remember that higher ISOs come with the trade-off of increased noise or grain in your images. Cameras with larger sensors (like full frame sensors) generally handle high ISO noise better than those with smaller sensors. Have a look at section 6 to know what's the best camera for northern lights photography.
As I told you in step #1, shoot in RAW format for maximum flexibility in noise reduction and to fine-tune the lightness with a software like Lightroom or Photoshop.
8. White Balance: Auto, Fluorescent (0 or -1) or 4300K
Adjusting the white balance is crucial in northern lights photography for accurately capturing the vibrant colors of the aurora borealis.
I suggest you 3 alternatives:
- Auto.
- Fluorescent (0 or -1).
- Setting the white balance manually to 4300K.
Let's examine each one individually.
Auto white balance (AWB)
The Auto White Balance setting allows your camera to make its best guess at correcting color temperatures across different lighting conditions. In the context of northern lights photography, AWB can be surprisingly effective, especially under clear skies and when the aurora displays a wide range of colors.
The downside is that AWB might sometimes neutralize the distinct green hues of the aurora, making them appear less vibrant. It can also fluctuate between shots, leading to inconsistencies in color across a series of images.
Fluorescent white balance
Setting your white balance to the Fluorescent preset can enhance the green hues of the aurora, making them appear more vivid.
Most cameras allow for fine-tuning of preset white balance settings. Adjusting the Fluorescent setting towards the warmer side (indicated by 0 or -1 on some camera models) can help in achieving a balance that highlights the aurora's colors without making the scene look unnaturally warm.
Manual setting to 4300K
Setting the white balance manually to 4300K offers a neutral starting point that works well under the night sky, providing a balance between warm and cool light. This setting is particularly effective in bringing out the range of colors in the aurora, from greens and purples to reds, without overemphasizing one over the others.
9. Shutter delay: 2s (optional)
For very clear photos, make sure your camera is on a firm tripod. Use a 2-second timer to stop blur when you click the button. If it's windy, use a 5-second timer instead to keep the camera still when you press the button.
You can also use an intervalometer. But when taking pictures of the northern lights and moving around to follow them, it's easier to just use the camera's timer.
How to photograph the northern lights with your iPhone
You're probably wondering if you can take aurora photos with your iPhone.
Well, the short answer is... Yes!
"Seriously? Can phones take pictures of northern lights?"
I'm serious. Your iPhone offers you a quick way to photograph the northern lights.
However, in order to shoot the northern lights you would need any iPhone model starting with iPhone 11. That's because Night mode is only available on iPhone 11 and above models.
In low-light conditions Night Mode will automatically turn on. The Night Mode icon will appear in the top left corner of your phone. This feature keeps the camera sensor open for a longer amount of time in order to get more light in, and therefore capture more detail in the image.
In other words, your iPhone will capture a long exposure.
"Awesome! And what settings do I need for the northern lights on my phone camera?"
Oh. It's super easy.
Open the camera app on your iPhone.
Your iPhones will automatically switch to Night Mode when it detects low light in the scene. If it doesn’t, set the camera app to Night Mode.
By default, depending on how dark the environment is, the exposure in iPhone’s Night Mode is somewhere between 1 and 3 seconds. If you need more than that you can change the exposure time to the maximum possible.
There’s a hidden settings menu in the iPhone’s camera app. Open this menu using the top arrow.
Look for the Night mode icon and tap on it.
A slider will appear that allows you to adjust the exposure time.
Slide it all the way to the right at Max.
Point the phone where you want to take your aurora photo.
Hold the phone with both hands and tap the shutter button.
Stand still until the iPhone has finished capturing the photo.
That's it!
Alternatively, you can use a tripod with a phone adapter to avoid blurred shots.
8.Experiment with these advanced northern lights shooting techniques
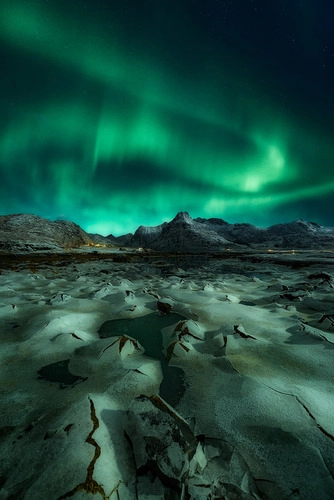
Photo by Javier de la Torre
Ready to up your northern lights photography game?
Cool, because you're about to dive into some awesome techniques that'll change the way you shoot those amazing lights in the sky.
Think beyond just snapping pictures. We're talking about capturing the aurora in ways you probably haven't tried before. From getting cool reflections to playing with time-lapses, this guide's got you covered.
Whether you're out in the cold chasing the lights or planning your next big adventure, these advanced northern lights shooting techniques are going to give your aurora photos a serious boost.
So, let's get started and make your northern lights shots stand out!
3 composition tips for captivating photos
As with any other genre of photography, composition is essential to creating an impactful image of auroras.
Here are some northern lights compositional elements that I look for when scouting the location and envisioning several compositions.
Include a compelling subject
A great northern lights photo needs more than just the aurora. Ideally, you want it to complement an already interesting scene.
Try searching for subjects such as cabins, churches, trees, and mountains, or perhaps try to go to an abandoned structure.
Just keep in mind that your subject should be facing north for aurora borealis (or south for the aurora australis), as this is typically where the lights come from (though they can completely cover the sky when the activity is high).
Use foreground elements effectively
To make your photo stand out, always include something interesting in the front part of your picture, not just the aurora.
Incorporate interesting foreground elements such as ice formations, rocky landscapes, or local architecture to add context and depth to your aurora images.
On very dark nights, it's tough to get a good photo of anything but the sky. But, the Moon can help a lot. The light from the Moon can light up everything, making it possible to take great photos of the aurora.
Incorporate leading lines
Use leading lines to make your photo look much better and attract the viewer's attention. Find lines in front of you that point to the main subject in your picture. This could be a road, a river, a house, flowers, or clouds.
Oh, and always make sure leading lines go towards the main subject in your photo, not away from it.
10 creative techniques for unique shots
Here are 10 creative techniques that will help you capture the aurora borealis in ways that stand out:
1. Reflections
Look for opportunities to capture the aurora's reflection in lakes, rivers, or wet surfaces. This adds symmetry to your composition and doubles the visual impact of the lights adding depth to your shots..
2. Silhouettes
Use the aurora as a backlight for interesting foreground subjects, creating silhouettes that add a sense of mystery and scale to your images. Trees, mountains, human constructions and people, of course, can serve as compelling silhouettes.
3. Integrate the Milky Way
If the conditions are right and the Milky Way is visible, compose your shot to include both the galaxy and the aurora. This requires careful planning and timing but can result in breathtaking, once-in-a-lifetime images.
4. Star Trails and auroras
Combine long exposure Star Trails photography with the northern lights. This technique requires a long exposure or, even better, stacking multiple images to capture the stars' movement along with the aurora, creating a mesmerizing image.
5. Portrait photography
Use the northern lights as a dramatic backdrop for portrait photography, illuminating your subject with a soft light source for an ethereal effect.
6. Multiple exposures
Experiment with multiple exposures to combine different elements of the scene in-camera. For example, one exposure for the sky and another for the foreground can create a perfectly exposed image throughout.
7. High ISO, low noise
Push your camera's ISO settings to capture the faintest auroras while using noise reduction techniques in post-processing to maintain image quality. This allows you to capture the aurora in conditions where it might not be as vibrant.
8. Light painting
During a long exposure shot of the northern lights, use a flashlight or other light source to "paint" light onto foreground subjects. This can highlight details that would otherwise be lost in silhouette, adding depth and interest to your scene.
9. Panoramic shots.
Stitch together multiple shots to create a panoramic view of the aurora, offering a wide, dramatic perspective that captures the vastness of the night sky and the landscape beneath it.
10. Time-lapse photography.
Capture the dynamic dance of the aurora over time. Set up your camera to take photos at regular intervals, then combine them into a time-lapse video to show the movement of the northern lights across the night sky.
Creating aurora panoramas
Creating a panoramic image of the northern lights involves stitching together multiple photographs to form a single, wide-view picture. This technique allows you to capture the vastness of the aurora borealis and the surrounding landscape in great detail.
Here's a step-by-step guide to creating a panoramic image of the northern lights:
1. Equipment that you need
- Camera: Any camera that allows manual control of settings.
- Lens: A wide-angle lens is preferred for its broader field of view.
- Tripod: Essential for keeping your camera stable and aligned during the shoot.
- Panoramic head (optional): For precise alignment and rotation. Though not mandatory, it helps in matching the nodal point of the lens, reducing parallax errors.
2. Camera settings
- Set your camera to Manual mode (M) to have a consistent lightness across all shots.
- Set your lens to manual focus and adjust it to infinity or to the hyperfocal distance to ensure the stars and aurora are sharp.
- ISO, aperture, and shutter speed should be set according to the intensity of the northern lights and the desired lightness, as I explained in section 7.
3. Composition and framing
- Plan your panorama: Visualize or sketch the entire scene you intend to capture, identifying key elements you want to include.
- Start from one end of the scene and decide on the overlap between images. A 30-50% overlap between consecutive shots is ideal for effective stitching.
4. Shooting the panorama
- Shoot in a consistent direction. Choose either left-to-right or right-to-left and stick with it.
- Keep the camera level to avoid uneven horizons. A tripod with a built-in level or a hot shoe bubble level can assist with this.
- Take multiple series if you're unsure about the overlap or lightness. It's better to have more images than you need than to miss a part of the panorama.
5. Post-processing
- Import your images into a photo editing software that supports panorama stitching (Lightroom, Photoshop, or a dedicated panorama software like PTGui).
- Select the images for your panorama and use the software's "Merge/stitch to Panorama" function. Adjust settings according to the software's options to blend the images seamlessly.
- Fine-tune the panorama: Adjust exposure, color balance, and crop the image as needed to create a cohesive final image.
Additional tips
- Practice shooting panoramas during the day to get comfortable with the process and your equipment.
- Consider the movement of the aurora. Fast-moving auroras may require quicker shooting between frames to maintain continuity in the panorama.
- Experiment with vertical panoramas (portrait orientation) for a different perspective, especially when the aurora is directly overhead.
9.15 aurora photography tips to succeed
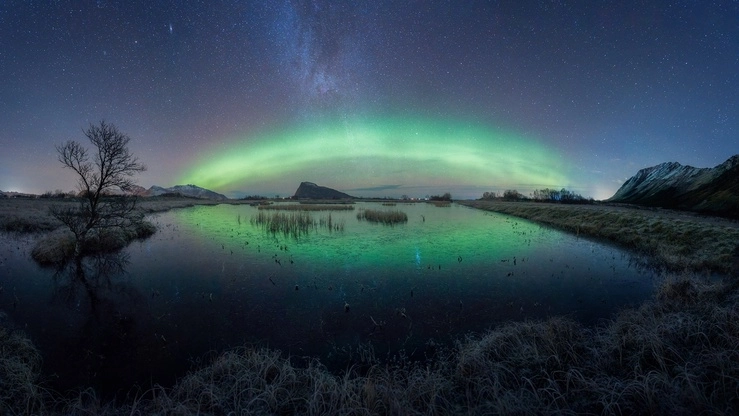
Photo by Jesús Carmona
Let's explore 15 essential tips that will empower your aurora photography, transforming your experiences under the night sky into stunning visual stories. From mastering camera settings to understanding the dance of the aurora's lights, these tips are designed to guide you towards capturing the northern lights' magic successfully.
Whether you're a seasoned pro or just starting out, these insights will enhance your skills and enrich your photographic pursuits.
Use the power of PhotoPills (1)
As I mentioned in section 5, using PhotoPills will help you determine the best place and time to shoot amazing aurora pictures:
Use the Sun pill to find the time of the year with less hours of light.
Use the Moon pill to decide if you want to shoot without any Moon.
These are 2 key factors to successfully capture beautiful northern lights pictures because:
- The more night hours on a certain date, the higher chances of seeing an aurora. Remember that there's solar activity at any time of the day, but northern lights are only visible to the naked eye (and your camera!) at night.
- Decide the Moon phase you want to shoot with depending on how much Moonlight you want in your scene.
PhotoPills is your best friend when determining these conditions! :)
Stay alert and turn on the notifications! (2)
Timing is everything to capture the northern lights.
Knowing when the aurora is likely to make its appearance can be the difference between a successful shoot and a missed opportunity. Fortunately, technology is on your side, offering several ways to stay informed and ready.
As I told you in section 5, keep an eye on the following apps and websites:
- Space Weather Live, also available on iOS and Android.
- My Aurora Forecast, available on iOS and Android.
Scout the ideal aurora location (3)
As I mentioned in section 3, there are a few things that you should take into consideration when scouting for the ideal aurora location:
Step #1. Try to find a location as close as possible to the aurora oval.
- In the northern hemisphere, travel to a location whose latitude is in the aurora oval (between 60º and 75º N).
- To photograph auroras in the southern hemisphere, you’ll need to go beyond the aurora oval (between 60º and 75º S) because it mainly covers Antarctica.
Step #2. Find a location without accessibility issues due to the unsafe conditions (e.g. roads, weather).
Step #3. A good aurora location has as much flexibility as possible to shoot in different directions, with a wide view of the sky.
Step #4. Regardless of the hemisphere you plan to shoot from, one principle remains constant: the need to escape light pollution. Seek out locations far removed from the glow of city lights, where dark skies reign supreme.
Apart from this, here are a few hints depending on your geographical position.
Northern hemisphere
Here you'll see the aurora borealis, often called the northern lights. It occurs in the northern hemisphere, predominantly in regions near the Arctic Circle. This includes countries like Norway, Sweden, Finland, Iceland, Canada, and Alaska.
- In the middle latitudes (below 67ºN), such as the picturesque Canadian Rockies, orientation is key. Aim to position yourself in a north-facing spot, where the aurora oval, which naturally encircles the magnetic poles, becomes visible when geomagnetic activity intensifies.
- Closer to the pole (between 67ºN and 90ºN), in regions like Iceland or Alaska, the northern lights can be present anywhere in the sky. In these higher latitudes, the lights often commence their display from east to west but don't limit themselves to any single direction as the night progresses.
Southern hemisphere
Here you'll see the aurora australis, often called the southern lights. It occurs in the southern Hemisphere, primarily around the Antarctic Circle. It can be seen in countries such as Australia, New Zealand, Antarctica, and parts of southern South America.
- In the middle latitudes (above 67ºS), such as the south of Western Australia, Tasmania and New Zealand, the direction to point your camera to is paramount. Look for unobstructed views facing south.
- Closer to the pole (between 67ºS and 90ºS), in Antarctica, the aurora can happen pretty much anywhere in the sky. Contrary to the northern hemisphere, the lights often start to show up from west to east. But as the night goes on, they can occur in any direction.
Chase the weather, not just the aurora (4)
To maximize your chances of success, integrating weather tracking into your planning process is essential (section 5).
This information is invaluable for making informed decisions on the fly, allowing you to relocate to areas where clear skies increase your likelihood of witnessing the aurora.
Use weather and aurora forecasting apps with a proven track record for reliability.
- Apps like Windy (iOS and Android) offer detailed insights into cloud cover, precipitation, and other weather patterns, not just locally but in surrounding areas as well.
- Websites like SpotWx and Clear Dark Skies can serve as an additional resource, offering forecasts specifically tailored to astronomers and night photographers.
- In specific regions, such as Iceland, local meteorological websites provide forecasts with remarkable accuracy.
Some cloud cover doesn't necessarily mean defeat... And PhotoPillers never give up!
A partially clouded sky can add depth and intrigue to your shots, creating a dramatic backdrop for the lights.
Scout in advance to craft your composition (5)
To elevate your aurora photography from good to breathtaking, scouting your location in advance is a step you cannot afford to skip.
This preparatory step is crucial for identifying compelling foregrounds that will anchor your night sky compositions, adding depth and context to the show happening above your head!
Make a point to visit your chosen location during daylight hours or a few days before your planned shoot. This daytime scouting will definitely reduce the stress of composing in the dark and under the time pressure of a fleeting aurora display:
- Wander through the area with your camera in hand, taking quick, handheld shots from various angles. These shots serve as a visual notebook, helping you pre-visualize how different compositions might frame the aurora.
- Pay special attention to elements that can reflect the aurora's glow, such as bodies of water, ice, or snow. These reflective surfaces not only double the visual impact of the lights but also integrate the sky and the earth into a cohesive composition.
Remember, the landscape as seen through your lens –especially at wide angles– can differ significantly from what your eyes perceive directly.
However, flexibility remains your best skill.
Even with the best-laid plans, the aurora and the clouds may have other plans for you...
Be prepared to adapt your composition in response to the shifting skies, moving to capture new angles or interesting interactions between the landscape and the lights. Sometimes, the scene that unfolds spontaneously is the one that captures the essence of the northern lights most memorably.
Aurora settings: use f/2.8 or your lens widest aperture (6)
When it comes to photographing the northern lights, your primary objective is to capture as much of the elusive aurora glow as possible.
Achieving this begins with one critical camera setting: your aperture. The aperture controls the amount of light that reaches your camera's sensor, and in the dim conditions of night sky photography, every photon counts.
To maximize light intake, set your lens to its widest aperture.
Fast lenses, those with maximum apertures of f/2.8 or wider, are ideal for aurora photography.
However, wide apertures come with a shallow depth of field, which can leave elements of your foreground out of focus if they're too close to the lens. In such cases, consider employing techniques like focus stacking, where you combine in post-processing multiple images at different focus points to achieve a uniformly sharp scene from foreground to stars.
If your lens doesn't open up to f/2.8 or wider, don't worry. Open it to the widest aperture available, and adjust your ISO and shutter speed accordingly to compensate for the reduced light intake.
Remember, the goal is to let in as much light as possible without compromising the quality of your image with excessive noise.
Aurora settings: set a shutter speed between 1-10 seconds (7)
Unlike static landscapes, the aurora borealis is a dynamic, swiftly changing subject, making the choice of shutter speed pivotal to capturing its true beauty.
To preserve the crispness of the stars and the distinct shapes of the aurora, a shutter speed between 1 and 10 seconds is often ideal.
This range allows you to collect enough light to reveal the colors and patterns of the aurora without the stars appearing as trails across the sky, which can occur with longer exposures.
However, thanks to the Spot Stars pill in PhotoPills you can quickly determine the optimal shutter speed based on your specific focal length and camera settings, taking much of the guesswork out of the equation.
Here's a quick guide to help you dial in the perfect shutter speed based on the aurora's activity:
- Faint and static northern lights. For auroras that are barely visible and relatively stationary, a longer exposure, closer to the 8-10 second mark, can help gather enough light to make these subtle displays visible in your photos.
- Vibrant auroras. When the aurora is clearly visible and showing moderate movement, aim for a shutter speed between 3 and 8 seconds. This range strikes a balance between capturing the movement of the aurora and keeping the stars as sharp points of light.
- Intensely active northern lights. For those moments when the aurora is dancing rapidly across the sky, a fast shutter speed of 1-3 seconds is key. This setting helps freeze the motion of the aurora, capturing the intricate details and preventing the lights from blending into a shapeless glow.
Aurora settings: use ISO to control lightness (8)
The ISO controls the relationship between exposure and lightness.
So, depending on the exposure you want (combination between aperture and shutter speed settings), you'll need to adjust the ISO.
The ideal ISO range for aurora photography typically falls between 3200 and 8000, allowing you to achieve the right exposure with a shorter shutter speed to vividly capture the aurora's colors and movements.
Start with an ISO of 3200. From there you can adjust it based on the aurora's intensity and the ambient light conditions:
- An intense aurora display may need lowering your ISO to prevent overexposure and preserve the delicate details of the lights.
- On the other hand, a faint aurora might require a higher ISO setting to ensure the camera captures its subtle luminance.
The optimal ISO setting also depends on your camera's capabilities:
- High-end cameras. Advanced models, especially those with full-frame sensors, can handle higher ISO settings (6400 to 12800) with less noise, allowing for clearer, more detailed shots even in low light.
- Low-end cameras. Cameras with crop sensors or lower light sensitivity may produce noticeable noise at higher ISO levels. For these cameras, keeping the ISO at 6400 or below is advisable to maintain image quality.
Additionally, environmental factors will affect your ISO setting:
- Moonlight. A bright Moon can illuminate the landscape, enabling you to lower your ISO and still capture well-exposed images (section 4).
- Artificial light. In areas with street or house lights, a lower ISO can help avoid overexposure and maintain the natural colors of the aurora.
The goal is to capture as much detail and color in-camera by choosing the most suitable ISO for the scene before you. But remember that digital noise resulting from high ISO settings can often be mitigated with noise reduction software during post-processing.
Fine tune your camera setting according to ambient light (9)
Ambient light, often overlooked, plays a crucial role in the art of capturing the northern lights. It's the subtle interplay of natural and artificial light sources, such as Moonlight, nearby city lights, or even intentionally added light, that can dramatically influence your final northern lights pictures.
As the level of ambient light varies, so too should your camera settings to accommodate these changes and ensure your images convey what you're looking for:
- An increase in ambient light offers the opportunity to experiment with narrower apertures, which can enhance the depth of field, bringing both the foreground and the aurora into sharp focus.
- Simultaneously, it may allow for a reduction in ISO, minimizing the digital noise that your camera may produce.
Consider a scenario where a relatively strong Moonlight illuminates the landscape. This additional light can enable you to close down your aperture to something like f/8, extending your exposure time to capture detailed foreground elements without sacrificing the clarity of the stars and aurora. For instance, capturing intricate frost patterns or the texture of the snow can add a compelling layer to your composition, achieved through focus stacking for ultimate sharpness.
Conversely, capturing the dynamic movement of the aurora and the stars might require a separate shot with a wider aperture, such as f/2.8, paired with a shorter exposure time. This technique ensures that the northern lights keep their brightness and motion, creating a vivid contrast against the serene landscape.
Keep your batteries warm (10)
Remember, the goal is to maximize your time under the aurora borealis.
Unfortunately, the cold, enchanting nights under the aurora can be harsh on your camera's batteries...
Cold temperatures reduce battery life, often at the most unexpected moments during your shoot. To prevent this, an essential strategy is to keep your batteries warm, ensuring they retain their charge for as long as possible.
Always carry spare batteries and store them in a place where they can benefit from your body heat. A practical method is to keep them in a zip-lock bag tucked inside an inner pocket of your jacket, close to your body. This warmth can significantly slow down the rate at which your batteries deplete.
Fight condensation (11)
One of the trickier aspects of northern lights photography is managing the transition between the biting cold outdoors and the warm indoors without causing condensation on your camera. This phenomenon not only obscures your lens but can also seep into your camera and lens, potentially damaging the internal mechanisms over time.
The key to preventing this is to control the temperature change your equipment experiences.
When you're venturing outdoors
When you're shooting outdoors at night at low temperatures lens fogging and condensation is a common issue. This problem becomes more pronounced as your camera and lens cool down, making them prone to condensation from the warmer, moist air.
The solution? Lens heaters.
These nifty, yet straightforward devices are designed to keep your lens just warm enough to prevent condensation without affecting your camera's operation. Wrapping snugly around your lens, lens heaters provide a gentle warmth that keeps moisture away, ensuring your lens remains clear throughout your shooting session.
Lens heaters typically feature a padded strip that wraps around the lens, secured with velcro.
They can be powered in several ways, including USB-rechargeable batteries or external power banks, offering flexibility in how you keep them running in the field. Some models even come with adjustable temperature settings, allowing you to tailor the heat output to the specific conditions you're facing.
When you're returning inside
1. Before moving from a cold environment to a warmer one, seal your camera in a zip-lock bag or a waterproof bag first, then place it inside your camera bag.
The idea is to create a barrier that slows down the temperature change, allowing your equipment to gradually adjust to the new environment. This method effectively prevents the formation of condensation on and inside your camera and lens.
2. If you find yourself without a camera bag, wrapping your camera in a piece of clothing (ensure it's dry) can also serve as a temporary solution.
Once indoors, resist the temptation to immediately check your shots or change lenses. Allow your gear ample time to acclimatize to the indoor temperature. Depending on the severity of the temperature difference, this could take several hours.
In the event that condensation does form, avoid detaching the lens from the camera body, as this can introduce moisture into the camera. Instead, place the camera in an airtight bag with some silica gel packets if available, and wait until the condensation has fully evaporated.
Prioritize safety in your aurora hunt (12)
Embarking on a journey to capture the northern lights often involves venturing into remote and rugged terrains, where safety must be your paramount concern.
The thrill of spotting the auroras can sometimes lead to hasty decisions, like pulling over to the side of a road in excitement. However, it's crucial to remember that many of these roads can be narrow, winding, and slick with ice or snow, posing significant risks.
To ensure your safety and that of others, always ensure your vehicle is completely off the road before setting up for your shoot. Visibility is key in these conditions, so wearing reflective vests or jackets is a smart precaution to make yourself visible to any oncoming traffic.
Additionally, equip yourself with a head torch to safely navigate the dark surroundings. Not only does it help in setting up your equipment, but it also ensures you can safely move around in unfamiliar or uneven terrain.
Remember, capturing the beauty of the auroras should not come at the cost of your safety. By taking these simple precautions, you can enjoy a successful and safe photography adventure under the mesmerizing northern lights.
Stay warm while capturing the aurora (13)
The key to enduring the cold while maintaining focus on your photography lies in layering effectively:
- Begin with a base layer of merino wool thermal underwear and socks, which provide great warmth and moisture management, far superior to cotton.
- Add mid-layers of fleece or additional wool for insulation, allowing you to adjust easily to changing temperatures.
- Outer layers should include a windproof and waterproof jacket and pants to shield you from the elements.
- Remember, the extremities lose heat quickly, so a wool beanie or hat, insulated gloves (preferably with touchscreen capability to help you manage your camera settings), and waterproof boots are indispensable.
Incorporating hand warmers into your gear can serve a dual purpose: they not only keep your fingers nimble for operating camera controls but also extend the life of your camera batteries in frigid conditions. Tuck them into boots, gloves, or even pockets to create a warm haven, ensuring your focus remains on the aurora's dance rather than the cold.
Keep shooting in challenging weather conditions (14)
Embarking on a journey to capture the northern lights often means facing very challenging weather conditions. While challenging weather conditions can test your resolve, they also present unique opportunities to capture the aurora in a new light.
Here's how to stay prepared and make the most of whatever the skies may bring:
Maintain realistic expectations, but stay optimistic. The unpredictability of nature means the northern lights may not always show up. It's essential to manage your expectations but keep an optimistic outlook. The aurora's elusive nature makes its appearance all the more rewarding.
Protect your gear. Use weather-sealed camera bodies and lenses if possible. Regardless, always have protective gear for your equipment, such as rain covers or plastic bags, to shield against rain, snow, and moisture. This precaution keeps your equipment safe and functional, no matter the conditions.
Use the harsh weather in your compositions. Use the challenging weather to your advantage by incorporating it into your composition. Snowflakes, raindrops, and fog can infuse your images with atmospheric depth, turning ordinary scenes into ethereal landscapes. These elements can add a layer of texture and mood that sets your photos apart.
Embody Patience and Persistence: The poles' rapidly changing weather demands patience and the willingness to wait for that perfect moment. Your perseverance will be tested, but it's often in the most challenging conditions that the most breathtaking scenes unfold. Stay ready to capture the beauty of the aurora as soon as the skies clear, even if it's fleeting.
Enjoy the show beyond the lens! (15)
While you're capturing the perfect shot of the northern lights, it's easy to become fixated on camera settings, composition, and the technicalities of night photography.
However, it's crucial to remember the reason you're braving the cold and venturing into the night: to witness one of nature's most spectacular displays.
Take a moment to step back from your camera, look up, and truly absorb the magnificence of the aurora borealis with your own eyes. The dance of colors across the sky, from vibrant greens to deep purples, is a sight that no camera can fully do justice. Feel the awe and wonder that comes from experiencing this natural phenomenon firsthand.
Sharing this experience with friends, family, or fellow photographers can also enhance your enjoyment. The excitement and collective anticipation of waiting for the aurora to appear create memories that last a lifetime, far beyond the photographs you take home.
Remember, while capturing stunning images of the northern lights is a rewarding endeavor, the joy and wonder of simply being present in the moment are what truly make the experience unforgettable.
So, bundle up, venture out, and let the magic of the aurora borealis remind you of the beauty our world has to offer!
10.11 aurora photographers to learn from
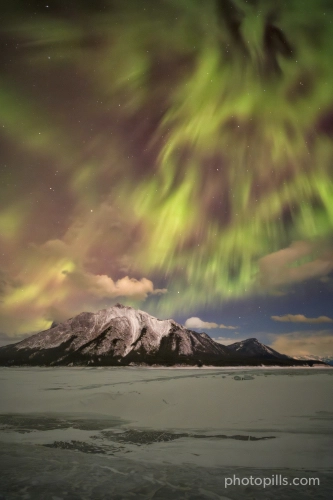
I really enjoy improving my photography by looking at the work of other photographers who are either very skilled or have a unique style.
That's why I want to share with you a list of my favorite aurora photographers who specialize in pictures of the northern lights. They might inspire you too.
Some of these talented people have taught at PhotoPills Camp, a special event we love, where you can learn from them in a great setting!
I'm sharing this list hoping it will make you better at taking pictures of the northern lights.
And if you know a photographer who should be known by everyone, please let us know by leaving a comment at the end of this guide :)
Rachel Jones Ross
Rachel Jones Joss, with her passion for nightscapes and the stars, is an accomplished photographer specializing in capturing the beauty of the northern lights and other celestial phenomena.
Her journey in photography began with an awe-inspiring moment of photographing the Milky Way, which deepened her interest in the technical aspects of capturing the night sky.
As a full-time photographer and a member of the Sony Alpha Imaging Collective, Rachel's expertise is further solidified by her commitment to sharing her knowledge through workshops and private lessons in the Canadian Rockies, where she lives.
To learn more from her, I suggest you have a look at her northern lights photography masterclass.
Javier de la Torre
Javier de la Torre is a Spanish photographer, known for his technically brilliant landscape photos with extraordinary details. His love for photography began in childhood and was further fueled by his passion for travel and exploration alongside his wife, Raquel.
Javier's photographic journey is marked by a significant emphasis on being present in the moment, which aligns with his approach to landscape photography. He's particularly drawn to capturing stunning landscapes, often embracing challenging conditions to photograph phenomena like the northern lights.
This focus on remote and breathtaking natural phenomena, combined with his meticulous approach to both capturing and post-processing images, has established him as an expert in northern lights photography. His work is proof of his dedication to traveling to some of the world's most incredible locations to capture their beauty.
Marco Grassi
Marco Grassi is an award-winning Italian landscape and travel photographer known for his deep connection with the natural world and expertise in capturing the Earth's most breathtaking landscapes.
His passion for remote, untouched destinations, combined with a knack for finding unique perspectives in well-known places, has made him a master in the art of northern lights photography.
Marco's work, celebrated and published globally in outlets like National Geographic and BBC, showcases the sublime interplay of light and shadow, evoking strong emotions through his images.
Albert Dros
Albert Dros is a well-regarded Dutch landscape photographer known for his breathtaking landscapes and particularly his expertise in capturing the northern lights. His photographs often showcase dramatic scenery with vibrant colors and intricate details, highlighting his ability to find the perfect moment and location to capture nature's beauty.
Albert's expertise in northern lights photography stems from his passion for nature and his dedication to chasing these elusive lights, often in challenging conditions. His work demonstrates a deep understanding of the technical and creative aspects of photography, making him a respected figure in this field.
Felix Inden
Felix Inden is is a photographer based in Köln, Germany, with a unique background that spans multiple continents, including his birthplace Spain and time spent in Germany and Chile. This diverse upbringing fostered a deep curiosity and love for nature, which eventually led him to discover his passion for photography.
Despite not initially identifying as artistic, the moment he began to explore the world through a camera lens, his perspective transformed, leading to a profound dedication to capturing the essence of landscapes.
Felix has a particular fascination with snow, ice, and the ethereal beauty of the northern lights, making him an expert in capturing these natural phenomena. His work is characterized by its ability to evoke feelings and narratives, inviting viewers to immerse themselves in the story of each image.
Laura Oppelt
Laura Oppelt is a self-taught landscape photographer from Germany, deeply passionate about capturing the beauty of nature. Born in September 1998, she grew up in a small town near Munich, Bavaria, where her love for the outdoors and nature flourished.
Laura's journey in photography began with a simple camera and evolved significantly over the years.
Her dedication to landscape photography was notably influenced by her time living, working, and studying in Norway, where she developed a profound connection to the wild and pristine landscapes of the North. This experience, along with her studies in Geography at the University of Bonn and the University of Bergen, Norway, has honed her skills and deepened her expertise in northern lights photography.
Giulio Cobianchi
Giulio Cobianchi is a professional landscape photographer renowned for his night photography, particularly of the northern lights. At 37, having self-taught for about ten years, he became a professional in 2017.
Giulio's passion for capturing extreme nature led him to relocate to the Lofoten Islands within the Arctic Circle. His work emphasizes the silent, breathtaking moments in nature and the artistic enhancement during editing.
Giulio also shares his expertise teaching landscape photography worldwide in nature's most spectacular settings.
Tor-Ivar Næess
Tor-Ivar Næess is a renowned landscape photographer based in Northern Norway, specializing in capturing the northern lights. His dedication and expertise are evidenced by his extensive experience, numerous accolades including being named northern lights Photographer of the year in 2020 and 2022, and roles as an ambassador for notable brands such as Sony Nordic and ASUS ProArt.
Tor-Ivar's work has been featured by major publications and he has also served as a judge in international photography competitions, further establishing his authority in northern lights photography.
To learn more from him, I suggest you have a look at his northern lights photography masterclass.
Marc Adamus
Marc Adamus is a landscape photographer renowned for capturing stunning wilderness landscapes across Western North America and beyond. His dedication to capturing the essence of nature is evident through his unique ability to seize rare moments of incredible light and fleeting atmospheres, making his work stand out with a sense of the epic, majestic, and bold.
Marc's deep immersion in the landscapes he photographs, sometimes for weeks or months under challenging conditions, demonstrates his expertise and passion, particularly in areas like the northern lights photography, where capturing the magic requires both patience and skill.
His work has garnered international acclaim, featured in major publications and utilized by leading companies, highlighting his impact and influence in the field of landscape photography.
Daniel Kordan
Daniel Kordan is a renowned photographer inspired by nature, showcasing the beauty and diversity of colors and compositions in his work.
Based in Bali, Indonesia, Daniel has a deep connection with places like the Lofoten Islands in Norway and Tuscany, Italy. These locations, especially the Lofoten Islands, are famous for their stunning northern lights, which Kordan masterfully captures in his photography. His expertise in northern lights photography is supported by his extensive experience guiding photography groups in Norway, and other cold destinations such as Greenland, Iceland or Antarctica.
Daniel's photography is celebrated globally, with publications in top magazines and collaborations with major clients. His equipment list and software proficiency underline his technical expertise, further establishing him as a leading figure in capturing the mesmerizing beauty of the northern lights.
Thomas Kast
Thomas Kast is a renowned photographer from Karlsruhe, Southern Germany, who has lived in Oulu, Finland, for over two decades.
His expertise in photography, especially in capturing the northern lights, stems from his deep passion for landscape, winter, and night photography. Thomas is known for his ability to not only capture the visual beauty of the auroras but also to convey the atmosphere and feelings they evoke.
His work in guiding photo tours and workshops since 2012, coupled with his fluency in German, English, and Finnish, showcases his dedication to sharing these breathtaking natural phenomena with others. His fascination with the northern lights is evident in his vivid description of their beauty and his time-lapse videos that further highlight his expertise.
11.Get out into life and take magical aurora photos
Alright PhotoPiller, it's time to embark on a journey into the night!
Armed with your camera and this guide, you're now ready to capture the ethereal beauty of the northern lights.
Remember, the essence of aurora photography lies in patience, practice, and persistence. Each outing is a new opportunity to refine your skills, experiment with different settings, and embrace the unpredictable nature of this magnificent light show.
Encountered a hiccup along the way or have a burning question? Don't hesitate to reach out. I'm here to offer guidance, share insights, and support your photographic journey every step of the way.
Before you venture out under the starlit sky, I've got a couple of treasures for you to explore:
- Dive into the world of 'Milky Way Photography: The Definitive Guide' for a deeper understanding of capturing the cosmos.
- Unravel the mysteries of 'Moon Photography: The Definitive Guide' to gain full control over your photographic outcomes.
These resources are packed with invaluable knowledge to enhance your night photography skills and help you make the most of your adventures under the aurora.
The journey of learning and discovery in photography is endless. Keep challenging yourself, exploring new horizons, and most importantly, savoring the thrill of the chase. The northern lights are a reminder of nature's grandeur, waiting for you to capture its fleeting moments of glory.
So, what's your next dream shot? A vibrant aurora corona, perhaps, or the subtle dance of green and purple hues across the Arctic sky?
Let your imagination lead the way, and don't forget to share your masterpieces with the the rest of the tribe submitting it to the PhotoPills Awards. Who knows, you might just inspire someone else to embark on their own aurora hunting adventure.
Happy shooting, and may the lights be ever in your favor!
Note: Some links on this page are affiliate links. What does this mean? If you buy/rent using these links you're helping support us and it costs you nothing extra. Thank you for your support.
Get this ebook for free now!