Zodiacal Light: The Definitive Photography Guide
Zodiacal light is Sunlight reflecting off a stream of dust that orbits the Sun in the inner Solar System.
It's visible in both hemispheres twice a year, around both equinoxes when it's at its steepest or narrowest angle to the Earth's orbit and points nearly straight up into the sky.
The zodiacal light appears as a fairly dim triangle of light stretching up from the west in spring and east during the fall.
The best time to see the zodiacal light is after the dusk astronomical twilight around the spring equinox and before the dawn astronomical twilight around the fall equinox.
And if you want to photograph it, make sure you go to a dark sky location well away from bright city lights.
So, do you want to know how to see and shoot the zodiacal light?
Well, keep reading because in this guide I will teach you everything you need to take amazing zodiacal light shots.
You'll learn everything you need to know about the zodiacal light so you know exactly where you need to go and when in order to capture it.
And speaking about locations, perhaps you need some inspiration. Well, there's nothing to worry about because you'll see pictures from other photographers like you who have shot the zodiacal light in the past.
Oh... And you'll also learn how to find the best locations, how to plan the perfect shot, the gear you need, and the camera settings you need to nail your zodiacal light shots.
And, as usual, you'll discover how to use my favorite app (PhotoPills) to help you get the picture you're dreaming of.
Are you ready for the ride?
"The surrealism of my pictures was nothing but the real made eerie by vision. I was trying to express reality, for there is nothing more surrealist." - Brassaï
Get this ebook for free now!
Content
- 7 zodiacal light photography ideas that will inspire you
- What is the zodiacal light?
- The perfect location for zodiacal light photography (and how to find it)
- How to plan your zodiacal light shots like a pro
- All the equipment you need to take zodiacal light pictures
- How to photograph the zodiacal light
- 10 zodiacal light photography tips to improve your technique
- 7 photographers that excel at shooting the zodiacal light
- Ready to chase the zodiacal light?
1.7 zodiacal light photography ideas that will inspire you
Every picture is the result of a pretty standard process.
You see something that you like.
You have an idea.
You plan this idea to find out if it's possible and when it will happen.
And finally, you capture the shot.
All the steps are important. If you miss one of them, you'll never get the picture.
So don't overlook the idea behind your photo. Use your imagination. And look for as many sources of inspiration as you can.
In this sense, looking at pictures of other photographers is essential. And to help you with that, here are some amazing photos featuring the zodiacal light.
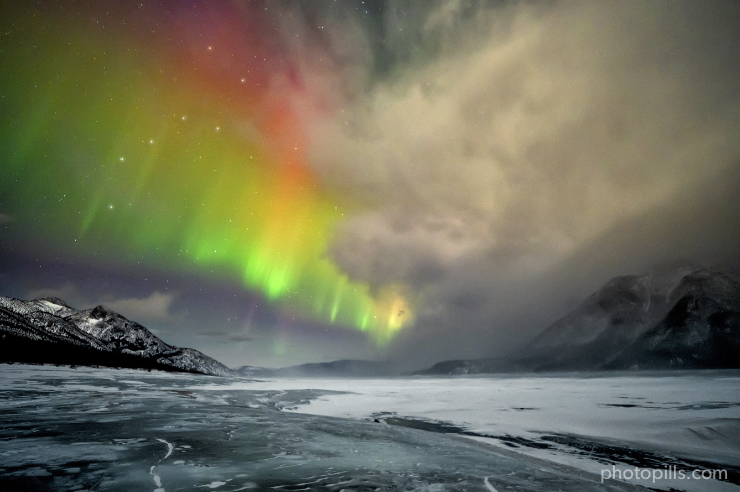
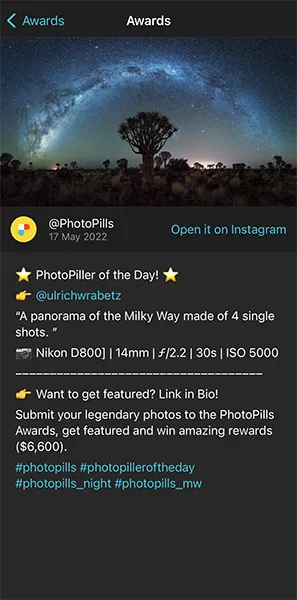
International Space Station (1)
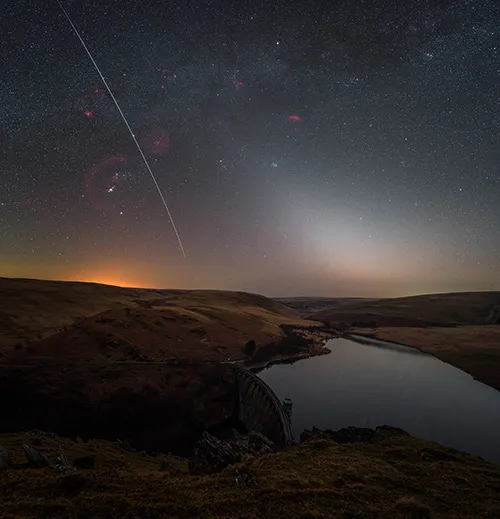
Photo by Alyn Wallace
There's so much in this image!
It was taken in one of Alyn Wallace's iconic locations – the Elan Valley. A beautiful place in Mid Wales that has become one of his favorite places to stargaze. Free of any large towns or cities it offers 360º of dark skies.
But let's go back to the picture...
The first thing that you can notice is the diffuse triangular glow of the zodiacal light, which is caused by interplanetary dust scattering Sunlight back into the night sky.
Then, there's the trail of a bright International Space Station passing across the sky.
Finally, you can also see a faint region of the Milky Way which passes through the winter constellations. See the pink-red patches in the sky? These are huge hydrogen clouds in space and can only be captured with an astro modified camera, like the one Alyn used.
Seascape (2)
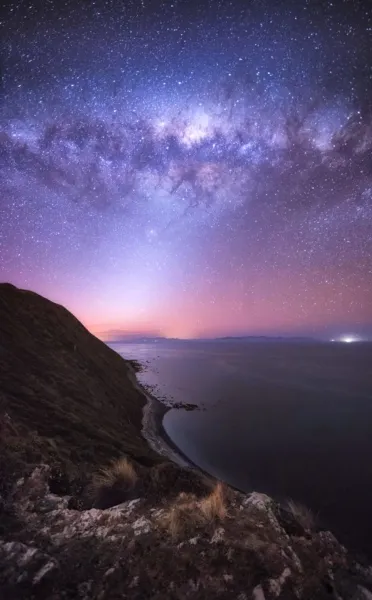
Photo by Mark Gee
Mark Gee took this picture on the west coast of Wellington, New Zealand.
He waited until the galactic center of the Milky Way was parallel to the horizon.
At the same time, the zodiacal light was coming up from the horizon. Caused by space dust scattering sunlight in the zodiacal cloud, you can see this amazing white triangular glow right below the Milky Way.
Being up there, on the ridge that night under a sky full of stars, was surely a unique experience. And it's something everyone should do every now and then.
Light painting (3)
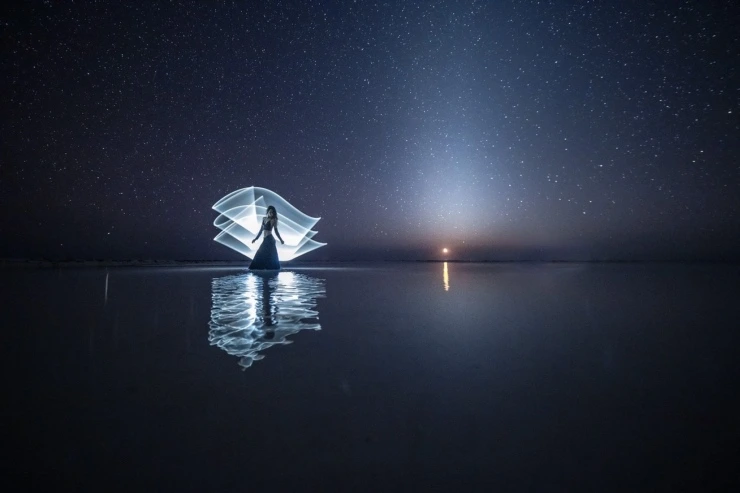
Photo by Eric Paré and Kim Henry
Eric Paré and Kim Henry love to shoot near shallow water to create a beautiful reflection, even though it usually makes the creation process more complicated. Every trace of light made by hand is unique and impossible to replicate.
When the location allows for reflection of light, the specific conditions of that moment (be it wind, depth of the water or waves) change the reflected trace of light in a unique way, contributing to the creation of a slightly altered perspective of reality.
In this case, apart from the water reflection, Eric and Kim waited for the perfect moment of natural light to add the zodiacal light to the composition. As you can see in the resulting image, it blends perfectly with Kim’s amazing body movement and the tube light reflection.
Salt flats (4)
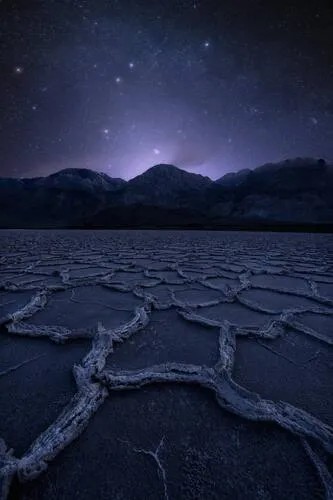
Photo by Rachel Jones Ross
The salt flats in Death Valley (California, USA), also called playas, are easily the most picturesque location within the park, and for good reason! The large area of salt formed into perfect hexagon shapes is truly nature’s work of art.
This incredibly large area (518 km2 or 200 mi2) is called Badwater Basin with a depth of 86 m (282 ft) below sea level.
These salt flats are caused from water forming into the basin and drying up quickly due to the intense heat. These salt flats are really cool in comparison to other ones because of the unique hexagon shapes that are formed in the salt, which are from the constant freezing, thawing, and evaporation of the water.
Rachel Jones Ross traveled to Death Valley searching for clear dark skies and compositions with foreground elements that command the attention of the viewer.
The patterns in the playas Death Valley have always intrigued her, whether they are salt or mud she finds them all super interesting. And on this occasion, Rachel thought it would be cool to combine them with the zodiacal light.
As you can see, the final result is pure magic.
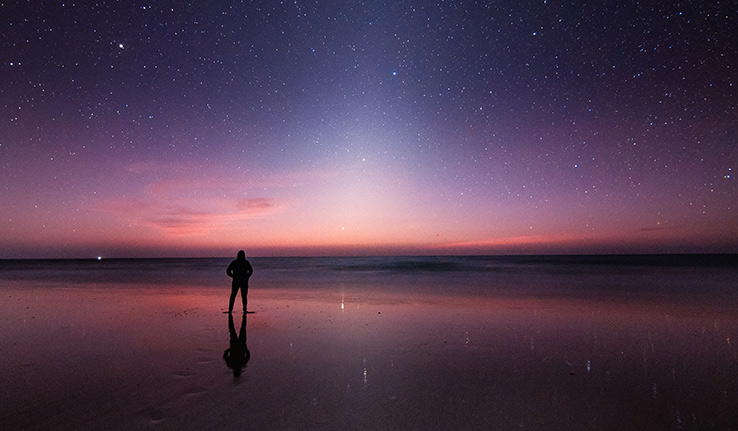
Starry sky (5)
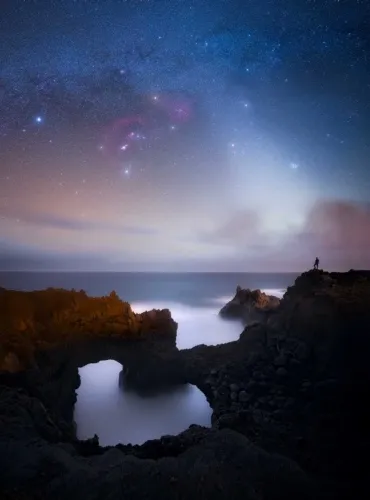
Photo by Javier Martínez Morán
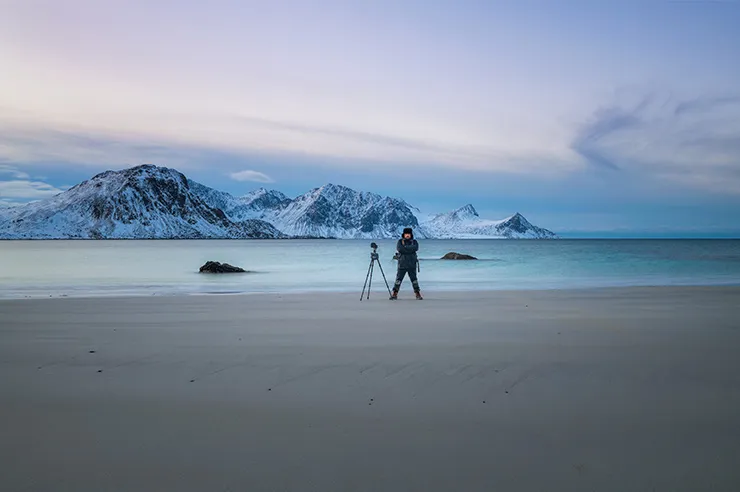
In this picture you can see the Orion sunset along with the zodiacal light captured from a beautiful seascape location in the island of La Palma (Spain).
Apart from the compelling composition, Javier included a human figure in the frame to add a sense of scale.
The skies of this gorgeous little island are incredible (quite as much as its landscapes). As you can see from the image above, even at sea level you can enjoy amazingly dark skies, incredibly crisp and full of detail.
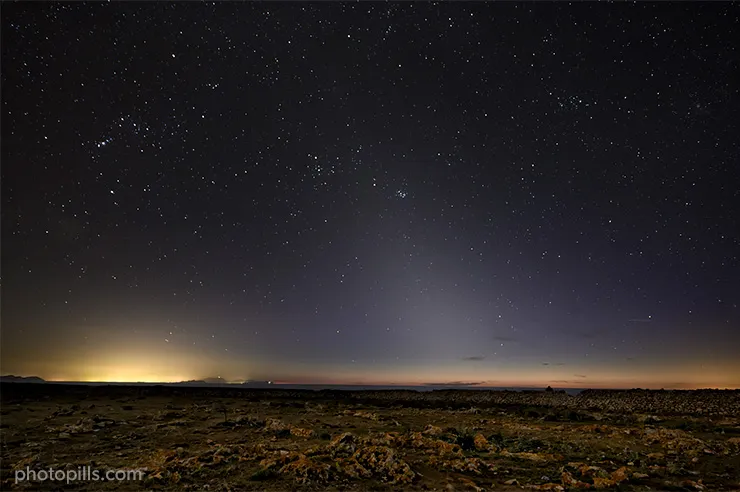
Desert (6)
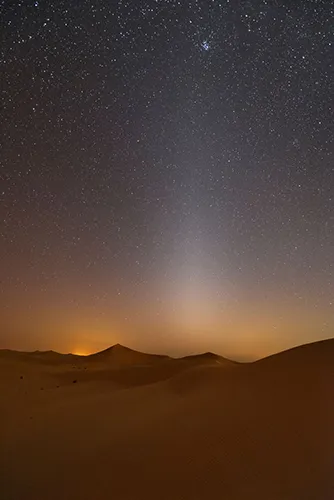
Photo by Babak Tafreshi
Dune after dune, the desert may seem endless when you look at the horizon. It's a vast empty space with nothing but sand… And incredible dark skies at night.
To capture this beautiful scene, Babak Tafreshi stood on the top of a sand dune in Al Quaa desert, somewhere in the UAE.
That night, this star-filled sky appeared far from the glow of Dubai and Abu Dhabi where the sky is empty of stars. This is one of the few remaining dark sky refuges in the region, where you can barely see any star or celestial body because of light pollution.
The picture was taken in February, and right after dusk an elongated patch of dim light appeared. It's the zodiacal light.
The zodiacal light is not coming from a city, nor from the atmosphere, but from dust particles scattering sunlight in the Solar System plane, near Mars and beyond. Scientists thought the dust to be remnants of asteroids or comets, but a new study by NASA's Juno mission to Jupiter shows Mars dust storms may be the source of these particles.
Rock formations (7)
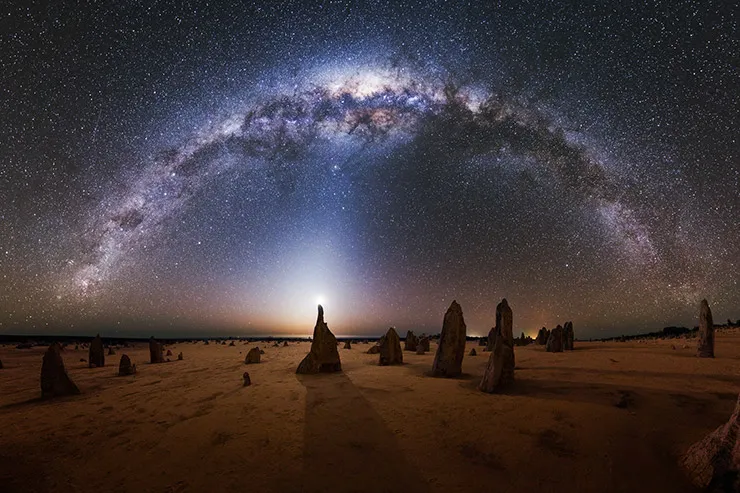
Photo by Michael Goh
This is another fantastic shot in which there are many elements present.
Michael Goh captured it in Nambung National Park in Western Australia, where you can find the Pinnacles – an unusual ensemble of rock spires made of ancient sea shells (limestone). How these human-sized picturesque spires formed is a mystery that remains unknown.
In the background, behind the tip of the central Pinnacle, is a bright crescent Moon.
Arching across the top is the Milky Way with the galactic center right above the central Pinnacle. You can also spot many stars and nebulae in the background night sky.
Michael took and composed this panorama after detailed planning that involved the Moon, the rock spires, and their corresponding shadows. However, Michael was not expecting to capture the eerie glow around the Moon, which is mostly zodiacal light.
What a magical surprise, don't you think?
Zodiacal light arch (8)
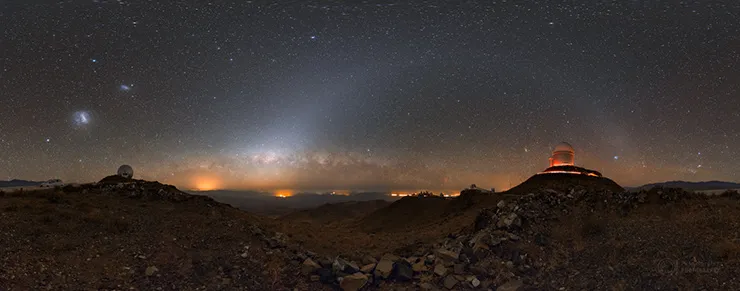
Photo by Petr Horálek
This amazing panorama of the zodiacal arch over the valley of Atacama Desert (Chile) was taken by Petr Horálek from ESO La Silla observatory.
As you can see, the Milky Way is about to set, while four more galaxies are present in the picture.
Two of them, the Magellanic clouds, lie on the left part, close to the southern sky pole.
You can find the other two (Andromeda Galaxy and fainter Triangulum Galaxy) nearby the dome of ESO 3.6-meter telescope. It's the one on the right hand side, illuminated by red car lights.
Photos by PhotoPillers (9) [bonus track]
In this section you've seen several examples of photos that you can capture while the zodiacal light is visible in the sky.
Use them as a source of inspiration to help you imagine your own photography ideas.
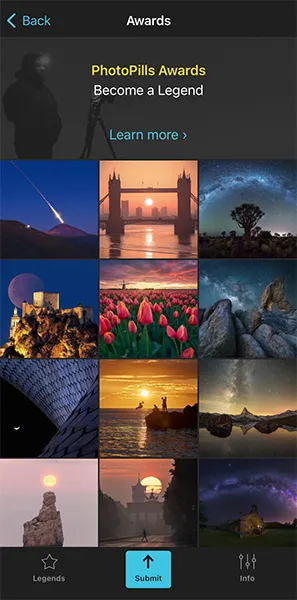
However, there's a much more powerful tool that you can use to your advantage. It's a virtual gallery where you can see lots of photos that other PhotoPillers have imagined, planned and captured all over the world...
There, you can see pictures of the zodiacal light. But you can also visualize images of the golden hour, blue hour, Sunrise, Sunset, Moon, Milky Way, Star Trails, Meteor Showers, drone, lunar eclipses, solar eclipses...
Isn't it awesome?
The good news is that you have all those amazing images in our Instagram account (follow us!) and in the PhotoPills app (My Stuff Menu > Awards).
Oh, and if you feel venturous, you can submit your own photos too and help us inspire other PhotoPillers.
You have all the information on the PhotoPills Awards section of our website.
And now, let's find out more about the zodiacal light...
2.What is the zodiacal light?
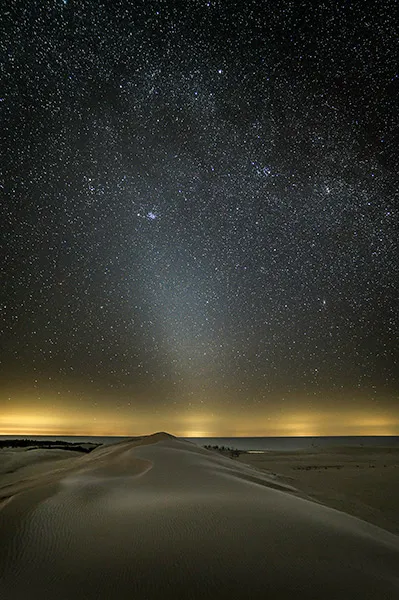
Photo by Scott Shields
As the equinox approaches, get ready because it's the perfect time to see and photograph the zodiacal light.
"Toni, what is this weird light you're talking about? I've never heard about it so please tell me more."
Fine!
Let's start with a zodiacal light for dummies section, shall we? ;)
What is the zodiacal light?
Here's a simple explanation of the science behind this bright cone of white light.
What is the zodiacal light?
The zodiacal light is a natural astronomical phenomenon.
You'll recognize it because it's a cone of eerie light that you can see above the horizon towards either the Sunrise or Sunset direction.
It occurs either during the transition of astronomical twilight to night or during the transition between night and astronomical twilight.
The light is rather more intense than that of the Milky Way, and also much more uniform. It's brightest in the horizon, near the Sun, and in its upper part its light fades away gradually.
What does the zodiacal light look like?
Sometimes known as false dawn or false dusk, the zodiacal light looks like a faint pyramidal column of light. But unlike a real dawn or dusk, it doesn't have any color – it's a dim white light.
It's visible with the naked eye if you happen to be in a dark sky location.
What causes the zodiacal light?
To put it simply, the zodiacal light comes from the sunlight reflection of tiny interplanetary dust particles, making them glow with a somewhat diffuse light.
These dust particles are known as cosmic dust, and they orbit the Sun in the inner Solar System.
Scientists believe that the cosmic dust is what's left behind from asteroid or comet collisions, and can be traced back to collisions that happened during the big bang to the formation of galaxies and solar systems.
The specific grains creating the zodiacal light were initially considered to be fragments of family comets and asteroid collisions venturing from afar.
However, recent research particularly from measurements taken by NASA's Juno Spacecraft suggests that this dust is actually coming from dust storms on Mars!
Where does the name zodiacal light come from?
The Earth's orbital plane around the Sun, is named the ecliptic.
It was also called the zodiac or pathway of animals, in honor of the constellations seen beyond it.
The zodiacal light is so-called from the fact that its axis is inclined to the horizon in the direction of the ecliptic or zodiac.
So it's produced by sunlight reflected from cosmic dust concentrated in the ecliptic or the zodiac's plane, hence its name.
When is the zodiacal light visible?
In order to see it and capture it, you need to know when the zodiacal light is visible.
So let's find it out!
When is the zodiacal light visible?
In other words, what day is the zodiacal light visible?
The zodiacal light is rare and can be observed around the spring and the fall equinox at higher latitudes, and throughout the year in tropical regions.
Why is the zodiacal light most visible around the equinoxes at higher latitudes?
That's because the zodiacal light follows the ecliptic, and the ecliptic makes its most extreme angles with the horizon around the equinoxes:
- It makes its steepest angle on spring evenings (fall mornings).
- It makes its narrowest angle on fall evenings (spring mornings).
So your observation of the zodiacal light depends on your location on Earth:
In the Northern Hemisphere,
- Around the spring equinox (late February through early May).
- Around the fall equinox (late August through early November).
In the Southern Hemisphere,
- Around the spring equinox (late August through early November).
- Around the fall equinox (late February through early May).
It is more easily and more frequently observed in tropical locations, and particularly near the Equator, because in those regions the obliquity of the Equator and zodiac to the horizon is less, and the duration of twilight is much shorter.
So you can see it throughout the year, and it looks larger and more impressive than in the northern or southern night sky.
What is the best time to see the zodiacal light?
As I just told you, the best time to see zodiacal light depends on your location on Earth.
The best time to see the zodiacal light from the Northern Hemisphere is
- Around the spring equinox (late February through early May), after the dusk astronomical twilight.
- Around the fall equinox (late August through early November), before the dawn astronomical twilight.
The best time to see the zodiacal light from the Southern Hemisphere is
- Around the spring equinox (late August through early November), after the dusk astronomical twilight.
- Around the fall equinox (late February through early May), before the dawn astronomical twilight.
If you happen to be in the equatorial regions, you can photograph the zodiacal light all year round. At high elevations, you can see the zodiacal light at all hours of the night to extend extensively from the eastern to the western horizon, in the form of a pale, luminous arch.
In addition to this, make sure you choose a Moonless night when planning your shot (section 4).
So preferably during the New Moon, or the third-quarter phase since the Moon doesn't rise until very late in the evening.
And pick a shooting location with no or little light pollution as it washes out the zodiacal light (section 3).
The darker your sky, the better your chances of seeing the zodiacal light. Remember that the zodiacal light is rather faint to the naked eye, just like the Milky Way.
Where can you see (and photograph) the zodiacal light?
In order to see and to photograph the zodiacal light, you need to know where in the sky it will be so you can point your camera to that direction.
Where can you see the zodiacal light?
As you may have guessed, the zodiacal light position in the sky depends on your location on Earth.
If you're in the Northern Hemisphere,
- During the spring equinox (late February through early May), you need to look towards the western horizon. So you need to find out the Sunset direction.
- During the fall equinox (late August through early November), you need to look towards the eastern horizon. So you need to find out the Sunrise direction.
If you're in the Southern Hemisphere,
- During the spring equinox (late August through early November), you need to look towards the western horizon. So you need to find out the Sunset direction.
- During the fall equinox (late February through early May), you need to look towards the eastern horizon. So you need to find out the Sunrise direction.
If you are near the Equator, the zodiacal light runs from the eastern to the western horizon, in the form of a pale, luminous arch.
How can you find out where the zodiacal light is located?
As I just told you, it all boils down to figuring out the Sunrise or Sunset direction.
But how can you know where the Sun is going to be in the sky?
You know the answer...
With PhotoPills!
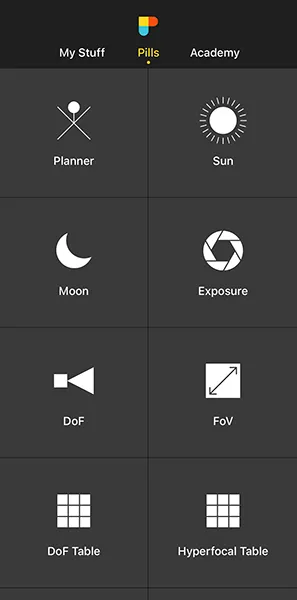
Open PhotoPills and tap Planner (Pills Menu).
Then, tap the Map Settings button (bottom right-hand corner, next to the (+) button):
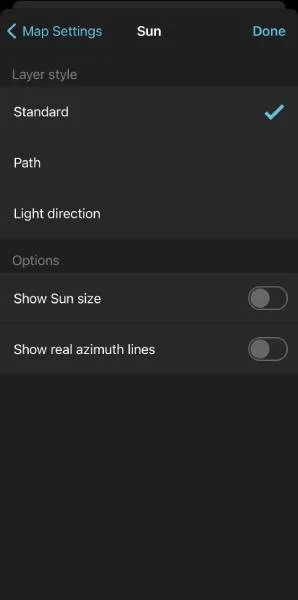
And now, tap Sun layer.
Finally, on the new screen, select the Layer style. In this case, tap Standard.
After doing this, you'll see several lines on the Map:
- The thick yellow line is the Sunrise direction.
- The thick orange line is the Sunset direction.
- The thin orange line is the Sun direction at the selected date and time.
All these directions are, obviously, according to the Red Pin position.
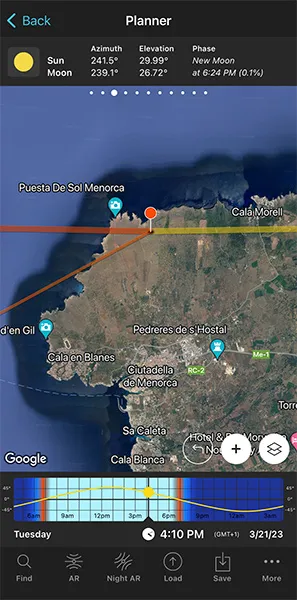
In addition to this,
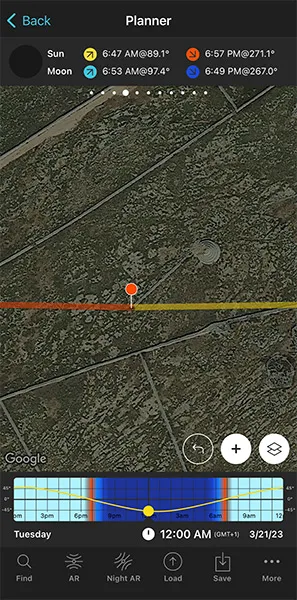
- On Panel 3 you have the Sun and the Moon position coordinates (azimuth and elevation), and the Moon phase info.
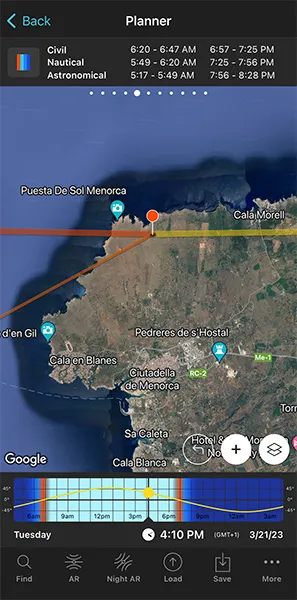
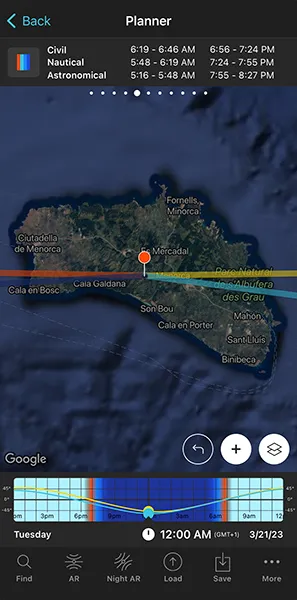
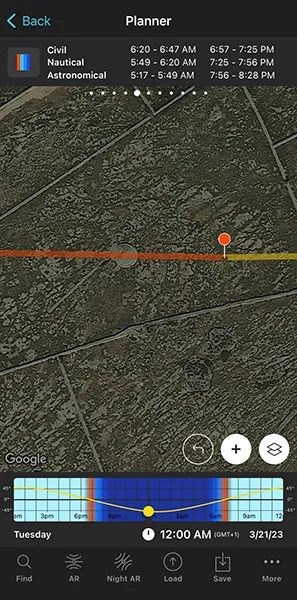
- On Panel 5 you have the the end and start times of the astronomical twilight before Sunrise and after Sunset.
As usual, all this information is for the selected date, time and Red Pin position.
So thanks to PhotoPills you know exactly where to look for zodiacal light!
3.The perfect location for zodiacal light photography (and how to find it)
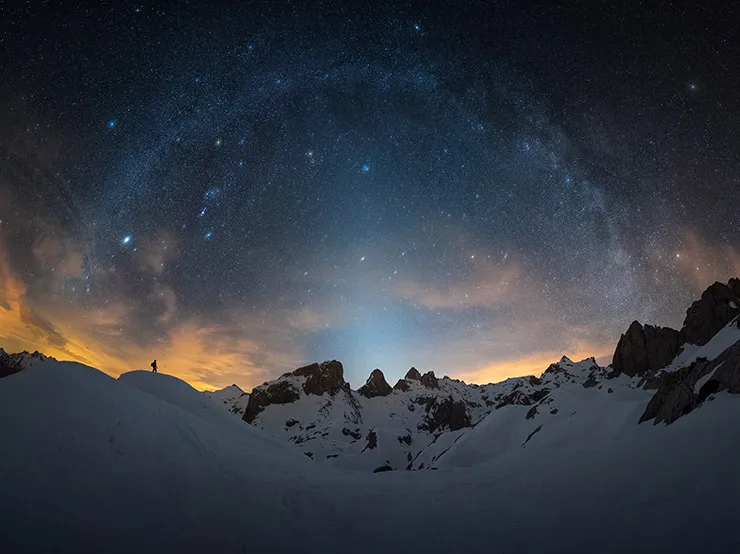
Photo by Pablo Ruíz García
If you want to find the best location to photograph the zodiacal light, all you need is time.
That time will allow you to conduct a thorough research.
You just need to figure out what ingredients the ideal location you want to capture must have and where it is.
Look for a location with no light pollution
In general terms, light pollution is bad for astrophotography:
- It makes it difficult to see smaller or faint objects.
- It washes out stars, constellations, galaxies, and nebulae, reducing the overall contrast between these objects and the darkness of the sky.
In other words, it makes the atmosphere much brighter than the natural night sky.
More specifically, in the case of zodiacal light, its glow is so faint that light pollution often outshines it, rendering it invisible.
Thus, the first thing you should look for is a location with no or very little light pollution.
Unfortunately, depending on where you live, finding a location with limited light pollution can be challenging.
These are some resources that can help you find dark sky locations:
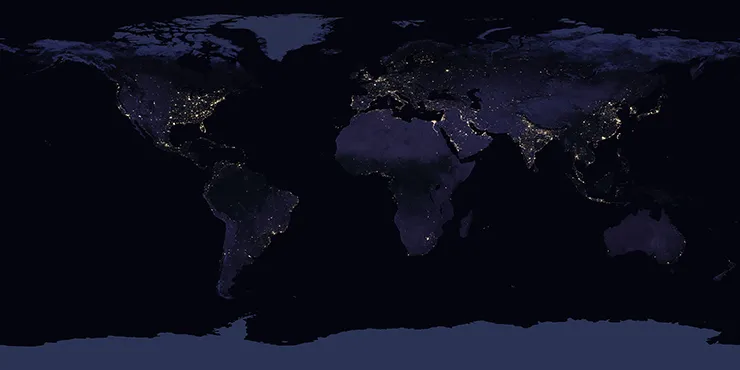
- NASA's Blue Marble: The site uses a Google Maps interface with NASA's most recent Night Lights image. You can browse the maximum resolution of 4 pixels per km², as well as a slightly coarser night-lights map, enhanced by town names and national borders.
- The World At Night (TWAN): It has one of the largest collections of global categorized astronomic landscape images sorted by region.
- International Dark Sky locations: I love these guys' movement. The International Dark Sky Association promotes the preservation and protection of night skies across the globe for future generations. You'll find 5 types of designations in their database: communities, parks, reserves, sanctuaries, and urban places. These areas are home to some of the darkest and most pristine skies in the world.
- Wikipedia Observatories list: Observatories are located in completely dark skies. It's a good idea to check where they are to find black crystal skies.
- Look for Local Astronomy Clubs: There are amateur astronomers everywhere. Make sure you ask them for suggestions. Most of them enjoy sharing their love for astronomy and would be happy to point you in the right direction.
- Light Pollution Map (also available on iOS and Android) helps you locate nearby dark skies to take a telescope, watch Meteor Showers, or simply relax under the stars. See light pollution maps of the entire world, along with dots that indicate good observing locations.
Check its orientation
It's important to include in the frame all the elements you have imagined.
As I'll explain to you later on, you should also think about their position within the scene, in which layer they are located. Working on your composition is crucial.
And if you want that what you imagined happens exactly the way you want so you can photograph it, take into account:
- The position of some of these elements. In this case, the zodiacal light relative to your subject, and the Moon, or rather the absence of it.
- Your own position with respect to them. In other words, where you have to position yourself and where you have to point the camera to.
Try to make sure there's plenty of room to move around
It's important that you can freely move around the location.
On the one hand, the more space you have, the more compositions you can get. When moving around you can look for different points of view, check that you are in the position that you like the most and make sure that everything is under control (the tripod is stable, you don't risk falling or slipping, etc.).
On the other hand, perhaps the photo you imagined has only one possible composition. It's not frequent, but it can happen. So if you have more room you can make small corrections so that all the elements are in the frame exactly where you want.
Include a powerful subject
The point of interest is the most important element of your composition.
That point of interest is the subject of your image, the main character of your story and the magnet to attract the viewer's eye.
And the more interaction there is between the location, the subject, the natural light (or the lack of it if you are doing astrophotography) and the rest of the elements of the frame, the greater visual impact the image will have.
Everything will depend on what you want to convey, the story you want to tell and how you want to surprise the viewer.
Avoid elements that aren't original, that aren't strong, that don't convey anything.
Instead, look for items that stand out. Look for the extraordinary in the ordinary.
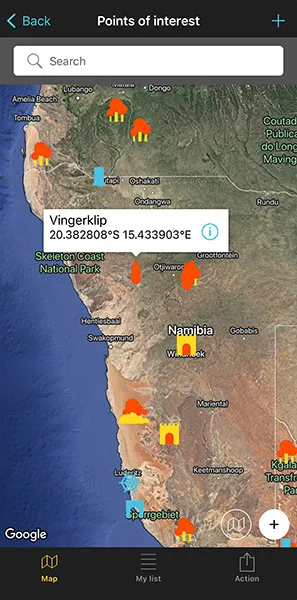
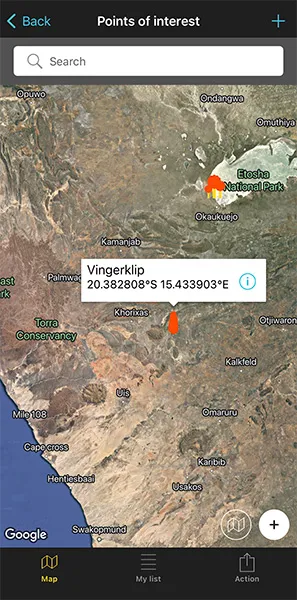
And if you're short on ideas, take a look at the PhotoPills Points of Interest (POI) database.
To find it, open PhotoPills and tap Points of interest (My Stuff Menu).
Tap Map (at the bottom of the screen) and move your fingers across the screen to navigate around the world. Thanks to the 10,000+ POIs included in our database, you'll be able to discover a lot of new locations.
Add depth with a strong foreground, middleground and background
When photographing landscapes, any type of landscape actually, adding a sense of depth to the image is super important.
"Cool Toni, but how can I do it?"
Oh, easy.
Use different layers. Use a strong foreground, middleground and background.
All three will allow you to transform a flat 2-dimensional image into a 3-dimensional photo.
Ideally, it would be great if the frame has something eye-catching in all three areas. However, you'll soon find out that this isn't always possible.
Foreground
To put it bluntly, the foreground is the part of the image that is closest to the camera.
The foreground element allows the viewer to enter the picture. Compositionally, you should make sure that the foreground includes a key element that magnetizes the viewer and sucks her into the photo.
In this case, I'm talking about a natural landscape. So you could include a patch of flowers, an array of intriguing rocks, a pond... The options are endless! :)
Middleground
The middleground is what's in the middle of the foreground and the background.
It adds a component that holds the viewer's interest.
When working on your composition, try to use the middleground as a landing and takeoff strip allowing the viewer to transition from the center of the image to the elements in the back.
Background
The background is the part of the image that is further away from the camera.
Both the foreground and the middleground should lead the viewer to the background in order to complete the image's visualization.
In similar fashion, the background should help unify and tie together the other two layers. Ideally, you'd want to include elements that prevent the viewer from wanting to look outside the image in the background's top area.
Therefore, a great background leads the viewer back to the middleground, and then back to the foreground in a circle, giving her time to deeply analyze the photo.
Combine the 3 layers in harmony
Obviously, both the subject and your composition will dictate which layer winds up having the most impact.
Nevertheless, when all 3 layers work in harmony, the picture improves tremendously. Create a balance between them to produce a smooth transition and the final shot will be much more powerful and striking.
Check different sources of information
Finding the perfect location is part of the planning. That research requires time and effort.
But, that doesn't mean it's not fun. It is.
So to find a great location where you can capture the best zodiacal light pictures, you need to spend some time looking for it.
If you don't know where to start, here are some sources that will help you out:
- Your main source of inspiration should be the photos of other photographers that draw your attention. Have a look at Instagram, Flickr, 500px, Unsplash, Getty Images, 1x.com, Viewbug, Pexels, Youpic, Shutterstock, Adobe Stock and Google Images.
- Learn from other photographers' discoveries and check the locations they have previously explored. Certain communities, such as Locationscout and ShotHotspot, offer this information.
- Analize publications like travel magazines (National Geographic, Condé Nast Traveler and Travel + Leisure), travel curated content (Exposure), travel guides (Lonely Planet) and the photography section of newspapers such as The Atlantic, The Guardian and The New York Times.
- Revisit your favorite photographers' websites and pay attention to their galleries. Have you checked the PhotoPills Masters' websites participating in the PhotoPills Camp?
- Don't forget the Wikipedia! It has tons of lists of interesting places. Let's say you're looking for lighthouses... Type in Google "lighthouse list Wikipedia" and you'll be surprised.
- A reliable and full of surprises source of information are the locals. No one knows the area better and provides greater advice.
- How long since your last visit to a library or a bookstore? Yes, books will tell you more about the local history and natural biodiversity of an area or town.
- Try to visit the nearest Town Hall or tourist office and look for first hand information.
- Again, check the Points of interest (POIs) included in PhotoPills.
- And finally, scout the area. It's usually the most effective strategy :)
In the next section I'm going to show you how to plan your zodiacal light photos, so you can go to that location to take an amazing photo.
Let's dive into it!
4.How to plan your zodiacal light shots like a pro
As I always say, planning is what makes everything possible.
Luckily, planning a zodiacal light shot is very easy.
And to prove it, here's a video where you'll learn how to plan any zodiacal light photo you imagine:
Zodiacal light photography planning cheat sheet
To plan a zodiacal light picture you have to follow 6 steps:
Place the Red Pin on a location that you like.
Select the date you want to photograph the zodiacal light.
Find out the Sunrise/Sunset direction. Check the thick yellow line (Sunrise) or the thick orange line (Sunset).
Find out the astronomical twilight time at Sunrise/Sunset on Panel 5.
Check the weather forecast and choose the best night (no clouds)
Save the plan using the Save button.
A real example of zodiacal light photography planning
If you prefer to read instead of watching a video, here's a full explanation of all the steps you need to follow to plan your zodiacal light photos before Sunrise and after Sunset on a given date.
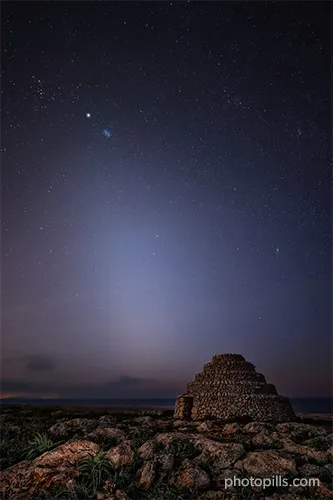
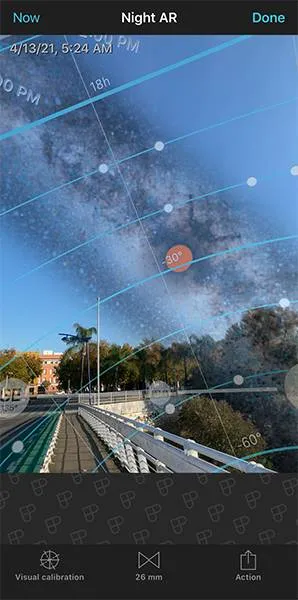
In this case, you're going to plan a photo of an old stone construction before Sunrise – a magical barraca, located in the northeast of Menorca (Spain).
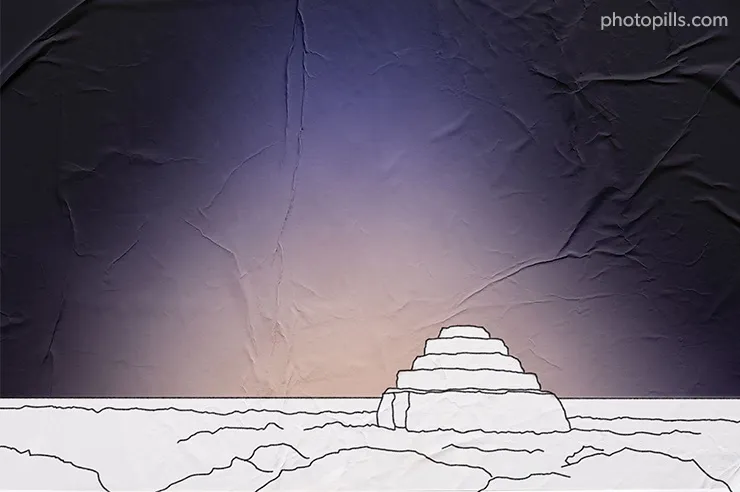
The idea is to shoot a long exposure to capture as much light as possible of the scene, while keeping the stars as bright dots. Let's hope that the sky is clear enough to capture the beautiful zodiacal light and some stars as well. It would be a great bonus!
OK, let's start planning.
Place the Red Pin in a potential location

Place the Red Pin in a potential location where you would like to take pictures of the zodiacal light. It can be a beach, the desert... You name it.
Don't worry about being too precise. Choose an approximate area. Later on, you'll have time to determine the exact shooting spot.
Open PhotoPills, tap Planner (Pills Menu).
Then, place the Red Pin somewhere you think it may be a cool location to take a picture of the zodiacal light.
Using the photo at the beginning of the section as an example, place it in Menorca (Spain).
If you don't know how to do it, this video shows you how to move the Red Pin.
Set the date you want to photograph the zodiacal light
As I told you in section 2...
The best time to see the zodiacal light from the Northern Hemisphere is
- Around the spring equinox (late February through early May), after the dusk astronomical twilight.
- Around the fall equinox (late August through early November), before the dawn astronomical twilight.
The best time to see the zodiacal light from the Southern Hemisphere is
- Around the spring equinox (late August through early November), after the dusk astronomical twilight.
- Around the fall equinox (late February through early May), before the dawn astronomical twilight.
If you happen to be in the equatorial regions, you can photograph the zodiacal light all year round. At high elevations, you can see the zodiacal light at all hours of the night to extend extensively from the eastern to the western horizon, in the form of a pale, luminous arch.
So choose a night with no little or no Moon, such as a New Moon night.
Ultimately, you need to have the Moon below the horizon at the time of the shooting, so the week before and after New Moon works too.
Thus, depending on your shooting location, you may need to set:
- A shooting date in the near future.
- A shooting date further away in time.
Let's see the easiest and fastest way to establish your shooting date in both cases.
Option #1: Shooting date in the near future
Set the current date and time tapping the center of the Time Bar twice.
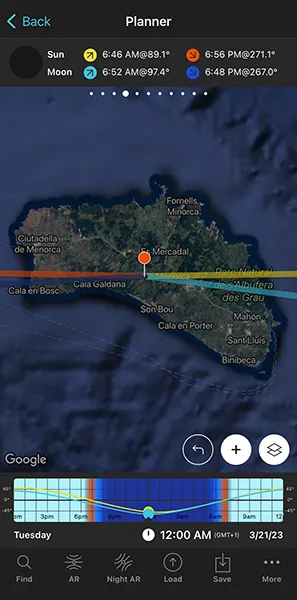
Then, swipe the top panels to Panel 4. Once there, tap the Moon icon to jump in time to the next important phase. Keep tapping until you get to the next New Moon.
Option #2: Shooting date further away in time
Go back to the Pills Menu and tap Moon.
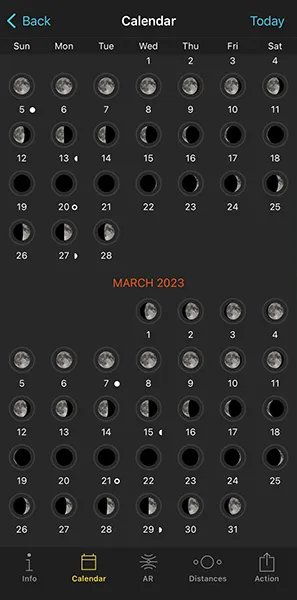
Then, tap Calendar. Scroll down the screen looking for a spring (from March through May) or a fall (August through November) New Moon.
Let's say that I want to capture the zodiacal light during the March New Moon, so looking to the west after Sunset since I'm in Menorca (Spain).
On the Calendar, New Moons have a white circle below the date. Thus, the March 2023 New Moon happens on the 21st. Tap it to select it.
On the new screen, you have all the information related to the New Moon, Moonset and Sunset:
- The New Moon happens at 06:24 pm.
- The Moonset occurs at 06:48 pm.
- The Sunset happens at 06:56 pm.
Now, tap Action and then Send to Planner.
You have to check the weather forecast and wait for a clear sky. But if that's not the case on that night, remember you just need to have the Moon below the horizon at the time of the shooting, so the week before and after New Moon works too.
Tip!
If at the location you have in mind, the photo you're looking for isn't possible on the selected date (because of the weather conditions for instance), you can always change the date using
- The Time Bar directly in the Planner.
- The Calendar in the Moon Pill.
Find out the Sunrise/Sunset direction and time
Just a quick recap from section 2.
If your shooting location is in the Northern Hemisphere:
- During the spring equinox (late February through early May), you need to look towards the western horizon. So you need to find out the Sunset direction.
- During the fall equinox (late August through early November), you need to look towards the eastern horizon. So you need to find out the Sunrise direction.
If your shooting location is in the Southern Hemisphere:
- During the spring equinox (late August through early November), you need to look towards the western horizon. So you need to find out the Sunset direction.
- During the fall equinox (late February through early May), you need to look towards the eastern horizon. So you need to find out the Sunrise direction.
If you are near the Equator, the zodiacal light runs from the eastern to the western horizon, in the form of a pale, luminous arch.
Once you know the date of the photo, you can quickly find out the position of the Sun.
Knowing the position of the Sun at the time of the photo is key, because it tells you where the zodiacal light will be visible.
This information is useful for two reasons:
- You'll know, for a given date, if the location you're analyzing works to capture the zodiacal light before the Sunrise and/or after the Sunset.
- You can use it to compose your shot.
In this case, since my shooting location is in the Northern Hemisphere, I took the photo during the dusk astronomical twilight. Therefore, you have to look at the Sunset direction and time.
If you want to plan a photo during the dawn astronomical twilight, just follow the same steps looking at the Sunrise direction and time.
Let's go to the next step...
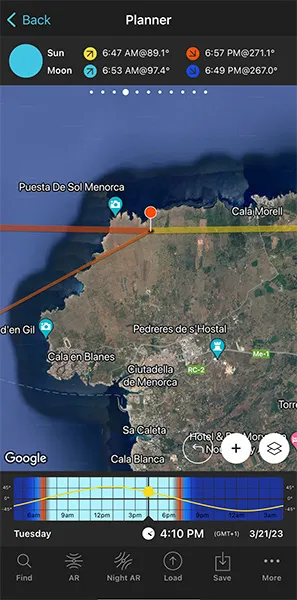
Swipe the top panels above the map to Panel 4. This panel says that on March 21, 2023 the Sun sets at 06:56 pm according to the Red Pin position.
And you can see on the map the Sun, Sunrise and Sunset directions for the selected date and time:
- The Sun direction is the thin orange line.
- The Sunrise direction is the thick yellow line.
- And the Sunset direction is the thick orange line.
If you don't see these lines, activate the Sun layer. You can do this by tapping the Map Settings button. You will find it next to the (+) button on the map.
Okay, let's continue.
Check out different locations until you find a photo you like
Now you know where the Sun rises and sets on a specific date. It's time to move the Red Pin to several cool locations you know. Try one by one until you find the one where your zodiacal light photo fits with the idea you have.
Obviously, and even though it will take you longer, the more locations you believe could work, the better.
If don't have any location in mind, follow the research workflow I explained in section 3.
In this case, I want to capture the zodiacal light along with a barraca.
A barraca is an old stone construction with a circular floor plan. It serves as a shelter for livestock both in the winter when it rains and to protect them from the harsh summer Sun. One of the reasons why I love Menorca is because it's full of barracas.
But how will I choose the right one?
Because...
My shooting location is in the Northern Hemisphere (Menorca, Spain).
I chose to shoot during the March New Moon, that is, in spring.
I needed to shoot a Sunset.
Therefore, I focused on the west coast of Menorca. I checked out some interesting locations until I finally found what I was looking for.
Because of its position and location, this barraca is my favorite one – you can move freely and have several shooting directions.
Let's go back to PhotoPills...
It's time to place the Red Pin in the location, in this case in the area where the barraca is, and then place it in the shooting spot: somewhere around the barraca considering the Sunset direction. So, somewhere towards the east of the barraca and pointing the camera to the west.
There are many ways to move the Red Pin, and you will find them all in this video.
As I had scouted the location, I zoomed in the map and placed the Red Pin in a very precise area that could be a good shooting spot.
Now it's your turn to do it.
Check at what time the astronomical twilight starts/ends
Finally, remember that...
The best time to see the zodiacal light from the Northern Hemisphere is
- Around the spring equinox (late February through early May), after the dusk astronomical twilight.
- Around the fall equinox (late August through early November), before the dawn astronomical twilight.
The best time to see the zodiacal light from the Southern Hemisphere is
- Around the spring equinox (late August through early November), after the dusk astronomical twilight.
- Around the fall equinox (late February through early May), before the dawn astronomical twilight.
If you happen to be in the equatorial regions, you can photograph the zodiacal light all year round.
Great.
You have the Red Pin on the shooting spot and the date selected in the Time Bar. Swipe the top panels to get to Panel 5 and have a look at the dusk astronomical twilight times.
In case you want to take a photo that looks like mine from the Red Pin position, you could take it on March 21, 2023, from 07:56 pm when the dusk astronomical twilight starts until 08:28 pm when it ends. Now you know the time you'll have to go to the location to take the shot.
Congratulations! You've just planned the photo!
Save the Plan
Now that you've done the research, don't forget to save the plan!
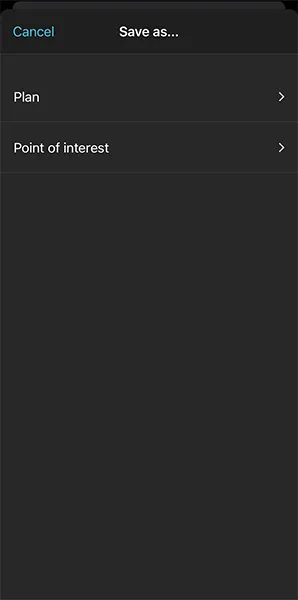
On the Planner, tap Save. On the Save as... screen, choose to save a Plan.
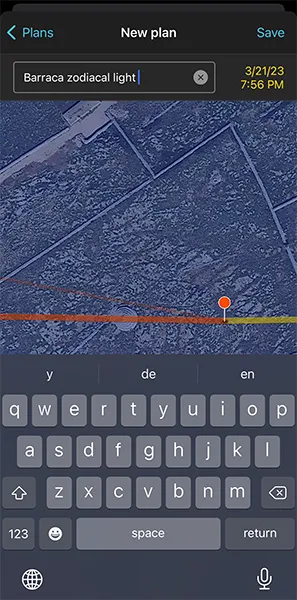
On the Plans screen, tap New plan. Type a name in the Plan name box, and tap Save.
This way you can check your plan as many times as you want on the Planner. Just tap the Load button (next to the Save button). Then, tap Plan and scroll down through the results until you find it.
If you tap it, PhotoPills automatically loads it to the Planner.
Great, now that you have your plan, it's time to prepare your gear!
In the next section you'll find everything you need to successfully capture the shot.
Keep reading!
5.All the equipment you need to take zodiacal light pictures
To photograph the zodiacal light, you should use the same equipment that you would use to photograph the Milky Way.
In fact, if you love astrophotography, my one and only piece of advice would be: invest in the best camera, the best lens, the best tripod and the best ballhead that you can afford.
If you are on a tight budget, this is what I consider the bare minimum:
- A camera that performs great at high ISOs, one that doesn't produce too much noise, and
- A very sharp lens.
These two elements are key to producing high quality images.
In our Milky Way photography guide, you can find an extensive analysis on astrophotography gear.
You should have a look at section 8 of that guide, where I discuss the pros and cons of a low-end, mid-range and high-end equipment for astrophotography.
As usual, remember that this is just my opinion and that my gear suggestions are personal.
The final decision is always yours... ;)
Zodiacal light photography gear cheat sheet
As I said before, I recommend you to use the same gear as you would use to shoot the Milky Way:
- Camera with good ISO performance.
- Wide angle lens. The faster, the better.
- Sturdy tripod and ball head.
- Intervalometer to shoot a long exposure.
- Fast and reliable memory card.
- Optional: 1 or 2 LED panels to illuminate the foreground.
- Optional: light pollution filter.
Camera
Obviously, the most expensive cameras come with more features and are, in my opinion, the best ones.
But you can still get a great camera to achieve acceptable zodiacal light images at an affordable price.
These are my recommendations depending on your budget.
Low-end cameras
- Cameras with an APS-C sensor: Nikon Z30; Canon 4000D, 250D and M5; Sony a6600.
- Cameras with a Micro 4/3 sensor: Olympus OM-D E-M10 Mark IV and Panasonic G95.
- Compact camera (1" sensor): Sony RX100 VII.
Mid-range cameras
- Cameras with an APS-C sensor: Nikon Z50, Zfc and D7500; Canon R10, R7, 850D, 90D and 6D Mark II; Fuji X-S20 and X-T30 II; Pentax KF; Sony a6700.
- Cameras with a Micro 4/3 sensor: Olympus OM-D E-M5 Mark III and Panasonic G9 II.
- Full Frame cameras: Nikon Z5 and D750; Canon RP; Sony a7C II.
High-end cameras
- Cameras with an APS-C sensor: Nikon D500; Fuji XH-2S, XT-5 and X-Pro3.
- Cameras with a Micro 4/3 sensor: Olympus OM-1 and Panasonic GH6.
- Full Frame cameras: Nikon Zf, Z6 II, Z7 II, Z8, Z9, D780, D850 and D6; Canon R8, R6 Mark II, R5, R3, 5D Mark IV, and 1D X Mark III; Panasonic S5 II, S5 II X, S1R and S1H; Pentax K-1 Mark II; Sony a7 IV, a7 CR, a7R V, a9 III and a1.
Lens
The summary is: get a wide angle lens!
The typical focal lengths you would use in night photography go from 10mm to 35mm depending on how much landscape and sky you want to include in the frame.
The lens should have a very wide aperture (f/1.4, f/2.8...) as well because the sensor needs to capture as much light as possible.
Low-end lenses
If you're looking for an affordable wide angle lens, try the
Mid-range lenses
For Micro 4/3 cameras, I'd like to highlight the following lenses:
For APS-C cameras, the following lenses are great for night photography:
For Full Frame cameras, these prime lenses are great:
High-end lenses
Tripod and head
You'll be shooting long exposures. So you need to keep your camera steady and avoid any vibration that could potentially blur your photos.
Hence, you need both a sturdy tripod and a sturdy head.
I've been recommending the Manfrotto 055XPRO3 to a large number of advanced amateur photographers for many years now. It's good value for money and it's a very robust aluminum tripod.
Another suggestion that I usually make to the students of my workshops is the Travel line by Benro.
As for tripod heads, my favorite is the Really Right Stuff BH-55 ballhead. It's not cheap, quite the contrary, but it's incredibly reliable.
Intervalometer
These are the intervalometers I usually recommend:
- Pro intervalometer: SMDV.
- For cheap intervalometers check the brands Neewer, Phottix and Vello.
A great alternative is a device called CamRanger. Right now it's available for Nikon, Canon, Fuji and Sony cameras.
It's a stand-alone device that you connect to your DSLR or mirrorless camera with a USB cable. It creates an ad hoc WiFi network to which you can connect your smartphone or tablet (iOS, Android and Windows). Thanks to the CamRanger application you can control your camera without a computer or an Internet connection.
Best of all, this device is independent. Therefore, if your mobile device loses its connection, the CamRanger has an internal memory to keep shooting. Imagine that you are making a timelapse, your sequence would be cut if the camera stops taking pictures in the time frame you've set...
So the CamRanger is great for many types of photos: timelapses (of the Milky Way, of Star Trails, of solar eclipses or lunar eclipses eclipse...), bracketing, focus stacking for macro and landscapes... and many more!
Memory cards
Buy the highest quality SD Cards (Secure Digital) with the highest transfer speed. There are many brands on the market but my favorites are SanDisk and ProGrade.
Nowadays the price of memory cards is very affordable. Even those with higher capacity (64GB, 128GB or even 256GB) are relatively cheap.
Although there are still cameras that use CompactFlash (CF) cards, it's a system that is slowly disappearing.
And to replace it, SanDisk, Nikon and Sony launched a new card format called XQD currently available for several Full Frame (Nikon D4, D4s, D5 and D850; Panasonic S1 and S1R), APS-C (Nikon D500) and mirrorless (Nikon Z6, Z6 II, Z7 and Z7 II) models. These cards
- Have a very high storage capacity (from 32GB to 256GB).
- Have a super fast reading and recording speed (400MB/s compared to 160MB/s for a CF card or 250MB/s for an SD card).
- Are very secure, resistant and with an incredible durability.
Later on, in 2017, CFexpress launched the latest standard memory card from the CompactFlash Association with 2 new form factors, Type A and Type C were announced, with the existing XQD form factor becoming Type B.
- Type A has, so far, only been adopted by Sony in all of its newest models.
- Type B is a far more common format offering a lower price. It has been widely adopted by Nikon in its Z series, Canon in some EOS R bodies, and Panasonic in the S1/S1R and GH6.
- Type C is not being produced yet.
Lightning gear (optional)
Buy a good headlamp because you'll be shooting in the dark.
My favorite ones are the Petzl Tikka XP, the Pelican 2750 and the Pelican 2760.
In addition to the headlamp, you could eventually get a couple of LED flashlights:
- A powerful flashlight to illuminate subjects over long distances, like the Coast HP7 or the Led Lenser M7.
- A second less powerful flashlight, such as the Coast TX-10, the Led Lenser L7 or the Maglite Mini to illuminate foreground subjects.
But my favorite option is a couple of LED panels because they provide a continuous source of light and are great to illuminate a large area of the foreground.
Light pollution filter (optional)
If there is light pollution in your scene from sodium vapor light sources, you should use a light pollution filter to remove in camera the yellowish glow they usually produce.
6.How to photograph the zodiacal light
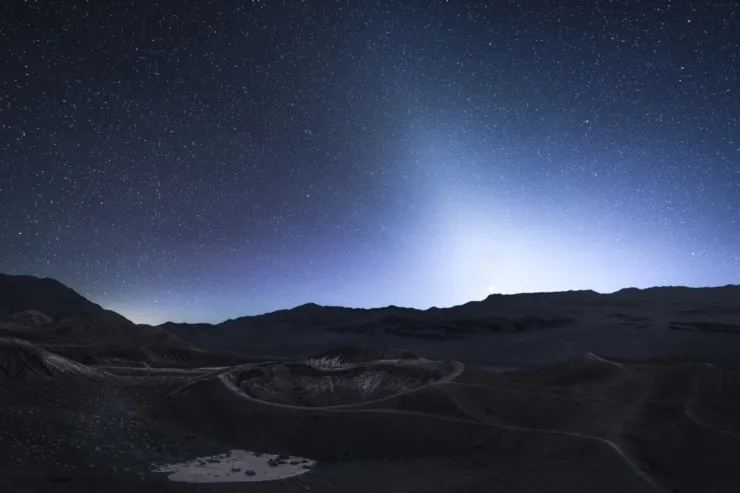
Photo by Michael Hoffman
Sometimes referred to as a pyramid of light, the zodiacal light is an eerie light extending up from the horizon.
It appears when light from the Sun reflects off space dust.
It's an amazing phenomena, but it's subtle so the best chance of seeing it is from a dark location well away from light pollution.
The good news is...
You can plan any zodiacal light picture you imagine with PhotoPills!
Thanks to the app, you can quickly figure out:
- When the dawn/dusk astronomical twilight occurs.
- And where the zodiacal light is visible (according to the Sunrise/Sunset direction).
With this information, you can figure out the right shooting spot and shooting time to capture the photo of the zodiacal light you have in mind.
Would you like to learn how you can do it?
Well, watch this video where Rafa teaches you how to photograph the zodiacal light step by step.
Zodiacal light photography cheat sheet
Below is a cheat sheet with the list of steps you should follow to photograph the zodiacal light:
- Make sure you get to the planned location in advance
- Use the PhotoPills Planner or the Augmented Reality (RA) button to check that you are in the right place. To photograph the zodiacal light you need to know the Sunrise or Sunset direction (depending on the hemisphere you are in and the time of the year you'll need to know one or the other. For more details, check section 2).
- Place the tripod on a solid surface and make sure the equipment is stable.
- If you have it on, remove the ultraviolet (UV) filter.
- If there is light pollution in your scene from sodium vapor light sources (they generate a yellowish glow), you should use a light pollution filter.
- Turn off the image stabilization system.
- If your camera has it, turn off the long exposure noise reduction option.
- Shoot in RAW.
- Use the shortest focal length you can (14mm, 18mm, 24mm,...). Try to keep it below 35mm.
- Select the Manual shooting mode (M).
- Use the largest aperture (smallest f number) you can to capture as much light as possible.
- Crank up the ISO to 3200 or 6400.
- Focus at the hyperfocal distance to maximize the depth of field.
- Take a test shot to check that the framing is correct.
- Use the NPF rule to adjust the shutter speed and avoid Star Trails. It's easy with PhotoPills and the Spot stars calculator.
- Adjust the ISO depending on how much noise your camera produces.
- Set the white balance to manual. Set it between 3400 and 3900K. If you use a light pollution filter, I suggest you adjust the color temperature to 5000K as this type of filter usually generates a bluish cast.
- Frame and take a couple of test shots to check if you like what you see and adjust accordingly.
- Depending on the light pollution you find in the location, illuminate the foreground with an artificial light (optional).
- Take the picture. Check the histogram and adjust the exposure triangle accordingly.
But if you prefer to read, here is a super detailed explanation of the complete workflow.
Make sure you get to the planned location in advance
I know what you're going to ask me. How long in advance is enough...
There's no right answer and it depends on your working methodology.
In my case, I arrive about 2 hours before either the Sunrise or the Sunset starts.
If you're going to a location you don't know to photograph the zodiacal light:
- Before Sunrise, you need to scout the location at least 1 or 2 days before as long as it's daylight. Keep in mind that, on the shooting day, you'll get there when it's still dark and it's pitch black.
- After Sunset, try to get there at least 2 or 3 hours in advance to scout the area thoroughly.
Thanks to getting in advance before either the Sunrise or the Sunset happens:
- You can work on your composition by paying attention to all the details.
- It allows you to set up your equipment at ease and make sure you don't forget anything.
Use the Augmented Reality views to verify the shooting spot
The good thing about arriving at the location early enough is that you have time to check that you are at the exact shooting spot, at the Red Pin position that you planned.
The easiest way to do this is to use the PhotoPills Planner.
On the map, tap the (+) button. Then tap the eighth button on the toolbar that just showed up (it's the compass icon). There should be a blue circle on the map now: it shows your current position.
Walk until the blue dot is actually aligned with the base of the Red Pin.
And also I recommend you to have a look at the PhotoPills Augmented Reality view (AR) to double check that you're at the right spot and that the Sun will rise or set in the direction you are interested in.
The cool thing is that the Augmented Reality view works offline as well! ;)
Place the tripod, ballhead, camera, and lens
Open the tripod, unfold the legs and mount the ballhead on. Then place the tripod on a solid surface and press it against the floor. It's important that it's perfectly stable.
Mount the lens you're going to use during the shoot on your camera. If you're still in doubt, I explain in section 5 how to decide in advance what focal length to use.
Once you've done that, anchor the camera on the ballhead and check again that it doesn't risk moving or vibrating.
Finally, plug the intervalometer in and check that everything is working correctly.
Remove the UV filter
You shouldn't, but if you usually have a ultraviolet (UV) filter attached to your lens, take it off.
The problem with this type of filter is that it slightly reduces the sharpness and contrast of your images.
And because you're adding an extra glass in front of the lens, it can cause reflections, halos and flares, especially if you have one or more light sources hitting the lens.
Use a light pollution filter (optional)
If there is light pollution in your scene from sodium vapor light sources, you should use a light pollution filter to remove in camera the yellowish glow they usually produce.
Turn off lens stabilization system
Some lenses include a function to stabilize vibrations. Canon, for example, calls it Image Stabilization (IS), while Nikon calls it Vibration Reduction (VR), and Sigma, Optical Stabilizer (OS). Other brands, such as Sony, Olympus and Pentax have been pushing for in-camera stabilization.
Since the equipment is stable on the tripod and ballhead, the system may try to compensate for non-existing vibrations... and the stars could end up blurry.
Therefore, as a precaution, I recommend you switch the lens stabilization system off when using a tripod.
Long exposure noise reduction: on or off?
Noise is one of the greatest enemies of long exposure shots.
Nowadays, almost all cameras include an option to automatically reduce noise in the final image: the long exposure noise reduction function.
How does it work?
Well, when this function is enabled, right after taking the photo, the camera takes a second exposure with the same parameters (shutter speed, ISO and aperture) but without letting any light into the system. This second photo has almost the same noise as the first one.
Finally, the camera detects the noise of this second picture and removes it from the first one.
In my opinion, this function is not useful in zodiacal light photography because:
- It's preferable if you shoot much shorter single exposures and if you avoid waiting for so long to see the picture.
- It consumes battery. You could even run out of battery in the middle of the process and end up without your photo.
Summing up...
When photographing the zodiacal light, it's better to turn the long exposure noise reduction off.
Shoot in RAW
Always shoot in RAW!
That way you'll always have a higher quality base image that will allow you to develop, post-process and correct errors that would otherwise be impossible.
Keep in mind that the image you see on your LCD is a JPEG copy of the RAW file. So the histogram you're seeing on camera is not exactly the RAW file one.
Use the shortest focal length you can
Set the shortest focal length you can (14mm, 18mm, 24mm, etc.)
Try to keep it under 35 mm for two reasons:
- To maximize the field of view and capture as much sky as you can.
- To maximize the exposure time (set the lowest possible shutter speed) to collect as much light as possible and, eventually, capture stars as big bright spots.
I'll explain it better in a section below, when going deeper into the shutter speed (exposure time).
Select the Manual shooting mode (M)
If you use your camera's auto mode you won't be able to capture the zodiacal light.
The Manual shooting mode (M) gives you total control over the exposure by setting aperture, shutter speed, ISO and white balance adjustments at your will. You'll need to use it to collect as much light as possible to capture stars as big bright spots while getting a photo correctly exposed.
Use the largest aperture you can
When it comes to the camera settings you need to photograph the zodiacal light, I like to start with the aperture.
Go as wide as you can to capture the most light. Set the lens to its widest aperture (the smallest f/number), for example f/1.4, f/2.8 or f/3.5, depending on your lens.
Select the ISO
Don't be afraid to crank up the ISO. Set the ISO to the maximum value for which your camera doesn't produce excessive noise (ISO 1600, 3200, 6400 or higher).
The idea here is to play with the ISO to tweak the exposure according to the exposure triangle. I'll show you how in a second ;)
Focus
When it comes to focusing you have two options:
- Focusing at the hyperfocal distance.
- Focusing on one star.
Depending on your taste, choose one or the other.
Focusing at the hyperfocal distance
The easiest way to have both the foreground and the meteors acceptably in focus is to focus at the hyperfocal distance.
Let me explain...
The hyperfocal distance is the shortest distance at which you can focus to have the stars in focus (acceptably sharp). In fact, you'll have "acceptably" in focus from half of this distance to infinity.
It maximizes the depth of field in the scene, which is pretty cool!
How to calculate the hyperfocal distance
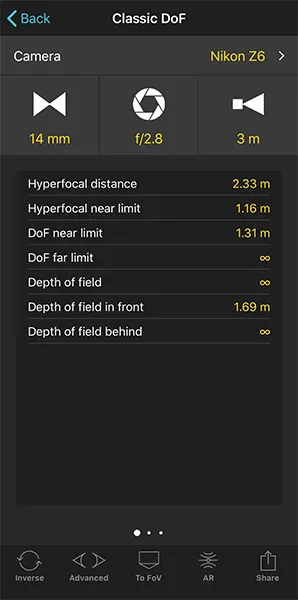
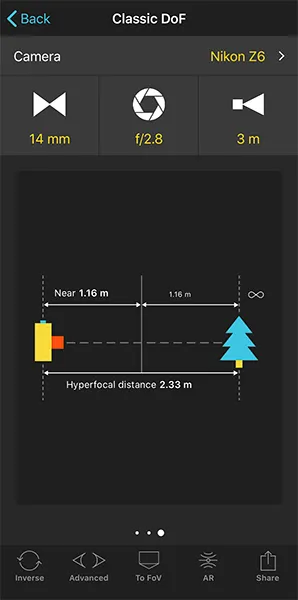
Once you've decided the focal length and aperture, use the PhotoPills Depth of Field calculator to calculate the hyperfocal distance for your camera settings.
As an example, using my Nikon Z6 together with an aperture of f/2.8 and a focal length of 14mm, the hyperfocal distance is 2.33 m.
How to focus at the hyperfocal distance
Watch this video to learn how to focus at the hyperfocal distance:
Once you have the hyperfocal distance (2.33 m in this example), make sure you're not focusing at a shorter distance. If you do, you'll get the meteors completely blurred, even if you miss the hyperfocal by one inch (or a couple of cm).
It's much better to achieve focus exceeding the hyperfocal distance by 1 meter (4-5 feet) rather than falling short. I'm serious, don't fall short!
You can learn all you need to know about the hyperfocal distance in our extremely detailed depth of field guide.
Lock the focus
After using the automatic focus mode to focus at the hyperfocal distance, set it back to manual focus. It's the best way to ensure your focus doesn't change.
Always check whether the stars are in focus before starting the shooting.
Finally, you need to take a test shot.
Use the Live View function on the LCD of your camera to focus accurately. And if your camera has the Focus Peaking and/or Focus Magnifier functions, turn them on too because they will help you to be even more precise.
Now, find a star and zoom in on it to magnify it (or use the Focus Magnifier option). Then, turn the focus ring to make focus on it. Turn it until you see the star as a tiny little dot (actually, the smallest possible dot).
Once the camera is attached to the tripod, take as many test shots as you need to see if everything is in focus and adjust accordingly.
The last thing you want is to spend the whole night in the cold and find out at the end that your stars are out of focus.
Focusing at one star
If you want the stars to be tack sharp, but you don't mind losing a bit of sharpness in your subject, then focus on one star.
Set the camera and lens to manual focus.
Now, find a star and zoom in on it to magnify it (or use the Focus Magnifier option). Then, turn the focus ring to make focus on it. Turn it until you see the star as a tiny little dot (actually, the smallest possible dot).
Take a test shot
Take a test shot to check that the framing is correct.
Set the shutter speed (exposure time)

You have two conditions that define your shutter speed:
- You need to keep the shutter open as much as possible to capture as much light as possible, and thus get more stars in the photo.
- You need to limit the exposure time to prevent stars from trailing, and thus get the stars as big bright spots.
To work out the exposure time you need, use the PhotoPills Spot Stars calculator.
To do so, go to PhotoPills and open the Spot stars calculator.
Once there, choose your camera and set
- The focal length,
- The aperture,
- The minimum declination of the stars, and
- The accuracy mode (default is the best option in most cases).
If you don't know the minimum declination of the stars you need to set, tap the AR button, point your smartphone where you're framing the camera and let PhotoPills automatically calculate the exposure time you need... ;)
Alternatively, if you're in doubt, just set the declination of the stars to 0º.
On the table of results you get two values: the NPF rule and the 500 rule.
The NPF rule gives you a more accurate value than the 500 rule. It even takes into account the megapixels of your camera.
If you want to learn more about the NPF rule and the 500 rule, you should read section 9 of our Milky Way photography guide.
Depending on the camera and settings you use, you should use a maximum exposure time between 10-25s.
Fine tune the ISO
And the last zodiacal light camera setting to adjust is... the ISO!
Remember that you've been using an extremely high ISO to take your test shots.
Now it's time to adjust it depending on:
- The exposure triangle.
- How much noise your camera produces.
You want to get the correct exposure and you've already set the aperture and the shutter speed. So, you only need to adjust the ISO according to the other two settings.
"But how much?"
I love this question... ;)
Again, the shutter speed (or exposure time) has to be limited to avoid Star Trails.
Therefore, to avoid an underexposed image you have no choice but to crank up the ISO. The higher the ISO the brighter the zodiacal light.
Now, it's time to fine tune the ISO.
The ISO you'll use in the final shot strongly depends on the noise performance of your camera.
Start with a relatively high ISO (e.g. 6400, 3200, 1600) and continue taking test shots. After each test shot (or while you're taking it, if you have the live histogram option), have a close look at the histogram and zoom in the image in your LCD to check how much noise your camera has produced. Then, adjust the ISO accordingly.
It's a game of try and fail, but it gets easier with a bit of practice! ;)
One thing, if your camera has these options, always avoid using ISOs that are amplifications by software instead of hardware, such as H1 and H2 levels.
There are lots of techniques to reduce noise in post-processing, so don't be afraid to use a high ISO.
But, at the same time, keep in mind that reducing noise in post-processing will soften your image and reduce sharpness. You will need to find the balance that gives you both a clean image and a sharp image.
That's why you need to get it right on camera in the first place.
Set the white balance manually
If you're shooting in RAW, white balance is something you can adjust in post-processing.
But, since I'm sure you would like to capture the real colors of the stars right in camera, use the following values as starting points and then adjust it from there:
- If the scene has a dark sky: 3900K
- If there is light pollution in the scene: 3400K
If you use a light pollution filter, I suggest you adjust the color temperature to 5000K as this type of filter usually generates a bluish cast.
Review the composition, the focus, and the exposure
You're almost set.
Now, take a test shot. Use it to check the composition (and the zodiacal light position!), that the focus is right and that the exposure is the one you're looking for (don't forget to examine the histogram).
You may need to make some adjustments. Maybe you'll have to recompose the shot a bit, or make focus again, or crack the ISO up (or down) to get the histogram you're looking for as I was suggesting earlier...
But after a few quick test shots, you should be ready to go :)
Light paint the foreground (optional)
Depending on the light pollution you find in the location, you can illuminate the foreground with an artificial light (optional).
In other words, you can add light in the first and in the last pictures of the shooting session.
At the beginning of the shooting session, test your exposure (check the histogram) and the light painting of the foreground. You may have to take a few test shots to adjust the amount of artificial light you add to the scene.
Once you're happy with the image, make sure to quickly start the shooting using the intervalometer.
At the end of the shooting session, just before stopping the camera, light paint the foreground again. This way, you have at least two great photos from where to choose the foreground for the final image.
Check the histogram and adjust the exposure
Take the picture.
Check the histogram and adjust the exposure triangle accordingly.
And that's it!
Now all you have to do is to wait for the right date and the right weather conditions!
7.10 zodiacal light photography tips to improve your technique
Throughout this guide, I've shared with you all the steps necessary to successfully capture incredible photos of the zodiacal light.
And here are some tips to make the most out of your zodiacal light photography.
Use PhotoPills to plan your zodiacal light picture (1)
Planning saves so much time and provides so much fun!
Because being at the right place, at the right time to capture the photo you want to capture is priceless... ;)
So as soon as you find a great location (section 3) and a cool subject, use the PhotoPills Planner to plan all the possible zodiacal light photos you can imagine.
With practice, it will take you just a few minutes to plan your zodiacal light photos.
And when you're on the field, tap the AR button to access the Augmented Reality view and visualize the position of the Sun at all times so you know where to frame.
So, thanks to the PhotoPills app, planning is a simple and precise work. Do you want to learn how to do it? Have a look at section 4.
Spend as much time as necessary and you'll get the photo of your dreams!
Choose a very dark area with no light pollution (2)
The best locations where you can photograph the zodiacal light are areas away from light pollution and preferably at a certain elevation.
Why should you avoid light pollution?
Because light pollution is a star-killer. Light of any kind, whether it's city lights, or even small town lights, will wash out the stars' brightness and make them look really dim.
Why is elevation important?
Because when you're at a certain elevation you may have great night sky visibility even in places that may be potentially affected by light pollution. And that's because you'll be above the lower areas of the atmosphere that contain the most light pollution.
So how can you find a very dark area with little or no light pollution at all?
These are some resources that can help you find dark sky locations:
- NASA's Blue Marble: The site uses a Google Maps interface with NASA's most recent Night Lights image. You can browse the maximum resolution of 4 pixels per km², as well as a slightly coarser night-lights map, enhanced by town names and national borders.
- The World At Night (TWAN): It has one of the largest collections of global categorized astronomic landscape images sorted by region.
- International Dark Sky locations: I love these guys' movement. The International Dark Sky Association promotes the preservation and protection of night skies across the globe for future generations. You'll find 5 types of designations in their database: communities, parks, reserves, sanctuaries, and urban places. These areas are home to some of the darkest and most pristine skies in the world.
Alternatively, you can carry a light pollution filter in your camera bag.
This filter targets and blocks a specific yellow/orange area of color that common street lamps emit. The sodium and mercury vapor lamp spectrums are bright and travel great distances which makes them great for lighting up your streets at night but a nightmare for astrophotography.
So get creative with your approach, and use all the available tools and resources to get the job done.
Find a good vantage point with a clear horizon (3)
There are literally infinite possible vantage points for any given scene. You can shoot from high up, from down low, from standing height, at a 45º angle, looking straight up, and much, much more.
Of course, not all vantage points are achievable (or useful) for all scenes, and some vantage points tend to look better than others.
But why is it so important to find a good vantage point?
Because it's a key part of photographic composition. Your vantage point determines how the viewer experiences the scene.
That's why too many elements in a scene will make it cluttered.
So choose your composition with care. Make sure the horizon is clear of any tall structure (mountains, trees, etc.) and your subject is perfectly isolated from other elements in the scene.
It will reinforce the storytelling and the intention behind your image.
Take the Moon into account (4)
As I told you before, the best conditions to capture the zodiacal light is having a dark sky. Zodiacal light is very dim and you need as much darkness as possible in order to photograph it successfully.
In other words, you want to avoid having light pollution and, of course, any Moonlight in your scene.
Why is that? Because the brightness of a quarter Moon or more will wash out the zodiacal light.
So it's best to shoot when there's no Moon! That is during a New Moon and the 4 days before and after it.
Therefore, when planning your zodiacal light shots, make sure they happen during a New Moon.
And when does the New Moon occur?
Well, you can easily predict it with an app like PhotoPills.
You have several ways of finding out this information in PhotoPills, but my favorite one is to use the Moon calendar.
Get to the location in advance (5)
In section 3 I have explained to you in detail what you have to do to find the best possible location for your zodiacal light photos.
Once you've found it and you're sure that this is the location where you're going to take pictures, scout it in advance. Go there a few days or even hours before the photo shoot.
The goals of your scouting are:
- To find and adjust the composition and get the best possible picture. While being on the field you can discover new angles and new compositional elements.
- Avoiding potential dangers that you might encounter: a cliff, an area where you might slip, a hole in the ground...
- Find out how long you will have to walk to the shooting spot, how much real space there is at the shooting spot (both you and your unfolded tripod should fit), what kind of composition you can get, etc.
With all this information you can work relaxed and concentrated.
The less eventualities you suffer (because, believe me, there are always some...), the better.
In the end, the assets that will help you get your photo are: concentration and flexibility.
Go out on a clear sky night (6)
Predicting weather is arguably one of the most important aspects of astrophotography, particularly when you're shooting outdoors.
And in the case of zodiacal light, having the right conditions is crucial to successfully capture it.
Unfortunately, if the night is overcast, you won't be able to see or capture anything as the clouds will cover everything.
So plan to go out on a night when the weather is clear of clouds.
However, depending on the shooting location, weather conditions can be very changing and you may not be able to predict anything long in advance.
Thus, before leaving home, check the weather forecast to make sure there will be no clouds.
Here are my favorite apps and websites to help you plan the weather:
- Windy is my favorite app for the reliability of its information: it's rarely wrong, although no meteorology service is infallible. It's available on iOS and Android.
- Ventusky is always my plan B. Just to make sure that I can get a more realistic idea of what can happen on the shooting day. It's available on iOS and Android.
- Meteoblue provides a precipitation chart that gives you in-depth information on where there will be high, mid, or low clouds; and how dense they will be. It's available on iOS and Android.
Once you've checked the weather forecast for the shooting date, it's time to prepare and check your photography gear! :)
Make sure your camera is stable to avoid blurred pictures (7)
The more stable your camera is, the sharper your zodiacal light photo will be.
Remember that you'll be shooting a long exposure, so avoid any vibration at all costs!
Vibrations produce blurry images. Therefore, get a sturdy tripod and press it against the ground to make sure it's stable.
In addition to this, use a shutter release or an intervalometer so you don't need to touch the camera while shooting.
And if it's a windy night, don't hang any weight on the tripod – it will make the system unstable and it will provoke vibrations.
Learn to frame at night (8)
How do you frame at night?
It's pitch black and you don't see anything!
And I don't recommend you to use your torch to illuminate the foreground because your eyes will take between 20 and 30 minutes to adapt again to darkness.
In other words, you'll lose your night vision.
If you want to preserve it, use a headlamp with a red light.
It could be even worse, you could ruin other photographers' shots. And I guess that you don't want to start running in the middle of the night chased by a horde of furious guys armed with tripods, stones and who knows why... :D
So how do you frame at night? And how do you do it fast?
It's very easy. Just crank the ISO up – to 6400, 12800 or more. That way you can set an extremely fast shutter speed and avoid wasting 20-30 seconds every time you want to take a test shot and adjust your framing.
Once you've done it, take a test shot, and check the result. If you don't like it, adjust the frame and repeat the process until you get what you're looking for.
Maximize the depth of field (9)
Why would you want to maximize the depth of field in your zodiacal light picture?
Well, because you'll get everything in your framing acceptably sharp – from the foreground to your subject (middle ground) and the stars (background).
And in order to do so, you need to focus at the hyperfocal distance.
I use it all the time and it works wonders.
Even though the name hyperfocal distance sounds intimidating, don't panic!
The hyperfocal distance is just a distance that you need to calculate. Actually, no. Let me rephrase, you need PhotoPills to calculate it for you ;)
The hyperfocal distance depends on:
- The sensor of your camera.
- The aperture.
- The focal length.
So open PhotoPills and tap the Hyperfocal Table pill (Pills Menu).
For example, if you're shooting with a Nikon Z6 at f/2.8 with a 14mm focal length, the hyperfocal distance is 2.33 m.
And when you're on the field, tap the AR button to access the Augmented Reality view and visualize the hyperfocal distance at your scene.
So it's a no brainer: focus at the hyperfocal distance ;)
Actually, it's better if you focus at a slightly longer distance (1 m, for example). This way you make sure everything is correctly focused from the foreground to the last element in the background.
In this video I show you how to focus to the hyperfocal distance in less than 1 minute.
If you want to know more about the hyperfocal distance I suggest you to:
- Watch our Understanding the hyperfocal distance video.
- Read our depth of field photography guide.
Avoid Star Trails (10)
Don't get me wrong. Star Trails are super cool! I love capturing the colors of the trails in my pictures.
But when photographing the zodiacal light, you don't want the stars to trail in your picture. On the contrary, you want pinpoint stars.
As you know, when shooting a long exposure, because of the Earth's rotation, after a certain exposure time the stars begin to appear as trails in the photo.
So how can you get pinpoint stars?
Easy! Limiting your exposure time. In other words, using a shorter shutter speed.
Now the crucial question is what shutter speed should you set?
As usual, PhotoPills has the answer ;)
Open PhotoPills and tap the Spot Stars pill (Pills Menu).
Then, set the
- Camera.
- Focal length.
- Aperture.
- Declination. If you don't know what the declination is or you're in doubt, just set the declination of the stars to 0º.
- Accuracy. Default is the recommended value for most cases, allowing you to shoot longer exposure times (slower shutter speeds) and to keep the ISO relatively low.
Finally, check the NPF Rule from the table of results. It's more accurate.
Take a test shot and zoom in on a star. If it's a pinpoint, try using a slower shutter speed to allow more light reaching the sensor and, maybe, having the chance of using a lower ISO.
Practice testing different shutter speeds until you get the result you're looking for.
8.7 photographers that excel at shooting the zodiacal light
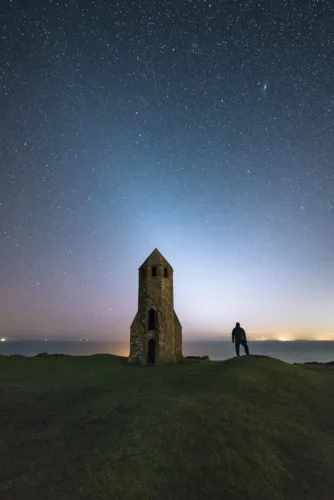
Photo by Ainsley Bennett
Oddly enough, I'm always looking for ways to improve my photography. And one of my favorite learning techniques is looking at other photographers' images.
There are a lot of good things you can learn from observing and analyzing someone else's work.
But most importantly, ask yourself questions about it.
- How do you think the photograph was made?
- What compositional techniques has the photographer used?
- What elements have been included in the frame?
- What is the natural light like?
- How does the photo make you feel?
So I thought it would be cool to share a list of talented astrophotographers with you. All of them have experienced how amazing it is to capture the zodiacal light.
And I believe all are an exceptional source of inspiration.
Alyn Wallace (1)
Alyn Wallace is a landscape astrophotographer based near the Brecon Beacons National Park in Wales (UK). His work has been featured by the likes of National Geographic, NASA and BBC Earth, and he won the “Landscapes at Night” category for Landscape Photographer of the Year 2020.
Now a full-time professional, Alyn travels the world on his quest to capture the darkest skies and most otherworldly landscapes, and he shares his adventures and knowledge on his YouTube channel.
Apart from taking pictures, Alyn is the creator of the Starglow filter, which makes constellations stand out in images. It's a lens filter that I love and I often use.
He is also the designer of the Z and V mounts. Both solve the problem of having your ballhead at an awkward angle when on a star tracker.
Mark Gee (2)
Mark Gee was the overall winner of Astronomy Photographer of the Year in 2013. He's an expert timelapse and astrophotographer, has given talks in TEDx and has been a PhotoPills Master for several years now.
Mark has traveled all over the world photographing the night sky and he usually spends hours alone under the starry sky, venturing to the darkest and most remote locations he can find, preferably areas with very little light pollution.
Mark is fascinated by all things astrophotography, but the biggest mind-boggling fact to him remains the Milky Way as you can see going through his portfolio.
Nevertheless, he also enjoys capturing other phenomena, such as the zodiacal light ;)
Eric Paré (3)
Eric Paré and Kim Henry surprised the world with their revolutionary light painting art.
While having the dream life by traveling with light and a plastic tube, both have managed to build a large learning community all related to his light painting technique.
Eric's trademark style features a hand-drawn circle of light behind silhouetting a perfectly poised dancer (Kim) in a spectacular location with a magnificent view of the Milky Way overhead and it's all captured in one shot, in camera.
Rachel Jones Ross (4)
Rachel Jones Ross is an intrepid adventurer and night sky photographer.
She fell in love with the technical side of photography when she photographed the tail end of the Milky Way for the first time. She was hooked after that and, since then, she spends most of her time photographing the night sky.
That means she's always looking at the landscape. She's looking at those details that help to draw the eye into the frame and make a person wish that they could go and see or photograph that location. And the night sky, whether it's the aurora or moonlight or the Milky Way, is the element that she gets to capture and it's part of the landscape.
Javier Martínez Morán (5)
Born in Madrid, Javier Martínez Morán is a photographer who loves capturing landscapes and astrophotography. In his childhood he spent 4 years in the Canary Islands and this left an indelible mark in his memory that is reflected in a very important part of his work.
He's a self-taught photographer, who has learnt experimenting and trying new techniques. Javier enjoys walking in the mountains and photographing landscapes, especially when the sun sets and the stars come out.
Photography has allowed him to combine these three passions: nature, creativity and dark skies.
Babak Tafreshi (6)
Babak Tafreshi is an Iranian born photographer, journalist and amateur astronomer. He's the winner of the Lennart Nilsson Prize for Scientific Photography of the Year 2009, and the founder of The World at Night (TWAN) project in order to preserve the night sky from light pollution.
He often stands for hours upon hours, sometimes from dusk to dawn, in many different weather elements to capture the image he has in my mind. In order to create a unique photo, location, timing and thinking of the story he wants to tell is very important.
He loves sharing the beauty and wonders of the night sky and with people who are unfamiliar with this part of our nature. That's the main goal of his astrophotography.
Michael Goh (7)
Michael Goh is a full-time photographer located in Western Australia primarily capturing astrophotography.
He received the international Photo Nightscape award 2015, Western Australian Astrofest 2014 and achieved NASA's Astronomy Picture Of the Day on February 17, 2016.
One of Michael's current focuses is improving night sky appreciation and awareness. In this sense, one of the projects he's working on is part of a documentary team on the night sky in Western Australia. Being in such an amazing location on Earth, Michael is able to capture the night sky at its best.
Petr Horálek (8)
Petr Horálek is a world-renowned astrophotographer, writer, traveler, and astronomer.
He specializes in photographing rare night-sky phenomena and his images frequently appear in European Southern Observatory (ESO) publications, as well as having achieved on numerous occasions the ESO Picture of the Week and NASA's Astronomy Picture of the Day.
His photos capture unique moments and views in the sky to show the importance of the fight against the global light pollution problem. He believes that his photographs can help him explain the structure of the Milky Way galaxy and show people what we are missing in light polluted cities.
9.Ready to chase the zodiacal light?
That's it!
This is the end of a complete and step by step tutorial on zodiacal light photography.
And now, it's time to start practicing.
But remember that the zodiacal light can be a bit elusive. So find out when and where you can capture it. And go chase it! ;)
If you think that something is missing or you have a question that wasn't answered in this guide, let me know by leaving a comment below.
I'm here to help ;)
Oh!
One last thing.
Take a look at this article: 'Milky Way Photography: The Definitive Guide'.
It's worth its weight in gold.
You'll learn how to capture amazing pictures of the Milky Way, a powerful element that you can combine with the zodiacal light...
Never stop learning!
Note: Some links on this page are affiliate links. What does this mean? If you buy/rent using these links you're helping support us and it costs you nothing extra. Thank you for your support.
Get this ebook for free now!