A step by step guide to master Moon photography settings
"What are the best camera settings for Moon Photography?"
Let's go straight to the point.
If you don't know where to start, this cheat sheet can help you out with the basic steps.
From then on, everything will depend on natural light! XD
Set the shooting mode to Manual (M).
Set the focal length according to the Moon size and the framing (composition) you want.
Set the aperture to f/8.
Focus on the subject.
Set the ISO to 100.
Adjust the shutter speed, but never above 1s.
Take a test shot and check the histogram.
Along this guide I will go step by step through each setting and the decision(s) behind it.
That way you can understand what you're doing, and most importantly, why you're doing it.
The only way to master the shooting workflow in Moon photography is by understanding the reasoning behind it.
While the above advice is a good starting point, you'll need to experiment and figure out which settings are right for you.
Remember, there rarely is a magic recipe in Moon photography that works for all case scenarios. Whether you're successful capturing your shot or not will depend on many factors, the most important one being the natural light conditions in the shooting location.
So you need to be flexible and be capable of changing your mind and adapting fast.
The natural light and the Moon won't wait for you! ;)
That's why I'm sure that this step by step guide will help you overcome any difficulty that you may face.
After all, the shooting should be exciting and fun, not stressful and frustrating. Don't you think? :)
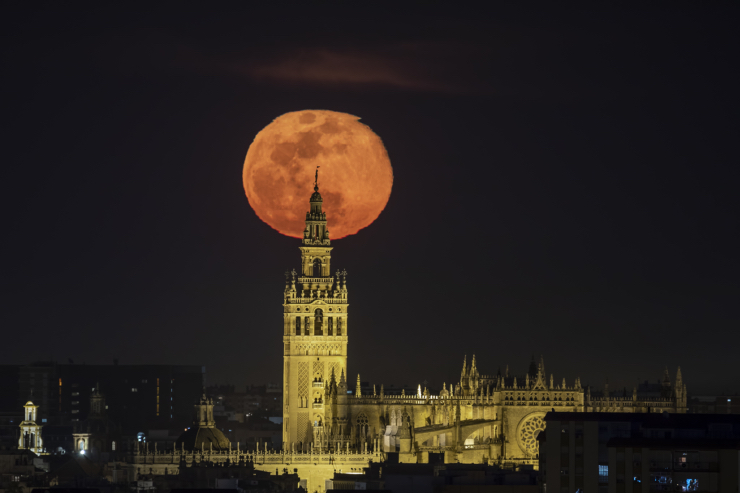
That's exactly what Toni Sendra, the author of the photo above, did.
Take the right decisions and follow a consistent workflow.
(After thoroughly planning the picture with PhotoPills, of course!) XD
Why don't you try it?
There's nothing to be afraid of!
And if you want to keep learning (which is something I always recommend), have a look at the following guides:
- Moon Photography: The Definitive Guide.
- Photography Planning: The Definitive Guide.
- How to take a picture of the Moon.
- How to photograph the Moon with a foreground.
- 50 tips for photographing the Moon.
- Your ultimate Moon photography cheat sheet: quick tips for stunning shots.
But for now, let's have a closer look at the Moon photography settings that you should use as a starting point.
"The Moon fascinates us in her simplicity." - Avijeet Das
Get this ebook for free now!
Content
- Set the shooting mode to Manual (M)
- Set the focal length according to the Moon size and the framing (composition) you want
- Set the aperture to f/8
- Focus on the subject
- Set the ISO to 100
- Adjust the shutter speed, but never above 1s
- Take a test shot and check the histogram
- Practice until there's no tomorrow
1.Set the shooting mode to Manual (M)
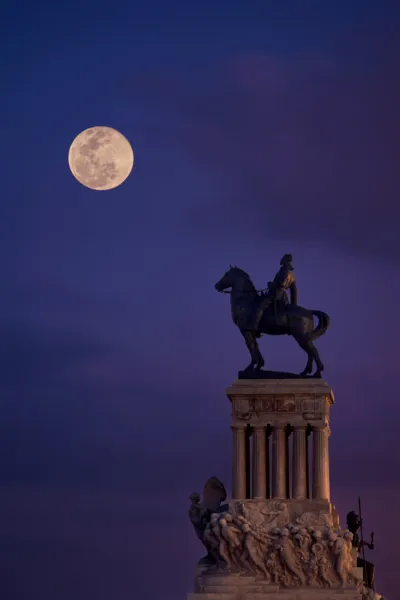
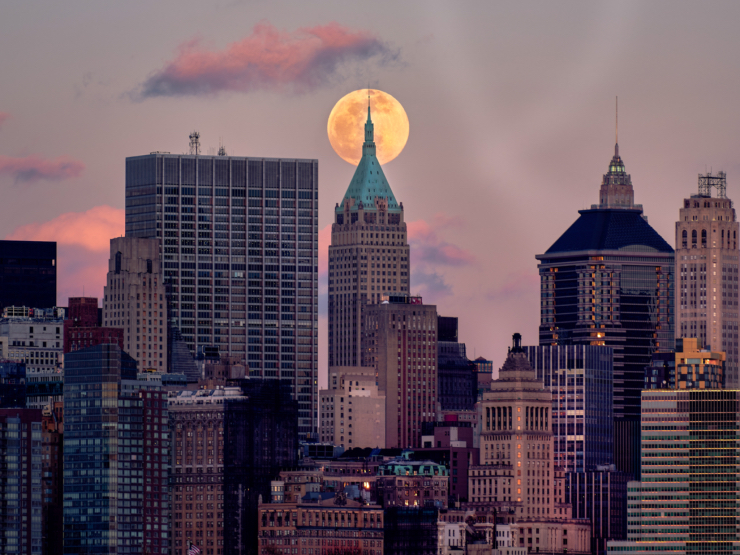
Photo by Yuleivy Matos
Don't be intimidated by the Manual shooting mode (M). I know letting your camera make exposure decisions for you sounds reassuring.
But there's no better time to start learning than right now! ;)
I'm a big proponent of the Manual shooting mode (M), because it gives you full control of your Moon photography settings.
Your aim should always be to get in camera the photo's lightness you're looking for.
To do so, you need to control the exposure triangle precisely: aperture, shutter speed and ISO.
So select the Manual shooting mode (M).
However, this is only a recommendation. It's based on my own workflow, but don't take it for granted.
If you feel more comfortable using one of the semi-automatic modes, go for it.
Just a quick reminder:
- If you select the Aperture Priority mode (A or Av), you'll set the aperture and the camera will decide the shutter speed for you. It helps you determine the depth of field.
- If you select the Shutter Speed Priority mode (S or Tv), you'll set the aperture and the camera will decide the shutter speed for you. It helps you convey motion (or not).
Alternatively, some people like to use the "Looney f/11 rule" to photograph a certain phase of the Moon.
It's an easy to memorize rule that can help you get a good lightness of the Moon. So it may prove useful if you want to capture just the Moon with no landscape or subject in the frame.
The Looney f/11 rule says that:
"Set the aperture to f/11 and use a shutter speed equal to 1 divided by the ISO that you have set (1/ISO)."
For example, f/11 at ISO 100 and 1/100s.
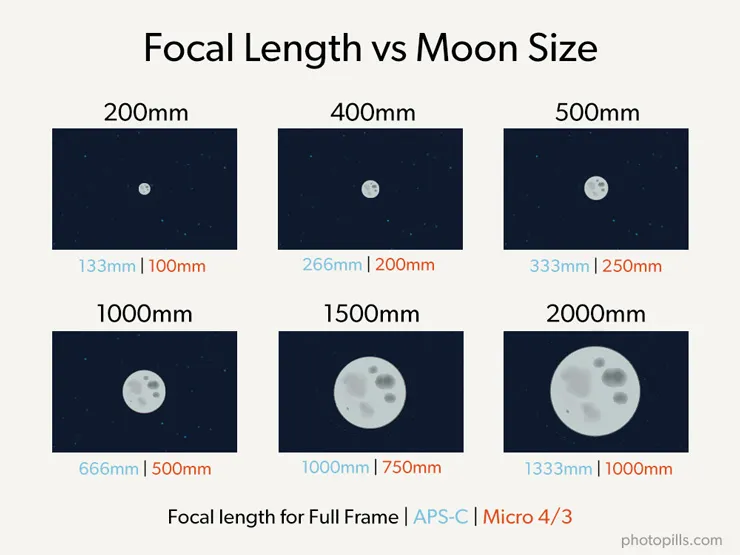
2.Set the focal length according to the Moon size and the framing (composition) you want
Do you want to capture a huge Moon?
Well, the first step is to plan the shot! :P
It's the only way to make sure that you'll capture the photo that you have imagined.
Before you start your plan, there are 2 major factors that you should take into consideration:
The shooting spot determines the size of the Moon relative to the subject size. So the further away you are from the subject, the bigger the Moon will look like.
The focal length determines the Moon size in the frame. And that's because a telephoto lens compresses perspective.
To learn more on the subject, I suggest you watch this video:
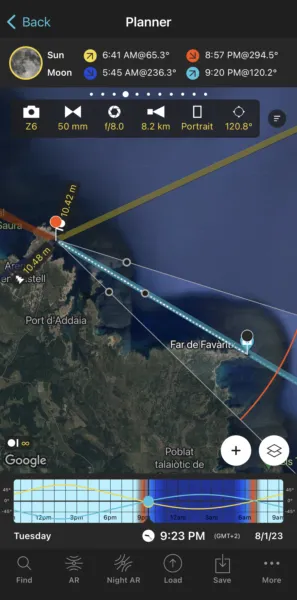
And guess what? You can easily plan your Moon shot with the help of PhotoPills :)
You don't need to calculate anything!
So as you can see, deciding the focal length is essential in your Moon photography settings.
It determines:
- The Moon size in the photo.
- The framing of your picture, depending on the composition you've envisioned.
Use a:
- Wide-angle lens (10-35mm) to get a Moon as a dot.
- Intermediate focal lengths (35-200mm) to capture a small Moon.
- Long focal length (>200mm) to get a big (or huge!) Moon.
This is something that you'll need to think about in advance, during the planning phase.
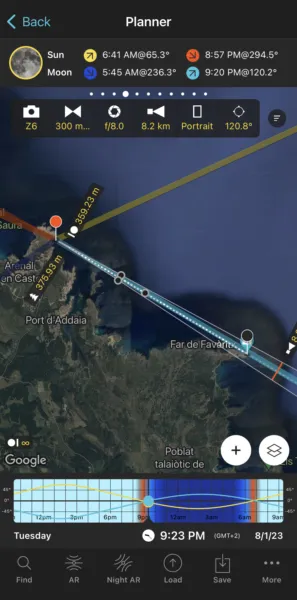
When planning your shot, decide where you want the Moon in the frame compared to your subject's position (the composition you're looking for) and how big you want it to be.
Let's say you want to plan a Big Moon aligned with a subject.
To get this kind of shot you need to:
- Be far away from your subject.
- Use a long focal length.
If you're not sure how the photo will look like, plan the field of view (FoV) and depth of field (DoF).
And of course, I suggest you read more about the best lens for Moon photography.
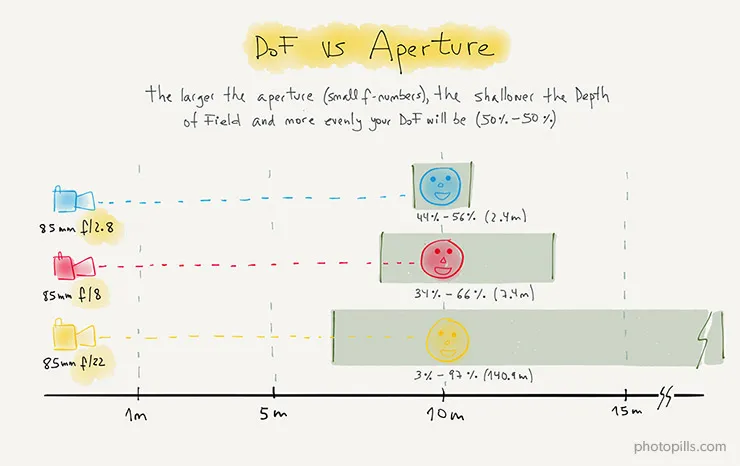
3.Set the aperture to f/8
"What aperture should I use for the Moon?"
Of all the Moon photography settings, the aperture is the most important one.
All lenses have what's known as a sweet spot. That's an aperture where the image isn't too soft and chromatic aberration is well-controlled. This sweet spot isn't usually at the widest or smallest aperture, but somewhere in the middle. For that reason, I like to start with an aperture of f/8 when taking pictures of the Moon.
So I recommend you use an aperture of f/8.
However, the exact aperture you'll use for your shot depends on:
- The depth of field you want in your Moon picture.
- The natural light present in the scene at the shooting time.
Let's say you want to shoot during the Moonrise (while the Sun is setting). This is the workflow I recommend you to follow:
Start with f/8.
Open the aperture (f/5.6, f/4) as the light fades away. You shouldn't go over f/4, otherwise you'll get a shallow depth of field and part of your picture will be blurred.
Conversely, if you want to shoot during the Moonset (while the Sun is rising), follow the opposite workflow:
Start with f/4.
Keep closing the aperture down until f/8 as the light intensifies. You shouldn't go over f/11 to keep your image tack sharp.
Obviously, it will be easier to shoot at f/8 if you're looking to get a golden hour or blue hour Moon shot. Since you'll have more light in the scene, you can shoot at a small aperture while getting both the Moon and the foreground correctly exposed in one single shot.
In similar fashion, in absence of light, shoot at f/4 during the astronomical twilight.
4.Focus on the subject

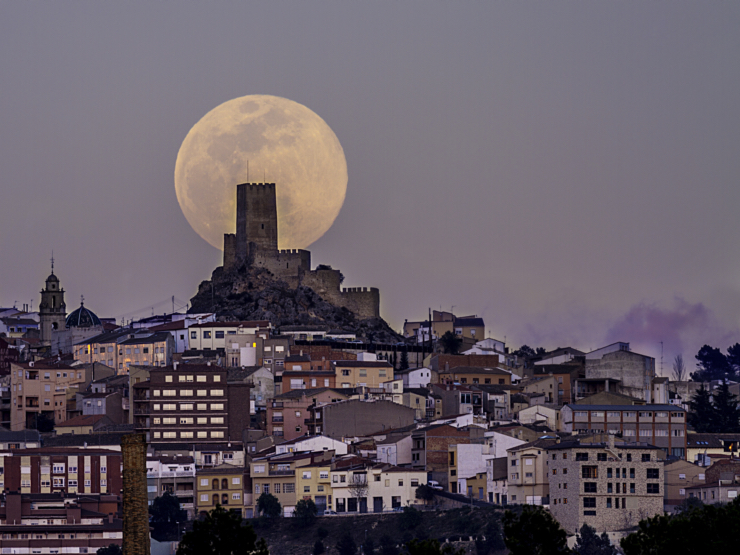
Photo by Arpan Das
Focusing is one of the biggest challenges when determining your Moon photography settings. Getting a blurry Moon and/or subject is very common when you're starting in this photography genre.
Fortunately, it's very easy to avoid this beginners' mistake.
First, you need to determine what you want to be sharp.
When capturing a certain Moon phase
When taking a picture of a certain Moon phase, the key step happens while focusing.
Here, you should focus on the Moon. There's nothing else in your frame except for the sky (negative space)!
When capturing the Moon with a foreground
When taking a picture of the Moon with a foreground, you should focus on the subject.
Why?
- If your subject falls behind the hyperfocal distance, the Moon will be acceptably sharp too.
- If your subject falls in front of the hyperfocal distance, then the Moon will be out of focus.
But, in my opinion, it's always best to have your subject tack sharp and the Moon (somewhat) out of focus, and not the other way around. Since your subject is the main element of your picture, if it's not tack sharp you won't attract the viewer's attention.
Apart from reading this tutorial, you can also watch this video where you'll learn how to photograph the Moon with a foreground:
How to capture clear and sharp images of the Moon
To capture clear and sharp images of the Moon, follow these easy Moon focusing steps:
Set your camera to Live View mode.
Use the digital focus magnifier to zoom in on a certain area of the Moon or your subject.
Manually adjust the focus ring on your lens until this specific area looks sharpest.
Remember: Once you have set the focus, keep it in manual mode and avoid touching the focus ring while taking Moon photos, unless you change your lens or focal length.
After setting the focus, take a test shot and view it on your camera's LCD screen. Zoom in on the picture to check if all or most of the scene appears clear. Occasionally do this while shooting to ensure your focus hasn't accidentally shifted.
5.Set the ISO to 100
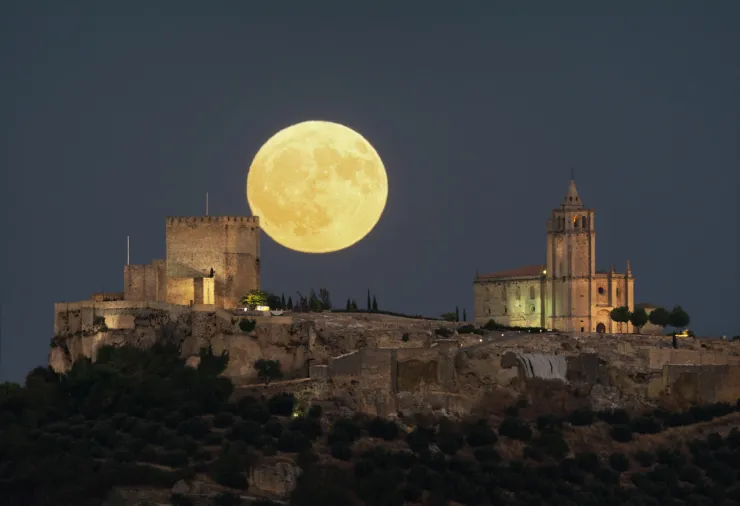
Photo by Miguel Ángel Avi
Let's keep going with your Moon photography settings.
Ideally, you should use an ISO as low as possible. But be ready to push it up to 400 or 800 depending on the natural light you have at the time of the photo.
Start with ISO 100 and increase it depending on the natural light conditions.
I recommend you keep it between 100 and 1600. But, as always, it all depends on how much noise your camera produces.
- Low-end cameras, usually with cropped sensors, are much more limited. If you crank up your ISO to the far end, chances are that your image will have digital noise. So try to keep it at or below 1600.
- High-end cameras with full frame sensors can produce amazing images with little or no noise at high ISO values (6400-12800).
Having said that, if you need to go over 1600 knowing that you'll get a reasonable noise level, do it. It's always better to have a noisy Moon picture than to have no picture at all ;)
Not sure about what type of camera you should use to capture the Moon? Find out more about the best camera to take pictures of the Moon.
You should also consider external lights present in the scene. If you're photographing the Moon and there are street lights, house lights, or any other type of artificial lighting, you should reduce your ISO to avoid blowing the highlights out.
And if you're shooting with natural light...
During golden hour, you can keep your ISO setting pretty much unchanged.
However, during the blue hour, the twilights and the night, you'll need to push the ISO up to keep the shutter speed under 1s.
Why under 1s?
Keep reading.
6.Adjust the shutter speed, but never above 1s
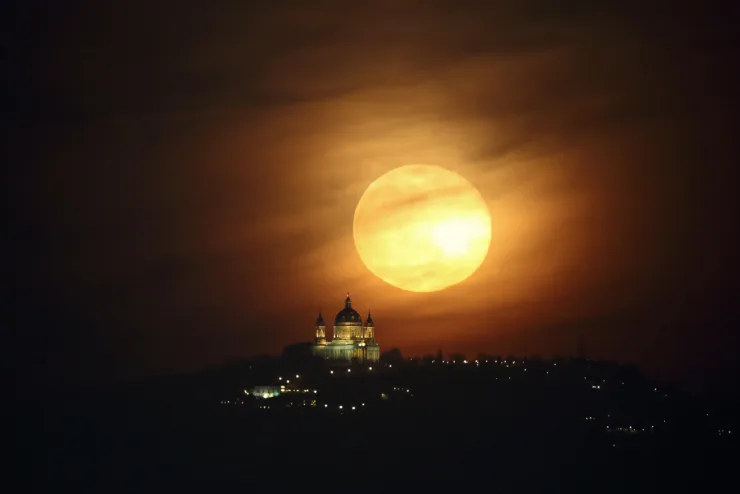
Photo by Cristian Buda
Now that you've set the aperture and the ISO, you need to figure out the last of your Moon photography settings – the shutter speed.
Remember that if you want to keep the lightness of your picture (how light or dark it is), you need to balance the aperture, the shutter speed and the ISO.
Shutter speed is one of the most important camera settings for Moon photography because of how fast the Moon "moves" across the sky. Similar to wildlife or sports photography, you'll need a fast shutter speed to freeze the motion.
So, considering the previous settings (aperture and ISO), adjust the shutter speed.
Just, don't set it above 1s.
Why?
Because of the Earth's rotation! ;)
Even though it doesn't look like it, the Moon "moves" very fast within the frame.
So if you set a very slow shutter speed (> 1s) when shooting a scene with very little light or completely dark, the Moon will come out blurred.
7.Take a test shot and check the histogram
Photo by Ramón Pérez
Now that all your Moon photography settings are adjusted, the last step is to check the histogram.
The histogram is key in photography. If you're not familiar with it, you should learn what's the histogram and what's it for.
Checking the histogram in Moon photography is important because the camera brightness and light conditions can trick your eye when seeing the image on the camera's LCD screen. To ensure that your picture has the lightness you want, always look at the histogram.
8.Practice until there's no tomorrow
Cool!
By now you should have a good understanding of the decision you'll be taking during the shooting. But most importantly, you should know how you'll reflect them on your Moon photography settings.
Don't trust anyone who says that getting them just can be tricky.
It's not!
Getting fantastic Moon shots doesn't require any magic or secret techniques. The key is to find the right Moon photography settings and practice until you're satisfied with the outcomes.
Start with these tips as a foundation, but don't be afraid to explore and experiment on your own.
You might be amazed by the pictures you can capture!
Happy shooting!
Note: Some links on this page are affiliate links. What does this mean? If you buy/rent using these links you're helping support us and it costs you nothing extra. Thank you for your support.
Get this ebook for free now!