50 tips for photographing the Moon
In this article I share with you 50 tips for photographing the Moon.
Moon photography is not a difficult genre, but it can present a few challenges both during the planning phase (here's where the PhotoPills app comes to your rescue) and on the shooting day.
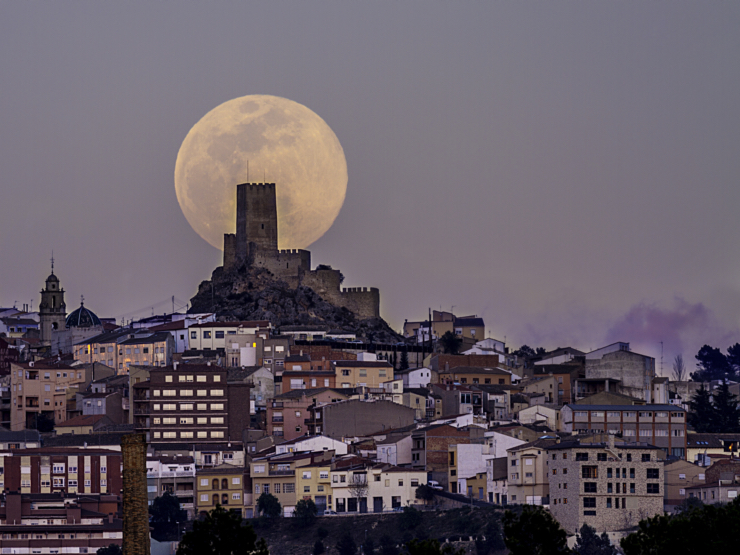
So the following tips will help you avoid bad surprises and capture an amazing Moon picture, like the cover of this article shot by Gregory O'Connell.
Oh, and you can also have a look at the ultimate Moon photography cheat sheet!
But before we start...
If you intend to become a Moonmaster (just like Gregory O'Connell with his picture above), I suggest you take a look at our super detailed Moon Photography guide.
Did you know that you can download for free? ;)
Well you can do so in the subscription box below.
And now let me tell you my favorite 50 tips for photographing the Moon.
"The Moon puts on an elegant show, different every time in shape, color, and nuance." - Arthur Smith
Get this ebook for free now!
Content
- Find inspiration looking at the best Moon pictures
- Get inspired by the best moon photographers
- Capture all types of Moons
- Don't miss the lunar eclipses either!
- Decide how big you want the Moon compared to the subject's size
- Determine the focal length you want to get the composition you want
- Decide the color of the Moon you want
- Understand the Moon position in the sky
- Finding out the Moon position relative to the subject
- Take your Moon picture the evening before the official Full Moon date
- Find an interesting subject
- Decide your composition
- Look for a location with space to move around
- Find a place that you can shoot towards the east and the west
- Look for a location that is far away from the subject
- Scout the shooting location during the day
- Respect the restrictions (if any)
- Use PhotoPills' AR views to confirm the Moon's position in the sky
- Check the weather forecast
- Never give up
- Use the best planning tool
- Know the height of your subject
- Plan your field of view
- Take advantage of the Moon size tool
- Begin by planning a Moonrise (or Moonset) on a certain date
- Plan a big Moon on a certain date
- Plan a Moonrise (or Moonset) with the Moon in a certain position
- Plan a big Moon in a certain position
- Take the mountains into account when planning your shot
- Use the best camera for Moon shots (the one you already have!)
- Use the best lens for Moon photography (any long lens will do!)
- Use a sturdy tripod to get a tack sharp Moon
- Use an intervalometer to avoid vibrations
- Bring a headlamp
- When shooting at night, wear warm clothing
- Make sure you're at the the exact shooting spot
- Be ready to work fast
- Switch on the lens stabilization option when it's windy
- Use an aperture between f/8 and f/11
- Focus at the hyperfocal if you're using a wide angle lens
- Focus directly on the Moon if you're using long focal lengths without foreground
- Be careful when focusing when using intermediate/long focal lengths with foreground
- Make sure both your subject and the Moon are in focus
- Use the Live View mode to focus accurately
- Use the Focus Peaking and/or the Focus Magnifier functions
- Don't use a shutter speed over 1s
- Set the minimum ISO
- Underexpose the Moon, don't overexpose it
- Do an exposure bracketing when the light changes fast
- Take a picture of the LCD screen after you nailed the shot
- Time to go out and shoot!
1.Find inspiration looking at the best Moon pictures
I always find some inspiration in other photographers' work. And I honestly believe that you could benefit from this strategy too.
Exploring the work of others is a wonderful way to get ideas for your own pictures, and can also lead you to discover new techniques and styles. Obviously, you don't want to be copying their pictures or style but you might see something that will inspire you to compose your own original shot.
Needless to say, social media is the simplest way to fuel your photography inspiration with amazing pictures.
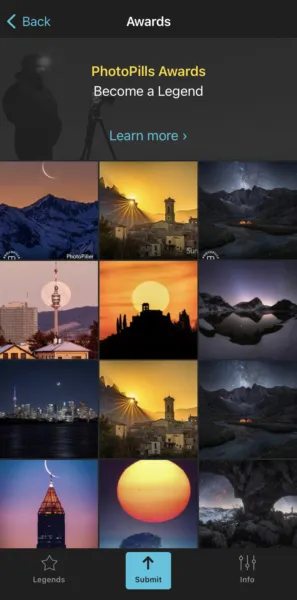
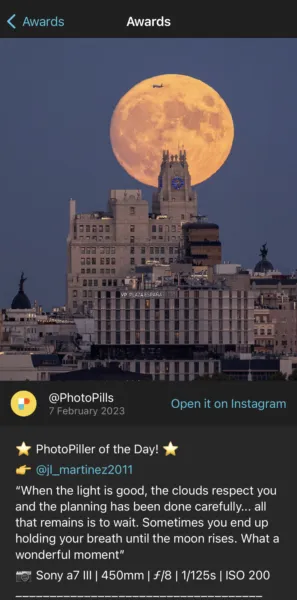
My first recommendation is to explore the PhotoPills Awards as often as you can. It's a contest that we've been organizing for the past few years in which we showcase the work of fellow PhotoPillers like you and me. All you have to do is follow our Instagram account! ;)
If you feel overwhelmed with the amount of images that populate our feed, I suggest you to have a look at a selection of the best Moon shots (2021, 2022 and 2023 editions).
In addition to this, Rafael produced a video some time ago where he selected 25 stunning Moon photos that can also inspire you.
My second recommendation is to find outstanding portfolios.
The easiest way to do so is following an endless list of photography Instagram accounts and scroll through them from the comfort of your own couch.
Alternatively, you can buy photography books and study the work of other great master photographers. Looking at photography books will often provide valuable insight into the author's ideas, process and techniques, allowing you to build a library of concepts, compositions and styles to inform your own work.
Finally, you should also try to attend photography exhibits near you. It's a great way to constantly discover and explore new formats to make the level of your craft rise.
You can go to a small art exhibition to learn from your peers or attend a museum to study the classics. Both will enhance your understanding of photography.
2.Get inspired by the best Moon photographers
As I said before, finding outstanding portfolios is essential. So you need to have a look at the work of the best Moon photographers.
"Fine Toni, but how do I find the best Moon photographers?"
Easy peasy!
Have a look at this article I wrote with a (long) list of the work of the best Moon photographers.
I tend to grow the list as I discover new Moon photographers so check the article out from time to time... :)
3.Capture all types of Moons
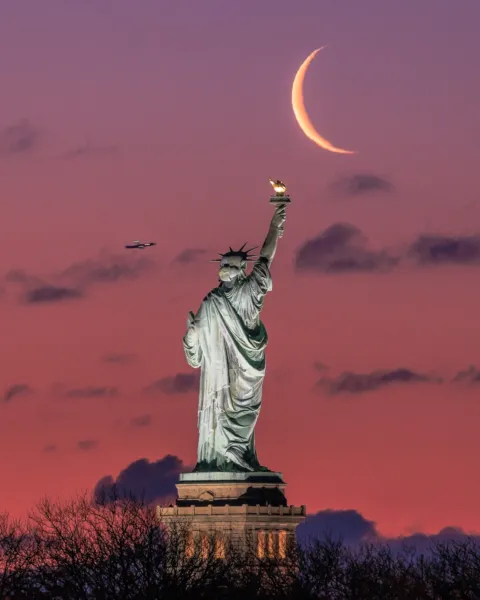
Photo by Michele Chiaia
When thinking about Moon photography, most images that come to mind are those including a Full Moon.
However, why limit yourself creatively when you can shoot jaw-dropping pictures of the Moon during the rest of its phases?
- Waning Gibbous Moon. After the maximum phase of a Full Moon, the light starts decreasing, called the Waning gibbous phase. This phase lasts until the Third Quarter.
- First and Last Quarter Moon. The First Quarter and the Last Quarter occur when you can see half of the illuminated part and half of the Moon's shadow part. This is why generally, these phases are known as Half Moon.
- Waning Crescent Moon. Following the Last Quarter, lights wane until the New Moon, when it's completely gone. This is the Waning Crescent phase.
- Waxing Crescent Moon. It happens after the New Moon when the sunlit part increases, but less than a half. If you want to learn how to plan a photo of the Waxing Crescent Moon, have a look at this video.
- Waxing Gibbous Moon. It occurs when the sunlit part of the Moon is now more than a half and still increasing.
Moreover, you can also try to capture other very special Moons:
- Supermoon. It's actually just a nickname for what astronomers call a perigean Full Moon – a Moon that is full and at its closest point in its orbit around Earth. So a Supermoon is a Full Moon that appears to you as a larger-than-usual Moon in the night sky because it's a bit closer to Earth.
- Moon with earthshine. Earthshine is a phenomenon that allows you to see the dark, night side of the Moon. You can see Earthshine whenever there's a Crescent Moon on the horizon at Sunset.
- Daytime Moon. There are certain windows each month during which the daytime Moon is most noticeable. Basically, you need 3 things to see the daytime Moon:
- Look within a week or so of the date of Full Moon.
- Before Full Moon, look for the daytime Moon in the afternoon.
- After Full Moon, look for the daytime Moon in the morning.
If you want to improve your Moon photography, don't shoot exclusively during the Full Moon dates. Shoot for almost the whole month!
4.Don't miss the lunar eclipses either!
Photo by Yuri Beletsky
Total lunar eclipses are the most colorful of all astronomical phenomena.
Each Moon eclipse is unique, with its brightness and coloration determined by a range of factors. So it's a great opportunity to capture the Moon under very special circumstances.
Here's a breakdown of the stages of a total lunar eclipse that you can photograph:
- Moon during the penumbral eclipse. The penumbral part of Earth's shadow starts moving over the Moon (or moves away if the eclipse is ending). This phase is very difficult to observe with the naked eye.
- A partially eclipsed Moon. It happens while the Earth's umbra covers the Moon.
- A fully eclipsed Moon. When a total eclipse of the Moon occurs, the Moon can take on different shades of red, orange, brown or even yellow. The color of the Moon depends on the atmospheric conditions of the Earth during the eclipse.
- A Blood Moon. In many eclipses the Moon becomes red! This Moon is popularly known as "Blood Moon".
If you want to know everything about how to plan and shoot a lunar eclipse, you should check:
- Our super detailed guide on lunar eclipses.
- Our video about how to plan and photograph a total lunar eclipse.
5.Decide how big you want the Moon compared to the subject's size
Yes, that's right. You can determine how big you want the Moon compared to your subject's size.
All you need to do is shoot from a relatively far away distance.
But how far away do you need to be?
Well... Now, I could refer to a mathematical rule and write several pages to explain to you how to determine it.
But what's the point in doing this when PhotoPills can do all the calculations for you? ;)
To learn what you need to do, I suggest you watch this video:
Just follow these simple steps:
- Open PhotoPills.
- Go to the Planner and place the Red Pin right in the shooting spot.
- Slide the top panels to get to Panel 2, and tap the button to activate the Black Pin.
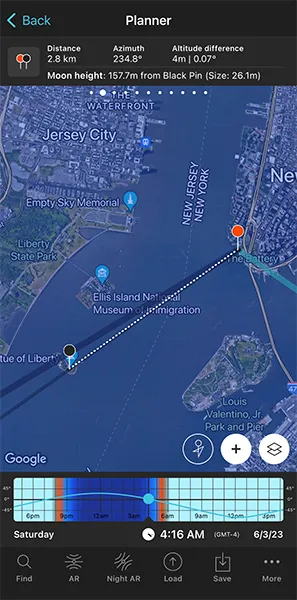
- Place the Black Pin on your subject, where you want the Moon to be. Panel 2 indicates the shooting distance, that is, the distance between the Red Pin and the Black Pin.
- Sliding your finger over the Time Bar to move time. You want to align the Moon (the thin blue line) with the Black Pin. As you move time, you'll notice that the size of the Moon appears in parentheses in Panel 2 above the map.
So that's how PhotoPills shows you in a matter of seconds how big the Moon is compared to your subject.
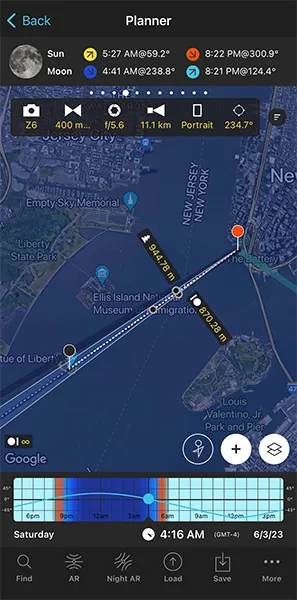
But did you know that PhotoPills shows you the size of the Moon on the map as well?
Here's what you need to do:
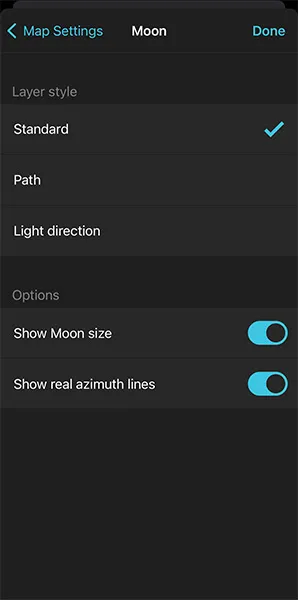
- Tap the Map Settings button next to the (+) button on the map (lower right corner).
- Tap the Moon layer and activate the Show Moon size option.
- Go back to the map and zoom in on the Black Pin. You'll now see that the light blue line (the one showing the Moon azimuth) shows you the size of the Moon.
As you can see, it's very easy to know how big the Moon is going to be compared to the width of your subject.
If you need a more detailed explanation read section 4 of our Moon photography guide.
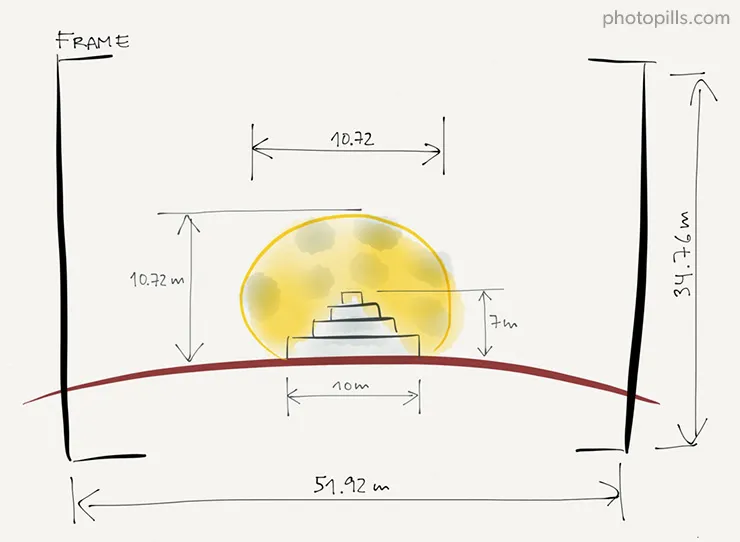
6.Determine the focal length you want to get the composition you want
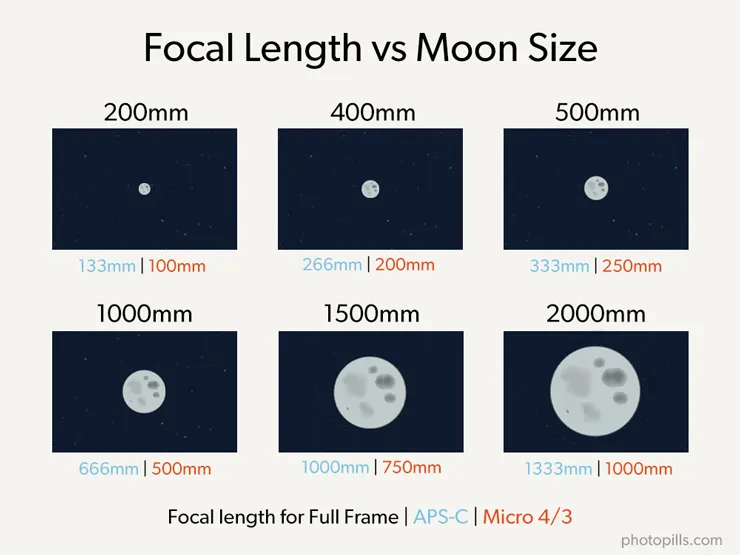
As you can see from the diagram above, the longer the focal length, the bigger the Moon appears in the frame.
If you're not sure which focal length you should use to capture a certain part of the landscape and/or to have a Moon of a certain size in the frame, use PhotoPills!
Thanks to PhotoPills you can see:
- The Moon size on the map (depending on the shooting distance).
- The field of view on the map (depending on focal length, camera...).
I already explained you in the previous tip (tip #5), how to activate and see the Moon size on the Planner.
And if you want to learn how to make the most out of the field of view (FoV) tool, read section 4 of our Moon photography guide.
7.Decide the color of the Moon you want

Photo by Delvis Disla
When photographing the Moon, natural light plays a key role.
First, because the color of the Moon will change (white, yellow, orange, pink, red).
Second, because it will affect the exposure and the camera settings you need to use to capture the Moon and the rest of the scene in one single shot.
Let's see when you need to shoot to get the color of the Moon you want.
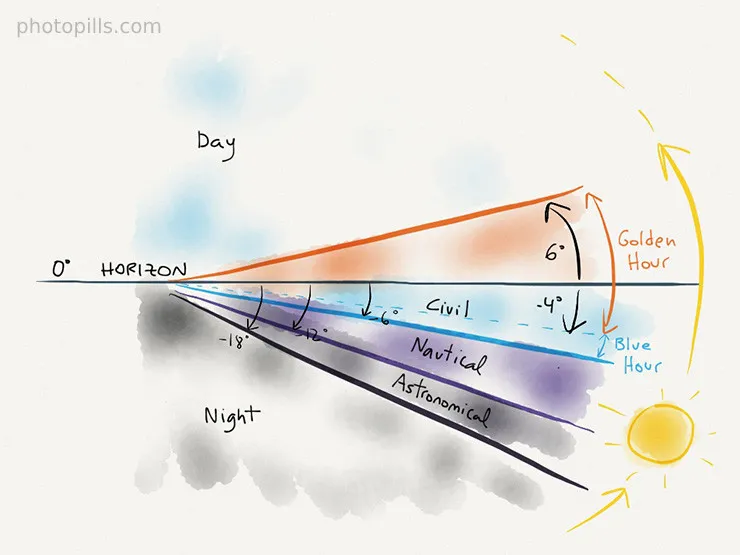
Day
- The Sun has an elevation higher than 6º.
- The color of the Moon is bluish, although very faint.
- You can capture the Moon and the rest of the scene in a single exposure.
Golden hour
- The Sun has an elevation between 6º and -4º.
- The color of the Moon varies between pink and yellow as the Sun goes down.
- You can photograph a landscape and the Moon in a single exposure.
Blue hour
- The Sun has an elevation between -4º and -6º.
- The Moon takes on a spectacular yellow color.
- If you work fast, you can still capture the landscape and the Moon in a single exposure.
Civil twilight
- The Sun has an elevation between 0º and -6º.
- The beginning of the civil twilight (the end of the golden hour) is the best time to photograph the Moon. That is, when the elevation of the Sun is between -1º and -4º.
Nautical twilight
- The Sun has an elevation between -6º and -12º.
- The color of the Moon goes from yellow to white.
- You can't capture the landscape and the Moon in a single exposure, unless there's an artificial light source in the scene. However, this is an ideal time for Moon silhouettes.
Astronomical twilight and night
- The Sun has an elevation between -12º and -18º, and the night when the elevation is below -18º.
- The sky is too dark and the Moon too white.
- You can no longer capture the Moon and the landscape in the same exposure, unless there's an artificial light source in the scene.
This is a brief summary of the different light phases as the elevation of the Sun changes.
But if you want to read more on the subject, I suggest you check our super guide on natural light.
Alternatively, you can watch a video where Rafa explains in depth how natural light behaves and the type of photos you can take at each moment of the day.
8.Understand the Moon position in the sky
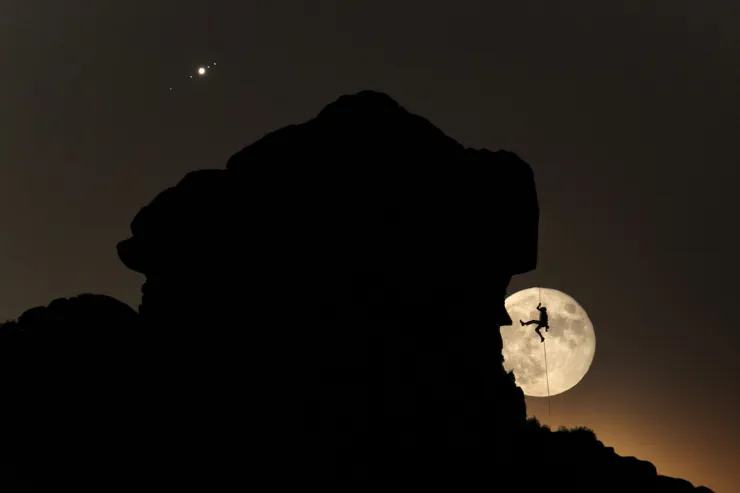
Photo by Daniel Sanz
When you imagine a picture of the Moon, you probably envision a photo of a certain subject and the Moon in a specific position in the frame (in the sky).
But how can you know if the Moon will be where you want to be?
And if it does, how can you determine when it will happen?
The answer to your prayers is PhotoPills (as usual!).
Having said that, first you need to know 3 things:
The shooting spot. The position where you're going to be taking the photo from.
The shooting date. The day you intend to take the picture.
The exact shooting time (in hours and minutes).
Once you know these 3 inputs, PhotoPills will help you know the Moon position.
OK, how do you define the Moon position in the sky? With 2 variables:
- The azimuth. It determines the Moon's direction and it's expressed with a number that goes from 0º to 359º where 0º is the True North.
- The elevation. It determines the Moon's altitude in the sky and it's expressed with a number that goes from 0º to 90º where 0º is the horizon.
If you want to know everything about the azimuth and elevation, you should definitely watch this video:
How can you see the Moon's azimuth and elevation in PhotoPills? Easy!
- From home, on the map,
- At the shooting location, when you're at the Red Pin position, tap the AR button (bottom of the screen) to visualize the Moon position with the Augmented Reality view ;)
If you want to expand on the subject, you can read everything you need to know about the azimuth and the elevation.
9.Finding out the Moon position relative to the subject
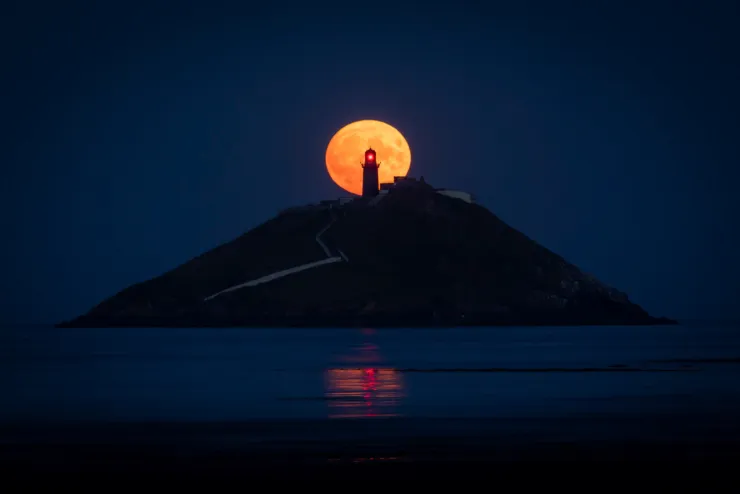
Photo by Karol Ryan
When you want to shoot a very specific composition, you need to define the Moon position relative to the terrain and/or height of your subject.
(Obviously, you need to know your subject's height in advance).
But how can you do this?
1. Scout the location.
The first piece of advice that comes to mind is that you should always scout the location thoroughly during daytime. It's the best way to figure out if something will block the view of the subject and/or the Moon from the shooting spot.
Apart from checking it with your own eyes, once you're at the Red Pin position (according to your PhotoPills plan), tap the AR button (bottom of the screen) on the Planner to visualize the Moon position with the Augmented Reality view ;)
Ideally, you should do this 2-3 days before the shooting date... If you can't, go at least a few hours before the shooting time.
You can find more details reading tip #16.
2. Use the PhotoPills Planner.
You can also find the information you need using the Planner:
- Change the map type to Terrain, so you can visualize the topography (mountains, hills, valleys, etc.).
- Take advantage of Panel 2 as tells you everything you need:
- The Moon altitude above the Black Pin. Actually, it's the center of the Moon altitude above ground level where you've placed the Black Pin.
- The Moon size, so you know how big it's going to be compared to the subject.
- As you change the Black Pin's position, you'll notice the Moon's altitude and size vary as well. So you can move the Black Pin along the Moon's azimuth (thin blue line) to know how the terrain changes along the shooting direction.
I suggest you have a look at these videos where Rafael explains everything with real plans:
- 'How to plan a photo of the next Full Moon with a building'.
- 'Will the Moon be blocked by a mountain?'.
10.Take your Moon picture the evening before the official Full Moon date

Photo by Jordi de Febrer
If you want to capture a Full Moon, don't limit yourself to the actual day when the Full Moon occurs.
There are 3 reasons why shooting the Full Moon on the day before or after might be a good idea:
- To shoot with better natural light.
- To benefit from better weather conditions.
- To capture more detail of the Moon's surface.
The Moon will still be nearly 100% full, so no one will notice the fraction of the surface covered in shadow.
You can shoot with better natural light (1)
The Full Moon rises and sets opposite the Sun.
To check this out have a look at the PhotoPills Planner – you'll notice that from the Red Pin position on the date and time of the Full Moon
- The Sunrise (thick yellow) and Moonset (thick dark blue) lines point towards opposite directions (azimuts).
- The Sunset (thick orange) and Moonrise (thick light blue) lines point towards opposite directions (azimuts).
What this means is that on Full Moon day, the Moon rises just after Sunset and sets just after Sunrise.
Thus, depending on the time of the year and the Red Pin position (Northern or Southern Hemisphere) you can take advantage of a longer period of time to shoot the Moon with the natural light conditions you're looking for.
For example, you may want to capture the Full Moon during blue hour to get a moody cityscape or you'd like to photograph a yellow Moon during golden hour.
So, once you know your shooting spot, check with PhotoPills the dates before, during and after Full Moon to see:
- How much time you have between the Moonset and the Sunrise or the Sunset and the Moonrise, depending on what you want to shoot. You have this information on Panel 4.
- The natural light you'll have during Moonrise or Moonset. To see the daytime, the golden hour, the twilights and the nighttime on the Planner's map, tap the Map Settings button (bottom right-hand corner, next to the (+) button). Then, tap the Twilights layer.
In most of your pictures, you'll be looking for a Moon with a low elevation (ie. not far from the horizon) so you may not want either the Moonrise and Sunset or Moonset and Sunrise to be too far away in time.
If they are, you may be shooting a Full Moon under low natural light conditions and the sky will be too dark to capture the foreground in one exposure.
You can benefit from better weather conditions (2)
Check the weather forecast on the days before and on the shooting day. Apart from the location's national meteorology service, my favorite apps are:
The sky should be clear, with no clouds covering the Moon. So if you don't find the weather conditions you're looking for, you can always try to shoot the day before or the day after Full Moon.
However, there's no reason to abort the shooting session if it's cloudy. You can't imagine how many photographers I know that tend to shy away from overcast weather.
And, honestly, I still don't understand why.
A cloudy day is an excellent time for stunning Moon photography!
Use the clouds themselves to add sky definition and create unique compositions. Clouds add texture, shape, and form.
You can capture more detail of the Moon's surface (3)
The Full Moon shows the least amount of shadows and surface detail.
Remember that Moonlight is just bright reflected Sunlight. So when the Moon is exposed to such a powerful light, the surface's detail is washed away.
What really happens is that the Moon is overexposed.
Therefore, details of the lunar surface are actually easier to capture when the Moon is not entirely full.
Just like in any other photography genre, shadows are important to reveal the beautiful textures on the lunar surface. These shadows begin when the Moon reflects the Sunlight from the side, which happens during a Gibbous Moon:
- The day(s) before Full Moon, you'll shoot a Waxing Gibbous Moon.
- The day(s) after Full Moon, you'll shoot a Waning Gibbous Moon.
11.Find an interesting subject
Photo by Jesús González
Photography suffers from the same problem that any other forms of art also has: everything's been done before.
Taking a unique and interesting Moon picture requires being in a situation or environment that hasn't been photographed many times before. So apart from finding a cool location, you also need to include an interesting subject in your composition.
Thankfully, such locations and subjects to work with don't necessarily have to be difficult or inaccessible.
Apart from the Moon, the subject will be the main element. And it will also be the magnet to attract your viewer's eye.
So when you're scouting a location (either online or offline), look for any element in the landscape that stands out: a rock formation, a tree, a unique construction (such as a lighthouse, a ruin, a building, a bridge, etc.), a monument, or a human figure...
If you don't know where to start, read section 3 of our super guide on Moon photography.
12.Decide your composition
Photo by Philippe Roques
When you're in the process of envisioning your picture, one of the first questions you should ask yourself is:
"What do I want to shoot the Moon with?"
In other words, you need to have an idea of
- What you want to include in the frame. Do you want to add something else apart from the Moon and the subject? Would you like to have a lot of negative space?
- Where you want the most important elements in the frame. Do you want the Moon over your subject? Or is it better to put it behind the subject?
The composition is crucial.
Having said that, the fewer elements you include in the frame, the easier it will be for the viewer to understand the story and sensations the photo conveys. That's why I'm a big fan of simple compositions.
But that doesn't mean you can't include one or several elements in your composition. Actually, it all depends on the location, the frame and how you want to tell the story.
13.Look for a location with space to move around
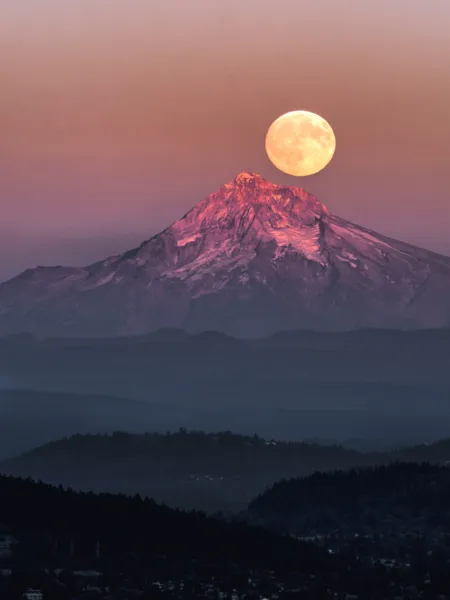
Photo by Joan Camp
Your preferred shooting location should have tons of room so you can move around.
Let me explain to you why.
Moon photography requires you to be extremely precise. Obviously, it depends on the type of photo you want to capture.
If you intend to shoot a simple Moonrise, both the planning and the shooting will be fairly easy because you don't need the Moon to be in a specific position in the sky.
However, if you want to align the Moon with your subject or if you want it to be in a specific position compared to your subject, you need to be very accurate.
On location, you could face the following situations:
You realize that the planned shooting spot is a couple of meters away from the right shooting spot. So if you shoot from there, you'll miss the alignment!
For some reason you miss the exact shooting time and the Moon is where you wanted anymore.
Well, sh*t happens.
But if you have room around you, you can easily move your gear and your shooting spot to recompose the shot.
In addition to this, the more space you have, the more shooting spots you'll have, increasing the potential compositions.
So having space to move around is essential. But, as I will explain in tip #37, practice to work fast because the Moon won't wait! ;)
14.Find a place that you can shoot towards the east and the west
Just like the Sun, the Moon always rises in the east and sets in the west.
So if you want to shoot:
- A Moonrise, you'll need to shoot towards the east.
- A Moonset, you'll have to point your camera towards the west.
Every day it does it in a different direction (azimuth), of course. So you need to adjust the shooting spot depending on the date and time at which the moment you've imagined occurs.
But sometimes the magic happens when you're looking for locations because some places serve both purposes – capturing a Moonrise and a Moonset.
Of course, you'll need to find different subjects and maybe certain alignments are not possible. But, the more versatile a location is, the more astonishing Moon pictures you'll be able to capture.
15.Look for a location that is far away from the subject

Photo by Andrés Domínguez
As I told you in tip #5, the further away you are from the subject the bigger the Moon will be compared to it.
So if you want a huge Moon compared to your subject, you need to find a location (and a shooting spot) that it's far away from the subject.
How far?
Well... It's up to you, depending on how big you want the Moon to be and how difficult it is to have a clear view of the subject and the rest of the landscape.
I recommend you apply the PhotoPills rule of 100!
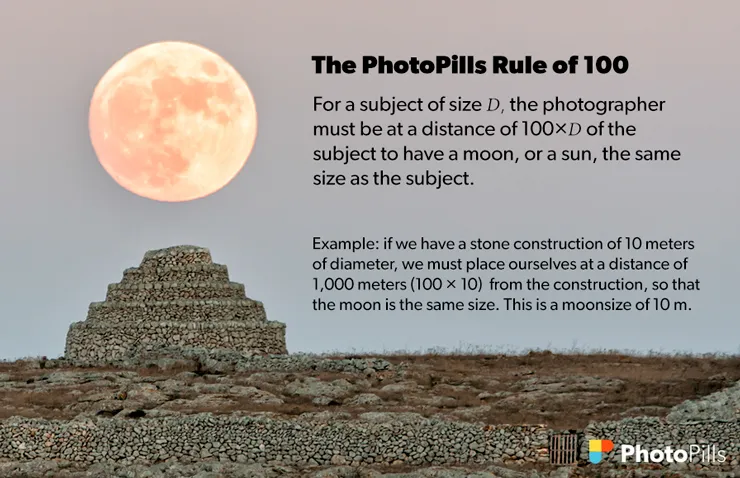
Just to give you an example, Andrés Domínguez, the author of the picture above, shot it from a location that is 44 km (27.3 mi) away from the skyscrapers.
16.Scout the shooting location during the day
To have the most success with shooting at a location, check it out in advance. This is true not only for new locations but also for well-known ones because things change over time.
You need to know as much about your location in order to be ready, and to plan for the worst if something doesn't go according to plan.
Here are some tips that you should follow when scouting a location:
- Make sure you know how to get there.
- Establish how long it gets to arrive at the location. What are the traffic patterns to get to the location? Give yourself wiggle room. It's always better to have too much time than to scramble to get the shot.
- Figure out if the access is easy or not (e.g. Is it restricted? Is there any opening times?).
- Always try to visit the place multiple times during the day. Pay attention to details around the quality of natural light at different times of the day. This gives you an idea of the conditions you may find on the shooting date and time.
- Take a walk around and use your phone to
- Save points of interest (POIs) on PhotoPills of spots that you want to shoot. That way you never have to worry about missing spots that you want to shoot at or forgetting where to go!
- Take snapshots of potential compositions.
- See how many unique shots you can get out of this one location. Is the location good for just one angle? Are there multiple angles and looks?
- Note potential dangers and hazards to avoid bad surprises, especially when it's dark and the only light source is your headlamp. Safety should always be the main point kept in mind when deciding on a location. Make sure to inspect every aspect of the location to ensure it's suitable to do a shoot, and if it's not don't go there to take pictures.
17.Respect the restrictions (if any)
Photo by Matt Walker
As much fun as photography is, you may be tempted at some point of trespassing private property.
Whether anyone cares that you're trespassing or not is another matter, but it's trespassing all the same. Some people even go so far as to break and enter.
For me, this is a line which you should not cross under any circumstance. You're not a vandal, you're a photographer.
In my opinion, no photo is worth the risk and I don't recommend you to do it. Instead, you should take very seriously the legal implications of trespassing.
Some locations might have security guards.
They can be an inconvenience, but they don't have much power. All they can do is ask you to leave. If that's the case, be polite, do as they say and don't cause trouble.
But if you give them a problem, they will call the police. And that's when you'll be in real trouble. Once the police get involved, the owner can press charges against you. A fine and some time in court is a high price to pay for a few photos.
However, the final decision is yours. So if you decide to enter anyway, respect the place and don't break anything. Work without leaving a mark, take your photos, and leave.
The laws around trespassing are different in every country. Make sure you check the local laws before you go exploring.
18.Use PhotoPills' AR views to confirm the Moon's position in the sky
The Augmented Reality (AR) view is one of my favorite tools of the PhotoPills app.
I love it because it tells me very precisely where the Moon (or the Sun) is going to be according to a selected date, time and Red Pin position.
So all I have to do is go to the location, stand up right at the Red Pin position, tap the AR button and visualize on the screen the Moon's position in the sky.
Have a look at the video below, where Rafa is in a beautiful location, using PhotoPills' AR views to confirm the Moon's position in the sky:
As you can see, with the AR tool you can
- Visualize a photo you planned with the Planner to make sure that the Moon will be at the desired position.
- Adjust your frame for the best composition before you shoot.
19.Check the weather forecast
Photo by Gabriel Monsalve
Predicting weather is arguably one of the most important aspects of Moon photography.
By doing this, you can anticipate what you'll find in the location. And also check if the conditions you're looking for are there.
First of all, it will determine the type of natural light you'll have at the scene. And you know how important that is (see tip #7).
Understanding weather forecasts and checking the local weather forecast before going to the location will help you increase your chances of success and, most importantly, avoid unnecessary risks.
These days you can get accurate forecasts many days in advance. You can rely on local news, weather information reports or my favorite – apps!
My personal experience is to always look for a 7-day weather forecast.
I'm aware that, depending on the location, weather conditions can change incredibly fast from one day to the next, or even within the same day.
However, looking at a 7-day weather forecast gives me a rough idea of what I can find in the location on the shooting date.
As you may have imagined, I start looking at the weather forecast at least 7 days before the shooting date. But I keep checking it every day, until a few hours before the shooting time.
That way I have the most updated and accurate information and I can adapt accordingly.
I strongly recommend you to do the same.
When meteorology comes into play, I'd rather be cautious and check several sources of information in order to have the most reliable data.
These are my favorite sources:
- Windy (available on iOS and Android) because I love the reliability of its information.
- Ventusky (available on iOS and Android) because it uses multiple maps to give you tons of weather information.
- Meteoblue because it has a very interesting tool called meteogram. It includes 3 charts: one for the temperature, another for the rain and a final one for the clouds.
20.Never give up
Very often I listen to amateur photographers who are down and discouraged.
They have carefully planned their Moon shot and when the shooting time comes up something goes wrong!
The weather was worse than expected – it's super windy and the sky is full of clouds.
Or the Moon alignment you planned is not working because an element is blocking the view...
Does this sound familiar?
If that's your case, don't give up.
If you have a picture in mind, chase after it with all your heart and soul, keep your blinders on and don't let bad weather conditions bring you down... At least not for too long.
Don't let the clouds beat you. If it's cloudy, go to the location and try to shoot it anyway because the weather conditions might change suddenly. And if the clouds hide the Moon, return home, and plan another Moon shot!
Try to find another view or another alignment that avoids any blocking elements. I'm sure you can find alternatives with the power of PhotoPills!
Once you get the shot, the satisfaction after so much effort is double.
21.Use the best planning tool
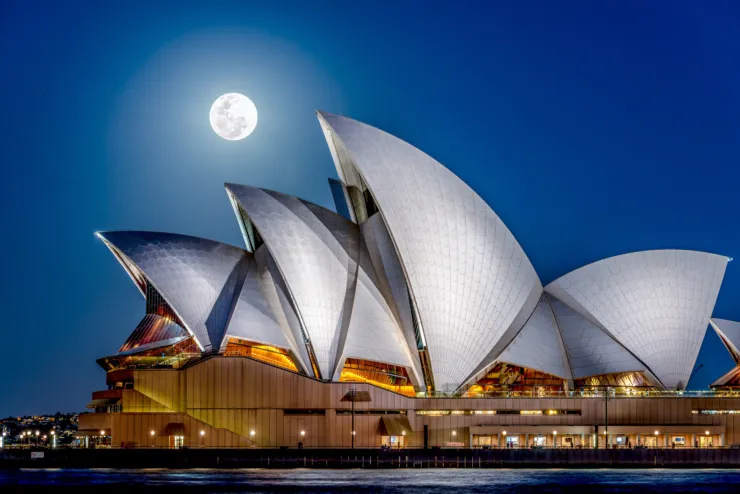
Photo by Szilard Szasz-Toth
OK, I know I'm biased here. But I can't help it.
For me, there's no other photography planning tool than PhotoPills.
But... What's exactly PhotoPills.
Some like to call it "a Swiss Army Knife for all photography matters in your pocket" like my good friend Francesco Gola.
But in my opinion, the best way of thinking of the PhotoPills app is as a toolbox. It has a bunch of different tools, known as "pills", that each serve a different purpose.
Some of the pills are designed to help you research and plan your photos in advance. Others are designed to help you execute your photos while on location.
Some will even help you choose the best lens, depending on the picture you'd like to produce.
Here's a quick summary of my favorite tools:
- The widgets. On the first one you can see at a glance what's happening in your location for the next 24 hours. The second one tells you the start and end of the Milky Way galactic center visibility. And the third one shows you your upcoming plans.
- The Augmented Reality (AR) views. Using this tool, you can see exactly where the Sun and Moon will be in the sky at any given moment in time for the Red Pin position.
- The Planner. This is the app's most powerful tool and you can use it when
- You know when you want to shoot and want to find a good location.
- You know where you want to shoot and want to find a good date and time.
The best way to learn anything is by doing, so go plan some images using PhotoPills. Keep it simple at first.
For example, a first step might be to use the Planner to figure out when and where the Moon will rise. Little by little start to add more details by choosing a different location and putting the Moon behind a building or other subject.
For more information and for inspiration, check out our Academy. There are also a lot of tutorials on our YouTube channel.
22.Know the height of your subject
This is a crucial piece of information, especially when you want to align the Moon with a specific subject.
Why?
Because you need to determine the Moon position in the sky relative to your subject so the Moon is right where you want it to be in the frame.
Remember that in tip #8 I told you that the Moon position in the sky is defined by
- The azimuth or the direction (e.g. the North has an azimuth of 0°).
- The elevation or height in the sky (e.g. 0º means that the center of the Moon is on the horizon).
So if you want to align the Moon with, let's say, the top of a building, you need to know how high that building is.
Sounds logical, right?
That's because when you're planning an alignment between the Moon and your subject, you need to set in PhotoPills the height of the subject to position the Moon properly.
If you want to learn how to do it step by step,
- Read section 9 of our super guide on photography planning.
- Watch our video 'Moon photography with buildings'.
23.Plan your field of view
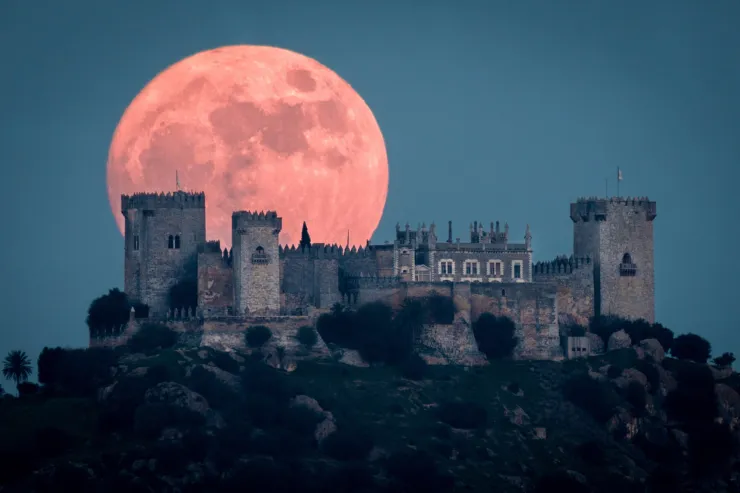
Photo by Rafael Cuevas
Planning the field of view (and the depth of field as you'll see in tip #43) is essential in Moon photography.
Why?
Because, depending on the camera settings you use,
- The field of view (FoV) determines what will be inside the frame.
- The depth of field (DoF) of your photo determines what is in focus and what isn't.
As you may have guessed, PhotoPills is the perfect tool to plan both the field of view and the depth of field.
And inside PhotoPills you can plan your field of view
- Inside the Planner.
- Using the dedicated pill in the Pills Menu.
The field of view tool is perfect for location scouting or making storyboards because it allows you to preview what you're going to capture in your frame. So it helps you reduce the number of attempts applying the try and fail method!
You can either calculate a certain field of view using the camera settings (Classic option) or get the camera settings according to a certain field of view (Inverse option).
To learn how to plan your field of view, I suggest you take a look at section 20 of our photography planning guide.
24.Take advantage of the Moon size tool

I love this tool inside the PhotoPills app!
It shows the angular diameter of the Moon on the Planner map.
In other words, how big is your Moon going to be in the frame ;)
Use it when you plan a long distance Moon shot. Zoom on your subject and on the Moon azimuth line to see how big the Moon will be compared to your subject. As you'll see, the wider the light blue line, the bigger the Moon.
You can find it in the Planner, inside de Map Settings. Access this menu tapping the Map Settings button on the map, next to the (+) button.
Once you see the Map Settings screen, have a look at the different layers. Notice that there's a Moon layer.
Tap it to see the layer styles and the options.
Switch on the Show Moon size button and you're done!
Now you can go back to the Planner Map and observe the Moon's size.
25.Begin by planning a Moonrise (or Moonset) on a certain date
If you want to learn Moon photography planning, you should definitely start with the easiest plan – a Moonrise (or Moonset) on a certain date.
So in this case, you know the date you want to take the picture. Thus, you also know the Moon phase you'd like to capture.
All you need to figure out is where to go and, more specifically, where to point your camera to.
Here's a video in which Rafa explains how to use PhotoPills to do it step by step:
Here are the steps you should follow to plan a Moonrise or Moonset on a specific date using PhotoPills.
Place the Red Pin in a potential location.
Set the date you're planning to photograph the Moonrise (or Moonset).
Find out the Moonrise (or Moonset) direction and time.
Check different locations until you find a photo you like.
Check the natural light at the time of the shooting.
When you're in the field, at the Red Pin position, use the Augmented Reality view (AR) on the Planner to visualize on your smartphone where the Moon will rise (or set).
If you want to learn how to do it step by step, read section 8 of our super guide on photography planning.
26.Plan a big Moon on a certain date
Similarly to the case scenario above, you also know the date when you want to go out and take pictures.
But here the difficulty increases a bit because you're looking to photograph a big Moon (like a Full Moon, for example, but not necessarily).
So you need to take into account several considerations:
- Where would you like to have the Moon in your composition?
- Do you want to align it with your subject? Where exactly?
- How big do you want the Moon compared to the size of your subject?
As you can see, there are a few things that you need to envision when imagining the shot so you can plan it accordingly.
Once you have a clear idea of the shot you want, it's time to figure out:
- A jaw-dropping subject.
- The exact shooting spot.
- The exact time the Moon will be where you want it to be.
Here's a video in which Rafa explains in great detail how to use PhotoPills to plan this type of photo:
Here are the steps you should follow to plan a big Moon on a specific date using PhotoPills.
Set the shooting date.
Place the Red Pin near the subject.
Place the Black Pin on the subject.
Find the initial shooting spot and shooting time.
Adjust the shooting spot and the shooting time.
Check the Moon size on the map.
Check the natural light.
When you're in the field, at the Red Pin position, use the Augmented Reality view (AR) on the Planner to visualize on your smartphone where the Moon will be.
If you want to read a more detailed explanation, have a look at my tutorial on how to plan a big Moon aligned with a subject.
27.Plan a Moonrise (or Moonset) with the Moon in a certain position
Your next step in the learning curve should be planning a Moonrise (or Moonset) with the Moon located somewhere specific in the sky.
Let's say you've found a very cool location with a particularly beautiful subject, and you want to have a rising Moon in a particular spot in your frame.
But... Is that photo even possible?
And if yes, when will that happen exactly?
Knowing the date is great, but knowing the exact time the Moon will be right there is awesome, isn't it?
Well, thanks to PhotoPills you can know absolutely all the information you need to nail the shot!
In this video Rafa explains in depth how to plan a photo of the Moon setting inside the Arc de Triomphe, the famous arch located in Paris (France).
Here are the steps you should follow to plan a Moonrise or Moonset in a specific position in the sky using PhotoPills.
Place the Red Pin on the shooting spot.
Place the Black Pin where you want the Moon to rise (or set).
Find the dates and times when the photo is possible.
Enter the date range.
Enter the Moon azimuth.
Enter the Moon elevation.
Get the possible shooting dates and times.
When you're in the field, at the Red Pin position, use the Augmented Reality view (AR) on the Planner to visualize on your smartphone where the Moon will rise (or set).
You should also check my tutorial on how to plan Moonrises (and Moonsets).
28.Plan a big Moon in a certain position
This type of picture is the ultimate challenge!
As a matter of fact, it's (almost) the same picture as the one of tip #27.
But... With a huge Moon in a very specific position in the frame (the sky) compared to the subject's position.
So you have a rough idea of the shooting spot from which you'll be taking pictures.
Now you just need to find out:
- If that specific photo is possible.
- And if it is, when exactly it does happen and the size of the Moon you'll get.
And in order to get all the answers there's nothing better than the Find tool of PhotoPills!
Here's a video in which Rafa explains how to use this tool to plan a big Moon in certain position in the sky:
Here are the steps you should follow to plan a big Moon in a specific position in the sky using PhotoPills.
Place the Red Pin on the shooting spot.
Place the Black Pin where you want the Moon.
Find the dates and times when the photo is possible.
Enter the date range.
Enter the Moon azimuth.
Enter the Moon elevation.
Get the possible shooting dates and times.
Adjust the shooting spot and the shooting time.
Check the Moon size on the map.
Check the natural light.
When you're in the field, at the Red Pin position, use the Augmented Reality view (AR) on the Planner to visualize on your smartphone where the Moon will be.
Would you like to learn how to do it? Read carefully this tutorial on how to plan a big Moon aligned with a subject.
29.Take the mountains into account when planning your shot
Let's imagine that you want to plan a photo of the Full Moon aligned with the Central Plaza building in Hong Kong (China).
You're looking for a cool location where you intend to find a nice shooting spot.
Unfortunately, you don't know the area so you have no idea if an object, more specifically a mountain, will block the view of the Moon (or the subject) from the location.
On top of it, you want to plan your shot as accurately as possible because the subject is far away from home and you can't simply get there and scout the location. You need to know in advance if the photo is possible and if you'll have a clear view so you can organize the shooting session.
Otherwise, there's no point in traveling to such a far away location! :(
So how do you take the mountains into account when planning your Moon shot using PhotoPills?
Well, Rafael explains it in this video with a real example:
Basically, here are the steps that you should follow:
First you need to plan your shot with the help of PhotoPills. So follow the steps I explained in tip #26.
On the Planner, take a look at Panel 2 and check the size of the Moon. For the sake of simplicity, let's say that you get a 100-meter wide Moon. So its radius is 50 m. And this figure is key because you want the height of the center of the Moon to be over 50 m to capture the whole Moon in the frame.
Then, move the Black Pin along the azimuth line of the Moon while checking the Moon height on Panel 2.
- If the height of the Moon is always higher than 50 m along the azimuth line, that's great! Nothing will block your view.
- If at some point the height of the Moon (of the Black Pin) is lower than 50 m, you won't be able to see the Full Moon completely. In other words, it means that at this spot there's an obstacle blocking your view!
If something is blocking your view, change the Red Pin position to another shooting spot and repeat the process until you find a shooting spot where nothing blocks your view.
Having said that, I always recommend to go to the location in advance (ideally 24 hours before at least) and scout it so you can see the real conditions in the field.
While you're there, take advantage of the Augmented Reality (AR) view and simulate the shooting session with the camera and lens you plan to use (more on that subject in tips #30 and #31).
30.Use the best camera for Moon shots (the one you already have!)
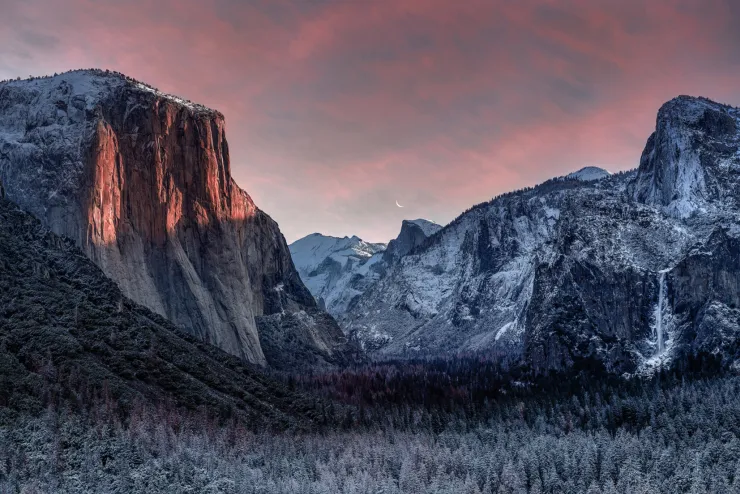
Photo by Jingyu Wu
"Toni, what's the best camera to take photos of the Moon?"
This is a question I get over and over during the PhotoPills workshops and expeditions I lead.
And I always give the same answer quoting the great Jay Maysel:
"The best camera is the one you have with you."
I truly believe it.
There's no good or bad camera for photographing the Moon. Any camera will do a good job.
I admit that some high end cameras will produce less noise when shooting in low light conditions. But there's always a turnaround for that:
- You can try to shoot at different moments of the day to get different Moons (and different colors!).
- You can always reduce the noise in post-production. It's very easy.
So don't wait until you save enough money to purchase a top-notch and flashy camera. Start shooting right away with the camera you already have.
In Moon photography practice and experience is much more important than gear.
But if you’re still curious, have a look at our review of the best camera to take pictures of the Moon.
31.Use the best lens for Moon photography (any long lens will do!)
"Toni, I have another question. What's the right lens to capture the Moon?"
Well... It all depends on what you want to include in the frame.
But, as a rule of thumb, and guessing that you'd like to include the Moon, a powerful subject and part of the landscape, I would suggest using a long lens.
"Fine Toni, but how long?"
The longer lens you have at home! :P
Remember that the focal length determines the Moon size in the frame (tip #6).
So if you want that big Moon, you should consider using a lens between 100mm and 400mm.
A lens longer than 600mm would be great if your shooting spot is very far away from the subject.
And don't neglect using a teleconverter, it's a very helpful piece of gear in this type of situation.
That's the basics, but if money is not an issue here are a couple of extra tips:
- Look for stabilization. When you're shooting at longer focal lengths, every shake is noticeable. Pick a lens with an internal stabilization system that helps to eliminate motion blur.
- Invest in high-quality lenses. Sharp details don't come from megapixels. They come from crystal-clear optical glass. Invest in the highest-quality lens glass your budget allows for razor-sharp images.
Do you want to know more?
Check our opinion on the best lens for Moon photography.
32.Use a sturdy tripod to get a tack sharp Moon
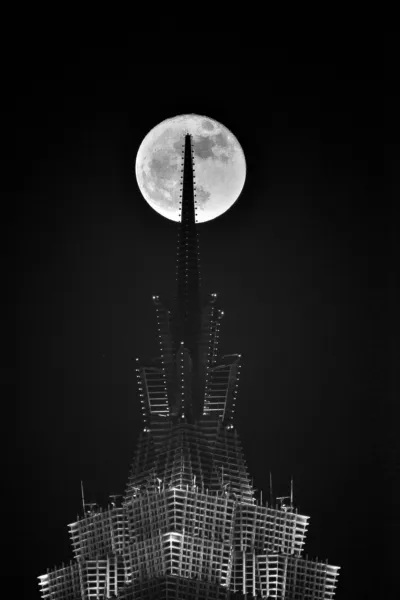
Photo by Felipe Percastegui
The importance of using the right tripod can improve the final results of your Moon photography.
Do you have a sturdy tripod for that high end telephoto lens that you just purchased?
No?
Well... It's vital to have a sturdy tripod, especially while shooting with a telephoto lens (tip #31).
You should definitely protect your investment by purchasing a sturdy carbon fiber tripod. I've seen many people using a tripod that's not suitable for a large telephoto lens.
In addition to this, a robust tripod can save your shot under difficult weather conditions. Windy dawns and dusks are the most challenging scenarios because the slightest movement of your gear can turn a great picture into a mediocre one.
Don't forget that most of the time you'll be shooting at a long exposure and a sturdy tripod will help prevent motion blur.
Oh, and if something goes wrong... work fast! (tip #37).
Forget about your tripod (whether it's sturdy or not) and move around you looking for the right shooting spot to get the alignment you're looking for! ;)
A tripod is part of a bunch of pieces of camera equipment for Moon photography you’ll need.
33.Use an intervalometer to avoid vibrations
Are you still seeing blurry images, even if you have the correct tripod?
Oftentimes Moon photography demands the shutter to be open for a relatively long duration of time because you'll be shooting in low light conditions.
That's why I recommend you to invest in an intervalometer. Using an intervalometer will help to avoid the camera shake due to pressing the camera shutter button.
Thus, you can avoid touching the camera physically while triggering the shot.
If you have a DSLR camera, you can use it along with the mirror lockup feature to remove the camera shake while setting slow shutter speeds.
Alternatively, you can use the timer that's equipped with your mirrorless or DSLR camera body.
An intervalometer is part of a bunch of pieces of camera equipment for Moon photography you’ll need.
34.Bring a headlamp
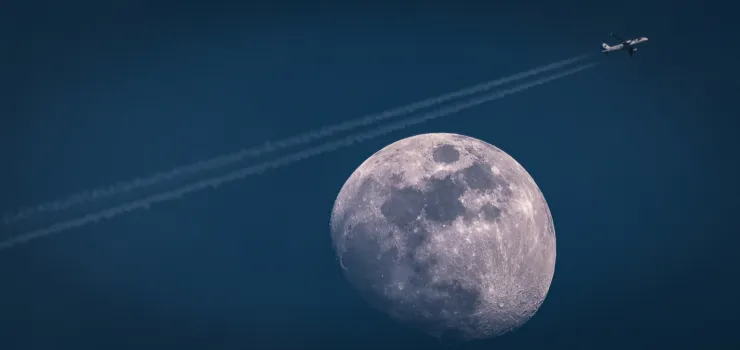
Photo by Nicolò Cerana
Whenever you're shooting the Moon, you'll need a small piece of lighting equipment. If your shooting session is at Sunrise, Sunset or twilight, you'll be in the dark at some point. That means before, during or after taking photos... ;)
A headlamp is important safety equipment for finding your way around in the field at night.
What should you use your headlamp for?
- In route. On the way to your planned location, you should have a medium to bright headlamp that will help you find the way to the shooting spot.
- At the shooting spot. Once you get there, you should shoot as much as possible without a light on. But you may need to use it to check your camera settings.
There are all kinds of models of headlamps. I've found it takes some research to find lights that do a good job of meeting this need.
But above all, I recommend you to get a RED Night Vision Light headlamp in case you need to.
The human eye needs 20 minutes to get used to seeing in the dark. It would be a shame to waste that precious time because of a strong white light...
And please, make sure you don't disturb the other photographers around you by turning on your headlamp or flashlight.
Before leaving home, don't forget to check that you have enough batteries (or, depending on the model, that you've charged the battery inside)! :)
A headlamp is part of a bunch of pieces of camera equipment for Moon photography you’ll need.
35.When shooting at night, wear warm clothing
I know, I know.
You're going to tell me that summer nights are not cold.
Hmmm... It depends on where you are!
If it's windy, you're up in the mountains or you're shooting at dawn it can be very cold.
Did you know that the coldest time of the day happens at dawn? Yep.
So on days (or nights) when your breath hangs in the air, your clothing strategy is key.
Layering lets you adjust your body's thermostat by putting on and removing clothes to maintain an even comfort level as weather conditions change. This clothing strategy is especially important in wintry weather.
To dress for cold weather, you need 3 layers to work together for maximum warmth:
Base layer. Your long underwear needs to keep your skin as dry as possible.
Middle layer. Your fleece or puffy jacket needs to hang onto as much body heat as possible.
Outer layer. Your rain gear needs to protect you from rain and wind.
Make sure that your layers play well together.
This means that both middle and outer layers need to glide on and off. When they fit too tightly with the layers beneath them, any adjustment becomes cumbersome and you risk constricting circulation.
As for materials, the golden rule is that cotton is a no-no in any layer.
So set aside your love of cotton flannel (or anything cotton) because it soaks up water and takes forever to dry out. That's the best recipe for catching a nice cold or even suffering from hypothermia!
And a final tip: don't wait to adjust your layers.
Throw on a shell at the first sign of rain or wind, and remove your insulating jacket the minute you start to sweat. Staying warm and dry is easier than warming up or drying out.
36.Make sure you're at the the exact shooting spot

Photo by Eduardo Marcos
It's something essential when taking any Moon photograph.
The slightest mistake, a meter to the left or right and...
Oops!
The Moon won't be where you wanted it to be! :(
That's why getting to the location in advance is so important:
- It allows you to scout the location in detail.
- You can make sure you're at the exact shooting point.
- It gives you enough time to prepare the gear.
So as soon as you arrive at the location, scout the terrain to confirm that you have the perfect conditions to shoot as I suggest in tip #16.
Then, confirm you're at the exact shooting point.
The best tool to do that is PhotoPills.
Open the app and activate the option to see your position on the map by tapping on the (+) button on the map. Then tap the eighth button on the toolbar that just showed up (it's the compass icon).
Do you see a blue circle on the map? Good, it shows your current position.
Walk to the Red Pin position. To do this, it's important that you zoom in on the map and check that the blue dot is actually aligned with the base of the Red Pin (the exact spot where the stick is pinned).
Anyway, you should always be able to move a few meters to adjust the composition the moment you see the Moon (tip #13).
37.Be ready to work fast
Once you're ready to shoot, you have to understand that you need to work fast for many reasons.
1. You may have missed the alignment between the Moon and your subject.
In that case, move around the location to preserve the alignment.
Depending on the natural light you have on the scene you may even forget about the tripod and start shooting handheld.
Remember the rule of thumb for capturing sharp, handheld Moon pictures – you shouldn't handhold a camera at shutter speeds slower than the equivalent focal length of the lens.
For example you shouldn't shoot a handheld at speeds slower than 1/500s with a 500mm lens, slower than 1/300s with a 300mm lens, and so on. Crank up the ISO and try to keep everything in focus (tip #43).
2. You want to recompose the scene.
Perhaps when you see the Moon showing up, even though you've already captured the picture you wanted, you want to recompose the scene and take a second shot. Or even a third one...
Here's a little trick for these situations... ;)
Did you know that the Moon will always "follow" you?
That's right, if you see that the Moon stays to the right of your subject and you want to align it again, walk to your left so that the Moon "moves" to the left as well and aligns again. If the Moon stays to the left of your subject, move to the right.
It seems simple but with the stress of the photo session you'll see that it's not so obvious to know where to go :)
3. The Moon moves extremely fast in the frame!
When you're using a telephoto lens, the Moon moves very fast within the frame.
That's why you must be quick and nimble when composing the shot and deciding your Moon camera settings (tip #39).
Shutter speed is particularly key. If it's too fast, you risk getting an underexposed (too dark) photo. If it's too slow, the Moon may be blurred.
So practice whenever you can. Shoot the Moon even if it's not the phase you want (Full Moon, for example). This way, you'll learn how it behaves and to adjust the exposure triangle quickly enough.
As you can see, knowing when to change your position is essential to make the most out of the moment. Quick and nimble! :)
38.Switch on the lens stabilization option when it's windy
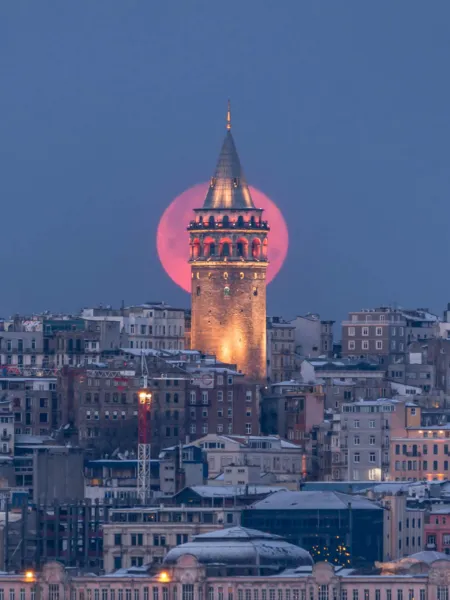
Photo by Serafettin Yagmur
Some lenses include a function to stabilize vibrations. Canon, for example, calls it Image Stabilization (IS), while Nikon calls it Vibration Reduction (VR), and Sigma, Optical Stabilizer (OS). Other brands, such as Sony, Olympus and Pentax have been pushing for in-camera stabilization.
The advantage of in-lens image stabilization is that it delivers a smoother performance when using longer focal length lenses. The downside is that it's not available as an option for all lenses and it adds to the cost of the lens.
The pros of in-camera image stabilization are that you gain the advantages of IS technology with any lens you can mount on the camera for considerably less cost than multiple IS-enabled optics. The downside is that it's less effective at smoothing the bumps when shooting with longer focal length optics when compared to lens-based image stabilization.
Although the common wisdom says to avoid using vibration reduction with a tripod, this is one situation where that advice absolutely doesn't apply. Vibration reduction does a surprisingly good job of reducing blurry photos in the wind.
So if your lens or your camera has an image stabilization system, turn it on.
In addition to this, here are some extra tips if it's windy during your Moon shooting session:
- Don't use your tripod's center column. It adds a single point of weakness to your setup and is very susceptible to vibrations from the surrounding environment.
- Lower your tripod, assuming that your composition allows it.
- Don't hang a bag from your tripod. The wind will cause your bag to swing around and make your photos less sharp.
- Don't grab the tripod to steady it. You'll just add larger, coarser shakes that blur your photos even more.
And a final, but important, piece of advice.
If it's so windy that your tripod is at risk of blowing over, never shoot in conditions that are quite that extreme.
39.Use an aperture between f/8 and f/11
When determining the best settings for Moon photography, the first one that you should decide is the aperture.
The aperture depends on two factors:
- The quantity of natural light in the scene.
- The depth of field you want to show in the image.
Now, taking this into account, you should set an aperture between f/8 and f/11 whenever it's possible. That is if the natural light in the scene allows you to do so.
Using a relatively small aperture (like f/8 or f/11) will give you a greater depth of field, so you can capture in detail both the Moon and the landscape (tip #43).
However, you should be ready to open it when light fades away.
For instance, let's say that you're photographing the Moon during the astronomical twilight. The absence of light forces you to use a wide aperture (f/2.8 or f/4 for example).
With so little natural light the foreground won't be illuminated, so you won't need to pay attention to depth of field. Focus on having a tack sharp Moon instead.
40.Focus at the hyperfocal if you're using a wide angle lens
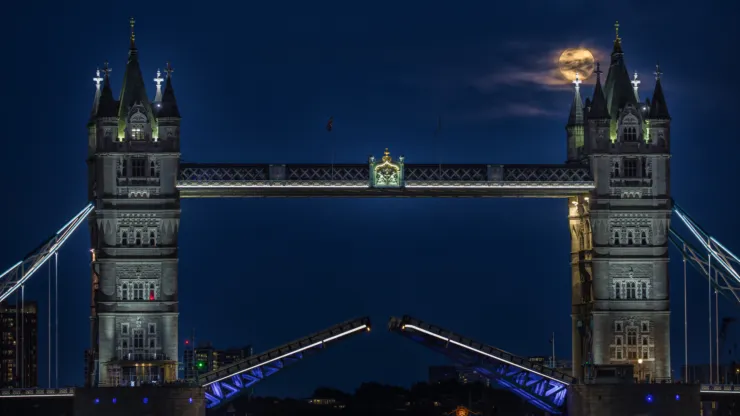
Photo by Roland Blum
If you're using a wide angle lens, focus at the hyperfocal distance.
Remember that when you focus the lens at the hyperfocal distance, everything that falls at any given distance from half of this distance out to infinity will be acceptably sharp, which is the maximum depth of field you can have.
You'll understand it better with the diagram below:
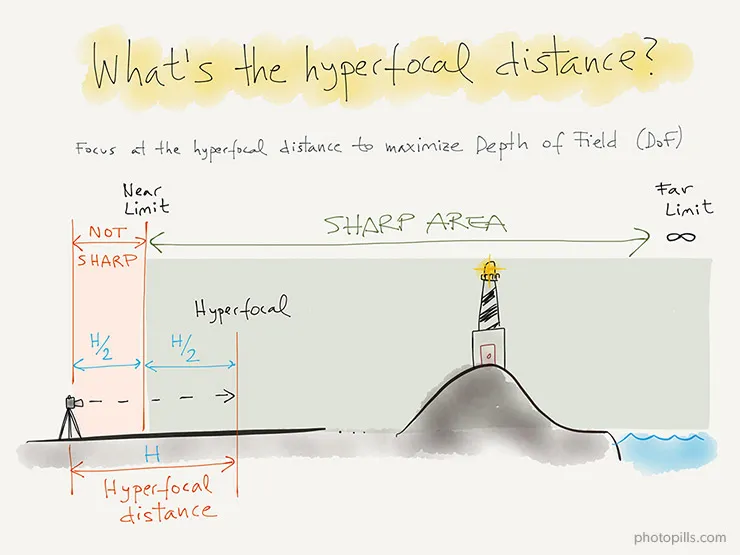
Actually, you should focus at a slightly longer distance (1 m, for example) to make sure everything is correctly focused from the foreground to the Moon.
Take a look at this video where I show you how to focus to the hyperfocal distance in less than 1 minute:
41.Focus directly on the Moon if you're using long focal lengths without foreground
If you're using long focal lengths and you don't intend to capture the foreground, focus directly on the Moon.
The Moon is bright and modern autofocus systems should have no problem locking good focus on the Moon.
Although you can autofocus on the Moon as it rises, or as it becomes visible just before Sunset, I'm used to focusing manually. If you want to nail your manual focus, use the Live View, Focus Peaking and/or Focus Magnifier tools if you have them. They'll make your life so much easier!
Regardless of the focal length you're using, take several test pictures to check that the framing and focusing are right. Zoom in on the result on your camera's LCD screen to see which one works best.
As I told in tip #3, the phase of the Moon itself plays a role in the appearance of the lunar features that are visible in close-up photos.
When the Moon is close to full, it can look quite flat due to sunlight falling directly onto it.
A better time to try taking close-up photos is when the Moon is away from being full (e.g. around half phase) instead. During those phases the Sun's rays are perpendicular to the Moon's surface, bringing out its rugged topography, which is dotted with shadow-filled craters and dark valleys.
42.Be careful when focusing when using intermediate/long focal lengths with foreground
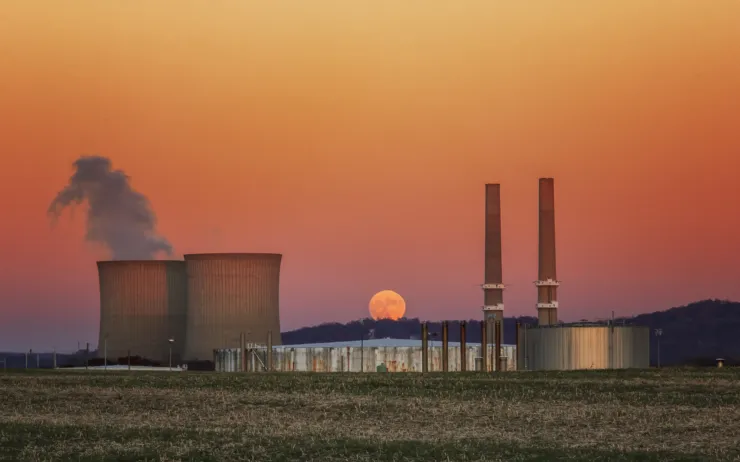
Photo by Tejus Shah
Focus on the subject as long as the hyperfocal distance is shorter than the distance to the subject. That way, you also make sure that the Moon is also in focus.
When the hyperfocal distance is greater than the distance to your subject, there are two alternatives.
Look for an element to focus on that is further away than the hyperfocal distance (1)
It can be any element in the scene (e.g. a building, a rock...).
But when focusing, always make sure that the depth of field (DoF) near limit is closer to you than your subject. This way your subject will be within the area that will be acceptably sharp (focused). That is, between the depth of field near limit and infinity.
How can you easily determine the depth of field (DoF) near limit when you're in the field?
Easy. With PhotoPills.
You only need to use the Planner and the Depth of Field (DoF) tool.
But before I start my explanation, I suggest you do this work at home, before you go to the location. That way you'll know in advance where you're going to focus during the session.
OK. Open PhotoPills and go to the Planner.
Once you've finished planning your shot, tap the Map Settings button. You have it on the map, next to the (+) button.
On the Map Settings screen, in the Map Tools section, tap the DoF (Depth of Field) button. Tap Done (top right corner) in iOS or the back arrow in Android.
You'll see that a new panel has appeared on the map.
Enter the shooting settings in the tool (camera, focal length, aperture, focus aligned with the Black Pin, etc.).
Then, instead of placing the Black Pin on your subject, place it on an element that is further away than the hyperfocal distance (it's marked on the map) and that you know will be visible from the Red Pin position. This way you can visualize on the map what will be in focus and what won't (what's left between the depth of field near limit and infinity).
That's it! :)
Focus directly on your subject and leave the Moon slightly out of focus (2)
That's right.
If you need to choose between having your subject or the Moon focused, always pick your subject!
First of all because in most photos, you'll hardly notice that the Moon is slightly out of focus.
Secondly, because it's always best to have your subject tack sharp and the Moon (somewhat) out of focus, not the other way around.
There's nothing worse from an artistic point of view than having the Moon perfectly focused and your subject completely out of focus. It distracts the viewer's attention and it reduces the picture's strength.
43.Make sure both your subject and the Moon are in focus
Of course, this tip doesn't apply to all case scenarios.
But whenever possible you should try to have both (Moon and subject) in focus.
Remember that to achieve it you need to check that the hyperfocal distance is shorter than the distance to the subject if you're using a long lens (tip #42).
If your subject falls behind the hyperfocal distance, the Moon will be acceptably sharp too!
Here you have a short video where Rafael explains how to use PhotoPills to make sure both your subject and the Moon are in focus:
One last thing.
There's nothing you can do against air pollution.
So when the Moon is close to the horizon, atmospheric pollution will certainly blur it and it will appear uneven.
As it goes up in the sky, you'll see it crystal clear.
44.Use the Live View mode to focus accurately
The best way to focus accurately is using the Live View function on your camera's LCD.
Zoom in on the image using your camera Live View on the LCD screen, until you see the detail of the Moon's surface. Then, turn the focus ring of the lens slowly until the detail of the surface is tack sharp.
If you're not used to focusing manually, turn the focus ring very subtly and when you notice that the Moon is focused, keep turning the ring until you go a little out of focus and then, turn the ring in the opposite direction to get everything in focus again.
This way you'll see very clearly how everything is now in focus again.
However you decide to focus on the Moon, you can verify by viewing and zooming in on your captured image using your rear LCD.
If the details are soft upon magnification, you may have to refocus and retake the shot.
45.Use the Focus Peaking and/or the Focus Magnifier functions
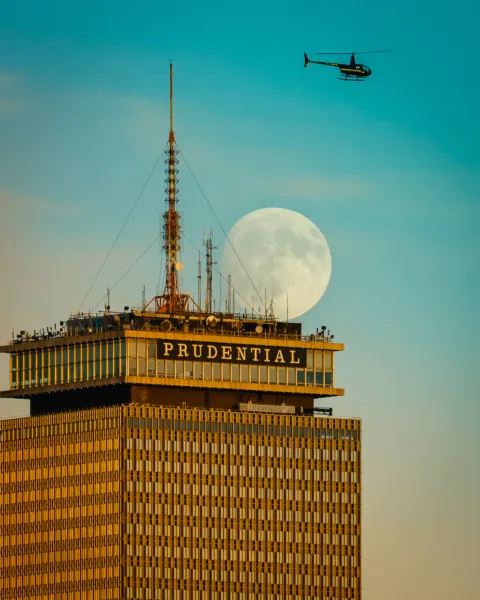
Photo by Kevin Tang
Use all the advanced functions your camera has to help you focus on the Moon.
If your camera has the Focus Peaking and/or the Focus Magnifier functions, turn them on because they will help you to be even more precise.
How to use Focus Peaking to get maximum sharpness
While all cameras are a bit different, the basic idea is the same. Usually, you can choose both the color and strength of the peaking overlay display.
I tend to choose red, but, depending on the subjects you like to shoot and in what types of light, other colors may work better. As far as strength or brightness level, the strongest settings are the easiest to see but can also be distracting when you're composing your shot.
Put your camera on the tripod, and frame an area on the Moon with contrasted craters.
Now, try to get their ridges as sharp as you can by focusing back and forth until you find the sweet spot.
Achieving good focus can take time so be patient enough until everything is tack sharp.
Having adapted from film to digital, and now to mirrorless, fine tuning my Focus Peaking skills has been a slow process. Mastering it to take full advantage of the benefits has taken me some time.
So, if Focus Peaking is totally new to you, give it practice and don't get frustrated. It's well worth the time invested.
How to use the Focus Magnifier tool
What the Focus Magnifier tool does is magnify the center section of the image full screen after you press a dedicated control button.
Obviously, the four direction buttons of the control wheel (and turning the wheel) or the joystick allow you to change the position of the enlarged section within the image.
This enlarged section is the starting point to fine-tune the focus.
Keep turning the focus ring little by little until you notice that the enlarged section is completely focused.
And after gaining focus, make sure that you don't move the manual focus ring on the lens.
46.Don't use a shutter speed over 1s
Of all the Moon photography settings, shutter speed is probably the most important one.
The Moon moves surprisingly fast within your frame, so you'll need to use a relatively fast shutter speed to avoid motion blur and to get your composition right.
The longer the focal length, the faster your shutter speed needs to be in order to avoid blurry images from camera shake.
The rule of thumb is to make sure the shutter speed is at least 1/the focal length. So, for example, if you're using a 500mm lens, then the shutter speed should be at least 1/500s.
However, this is not a fixed rule. Remember that you can also play with your ISO (tip #47).
The important thing here is that the Moon rotates quite fast around the Earth. Much faster than it looks!
Therefore, shooting with a slow shutter speed will cause the Moon to blur in your images.
My recommendation is that you should never use a shutter speed over 1s even if your ISO allows it because the Moon will be always blurred.
47.Set the minimum ISO

Photo by Eduardo Marcos
Once you set the aperture (tip #39) and the shutter speed (tip #46), it's time to adjust the last of the camera settings for Moon photography – the ISO.
You should set it considering:
- The exposure triangle.
- How much noise your camera produces.
Ideally, you should use an ISO as low as possible. Start with ISO 100 and increase it depending on the natural light conditions.
Usually you should keep it between 100 and 1600.
But don't be afraid to go over 1600...
It's better to bump it sky high instead of using a slow shutter speed (e.g. when it's windy, when there's no/low light).
Why?
Because it's easier to remove noise in post-processing than to fix a shaky picture!
48.Underexpose the Moon, don't overexpose it
It's often impossible to have both the Moon and the scenery well exposed.
If in doubt, underexpose. It's better to have a darker foreground than an overexposed Moon. Otherwise you won't ensure detail of the craters on the Moon's surface.
The result is a picture without any blown highlights and plenty of room for post-processing. Remember that it's much harder to recover highlight details than shadows in Lightroom or Photoshop.
Nowadays most camera's sensors are incredible and allow you to recover a lot of detail from the shadows.
Alternatively, you can take 2 shots (one exposed for the Moon and one for the rest of the scene), and then blend them together in Photoshop.
It's something I rarely do, but you can try it and see it for yourself.
49.Do an exposure bracketing when the light changes fast
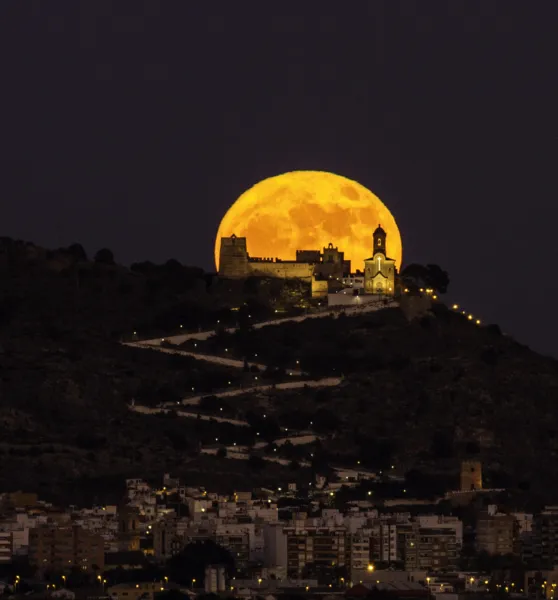
Photo by Toni Sendra
The natural light changes a lot while the Sun is rising or setting. And because of that, the Moon's brightness will also change over time.
Therefore, you should be prepared to adjust the exposure during the photo shoot.
But be careful because:
- If you set your exposure for the midtones, you'll end up with a dark foreground with no detail and a bright sky with no detail.
- If you expose for the shadows, you'll lose detail in the highlights.
- If you expose for the highlights, you'll lose detail in the shadows.
And even worse... You can end up with a totally overexposed Moon :(
A good way to make sure you don't blow out the Moon is to do a bracketing.
Bracketing is a camera technique where you capture several different exposures of the same scene.
A 1-stop bracketing of 3 shots will be enough in most situations. In other words, you capture a standard image, a darker/underexposed version, and a brighter/overexposed version.
That way, once at home you can choose the photo with the best exposure as the base of your post-processing.
As I just told you in tip #48, the most important thing is to avoid blowing out the Moon: shadows are easy to recover, but highlights are not. As long as you have the Moonlight under control, you can recover the rest of the picture.
50.Take a picture of the LCD screen after you nailed the shot
All my Moon pictures are one shot.
I never paste the Moon somewhere in a landscape picture.
Unfortunately, you can't imagine how many times I've been accused of faking one of my Moon pictures or being a Photoshop master.
And I'm afraid that as you become more and more proficient at your craft, it will happen to you too.
Lots of people still can't believe the Moon could even appear so large, so whenever I can I ask them:
"If you move a kilometer in the opposite direction of the Moon, does it seem to change size? What about 5 kilometers?"
Hopefully they answer correctly:
"No."
Then I ask:
"And what about if you move a kilometer away from something on the ground, say a friend, do they seem to change size?"
The correct answer is "yes", of course.
With a bit of logic, at this point, they've put A and B things together and understand the "trick".
These are two simple concepts that people don't normally think about. But once you explain them, they realize that it's all about making things on the ground smaller by moving away, so that the Moon will appear larger by comparison (tip #5).
So what can you do to prove people wrong when they falsely accuse you of manipulating your Moon pictures?
Well, apart from asking them the right questions I mentioned above, there's a cool and fast trick I'm starting to use quite often these days.
After you nailed your Moon shot, use your smartphone to take a picture of the LCD screen of your camera. And make sure the settings are displayed.
They'll remain in awe and without any kind of arguments! :D
51.Time to go out and shoot!
Alright PhotoPiller!
Thanks to these 50 tips you have everything you need for photographing the Moon.
Now it's time to put your imagination to work.
It's simple. You just need an idea.
Plan it with PhotoPills and get ready to shoot!
Every picture is like a little adventure. Or a big one!
It tells a story and, the best of it all, it has a story behind that you'll never forget.
So go chase the Moon picture you envision. Make your dreams true and share the experience with your friends!
Oh... And as I always like to remind you, don't keep the picture in your hard drive.
Share it with us and the rest of the PhotoPills tribe. Who knows? You may be featured in the PhotoPills Awards and even win a cool prize! ;)
Note: Some links on this page are affiliate links. What does this mean? If you buy/rent using these links you're helping support us and it costs you nothing extra. Thank you for your support.
Get this ebook for free now!