How to take a picture of the Moon for beginners
This article is a comprehensive tutorial on how to take a picture of the Moon for beginners.
And with a bit of practice, you can nail shots like the cover of this article, captured by Joss Demars with the help of PhotoPills ;)
So this article is for you whether you've never photographed the Moon and want to start learning or you already have some experience shooting at the Moon.
Learning how to photograph the Moon and the best camera settings for Moon photography is something my students are always eager to do.
As a matter of fact, this is their most recurring question:
"Toni, how do you take a picture of the moon with a DSLR?"
So just as I do with my students, I’ll give you a step by step method to nail your Moon shot: from inspiring Moon pictures and how to plan them with PhotoPills, to the gear (including the camera and lens) and camera settings you need to photograph the Moon.
However, the shooting workflow depends on the type of shot you want to capture:
- Moon phase. You want to photograph just the Moon and a small portion of the sky. For example the Full Moon or a crescent Moon, just to mention 2 of the most important phases of the Moon.
- Moon with a foreground. You want to photograph the Moon with an interesting subject and a landscape. Have a look at this video where you'll learn how to photograph the Moon with a foreground.
Oh!
And if you want to learn more and become a true Moon photography expert, I invite you to read our super detailed Moon Photography guide.
A guide that you can download for free below!
Now let's take a look at what you should do to take good pictures of the Moon!
Content
- Get inspired by the best Moon pictures
- Plan your picture of the Moon
- Use the best camera equipment for Moon photography
- Learn how to take a picture of the Moon
- Learn how to take pictures of the Moon with a smartphone
- Get inspired by the best Moon photographers
- Practice, practice, practice
"The Moon is the first milestone on the road to the stars." - Arthur C. Clarke
Get this ebook for free now!
1.Get inspired by the best Moon pictures
Finding inspiration to practice Moon photography can be a challenge.
If you don't have any experience you may not know where to start. However, finding an idea is crucial to start planning shots.
On the contrary, if you're a very prolific photographer and you've taken thousands of pictures, you may start to feel like you've either done it all, or your well of inspiration may simply seem to have run dry.
And because finding inspiration is essential, the works of other photographers provide rich material for photography opportunities.
From my own experience, I can tell you that the best way to be inspired is looking at photos from others and it's what works best for me.
But let me show you a few examples.
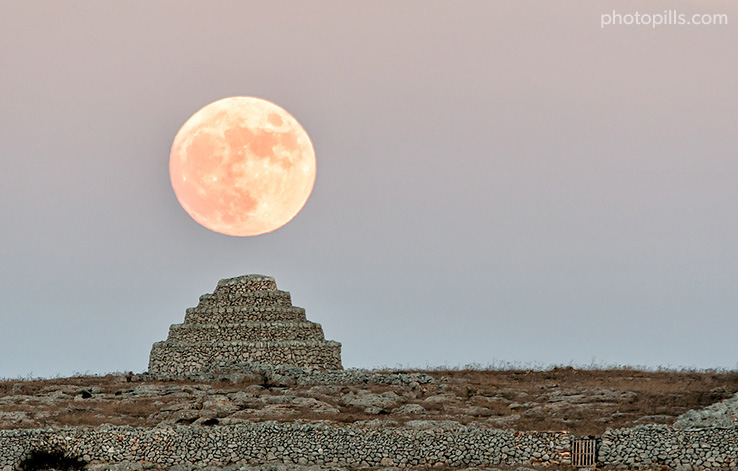
A certain Moon phase
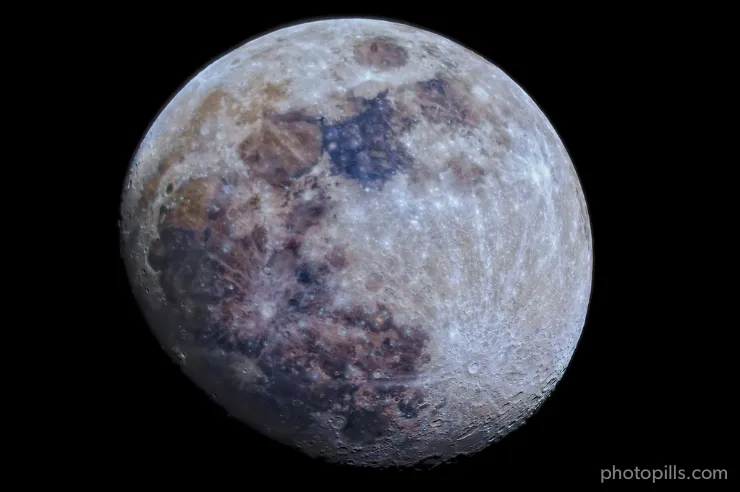
In the Moon picture above you can see that I captured some interesting colors on the Moon. These colors are visible thanks to several minerals present on the the surface of the Moon
Moreover, when you zoom very close into the Moon and observe the lunar surface you can notice many craters, mountain ranges, volcanic channels and something the scientists call maria – dark regions believed to have been formed from molten rock.
This is the easiest shot of the 3 examples because:
- You don't need a Full Moon, so you can shoot more nights along the month.
- You have a certain margin on where you can position the Moon within the frame. In other words, you don't need to be super precise with the shooting spot (Red Pin position).
So next time, when the sky is very clear, take your camera and your telephoto lens and try to capture a close up of the Moon.
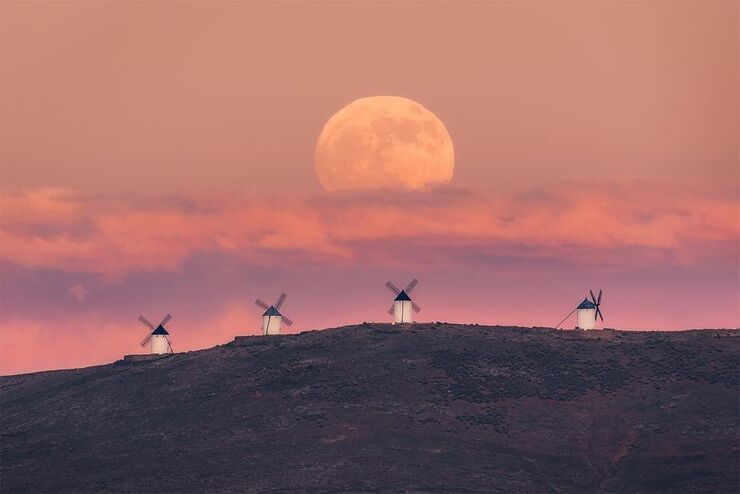
Moon with a foreground with daylight

Photo by Josh Quattrone
As you can see from this example, you don't need to wait for a Full Moon to get a cool shot.
You only need to use PhotoPills to know when this alignment happens, and even then you have to wait for a clear day.
And even if the Moon and the subject are not perfectly aligned, like in this case, the picture is still spectacular. So it's worth going out there and trying to capture it.
Practicing is the best way to become proficient in Moon photography ;)
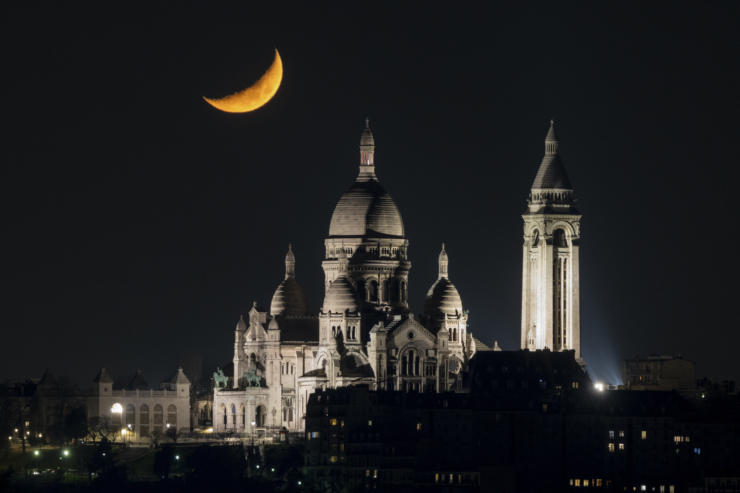
Moon with a foreground at night
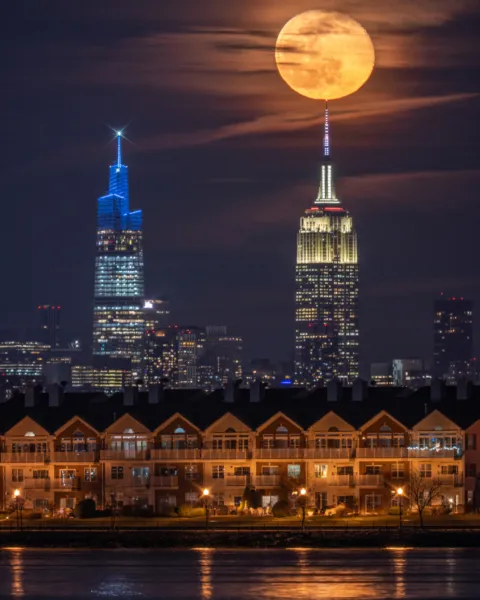
Photo by Mira
This Moon picture is a fine example of excellent planning and outstanding shooting.
To get this result you need to plan very precisely the Moon position in the sky so that it's perfectly aligned with the subject (the Empire State Building).
PhotoPills Awards
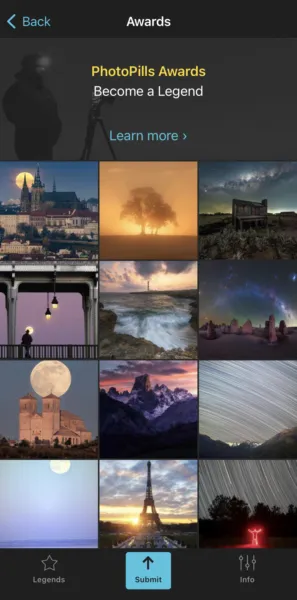
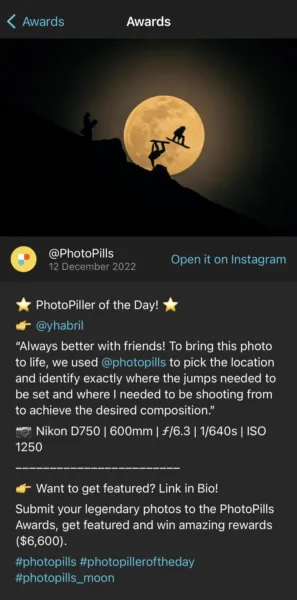
If you need more examples to get inspired, check the PhotoPills Awards where dozens of PhotoPillers like you submit their best Moon photos every day.
You'll find them in our Instagram account (follow us!) and in the PhotoPills app (My Stuff Menu > Awards).
But there's more...
Because if you have an amazing shot that you want to be showcased, you can submit your own photos too and help us inspire other PhotoPillers! ;)
Apart from these specific examples, one good source of inspiration is this article I wrote with a selection of the 2023 best Moon pictures.
2.Plan your picture of the Moon
You can't expect to arrive at a location at any time of the day (or night), put your tripod anywhere, work a bit on your composition and settings and get an amazing picture.
That's not how it works.
You need to plan your photos.
Planning is always essential but even more so in Moon photography.
And this is where PhotoPills comes into play.
It's the best tool to help you plan your Moon picture, including the 3 basic pieces of information – the shooting spot, the shooting date and the shooting time.
And now let's have a look at the 2 types of Moon picture that you can shoot:
- A certain Moon phase picture.
- A picture of the Moon with a foreground.
Plan a certain Moon phase picture
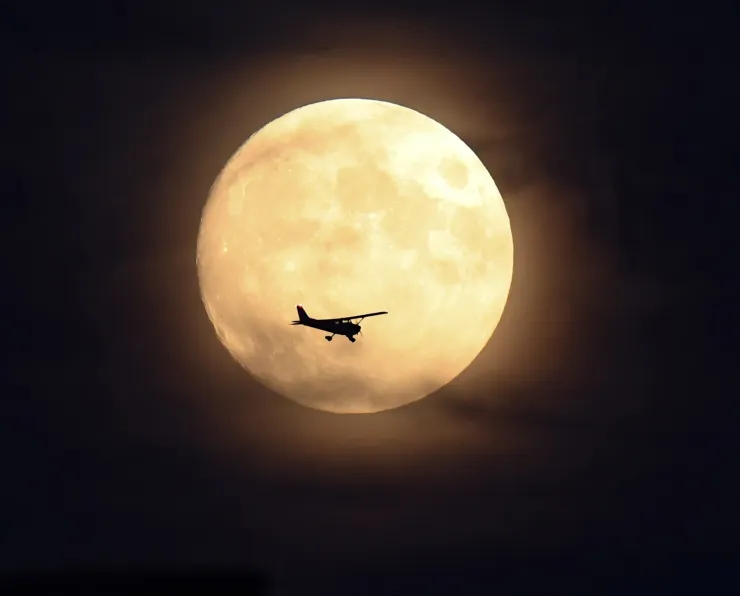
Photo by Elizabeth J. Jansen
When planning a certain Moon phase picture, the Moon position is not important.
Why not?
Well, because the Moon itself is the main subject. There's no other subject, and you don't intend to align the Moon with any other element in the frame.
The important factor is the date – depending on the Moon phase you want to shoot, you need to take the picture on a specific day.
Also, the shooting time is important. Usually, for this type of Moon pictures, you want to take the photo at night, to capture the Moon's natural color and details.
Thus, this type of Moon photo is easier to plan than a picture of the Moon with a foreground.
Thanks to PhotoPills knowing the shooting date is super easy:
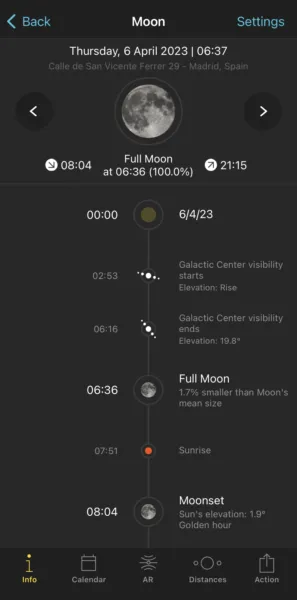
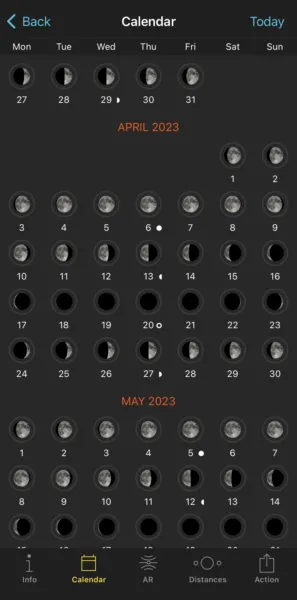
- To find out the dates of any Full Moon, Supermoons, Blue Moon and New Moon, use the Moon pill.
- Open PhotoPills and tap Moon (Pills Menu). Then tap the Calendar button at the bottom of the screen.
In addition to this, you can use the Augmented Reality view (AR) on the Planner to visualize on your smartphone where the Moon will rise (or set).
Alternatively, you can use the Planner to know where the Moon will be at night.
Here are the steps you should follow to plan your photo of the phase of the Moon at night on a specific date.
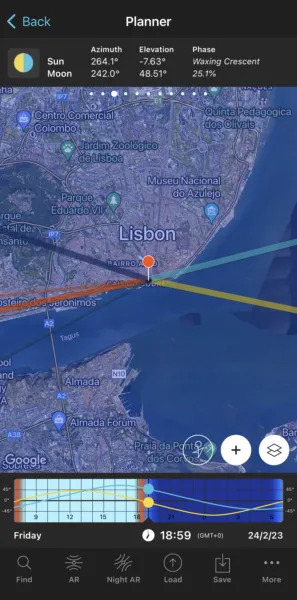
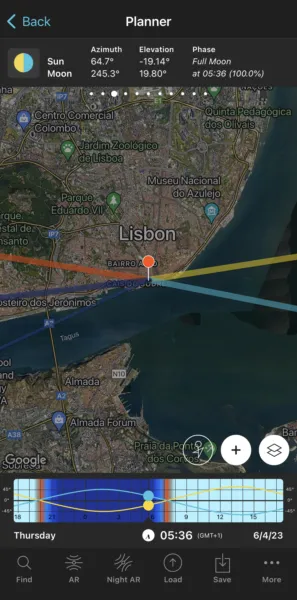
Place the Red Pin in the desired shooting location.
Set the date you're planning to photograph the Moon. Panel 4 above the map shows you the picture of the exact Moon phase for the selected date and time.
On the map, find out the Moonrise direction (thick light blue line) and Moonset direction (thick dark blue line).
Use the Time Bar (color bar below the map) to change time until it's nighttime. A thin blue line appears on the map showing you the position of the Moon for the selected time.
Based on the position of the Moon, choose your desired shooting time.
When you're in the field, at the Red Pin position, use the Augmented Reality view (AR) on the Planner to visualize on your smartphone where the Moon will rise (or set).
If you want to master Moon photography planning, read the following guides:
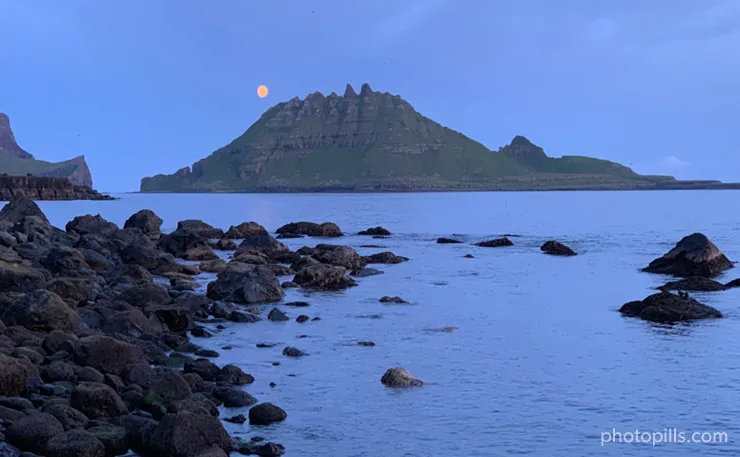
Plan a picture of the Moon with a foreground
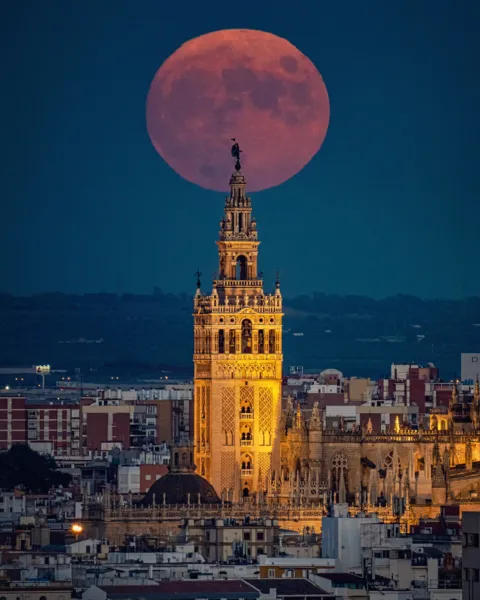
Photo by David Pineda
When planning a picture of the Moon with a foreground, the 2 most common cases are:
- A plan for a certain date, as for example, when you want to plan the next Full Moon.
- A plan with the Moon in a certain position. In this case, you know the shooting spot and the photo you want, and you want to find out when it happens.
Plan a Moon on a certain date
In this case, you want to capture the Moon on a specific date.
You can either plan a
- Moonrise or Moonset.
- Big Moon.
How to plan a Moonrise (or Moonset) on a certain date (1)
Planning a Moonrise or a Moonset shot when you know the date you want to take the picture is extremely easy.
To prove it, here's a video in which Rafa explains how to do it step by step:
Here are the steps you should follow to plan a Moonrise or Moonset on a specific date.
Place the Red Pin in a potential location.
Set the date you're planning to photograph the Moonrise (or Moonset).
Find out the Moonrise (or Moonset) direction and time.
Check different locations until you find a photo you like.
Check the natural light at the time of the shooting.
When you're in the field, at the Red Pin position, use the Augmented Reality view (AR) on the Planner to visualize on your smartphone where the Moon will rise (or set).
If you want to read a more detailed explanation, have a look at my tutorial on how to plan Moonrises (and Moonsets).
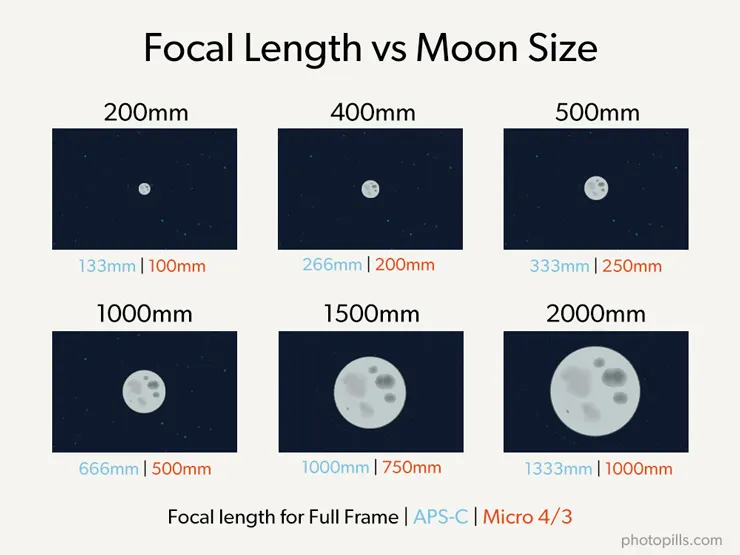
How to plan a big Moon on a certain date (2)
In this case, you know the date you want to take the photo but you need to find out:
- A cool subject that can be aligned with the Moon.
- The exact shooting spot from which you'll be shooting to get the size of the Moon you need. Or, if the location limits the shooting distance, then, at least get a large enough Moon.
- The exact time the Moon will be where you want it to be.
Imagine you want to photograph the next Full Moon, a Supermoon or a lunar eclipse.
You know when they're going to happen, but... What subject can be aligned? Where will it be better to take the picture from? And at what time?
To find the answers to these questions it's best to use the main PhotoPills tool: the Planner.
Here's a video in which Rafa explains in great detail how to plan this type of photo:
Here are the steps you should follow to plan a big Moon on a specific date.
Set the shooting date.
Place the Red Pin near the subject.
Place the Black Pin on the subject.
Find the initial shooting spot and shooting time.
Adjust the shooting spot and the shooting time.
Check the Moon size on the map.
Check the natural light.
When you're in the field, at the Red Pin position, use the Augmented Reality view (AR) on the Planner to visualize on your smartphone where the Moon will be.
If you want to read a more detailed explanation, have a look at my tutorial on how to plan a big Moon aligned with a subject.
Plan a Moon in a certain position
In this case, you want to capture the Moon in a specific position in the sky compared to your subject.
You can either plan a
- Moonrise or Moonset.
- Big Moon.
How to plan a Moonrise (or Moonset) with the Moon in a certain position (1)
In this case, you need to use the Find tool in the PhotoPills Planner.
And how can you use this tool?
Easy!
In this video Rafa explains in depth how to plan a photo of the Moon setting inside the Arc de Triomphe, the famous arch located in Paris (France).
Here are the steps you should follow to plan a Moonrise or Moonset in a specific position in the sky.
Place the Red Pin on the shooting spot.
Place the Black Pin where you want the Moon to rise (or set).
Find the dates and times when the photo is possible.
Enter the date range.
Enter the Moon azimuth.
Enter the Moon elevation.
Get the possible shooting dates and times.
When you're in the field, at the Red Pin position, use the Augmented Reality view (AR) on the Planner to visualize on your smartphone where the Moon will rise (or set).
If you want to read a more detailed explanation, have a look at my tutorial on how to plan Moonrises (and Moonsets).
How to plan a big Moon in a certain position (2)
You know exactly the photo you want: you know the exact shooting spot from which you'll be taking pictures, the frame and the Moon position relative to the subject you want.
Now you just need to find out:
- If that specific photo is possible.
- And if it is, when exactly it does happen and the size of the Moon you'll get.
Here's a video in which Rafa explains how to use the Find tool of PhotoPills to plan any Moon alignment you imagine:
Here are the steps you should follow to plan a big Moon in a specific position in the sky.
Place the Red Pin on the shooting spot.
Place the Black Pin where you want the Moon.
Find the dates and times when the photo is possible.
Enter the date range.
Enter the Moon azimuth.
Enter the Moon elevation.
Get the possible shooting dates and times.
Adjust the shooting spot and the shooting time.
Check the Moon size on the map.
Check the natural light.
When you're in the field, at the Red Pin position, use the Augmented Reality view (AR) on the Planner to visualize on your smartphone where the Moon will be.
If you want to read a more detailed explanation, have a look at my tutorial on how to plan a big Moon aligned with a subject.
3.Use the best camera equipment for Moon photography
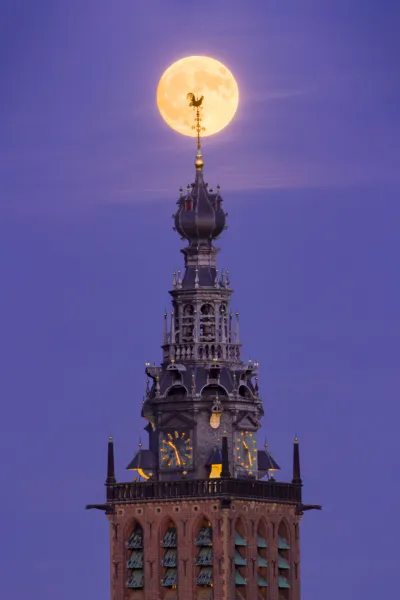
Photo by Patrick van Os
You only need a handful of tools when photographing the Moon.
Here's some of the basic gear you need:
- A sturdy tripod. Even though you won't be photographing at very slow shutter speeds, using a strudy tripod will help you to get sharper pictures.
- A camera. Try to use a camera that produces as less noise as possible because you'll be shooting in low light conditions.
- A telephoto lens. Ideally, your lens should have a focal length of at least 200mm. You can even use a teleconverter to multiply the focal length of your lens.
- An intervalometer. I recommend using an external intervalometer, but if you don't have one, use a shutter release. When shooting, the less you touch the camera the better.
Have a look at my recommendations below.
Best camera to take pictures of the Moon
Because you'll be taking Moon pictures in low light conditions most of the time, make sure your camera:
- Has a sensor with a reasonably high dynamic range sensor.
- Produces as little noise as possible.
If you're looking for some recommendations, here are, in my opinion, the best cameras to take pictures of the Moon:
If you want to go deeper into the subject, check my thoughts on what I consider the best camera to take pictures of the Moon.
Best lens for Moon photography
"Toni, help please! What lens should I use to shoot the Moon?"
If you want to start in Moon photography, I always like to say that the best lens is the one you have with you.
But if you want to capture an cool photo of a big Moon, your lens should be:
- Very sharp.
- Reasonably fast (f number as low as possible).
- As long as possible.
Remember that, to capture a big Moon your shooting spot should be far away from the subject and you need a long focal length (>200mm).
You cannot imagine how many lenses I've tested and compared throughout the years… These are, in my opinion, the best lenses to photograph the Moon:
- Nikon NIKKOR Z 100-400mm f/4.5-5.6 VR S.
- Sony FE 100-400mm f/4.5-5.6 GM.
- Canon EF 100-400mm f/4.5-5.6L IS II.
- Fujifilm XF 100-400mm f/4.5-5.6 R LM.
- Sigma 100-400mm f/5-6.3 DG.
And if you need a longer focal length to capture your Moon picture, I suggest you use a 1.4x or 2x teleconverter.
If you want to go deeper into the subject, have a look at what I consider the best lens for Moon photography.
4.Learn how to take a picture of the Moon
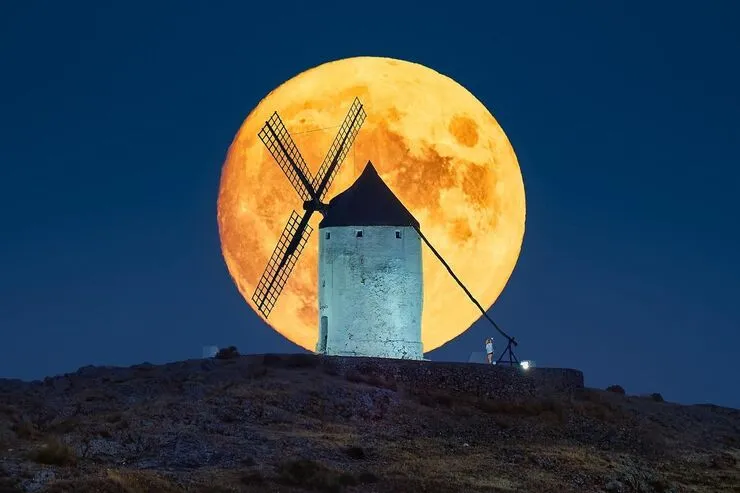
Photo by Jesús M. García
Learning how to photograph the Moon is one of the techniques that most astrophotographers want to dominate first. The Moon's ethereal aesthetic evokes powerful moods and emotions, and it works like a magnet to the viewer with a nice composition.
To take a great picture of the Moon you basically need to follow the same steps regardless of whether you're shooting the Moon alone or with a foreground. The only difference is where you should focus.
Let's have a look at each of the shooting workflows.
How to take a picture of a certain Moon phase
"Toni, can you teach me how to take a picture of a certain Moon phase?"
Of course!
Again, the key step happens while focusing.
Here, you should focus on the Moon. There's nothing else in your frame except for the sky (negative space)!
If you want to learn how to take a picture of a certain Moon phase, follow the steps below:
Get to your shooting spot in advance.
Place the tripod at the shooting spot.
Prepare your camera equipment.
Set the shooting mode to Manual (M).
Set the focal length according to the Moon size you want in the frame.
Set the aperture between f/8 and f/11.
Make sure that the Moon is tack sharp.
Set the ISO to 100.
Adjust the shutter speed, but never above 1s.
Take a test shot and check the histogram to make sure the exposure looks good.
How to take a picture of the Moon with a foreground
"Toni, can you teach me how to take a picture of the Moon with a foreground?"
Sure!
As I told you earlier, the main difference in your shooting workflow will happen while focusing.
Here, you should focus on the subject.
Why?
- If your subject falls behind the hyperfocal distance, the Moon will be acceptably sharp too.
- If your subject falls in front of the hyperfocal distance, then the Moon will be out of focus.
But, in my opinion, it's always best to have your subject tack sharp and the Moon (somewhat) out of focus, and not the other way around. Since your subject is the main element of your picture, if it's not tack sharp you won't attract the viewer's attention.
Apart from reading this tutorial, you can also watch this video where you'll learn how to photograph the Moon with a foreground:
If you want to learn how to take a picture of the Moon with a foreground, follow the steps below:
Get to your shooting spot in advance.
Place the tripod at the shooting spot.
Prepare your camera equipment.
Set the shooting mode to Manual (M).
Set the focal length according to the Moon size and the framing (composition) you want.
Set the aperture to f/8 but be ready to open the aperture to f/5.6 or f/4 depending on the natural light you have in the scene.
Focus on the subject.
Set the ISO to 100 and be ready to push it up to 400 or 800 depending on the natural light you have at the time of the photo.
Adjust the shutter speed, but never above 1s.
Take a test shot and check the histogram to make sure the exposure looks good.
Take a 3-shot bracketing of 1 stop if you need it.
Read more on how to take a picture of the Moon with a foreground.
5.Learn how to take pictures of the Moon with a smartphone
One of my favorite sentences in photography is the one that says that "the best camera is the one you have on you".
Not everyone has a good camera. But everyone has a smartphone.
And you can actually take a cool picture of the Moon whether you have an iPhone or an Android phone if you follow a very basic workflow.
Remember that, depending on the natural light present on the scene, you'll need to use a tripod, take a long exposure or be careful with the exposure.
Here's what you should do.
How to photograph the Moon with an iPhone
While Moon photography is challenging for the optics and image sensor of an iPhone, you should still be able to capture some detail of a large and bright Moon.
You just need to follow these steps.
1. Zoom in on the Moon
You first need to point your iPhone to the Moon.
Then, zoom all the way.
And when I write "all the way" I mean you have to zoom to the maximum capacity of your iPhone.
2. Lock down the focus
Now, press and hold down on the image of the Moon to lock down the focus.
This means that even if you move your iPhone, the camera will still focus on the Moon. This is a super useful trick if you happen to have shaky hands.
Once you lock down the focus, a tiny yellow Sun will appear on the screen, which you can then move up or down along a bar.
3. Lower the exposure
Move the Sun on the bar all the way down to lower the exposure.
As you move the exposure bar down, you'll notice how the image on your iPhone goes from a blurry ray of light to the actual Moon itself.
The Moon's surface will become clear and you'll even be able to see the craters.
4. Take the photo
Now that everything is set, press the shutter to take the photo!
How to photograph the Moon with an Android phone
Whether you're trying to grab a shot during a Supermoon or even during a regular Full Moon, the Moon is more within reach than you might expect, you just have to control your phone's camera a little.
Let's have a look at the steps that you should follow.
1. Turn off the flash
First of all, turn off your mobile flashlight.
There's no way your phone's flash of light would ever touch the sky, but there's a good chance it will highlight a dimensional target and spoil your aim.
2. Zoom in on the Moon
Zoom in on your picture to
- Capture a bigger Moon.
- Get more detail of the Moon's surface.
Zoom in by touching the screen of the mobile using two fingers.
Alternatively, some top-notch Android phones with several lenses allow you to zoom in using optical zoom instead of digital zoom, which will produce much better results.
3. Focus on the Moon
When taking photographs of the Moon, make sure you focus on the Moon. I know it sounds obvious, but sometimes you're in such a hurry to capture a cool photo that you just press the shutter without even thinking where you're focusing.
Once the Moon is sharp, press and hold down on the image of the Moon to lock down the focus.
4. Lower the exposure
Now you need to adjust the shot for the Moon's exposure.
This is important because the Moon is much brighter than what you may think.
I can't give you the exact instructions because this setting changes from one Android phone to another.
5. Take the picture
And now, press the shutter button and take your picture of the Moon!
Expand your Moon shooting options with these mobile accessories
Thankfully, not only does the average iPhone or Android have a great camera, but it also allows you to enhance the smartphone photography experience with some amazing accessories.
While any smartphone camera is already amazing, there are a few ways you can make it even better.
Let's have a closer look at the best iPhone camera accessories (or Android!).
1. Tripod
If you're shooting night Moon shots or Moon pictures in low light conditions, a phone tripod is an essential accessory.
A tripod helps to keep your photos steady and sharp.
2. External lenses
Over the past few years, high-end mobile phones have come with more than one camera lens.
However, you may still want to invest in a quality set of lenses in order to take advantage of the technology this field has to offer.
Whether you're shooting in low light or just want to take advantage of a longer lens, any external lens kit has you covered. You can switch between the several lenses to find the best one that fits your phone and the occasion.
These lenses mount to your phone right where the camera sits. They include a system (usually a clip) that keeps the lens securely fastened.
6.Get inspired by the best Moon photographers
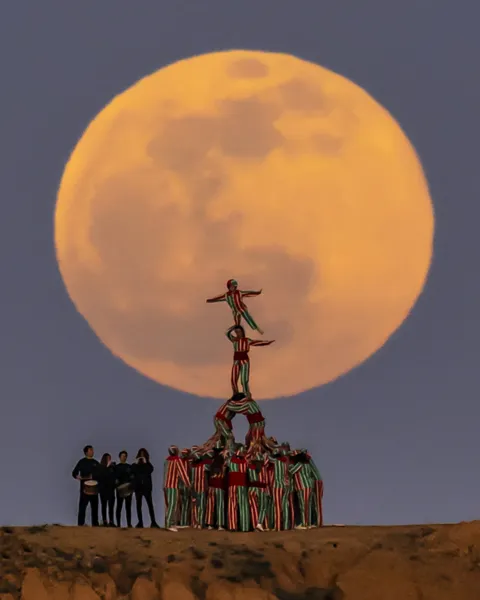
Photo by Toni Sendra
For most of us, the inspiration comes from seeing the incredible work others produce.
As I told you at the beginning of this article, it's not only about inspiration, but about learning as well.
Moon photography is a genre that requires a lot of planning, a lot of patience and a lot of persistence because on many occasions you won't get the shot you're looking for at the first attempt.
So you definitely need to learn from others that have more experience than you, and that have been capturing Moon shots for quite some time now.
That's why the best way to improve your Moon photography is by learning from specialists – Moon photographers that strive at their craft producing an amazing body of work.
To help you find outstanding profiles, I've gathered up the best Moon photographers to inspire you.
Simply check their work out, and give them a follow, to get some brilliant Moon pictures direct to your feed! :)
7.Practice, practice, practice
Moon photography is a genre that requires constant practice and experimentation, so if you want to improve your skills, I suggest you eagerly work on it.
If you want to keep learning (which is something I always recommend), have a look at the following articles:
- 50 tips for photographing the Moon.
- Your ultimate Moon photography cheat sheet: quick tips for stunning shots.
And then…
Try new compositions.
Plan crazy Moon shots.
Practice with different Moon settings.
And focus on creativity.
Once you nail your Moon picture, share it with us and the rest of the PhotoPillers to get featured in the PhotoPills Awards!
Your work will be viewed by thousands of people ;)
Note: Some links on this page are affiliate links. What does this mean? If you buy/rent using these links you're helping support us and it costs you nothing extra. Thank you for your support.
Get this ebook for free now!