What is the best camera equipment for Moon photography? (2024)
I always like to say that the photo idea is always the most important step of Moon photography.
Without ideas, there are no pictures.
Then, you need to plan this idea. Basically to make sure that it's going to happen ;)
And finally, you have to capture it. Yes, you'll need some gear for that. But it doesn't have to be super fancy.
The best camera equipment for Moon photography is the one you already have.
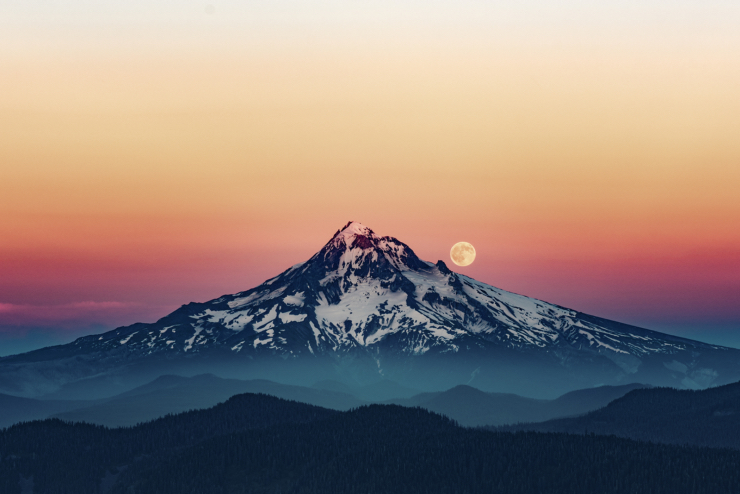
Just do like Iván Roldán, the author of the hypnotic picture I used as the cover of this article, who followed our motto.
Think of an impressive shot. (Imagine)
Plan your picture with PhotoPills. (Plan)
Go to the location on the planned date and time and capture it. (Shoot!)
The whole workflow is super detailed in our Moon photography guide.
Read it thoroughly, start practicing and after a while you'll become a Moon Master.
And if you want to keep learning (which is something I always recommend), have a look at the following guides:
- Photography Planning: The Definitive Guide.
- How to take a picture of the Moon.
- How to photograph the Moon with a foreground.
- 50 tips for photographing the Moon.
- Your ultimate Moon photography cheat sheet: quick tips for stunning shots.
But for now, let's have a look at what I consider the best camera equipment for Moon photography.
"Skill in photography is acquired by practice and not by purchase." - Percy W. Harris
Get this ebook for free now!
Content
- What is the best camera equipment for Moon Photography?
- Always rely on PhotoPills!
- What is the best camera to take pictures of the Moon?
- What is the best lens for Moon photography?
- Get a sturdy tripod and head
- You need an intervalometer
- Take enough memory cards
- A headlamp may be useful
- Moon photography, it's not about the gear... is it?
1.What is the best camera equipment for Moon Photography?
Photo by Adrian Drag
"Quick question Toni... What's the best camera equipment for Moon photography?"
OK, that's a quick question. But the answer is going to take me a bit... :D
Just in case you want to go straight to the point, here's a short camera equipment list:
1. PhotoPills is the best planning and shooting app that you can have in your pocket.
2. A camera with
- A sensor with a reasonably high dynamic range sensor.
- The capacity to produce as little noise as possible.
- A good resolution.
- Some stabilization technology.
3. A lens that is
- Long.
- Very sharp.
- Reasonably fast (f number as low as possible).
- Stabilized.
4. A sturdy tripod and head that are
- Tall enough for you.
- Capable of carrying the weight of your camera and lens.
5. An intervalometer.
6. A bunch of memory cards.
7. A powerful headlamp (in case your session starts or ends at night).
However, I suggest you keep reading to know all the details about each piece of gear and what you really need to nail your Moon shot.
2.Always rely on PhotoPills!
Have a I told you that PhotoPills is the photographer's Swiss Army knife?
You may have read it before because I truly believe it :)
My good friend and PhotoPills Master Francesco Gola wrote this definition a while ago and I think it's very accurate.
That's why your best piece of camera equipment for Moon photography is PhotoPills. It's the best:
- Planning tool.
- Shooting companion (it will help you with your composition and with the focus).
So it's a super cheap and powerful tool that you can use right from the first creative steps!
Let me tell you how it can help you with your Moon photography session.
Take advantage of the planning tools (1)
Planning your Moon photos is essential. Full stop.
Why?
You'll avoid surprises and have (almost) everything under control.
You'll always be at the right place at the right time to capture the photo you want to capture.
And there's no better tool than PhotoPills to find out if your idea is possible and the three basic pieces of information – the shooting spot, the shooting date and the shooting time.
Depending on the type of picture you've imagined, you'll need to follow a different workflow.
In the guide 'How to take a picture of the Moon for beginners' you have all the steps you need to follow.
But here are some cheat sheets that I'm sure you'll find useful.
How to plan a Moonrise (or Moonset) on a certain date (1)
Planning a Moonrise or a Moonset shot when you know the date you want to take the picture is extremely easy.
- Watch a video in which Rafa explains how to do it step by step.
- Have a look at my tutorial on how to plan Moonrises (and Moonsets).
How to plan a big Moon on a certain date (2)
In this case, you know the date you want to take the photo but you need to find out:
- A cool subject that can be aligned with the Moon.
- The exact shooting spot from which you'll be shooting to get the size of the Moon you need.
- The exact time the Moon will be where you want it to be.
So...
- Watch a video in which Rafa explains in great detail how to plan this type of photo.
- Have a look at my tutorial on how to plan a big Moon aligned with a subject.
How to plan a Moonrise (or Moonset) with the Moon in a certain position (3)
Here, you need to use the Find tool in the PhotoPills Planner.
- Watch a video where Rafa explains in depth how to plan a photo of the Moon setting inside the Arc de Triomphe.
- Have a look at my tutorial on how to plan Moonrises (and Moonsets).
How to plan a big Moon in a certain position (4)
You need to find out:
- If the specific photo you've imagined is possible.
- And if it is, when exactly it does happen and the size of the Moon you'll get.
Great!
- Watch a video in which Rafa explains how to use the Find tool of PhotoPills to plan any Moon alignment you imagine.
- Have a look at my tutorial on how to plan a big Moon aligned with a subject.
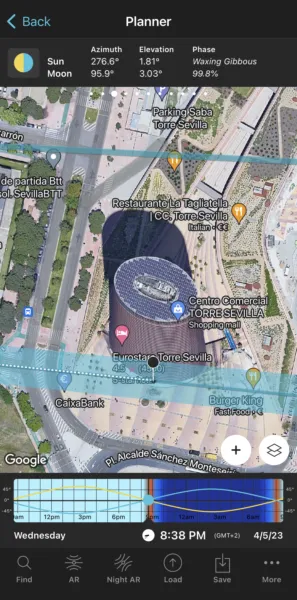
Nail your photo with the shooting features (2)
You can use PhotoPills to plan the field of view (FoV).
Would you like to know how?
Just watch this video:
You also have a super detailed explanation in section 20 of our photography planning guide.
But here's a short summary:
Open PhotoPills and tap Planner (Pills Menu).
Tap the Map Settings button. You have it on the map, next to the (+) button.
On the Map Settings screen, in the Map Tools section, tap the FoV (Field of View) button. Tap Done (top right corner) in iOS or the back arrow in Android.
Enter the settings in the new panel (e.g. camera model, focal length, composition orientation).
Tap the Azimuth framing button (the last button). And on the Azimuth screen, tap the Align with Black Pin option. The field of view is now aligned with the Black Pin.
Tap the Map Settings button again. Then tap the Moon layer and activate the Show Moon size option. Now you can also see the size of the Moon on the map.
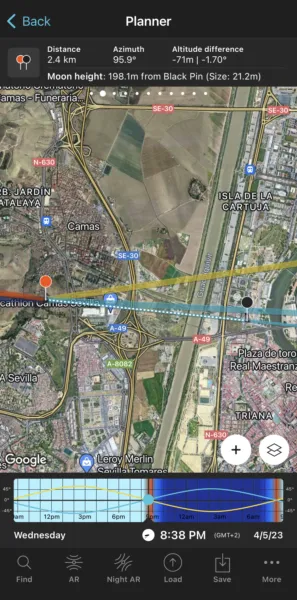
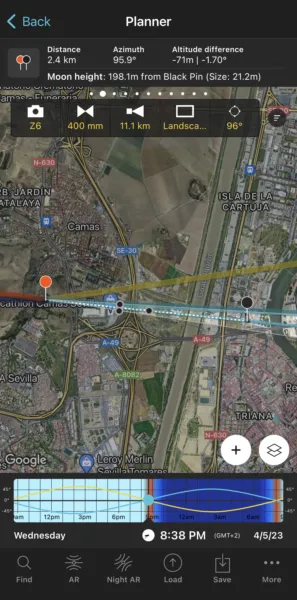
Have a look at the screenshots above.
According to PhotoPills, if you use a Nikon Z6 with a 400mm in landscape mode (horizontally) and focusing right at the distance to the Black Pin:
- Your horizontal FoV will be 995.03 m.
- Your vertical FoV will be 662.43 m.
Once you're in the field, go to the Red Pin position (the shooting spot).
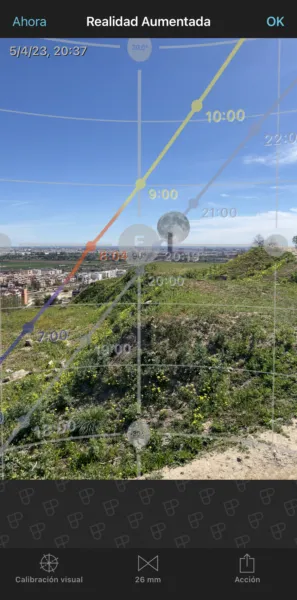
Here's a video in which Rafa explains how to make the most out of the Augmented Reality view (AR) when you're in the field:
To make sure you're at the right spot, follow these steps:
In the Planner, tap the (+) button on the map (lower right corner) and activate your position on the map (by tapping on the button with the GPS icon or arrowhead). A blue circle will appear on the map indicating the exact location you're in.
Now walk to where the Red Pin is. And make sure the blue circle is centered with the end of the Red Pin stick.
Then, use the Augmented Reality view (AR) on the Planner to visualize on your smartphone where the Moon will be.
3.What is the best camera to take pictures of the Moon?
Photo by Albert Dros
"OK Toni... What's the best camera to take pictures of the Moon?"
Let me start by telling you there's no need to panic because you don't need to spend a fortune ;)
You can read everything you need to know in this article about the best camera to take pictures of the Moon.
But here's a quick summary to get the best photography equipment.
The good news is that the best camera is the one you have.
It will surely produce very good results.
However, here are some features that your camera should ideally have:
- A sensor with a reasonably high dynamic range sensor.
- The capacity to produce as little noise as possible.
- A good resolution.
- Some stabilization technology.
After years testing and comparing many camera bodies these are, in my opinion, the best cameras to take pictures of the Moon:
And remember that you can always take advantage of a camera body with a cropped sensor as it brings you closer even further.
Let's say that you have a mirrorless camera with an APS-C sensor. So, depending on the brand of camera you use, your 400mm focal length might increase to an equivalent of 640mm.
4.What is the best lens for Moon photography?

Photo by Dale Sharpe
"Now that I know more about the camera, can you tell me what's the best lens to shoot the Moon?"
Sure!
But the answer is not very different :D
You can read everything you need to know in this article about the best lens for Moon photography.
But here's a quick summary to get the best camera gear.
The best lens is the one you have, the longer the better...
Having said that, it would be great if your lens is:
- Long.
- Very sharp.
- Reasonably fast (f number as low as possible).
- Stabilized.
- Not heavy.
After years testing and comparing many camera lenses these are, in my opinion, the best lenses to photograph the Moon:
- Nikon NIKKOR Z 100-400mm f/4.5-5.6 VR S.
- Sony FE 100-400mm f/4.5-5.6 GM.
- Canon EF 100-400mm f/4.5-5.6L IS II.
- Fujifilm XF 100-400mm f/4.5-5.6 R LM.
- Sigma 100-400mm f/5-6.3 DG.
As I said in section 3, if you have a camera with a cropped sensor, you can always benefit from it as your lens will have some extra focal length (e.g. 1.5x, 1.6x, 2x).
And if you wish to go longer, you can always use a 1.4x or 2x teleconverter.
5.Get a sturdy tripod and head
Photo by Alexander Schimpf
The Moon is over 384,400 km (238,855 miles) away on an average distance.
And to capture a huge Moon, there are 2 major factors that you should take into consideration:
The shooting spot determines the size of the Moon relative to the subject size. So the further away you are from the subject, the bigger the Moon will look like.
The focal length determines the Moon size in the frame. And that's because a telephoto lens compresses perspective.
So to get a detailed photo you'll need a long lens. The longer the better.
With such a long lens, it's very unlikely you'll be able to get a handheld sharp photo, so a sturdy tripod is a must.
And, depending on the natural light of the scene you may need to shoot a relatively long exposure. Thus, any vibration or movement will remove sharpness from your photo.
In addition to the tripod, you'll need a solid tripod head that makes it easy to readjust the camera position when the Moon "moves". Keep in mind that the Moon "moves" very fast within the frame, especially at higher magnifications, so you'll be constantly adjusting your camera to keep the Moon exactly where you've planned to have it in the frame.
All in all, a good tripod and a ball head are essential Moon photography accessories.
Tripod and head recommendations
Choosing the best tripod can mean spending a little more money or being a bit clearer about the kind of photography you shoot.
In general, the key things to think about are the size and capacity of the tripod. In other words, how tall you need it to be, and how much weight you need it to carry.
Low-end tripod and head
The main challenge here is to make sure that even with the cheap price tag, you're still getting a quality product.
If you're spending little money, you're not going to get tripods made from carbon fiber, which is the stronger and more lightweight material. You'll also get a relatively simple ball head.
Try to invest in high quality gear as much as your budget allows for it. And stick to reputable brand names, such as Benro and Manfrotto.
Mid-range tripod and head
One of the main tripods that I always recommend to my students is the Manfrotto 055XPRO3 no matter what their situation.
It's a solid tripod that offers some of the best possible performance and functionality available for its price point.
A very good alternative is the Travel line by Benro.
Although if you have a slightly bigger budget, you should invest in a carbon fiber tripod. It offers the same strength and stability as an aluminum tripod. But it's much lighter and your back will thank you for it.
It's a true investment that can last you decades.
The tripods from Gitzo, Induro or Really Right Stuff are fantastic as well.
High-end tripod and head
Obviously, the lighter the tripod, the more expensive it will be. But from a certain price range up, all the carbon fiber tripods of the brands I just mentioned are very good.
Do you want to invest a little more? Buy yourself a good head.
A good ball head can be transformative for your shooting, and it's worth investing in one rather than relying on the basic head bundled with your tripod.
The best ball heads offer great stability and smoothness, are super simple to use, and are easily portable.
My favorite ballhead is the Really Right Stuff BH-55.
Although I also like the Gitzo GH1382QD, the Kirk Enterprises BH-1 and the Arca Swiss Monoball Z1 SP. All of them are extremely solid, reliable and allow you to work with great precision.
And when I use a super telephoto lens I use a Benro GH2 gimbal head.
Tripod tips when shooting the Moon
A tripod is the trusted tool of Moon photographers, so here are 4 pro tips on how to use your tripod for the best results!
Check the weight of your camera and lens combined and ensure your tripod is rated to handle at least that weight.
Keep your tripod as short as possible while still being able to use your camera comfortably. Only extend the legs as much as you need to, and extend the larger diameter sections first.
If your tripod isn't of very good quality, use a stationary object to rest against when taking the photo. But be careful, because the tiniest movements will show up in a photo like this.
If you missed a bit your shooting spot (section 2) or the Moon "moves" too fast in the frame, forget about the tripod! Take advantage of your modern image-stabilization lens, set a fast shutter speed and crank the ISO up. It's better to risk taking a handheld image than having no picture at all.
6.You need an intervalometer
Photo by Kwong Liew
An intervalometer allows you to take a picture without touching the camera shutter. That's why they are perfect for Moon photography and you should always include one in your photo gear arsenal.
Whenever you photograph the Moon, try to avoid any contact with the camera. The slightest vibration will make you end up with a blurred photo.
Some high-end cameras have built-in intervalometers.
But what if your camera doesn't have a built-in interval function? Then external intervalometers are your next best option.
I usually recommend these great intervalometers:
- Pro intervalometer: SMDV.
- For cheap intervalometers check the brands Neewer, Phottix and Vello.
A great alternative is a device called CamRanger. Right now it's available for Nikon, Canon, Fuji and Sony cameras.
It's a stand-alone device that you connect to your DSLR or mirrorless camera with a USB cable. It creates an ad hoc WiFi network to which you can connect your smartphone, tablet or computer (iOS, Android, Mac and Windows). Thanks to the CamRanger application you can control your camera without a standard Internet connection.
Best of all, this device is independent. Therefore, if your mobile device loses its connection, the CamRanger has an internal memory to keep shooting.
Apart from this, you can:
- Set the camera settings from the remote device avoiding touching your camera equipment.
- View your shots on a large portable high resolution screen as you take them allowing you to check on the field that your subject is tack sharp.
It carries a hefty price tag considering what it is, but for photographers who want advanced control over their camera, it's the nicest option for doing so and worth the price.
7.Take enough memory cards

Photo by Rubén Domínguez
Make sure you always include a bunch of memory cards in your photo equipment.
If you don't have the best memory card for your camera, then you're not going to get the most out of your photo sessions. With so many options for speed, capacity, brand, compatibility, and price available, you might initially feel overwhelmed.
However, here are a few tips and pieces of information that will help you determine which one is best for you:
Determine the type of memory card your camera uses.
Decide the card's capacity.
Choose the speed of the memory card.
The different types of memory cards (1)
The first thing you should do is to check the camera's specifications before you buy any memory card.
Manufacturers offer the following memory card types:
- CompactFlash (CF). This format has been available since the early days of digital photography. It used to represent the best in speed and capacity but has been caught up by the newer memory card formats.
- SD Cards. This is by far the most common format and it comes in 3 upgraded versions:
- SDHC (Secure Digital High Capacity). These are SD camera memory cards that store between 2GB and 32GB worth of data.
- SDXC (Secure Digital ‘Xtra Capacity'). These are SD camera memory cards storing between 32GB and 2TB.
- SDUC (Secure Digital Ultra Capacity). The latest standard stores between 2TB and 128TB.
- XQD (or Express Card). It's a high-speed memory card developed as a successor to CompactFlash cards.
- CFexpress. These are even faster and better performing cards. And they come in 3 formats:
- Type A. Slightly smaller and slightly thicker than a standard SD card.
- Type B. These are the same shape as XQD memory cards.
- Type C. Far larger and thicker than even the classic CompactFlash card. At present, no cameras use the CFexpress Type C standard.
The capacity of the memory card (2)
When it comes to choosing the best memory card, you may think that the biggest card is best. But it depends on what you're doing with it.
If you're taking hundreds of images without importing them to your computer, a bigger card is better.
A memory card with more storage is better for high-end cameras (full frame or medium format). That's because the images they take are bigger, sometimes bigger than 50MB each.
But even prices have plummeted for certain types (particularly SD Cards and XQD cards), I like to use medium capacity cards (usually 32GB). So if a card breaks or I lose it (let's hope not!), the number of lost pictures is lower.
The speed of the memory card (3)
You may also feel that the fastest card is the best.
The camera needs to transfer this data quickly and efficiently, especially if it's shooting in burst mode, which is why having a fast memory card is important for optimal performance. The card needs a fast write speed to keep the buffer from jamming up and bottlenecking the data transfer.
However, not all cameras support all speeds, so double check before you buy.
Also, the memory card might be able to write images fast, but if the card is faster than your camera, it's wasted speed.
Finally, the fastest memory cards are great, but they are also costly.
8.A headlamp may be useful

Photo by Ricardo Martínez
Moon photography may eventually require you to arrive or leave the location during the night. And even when the Moon is shining, it can still be quite challenging to see.
Let's say that you want to capture a:
- Moonset or a big Moon setting. You'll need to get to the location before dawn.
- Moonrise or a big Moon rising. You'll need to leave the location after dusk.
This means setting or packing your camera gear in the dark. Or walking in the dark.
So bring a headlamp with you to make everything easier. It's a piece of photography gear that you'll find useful.
Any headlamp works for Moon photography.
But my favorite ones are the Led Lenser SEO5, the H14R or the H7R.2.
Versatility and a compact design are the keys to a durable flashlight worth every cent. My favorites are the Coast TX-10, the Led Lenser L7 or the Maglite Mini.
9.Moon photography, it's not all about the gear... is it?
I confess, I am a bit of a gear-head.
Over the years I have collected lots of cameras, lenses, filters, accessories and loads and loads of lighting gear.
But here I am, telling you to do as say and don't do as I do XD
It's just that as time goes by I'm getting wiser (or at least that's what I like to believe!) and I don't want you to make the same mistake I did.
For some time, I fell into the trap of believing that upgrading my camera every time a new model came out was necessary because I needed the latest technology to take the best photos.
And that's not true.
Gear should always be at the end of your priority's list.
Focus on learning (e.g. planning shots, scouting locations, shooting techniques, etc.) and practicing.
Because you know what Master Yoda used to say...
"If no mistake you have made, losing you are. A different game you should play."
So start with the basics: imagine a photo, plan it, go outside and capture it.
Then, the rest will come.
Note: Some links on this page are affiliate links. What does this mean? If you buy/rent using these links you're helping support us and it costs you nothing extra. Thank you for your support.
Get this ebook for free now!