Photography Planning: The Definitive Guide - Chapter 4
Get this ebook for free now!
Content
Chapter 1
- Find creative inspiration with these 20 planned photos
- How to come out with amazing photography ideas
- How to find the perfect location to plan your shots
- 8 things you must know before start planning your photos
- How to plan a specific natural light
Chapter 2
- How to plan Sunrises (and Sunsets)
- How to plan a Big Sun aligned with a subject
- How to plan Moonrises (and Moonsets)
- How to plan a Big Moon aligned with a subject
Chapter 3
- How to plan a Milky Way shot
- How to plan a Star Trails shot
- How to plan a Meteor Shower shot
- How to plan an architecture shot
- How to plan a portrait outdoors
- How to plan a wedding photo in natural light
Chapter 4
- How to plan a drone shot
- How to plan the tides in a seascape
- How to plan a photo of a lunar eclipse
- How to plan a photo of a solar eclipse
- How to plan the field of view and depth of field
- How to plan the weather
- How to plan a shoot during a certain season
- How to scout the location before the shooting date
- Check the weather forecast
- Prepare and check your photography gear
- Be prepared to throw the plan out of the window
- 10 photography planning tips
- 10 photographers that master photography planning
- Planning is everything
Chapter 4
16.How to plan a drone shot
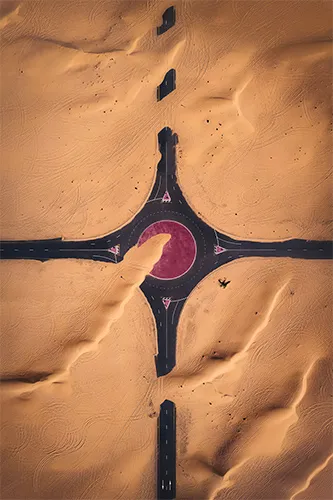
Photo by Javier de la Torre
Nowadays drone technology has advanced so rapidly that pretty much any photographer can capture amazing aerial shots.
You can keep shooting and getting amazing images even after exhausting all the possibilities available on the ground! :)
But to get a truly cool result you need to plan the shooting spot, the frame, the composition, and the date and time you need to go to the location to get the right light direction and light quality.
And here is where the PhotoPills drone mode comes into play.
In this video Rafa explains in depth how to plan a top down aerial photo of an amazing rock that looks like a crocodile and that is located on the island of Menorca (Spain).
But let me show you how to plan your drone photos with another example.
Imagine that you want to capture an abandoned plane, more precisely an Antonov An-8, from high above with your drone.
This abandoned plane is in the outskirts of St Petersburg (Russia), some 25 km north of the city center.
Let's see how you plan a cool aerial image of the abandoned plane with PhotoPills...
Place the Red Pin on the area you want to photograph
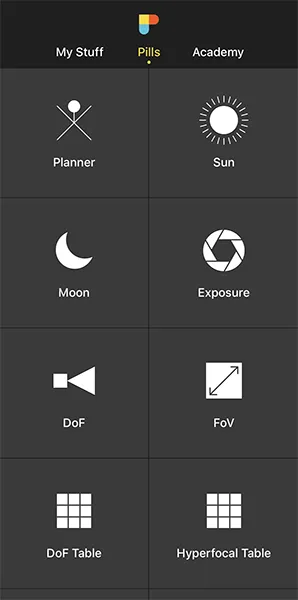
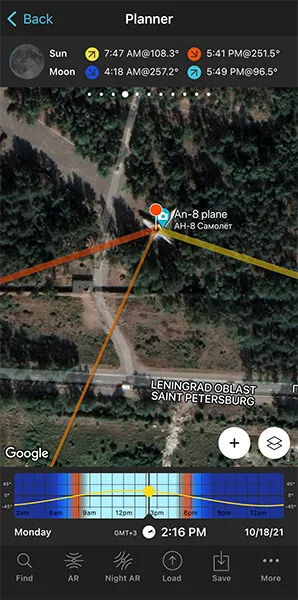
Open your PhotoPills app and tap Planner (Pills menu).
Then, place the Red Pin in the area where you want to take your drone shot.
For example, at the abandoned plane location, some 25 km north of the St Petersburg city center (Russia).
Tap the Load button (at the bottom), select Latitude/Longitude and type the abandoned plane location coordinates in the empty fields, which are 60°07'04"N/30°12'12"E. Then, tap OK (back arrow on Android) and the Red Pin will be placed in the location.
If you don't know how to do it, this video shows you how to move the Red Pin.
Set the shooting date
The next step is to set the date you want to take the drone photo. You need it to figure out, for example, when the golden hour occurs and how light will hit your subject.
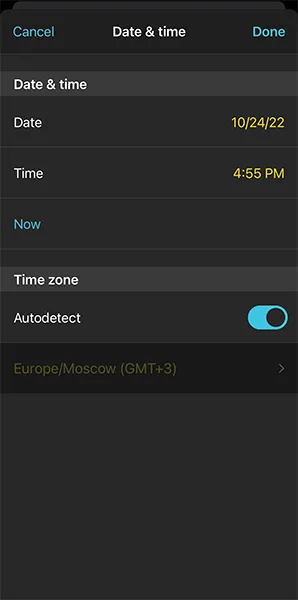
Suppose you want to take your drone photo on October 24, 2022.
There are a few ways to quickly set the date.
The first one is to set your current date and time by double tapping the Time bar below the map. Then, move time forward by swiping the Time bar to the left until you get to the date you want to take the photo.
The second one is to set the date using the Calendar. To do this, tap the center of the Time bar. On the Date & time screen, tap Date to manually change the shooting date.
Switch on the PhotoPills Drone mode
To see the drone information on the map you need to switch on the Drone mode of the PhotoPills Planner.
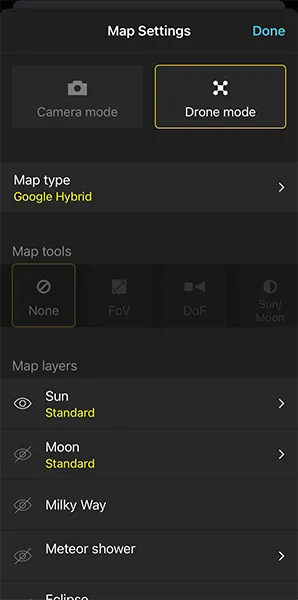
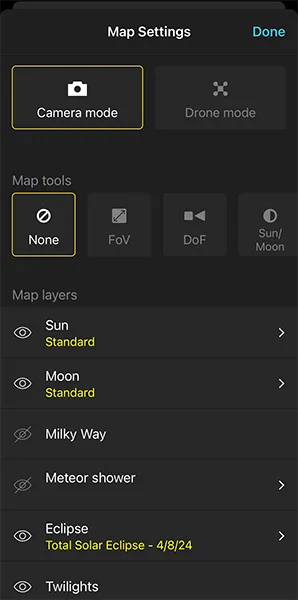
To do it, tap the Map Settings button (bottom right-hand corner, next to the (+) button).
On the Map Settings screen, set the Drone mode (top right hand corner).
On this screen, you can also choose the information layers you want to see on the map (Sun, Moon, Milky Way, Meteor Showers, Eclipse, Twilights, Shadow, etc.).
I suggest you turn all the information layers off, except for the Sun layer. To enable/disable a layer, tap the eye icon you see on the left of the layer. Then, tap Done to confirm your settings in iOS or the back arrow in Android.
The Sun layer will help you understand everything about light direction :)
Set the drone photography settings

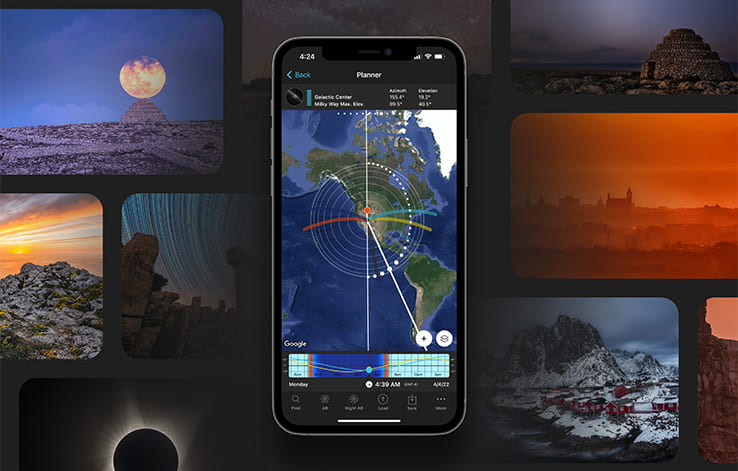
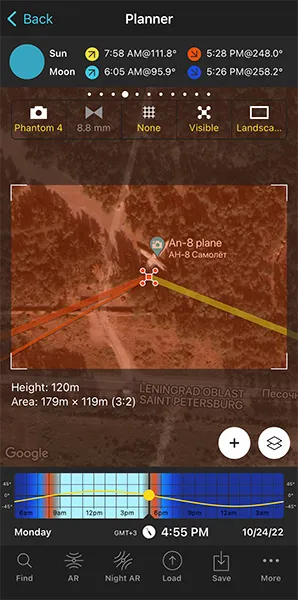
Have a look at the first screenshot above, now the Planner shows the Drone mode and the Red Pin is now a small drone... :)
- The rectangle you see on the map shows you the field of view. That is, the framing you'll get depending on the focal length you're using and the height of the drone.
- Right below, you can see the drone's height and the area.
At the top of the map, right below the top panels, you can see 5 Drone buttons.
Tap each one of them to change the settings:
- Drone selector: Select your drone or the camera you've attached to a drone. My drone is a DJI Mavic 2 Pro.
- Focal length: Select the focal length you'll use with your drone. If it's grey it displays the fixed focal length of your selected drone (4.7mm on my drone).
- Composition grid: Choose from different composition proportions (thirds, diagonal, triangle, golden ratio, golden spiral, etc.) to help you plan your aerial photo.
- Visible/Invisible: Hide the Sun, Moon and Milky Way map lines to enjoy a clean view of the map.
- Landscape/Portrait: Choose between landscape and portrait shooting orientation.
Find an awesome drone composition (to shoot straight down)
Shooting straight down is by far my favorite drone photography style.
I literally love navigating the PhotoPills map looking for eye catching patterns, lines, landmarks or any other interesting elements.
Now that you know that you want to capture the abandoned plane, just drag the map and zoom in and out looking for a great composition.
First, to adjust the shot, you can rotate the map and also play a bit with the zoom.
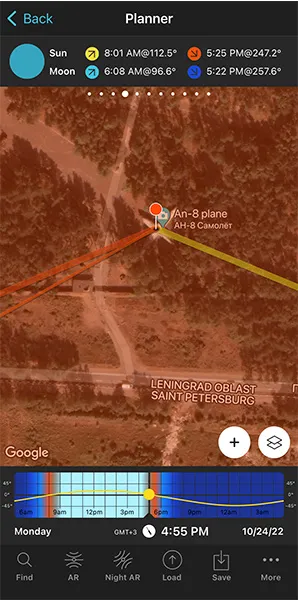
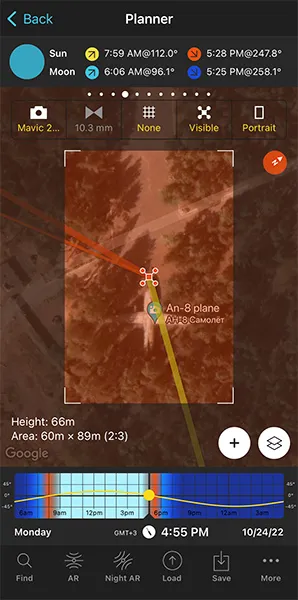
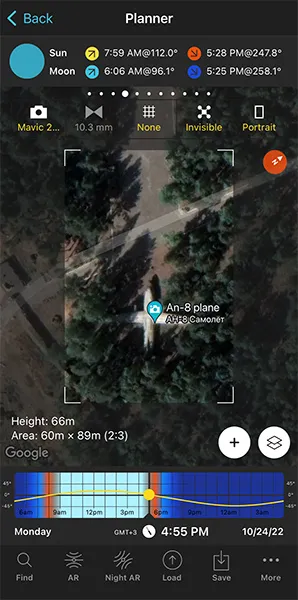
Then, tap the Visible button (above the map) to hide the red drone and Sun/Moon azimuth map lines.
Pay attention to the second screenshot above. Notice that the button says Invisible now, and no lines are displayed on the map for a cleaner view of the photo.
Zoom in and out until you get the photo you want – the perfect shooting spot, frame and the drone height required (in this case, 66 m).
Note: Always check the local regulations on drone flying. You need to be sure you're flying your drone in a place where it's allowed, and at a height that's allowed too.
Plan the natural light (time and direction)
Depending on the shooting time you choose, you'll have one type of natural light or another.
Let's say you want to have a warm golden hue in the image. When does the golden hour begin? And what's the light direction?
Let's figure it out.
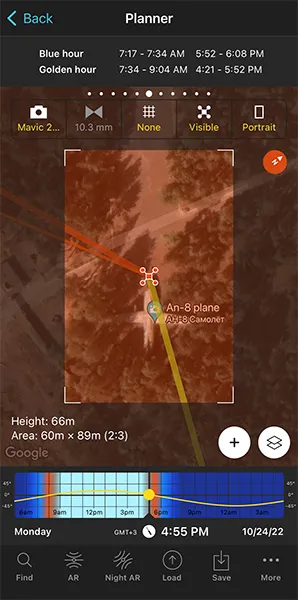
First, tap the Invisible button (above the map) to display the red drone and the Sun azimuth map lines:
- The thick yellow line represents the Sunrise direction for the selected date.
- The thick orange line represents the Sunset direction for the selected date.
- And the thin orange line represents the position of the Sun for the selected date and time.
So, thanks to the thin orange line you know the Sunlight direction at all times.
When does the golden hour begin?
Swipe the top panels above the map until you get to Panel 6. This panel gives you the golden hour and blue hour information for the selected date and selected Red Pin position.
According to Panel 6, on October 24, 2022 the golden hour times are:
- Between 07:34 am and 09:04 am.
- Between 04:21 pm and 05:52 pm.
Therefore, if you want to shoot in the evening, now you know the golden hour begins at 04:21 pm and ends at 05:52 pm. That's your shooting time range.
Use the Time bar to choose the shooting time based on light direction and light type (golden hour) you're looking for.
And that's it! You've just planned a cool drone photo.
Now you just have to save the plan (tap Save and then choose to save a Plan).
Oh, and make sure to get there on time! ;)
Become a master reading our drone photography guide.
17.How to plan tides in a seascape
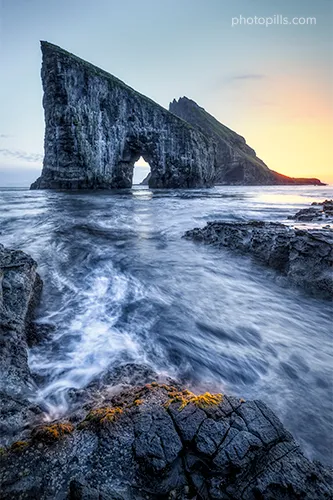
Timing is crucial in seascape photography.
Apart from natural light (section 4) and weather (section 21), you'll need to take another important element into consideration: tides.
All 3 of them will define the shooting time.
Plan the seascape tides on the field (1)
Ideally, you should scout the location during the day at low tide to look for a subject, but most specifically to develop compositions with all sorts of elements (e.g. rocks, moss, sand patterns, reflections, rock pools, etc.).
From there, you can also determine if high tide might work: water will hide most of these elements and will therefore eliminate clutter.
This is a really useful exercise as it will allow you to envision your shot and plan it consequently.
In addition to this, you can always confirm the tide times with my 2 favorite tools:
- Nautide (and its free website tides4fishing).
- Tide Charts Near Me.
More details on them in the next section... ;)
Plan the seascape tides from home (2)
You can use the PhotoPills Planner to plan from your couch any seascape for any location on Earth!
Plan the position of the Sun, the natural light type and direction you need so you have the shooting time. Then, check the tides.
If you want to become a master of seascape photography and seascape photography planning, you should study in depth the Masterclass that my friend Francesco Gola gave us on this topic.
But if you prefer a written explanation, keep reading!
Let's see how it works...
Decide the type of shot you want to capture
Depending on the type of picture you have in mind, follow the steps I explained previously:
- Have a look at section 6 if you want to shoot a Sunrise or a Moonrise.
- Check section 8 if you want to shoot a Sunset or a Moonset.
- Check section 10 if you want to photograph the Milky Way.
Check the tides on the shooting location
Now that you have your photo planned, it's time to check the tides.
Remember that the Sun/Moon's position doesn't change that much from one day to the next during a week or so... This allows you to choose the day with the tide that you are looking for ;)
And in order to do so, here are my favorite tools.
Nautide
If you intend to photograph a seascape, it's essential that you know what time the tide rises or falls in the location.
My favorite tidal app is Nautide.
I like it because it gives a lot of very detailed information: high and low tides times, the water level (how much the water will rise or fall), daily tide charts, the tidal coefficient and the marine life activity among others.
Nautide relies on the data provided by the National Ocean Service of the American NOAA buoys, so you can choose from more than 10,000 buoys...
The downside is that if you want to plan weeks or months in advance, you'll need to purchase an annual data package.
The good news is that their website tides4fishing is completely free ;)
Nautide is available on iOS and Android.
Tide Charts Near Me
What I like most about Tide Charts Near Me is that it offers tidal information with no time limitation. There's no need to buy a data package or pay for a premium version.
Its main graph shows the information very clearly and how the tide is going to rise and fall throughout the day and night.
You can also see the current tide level (meters and centimeters or feet and inches, depending on the system you prefer). And to make the information more visual, a small arrow points up or down as the tide rises or falls.
Tide Charts Near Me is available on iOS and Android.
Check the weather on the shooting location
Finally, it's time to check the weather conditions.
You have all the essential steps to do so detailed in section 21.
Again, because the Sun/Moon's position doesn't change that much from one day to the next during a week or so you can choose the day with the best weather forecast ;)
Obviously, you'll have to make compromises if you don't get the perfect conditions in one day. That is
- The Sun or Moon in the direction or position you want (e.g. To the side of your subject).
- The tide you're looking for (e.g. Low tide to photograph the mossy rocks).
- The weather you envision (e.g. A nice sky with scattered clouds).
Therefore, establish the priorities and decide your shooting date according to what's most important for you.
18.How to plan a photo of a lunar eclipse
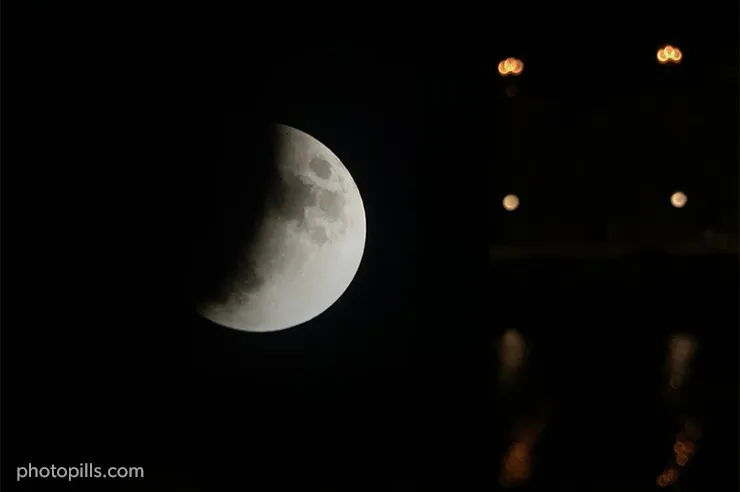
A lunar eclipse is a rare and breathtaking phenomena, which occurs when the Moon passes into the Earth's shadow and seemingly changes shape, color, or disappears from the night sky completely.
Have a look at section 4 to learn more about the different lunar eclipses and the eclipse phases that you can photograph.
And if you want to learn how to photograph a lunar eclipse, check our super detailed lunar eclipse photography guide. You'll find everything you need to nail your lunar eclipse photos in there.
Living a lunar eclipse, either partial or total, and photographing it is something every photographer should do at least one in a lifetime.
And in order to photograph it, you need to plan it first ;)
You may have to answer a few questions:
- When does the next lunar eclipse occur?
- Where on Earth is the lunar eclipse visible?
- Is it a partial or a total lunar eclipse?
- And most importantly, what's the best shooting spot and shooting time to photograph it?
Well...
You can quickly answer all these questions with PhotoPills. Actually, in this video Rafa teaches you how to plan a photo of a total lunar eclipse step by step.
But let's see another example of lunar eclipse planning.
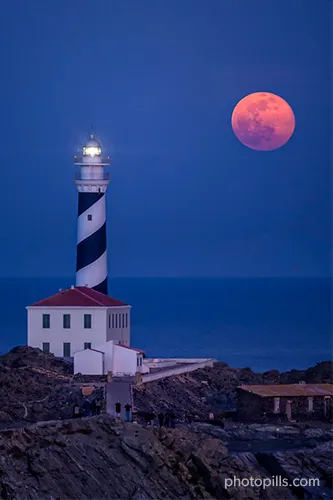
Suppose that you want to capture a totally eclipsed Full Moon (also known as Blood Moon) with a telephoto lens.
Where does the Blood Moon name come from? It's because during a total lunar eclipse the Moon takes a mystic red hue.
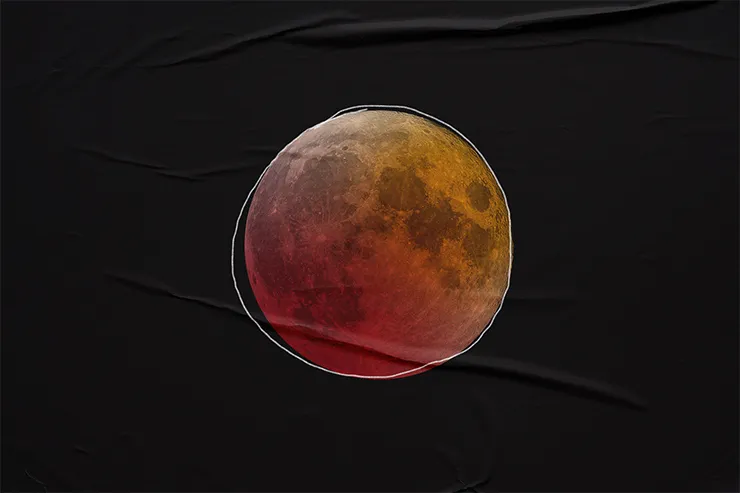
The idea is to photograph a close up of the totally eclipsed Moon (the red Moon), without any other element in the frame.
Let's see how you can plan this shot.
The first step is to figure out when the next total lunar eclipse occurs.
Select the lunar eclipse you want to plan
The first thing you have to do is to select the eclipse you want to plan.
Open PhotoPills, and tap Planner (Pills Menu).
Then, tap the Map Settings button. You'll see it on the map, in the lower right corner, right next to the (+) button on the map.
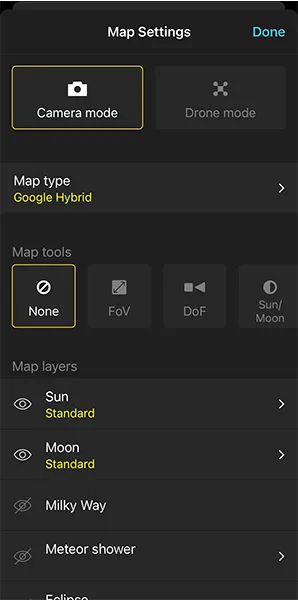
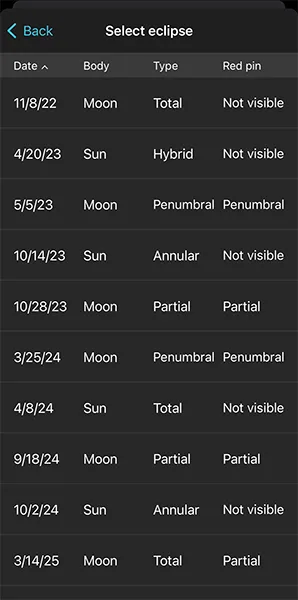
Once on the Map Settings screen, tap the Eclipse layer to see the calendar of eclipses.
The calendar displays all the solar and lunar eclipses, showing:
- Date
- Object (Sun or Moon)
- Type (total, partial, annular or hybrid)
- Red Pin, if it's visible or not from the Red Pin position. And when visible, if it's total, partial or penumbral.
Note: Tap Date, Object, Type or Red Pin at the top to sort the table according to the criteria you prefer.
Let's say that you want to plan a photo of the total lunar eclipse of May 16, 2022.
On the table, tap the eclipse of May 16, 2022 to select it. And go back to the map.

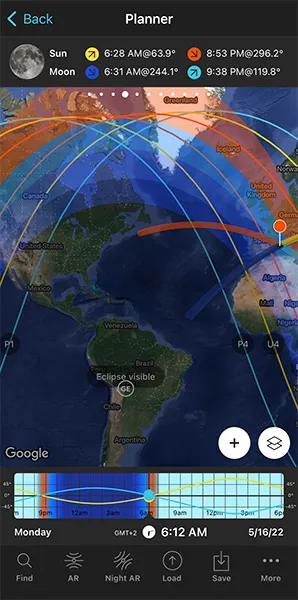
On the map, zoom out to get a global view of the eclipse visibility information.
Let's find out where you can see and photograph the lunar eclipse.
Find out where the lunar eclipse is visible
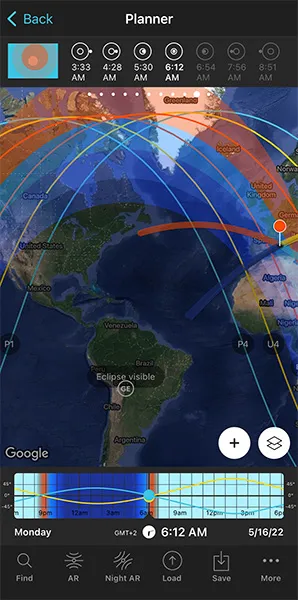
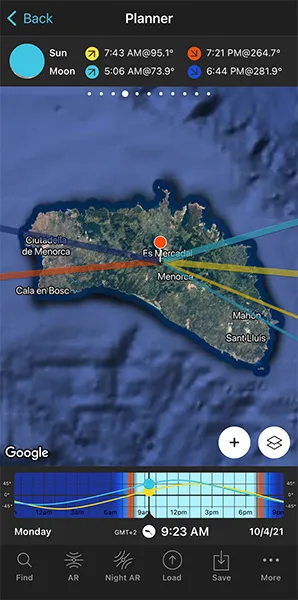
Swipe the top panels above the map to the left to get the eclipse information: Panel 9 (first screenshot above) and Panel 10 (second screenshot above).
Look at the map so you can quickly find out the areas of the planet where the total eclipse is visible.
Again, have a look at section 4 to understand lunar eclipses and their phases.
In order to enjoy a total lunar eclipse, you should go to the areas displayed on the map as:
- Eclipse visible.
- Eclipse at Moonrise, only between lines P1 and U3.
- Eclipse at Moonset, only between lines P4 and U2.
Navigate the map.
For example, Toronto (Canada) is located in the area of the map where the eclipse is visible. Thus, it's a great place to enjoy all the phases of the total lunar eclipse.
But there are many other areas where you can see the total lunar eclipse: Northwest North America, South America, west of Europe and west of Africa. Not bad :)
Now, all you need to do is to place the Red Pin in Toronto (Canada). If you don't know how to do it, this video will teach you how to move the Red Pin.
Let's find out
- When each phase of the eclipse occurs in Toronto so you arrive in time.
- Where in the sky they will occur so you know where to frame the camera.
Find out when and where the lunar eclipse is visible
In other words...
- At what time does each phase of the eclipse occur according to the Red Pin position?
- And where will the Moon be during each phase of the eclipse?
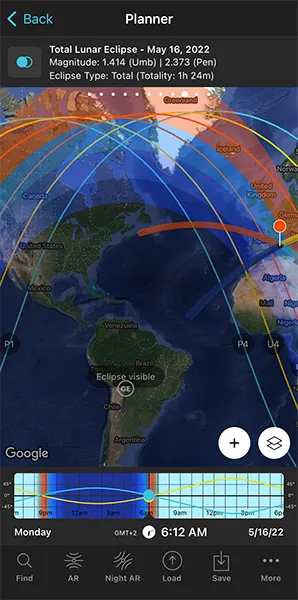
You'll find the answer of the first question on the top panels above the map. Again, Panel 9 and Panel 10.
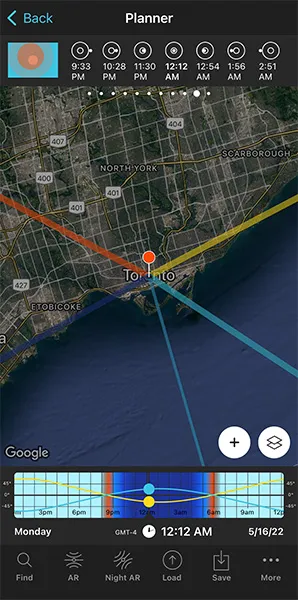
First, have a loot at Panel 10. Considering the Red Pin position, the penumbral phase of the May 15, 2022 eclipse starts at 09:33 pm. The partial phase starts at 10:28 pm and the total eclipse starts at 11:30 pm.
Let's look at the two eclipse panels in more detail...
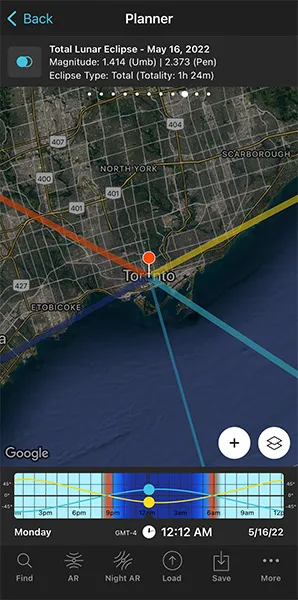
In Panel 9 you'll find the basic information of the eclipse for the position of the Red Pin:
- Eclipse selector button: If the Eclipse layer is active on the map, you can deactivate it by tapping this button. Tap it again to access the eclipse calendar and select the eclipse you wish to plan.
- Selected eclipse: In this case, the total lunar eclipse of May 15, 2022.
- Eclipse magnitude: A lunar eclipse has two magnitudes (section 4). Here, the umbral magnitude is 1.414 and the penumbral magnitude is 2.373.
- Eclipse type: The type of eclipse that you can see from the Red Pin position (total, partial, penumbral or not visible). If the Red Pin is within the area of totality, it also indicates the duration of totality (1h 24min).
Finally, Panel 10 will help you to quickly find out the exact time the different phases of the eclipse happen considering the Red Pin position:
- Eclipse phase picture: Image on the left of the panel. It shows the phase of the eclipse at all times as seen from the Red Pin position. Tap it to jump in time to the next phase and the time will be set in the Time bar. Double tap it and you'll go back in time to the previous phase.
- Eclipse phase time: The panel displays the times at which the eclipse phases occur.
Good...
Thanks to Panel 10 now you know when each phase of the eclipse occurs. To select the time of a phase, tap and hold the time of the phase that is displayed on the panel. The time will be set in the Time bar.
Once you've set the time of the phase you want to photograph, pay attention to the map. The thin blue line tells you the direction where that particular eclipse phase occurs. It helps you determine the direction you need to point the camera to.
But how high in the sky?
Well...
When you're in the field, at the Red Pin position, use the Augmented Reality view (AR) on the Planner to visualize on your smartphone the position of the Moon during the eclipse.
Your plan is done.
Good job!
Now all you have to do is to save the plan tapping Save and then Plan.
One last thing.
If you want to align the eclipsed Moon with a subject, you need to go to a location on Earth where the Moon is low in the sky during the eclipse. This occurs in the areas where the eclipse is visible at Moonrise and at Moonset.
And then follow the same steps I explain in section 9 about planning a big Moon aligned with a subject. You can't miss it!
Become a master in lunar eclipses reading our lunar eclipse photography guide.
19.How to plan a photo of a solar eclipse

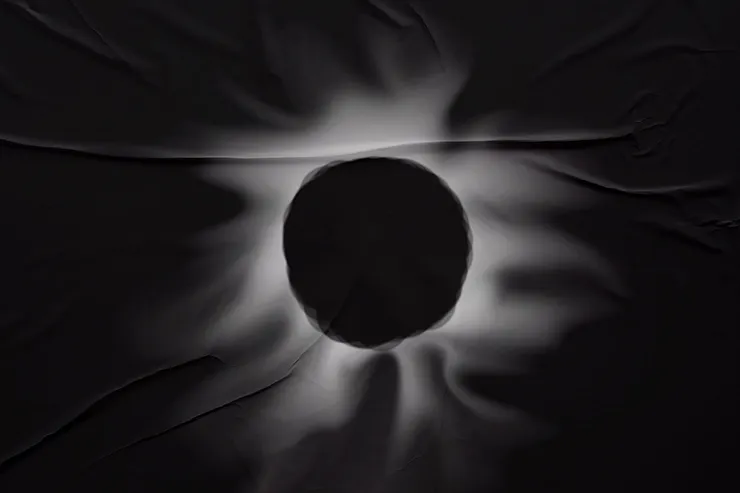
Photo by Josh Cripps
A total solar eclipse is a natural event you need to live (and photograph) at least once in your life.
As the Moon covers the Sun completely, the temperature drops, darkness surrounds you and wild animals go quiet... It's a strange and magical moment at the same time.
It cannot be described with words, you must live it.
The good news is...
You can plan any solar eclipse picture you imagine with PhotoPills!
Thanks to the app, you can quickly figure out:
- When the next total or partial solar eclipse occurs.
- And where on earth the solar eclipse is visible.
With this information, you can figure out the right shooting spot and shooting time to capture the photo of the solar eclipse you have in mind.
Would you like to learn how you can do it?
Well, watch this video and learn how to plan a photo of a total solar eclipse, step by step.
But if you prefer to read, here you have another example.
Suppose that you want to capture a totally eclipsed Sun (what's called the totality phase) with a telephoto lens. It's when the Moon completely covers the Sun's disk.
You don't want to include the foreground in the frame. You just want to photograph a close up of the Sun and capture all the spectacular phenomena that occur during totality: the Diamond Ring, the Baily's beads, the Sun's corona and the Sun's chromosphere.
Let's see how to plan your eclipse shots.
Select the solar eclipse you want to plan
The first thing you have to do is to select the eclipse you want to plan. So let's see the eclipses that will occur in the future.
Open PhotoPills, and tap Planner (Pills Menu).
Then, tap the Map Settings button. You'll see it on the map, in the lower right corner, right next to the (+) button on the map.
Once on the Map Settings screen, tap the Eclipse layer to see the calendar of eclipses.
The calendar displays all the solar and lunar eclipses, showing:
- Date
- Object (Sun or Moon)
- Type (total, partial, annular or hybrid)
- Red Pin, if it's visible or not from the Red Pin position. And when visible, if it's total, partial or penumbral.
Note: Tap Date, Object, Type or Red Pin at the top to sort the table according to the criteria you prefer.
For example, let's plan a photo of the total solar eclipse of April 8, 2024.
Tap the total solar eclipse to select it. And go back to the map.
On the map, zoom out to get a global view of the eclipse visibility information.
Now, let's find out where you can see and photograph the total solar eclipse.
Find out where the solar eclipse is visible
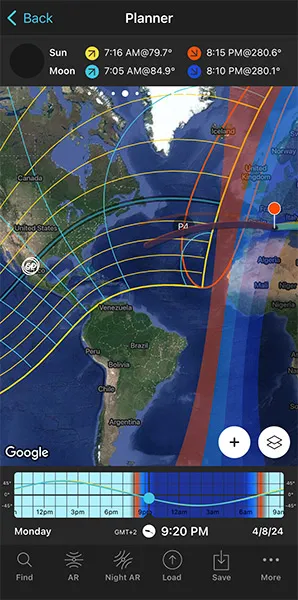
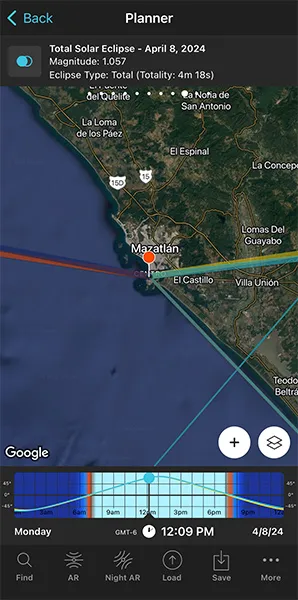
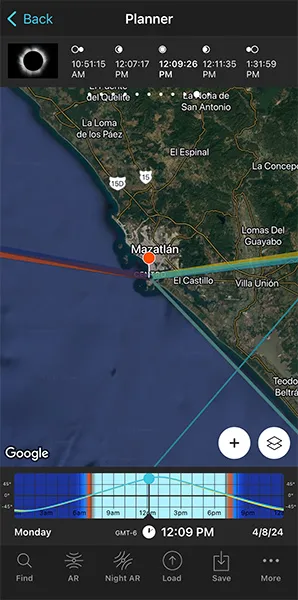
Swipe the top panels above the map to the left to get the eclipse information: Panel 9 (first screenshot above) and Panel 10 (second screenshot above).
Look at the map so you can quickly find out the areas of the planet where the total eclipse is visible.
In order to enjoy a total solar eclipse, you should go to the areas displayed on the map as:
- Map central dark band, which is the path of totality (the area of total darkness).
- Map blue line within the path of totality, which is the centerline where you'll benefit from the longest amount of time the Sun will be covered by the Moon.
The areas outside the path of totality and within the yellow lines mark the areas on Earth where you'll be able to see a partial eclipse.
And in the areas outside the yellow lines, the eclipse won't be visible.
For example, Mazatlán (Mexico) is located within the path of totality. Thus, it's a great place to enjoy all the phases of the total eclipse, including totality.
But there are many other areas where you can see the total eclipse: Mexico, central USA, east Canada. Not bad :)
Now, all you need to do is to place the Red Pin in Mazatlán (Mexico) or in any location you want that is within the path of totality. If you don't know how to do it, this video will teach you how to move the Red Pin.
Great!
Let's find out:
- When each phase of the eclipse occurs in Mazatlán so you arrive in time.
- Where in the sky totality will occur so you know where to frame the camera.
Find out when and where the solar eclipse is visible
Long story short...
You need to answer the following questions:
- At what time does each phase of the eclipse occur according to the Red Pin position?
- And where will the Sun be during each phase of the eclipse?
The answer to the first question is in the top panels above the map. Again, Panel 9 and Panel 10.
First, have a look at Panel 10. Considering the Red Pin position, the April 8, 2024 eclipse totality phase starts at 12:07:17 pm and ends at 12:11:35 pm. And the maximum eclipse occurs at 12:09:26 pm.
That gives you the shooting times.
Let's look at the two eclipse panels in more detail...
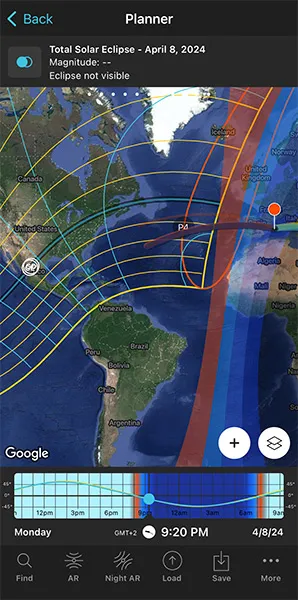
In Panel 9 you'll find the basic information of the eclipse for the position of the Red Pin:
- Eclipse selector button: If the Eclipse layer is active on the map, you can deactivate it by tapping this button. Tap it again to access the eclipse calendar and select the eclipse you wish to plan.
- Selected eclipse: In this case, the total solar eclipse of April 8, 2024.
- Eclipse magnitude: Here, the eclipse magnitude is 1.057 (section 4).
- Eclipse type: The type of eclipse that you can see from the Red Pin position (total, partial, annular or not visible). If the Red Pin is within the area of totality, it also indicates the duration of totality (4m 18s).
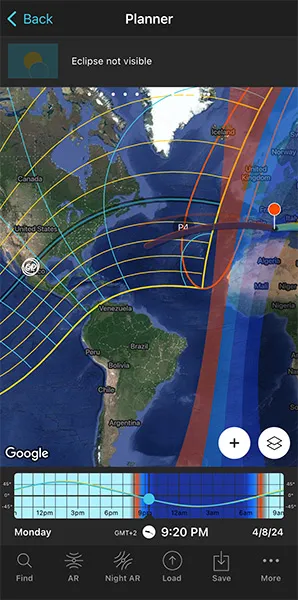
Finally, Panel 10 will help you to quickly find out the exact time the different phases of the eclipse happen considering the Red Pin position:
- Eclipse phase picture: Image on the left of the panel. It shows the phase of the eclipse at all times as seen from the Red Pin position. Tap it to jump in time to the next phase and the time will be set in the Time bar. Double tap it and you'll go back in time to the previous phase.
- Eclipse phase time: The panel displays the times at which the eclipse phases occur. To select the time of a phase, tap and hold the time of the phase that is displayed on the panel. The time will be set in the Time bar.
OK!
On Panel 10 you have the time each phase of the eclipse occurs. To select the time of a particular phase, tap and hold the time of the phase that is displayed on the panel. The time will be set in the Time bar.
Once you've set the time of the phase you want to photograph, pay attention to the map. The thin yellow line tells you the direction where that particular eclipse phase occurs. This helps you determine the direction you need to point the camera to.
But how high in the sky?
Well, it's super easy to figure it out thanks to the Augmented Reality views.
When you're in the field, at the Red Pin position, use the Augmented Reality view (AR) on the Planner to visualize on your smartphone the position of the Sun during the eclipse.
And that's it!
Now all you have to do is to save the plan tapping Save and the Plan.
If you want to align the Sun during totality with a subject (although it's not always possible), just follow the same steps I explain in section 7 about planning a big Sun aligned with a subject.
If you want to know everything about solar eclipses, read our solar eclipse photography guide.
20.How to plan the field of view and depth of field
Planning the field of view and the depth of field is essential in any type of picture. For example, for
- A Sunrise or a Sunset, both on a certain date and with the Sun in a certain position (section 6).
- A Big Sun, both on a certain date and with the Sun in a certain position (section 7).
- A Moonrise or a Moonset, both on a certain date and with the Sun in a certain position (section 8).
- A Big Moon, both on a certain date and with the Sun in a certain position (section 9).
- The Milky Way (section 10).
Why?
Because, depending on the camera settings you use,
- The field of view determines what will be inside the frame.
- The depth of field of your photo determines what is in focus and what isn't.
As you can imagine, PhotoPills is the perfect tool to plan both the field of view and the depth of field.
To make things even easier, here's a video in which Rafa explains how to do it step by step:
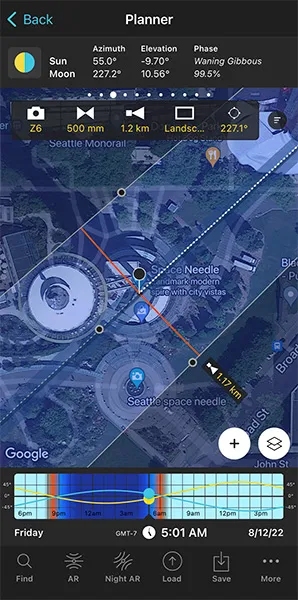
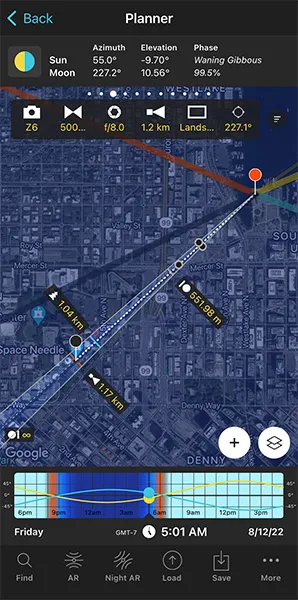
But if you prefer to read, let's use the planning example of section 9, a photo of the Full Moon aligned with the Space Needle in Seattle, Washington (US).
How to use PhotoPills to see the field of view
Open PhotoPills and tap Planner (Pills Menu).
Tap the Map Settings button. You have it on the map, next to the (+) button.
On the Map Settings screen, in the Map Tools section, tap the FoV (Field of View) button. Tap Done (top right corner) in iOS or the back arrow in Android.
You'll see that a new panel has appeared on the map.
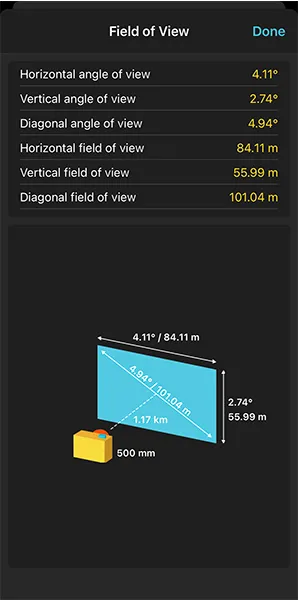
Imagine you're using a Nikon Z6 with a 500mm in landscape mode (horizontally) and you're focusing right at the distance to the Black Pin.
You want to frame in the direction in which the Black Pin is located. Tap the Azimuth framing button (the last button). And on the Azimuth screen, tap the Align with Black Pin option. The field of view is now aligned with the Black Pin.
And the cool thing is that you can also see the size of the Moon on the map.
Simply tap the Map Settings button next to the (+) button on the map (lower right corner). Then tap the Moon layer and activate the Show Moon size option.
Go back to the map and zoom in on the Black Pin. You'll now see
- What part of the landscape fits into the frame.
- That the light blue line (the one showing the Moon azimuth) shows you the size of the Moon. So it's very easy to know how big the Moon is going to be compared to the width of your subject.
Tap the 3-line rounded icon on the right of the new panel to get a visual of the field of view.
Now, let's have a look at the depth of field to make sure that everything is acceptably sharp.
How to use PhotoPills to see the depth of field
Again, tap the Map Settings button. You have it on the map, next to the (+) button.
On the Map Settings screen, in the Map Tools section, tap the DoF (Depth of Field) button. Tap Done (top right corner) in iOS or the back arrow in Android.
You'll see that a new panel has appeared on the map.
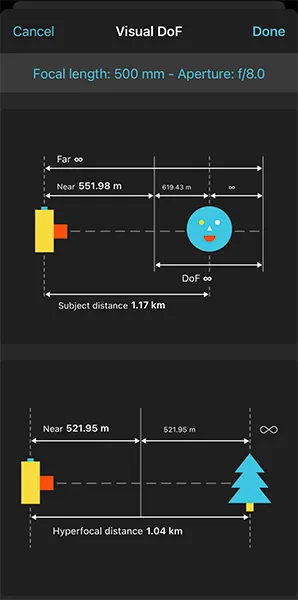
Imagine you're using a Nikon Z6 with a 500mm at f/8 and you're focusing right at the distance to the Black Pin. You're focusing on your subject, where the Black Pin is.
On the map you can now see that the hyperfocal distance is 1.04 km, less than the shooting distance (8.9 km). So by focusing on the Black Pin, on your subject, the Space Needle will be perfectly focused. And the Moon will be acceptably sharp.
Why is that?
Well...
If you want to master the hyperfocal distance you can do 2 things:
Watch this video.
Read our super detailed depth of field guide.
Tap the 3-line rounded icon on the right of the new panel to get a visual of the depth of field.
21.How to plan the weather
Except for very specific photos in which you want the Sun or the Moon to be perfectly aligned with your subject, you can still take your planned shots during a week more or less.
This allows you to choose the day with the weather conditions that you are looking for ;)
Let's see what the right weather conditions are!
Wait for the right weather conditions
Unfortunately, weather conditions are out of your control. You'll have to be patient and wait for the right timing...
Here's what you should look for depending on the type of picture you intend to capture.
A specific light:
- It all depends on what you are looking for. Sometimes you'll want clear skies, other times you'll prefer some clouds or even a completely overcast sky (diffused light).
- You'll find all the key features of natural light in section 4 and you'll learn how to plan a specific natural light in section 5.
Sunrises and Sunsets:
- The best conditions are a sky with enough middle and high clouds to get amazing colors.
- Try to avoid very windy days as the clouds will move too fast across the sky.
A big Sun aligned with a subject:
- Ideally, you should look for a clear sky to avoid any cloud covering the Sun.
- However, some scattered clouds can also add drama to the shot.
Moonrises and Moonsets:
- Shoot with a clear sky.
- If there are clouds, take pictures anyway. They may confer the scene another atmosphere and you may capture something spectacular you never imagined.
A big Moon aligned with a subject:
- Ideally, you should look for a clear sky to avoid any cloud covering the Sun.
- However, some scattered clouds can also add drama to the shot.
A Milky Way, Star Trails or Meteor Shower shot:
- Actually any night shot needs a dark clear sky. On an overcast night you won't be able to capture anything.
- Decide whether to shoot on a New Moon night (no Moonlight means brighter stars) or on a Full Moon light (when you can use the Moonlight to illuminate the foreground).
A drone shot:
- Avoid rainy and windy days as these are dangerous conditions to fly your drone.
Tides:
- If you plan to shoot a Sunrise or a Sunset, have a look at the conditions suggested above.
- If you plan to shoot a Moonrise or a Moonset, have a look at the conditions suggested above.
Lunar or solar eclipse:
- You need a clear sky or very few scattered clouds that don't hide the Sun and the Moon.
My favorite apps and websites to help you plan the weather
The good news is that you don't need to do anything. I've been testing a ton of tools for years! And now I know which ones are the best.
So whenever you need to check the weather forecast, I suggest you have a look at these tools.
Windy
There are so many weather applications, websites and services that it's almost impossible to decide which is the best or the most reliable.
You cannot imagine the amount of applications and web pages that I have used over the years... I have lost count, really.
So after much searching and testing, I've come to the conclusion that Windy is my favorite app.
For starters, I love the reliability of its information: it's rarely wrong, although no meteorology service is infallible. In addition to this, its interface allows me to check a lot of information and a lot of options.
The application gives you the following data, depending on the location you determine: wind (direction and speed), rain, snow, temperatures, clouds (at different altitudes) and waves direction, force and water temperature). And you still have many more options, data and forecasts.
And best of all, it's free...
You can download the Windy application on your smartphone and on your tablet. But you can also use it through the website on your laptop and desktop computer.
Windy is available on iOS and Android.
Ventusky
As I just told you, no weather application or service is infallible. That's why I always like to check several sources of information. Therefore, I can get a more realistic idea of what can happen on the shooting day.
And my second favorite option is Ventusky, an app that uses multiple maps to give you tons of weather information.
By default, the main interface is a map of your local area that allows you to see, at a glance, what the weather is like in your location. Thanks to a color code you can see the temperature and the wind direction lines that move over the earth. Of course, you can change the units in the configuration settings.
To see the weather nationwide, zoom out the map. To see it internationally, zoom out even further.
You can also see an animated weather forecast on the screen. Tap the Play button (lower left corner) and you'll see the weather evolution in the next hours or days. You can see a 7-day forecast or go back in time.
You can download the Ventusky application on your smartphone and on your tablet. But you can also use it through the website on your laptop and desktop computer.
Ventusky is available on iOS and Android.
Local weather services
And since good things come in threes, I always check one last source of information to try to get the most accurate and reliable forecast possible.
I believe it's essential to check the official meteorology service of the location where I plan to take photos. This service is usually owned by the local government and the accuracy of its data is far greater than that of any other source.
Neither is 100% infallible, but they help me verify the information Windy and Ventusky give me.
Here are some examples: the US National Weather Service, the German Deutscher Wetterdienst, the Australian Bureau of Meteorology, the British Met Office, and the Spanish Aemet.
SunsetWx
Even though the SunsetWx website has a 90s interface, it's the best free tool for predicting the Sunrise and Sunset quality.
And this type of information is essential in landscape photography.
It works in a very simple way. On the home page there is a satellite image of the USA (although, if you prefer, you can change it to a satellite image of Europe or the World with the options on the top menu). And on it, you can see a heat map overlay.
The heat map represents the probability of a good Sunrise:
- The warmer (closer to red or a higher percentage) the image, the higher the probability that the Sunrise will be amazing.
- The colder (closer to blue or a lower percentage), the greater the probability of a poor Sunrise.
The first maps you see are the Sunset one's.
Scroll down the screen or use the options in the top menu to see the Sunrise maps.
22.How to plan a shoot during a certain season
It may occur to you that you need to know when a season starts (or ends) in a certain location.
Let's say you live in the United States and you're planning a trip to New Zealand. You want to capture the amazing Mt Cook covered in snow. Since New Zealand is in the Southern Hemisphere, you're not sure when the winter starts.
It's very easy to find it out with the Sun Pill of PhotoPills.
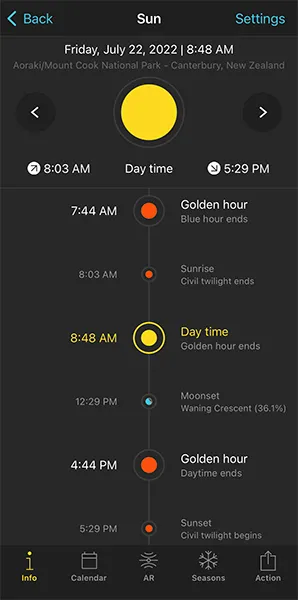
Open PhotoPills, and tap Sun (Pills Menu). By default, the information displayed corresponds to your current location (according to the GPS on your smartphone) and the current date and time.
So the first thing you need to do if you're planning to go to Mount Cook is to set it as the location.
To do it, tap Settings (top right corner).
On the new screen, you can change:
- The location by taping on Position. Slide the Autoupdate button to unlock the rest of the screen. You can use
- The search box if you want to type an address (for example, type “Mount Cook”).
- The coordinates option if you know the latitude and longitude.
- The date by taping on Date. Slide the Current date and time button to unlock the rest of the screen. Tap
- Date to change the date.
- Hour to change the hour.
- You can also determine whether you want PhotoPills to automatically detect the time zone or not.
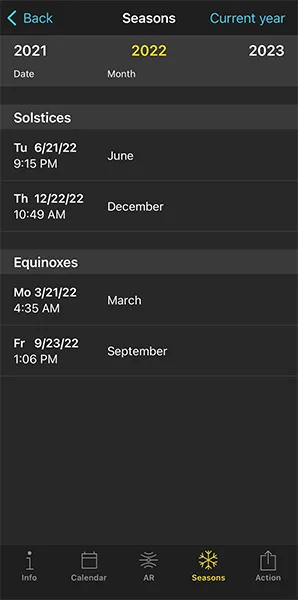
Once the location is set, tap Seasons.
According to the current year, PhotoPills gives you a table with the solstices and equinoxes dates.
To change the year, swipe the table right or left. Or tap the year you see on top of the table (on each side of the screen). In this case, you can tap 2022 to see when the winter will start in Mount Cook, New Zealand in 2022. The winter solstice begins on June 21st.
Now that you know when the season you want (winter) occurs in Mount Cook, you can plan your Sun (section 6 and section 7), Moon (section 8 and section 9), and Milky Way (section 10) shots following the steps I explained.
23.How to scout the location before the shooting date
The cool thing about scouting a location is that it's something that you can do days, months, years before the actual shooting.
So you can use the hours of harsh light or any other time of the year to do your homework, gather all the practical information and then have it all ready for the shooting date.
First, it will help you identify potential risks so you remain safe at all times while shooting.
Then, this preparation work will also allow you to thoughtfully scan the scene, giving you time to work on your composition as well as identifying any distractions.
So take your time, explore the area thoroughly and take notes of everything that you consider relevant.
Being prepared is the main ingredient in the recipe for success. Cheesy but true!
Plan your route and schedule to get to the location
Planning your route to get to the location is essential.
You want to make sure to get there with enough time to:
- Get to the shooting spot.
- Confirm the frame and the composition.
- Prepare your photography gear.
There's nothing worse in photography than doing things in a rush. You'll forget something, you'll make mistakes and you risk not getting that shot you've carefully planned... :(
Plan your route using different services, just in case one of them gives you a better route or additional information of an incident. You can use Google Maps, Apple Maps, Waze, Maps.Me...
If you can and it's not far away, drive to the shooting location a couple of days before. You'll get to know the road, the exits you need to take and where to park.
On the shooting date, get on the road with enough time. Something unexpected could come up (e.g. a traffic jam, an accident, strong rain) that could prevent you from being on time... and the Sun, Moon or Milky Way won't wait for you!
I can't stress it enough: take your time and get to the location in advance. Don't rush off.
Why you should scout the location thoroughly
I repeat it to my students over and over. And now I'm telling you.
Once you've decided on a location it's essential that you go there and scout it thoroughly.
You need to do it calmly and with enough time, so I suggest you do it at least one day in advance. Ideally you should go a few days before the shooting date.
This way, if you find something you didn't know or didn't find out during your research from home, you have more room to adjust.
These are the top two reasons why you should never underestimate the location' scouting.
To identify potential risks
As soon as you get to the location, check whether there's good cell phone service.
Your safety is critical and it has to be above photography. Don't put yourself in danger just to get the photo. Honestly, it's not worth it.
Keep it in mind at any time of the day. But you should be extra careful if
- You plan to arrive at the location at night to take landscape photos at Sunrise.
- You plan to take photos at | sunset| since it will be dark by the time you've finished the shooting.
- You want to do night photography or astrophotography (Moon, Milky Way, Star Trails, Meteor Showers, etc.).
The absence of natural light makes everything much more difficult.
When scouting the location with natural light, look for landmarks so you can easily navigate the area on the shooting day. So it will be easier for you to identify the access route and you'll be able to get to the shooting spot without any problem.
You can also identify potential hazards such as a ditch, a cliff, or a fence.
As soon as you locate the shooting spot, adjust it in PhotoPills if necessary. Just in case, you can also save it in Google Maps and save the GPS coordinates as well.
To find a unique and powerful composition
If you want to be a good photographer, you should be able to find unique and powerful compositions. As you develop this skill, you'll create your own style.
I've spent years nurturing and honing my ability to find compositions almost anywhere. And I'm still working on it. I think it's something that you can never fully master and that you have to constantly work on.
The good news is that it's something that everyone can learn. You have that ability as well.
You just have to melt your curiosity, your creativity and your ambition. Sometimes you'll see it right away, other times it'll take you more time, but keep in mind that you can find a unique composition whenever you resolve.
And to achieve this, you should regularly train your photographic eye:
- Search for possible compositions all the time. When you're walking down the street or outdoors, from the train window or while driving. By having vision regardless of where you are, you'll be able to take good photos wherever you want.
- Find possible points of interest (subjects) even from a distance.
- When you've found a composition, don't stop and keep looking. The best is always yet to come.
- Use different composition rules, elements within the frame and some alternative tools to tell the story exactly how you want.
- Learn to evaluate and classify each composition that you've discovered in the location. This way you can decide the exact spot from which you'll capture the Sunrise or the Sunset, for example.
Look around (360º view)
Even though you should already have a rough composition in mind and an idea of where you intend to point your camera at, don't neglect looking around for other framings.
You may find different angles and points of view
It always surprises me how shifting a bit the point of view can turn a flat and dull image into something much more dramatic.
When you're in front of the scene you want to photograph, analyze the different points of view from which you can capture it.
Consider taking the photo from a high vantage point, putting your camera at ground level, or finding somewhere in between. And avoid photographing at eye level, which is how we all see the world.
You may find a different light
Another thing... Don't forget to turn around!
You never know what the light may be creating behind your back. The scene behind you may be spectacular and you risk missing it if you're focused on the Sun only.
So, when you get to the location, take a good look at the scene where you're going to work your composition:
- In the Sun's direction.
- In the Sun's opposite direction.
Thanks to PhotoPills it's very easy to check the Sunrise/Sunset direction. You have all the information in the Planner.
Make sure you've activated the Sun layer in the map tools. The thick yellow line indicates the Sunrise direction for the location and date you've set. And the thick orange line is the Sunset direction.
Scout at the right time
The cool thing about locations that are not far away from home is that you can return there as many times as you want.
So if you want to have a fair idea of the conditions that you will have on the shooting date, particularly in terms of natural light and other elements (e.g. vegetation, tides, traffic, crowds), go there at the time of day when you'll most likely be shooting.
Try to replicate the conditions as much as you can, particularly in terms of the season and the time of the day. The idea is to mimic what you would like to find on the shooting date.
I am aware that the weather is unpredictable, of course. But if you plan to shoot a seascape on a stormy afternoon, don't scout the location in the middle of the summer with a sunny and clear sky...! :D
The same occurs with specific conditions related to a particular season (e.g. fall foliage colors, snowy landscape) or event (e.g. fireworks, street parade). Try to go to the location when something similar takes place.
Scout for a different time of day
Scouting an area for a different time of the year is something that you can do with locations that are not far away from home and to which you can return over and over.
However, when you're on a long trip or a weekend getaway, you'd be scouting just a few hours before the shooting time. You may be visiting an area at midday while waiting for a beautiful Sunset, for example.
My recommendation would be to do it at least a couple of days before, but I understand that it's not always possible because of time constraints.
In this case, I suggest you spend the hours of harsh light scouting the location.
The first thing to do, of course, is to walk around and spend some time taking in a location's features. You may identify subjects and compositions that might be more compelling than what first caught your eye.
But you should also use the PhotoPills Augmented Reality views.
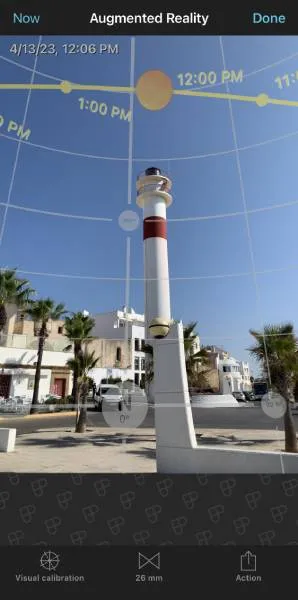
You can find two types of Augmented Reality views in PhotoPills:
- The AR view inside the Sun Pill (also available in the Planner).
- The Night AR Pill.
Information on the Sun Pill's AR view
The Augmented Reality view gives you the position and path of the Sun for the selected location (by default where you are), date and time (by default the current ones).
Use it in situ, when planning any shot involving the Sun shots, to adjust your frame and shooting spot for the best composition before you shoot.
You'll see the selected date and time on the top left-hand corner of the AR view.
Notice that you can change the date and time directly from the AR view:
- Swipe the AR view to the left to move time forwards. Swipe it to the right to move time backwards.
- Tap the right-hand side of the AR view to jump to the next day.
- Tap the left-hand side of the AR view to jump to the previous day.
- Tap Now (top left corner) or double tap the center of the screen to come back to your current date and time.
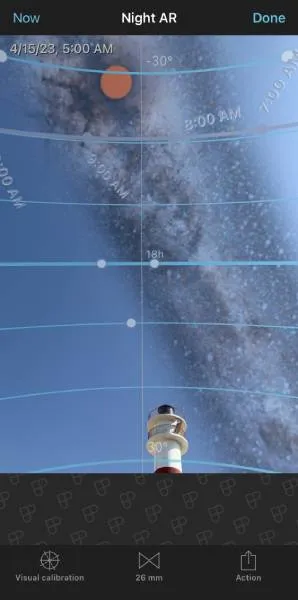
Information on the Night AR view
The Night Augmented Reality view gives you the position and path of the following elements for the selected location (by default where you are), date and time: Milky Way, celestial equator, Polaris, north/south celestial pole, circumpolar stars path and sense of rotation, Moon position, Moon path, Moonrise/set directions, and the Star Trails pattern.
Use it in situ to plan your night shots and adjust your frame for the best composition before you shoot.
You'll see the selected date and time on the top left-hand corner of the Night AR view.
Notice that you can change the date and time directly from the Night AR view:
- Swipe the Night AR view to the left to move time forwards. Swipe it to the right to move time backwards.
- Tap the right-hand side of the Night AR view to jump to the next day.
- Tap the left-hand side of the Night AR view to jump to the previous day.
- Tap Now (top left corner) or double tap the center of the screen to come back to your current date and time.
The PhotoPills Augmented Reality views are an incredibly powerful tool while you're out on the field.
How to work on your composition while on the field
What should your picture have to attract the viewer's attention?
That is the key question you have to ask yourself before pressing the shutter.
Yes, you want to tell a story in a certain manner... But will it be compelling?
Because photography is a visual language, and it provides a myriad of ways to tell stories.
In order to do this you need to make artistic decisions so that your image is just as you've imagined it.
This is where the magic of composition comes into play.
And you're going to have to decide many things!
Find the perfect framing
Behind an impressive image, there's always the vision and emotions of the photographer.
Without vision or intention, there is little or nothing to say. And if you don't understand the creative process, your vision won't translate into a photo that best expresses that vision.
We all see the world in a different way. We have different opinions about what we see, and different tastes as to how we want to capture it in a photo. Ultimately, it comes down to two things: how you see the world and how you decide to show that world in your photos.
At the beginning of this section I asked you a question, but here are some more that you should ask yourself:
Why do I want to take this particular photograph?
What story do I want to tell?
What is the best way to do it?
What tools (technical and artistic) can I use?
And it can all be summed up in the following question: why?
Find your background, middleground and foreground
Depth and dimension in any picture add more interest in the eyes of the viewer. It makes her pause to take in different elements and how they work within the context of the frame.
And the best way to add depth and dimension is to take care of the background, the middleground and the foreground while working on your composition.
A quick recap...
- Background: the part of the image that is further away from the camera.
- Foreground: the part of the image that is closest to the camera.
- Middleground: everything between the background and the foreground.
So how can you use the background, the middleground and the foreground?
Well, in an ideal situation, it would be awesome if the frame has something eye-catching in all 3 areas.
Unfortunately, this is not always possible.
If you have to sacrifice an area, that would be the middleground.
As for the background, try to avoid distractions and work on keeping it as clean as possible. You don't want it to ruin your subject or your foreground.
Finally, the foreground should be the area you should pay most attention to – a strong foreground creates context whilst providing a sense of perspective. It's the entrance gate of the image, so get down low, use leading lines and experiment with depth of field.
Find your subject
Actually, I should have written “confirm your subject”, because you already found it when you were looking for the location (section 3).
Once on the field, your mission should be:
- Confirm that the subject is actually there. I know it sounds absurd, but sometimes landscapes change (e.g. a rock arch may collapse).
- Check that everything is as it should be (e.g. no scaffolding on the building you wanted to photograph).
- Analyze how it looks from the shooting spot and if the composition is what you were looking for.
However, sometimes your subject can be elusive.
Imagine you're in Iceland, on a black beach called Breiðamerkursandur. Maybe the name Diamond Beach rings a bell...
This Icelandic beach is famous for its glittering ice chunks, which sparkle like diamonds.
Because the nearby Jökulsárlón glacier melts regularly, icebergs float down the river and into the Atlantic ocean. However, the strong currents wash ashore some of them and these icebergs end up sparkling on the black beach like diamonds, after having been polished by the waves.
This is a location where the elements are constantly changing and you'll never capture the same image twice.
So, in cases like this, you'll need to spend time finding your subject and then, working on a compelling composition.
The so-called composition rules
It may sound cliché, but the only rule in photography is that there are no rules.
However, there are established composition guidelines or rules that can be applied in almost any situation and which, if used skillfully, increase the visual impact of your scene.
Composition rules help your photos stand out. Thanks to them you can give them a natural balance, draw attention to what you consider important in the scene, or guide the viewer's eye through the image.
As you learn them, you'll be surprised how universal most of them are. You'll see them everywhere... And, above all, you'll understand why some photos work while others look like simple snapshots.
There are many composition rules and it would be impossible to include them all here, but here are some examples:
- The rule of thirds. Place your subject at the intersection of imaginary lines that divide a photo into three parts from top to bottom and from left to right.
- The golden ratio. Compose a photo following a spiral defined by this ratio.
- Centered composition and symmetry. Place your subject in the center of the frame and create a symmetry between the two halves.
- Golden triangles. Draw a diagonal line from the upper right corner to the lower left corner. Next, draw two more lines: one from the upper left corner until it touches your diagonal line, and another one from the opposite point, that is, from the lower right corner to your diagonal. You'll get an area divided into 4 triangles known as golden triangles.
- Interesting foreground and depth. Place elements in the foreground in a way that attracts the viewer's attention, and make sure that what's in the midground and the background also help to create depth.
- Juxtaposition. Combine 2 or 3 elements in the frame so that they convey something.
- Frame within another frame. Use the main framing and find another frame within the scene to highlight the subject.
- Balance of the elements in the scene. Make sure that the visual weights of the elements are not unbalanced.
- Guiding lines. Use elements of the composition to guide the viewer's eye where you want.
- The left-to-right rule. Most of us are used to reading from left to right so an image could be read that way too.
- Diagonals and triangles. Use diagonals and triangles, the vanishing point for example, to create tension in the scene.
- The rule of space. Be creative when using negative space, that part of the composition in which there is nothing.
- Patterns and textures. Patterns add visual harmony to an image while textures add depth.
- Color theory. Apply combinations of colors that fit well together, so that the result is harmonious.
- Change your point of view. Avoid shooting at eye level.
- Odd rule. If you repeat elements (trees, people) try to make their number odd.
- Isolate the subject. Make sure that the subject is tack sharp and leave the rest of the frame out of focus.
- Fill the frame. Don't leave any negative space inside the frame.
- Simplicity and minimalism. Generally a few elements are enough to tell a story. Avoid chaotic compositions.
Develop your own style by breaking the rules
Photography rules are made to be broken...
Becoming a rebel photographer will help you produce more impressive images.
As I explained in the previous section, composition rules are very useful to produce a balanced and attractive image.
But if you want to develop your own photography style, break them. You'll be more original by being creative.
Here are some ideas to inspire you...
- Forget the rule of thirds: place the horizon in the center to create symmetry or the subject near one of the edges to create tension.
- Break the pattern or symmetry you have created.
- Tilt the horizon... Although it's generally a very common mistake among beginning landscape photographers, a slight tilt (also called a Dutch angle) creates a diagonal that produces dynamism or tension in the composition.
- Put the subject in the center of the frame and don't use any other angle so it remains the main character.
- Place the vanishing point in the center.
Focus on what is important
Framing
The framing (or frame) is not just the continent of the image. It's made up of the four most important lines in the image, the edges, and it determines how you should read the photo.
Its orientation (horizontal or vertical) is important as it dictates the path that the viewer's eye will follow when viewing the photograph.
And you also have to take into account the proportion as it will reinforce or soften the visual flow of your photography.
Point of view
The point of view is the most powerful tool you have. When you move and you move the camera, everything changes.
When you vary your position, study which elements strengthen that change and which weaken it. And then see if it's worth changing your point of view.
In this sense, you should observe how the position of the subject varies in the frame and in the composition since it's the main character of your story. Be careful, as it may lose its main role in the image.
Depth
The camera sees in two dimensions, flattening the world in a picture. Your mission is to create depth in the image. In other words, create an illusion so that the photo seems to be 3-dimensional and reflects the scene as you see it with your own eyes.
Why is the sense of depth so important?
Because deep images are what make the viewer have the impression of being inside the scene. Obviously, that's what makes a photo more captivating or attractive.
Take care of the different shots (foreground, midground and background) and above all, look at what you include (or not) in each one of them.
Exclusion
The camera offers you a myriad of possibilities and, as I said before, you can tell it what you want to isolate in your scene. That is, you can put intention into your composition.
Thus, photography is an art of exclusion.
One of the skills of a great photographer is to take care of the composition by identifying what elements are necessary to tell the story. Cut out and eliminate anything that is superfluous and doesn't add anything to the story.
Keep only with what really matters.
And in order to do this, use negative space: the space that remains between the different elements of a composition.
Relationship between elements
You may have noticed that I always attach great importance to the subject. And it makes sense because it's the main character of your story and the visual core of the photo.
However, the subject alone is not everything. An image works and has an impact when you manage to relate the subject to other elements in the frame.
That is why it is important for the viewer to easily and quickly recognize these relationships and understand what role each element plays, what links there are between them and how they affect the message you want to convey.
It's the key to visual language: that each ingredient you use in your photo fulfills its role and that it is recognizable.
Possible elements within the frame
All the elements that are in your composition have to be there for some reason. Don't leave anything to chance. Don't include superfluous elements or elements that don't add something to the story and that don't arouse an emotion in the viewer.
You should be concerned that they are a visual roadmap for the viewer to follow your steps while looking at the image.
And to help you with your compositions, here are some of the elements that you can play with.
- Point. It's a small element, separated from others, that conveys distance, order, balance, solitude.
- Line. The lines connect the different parts of the scene. A straight line provides rigidity and a dynamic curve. A horizontal line conveys stability and tranquility. A vertical line gives dynamism and movement. And a diagonal line breaks stability and brings perspective.
- Shape. These are a set of lines to form triangles, circles, etc. Thanks to the triangle you can emphasize its vertices. A circle isolates its content from the outside and translates totality, perfection and continuous movement.
- Volume. You need to use deception to show three-dimensionality (weight, volume) in the image and to convey volume you can use contrast, perspective and overlay.
- Color. A color is defined by its brightness (light intensity), its hue (tone) and its saturation (purity). They are usually divided into warm colors that are invigorating and cool that are intimate.
- Black and white. It's a picture without color or, rather, one that reflects a grayscale. Since there is an absence of color, the eye focuses on other aspects of the composition.
- Lights and shadows. A dark tonal range is synonymous with anguish and imbalance. A clear tonal range arouses interest and generates optimism and joy.
- Contrasts. It's an effect produced when one visual element stands out compared to another in the same image. There are several types of contrast: tonal and conceptual.
- Texture. A texture can be soft, rough, smooth, hard, rough and enhances the sense of sight and touch.
- Scale. It's the size relationship that you establish between the different elements present in the composition. Thanks to it, you can establish a hierarchy between them and highlight one or those that interest you the most.
- Movement. By changing the shutter speed you can convey movement and dynamism. You can do a long exposure or a panning shot.
- Rhythm. You produce rhythm through the regular repetition (or not) of lines or shapes. Or you can break it to create tension and get attention.
- Positive and negative space. Positive space can be considered to be the subject of the composition, while negative space is the backdrop. The use you make of each of these spaces determines the harmony, balance and tone of the image.
- Balance. To establish balance between the different elements of the composition, use visual weights. Thus, the larger the size of an element, the greater its visual weight. And light, warm, and saturated colors outweigh dark, cool, and low-saturated colors.
- Symmetry. Symmetry is a very powerful composition tool because it can create a serene and pleasant feeling.
- Atmosphere. It's the environment that your photo reflects. Thanks to it you can convey a wide array of sensations.
Some alternative tools
In the previous section I mentioned some elements to vary your compositions. But there are a lot of different creative resources.
Here are some ideas...
- Frame: what do you want to include and what do you want to leave out?
- Simplification: include only the necessary elements.
- Point of view: at eye level, from below, from above, looking up or down.
- Planes: be careful what you put in the foreground, in the midground and in the background.
- Format: you can choose between horizontal, vertical, panoramic or square format.
- Sharpness: determine where you want to focus.
- Focal length: remember that the wide angle distorts and a long focal distance compresses the scene.
- Subject size: You can modify the relative size of the subject according to how you display it compared to its surroundings.
- Exposure time: do you want to convey motion?
- Light: light is everything in landscape photography, it's your raw material and remember that it's neither good nor bad, it all depends on how you use it.
- Perspective: it's what gives the photo a real and three-dimensional look.
- Depth of field: its artistic possibilities are infinite as I explain in this article.
- Exposure: thanks to the exposure triangle you can give your scene the look you want.
Take tons of test shots
When scouting, take tons of test shots. You can also call them drafts or sketches.
The idea behind this work is to take frames you know aren't working but have some idea in them you want to explore.
Obviously, you can take them with your smartphone, or you can also take your camera and experiment with several lenses and focal lengths to play with different perspectives.
So try different angles, make the photograph and see what it feels like.
Change the angles or the settings until you get it feeling the way you want it to. Then, let those images give you feedback.
Little by little you'll get closer to the magic – bad images will slowly get stronger and will lead to good images.
Until you finally get the image you were looking for.
At the same time, try to take in as much of the area as you can.
Keep an eye open for particularly interesting image possibilities. Even if you're scouting for a particular time of day, you may find good night photo opportunities when scouting locations for Sunrise images, for example.
Oh, and even if the light is bad when you're at a location, always take test shots because you never know...
Take notes
You should always take notes while scouting.
Most likely you'll be nervous on the shooting date. Or at least you'll have some butterflies in the stomach...
So the more prepared you are and the less you rely on your memory the higher chances of getting a great shoot.
Write down (or take pictures with your smartphone) of everything that can be useful.
Let me give you some examples:
- The exact location where you plan to be shooting (e.g. a lookout in a National Park, a precise area within a neighborhood).
- Access instructions if needed.
- The shooting spot GPS coordinates.
- The date and time of day you're scouting the location. You can compare the information with other times of the year or the day if it's a recurring location.
- Tidal conditions when appropriate.
- Possible images that you can take at the location.
Effective note taking helps you to remember information and to understand that information. Your notes then act as a record of your thinking and they also provide the source material for your next creative project.
All in all, your notes help you to organize your thoughts and time, keep all ideas and concepts in one place, and add reminders for the things you need to do.
24.Check the weather forecast
Predicting weather is arguably one of the most important aspects of photography, whether you're shooting outdoors or indoors (and you plan to use window light, for example).
And that's because it has a clear impact on the 4 attributes of natural light: color, intensity, quality and direction.
The lights and shadows, as well as the main colors of the scene, will contribute towards the mood of your photo. Warm tones and yellow light give you a feeling of tranquility, whereas a stormy sky can give you a feeling of threat.
In the end, it's all about the atmosphere, that is the emotions that the scene (and its conditions) evokes in the viewer.
Why should you check the weather forecast?
Whenever you're planning to take photos outdoors (or indoors if you plan to use window light), it's important to take into account the weather forecast.
By doing this, you can anticipate what you'll find in the location. And also check if the conditions you're looking for are there.
First of all, it will determine the type of natural light you'll have at the scene. And you know how important that is (section 3).
Then, from a composition point of view, clouds, along with wind direction and speed, are an essential element.
Sometimes you're lucky enough to have the clouds you want and the wind direction you need to reinforce the storytelling.
Nevertheless, if weather forecasts indicate that on the shooting time there will be clouds in your scene, you should study them. That's how you'll be able to anticipate their behavior and get the most out of them when you're doing your long exposure, for example.
How fast are the clouds going to move?
Don't panic because this isn't an "Advanced Meteorology" course... XD
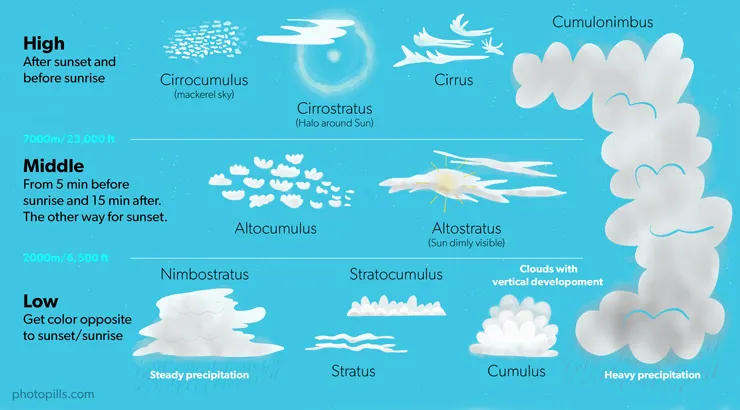
I just want to draw your attention to some features so that you become familiar with the different types of clouds you may encounter.
Since we're talking about long exposures, and as long as there is wind in the location, the clouds will be one of the main elements that will help you convey motion.
But how much motion?
In other words, how fast do those clouds move? And what shutter speed do you need during the shooting?
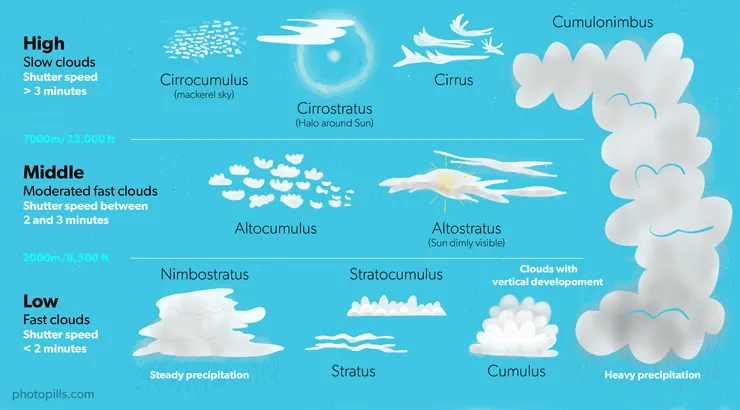
We can divide the types of clouds into 3 groups. Each of them moves at a different speed:
- High clouds. They move very slowly. Use shutter speeds of 3 minutes or more.
- Middle clouds. Their speed is moderately fast. I recommend using shutter speeds between 2 and 3 minutes.
- Low clouds. They move very fast. Use shutter speeds of 2 minutes or less.
Obviously these are just estimates as everything will depend on how strong the wind blows.
What color can the clouds have?
Clouds convey other emotions on a long exposure picture. They can also leave the viewer speechless depending on the color they have.
That's why it's important to know when the sunlight is going to color them.
Again, we can divide the types of clouds into 3 groups. Each of them is colored at a different time of Sunrise or Sunset:
- High clouds. They are colored before Sunrise or after Sunset.
- Middle clouds. They can get color between 5 minutes before Sunrise and 15 minutes after Sunrise. Conversely, they can get color 15 minutes before Sunset and 5 minutes after.
- Low clouds. They are colored during Sunrise and Sunset. But only those that are in the opposite direction to the Sun.
Understand the location's own local weather
I can't stress enough the importance of understanding local weather phenomena or conditions, and the biases inherent in weather forecasts due to local terrain.
Most basic weather forecasts neglect smaller, localized weather patterns.
So knowing the local phenomena can make or break your photographic opportunities.
The more you study local weather conditions, and the more you compare reality to what you see in computer weather forecasts, the more you'll understand your local weather, and be able to anticipate what sort of conditions to expect in the field.
Nowadays there are tons of resources to study local weather.
Perhaps the two most important ones are:
- Satellite imagery. You can get a lot of information from it, but if you're just starting out the most important thing to know is where the clouds are, and then you can determine the best strategy for putting them to good use.
- An ever growing network of webcams. Thanks to webcams you can monitor almost any location on Earth in real time. So you can basically see the weather conditions with your own eyes.
Find out the 7-day weather forecast
Understanding weather forecasts and checking the local weather forecast before going to the location will help you increase your chances of success and, most importantly, avoid unnecessary risks.
These days you can get accurate forecasts many days in advance. You could rely on local news, weather information reports or even apps.
My personal experience is to always look for a 7-day weather forecast.
I'm aware that, depending on the location, weather conditions can change incredibly fast from one day to the next, or even within the same day.
However, looking at a 7-day weather forecast gives me a rough idea of what I can find in the location on the shooting date.
Let me give you a couple of examples:
- If the 7-day weather forecast predicts sunny and clear skies for a whole week, chances are that nothing will change on the shooting date.
- Nevertheless, if the prediction is erratic you should prepare for the worst, just in case.
As you may have imagined, I start looking at the weather forecast at least 7 days before the shooting date. But I keep checking it every day, until a few hours before the shooting time.
That way I have the most updated and accurate information and I can adapt accordingly.
I strongly recommend you to do the same.
The best apps to check the weather forecast
Whenever possible, I like to check first the location's national meteorology service. It usually provides the most accurate and reliable information.
But when meteorology comes into play, I'd rather be cautious and check several sources of information in order to have the most reliable data.
So here you have the three sources that I use to contrast the information the location's national meteorology service provides.
Windy
There are so many weather applications, websites and services that it's almost impossible to decide which is the best or the most reliable.
You cannot imagine the amount of applications and web pages that I have used over the years... I have lost count, really.
So after much searching and testing, I've come to the conclusion that Windy is my favorite app.
For starters, I love the reliability of its information: it's rarely wrong, although no meteorology service is infallible. In addition to this, its interface allows me to check a lot of information and a lot of options.
The application gives you the following data, depending on the location you determine: wind (direction and speed), rain, snow, temperatures, clouds (at different altitudes) and waves direction, force and water temperature). And you still have many more options, data and forecasts.
And best of all, it's free...
You can download the Windy application on your smartphone and on your tablet. But you can also use it through the website on your laptop and desktop computer.
Windy is available on iOS and Android.
Ventusky
As I just told you, no weather application or service is infallible. That's why I always like to check several sources of information. Therefore, I can get a more realistic idea of what can happen on the shooting day.
And my second favorite option is Ventusky, an app that uses multiple maps to give you tons of weather information.
By default, the main interface is a map of your local area that allows you to see, at a glance, what the weather is like in your location. Thanks to a color code you can see the temperature and the wind direction lines that move over the earth. Of course, you can change the units in the configuration settings.
To see the weather nationwide, zoom out the map. To see it internationally, zoom out even further.
You can also see an animated weather forecast on the screen. Tap the Play button (lower left corner) and you'll see the weather evolution in the next hours or days. You can see a 7-day forecast or go back in time.
You can download the Ventusky application on your smartphone and on your tablet. But you can also use it through the website on your laptop and desktop computer.
Ventusky is available on iOS and Android.
Meteoblue
It's a weather website and it looks simplistic, like many other websites...
But the interesting tool is called the meteogram.
To see it you can:
- Scroll down the page.
- On the left side, click on the submenu Forecast and then on Meteograms.
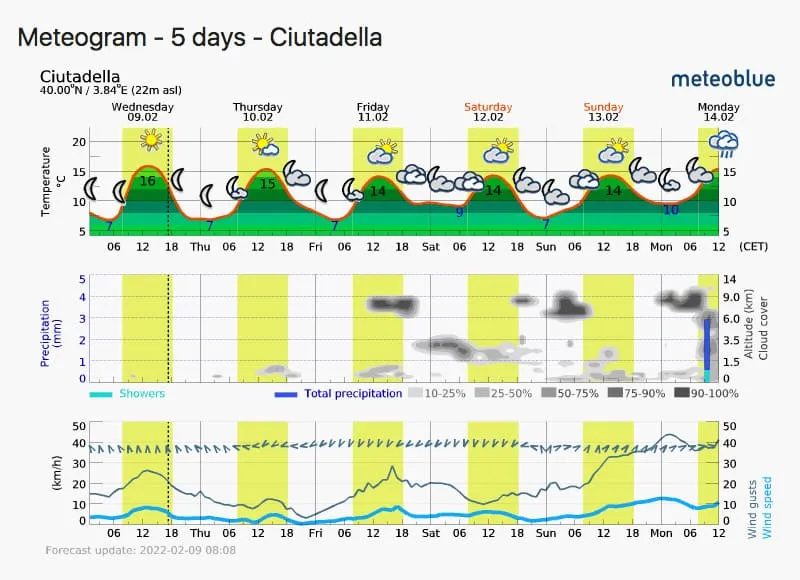
As you can see on the screenshot above, there are three charts. In all three you'll find the white and yellow vertical bars distinguishing day from night, yellow being daytime.
Temperature chart
The temperature chart shows the temperatures throughout the week. This includes highs, lows, and some basic information about clouds and rain or snow .
Wind chart
The wind chart shows you wind information:
- The light blue line is the wind speed.
- The dark blue line indicates wind gusts.
- A wind direction marker at the top of the chart.
This chart can be useful if you are looking to get dramatic windy conditions.
Precipitation chart
The precipitation chart is all about clouds! :)
It gives you in-depth information on where there will be high, mid, or low clouds; and how dense they will be.
Most forecasts ignore high clouds. However, high clouds tend to produce most of the warm Sunrises and Sunsets that you see because it is easy for the low angle Sun to get under these clouds and light them up.
Along the bottom of the chart, you can also see when a storm will be coming in through a bar chart – the higher the bar the higher the rainfall. If you see asterisks it may snow.
Meteoblue is available on iOS and Android.
However, I recommend you to check the meteograms on the website instead.
And now that you have checked the weather forecast for the shooting date, it's time to prepare and check your photography gear! :)
25.Prepare and check your photography gear
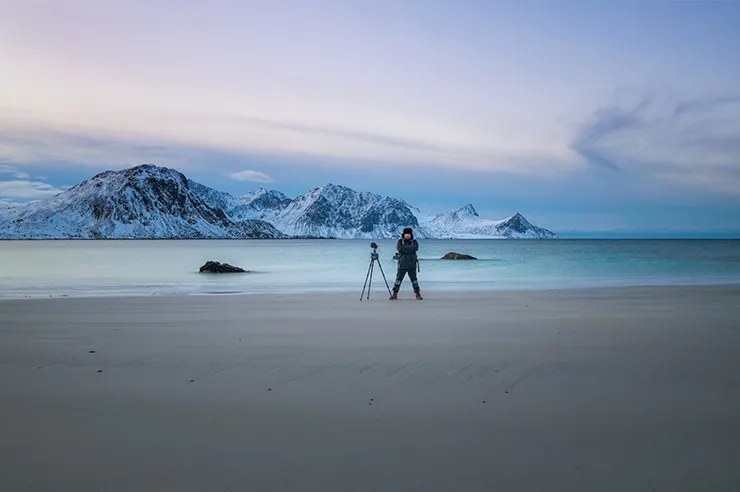
A while ago you had a great idea that you wanted to photograph (section 1).
You carefully planned it with PhotoPills.
And finally, the shooting date has come.
Everything is ready and you're about to walk out the door.
But just before going out you find yourself staring at your bag and wondering...
"Am I bringing everything I need for my session?"
"Am I forgetting something important?"
A crucial part of photography planning is to make sure that all equipment you're going to need is packed in your camera bag and ready to go.
That's why you need to make and go through a photography gear checklist before leaving home.
Why it's crucial to prepare and check your photography gear
Having the right stuff with you sure makes everything easier.
First of all, by equipping yourself with the right photography gear, you can give yourself one less thing to worry about.
Is there anything worse than realizing, just before starting shooting, that you've forgotten something essential? Just imagine that your batteries aren't charged or your memory cards are not empty...
Then, if you pack wisely, you won't need a pack mule to carry all your stuff around!
Over time, your photographic equipment will probably grow as you buy more gear. Depending on the type of photography you're trying to capture, you'll need a different lens, certain lens filters or a tripod.
That's why you should carefully choose the equipment you will take with you according to the picture you've planned.
So make a photography gear checklist.
You can create a digital template and save it on your computer or smartphone so you can always carry it with you. Alternatively, you can write it in a notebook or in an agenda.
What's essential is to check it while you're preparing your next shooting session.
Use a photography gear checklist
It doesn't matter, whether you're a professional photographer or you're just starting out, it's easy to overlook or forget a piece of gear when preparing your photography backpack.
The good news is that you don't have to worry anymore because I have compiled a checklist to help you, no matter your skill level, you haven't forgotten anything.
Keep in mind that this is a generic photography gear checklist. So feel free to adapt it to your needs.
- Camera bodies. If you're just starting out, you'll probably only have one camera body. But if you can afford it, it's always best to bring 2 camera bodies with you. If something goes wrong with your main camera body, you can always keep shooting. In addition to this, you can always use each body with a different lens and have a different composition.
- Lenses. If you can, take with you a variety of lenses which include a range of focal lengths. For example a wide angle (e.g. a fast prime lens like a 14mm, a 14-24mm or a 16-35mm), a standard zoom (e.g. a 24-70mm or a 24-105mm) and a telephoto (e.g. 70-200mm or a 100-400mm).
- Tripod. Essential for landscape and astrophotography. Pack a carbon fiber tripod if you have the budget and know you are going to be doing some hiking or carrying it around for long periods of time.
- Tripod head and quick release plate. Try to use an Arca-Swiss compatible plate. Alternatively, you can also use an L-bracket plate, very useful for shooting in portrait mode.
- Memory cards. Use 16GB, 32GB or 64GB cards depending on how many megapixels your camera's sensor has. Make sure to carry multiple cards in case one or two break or fail.
- Extra batteries. You never know when you'll have an opportunity to recharge your batteries.
- Battery charger and power cords. Apart from the regular cords that you can plug in a socket, it may also be interesting to bring a USB car charger.
- Power adaptor. In case you're traveling abroad...
- Power banks. If you're not going to be near power for a few days, take a couple of these to charge your equipment while on the road.
- Lens filters. My essential lens filters are a circular polarizing filter (CPL), a 6-stop neutral density filter (ND) and a 3-stop soft graduated neutral density filter (GND).
- Filter holder and adapter rings. You need a filter holder to use rectangular (ND) and rectangular (GND) filters. Buy adapter rings for all the lenses you have. That way you can use the same filter with all your lenses.
- Microfiber cloths. Take along several ones, as these will often get dirty or lost.
- Intervalometer. While shooting a long exposure, you should avoid vibrations. Otherwise, you risk ending up with a whole bunch of blurred photos. I prefer an intervalometer to a shutter release because it's programmable – you can set the exposure time, the time interval between each shot, the total number of photos you want to take and even the time delay of the first picture.
- Air blower. To clean your camera lenses and sensor.
- Plastic shower cap. The most inexpensive way to protect your camera from dust or moisture!
- Plastic zip lock bags. They can prove useful for protecting spare memory cards or batteries.
- LED headlamp and/or a flashlight. In case you plan to shoot the Sunrise, the Sunset or at night. Don't forget to bring spare batteries too.
- Allen key. In case you need to screw your tripod legs, change the tripod plate or unscrew an L-plate.
- Swiss army knife. It's one of the most versatile tools you can carry. It's compact, lightweight, and small enough to fit in a pocket or pouch.
How to prepare your photography gear
The day before the big shoot you have a lot to consider before simply strapping that camera around your neck and running off.
You should prepare your photography gear.
Every photographer does this a little differently. So try to set up a routine and follow it consistently.
Charge your batteries
Make sure that your camera battery is fully charged. Although current batteries have a high durability, it's best to fully charge it.
Actually, bring several extra batteries as well, and make sure all of them are fully charged.
This is particularly important if you intend to shoot in a remote location. Although you should always take spare batteries with you regardless of the type of location. Yes, I know it's easier to find a socket in a city than in the middle of nowhere, but you don't want to worry about battery power when shooting!
Carrying spare batteries will come in handy in case one of them fails or you decide to stay longer in the location.
Remember that in low temperatures batteries drain in no time. So here are some simple tricks to extend battery life:
- Always keep at least one spare battery in your inner pocket. The closer to the body, the warmer it stays.
- Leaving Live View on in-between shots and compositions is the recipe for short battery life in cold weather.
- Leave the camera on if it's only a minute between the compositions. But if you're hiking further or spending some time scouting the area, turn it off.
- While hiking, wrap the camera in an extra clothing layer (e.g. fleece) when you're not using it.
How many spare batteries should you bring?
Well, that depends on:
- The type of camera you plan to use (e.g. mirrorless cameras drain their batteries faster than DSLRs).
- How long you intend to be shooting (e.g. half an hour, several hours at night).
- How remote the location is (e.g. you plan to hike for 3 days in a remote location without electricity and take photos along the way).
So my advice is that you should always carry at least 3 batteries. But considering the weight of a battery, the more the better.
Before leaving, check that every battery is fully charged and works correctly. To do so, insert each one in the camera and take several shots.
Prepare your memory cards
First, think about how many cards you will need.
Is it going to be a long session shooting Star Trails? Are you going to use the burst mode while capturing wildlife? Or are you going to create a time lapse?
You'll have to decide whether to take a number of high capacity memory cards or several medium capacity cards.
Again, just like I told you with batteries, since they take up little space and are light, take as many as you can with you.
Then, check each memory card one by one:
- Insert it in your camera.
- Review a few shots and make sure you have downloaded the files in your computer or in an external hard drive.
- Format it, so it's ready to use.
- Take a couple of test shots.
- Check that you can see the pictures on your LCD.
Pick only the photography gear you're going to use
Now it's time to take a difficult decision...
How many lenses should you take?
Well, it really depends on the type of photography you've planned to do.
However, even if you already have a certain picture in mind, you should always carry two lenses at least:
- The specific to the type of photography you intend to focus on.
- A zoom lens that allows you to cover various focal lengths, just in case you come up with a different composition or idea.
Consider also if you're going to need your tripod and lens filters. Or maybe an intervalometer to shoot Star Trails or some equipment against moisture to capture the Milky Way...
Check and clean all your photography gear
Take some time to check that all your photography gear is completely clean and in mint condition.
Have a close look at your lens (both the front and rear glass), lens filters, viewfinder and LCD screen – there may be dust or stains.
Remember that these are extremely delicate surfaces, so clean each element carefully with a microfiber cloth.
In addition to this, you can also clean your camera's sensor. It may seem difficult or complicated but it is actually much more straightforward than you may think.
It's the best way to avoid dust spots that could ruin your photos.
Check your camera settings
Before putting all your gear in your backpack, take a look at your camera's settings.
Little by little you should get in the habit of leaving your camera with neutral settings at the end of every session. If you don't, you may start the next session using settings that are completely useless.
For example, if you spent the night shooting the Milky Way, you may have been using a high ISO during the session (e.g. 3200, 6400).
A few days later you may want to shoot during the golden hour. What would be the point of keeping such a high ISO? None, of course.
But if you forgot to set it back to ISO 100, you may end up with a pile of files shot at ISO 6400...
So every time you stop using your camera after a shooting session, remember to leave the camera with neutral settings. Pay special attention to the following settings:
- ISO.
- White balance.
- Exposure compensation.
- Focus mode.
That way will make sure that you don't waste time reconfiguring these settings when you start your next session and you don't miss the chance to photograph something unique because your camera wasn't ready.
Don't forget other pieces of gear
Apart from the obvious you should also carry in your backpack some stuff that you may find helpful later on.
- Microfiber cloth to clean your lens or lens filters and remove dust, water spray, raindrops...
- Dust removal tool to remove lens or sensor spots.
- Camera strap to comfortably carry your camera out of the backpack.
- Allen key in case you need to screw your tripod legs, change the tripod plate or unscrew an L-plate.
- Battery charger, if your shooting session is part of a getaway or a longer trip.
Wear comfortable and appropriate clothing
Sometimes, to get the perfect shot you'll do anything – kneel, sit or lie on the ground...
So try to wear flexible and comfortable clothing. The type that allows you to get it dirty, so to speak.
Obviously, depending on the shooting date (e.g. hot summer day, cold winter night) and the weather forecast for the shooting location, choose appropriate clothing and footwear.
In this sense, you can have a wider choice when shooting in an urban environment.
But if you plan to be in a natural landscape, consider wearing hiking clothing and footwear.
Wrap yourself up warm with multiple thin layers:
- Moisture-wicking underwear and sports bra (if you're a woman ;)).
- Moisture-wicking short or long sleeve t-shirt.
- Quick-drying shorts or pants. You may wear long pants to avoid scratches or insect bites. However, if you plan to shoot a seascape or a scene with water and the weather is nice, wear shorts.
- Lightweight fleece.
- Hiking socks. Both synthetic and wool are great, but I personally prefer wool.
- Hiking boots or shoes with good traction.
- Bandana. Bandanas are extremely simple, effective, multi-functional, and versatile. Use it to cool off in the heat, to dry off sweat, to protect you from the Sun, to keep your hair under control on a windy day, etc.
If you expect cool or rainy weather, you should wear:
- Rain jacket or shell jacket and rain pants.
- Insulated jacket. I prefer down to synthetic because they pack down significantly smaller and generally tend to be warmer.
- Long underwear layers.
- Gloves. Look for some well made photography-specific gloves.
- Beanie. Perfect to keep your head warm.
And don't forget to bring:
- Trekking poles. They will protect your knees and carrying a heavy pack will feel easier.
- Hand sanitizer. Washing your hands isn't always an easy option when hiking.
Bring something to eat and drink
It all depends on how long you plan to stay outside and the type of activity you intend to do (e.g. a 3-hour hike to the shooting location).
For water, you can usually start with about 2 liters per person for the day, but adjust the amount depending on length and intensity of the hike, weather conditions, your age, sweat rate and body type.
Along with water, it's essential to pack enough food for your hike (and even a little more).
So I would suggest taking with you all (or part) of the following:
- Reusable water bottle or hydration reservoir. Depending on the hike you should at least pack 1 liter of water (ideally, 2 liters). If your backpack supports it, use a hydration bladder. And if it's really hot outside, take an insulated water bottle filled with ice.
- Water filter or purifying tablets. If you're on a longer trail or one that you know has water nearby, bring a 1-2 liter collapsible water bottle. They're small and lightweight.
- Breakfast or dinner. Depending on if you're shooting at Sunrise or Sunset, plan to bring a meal.
- Snacks. Trail mix, granola bars, dried fruit, nuts, crackers, candy bars, vegetables (e.g. carrots, cucumbers).
- Small trash bag. Almost everyone forgets, but it's an important item to bring when you're outdoors (remember, leave no trace!). If you can, bring a reusable food storage bag.
Obviously, if you plan to be at the location for a couple of hours, bring just some water and a few snacks.
26.Be prepared to throw the plan out of the window

I have told you about the importance of photography planning.
It's the only way to avoid surprises and have (almost) everything under control. And you'll make sure that you are always at the right place at the right time to capture the photo you want to capture.
However, there will always be instances when you have the best plan, you've thought of every risk and contingency, you have your shooting planned out, and then something happens that forces you to abort the plan...
What a bummer!
So in order to avoid any frustration, you should always follow the 4 rules to planning:
Make the plan
Execute the plan
Expect the plan to go off the rails
And... Throw away the plan!
I've talked about making and executing plans long enough throughout the article.
Where it becomes more interesting is rule #3...
Expect the plan to go off the rails
Unfortunately, photography planning doesn't guarantee success.
Sometimes your plan fails
S*** happens.
Remember that time when you forgot to put an alarm and you missed the Sunrise?
Or when a mass of thick clouds covered the sky and you couldn't photograph the Milky Way?
Not to mention the day you got to an awesome location only to find out that it was completely crowded...
I know, I've been there too.
But when there's a will, there's a way.
If it was because of a planning mistake, try to be more thorough next time and double check everything.
If it was because of something out of your control, there's nothing you can do other than wait for the next opportunity.
In any case, the best attitude is to face it with a positive mood and with persistence. Keep trying and you'll make it!
Or you come up with a new idea
As I did with you in section 5, I always recommend scouting the location in advance.
I've already mentioned the reasons why scouting is important.
You get to the location with an idea in mind – an idea you've thoroughly planned with PhotoPills. You want to check that there won't be last minute surprises (e.g. restricted access to the location or there's construction work going on).
Fortunately, everything is fine. Now you can start working on your composition, looking for different angles and taking some test shots.
But... Wait a minute!
You suddenly discover a new point of view that changes everything. You couldn't have thought of this from home!
And what if...? Hmm... What if this is THE shot?
In a couple of minutes all your planning has vanished.
It's frustrating
I know.
It didn't work out as you expected.
But sometimes you just have to accept that the shot you wanted wasn't meant to be on that occasion and move on.
The worst thing you can do is give up.
The best thing is to... (keep reading).
Throw away the plan!
I know what you're thinking...
"Toni... Why plan if you are just going to throw away the plan?"
OK, you're right.
I should probably rephrase this to 'know when to throw away the plan'.
By 'throwing away' I don't mean 'forgetting absolutely everything you've been working on for the past few days, weeks or even months'!
I mean adapting.
In other words, keep what could work for this new idea and dismiss what couldn't.
Actually, you should see the fourth rule as being flexible.
So always keep a certain degree of flexibility. Having that flexibility allows you to take a step back or forward to focus on what counts – getting the best possible shot.
By being flexible you'll also be more creative, which means that you'll make good photos in any conditions... ;)
27.10 photography planning tips
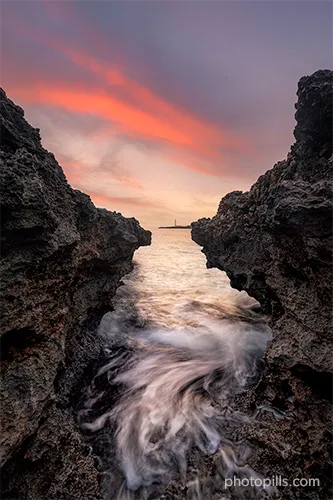
Don't go to a location expecting that luck will be on your side. Because oftentimes, it won't.
You won't have the best light, the weather might be awful and you may not have time to work on your composition.
That's actually the best recipe for anger and frustration... XD
Instead, you should plan. Everything. To the last detail.
It's the only way to get the photo you're dreaming of.
Throughout this article I've explained you how to come out with amazing photography ideas (section 2), how to find (section 3) and scout (section 23) the perfect location, and how to plan your photos with PhotoPills (from section 6 to section 22).
And to finish up, here are some practical tips to improve your planning workflow.
After that, it's just a matter of "Plan & Pray"! :P
Spend as much time as necessary (1)
Planning in any photography genre is absolutely essential, an often neglected aspect that makes the difference between any photo and THE photo.
That's why you should definitely spend as much time as necessary while doing your photography planning.
Sometimes it will take you a couple of minutes.
You have a very specific idea in mind and you know the location like the back of your hand. The only thing you need you to do is to open PhotoPills to find out the exact shooting spot and the shooting date and time.
Other times, it can take weeks, months or even years...
It doesn't matter! It will be time well spent as you'll gather all the information you need to make 99% sure that everything will be fine. That you will finally get the shot you've been dreaming of for so long.
Be thorough (2)
When planning a shot, I'm a big advocate of doing it to the last detail. It gives me confidence and I feel less stressed while on the field because I know that I thought of (almost) everything.
So if something goes wrong, I know what to do: I either have a plan B (or C), or I use my magic wand to improvise and make the most out of my creativity.
The reality is that every single decision you take during a photo shoot is a choice under a degree of uncertainty.
In practice what you end up doing is basing your choices on possible outcomes and best case predictions about where the future (natural light, weather, and other conditions) is going to go.
Thus, meticulous planning will definitely help you achieve your goal – capture a stunning shot.
It helps you to focus on the specific pieces of information that you need to know and on the tasks that you need to get done.
Be thorough and consider different scenarios. Identify a specific set of uncertainties, different realities of what might happen while you are in the field.
You'll feel more confident about which decision to make, and which strategy to choose depending on what you find at the location.
Plan carefully what you do, and whatever you do will turn out right.
Follow a workflow (3)
Let's start from the beginning...
What is a planning workflow?
A photography planning workflow is an end-to-end system of preparing everything to get an image, from idea to capture. It's based on a series of interconnected steps developed by a photographer (you!) to simplify and standardize her work.
And why should you follow one?
There are 2 keywords here: simplification and standardization.
A well-established workflow process helps you to:
- Simplify and speed up the process of finding out where and when to go.
- Stay organized.
- Improve your efficiency.
- Bring consistency to your work.
In this sense, I suggest you use a photoshoot planning template. That way you'll always know what you need to do. It will be like walking on an established path: just take one step after the other.
It doesn't mean that there's no room for spontaneity or improvisation (section 8). But having a detailed workflow makes things way easier.
One last thing.
You won't find a universal photography planning workflow. Every master has his own trick.
Know your limits (4)
As a photographer, you need to know your own boundaries, which can be defined as the lines you draw between yourself and your own expectations.
You have to determine what exactly is too far or too much for you in order to know how much you can achieve without falling into the trap of frustration.
Start by establishing how much photography you know and how many techniques you dominate or, at least, you feel comfortable putting into practice. I'm not only talking about fiddling with the settings, but also about what you need to do to get a certain effect on the final image – the famous "if this, then that".
Moreover, be honest with yourself about your physical fitness. This is particularly important if you plan to be shooting outdoors for a long time or the weather conditions are extreme. Leave yourself plenty of time to hike in and back out at a pace that's comfortable for you.
Being realistic doesn't mean avoiding challenges or refusing to make mistakes. Quite the opposite!
Force yourself to think out of the box and your creativity will explode.
But you need to find a balance between the tools you have (knowledge, conditions, timing) and the result you want to get (expectations, final image).
Like anything else in photography, setting boundaries takes practice.
However, it pays off.
Patience is your best ally (5)
Years ago I realized that most successful photographers have the ability to sit with a scene or subject for a considerable amount of time until the situation is right to get things just as they should be to get the picture perfect.
So I started imitating them. And guess what, it works.
Patience is important in most photography genres, especially in those in which you're likely not in control of the scene. You can decide your shooting spot and your shooting date, but often the scene evolves at its own pace, which is different from yours.
Naturally, nothing is guaranteed.
But I believe that one of the most important things you can learn as a photographer is to invest time. The more time you spend in the field, the more likely it is you're going to be shooting outdoors with great conditions.
Moreover, patience is not simply the ability to wait – it's how you behave while you're waiting.
Stop considering the days where the light is boring and the conditions aren't optimal as a failure.
Instead, take the time to explore and take note of possible compositions and perspectives. Look for interesting subjects. Become familiar with the place so that you're prepared when the light becomes better.
Because, if you're patient enough, conditions will be top-notch one day.
And you'll be there to capture the shot.
Don't give up (6)
Sometimes luck is in our favor, but I would not count on it. When planning a photography trip, it is a good idea to give yourself a few days to tackle your most desired shots. This will give you time to scout as well as increase your odds of getting really great light.
I consider myself a lucky person. I've had the chance to experience and photograph incredible landscapes and amazing scenes.
But that only happens once in a Blue Moon... The truth is that I experience inadequate light much more often than incredible light.
I'm sure you've been there too...
That's why persistence is key.
If you want a shot with unique natural light or any other special condition, there's a good chance that you will have to visit that location more than once.
And if something comes up and you don't get the shot, it's fine (section 8).
When your planning fails for whatever reason, keep trying.
Over. And over. And over again.
Persistence often pays off eventually. You'll undoubtedly have some bad experiences in the fields and return home with crappy images, but if you know you have the talent to get the photo you're dreaming of, stick at it and the rewards will come.
Learn from your mistakes (7)
No matter what field you're in, you learn by repetition:
- Try something.
- Make a mistake.
- Figure out what the mistake was.
- Correct it.
- Repeat.
Mistakes are a good thing.
Making mistakes is a crucial component of the human process of learning. How could you expect to improve yourself if you never had any areas for improvement to even make?
All this applies to your photography planning, of course.
A good photographer is a good problem solver. Learn from your bad experiences. Then, become better by preparing for anything that could happen next time.
If you don't make mistakes, you're either not learning, or you're making mistakes and are too dumb to see it.
Try, fail, and learn from your mistakes.
Being a good photographer is as much about learning what not to do as it is learning what to do!
Use your creativity (8)
Most photographers feel that you are either born with a creative mind or not, rather than it being a tool that you can learn and practice, just like any other skill!
Learning the tools of your trade is undoubtedly valuable. Yes, you need to know how to transform the vision in your head into a photograph. And that's something that takes some sort of technical skill.
However, maybe spending a little bit of time nurturing your creativity wouldn't go missing every once in a while :)
Especially because when planning fails (section 8), being creative is crucial in finding the best solution to a problem.
You should always bring your own unique voice, perspective, and heart into your images, whether that is executing a vision you have in your head or just capturing a genuine moment as it occurs.
So experiment with new subjects, new locations, new light, new gear... And you'll always come up with something unique.
In addition to this, shoot with purpose and vision. Be conscious when choosing your gear, settings, light, perspective, and composition to capture your story.
To be creative, challenge yourself to think differently while always trying to reveal the unapparent. Your plans and photos will never be the same.
Visit the location more than once (9)
I believe in learning the soul of a place and, if you strive to do this, there's always new perspectives to discover. If you take the time to truly see and know a location, you'll find that it can be incredibly changeable.
Obviously, the easiest places to make return visits to are of course those close to home, but heading back to that far-off exotic destination is also rewarding.
So why should you go back to an iconic location or any other place you've already shot?
Conditions vary throughout time
First of all, you'll never find the same conditions.
- You can experience changing weather conditions going at different times of the day or the week. So one day might be sunny with no clouds and the next could be stormy, for example.
- Go to the location in different seasons and you can see variations in the vegetation, the natural light and, of course, the Sun/Moon/Milky Way position.
- When shooting seascapes don't forget to take the tides into account (section 17).
You become a better photographer
Then, you'd surely have improved as a photographer.
As time goes by you'll learn from your mistakes and you'll gain more experience by dominating new techniques.
With every shot you'll be getting a better photographer.
So the longer the gap between revisiting a photo location, the more your photography will have changed. And this will have a huge impact on your final image.
Don't neglect special occasions
And finally, you should always return to a location when there's something special going on.
It could be anything: fireworks, special urban lights (e.g. New York City 9/11 Tribute in Lights), a solar/lunar eclipse...
Safety first (10)
Outdoors photography can often take you to places that are rather remote or rugged.
When you're out in nature, it's important to take the appropriate safety precautions to prevent injury. And this is even more important as you go to more remote locations.
Sufficiently research and scout the area
While scouting the location, be sure to watch the ground and locate potential tripping hazards! Injuries happen when you least expect them.
So make sure you sweep the area visually. Make a mental note of dips, holes, edges, and so on that you could potentially walk into.
Alternatively, you can take photos of them with your smartphone. Write notes on these hazards on your smartphone or a notebook.
Put safety ahead of photography
Please, never put yourself in danger just for a picture.
Walking out on slippery rocks near a river or a waterfall is not worth the risk.
Heading out in solitude may be appealing, but going alone to a remote location can be dangerous. You don't want to find yourself in need of help and alone... :(
Don't do anything that will put your safety in jeopardy. There are plenty of great photo opportunities that don't require serious risk.
28.10 photographers that master photography planning
One of the best ways to learn photography is by viewing (and analyzing) the photos of great photographers.
Their images are a constant source of inspiration and you can learn a lot from them (e.g. discover a new location, analyze the composition, understand the use of light). And it's free!
This is something that I do regularly.
I love seeing the work of my favorite visual creators. But I also like to discover amazing photographers that are new to me.
Among them, there is a list of photographers that are real masters of photography planning. The planning that goes into their images is designed to give them the best possible chance of walking away with a great image.
They spend as long as it takes to capture awesome shots.
So I thought it would be cool to share this list with you.
It's a very personal list but I would love to add your recommendations. If you know a master of photography planning, just leave a comment at the end of this article.
Rachel Jones Ross
Rachel Jones Ross is an intrepid adventurer and night sky photographer.
She fell in love with the technical side of photography when she photographed the tail end of the Milky Way for the first time. She was hooked after that and spent all of her free time photographing the night sky.
That gradually evolved into more and more landscape photography, and into thoroughly planning most of her shots. You can learn Rachel's planning technique watching the following videos:
- Night Sky Photography Class with Rachel Jones Ross.
- From Concept to Creation: Chasing a Bucket List Shot with Rachel Jones Ross.
Chris Burkard
Chris Burkard is one of the world's most well-known adventure photographers. He travels to the most remote corners of the planet. He strives to capture stories that inspire people to reflect on their relationship with nature and is an advocate for the preservation of wild places.
For Chris, photography planning is one of the most important steps and can take years. Without properly preparing you can leave yourself open to missing opportunities to capture photos and that's how he's able to produce truly mind-blowing images.
To give an example, this image of highliner Garrison Rowland and the Supermoon in the background at Joshua Tree National Park (USA) proves his talent and persistence.
Erin Babnik
Award-winning wilderness photographer Erin Babnik travels worldwide to produce astonishing images and to teach photography workshops. The enjoyment of storytelling keeps her exploring, photographing, and dreaming in places where only her feet and a little imagination can take her.
For Erin, creating a pristine nature photograph requires a lot more planning and preparation than driving to a geotagged Instagram spot and hoping to capture something great.
You can learn Erin's approach to landscape photography watching this video: Understanding Landscapes: Six Elements of Photographic Style with Erin Babnik.
Alyn Wallace
Alyn Wallace is something of a master when it comes to night sky photography. Labeling himself an astro, landscape, and timelapse photographer, Alyn captures otherworldly imagery at times while you are tucked up in bed.
Tons of planning go into his work. He spends a lot of time exploring remote and beautiful landscapes in the daytime, hunting for interesting foregrounds and stories to tell. Then, he works out when he needs to return to include the kind of night sky he wants to feature in the image.
Check Alyn's workflow watching:
- Milky Way Photography Class with Alyn Wallace.
- Milky Way Photography in Turkey with Alyn Wallace (Part 1: Planning).
Rach Stewart
Rach Stewart is a landscape, travel and adventure photographer specializing in long exposure, which brings a special and unique quality to the images captured by her lens.
Her images are incredibly refined and thoughtfully planned. When researching photography ideas, she spends hours online weighing up where to go and when.
And, as you can see, the results speak for themselves...
Travis Burke
Travis Burke's diverse and creative approach to outdoor adventure photography stems from his own perspective on life. Whether it's highlining over a breathtaking canyon, freediving in turquoise waters or capturing the Milky Way in remote locations, Travis is constantly pushing himself and the boundaries of his craft.
Burke's breathtaking pictures feature the unending beauty of the natural world. A trademark of his images is the human touch and the planning behind them.
Catherine Simard
Catherine Simard is a travel and landscape photographer. Her passion for the wilderness and outdoors has led her on many adventures while producing striking, creative, and artistic images.
She stands out through pushing her creativity, shooting original compositions, capturing never seen before locations and achieving a distinctive style through post-processing.
Creating her adventure-type and fantasy-like composite landscapes requires long and hard work involving lots of planning and editing – two tasks at which she clearly excels.
Joshua Cripps
Joshua Cripps is a former engineer who 12 years ago fell in love with photography and has been doing nature photoshoots ever since.
His ability and ingenuity when photographing landscapes results in incredible images whose storytelling and composition stand out from the rest. He's a big advocate of perfect timing, which also often entails perfect planning. Many of his best pictures were possible because a lot of care and planning went into it.
For example, his "Ring Of Fire" eclipse shot in the Dubai Desert taken at the end of 2019 went viral. It's an absolutely spectacular photograph that required a precise time in a particular location under specific climate conditions, all according to Josh's unique vision. We were lucky enough to have Josh on our YouTube channel to explain to us how he pulled it off!
- Annular Solar Eclipse Photography Class with Joshua Cripps.
- 7 Secrets of Outstanding Telephoto Landscapes with Josh Cripps.
Isabella Tabacchi
Known for her dynamic landscape compositions, Isabella Tabacchi brings out exceptional colors and preserves the magic of the scenes before her. Her favorite elements are flowers, roots, tree branches, lines drawn by the wind in the snow, and cracks in the ice.
While sometimes the locations in the images are quite famous, she usually looks for new unknown spots researching online. In addition to this, she checks the direction of the light and plans when and where specific light conditions will appear.
Then, she usually visits the location some hours before golden hour where she walks around looking for specific elements on the ground to build a composition with.
You can learn more about her planning and her creative process watching this video: How to Focus Stack for Tack Sharp Landscape Photos with Isabella Tabacchi.
Daniel Kordan
Formerly a quantum physicist and a mountain guide and always an explorer at heart, Daniel Kordan, is a Russian photographer passionate about landscape photography.
He firmly believes that a landscape photographer's style is not only in the post-processing, but first of all, in the planning.
Each of his adventures is not just a tourist trip to a location. There's a lot of work behind the scenes: with planning, searching for fresh ideas, scouting... He plans his photography trips with very fine attention to every detail.
That's why the way he plans his travels and his shots reflect his style.
29.Planning is everything
It's fun to get really nerdy about a photo and plan everything out.
This way you avoid the risk of going back home without any good image. Or at least, you'll try your best to get the shot, instead of waiting to get lucky.
And what's also cool is that when you're actually shooting, you can do it as efficiently as possible.
Get a good night's sleep beforehand and wake up feeling prepared because you have a plan in place and you're not going to be scrambling to capture things... ;)
Planning is a craft that you need to hone over time.
So practice, put in place a system that will lead to capture better images, and get the most out of PhotoPills. It's the tool that will make your dreams come true.
And once you get that shoot, don't forget send it to the PhotoPills Awards, a contest that we organize at PhotoPills to reward the creativity of PhotoPillers like you and me.
Oh, one final thing.
If you have any questions or problems, you're not alone. I'm here to help you!
Leave your question or your suggestion in the comments section that you'll find at the end of this article and I'll answer you as soon as possible.
And remember that planning is essential in photography.
Some photos, without planning, are impossible!
So you know what to do...
Start planning your next shot! ;)
Note: Some links on this page are affiliate links. What does this mean? If you buy/rent using these links you're helping support us and it costs you nothing extra. Thank you for your support.
Get this ebook for free now!

