Photography Planning: The Definitive Guide

It all begins with the same question:
"What story do you want to tell?"
And this, of course, translates into:
"What do you want to photograph... to tell that story?"
This question is crucial because many photography genres are not spontaneous or candid. Think of landscape photography, for instance. Or astrophotography, architecture, travel, real estate, wedding, drone, Moon... Just to mention a few.
You can't expect to arrive at a location at any time of the day (or night), put your tripod anywhere, work a bit on your composition and settings and get a jaw-dropping picture.
That's not how it works.
The harsh truth is that you'll return home empty-handed.
No terrific shots.
No amazing experience.
Nothing.
Except for a deep sense of frustration.
Fortunately, there's a solution for this. An easy one to implement.
Plan your photos.
Devote as much time as you can to find and scout the perfect location, to check the weather forecast, to prepare your gear and to plan your photo down to the very last detail.
Thanks to photography planning you'll avoid surprises and have (almost) everything under control. You'll always be at the right place at the right time to capture the photo you want to capture.
You will know where to go and when to go to get the photo you want. You will know exactly what to do. And you will take certain pictures that would have been impossible to shoot without planning.
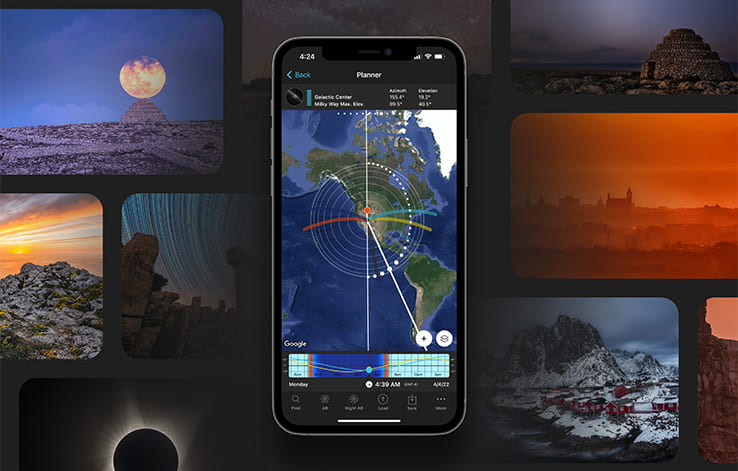
And there's no better tool than PhotoPills to find out if your idea is possible and the three basic pieces of information – the shooting spot, the shooting date and the shooting time.
So, it all starts with an idea and finding out if it really happens. If it does, figure out when it happens. Then, pack your equipment, go to your dream location and get the shot of your life.
It will be an experience you'll never forget!
Our motto is "Imagine. Plan. Shoot!"... Didn't you know it?
"A goal without a plan is just a wish." - Antoine de Saint-Exupéry
Get this ebook for free now!
Content
Chapter 1
- Find creative inspiration with these 20 planned photos
- How to come out with amazing photography ideas
- How to find the perfect location to plan your shots
- 8 things you must know before start planning your photos
- How to plan a specific natural light
Chapter 2
- How to plan Sunrises (and Sunsets)
- How to plan a Big Sun aligned with a subject
- How to plan Moonrises (and Moonsets)
- How to plan a Big Moon aligned with a subject
Chapter 3
- How to plan a Milky Way shot
- How to plan a Star Trails shot
- How to plan a Meteor Shower shot
- How to plan an architecture shot
- How to plan a portrait outdoors
- How to plan a wedding photo in natural light
Chapter 4
- How to plan a drone shot
- How to plan the tides in a seascape
- How to plan a photo of a lunar eclipse
- How to plan a photo of a solar eclipse
- How to plan the field of view and depth of field
- How to plan the weather
- How to plan a shoot during a certain season
- How to scout the location before the shooting date
- Check the weather forecast
- Prepare and check your photography gear
- Be prepared to throw the plan out of the window
- 10 photography planning tips
- 10 photographers that master photography planning
- Planning is everything
Chapter 1
1.Find creative inspiration with these 20 planned photos
A great photo always starts with a great idea.
Something you have imagined, something that you think it would be possible and that you want to capture with your camera.
It's a very simple creative process but it's very, very powerful.
As PhotoPillers (crazy photographers and PhotoPills users) we usually sum it up in three words:
"Imagine. Plan. Shoot!"
It's our motto, our battle cry.
But don't worry, we still haven't forced any PhotoPiller to tattoo it onto his arm, wearing our t-shirt is enough :D
The important thing here is that you should definitely learn how to plan your shots. You can achieve some incredible results regardless of your photography level and skills!
Learning how to plan your picture will have a huge impact on your photography, whether you are an enthusiast or a professional photographer.
You'll capture the picture of your dreams. You'll know exactly what to do: where and when to go, where to frame and when to shoot.
And you'll avoid the frustration of being in the field clueless and returning home empty handed...
That's why I thought that these 20 ideas could help you to learn photography planning. As you can imagine, all of them have been planned with PhotoPills! ;)
Natural landscape (1)
Lofoten is a group of islands scattered in the wild waters of the European North Sea, above the Arctic Circle. And if you are a landscape photographer like me, it's just paradise!
Despite the changing weather conditions, I tried to make the most of my time out there. I planned tons of shots and I could capture some amazing scenery.
That's how I ended up with the picture above: planning everything to the last detail, getting ready for any unexpected event and waiting for the best natural light!
Urban landscape (2)
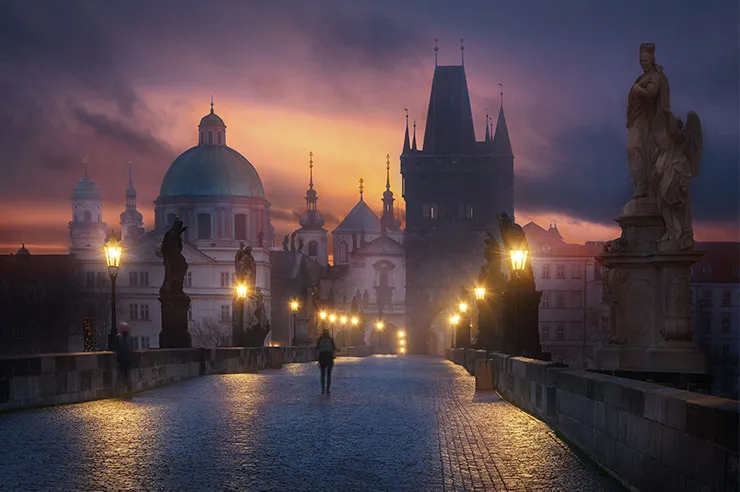
Photo by Denis Poltoradnev
This picture was taken by fellow PhotoPiller Denis Poltoradnev during a cold winter morning.
Charles Bridge is probably one of the most magical places in Prague, the Czech capital. And while most people complain that such an empty bridge is a Photoshop trick because there are usually a lot of tourists, well...
I'm afraid I have to disappoint these people!
Prague in the early morning, like almost all cities I have visited in Europe, is almost empty. So, you plan your shot carefully, find out the Sunrise time and direction and get up early!
Avoid being lazy and you'll enjoy in silence stunning Sunrises and beautiful pictures in the heart of the Czech capital like this unique, magical moment!
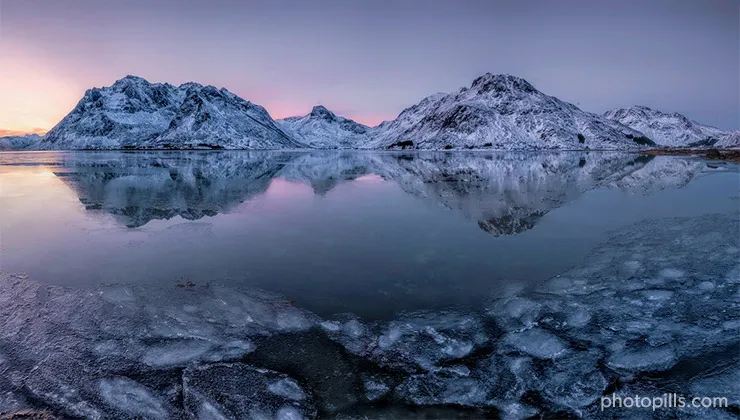
Sunrise (3)
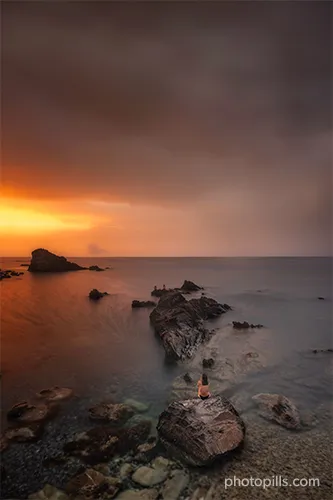
There is absolutely no obligation to include the Sun in your frame. Look at the photo above: the Sun is not in the composition. But it's projecting a beautiful warm light onto the landscape.
The combination of the warmth of the Sun along with the cool tones of the rocks and the water creates a beautiful contrast.
Add to this the silk effect in the water, plus a human figure to convey a sense of scale, and you have a magical image.
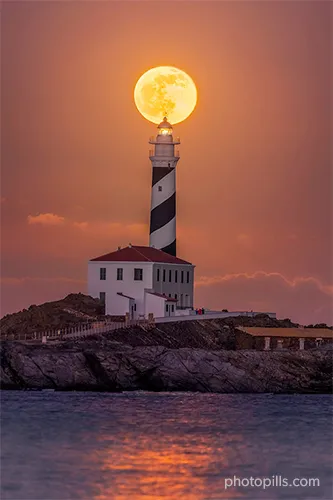
Sunset (4)
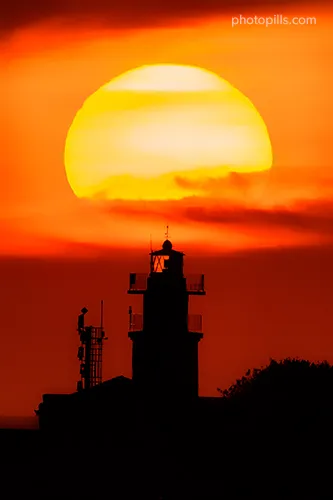
As you know, capturing a a huge Sun or Moon depends on your shooting distance, not on the focal length.
So in order to capture a big Sun setting behind the Sa Farola lighthouse I had to know exactly how far away I needed to shoot from.
I nailed the planning in the morning and then I took advantage of the only clear sky window of the afternoon to transform an idea I had years ago into an epic picture.
Golden hour (5)
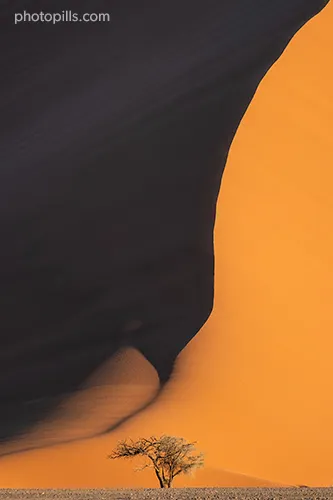
This photo was taken during the expedition to Namibia, where the desert landscapes are immense and the red rusty iron dunes of the Namib are unmistakable.
It was taken during the golden hour, when the light is perfect to capture the colors of the sand of this very particular desert.
I wanted to show the huge size of the dunes so I added an acacia to the composition at the bottom of the frame. And I thought it would be interesting to put the line of the dune in the upper right corner.
Blue hour (6)
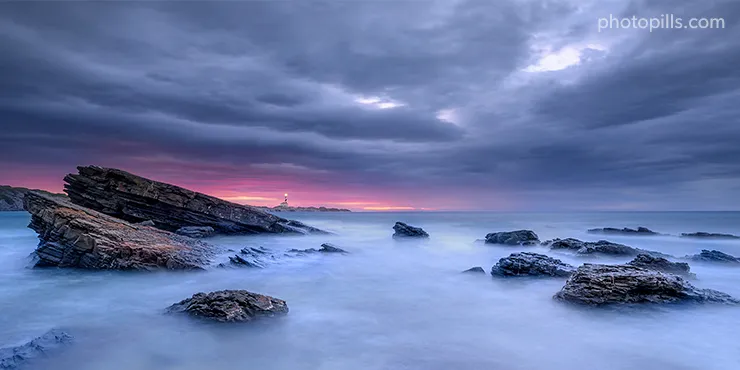
Thanks to PhotoPills I knew that on that morning the Sun would be rising behind the Favàritx Lighthouse from Cala Presili. This small beach of Menorca is an ideal location for Sunrises, Moonrises and also for Sunsets and Moonsets.
I also knew where I need to put my camera and tripod so the natural light would be where I wanted it to be...
What I wasn't expecting at all was to witness and photograph one of the most powerful Sunrises I have ever seen.
So yes, planning is essential. But sometimes nature holds a little surprise for us to enjoy!
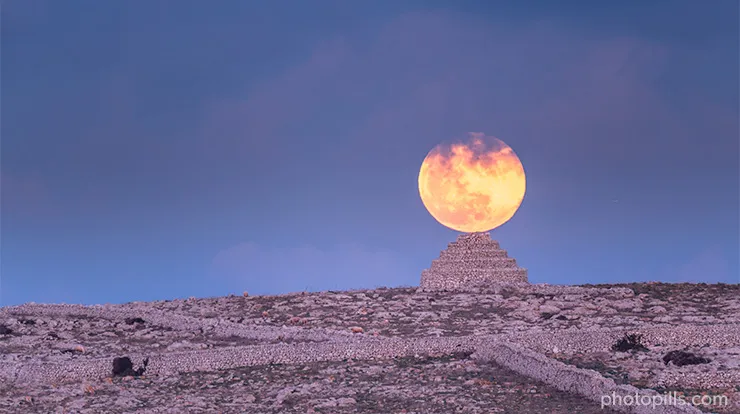
Moonrise (7)
The Favàritx lighthouse is an iconic subject. I've photographed countless times and I love to return to this location over and over... I just can't help it. Every time is different.
It has also become a Moon magnet. Aligning a big Moon with the lighthouse is a successful recipe to produce a jaw-dropping image.
And in order to know where and when I need to go, I always rely on PhotoPills. Big Moon shots require a bit of planning, but once you get the hang of it, it's so fun!
Moonset (8)
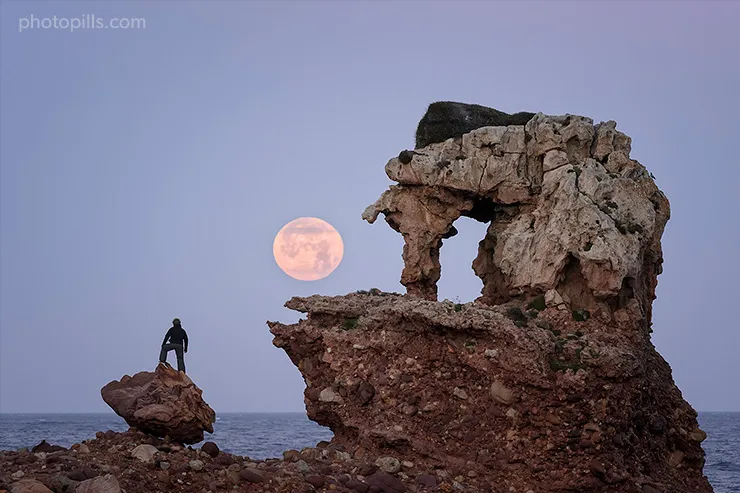
As time goes by, rocks mute into some very weird shapes because of the effect of erosion.
A very good example is the one that you can see in the picture above, known by the Minorcans as "Sa punta de s'Elefant". You'd call it "The Elephant Rock" in English.
With such a gift from nature, I was obsessed with finding a composition with The Elephant Rock and the Moon setting behind it. But I also wanted to add a human element, to convey a sense of scale and tell a legendary story.
Once I knew that I could count on Rafa to model for me, I started planning the shot like crazy. Fortunately, I found a date in which the scene would actually happen.
Now I just had to grab my camera and wait for the perfect moment...
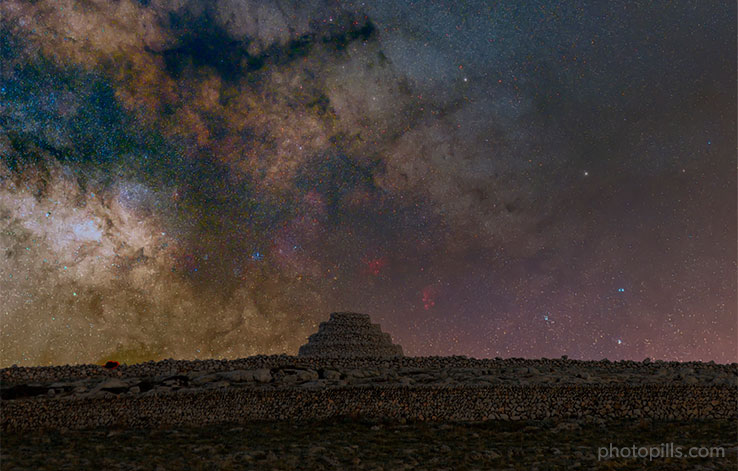
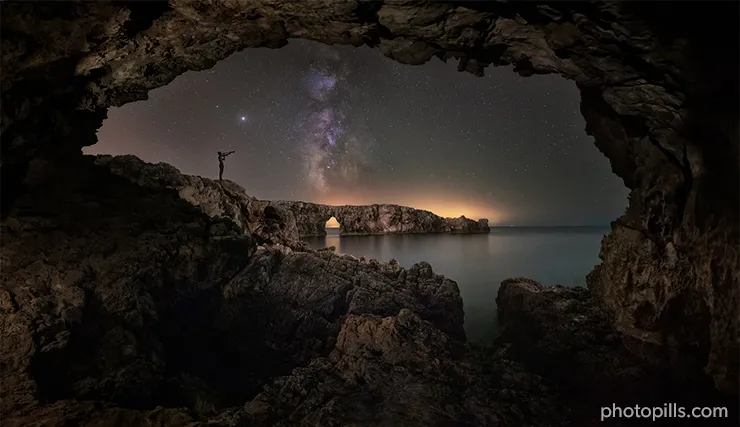
Milky Way (9)
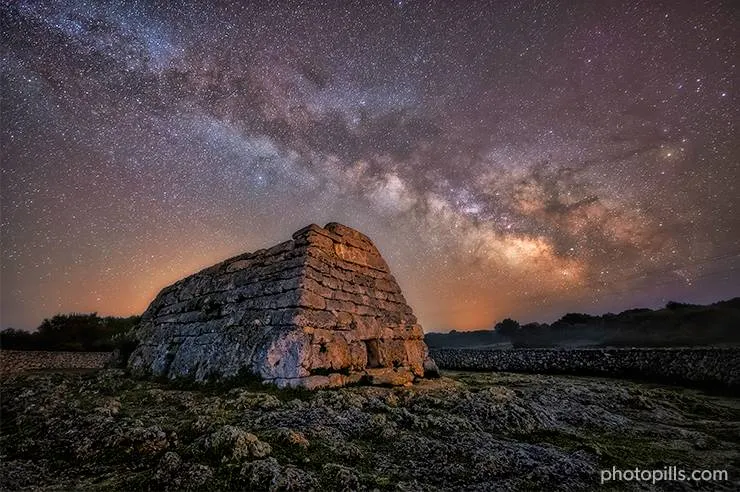
In this picture I wanted to create a connection between the stars and one of those rare buildings that our ancestors left for us to enjoy... and photograph!
The photo shows the Milky Way together with an amazing construction: the Naveta d'es Tudons, – a remarkable megalithic chamber tomb that you can find in Menorca (Spain). And this building served as a collective ossuary between 1200 and 750 BC. Isn't it amazing?
Thanks to PhotoPills I was able to plan the exact moment in which the Milky Way would be drawing a nice diagonal behind the main subject.
Star Trails (10)
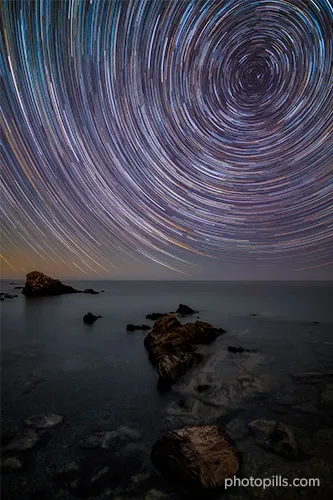
Most people love Star Trails images. And it's easy to understand why: you simply can't stop staring at them.
Depending on the direction you aim your camera, you'll get a different Star Trails pattern: verticals, diagonals and circles. What's your favorite?
In this occasion I found a gorgeous seascape in Menorca and thanks to PhotoPills I knew:
- Where I needed to point my camera to.
- When I should start shooting.
- When I should stop shooting.
- The shutter speed of each frame.
All I had to do was follow the plan and then merge all the frames once I got back home.
Meteor Showers (11)
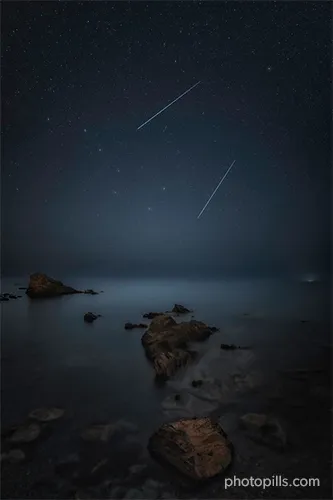
Menorca's seascapes are perfect for astrophotography. They offer beautiful locations with interesting subjects and they don't depend on tides... ;)
As you saw in the previous photo, this shooting spot was great because I could capture some Star Trails while taking some frames of the always amazing Perseids Meteor Shower.
You can use PhotoPills in two different ways to plan your Meteor Shower shots:
- In the field, with the Meteor Shower pill.
- From home, with the Meteor Shower features included on the Planner.
Architecture (12)
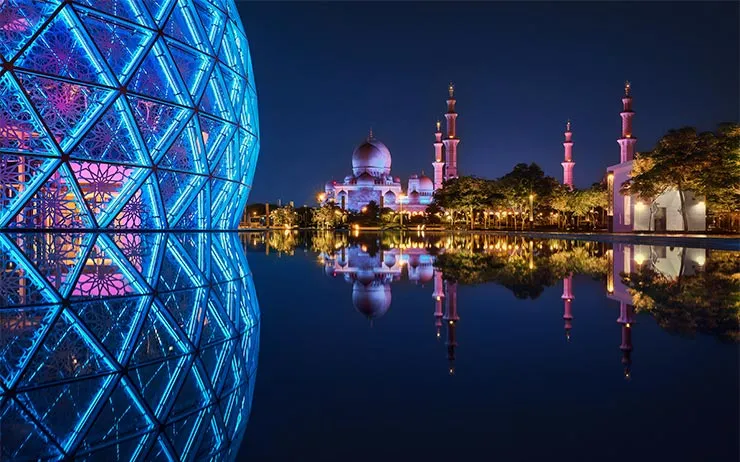
Photo by Jesús García
Photographing Dubai's Sheikh Zayed Grand Mosque can prove incredibly challenging. It's a building that has been captured on countless occasions, and finding a new point of view and composition is quite difficult.
However, my friend Jesús García managed to get a unique perspective including new architectonic elements, a mysterious reflection and the power of the blue hour natural light.
These types of shots are almost impossible to capture without a detailed plan.
Portrait (13)
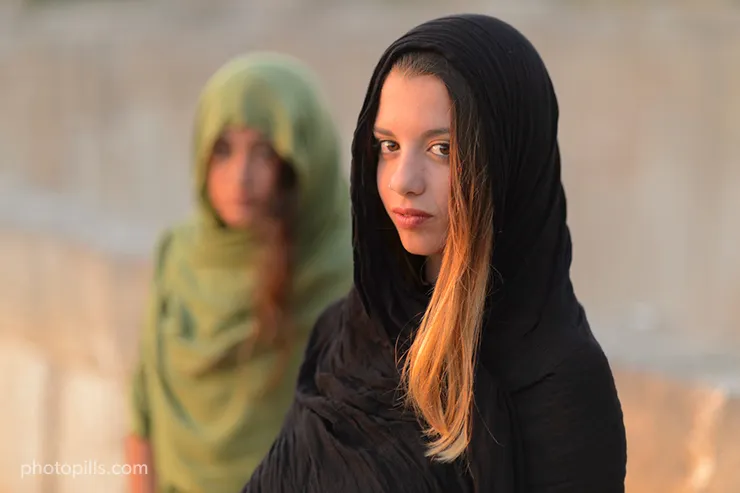
This is not one of my best portraits, but I feel very attached to it. I took it during the 2017 PhotoPills Camp in a magical location called s'Hostal Quarries (also known as Líthica), not far away from Ciutadella in Menorca (Spain). These are quarries of marés limestone, the stone traditionally used in the island for building. I just love the red, ocre and golden colors of the rocks there: they make a fantastic background.
I waited for the golden hour while the Sun was setting to the left of the models so it would illuminate them from the side, while casting a fabulous golden light on them.
And PhotoPills proved very helpful to help me position the models according to the Sunset direction and the time of the day the golden hour would occur.
Wedding (14)
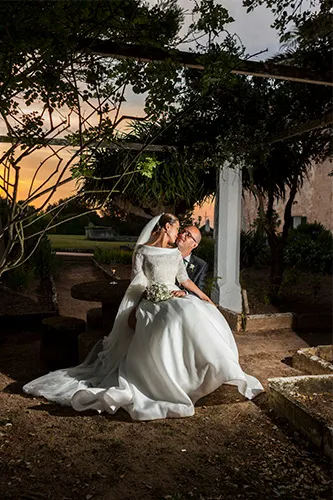
This photo was taken by Joan Mercadal in Alcaufar Vell, a rural hotel located in Menorca (Spain), a fantastic venue for a wedding.
The idea was to have the Sun setting along the main building creating beautiful red and golden colors in the background, behind the newly weds.
And then, use a flash to light the adorable couple.
How did Joan figure out the right shooting spot and time on the wedding day?
You've guessed it right... He used PhotoPills... :)
Drone (15)
Photo by Javier de la Torre
This shot was taken by my friend Javier de la Torre, an amazing travel and landscape photographer, in the Dubai desert.
Dubai has a jaw-dropping architecture. But on this occasion Javier wanted to showcase the power of the desert and how it inevitably gobbles up all signs of civilization as time goes by.
Javier used PhotoPills to plan the composition of this shot and take advantage of the Drone and Field of View tools.
Lunar eclipse (16)
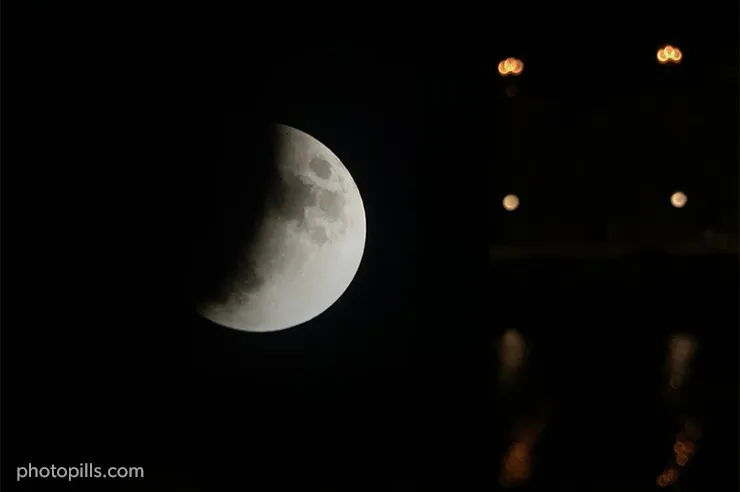
When there's a will, there's a way!
This picture is a great example of why gear is not important to capture cool images.
I took a shot of the July 16, 2019 partial lunar eclipse with my iPhone... ;)
And I was able to do so thanks to a thorough planning: I needed to find a location from which the eclipse would be visible, and I also needed to find out when to shoot it.
Solar eclipse (17)

Photo by Josh Cripps
This incredible image was planned and shot by my friend Joshua Cripps at the end of 2019.
As soon as he found out that an annular solar eclipse was going to occur in the Middle East, he started imagining and planning a shot until he found a potential location in the Dubai desert. He used the PhotoPills app to plan the location aspects of the shot including the shooting position he would be in as well as the position of the man and camel.
As you can see, the result is amazing and it shows you the endless power of planning. Josh was designated the PhotoPiller of the Year 2019, and we invited him to our YouTube channel to explain everything about this picture.
Wildlife (18)
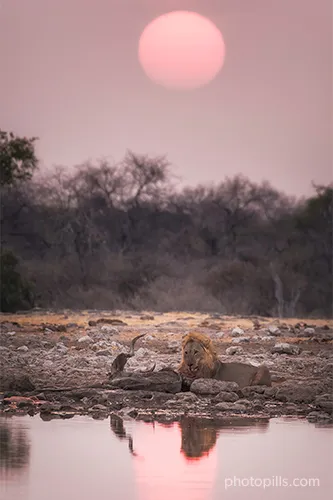
This was one of the most surprising moments we had the opportunity to experience during the PhotoPills expedition to Namibia, when a couple of lions were feeding (although there is only one in the picture).
They were next to the Klein Namutoni waterhole, and the light during the golden hour was perfect.
So I used PhotoPills to know the Sun's path thanks to the Augmented Reality view. Once I established the shooting spot, I quickly picked up my camera with the telezoom lens and started shooting almost from the ground so that I could capture a nice reflection of the animals as well.
Street (19)

Photo by Ruya Gong
This picture is the perfect example of a silhouette created thanks to the light illuminating the scene from the back.
It was taken in San Francisco, more precisely on California Street from where you can see part of the Oakland Bay Bridge. The slope and the tram rails create some nice leading lines.
But, as you can imagine, the Sun creates this light only a few days every year. So here PhotoPills comes in handy to know exactly when to expect this beautiful golden backlight.
Macro (20)
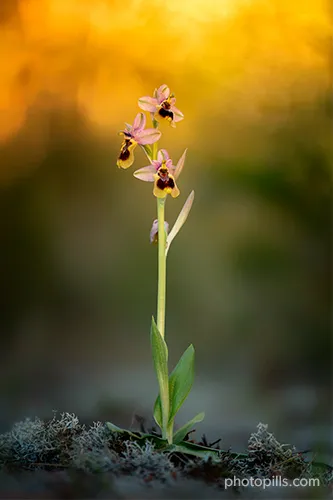
The slender and majestic sawfly orchid (ophrys tenthredinifera) is perfect for portraits.
It's not a very tall orchid (15-30 cm) but its large pink sepals and yellow labellum margins make it a tremendously original species.
Photographing orchids is one of my most secret passions and I love planning a macro shooting session to the last detail. Using the natural light to enhance the flower's shape and colors is essential.
Photos by PhotoPillers (21) [bonus track]
My goal with this section was to inspire you.
To show you a lot of examples that you can use as a photography idea.
Hopefully I did.
And if not, it's fine.
I have another suggestion: to inspire you by looking at the thousands of photos other PhotoPillers have imagined, planned and captured across the globe.
You'll see pictures of all types of landscapes. And also of Sunrise, golden hour, blue hour, Sunset, Moon, Milky Way, Star Trails, Meteor Showers, drone, lunar eclipses, solar eclipses and other astronomical events...
You could spend hours and hours looking at mind-blowing images!
Would you like that?
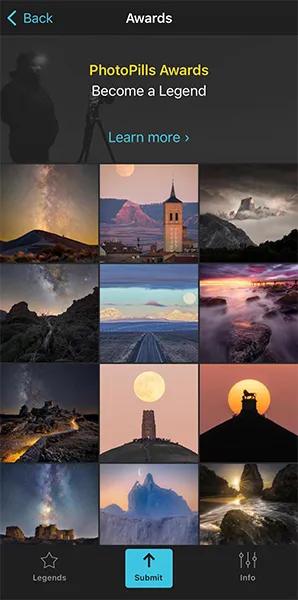
Well, they are compiled in our Instagram account (follow us!) and in the PhotoPills application (Menu My stuff > Awards).
And if you want to inspire other PhotoPillers while participating in our contest, the PhotoPills Awards, send us your photo and you may win some cool prizes!
2.How to come out with amazing photography ideas
Before you can start planning, you need to come up with a great photo idea to plan. You need to get inspired.
And finding creative inspiration can be incredibly challenging. We live in a time when there's nothing that is not created in the context of other stuff.
You need to sculpt your own voice adapting locations, subjects and techniques that others have used before you, not adopting them. That would be pretty much imitating, not using something as an inspiration.
Now that you saw some planned photos that may have inspired you (section 1), here's a list of ideas – actually, sources, that you can revisit over and over when you can't think of anything on your own.
This is something that you can do days, months, years before the actual shooting. So once you find anything interesting, store somewhere (ie. take notes, make a screenshot) so you can use it later on during a shooting session or a trip to a remote location.
Browse the work of others on social media
As you may have guessed, the first and easiest option to find inspiration is to browse the work of others on social media.
Social media platforms such as Instagram, Twitter or even Tik Tok are full of talented and incredible photographers. Whether they're professional or hobbyists, they're putting their art and images online for the world to see for free. That's literally millions of people with different ideas and locations! :)
Spending hours on Instagram is not mandatory, of course. But it's definitely a good place to start.
What I like about social media is that it's very easy to jump from one profile to another either following the algorithm suggestions, looking for certain hashtags or having a look at who your favorite photographers are following.
Here are a few tips so you don't get lost...
- Look for inspiration intentionally. What is it that draws you to follow a particular profile and why do you like her images?
- Search for hashtags that are relevant to you. It can be a location, a subject, a moment in time (e.g. Sunrise, Sunset).
- When exploring images of a location,
- Observe what angles people are using and which look the best.
- Look how the light reacts and falls at a certain time of the day.
- Find hidden gems!
- Have a look at the suggested profiles and who your favorite photographer is following. It's a quick and easy way to find similar accounts to the one you're looking at and finding other creators that can inspire you.
Look at your favorite photographers' websites
Whether you're into landscape, portrait, or street photography, looking through the lenses of other professional photographers can help you get some amazing ideas.
The idea, of course, is not to mimic their photographs, but rather to discover new locations, explore different compositions or learn new techniques.
Take your time to observe and analyze every photograph that you like. Have a look at different elements (ie. natural light, composition, color, etc.) and ask yourself why you find them appealing. You'll often discover that the creator has had a good reason to showcase what she considers her best work.
Another interesting issue is that you won't be bothered with advertisements or any social media proof. Who cares about the number of likes and comments? They are just a distraction.
If you enjoy the work of a photographer, go to her website and try to learn as much as possible from her.
Explore photography websites regularly
One of the things that I love about photography is that I never stop learning.
And that's something you should do too.
You might think you know everything, like the technical side, but there will always be something else out there for you to learn.
The more you learn, the more inspired you become.
However, if you're just starting out it can seem like the mountain of information is never ending. The web is an amazing resource, but sometimes too much choice can be confusing.
That's why I thought that I could share with you some cool photography websites that you can use as a reference and visit them often.
- Every day, the Explore page is updated with the most popular photos on Flickr.
- 1x.com is the world's biggest curated photo gallery online.
- Exposure is a great platform to combine text and images together into a narrative structure, where you can find terrific stories.
- Viewbug, offers photography challenges and contests to help people grow their craft and connect with other creative individuals.
- Unsplash is basically a free stock photography site with hundreds of thousands contributing photographers.
- Pexels, is an online photo and video management application allowing users to upload, organize, edit and share photos.
- Youpic is a photography online community, with the primary purpose of photo sharing.
Read our photography guides
PhotoPills is your photography planning app. It helps you plan your photos ahead of time... So you're always at the right place at the right time to capture the best photo possible and turn your photography ideas into reality.
But you already knew that, right?
And to turn an idea into a reality you need to imagine something first...
You need inspiration.
That's why all our photography guides included in the PhotoPills Academy start with tons of photos, visual examples, that you can use as inspiration.
As a matter of fact, this article begins in a similar fashion... ;)
So I suggest you have a look at our photography guides, particularly the first sections in which you'll find dozens of examples that will help find the photography idea you're looking for:
- Milky Way Photography: The Definitive Guide
- Mastering Natural Light Photography
- Landscape Photography: The Definitive Guide
- Seascape Photography: The Definitive Guide
- Sunrise Photography: The Definitive Guide
- Golden Hour Photography: The Definitive Guide
- Blue Hour Photography: The Definitive Guide
- Sunset Photography: The Definitive Guide
- Moon Photography: The Definitive Guide
- Long Exposure Photography: The Definitive Guide
- Lens Filters: The Definitive Guide
- Star Trails Photography: The Definitive Guide
- Meteor Showers: The Definitive Photography Guide
- Zodiacal Light: The Definitive Photography Guide
- Lunar Eclipses: The Definitive Photography Guide
- Solar Eclipses: The Definitive Photography Guide
- Exposure in Photography: The Definitive Guide
- Depth of Field: The Definitive Photography Guide
- Drone Photography: The Definitive Guide
Have a look at photography contest winners
Photography contests feature powerful and inspiring images of animals, cultures, and places from around the world.
They are an endless source of inspiration in 2 ways.
The most obvious one is for you to compete in a photography contest. The competitive spirit will surely ignite your creativity.
The other one is to go to the website of a photo contest once the winners have been announced. You'll have the chance to analyze some amazing work which, according to a jury of experts, deserved an award. In other words, you'll be looking at the best single images from around the world.
There are dozens of photo contests organized every year depending on the genre, technique, and other reasons.
Here are a few examples that you can regularly use as a source of inspiration:
- World Press Photo.
- Sony World Photography Awards.
- National Geographic Traveller Photography Competition.
- Travel Photographer of the Year (TPOTY).
- Astronomy Photographer of the Year.
- EPSON International Pano Awards.
- Fine Art Photography Awards.
- Annual Smithsonian Photo Contest.
- Neutral Density Photography Awards.
- Chromatic Awards.
- Monochrome Photography Awards.
- International Photography Grant.
- Monovisions Photography Awards.
- iPhone Photography Awards.
- The Nature Conservancy Global Photo Contest.
- LensCulture Street Photography Awards.
- International Landscape Photographer of the Year.
- and, of course, the PhotoPills Awards.
Work your way through photography books
Most photographers underestimate the power of a good book.
While scouring Instagram and other social media can sometimes lead to inspiration, it's a very different thing to hold in your hands a book of quality prints that are meant to be viewed as a whole.
Looking at photography books will often provide valuable insight into the author's ideas, process and techniques, allowing you to build a library of concepts, compositions and styles to inform your own work.
A great photography book generally includes a combination of three important elements: well-curated images, interesting and informative text and a valuable message. It's the way they all come together that makes for a truly spectacular ensemble you'll want to read again and again.
A great place to find inspiration is in your neighborhood bookstore or library.
However, you can also find great books online either on Amazon or other big bookstores (Barnes & Noble, Books A Million, Waterstones, Book Outlet, Booktopia).
Another good option is to look for self published authors (you'll get to know their projects through their website and social media) or specialized photography publishers.
Read magazines (art, travel, fashion, etc.)
Yes, you should definitely read photography magazines.
Each image that you look at in a photography magazine is an important component of a photographer's visual experience. So make it a habit to look through them once in a while for inspiration for any magazine you like.
But don't focus solely on them.
There are other types of magazines that you can get tons of inspiration from.
- Art is a very broad concept that includes other genres apart from visual arts. So try to look for magazines featuring both the oldest and newest talent in the fine art world.
- Travel magazines are an amazing source of inspiration because of the effort editors put into the photo selection. They want to make you dream with new adventures and destinations and they need to do so using the power of images...
- Fashion is all about perception and perfection. If you're into shooting people, fashion magazines can give you tons of ideas on poses, portraits and looks.
- Photographing buildings can prove challenging, but architecture magazines are a good way to learn how to avoid shadows, find the best angle and play with natural light.
- Wildlife photography is a beautiful and difficult genre – you rely completely on the animal's behavior and environment. However, you can learn to anticipate some of their reactions by looking at specialized magazines.
- History magazines can be a great way to find new and special locations...
So whether it's online or on paper, don't underestimate the power of a magazine. Their visual content can prove a gold mine ;)
Watch movies and TV series
One of the best ways to get inspiration in photography is to watch movies and TV series.
Nowadays the quality of the visual content is remarkable compared to what we used to watch when we were kids. And part of this quality comes not only from the script, but also from the impressive work of the photography directors.
Little by little their weight in the final product has dramatically increased and right now you won't find a good movie or TV series that hasn't taken care of its aesthetics.
When watching appealing movies and shows, a smart idea is to take notes of your thoughts and inspiration. Note the names of directors and observe their style.
You can implement many of the tricks and techniques used in movies to your own photography. It might be the lighting, the color contrast, the depth of field or the camera angle that gets your attention.
Let me give you some examples...
Blade Runner, with its strong shafts of light and use of backlighting, immediately evokes images from classic black-and-white movies.
Out of Africa was the film that made us fall in love with Kenya with a lush, soft quality that matched its romantic mood.
The Last Emperor is a recreation of Ching dynasty China with astonishing detail and unparalleled craftsmanship.
Watch your favorite movies and see what you can learn, but also consider watching movies and TV series you wouldn't normally watch. Forget about the story, pay attention to the atmosphere instead.
Revisit old locations
As you grow as a photographer and as your personal perceptions change, a location can develop a new meaning or open new opportunities.
First of all, conditions are never the same. Whether it's the natural light, the weather or the season, you'll always find that something has changed from your previous time there.
Then, you may learn a new technique... The best way to see if you can improve on your old shots is revisiting the location.
Finally, something special could be happening at the location (e.g. a cultural event, a festival, a celebration). These events create unique opportunities to capture a location under peculiar circumstances.
On top of this, planning can help you find new perspectives and compositions, whether it's because you're looking for a specific natural light or because you want to align the Sun or the Moon with an interesting subject.
In the end, it's all about learning – incorporating new elements into your images to see what works and what doesn't. And the only way to know this is to go back to old locations and use them as a testbed for new ideas.
You never know...
The location you thought done and used up may just offer you a new chance of becoming your greatest picture.
Join a photowalk
Don't walk on your own – invite friends or others who share your passion for photography to walk with you. Turn it into a social event!
We tend to do what we know, so photowalks give you an opportunity to see how other photographers approach a subject and how their vision differs from yours.
You can spend part of the time learning new techniques and sharing your own knowledge and ideas with other like-minded people.
And, of course, it can be a source of inspiration if you feel like you're in a photography rut. That's true not only for a specific technique. You can learn a lot about composition and you can discover new locations you've never heard of.
Challenge yourself while networking with other photographers!
Go to a photography exhibition
Surely in a world where everything can be found at your fingertips, there's no need to visit exhibitions?
Think twice.
An exhibition invites you to slow down and to experience work as the photographer and/or curator intended.
(A side note: a curator is a person who selects and organizes work for an exhibition. She might do it alongside the photographer, but that's not always the case).
So start analyzing...
Is there a clear beginning and end and directions of where to start and finish? What's the logic behind this decision?
Is the exhibition curated chronologically, organized by dates of creation; or thematically, grouped by topics, styles, potential meanings?
As you can see, it's not mandatory to know everything (or even anything) about the work on show. While it's true that prior knowledge can certainly help, your first impressions (e.g. your instinctive reactions, personal taste and opinion) are also valuable.
Visit an art museum
For a jolt of creativity, spend an afternoon in an art museum. Surrounding yourself in the creative work of others will lead to a flood of new ideas.
You'll find centuries of photography inspiration ideas hanging on the walls of galleries and museums.
And please, don't do as other people do, don't walk past paintings as you were walking. Take the time to be with the artwork in front of you and spend as long as you need to capture every detail – feel it as a whole.
You'll discover that paintings speak and provoke thoughts and emotions! ;)
If there are audio guides, get them and use them.
As much as I thought I knew Joaquín Sorolla during the exhibition I visited at the Museo del Prado in Madrid, the audio guide provided me with a number of additional information and anecdotes I knew.
Anything you can know more about an artist is an additional tool to understand his work and his virtues.
Then, when you're back home, get more information and you'll better understand what you have seen and experienced. And if you have the opportunity, go to the museum again. You'll have fresh eyes and see many things you didn't the first time.
Finally, take the time over days, weeks and months to learn more about what you saw. Surf the web and read everything that may give you the opportunity to deepen your experience.
Study the old masters
But who are the old masters?
Painters that worked in Europe prior to the 19th century. More specifically, it refers to the ones who were working at the top of their game. That's why they are considered masters.
Photography and painting have much in common. Both artists (the painter and photographer) are concerned about composition, lighting, color, and story.
- Composition. Painters knew exactly where each element of the painting should appear to make the piece aesthetically. They used shape, form, and objects to create leading lines that all lead the viewer to the center subjects. Have a look at the works of Velázquez or Jan van Eyck.
- Lighting. Painting has had a significant impact on the way that photographers use natural light as painters are constantly paying attention to it. Just look at the masterpieces of Rembrandt, Vermeer or Caravaggio.
- Color. Because painters had everything in focus in their images, they had to use different ways of guiding the viewer where they wanted her to look and they did this with color. Great examples of mastering color are Fra Angelico, El Greco and Raphael.
- Story. They deeply cared about visual storytelling. In fact, you can consider many of them the predecessors to documentary and street photographers. Check how Goya and Canaletto depicted living scenes as accurately as possible.
Oh, and don't focus solely on painters. Have a look at photographers, sculptors and architects as well.
3.How to find the perfect location to plan your shots
Location is key.
Without a good location, it will be more difficult to get a photo that has an impact, tell a story, convey an emotion...
Nevertheless, you have to understand that there is no such thing as a perfect location. What does exist is the best location to photograph something in particular. Like, for example, the Sun setting through the Arc du Triomphe in Paris (France).
The location is the place where the scene you want to capture will take place. In other words, where the story you want to tell takes place.
That's why it's crucial that you carefully and meticulously select the setting of your story and its main characters.
This is something that you can do days, months, years before the actual shooting.
And in order to do this, I suggest you follow the methodology that I myself apply.
However, that doesn't mean it's the only way or the best way. But it works for me and I want to share it with you in case it helps you or you want to use it as a starting point ;)
Choose the type of landscape (scene) you want to photograph
As you'll see below, when looking for a location you should consider several elements. All depends on the idea you have in mind – the story you want to tell, and how you plan to tell it.
In other words, it depends on the photo you want to produce.
So always take into account what's going to be in your frame. It's the setting in which your story will take place.
That's why the location is so important, because it establishes the grounds to give context to your story.
Be thorough when picking it and don't forget to use the most powerful tool you have: the imagination of the person who experiences your pictures.
What type of landscape?
You can choose between two large groups of landscapes:
- Nature (mountain, seascape, river, lake, waterfall, forest, rainforest, scrubland, grassland, desert, volcanic).
- Artificial or urban (megacity, city, suburb, crop field, breeding field, mine).
Once you have determined the type of location, you should check that you'll have enough room in your frame to:
- Include the Sun, the light that comes from it, the Moon, the Milky Way, Star Trails...
- Show where that particular moment takes place. Is it a view of the Corcovado over Rio de Janeiro? Have you gone to Moscow to photograph the Red Square or have you freaked out while capturing a view of the Highlands of Iceland?
- Include a powerful subject. I'll give you more details about this in the next section.
Check its orientation
Remember, it's important to include in the frame all the elements you have imagined.
It can be the Sun setting between two skyscrapers, the Moon rising from behind a mountain or the Milky Way aligned with a windmill in a deserted landscape...
And if you want that what you imagined happens exactly the way you want so you can photograph it, take into account:
- The position of some of these elements (the Sun, the skyscrapers, the Moon, the mountain, the Milky Way, the windmill).
- Your own position with respect to them. In other words, where you have to position yourself and where you have to point the camera to.
Try to make sure there's plenty of room to move around
As I just told you, it's important that you can freely move around the location.
Why is that?
Well, first of all because the more space you have, the more compositions you can get. And that's essential in terms of creativity. You can't imagine how many times I had an image in mind and once on the field I found out a new composition that was way better than my initial thought.
Moreover, when moving around you can look for different points of view, check that you are in the position that you like the most and make sure that everything is under control (the tripod is stable, you don't risk falling or slipping, etc.).
Finally, it may occur to you that the photo you imagined has only one possible composition. It's not frequent, but it can happen.
When you have some freedom to move around the shooting spot, you can make small corrections so that all the elements are in the frame exactly where you want.
Decide the point of interest (subject)
Look for a location that has one or more points of interest. That point of interest is the subject of your image, the main character of your story and the magnet to attract the viewer's eye.
And the more interaction there is between the location, the subject, the natural light (or the lack of it if you are doing astrophotography) and the rest of the elements of the frame, the greater visual impact the image will have.
Everything will depend on what you want to convey, the story you want to tell and how you want to surprise the viewer.
The point of interest is the main character of your story
With the constant influx of images that we get every day, it's becoming harder and harder to attract the viewer's eye. And holding their attention has become (almost) mission impossible.
If you want someone to notice your photography, you'll have to go the extra mile to make your image stand out among hundreds, thousands, millions of photos!
You need to choose a character for your story that captivates at first sight and that conveys an irresistible strength.
The point of interest is the most important element of your composition.
What can you use as a point of interest?
Avoid elements that aren't original, that aren't strong, that don't convey anything.
Instead, look for items that stand out like an abandoned temple in the middle of the jungle, the top of a mountain lit by the Sun at Sunrise, or the silhouette of a person under the Milky Way.
Look for the extraordinary in the ordinary.
"And how can I find cool points of interest Toni?"
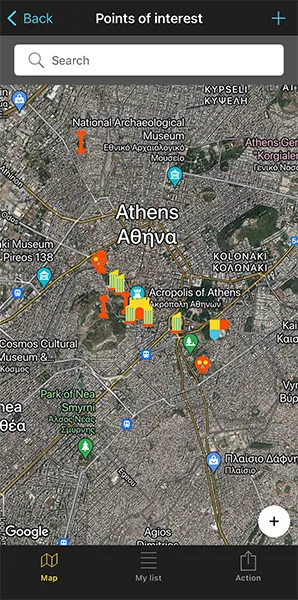
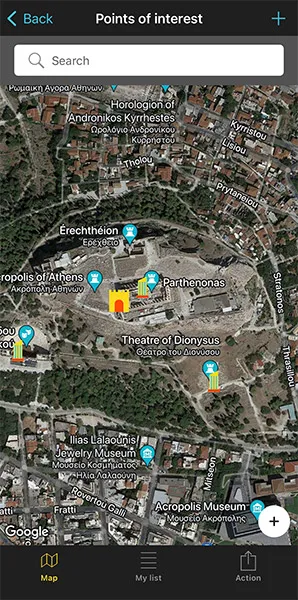
If you're short on ideas, take a look at the PhotoPills Points of Interest (POI) database :)
To find it, open PhotoPills and tap Points of interest (My Stuff Menu).
Tap Map (at the bottom of the screen) and move your fingers across the screen to navigate around the world. Thanks to the 10,000+ POIs included in our database, you'll be able to discover a lot of new locations.
Apart from PhotoPills Points of Interest (POI) database you can explore other sources of inspiration (section 2).
Keep reading for more ideas below on how to investigate on the internet and in real life.
Don't neglect the foreground
All areas of the composition are important, but the foreground is critical in photography.
To begin with, for a technical reason.
Although some photographers take pictures with a telephoto lens, the vast majority use a wide angle lens for almost all of their photos.
The optical effect that this type of lens produces when looking at the photo, is that all the elements of the composition seem to be very far away. If you don't include an attractive foreground in your photo, the image will be flat and boring.
And also for an artistic reason.
The foreground is the entrance gate of the image. It's usually the first element the viewer looks at. From there, if the image she's just seen has caught her attention, she'll scan the image with her eyes to discover the story you want to tell.
A good foreground produces a deep photo. And if you can get the viewer to identify with what is happening, she may have the impression of actually being there.
Here are some ideas to capture interesting foregrounds:
- In order to accentuate the foreground, get down low. It allows you to focus on interesting elements, such as wildflowers, a group of rocks, or patterns in the ground.
- Look for leading lines (vertical, diagonal or curved) to guide the viewer's eye on a path around your shot.
- Raise the horizon by pointing your camera at an angle slightly downwards so your foreground occupies more space in your frame.
Investigate from far away (on the internet and in real life)
When I write "from far away" I mean far away from the location.
Because an essential step when planning a shot (section 4) is to conduct a thorough research before actually being in the field.
You need to gather as much information as possible about the location so you can anticipate all the potential scenarios, including that something may go wrong... (section 26).
Check tons of information sources
Once you decide where and at what time of year you're going to take photos, check all the sources of information that you can think of.
Here are some ideas that can help you:
- Look at tons of photos that other photographers have taken at this particular location or area. You can find them on Instagram, Flickr, 500px, Unsplash, Getty Images, 1x.com, Viewbug, Pexels, Youpic, Shutterstock, Adobe Stock and Google Images.
- Learn from other photographers' discoveries and check if they have previously explored the location. Certain communities, such as Locationscout and ShotHotspot, offer this information.
- Analize publications like travel magazines (National Geographic, Condé Nast Traveler and Travel + Leisure), travel curated content (Exposure), travel guides (Lonely Planet) and the photography section of newspapers such as The Atlantic, The Guardian and The New York Times.
- Revisit your favorite photographers' websites and pay attention to their galleries to see if they have been there. Have you checked the PhotoPills Masters' websites participating in the PhotoPills Camp?
- Again, check the Points of interest (POIs) included in PhotoPills.
- How long since your last visit to a library or a bookstore? Yes, books will tell you more about the local history and natural biodiversity of an area or town.
- Try to visit the nearest Town Hall or tourist office and look for first hand information.
- A reliable and full of surprises source of information are the locals. No one knows the area better and provides greater advice.
Take advantage of the potential of geolocated Instagram Location Tags
Instagram has a very powerful tool: geolocated tags called "location tags".
The process is very simple.
When you see a photo on Instagram that you like, skim the tags to see if the author has included one with the location name. Tap the tag and Instagram will show you all the photos that have that same tag. That is, pictures taken in the same place.
Also, many users are likely to post their photos shortly after taking them. So you can see exactly the weather conditions of that spot and other inconveniences that may arise (a scaffold covering a building, for example).
It helps you find a location very precisely once you've selected a destination or a more generic area.
Instagram is not the only service that offers photos with geolocated tags. Others like Flickr, 500px, Unsplash, Getty Images, Viewbug, Youpic, Shutterstock, Adobe Stock, Locationscout or ShotHotspot also offer this tool.
Find out all the practical information about the location
Before leaving home, you should know the following information about the location:
- The address or GPS coordinates of the location. Is the location real or did someone take multiple composite shots?
- How to get to the location.
- How far it is from your house or accommodation and the exact route you need to follow (using your own vehicle or public transportation).
- If it's a place that you're going to reach on foot after a walk, get information about the path, including the duration, the difficulty and any other information that can help you (where to park, for example).
- Is it within a private property?
- When it's a natural landscape, find out everything about its geography: mountains height, tides schedule, amount of water on a river, lake or waterfall depending on the season, type of terrain, potential hazards (e.g. strong winds, cliffs, wildlife).
- When it's an urban landscape, find out everything about its surroundings: high buildings, ongoing works (e.g. scaffoldings), crowds, traffic, limited or forbidden access.
- What is the best time of year and day to take photos.
Go on an adventure
A good way to find new places to take pictures near you is to just get out there and start exploring.
Simply going to an unfamiliar location can spark your creativity.
Here are a few of examples on how you do it:
- Open Google Maps, choose an area and comb it to find and identify potentially interesting photographic locations. Then, get there and put yourself into an unknown area with all sorts of new things to see.
- Take roads that you don't normally drive on. Get on back roads through the county, or pick a random exit on the highway.
- Try leaving the car at home and walking (when possible). Explore a neighborhood you've never been to or small side streets in the city.
- Change your routine by taking a different route than usual. Straying from your normal path may lead you to find nearby photography locations you never knew were there.
Of course it's not a fool proof plan.
While it's certainly possible that you'll find a location you might otherwise have overlooked, it's nearly just as likely that you'll spend your day driving or walking around with no reward.
Nevertheless, it's time well spent.
If you find a great location, it's time to start planning! ;)
If not, you spent time outdoors, enjoying nature or the city, and you can now discard this area.
4.8 things you must know before start planning your photos
This is a key section.
Because here you'll find all the concepts you need to know and master in order to quickly plan your photos.
You'll learn:
- What the azimuth and the elevation are. Both help you understand the position of the Sun and the Moon in the sky so you can choose the shooting spot, shooting date and shooting time the Sun and the Moon will be where you want them to be.
- The different types of natural light, and when do they occur so you can choose the right time to get the type of natural light you want.
- How shooting distance affects the size of the Sun and the Moon relative to your subject. Here you'll learn how to calculate the shooting distance you need from your subject to get the size of the Sun/Moon you want.
- How to figure out how high the Sun or Moon will be above the terrain or a subject. This is key to find the right shooting time the Sun or the Moon will be at the right place in the frame relative to your subject (or the terrain).
- How focal length affects the size of the Sun and the Moon relative to the frame (your photo). Depending on the focal length you use, the Sun/Moon will appear bigger or smaller in the photo.
- The 4 key Milky Way points that will help you understand the position of the galaxy in the sky.
- The Star Trails pattern you'll get depending on the shooting direction so you can choose the shooting spot to get the photo you want.
- What a lunar eclipse is, its different types and different phases.
- What a solar eclipse is, its different types and different phases.
Thus, I strongly recommend you to spend some time carefully reading this section. You'll save a ton of time and avoid any hassle when planning your photos.
Ready?
Let's dive into it!
What are the azimuth and the elevation
Both the azimuth and the elevation are key concepts when planning your natural light, Sun and Moon photos.
They are the coordinates that help define the position of the Sun or the Moon in the sky. Therefore, they are key when deciding the shooting post, shooting date and shooting time depending on the photo you have in mind.
They will prove helpful when planning:
- A Sunrise or a Sunset, including those with the Sun in certain position (section 6).
- A big Sun aligned with a subject (section 7).
- A Moonrise or a Moonset, including those with the Moon in certain position (section 8).
- A big Moon aligned with a subject (section 9).
What is the azimuth
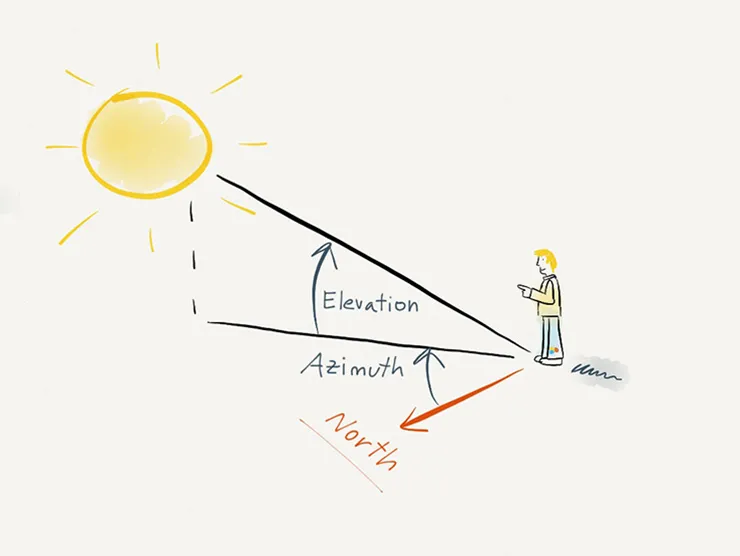
The azimuth basically tells you the direction where a celestial body (e.g. the Sun or the Moon) is.
It's the angle between the center of a celestial body, measured clockwise around the observer's local horizon, and the North.
The observer's local horizon is your current position. That is the current position of your camera or the Red Pin in the PhotoPills planner.
The azimuth is measured in degrees and it can be between 0º and 360º.
For example, the Moon due
- North has an azimuth of 0°.
- East has an azimuth of 90°.
- South has an azimuth of 180°.
- West has an azimuth of 270°.
What is the elevation
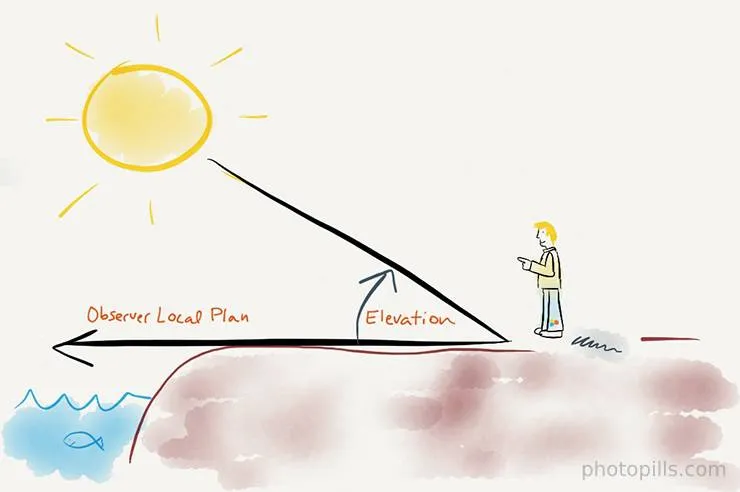
The elevation tells you how high a celestial body (e.g. the Sun or the Moon) is above the horizon.
It's the vertical angular distance between the center of a celestial body and the observer's local horizon, or observer's local plane.
Again, the observer's local horizon is your current position. That is the current position of your camera or the Red Pin in the PhotoPills planner.
The elevation is measured in degrees and it can be between 0º and 90º when the celestial body is visible. Negative elevations imply that the center of the celestial body is below the horizon.
For example,
- At Sunrise, the Sun has an elevation of 0º.
- At midday, the Sun has its highest elevation. In the extreme case of an elevation of 90º, it would mean that the Sun is right above your head.
This is a brief summary. For a full explanation on both concepts and how to use PhotoPills to find out both according to the Red Pin position and a certain date and time:
- Have a look at this video where Rafa explains it in depth.
- Or read our article 'Understanding Azimuth and Elevation'.
Understanding natural light
Natural light is, of course, a crucial element in photography.
You'll see how to plan natural light in section 5...
But what exactly is natural light?
What is natural light?
Natural light is any available light that you can find in the scene, such as that produced by the Sun or the Moon :)
In other words, it's the opposite of artificial light – any human-made light source such as electric lamps (e.g. a torch, a headlamp, a flash, a strobe, etc.), fire, candlelight, gaslight, for example.
What are the different types of natural light
As you know, the light from the Sun varies throughout the day.
You'll notice that the Sun doesn't illuminate a scene in the same way at midday than right before dusk.
Actually, we can establish that light varies according to the time of the day it is, don't you agree? To be more precise, it changes over several periods of time.
Now...
How can we determine when these periods of time start and end?
Easy peasy!
We have the perfect factor: the Sun elevation. If you don't know what it is, check the first part of this section.
OK, just in case, here's a quick reminder:
It's the vertical angular distance between a celestial body (Sun, Moon, ...) and the observer's local horizon (ie. the horizon from your position!). This angle is measured in degrees that go from 0º to 90º when the celestial body is visible.
Back to the different periods of natural light...
As I mentioned before, you can establish them depending on the Sun elevation.
Pay attention to the diagram above. There you can see the different types of natural light depending on the Sun elevation:
- Day. Elevation higher than 6º.
- Golden hour. Elevation between 6º and -4º.
- Blue hour. Elevation between -4º and -6º.
- Civil twilight. Elevation between 0º and -6º.
- Nautical twilight. Elevation between -6º and -12º.
- Astronomical twilight. Elevation between -12º and -18º.
- Night. Elevation lower than -18º.
There you have it: you have 7 types of natural light throughout a 24-hour day.
Having said that, not all types are the same, right?
So can you take great pictures no matter the time of the day it is? Or should you wait for the "perfect light"?
And... What exactly is this "perfect light"?
Let me answer all these questions.
What is the "perfect light"
Some photographers, especially landscape photographers, believe that the best (and only) time of the day to shoot is during golden hour and blue hour. No wonder why they call them the magic hours.
However, I believe that as a photographer you should be flexible and skilled enough to shoot in every situation, no matter the natural light conditions. And this regardless of the genre you're into.
As Jay Maisel said once:
"There is no bad light. There is spectacular light and difficult light. It's up to you to use the light you have."
So no, there is no "perfect light".
Instead, master each type of natural light and you'll improve your storytelling. By using the available light from the Sun creatively you'll communicate your emotions and evoke emotions in others.
How? Understanding how it behaves and the factors that influence it.
In the following video Rafa (aka the PhotoPills Bard) explains in depth how natural light behaves and the type of photos you can take at each moment of the day:
You can delve into this matter by reading our superguide on natural light.
How you can take advantage of each type of natural light
Understanding natural light, how it changes during the day, and how you can best use the light to your advantage are all critical aspects to become a successful outdoor photographer.
So let's analyze each type of light to see how to make the most out of them.
Harsh daylight
Harsh daylight is the light produced outdoors, on bright sunny days.
It happens between morning and evening golden hours, when the center of the Sun is above 6º of elevation.
This light works very well when you want textures to look rough. So it's perfect to convey authenticity, the sense that something or someone is real and original.
Golden hour light
The golden hour occurs twice during the day (section 3):
- In the morning, it begins when the Sun is at -4º of elevation and it ends when the Sun is at 6º above the horizon. It matches the end of the civil twilight, just after the blue hour.
- In the evening, it begins when the Sun is at 6º of elevation and it ends when the Sun is at -4º above the horizon. It matches the beginning of the civil twilight, right before the blue hour.
Golden hour light is a powerful way to convey emotion. The warmth of the Sun translates to the emotional warmth of a moment.
Use this light to make details and textures pop out of the frame. You'll create a sense of volume and an intense atmosphere.
Twilights (including blue hour)
Twilight is that magical time between daylight and darkness. It occurs twice during the day.
Actually, there are 3 twilights:
- Civil twilight. It happens when the Sun's elevation is between 0º and -6º. It includes the blue hour which occurs when the Sun has an elevation between -4º and -6º. It's great for photography in general, and it's my favorite time to photograph the Moon.
- Nautical twilight. It happens when the Sun's elevation is between -6º and -12º.
- Astronomical twilight. It happens when the Sun's elevation is between -12º and -18º.
Twilight light is generally associated with a mystical and magical atmosphere.
Ideally, a sky with scattered clouds is the perfect scenario to combine with the effect of the twilight light. Once the clouds lose their amazing tint, use the cool colors present in the scene to transmit calmness and tranquility.
When you're outdoors in the wild, this light is particularly beautiful if you're by the sea or a lake as the water reflects the colors in the sky.
When you're shooting an urban landscape, take advantage of the combination between natural and artificial light.
Light diffused by clouds
It's the light resulting from the sunrays entirely blocked by clouds.
A cloudy day offers many photo opportunities...
First of all, use the clouds themselves to add sky definition and create unique compositions. Clouds add texture, shape, and form. Capture them with a long exposure to add movement to your scene.
Then, you can create a serious, melancholic, or somber mood, using a combination of the natural light in the scene and other details in the scene such as cloudy skies or stormy seas. The mood is strengthened even more if the subject is mysterious, gloomy or melancholic.
Window and dappled light
Natural light can be diffused:
- Indoors when natural light indirectly penetrates the interior (e.g. through a window, a door, a skylight). It can also be called window light.
- Outdoors when you're shooting in the shade cast by any element in the scene (e.g. a tree canopy, a building). It's also known as dappled light.
Let's start talking about window light.
You can create intense, dramatic, dynamic, or even mysterious atmospheres if you direct window light intentionally:
- Accentuate textures, details and colors.
- Transform mediocre subjects into fascinating ones.
- Make interesting subjects look particularly dramatic.
And now, let's talk about dappled light.
Dappled light can be particularly effective when details are important to your story.
Thanks to the spread and the softness of the light, everything is illuminated evenly. So the viewer can easily spot those details and easily understand the story.
Light in fog
There are 2 main types of lighting scenarios involving fog. They usually occur in the morning although not exclusively:
- A foggy day with heavy clouds and a total absence of direct rays from the Sun.
- A day when the fog is close to the ground and not very thick, while above the fog the sky is free of clouds. Here the Sun rays can interact with the fog creating a spectacular effect.
Fog can be a powerful and valuable tool for emphasizing the depth, lighting, and shape of your subject. These traits can even make scenes feel mysterious and uniquely moody.
Moonlight
You can use the Moon as your primary source of light for your night photos, just like you do with the Sun during the day.
Photographing under a Full Moon can produce dramatically different results than shooting under no Moon:
- When shooting under a Full Moon, the Moon illuminates the foreground and brings out the color and detail in the scene.
- When shooting with no Moon, your camera can capture more stars.
Understanding how shooting distance affects the size of the Sun and the Moon vs your subject
OK, let's get straight to the point.
No, to get a big Sun or Moon compared with your subject you don't need a long focal length. You need to be far away from your subject.
In other words, the size of the Sun/Moon relative to the subject size is determined by the distance between the shooting spot and the subject.
So the shooting distance is crucial when planning:
But why is that?
Because of the angular diameter of the Sun/Moon.
What is the angular diameter of the Sun/Moon
The angular diameter of the Sun/Moon is the diameter of the Sun/Moon measured in angle.
You can use PhotoPills to find it out.
Open PhotoPills and tap Sun (Pills Menu). By default, the information that appears corresponds to your current location (according to your mobile GPS) and the current date and time.
If you scroll down, you'll see that the angular diameter of the Sun is almost at the end.
If you want to find out the angular diameter of the Moon, tap Moon (Pills Menu) and follow the same steps as above.
How to determine the distance between the shooting spot and the subject to get a Sun/Moon of a certain size
You can basically do 2 things:
- Apply the PhotoPills Rule of 100.
- Use PhotoPills to determine the shooting distance and Sun/Moon size.
What is the PhotoPills Rule of 100
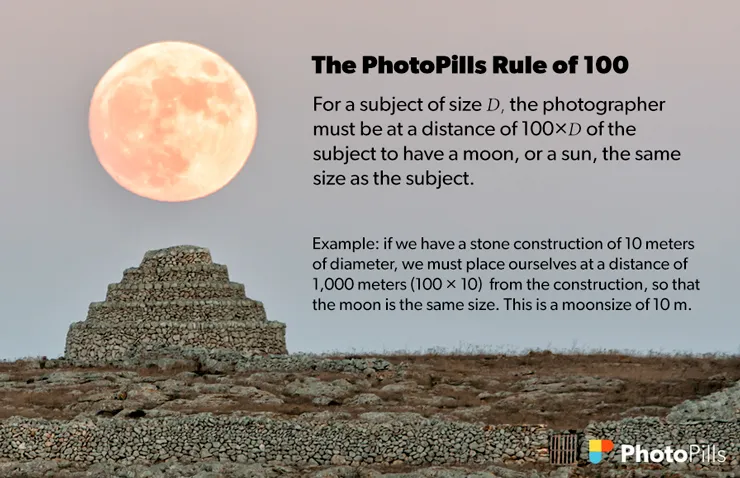
The image above sums it up pretty well :)
All you have to do is multiply by 100 the diameter of the Sun/Moon you're looking for to get the shooting distance.
Use PhotoPills to determine the shooting distance and Sun/Moon size
The PhotoPills Rule of 100 is very useful but less accurate than using PhotoPills.
I prefer to use the app and let it do all the math for me. I trust it with all my heart! ;)
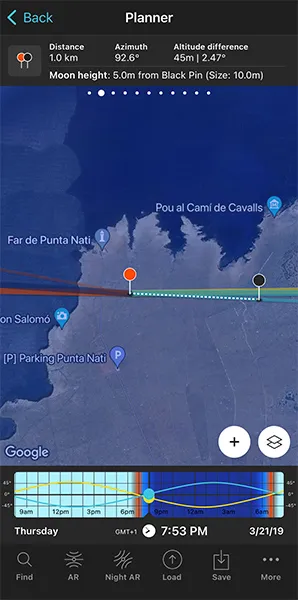
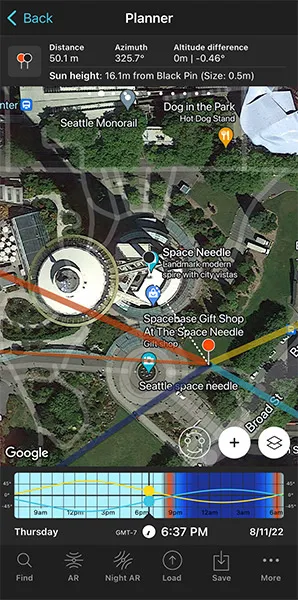
Go to the Planner and place the Red Pin in the shooting spot.
Swipe the panels above the map to the right until you find the Black Pin information panel (Panel 2). Tap the icon on the panel that's showing the Red Pin and the Black Pin to activate the Black Pin on the map.
Then, place the Black Pin over your subject, where you want the Sun/Moon to be. Panel 2 indicates the shooting distance, that is, the distance between the Red Pin and the Black Pin.
Now, move time by sliding your finger over the Time Bar to align the Sun/Moon with the Black Pin. When doing so, you'll see that the size of the Sun/Moon appears in parentheses in Panel 2 above the map.
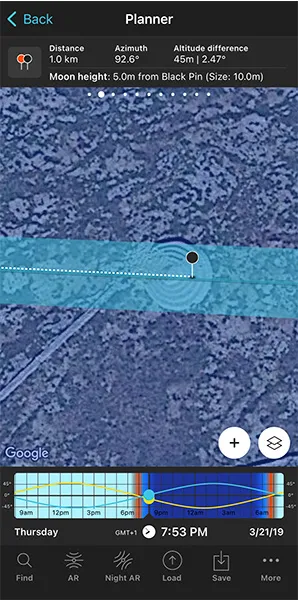
And the cool thing is that you can also see the size of the Sun/Moon on the map.
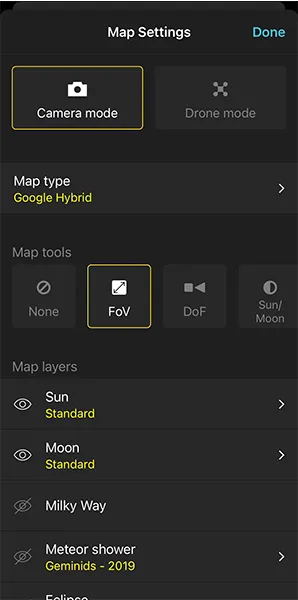
Simply tap the Map Settings button next to the (+) button on the map (lower right corner). Then tap the Sun layer (or the Moon layer) and activate the Show Sun size (or Show Moon size) option.
Go back to the map and zoom in on the Black Pin. You'll now see that the light yellow/blue line (the one showing the Sun/Moon azimuth) shows you the size of the Sun/Moon. So it's very easy to know how big the Sun/Moon is going to be compared to the width of your subject.

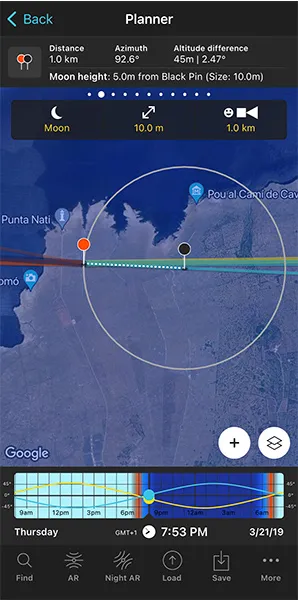
But my favorite tool is the Sun/Moon map tool.
You can use it to calculate the shooting distance you need to get the Sun/Moon the size you want. Activate it by tapping the Map Settings button (you'll find it next to the (+) button on the map). Then, in the map tools section select Sun/Moon.
In the top box that just appeared, type the Moon size you want (10 m, for example). You'll see that the diameter of the grey circle changes according to the size you type.
Now all you have to do is place the Red Pin on the grey circle.
You can read more on how the shooting spot determines the size of the Moon relative to the subject size in our super guide on Moon photography.
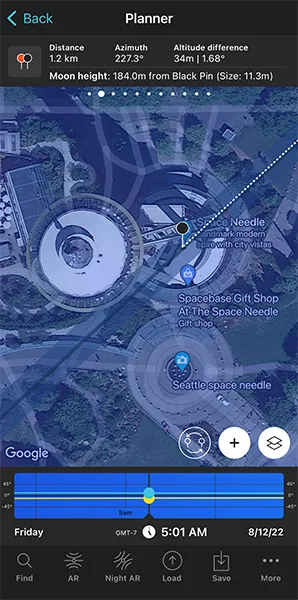
Understanding Sun or Moon height above the terrain or a subject (Black Pin)
There's a key piece of information that you need when planning a big Sun (section 7) or a big Moon (section 9) aligned with a subject.
The importance of finding out the Sun or Moon height above the terrain or a subject
You need to figure out how high the Sun or Moon will be above the terrain or a subject.
It's crucial to find the right shooting time the Sun or the Moon will be at the right place in the frame relative to your subject (or the terrain).
How to use PhotoPills to find how high the Sun/Moon will be above the terrain or a subject
Thankfully, PhotoPills is the perfect tool to find it out.
Open PhotoPills and tap Planner (Pills Menu).
Then swipe the top panels to Panel 2. Tap the button on the panel and the Black Pin will appear on the map.
Now place the Black Pin over your subject. If you move the time to align the Sun/Moon with the Black Pin, you'll see that Panel 2 tells you everything you need:
- The Sun/Moon height above the Black Pin. More specifically, it's the center of the Sun/Moon height above ground level where you have placed the Black Pin.
- The Sun/Moon size or apparent diameter. Therefore, you know how big it's going to be compared to the subject.
Both will help you better understand how the elements you want to capture are positioned and get the composition you've imagined.
However, keep in mind that if you place the black pin on a building, Panel 2 still gives you the height above the ground. It doesn't take into account the height of the building, as PhotoPills cannot calculate it.
If you need to dive deeper into the topic, check out these 2 step by step examples:
Understanding how the focal length affects the size of the Sun/Moon in the frame
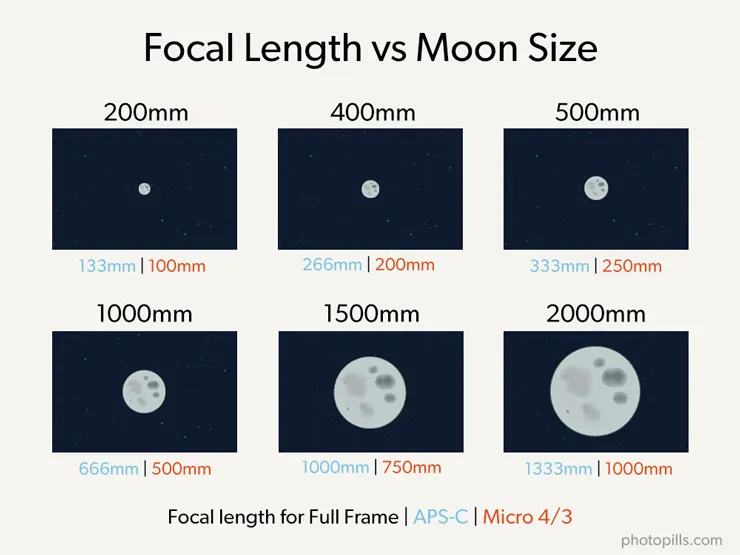
Depending how big you want the Sun/Moon to be in the picture (that is, in the frame) you'll need to use one focal length or another.
If you want a:
- Sun/Moon as a dot, use a wide angle lens (10-35mm).
- Small Sun/Moon, use a short to medium focal length (35-200mm).
- Big Sun/Moon (or huge!), use long focal lengths (>200mm). If you don't have a very long lens, consider using a teleconverter.
Use PhotoPills to determine which focal length you should use to have a Sun/Moon of a certain size in the frame.
On the Planner's map you can see:
- The Sun/Moon size, depending on the shooting distance.
- The field of view, depending on the focal length, the camera, etc.
How to use PhotoPills to see the Sun/Moon size
Open PhotoPills and tap Planner (Pills Menu).
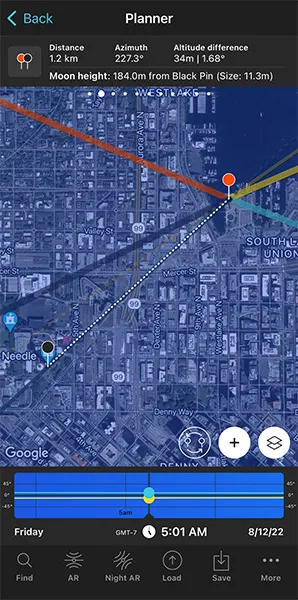
Swipe the top panels until you get to Panel 2. Tap the icon showing the Red Pin and the Black Pin to activate the Black Pin on the map. Drag the Black Pin to the center of the ground floor of your subject, right where you want the Moon to be aligned.
Let's use the screenshots above as an example.
As you can see on Panel 2, the Moon's size is 11.3 m (diameter).
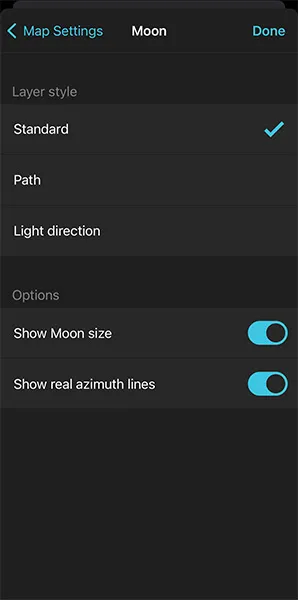
But if you want to see it on the map, tap the Map Settings button. You'll find it at the bottom right corner of the map, right next to the (+) button.
On the Map Settings screen, tap the Moon layer and activate the Show Moon size option. Finally, tap OK (top right corner) in iOS or the back arrow in Android.
Zoom in on the map over the Black Pin to see that the width of the thin blue line shows you the Moon diameter at that date and time. This allows you to compare its size to your subject.
On the screenshots above, you can see an example for a Moon shot. Follow the same procedure on the Sun layer style screen for a Sun shot.
As you'll learn in section 7 and in section 9, you can plan all types of shot with a big Sun or a big Moon with PhotoPills. And this tool will prove priceless... ;)
How to use PhotoPills to see the field of view
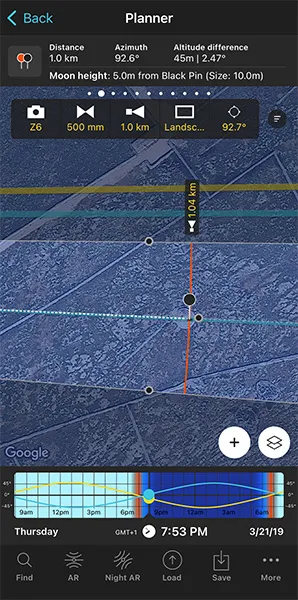
Open PhotoPills and tap Planner (Pills Menu).
Tap the Map Settings button. You have it on the map, next to the (+) button.
On the Map Settings screen, in the Map Tools section, tap the FoV (Field of View) button. Tap Done (top right corner) in iOS or the back arrow in Android.
You'll see that a new panel has appeared on the map.
Imagine you're using a Nikon Z6 with a 500mm at f/8 and you're focusing right at the distance to the Black Pin.
The framing is in landscape mode (horizontal) and you want to frame in the direction in which the Black Pin is located. Tap the Azimuth framing button (the last button). And on the Azimuth screen, tap the Align with Black Pin option. The field of view is now aligned with the Black Pin.
Finally, zoom in on the map around the Black Pin to see
- What part of the landscape fits into the frame.
- How big the Moon will be compared with the frame.
You can learn how to plan the field of view in section 20.
Understanding the Milky Way key points
As you'll see in section 10, the Milky Way has a number of key points that you should understand to successfully plan your Milky Way shots.
What are the Milky Way key points?
These are the Milky Way key points:
- Galactic center. It's the point right at the center of the core of the Milky Way, which is the brightest part of our galaxy. Therefore, you should include it in your image.
- Highest point. This is the middle point of the Milky Way arch. Use it to understand whether the Milky Way is low in the sky (great for a pano!), or when it's high so you can photograph the Milky Way creating a diagonal or even a vertical in the frame.
- Crossing point(s). These are the directions in which the Milky Way meets the horizon. Both are key points when planning a panoramic image of the Milky Way.
Let's see how you can find these 4 key points with PhotoPills.
How the Milky Way key points are represented in PhotoPills
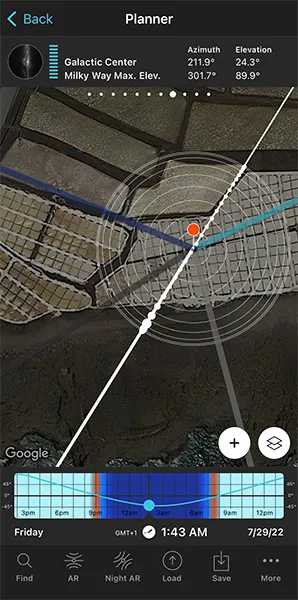

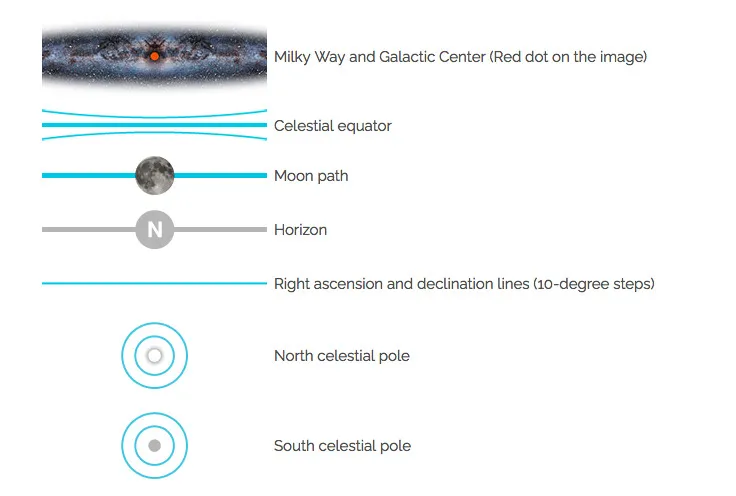
Have a look at the two screenshots above.
The first one shows a view of the Planner map with the Milky Way layer activated.
This is the Milky Way information you can see on the map:
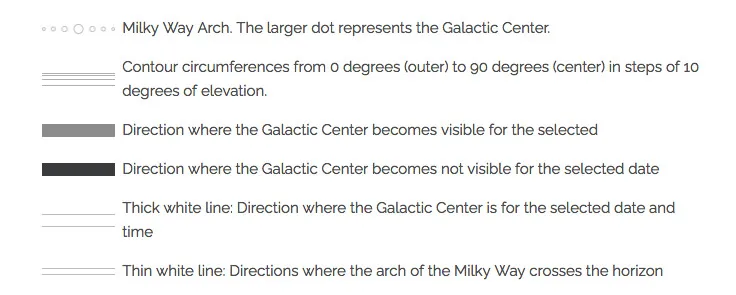
The second one shows the Night Augmented Reality (AR) view of the previous exact same plan.
With this tool you can check the position of the Milky Way, the Galactic Center (red dot), the highest point (middle point of the arch) and the two crossing points with the horizon (represented by a thin white line on the Planner's map).
The blue curved lines you see on the Night Augmented Reality (AR) view represent the Star Trails pattern you'll get when framing in that direction.
And the white moving dots are the stars. Their movement indicates the sense of rotation around the celestial poles.
This is the Milky Way information you can see on the Night AR:
Our article 'How To Plan The Milky Way Using The 2D Map-Centric Planner' is a bit outdated but there you'll find a detailed explanation on how the Milky Way is displayed on the PhotoPills Planner map.
Great!
Now you have all you need to start planning the Milky Way :)
Understanding the different Star Trails patterns
It's very simple.
You'll get a different Star Trails pattern depending on the direction you point your camera to.
So, determine the shooting spot and shooting direction according to the Star Trails shape you need to tell the story you want
Northern Hemisphere
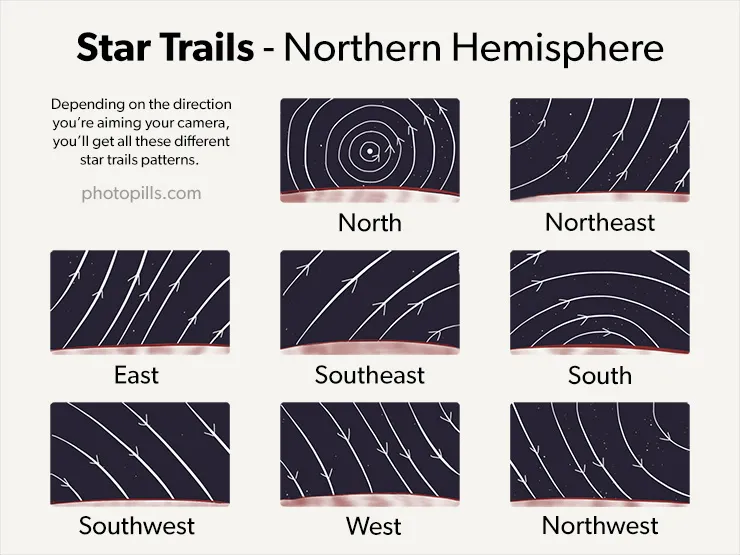
In the Northern Hemisphere, you'll get all the Star Trails patterns you can see in the image above. Again, it will depend on the direction you're pointing your camera to.
For spectacular results make sure to:
- Include the Polaris to create a circumpolar Star Trails.
- Aim east or west to include the celestial equator and capture stars moving in three different directions.
- Aim south and the Star Trails will arch above your subject.
Southern Hemisphere
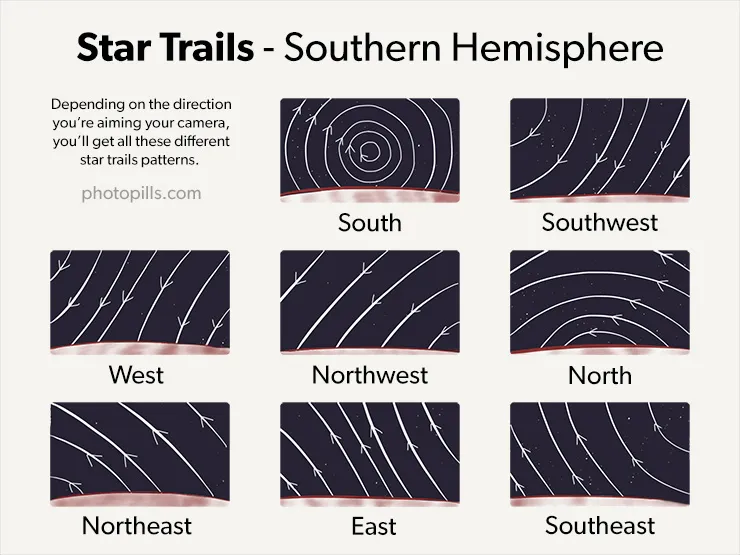
As you can see above, these are the Star Trails patterns you can get in the Southern Hemisphere.
You can decide to:
- Include the south celestial pole to create a circumpolar Star Trails.
- Aim east or west to include the celestial equator and capture stars moving in three different directions.
- Aim north and the Star Trails will arch above your subject.
Equator
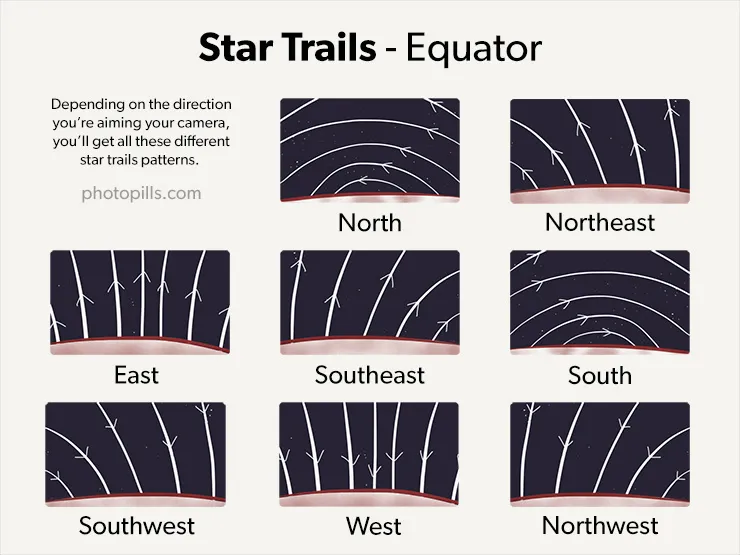
As you approach the Equator, the north and south celestial poles seem to be very close to the horizon.
So, if you're shooting in a location close to the Earth's equator, you can create stunning images capturing half of the circles described by the stars.
For example, when shooting to the west or east, the celestial equator appears as a vertical line, creating a striking effect.
Learn everything you need to know with our ultimate guide on Star Trails photography.
Understanding lunar eclipses
Before you start planning lunar eclipse photos as if there were no tomorrow, you should understand its basics...
What is a lunar eclipse?
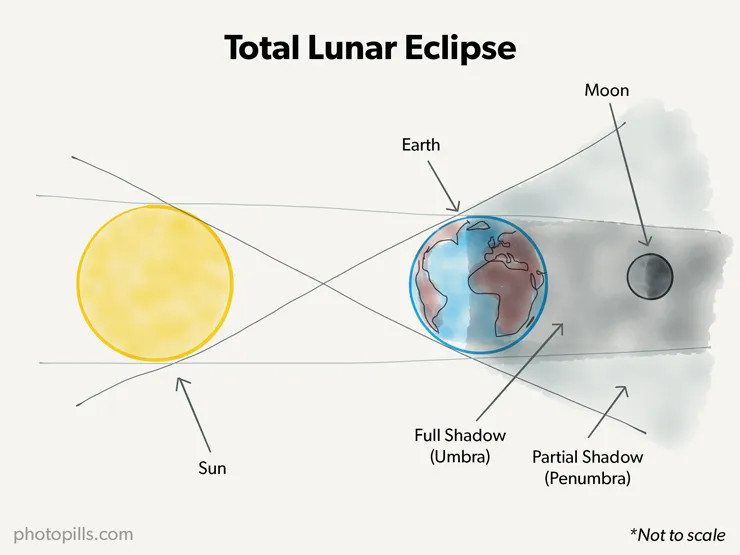
The shadow projected by the Earth has 2 parts:
- Umbra. The darkest part of the shadow cast by the Earth over the Moon.
- Penumbra. The lightest part of the shadow cast by the Earth over the space.
Each shadow causes different types of eclipses:
- When the totality of the Moon enters the Earth's umbra, a total lunar eclipse occurs. At this point the Moon might catch an amazing red color (the Blood Moon).
- When only a part of the Moon enters the Earth's umbra, a partial lunar eclipse occurs.
- When the Moon enters the Earth's penumbra, a penumbral lunar eclipse occurs.
When does a lunar eclipse occur?
Lunar eclipses happen during the Full Moon only. But not every single one!
To find out when a lunar eclipse happens, use PhotoPills.
Open PhotoPills, and tap Planner (Pills Menu).
First, place the Red Pin in your shooting location. If you don't know how to do it, this video will teach you how to move the Red Pin.
Then, you can access the calendar of eclipses using 2 workflows.
1. The Map Settings option
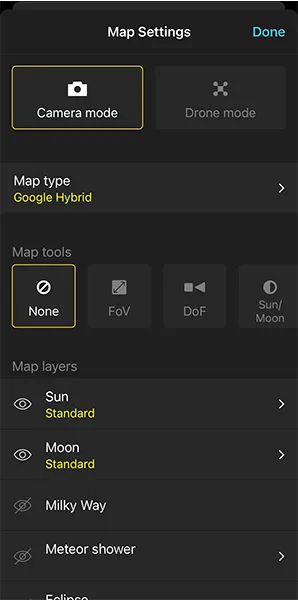
Tap the Map Settings button. You have it on the map, next to the (+) button.
On the Map Settings screen, tap the Eclipse layer to see the calendar of eclipses.
2. Panel 9
Swipe the top panels above the map to the left to Panel 9.
Can you see the switch button? Tap it and you'll access the calendar of eclipses.
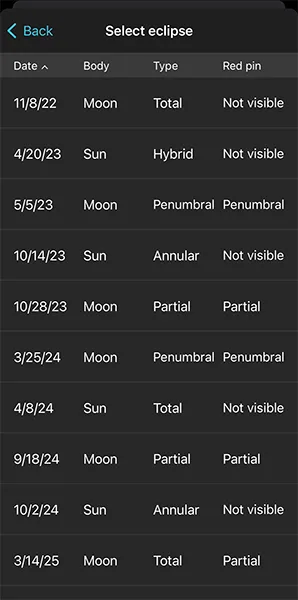
The calendar displays all the solar and lunar eclipses, showing:
- Date
- Object (Sun or Moon)
- Type (total, partial, annular or hybrid)
- Red Pin, if it's visible or not from the Red Pin position. And when visible, if it's total, partial or penumbral.
Note: Tap Date, Object, Type or Red Pin at the top to sort the table according to the criteria you prefer.
What is the magnitude of a lunar eclipse?
Lunar eclipses have 2 magnitudes:
- The umbral magnitude represents the fraction of the lunar diameter covered by the Earth's umbra.
- In a partial lunar eclipse it always has a value greater than 0 and less than 1, where 1 means total eclipse.
- A total lunar eclipse always has an umbral magnitude higher than 1.
- Finally, a penumbral lunar eclipse always has an umbral magnitude of less than 0.
- The penumbral magnitude is the fraction of the diameter of the Moon that is covered by the Earth's penumbra.
- In a total lunar eclipse, the penumbral magnitude is usually greater than 2.
- In a partial lunar eclipse it's always greater than 1 and, as a rule, less than 2.
- In a penumbral lunar eclipse, the magnitude is less than 1.
What are the different lunar eclipse phases
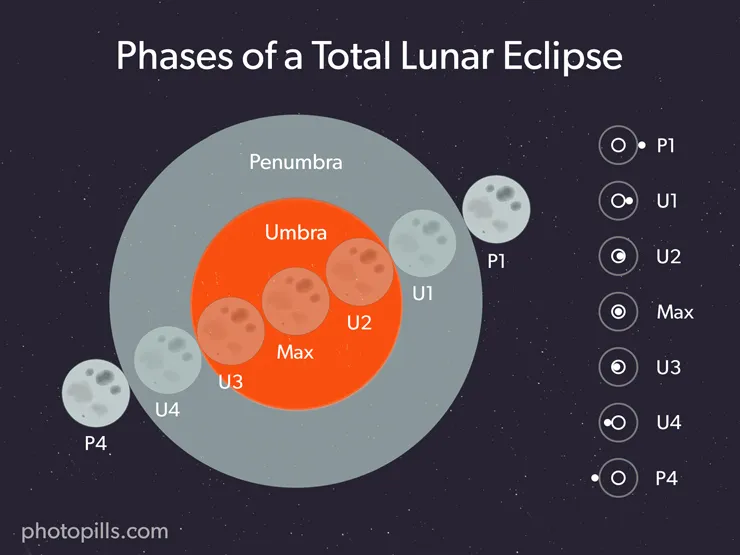
These are all the phases you can enjoy (weather permitting!) if you happen to be in a location from which you can see a total lunar eclipse:
- Penumbral eclipse begins (P1): The penumbral part of Earth's shadow starts moving over the Moon. This phase is very difficult to observe with the naked eye.
- Partial eclipse begins (U1): The Earth's umbra starts covering the Moon, and the eclipse becomes more and more perceptible.
- Total eclipse begins (U2): The Earth's umbra completely covers the Moon. The Moon turns into red, brown or yellow.
- Greatest eclipse (Max): This is the central moment of the total eclipse.
- Total eclipse ends (U3): The Earth's umbra starts moving away from the Moon so it's visible again.
- Partial eclipse ends (U4): The Earth's umbra completely leaves the Moon allowing the lunar surface to be visible again.
- Penumbral eclipse ends (P4): The Earth's penumbral shadow moves away from the Moon. It's the end of the eclipse.
During a partial lunar eclipse, you can see the P1, U1, Max, U4 and P4 phases only.
How the lunar eclipse phases are displayed on PhotoPills
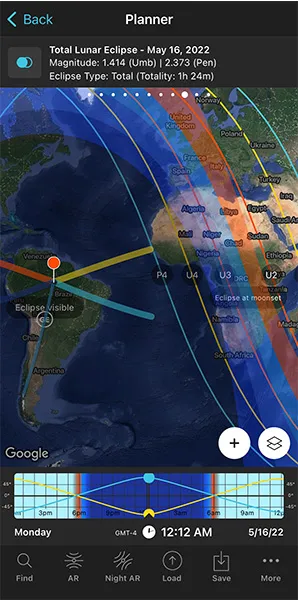
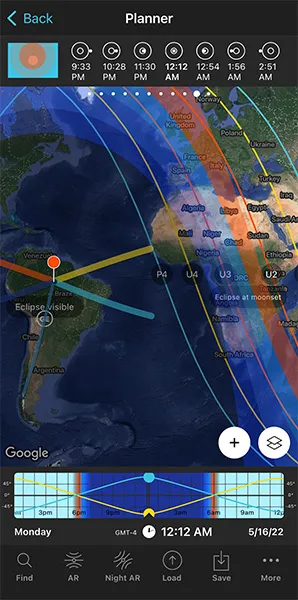
Considering the different phases of the lunar eclipse, this is the information you will find on the map:
- Eclipse visible area: The map label Eclipse visible shows you the map area where all phases of the Moon eclipse are visible (P1, U1, U2, Total, U3, U4, P4). This is the area between the blue lines (P1 and P4).
- Eclipse visible at Moonrise area: The map label Eclipse visible at Moonrise shows you the map area where at least one of the eclipse phases is visible during Moonrise. This is the area between the two blue lines (P4 and P1) which also contains the yellow and red lines.
- Eclipse visible at Moonset area: The map label Eclipse visible at Moonset shows you the map area where at least one of the eclipse phases is visible during Moonset. This is the area between the two blue lines (P4 and P1) which also contains the yellow and red lines.
- Eclipse not visible area: The map label Eclipse not visible shows you the map area where the eclipse is not visible (because the eclipse happens when the Moon is under the horizon). This is the area between the blue lines (P1 and P4).
- Map Greatest Eclipse Point (GE or o Greatest Eclipse Point): It's the moment when the Moon passes closest to the axis of Earth's shadow.
For the eclipse Moonrise area:
- Area between the blue and yellow lines (P4 and U4): It represents the locations where the Moon rises during the penumbral eclipse, after the end of the total eclipse. It's visible until the end of the penumbral eclipse (P4).
- Area between the yellow and red lines (U4 and U3): It represents the locations where the Moon rises during the partial eclipse, after the end of the total eclipse. The end of partial eclipse (U4) and end of penumbral eclipse (P4) phases are visible.
- Area between the two red lines (U3 and U2): It represents the locations where the Moon rises during the total eclipse, and the end of total eclipse (U3), end of partial eclipse (U4) and end of penumbral eclipse (P4) phases are visible. Depending on the location within this area, the maximum eclipse phase may or may not be visible.
- Area between the red and yellow lines (U2 and U1): It represents the locations where the Moon rises during the partial eclipse. All phases are visible except for the penumbral eclipse (P1) and the beginning of the partial eclipse (U1).
- Area between the yellow and blue lines (U1 and P1): It represents the locations where the Moon rises during the penumbral eclipse. All phases are visible except for the beginning of the penumbral eclipse (P1).
For the eclipse Moonset area:
- Area between the blue and yellow lines (P4 and U4): It represents the locations where all the Moon eclipse phases are visible except for the final of the penumbral eclipse (P4).
- Area between the yellow and red lines (U4 and U3): It represents the locations where all the Moon eclipse phases are visible except for the end of the partial eclipse (U4) and the end of the penumbral eclipse (P4). When the Moon sets, the eclipse is partial.
- Area between the two red lines (U3 and U2): It represents the locations where the beginning of the penumbral eclipse (P1), the beginning of the partial eclipse (U1) and the beginning of the total eclipse (U2) phases are visible. When the Moon sets, the eclipse is total. Depending on the location within this area, the maximum eclipse phase may or may not be visible.
- Area between the red and yellow lines (U2 and U1): It represents the locations where only the beginning of the penumbral eclipse (P1) and the beginning of the partial eclipse (U1) phases are visible. When the Moon sets, the eclipse is partial.
- Area between the yellow and blue lines (U1 and P1): It represents the locations where only the beginning of the penumbral eclipse (P1) phase is visible. When the Moon sets, the eclipse is penumbral.
This is just a summary of the key points, but if you want to learn more, have a look at our guide on lunar eclipses.
Understanding solar eclipses
It's important to have a full understanding of the different types of solar eclipses before you start planning one.
So let's start from the beginning...
What is a solar eclipse?
A solar eclipse happens when the Moon moves between the Sun and Earth, blocking out the Sun's rays and casting a shadow on parts of Earth.
Because the Moon is 400 times smaller than the Sun, but it is also 400 times closer, the two celestial bodies appear nearly the same size!
There are 3 types of solar eclipses:
- A total solar eclipse happens when the Moon completely covers the Sun. But because the full shadow of the Moon (also called umbra) is not big enough to cover the Earth completely, it only covers a portion. This area or path is called "the path of totality". In other words, it's the area from which the total solar eclipse can be seen.
- A partial solar eclipse occurs when the Moon partially covers the Sun and casts only its penumbra shadow onto Earth.
- An annular solar eclipse takes place when the Moon is not big enough to cover the Sun completely.
When does a solar eclipse occur?
Solar eclipses happen during the New Moon only. But not every single one!
To find out when a solar eclipse happens, use PhotoPills.
Open PhotoPills, and tap Planner (Pills Menu).
First, place the Red Pin in your shooting location. If you don't know how to do it, this video will teach you how to move the Red Pin.
Then, you can access the calendar of eclipses using 2 workflows.
1. The Map Settings option
Tap the Map Settings button. You'll see it on the map, in the lower right corner, right next to the (+) button on the map.
Once on the Map Settings screen, tap the Eclipse layer to see the calendar of eclipses.
2. Panel 9
Swipe the top panels above the map to the left to Panel 9.
Can you see the switch button? Tap it and you'll access the calendar of eclipses.
The calendar displays all the solar and lunar eclipses, showing:
- Date
- Object (Sun or Moon)
- Type (total, partial, annular or hybrid)
- Red Pin, if it's visible or not from the Red Pin position. And when visible, if it's total, or partial or penumbral.
Note: Tap Date, Object, Type or Red Pin at the top to sort the table according to the criteria you prefer.
What is the magnitude of a solar eclipse?
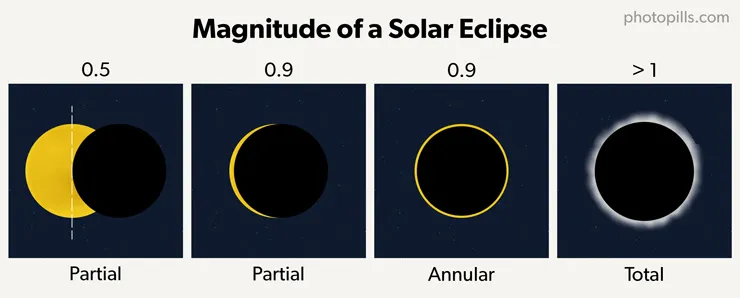
The magnitude represents the fraction of the solar diameter that is covered by the Moon. It has a value between 0 and 1 inclusive, where 1 is totally eclipsed.
Sometimes, the eclipse magnitude can have a value greater than 1. This happens when the apparent size of the Moon is larger than the diameter of the Sun.
What are the different solar eclipse phases
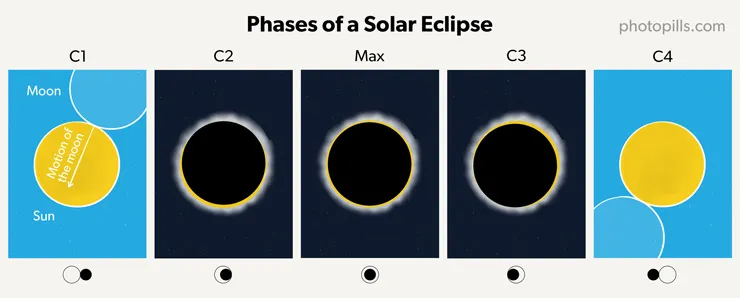
These are all the phases you can enjoy (weather permitting!) if you happen to be in a location from which you can see a total solar eclipse:
- Partial eclipse begins (1st contact - C1): The Moon starts to cover the Sun little by little. The Sun looks as if the Cookie Monster has bitten it.
- Total eclipse begins (2nd contact - C2): The Sun is almost entirely covered by the Moon. If you happen to be in the path of the Moon's umbra (its full shadow projected on Earth) you might see Baily's beads and the diamond ring effect, just before totality.
- Totality and maximum eclipse (Max.): The Moon covers the Sun completely. Only the Sun's corona (the outer atmosphere of the Sun) is visible. Aren't you excited? The sky is now dark! You also experience a fall in the temperatures and notice how animals go quiet. Again, if you happen to be in the path of the Moon's umbra you may be able to see Baily's beads and the diamond ring effect, just after totality ends.
- Total eclipse ends (3rd contact - C3): The Moon starts to move away from the Sun, allowing it to reappear.
- Partial eclipse ends (4th contact - C4): The Moon stops overlapping the Sun. The eclipse ends at this stage in this specific location.
During a partial solar eclipse, you can see the C1, Max and C4 phases only.
During an annular solar eclipse, you can see the C1, C2, Max, C3 and C4 phases only. However, during totality (Max) the Sun's outer edges remain visible to form a ring of fire in the sky.
How the solar eclipse phases are displayed on PhotoPills
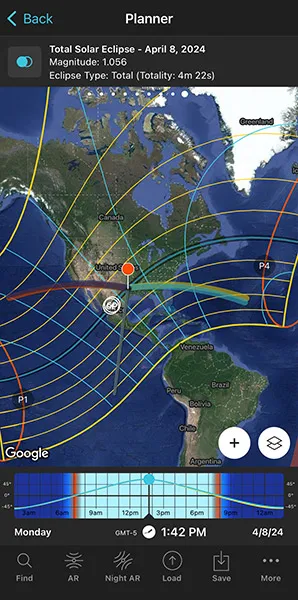
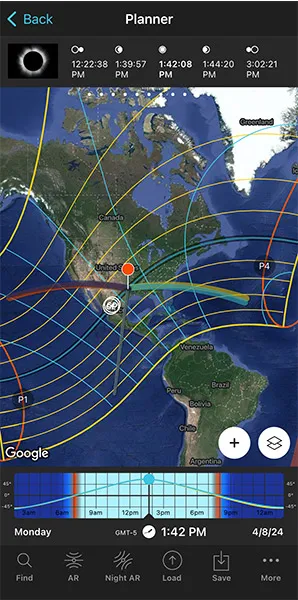
Considering the different phases of the solar eclipse, this is the information you will find on the map:
- Map central dark area: It's the path of totality (the area of total darkness). In other words, the area where you can observe how the Moon will completely cover the Sun.
- Map blue line within the path of totality: It's the centerline. The further away from the centerline you are (while being in the path), the shorter amount of time the Sun will be covered by the Moon. In other words, you will see a shorter totality duration.
- Map yellow lines: Outside the path of totality you'll be able to see a partial eclipse. The first yellow line on both sides of the path represents the locations where the Moon will cover 80% of the Sun. The next yellow line represents 60% and so on. The furthest from the path of totality, the more partial the eclipse will be.
- Map Greatest Duration Point (GD): The location where totality lasts longer, where the phase of total eclipse lasts longer. For the August 21 eclipse, the GD is located near Carbondale, IL where the duration of totality is 2 minutes and 41.6 seconds.
- Map Greatest Eclipse Point (GE): Don't confuse it with the Greatest Duration Point. The Greatest Eclipse Point is not where the total eclipse lasts longer. It is just a geometric point. GE wasn't a good name choice at all. It is actually the location where the shadow of the Moon is nearest to the center of the Earth. Sometimes, it falls very close to the GD point, but it's not always the case.
If you want to photograph a total eclipse, I strongly recommend you to plan to be in the path of totality.
Here are the different phenomena that you can photograph before, during and after the totality phase:
- Diamond ring. About 10 to 15 seconds before and after totality, the solar corona (the outer atmosphere of the Sun) becomes visible. As the last bits of Sunlight pass through the valleys on the Moon's surface, it looks like a ring with glittering diamonds on it.
- Baily's beads. Approximately 5 seconds before totality, you can see an ensemble of brilliant beads of Sunlight caused by the Sun shining through valleys and depressions on the Moon's surface.
- Sun's corona. As the diamond ring fades away, you are now able to spot the faint rays that surround the silhouette of the Moon.
- Chromosphere. Just a few seconds after totality ends, you can notice a reddish glow – the chromosphere.
For more information, check out our solar eclipse photography guide.
OK!
If you've reached this point, you're ready to start planning your photos.
So, welcome to the wonderful world of photography planning!
Keep reading!
5.How to plan a specific natural light
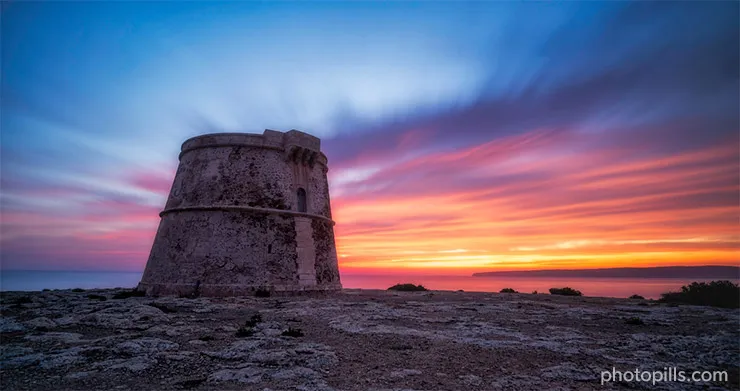
No matter the photography genre you're into: landscape, portrait, wedding, astrophotography, architecture, Moon, real estate...
When photographing outdoors, you need to understand and predict the natural light you'll have in the scene.
This gives you the power to decide the best location and the best time to take the photo you want.
When planning a photo with a certain natural light, the questions you need to answer are:
- What type of natural light do you want in the photo? Daytime? Golden hour? Blue hour?
- At what time the type of light you want actually occurs in a desired location?
- In what direction will light hit your subject and scene?
Answering these 3 questions will help you decide the shooting spot, the shooting date and the shooting time you need to take the photo you have in mind.
Decide the type of natural light you want in the photo
Natural light is a crucial element in photography.
If you use it creatively, it will help you communicate your emotions and evoke emotions in others.
That's why you need to understand the different types of natural light and how you can use them in your storytelling (section 4).
Once you know them, you can decide which one is best for your purpose.
Alternatively, you can watch this video to easily learn the different types of natural light, when they occur and the type of photos you can take in each natural light type.
How to know when a certain natural light happens
Depending on the type of picture you have in mind, you'll need to know when you may find a certain type of natural light at the location.
Weather permits, of course. But that's another story... (section 21).
PhotoPills tells you very precisely the exact time of a certain event for a given date and according to the Red Pin position.
Here's how to find it out.
Check in the location when a certain natural light happens
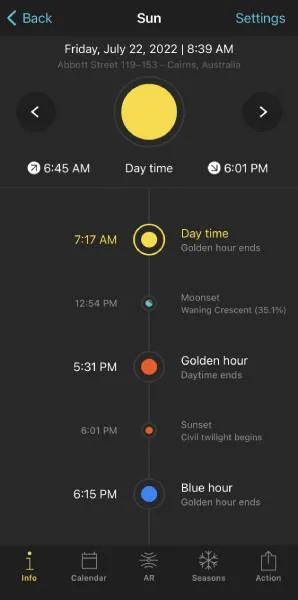
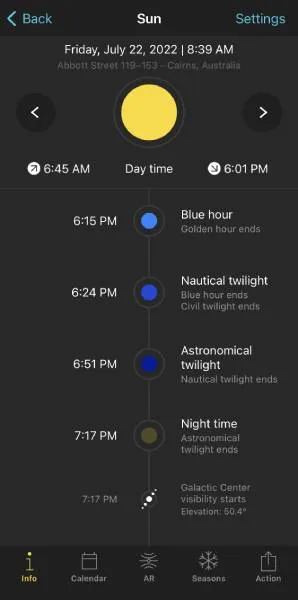
The Sun Pill is the tool that you should use when you are at the location. By default, the information displayed corresponds to your current location (according to the GPS on your smartphone) and the current date and time.
To use it, all you have to do is open PhotoPills, and tap Sun (Pills Menu).
If you scroll the screen up and down, you'll see the start time of all the natural light phases on a specific date from midnight until 11:59 pm.
Tip!
If you want to change the location and/or date and/or time, tap Settings (top right corner). On the new screen, you can change:
- The location by taping on Position. Slide the Autoupdate button to unlock the rest of the screen. You can use
- The search box if you want to type an address.
- The coordinates option if you know the latitude and longitude.
- The date by taping on Date. Slide the Current date and time button to unlock the rest of the screen. Tap
- Date to change the date.
- Hour to change the hour.
- You can also determine whether you want PhotoPills to automatically detect the time zone or not.
Check from home when a certain natural light happens

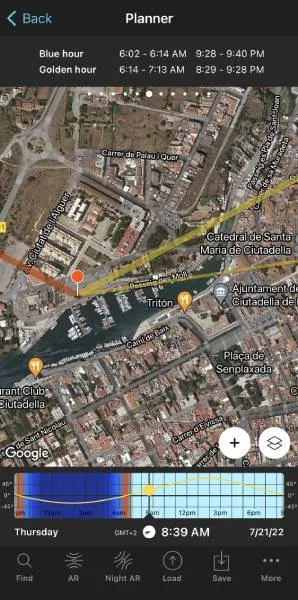
When you are at home, the quickest way to figure out when a certain type of light is by using the Planner.
Open PhotoPills and tap Planner (Pills Menu).
Then, place the Red Pin somewhere on the planet.
In this example I have placed it in Menorca, one of the most beautiful islands in Spain. More specifically, I have placed it right in a spot from where you can photograph the spectacular city walls and old town of Ciutadella during the blue hour.
If you don't know how to move the Red Pin, this video shows you how to do it.
Now, select the date you want to shoot the blue hour.
Double tap the center of the Time bar to set the current date and time. Then swipe it to the left to change the date and time until you set the date you want to take the picture, say July 21, 2022.
Alternatively, you can set the date using the Calendar. To do this, tap the center of the Time bar. In the Date & Time screen, tap Date to change the shooting date manually.
Finally, swipe the top panels until you reach Panel 6. This panel shows you the exact start and end times of the golden hour and the blue hour for the selected date and Red Pin position.
If you need to know the exact start and end times of the twilights (civil, nautical, astronomical) for the selected date and Red Pin position, swipe the top panels until you reach Panel 5.
How to know the exact natural light direction
One of the natural light attributes is direction.
Light direction has a dramatic influence on the scene in general and particularly on the subject. It has some control over the subject's shape and also over the length of shadows, and thus in creating depth.
In the case of natural light, the light direction depends on the time of the day as the Sun's position in the sky changes.
And if you plan to shoot at night, you should also be aware of the Moon's position in the sky.
But how can you know where the Sun (or the Moon) is going to be in the sky?
You know the answer...
With PhotoPills!
Check in the location the exact natural light direction
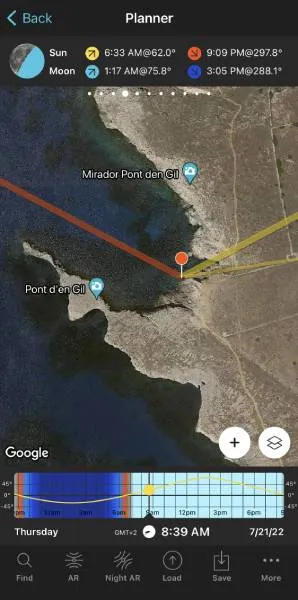
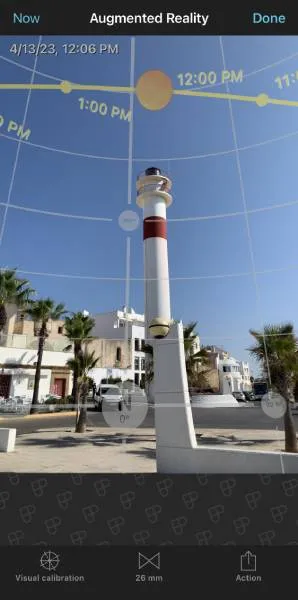
When you are at the location, you should always use the Sun Pill. By default, the information displayed corresponds to your current location (according to the GPS on your smartphone) and the current date and time.
So open PhotoPills, and tap Sun (Pills Menu).
If you scroll the screen up and down, you'll see the start time of all the natural light phases on a specific date from midnight until 11:59 pm.
Tip!
If you want to change the location and/or date and/or time, tap Settings (top right corner). On the new screen, you can change:
- The location by taping on Position. Slide the Autoupdate button to unlock the rest of the screen. You can use
- The search box if you want to type an address.
- The coordinates option if you know the latitude and longitude.
- The date by taping on Date. Slide the Current date and time button to unlock the rest of the screen. Tap
- Date to change the date.
- Hour to change the hour.
- You can also determine whether you want PhotoPills to automatically detect the time zone or not.
In addition to this, use the Augmented Reality view that you can find inside the Sun Pill. It gives you the position and path of the Sun for the selected location (by default where you are), date and time (by default the current ones).
It's the perfect tool to adjust your frame and shooting spot for the best composition before you shoot.
Check from home the exact natural light direction
When you are at home, the quickest way to figure out the direction of a certain type of light is by using the Planner.
Open PhotoPills and tap Planner (Pills Menu).
Then, place the Red Pin somewhere on the planet.
In this example I have placed it in Rota, a nice coastal town in the south of Spain. More specifically, I have placed it right in a spot from where you can photograph the old town during the Sunrise.
If you don't know how to move the Red Pin, this video shows you how to do it.
Then, make sure that either the Sun layer or the Moon layer are turned on.
To do so, tap the Map Settings button (bottom right-hand corner, next to the (+) button):
And now, tap either
- The Sun layer.
- The Moon layer.
Finally, on the new screen, select the Layer style. In this case, tap Standard.
As you can see on the Planner, there are several lines on the map:
- The thin orange line tells you the position of the Sun for the selected date and time.
- The thin blue line tells you the position of the Moon for the selected date and time.
- The thick lines show the Sunrise (yellow), Sunset (orange), Moonrise (light blue) and Moonset (dark blue) directions for the selected date.
All these directions are, obviously, according to the Red Pin position.
Moreover, you should use the Augmented Reality view that you can find inside the Planner. It gives you the position and path of the Sun for the selected location (by default where you are), date and time (by default the current ones).
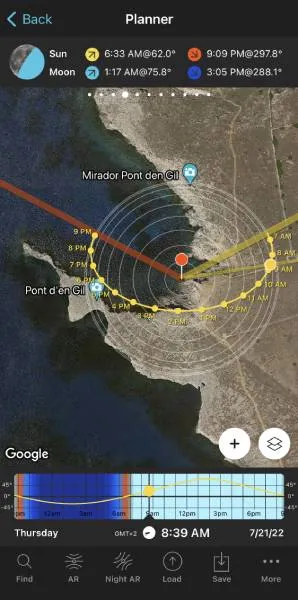
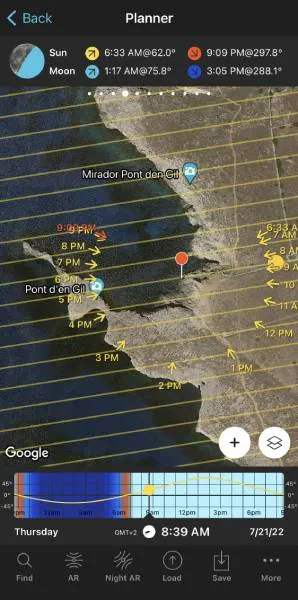
Alternatively, you can use the Sun and Moon Path layers.
On the Planner, tap the Map Settings button (bottom right-hand corner, next to the (+) button):
And now, tap either
- The Sun layer.
- The Moon layer.
Finally, on the new screen, select the Layer style. In this case, tap Path.
This layer shows the same info as the Standard layer plus the Sun/Moon path for the selected date.
So working together with the Sun/Moon Path and the contour circumferences you can quickly assess the position of the Sun/Moon in the sky (azimuth and elevation).
Or you can use the Sun and Moon Light direction layers.
When selecting the layer style, tap Light direction.
The Sun/Moon Light direction layer shows the direction of light throughout the selected date.
Notice that:
- The thin yellow lines showing the direction of light will only appear during daytime. Sunlight matters only throughout the day.
- The thin blue lines showing the direction of light will only appear during nighttime. That's because Moonlight is only important at night.
This is the perfect tool to figure out how Sunlight/Moonlight will hit your subject on a given date.
Get this ebook for free now!