Golden Hour Photography: The Definitive Guide
The golden hour is magic.
The Sunlight bathes the scene with wonderful tones (ochre, orange, even reddish...) that make everything warmer, more beautiful and above all, more dramatic.
My intention with this article is to help you take amazing pictures during the golden hour.
Photos of all kinds: nature landscape, portrait, wildlife, flowers, urban landscape...
Once you've finished reading this guide, you'll be able to take jaw-dropping photos during the golden hour.
I promise!
You'll learn everything you need to know...
- Lots of golden hour photos to inspire you...
- When the golden hour occurs.
- How to use the PhotoPills app to find the best location. So you can imagine your golden hour photo, plan it and capture it...
- What equipment do you need to photograph in the golden hour...
- How to photograph the golden hour step by step and what are the golden hour camera settings.
- And I'll also give you a lot of tips and tricks that will help you take amazing pictures during the golden hour!
Are you ready?
Let's get started!
"A kind of golden hour one remembers for a lifetime... Everything was touched with magic." – Margaret Bourke-White
Get this ebook for free now!
Content
- 15 golden hour photography ideas to inspire you
- What is golden hour and when it happens
- How to find the best location to shoot during golden hour
- How to easily plan your golden hour photos
- What gear you need to photograph at golden hour
- How to photograph during the golden hour step by step
- 12 tips to make the most out of the golden hour
- 10 golden hour photographers that you should follow
- Let's do it!
1.15 golden hour photography ideas to inspire you
The starting point of any picture is the idea.
The idea is that spark igniting the fuse and originating the process that culminates when you finally get your precious trophy: that the photo you had in mind becomes reality.
That's why the idea, your golden hour photography idea is the origin of everything else.
Obviously, then you'll have to find the perfect location (section 3), plan the image (section 4) and photograph it during the golden hour (section 6).
But for now, focus on taking the first step: finding the inspiration you need to create an image that tells a story.
And to help you with that, here are some pictures I planned with PhotoPills of course ;)
Nature landscape (1)

I took this picture during our expedition to Namibia.
Known as the "finger-shaped rock" or, as we call it, the "finger of the gods", the Vingerklip dominates the Ugab valley from the top of a hill thanks to its 35 meters high.
I didn't get a chance to photograph a Sunrise with clouds. The sky was completely clear. So I had to settle for the reddish and orange colors of the rocks along with a mauve and pink sky.
I chose to take the photo during the morning golden hour so that the Sun would illuminate the rocks. In the afternoon, the Sun sets in another direction and leaves them totally in shadow.
As you will see in section 4, planning the photo is crucial.
Urban landscape (2)

The old quarter of Ciutadella, the town where I live, is full of buildings made of a typical Minorcan limestone, called the marés, which gives them a beautiful warm tone.
Therefore, the golden hour is a great time to photograph the city.
And this photo is proof of that. I took it from the roofs of Ciutadella's Cathedral, where the light of the setting Sun accentuates the orange cast of the worn stone.
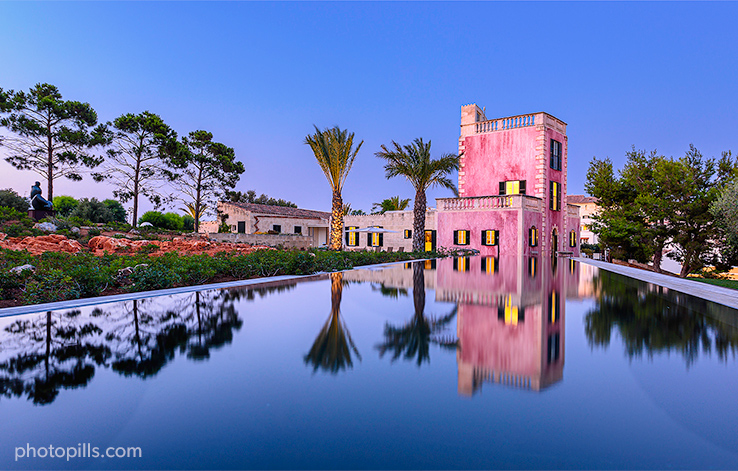
Reflections (3)

I can't help but photograph the Favàritx lighthouse over and over again. It's a powerful magnet that I find impossible to resist to.
In order to photograph this dawn golden hour, I had to wait until it rained first. The pool you see in the foreground is far from the sea and the only way to see it full is after a heavy rain.
But I also had to trust that the sky would have the right clouds: not too high, not too low, not too thick, not too thin... It was the only way I could get the Sun to heat them up and cast a strong orange tone on them.
Big Sun (4)

In this pano you can see how shooting from a relatively long distance from the subject allows me to play with the apparent size of the Sun. Thanks to the photo, I can fool you into thinking that the Sun is much bigger than it really is.
Also, by adding the Punta Nati lighthouse to my composition, I give the landscape scale and set a series of quite logical proportions.
On the horizon, you can see the silhouette of our neighboring island, Mallorca.
The cherry on the cake is the Sunlight which, during the dusk golden hour, gently warms the scene.
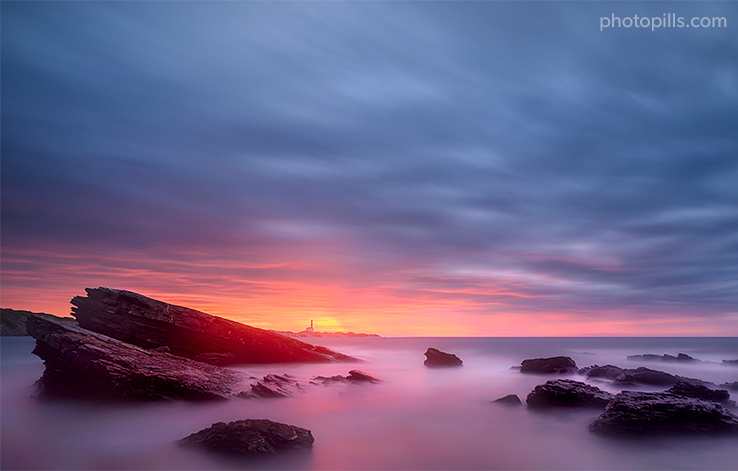
Long exposure (5)

The two elements that best convey motion through a long exposure are water and clouds. And what better than a seascape scene to show the strength of the sea with an almost covered sky?
If you take a closer look, you can sense the Sun in this photo but it's not visible. I decided to position it on the left side and remove it from the frame. This way I could control the scene dynamic range and use the golden hour side light to illuminate the rocks and cast a red color onto them.
Silhouettes (6)

Planning and capturing this photo was a real challenge. The idea was to capture a huge Sun during the golden hour while facing the camera so that it could create a silhouette with some buildings in Ciutadella.
And to make the silhouette easily recognizable, I decided to look for a shooting spot from which I could highlight the cathedral within the frame.
Desert (7)

Again, I took this picture during our expedition to Namibia, where the desert landscapes are huge.
The red rusty iron dunes of the Namib are unique. This photo was taken in Deadvlei, which means dead marsh. It's a space between dunes with petrified trees and white clay soil.
Photographing it during the golden hour is a photographer's dream.
Rock formations (8)

Our expedition to Iceland was quite an eye-opening trip.
I saw landscapes and lights that I hadn't seen before. The land of ice and fire conquered me and left a trace inside me that will never disappear.
When we arrived at this well-known view of the Kirkjufell, the mood of our party was a bit down: the sky was completely covered with a very dense layer of clouds and it looked as if the Sunset was going to be a total failure.
But nature always has an ace up its sleeve and just when the Sun was rising, a gap opened up between the clouds that let in that fantastic light you see in the photo.
Golden hour portrait (9)

The golden hour is one of the best times of the day to take portraits. The soft light allows you to place your subject almost anywhere you want. Actually, it depends on whether you want to use a front light, side light or backlight, as in this case.
I wanted the light to gently hit the person's face and create a rim light on one side. This is an effect that you can only get during the golden hour.
Moon during golden hour (10)

I love photographing the Full Moon during the golden hour: its deep yellow stands out among the roses and oranges in the sky as if it were a fireball.
Once again, I got quite far from the main subject, the Punta Nati lighthouse, so that the Moon looks bigger in the photo. The colors of the sky did the rest...
Wildlife photography (11)

I haven't experienced again the emotions that I lived photographing in the golden hour during our expedition to Namibia. This is probably due to the fact that it's right in the Tropic of Capricorn and its arid desert climate.
That light enhances the reddish tones of the soil and the ochre skins of the giraffes. Seeing them moving around and playing with their necks is impressive.
Architecture (12)

Although it's a country where nature is the main highlight, during our expedition to Iceland I noticed that Reykjavik has some corners whose architecture is unique.
This aluminium sculpture is called Sun Voyager (Sólfar in Icelandic). I was told it's a dreamboat and an ode to the Sun that symbolizes a territory to be discovered and the dream of a hope.
Flare and starburst (13)

It's hard to photograph the Sunset in Cala Pregonda. Because of its orientation, you'll never find a clear horizon to shoot the Sun. So it's a good location to take pictures during the golden hour and be creative.
It was the end of spring so I decided to use a huge group of flowers. I shot from a very low point of view just as the Sun was grazing the mountain. I closed the aperture and created a starburst effect.
Flowers (14)

The slender and majestic sawfly orchid (ophrys tenthredinifera) is perfect for portraits.
It's not a very tall orchid (15-30 cm) but its large pink sepals and yellow labellum margins make it a tremendously original species.
Photographing orchids is one of my most secret passions.
Old constructions (15)

Menorca is full of barracas. These are old stone constructions with a circular floor plan. They serve as a shelter for livestock both in the winter when it rains and to protect them from the harsh summer Sun.
The barraca you see in the image is, because of its position and location, my favorite. You've surely seen some of my pictures where I've captured it with the Moon.
In this case, the dramatic sky was ideal to evoke some kind of imminent danger.
Photos by PhotoPillers (16) [bonus track]


In this section you've seen examples of photos that can inspire you and show you everything that you can achieve during the golden hour.
Examples that will surely help you to imagine your own photography ideas.
But if you still have no ideas, you can always take advantage of another (almost) infinite source of inspiration.
And if I told you that you can see lots of photos that other PhotoPillers have imagined, planned and captured all over the world... Would that help you?
And if apart from seeing pictures of golden hour, you could see pictures of blue hour, Sunrise, Sunset, Moon, Milky Way, Star Trails, Meteor Showers, drone, lunar eclipses, solar eclipses...
That'd be pretty cool, huh?
Well...
You have all those amazing images in our Instagram account (follow us!) and in the PhotoPills app (My Stuff Menu > Awards).
Come on, don't be shy... Submit your photos. Help us inspire other PhotoPillers.
How can you do it?
It's very easy. Here's all the information: PhotoPills Awards.
Okay...
I'm sure you're inspired enough to keep on...
The time has come to learn what the golden hour is and, above all, to learn how to find out when it happens.
Let's go for it!
2.What is golden hour and when it happens

What is it with us photographers and the golden hour? Why do the magic hours cast a spell on ourselves? What are they and when do they occur?
Although these are a lot of questions, I'm going to answer them all! ;)
What are magic hours
Magic hours is a concept used in photography to define what are generally considered the best hours to take pictures.
It's a time of day when the light is very soft, very diffuse and with little intensity.
Actually, the magic hours include two moments:
- The golden hour. The light has reddish, orange, yellow or, as its name suggests, golden tones.
- The blue hour. The light has an intense blue tone, with a cold color temperature and saturated colors.
When do magic hours occur

Light is essential. Without it, photography doesn't exist.
That's why it's very important that you understand and embrace this diagram. And if you learn it by heart, it's even better :P
Notice how the natural light changes according to the elevation of the Sun with respect to the horizon:
- Day. Elevation higher than 6º.
- Golden hour. Elevation between 6º and -4º.
- Blue hour. Elevation between -4º and -6º.
- Civil twilight. Elevation between 0º and -6º.
- Nautical twilight. Elevation between -6º and -12º.
- Astronomical twilight. Elevation between -12º and -18º.
- Night. Elevation lower than -18º.
Therefore, if you know what the elevation of the Sun is at the time of the picture, you can determine exactly what kind of light there should be. Of course, you can't take anything for granted because light also depends on the weather, haze, suspended particles, etc.
But that's part of the fun...
Keep in mind that the magic hours and twilights occur twice a day: during Sunrise and Sunset.
Well...
I've briefly summarized the different phases of light that occur as the elevation of the Sun changes.
In the following video Rafa (aka the Bard of PhotoPills) explains in great detail the different types of natural light, when they occur and the type of photos you can take in each natural light type:
If you want to go deeper and learn more about it, you can check our super guide on natural light.
Why the golden hour is so captivating
Actually, it is. The golden hour is a very special time of day.
Especially for taking pictures :P
When the elevation of the Sun is low, the light transforms magically and the photos become really spectacular.
These are some reasons why you should make the most out of the golden hour.
Play with diffused light
As the Sun is closer to the horizon, light is forced to go through a larger area of the atmosphere. This makes the light (whether direct or not) softer and less intense.
The light is much more diffused. The contrast is much lower, making it easier to get pictures with a regular exposure.
Also, during the golden hour, the light is warmer. And because of this, shadows are less dark and highlights are dimmer. So there's a very nice contrast, not so harsh, that adds depth and dimension to your images.
You can use that soft, diffused light to produce creative effects that you can't capture at any other time of the day.
Take advantage of the light color and brightness
Contrary to what happens during dawn and dusk, when the color palette in the scene is much wider, the golden hour photos are almost monochromatic.
It's a time of day when the light is warm and has a special brightness.
As the light crosses the atmosphere from a low angle (near the horizon), it's filtered out and becomes warmer, taking an orange cast. The reds and yellows add a magical, compelling warmth to your pictures.
The golden hour allows me (and you) to simplify the compositions and the chromatic range of the images.
By limiting the emotional load of my photos I manage to convey the message more clearly and to make the viewer understand the story I want to tell.
Include shadows in your composition
So far I've told you about how the low elevation of the Sun creates colors during the golden hour that you can't see for most of the day.
But it also generates long, soft shadows. It's one of those oddities that will make your photographs much more interesting and compelling.
Thanks to the contrast I mentioned above and these particular shadows, you can add depth and volume to your images.
Convey unique emotions
The golden hour helps you to convey certain feelings and emotions that are much more difficult to capture at other times of the day.
The ochre dominant tone that colors the scene helps to evoke feelings such as joy, warmth, optimism, etc.
Obviously, there is no obligation to include these emotions in all your photos. The atmosphere of your photo depends on the story you want to tell and how you want to tell it. But if you feel like sharing a sense of tranquility and happiness, the golden hour is the ideal time of day.
When does the golden hour occur
This is crucial.
If you want to take pictures during golden hour, you have to know when it starts (and ends).
And the easiest way to find out is by using the PhotoPills app. It gives you all the information you need.
In your current position (when you're in the field)
Let's say you're already at the location where you'll take photos during the golden hour. You got there in time (2-3 hours) to explore the terrain and confirm your plan (section 4).
Stand near the shooting spot, open PhotoPills and press Sun (Pills Menu). By default, the information displayed corresponds to your current location (according to the GPS on your smartphone) and the current date and time.
If you scroll the screen up, you'll see the start time of the golden hour during Sunrise. If you scroll the screen down, you'll see the start time of the golden hour during Sunset.


Tip!
If you want to change the location and/or date and/or time, tap Settings (top right corner). On the new screen, you can change:
- The location by taping on Position. Slide the Autoupdate button to unlock the rest of the screen. You can use
- The search box if you want to type an address.
- The coordinates option if you know the latitude and longitude.
- The date by taping on Date. Slide the Current date and time button to unlock the rest of the screen. Tap
- Date to change the date.
- Hour to change the hour.
- You can also determine whether you want PhotoPills to automatically detect the time zone or not.
In any other location (when you're at home)
Imagine you're at home planning your golden hour photo (section 4). And you want to find out when it happens in a certain location.
Open PhotoPills and tap Planner (Pills Menu).


Then, place the Red Pin somewhere on earth. Wherever you want to photograph the golden hour.
In this example I have placed it in Menorca, a wonderful island bathed by the Mediterranean waters. More specifically, I have placed it in Playa de Binigaus, in a spot from where you can photograph some beautiful rocks near the shore during the golden hour.
If you don't know how to move the Red Pin, this video shows you how to do it.


Now, select the date you want to shoot the golden hour.
Double tap the center of the Time Bar to set the current date and time. Then, swipe it to the left to change the date and time until you set the date you want to take the picture, say November 14, 2020.
Alternatively, you can set the date using the Calendar. To do this, tap the center of the Time Bar. In the Date & Time screen, tap Date to change the shooting date manually.
Finally, swipe the top panels until you reach Panel 6. This panel shows you the exact start and end times of the golden hour and the blue hour for the selected date and Red Pin position.
How long is the golden hour
Despite its confusing name, the golden hour doesn't always last an hour.
Actually, its duration depends on 2 factors:
- The time of year you plan to do the photo shoot and
- The latitude of the location where you plan to do the shooting.
Considering this, the golden hour is longer in summer and shorter in winter.
As for the location's position on Earth, you have to take into account the latitude.
In areas where the Sun crosses the horizon at a 90º angle (i.e. directly above your head at noon), the transition between day and night is very fast. Therefore, the golden hour is relatively short.
For example, at a location on the equator (0º), Nairobi for example, the golden hour lasts for about 40 minutes during either equinox.
At higher latitudes, the golden hour lasts somewhat longer:
- Near the Tropics (23.5º) of Cancer and Capricorn, for example in Abu Dhabi (United Arab Emirates) and Rockhampton (Australia), the golden hour lasts a little over 47 minutes.
- At about 40º north and south, for example in San Francisco (USA) and San Carlos de Bariloche (Argentina), the golden hour lasts more than 55 minutes.
- In Stockholm (about 60º north) and at the northernmost tip of Antarctica (about 60º south), the golden hour lasts about 90 minutes.
- In and around the polar circles, the Sun has a very low elevation and that makes the golden hour likely to last several hours.
Anyway, if you have any doubt, remember that you can check PhotoPills:
Although the golden hour lasts significantly longer than the blue hour, it's still a short period of time. So if you want to take pictures, you should work quickly and, above all, have everything prepared. If you don't, you risk not getting the photo you want.
Therefore, planning your photo is (almost) mandatory.
In section 4 I explain step by step how to plan the golden hour with a real example.
But before you start planning, your next task is to find the location where you want to take your golden hour photo.
Let's see what you have to do...
3.How to find the best location to shoot during golden hour

I've never really understood why so many photographers have such a hard time dealing with this part of the workflow.
It's one of my favorites! :D
The fact of realizing that there are still thousands of corners that I haven't photographed and that are waiting there for me to discover them gives me goosebumps.
But notice that I wrote in the title the "best" location, not the "perfect" location.
Because the perfect location as such doesn't exist. What does exist is the best location to photograph something.
And in this case I'm going to show you how to find the best location to photograph during the golden hour.
In landscape photography, location is essential. It's the place where the scene you want to capture will take place. Or in other words, the story you want to tell.
That's why it's crucial that you select the location with care and attention of your story and its main characters.
For many years now, I've been following a workflow that works well for me and that I'd like to share with you.
Nevertheless, that doesn't mean it's the only way to do it. Each photographer has his or her own workflow and adapts it as it best suits him or her. That's why I thought that my method could help you or you could use as a starting point ;)
Finally, don't procrastinate this task. It takes time and it's better to do it thoroughly. This way you'll be sure to have found what you're looking for.
These are the steps you should follow to find a good location to take pictures during the golden hour.
Find the Sunrise and Sunset direction (1)
First, you should find out exactly where the Sun is going to rise or set on a certain date.
Remember that golden hour occurs when the elevation of the Sun is
- between -4º and 6º (at dawn) and
- between 6º and -4º (at dusk).
Why is it important to know the Sunrise and Sunset direction?
Actually, what you need is to know the Sunrise or Sunset direction relative to your position or the position you want to be in.
In other words, it's important to know where the light is going to come from, considering the place from where you're going to take the picture.
Knowing the direction in which the Sun rises or sets (direction of the light), helps you to determine where you should (or should not) point your camera at during the golden hour.
So depending on the position of the Sun, there will be suitable locations and others that will not.
How does the light change depending on the Sunrise and Sunset direction?
Note that the light changes depending on the Sunrise or Sunset direction.
Imagine you want to photograph the golden hour during Sunrise.
- Start shooting in the Sunrise direction: that scene is illuminated before.
- Then shoot in the Sunrise opposite direction: the light reaches that scene later.
And now imagine you want to shoot the golden hour during Sunset.
- Start shooting in the Sunset opposite direction: that scene becomes dark before.
- Then shoot in the Sunset direction: the light fades out later.
So, as you can see, it's important to know the Sunrise and Sunset direction in order to know when the golden hour will occur.
But it's also important to know where the golden hour starts earlier and where the golden hour ends later at that particular location on that exact date.
How can you easily find out the Sunrise and Sunset direction?
To easily find out the Sunrise and Sunset direction, use PhotoPills ;)
Thanks to PhotoPills you can find out in just a few seconds:
- The Sunrise and Sunset direction and time for a certain location and date.
- The exact start and end time of the golden hour, as I explained in section 2.
Here's an example of how you can easily use PhotoPills to find out all this information.
Open PhotoPills and tap Planner (Pills Menu).


Using the map as the main tool, the steps you should follow is super simple:
- Use the Time Bar (the colorful bar you see below the map) to set the date you want to photograph the golden hour. Swipe it to change time. Or tap it to access the Calendar. Another option is to double tap it to set the current date and time.
- On the map you can see 3 lines (they show the Sun information):
- The thick yellow line is the Sunrise direction.
- The thick orange line is the Sunset direction.
- The thin orange line is the Sun direction at the selected date and time.
- You can activate the Sun information tapping the Map Settings button and activate the Sun layer. You'll find it next to the (+) button that's on the map. Then, tap the eye-shaped icon next to the Sun layer if it's not crossed out. If it is, tap it.
- If you want to photograph the golden hour during Sunrise, use the Sunrise direction as a reference (thick yellow line).
- If you want to photograph the golden hour during Sunset, use the Sunset direction as a reference (thick orange line).
- Move the Red Pin to a potential shooting spot, and figure out if that location works out for that particular Sunrise and/or Sunset.
- If it doesn't work out for that Sunrise and/or Sunset, try another location... and another one until you find the perfect Sunrise and/or Sunset location.
Let me give you an example.


Imagine that you plan to spend a few days exploring and photographing Budapest (Hungary). And you want to capture the golden hour from one of its iconic locations near the banks of the Danube River, for example, on Friday, January 15, 2021.
Look at Panel 4 above the map. In Budapest, on that day the Sun:
- Rises at 07:27 am. The Sunrise (yellow line) points to the east, at an azimuth of approximately 121.1º.
- Sets at 04:20 pm. Sunset (thick orange line) points to the west, at an azimuth of approximately 239.0º.
In case you don't know it, the azimuth is the angle measured from the north to the position of the Sun. You have all the information you need in our article on the Sun azimuth and elevation.
Look at Panel 6 now. In Budapest, on that day:
- At dawn, the golden hour starts at 07:06 am and ends at 08:17 am.
- At dusk, the golden hour starts at 03:30 pm and ends at 04:41 pm.
Now, place the Red Pin on a tentative shooting spot. Imagine that you place it in Budapest, Hungary, on the Fisherman's Bastion (Halászbástya in Hungarian), one of the best lookouts in the city. If you don't know how to do it, this video shows you how to move the Red Pin.
This is an interesting location because:
- At this time of year, you can photograph the Fisherman's Bastion to the south (golden hour at dawn) and to the north (golden hour at dusk).
- The Fisherman's Bastion offers you a high and clear view over the Danube River.
- It has a clearly defined subject, the Fisherman's Bastion itself along the bank of the Danube River.
- And the horizon is relatively clear (no obstacles), so you can work on a nice composition.
As you can see in the screenshot above, there are 3 lines originating from the Red Pin:
- The thick yellow line shows the direction of the Sunrise.
- The thick orange line shows the direction of the Sunset.
- The thin yellow line shows the position of the Sun.
All this information is for the selected date, time and Red Pin position. In this case, January 15, 2021.
Have a look at the Time Bar that is below the map.
It's the best tool to change the time easily.
- If you swipe it to the left, you move time forward and the Sun information is updated.
- If you swipe it to the right, you go backwards in time and the Sun information is updated.
So you can see how the position of the Sun (and the direction of the light) changes as you go backwards or forwards in time.
You can also change the date to a past or future date. To do this, use the Time Bar or the Calendar (Date & time screen). To access the Calendar, tap once the centre of the Time Bar.
A good starting point is to check the Sunrise and Sunset position on the solstices. That way, you can see how the Sunrise and Sunset position moves throughout the year in a particular location.
Open PhotoPills and tap the Sun pill (Pills Menu). Then press the Seasons button at the bottom of the screen.
In the Seasons screen you have the dates of the solstices and equinoxes of the current year. If you tap the year before or after, you see the corresponding dates.
And if you want to dive into this topic, you should read our super Sunrise and Sunset photography guides.
Select nature or urban landscapes that work (2)
Landscape photography is often associated with nature.
When you hear "landscape photography", don't images of rainforests, a coastline with cliffs and rivers crossing the forest come to mind?
It's obvious, but you shouldn't forget the urban landscapes.
A town, a city and any place where you can feel the human presence is equally valid for landscape photography.
Especially during the golden hour!
Let's see what the advantages and disadvantages of both are.
Advantages of photographing a landscape during the golden hour
These are the advantages that a (nature or urban) landscape has during the golden hour.
Take advantage of the (Full) Moon rising and setting
The best time to photograph the Moon is when it's rising or setting.
And guess when this happens...
Right during the golden hour, during the Sunrise and Sunset.
The sky is filled with colors going from yellow to red, along with golden tones. This soft light is perfect for photographing the Moon and the landscape in one exposure.
Imagine that you want to photograph the Full Moon rising.
If you know in advance the location and date of the photo shoot, there's only one direction in which the Moon will rise.
Look for a location with a powerful subject that you can align with the Moon and where you have room to move around. You should be able to change the shooting spot to adjust the alignment of the Moon according to the composition you've imagined.
The result will be spectacular.
Combine the golden hour light with other elements
Light is the soul of photography.
It's nothing new, and I'm sure it's something you've heard a thousand times.
However, as spectacular as it is, the golden hour light is not enough to make an amazing shot.
You have to include other ingredients in the scene you're photographing. Considering it's a nature landscape, you surely have many elements to work with.
For example, the clouds. Look at the sky, see what kind of clouds they are, how high they are, and how fast they move.
If you're facing a seascape, near a river or on the shore of a lake, look at how the water behaves. Does it hit rocks strongly? Is it a perfect mirror where you can create reflections?
It can also be interesting to photograph a scene where there is fog. It's a very special element allowing you to create an atmosphere in your image that will attract a lot of attention.
Take advantage of the rim light
Basically, the rim light is the result of a simple lighting technique. Place the Sun behind your subject in such a way that by lighting it, you create a silhouette and thus hide its details in the shadow.
At the same time, the Sun creates a thin halo of light or rim light that strongly illuminates the subject's profile.
It's not easy to capture it, you need the day to be (almost) completely clear. When it's cloudy, the Sun won't be strong enough to create the rim light.
But if you manage to do this, it's an awesome effect that gives your image a magical touch. Above all because it's easy to play with the viewer: you're telling her something but you don't reveal it, so you let her imagination do the rest ;)
Enhance the golden palette color
During the golden hour, the sky gradually changes from yellow to orange and the rest of the scene has also a fantastic gold cast.
You'll hardly have the kind of contrast between the blues of the sky (cold tones) and the oranges of the artificial lights (warm tones) that occurs during the blue hour.
Usually you're facing a scene with little contrast and, above all, a rather limited color palette. And this, whether you disagree or not, is very interesting.
The fact of having a golden scene allows you to work in a more uniform and, therefore, simpler and minimalist environment. Simplicity always helps you to tell your story better and to make the viewer understand it as you want her to.
On the contrary, these are the disadvantages of photographing a landscape in golden hour.
Disadvantages of photographing a landscape during the golden hour
These are the disadvantages of a (nature or urban) landscape if you want to photograph it during the golden hour.
The risk of flares is higher
All types of landscapes present this risk.
Light during the golden hour can cause flares when it hits your lens.
You can mitigate these flares with a bracketing. You can also use an original or homemade lens hood (a cardboard, for example) to help you block the flares.
Or you can explore your more artistic side and use these flares as a visual tool. You can enhance the effect and color of the Sun's rays to give your image more depth and warmth.
Depending on how you position yourself according to the Sun, you'll get a different kind of flare.
Avoid dark areas in the composition or create silhouettes
The magic of the golden hour is due to the low angle from which it illuminates the scene.
And precisely that angle and, above all, your position in relation to the Sun (depending on whether you have front, side or back light) are the variables that will determine how the scene in your photo will be lit.
During the golden hour, when you shoot with backlight, the foreground can be underexposed (very dark) in your photo.
If you don't work on your composition, you risk having an important part of your frame completely dark. You can use this lack of detail as negative space.
But be careful to balance the visual weights in the scene.
And, above all, avoid a dark foreground if you want your image to have depth and intention.
Or you can take advantage of it by creating a fantastic silhouette. The golden hour is the best time to use this effect.
Landscapes where you can shoot in two directions
In subsection (1) I explained the importance of finding out the Sunrise and Sunset directions. And this is something you have to keep in mind when looking for locations. Don't worry, I explain how to do it in subsection (4).
There's one more thing I want to talk to you about.
Locations where you can shoot in opposite directions (one at 180º from the other) are the best for two reasons:
- They allow you to make the most of the golden hour (for a longer period of time).
- You can work on totally different framings and compositions.
If you want to photograph the golden hour during Sunrise,
- Start shooting in the Sunrise direction: that scene is illuminated before.
- Then shoot in the Sunrise opposite direction: the light reaches that scene later.
If you want to shoot the golden hour during Sunset,
- Start shooting in the Sunset opposite direction: that scene becomes dark before.
- Then shoot in the Sunset direction: the light fades out later.
The duration of the golden hour depends on the time of year and the latitude of the location you choose (section 2).
However, you shouldn't be too confident: the golden hour doesn't usually last long and when you're taking pictures time flies by.
Therefore, the more versatile the location is, the more you will get out of those brief moments of Sunrise and Sunset.
Add a powerful subject (3)
All the elements of your picture are equally important: the landscape, all the elements in it and the subject, of course.
I always like to compare landscape photography to a theatre. For me, the landscape is the stage, the place where the play takes place. And the subject is the main character of the story, the one who personally experiences everything I want to tell.
And the only way for the viewer to understand what you want to tell is to clearly establish the relationship between the landscape, the subject and the light that is there at that moment, during the golden hour.
Include a point of interest in the picture
When using several scenarios (in the Sunrise and/or Sunset direction and in the Sunrise and/or Sunset opposite direction) you can search:
- A subject that you can capture in both directions.
- One subject for each landscape (scenario).
The more options the location offers you, the more opportunities you have to capture one or more incredible images. It's very important to make the most out of the light conditions and to be flexible, especially on days when the weather changes a lot.
While you're looking for your subject, work on the composition as well. The simpler it is, the more the subject will stand out.
In other words, your viewer will understand the story better and more easily.
Here are some examples of elements you can use as your subject...
The peak of a mountain, a group of buildings reflected in a lake, some cliffs with the sea hitting them, a modern bridge in an old town, a pier that goes into the sea...
In fact, this list could go on and on with your endless ideas ;)
And if not, I suggest you to look at another source of inspiration...
The PhotoPills Points of Interest (POI) database :)
If you want to have a look at it, open PhotoPills and tap Points of Interest (My Stuff Menu).
Tap Map (at the bottom of the screen) and navigate the map. Our database has 10,000+ POIs worldwide!


Draw your viewer's attention with a powerful foreground
Unfortunately, the camera only captures images in 2 dimensions and you can easily end up with a flat image, so you need to create depth.
"How can I do it, Toni?"
Working on the foreground and drawing the viewer's attention to this part of the frame.
"And why the foreground?"
Well, because it visually divides the bottom and the top of the image. It's the part of the frame that helps you create at least 2 areas of interest.
Put a powerful element in the foreground and it will be the entrance gate that the viewer will use to enter your image. Her eye will be attracted by that element and it will go through the photo layer by layer.
If you manage to relate each element of the photo (the foreground, the background, the subject, the light during the golden hour) you'll create a visual path. So the viewer will see the image as you want her to see it.
I suggest you use the elements I mention in subsection (5).
Conduct a thorough research (online and offline) (4)
Alright, I'm not going to lie to you. It's a part of the planning that requires time and effort.
But, that doesn't mean it's not fun. It is.
That said, if you want an idyllic location where you can get great shots during the golden hour, you need to do your research.
If you don't know where to start, here are some sources you can check out:
- Your main source of inspiration should be the photos of other photographers that draw your attention. Have a look at Instagram, Flickr, 500px, Unsplash, Getty Images, 1x.com, Viewbug, Pexels, Youpic, Shutterstock, Adobe Stock and Google Images.
- Learn from other photographers' discoveries and check the locations they have previously explored. Certain communities, such as Locationscout and ShotHotspot, offer this information.
- Analize publications like travel magazines (National Geographic, Condé Nast Traveler and Travel + Leisure), travel curated content (Exposure), travel guides (Lonely Planet) and the photography section of newspapers such as The Atlantic, The Guardian and The New York Times.
- Revisit your favorite photographers' websites and pay attention to their galleries. Have you checked the PhotoPills Masters' websites participating in the PhotoPills Camp?
- Don't forget the Wikipedia! It has tons of lists of interesting places. Let's say you're looking for lighthouses... Type in Google "lighthouse list Wikipedia" and you'll be surprised.
- A reliable and full of surprises source of information are the locals. No one knows the area better and provides greater advice.
- How long since your last visit to a library or a bookstore? Yes, books will tell you more about the local history and natural biodiversity of an area or town.
- Try to visit the nearest Town Hall or tourist office and look for first hand information.
- Again, check the Points of interest (POIs) included in PhotoPills.
- And finally, scout the area. It's usually the most effective strategy :)
Work carefully on your composition (5)
In golden hour photography, composition is essential.
Having a magic light in the scene is great but it's not enough to make your image truly spectacular.
It's important to take care of the framing and the position (and layer) in which you are going to place each element.
Why?
Because the composition helps to direct the viewer's eye
Your composition should tell the person who is going to see your picture what to look at and in what order she should look at it.
There are many tools to guide the viewer to focus on the subject, to understand the story your picture tells and to enjoy it... ;)
One option is to use a minimalist and simple background. You can also use lines or vanishing points.
Or even a triangle. Depending on how you place the 3 elements that form it, the viewer will first look at one of the vertices and then at the other 2.
Because it reinforces the aesthetics of the photo
You may not have noticed (or you actually may have), but photography is an art form. So you and I are artists who use photography to express themselves.
We use it to show with our own eyes the beauty we have around us. And what is not so beautiful as well.
Sometimes a photo can be the best way to show something incredible, a unique experience, something that nature has gifted you (like a magic moment during the golden hour, for example).
And it can also be a tool to tell a story that is worth telling, that the person that wasn't there with you should know about, like conservation photography does, for example, by raising awareness of an environmental threat.
Well, it's the composition that gives strength to that message.
Without it, your message may not get through or there may be something left behind.
Because it can be a visual anchor
It's important to keep the attention of your viewer's view, to make sure he or she doesn't get distracted or find something other than your photo that catches his or her eye.
And that's a challenge.
With the constant influx of images we have today it's difficult to keep focused. Many go unnoticed or, worse, unseen.
How many stories go unseen? How many messages get lost along the way?
Many. A lot.
And it's a real shame.
That's why it's crucial that you work on your composition, that your photo is visually attractive and anchors the viewer's eye without letting it drift.
Since we're talking metaphorically about the sea, I'll give you an example.
Suppose you're taking pictures during the golden hour in a seascape at a time when the tide is going out. Well, try to highlight the main shot with something that stands out (an element, a pattern, etc.), something that catches the viewer's attention, while the water slowly goes back leaving a trace and a reflection in the wet sand.
Because your picture needs several basic ingredients
These are the visual elements of the composition:
- Light. It determines the brightness of a color: the more light there is the brighter it is (the more it tends to white). It's the soul of photography.
- Dot. You may be thinking of a perfect circle, perhaps black on a white background and right in the center of the image. But a dot can be any element of limited dimensions that stands out from its surroundings.
- Layer. Gives depth to your picture. The scene shifts from a two-dimensional support (the paper or the screen) to a three-dimensional reality.
- Line. It's basically the mark or the trace that connects two points. A line can be horizontal, vertical or diagonal, straight or curved, thin or thick.
- Color. Color is visible because objects reflect it. In section 7 you have some ideas on color theory.
- Space. It's the framing you choose for your photo, the part of the scene you decide to include in the frame. It's usually two-dimensional, but it can become three-dimensional if you add depth.
- Volume. It allows you to give depth and realism to your image mainly thanks to the light or the absence of it.
- Shape. It can be a geometric shape (like a triangle or a circle). And it can also be organic (natural, irregular or asymmetric shapes).
- Texture. It's the quality of a surface (for example, rough, smooth, rough).
Because you have a lot of tools
Have you ever wondered what exactly a picture is?
What do you want to achieve with it?
To tell a story perhaps? Or to share a life experience?
If so, you need to use a common communication system. A vehicle to help you get that information to your viewer. And that person should be able to understand and interpret it.
Well, that can only be achieved through a visual language, a set of elements that allow you to communicate... :)
Elements such as, for example:
- Point of view
- Frame
- Format
- Focal length
- Light and shadow
- Balance
- Symmetry
- Exposure time
- Depth of field
- Sharpness
- Subject selection
- Simplicity
- Negative space
- Shades
- Texture
- Contrast
- Juxtaposition
- Weights
Well, you know how to find the best location to take pictures during golden hour.
In the next section I'm going to show you how to plan your golden hour photos, so you can go to that location to take an amazing photo.
Let's go!
4.How to easily plan your golden hour photos

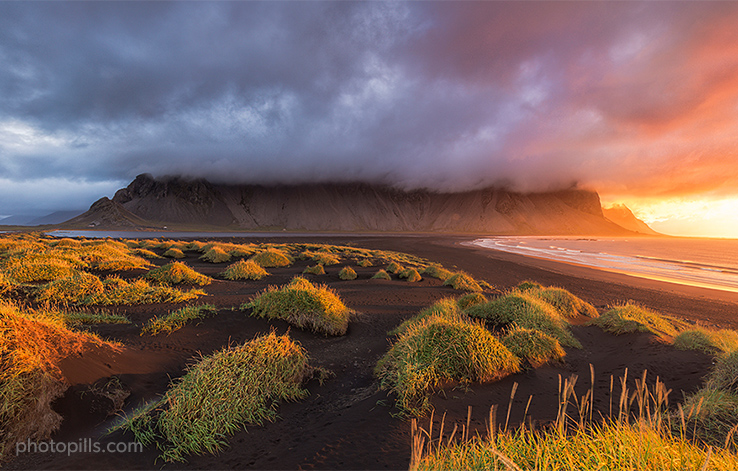
I'm going to explain you how to plan your golden hour photos with a real example. So you can see for yourself that it's much easier than it seems ;)
The picture you just saw at the beginning of this section shows one of the most special moments I've ever lived. And I was lucky enough to share it with a lot of PhotoPillers during our expedition to Iceland.
We were on the beach of the Stokksnes peninsula, enjoying a beautiful Sunrise and the spectacular views of the wonderful and imposing Vestrahorn mountain range.
I took this photo during the golden hour, just when the Sun was rising from the side of the mountains. I decided not to include the Sun in the frame to avoid problems with the dynamic range and flares, and to fill the foreground with golden tones thanks to the side light.
I used two elements in the foreground to lead the eye towards the Vestrahorn and the light: the seashore and some bushes that contrast with the black and volcanic sand.
That morning I was lucky enough to have a spectacular Sunrise. But don't take me wrong: without planning I would have never got the picture.
Before arriving at the location I already knew where and when I had to put the tripod. I had the photo perfectly planned.
Planning means finding out:
- A shooting spot from which to take the photo,
- A shooting direction (the framing) and
- A date and time of shooting...
It's the only way to know where you have to go, what day you have to go and what time you have to shoot.
Well...
With a little practice and with PhotoPills you can plan in a few seconds any golden hour photo you imagine.
So grab your smartphone and if you haven't already done so, install the app.
I'll show you exactly how I planned the photo of the Stokksnes peninsula beach with the Vestrahorn massif in the background. So you can take this photo yourself by setting a future date! :)
But before I start planning this example...
Do you want to plan a golden hour photo that includes the Moon in the composition? Study our Moon photography guide.
Do you want to plan spectacular Sunrises and Sunsets? Don't miss our Sunrise and our Sunset photography guides.
That being said...
Let's get down to business!
Place the Red Pin in a potential location
Start from the beginning: place the Red Pin in a potential location where you may take pictures during the golden hour. It can be a beach, a town... Your call.
Don't worry about being too precise. Choose a rough area. Later on, you'll have time to determine the exact shooting spot.


Open PhotoPills, tap Planner (Pills Menu).
Then, place the Red Pin somewhere you think it may be a cool location to take pictures during the golden hour.
Using the photo at the beginning of the section as an example, place it in Iceland, the land of fire and ice. If you don't know how to do it, this video shows you how to move the Red Pin.
Select the date when you want to photograph the golden hour


Set the current date and time tapping the center of the Time Bar twice. Then, swipe it to the left to move time forward to get to the date when you want to take the picture.
You can also do this using the Calendar. To do it, tap once the center of the Time Bar. In the Date and Time screen, tap Date to manually change the shooting date.
And if you want to, although you actually don't need to, you can also tap Time to change the shooting time manually.
Now, suppose you want to take the golden hour photo on August 19, 2021.
Use the Time Bar to set it in the Planner.
Tip!
If at the location you have in mind, the photo you're looking for isn't possible on the selected date, you can always change the date using the Time Bar.
Or use the Find tool in the Planner, to find out the exact day and time that the Sun will be where you want it to be in the frame.
To do this, follow the same steps that Rafa shows you in this video.
Find out the direction and time of Sunrise/Sunset
Once you know the date of the photo, you can quickly find out the position of the Sun.
Knowing the position of the Sun at the time of the photo is key, because it tells you how the light will affect the foreground and your subject. So you'll know, for a given date, if the location you're analyzing works for the Sunrise and/or for the Sunset.
In this case, I took the photo during the dawn golden hour. Therefore, you have to look at the Sunrise direction and time.
If you want to plan a photo during the dusk golden hour, just follow the same steps.
Let's go to the next step...

Swipe the top panels above the map to Panel 4. This panel says that on August 19, 2021 the Sun rises at 05:14 am according to the Red Pin position.
And you can see on the map the Sun, Sunrise and Sunset directions:
- The Sun direction is the thin orange line.
- The Sunrise direction is the thick yellow line.
- And the Sunset direction is the thick orange line.
If you don't see these lines, activate the Sun layer. You can do this by tapping the Map Settings button. You will find it next to the (+) button on the map.
Okay, let's continue.
The Sunrise direction line (thick yellow line) is essential. It will help you determine the perfect shooting point as it indicates the light direction.
On the contrary, if you want to shoot during the dusk golden hour, look at the Sunset direction line (thick orange line).
Now, swipe the top panels above the map to Panel 6. On August 19, 2021, the golden hour starts at 04:36 am and ends at 06:24 am. So now you have an idea of when you should be taking pictures.
Check out different locations until you find a photo you like
Now you know where the Sun rises and sets on a specific date. It's time to move the Red Pin to several cool locations you know. Try one by one until you find the one where your golden hour photo fits with the idea you have.
Obviously, and even though it will take you longer, the more locations you believe could work, the better.
If don't have any location in mind, follow the research workflow I explained in section 2.
In this case, I wanted to shoot a Sunrise so I focused on the east coast of Iceland. I checked out some interesting locations until I finally found what I was looking for.
It's a fantastic beach on the Stokksnes peninsula. The photo is taken from the southern end of the beach, from the cape of the peninsula.
Stokksnes has three characteristics that make it a perfect location to take pictures at Sunrise, during golden hour:
- It's a beach so you can move freely and have several shooting directions.
- You can photograph the mountainous massif of Vestrahorn by shooting to the north, leaving the Sunrise direction to the right of the frame.
- The bushes are the main element in the foreground and serve as an entrance gate into the image, although the main subject and true visual anchor point are the Vestrahorn mountains in the background.
Let's go back to PhotoPills...
It's time to place the Red Pin in the location, in this case in Stokksnes, and then place it in the shooting spot: at the beginning of the beach, in the area where the bushes are.
There are many ways to move the Red Pin, and you will find them all in this video.
As I had scouted the location, I zoomed in the map and placed the Red Pin in a very precise area that could be a good shooting spot.


Now it's your turn to do it.
Once you have the Red Pin in Stokksnes, zoom in and move the Red Pin around the bushes. Make sure you find a shooting spot where the bushes and the seashore are aligned with the Vestrahorn to create a leading line. The easiest way to do this is to drag and drop the Red Pin.
As you can see, from the Red Pin position, the Sunrise is to the right of the Vestrahorn massif so that the Sun is out of the frame. This isn't a coincidence, since I chose the date when the Sun rises to the right of the massif to get the golden side light to fill the scene.
Again, to find that date I used the Find tool in the Planner. Check this video to learn how to use the Find tool.
Check at what time the golden hour starts
Great.
You have the Red Pin on the shooting spot and the date selected in the Time Bar. Look again at Panel 6 and you'll know the golden hour start and end time.
In case you want to take a photo that looks like mine from the Red Pin position, you could take it on August 19, 2021, from 04:27 am when the golden hour starts until 06:13 am when it ends. Now you know the time you'll have to go to the location to take the shot.
Congratulations! You've just planned the photo!
Save the Plan
Now that you've done the research, don't forget to save the plan!


On the Planner, tap Save. On the Save as... screen, choose to save a Plan.
On the Plans screen, tap New plan. Type a name in the Plan name box, and tap Save.
This way you can check your plan as many times as you want on the Planner. Just tap the Load button (next to the Save button). Then, tap Plan and scroll down through the results until you find it.
If you tap it, PhotoPills automatically loads it to the Planner.
Great, now that you have your plan, it's time to prepare your gear!
In the next section you'll find everything you need to successfully capture the shot.
Keep reading!
5.What gear you need to photograph at golden hour

In this section I'll share with you a complete list of the equipment you'll need to photograph during the golden hour.
And when I write "complete", I mean it.
The idea is to have plenty of options to choose from and that suit your needs no matter what type of photographer you are – beginner, advanced or professional.
Camera
The good thing about technology is that it evolves so quickly that you can now take pictures in golden hour with virtually any camera. Even with smartphone cameras.
Don't look at me like that, I'm very serious.
Right now you can take pictures during golden hour with any camera.
But I won't lie to you.
Not all cameras are the same or have the same technical specifications. And that implies that the quality of your photos depend on the capabilities and limitations of your camera.
As a general rule, I recommend you to be a flexible photographer. I suggest you adapt your photographic ideas (and expectations) to the type of camera you use.
Smartphones
Sometimes I find it hard to believe how much smartphone cameras have improved. It's amazing how many different photos you can take with them and the quality they have.
But keep in mind that except for a few specific models, your smartphone camera uses a short focal length (wide angle). And while that limits your compositions, work on your foreground: include elements that are close and you'll create depth and play with several layers.
In addition to this, any smartphone camera has a small sensor. As the light fades out, your phone will have a hard time focusing and metering. Even those with a night mode won't be able to face certain low light situations.
And then there's an extra problem – most smartphone don't allow you to change the aperture. Therefore, in low light situations the software will decide to crank the ISO up. And the picture will have a lot of noise.
Whenever you take photos with a smartphone, use your ingenuity and creativity: look for original compositions and make the most out of the natural light, especially during the golden hour.
Compact cameras
Compact cameras are about to disappear. As I was saying before, smartphone cameras are so powerful they've replaced compact cameras. Who uses a compact camera anymore?
If you have one, don't get rid of it. You can still take good pictures with it, including during the golden hour. However, they are very limited cameras that can hardly compete with DSLRs and mirrorless cameras.
Like smartphone cameras, they have a small sensor (1" maximum). And you'll face the same problems when shooting in low light: you'll have to use high ISOs to get the right exposure and the photos will have a lot of noise.
Once again, your imagination is your best tool to get a picture that conveys something.
Low-end cameras
The good thing about these cameras is that they are very affordable and perfect for learning how to use the Manual shooting mode (M). They're basic cameras, but they allow you to have full control over the exposure.
With one of these models you can capture great photos during the golden hour.
- Cameras with an APS-C sensor: Nikon Z30; Canon 4000D, 250D and M5; Sony a6600.
- Cameras with a Micro 4/3 sensor: Olympus OM-D E-M10 Mark IV and Panasonic G95.
- Compact camera (1" sensor): Sony RX100 VII.
Mid-range cameras
During the golden hour, the light is strong enough so you don't need to crank the ISO up. This is the best part of that time of day: the light is warm and dim at the same time.
So chances are that a mid-range camera, whose sensor is really great, will get high quality images.
- Cameras with an APS-C sensor: Nikon Z50, Zfc and D7500; Canon R10, R7, 850D, 90D and 6D Mark II; Fuji X-S20 and X-T30 II; Pentax KF; Sony a6700.
- Cameras with a Micro 4/3 sensor: Olympus OM-D E-M5 Mark III and Panasonic G9 II.
- Full Frame cameras: Nikon Z5 and D750; Canon RP; Sony a7C II.
High-end cameras
These are professional cameras and offer the best that a camera can offer:
- Cameras with an APS-C sensor: Nikon D500; Fuji XH-2S, XT-5 and X-Pro3.
- Cameras with a Micro 4/3 sensor: Olympus OM-1 and Panasonic GH6.
- Full Frame cameras: Nikon Zf, Z6 II, Z7 II, Z8, Z9, D780, D850 and D6; Canon R8, R6 Mark II, R5, R3, 5D Mark IV, and 1D X Mark III; Panasonic S5 II, S5 II X, S1R and S1H; Pentax K-1 Mark II; Sony a7 IV, a7 CR, a7R V, a9 III and a1.
Lens
What do you want to include in the frame?
That's the key question. Your answer will depend on the lens (the focal length) you choose.
You want to include the landscape in the frame.
Okay... Choose a short focal length.
In that case, use a wide-angle lens like the Nikon 14-24mm f/2.8 or the Zeiss Milvus 18mm f/2.8, for example. These are my favorite angle lenses.
Also, keep in mind that if you get close to an object with a wide angle, you change the point of view and even the apparent size between the objects in the foreground and those in the background.
This means that big becomes small and vice versa. For example, you can make a small puddle look like a lake if there is no scale.
You want to include a considerable part of the landscape in front of you.
Perfect... Use intermediate focal lengths, like 35mm or 50mm.
You want to show a particular detail or area of the landscape.
Okay... Use a long focal length.
For example, a standard telephoto lens like the Nikon 70-200mm f/2.8 or the Canon 70-200mm f/2.8.
Or a super telephoto lens. The market is full of great options.
Here are some recommendations: the Nikon 200-500mm f/5.6, the Canon 100-400mm f/3.5-5.6, the Fujifilm 100-400mm f/4.5-5.6, the Olympus Zuiko 300mm f/4 PRO, the Sony 100-400mm f/4.5-5.6, the Sony 400mm f/2.8, the Sigma 120-300mm f/2. 8 for Nikon and Canon or the Sigma 150-600mm f/5-6.3 for Nikon and Canon.
The longer the focal length, the larger the subject in the frame.
So, if you need to take pictures from further away, you can use a teleconverter (1.4x or 2x).
If you have a camera with a Micro 4/3 or APS-C sensor, take advantage of the cropping factor.
Filters
As I explained in section 2, during the golden hour light conditions change rapidly. Also, the exposure changes according to the type of light you have (side, front, back). This means you have to be very careful with the scene dynamic range.
When the light changes so fast, you have 2 options:
- Make a bracketing of the scene. Then, when you're at home, you can merge the different exposures and the result is an image with full dynamic range.
- Use lens filters.
You can use several lens filters depending on what you want to achieve.
Thanks to a graduated neutral density filter (GND) you can darken the sky during the golden hour. This prevents the photo from being overexposed and adds colour to the scene.
With a neutral density filter (ND) you capture a long exposure to convey motion or create a silk effect on the water.
A circular polarizing filter (CPL) lets you remove reflections from glass and water surfaces and enhance the contrast and color of the clouds and sky in your photo.
I love using filters!
This is the equipment I use:
- Depending on the lens, I have a 100mm and a 165mm Lucroit filter holders.
- A long list of ND and GND filters from Lucroit.
- The B+W Kaesemann Circular MRC 77mm polarizing filter. I also have the 112mm Slim circular polarizer from Lucroit and the 165x165mm square polarizer from Lucroit.
Here are two or three ideas of what you can do with the filters. If you're interested in the subject, take a look at our guide on lens filters.
Tripod and head
To take pictures in golden hour, you should definitely use a tripod. It's not essential as in the blue hour but I use it most of the time.
And I'm telling you the same thing I tell my students in all the workshops: invest in a good tripod, the best one you can afford.
A tripod is a crucial piece of gear. It's as important as a sharp lens or a camera that produces very little noise.
As soon as the light fades during the golden hour, you'll have to use slower shutter speeds. The problem is that a cheap tripod doesn't provide any stability. And your photos may be blurry because of some vibration.
Don't waste time (or money): buy a sturdy, solid tripod.
Your equipment has to be completely still while you take long exposures in the golden hour.
Tripod
The tripod that I recommend the most is the Manfrotto 055XPRO3 because it's very robust and affordable.
Another good option is the Travel line from Benro.
You can also buy a carbon fiber tripod. It's much lighter and stronger than an aluminium tripod: depending on the model, it holds weights between 5 and 25 kg. Although it's a bit more expensive.
Brands like Gitzo, Benro, Manfrotto, Induro or Really Right Stuff offer high quality tripods in both materials, carbon and aluminium.
Ballhead
You can find various types of heads on the market. The ballhead is the most popular among photographers because it's the most versatile, precise and easy to use.
When you've chosen your tripod, look for a ballheads that can bear at least 5-7 kg (11-16 lb) and that includes a removable plate.
I've been using a Really Right Stuff BH-55 for several years and it's wonderful because of its convenience and precision. The downside is that it's a very expensive ballheads.
That's why I recommend these other ones: the Gitzo GH1382QD, the Kirk Enterprises BH-1 and the Arca Swiss Monoball Z1 SP. These are solid, sturdy ball joints that can bear 13.5 kg or more.
And if you're looking for a good gimbal head, try the Benro GH2.
LED panels and other light sources (optional)
During the golden hour the light is softer.
Your scene is much less illuminated than at other times of the day.
Therefore, you may need to add some artificial light. This way you can control the scene light conditions to make the best possible shot during the golden hour.
For example, LED panels, flashlights and flashes are light sources that can be very useful when illuminating the landscape or the person you're photographing.
In addition to this, you may need passive elements (e.g. diffusers, filters, reflectors) that soften the harsh light produced by the light source you plan to use.
Intervalometer
I've been saying it throughout the article, the natural light conditions change pretty quickly during the golden hour. Therefore, the scene dynamic range is high.
Whether you want to make a long exposure and compensate for the sky using a graduated neutral density filter (GND) or capture silhouettes, avoid touching your camera while the sensor is capturing the light of the scene. If the camera vibrates, even just a little bit, your photo will be blurred.
Therefore, it's best to use an intervalometer.
I usually recommend these great intervalometers:
- Pro intervalometer: SMDV.
- For cheap intervalometers check the brands Neewer, Phottix and Vello.
A great alternative is a device called CamRanger. Right now it's available for Nikon, Canon, Fuji and Sony cameras.
It's a stand-alone device that you connect to your DSLR or mirrorless camera with a USB cable. It creates an ad hoc WiFi network to which you can connect your smartphone or tablet (iOS, Android and Windows). Thanks to the CamRanger application you can control your camera without a computer or an Internet connection.
Best of all, this device is independent. Therefore, if your mobile device loses its connection, the CamRanger has an internal memory to keep shooting. Imagine that you are making a timelapse, your sequence would be cut if the camera stops taking pictures in the time frame you've set...
So the CamRanger is great for many types of photos: timelapses (of the Milky Way, of Star Trails, of solar eclipses or lunar eclipses...), bracketing, focus stacking for macro and landscapes... and many more!
Memory cards
Buy the highest quality SD Cards (Secure Digital) with the highest transfer speed. There are many brands on the market but my favorites are SanDisk and ProGrade.
Nowadays the price of memory cards is very affordable. Even those with higher capacity (64GB, 128GB or even 256GB) are relatively cheap.
Although there are still cameras that use CompactFlash (CF) cards, it's a system that is slowly disappearing.
And to replace it, SanDisk, Nikon and Sony launched a new card format called XQD currently available for several Full Frame (Nikon D4, D4s, D5 and D850; Panasonic S1 and S1R), APS-C (Nikon D500) and mirrorless (Nikon Z6, Z6 II, Z7 and Z7 II) models. These cards
- Have a very high storage capacity (from 32GB to 256GB).
- Have a super fast reading and recording speed (400MB/s compared to 160MB/s for a CF card or 250MB/s for an SD card).
- Are very secure, resistant and with an incredible durability.
Later on, in 2017, CFexpress launched the latest standard memory card from the CompactFlash Association with 2 new form factors, Type A and Type C were announced, with the existing XQD form factor becoming Type B.
- Type A has, so far, only been adopted by Sony in all of its newest models.
- Type B is a far more common format offering a lower price. It has been widely adopted by Nikon in its Z series, Canon in some EOS R bodies, and Panasonic in the S1/S1R and GH6.
- Type C is not being produced yet.
And finally, don't forget to dress up for the occasion with...
The PhotoPills Light Meter-Man T-shirt!
Getting the exposure metering right is important. Especially during the golden hour, when the creative possibilities are (almost) endless.
Do you want to create a silhouette? Do you prefer to take advantage of side lighting?
Do it with style and glamour :P

6.How to photograph during the golden hour step by step

Well, it's here.
The day you've been waiting for has come.
That wonderful light you want to capture is about to begin.
It's time to check that the plan (section 4) is going to work perfectly.
Now all you need to do is nail the shot.
If you succeed, you'll have a supershot that you won't forget, the proof of that special moment you lived...
And to help you with this, I'm sharing with you a complete workflow with all the steps you need to follow to photograph during the golden hour.
No more doubts before pressing the shutter button!
Make sure you get to the planned location in advance
I know what you're going to ask me. How long in advance is enough...
There's no right answer and it depends on your working methodology.
In my case, I arrive about 2 hours before the golden hour starts (both during Sunrise and Sunset).
If you're going to a location you don't know to photograph the golden hour:
- After Sunrise, you need to scout the location at least 1 or 2 days before as long as it's daylight. Keep in mind that, on the shooting day, you'll get there when it's still dark and it's pitch black.
- Before Sunset, try to get there at least 2 or 3 hours in advance to scout the area thoroughly.
Thanks to getting in advance before the golden hour happens:
- You can work on your composition by paying attention to all the details.
- It allows you to set up your equipment at ease and make sure you don't forget anything.
And, of course, you have time to check that you are at the exact shooting spot, at the Red Pin position that you planned.
The easiest way to do this is to use the PhotoPills Planner.
On the map, tap the (+) button. Then tap the eighth button on the toolbar that just showed up (it's the compass icon). There should be a blue circle on the map now: it shows your current position.
Walk until the blue dot is actually aligned with the base of the Red Pin.
And also I recommend you to have a look at the PhotoPills Augmented Reality view (AR) to double check that you're at the right spot and that the Sun will rise or set in the direction you are interested in.
Place the tripod, ballhead, camera, and lens
Open the tripod, unfold the legs and mount the ballhead on. Then place the tripod on a solid surface and press it against the floor. It's important that it's perfectly stable.
Mount the lens you're going to use during the shoot on your camera. If you're still in doubt, I explain in section 5 how to decide in advance what focal length to use.
Once you've done that, anchor the camera on the ballhead and check again that it doesn't risk moving or vibrating.
Finally, plug the intervalometer in and check that everything is working correctly.
Remove the UV filter
You shouldn't, but if you usually have a ultraviolet (UV) filter attached to your lens, take it off.
The problem with this type of filter is that it slightly reduces the sharpness and contrast of your images.
And because you're adding an extra glass in front of the lens, it can cause reflections, halos and flares, especially if you have one or more light sources hitting the lens.
Prepare the filter(s)
Depending on what you want to convey with your photo, you'll need a particular filter or a combination of different ones:
- A circular polarizing filter (CPL) eliminates or enhances non-metallic reflections (especially in water surfaces), fog and rainbows. It allows you to increase saturation and contrast and its effect is not replicable in post-processing.
- A neutral density filter (ND) reduces evenly the light reaching the sensor, forcing you to use slower speeds.
- A graduated neutral density filter (GND) Gradually reduces the light that reaches the sensor with greater intensity on one of the edges of the filter. It's perfect for protecting the highlights in scenes with high dynamic range.
Screw the adapter ring onto the lens and adjust the filter holder.
But... Don't insert any ND or GND filters into the filter holder slots yet.
Don't be in a hurry.
What you can insert is the polarizer. Screw it to its corresponding adapter ring (if you use a system like NiSi, for example) or to the front of the filter holder (if you use a system like Lee, for example). You can also mount it later, with the rest of the filters.
Don't know in which order you have to insert the filters? You'll find the answer in our lens filters photography guide.
Turn off the lens stabilization system
You just set up your camera and lens on the tripod.
And even though it may seem counterintuitive, you should turn your lens' vibration reduction or image stabilisation system (VR/IS) off.
When your camera is on a tripod, the system gets confused and the lens may try to eliminate unexisting vibrations. Surprise: the image will be blurred.
Shoot in RAW
Do you hesitate between shooting in JPEG or RAW? Here's the answer: always in RAW.
The RAW file contains all the photo data captured by the sensor. It's the negative, the highest quality base image that you can post-process and also correct errors in.
Don't forget that the image you see on your LCD is a JPEG version of the RAW file. And that the histogram you're looking at is that of the JPEG file, not the RAW file. It's a very similar histogram, but it's not the one from the RAW file.
Select the spot metering mode
Thanks to the metering mode you can determine the exposure in the key tone. The key tone is that part of the scene where you want to know what kind of light you have and what settings you need to expose the photo correctly.
If you don't get it on the first attempt, it's okay. Try again and take several test shots until you get what you want. That's one of the advantages of going to the location ahead of time! ;)
If you plan to use the polarizer, mount it now and rotate it until you polarize the area of the frame where you want to get the effect you're looking for.
Then, meter the key tone without any ND or GND filter on. It's essential that they don't affect the image exposure.
Select the spot metering mode. It's perfect for metering very precisely.
Meter the brightest area of the scene you want with detail and overexpose by 1 or 2 light steps (+1EV or +2EV) or according to your camera's overexposure limit.
The light meter usually turns whites into grays. That's why I suggest you always overexpose the photo slightly. This way you can capture the natural colors of the scene and have them in the RAW file.
Determine the focal length you're going to use
It's time to select the focal length according to the composition you have in mind and have planned (section 4).
Turn your lens ring more or less smoothly until you choose the focal length that fits your framing.
If your lens is a fixed focal length, move the tripod and anchor it in a stable spot. Move the ballhead knobs and change the shooting direction of the camera until you get the composition you're looking for.
Select the Manual shooting mode (M)
The Manual shooting mode (M) allows you to precisely control the aperture, shutter speed and ISO. This way you don't let the camera make any decisions.
So you can determine the settings you need to get the perfect exposure for your photo.
Select the aperture
During the golden hour, the aperture you'll set depends on two factors:
- The quantity of natural light in the scene.
- The depth of field you want to show in the image.
Imagine you're photographing during the Sunset golden hour.
Suppose you're at the beginning of the golden hour, while the Sun is slowly approaching the horizon and the scene is still quite bright. Try a relatively small aperture (f/8 or f/11 for example). You'll have a greater depth of field, and you'll be able to capture detail in the sky as well as in the landscape.
Depending on the light conditions you have, try closing the aperture a little more (f/16 for example). Then, use any light source in the scene to create a starburst effect (section 7).
And now suppose you're at the end of the golden hour. The light fades away and you're forced to use a large aperture (f/4 for example). Don't neglect the depth of field and make sure it remains the same. If not, close the aperture down and use a slower shutter speed or crank the ISO up.
Focus
It's essential that you master the depth of field concept to avoid ending up with a blurred photo.
There are several ways to focus depending on the focal length you use.
Wide angle lens
It's a no brainer: focus at the hyperfocal distance ;)
Actually, it's better if you focus at a slightly longer distance (1 m, for example). This way you make sure everything is correctly focused from the foreground to the last element in the background. In this video I show you how to focus to the hyperfocal distance in less than 1 minute:
Intermediate/long focal lengths with foreground
If the hyperfocal distance is shorter than the distance to the subject, focus on the subject.
However, if the hyperfocal distance is longer than the distance to your subject, you have two options.
1. Look for an element to focus on that is further away than the hyperfocal distance
You can use anything inside your frame, like tree branches or a window on a building, for example.
When you're focusing on that element, check that the depth of field (DoF) near limit is closer to you than to your subject. This way your subject will be within the area that is acceptably sharp (focused). That is, between the depth of field near limit and infinity.
It's easier if you use the PhotoPills Planner and the Depth of Field (DoF) tool.


On the Planner, tap the Map Settings button, located next to the (+) button on the map (lower right corner).
Then, in the Map Setup screen, tap the DoF button to activate the Depth of Field tool.
Back on the map, there's now a black box at the top. Tap each of the sections to enter the shooting settings into the tool (camera, focal length, aperture, focus aligned with the Black Pin, etc.)
Don't place the Black Pin on your subject. Place it on an element that is further away than the hyperfocal distance (it's marked on the map) and that you know it will be visible from the Red Pin position. This way you can visualize on the map what will be in focus and what won't (what's left between the depth of field near limit and infinity).
You should definitely do this work at home, before you go to the location. It's best to know in advance where you're going to focus during the session.
2. Focus directly on your subject and leave the background slightly out of focus
Unless you have a superhero sight, you'll hardly notice that the background is slightly out of focus.
From an artistic point of view it's always better to have your subject tack sharp and the background (somewhat) out of focus, than the other way around.
Super long focal lengths with foreground

If you use long focal lengths, you'll find that the hyperfocal distance is quite far from the shooting spot. It may be so far away that it's (almost) impossible to focus at that distance.
If so, focus at the lower third of the frame (or scene).
You can focus in two different ways: in manual and in automatic.
Manual focus
First, select manual focus on your camera or lens.
Turn the Live View function on your camera's LCD screen. It's perfect to focus accurately.
Also, if your camera has the Focus Peaking and/or Focus Magnifier (Focus Magnifier) features, turn them on too. They'll help you to be even more accurate.
Once you've decided where you want to focus, focus manually by slowly turning the focus ring on your lens.
Then, zoom in on the LCD screen until you see the detail of the subject's surface.
And if you have
- The Focus Peaking activated, look at the areas that the camera has highlighted with color stripes: these are areas with more contrast and therefore in focus.
- The Focus Magnifier turned on, look at the magnified area on your framing and make sure it's in focus.
Finally, turn the focus ring of the lens slowly until the detail of the surface is tack sharp.
If you're not used to focusing manually, turn the focus ring very subtly and when you notice that your subject is focused, keep turning the ring until you go a little out of focus. Then, turn the ring in the opposite direction to get everything in focus again. It's the best way to adjust the focus.
Autofocus
This is generally the focus mode that any camera has selected by default.
Focus on the area or point of the framing that suits you and press the camera shutter button halfway until it focuses. Most cameras "beep" when they've focused correctly.
And now comes the detail that looks silly but it's not :P
Change the focus mode of your lens from automatic to manual to prevent the camera from refocusing when you shoot.
Don't forget to do it!
Another way to lock the focus is to assign the focusing to a button other than the shutter button. With this option, focus by pressing with your thumb another button on the back of your camera. As soon as you release it, the focus holds on the spot you've chosen.
If you want to know how to set the back button focus, take a look at your camera's user manual.
Set the shutter speed
During the golden hour the light conditions are quite variable so the shutter speed will depend on the natural light you have when pressing the shutter release button.
The best advice I can give you is to apply a "try and fail" approach. Take several test shots (as many as you need) until you find the right exposure.
Once you've set a base shutter speed, change the shutter speed as the light changes. That is, depending on whether it's dawn (setting a shorter one) or dusk (setting a longer one).
If you don't know what to do, it's better to get a slightly underexposed picture than an overexposed one. Although it depends a lot on the post-processing software you use, it's usually easier to recover information in the shadows than in the highlights.
And if you're using your lens filters, you can:
- Get the right exposure, allowing your camera capture a high dynamic range scene.
- Convey a sense of motion (e.g. silky water).
Here are some examples of shutter speeds according to the effect you want:
- Sea silky water: 1s.
- Slow water motion: 1/2s.
- Fast water motion: 1/8s.
- High clouds: 3 min or more.
- Middle clouds: between 2 and 3 min.
- Low clouds: 2 min or less.
Thanks to these shutter speeds you can get the right exposure before inserting any neutral density filter (ND) or graduated neutral density filter (GND).
Fine tune the ISO
Decide the ISO you're going to set considering:
- The exposure triangle once you've set the aperture and the shutter speed.
- How much noise your camera produces.
If possible, use the lowest ISO. Start with ISO 100 and increase it depending on the light conditions and the lens filters you're using.
And try to keep the noise as low as possible!
Put the filter(s)
You haven't finished calculating the exposure yet...
So far you've calculated and checked the correct exposure without using any filters.
Put the lens filters (GND and/or ND).
Obviously, depending on the lens filters you use you have to adjust the exposure one way or another.
To reduce the "try and fail", you can use the PhotoPills' Exposure calculator. It's very easy to use it. You won't need to do any calculations and, above all, you won't make mistakes when making the equivalence ;)
Let's do it...
Start by taking a test shot without the filter(s) that gives you the exposure you want. Take as many test photos as you need.
Now, look at the histogram of your final test picture, the one with the histogram that fits the exposure you want. This is the reference shot you're going to use to recalculate the exposure when you put the filter(s) in front of the lens and when the light changes.
Then, use the calculator to figure out the equivalent shutter speed you need to get the same exposure when using the filter(s).


Here you have a full description step by step on how to expose by combining several filters (ND, GND and polarizer).
And in our lens filters guide you have several sections in which I explain step by step how to take a long exposure according to the filter(s) you want to use.
Set the white balance manually
Set a white balance between 6000K and 7500K to boost the oranges if you plan to shoot during golden hour.
Another option, which is also very useful, is to leave the white balance on automatic and then correct it later on with Lightroom or Photoshop.
Take a test photo, check the histogram and adjust the exposure
Check the framing and adjust it if necessary.
Take a test shot.
Check the histogram, analyze the image exposure and make the necessary adjustments to get correct exposure in the field.
If not, adjust your golden hour camera settings to get the exposure you're looking for.
Imagine the photo is underexposed (darker than you want). You can correct it like this:
- Start using a wider aperture (small f number). Check that you get the depth of field you want as well.
- If the photo is still underexposed, set a slower shutter speed (longer exposure time).
- And if the aperture and the shutter speed are not enough, increase the ISO.
Do a bracketing to be sure
As the golden hour approaches the blue hour, the light changes quite quickly. You'll almost certainly have to adjust the exposure during the photo shoot.
Personally, to make sure that I don't clip in the shadows or blow out the highlights I do a bracketing. When I get home, I download the photos into the computer and choose the photo that has the most suitable exposure according to what I want to convey. Using that photo as a starting point, I do my post-processing.
I've been doing bracketings for many (many!) years. In my experience, a 1-stop bracketing of 3 photos is enough in most cases.
But you can decide the settings you prefer, such as changing the stops' interval (to 1.5 or 2) and/or the number of shots (5, 7, 9) you want your camera to take.
Don't rest on your laurels!
When you photograph during the golden hour you have a real challenge ahead of you: the perfect light fades out relatively quickly...
Also keep in mind that if you plan to use lens filters during the photo shoot, you need more time to prepare your equipment and take the photo (it will probably be a long exposure)...
So, you should try to get the photo right the first time!
If, for whatever reason, you don't get it right the first time, it's fine.
Don't despair and concentrate. Don't waste all the previous work you've done so far: imagine an amazing photo and plan it in advance to take into account all the details.
It's important that you make the most out of the magic light.
And, as I said before, if you don't get it this time, don't give up! You have another chance the next day... :P
7.12 tips to make the most out of the golden hour

The golden hour is linked to the Sunrise and Sunset. So you can enjoy and photograph during the golden hour twice a day: at dawn and at dusk.
If you think about it, it's amazing...
You get two photo opportunities during the golden hour every day!
Every time you go out to take pictures during the golden hour you'll experience a special moment. And that magical feeling you'll experience will be reflected in your images.
They will be the proof that you were there...
Throughout this guide, I've shared with you all the steps necessary to successfully capture incredible photos during the golden hour.
And here are some tips to make the most out of your golden hour photography.
Spend the necessary time on planning (1)
Planning is an essential part of my photographic workflow. And it's something I explain in every article I write.
If you don't plan it, you'll hardly capture that photo you've been dreaming about for so long.
I'm not saying it's not possible, but it will be more difficult.
Planning needs preparation and research. Thanks to it you can know:
- If the photo is possible, if the event you're waiting for is going to happen. For example, a photo in golden hour with the Sun in a certain position in the sky.
- At what time the golden hour occurs in a certain location and on a certain day.
And thanks to the PhotoPills app, planning is a simple and precise work. Do you want to learn how to do it? Check out section 4.
So spend as much time as you need!
Get to the location in advance (2)
In section 3 I have explained to you in detail what you have to do to find the best possible location for your golden hour photos.
Once you've found it and you're sure that this is the location where you're going to take pictures, scout it in advance. Go there a few days or even hours before the photo shoot.
The goals of your scouting are:
- To find and adjust the composition and get the best possible picture. While being on the field you can discover new angles and new compositional elements.
- Avoiding potential dangers that you might encounter: a cliff, an area where you might slip, a hole in the ground...
- Find out how long you will have to walk to the shooting spot, how much real space there is at the shooting spot (both you and your unfolded tripod should fit), what kind of composition you can get, etc.
With all this information you can work relaxed and concentrated.
The less eventualities you suffer (because, believe me, there are always some...), the better.
In the end, the assets that will help you get your photo are: concentration and flexibility.
Change your shooting direction and use the front, side and backlight (3)
One of the great advantages of the golden hour light is that, unlike any other time of day, you can easily change your shooting direction.
So you can use 3 types of light in the scene:
- Front light. Great for illuminating the subject or taking portraits by preventing the subject(s) from winking.
- Side light. By keeping part of the subject lit and part of the subject in shadow, you add contrast and volume.
- Backlight. You can get great silhouettes and some rim light. Or combine the two. I'll give you more details in the next section.
Create silhouettes and add rim light (4)
The golden hour is the perfect time to capture silhouettes.
Place your subject between your camera and the Sun, expose for the sky and you'll create an impressive image!
If there's more than one shape or object in the scene where you want to create a silhouette, make sure you isolate them and make your subject stand out. Imagine, for example, that you want to create the silhouette of a cyclist pedaling along the riverbank. Avoid having the cyclist near a tree or a bank, as both elements will be merged into one confusing shape and the viewer won't be able to clearly identify them.
If you want to photograph a person's silhouette, it may be interesting to focus on the profile rather than when they're facing the camera. This way, their features (nose, mouth, eyes) are easily recognizable.
To emphasize the result, you can add some contrast in post-processing and completely isolate the silhouette from the background.
When the foreground of a backlit image is quite dark, a very subtle halo of light often appears around the subject. This is known as rim light, and it's great for isolating the subject from the background.
To produce this effect, you need to backlight your subject. Then, slightly adjust your position until you find the sweet spot. Although it doesn't always work, shooting from a low angle usually works quite well.
Include shadows in the composition (5)
Another effect light creates during the golden hour is relatively soft shadows. They are not as dark as when the light is harsh.
Also, because of the low elevation of the Sun, these shadows are usually very long. In fact, the lower the Sun is, the longer they are. Until they disappear during the blue hour, of course ;)
Shadows add texture and detail to the image. They give a sense of volume and depth. You can use them to emphasize some elements in the picture: grooves in the sand, roughness in the wood,...
You can also use shadows as a compositional element in your photo. They help you to balance the warm yellows and oranges of the Sun with other darker colors such as brown, for example.
Finally, although it may seem silly, when you have the Sun behind you, avoid putting your own shadow inside the frame. Make sure you check where your shadow is before you press the shutter button unless you want to you with it! :D
Play with color (6)
I'm just going to give you a couple of hints because I could write a complete guide on the color theory.
These are the types of color that exist:
- Primary colors. They're colors that you can't create by combining them with others. The pure colors are yellow, red and blue.
- Secondary colors. They're the result of a 50% combination of any two primary colors, for example yellow + red = orange.
- Tertiary colors. They're the result of a 25%-75% or 75%-25% combination of a primary color and a secondary color, for example green + blue = turquoise.

By following this dynamic, you can create colors to infinity.
As you combine colors, you create a pattern.
And the pattern that I want to highlight and that will work in your golden hour photos is the scheme of analogous colors. That is to say, those colours that are next to each other on the wheel, for example yellow and light orange.
You may remember that throughout the article I've highlighted that one of the characteristics of the golden hour is that it produces an almost monochromatic scene. Therefore, part of the scene has yellow colors and another part has orange tones.
Thus, your picture is simpler and, in this case, warmer. In addition to this, you give the image a balance that helps make it much more visually pleasing to the viewer.
Color is a very powerful tool: master it and you'll create incredible images.
Draw the viewer's attention with the starburst effect (7)
With the starburst effect you can create amazing results in your golden hour photography.
It's very easy to produce it.
First, use a small aperture (high f-number), between f/16 and f/22 depending on your lens. Then, make sure you use as low an ISO as possible to avoid having noise in the photo (ideally 100 or 200). Finally, adjust the shutter speed according to the exposure triangle.
The key is in the aperture.
By letting too little light through the lens, you're creating a slight diffraction, which transforms a light source (for example, the Sun) into a star.
The type of starburst you create depends on how your lens is made.
Depending on the model, a lens can have a different type and number of blades:
- Straight blades result in better defined rays compared to rounded ones.
- An even number of blades produces the same even number of rays. For instance, a lens with 8 blades produces an 8-pointed star. An odd number of aperture blades produces twice as many rays. For example, a lens with 9 blades produces an 18-pointed star.
Make an artistic use of flares (8)
A flare occurs when a bright light that is not in the camera's field of view hits the front glass of your lens. As a result, the light is dispersed and flares and circles show up in the picture. Most of the time, this effect is very annoying and you'd probably want to avoid it.
However, during the golden hour the Sun is at the ideal elevation to produce a beautiful flare in your photos. Thanks to it, you can reinforce the dynamism of your composition and add depth to the scene.
The easiest way to get this effect is to position your subject by partially covering the Sun. Move around until you find the angle from which you can get the flare. Sometimes you only need to move one or two steps to the left or right.
Another way to get a flare is leaving the Sun out of the frame.
Depending on the lens you're using the flare will be different in size, intensity, color... Experiment with it and you'll be surprised.
Include the Moon into your composition (9)
You saw an example in section 1. If you want to see many more, take a look at the PhotoPills Awards ;)
Did you know that on Full Moon days both the Moon and the Sun rise and set at the same time?
Well, now you know.
So include the Moon into your compositions.
Although planning a Moon shot requires a little more work, PhotoPills is there to help you.
And if you have any doubts, in section 5 of our Moon photography guide you have everything you need to get a jaw-dropping picture of the Moon during the golden hour.
Use filters to reduce the high dynamic range (10)
Sometimes, during the golden hour, you may face a high dynamic range scene.
If you anticipate that this is going to happen while on the field, the best way to control the light is to use one or more of these 3 types of lens filters:
- The graduated neutral density filter (GND)
- The circular polarizing filter (CPL)
- The neutral density filter (ND)
Thanks to a GND filter you avoid blowing up the highlights of the scene. It allows you to subtract more (or less) light from a particular area of the frame.
With the polarizer you can:
- Reduce the light by one stop (-1EV) more or less, although it depends on the model.
- Enhance the colors of a portion of the frame.
- Accentuate or diminish reflections if you're photographing water or a seascape.
A long exposure with an ND filter creates fantastic results with water and clouds.
To master the use of the filters, I recommend you to study in depth our lens filter guide.
Master the bracketing technique (11)
Scenes with high dynamic range are a real challenge for any camera.
In most cases, it will most likely not be able to capture the scene with a single exposure. Even the sensors of the latest professional cameras have problems sometimes.
That's why throughout the article I mentioned that lens filters can be a solution to this problem.
Unfortunately, filters are not infallible. So, depending on the light conditions, a bracketing may be your only option. It allows you to get a picture with detail in both the shadows and the highlights.
Doing a bracketing is very easy.
First you have to shoot a series of pictures (3, 5, 7...) of different exposures. Then you have to merge them with a post-processing software (Lightroom, Photoshop, etc.).
Before you take the pictures make sure that
- The tripod is completely stable and hasn't moved. All images should be identical to mitigate any merging problems during the post-processing.
- The most overexposed photo doesn't have the highlights blown out.
- The most underexposed photo doesn't have the shadows clipped, or noise in the blacks.
I suggest you read section 23 of the exposure guide if you want to become an expert.
Pay special attention to the post-processing (12)
Any photo you take during the golden hour should have warm and pleasant tones.
However, you may be slightly disappointed when you see the image on your computer screen...
There is an explanation.
Your camera doesn't see color the same way your eyes do. The reality is that it averages the color data it gets from the sensor. The problem with that average is that it drastically neutralizes the actual color palette of the scene.
To make sure those yellow and orange tones of the golden hour stand out in your final image you need to work on your post-processing.
For example, you can adjust the white balance by heating the scene and adding a touch of magenta as well. That way you're sure to convey what you actually saw in the field: a scene that's certainly much warmer.
As for the shadows, be careful to keep them more neutral compared to the highlights. The shadows are naturally cooler than the highlights so don't warm up the whole image uniformly.
Finally, you can also play with the HSL (hue saturation luminosity) tools in Lightroom or Camera RAW to get the tonal separation between shadows and highlights that matches reality.
Here's an example of post-processing a golden hour picture with Lightroom.
And if you want to go one step further using Photoshop, I suggest you watch this video by Peter Zelinka.
8.10 golden hour photographers that you should follow
I've always thought that the best way to learn is to see other photographers' work. Especially those with more experience and who master one type of photography.
So in this section I have made a list of golden hour photographers that you should follow.
I've been lucky enough to watch some of them work in the field during the PhotoPills Camp. Don't tell anyone but it's our favorite event of the year... :D
They are true masters and capture scenes during the golden hour that will blow your mind.
If you have any other name in mind that is worth knowing, share it with me and the rest of the PhotoPillers by leaving a comment at the end of this guide :)
Rach Stewart
Rach Stewart is a New Zealand landscape, travel and adventure photographer.
Her passion for nature drives her to spend a lot of time outdoors, hiking in the mountains or surfing on the beach. In addition to long exposures, the golden hour is one of the key features of her photography.
Max Rive
Born and raised in a totally flat country (the Netherlands), Max Rive visited the Swiss mountains for the first time at the age of 5 and was amazed.
Today, he travels all over the world to Chile, Argentina, Greenland, Sweden, Scotland, Norway and New Zealand to capture unique scenes with the mountains as the main subject. And of course, it's very hard to resist the charms of the golden hour in the middle of the mountain...
Simona Buratti
Simona Buratti's work is linked to that of her partner in crime Arnar Kristjansson with whom she lives in Iceland and photographs the country. His images focus on that wonderful natural environment whose possibilities are almost endless. And, of course, Simona has a special sensitivity when it comes to capturing the beauty of Icelandic nature during the golden hour.
Daniel Kordan
Daniel Korzhonov, better known as Daniel Kordan, is a landscape photographer with a special interest in mountainscapes and seascapes.
And what better time to photograph those landscapes than during golden hour. Take a look at his work and you'll realize that he loves that orange light.
Sapna Reddy
The incredibly talented landscape photographer Sapna Reddy has travelled all over the world. Those experiences have led her to develop a special sensitivity for nature and the need to preserve it.
Apart from returning over and over to certain locations to photograph them in different seasons, Sapna also likes to take pictures in those same places at different times of the day like the golden hour or the blue hour.
Francesco Gola
Francesco Gola loves two things: seascapes and Nutella. Although I'm not sure if in this particular order... ;)
And to photograph seascapes as he does, you must have a great photographic eye, a bag full of filters and the perfect light! Many of those images of him with the pastel tones, silky seas and soft clouds that I like so much are shots captured during the golden hour.
He's a light wizard... And that's why we invited him to give a seascape photography Masterclass.
Emilie Ristevski
Emilie Ristevski captivates the eye with each one of his photos. Many of them have a dreamy mood and convey freedom: the idea that there is nothing better than being outdoors...
Shooting under different types of light can change everything, and she often returns to a location to capture different atmospheres in her images. Her favorite moments are the Sunrise and the Sunset. Thanks to the golden hour light she conveys peace, warmth and serenity.
Tobias Hägg
Tobias Hägg is a fabulous aerial photographer who focuses primarily on nature landscapes. Although recently he has also shared his travel and wildlife photos, showing surprising images.
Many of them were taken during the golden hour, capturing a soft and warm light either with his DSLR or his drone.
Cory Richards
The life of photographer and climber Cory Richards is a story of adventure and achievement.
His physical and artistic talent has led him to a prestigious career with National Geographic magazine and he is, without doubt, one of the great photographers of recent decades. With a truly extraordinary mastery of light and composition, his images reflect reality in a unique way.
Max Muench
Max Muench photography work has an outstanding beauty and sensitivity.
But above all it evokes his deep passion for travel. Each image makes you travel in your mind while learning about different cultures, landscapes and people from all over the world.
9.Let's do it!
That's it. You've reached the end of this guide.
And I'm curious... What did you learn?
I'm sure you're full of ideas and you're eager to take pictures during the golden hour.
Aren't you?
You don't have a clue?
It's okay. Spend some time looking at the photos that other PhotoPillers like you have submitted to the PhotoPills Awards. It's a never-ending source of inspiration!
And if you manage to capture a photo during the golden hour that you're proud of, submit it! Your image may be one of the winners we choose once a month... ;)
Do you have any questions even though you've read the whole article? Is there anything you didn't understand?
It's very important that you get everything.
I want to make sure you understand what you have to do and how you have to do it.
So if there is anything you don't understand or don't know, please leave a comment at the end of this guide and I'll get back to you as soon as possible.
And now, it's time to get going.
Only practice and experience will allow you to master photography in golden hour.
Practice and you'll become a master!
Note: Some links on this page are affiliate links. What does this mean? If you buy/rent using these links you're helping support us and it costs you nothing extra. Thank you for your support.
Get this ebook for free now!