Exposure in Photography: The Definitive Guide
Let's face it.
The world is divided into two categories.
Those who know how to correctly expose their photographs regardless of the scene they have in front of them... and those that don't.
If you belong to the first category, congratulations! You're a genius and there's little I can do for you.
But if you are like the rest of the mortals and want to learn how to easily expose your photographs in countless different situations, you're in the right place!
Keep reading.
You'll not only learn how to expose pictures like portraits, the Milky Way, Star Trails, wildlife, travel, black and white, landscape, long exposure, Moon, Sunrises and Sunsets, street, light painting, macro, lunar eclipses, solar eclipses, pannings...
You'll also master your camera in such a way that you'll capture those images that you dream of, both from the point of view of the story you want to tell as well as the exposure.
I'll give you everything you need to succeed.
Basic concepts (light, exposure triangle, reciprocity law, exposure modes, metering modes, and much more), tools such as PhotoPills that will help you with exposure calculations, a ton of practical examples, the mistakes you should avoid... And even the most advanced techniques such as the use of lens filters and bracketing.
Ready?
Welcome to the wonderful world of exposure.
"Exposure is less about twiddling knobs and pressing buttons than about managing light and knowing what you want from an image." - Michael Freeman, Perfect exposure
Get this ebook for free now!
Content
Chapter 1
- 18 quick answers to 18 questions about exposure
- It all starts with light
- What's exposure?
- Caution! The exposure serves your ideas (not the other way round)
- Understanding the exposure triangle
- The stop and how to use it
- The reciprocity law and some examples
- What's the exposure value (EV) and what is it for
- Scene dynamic range vs your camera's dynamic range
Chapter 2
- Check the exposure, examine the histogram
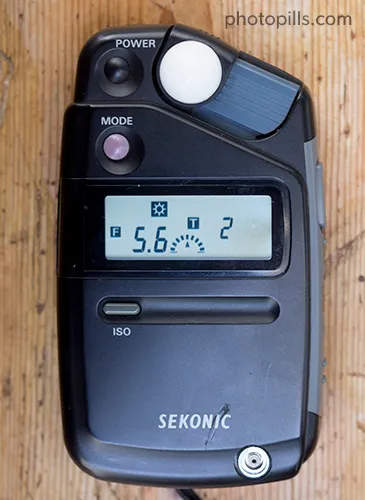
- Your allies (the light meter and the handheld photometer)
- Your camera's light metering modes
- Your camera's exposure modes
- How and when to use the exposure compensation (±EV)
- How and when to lock the exposure (AEL o AE-L)
- Be careful with the light meter (it sees everything at an 18% gray)
- Expose your histogram to the right (ETTR)
- How to expose step by step
- How to expose without a light meter: the "Sunny f/16" and "Looney f/11" rules
- How to expose with the Ansel Adams zone system
- How to expose a video
Chapter 3
- Use filters to successfully capture high contrast images
- Use auto exposure bracketing to successfully capture high contrast images
- 30 practical examples of exposure
- The 12 mistakes you should avoid when exposing
- 10 amazing photographers to inspire you and learn how to expose
- Your time has come...
Chapter 1
1.18 quick answers to 18 questions about exposure
As I did in the depth of field photography guide and before going to the point, let me give you some quick answers to the main questions regarding exposure.
Here we go!
What's exposure? (1)
In photography, exposure is the amount of light per unit area that reaches a photosensitive material (i.e. the film or your camera's electronic sensor) to create an image.
Therefore, exposure defines an input.
Why should I care? (2)
Dominating the exposure will give you complete creative control over what appears illuminated and what doesn't in your images, allowing you to tell the story the way you want to.
All in all, you're looking to control the lightness of your image. That is, how light or dark it is.
Note: Lightness, luminance and luminosity, are three different concepts.
What is lightness? (3)
Lightness is the technical term for how light or dark your final image looks.
Some people confuse it with exposure, but as I said above, that means how much light is captured by the sensor.
Remember, exposure describes the input, so lightness describes the output.
Are there any exposure calculators? (4)
Yes... Take a look at PhotoPills ;).
Not only does it include an awesome exposure calculator but many more tools. All of them will help you plan your photos to always be in the right place at the right time to capture the scene you've imagined.
It's about turning your ideas into real photos :P
What affects exposure? (5)
Three variables affect exposure: aperture (lens f number), shutter speed and scene luminance.
Once you dominate these parameters, you'll dominate exposure.
What's the aperture? (6)
The diaphragm aperture (hole through which light travels through the lens) regulates the amount of light that goes through your lens to the camera's sensor.
The greater the aperture of the diaphragm, the more light will be collected by the sensor.
In addition to exposure, the aperture you use will also have an impact on depth of field. So you should choose its value not only thinking about the exposure, but also about the depth of field you want to get in the photo.
What's the shutter speed? (7)
The shutter is a sort of curtain that's in your camera. It allows you to let light pass through the sensor for a certain period of time. That period of time when the shutter is open is the shutter speed.
The slower the shutter speed the more light will be collected by the sensor.
Apart from exposure, the shutter speed you set will also affect motion. So when deciding the settings, think about how you want to show motion in your picture.
What's the scene luminance? (8)
Technically, luminance of light is a measure of the luminous intensity per unit area of light traveling in a given direction.
It measures the luminous intensity of an area: quite literally how bright or dark it appears.
What's the reciprocity law? (9)
The reciprocity law is an important principle of exposure.
It basically refers to the relationship between the aperture and shutter speed values. The aperture value and shutter speed are inversely proportional which means, if one value increases, the other decreases.
Note that ISO has nothing to do with the reciprocity law! ;)
What's the correct exposure of an image? (10)
It depends!
Apart from the aperture (lens f number), the shutter speed and the scene luminance, there's another element that determines the appropriate exposure of an image – the sensitivity.
Thus, establishing a "correct" exposure is totally subjective. A photograph may have a correct exposure for you, but not have it according to another photographer.
A scene can be exposed in many ways, so you'll achieve a correct exposure if you get the effect you want to convey or the result you have in mind.
What's the sensitivity (or ISO)? (11)
Sensitivity (or ISO) is a concept initially used for photographic film. A film has a certain sensitivity or speed depending on how much exposure it needs to produce a readable image.
The film's sensitivity is measured on a scale published by the International Organization for Standardization (ISO). Hence its popular name.
In digital photography ISO controls the relationship between exposure (the input) and lightness (the output).
It's inversely proportional to the exposure that will produce a pleasing lightness in the final image:
- With a low ISO you need a large exposure to produce that lightness.
- With a high ISO a small exposure will do it.
The ISO setting controls how the camera processing "develops" the raw image inside the camera.
Unfortunately, whilst a high ISO allows a good lightness from a small exposure, it doesn't solve the effect of using a small exposure, which is a high level of noise. Light is made of individual particles called photons (section 2), and when the exposure is small you can see the uneven pattern of those photons, which we call noise.
Choosing an ISO setting programs your camera light meter to center at the "correct" exposure for that ISO – the exposure that will give good lightness at that ISO setting.
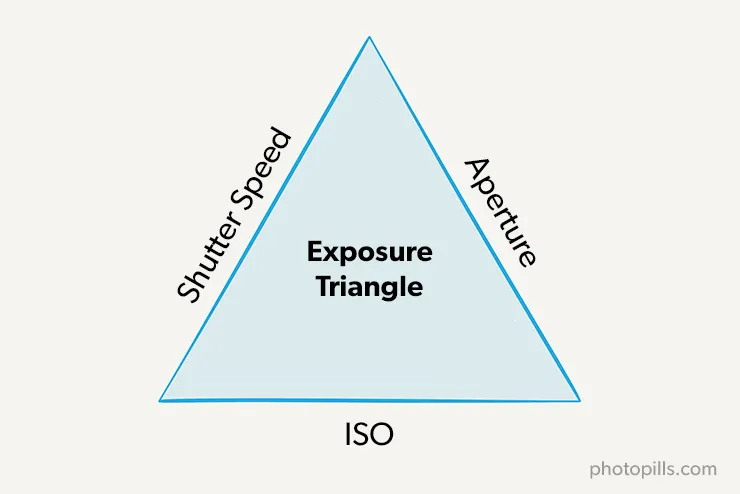
What's the exposure triangle? (12)
A basic and essential principle of exposure is reciprocity.
In photography, reciprocity is the inverse relationship between the aperture and shutter speed values. This means that you can gain more light by increasing the aperture or reducing the shutter speed, or by reducing the aperture and increasing the shutter speed.
Therefore, to maintain the same exposure:
- If the aperture is wide or larger (allows a greater amount of light), the shutter speed needs to be fast or shorter (exposure time is decreased).
- If the aperture is narrow or smaller (allows a lesser amount of light), the shutter speed needs to be slow or longer (exposure time is increased).
But what happens if you still don't get the correct exposure for the ISO that you have set?
Clearly you must change the ISO setting or compromise on something else.
Factors that will cause you to fail to get the correct exposure are usually the following:
Your need to avoid camera shake or motion blur, which will limit how slow a shutter speed you can set.
Or, you might need a small aperture to get enough depth of field to cover your subject.
If you feel that you'll get too much noise with the lower exposure at a higher ISO setting, then you need to compromise on one of these two.
Since aperture, shutter speed and ISO are the 3 camera settings that you can decide (contrary to the scene luminance, for instance), the combination of these elements is generally called the exposure triangle.
However, only aperture and shutter speed directly control exposure, so it should be called the lightness triangle. Unfortunately, despite being an error, the name "exposure triangle" has become so popular that you'll hear and read it everywhere.
What's the exposure value (EV)? (13)
The exposure value (EV) is a number that represents a combination of a certain aperture (f number) and shutter speed.
The EV is also used to indicate an interval on the photographic exposure scale. So it's commonly referred to as a stop.
Imagine that there is an amount x of light coming into the sensor:
- If 2x the amount of light reaches the sensor when you take the next photo, you've increased the exposure by 1 stop.
- On the contrary, if half of the light (x/2) reaches the sensor, the exposure of your photo has decreased by 1 stop.
By changing the exposure parameters, the light reaching the sensor will vary in a given number (or fractions) of stops.
What's the dynamic range? (14)
The dynamic range is measured in exposure values (EV) or in stops. It establishes the relationship of the existing light intensity between the darkest shadows and the brightest highlights.
There are 2 types of dynamic range:
- The dynamic range of the subject. It refers to the range of light intensities from the shadows to the highlights.
- The dynamic range of the camera. This refers to the range of light intensities that the camera can record.
The highest light intensity is set when the intensity is high enough that the camera clips the highlights. The lowest is set by the noise floor, the irreducible electronic noise of the camera. If the signal given by a low light intensity is smaller than this level, it can't be measured.
Therefore, a camera with a large dynamic range is capable of capturing simultaneously (in the same frame) the detail in some very dark areas of the scene and in others that are brighter.
If the dynamic range of the subject doesn't exceed the dynamic range of the camera, you can get an ideally exposed image.
What's the histogram and what's its practical use? (15)
The histogram is a statistical graph of the lightness values in your final image (and not the RAW file!).
The left hand side of the graph represents black (darkness, shadows) and the right hand side represents white (light). Everything in between are the shades of gray.
It's very useful because it gives you information about the range of tones or levels of lightness (how dark or bright a color is) present in your image. With the help of the histogram you can know if the photo is "correctly" exposed or not.
What's the exposure compensation (±EV)? (16)
It's a setting, measured in exposure values (EV) or in stops, that changes the exposure at which your meter centers (or what is the "correct" exposure).
The processing set by the ISO control doesn't change, so if you use a positive value of exposure compensation the exposure will increase and your photo will become lighter. Conversely, when you set a negative value, the exposure decreases and the image becomes darker.
What's depth of field (DoF)? (17)
Depth of field (DoF) is the distance between the closest and farthest element of a scene that appears "acceptably sharp" on the image.
If you want to read more about it, take a look at the depth of field photography guide.
What's long exposure photography? (18)
It's a technique that consists in leaving the shutter open for a relatively long period of time. By doing this you get amazing results like car light trails, ghostly people or a photo of the coast with the silky water effect.
In section 22 you'll discover how to take long exposure photos with the help of lens filters. You'll also learn how to use the PhotoPills exposure calculator to determine the shutter speed you need when using a lens filter.
If you want to become a long exposure master, have a look at our:
But let's not jump ahead, let's start from the beginning...
2.It all starts with light
Light is the soul of photography. Without light there is no photo.
So if you want to make truly legendary pictures, you should master the light (both natural and artificial).
Without knowing light properly, you can't expose correctly, nor create the desired effect. Therefore, you won't be able to take that photo you're looking for.
Ultimately, learning the attributes of light (intensity, direction, quality and color), as well as the difference between incident and reflected light, gives you a solid base to take your equipment, expose and make the most out of the different scenes that you'll face.
Before we start, I suggest you read our guide to master natural light photography to take amazing shots.
And now, let's go for it!
What's light
Sorry to all the physicists in the room! I'm trying to simplify as much as possible, so I dare say that light is the visible part of the electromagnetic radiation generated by a specific source of energy (the Sun, a flashlight, a LED bulb, a flash, a fire, etc.).
It's formed by elementary particles called photons.
What's a photon
A photon is a particle without mass that carries all forms of electromagnetic radiation, including gamma rays, X-rays, ultraviolet light, visible light, infrared light, microwaves and even radio waves.
But to make things easier, a photon is a tiny particle. Light is made of a whole bunch of them.
Whilst that might seem like abstract physics, it actually has an effect on your photography. If you make an image from not many photons you'll see a random pattern in them, which we call noise. Use a lot of photons and that pattern smooths out.
It's like painting with an airbrush. If you cover lightly, you can see the individual droplets. The more ink you apply the smoother it gets.
Let me show you what the attributes of light are and how they affect you when you take photos.
Light attributes
As I told you at the beginning of this section, light is the soul of photography, the raw material, the basic ingredient. Without it, it wouldn't be possible to take pictures. It's essential.
This means that depending on how you use it, you get one result or another, expressing in different ways what you saw or happened.
That's why it's fundamental to know its attributes, so you're able to understand it and manage it the way you want.
And I don't refer only to natural light but also to any kind of artificial light.
The four attributes of light are:
- Intensity: high or low.
- Direction: front, side, rear, zenith or nadir.
- Quality: hard or soft.
- Color: warm or cold.
Light intensity
Intensity is the amount of light that falls on (or falls upon) a subject. It determines how much the subject is illuminated.
If the light is very intense, it brightens the subject too much and the shadows are very noticeable (very dark).
On the other hand, if it's not very intense (or dim), the subject is darker, less illuminated, but the shadows are less dark, less harsh.
Depending on the intensity of light in the scene and the area(s) you want to highlight, you should decide your camera settings in one way or another when exposing your photos to allow the amount of light you want to reach the sensor.
So knowing how to correctly measure the intensity (or quantity) of light in the scene plays a fundamental role when calculating the exposure. Especially if you want to get in your photos this "right" exposure you are looking for.
And how do you measure, or meter, light?
You measure it with an exposure meter, whether it's internal (inside the camera) or external.
In section 18 I will explain to you in full detail how and where to meter light with your camera when exposing your pictures.
Can you control light intensity?
Yes.
As a photographer, you can often affect the light intensity that you want to have in the scene you are photographing.
For example, if you're shooting outdoors, choose the time of day when the light is less intense (golden hour, blue hour and twilight) or more intense (rest of the day).
Or use, both outdoors and in the studio, different techniques and lighting devices or light reducers.
For example, flashes, flashlights and LED panels are active elements that produce light by themselves and are used to add brightness to the scene. In addition, passive elements (diffusers, filters, reflectors) alter the illumination although they are not light producers.
Light direction
Light direction determines many of the effects that you'll capture with the camera (volume, textures, silhouettes, etc.).
Therefore, you have to work with natural light and/or artificial light (light schemes) to achieve the effect you're looking for in your photo.
Remember that light direction is the angle with which light hits the subject.
As a rule of thumb, when you are exposing your picture, ask yourself:
- How does light shine on the subject from the position in which I am (i.e. from your camera)?
- How do I want it to affect the subject (or scene) according to the type of photo I'm looking for?
Light can have several types of directions:
- Frontal lighting.
- Side lighting.
- Back lighting.
- Zenith lighting.
- Nadir lighting.
Frontal lighting
It's located in front of the subject so it faces it. It illuminates all visible surfaces of the subject. It highlights the color but it eliminates shadows, subtracting volume and texture.
Side lighting
It affects the subject from the side. Thanks to this light the viewer has a sensation of more volume and it increases the texture of the subject.
For example, in night photography, when photographing the Milky Way or Star Trails, you can take advantage of the side light provided by a low Moon (when it has little elevation) to capture volume and texture in the foreground.
Back lighting
It comes from behind the subject. It helps to highlight the subject's silhouette, but subtracts information from other elements such as color or texture. Back lighting allows you to make spectacular portraits with perfectly shaped subjects, landscape and even spectacular silhouettes of full Moon.
Zenith lighting
It comes from a single point of light located vertically above the subject. When you control it while shooting in the studio, you can create incredibly mysterious pictures.
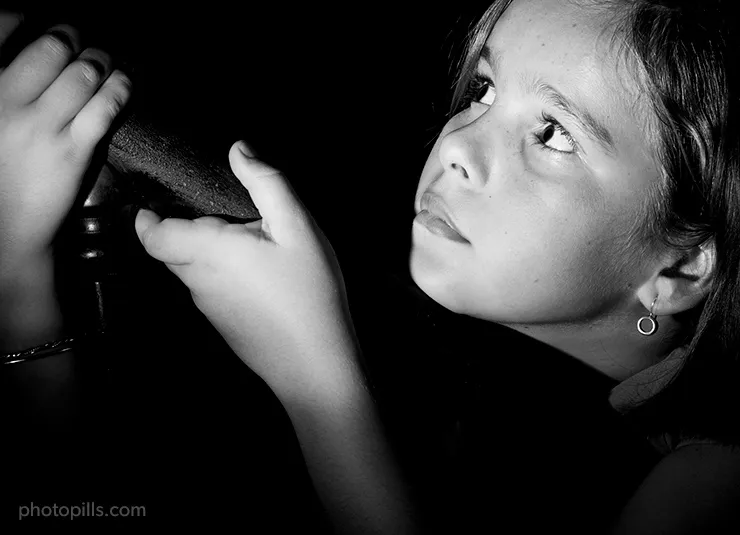
Nadir lighting
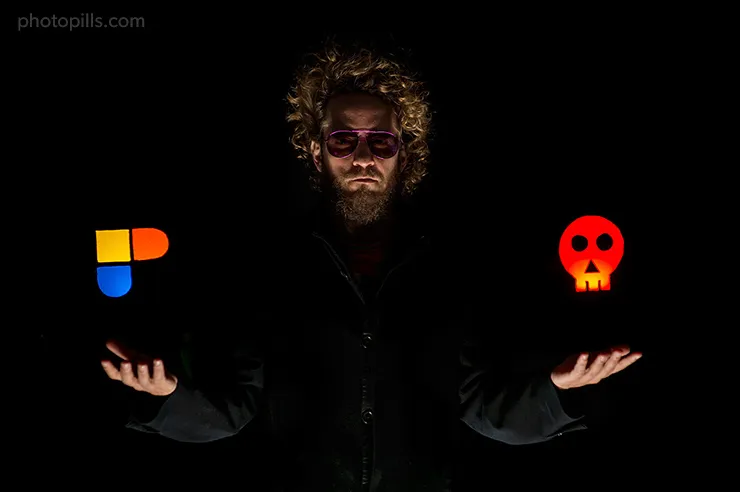
It comes from below. It rarely occurs in natural conditions, although good examples are snow and water reflections. You can also use it to make risky portraits, such as the one you can see below.
Here you can see Rafael (the Bard) playing tough guy as in Matrix:
"This is your last chance. After this, there is no turning back. You take the Skull pill: the story ends, you wake up in your bed and believe whatever you want to believe. You take PhotoPills: you stay in Wonderland and I show you how deep the rabbit-hole goes. Remember: all I'm offering are Legendary Photos and Goosebumps, nothing more."
In addition to light direction, there are two other factors that you should keep in mind when taking the picture:
- Light direction rarely comes from exactly one side or the other. Most of the time it comes from a combination of several directions.
- An object isn't usually illuminated by a single source of light but by several ones. Depending on the intensity (i.e. weighting) of each of them, the scene will be different. Obviously, the most intense light will be the main one.
Light quality
Light quality shows the distribution of lights and shadows in your scene. That is, the transition between the two.
When I refer to light quality, I don't mean whether it is good or bad but whether it's hard or soft.
Hard
It comes from a very specific source and produces a marked and sudden transition from light to shadow. The shadows are very dark and contrasted with very well defined edges.
For example, the light produced by the flash or the Sun at noon (in most of the world) is a hard light. There is hardly (pun intended... :)) a transition between lights and shadows. In this case, there is a lot of contrast.
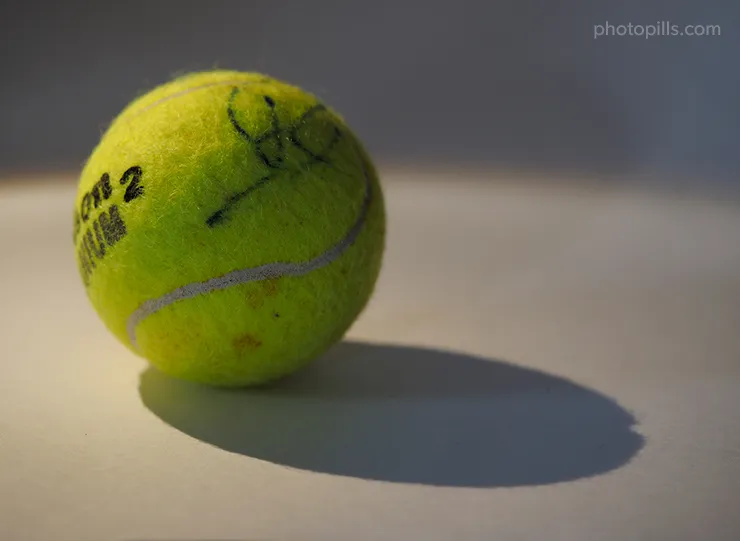
Hard light gives you a feeling of aggressiveness and strength.
You can use it, for example, to create high contrast scenes with portraits or still lifes while separating dramatically the contrast from the scene.
High contrast scenes are a challenge for any photographer. In section 22 I'll show you how to capture high contrast scenes with filters. And in section 23, I'll explain to you how to do it using the bracketing technique.
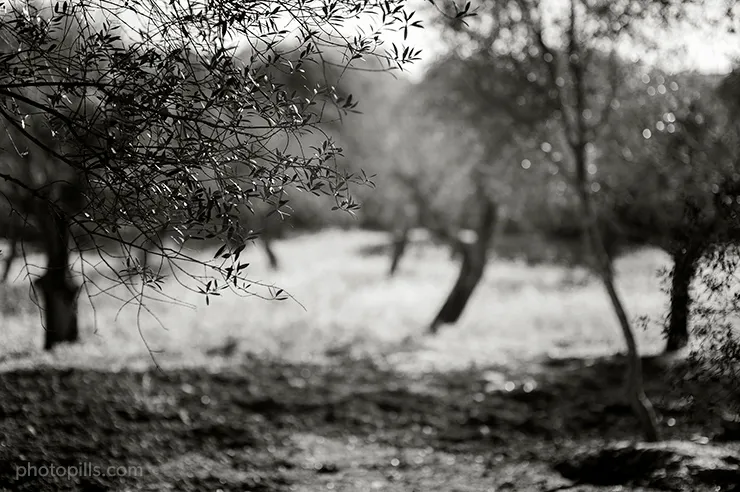
Soft
Unlike hard light, soft light causes a progressive transition between lights and shadows. It's a very dim light and it blurs the outlines of the shadows. It smooths the image, removing contrasts and textures.
Soft light helps you convey tenderness, melancholy...
Depending on the light quality you have in the scene you can take different types of pictures. If you're skilled enough you can also use a tool to change light quality.
For example, to soften a hard light use a diffuser or a reflector. And to add a hard light, use a flash or a flashlight.
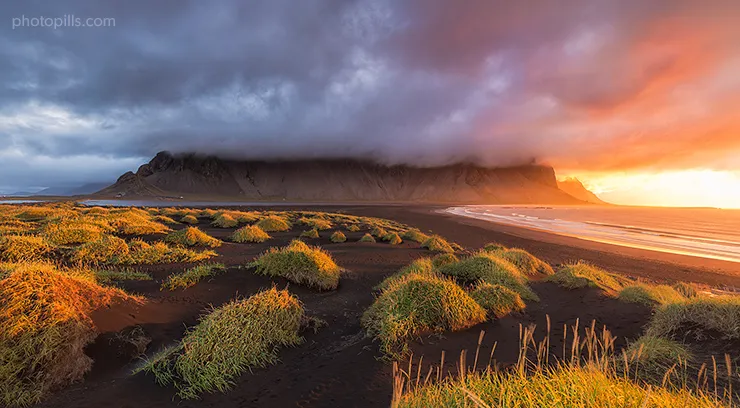
As for natural light, take advantage of the moments of soft light that occur during the day: the golden hour and the blue hour.
You know what they say, if you can't beat the enemy, join them!
Throughout the net you'll find tons of web pages that will tell you when these hours happen on an exact date.
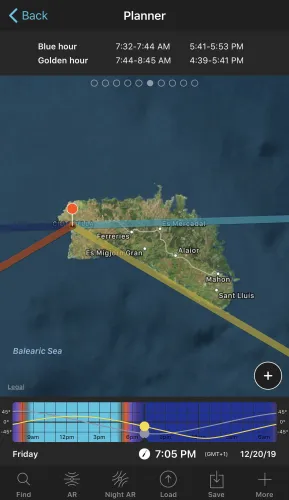
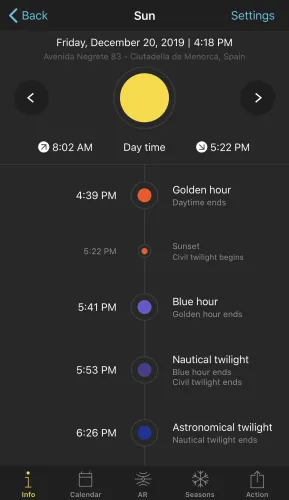
But if you are one of us (you use the PhotoPills app), you have all the information about the golden hour, the blue hour and the twilight, for any date and part of the world, both in the Sun tool and in the Planner.
Finally, there are two more factors to keep in mind:
- The size of the light source relative to the illuminated subject is crucial to know what type of light you have. Thus, a source of light produces hard light over an object when this object (your subject) is larger than the light source. On the contrary, it produces soft light when the object (your subject) is smaller than the light source.
- Similarly, for a given size, the distance to which the subject's light source is located determines the light quality. I'll give you an example. The Sun is a huge source of light. However, when it's far away from your subject, it becomes a point and it produces harsh shadows.
Light color
"Light is therefore color." - J. M. W. Turner
When light strikes a body, there is a part that is reflected, another one that is transmitted through it and another one that is absorbed.
The thing is you only see color when the reflected light reaches your eyes. And, as long as light doesn't interact with matter and reaches your eyes, you don't see it, you don't see color.
Think of deep space, you see it completely dark. However, it's full of light.
Before taking a picture, if you pay attention to the scene, you'll realize that light tends towards two extremes (or dominances):
- Hot colors (yellow, orange, red).
- Cold colors (purple, blue, green).
Actually, the way the scene colors are displayed in a picture depends on you and your artistic vision. And you might not always want the final image colors to be the same as those in the scene. Sometimes you may want to change them.
When we lived in the days of film negatives and slides, or when you took pictures in black and white and wanted to change the light color, you had no choice but to use color filters.
Today, everything is different.
Although I am a lover of analog photography, I must admit that in the digital world, apart from the color filters, we have another very powerful tool: the white balance.
"Did you say white balance Toni?"
Yes, I know the word sounds a little bit intimidating...
But it's not.
In my opinion, the white balance is a tool that we photographers have to show our artistic side in terms of how colors look in our photos.
I'm not going to go too far on this concept, but I would like you to keep in mind that you can adjust the white balance directly on camera or later on with an editing software.
This tool allows you to add a warm or cool cast to your photos.
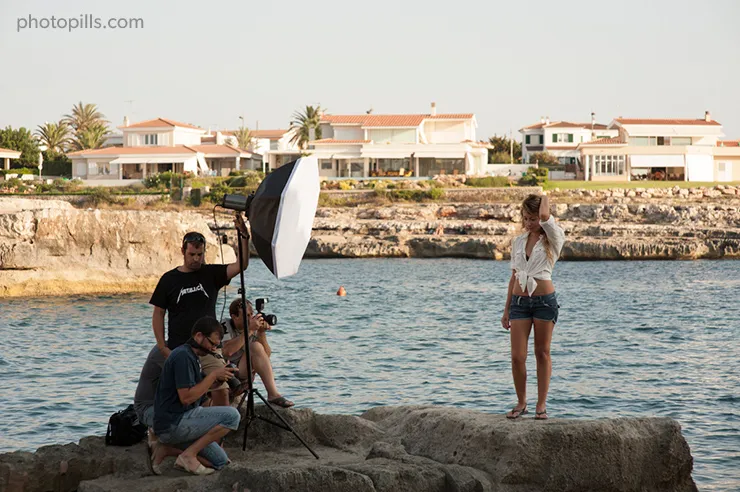
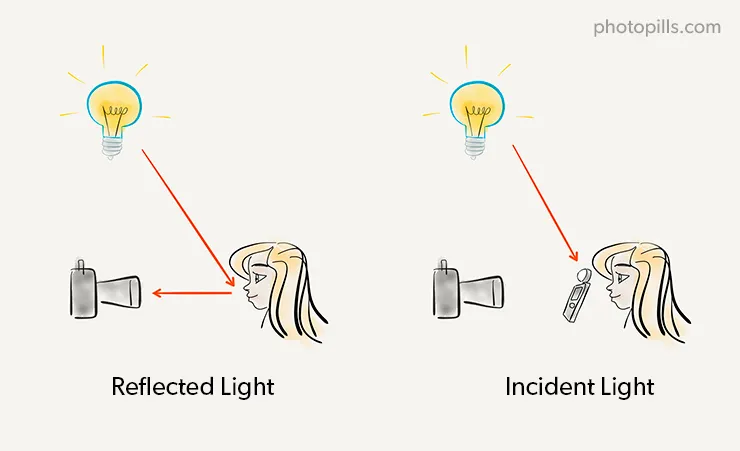
Incident light vs reflected light
It's important to know the difference between incident and reflected light, especially when you take pictures in a studio. It helps you understand where you need to meter light in order to calculate the exposure.
Don't tell me you've never metered light in the wrong place! It's a typical rookie error... :P
On the one hand, incident light is the light that the subject you're going to photograph receives. You can meter it with your camera's light meter or a hand-held photometer by placing it next to the subject and pointing it towards the camera.
On the other hand, reflected light is the light that the subject you're going to photograph reflects. You can meter it with your camera's light meter or a hand-held photometer placed next to the camera and facing the subject. Sometimes, it gives you an estimated result that may require your interpretation.
The problem with reflected light metering is that the meter has no way of estimating how reflective the scene you're photographing is. The meter is set up on the basis that scenes usually reflect about 18% of the incident light.
But what if the scene that you're photographing doesn't?
Suppose it reflects 50% (like a snowscape). Your meter will tell you to set an exposure that will make it look like 18% gray, and the snowscape won't look how you remember it.
Incident metering, however, measures the light illuminating the scene directly, so isn't subject to this problem. Handling this problem with reflected light metering is the main reason for having an exposure compensation control – to adjust for scenes that don't conform to 18% reflectivity.
Usually, when you expose your photos you meter the reflected light using your camera's light meter. It's also the only way to determine the exposure value when you can't be close to the subject you're about to photograph.
In section 12 I'll give you more details on the different methods that you can use to meter reflected light with your camera and when to use each one of these methods.
Great!
Now that you have the basic notions of what light is and what its attributes are, let's move on.
Let's see what exposure is, the journey that the light performs until reaching the sensor and what settings of your photo gear you can use to make the "correct" (or desired) exposure.
There's no way back.
It gets bumpy from here on out!
3.What's exposure?
Exposure is a quantity of light.
It's the amount of light that reaches a photosensitive material (the film or the sensor of your camera) to create an image.

"Great Toni, exposure is a quantity of light. But how much light do I need to expose a photo correctly?"
That, my friend, depends on the scene you have in front of you, and the result you want to get.
It depends on whether you want to capture more or less detail in the dark (shadows) or bright tones (highlights). In the end, it depends on the story you want to tell.
Therein lies the art of photography. You must exercise the right control over the light that reaches the sensor (or film) to get the image you want.
In other words, your photo will vary depending on how much light you let into the sensor, that is, it will vary depending on how you expose the photo.
Note: To avoid repeating the same thing over and over, let's assume you have a digital camera, so I'll always talk about the sensor. If you use a film camera, the explanation would be the same, you just have to replace "sensor" with "film".
How exposure affects your pictures
The exposure (the quantity of light you've allowed the sensor to capture) along with the ISO setting you've chosen determines how light or dark your photo is. In other words, the more light reaches the sensor, the lighter your image is.
And the other way round, the less light you let into the sensor, the darker your picture is, depending, of course, on the ISO setting.
Your goal is to get the level of lightness/darkness you want in the photo. A level that allows you to show through the picture the scene as you see it or want to transmit it. To do that, you have to decide the combination of ISO and how much light you want to reach the sensor.
"So how do I control the amount of light reaching the sensor?"
To get it right and never forget it, you should first visualize the journey that the light makes to get to the sensor.
This journey will lead you to the well-known exposure triangle that I'll talk about in great length in section 5.
Two of the elements that are part of the exposure triangle (aperture, shutter speed and ISO) allow you to control the amount of light that reaches the sensor in your camera and, therefore, the exposure.
How to control exposure: initial thoughts
Light goes through a series of elements along the journey starting on its origin and ending at the sensor of your camera. These elements are the lens and the shutter, and they allow you to control the amount of light reaching the sensor.
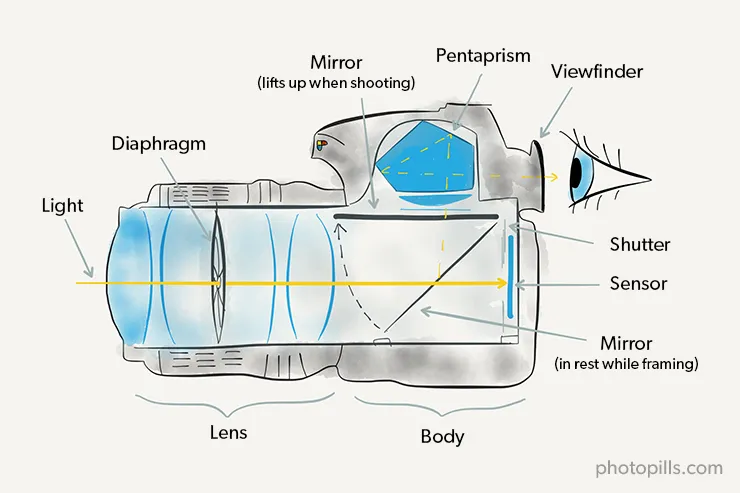
The lens
First, light reaches the lens of your camera. As long as you don't use one or more lens filters in front of the lens, of course. If you use lens filters, these are the first tools you can use to reduce the amount of light reaching the sensor.
I'll talk about lens filters and how you can use them in section 22. And if you want to expand on the subject, you should definitely read our lens filters photography guide.
For now, and to make things simpler, I'm going to assume you don't use lens filters.
Well, once inside the lens, the beam of light goes through the diaphragm. It allows more or less light depending on the aperture you have selected.
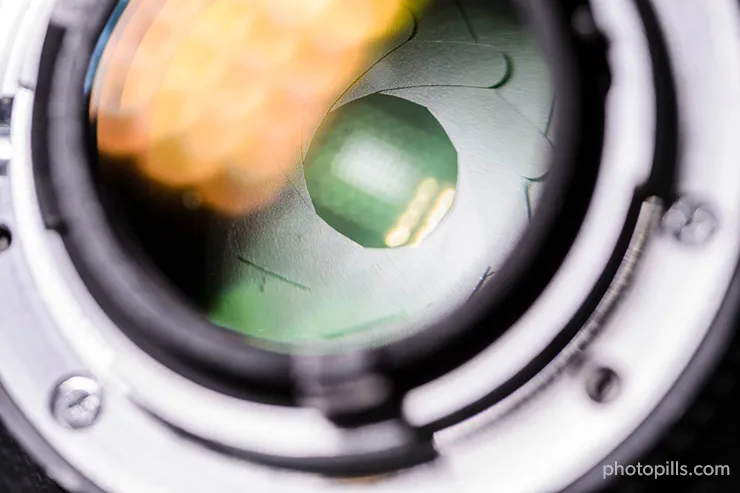
So the aperture is the first element of the exposure triangle that you can use to adjust exposure.
Of course, the larger the diaphragm, the higher quantity of light reaches the sensor and vice versa. If you want to allow less light through, use smaller apertures. In other words, close the diaphragm.
Once it has gone through the diaphragm, the light beam reaches the shutter. Here comes the second element of the exposure triangle: the shutter speed.
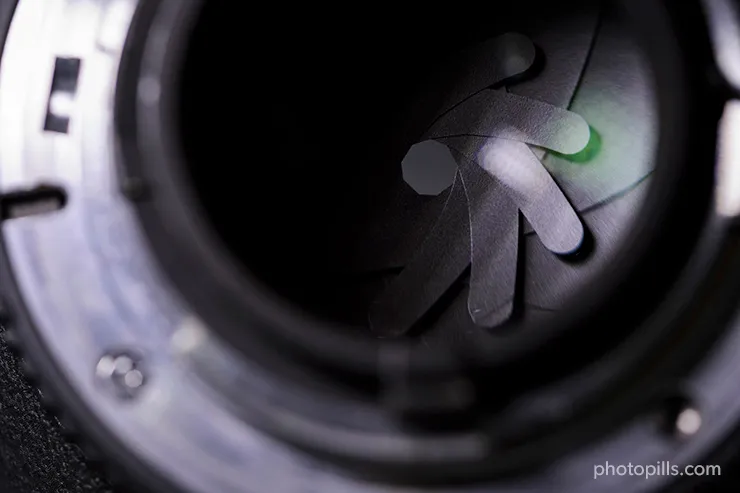
The shutter
The shutter is a sort of curtain that allows light to reach the sensor (when it's open) or prevents it (when closed).
The period of time during which the shutter is open is called the shutter speed. It's also known as exposure time. I'll use both terms throughout the article.
During the time the shutter is open, the beam of light hits the sensor of your camera. Therefore, when you set its value, you're affecting the exposure.
The slower the shutter speed, the more light reaches the sensor and vice versa.
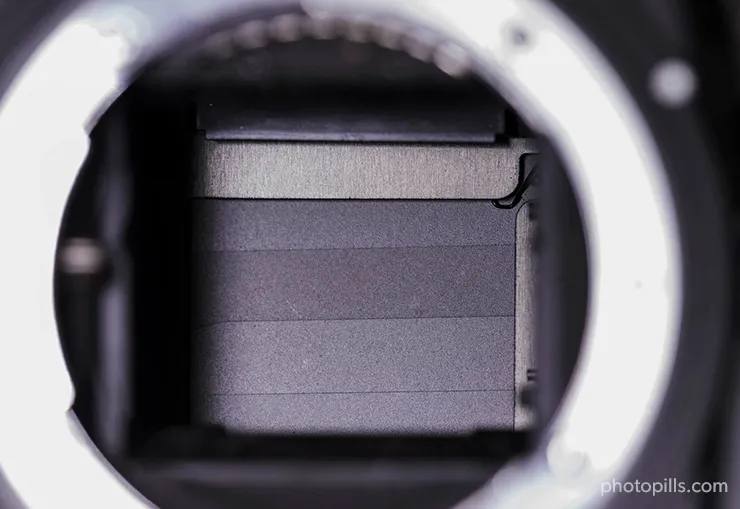
The sensor
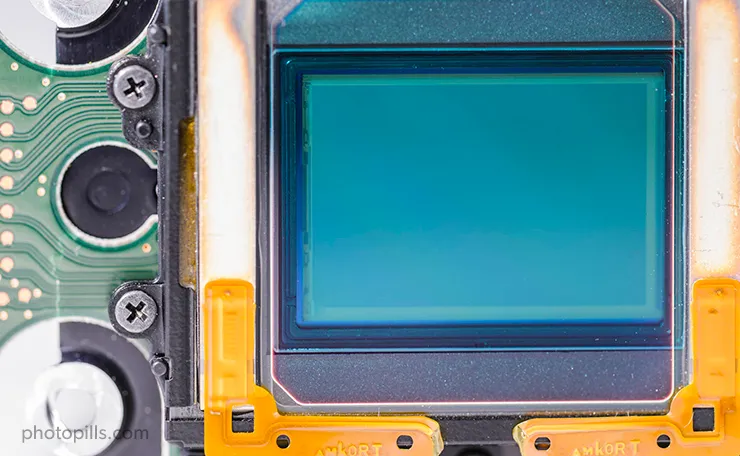
The sensor is the place where the image is created inside the camera. It's made of photosites or semiconductors sensitive to light.
When the photons of the light beam impact on the photosites, they are captured and processed, generating the digital image of the scene that the camera sees.
Remember that the ISO controls the exposure that will produce the lightness (how dark or bright your image is) that you want. The penalty of a small exposure is noise, so in general you want to set the lowest ISO which allows you to use the shutter speed and aperture you need for the photographic effect you're aiming for.
I want you learn that these parameters allow you to control the exposure and the creative effects that we'll see in section 4.
Now, before going into the details, let's dig a little deeper into the concept of exposure triangle.
Introduction to the exposure triangle
When I explained to you the path that the light follows through the camera, I mentioned 3 key parameters: aperture, shutter speed and ISO.
Together they form the well-known exposure triangle.
Once you master the exposure triangle, you will dominate your camera (and even the world!).
You might have forgotten it, but I also mentioned a fourth element that will help you control the light: the use of lens filters.
But this is an additional element that not all photographers use, and if they do they use it only in certain situations. So I'll explain how and when to take advantage of the filters in section 22. And you can go even deeper reading our lens filters photography guide.
Going back to the exposure triangle...
Depending on what decisions you take when setting the aperture, the shutter speed and the ISO you'll get one result or another. That is, one photograph or another.
The shutter speed and aperture directly affect the look of the photo, by impacting depth of field and motion blur or shake. The ISO does indirectly by leading you to use a higher or lower exposure, which affects the noise.
Aperture and shutter speed affect directly the amount of light reaching the sensor:
- If you close the aperture, you reduce the size of the hole (the diaphragm) through which the light enters the lens, so the amount of light reaching the sensor is smaller.
- If you open the aperture, more light comes to the sensor.
- If the shutter speed is fast, the amount of light reaching the sensor is lower.
- If the shutter speed is slow, more light arrives at the sensor.
The ISO value changes the lightness that you get from a given exposure, and therefore leads to the use of high or low exposures.
The ISO control sets how much light you're going to use for a "correct" exposure, and the aperture and shutter speed allow you to set that exposure using the meter to guide you.
Note: Now that you know that the exposure relies solely on aperture, shutter speed and scene luminance, you've figured out that the concept of "exposure triangle" makes no sense. ISO has no impact on the photo's exposure, but on its lightness (how dark or light it is).
However, since aperture, shutter speed and ISO are the only settings that you can control in camera, it's widely accepted that "they determine the exposure of an image and that they form the exposure triangle".
Unfortunately, there's a naming error. This triangle shouldn't be called "exposure triangle", but rather "lightness triangle".
Therefore, for the sake of simplicity and because this is a beginners' guide, you'll notice that from time to time I'll refer to the exposure triangle despite not being technically correct.
The "correct" exposure
"Very well Toni, I understand more or less how to control the amount of light captured by the sensor. But... How much light is the right amount? What is the correct exposure?"
Well... It depends.
Technically, the "correct" exposure is the one for which an 18% gray scene would give the nominal exposure for the ISO setting that you chose, but in reality, you might find that a different exposure gives the effect that you're looking for.
For a certain photographer, a picture may have a correct exposure while another photographer may consider it badly exposed. It all depends on whether or not you get the effect you want to convey, or the result you have in mind.
If you get it, then you have the photo you want and the exposure is perfect for you.
"OK Toni, but there surely is a consensus on what could be considered to be a correct exposure."
You're right.
The "correct" exposure might vary according to whether you're letting the camera do the processing or whether you want to use a RAW file and process it yourself.
In the latter case, you're trying to avoid losing information in the shadows or highlights. In the former, you're trying to get the lightness and tonality you want.
For a raw workflow it's the exposure that takes full advantage of the camera's sensor capacity to capture as much information as possible from the scene, capturing detail in both the shadows and the highlights.
But getting that "right" exposure is not always possible.
The general belief is that "the sensor in your camera is not capable of capturing the same brightness levels as your eyes do".
However, the truth is that a camera sensor can capture a much greater range than the eyes do.
The thing is that camera systems can't match the image processing capability of the human brain yet. So you need to provide image processing systems with much better starting information, which means solving the dynamic range problem in the camera as best you can.
And this is where the difficulty lies.
Sometimes, you'll face situations where you won't be able (or will not want) to capture all the information in the scene and you'll have to decide what to do:
- Lose information in the shadows (there will be areas that will be black).
- Lose information in the highlights (you will have areas that will be white).
- Use other techniques so that the sensor is able to capture all the actual information, such as the use of lens filters (section 22), blending of several shots (section 23) or adding light to the scene (artificial light, the Moon...).
In this type of situation, you have no choice but to go out on a limb and decide what you want to capture in the image.
If you choose to lose information (detail) in the shadows or blacks, you’ll get a dark photo. On the other hand, if you decide to lose information in the highlights or whites, you will get a light photo.
I know, I know...
In either case, most people will say that their image is underexposed instead of dark or overexposed instead of light. But these terms aren't synonyms.
Remember that aperture, shutter speed and scene luminance affect the exposure. ISO doesn't.
Now, let's go back to the idea of "correct" exposure.
Sometimes you will want to have a very dark or a very light image. For example, to get what is called a low key or a high key.
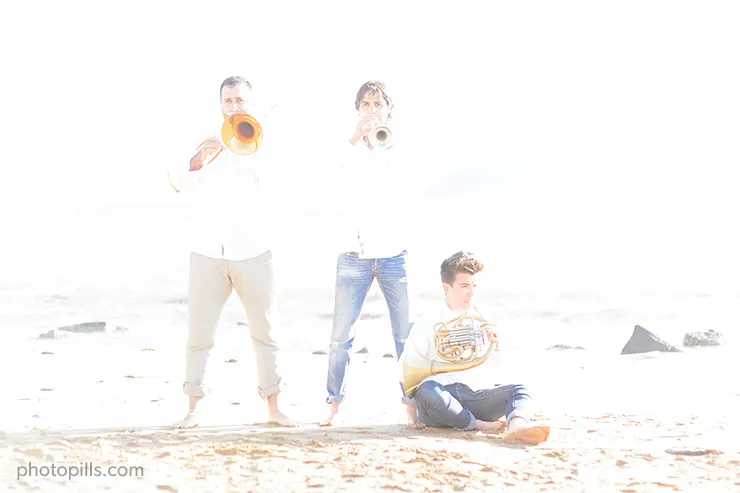
In the picture below I decided to shoot a high key, overexposing a large part of the scene, so that the musicians would blend perfectly with the environment. That's how I managed to focus on the most important parts of the scene: the faces and the instruments.
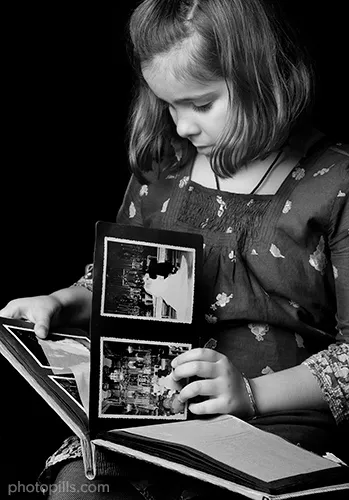
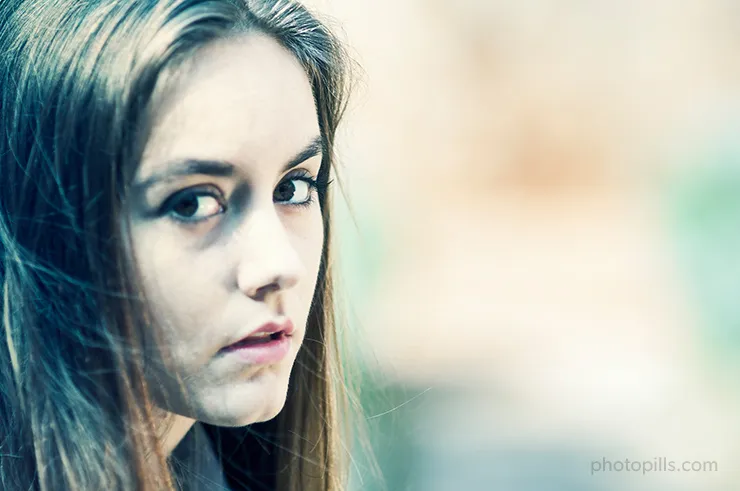
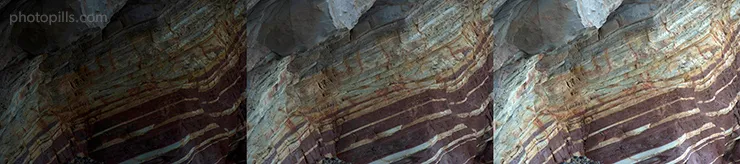
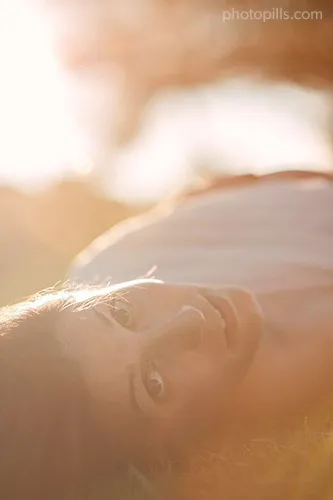
In the previous image I overexposed to focus on subjects, so in the next one (below) I decided to underexpose (shoot a low key) to highlight the beauty of the model's eyes and face.

Photography is imagination... And, sometimes, a scene that seems impossible to capture becomes a whole story.
The spectacular silhouettes that you can capture by completely underexposing the foreground are a good example.
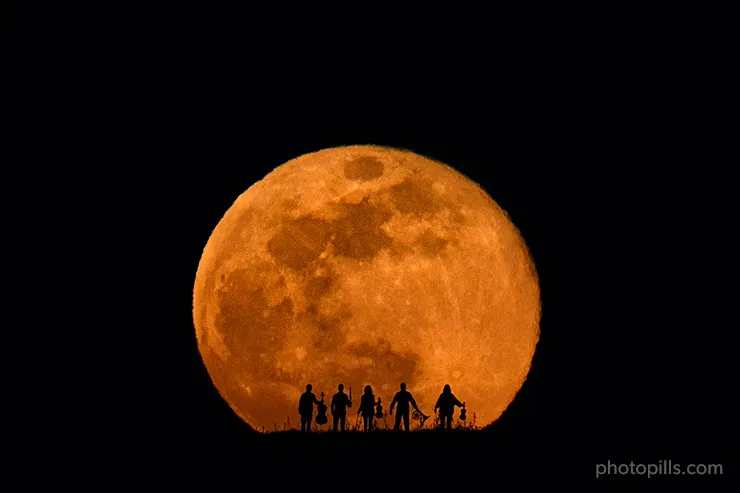
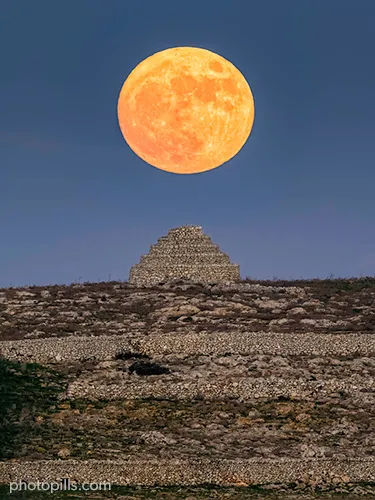
I am in love with the Moon and its power to tell stories. You can do it too. Study our 'How to shoot striking Full Moon silhouettes videos' article and give it a try. But be cautious: photographing Moon silhouettes is incredibly addictive.
Another example (and a huge challenge) is backlight. By mastering the exposure triangle you can capture beautiful backlights without losing too much information.
The "wrong" exposure
What's real is a "wrong" exposure!
For me, a wrong exposure is the one you get when, in certain light conditions, you can't shoot the picture with the lightness you want.
That is, the final image is much darker or much brighter than your original idea. You don't get the photo you want.
This can happen for several reasons and my goal with this article is to help you overcome them:
- Gear limitations (camera, lens, etc.): When gear limitations don't allow you to get the result you want.
- Lack of control of the exposure triangle: Aperture, shutter speed and ISO.
Tips
- Aperture and shutter speed allow you to get the correct exposure for the ISO you're using. But as you'll see in section 4, what determines these settings is not the exposure but the idea of the photo you want to do (freeze motion, get a silky water effect, increase depth of field, capture stars as bright as possible, etc.).
- If you can't get the depth of field, motion blur and lightness effects you want without using an ISO that will cause noise due to low exposure, you need to decide which of the 3 you're going to compromise. Sometimes you can decide this in advance, and leave the third one to get the meter centered after setting the other two.
At this point, you should go deeper into learning about the exposure triangle (section 5) and I should teach you how to expose (section 18). But photography isn't only knowing how to expose.
In fact, I dare say that exposing the photo is the last thing you do before actually taking the picture.
So what comes first?
The first thing is that you should know how to capture the photo that conveys the idea you want to express.
4.Caution! The exposure serves your ideas (not the other way round)
What came first? The egg or the chicken? The exposure or the idea?
Right answer: The idea!
What do I mean by this?
You always have to choose the aperture and shutter speed depending on the photo you want to take, the effect you want to capture, the story you want to tell.
Normally, you will determine one of the two exposure variables (aperture and shutter speed) to get the picture you're looking for.
To sum up, depending on the aperture and shutter speed settings that you use, you'll not only affect the exposure but you'll also be able to express one idea or another, create one effect or another.
Let's see what these effects are...
The aperture effects
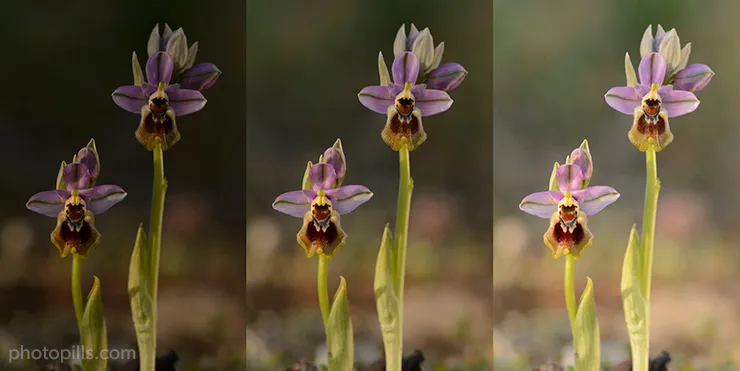
Depth of field
The aperture allows you to control the depth of field: the part of the scene that appears sharp on the image.
On the one hand, if you intend to show the viewer what's happening in a larger part of the scene (increase the depth of field), you can do this by closing the diaphragm (reducing the aperture to f/8, f/11, f/16). In section 5 I'll explain in detail what these f numbers are.
To maximize depth of field if you're using long focal lengths (70-500mm), use small apertures (f/8, f/11, f/16), and focus on a point located in the lower third of the scene.
If you're using short focal lengths (14-35mm), you can maximize depth of field without using small apertures. In this case, just focus at the hyperfocal distance.
On the other hand, if you open the diaphragm (increasing the aperture to f/1.4, f/2.8, f/4), the depth of field decreases. It helps you to direct the attention of the viewer to a specific point or area of the scene.
The starburst effect
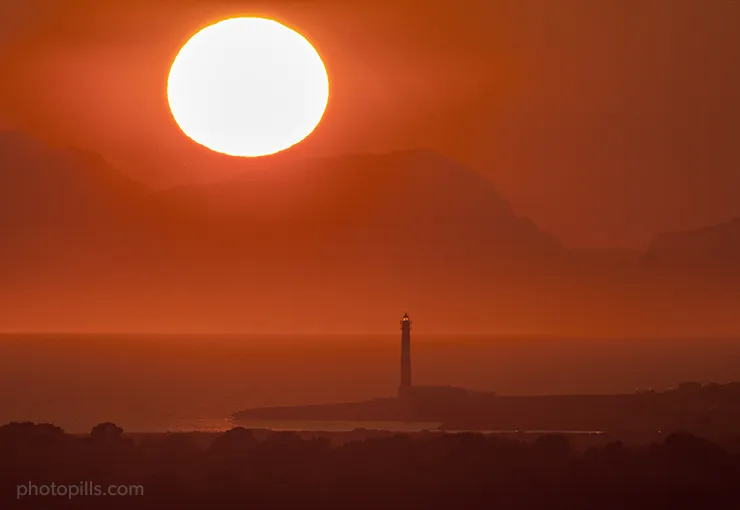
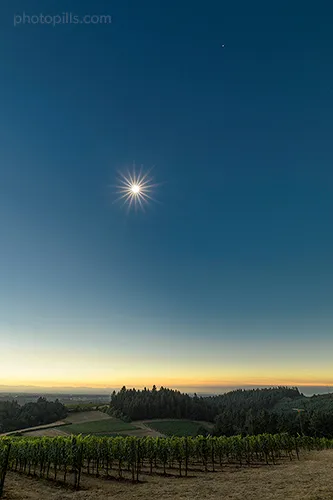
If you want the Sun, Moon or any other light spot (street lamp, lighthouse, etc.) to have the starburst effect in the photo, simply use small apertures (close the diaphragm to f/8, f/11, f/16).
Capture more stars
In astrophotography, if you want to capture a huge number of stars, you must capture as much light as possible during the exposure. So use large apertures (f/2.8, f/4, depending on your lens).
The shutter speed effects
Depending on the shutter speed, you can freeze motion or show it.
Freeze motion
Use fast shutter speeds to freeze the movement of a vehicle, a person, an animal, etc.

These are some examples of shutter speeds that you can use to freeze motion.
- Bird flying: 1/800s - 1/2000s.
- Person walking: 1/125s at least.
- Sports (football, etc.): 1/500s - 1/2000s.
- Car at 50 km/h: 1/1000s - 1/2000s.
- Car racing: 1/1000s - 1/8000s.
- Fast vehicles panning: 1/250s.
- Mountain bikers panning: 1/60s.
- Road cyclists panning: 1/30s.
- Runners or animals moving panning: 1/15s.
- Avoid star trails: use the NPF rule rule or the 500 rule, or use the PhotoPills Spot Stars calculator.
- Avoid Moon trail: 1s maximum.
Show motion
Use slow shutter speeds to show to the viewer the motion in the scene (water, clouds, people, vehicles, Stars Trails, etc.).
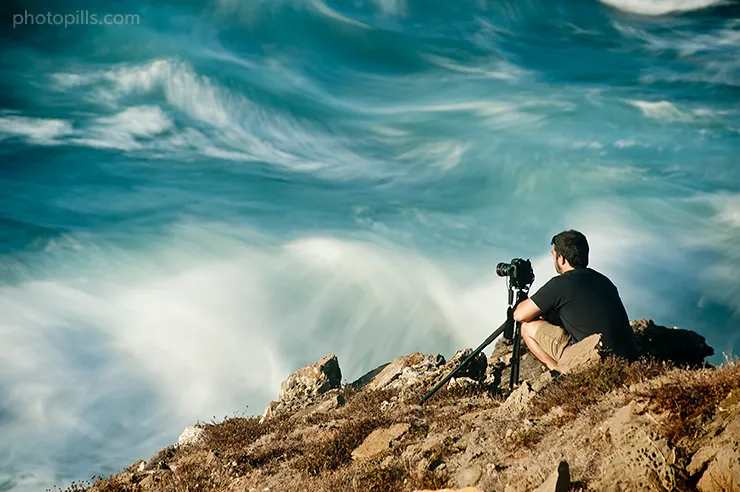
Here are some examples (you need a tripod).
- Waterfall silky water: 1s.
- Sea silky water: 1s.
- Show people moving, slow cars: 1/15s.
- Slow water motion: 1/2s.
- Fast water motion: 1/8s.
- People walking: 1/4s.
- Short star trails: 1min - 10min.
- Long star trails: 30min - 4h.
ISO effects
Normally, once you have decided the aperture and shutter speed settings, you use the ISO to balance the lightness.
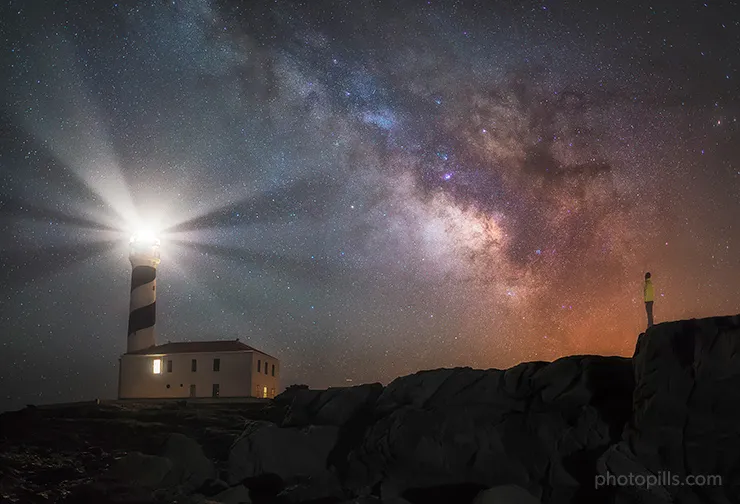
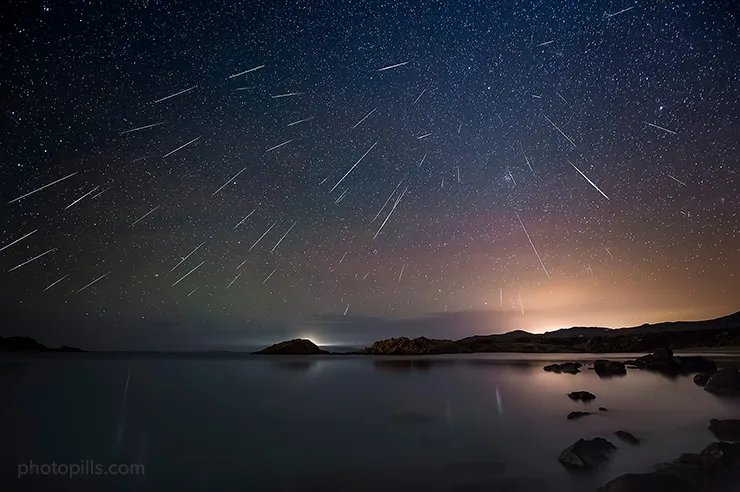
Using high ISOs (1600, 3200, 6400), allows you to take pictures that wouldn't be possible otherwise, such as when shooting the Milky Way or Meteor Showers.
Of course, be careful with the noise levels produced by lower exposures because the higher the ISO, the lower exposure you'll be using.
This is because the noise depends on the number of photons captured, and changing the ISO can't change the number of photons, all it can do is make it so that the low exposure will produce an acceptable level of lightness.
Cheat sheet of the aperture, shutter speed and ISO effects
Since a picture is worth a thousand words, here's a summary of the effects that you should take into account when deciding the aperture, shutter speed and ISO settings.
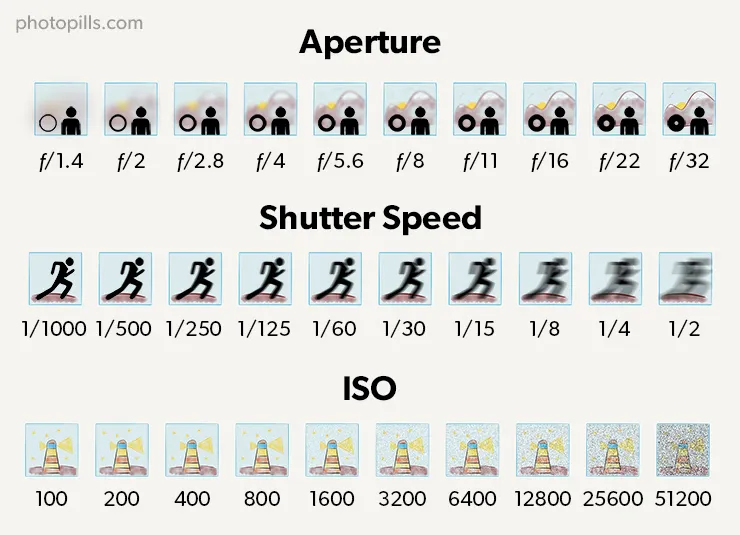
To sum up:
- Higher aperture (lower f number) → Lower depth of field.
- Lower aperture (greater f number) → Greater depth of field.
- Slower shutter speed (longer exposure time) → Show motion (blur, silk effect).
- Faster shutter speed (shorter exposure time) → Freeze motion (no movement).
- Greater ISO → Lower exposure and, in turn, more noise.
- Less ISO → Higher exposure and, in turn, less noise.
Let's have a look now at three practical examples of how to choose the aperture, shutter speed and ISO settings to get the photo you want with the right lightness.
Three examples of photographic reasoning: idea + lightness
In section 24, you have 30 examples in which I explain to you step by step how I managed to capture the photo I was looking for with the lightness I wanted.
But for now I'd like to go over 3 case scenarios so that you can see the logical reasoning behind my photographs. I hope that it will help you embrace the workflow I follow to set the exposure triangle parameters.
Remember, the idea always goes before the exposure.
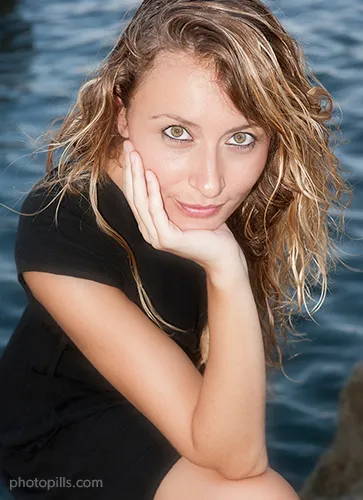
Portrait
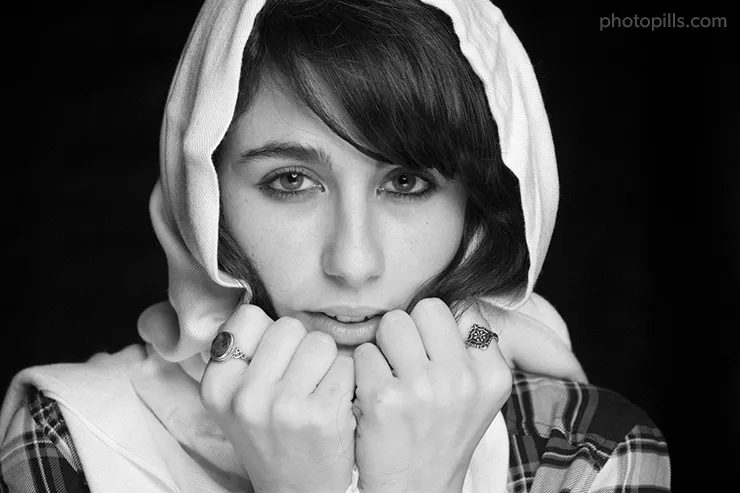
The idea behind this photo is that the viewer focuses all her attention on the subject. I want her, the viewer, to first notice the model's eyes. What I am looking for is that both glances, the model's and the viewer's, meet. I want the viewer to feel that the model is really looking at her...
To achieve this I chose a fixed focal lens (85mm) that is ideal for portraits both for its sharpness and its speed (in this case the aperture reaches f/1.8).
However, I don't need such a large aperture. Here, f/8 is more than enough since I'm shooting in a studio, with a totally controlled lighting environment. Also, because there's a black background, I don't need a large aperture to create a bokeh (or blur) in the background so it doesn't distract the viewer.
I stand about 3m from the model and focus on her right eye. With all this information and thanks to the PhotoPills DoF calculator, I know that the depth of field is 0.59m.
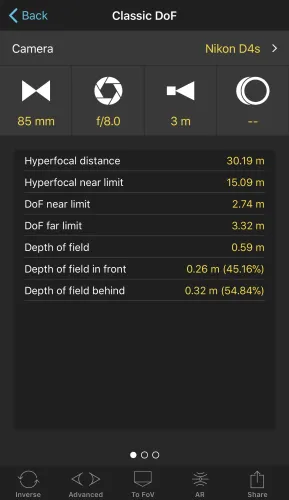

I'm using a fairly closed aperture (f/8) so this piece of information is not critical. But if I had used a much larger aperture, f/2.8 for example, I would have needed to know the depth of field accurately. That way I would have known where to position my subject according to which parts of her face or body I wanted sharp on the final shot.
Once I know the depth of field and the model is at the right place, I meter the light using the spot metering mode of my camera. It's my favorite metering mode because it's the most precise one. I meter the lighter tone of the model's face so I don't blow out the highlights (I'll explain more about this in section 17).
Since I've selected the Manual exposure mode (M), and I've set my aperture, I have to decide the ISO and shutter speed settings.
I set the ISO to the native ISO of my camera to increase the exposure at which the meter centers as much as possible: ISO 100. If you want to know more about noise, you have all the details in section 5.
Finally, I set the last parameter, the shutter speed. In order to do this, I just have to look at the light meter and find the shutter speed value at which the light meter is zero-centered (section 11). In this case, 1/160s.
Travel photography
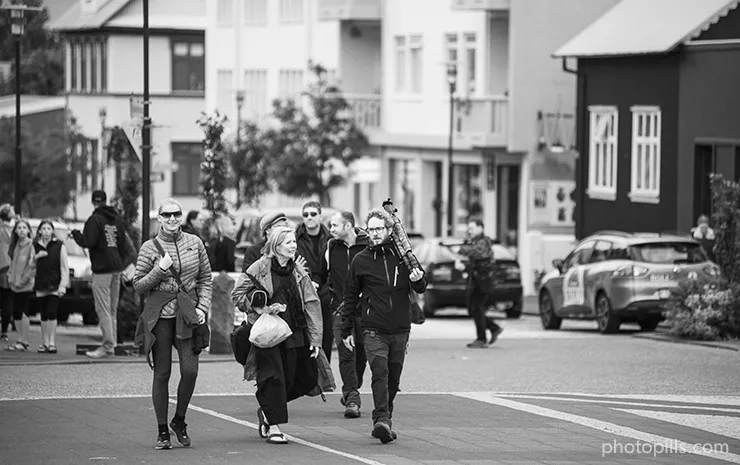
Taking photos during a trip is the best way to visually document a story. You can actually add more or less artistic ingredients or use the image as a pure document. All you have to do is be a viewer of what's happening around you.
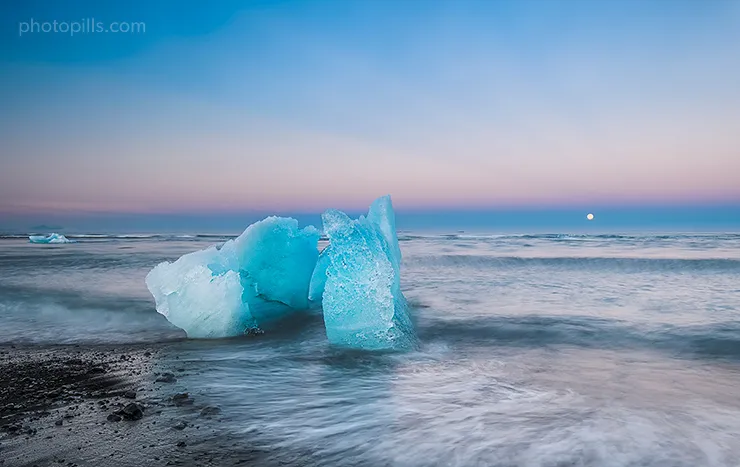
In this photo I just wanted to capture the joy of beginning our first expedition to Iceland. Part of the PhotoPillers group was heading to the Reykjavik church. The only thing I did was to walk a few meters away to capture what was happening, to keep that moment's atmosphere.
In this type of photography, one of the most important decisions that you have to take is what focal length you want to use and what depth of field you want to have. These settings always depend on what you want to capture: a landscape, a portrait or simply capture the atmosphere of the place you're visiting.
Here the idea was to separate the group of photographers from the background. Considering the distance between the subjects and my camera, I chose a large aperture and a telephoto lens. I used the center-weighted metering mode to make sure I metered the correct exposure in the group.
I chose a shutter speed fast enough to freeze any motion. In this case I set an automatic ISO and it was the camera who set it to 100.
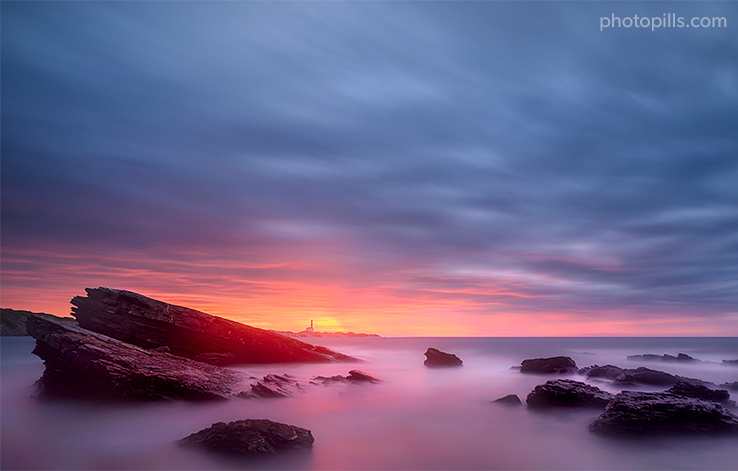
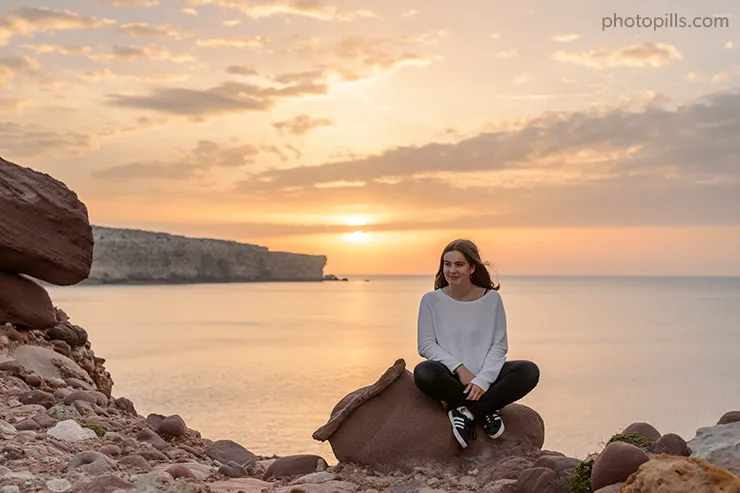
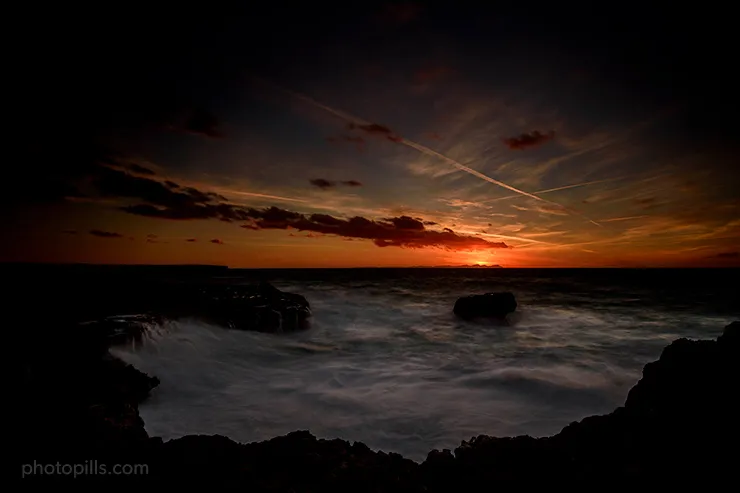
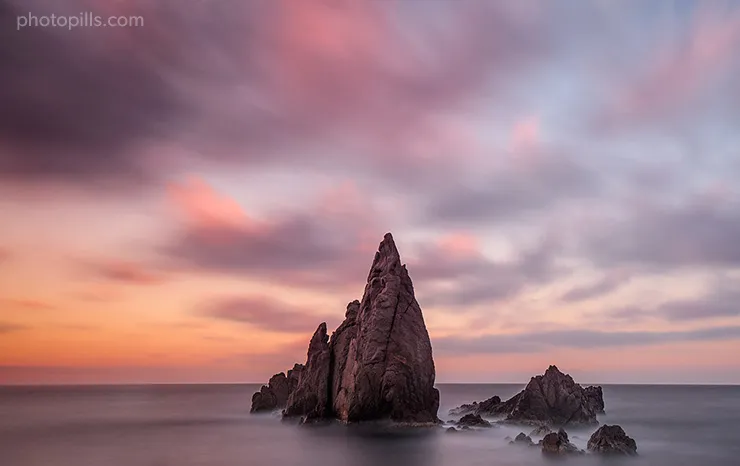
Sunset photography
Landscape photography is one of my favorite types of photography, not to say my favorite. Here, the focal distance, the field of view and the framing are the prime factors. Depending on the frame I choose a specific focal length.
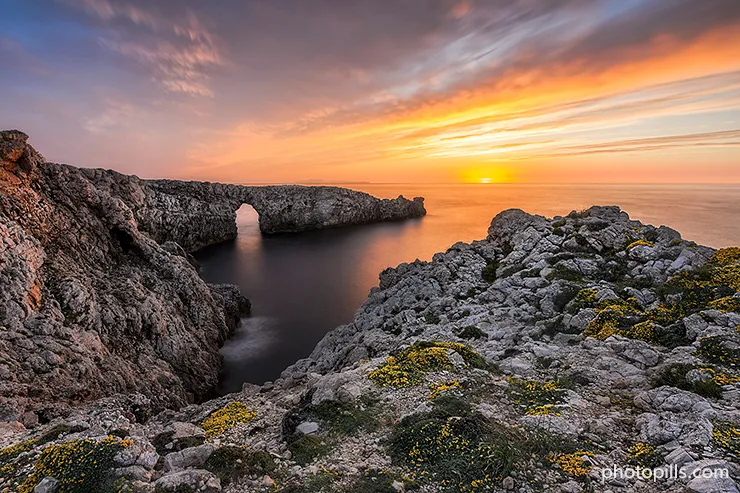
I work my composition with the camera on the tripod. This composition takes me to set a certain focal distance. In this case, I sought a balance between the clouds illuminated by the Sun setting, the arch and part of the coast, and the close-up detail of rocks and plants.
Once this is done, I choose my aperture. In this previous photo, I closed the diaphragm to f/13 to maximize the shutter speed.
Subsequently, I use PhotoPills to calculate the hyperfocal distance. When I focus I make sure that I focus at a distance a little bit longer (between 0.5m and 1m) and I put the focus in manual mode.
As for ISO, I always try to use an ISO as low as possible to avoid noise in my image. Here, ISO 100.
Now I have to meter the light of the scene. To do this, I use the spot metering mode, I meter the brightest area of the scene I want in detail and, taking into account the camera I use, I overexpose by 2 stops (+2EV). In section 17 I'll explain in detail why I do this.
However, I want to use a shutter speed a bit slower so that the silk effect in the water is perfectly noticeable. So I decide to use a neutral density filter (ND). Thanks to the PhotoPills exposure calculator, I find out that I need a 6-stop filter (ND64) to get the correct exposure.
Finally, I'm in front of a Sunset. Since there is a difference of light between the sky and the foreground, I use a 2-stop reverse graduated filter (GND 0.6) to further darken the area of the horizon where the Sun is located.
Once this is done, I shoot while enjoying the scenery and the spectacular Sunset.
Conclusion
In short, to take the photo you want, first establish the settings allowing you to get the desired effect (aperture and/or shutter speed), and then adjust the third (or the remaining two) to get the right lightness.
Are you still there?
Yes? Great!
Time to go deeper into the key to learn to expose: the exposure triangle and its 3 elements.
5.Understanding the exposure triangle
We have seen in the previous two sections that you have three elements to adjust the lightness:
- Aperture (using the diaphragm).
- Shutter speed (thanks to the shutter).
- ISO (sometimes called sensitivity).
These three elements form the so-called exposure triangle.
Note: Remember what I mentioned in section 3, the exposure triangle should be called "lightness triangle". The concept of an exposure triangle formed by aperture, shutter speed and ISO is wrong. But for the sake of simplicity, and now that you understand the difference between exposure and lightness, I'll explain to you why this analogy is popularly used.
How the exposure triangle works
It's quite simple.
You increase the exposure by using large apertures, and slow shutter speeds. On the contrary, you reduce the exposure with small apertures, and fast shutter speeds and low ISOs. A high ISO allows you to work with a low exposure and a low ISO lets you use a large exposure.
Therefore, for a given lightness, the aperture, shutter speed and ISO settings are closely related. In other words, they are linked to one another.
What does this mean?
Imagine that you set an aperture, shutter speed and ISO setting that allows you to get the photograph you want with the lightness and tonality you want.
Have you captured the right amount of light?
The best amount of light (exposure) is the largest that you can get, because that results in the lowest noise.
So, when you look at the choice, you could have got the depth of field you needed with a larger aperture, or avoided motion blur with a slower shutter speed, and were not at the lowest ISO setting, then you could have chosen exposure better.
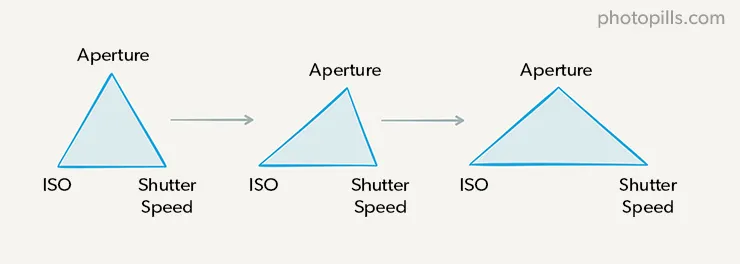
Now, if you modify one of the parameters that make up the triangle, you have to adjust at least one of the other two to keep the same lightness, but if you adjust the ISO you'll change the amount of light.
Check this out. If you change a parameter, you break the balance of the exposure triangle (by capturing a greater or smaller amount of light), so you have to modify at least one of the other two so that the triangle is balanced again (to capture the same light).
For example, imagine that you have determined the aperture, shutter speed and ISO that allow you to freeze the movement of a bird in flight and get a well exposed photograph.
If you decide to close the diaphragm to increase the depth of field (letting in less light), and you want the balance to be maintained (the lightness is the same), you have to change one of the other two parameters (or both) depending on the effect you want to capture:
- You can reduce the shutter speed, to let light reach the sensor for a longer period of time. But if you do so, the bird will surely be blurred. You won't freeze the movement.
- Or you can increase the ISO, to keep a fast shutter speed and thus to freeze the bird's movements.
In conclusion, depending on which parameter (aperture, shutter speed or ISO) you modify to adjust the lightness, you get one effect or another (depth of field, frozen motion, blurred subject, silk effect, etc.).
Therefore, as we saw in section 4, the idea of the picture that you have in mind will tell you which parameter you should adjust.
But let's review one thing at a time.
Let's have a closer look at each of the elements that are part of the exposure triangle.
The aperture
What's the aperture?
We have seen in section 3 that you can control the amount of light that reaches the sensor of your camera using the diaphragm of your lens.
The diaphragm leaves a hole that allows light to go through it before reaching the sensor. Well, the size of that hole is what's called aperture.
But how do you know the hole size you've selected?
The f number (f/2.8, f/4, f/5.6, etc.) indicates the size of the aperture you've selected.
You usually say:
"I've shot this picture at an aperture of f/8."
Well, the f number indicates the relationship between the diameter of the diaphragm (hole) and the focal length you've selected.
More specifically, it's the result of dividing the focal length (in mm) by the aperture diameter (in mm).
So, for a given focal length, the larger the aperture, the smaller the f number, and vice versa.
An aperture of f/2.8 is larger than one of f/4 (for the same focal length).
What?
Oh! Don't you know what the focal length is?
Let's make a quick aside.
The focal length
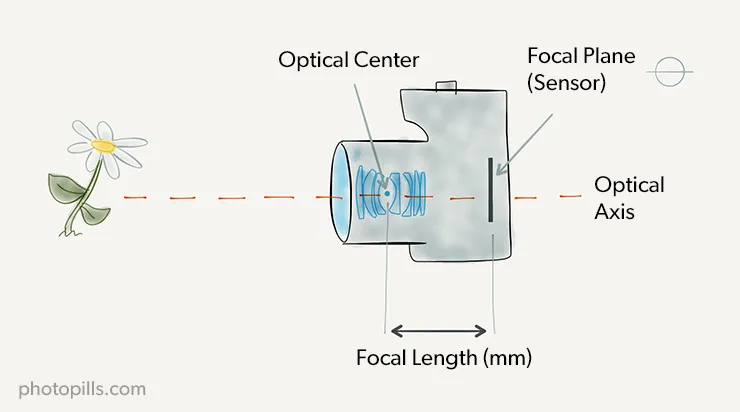
The focal length of a lens is the distance between the optical center of the lens (where the lens is situated) and the sensor (or focal plane, where the image is generated) when the lens is focused at infinity.
It's measured in millimeters (always, no imperial units here!) and covers a wide range of values. For example 14mm, 18mm, 35mm, 50mm, 70mm, 105mm, 200mm...
Like the aperture and the shutter speed, the focal length is a parameter you can use to boost your creativity. It allows you to decide what part of the scene you want to include in the photo (field of view) and how big or small the subject appears in the photo.
To give you a better idea:
- The smaller the focal length, the larger the field of view, and the greater the part of the scene included in the photograph.
- On the contrary, the greater the focal length, the smaller the field of view, and the smaller the area of the captured scene.
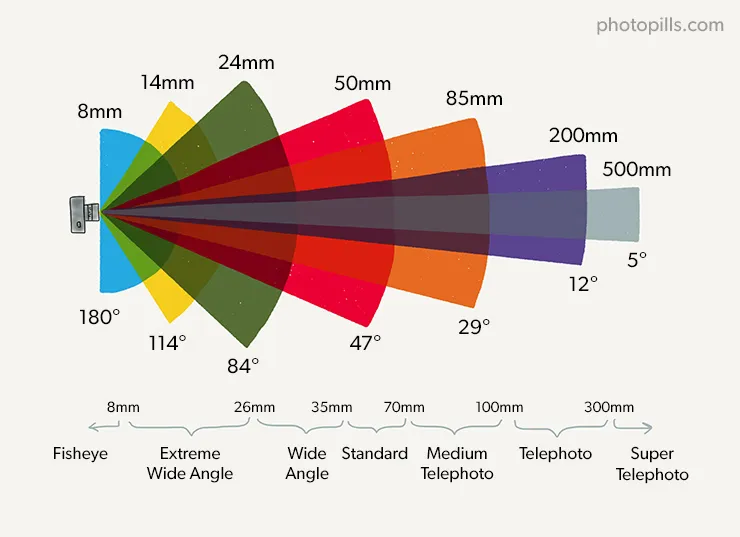
So, depending on the photo you want to take, you choose a certain focal distance or another.
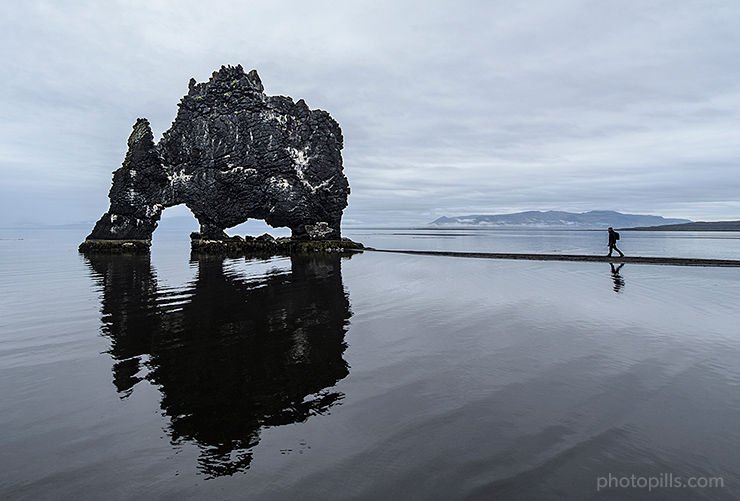
A short focal distance allows you to capture more landscape, as in this photo taken in Iceland with the dragon rock, Hvítserkur.

And the longer the focal length, the smaller the field of vision, allowing you to focus on the subject.
After this quick explanation, let's go back to the f number.
The f number
As I said, if you divide the focal length of the lens by the diaphragm hole you get the f number of that particular aperture.
Let's have a look at an example. Consider a focal length of 50mm and calculate the f number for two different diaphragm apertures:
- If you open the diaphragm up to a 28mm diameter hole, the f number is 1.8 (50mm / 28mm = 1.8). In this case, the selected aperture is f/1.8.
- If you close the diaphragm, leaving a hole diameter of only 6.25mm, your f number is 8 (50mm / 6.25mm = 8) and the selected aperture is f/8.
Oh, oh... Don't look at me like that...
Relax! You don't need to do any math.
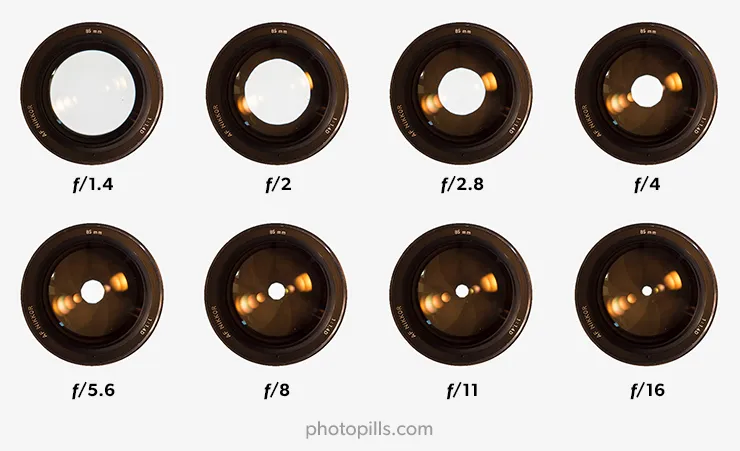
You select the diaphragm directly with the f number, so you just need to know that:
- The smaller the value of the f number (f/1.8, f/2.8, f/4, etc.) the bigger the diaphragm is open and the more light you let pass.
- The larger the f number (f/8, f/11, f/16, etc.) the smaller the diaphragm and the less light you let pass.
Thus, an f number of f/1.8 indicates a considerably larger diaphragm hole than that of an f/8, so it allows a lot more light to go through it.
Remember that the greater the f number, the less light you let reach the sensor.
The f number standard scale
The f number standard scale is:
1, 1.4, 2, 2.8, 4, 5.6, 8, 11, 16, 22, 32...
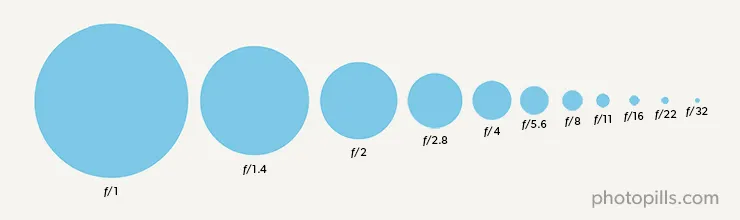
We say it's the standard scale because, as you close the diaphragm, each of these holes (f number) allows exactly half the light through than the previous f number.
For example, an aperture of f/2 lets out twice as much light as an aperture of f/2.8, but half of an aperture of f/1.4.
This is because the area of the diaphragm orifice through which the light travels is halved when you close the aperture from f/2 to f/2.8. And it's doubled when you open the diaphragm from f/2 to f/1.4.
In photography, this gap, this doubling (or halving) of the diaphragm orifice area is called a stop.
Therefore, between two consecutive apertures of the standard scale there is a difference of one stop.
Knowing the amount of light you reduce or increase when shifting from one aperture to another is key when exposing your photographs. This allows you to adjust the parameters according to the amount of light you want to increase or decrease.
In section 6 I go into more detail when explaining the concept of stop.
How do you select the aperture on your camera?
Each camera is different. Have a look at your camera's manual.
In most cameras, you can change the f number by turning a control wheel.
Because I miss the good old times, when I use manual lenses I change my settings in the menu so I can change the aperture using the diaphragm ring.
What aperture do you need?
As we've seen in section 4, you don't always choose the aperture setting depending on how much light you want to capture to expose the photo.
Normally, there are other factors that determine its value depending on the picture you have in mind:
- If you want more or less depth of field.
- Do you want to create a starburst effect on light sources?
- If you are looking to maximize the light the sensor has captured during a certain exposure time (shutter speed). For example, in night photography, the dim light will rarely allow you to use small apertures.
- You want to avoid diffraction. If you don't want to lose sharpness in your photos, avoid closing the diaphragm as much as you'd like (f/22, f/32, etc.).
The shutter speed
The shutter is a sort of curtain that's in your camera.
It allows you to let light go through the sensor for a certain period of time. It opens when you press the shutter release button on the camera and it closes after a period of time you've previously selected.
What's the shutter speed?
The time period during which the shutter is open is called the shutter speed, and it's measured in seconds, minutes, or hours.
Therefore, the longer you have the shutter open, the more light you allow to reach the sensor. On the contrary, the less time, the less light reaches the sensor.
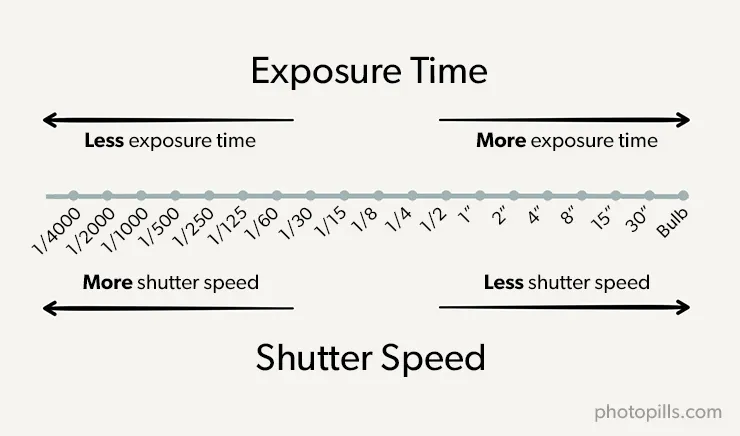
The shutter speed standard scale
The standard scale of full stops corresponds to the following series (in seconds):
1, 1/2, 1/4, 1/8, 1/15, 1/30, 1/60, 1/125, 1/250...
In this series 1/2 is half a second, 1/4 is a quarter of a second, and so on.
As with the aperture, there is one stop between two consecutive values of the scale.
For example, shooting at 1/4s you allow twice as much light as at 1/8s, but only half than at 1/2s.
In other words, halving the shutter speed also doubles the amount of light that reaches the sensor, increasing the exposure (captured light) in one stop.
How do you select the shutter speed on your camera?
Each camera is different. Have a look at your camera's manual.
In most cameras, you can change the shutter speed by turning a control wheel.
What shutter speed do you need?
Depending on the idea of the picture you have, you need one shutter speed or another.
Similarly to how the aperture helps you control depth of field, the shutter speed helps you control how the motion appears. You can freeze the subject or leave it blurry and fuzzy.
For example, to freeze motion you only have to set a fast shutter speed.
On the contrary, with a slow shooting speed, you blur elements that are moving in the scene. Or you can even get a very interesting silk effect in the water (a river, a waterfall or the sea).
All in all, you always have to keep in mind the photo you want to produce, taking into account the message you want to convey and the exposure you need for it.
In section 4 you'll find some reference values of shutter speeds that you can use depending on the effect you're looking for.
ISO
The third element that you can control in camera is the ISO, which controls the relationship between exposure and lightness.
What's ISO?
ISO is an exposure index, defined by the International Organization for Standardization (ISO). An exposure index is simply a guide to setting exposure.
The concept arose in film days. Films can handle a very limited range of exposures because their reaction to light is non-linear, called the exposure latitude. If you get the exposure wrong, you get compressed tones in the final image.
Digital sensors, on the other hand, have a very large exposure latitude. When you select an ISO, you're effectively choosing the exposure you'll be using, and the camera sets up the internal processing to provide a good range of tonality (good lightness) from that exposure.
So, and it's worth repeating it, the ISO doesn't affect the amount of light captured, because the number of captured photons is defined by the aperture and the shutter speed.
However, although ISO doesn't affect the exposure, it's generally accepted that ISO is one of the exposure triangle variables that you should take into account when taking your photographs.
Depending on the ISO you set, you can play with different aperture and shutter speed settings.
The ISO standard scale
Sensitivity doesn't have a unit of measure.
As with aperture and shutter speed, between two consecutive values of the ISO standard scale there is one stop, doubling or halving the light captured.
Thus, the standard scale of full stops corresponds to the following series:
100, 200, 400, 800, 1600, 3200, 6400, 12800, 25600...
As the ISO doubles its value, the exposure (the amount of light that the sensor picks up) halves. So at an ISO of 400 the sensor captures half as much light as it does at 200.
The base or nominal sensor sensitivity is usually ISO 100 or 200, depending on the brand and model of the camera.
How do you select the ISO in your camera?
Each camera is different. Have a look at your camera's manual.
Usually you can select the ISO in 3 different ways:
- Manual mode: use the camera controls to select the ISO value you want.
- Automatic mode (Auto ISO): The camera selects the ISO value for you depending on the aperture and shutter speed settings.
- Automatic mode with bracketing values: The camera selects the ISO value from a range of values that you set. For example, you can let the camera choose the ISO between the native ISO (100 or 200) and the highest ISO to avoid having too much noise in the photo (800, 1600, 3200, etc.).
What ISO do you need?
In many cases, ISO allows you to use the right aperture or shutter speed that allows you to take the picture you have in mind, either to get a certain depth of field, or to freeze or blur the movement.
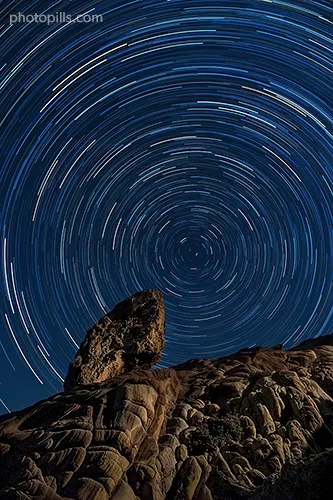
If you use a low ISO, you can use larger apertures to get a shallower depth of field in a portrait, shoot with slower shutter speeds to blur motion or, in night photography, to get Star Trails.
In most cases you should use a low ISO, mainly to avoid having grain or noise in the image.
For example, imagine you want to capture a landscape picture before dawn. You are in a low light situation, so you could decide to increase the ISO to compensate for that lack of light.
The problem is that if your scene has dark areas (rocks, cliffs, caves or any other element of the landscape that light hasn't illuminated), increasing the ISO results in a noise bump in those areas.
Therefore, to capture more light in this particular case and, considering that part of the elements of your composition don't move at all, you get a better result if you take a longer exposure.
In addition to this, if there is water, clouds or other natural elements that are moving in your composition, you get a beautiful silky effect.
On the contrary, a high ISO allows you to shoot using a faster shutter speed if you happen to be indoors without using flash or take a night shot where you want the stars to be big bright spots (no trails).
One of the obvious situations in which it's essential to use a high ISO is night photography.
Imagine that you want to capture a landscape scene that shows an outstanding rock formation in the foreground, and in the composition you also want to include the Milky Way.
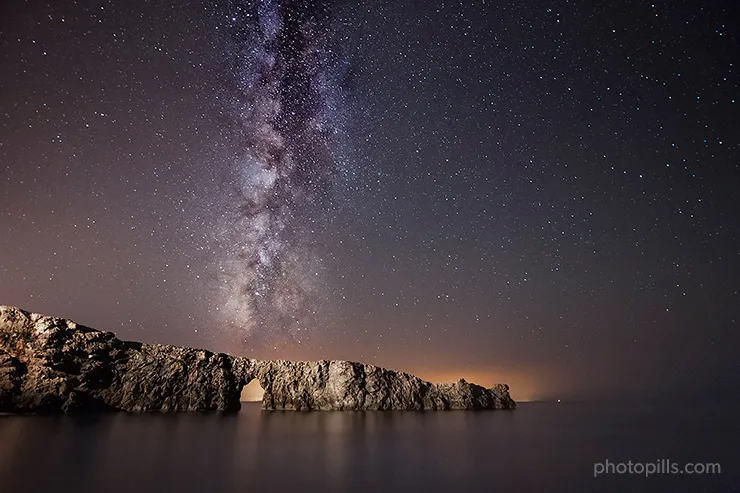
Take the picture using the largest aperture (smallest f number) of your lens. By doing this you allow the sensor to capture more light.
In addition to this, you can't use a very slow shutter speed because the stars won't appear as big bright spots. You'll end up with Star Trails. The Earth does not stop rotating because you're taking a picture!
You can calculate the maximum exposure time to avoid Star Trails using the NPF rule rule or the classic 500 rule.
Due to the light conditions and the type of photo, you have no options when deciding your aperture and shutter speed settings. So, what parameter do you have to nail the lightness?
Correct! The ISO.
And in this particular case, you have no choice but to increase the ISO (1600, 3200, 6400, etc.) so that your exposure is correct.
A consideration on automatic ISO
Making good use of automatic ISO depends a lot on your camera.
If you have a low-end camera (these are usually low-budget cameras aimed at beginners), my recommendation is that you shouldn't use the automatic ISO function.
This type of cameras usually begin to show noise problems at relatively low ISOs, starting at 800.
Therefore, it's best to keep the ISO as low as possible and determine the most suitable exposure for your photo by playing around with the aperture and shutter speed.
However, if you have a mid-range or high-end camera, the automatic ISO function is a good option as long as you set an ISO range according to your camera's limitations.
Let's assume that from ISO 1600 on your camera generates a lot of noise and the grain is clearly visible in the photo. In that case, select an automatic ISO range between 100 and 1600.
This way, you have more room to play with the aperture and shutter speed when deciding the exposure you want.
By letting the camera always adjust the ISO between 100 and 1600, you keep the noise under control.
Noise
"Toni, what's noise exactly?"
Noise is some sort of grain that appears in the photograph. It's really ugly and it can ruin your photo.
The higher the ISO you use, the lower the exposure and the greater the amount of noise that appears in the image.
Actually, you can barely see noise with low ISO values (between 100 and 400). Even zooming in the image a lot on a computer, you'll have a hard time seeing noise. But from ISO 400 on, noise begins to become more and more visible.
Although the ISO value scale is standardized, the amount of noise corresponding to each of those values is not. It depends on how much light is captured, which in turn depends on the exposure (set by the ISO) and the size and efficiency of the sensor. Within each generation of cameras, sensor efficiency doesn't vary very much, so in the end noise at a given ISO is closely related to sensor size.
However, given that a larger sensor gives shallower depth of field for the same f number, if your shot is constrained by both depth of field and shutter speed, you won't see much noise advantage from a bigger sensor.
In fact, one of the first things you need to figure out is what is the maximum ISO that you can use on your camera while maintaining a reasonable noise level.
How can you fight against noise?
Again, it depends.
Don't stare at me! Photography is not an exact science.
The best, least noisy, exposure is the largest you can get, subject to the constraints I've already discussed. So I'd recommend that, whenever possible, you select the native ISO base of your camera (the lowest) or an ISO that is closest to it.
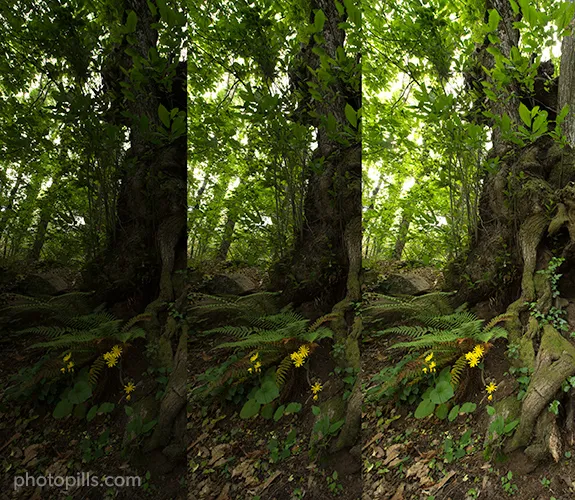
If you're shooting outdoors, on a clear sunny day, you can use a low ISO so your photos will be sharp and will have no noise.
However, a low light situation like a forest on a cloudy day forces you to increase the ISO value. So, noise will be higher.
In this case, you can use a tripod. So, even if you're forced to use a slow shutter speed, you can keep the ISO as low as possible. But be careful, your subject must be perfectly still or it will be blurry in the image.
Obviously, there are also situations in which you can only take the picture by increasing the ISO a lot (800, 1600, 3200 or more), such as when photographing the Milky Way or Star Trails.
In these cases, you'll use an ISO that gives you good lightness with the exposure you can get. It's generally better to get a noisy image than none at all.
As you've read in the sections on the other two elements of the exposure triangle (aperture and shutter speed), you always have to pay the price if your exposure is limited by what you're trying to achieve.
Summarizing:
- If you select a large aperture, you have a shallow depth of field.
- If you use a slow shutter speed, it's harder to get the moving elements of the photo in focus (frozen).
- And now, if you reduce exposure by increasing the ISO your images begin to have grain or noise, as it's usually called.
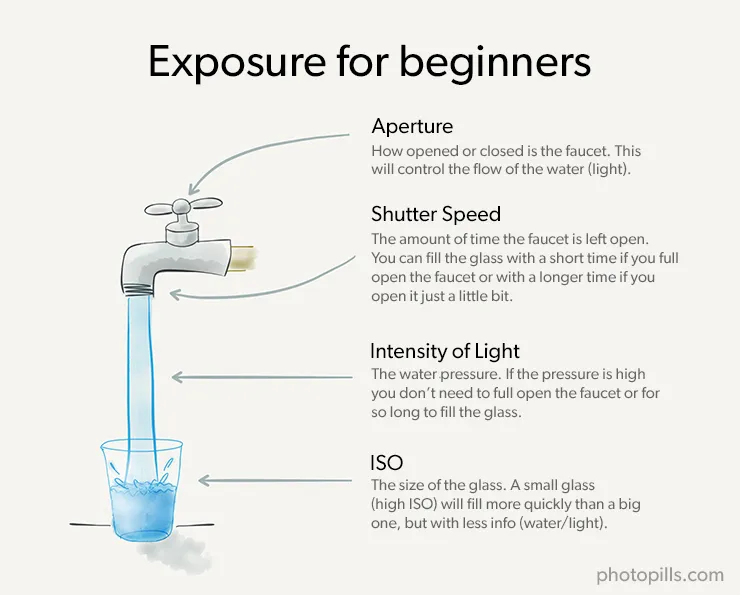
Exposure for beginners
Is the triangle exposure concept still not clear in your mind?
That's an easy problem to solve.
The analogy of the bucket and the faucet is perfect to explain how aperture, shutter speed and ISO affect the exposure.
"Bucket and faucet Toni? Aren't we talking about photography?"
Well, yes... But it's a great way of explaining it ;)
Here we go!
Imagine you want to fill a bucket to the brim with a faucet.
There are three parameters that come into play to achieve this goal:
- How much open or closed the faucet is.
- How long you let the water run.
- And the size of the bucket.
You can vary each of these settings separately to get different combinations that will result in a full bucket.
Does this ring a bell?
Well, your camera works in pretty much the same way:
- Water would be the light and, while we are at it, the water pressure would be its intensity.
- How much open or closed is the faucet would be the aperture of the diaphragm.
- How long you let the water run would be the shutter speed.
- The bucket size would be the equivalent to ISO. A small bucket equals a high ISO.
Let's say a correct exposure would be to have a brimful bucket, whatever the size of the bucket – meaning that "correct" depends on what the ISO is.
If you don't control any of the parameters properly, the bucket may overflow. You would have an overexposed photo: certain parts of the photo come out white (or blown out). There is too much light for the size of the bucket!
On the contrary, if the bucket is too empty you are underexposing the image: certain areas of the image come out black (without any detail). You don't have enough light to fill the bucket size that you chose!
The comparison of ISO to the bucket size is also interesting. A high ISO equals a small bucket.
The smaller the bucket the less water you need to fill it. Similarly, the higher the ISO, the less light you need to expose the photo correctly for that ISO.
That means that the image will be well exposed (a good lightness) but with less light, so noise appears in the image since the camera has actually captured less information (the water has less water).
To conclude, in order to get a correct exposure (a brimful bucket) you need to use a suitable aperture, shutter speed which, along with the amount of light coming from the scene, give the "correct" exposure for that ISO.
6.The stop and how to use it
While explaining the aperture, shutter speed and ISO, I've mentioned the word "stop" several times.
Well, the stop is a basic and essential concept that you need to understand to know how to expose.
Let's examine in depth its meaning and how to use it.
What is a stop?
Modifying the exposure one stop means to double (or halve) the amount of light captured by the sensor when you take a photo.
It's also the difference in the exposure of an image when you capture double or half the light.
Maybe if I explain it to you otherwise, you'll understand better.
Imagine that you have an aperture, shutter speed, which along with the light coming from the scene gives you a certain exposure:
- If you change one of these two parameters to double the light, you've increased the exposure one stop.
- If instead of doubling the light, you halve it, you've decreased the exposure one stop.
- You could compensate by raising the ISO one stop, so that "correct" exposure is one stop smaller.
What are stops used for?
A stop helps you to quickly expose your photos. It's a measure that you can use as a reference as you change the exposure until you get the exposure that you consider correct.
In photography, you must completely control the amount of light that the sensor captures and, at the same time, you must be able to associate that amount of captured light with the way the photograph you just took looks.
That's why it's critical that you know how the amount of light captured by the sensor varies when you change the aperture and shutter speed. That way, you'll know how the photo will change at all times.
Look at the three photos below and how the exposure changes when you increase or decrease by one stop the light that the sensor captures or you change the ISO.
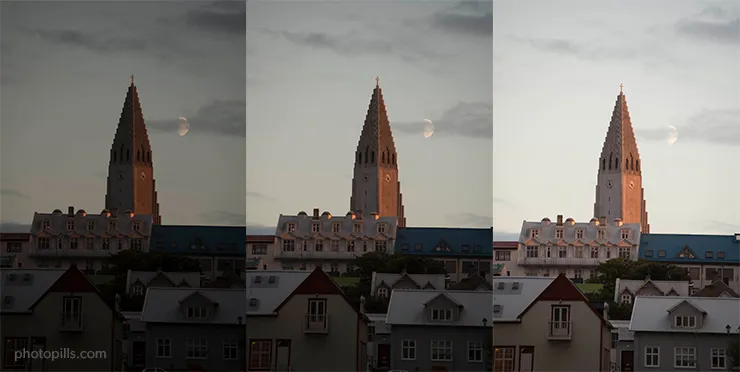
In short, when you're exposing a photo, knowing the stops between one exposure and another will make your work much easier.
If the picture is underexposed (you haven't captured enough light), you can increase the exposure by one stop (by doubling the amount of light when opening the aperture or using a slower shutter speed) and check how the image looks. And if you need more light, you can go up another stop, doubling again the amount of light captured.
On the other hand, if the photo is overexposed (you have captured too much light), you can reduce the exposure by one stop at a time to expose the photo correctly.
Or, you can change the exposure that is "correct" by changing the ISO and achieve the same lightness.
"OK Toni, I now know how to double or halve the captured light, but... What if I need to be more precise when changing the exposure?"
Well, light has different scales.
The stop scale (whether it's the aperture, the shutter speed or the ISO) can be divided into half stops or in thirds of stop as well.
Most cameras allow you to work with a scale of thirds of stop. This scale is the most common one among photographers. The great advantage of this scale is that it gives you much more control as you are able to increase (or decrease) the light captured more accurately.
Let's see how the stop scales are in each of the exposure triangle variables.
The aperture stop scale
If you want to use the diaphragm to increase the exposure by one stop, choose an aperture that lets you double the light compared to the one you have previously set.
Remember the aperture scale of full stops:
1, 1.4, 2, 2.8, 4, 5.6, 8, 11, 16, 22, 32...
So if you have set an f/8 aperture, open the diaphragm to an aperture of f/5.6 to double the light (increase the captured light by one stop).
On the contrary, if you have selected an aperture of f/8 and you want to decrease the exposure in one stop, set the aperture to f/11.
What if you want to change the exposure in less than one stop?
As I told you before, if you want to make precise adjustments, the scale of stops can be divided into half stops or into thirds of stop. The latter is available in almost all cameras and it's the most common one among photographers.
Here you have the scale of thirds of stop. I have bolded the full stops so you can differentiate them from the thirds of stop:
1, 1.1, 1.2, 1.4, 1.6, 1.8, 2, 2.2, 2.5, 2.8, 3.2, 3.5, 4, 4.6, 5, 5.6, 6.3, 7.1, 8, 9, 10, 11, 13, 14, 16...
In this case, each f number lets one third less of light go through the diaphragm than the previous f number. For example, f/2 allows a third less of light than f/1.8, but a third more than f/2.2.
The shutter speed stop scale
The shutter speed follows the same pattern as the aperture.
And luckily for you, it's even easier to use.
If you have set a shutter speed of 1/15s and you want to allow one more stop of light (capture twice as much light), select a speed of 1/8s (twice as long).
On the contrary, to halve the captured light (reduce the exposure in one stop), select 1/30s, which is exactly half as long as 1/15s.
As with the aperture, the scale can also be divided into halves or thirds of stop. Again, the most popular scale is the thirds of stop one:
1, 1/1.3, 1/1.6, 1/2, 1/2.5, 1/3, 1/4, 1/5, 1/6, 1/8, 1/10, 1/13, 1/15, 1/20, 1/25, 1/30, 1/40, 1/50, 1/60, 1/80, 1/100, 1/125...
Each of these shutter speeds allows one third of light less in the sensor than the previous one, but one third more than the next.
The ISO stop scale
Finally, you can also increase or decrease the ISO using stops. The calculation is very simple:
- Doubling the ISO you halve the exposure at which the meter centers ("correct exposure").
- Halving the ISO you double the "correct exposure".
If you select an ISO of 400, one less stop is an ISO of 800 (halving correct exposure). Instead, an ISO of 200 is one more stop (doubling correct exposure).
And yes, you guessed it. The scale can be divided into halves or thirds, the latter being the most common:
100, 125, 160, 200, 250, 320, 400, 500, 640, 800, 1000, 1250, 1600...
Now that you understand perfectly the concepts of stop and exposure triangle, you can start playing with them.
Let's see how you can capture the photo with different aperture, shutter speed and ISO settings. To do this, you need to use the reciprocity law.
7.The reciprocity law and some examples
The reciprocity law... What a name! Don't you think?
Take it easy, there's nothing to be afraid of.
With such a name it looks like something awfully complicated, but it's not.
You should know by now that the exposure is determined by the amount of light (controlled by the aperture) that reaches the camera sensor for a certain time (shutter speed). ISO controls how much light makes for a correct exposure.
And, as we saw in section 4, depending on the aperture and shutter speed settings you will capture different effects (more or less depth of field, frozen motion or not, etc.).
Now it's time to learn how you can get the same lightness (how dark or light the picture looks) with different combinations of aperture, shutter speed and ISO settings.
This allows you to change the aperture, shutter speed and ISO settings to get the effect in the photo you're looking for while maintaining the correct lightness.
To achieve this, use the reciprocity law.
What's the reciprocity law?
Imagine that you have an aperture, shutter speed and ISO settings that gives you the correct lightness.
Now, if you increase the aperture by one stop (to allow twice as much light) and you also decrease by one stop the shutter speed (so that half the light enters), you get the same exposure than with your initial settings.
Therefore, you capture the same amount of light.
This, my friend, is the reciprocity law:
"If you maintain the ratio between aperture and shutter speed, you get the same exposure."
Note that ISO has nothing to do with the reciprocity law! ;)
What is it for?
Once you get a correct exposure, the reciprocity law allows you to modify the aperture, shutter speed as you want to get the effect you're looking for while keeping the same exposure. That is, capturing the same amount of light.
"Toni, when you write ‘get the effect you're looking for', what effect are you referring to?"
As we saw in section 4, you may want to change the depth of field or freeze the motion (or not)... And to get that effect in the photo, you have to change the aperture, the shutter speed or even the ISO if you cannot get the effect that you want with the exposure set by the ISO you were using.
Therefore, to maintain the exposure, depending on the parameter you change, you must apply the reciprocity law to adjust the other one.
In conclusion, the reciprocity law allows you to modify the aperture and shutter speed to get the photo you are looking for while keeping the same exposure.
Let's have a look at an example.
Practical example of the reciprocity law
Imagine that you have in front of you a scene that you want to photograph. After carrying out some exposure tests, you managed to get the correct exposure with the following settings:
- Aperture: f/8
- Shutter speed: 1/250s
- ISO: 800

Now, you decide that you want to decrease the depth of field to separate the subject from the background. And to get this you open the aperture three stops (f/8 → f/2.8).
Since you're opening the aperture three stops, the sensor receives three times twice as much light, overexposing the photo.
Well, the reciprocity law says that if you want to capture the same light (same exposure) you must modify the shutter speed.
Imagine that you are in low light conditions and you want to use a high ISO (800 in this case). All you have to do is reduce by three stops the shutter speed (1/250s → 1/2000s), to capture less light, and thus compensate the exposure.
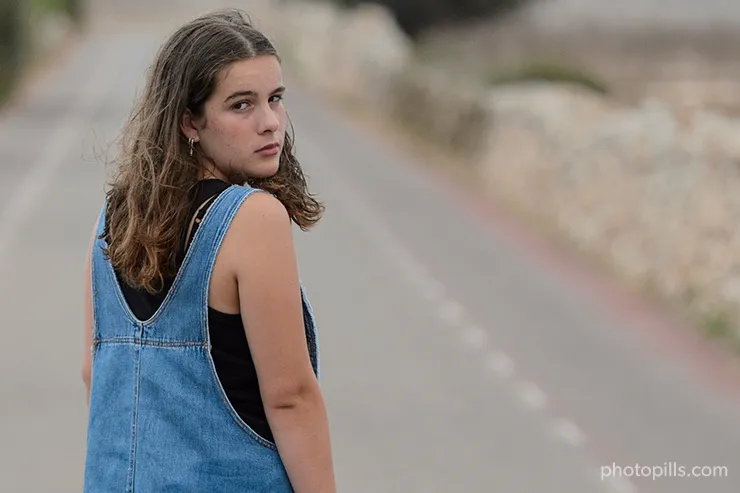
To conclude, keeping an ISO 800, and applying the reciprocity law, you can deduce that the following combinations of aperture and shutter speed will allow the sensor of your camera to capture the same amount of light (the same exposure):
- f/22 – 1/30s
- f/16 – 1/60s
- f/11 – 1/125s
- f/8 – 1/250s
- f/5.6 – 1/500s
- f/4 – 1/1000s
- f/2.8 – 1/2000s
In this example you've used full stops, but the law is the same if you use thirds of stop. The important thing is to maintain the balance between the exposure triangle elements in order to capture the same light.
So you get the same exposure than the one of previous combinations if you use an ISO of 800, an f/7.1 aperture and a 1/320s shutter speed.
Why?
Because an aperture of f/7.1 is one-third greater than f/8 (it captures one-third more light). And, at the same time, you've reduced the shutter speed by a third of the time, from 1/250s to 1/320s. So the amount of light you're going to capture will be the same.
And what about the ISO? Why have you kept this parameter constant so far?
As you may have already guessed, you can also use the ISO so that if you change the exposure, you can make the new "correct" exposure (given the required lightness).
For example, if you double the ISO (halving the exposure that is "correct"), you can compensate for it by using an aperture one stop narrower or exposing for half the time.
Thus, applying the reciprocity law and changing ISO to compensate you get the following equivalent combinations:
- f/2.8 – 1/500s – ISO 200
- f/2.8 – 1/1000s – ISO 400
- f/5.6 – 1/125s – ISO 200
- f/5.6 – 1/250s – ISO 400
- f/8 – 1/125s – ISO 400
- f/8 – 1/500s – ISO 1600
As you can see, there are many combinations that produce the same lightness, and all of them are equivalent with respect to lightness, but not other aspects of how the picture looks, such as depth of field, motion blur and noise.
But remember!
They are combinations of aperture, shutter speed and ISO equivalent in terms of lightness, but not from the aesthetic point of view (of the effect or the type of photo).
Yes, all these combinations will help you achieve the same lightness. However, as we saw in section 4, depending on the settings, you change the depth of field, freeze any motion or not, and there can be noise (or not).
The advanced exposure triangle
Now that you know how the aperture (depth of field), the shutter speed (motion) and the ISO (exposure, and therefore noise) and the relationship between them affect the final image, it's time to complete the exposure triangle:
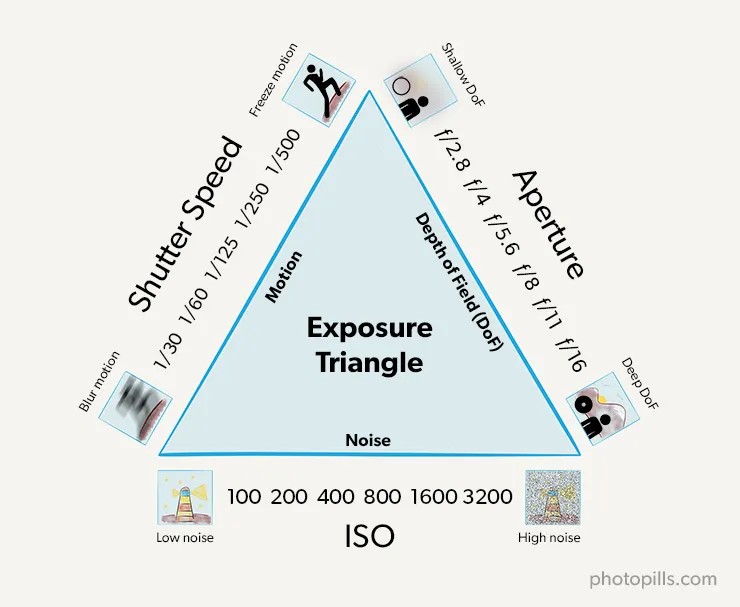
From the previous triangle you deduce that:
- When opening the diaphragm (large apertures) you capture more light, and a shallower depth of field. And when you close the diaphragm (small apertures), you capture less light, but a greater depth of field.
- By using a slower shutter speed, you capture more light but you don't freeze the movement (silky effect or blur). And by using a faster shutter speed, you capture less light and you can freeze the movement.
- By increasing the ISO, you can change the exposure which is correct (produces the lightness you want) but changing the exposure changes the noisiness of the photo.
When you change the aperture, shutter speed and/or ISO you have to check the exposure meter to see whether you still have "correct" exposure, and you also have to keep in mind how the photo will change.
Note: As I mentioned in section 3, the exposure triangle should be called “lightness triangle”. The concept of an exposure triangle formed by aperture, shutter speed and ISO is wrong. But for the sake of simplicity, I keep using this expression throughout the guide.
More practical examples on the reciprocity law
Let me insist.
Two different aperture, shutter speed and ISO combinations can give you the same lightness, but can produce different effects in the photo. Therefore, you'll take two different photos.
Let's see some practical situations in which you first find out the aperture, shutter speed and ISO combination that gives you the required lightness. Then you change their settings depending on the photo you are looking for.
I'll use the manual exposure mode (section 13) in all the examples to have complete control over the exposure.
I'll also use the PhotoPills exposure calculator so I don't have to do the calculations of the reciprocity law in my head.
A single long exposure Star Trails picture
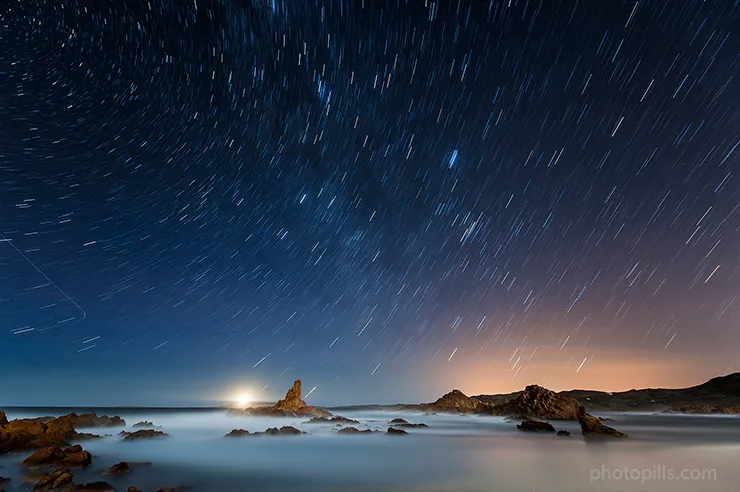
If you want to take a single long exposure Star Trails image (one unique photo), you'll have to use slow shutter speeds (10min or more) to get longer and aesthetic trails.
But when you are in your shooting position, taking test pictures until you find the correct lightness, the last thing you want is waiting for so long between one shot and the next.
Can you imagine having to wait for 10min, 20min or even hours to find out if the photo has a good lightness? It would be crazy!
You need a much faster method to find the lightness you want. The solution is the reciprocity law.
The idea is to take test photos until you reach the correct lightness. To do this use the maximum aperture that your lens allows you, a very fast shutter speed and a high ISO.
Once you find the combination of aperture, shutter speed and ISO that gives you the correct lightness, apply the reciprocity law to use a shutter speed as slow as possible to get the length of star trails you want.
In order to do this, you'll have to reduce the ISO or even close the aperture a little bit.
As you know that low exposures produce noise (grain) in the photo, being able to use lower ISOs will help you reduce this effect.
Let's see how you would do it.
Imagine that you've taken a test photo of 20s at f/2.8 and ISO 3200, and the photo is too dark. Take a second test photo by decreasing the shutter speed to 30s for example.
Conversely, if the picture is too light, use a faster shutter speed (shorter exposure time).
The issue is to modify the shutter speed until the photo has a good lightness.
Imagine that at 30s, f/2.8 and ISO 3200 the test photo has a perfectly good lightness.
Although it depends on your camera, when shooting at 3200 ISO your image may have some noise. But it doesn't matter because you're not going to take your final photo at ISO 3200.
Remember that you're just taking a test photo. You'll take the final shot using the base ISO of your camera, ISO 100 for example. And that will reduce the noise to the maximum extent.
So if you want to use an ISO of 100 and an aperture of f/2.8... What shutter speed allows you to keep your photograph properly exposed?
Use the reciprocity law.
Between ISO 3200 and ISO 100 there are 5 stops (100, 200, 400, 800, 1600 and 3200), so you have to double the shutter speed 5 times. Doubling the shutter speed (30s) 5 times in a row gives you the new shutter speed:
30 × 25 = 30 × 32 = 960s = 16min
If you would like to continue slowing the shutter speed, you could close the aperture. For example, closing the aperture one stop (from f/2.8 to f/4) you can use a shutter speed of 32min (the double).
When you're shooting in the field, doing the math is a pain in the back. Besides, you should avoid wrong calculations. It would be a pity to realize after waiting for 30min that you haven't applied the reciprocity law correctly!
Since it's the easiest way and it prevents mistakes, I always use the PhotoPills exposure calculator.
In this case, first set the shutter speed as the parameter you want to calculate.
Then, it's very simple: enter the aperture, shutter speed and ISO values of the test photo correctly exposed. Once this is done, enter the aperture (f/2.8 or f/4) and ISO (100) values that you want to use in the final photo (they are the equivalent settings).
The calculator gives you the new shutter speed you have to use: 16min at f/2.8 or 32min at f/4.
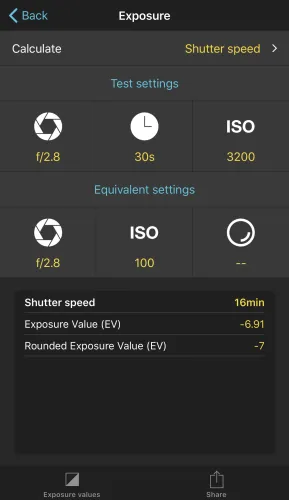

Portraiture
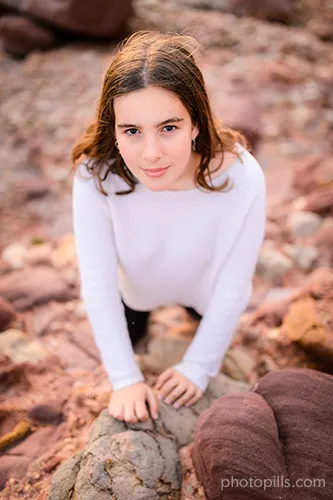
Let me introduce you to Aina, my youngest daughter. The truth is that she loves modeling, contrary to her mother who hates it (I hope Assumpta, my wife, doesn't read this).
To shoot the first photo, I use an aperture of f/5.6 to get more depth of field. Why do I want more depth of field? To show some details of the rocks at the back.
I set the ISO to 160 and the shutter speed to 1/30s so the photo has a pleasing lightness. I check this by making sure the light meter is centered at zero.
I don't quite like the resulting photo, so I decide to open the diaphragm 4 stops to f/1.4 to reduce the depth of field. So, keeping the ISO at 160, the reciprocity law tells me that I should use a shutter speed of 1/500s. That is, reduce the light by 4 stops.
As you see in the final result (the photo above), the rocks behind Aina come out very blurred thanks to a shallow depth of field. At the same time, the exposure is correct because it's neither too dark nor too bright.
Long exposure photography with filters
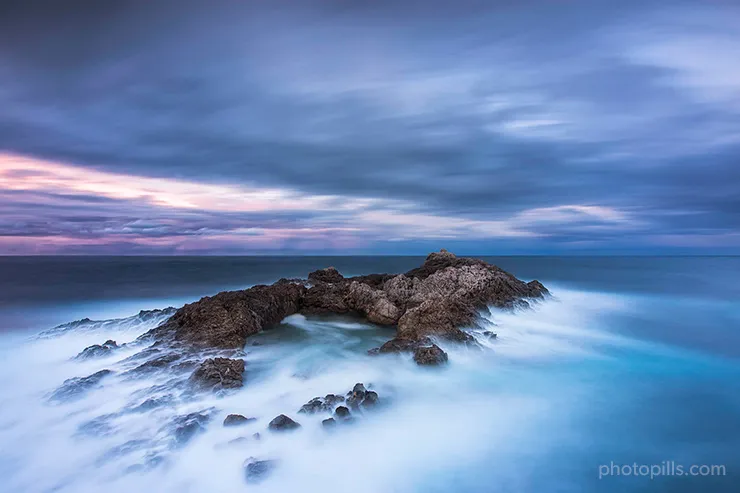
Na Joanassa is a long and relatively low rock formation. It's located near the coast, on the island of Menorca, Spain.
It's one of the ensembles that have always caught my attention in Menorca and photographing it has been fascinating.
That day the intensity of the wind and the rain are constantly changing. Both become strong at times and I'm having a hard time keeping the camera on the tripod.
A small rock that resembles a cave allows me to hide the backpack with all my equipment while I wait for the rain to let up.
However, during those moments the wind and the waves create an atmosphere that is worth photographing. So I decide to stay there despite the weather. Actually, what I want is an image that conveys what's happening right at that moment.
I seek to capture a dramatic scene with the sky and the water breaking on the rocks. I want to capture the movement of the clouds in the sky and the waves whipping the stone.
The first thing I do is to work on the composition and I choose the lens that allows me to capture the rock formation completely, part of the water in the lower strip of the frame and a lot of sky so that it shows tons of clouds. I take the Nikon 14-24mm f/2.8 from the backpack and attach it to the camera.
Now I have to determine the focal length. The rocks are very close to the coast, so I'm forced to open a very wide angle of vision. I select 14mm, I slightly twist the wheel, and when I reach 15mm I like how the framing looks.
Here comes the key moment: the exposure settings!
I know that I want to convey motion in the water and clouds. In order to do this, I need a slow shutter speed that allows me to get that silk effect in the clouds and in the water.
In this case, I determine the parameters in order to extend the exposure.
First, I set the aperture to f/11 to have a large depth of field and also to use a slow shutter speed.
Then, I select a low ISO to avoid noise: ISO 100.
Finally, I need to decide the shutter speed.
But how much time do I need?
I generally shoot in Manual mode (M). In section 13 I'll explain to you the different modes of exposure (or shooting). But for now, stick with the idea that I determine the shutter speed by making sure the light meter is centered at zero so the photo is correctly exposed.
I take the photo. The shutter speed that gives me a correct exposure is 1.3s. But I realize that the image doesn't reflect the motion with the intensity that I would like. I need an even slower shutter speed.
How do I get it? Using a 6-stop neutral density filter (ND). This type of filter allows to decrease the shutter speed since it reduces the amount of light that enters through the lens. I'll explain it in more detail in section 22.
However, when I put this element in front of the camera, my exposure settings are no longer useful. I take a picture and, as expected, it's too dark (underexposed).
So we're back to the initial question: what shutter speed do I need to get a correctly exposed picture with the filter I'm using?
It's a piece of cake!
I use the PhotoPills exposure calculator to calculate the equivalent shutter speed: 1min 30s.
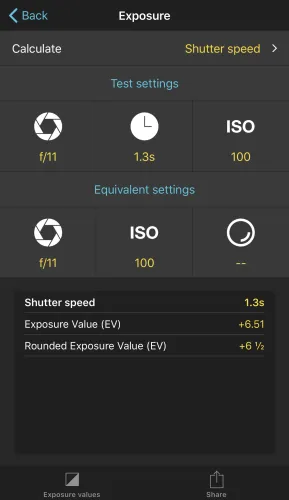
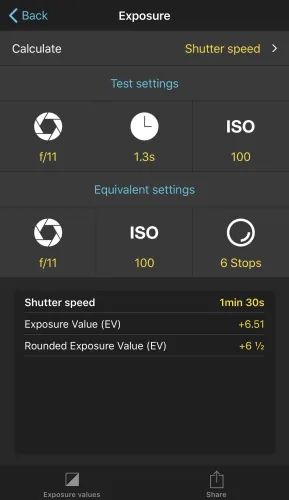
Finally, I set the white balance (I briefly mentioned it in section 2). It's another variable that I like to control manually.
In this case, when using a Haida ND filter, I know from my experience that it has a cool cast (it slightly dyes the image with a bluish tone). So I decide to increase the color temperature to 9000K to avoid too much blue color cast in the image. As you can see, the image is now very cold, conveying an even gloomier atmosphere.
8.What's the exposure value (EV) and what is it for
From the reciprocity law (section 7) you have deduced that there are many combinations of aperture and shutter speed that allow you to get the same exposure.
And from what I explained in section 5, you now know that there are many combinations of aperture, shutter speed and ISO that allow you to obtain the same lightness.
This brings me to the concept of exposure value (EV).
What's the exposure value (EV)?
The exposure value (EV) is simply a number representing all combinations of aperture, shutter speed that produce the same exposure (capture the same amount of light) with the same light coming from the scene.
In other words, all configurations that capture the same amount of light from the same scene (produce the same exposure) have the same EV number.
For example, EV0 is the amount of light that captures the sensor with an aperture of f/1 for 1s (and all equivalent configurations).
The EV increases by one unit for each stop that you increase the exposure. And, conversely, the EV decreases by one unit for each stop that you decrease the exposure.
There is a related measure, EV100, which relates to the light coming from the scene.
Consider it this way.
Exposure depends on aperture and shutter speed (together giving EV) and the scene luminance. So EV and scene luminance together gives exposure.
Now you can ask how much light would be needed from the scene to make an EV give correct exposure for ISO 100. The answer to that question is what we call EV100, and it's a measure of the light coming from the scene.
Unfortunately, in many places the subscript 100 is dropped, leading to confusion between two measures that mean completely different things.
How do you calculate the EV100?
Math alert!
If you don't like math, skip this section :P
EV100 is calculated using the following formula:
EV100 = log2(N2/t) - log2(ISO/100)
N is the f number, t is the shutter speed in seconds, and ISO is the ISO level you are using.
For example, what EV100 do you get with a combination of f/8, 1/4s and ISO 100?
EV100 = log2(82/0.25) - log2(100/100) = +8
Thus, we can say that all configurations equivalent to f/8, 1/4s and ISO 100 correspond to an EV100 of +8.
There is a much easier way to calculate the EV100 from the aperture, shutter speed and ISO values: using the PhotoPills exposure calculator.
Enter the values on the first row of the calculator (test settings) and you will get the EV100 in the results table.
You can use the second row (equivalent settings) to apply the reciprocity law, whether you are using filters or not (although I'll tell you more about them later on, in section 22).
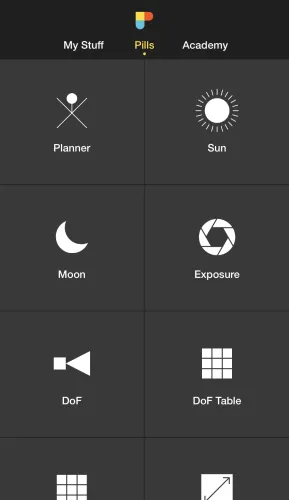
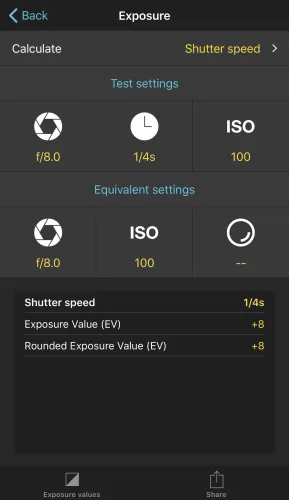
What is the EV100for?
The EV100 helps you reduce the "try and fail" when exposing. Use it as an indicator to quickly find the aperture, shutter speed and ISO settings.
There are tables, such as the one included with PhotoPills in your exposure calculator, that suggest the exposure value (EV) at ISO 100 (EV100) for different lighting conditions.
That said, take these values as orders of magnitude or starting points, not as absolute truths.
For example, according to the table of the first screenshot below, to correctly display a "Rainbow with Clear sky background" you should use a combination of the exposure triangle that gives you an EV100 of +15 at ISO 100.
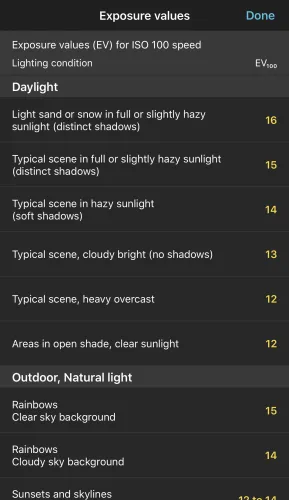
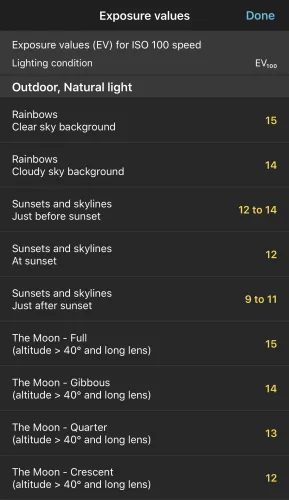
Therefore, you can begin to expose looking for the combination of aperture and shutter speed at ISO 100 gives you an EV100 of +15. If you click on the "Rainbows" row, PhotoPills gives you a valid combination: f/8, 1/500s and ISO 100.
If you're not happy with these values, you can calculate other equivalents. Select the setting you want to calculate, in this case "shutter speed", and enter the values you want to use in the "Equivalent settings" row. In your case f/10 and ISO 100. The new speed is 1/320s.

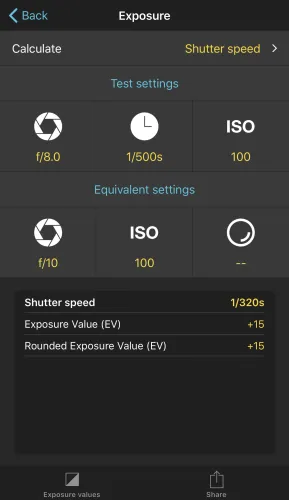
This is your starting point. Now take a test photo and adjust the parameters accordingly.
First, make sure the photo has the exposure you want. Otherwise, adjust some of the settings until the photo is well exposed.
Once you've got the exposure you are looking for, if you don't like the resulting photo or you haven't achieved the effect you want, adjust the aperture and/or shutter speed and/or ISO values by applying the reciprocity law and compensating if necessary with the ISO.
You can do the calculations on your own (section 7) or use the PhotoPills exposure calculator again.
Adjusting the EV on camera
All DSLR and mirrorless cameras have a tool to compensate the exposure (±EV). This setting allows you to increase or decrease the exposure at which the camera meter centers in a series of stops (or fractions of stop).
For example, if you select +1/3EV, the camera will center the meter at one third of a stop measured exposure.
However, the measured exposure might not be the correct one because the camera doesn't know how much light the scene reflects. Fortunately, the exposure compensation tool allows you to give it a hint.
I'll explain it in depth in section 14, but I anticipate you that it's a very useful tool in many situations since it allows you to give a little more (or less) light to the image:
- When you use the automatic mode P (section 13).
- When you use the semi-automatic modes of Aperture Priority (A or Av) or Shutter Speed Priority (S or Tv) (section 13).
- When you use the Manual shooting mode (M) and you have selected the automatic ISO (remember to set it within an interval so that it doesn't go beyond the ISO from which your camera generates a lot of noise as I explained in section 5).
- However, if you shoot in fully Manual mode (M), this tool is useless because you control the exposure yourself. If you're using auto ISO, some cameras let this control adjust the ISO in a similar way. That is, you modify the exposure by manually adjusting the aperture and shutter speed and what is "correct" exposure using the ISO control.
9.Scene dynamic range vs. your camera's dynamic range
The light is distributed unevenly in the scene. Typically, there are areas where the light is more intense and looks brighter. On the other hand, there are areas where the light is less intense and looks darker.
When you're working on your picture's exposition, it's essential that you understand the different light intensities of the scene.
When you face a scene, you should know if your camera is capable of capturing detail everywhere in the scene. That is, if it's capable of capturing detail in both the darkest areas of the scene and the brightest ones.
This brings me to the main concept so you understand how to expose: the dynamic range.
What's the dynamic range?
The dynamic range of the scene is measured in stops or exposure values (EV) and it shows the difference in light intensity between the darkest shadows and the brightest highlights of the scene.
In this section I'll explain to you why you have to differentiate between the dynamic range of the scene you want to shoot and the dynamic range that your camera is capable of capturing.
When the camera is not able to capture in a single exposure and with enough detail the darker and brighter areas, we say that the dynamic range of the scene you're facing surpasses that of the camera.
In section 22 and section 23 I'll give you several solutions so you can expose for this type of high contrast scenes.
But first, let's dig deeper into the concept of the scene's dynamic range.
The dynamic range of the scene
What is it?
The dynamic range of the scene is the brightness difference that you have in the scene you want to shoot. This range depends on how the light is distributed in the scene and it's measured in stops or exposure values (EV100).
How do you calculate it?
You probably understand it better with an example. Look at the picture below.
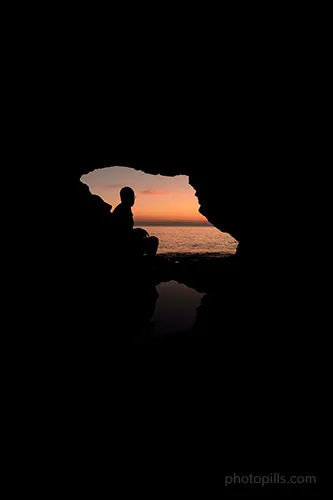
Let's calculate the dynamic range of the scene. That is, the number of stops between the highlights and the shadows.
If you meter with the camera the light (section 12) of the brightest highlights, you get a combination of aperture, shutter speed and ISO that will treat these highlights as a "correct" exposure for that ISO.
Thanks to these three values you can obtain an EV100.
"Meter the light? How do I do that Toni?"
You'll understand it perfectly when I'll explain you the different metering (section 12) and exposure (section 13) modes that the camera has.
For now I just want you to keep in mind that you have to select the Aperture Priority (A or Av), Shutter Speed Priority (S or Tv) or Manual (M) exposure mode (section 13). Either of them is useful.
Once this is done, select the spot metering mode (section 12). This mode allows you to accurately meter the light wherever you want.
In the photo below, to correctly expose for the highlights at ISO 400 you need to shoot at f/8 and 1/160s.
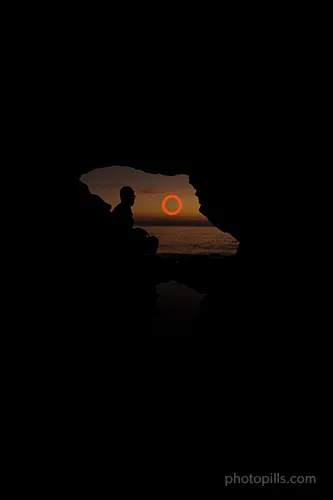
In section 8 you learned that an exposure value (EV) that gives correct exposure at 100 ISO gives a measure of the scene luminance (light coming from the scene) called EV100. In this particular case, the highlights have a value of +11 1/3 EV100.
You can find out the EV100thanks to the PhotoPills exposure calculator. Simply enter the values of the exposure triangle and the EV will be displayed in the lower results table.
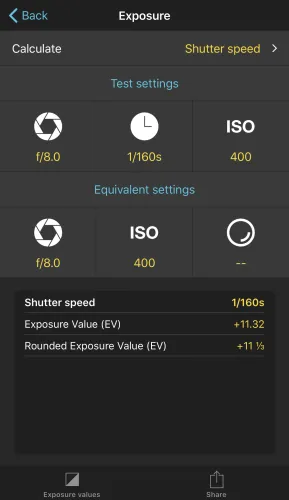
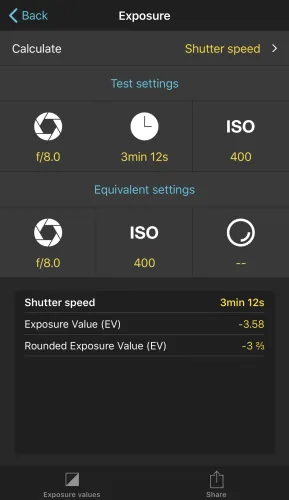
Repeat the same process for the shadows, and you'll get another combination of aperture, speed, and ISO. And therefore, another EV100. According to the previous PhotoPills screenshot you get a -3 2/3 EV100.
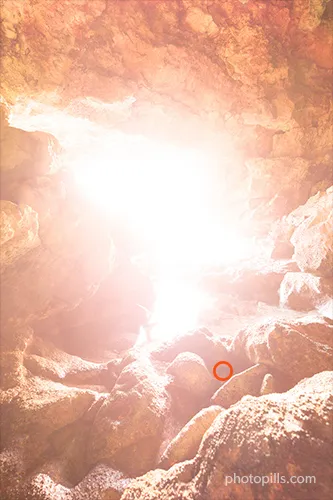
Once you have both exposure values, subtract the shadows from the highlights.
11 1/3 - (-3 2/3) = +15 EV
Therefore, in this case the dynamic range of this scene is +15 EV.
And what does this mean?
The dynamic range of the scene is +15 EV. What does it mean?
To put it bluntly, it means that there's a difference of 15 stops between the settings to correctly expose the shadows and the ones to correctly expose the highlights. And if you want to capture detail in both areas (shadows and highlights) you need a camera capable of successfully capturing these 15 stops.
Since my camera has a dynamic range of about 13 stops or so, it won't be able to capture the entire dynamic range of the scene, so I decided to shoot a silhouette.
I was composing the scene in this cave when, suddenly, Joanma appeared in the frame. "Stand still!" I said. His silhouette gave me an opportunity to capture a different Sunset photograph and use his silhouette to break the great negative space produced by the shadows.
I didn't have to change any settings since I was going to photograph the same composition but metering the highlights to boost the colors of the impending Sunset.
So, depending on the location and the time of day (or night) in which you are taking pictures, you'll find different dynamic range scenes. And you have to learn to successfully expose them.
Some scenes have a wide dynamic range, with very dark shadows and very bright highlights. For example:
- Landscape scenes during daylight hours (around noon).
- Or when you include a source of light like the Sun in the frame. In this case you can shoot backlit silhouettes.
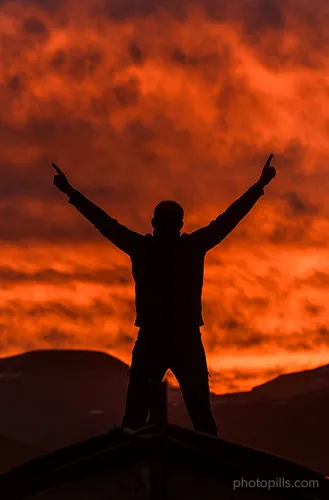
However, other scenes have a narrower dynamic range, such as a landscape during the golden hour or the blue hour. These are two moments during which you can photograph, for example, the landscape and the Moon in a single exposure. And that's possible because of the narrow dynamic range of the scene.
The dynamic range of the camera
It's time to combine the dynamic range of the scene with the dynamic range that your camera is capable of capturing. You need to understand both to expose.
What's the dynamic range of the camera?
The dynamic range of the camera is the range of subject lightness that your camera can capture, from the lightest to the darkest usable tone.
The lightest usable tone is the brightest highlight, and the darkest one is the darkest shadow.
Do you remember when I explained to you that the sensor on your camera is much less accurate and efficient than your eyes?
And while the sensor of your camera is much more accurate and efficient than your eyes, what you perceive is the result of loads of processing that goes on after the eye has done its work.
This processing includes changing aperture and shutter speed, exposure stacking, loads of real (as opposed to artificial) denoising and other image corrections...
And the result is the JPEG file that you see on your LCD screen
Unfortunately, JPEG files don't even use a camera's full dynamic range – they typically include only 9 or so stops of dynamic range.
And what does that imply?
As long as the difference in intensity between the brightest highlights and the darkest shadows of the scene falls within the dynamic range of your camera (ie. the JPEG file that you see), you'll be able to capture all the detail of the scene in a single shot. You won't have any overexposed or underexposed areas in the photo.
What happens when the dynamic range of the scene exceeds that of the camera?
If the dynamic range of the scene exceeds that of your camera, you will have to resort to multiple exposures or to use filters. In section 22 and in section 23 we'll see in detail how to expose when you face situations with a high dynamic range.
Once again, let's look at an example. Imagine that you want to photograph a scene with an 8-stop dynamic range (or EV). If your camera has a dynamic range of 10 or more stops, you can capture the scene seamlessly in a single photo.
But what if the dynamic range of the scene exceeds that of your camera?
In this case, the camera overexposes the brighter areas or underexposes the darker areas. The point is that you will have to choose between:
- Overexposing certain areas, and losing information in the highlights.
- Underexposing other areas, and losing information in the shadows.
- Taking a bracketing or a multiple exposure. That is, take two or more photographs to cover the whole dynamic range of the scene and then blend them together in post-processing.
- Producing a bracketing directly on camera. The camera takes a number of pictures to cover the dynamic range of the scene and it blends them, displaying the final image.
- Using filters, although this is a more advanced level. We'll look at the filters in detail in section 23.
Another option is to look for the hours of day when the light is soft and with a low dynamic range. I'm referring to the golden hour or the blue hour, which are fantastic moments for any type of photography (landscape, Moon, urban, portrait, street ...).
The last option is to use a camera capable of capturing a high dynamic range, which allows you to simultaneously record the detail in both very dark and very bright areas of the scene. I'm talking about high dynamic range cameras.
How do you know if the dynamic range of the scene exceeds that of the camera?
I guess after this section you'll be asking yourself:
"And how can I know if the dynamic range of the scene "fits" in my camera?"
The reality is that, unfortunately, there's no actual way of finding out.
However, you can always use the histogram :P
Keep reading.
Get this ebook for free now!