How to Photograph the Annular Solar Eclipse on June 10th, 2021
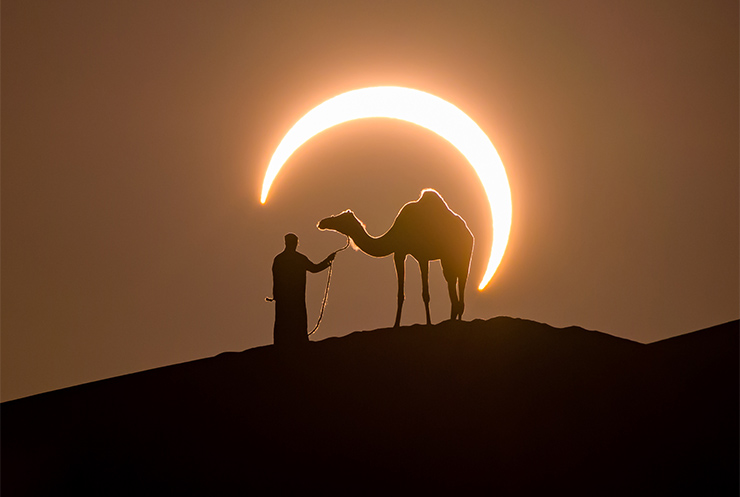
Annular solar eclipses give us the chance to capture incredible photos.
Just have a look at the image above, taken by Josh Cripps back in 2019.
Simply legendary!
Well...
The good news is that there is another annular eclipse approaching...
So get ready to learn everything you need to photograph the June 10th, 2021 annular solar eclipse.
Everything!
Where to go and when…
How to plan your annular solar eclipse photo idea with PhotoPills...
All the gear you need…
And how to photograph the solar eclipse step by step…
Including all camera settings!
For both: the ring of fire (totality) and the partical phase of the eclipse.
Ready?
Keep reading!
"A goal without a plan is just a wish" - Antoine de Saint-Exupéry.
Content
- What is an annular solar eclipse?
- When and where is the annular solar eclipse visible?
- How to plan a photo of an annular solar eclipse like a pro
- All the equipment you need to photograph the annular solar eclipse
- How to photograph an annular solar eclipse step by step
- Need more help?
1.What is an annular solar eclipse?
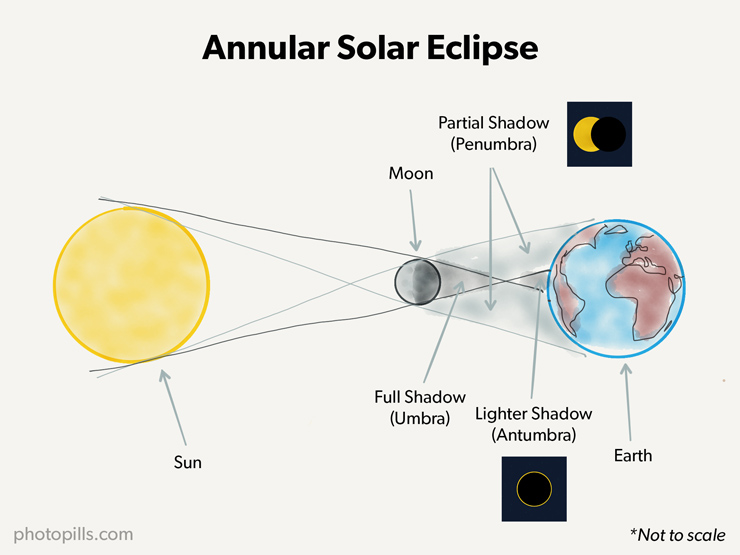
A solar eclipse happens when the Moon passes between the Sun and the Earth casting its shadow on some parts of our planet.
Depending on how the Moon's shadow falls on Earth, the eclipses are classified as:
- Partial solar eclipse: the Moon covers only part of the Sun.
- Total solar eclipse: the Moon covers the Sun disk completely.
- Annular solar eclipse: the Moon covers the Sun disk partially, creating a spectacular ring of fire around the Moon.
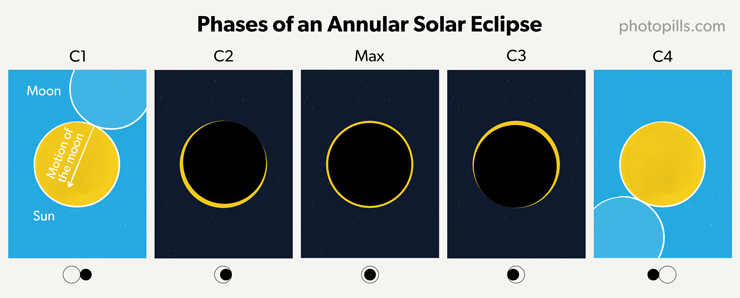
When it comes to an annular eclipse, you want to be in a location where you can enjoy (and photograph) all the phases of the eclipse:
- Partial eclipse begins (1st contact - C1): The Moon starts to cover the Sun.
- Annular eclipse begins (2nd contact - C2): The Moon starts to be inside the Sun. you begin to see a ring of light around the Moon.
- Totality and maximum eclipse (Max.): The Moon covers the center of the Sun completely creating a stunning ring of fire in the sky.
- Annular eclipse ends (3rd contact - C3): The Moon starts to move away from the Sun.
- Partial eclipse ends (4th contact - C4): The Moon completely leaves the Sun.
All the eclipse phases are spectacular!
Unfortunately the eclipse will be visible only from certain places on Earth: US, Europe, UK, Canada...
There'll be lots of areas where you can go and photograph the partical phase of the eclipse.
But only the locations that fall within the so called "path of totality" will be able to enjoy all the phases of the eclipse, including the stunning Ring of Fire.
So, the question is:
Where on Earth you should go, and when, to have the best chance to photograph the annular eclipse.
2.When and where is the annular solar eclipse visible?
The path of totality of the June 10th, 2021 annular solar eclipse goes through parts of Canada, Greenland and Russia. It's where you can photograph the Ring of Fire.
And the partial phase of the elicpse will be visible in parts of Canada, US, Europe, UK, Russia, China...
Here you have a list of places that fall within the path of totality, where you can enjoy all the phases of the eclipse (including the maximum phase). The table also shows places where you can photograph the partical phase of the eclipse.
Note: Time is shown in Hours:Minutes:Seconds.
| Country | Place | Partial Eclipse Begins (C1) | Maximum Eclipse | Partial Eclipse Ends (C4) | Type |
|---|---|---|---|---|---|
| Canada | Peawanuck | 5:57:32am | 5:59:05am | 6:00:37am | Annular |
| Canada | Fort Hope | 5:53:44am | 5:55:32am | 5:57:21am | Annular |
| Canada | Sanikiluaq | 5:56:36am | 5:58:27am | 6:00:18am | Annular |
| Canada | Qutialuk | 6:02:44am | 6:04:30am | 6:06:16am | Annular |
| USA | New York | 5:25:00am (2) | 5:32:47am | 6:30:51am | Partial |
| USA | Philadelphia | - | 5:32:00am (2) | 6:30:02am | Partial |
| USA | Boston | 5:07:00am (2) | 5:33:19am | 6:32:37am | Partial |
| USA | Portland (Maine) | 4:59:00am (2) | 5:34:43am | 6:34:38am | Partial |
| USA | Bar Harbor | 4:48:00am (2) | 5:34:48am | 6:35:25am | Partial |
| Greenland | Oqaatsut | 7:12:12am | 8:18:28am | 9:28:15am | Partial |
| Iceland | Reykjavik | 9:06:11am | 10:16:51am | 11:32:21am | Partial |
| Ireland | Dublin | 10:00:59am | 11:08:59am | 12:21:07pm | Partial |
| England | London | 10:08:50am | 11:13:18am | 12:22:31pm | Partial |
| Spain | A Coruña | 10:49:34am | 11:43:47am | 12:43:10pm | Partial |
| France | Paris | 11:12:52am | 12:11:34pm | 1:14:24pm | Partial |
| Germany | Berlin | 11:36:36am | 12:38:28pm | 1:42:17pm | Partial |
| Sweeden | Sockholm | 11:41:50am | 12:53:04pm | 2:04:57pm | Partial |
| Russia | Moscow | 1:23:01pm | 2:26:33pm | 3:27:14pm | Partial |
| Mongolia | Jargalan | 7:26:53pm | 8:19:47pm | 9:10:00pm (1) | Partial |
| China | Qingyang | 7:46:23pm | 8:04:00pm (1) | - | Partial |
(1) Solar eclipse ends at Sunset. (2) Solar eclipse begins at Sunrise.
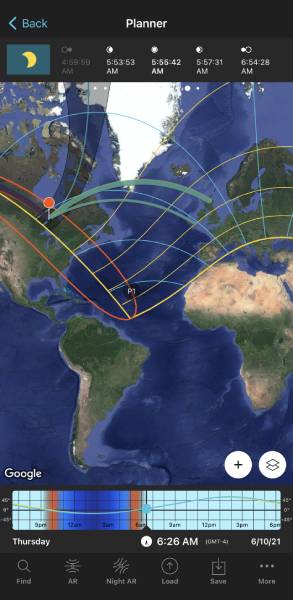
To create the table above, I've used the eclipse information that the Planner tool included in the PhotoPills app provides.
PhotoPills allows you to plan your photos ahead of time so you're always at the right place, at the right time to capture the scene you want.
It's super fun!
There are already 550,000+ photographers across the world using PhotoPills to plan their Sunset, Sunrise, golden hour, blue hour, Moon, solar eclipses, lunar eclipses, Star Trails, Meteor Showers and Milky Way photos.
Curious?
Check out the pictures that the PhotoPills community is capturing.
And if you're one of us, to get all the eclipses info you need, all you have to do is to:
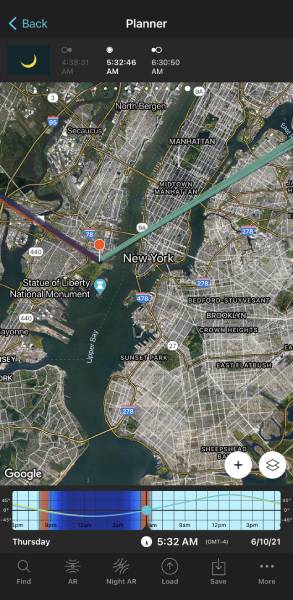
- Go to the Planner and choose the June 10th, 2021 annular solar eclipse from the eclipse calendar. The path of totality will appear on the map.
- Place the Red Pin in the location you want to photograph the eclipse within the path of totality. You can use the Load button (at the bottom) to type the name of the place if you know it. Otherwise you can drag and drop the Red Pin. Or just do a long press on the spot you wish to place the Red Pin and it'll be placed there.
- Get the local times each eclipse phase occurs from the eclipse panel above the map. Swipe the panels until you find it.
- Swipe the Time Bar (below the map) to change the time and see on the map where the eclipse occurs at all time (thin line).
- And if you're right where the Red Pin is, you can also use the Augmented Reality (AR) button to visualize the position of the eclipse in the sky.
Confused?
Don't worry...
Everything will become clear in the next section.
I'll show you how to plan your solar eclipse photo step by step in a video.
Keep reading!
3.How to plan a photo of an Annular Solar Eclipse like a pro
Stop!
The idea goes first.
Then you plan it!
Then you shoot it!
Imagine. Plan. Shoot!
That's the PhotoPills workflow :)
So decide what you want first.
Maybe you want to create an image of the eclipse aligned with an interesting subject. Like Josh Cripps did during the December 26, 2019 annular solar eclipse.
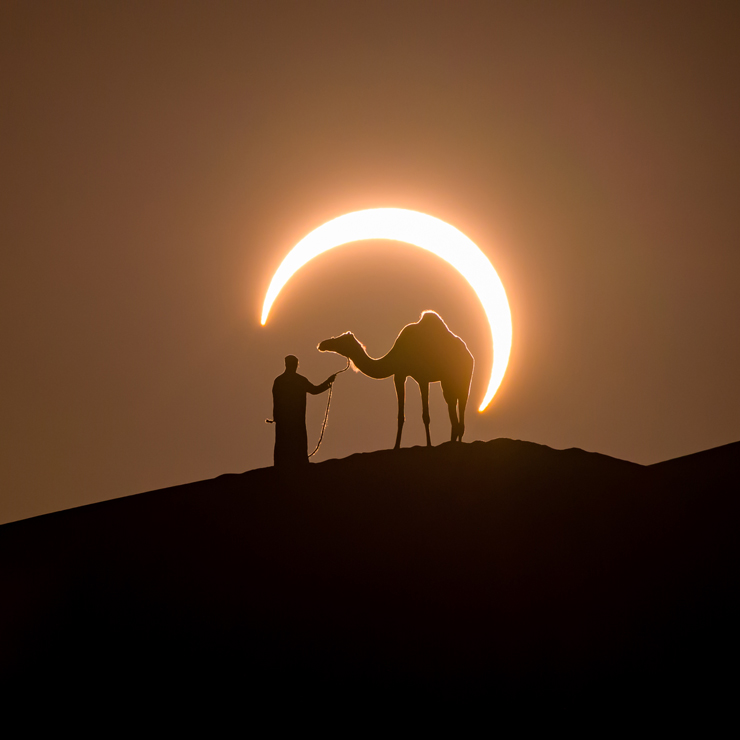
Photo by Josh Cripps.
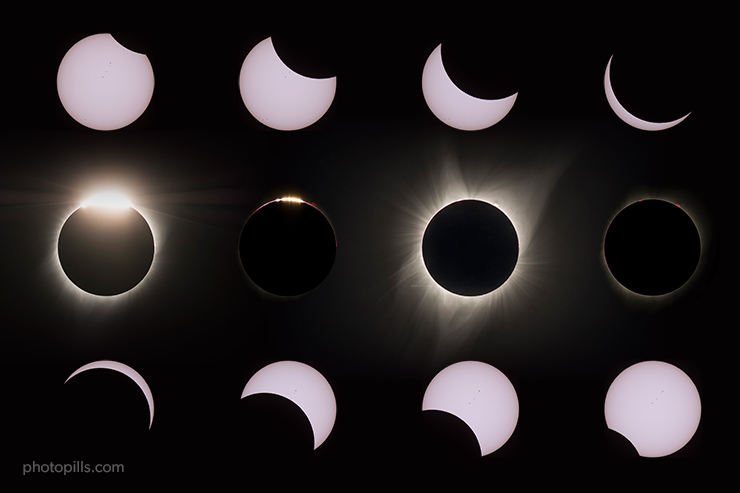
Or maybe you're interested in capturing all the phases of the eclipse. Like I did during the 2017 total solar eclipse in Oregon, USA.
No matter the photo you want to capture, watch this video and you'll learn how to easily plan it.
So you can go and capture it!
In the video you'll see Rafa (the Bard of PhotoPills) planning the June 10, 2021 annular eclipse. All you have to do is to follow the same workflow ;)
Now that you've planned your photo, you know your shooting spot and shooting time.
Let's have a look at the gear you'll need to photograph the eclipse.
4.All the gear you need to photograph the Annular Solar Eclipse
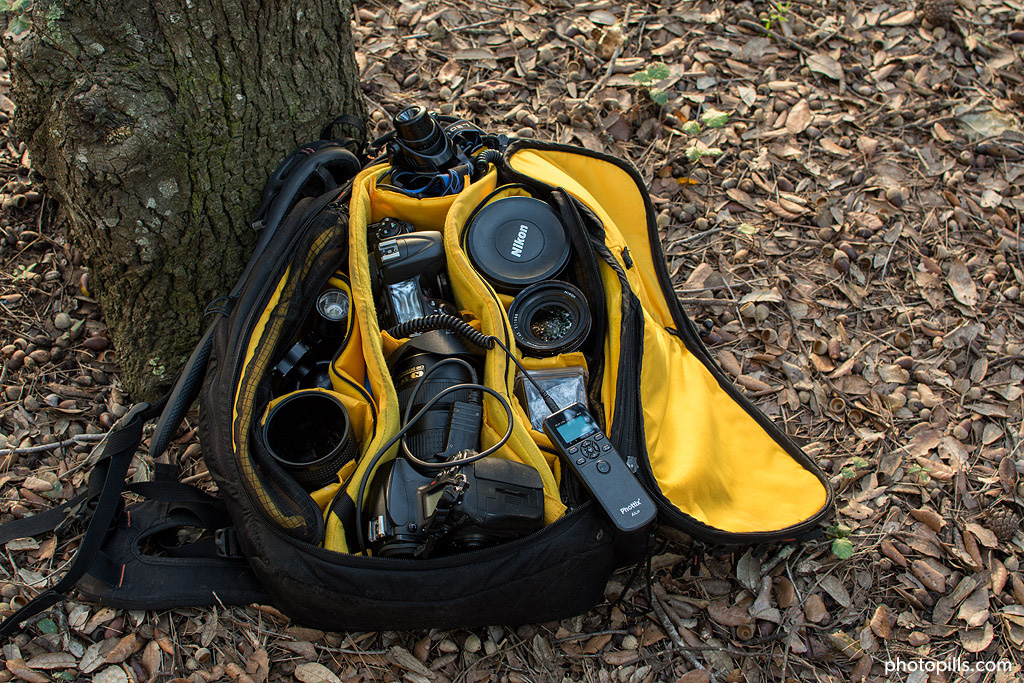
I love my solar eclipse checklist.
It's the only way I make sure to bring everything I need for the shooting session.
So I thought you might like it too :)
Long story short...
This is the gear you need to photograph the eclipse:
- Solar filter
- Telephoto lens
- Your camera
- Sturdy tripod and head
- Shutter release or intervalometer
- Memory cards and batteries
- Special eclipse glasses to protect your eyes
Solar filter
You need to put a solar filter in front of your lens if you want to photograph the solar eclipse. Otherwise you'll damage your camera and your eyes when you look through the viewfinder of your camera.
Nowadays you can buy a solar filter almost everywhere, including Amazon and B&H.
Make sure you buy a solar filter that works with your lens diameter.
My to go filters are:
- 77mm Solar Filter "White light" by Thousand Oaks Optical.
- Baader Solar Filter for my telephoto lens.
Can you use an ND filter instead?
In practice, you can, but you shouldn't.
There is the risk of damaging your camera.
I wouldn't definitely use an ND filter to photograph a solar eclipse :)
Lens
The lens choice depends on the photo you want to capture.
Go wide (14-35mm) if you want to include the landscape. The Sun will be small dot in your photo, but you can make it work in your composition.
Go long (200-500mm) for a close-up view and to create a powerful image of the eclipse aligned with a subject. Or to photograph all the phases of the eclipse.
Camera
Use your own camera!
You don't need a special camera to photograph the eclipse.
The advantage of using a crop sensor camera vs a full frame camera is the focal length multiplier effect.
For instance, using a APS-C camera with a 1.5x crop sensor, a 200mm focal length turns into a 300mm focal length.
Tripod and head
The filter, the camera and the lens are heavy. Therefore you need a sturdy tripod and head capable of bearing it, and that are as stable as possible on a windy day.
Shutter release or intervalometer
Don't press the shutter button of your camera! If you do so, you'll shake your camera and your images won't be 100% tack sharp.
And you want them crispy and sharp!
Always use a shutter release or and intervalometer.
Memory cards and batteries
Don't forget to bring several memory cards and spare batteries just in case something goes wrong.
Eclipse glasses
And last but not least...
Protect your eyes.
And that's it...
You're ready to go!
5.How to photograph an Annular Solar Eclipse step by step
Photographing the annular solar eclipse will be lots of fun.
And the good news is that you have plenty of time…
So practice a bit photographing the Sun before the eclipse begins.
Just follow the steps in this section.
And you'll nail the photo.
Go to the planned shooting spot
On June 10, go to planned shooting spot. And make sure you set up the tripod and head right where the PhotoPills' Red Pin is in your photo plan.
Being at the right spot is key, especially if you're photographing the solar eclipse aligned with a subject.
Use the PhotoPills Planner and Augmented Reality views to make sure you're at the right spot.
Shoot in RAW
Don't shoot in JPG, shoot in RAW to collect as many data as possible for a better post-processing work.
Use a long focal length (200-500mm)
If you want to center the attention of the viewer on the eclipse, use a long focal length. The longer the better!
Attach the solar filter to the lens
The solar filter is key here. Use it to protect your camera.
However, you don't have to take it out during totality as you would during a total solar eclipse.
During an annular eclipse, the Moon never covers completely the Sun. Therefore you need to keep the solar filter in front of your lens at all times.
Set spot metering mode
And meter light on the Sun to nail the exposure.
Close the aperture (f/8)
I usually shoot my eclipse photos (close up) at f/8. It works great for these type of images.
Use ISO 100
Use a low ISO to prevent image noise. Use the nominal ISO of your camera (100 or 200).
Set shutter speed (1/500s-1/1000s at f/8 and ISO 100)
Since you've metered light on the Sun and you've set the aperture and ISO, set the shutter speed to have an image correctly exposed (exposimeter centered to 0).
Usually a shutter speed between 1/500s-1/1000s should work.
Bracket your exposure
After all the planning, the last thing you wish is to fail the get the exposure right.
So make sure you apply the bracketing technique. A 3-stop bracketing will work.
Focus at the edge of the Sun
When you're ready to start shooting, focus at the edge of the Sun, take a test shot, and use the Live View option on the LCD screen to double check that the Sun is in focus.
6.Do you need more help?
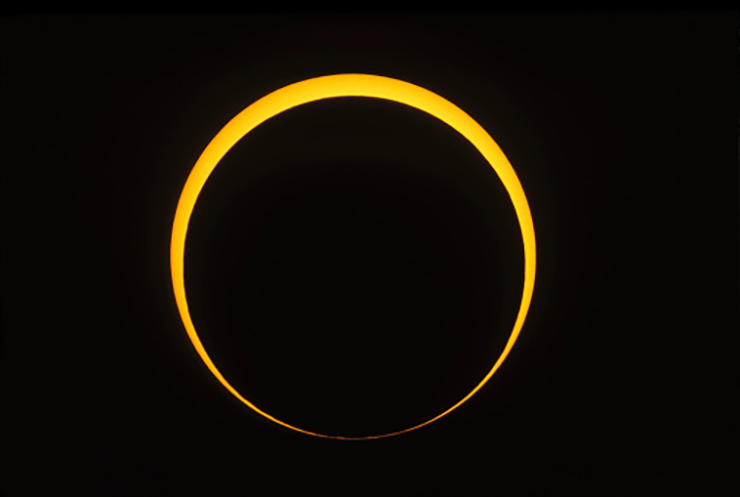
Photo by Alan Dyer/Stocktrek Images.
Congratulations!
Now you can successfully photograph the June 10, 2021 annular solar eclipse.
But...
If you want to know much more about solar eclipse photography, check our super detailed solar eclipse guide!
There you'll find everything you need to photograph any solar eclipse, including a total solar eclipse.
And if you want to improve your photography, make sure to have a closer look at our collection of free photography guides. I'm sure you'll love them ;)
And if you have a question, leave a comment below.
I'm ready to help!
Note: Some links on this page are affiliate links. What does this mean? If you buy/rent using these links you're helping support us and it costs you nothing extra. Thank you for your support.