7 Tips to Make the Next Supermoon Shine in Your Photos
Another Supermoon is approaching!
Are you looking for new ideas for the shot, looking for a new challenge?
If that's the case, you’re at the right place... let me help you unchain your creative potential.
How?
Location power, inspiration, equipment and the following tips are the ingredients you need to have in the mix in order to come up with the best cocktail for the Supermoon.
It all begins by deciding how big you want the moon in your photos. Are you ready?
Get this ebook for free now!
Content
- Focal length defines how big the moon will appear in the photo
- Go to a location with an interesting subject, a beautiful landscape and space to move
- The shooting spot determines the size of the moon relative to your subject
- The idea, your imagination makes the difference
- The plan, finding the right shooting time and the right shooting spot
- How to shoot the Supermoon
- Just do it!
1Focal length defines how big the moon will appear in the photo
When brainstorming, you need to take into account the lens you have available, because focal length determines the size of the moon in the photo. In other words, field of view determines how much area the moon will cover in the image.
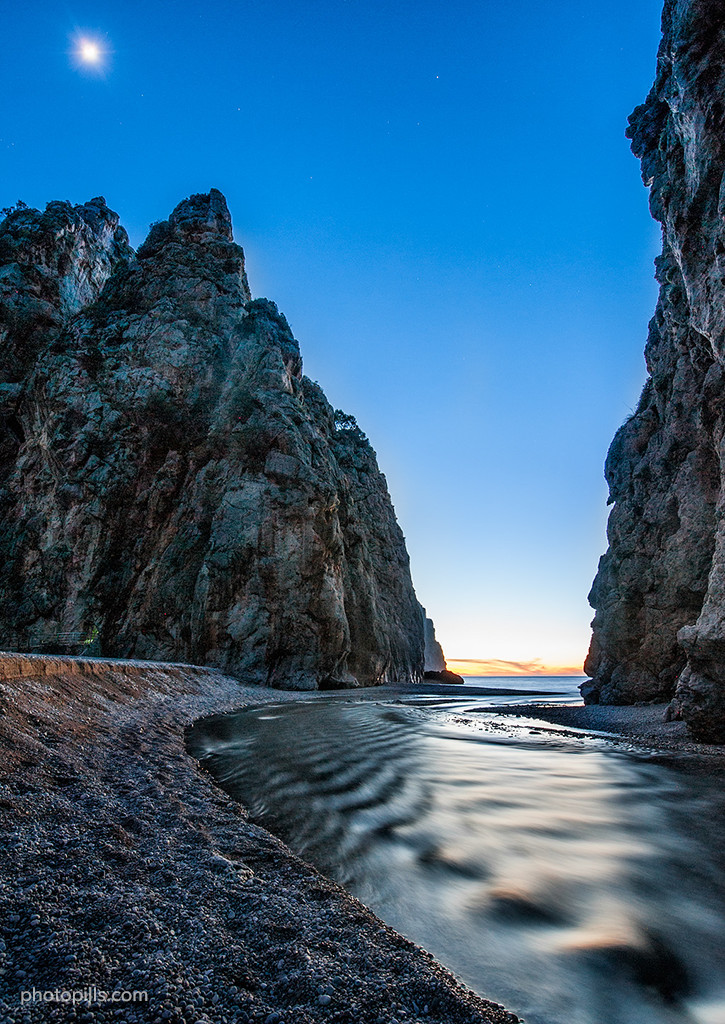
Moon as a dot, wide angle lens
Use a wide angle or a fish-eye lens (8-35mm) when you want to emphasize the beauty of the landscape. Thanks to the wider angle of view, you’ll capture a large area of the landscape showing all its beauty. The cons is that the moon will appear as a small bright dot in the sky. In this case, if you want to include a subject in the foreground, you’ll need to get closer to it.
07/08/14 10:09 pm | Sun elevation: -13.8° (Astronomical Twilight) | Moon elevation: 29.6°
04/05/14 08:57pm | Sun elevation: -9.1° (Nautical Twilight) | Moon elevation: 53.8°
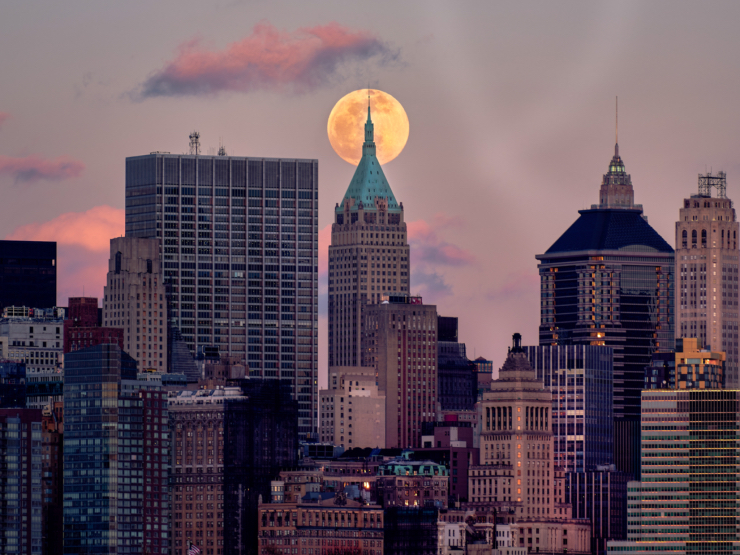
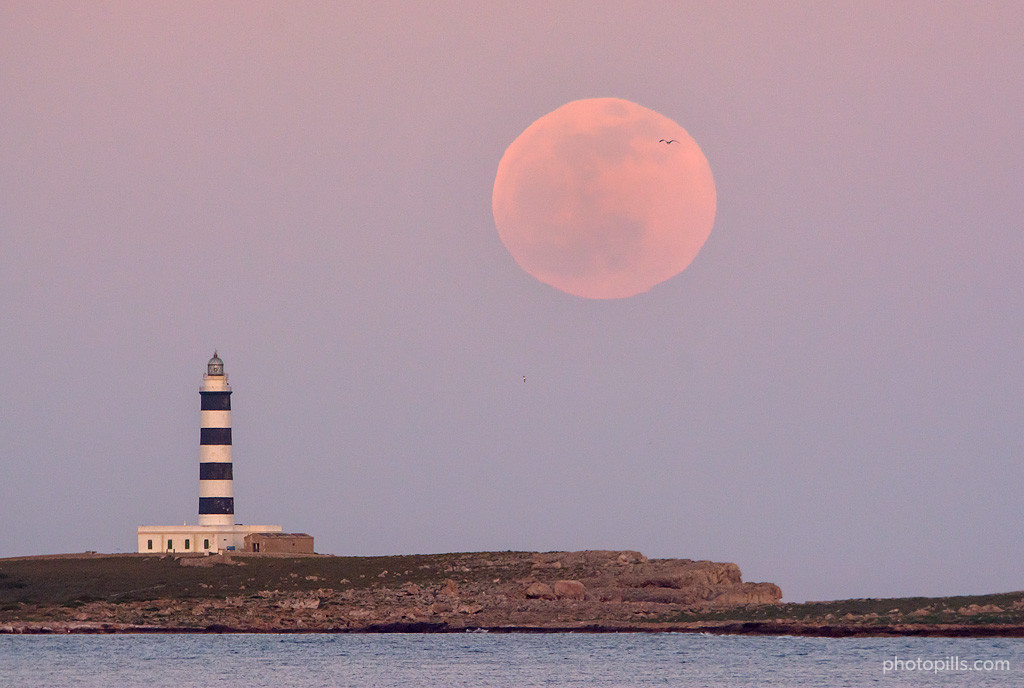
Small moon, medium range focal length
By using short to medium focal lengths (50-200mm), the angle of view is narrower, increasing a little bit the size of the moon in the frame, and reducing the area of the landscape captured. The moon appears pretty small in the photo, but its presence gains importance in relation with the landscape.
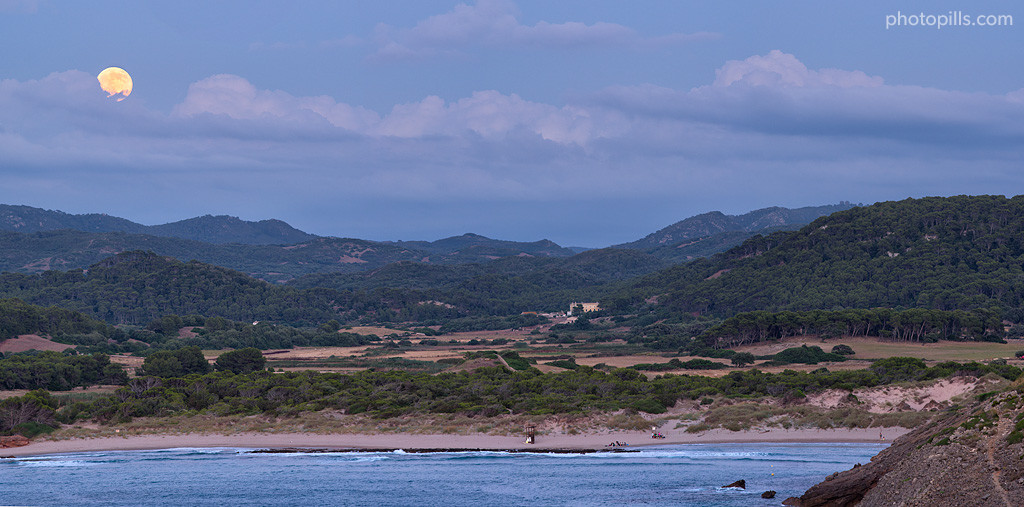
07/12/14 09:26pm | Sun elevation: -2.8° (Golden Hour) | Moon elevation: 3.2°
12/04/13 06:09pm | Sun elevation: -9.4° (Nautical Twilight) | Moon elevation: 9.3°
Big moon, long focal lengths
Finally, if you want the moon to be the main attraction in the photo, go for focal lengths of 400mm, 500mm and beyond. Depending on the idea you have, you can use a teleconverter (for example, a 2x) to increase your focal length and capture a giant moon.
By using such a long focal length, you’re reducing the angle of view so much that you’ll only capture the moon and the subject in the frame, neglecting the landscape. In this case, you’ll need to get far from the main subject (more than 1km). It’s the case of the typical long distance shots.
06/13/14 09:41pm | Sun elevation: -5.1° (Blue Hour) | Moon elevation: 1.3°
Now that you’ve decided how big you want the moon in the photo in relation with the frame, begin to think where to go!
2Go to a location with an interesting subject, a beautiful landscape and space to move
Sure you know many beautiful places for the shooting of the supermoon, powerful locations with a magic atmosphere to inspire you. In my opinion, a great location is the one that combines these three characteristics.
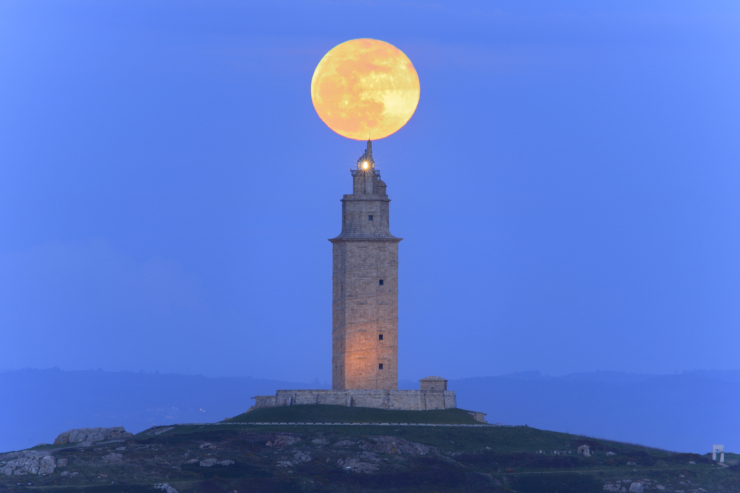
An interesting subject
It can be anything, a rock, a tree, a lighthouse, a building, an ancient construction. Anything that motivates you to create a story, a plot with a very special leading actress: the Supermoon.
05/14/14 08:45pm | Sun elevation: 0.8° (Golden Hour) | Moon elevation: 0.4°
A beautiful landscape
Some photographers state that a location can make you win an award... and they have a point. So, if you’re so lucky to live near such a magic location as Gaztelugatxe, don’t hesitate it. It’s where you must go.
Space to move
Ok, pay attention now, this is key!
The best moment to shoot the supermoon is during moonrise and moonset, which always happens during the golden hour at sunset or sunrise. It’s when the color of the sky goes from yellow to orange, in a golden tones. This soft light is perfect for capturing the moon and the landscape in a single exposure. Have a look at one of our best articles to learn more about light, golden hour, blue hour and twilights.
Let’s say that you decide to shoot the moon at moonrise. Then, given a location, the alignment of the moon is determined by the moonrise. The moon only rises once a day and in one direction (or alignment).
Therefore, if you want the moon to rise in a determined position in the frame, it’s better to go to a location where you can choose the shooting spot based on your desired moon alignment in relation with landscape and main subject.
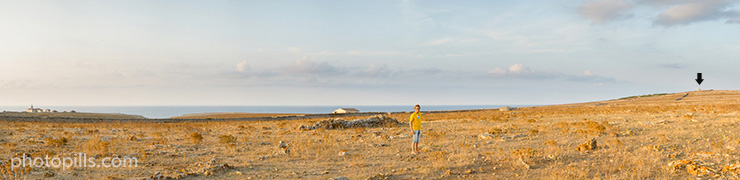
For a given date, and thus for a given moonrise alignment, if you go to a location where you cannot change the shooting spot at your will, you’ll have a limited number of possible shots. You’re actually putting a limit to your imagination.
Photography is all about creativity and the less constraints the better.
3The shooting spot determines the size of the moon relative to your subject
I know that this is a very advanced topic, very few people know this. But, it is important that you start scaling!
Most people believe that the size of the moon relative to the size of a subject (construction, tree, rock) is determined by focal length. But the truth is that focal length has nothing to do with it.
As I explained in the first section of this post, focal length determines how big the moon will appear in the photo compared to the frame (field of view). But, it is the distance between the shooting spot and your subject that determines how big the moon will appear to be in relation with the subject. This is due to the angular diameter of the moon.
Therefore, depending on the image that you have in mind, you’ll need to choose a shooting spot that is at the distance that gives you the desired size of the moon compared with your subject.
The following drawing shows a possible idea for a shot, a possible composition between an old stone construction and the moon.
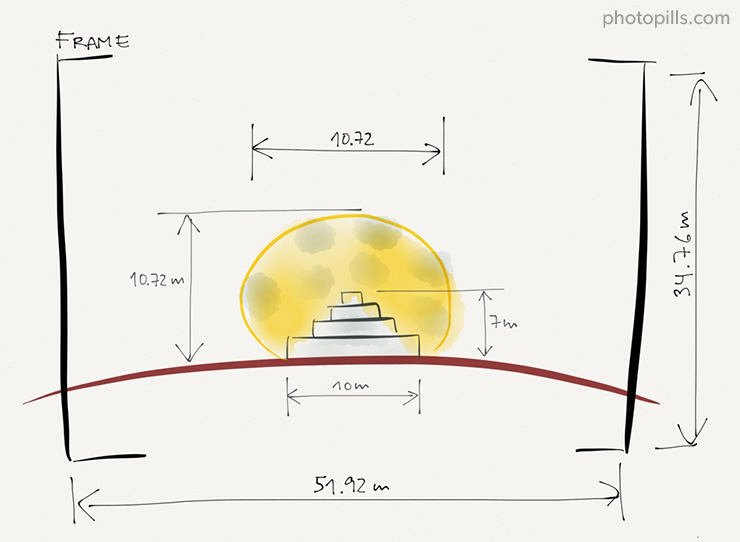
Given the dimensions of the construction, I decided the size of the moon. And this is the resulting shot!
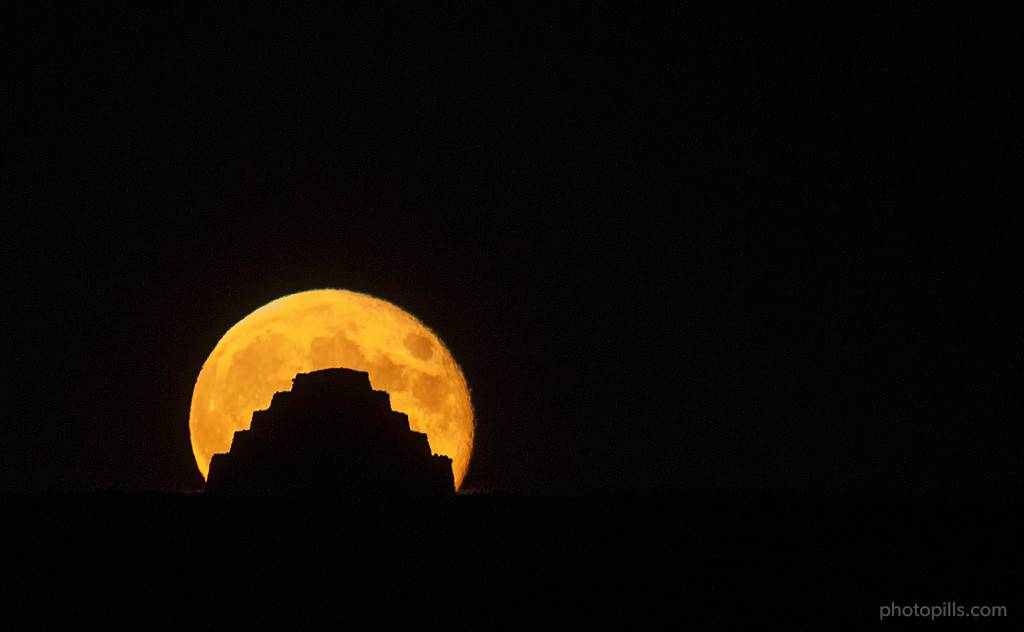
09/20/13 08:20pm | Sun elevation: -7.5° (Nautical Twilight) | Moon elevation: 1.4°
If you want to learn how to calculate the shooting distance for a given moon size, have a look at the following article: How To Plan The Next Full Moon.
In this article, it’s explained how to assess the diameter of the moon by using the angular diameter of the moon, the shooting distance from the subject, your lens angle of view and the resulting field of view.
There is an easier way to calculate the shooting distance, just use the following equation:
Shooting Distance = Moon Diameter / [2 × tan(Moon Angular Diameter/2)]
For example, if we assume that the full moon has an angular diameter of 0.556°, then the equation is:
Shooting Distance = Moon Diameter × 103.05
So, if your subject is 7 m tall and 10 m wide, and you want a moon with an apparent diameter of 10m, the shooting distance should be approximately 1,030.50m (10m × 103.05).
You can find the angular diameter of the moon for a given day within PhotoPills' Moon Pill.
Have a look at the equation above. The multiplying factor (103.05) is pretty close to 100. Therefore, in practice, we use what we call the PhotoPills Rule of 100:
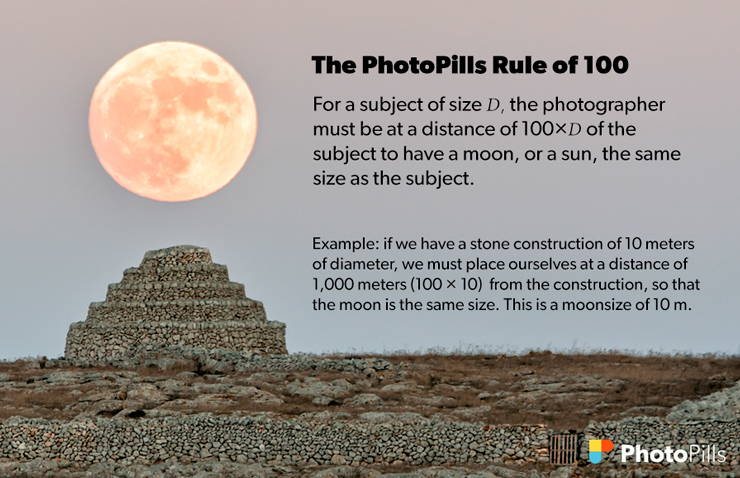
So, just multiply the size of the Moon you want compared to your subject by 100 and you'll get the shooting distance!!
After this tough section, what about a little bit of inspiration?
4The idea, your imagination makes the difference
My goal now is to give you a few examples in the hope of inspiring you. But, of course, creativity and imagination have no rules. Just go out and shoot what you really love shooting.
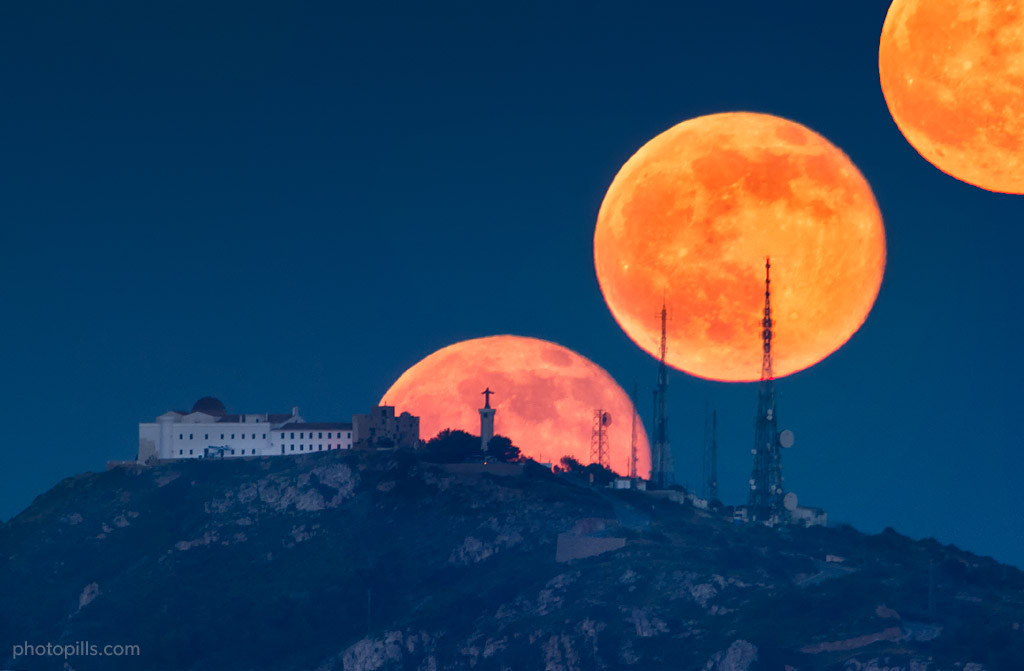
Tell the whole story
Why showing only one picture when you can tell the whole story? And my story talks about the full moon rise happening just behind the highest peak in Menorca: “Monte Toro”.
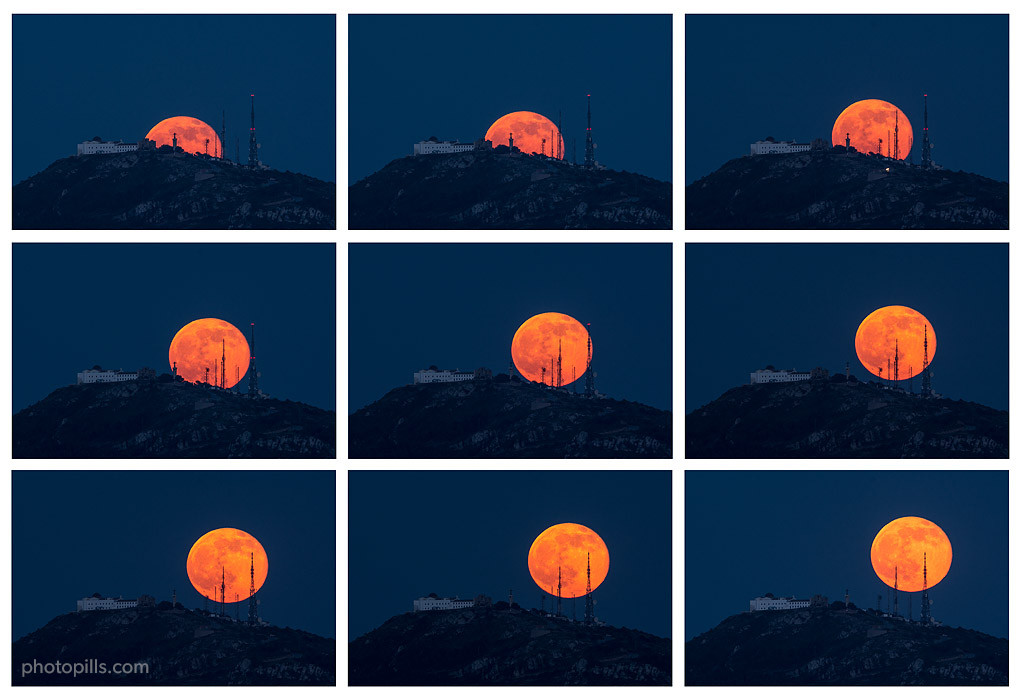
06/13/14 09:41pm | Sun elevation: -5.1° (Blue Hour) | Moon elevation: 1.3°
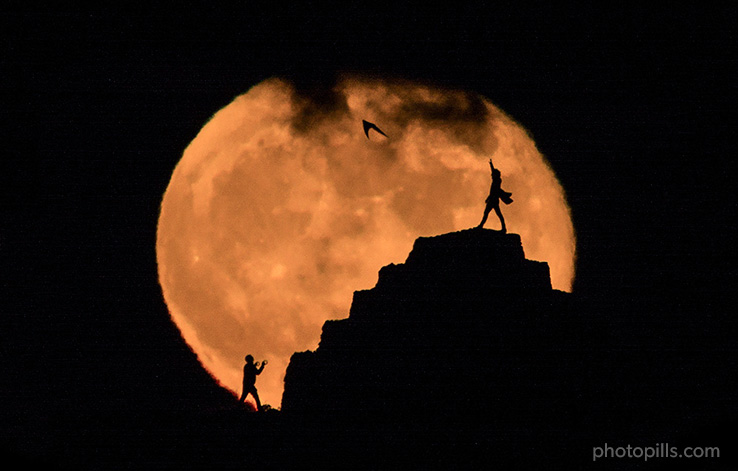
Full moon silhouettes
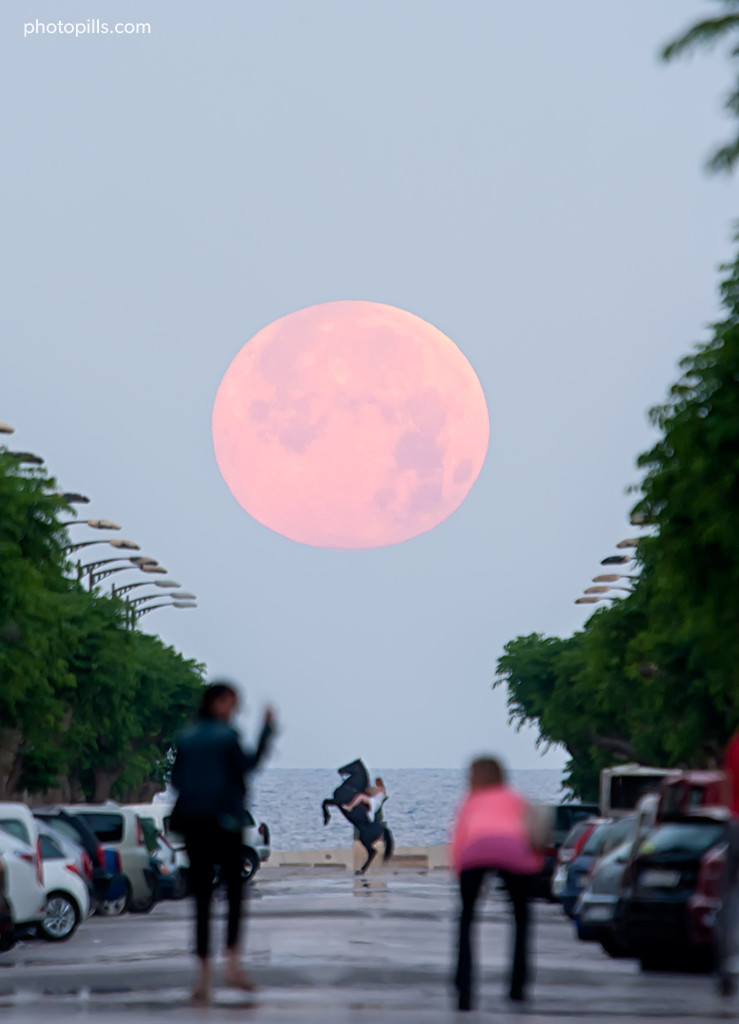
Shooting a full moon silhouette is really fun, but living the moment is just nuts. The full moon gives you the perfect theatre for an awesome night show. In this case, I wanted to tell the story of two kids playing with a kite in a windy day.
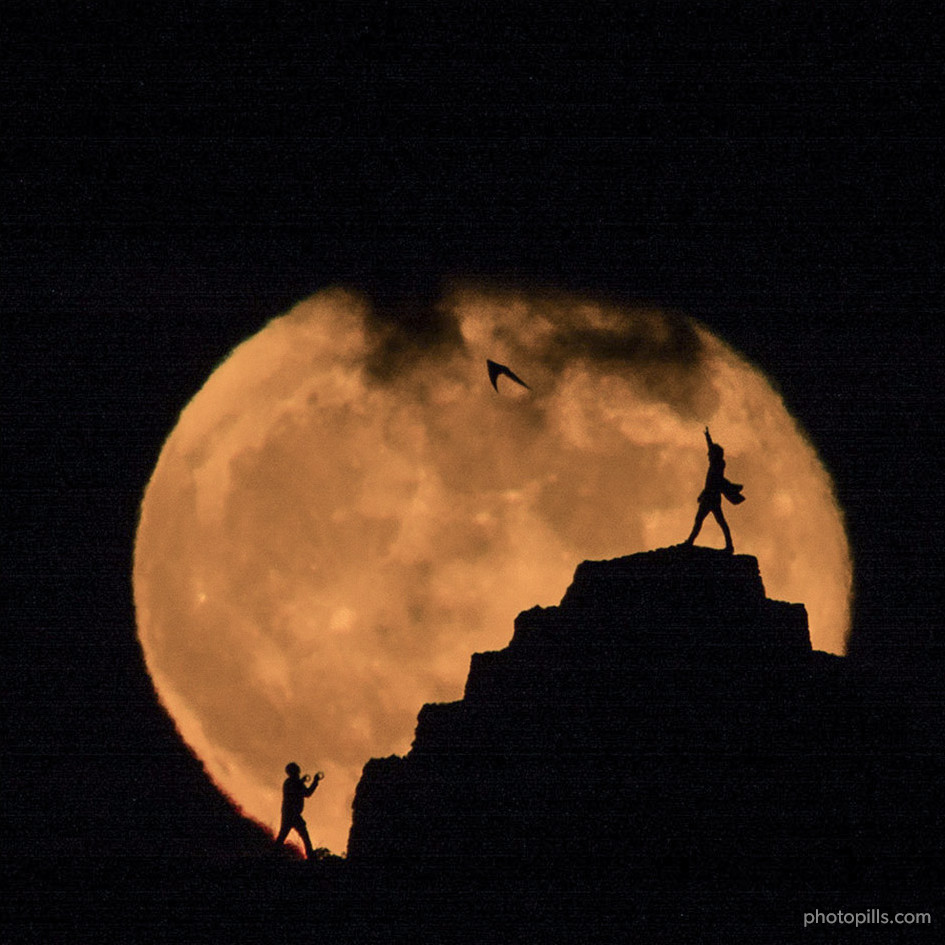
11/07/14 07:28pm | Sun elevation: -10.4° (Nautical Twilight) | Moon elevation: 1.5°
Full Moon Silhouettes in a video
Video? Why not? You can do like Mark Gee and shoot a stunning video showing how the full moon discovers the action happening in the dark. Mark’s video went viral a few hours after published!
Wish to crate your own full Moon silhouettes videos? In the following article we give you all you need: How To Shoot Striking Full Moon Silhouettes Videos
Trapped
Framing the moon with a subject can result in great images. In this photo, I’m capturing the moon under a really beautiful natural bridge in Menorca, called “Es Pont d’en Gil”.

05/14/14 06:09am | Sun elevation: -4.5° (Blue Hour) | Moon elevation: 1.1°
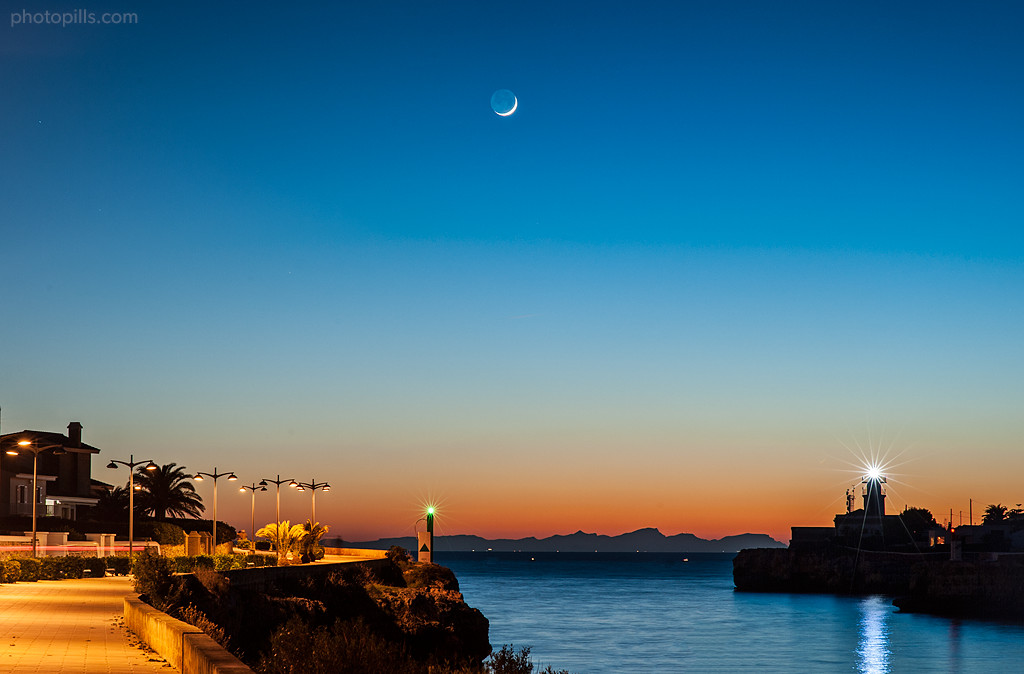
Alone
Ok, I know, this is not a full moon, but I want you to see this photo as an example of shooting the part of the moon in shade.
Also known as “Earth Shine”, the residual light that the moon receives from Earth allows us to capture detail on the part of the moon in shade.

Aligned with a street in your city
It’s incredible how many things can happen in the streets. Be ready to live an adventure and a challenging experience.
06/23/13 06:11am | Sun elevation: -1.6° (Golden Hour) | Moon elevation: 0.4°
Reflections
Joining the full moon and water, it's always a good idea.
12/07/14 10:05pm | Sun elevation: -8.9° (Nautical Twilight) | Supermoon elevation: 9.5°
Ideas are great, but as Katherine Paterson said...
“A dream without a plan is just a wish”
And, when it comes to the moon, planning is compulsory. The moon moves fast, so you need to be at the right spot at the right time or you’ll miss the shot.
Let’s plan your dreams!
5The plan, finding the right shooting time and the right shooting spot
As Clint Eastwood would say:
“You see, the Plan has two parts, my friend: finding the right time to shoot and finding the right shooting spot, and you must find both”
Once I know the location, the idea (where you want the moon in the frame) and the shooting distance, this is how I plan my shots with PhotoPills. Let’s see the example of the composition between the moon and the old construction explained in chapter 3, step by step:
- In the Planner, bring the Observer’s Pin (red pin) to the location in study. In this example, the location is Punta Nati, Menorca.
- Set the date and rise time of the Supermoon: Let's take as an example the supermoon of Saturday, August 29th 2015. The rise time was 8:07pm. Remember that the exact date and time depends on your desired location. Find out when is the next Supermoon happenning with the lunar calendar you have in the Moon Pill (Pills Menu) of PhotoPills. All Supermoons appear in a yellow circle in the calenar.
- Place the Observer’s Pin (red pin) in a shooting spot that:
- The thick light blue line you see on the map (moonrise direction) is aligned with the direction I want the moon to be. Let’s say that I want the moon to be just behind my subject. Then the thick light blue line has to fall right on my subject.
- The shooting spot is at the calculated shooting distance from the subject (to get the desired size of the moon compared with the size of the subject): 1km in the example, because I want a moon with an apparent diameter of more or less 10m.
- Place the Obstacle’s Pin (black pin) on my subject and check topography elevation to find out whether the moon will be hidden by the terrain. Remember that at moonrise, the elevation of the moon is 0°. Then, if the relative elevation between the ground level of the subject’s location and the ground level of the shooting spot is not 0°, moonrise will not be visible. Learn how to use the Obstacle’s Pin with this video: Planner: Geodesic Information.
- If moonrise is visible, then I check moonrise time and I’m done. I know: date, shooting time and shooting spot.
- If moonrise is not visible due to the higher elevation of the terrain. By moving time forwards, I find the time the moon is at an elevation equal or slightly higher that the elevation of the terrain. Finally, I choose a new shooting spot where the thin light blue line (direction of the moon for the selected time) falls on my subject. That’s it, I have the plan. I know: date, shooting time and shooting spot.
It's easier than it looks, it only requires a little bit of practice. In our Academy you’ll find 11 videos to help you master PhotoPills’ Planner. You can do it too!
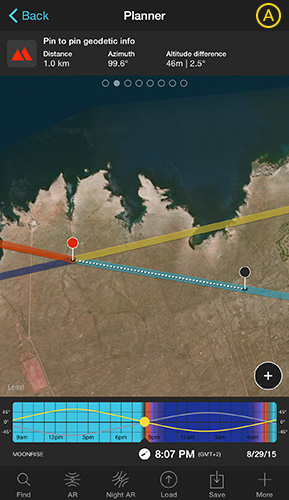
These are the options for shooting the supermoon and the stone construction. I’ve placed the Obstacle’s pin on my subject and calculated two options for the shooting spot and shooting time: Plan A and Plan B.
- In Plan A, I want to shoot the full moon behind the construction at exactly moonrise (moon’s elevation is 0°) at 8:07pm. The problem is that the ground level of the construction is at an elevation of 2.5° seen from the shooting spot. The moon will not be visible. It’s not a good plan!
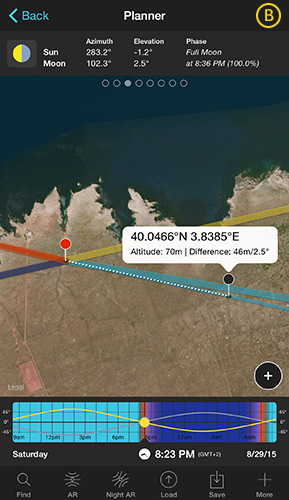
- Plan B is the best plan. From this new shooting spot, at 8.23pm, I’ll be able to capture the moon at 2.5°. The full moon is just appearing from behind my subject. Besides, the sun is at an elevation of -1.2° (after sunset). Natural light conditions will be awesome for capturing the landscape and the moon in one single exposure.
Also, to help you in the process, we’ve prepared the following articles and videos. Take a look at them and I promise you’ll become a PhotoPills Master:
- How To Plan The Next Full Moon
- Planner: Find a Sun or Moon over a mountain (video)
- How to Shoot Striking Full Moon Silhouettes videos
6How to shoot the Supermoon
Equipment
The necessary equipment is composed by: dslr camera, desired lens (wide angle, telephoto, teleconverter), sturdy tripod, a head (ideally a Gimbal head), remote shutter release cable.
The tripod
When you get to the location, place the tripod right at the planned shooting spot and make sure it is stable.
Disable lens stabilization
If your lens includes a function to stabilize vibrations when shooting handheld, disable it. Since you’ll be using a tripod, this function might try to compensate vibrations that don’t exist and blur your images. You don’t want to get a blurred moon after all the planning, right?
Also, use a remote shutter release cable o device to avoid camera shake caused by your hands. In the same way, I recommend you to turn Exposure Delay/Mirror Lock Up on to avoid a possible camera shake caused by the mirror slap before the exposure.
Finally, if you don’t have a shutter release or you left it at home, set the camera to a timer. This way, you’ll also prevent camera shake caused by both your hands and the mirror slap.
Remove the UV filter
Ultraviolet filters (UV) are great to protect your lens, but you don’t need an extra glass on your lens for this shot. Remove it!
Shoot in Raw
Always shoot it RAW. This image file format allows you to use image data recorded by the camera sensor to produce higher quality images than JPG.
Shoot in manual
Shooting in manual gives you the total control over exposure by adjusting shutter speed, aperture and ISO at you will.
Focal length
Your desired composition determines the focal length to use. If you wish to capture as much landscape as possible, while getting a tiny moon, go for a short focal length (8-35mm). If you have a foreground subject to which you want to give importance, get closer to it.
On the contrary, if you want to capture a big moon compared with the frame and the subject, use a focal length of 400mm, 500mm (or more, use a teleconverter if necessary) and go far away from the subject. What distance exactly? It depends on the size of the moon you want. Go back to chapter 3.
Exposure: ISO, Shutter Speed and Aperture
The shooting time you’ve planned will give you also the elevation of the sun and, thus, the light conditions you’ll have and the exposure you’ll need. Natural light conditions determine how bright the moon is compared to the landscape.
When it’s too dark (sun’s elevation below -6°), the moon is very bright and the landscape very dark. On the one hand, if you expose for the landscape, you’ll get an overexposed moon. The moon will appear as a white circle in the photo. On the other hand, if you expose for the moon, you’ll get an underexposed landscape (ideal when shooting full moon silhouettes).
If your intention is to have both the moon and the landscape correctly exposed, you have two options: shoot two exposures and then blend them or shoot during the golden hour or blue hour (taking advantage of city lights to light the foreground).
There is another possibility. If you have a camera that allows you to shoot multiple exposures, then, you’ll be able to get the image in one single RAW.
Apart from the elevation of the sun (the light you’ll have), you need to take into account that the moon moves quickly in the sky, so you’ll have to use a fast shutter speed to avoid capturing the moon trailing.
Under each photo in this post, you’ll find the EXIF information with the ISO, shutter speed and aperture used. Check them out and try to understand what type of natural light you see in the photo.
What’s the right exposure? Well, this is what I do depending on the elevation of the sun.
Golden hour before sunset or after sunrise (sun elevation between 6 and 0 degrees):
When the sun is above the horizon, the moon has a pale hue. It is less visible and also less interesting. But when the sun has elevations under 1°, the moon starts gaining power.
Recommended exposure settings:
- Aperture: f/8 or wider, like f/5 or f/5.6, depending on the amount of light available (less light).
- Shutter speed: between 1/200 and 1/8.
- ISO: I start with the camera’s base ISO (typically ISO 100 or 200 depending on the camera) and I push the ISO up depending on the light conditions. ISO value should stay between 100 and 1600.
Golden hour after sunset or before sunrise (sun elevation between 0 and -4 degrees):
This type of natural light allows you to capture the right colors and texture of the moon and landscape with one single exposure. The more the sun goes down, the less light available and the more difficulties when exposing. There’ll be a moment when the moon will start to get overexposed. During this part of the golden hour, light changes very quickly.
Recommended exposure settings:
- Aperture: probably you’ll start with an aperture of f/8. But, as times goes by, you’ll have to set the maximum aperture in your lens. This will allow you to increase the amount of light collected and avoid increasing the ISO more than necessary. Usually, this apertures are f/4 or f/5.6 if you’re using a telephoto lense. Or even, smaller if you’re using a teleconverter.
- Shutter speed: between 1/100 and 1 second.
- ISO: between 200 and 400, but you might need to increase it to compensate exposure.
Blue Hour (sun elevation between -4 and -6 degrees):
I love shooting the moon during the blue hour in a city scape. Artificial light will light the landscape making it possible to capture both moon and landscape in a single exposure. When you’re shooting outside the city, in nature, you’ll probably get an overexposed moon. Unless, you’ve decided to get the moon correctly exposed. Then, the landscape will look underexposed.
Recommended exposure settings:
- Aperture: I usually go for smaller apertures (f/11 and f/16) to get streetlights as bright stars.
- Shutter speed: in this case, I first set ISO and then choose the shutter speed to get a well exposed image. Shutter speed can vary from 1/250s to 3 seconds. Pay attention to the movement of the moon. When you use slow shutter speeds, the risk is to capture the moon trailing.
- ISO: between 200-400. Push it up if you need to compensate exposure.
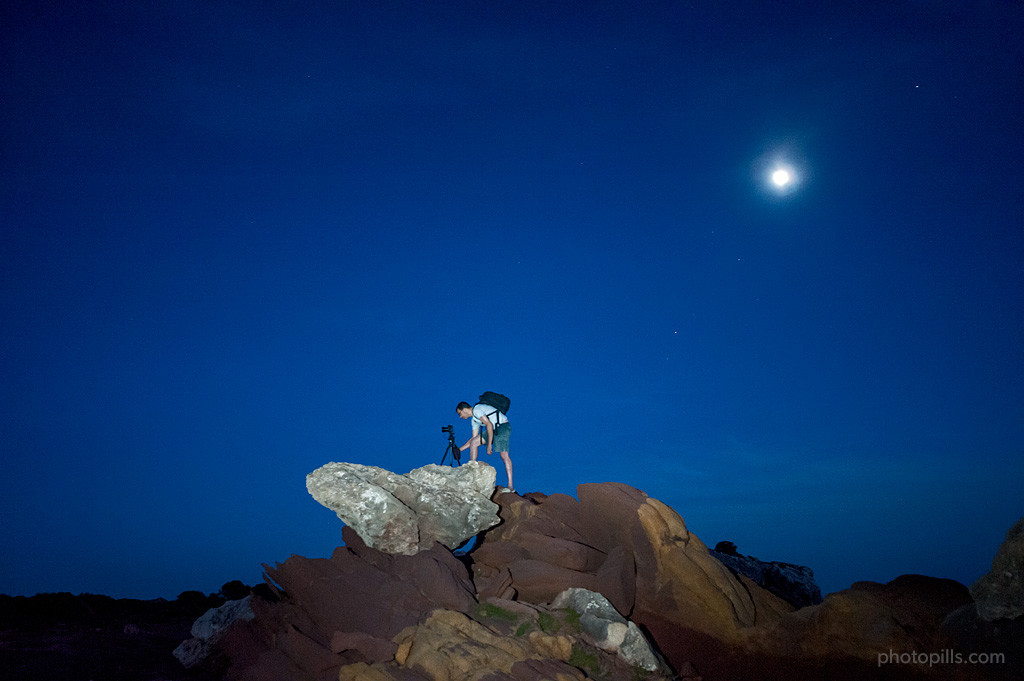
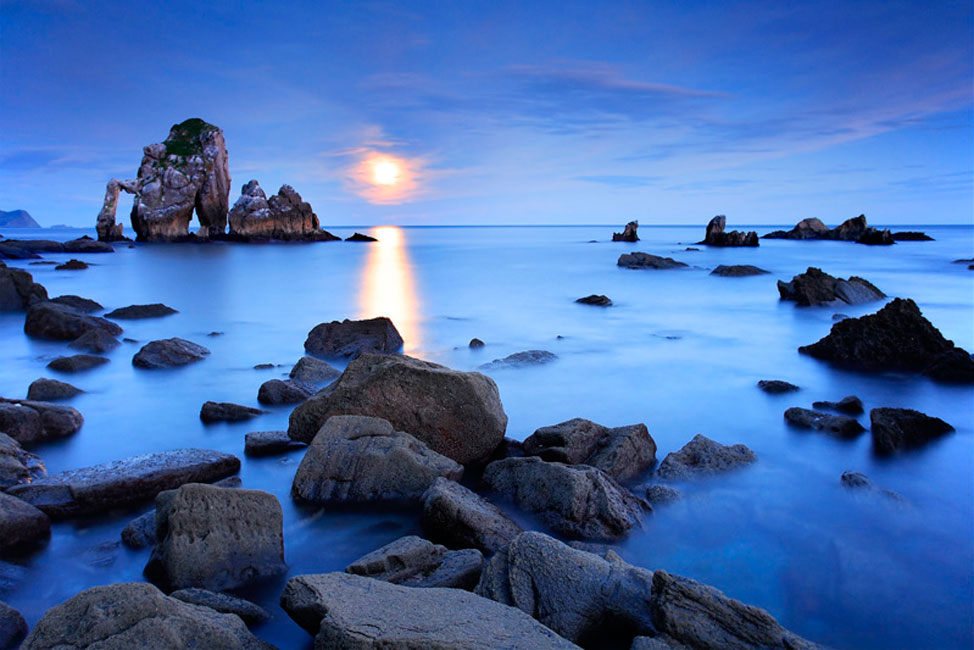
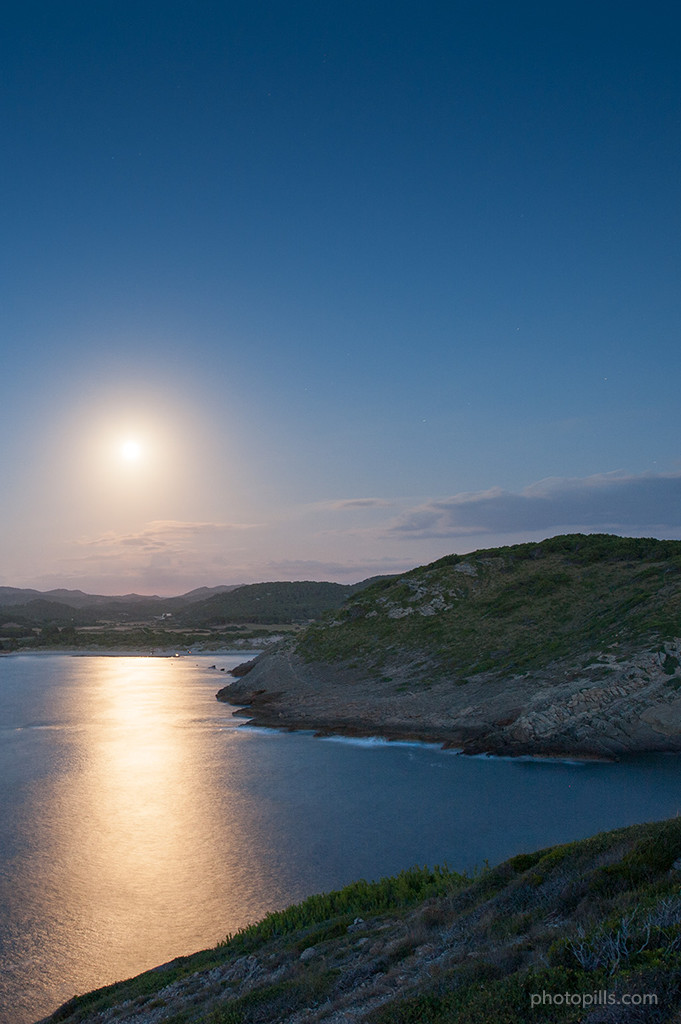
Nautical twilight, astronomical twilight and nighttime (sun elevation under -6 degrees):
If you’re shooting in the city, you’ll probably achieve good results using the same settings as during the Blue hour. But, if you’re in the great outdoors, it’s better to use a wide angle lens to capture as much landscape as possible, taking advantage of the position of the small overexposed moon in your composition. The second photo of this post is an example.
In this case, exposure depends on the effect you want to achieve. If you wish to capture stars as big bright spots, the best option is to use the widest aperture, use PhotoPills’ Spot Stars calculator to calculate the maximum exposure time and increase ISO to compensate exposure. The ISO value will depend on the noise performance of your camera. It should be between 400 and 3200.
On the other hand, if you wish the sky to look continuous and silky, or the traces of the clouds while moving (capturing the movement of clouds), you can close a little more the aperture and lower the ISO to increase the exposure time. Note that the moon will leave a very thick trail, which sometimes can be quite unpleasant. So adjust exposure time in order to capture the moon as you wish.
As it happens during the blue hour, if you want the moon to have the shape of a star, use apertures of f/11 or f/16, and compensate exposure adjusting shutter speed and ISO.
When I shoot with a telephoto lens, and the exposure time is below 1/125s, I always use a shutter release cable together with the Exposure Delay/Mirror Lock Up enabled to avoid a possible camera shake.
Full moon silhouettes:
Shooting this type of photos is awesome, but shooting a video is addictive. I found it out after watching Mark Gee’s Full Moon Silhouettes video. Since that moment, I cannot stop imagining, planning and shooting silhouettes using the full moon as a theatre stage.
You’ll need a telephoto lens, ideally 500mm or 600mm. Also, a teleconverter is very useful.
Recommended exposure settings:
- Aperture: the maximum aperture possible when combining telephoto lense and teleconverter (f/4, f/8). You need to collect as much light as possible, in the shortest time possible, to prevent your main subject to appear completely blurred.
- Shutter speed: when shooting a video, use a shutter speed that is twice the video frame rate (fps). For example, if the video frame rate is 24 fps, shutter speed should be 1/50. When shooting a picture, use a shutter speed of 1/50 or faster. The key point here is to avoid blur.
- ISO: it’s the setting I use to match exposure. Its value should be around 400.
Focusing
The goal here is to maximize depth of field to have the landscape and the moon in sharp focus. Where to focus depends on the focal lens choice and the area covered by the landscape:
- Short focal lengths (8-35mm): Focus the lens at the hyperfocal distance, always making sure that you’re not falling short. It’s better to focus a little bit further than the hyperfocal distance. This will ensure that everything at the horizon is in focus. Falling short will blur all the elements at the horizon (mountains, the moon). You can calculate the hyperfocal distance using our depth of field calculator for a given focal length, aperture and camera model.
- Longer focal lengths (50-500mm and more): When the landscape covers an important area in the image, you should focus the lens about a third of the way into the frame. But when most of the photo is covered by the moon and the subject, then you must focus on the subject. The typical example are the full moon silhouettes.
White Balance
Set white balance to manual. Depending on your focal length choice and the colors in the sky, I recommend you to play with this numbers:
- When shooting with a telephoto lense (400mm, 500mm and beyond), I use the white balance for the color of the moon: 3400K.
- When you want to include the landscape in the photo and, thus, you use a short focal length, my white balance choice depends on the colors I see in the landscape:
- To potentiate blue tones, I use a white balance between 3400K to 5000K
- To potentiate golden tones, I use a white balance between 6000K to 7500K.
7Just do it!
Awesome!
Congratulations, you have everything!
The location, the idea, the planning and the camera settings... all you need to shoot a great picture of the Supermoon.
All you have to do is to take action and shoot it!
As you know, imagining and planning is fun, but shooting and living the experience is priceless.
And if you fail because of weather, bad framing, wrong planning, wrong settings… Well, this is how we all improve. Don’t give up, keep learning and fighting against all sort of adversities. Sooner or later, you’ll nail it!
As you already know: PhotoPillers never give up!
There’ll be other opportunities.
Find out when is the next Supermoon happenning with the lunar calendar you have in the Moon Pill (Pills Menu) of PhotoPills. All Supermoons appear in a yellow circle in the calenar.
Whether you succeed or fail, I'd love to see your shots. Just submit them to the PhotoPills Awards :)
Happy Supermoon!
Get this ebook for free now!