How To Shoot The Unique Total Supermoon Eclipse In 2015

A total lunar eclipse is approaching. This September 27th, the full Moon will cross the shade cast by Earth, getting a reddish beautiful hue. Besides, knowing that the next total lunar eclipse will occur on January 31st 2018, you can't miss it! Get ready, prepare your equipment and find a powerful location for the shooting. It’s going to be epic!
Notice that, depending on where you live, the eclipse will be visible on the 28th (from the first day hours until dawn). Further down this article, you’ll find the right date and time based on your local time zone.
There are more good news!
On this occasion, the lunar eclipse coincides with the largest supermoon in 2015. In other words, the full Moon will be at its closest point to Earth this year. At only 356.869 km away from Earth and with an angular diameter of 0.563 degrees, the full Moon will look 7.8% larger than the Moon’s mean annual size.
My goal with this article is to give you everything you need to imagine, plan and shoot a truly legendary photo of the total supermoon eclipse. But more specifically, I’d love to help you find when to shoot it and learn how to shoot it! ;)
What’s a total lunar eclipse?
A total lunar eclipse occurs when the Sun, Earth and the full Moon are aligned. It’s when Earth blocks the sunlight, casting a shadow that completely covers the Moon.
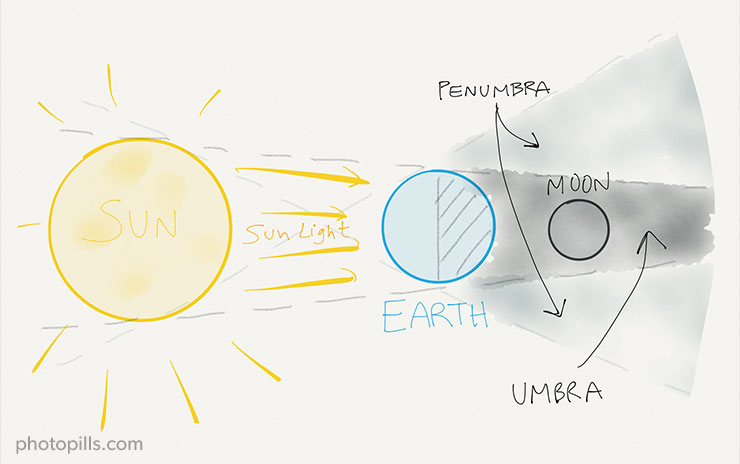
As the Moon gets deeper into the penumbra and umbra zones, its color turns into a kind of blood-red hue. This fact terrified our ancestors, who believed this phenomenon was caused by powerful evil forces. The next thing they expected was chaos!
The following image shows the path to the Moon through the shadow of Earth and how the Moon’s color changes. Notice that the Moon’s path crosses the southern half of Earth’s shadow.

Eclipse visibility: where and what time
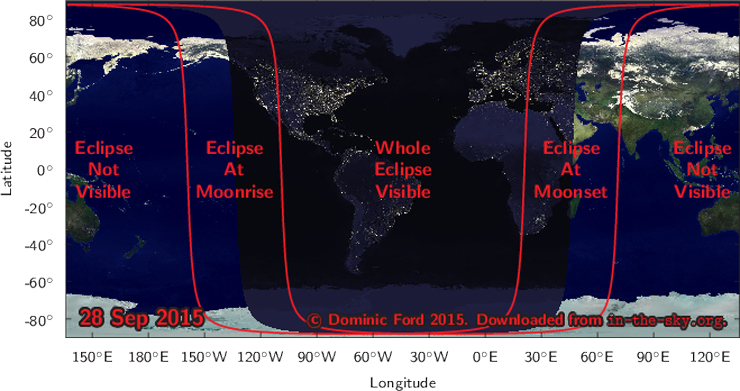
In South America and most North America, the total lunar eclipse will be visible after sunset on September 27th. In Europe, the Middle East and Africa, the eclipse will happen after midnight and before sunrise on September 28th. Unfortunately, it will not be visible in Asia and Oceania.
Take a look at the following map. It shows where the eclipse will be visible and not visible.
As for the timing, the total lunar eclipse will occur at the same time worldwide. Depending on your time zone, use the following tables to figure out when the main phases of the eclipse occur.
| Event | GMT-7 (PDT) (Portland) | GMT-6 (MDT) (Denver) | GMT-5 (CDT) (Memphis) | GMT-4 (EDT) (New York) |
|---|---|---|---|---|
| Date September | 27th | 27th | 27th-28th | 27th-28th |
| Penumbral eclipse begins | 5:11pm | 6:11pm | 7:11pm | 8:11pm |
| Partial eclipse begins | 6:07pm | 7:07pm | 8:07pm | 9:07pm |
| Total eclipse begins | 7:11pm | 8:11pm | 9:11pm | 10:11pm |
| Peak total eclipse | 7:47pm | 8:47pm | 9:47pm | 10:47pm |
| Total eclipse ends | 8:23pm | 9:23pm | 10:23pm | 11:23pm |
| Partial eclipse ends | 9:27pm | 10:27pm | 11:27pm | 12:27am |
| Penumbral eclipse ends | 10:22pm | 11:22pm | 12:22am | 1:22am |
| Event | GMT-3 (Rio) | GMT-1 (Dakar) | GMT+0 (Reykjavik) | GMT+1 (Lisbon) |
|---|---|---|---|---|
| Date September | 27th-28th | 27th-28th | 28th | 28th |
| Penumbral eclipse begins | 9:11pm | 11:11pm | 12:11am | 1:11am |
| Partial eclipse begins | 10:07pm | 12:07am | 1:07am | 2:07am |
| Total eclipse begins | 11:11pm | 1:11am | 2:11am | 3:11am |
| Peak total eclipse | 11:47pm | 1:47am | 2:47am | 3:47am |
| Total eclipse ends | 12:23am | 2:23am | 3:23am | 4:23am |
| Partial eclipse ends | 1:27am | 3:27am | 4:27am | 5:27am |
| Penumbral eclipse ends | 2:22am | 4:22am | 5:22am | 6:22am |
| Event | GMT+2 (CEST) (Madrid) | GMT+3 (Athens) | GMT+4 (Dubai) |
|---|---|---|---|
| Date September | 28th | 28th | 28th |
| Penumbral eclipse begins | 2:11am | 3:11am | 4:11am |
| Partial eclipse begins | 3:07am | 4:07am | 5:07am |
| Total eclipse begins | 4:11am | 5:11am | 6:11am |
| Peak total eclipse | 4:47am | 5:47am | 6:47am |
| Total eclipse ends | 5:23am | 6:23am | 7:23am |
| Partial eclipse ends | 6:27am | 7:27am | 8:27am |
| Penumbral eclipse ends | 7:22am | 8:22am | 9:22am |
These are the different phases of the eclipse:
- Penumbral eclipse begins: The Moon’s outer limb touches Earth's penumbra.
- Partial eclipse begins: The Moon’s outer limb touches Earth's umbra.
- Total eclipse begins: For the first time, the Moon is entirely within Earth's umbra.
- Peak total eclipse: The Moon is at the center of the Earth's umbra.
- Total eclipse ends: The Moon is entirely within Earth's umbra, but the outer limb starts to exit it.
- Partial eclipse ends: The Moon completely leaves Earth's umbra.
- Penumbral eclipse ends: The Moon completely leaves Earth's penumbra.
Moon planning is key in landscape photography. If you want to become a true Moon Hunter, the following article was made for you: How To Plan The Next Full Moon.
Where to frame, the position of the Moon in the sky
Now that you are aware of the phases of the eclipse, your next step is to know the time your shooting should start.
We are talking about capturing legendary photos here! So, as soon as you decide your shooting’s location, you need to know where the Moon will be and the path it will follow. This way, you’ll be able to choose the right shooting spot, and the right area you need to frame in order to capture the whole eclipse following the idea of the picture you envisioned.
Open PhotoPills on your favorite device and watch the following video. The Bard shows you how to use PhotoPills’ Planner and Augmented Reality to figure out where the Moon will be during the eclipse and the light conditions that you will have. He will also help you to choose the right shooting spot according to the image you had in mind.
For most of us, the eclipse will occur at night, and at a time in which the Moon will be high in the sky (Moon’s elevation above 20 degrees). Only those of you living in North America’s Pacific Coast (GMT -7) will be able to shoot the beginning of the eclipse just after the Sun sets and right after the Moon rises. During that short period of time, you will be able to capture a lower Moon and benefit from a better light. Why will the light be better? Because you will be shooting at the end of the blue hour and during the nautical twilight.
As you’ve seen in the video, PhotoPills allows you to figure out the direction (azimuth) and elevation of the Moon (ie. the position of the Moon in the sky) exactly as you will see it from your desired shooting location. Besides, the app can also help you calculate the elevation of the Sun and, thus, the light conditions you will have. If you want to learn more about natural light, check our article Understanding Golden Hour, Blue Hour and Twilights.
To truly understand light and the Moon’s position throughout the different phases of the eclipse, I recommend you to use PhotoPills’ Planner to build a table with the following information. As an example, I’ve built the table for Yosemite National Park.
| Yosemite National Park September 27th GMT-7 Pacific Time (PDT) 37.7445°N 119.5977°W | |||||
|---|---|---|---|---|---|
| Event | Time | Moon Elevation | Moon Azimuth | Sun Elevation | Light |
| Penumbral Eclipse begins | 5:11pm | Under horizon | 74.5° | 18° | Daytime |
| Partial Eclipse begins | 6:07pm | Under horizon | 83.1° | 7.2° | Daytme |
| Moonrise | 6:44pm | -0.9° | 88.4° | 0.4° | Golden hour |
| Total Eclipse begins | 7:11pm | 4.6° | 92.5° | -5.5° | Blue hour |
| Peak Total Eclipse | 7:47pm | 11.4° | 97.8° | -12.6° | Astronomical Twilight |
| Total Eclipse ends | 8:23pm | 18.3° | 103.3° | -19.7° | Nighttime |
| Partial Eclipse ends | 9.27pm | 29.9° | 114.5° | -31-5° | Nighttime |
| Penumbral Eclipse ends | 10:22m | 39.1° | 126.1° | -40.8 | Nighttime |
In order to know where the Moon will be and what light conditions you will have, you should to start brainstorming about possible shots as soon as you read this.
Would you like to know the focal length you will need to capture the whole eclipse in one single frame?
Easy Peasy. All you have to do is compare your lens’ angles of view with the horizontal and the vertical angles the Moon will cover during the eclipse.
For example, if you use the elevation and azimuth of the Moon provided in the table above for Yosemite National Park you would have:
- The horizontal angle covered by the Moon is 37.7°. You get it by subtracting the azimut of the Moon at Moonrise (88.4°) to the azimuth of the Moon at the end of the penumbral eclipse (126.1°).
- The vertical angle covered by the Moon is 40°. You get it by subtracting the elevation of the Moon at moonrise (-0.9°) to the elevation of the Moon at the end of the penumbral eclipse (39.1°).
Then, compare the angles covered by the Moon with the following horizontal and vertical angles of view for a full frame 35mm camera in landscape orientation. As an example, I have created the following table to help you determine the focal length you could use.
| Focal Length | Horizontal Angle of View | Vertical Angle of View |
|---|---|---|
| 16mm | 95° | 74° |
| 20mm | 82° | 62° |
| 24mm | 74° | 53° |
| 28mm | 65° | 46° |
| 35mm | 54° | 37° |
Therefore, according to this table, if you plan to shot at Yosemite National Park and would like to capture the whole eclipse in one frame, the maximum focal length you could use would be 28mm.
If you have a camera with a cropped sensor, just divide the proposed focal length values by the crop factor. This will give you the focal length you need to use to match the angles of view you see on the table. You can also use PhotoPills’ Field of View calculator to work out the right focal length.
How to shoot the total lunar eclipse
I have summarized a few practical recommendations to help you with the shooting:
The ideal equipment
I recommend you to use a DSLR camera, your preferred lens (wide angle, telephoto, teleconverter), a sturdy tripod, a head (ideally a Gimbal head when you use a telephoto lens), and a remote shutter release cable.
Make sure you prevent vibrations
Use a remote shutter release and disable your lens stabilization function.
In most cases, when you’re using a tripod, you’ll turn lens stabilization off to avoid this function to compensate vibrations that don’t exist and blur your images. However, in my experience when I’m shooting with a telephoto lens (500mm or more) vibrations may occur because of the weight of the lense. In this particular case, using the lens stabilization function allows you to reduce potential vibrations.
Finally, turn Exposure Delay/Mirror Lock Up on to avoid the camera shake caused by the mirror slap before the exposure. If you don’t have a shutter release, use your camera’s Self-Timer Release mode.
Maximize your camera’s abilities
Don’t forget to remove the UV filter if you use one to protect the lens.
As for the shooting requirements, shoot in RAW mode to produce higher quality images than what you would get shooting in JPG mode. Finally, shoot in manual mode to get full control of exposure.
Determine the focal length
Your focal length choice depends on how big you want the Moon in your frame:
- Use a short-medium focal length (24-200mm) to capture a small Moon and a large area of the landscape. This is a good idea for those of you living in the Pacific Coast (GMT-7). As I said before, you will be able to shot at the end of the blue hour, when the full Moon will be relatively low in the sky. In this case, including a cityscape in the frame is a good idea. The artificial light will fill in the foreground, while capturing a nice full Moon.
- Use a long focal length (400mm or more) to capture just the Moon. For most of us shooting during the night, a good option will be to use a long focal length and concentrate in capturing only the Moon, or even create a beautiful full Moon silhouette... An awesome one!
Don’t neglect the exposure
The exposure (the triangle formed by ISO, shutter speed and aperture) will vary as the light conditions and the brightness of the Moon change throughout time. Light changes incredibly fast so, be ready to quickly adjust your exposure when the Moon touches the umbra zone. Use the Bracketing technique (or the internal mode if your camera has one) as it could prove useful in post processing.
- Aperture: start with f/8. If you are including a city scape and want the artificial lights to appear in the photo with the shape of a star, go down to f/11.
- ISO: start with an ISO value of 400 and push it up if you need to compensate exposure. ISO should be between 400 and 1600 depending on aperture and shutter speed. If you’re one of the lucky photographers that live in North America's Pacific Coast, and want to start shooting at the end of the blue hour, start with an ISO value of 200 and adjust it accordingly.
- Shutter speed: Depending on your location (light conditions and Moon’s brightness), it can vary from 1/250 seconds to a maximum of 3 seconds. Keep an eye at the movement of the Moon. When using long exposures (more than 3 seconds), you’re risking to capture the Moon trailing in the frame. Unless it’s the effect you want to create, keep the exposure time under control to prevent the Moon from trailing.
Show the whole sequence
A creative idea that you could use during your session is to shoot multiple exposures. Once you are back home, you can merge those exposure using a post processing software. The idea is to create a stunning effect as you will be reflecting in one single image the path of the Moon and how the color of the Moon changes throughout the eclipse.
Also, nowadays most cameras allow you to shoot a multi exposure in one Raw.
Where should you focus?
The spot in which you should focus depends on the focal length used.
For short focal lengths (24-35mm), focus at the hyperfocal distance. When doing it, make sure you’re focussing in excess (by 0.5m or even more). Never, never, ever focus at a shorter distance than the hyperfocal because you’ll get a blurred Moon. Please, feel free to use our depth of field calculator to calculate the hyperfocal distance.
For longer focal lengths (50mm or more):
- If you are capturing the landscape, focus the lens about a third of the way into the frame.
- If you intend to cover most of the frame with the Moon and the subject, focus on the subject. A classic example is Mark Gee’s full Moon silhouette.
- If you are shooting at the Moon only, use live view to focus. Make sure you focus before the Moon reaches the total eclipse peak. During the peak, the Moon is darker and it’s more difficult to make focus.
Set white balance to manual
When the Earth casts its shadow on a Full Moon and eclipses it, the Moon may get a red glow. This phenomena is popularly known as “Blood Moon”.
If you are shooting at that specific moment, keep the white balance around 4000-5600K when exposing for the Moon only, and while having the landscape underexposed.
If you want to learn more about how to shoot the full Moon and how to take into account its size when composing your images, have a look at our article All You Need To Make This Saturday’s Supermoon Shine In Your Photos.
Future total lunar eclipses
Don’t tell me you are going to miss next September 27th (or 28th) lunar eclipse!
It’s a real shame that you won’t be able to capture (or witness for that matter) such a beautiful spectacle that nature displays from time to time.
But the good news is that there will be more lunar eclipses in the future...
Here are some of the next dates in case you can make it by then:
- 01/31/2018 and 07/27/2018
- 01/21/2019
- 05/26/2021
- 05/16/2022 and 11/08/2022
- 03/14/2025 and 09/07/2025
We want to see your photos!
Being creative pays off! Send us your photos via [email protected] and enter our monthly t-shirt contest. One of our cool t-shirts can be yours!

To see August entries take a look at this blog post.
Happy eclipse!
