Total Solar Eclipse of August 12, 2026: The Photography Guide

A total solar eclipse is an event you need to live (and photograph) at least once in your life.
As the Moon covers the Sun completely, the temperature drops, darkness surrounds you and wild animals go quiet... It's a strange and magical moment at the same time.
It cannot be described with words, you must live it.
The good news is...
One of the next big total solar eclipses will occur on August 12, 2026, and it will be visible in its totality in countries like Iceland, Greenland and Spain.
The Path of Totality will cross the Iberian Peninsula from south-east to north-west…
And if you’re lucky enough to be in the Balearic Islands (Majorca, Ibiza and Menorca), you’ll see how the eclipse sinks right after totality into the Mediterranean sea.
An ideal situation to plan an Eclipse Alignment with an interesting subject!
Don’t miss it!
Ah!
And if you don’t want to shoot the total solar eclipse alone, you can always join one of our Eclipse Expeditions to Iceland, North Spain or Menorca!
Long story short...
In this guide, you'll find everything you need to successfully photograph the 2026 total solar eclipse.
Ready?
Keep reading!
"On the day of the eclipse, even the sun steals his shine from the moon." – Shristy Sinha
Get this ebook for free now!
Content
- What is a total solar eclipse
- Where to go and when to photograph the 2026 total solar eclipse
- Planning a photo of the 2026 total solar eclipse with PhotoPills
- All the equipment you need to photograph the 2026 total solar eclipse
- How to photograph the 2026 total solar eclipse step by step
- Join us on our 2026 Total Solar Eclipse Expeditions
- Your turn...
1.What is a total solar eclipse

A total solar eclipse occurs when the Moon passes between the Sun and Earth completely covering the solar disk. And thus, casting it's full shadow (the umbra) on some parts of our planet.
There are other types of solar eclipses (partial, annular and hybrid). If you wish to learn more about these particular events, when they occur and how to photograph them, please check our detailed solar eclipses photography guide.
During a total solar eclipse, as the Moon moves, its full shadow also moves across Earth, creating what is known as the "path of totality".
In other words, if you wish to photograph a total solar eclipse, you need to be in a location within the path of totality. Period!
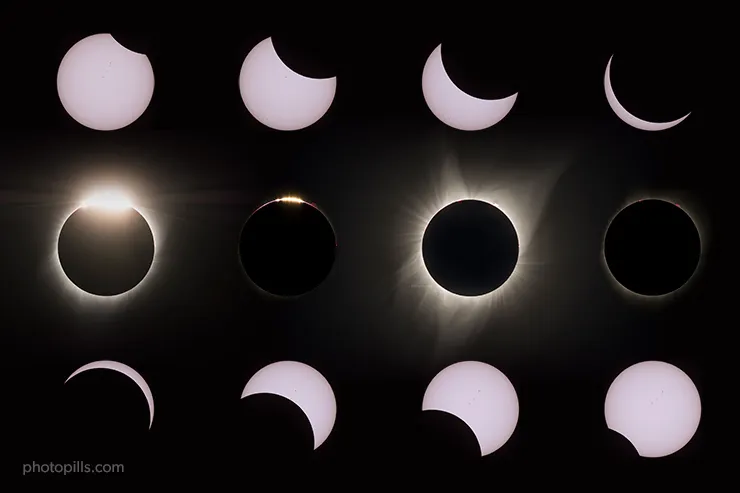
From the path of totality, you'll be able to photograph all the phases of the solar eclipse:
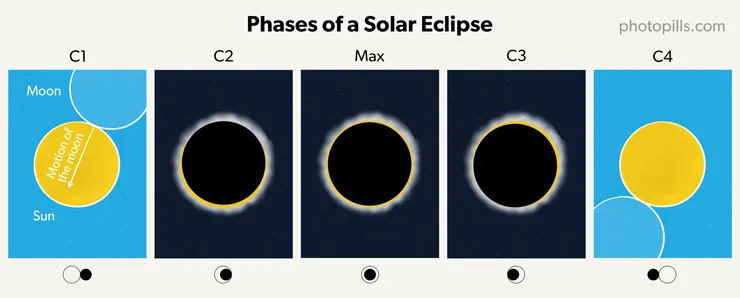
- Partial eclipse begins (1st contact - C1): The Moon begins to cover the solar disk.
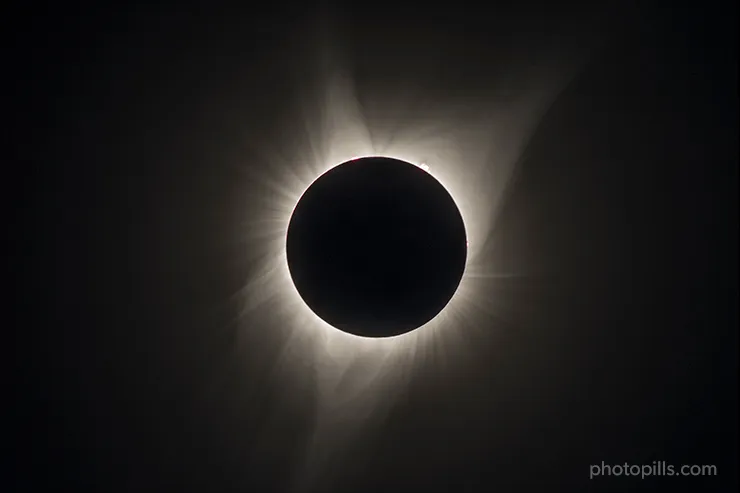
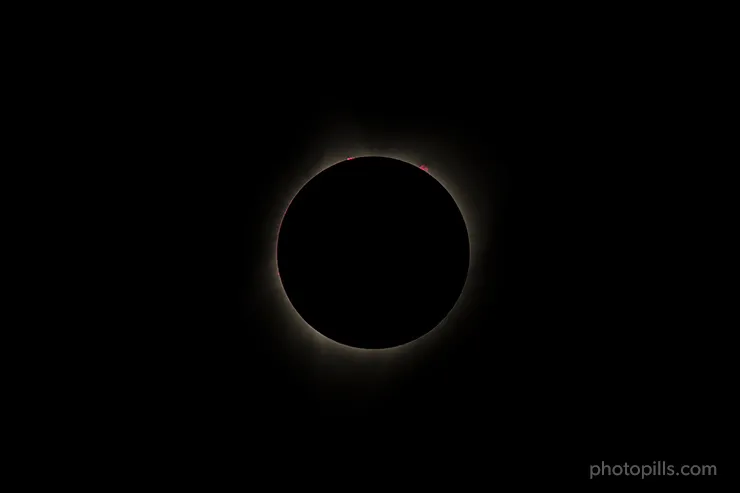
- Total eclipse begins (2nd contact - C2): The solar disk is about to be completely covered by the Moon. It's when you can photograph the Baily's beads and the diamond ring effects.
- Totality and maximum eclipse (Max.): The Moon completely covers the solar disk. Only the corona of the Sun (the Sun's outer atmosphere) is visible. The sky gets darker and the temperature drops.
- Total eclipse ends (3rd contact - C3): The Moon starts to move away from the solar disk. Again, right before totality ends you'll be able to photograph the Baily's beads and the diamond ring effects.
- Partial eclipse ends (4th contact - C4): The Moon completely leaves the solar disk.
Photographing all the eclipse phases and phenomenons (Baily's beads, diamond ring, Sun's corona and Sun's chromosphere) is so much fun. In section 5 I'll explain to you how to photograph all of them step by step.
Outside the path of totality, there are places where you can photograph the partial eclipse and places where the eclipse is not visible.
So...
The question is...
Where exactly should you go and when to photograph the August 12, 2026 total solar eclipse?
Easy!
Keep reading...
Because in the next section, I'll show you how to use PhotoPills to figure it out in just seconds :)
2.Where to go and when to photograph the 2026 total solar eclipse

The Total Solar Eclipse on August 12, 2026, will be partially visible in the northern part of North America, West Africa, and Europe.
And it will be visible in its totality in certain parts of Russia, Iceland, Greenland, and a large portion of the northern half of the Iberian Peninsula and the Balearic Islands in Spain.
The duration of totality varies, being longer the further Northwest you are, and shorter and lower on the horizon in the Eastern regions and the Balearic Islands.
It is crucial to note that the eclipse will occur in the evening in Spain, close to sunset, especially towards the Balearic Islands which means that the sun elevation will be low and therefore you will be able to include interesting motifs on the ground in your photos.
Mind the following Key Facts to take into account:
| Concept | Key Detail |
|---|---|
| Date | Wednesday, August 12, 2026 |
| Eclipse Type | Total Solar Eclipse (Magnitude > 1.00) |
| Path of Totality | Arctic, Greenland, Iceland, Atlantic Ocean, and Spain (Peninsula and Balearic Islands) |
| Maximum Duration (Global) | Approximately 2 minutes and 18 seconds (in the Atlantic) |
| Maximum Duration (Spain) | Up to 1 minute and 48 seconds (Northern Spain, near Asturias/Cantabria) |
| Photographic Challenge | Capturing the phenomena that occurs during totality (Diamond ring, Baily’s beads, Chronosphere and the Sun’s Corona) |
| Photographic Opportunities | Capturing the eclipse aligned with an interesting subject around Sunset |
And here you have a table with the Total Eclipse times (and duration of totality) for some of the cities that fall within the Path of Totality. These are great places to photograph all the phases of the 2026 total solar eclipse.
| Country/Region | Location | Time Zone | Totality Starts | Totality Duration | Sun Altitude (approx.) |
|---|---|---|---|---|---|
| Greenland | Vandreblok | GMT/UTC | 4:35:10 PM | 1m 15s | 19.96º |
| Iceland | Keflavík | GMT/UTC | 5:47:59 PM | 1m 40s | 20.66º |
| Iceland | Reykjavík | GMT/UTC | 5:48:16 PM | 0m 57s | 24.60º |
| Iceland | Látrabjarg (West) | GMT/UTC | 5:44:26 PM | 2m 12s | 25.58º |
| Spain | Oviedo | CEST (UTC+2) | 8:27:00 PM | 1m 48s | 10.43º |
| Spain | Burgos | CEST (UTC+2) | 8:28:20 PM | 1m 44s | 8.53º |
| Spain | Mahón (Menorca) | CEST (UTC+2) | 8:30:02 PM | 1m | 2.11º |
Note: All times are for August 12, 2026, shown in hours:minutes:seconds in their respective time zone. "Sun Altitude" indicates how high the Sun will be above the horizon during totality; a low number (as in Spain) means it will be near sunset, offering a unique photographic challenge with the potential for an orange-hued corona.
3.Planning your photo of the 2026 total solar eclipse with PhotoPills
Photography planning is the art of finding the right shooting spot, and the right shooting date and time the photo you have in mind actually occurs... So you can go and capture it!
In other words, planning helps you get back home with a greater number of stunning images.
For instance...
Maybe you have a location in mind and wish to photograph the perfect Sunset.
Maybe you want to photograph the Moon aligned with a cool lighthouse you know.
Maybe you're a Milky Way lover and you want to photograph our galaxy arching above a beautiful rock formation you just discovered.
Maybe you want to photograph the 2026 total solar eclipse aligned with a powerful subject, like Ted Hesser did during the 2017 total solar eclipse.
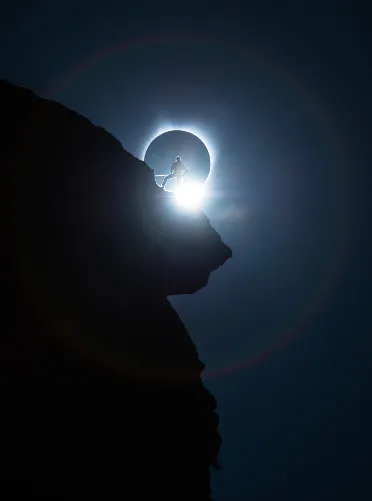
Photo by Ted Hesser.
Maybe you're planning to photograph all the phases of the 2026 total solar eclipse and need to figure out where to go and when, like I did during the same 2017 total solar eclipse in Oregon, USA.
Or maybe you want to use a shorter focal length to include the landscape in your 2026 eclipse photo. That's what I did during the 2017 total solar eclipse.
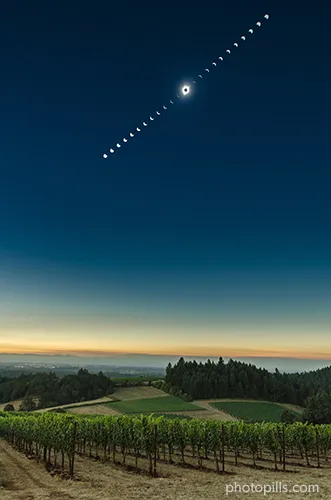
Solar eclipse base photo: 1.3s
Partial eclipse pictures: 1/25s | Solar filter
No matter the photo you want to capture, if you master the art of planning, you'll be able to figure out whether that particular image is possible or not. And if it's in fact possible, you'll be able to capture it.
OK, let’s cut to the chase, shall we?
As you know, PhotoPills helps you plan your photos ahead of time so you're always are the right place at the right time to capture the best photo possible.
This includes Sunset, Sunrise, golden hour, blue hour, Moon, solar eclipses, lunar eclipses, Star Trails, Meteor Showers and Milky Way photos.
Long story short...
If you wish to learn how to plan the August 12, 2026 Total Solar eclipse, watch this video in which Rafa (the Bard of PhotoPills) guides you step by step along the process:
And here you’ve got a little cheat sheet of all the steps you need to follow:
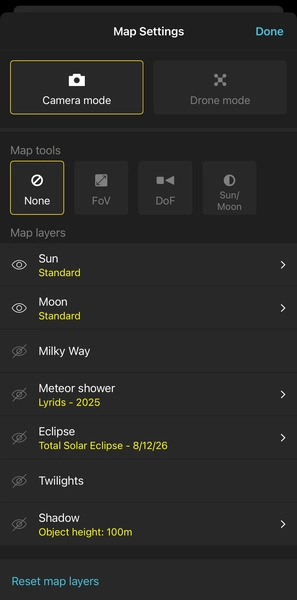
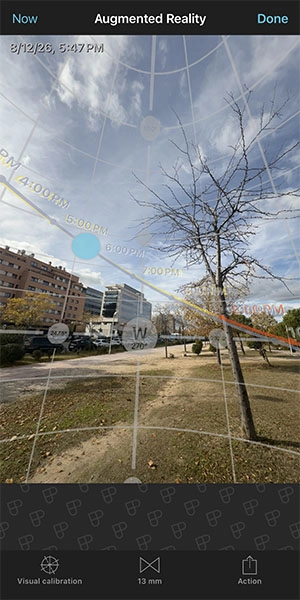
Step 1: Establish the map settings
Go to the Planner and tap the Map Settings button, next to the (+) map button. Under Map layers, tap the Eclipse layer and choose the August 12, 2026 total solar eclipse from the eclipse calendar.
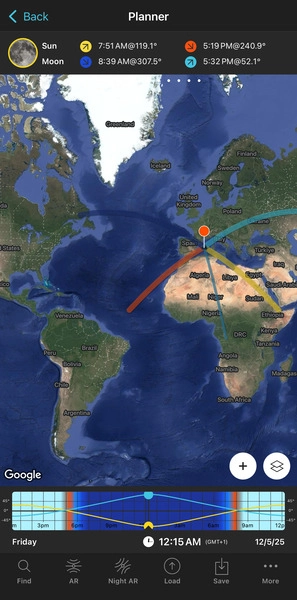
Step 2: Place the Red Pin
The Path of Totality will appear on the map represented by a dark blue band.
Now place the Red Pin in the location you want to photograph the eclipse within the Path of Totality:
- You can use the Load button (at the bottom) to type either the coordinates or the name of the place if you know it.
- Otherwise you can drag and drop the Red Pin.
- Or just do a long press on the spot where you want to place the Red Pin and it’ll be placed there.

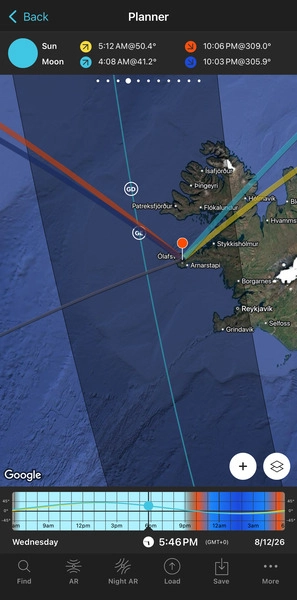
Step 3: Get the local times of the eclipse phases
Get the local times each eclipse phase occurs from the eclipse panel above the map (Panel 10). Swipe the panels to the left until you find it.
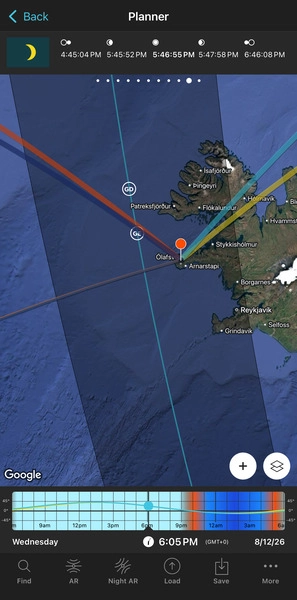

Step 4: See the eclipse azimuth (direction)
See on the map where the eclipse occurs at all times (thin purple line).
And if you’re right where the Red Pin is, you can also use the Augmented Reality (AR) button to visualize the position of the eclipse in the sky.

Now that you know how to use PhotoPills to figure out:
- Where the Path of Totality is
- For a given location, the time each eclipse phase occurs
- And where the Sun will move across the sky during the eclipse
It’s time to start planning your 2026 total solar eclipse photo.
Moreover, if you want to learn more on how to plan a solar eclipse, check sections 4 and 5 of our super detailed Solar Eclipse Photography guide.
Well...
Now that you know how to plan your total solar eclipse photo...
Do it!
Come up with a cool photo idea and plan it.
Find your shooting spot and shooting time.
And then, have a look at the next section. It contains all the gear you need to photograph the eclipse.
4.All the equipment you need to photograph the 2026 total solar eclipse
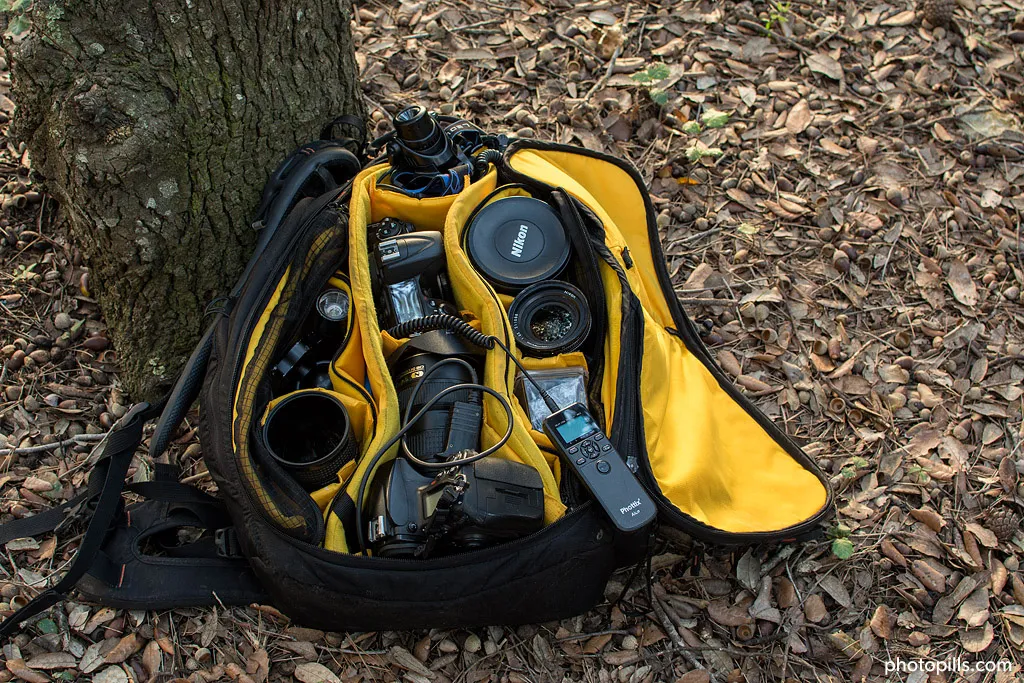
This is the gear you need to photograph the total solar eclipse:
- Solar filter
- Telephoto lens (or wide angle)
- Your camera
- Sturdy tripod and head
- Shutter release or intervalometer
- Memory cards and batteries
- Special eclipse glasses to protect your eyes
- Star tracker (optional)
Solar filter
A solar filter is required when you’re photographing the partial phase of a solar eclipse. It prevents the Sun rays from damaging your camera… And most importantly, if you are using a DSLR camera, it prevents the Sun rays from damaging your eyes when looking through the viewfinder of your camera.
But...
And this is key!
Don't use a solar filter when you're photographing totality and all its cool effects (Baily's beads, diamond ring, Sun's corona and Sun's chromosphere). Otherwise you'll get an underexposed image.
So, remember to remove the solar filter when totality is about to begin.
Are you looking for a solar filter?
You'll find good solar filters on Amazon, B&H and at your local camera store.
Make sure you buy a solar filter that fits the diameter of your lens.
My solar filters are:
- NISI ND100.000 irCut
- Benro ND100.000 irCut magnetic
- Baader solar filter (polymer)
Can you use a regular ND filter instead?
Technically yes… But you shouldn’t.
The risk of damaging your camera (and your eyes) is real.
Neutral Density filters reduce visible light, but they do not effectively block infrared (IR) or ultraviolet (UV) radiation.
And during the partial phase of the solar eclipse, the Sun is still extremely bright.
This means your camera (and especially your eyes) can be exposed to light and heat that an ND filter simply cannot stop.
Because IR and UV still pass through, your sensor can:
- overheat
- get burned
- suffer permanent damage
And your eyesight is at risk, too.
Looking through an optical viewfinder with only an ND filter allows harmful IR to reach your eyes, potentially causing serious eye injury, even if the image appears dim.
Lens
The lens choice depends on the photo you want to capture.
Use a short focal length (14-35mm) if you want to include the landscape. The Sun will be a small dot in your photo, but you can make it work in your composition.
Use a long focal length (200-500mm) for a close-up view and create a powerful image of the eclipse aligned with a subject. Or to photograph all the phases of the eclipse.
Camera
Use your camera!
You don't need a special camera to photograph the eclipse.
The advantage of using a crop sensor camera vs a full frame camera is the focal length multiplier effect.
For instance, using a APS-C camera with a 1.5x crop sensor, a 200mm focal length turns into a 300mm focal length.
Tripod and head
The solar filter, the camera and the lens are heavy. Therefore you need a sturdy tripod and head capable of bearing the weight, and that are as stable as possible on a windy day.
Shutter release or intervalometer
Don't press the shutter button of your camera! If you do so, you'll shake your camera and your images won't be 100% tack sharp.
And you want them crispy and sharp!
Always use a shutter release or and intervalometer.
Memory cards and batteries
Don't forget to bring several memory cards and spare batteries just in case something goes wrong.
Eclipse glasses
And last but not least...
Protect your eyes.
Star tracker (optional)
Using a star tracker (or equatorial mount) to follow the Sun during the eclipse gives you the comfort of not having to manually adjust your camera and lens to keep the Sun in the frame.
It’s incredibly convenient!
And that's it...
This is all the gear you need.
Let's see now how to use it to photograph a total solar eclipse.
5.How to photograph the 2026 total solar eclipse step by step
On August 12, 2026, arrive at the planned location ahead of time. Ideally, get there before the partial phase of the eclipse begins. Then, place the tripod and head right at the shooting spot. This is the Red Pin position in your PhotoPills plan.
Attach your desired lens to your camera. Set the camera to shoot in RAW. Turn off the lens stabilization. And follow the following steps depending on the photo you want.
Partial solar eclipse
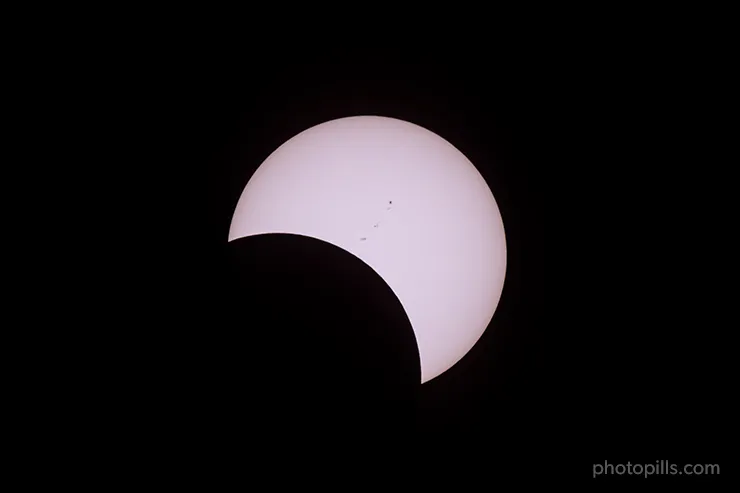
These are the steps to photograph a partial solar eclipse:
- Filter: You need to use a solar filter.
- Focal length: Use a long focal length (300mm, 450mm, 600mm, etc.).
- Metering mode: Set the spot metering mode. Before the eclipse begins, meter light on the Sun.
- Aperture: Use a small aperture like f/8.
- ISO: Keep it low to avoid noise. Use the nominal ISO (100 or 200).
- Shutter speed: Based on the metering, aperture and ISO, adjust the shutter speed to have the light meter centered at zero (correctly exposed). During the partial eclipse I used a shutter speed base of 1/500s.
- Bracket your exposure: To make sure you're getting the exposure right, do a 3-stop exposure bracketing using the base shutter speed (1/500s).
- White balance: Set it to manual. But you can always correct it in post-processing. In this photo I used a warm white balance (7460K) to capture the colors of the Sun through the Baader solar filter, which produces a neutral dominant (white).
- Where to focus: Place the solar filter in front of the lens. Focus at the edge of the Sun before the eclipse begins. To make sure the Sun is in focus, zoom in the image using your camera Live View on the LCD screen.
Diamond ring
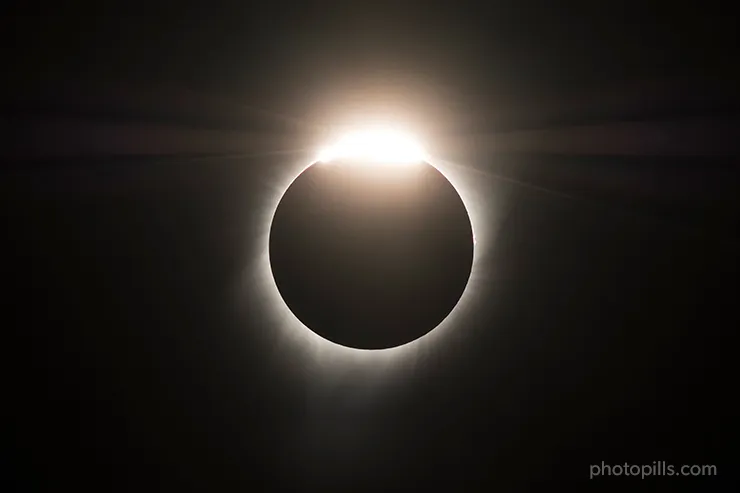
These are the steps to photograph the Diamond ring during a total solar eclipse:
- Filter: You don't need to use a solar filter. Remove the filter right before totality.
- Focal length: Use a long focal length (300mm, 450mm, 600mm, etc.).
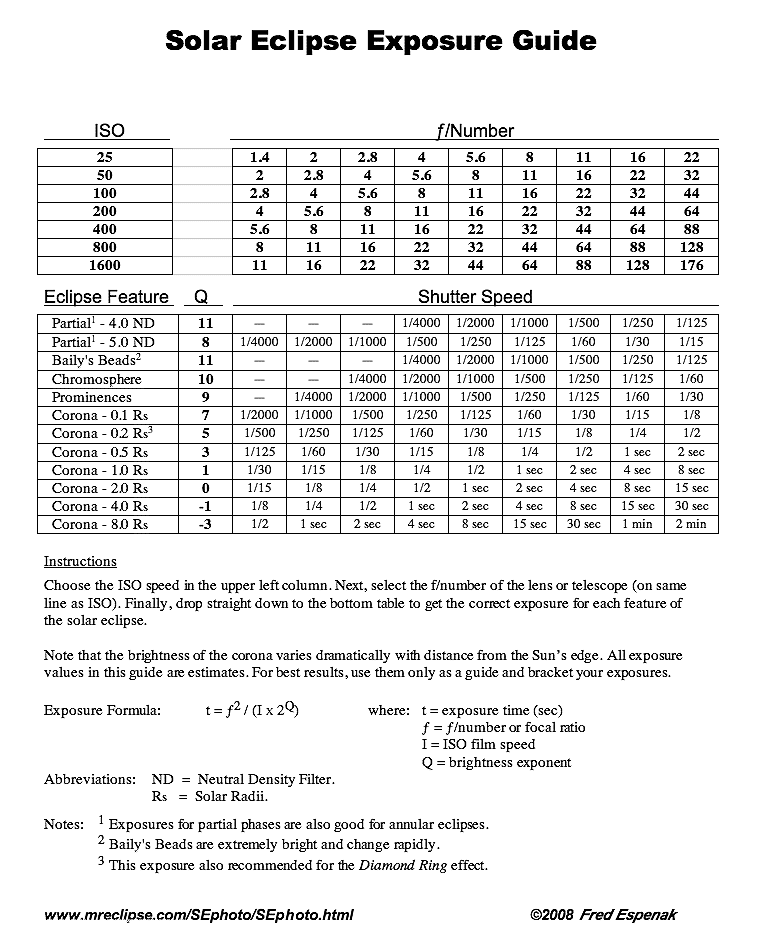
- Metering mode: You don't have time to measure light. To work out the exposure, I used Fred Espenak's exposure table, and I bracketed my exposures taking the values of the table as a reference.
- Aperture: Use a small aperture like f/8.
- ISO: Keep it low to avoid noise. Use the nominal ISO (100 or 200).
- Shutter speed: Since you don't have time to meter light to find out the shutter speed you need, the safest move is to use Fred Espenak's exposure table to choose a base shutter speed (here 1/30s) and then do an exposure bracketing of 9 photos (or the maximum number of photos your camera allows).
- Exposure bracketing: To make sure you get the exposure right, bracket your exposure starting with a shutter speed base of 1/30s. For this photo I used an exposure bracketing of 9 photos from 1/2s to 1/500s. The best image was the one with a shutter speed of 1/125s.
- White balance: Set it to manual. But you can always correct it in post-processing. In this photo I used a warm white balance (6450K) to capture the colors of the diamond ring.
- Where to focus: When photographing a solar eclipse, the first thing you have to do is to put the solar filter on your lens. Focus at the edge of the Sun before the eclipse begins. To make sure the Sun is in focus, zoom in the image using your camera Live View on the LCD screen. Don't forget to remove the solar filter at the end of the partial eclipse. Otherwise, all your photos will be underexposed.
Baily's beads

These are the steps to photograph the Baily's beads during a total solar eclipse:
- Filter: You don't need to use a solar filter. Remove the filter right before totality.
- Focal length: Use a long focal length (300mm, 450mm, 600mm, etc.).
- Metering mode: You don't have time to measure light. To work out the exposure, I used Fred Espenak's exposure table, and I bracketed my exposures taking the values of the table as a reference.
- Aperture: Use a small aperture like f/8.
- ISO: Keep it low to avoid noise. Use the nominal ISO (100 or 200).
- Shutter speed: Since you don't have time to meter light to find out the shutter speed you need, the safest move is to use Fred Espenak's exposure table to choose a base shutter speed (here 1/500s) and then do an exposure bracketing of 9 photos (or the maximum number of photos your camera allows).
- Exposure bracketing: To make sure you get the exposure right, bracket your exposure starting with a shutter speed base of 1/500s. For this photo I used an exposure bracketing of 9 photos. The best image was the one with a shutter speed of 1/8000s.
- White balance: Set it to manual. But you can always correct it in post-processing. In this photo I used a warm white balance (6450K) to capture the Baily's beads colors.
- Where to focus: When photographing a solar eclipse, the first thing you have to do is to put the solar filter on your lens. Focus at the edge of the Sun before the eclipse begins. To make sure the Sun is in focus, zoom in the image using your camera Live View on the LCD screen. Don't forget to remove the solar filter at the end of the partial eclipse. Otherwise, all your photos will be underexposed.
Sun's corona
These are the steps to photograph the Sun's corona during a total solar eclipse:
- Filter: You don't need to use a solar filter. Remove the filter right before totality.
- Focal length: Use a long focal length (300mm, 450mm, 600mm, etc.).
- Metering mode: You don't have time to measure light. To work out the exposure, I used Fred Espenak's exposure table, and I bracketed my exposures taking the values of the table as a reference.
- Aperture: Use a small aperture like f/8.
- ISO: Keep it low to avoid noise. Use the nominal ISO (100 or 200).
- Shutter speed: Since you don't have time to meter light to find out the shutter speed you need, the safest move is to use Fred Espenak's exposure table to choose a base shutter speed (here 1/30s) and then do an exposure bracketing of 9 photos (or the maximum number of photos your camera allows).
- Exposure bracketing: To make sure you get the exposure right, bracket your exposure starting with a shutter speed base of 1/30s. For this photo I used an exposure bracketing of 9 photos from 1/2s to 1/500s. The best image was the one with a shutter speed of 1/30s.
- White balance: Set it to manual. But you can always correct it in post-processing. In this photo I used a warm white balance (6450K) to capture the colors of the Sun's corona.
- Where to focus: When photographing a solar eclipse, the first thing you have to do is to put the solar filter on your lens. Focus at the edge of the Sun before the eclipse begins. To make sure the Sun is in focus, zoom in the image using your camera Live View on the LCD screen. Don't forget to remove the solar filter at the end of the partial eclipse. Otherwise, all your photos will be underexposed.
Sun's chromosphere
These are the steps to photograph the Sun's chromosphere during a total solar eclipse:
- Filter: You don't need to use a solar filter. Remove the filter right before totality.
- Focal length: Use a long focal length (300mm, 450mm, 600mm, etc.).
- Metering mode: You don't have time to measure light. To work out the exposure, I used Fred Espenak's exposure table, and I bracketed my exposures taking the values of the table as a reference.
- Aperture: Use a small aperture like f/8.
- ISO: Keep it low to avoid noise. Use the nominal ISO (100 or 200).
- Shutter speed: Since you don't have time to meter light to find out the shutter speed you need, the safest move is to use Fred Espenak's exposure table to choose a base shutter speed (here 1/500s) and then do an exposure bracketing of 9 photos (or the maximum number of photos your camera allows).
- Exposure bracketing: To make sure you get the exposure right, bracket your exposure starting with a shutter speed base of 1/500s. For this photo I used an exposure bracketing of 9 photos. The best image was the one with a shutter speed of 1/1000s.
- White balance: Set it to manual. But you can always correct it in post-processing. In this photo I used a warm white balance (6450K) to capture the colors of the Sun's chromosphere.
- Where to focus: When photographing a solar eclipse, the first thing you have to do is to put the solar filter on your lens. Focus at the edge of the Sun before the eclipse begins. To make sure the Sun is in focus, zoom in the image using your camera Live View on the LCD screen. Don't forget to remove the solar filter at the end of the partial eclipse. Otherwise, all your photos will be underexposed.
Including the landscape in the solar eclipse photo (totality)
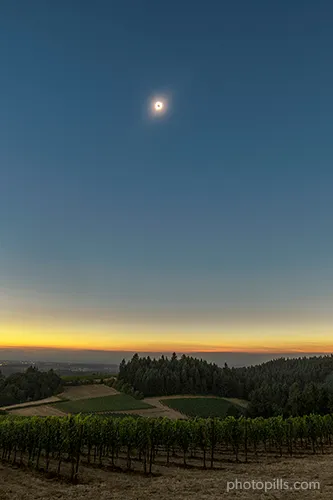
During totality, if you wish to include the landscape in the photo follow these steps:
- Filter: You don't need to use a solar filter. Remove the filter right before totality.
- Focal length: Your composition will determine the focal length you need. Use a short focal length (8-35mm) to include the landscape. The Sun will appear as a small bright dot in the sky.
- Metering mode: Set the spot metering mode. Meter on the eclipsed Sun. It is the brightest spot in the scene. And overexpose by 1 or 2 stops (+1EV o +2EV).
- Aperture: Use a small aperture like f/8 or f/11. In this photo I used an aperture of f/16.
- ISO: Keep it low to avoid noise. Use the nominal ISO (100 or 200).
- Shutter speed: Based on the light metering, aperture and ISO set a shutter speed so the exposimeter of your camera is 1 or 2 stops overexposed.
- Exposure bracketing: Bracket your exposures to increase your chances of nailing the exposure. I usually use an exposure bracketing of 9 photos (or the maximum number of photos my camera allows).
- White balance: Set it to manual. But you can always correct it in post-processing. But if you wish to capture the true colors of the Sun and the scene in camera, I recommend you try with a white balance of 5200K, and adjust accordingly.
- Where to focus: Since you're using a short focal length, focus at the hyperfocal distance.
Focus the attention on your subject (during totality)
To include an interesting subject in your solar eclipse photo follow these steps:
- Filter: You don't need to use a solar filter. Remove the filter right before totality.
- Focal length: Use a long focal length (300mm, 450mm, 600mm, etc.).
- Aperture: Use a relative small aperture like f/8. In this case Ted Hesser used an aperture of f/5.6.
- ISO: Keep it low to avoid noise. Use the nominal ISO (100 or 200).
- Shutter speed: Since you don't have time to meter light to find out the shutter speed you need, the safest move is to use Fred Espenak's exposure table to choose the right base shutter speed depending on the eclipse effect (Baily's beads, diamond ring, Sun's corona and Sun's chromosphere) you wish to photograph. For example, if you want to capture the diamond ring with your subject use a shutter speed of 1/30s and then do an exposure bracketing of 9 photos (or the maximum number of photos your camera allows).
- Exposure bracketing: To make sure you get the exposure right, bracket your exposure starting with a shutter speed base of 1/30s. For this type of photos I recommend you to use an exposure bracketing of 9 photos (1/2s to 1/500s). Ted Hesser's best image was shot at 1/200s.
- White balance: Set it to manual. But you can always correct it in post-processing. For this type of images, I like a cool white balance (5600K).
- Where to focus: Focus at your subject. You want your subject to be tack sharp.
Bonus: Align your camera with Polaris to track the solar eclipse
A star tracker doesn’t let you actually see Polaris.
However, the apps Polar Scope Align Pro (iOS), PolarAligner Pro (Android), and the Skylabs aligner (a phone support bracket) make this task a breeze, even in broad daylight (without seeing a single star!).
Step 1: Set up your gear
Place the star tracker and the equatorial wedge on the tripod. Then install the Skylabs mount on the rotation axis.
Step 2: Level your phone
Place your phone in the Skylabs holder and tighten it so it stays completely flat and parallel to the tracker’s axis. If the phone is tilted, the alignment may fail.
Step 3: Open the app to start aligning
Open Polar Scope Align Pro (iOS) or PolarAligner Pro (Android) and look for the daytime alignment feature (it usually has a sun icon).
Step 4: Perform the alignment
Look at the reticle and the calculated position of the celestial pole.
Use the azimuth and altitude knobs on your base (without moving the phone) until the cross on the screen matches the virtual target.
Why is this so useful during a solar eclipse?
Because it guarantees automatic tracking of the Sun.
Remember, the Sun moves quickly (15º per hour). If you’re using a telephoto lens, it will drift out of frame in seconds or minutes if you’re not tracking it.
Thanks to the Skylabs aligner and the app (Polar Scope Align Pro for iOS or PolarAligner Pro for Android), the tracker’s motor rotates at exactly the same speed and angle as the Earth — but in the opposite direction.
This way you get:
- A steady frame: the Sun stays centered throughout the event.
- Perfect timelapses: you avoid the Sun “dancing” across the scene.
- Less handling: you don’t have to adjust the tripod every few minutes, reducing vibrations and mistakes.
6.Join us on our 2026 Total Solar Eclipse Expeditions
The 2026 Total Solar Eclipse is a once-in-a-lifetime event...
Why go it alone when you can join a team of passionate photographers, led by PhotoPills Masters?
Choose Your Adventure: Three Epic Destinations
We have planned three unique Eclipse Expeditions, each offering a distinct and spectacular backdrop for this celestial event:
- Eclipse Expedition to Iceland: Capture the total eclipse over the dramatic, otherworldly landscapes of Iceland. A setting that screams for an epic, once-in-a-generation photograph.
- Eclipse Expedition to the North of Spain: Experience the eclipse from the historic and breathtaking coast of Northern Spain, known for its rugged cliffs, charming fishing villages, and rich cultural heritage, providing a dramatic foreground for the astronomical spectacle.
- Eclipse Expedition to Menorca: Join us on the tranquil Mediterranean island of Menorca. With its beautiful beaches and clear, dark skies, it offers a serene and photogenic environment for capturing the eclipse, followed by a chance to photograph the stunning Milky Way.
Beyond the Eclipse: A Photographic Adventure
Our expeditions are about more than just the brief moment of the Path of Totality.
You’ll spend days with a small group of like-minded photographers, exploring incredible locations, and honing your skills with hands-on coaching from the PhotoPills Masters.
You will learn advanced techniques for landscape, night, and specialized solar photography, all while building friendships that last long after the final shot is taken.
Don't leave your eclipse photography to chance. Join the PhotoPills family and ensure you are in the perfect location, with the perfect plan, to capture the perfect image.
Spots are extremely limited, so secure your seat today!
7.Your turn...
If you're reading these final words...
It means that you know everything you need to imagine, plan and shoot a truly LEGENDARY photo of the August 12, 2026, total solar eclipse.
It's time to take action!
Come up with a cool eclipse photo idea and plan it.
And on August 12, 2026, you'll be at the right spot at the right time to capture it.
If you need more help during the process, please leave a comment below.
I'm ready to help!
- If you want to photograph other solar eclipses (annular, hybrid, total) or you feel like learning more about solar eclipse photography, please check our super detailed solar eclipse photography guide.
- If you want to improve your photography, make sure to have a closer look at our collection of free photography guides. I'm sure you'll love them ;)
- And if you go and photograph the 2026 total solar eclipse, please submit your photo to the PhotoPills Awards. We'd love to feature it for everyone to see... And you can win a prize!
Note: Some links on this page are affiliate links. What does this mean? If you buy/rent using these links you're helping support us and it costs you nothing extra. Thank you for your support.
Get this ebook for free now!
