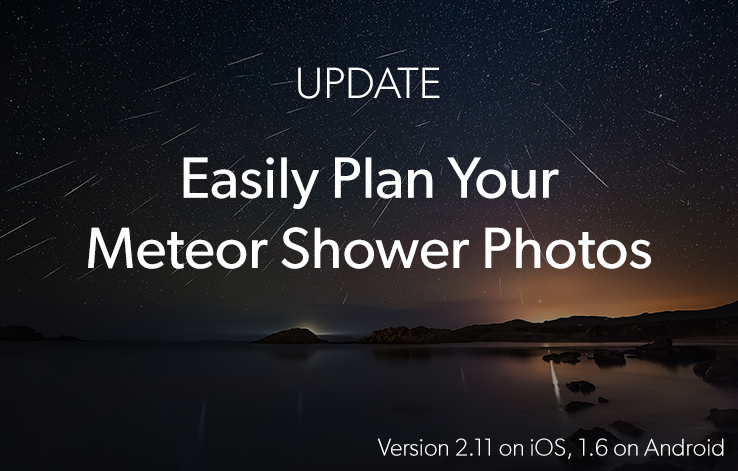
Update PhotoPills Now and Start Planning Your Meteor Shower Photos In Just Seconds!
Note: Tap here to learn how to update PhotoPills on iOS & Android.
When is the next cool Meteor Shower happening?
Will it be visible from where I live?
How intense will it be?
When is the Meteor Shower peaking?
What’s the local peak time?
How can I locate the radiant in the sky?
These are the questions we usually get when we announce that a Meteor Shower is approaching…
The good news…
Now you can answer all these questions (and a few more) with PhotoPills.
So, update PhotoPills now to enjoy planning your Meteor Shower shots:
- In the field, with the new Meteor Shower Pill.
- And from home, with the new Meteor Shower features added to the Planner.
Planning a Meteor Shower with the Meteor Shower Pill
You’ll find the Meteor Shower Pill next to the Night AR in the Pills Menu.
This Pill gives you instant access to all the key information of the most important Meteor Showers. And it works offline!
Here you’ll find:
- A Meteor Shower calendar.
- Dates and local times of Meteor Shower peaks for the selected location.
- Meteor Shower visibility and quality for your location (taking into account Moonlight and daylight).
- Radiant information and position in the Augmented Reality view.
- Detailed information for each Meteor Shower, Sunrise and Sunset times, Moonrise and Moonset times, number of hours with no Moon, and Galactic Center visibility times (Milky Way).
Use it in the field to visualize the Meteor Shower radiant position and path with the Augmented Reality view (even offline).
Long story short...
This is how it works...
Step 1. Select the Meteor Shower
In the Pills menu, scroll down and tap the Meteor Shower Pill.
Now...
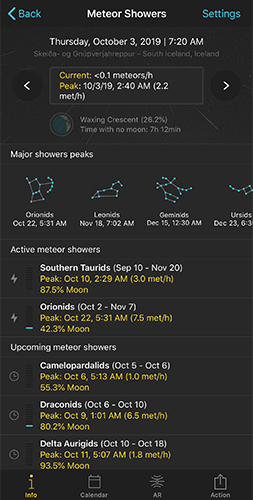
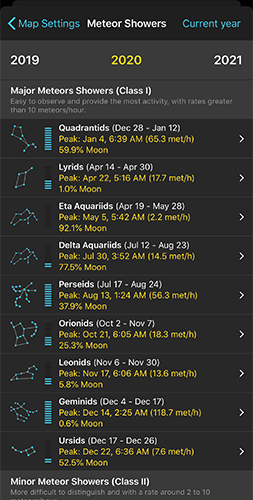
You can choose the Meteor Shower you wish to plan either from the Info tab (choosing one of the major upcoming Meteor Showers) or from the Calendar tab.
In the Calendar, when you tap on a Meteor Shower, you’ll access the Meteor Shower information sheet. Tap on the Peak information to select it (first row of the table).
Notice that, to help you choose a cool Meteor Shower, the information PhotoPills provides includes the name, period of activity, peak date, peak time, peak meteors/h and peak Moon phase.
It also includes an energy bar showing how good is the Meteor Shower in terms of the number of meteors you could capture. The more filled the energy bar is, the better the Meteor Shower is expected to be.
Step 2. Find the Meteor Shower key information
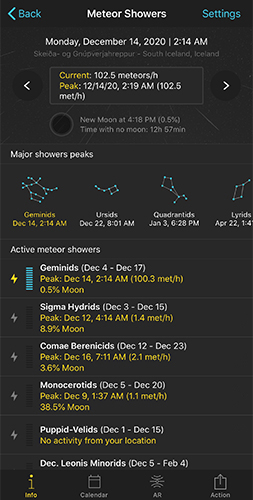
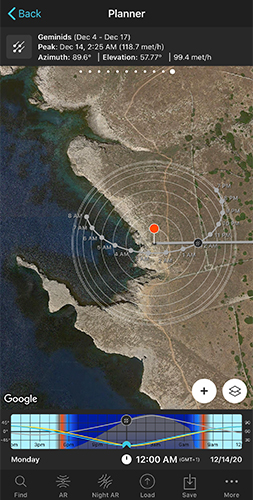
Once you’ve selected the Meteor Shower, all the key peak information will appear in the Info tab.
What you’re seeing now is all the information you need to know about the Meteor Shower for your current location and the selected date and time (the peak date and time of the selected Meteor Shower). If you want to change the location, tap on Settings (at the top right hand corner).
In the big box at the top of the screen, you have the meteors/h (taking into account all active Meteor Showers). It also tells you the peak time and peak meteors/h.
Below the big box, you find the Moonphase and the amount of time you can enjoy the Meteor Shower activity with no Moon… Pretty cool, isn’t it?
Swipe your finger on the big box to change time and see how the Meteor shower conditions change throughout the night.
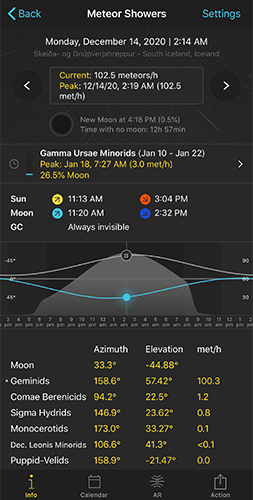
If you scroll down a bit, you’ll see the key Sun, Moon and Milky Way information. And below it, there is a super interesting graph...
This graph is great to quickly understand at what time the meteors maximum intensity will happen and how intense the shower will be. Moreover, visualizing the radiant and Moon path gives you valuable inputs on how the position of the Moon and the Radiant will affect the shooting session.
You can swipe your finger on the graph to change the time and see how everything evolves.
Finally, at the bottom, you’ll find the azimuth and elevation of the Moon and all the radiants of the active Meteor Showers for the selected date and time. It also includes the number of meteors /h of each shower.
Step 3. Find your shooting spot and framing (locate the radiant in the sky)

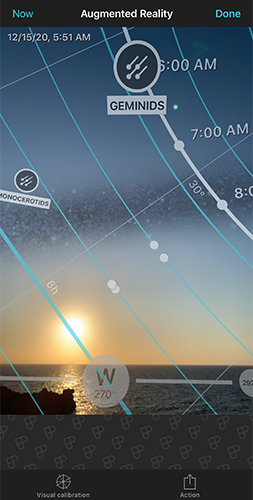
When the Meteor Shower peaking date finally arrives, go to the shooting location (before sunset if possible), and use the AR button to locate the radiant at the beginning and at the end of the session.
Swipe the AR view from right to left again to move time forward and visualize how the radiant moves across the sky.
The radiant is the point in the sky where meteors appear to originate. Locating it in the sky will help you decide where to frame your camera, depending on the image you wish to capture:
- You want the radiant in the frame if you intend to create an image in post-processing where all the meteors appear to converge in one spot in the sky. Like the cover image of our Meteor Showers photography guide. It’s a cool effect.
- The further away a meteor appears from the radiant, the longer its tail might be. So to increase the odds of capturing longer tails, frame an area of the sky that is away from the radiant.
- Also, to capture the maximum number of meteors, use the shortest possible focal length (wide angle lens). The more sky you include in the frame the more meteors you’ll potentially capture.
- But don’t forget to include an interesting subject in the foreground. Connecting the action in the sky with a powerful foreground will make your image shine!
With this information in mind, decide your shooting spot and framing... and you’re all set!
Enjoy a fantastic night under the stars ;)
Planning a Meteor Shower with the Planner
Now, the Planner allows you to plan any Meteor Shower anywhere in the world, from your couch :)
This is how it works:
Step 1. Select the Meteor Shower
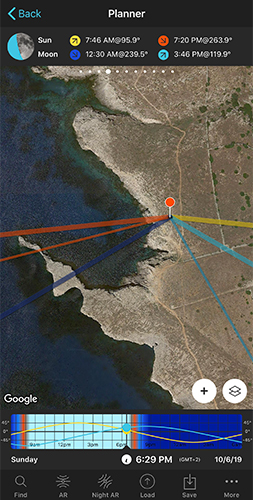
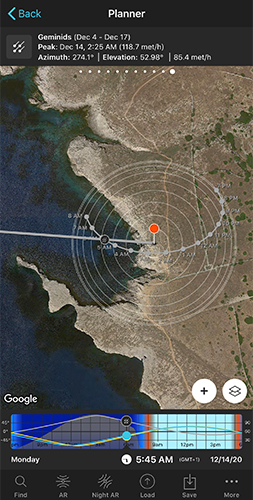
Go to the Planner and place the Red Pin where you want to plan the Meteor Shower.
Then,
- Tap the Map Settings button. You’ll find it on the Map, next to the (+) map button.
- Tap on the Meteor Shower layer.
- And choose the Meteor Shower peak from the calendar.
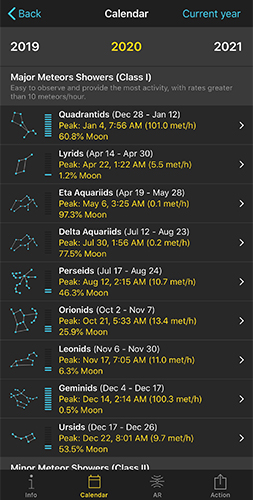
Again, notice that, to help you choose a cool Meteor Shower, the information PhotoPills provides includes the name, period of activity, peak date, peak time, peak meteors/h and peak Moon phase.
It also includes an energy bar showing you how good the Meteor Shower is in terms of the number of meteors you could capture. The more filled the energy bar is, the better the Meteor Shower is expected to be.
Step 2. Find your shooting spot and framing
To find your shooting spot and framing, you need to know the Meteor Shower radiant’s position and path during the session.
Well...
When you select the peak of a Meteor Shower, the peak date and time will be set in the Planner (check the time bar below the map).
And on the map and on Panel 11, you’ll find all the information you need to plan the photo.
On the map you have the following information:
- Radiant path: The path the radiant will follow during the night. It looks like an arch on the map. It’s where the radiant is moving.
- Radiant position: The radiant is displayed as a circle on the path. The radiant azimuth line (that starts at the Red Pin) shows you where the radiant is at the selected date and time.
- Concentric circumferences: A kind of contour lines that help you understand the elevation of the radiant. The azimuth and the elevation of the radiant also appear on Panel 11.
And on Panel 11 you have the selected Meteor Shower name, activity period, peak date and time, radiant coordinates (azimuth and elevation) and number of meteors/h (of all active meteor showers) for the position of the Red Pin at the selected date and time.
Also note that on the Time Bar you have the path of the radiant and the number of meteors/h (gray graph).
Swipe the Time Bar to see how the radiant changes its position throughout the night.
Again, knowing the position of the radiant at all times will help you adjust your shooting spot and framing.
Step 3. Locate the Radiant in the sky

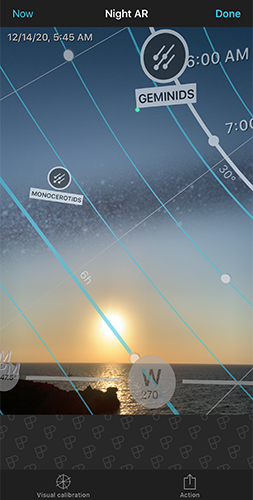
Finally, use the Night AR bottom option to visualize the position of the radiant in the Sky. Notice that what you’re seeing is the view from the Red Pin position (not from where you are).
So, when the Meteor Shower peaking date arrives, go to the shooting spot (where the Red Pin is), and use the Planner’s Night AR view to locate the radiant at the beginning and at the end of the shooting session.
Swipe the Night AR view from right to left again to move time forward and visualize how the radiant moves across the sky
Well..
Now you know how to use the new Meteor Shower Pill and the new Planner’s Meteor Shower features to plan your Meteor Shower shots.
It’s your turn!
It’s time to let your imagination fly :P
Other improvements
- New cameras added: Canon EOS C700, EOS M6 Mark II, EOS 90D, EOS M200; Fujifilm X-A7, X-Pro3; Nikon Z50; Olympus OM-D E-M5 III; Panasonic Lumix DC-S1H; Sony Venice, PDW-680, PDW-F800, PDW-850, PXW-FS7 II,P XW-Z150, NEX-FS700R, Cyber-shot DSC-RX100 VII, a6600, a6100, a9 II; TinyMOS nano1
- Bug fixes.
Please, if you find a bug (or have a suggestion), send us an email to [email protected] and we'll fix it as soon as possible :)
Let us know how it goes!
We’ll keep improving.
Imagine. Plan. Shoot!
Note: Tap here to learn how to update PhotoPills on iOS & Android.