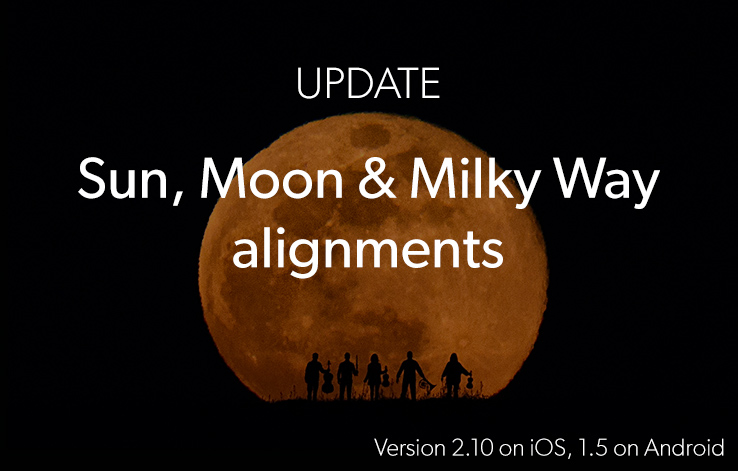
Update PhotoPills Now and Start Planning Sun, Moon and Milky Way Alignments Like a Pro!
Note: Tap here to learn how to update PhotoPills on iOS & Android.
This PhotoPills update contains lots of cool improvements...
Lots!
We’ve been working super hard to make planning Sun, Moon and Milky Way alignments above the terrain and buildings much more easy (and accurate)…
Among many more things!
The highlights are:
- Planner: Redesign of Panel 2 (terrain info) to show the altitude of the Sun/Moon/Milky Way Arch/Galactic Center above the Black Pin ground level. It also shows the size of the Sun/Moon.
- Planner: New Sun/Moon map tool to help you figure out the shooting distance you need to get the size of the Sun/Moon you want.
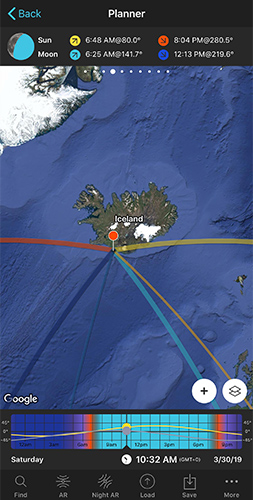
- Planner: Sun/Moon azimuth lines adjusted to Earth curvature. This allows to plan with more precision your long distance Sun/Moon shots. Switch them from Map Settings button > Sun/Moon layer > Show real azimuth lines.
- Planner: When using the Find tool to figure out when the Sun or Moon will be where you want it to be in the frame, now you can set the Elevation value by introducing the altitude you want the Sun/Moon to be above the terrain.
- Planner: Manually introduce the terrain altitude values of the Red Pin and the Black Pin (More > Altitudes).
- Planner: To adjust time with more precision, do a long press on the time bar to go from a 24-hour length to a 15-minute length.
- Planner: Latitude and Longitude coordinates now show 6 decimal places instead of 4.
- New cameras added: Canon EOS RP; Film camera 24x65 XPan, Medium Format 5x12, 6x10, 6x12, 6x17, 6x24, 6x7, 6x8; Fujifilm FinePix XP140, X-T30; GoPro HERO7; Leica D-Lux 7, M10-D, Q-P, Q2; Nikon Coolpix A1000, Coolpix B600, Coolpix L830, Coolpix P600; Panasonic Lumix DC-FZ1000 II, Lumix DC-S1, Lumix DC-S1R, Lumix DC-ZS80 (DC-TZ95); Ricoh G900, WG-6; Sony a6400; Xiaomi YI 4K.
- Bug fixes.
But let’s dive into the update...
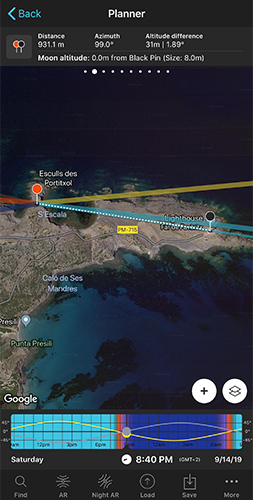
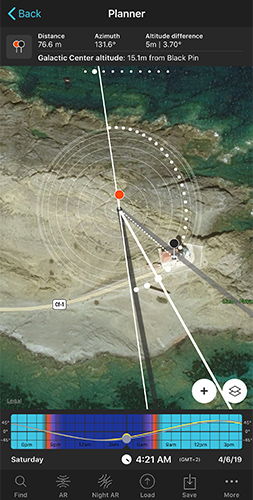
Calculating Sun, Moon and Milky Way altitude above terrain (and a building) made easy
There is a question that we get a lot...
“Hey guys, how do I know the elevation of the Sun/Moon/Milky Way arch/Galactic Center above the terrain? And relative to a building?”
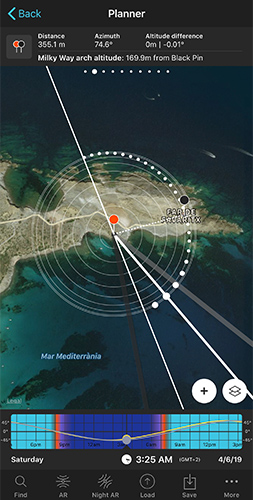
Well, now you have the answer in Panel 2 of the Planner!
¡It has been completely redesigned!
Align the Sun/Moon/Milky Way arch/Galactic Center with the Black Pin and read on Panel 2 the altitude above the terrain, at the Black Pin position… and also the real Sun/Moon size :D
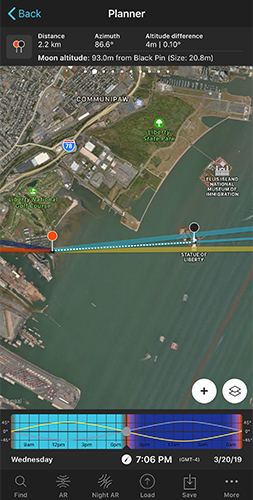
Now on panel 2 you have:
- Black pin button (NEW): We’ve changed the “mountains” icon for a new icon that shows the Red Pin and the Black Pin. Tap this button to switch the Black Pin on the map.
- Distance: Distance between the Red Pin and the Black Pin.
- Azimuth: Angle measured along the horizon from the North to the Black Pin position on the map.
- Altitude difference: Terrain altitude difference between the Red Pin ground level and the Black Pin ground level.
- Moon/Sun/Milky Way altitude (NEW): When the Moon, the Sun or the Milky Way (Milky Way arch or Galactic Center) is aligned with the Black Pin, the panel shows its altitude above the terrain. This is the altitude above the Black Pin ground level. This way it is super easy to know if the Moon, the Sun or the Milky Way is at the elevation you need above the terrain (or a building).
- Moon/Sun size (NEW): It appears in brackets () at the end of the Moon/Sun altitude above Black Pin. It shows the real Size of the Moon or the Sun. If you place the Black Pin on your subject, then you’ll be able to compare the Moon/Sun size with the size of your subject.
Quickly figure out the shooting distance to get the Sun/Moon size you need
Imagine that you’re planning the next full Moon. In the Planner, you place the Red Pin in the location you wish to plan the shot and set the full Moon date.
When designing a Moon (or Sun) long distance shot, once you’ve decided the size of the Moon you want compared to your subject, you need to calculate the shooting distance that gives you the desired Moon size. So you know the distance you have to place the Red Pin... to start looking for the shooting spot that gives you the right Moon alignment.
Till now, as a rule of the thumb, we used the PhotoPills rule of 100 to calculate it. Therefore, to get the shooting distance, we multiplied the desired Moon size by 100.
Well...
Now you can use the new Sun/Moon map tool to work out the shooting distance faster and with more precision.
In the Planner, place the Black Pin on your subject. Then tap on the Map settings button, next to the (+) map button. And switch on the Sun/Moon map tool.
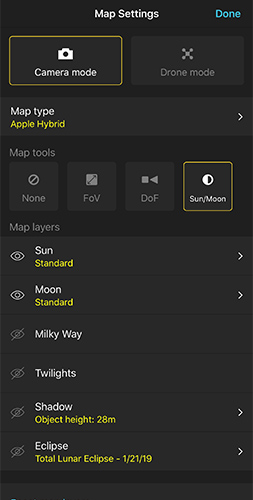
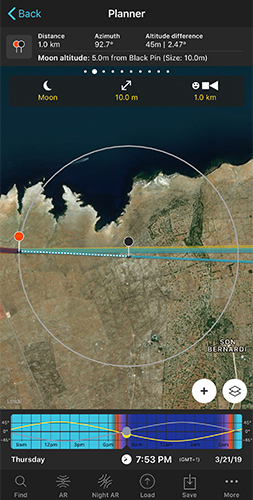
To calculate the shooting distance, use the tool box that appears above the map (under the top panels):
- Choose to plan the Sun or the Moon.
- Set the Sun/Moon size you want.
On the map, a gray circumference will point out the shooting distance you need. This way, based on the desired alignment and desired Moon size, you’ll quickly know where to place the Red Pin.
Use real Sun/Moon azimuth lines when planning your long distance shots
Earth is not flat!
So switch on the real Sun/Moon azimuth lines on the map ;)
When planning Sun/Moon alignments for short shooting distances... assuming the azimuth lines to be straight lines works pretty well...
But for long shooting distances... Earth curvature must be taken into account when drawing the azimuth lines on the map.
Therefore, in the Planner, tap on Map Settings button, next to the (+) map button. Then tap on the Moon layer (or the Sun layer) and switch on “Show real azimuth lines”.
Notice that the Sun/Moon azimuth lines aren’t straight lines anymore, they are curves. This will give you a more accurate position of the Sun/Moon on the map.

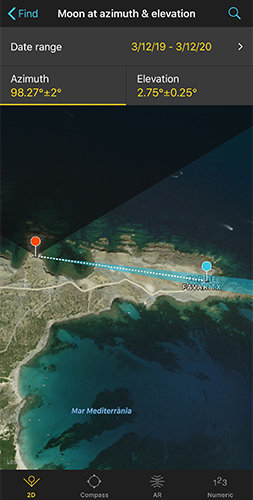
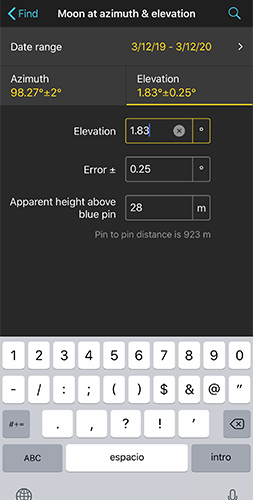
Quickly find when the Sun/Moon is at a desired altitude above the terrain
In the Planner, when using the Find tool to figure out when the Sun/Moon will be at a desired position in the frame... Now you can use the Numeric Elevation option to set the Sun/Moon elevation by introducing the desired Sun/Moon apparent height above the Yellow/Blue Pin ground level.
Let me give you an example...
If you have a building that’s 28m tall and you wish the center of the Moon to be at the same height. This is 28m above the ground level. In the Numeric Elevation option, just introduce 28m as the “Apparent height above blue pin” and the elevation angle will be automatically calculated 1.83º.
Manually set the Red Pin and Black Pin altitudes
When you have access to a local map that offers accurate terrain altitudes, or when you’re shooting from the top of a building... now you can manually plug the Red Pin and Black Pin (if you have it visible on the map) altitudes and offsets to work out your Sun, Moon and Milky Way alignments.
To do it, go to the Planner, tap on More (at the bottom right hand corner), tap on Altitudes and introduce the values you wish to use: Terrain altitude and/or offset.
Introduce an offset when you wish to take into account the height of a building.
When you use personalized elevation values, the altitude values in Panel 2 adjust accordingly.
TIP: To go back to use the default Red Pin altitude values move the Red Pin more than 30m (100ft) or switch off "Set custom altitudes" from More>Altitudes. The same thing happens with the Black Pin.
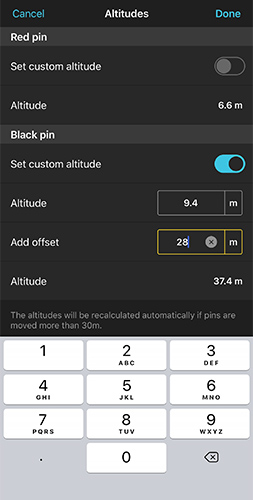
When to add an offset?
Add it:
- When shooting from the top of a building. In this case, the Red Pin offset would be the height of the building.
- When you wish the Sun/Moon to be aligned with a certain offset above the terrain. For example, the top of a building. In this case, the Black Pin offset would be the height of the building.
Adjust your Sun and Moon alignments with more precision
As you know, if you do a long press on the time bar, it changes from a 24-hours length to a 1-hour length. This allows you to change time with more precision to better adjust the Sun/Moon/Milky Way alignment you need.
According to our experience, sometimes 1-hour isn’t small enough to work the shooting time with precision. So we’ve shortened to 15-minutes.
In our opinion, this change has improved the usability of the time bar a lot :)
Other improvements
- Planner: Latitude and Longitude coordinates now show 6 decimal places instead of 4.
- New cameras added: Canon EOS RP; Film camera 24x65 XPan, Medium Format 5x12, 6x10, 6x12, 6x17, 6x24, 6x7, 6x8; Fujifilm FinePix XP140, X-T30; GoPro HERO7; Leica D-Lux 7, M10-D, Q-P, Q2; Nikon Coolpix A1000, Coolpix B600, Coolpix L830, Coolpix P600; Panasonic Lumix DC-FZ1000 II, Lumix DC-S1, Lumix DC-S1R, Lumix DC-ZS80 (DC-TZ95); Ricoh G900, WG-6; Sony a6400; Xiaomi YI 4K.
- Bug fixes.
Please, if you find a bug (or have a suggestion), send us an email to [email protected] and we'll fix it as soon as possible :)
Let us know how it goes!
We’ll keep improving.
Imagine. Plan. Shoot.!
Note: Tap here to learn how to update PhotoPills on iOS & Android.