Photography Planning: The Definitive Guide - Chapter 3

Get this ebook for free now!
Content
Chapter 1
- Find creative inspiration with these 20 planned photos
- How to come out with amazing photography ideas
- How to find the perfect location to plan your shots
- 8 things you must know before start planning your photos
- How to plan a specific natural light
Chapter 2
- How to plan Sunrises (and Sunsets)
- How to plan a Big Sun aligned with a subject
- How to plan Moonrises (and Moonsets)
- How to plan a Big Moon aligned with a subject
Chapter 3
- How to plan a Milky Way shot
- How to plan a Star Trails shot
- How to plan a Meteor Shower shot
- How to plan an architecture shot
- How to plan a portrait outdoors
- How to plan a wedding photo in natural light
Chapter 4
- How to plan a drone shot
- How to plan the tides in a seascape
- How to plan a photo of a lunar eclipse
- How to plan a photo of a solar eclipse
- How to plan the field of view and depth of field
- How to plan the weather
- How to plan a shoot during a certain season
- How to scout the location before the shooting date
- Check the weather forecast
- Prepare and check your photography gear
- Be prepared to throw the plan out of the window
- 10 photography planning tips
- 10 photographers that master photography planning
- Planning is everything
Chapter 3
10.How to plan a Milky Way shot
Photographing the Milky Way is magical.
But if you manage to do it in the way and the location you want, the result is even more rewarding. That's why planning is so important.
The good news is that planning the Milky Way is super easy.
Let me show you how to do it from your couch... ;)
In the following video you'll learn:
- How to easily plan the best possible Milky Way photo for a given date with PhotoPills.
- If you know the photo you want to take but don't know when it happens, how to determine the exact date and time that the Milky Way will be exactly where you want it to be.
Now let's dive into the wonderful world of Milky Way planning with another example :)
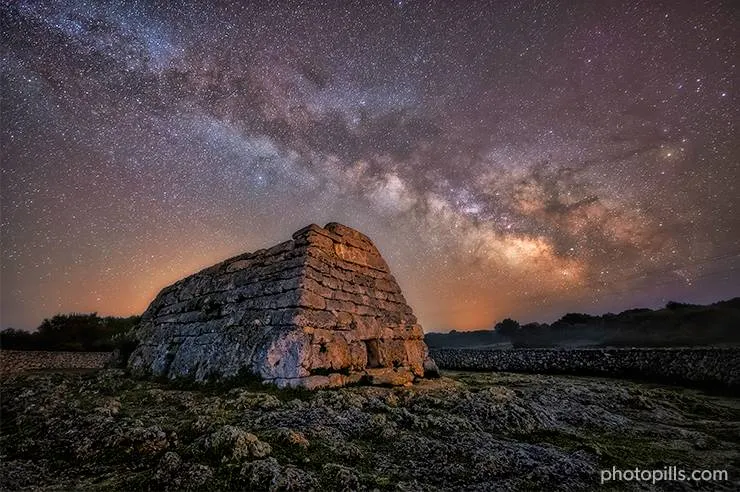
Imagine that you want to capture the Milky Way completely vertical above the magical salt pans of Fuencaliente in the island of La Palma (Spain).

In addition to this, you could add a human figure aligned with the Milky Way to give the viewer a sense of scale, to add more interest to the image.
What do you think?
Doesn't it sound cool?
Let's plan the photo step by step! :)
Place the Red Pin on the shooting spot

The first step is to place the Red Pin in the location. You'll adjust the shooting spot later on.
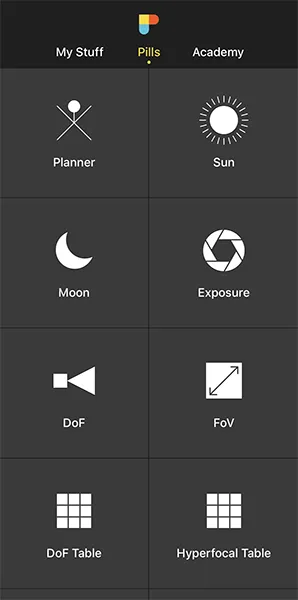
So open PhotoPills, tap Planner (Pills Menu) and then place the Red Pin on the location you wish to go to photograph the Milky Way. For example, on Salinas de Fuencaliente, on the island of La Palma (Spain).
It's an incredibly beautiful spot, with plenty of salt pans where the salty water is perfect to capture reflections of the stars.
Tap the Load button (at the bottom) and type "Salinas de Fuencaliente" in the search bar. Then, select it and the Red Pin will be placed in the location.
If you don't know how to do it, this video shows you how to move the Red Pin.
Set the shooting date


Now...
You can face two scenarios.
Scenario #1
If you know the date you want to photograph the Milky Way, let's say next Saturday, the next New Moon or any other date, you can set it using the Time bar.
When it's a date not far away from the present, set your current date and time by double tapping the Time bar below the map. And go forward in time by swiping it to the left to get to the date you want to take the photo.
When it's a date far away in time, set this specific date using the Calendar. To do this, tap the center of the Time bar. On the Date & time screen, tap Date to manually change the shooting date.
Once you have set the date, then you can find your shooting spot and shooting time based on the position of the Milky Way for that specific date. I'll explain how to do it in a minute.
But first, let's see scenario #2.
Scenario #2
Imagine that you have a composition in mind, for example, the Milky Way vertical with the salt pans of Fuencaliente, but you don't know the date it happens.
In this case I recommend you to check the possible compositions you can get in each one of the New Moons of the year, until you find the composition you're looking for.
This is the workflow you need to follow:
- Double tap the center of the Time bar to set the date to today and the time to right now.
- Swipe the panels above the map until you get to Panel 8, the second Milky Way panel.
- Tap the Milky Way picture on Panel 8 to jump in time to the next New Moon. Double-tap it to jump the date to the previous New Moon.
- Finally, change the time with the Time bar to see where the Milky Way (and the Galactic Center) will be during the night.
OK!
Let's suppose you want to take your Milky Way photo on the July 2022 New Moon.
In this case, the best option is to set the date is to use the Milky Way picture on Panel 8.
Switch on the Milky Way layer


You have the Red Pin on the location you want, in Salinas de Fuencaliente. And you've set the shooting date you want (the July 28, 2022 New Moon).
To plan your Milky Way photo you need to understand the position of the Milky Way at all times. So the next step is to switch on the Milky Way layer on the map. Let's do it!
On the Planner's map, tap the Map Settings button (bottom right-hand corner, next to the (+) button).
Then, check that the eye icon on the Milky Way layer map layer is not crossed out. If it is, tap it to turn the layer on. Tap OK (upper right corner) in iOS or the arrow to go back in Android.
If you want to have a cleaner view on the Planner, you can turn off the rest of the layers (tap the eye icons to cross them out). Consider keeping the Moon layer as it's always useful to know where the Moon is when planning a Milky Way photo.
Now...
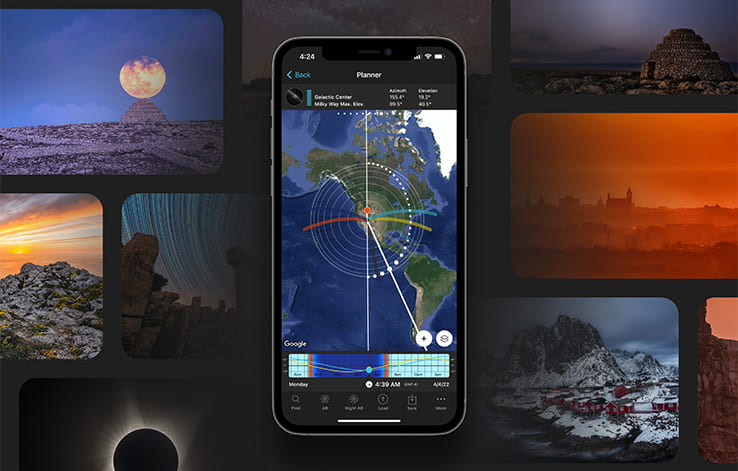
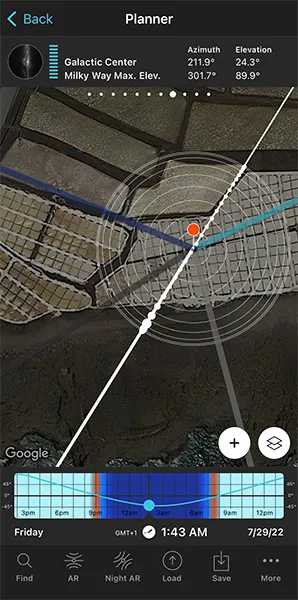
If you swipe the Time bar until it's nighttime, you'll see the Milky Way appear on the map. It's represented by the white dotted arch.
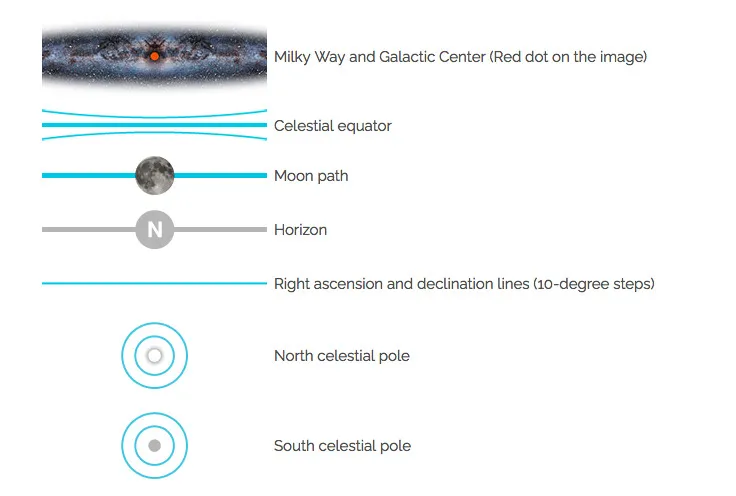
This is the Milky Way info you can see on the map:
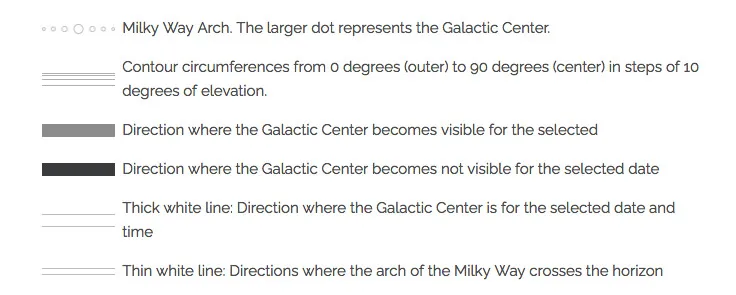
The biggest dot on the arch represents the Galactic Center, the center of our galaxy. It's the brightest part of the Milky Way, so it's the part you definitely want to include in your composition.
The contour circumferences help you understand the position of the Milky Way in the sky:
- When the Milky Way is close to the center (Red Pin), then the Milky Way is higher in the sky (more vertical).
- When the Milky Way is far away from the center, then the Milky Way is lower in the sky (more horizontal).
Tip!
The Milky Way picture on Panel 8 tells you how vertical or horizontal the Milky Way is. Also, when you're in the field at the Red Pin position, you can use the Night AR button to visualize the position of the Milky Way.
Cool... Let's go back to the plan...
The thin white line is key because it shows you the directions where the Milky Way arch meets the horizon.
Now, swipe the top panels to get to Panel 7, the first Milky Way panel. This panel tells you the visibility time frame of the Galactic Center (remember, the brightest part of the Milky Way).
You can also see this information on the map, for the selected date and Red Pin position:
- The light grey line indicates the direction in which the Galactic Center will become visible. This occurs on July 28, 2022 at 10:33 pm.
- The dark grey line indicates the direction in which the Galactic Center will not be visible anymore. This occurs on July 29, 2022 at 04:23 am.
So the Galactic Center of the Milky Way will be visible in the directions between those two grey lines from 10:33 pm until 04:23 am.
Notice the Milky Way is visible everyday at night. But the Galactic Center is only visible for a certain period of time during nighttime.
Change the time until the Milky Way is in the position you want

Now, swipe the top panels to get to Panel 8, the second Milky Way panel. The picture on this panel shows you the inclination of the Milky Way in the sky for a given date, time and Red Pin position.
So change the time with the Time bar until the Milky Way is in the position you want. For example, when it's completely vertical.
As you can see from the first screenshot above, this happens on July 29, 2022 at 01:43 am.
On the map, you see that the Galactic Center is visible towards the south west.
Have a look at the dotted white line – it's a completely straight line going over the Red Pin. This means that the Milky Way is completely vertical. To confirm it, have a look at the picture on Panel 8 – it is clearly showing a vertical Milky Way.
In addition to this, you can use the Night Augmented Reality (AR) view to check the position of the Milky Way, the Galactic Center (red dot) and the two crossing points with the horizon (represented by a thin white line on the Planner's map).
The Night AR view is showing a vertical Milky Way on July 29, 2022 at 01:43 am.
And remember that you can swipe the Night AR view to the left to move time forwards, and swipe it to the right to move time backwards.
If you can't get the position of the Milky Way for that specific date, follow the workflow I just explained in the “Set the shooting date” section. Just tap the Milky Way picture on Panel 8 to jump time from New Moon to New Moon, until you find the Milky Way position you're looking for.
Move the Red Pin to adjust the shooting spot


Now that you have the Milky Way where you want in the sky (e.g. completely vertical), all you have to do is move the Red Pin until you find a shooting spot to get a cool composition.
For example, move the Red Pin to align the Milky Way with your subject.
In this case, you should align the white line with the grid formed by the salt pans to create a powerful leading line...
Then, confirm the composition using the PhotoPills Night Augmented Reality (AR) view. Make sure that the date and time is correct: July 29, 2022 at 01:43 am.
Once you find the photo you want, you have all the information you need:
- Your shooting spot (where you need to go).
- The shooting date and time (when you need to take the picture).
Also, have a look at section 20 and plan your Milky Way photo to the very last detail. This includes planning the field of view (the focal length) and the depth of field (to make sure you get everything in focus).
Awesome!
Now you know where you have to go to capture a unique photo of the Milky Way.
The last step is to save the plan tapping Save and then Plan.
If you want to keep learning, have a look at our Milky Way photography guide!
11.How to plan a Star Trails shot
I am sure that the first thing that comes to your mind is “What Star Trails pattern can I capture?”.
Well, it depends on the location you are in.
As you know, in section 4 I explain in detail all the Star Trails patterns you can photograph in both the Northern Hemisphere and the Southern Hemisphere.
But the good new is that PhotoPills will help you plan not only the Star Trails pattern you want, but also:
- If you will have Moonlight in the scene.
- The position of the Polaris (Northern Hemisphere)
- The position of the South Celestial pole (Southern Hemisphere)
- The position of the celestial equator. It's where stars seem to move in a straight line.
- The time at which you should start taking photos.
Actually, PhotoPills will answer all your questions!
If you're still in doubt, check out this video where Rafa teaches you how to plan a Star Trails photo from start to finish.
And if you don't like videos, here's a step by step explanation of another example.
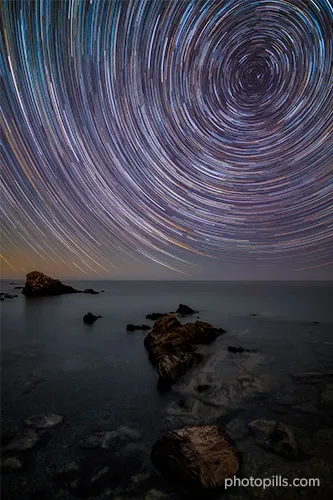
Imagine that you want to capture an amazing circumpolar right above the magical Kriebstein Castle, a beautiful castle located in Kriebstein near the town of Waldheim, Saxony (Germany).

Sounds cool, huh?
Let's see how you can easily plan it...
Plan your Star Trails shot in the field (1)
To plan your Star Trails shot in the field, you need to follow a very simple workflow and use one of my favorite tools – the Night Augmented Reality (AR) view.
Here's a video where Rafa explains how to do it in a few minutes.
Go to the location to check your composition
The first thing that you need to do is to go to the location. In this case, Kriebstein Castle, a beautiful castle located in Kriebstein near the town of Waldheim, Saxony (Germany.
You want to check and confirm your composition on the field. Go to the other side of the Zschopau river, right at the end of the bridge crossing it from the castle.
Now, stand in front of the subject.
Don't worry about the distance or the angle. You'll fine tune it later on.
Use the Night Augmented Reality (AR)


Use the Night Augmented Reality (AR) view to find the Polaris, the celestial equator, and every possible star trail pattern.
Tap the Night RA button (at the bottom of the screen).
Thanks to your smartphone's GPS, PhotoPills knows your current position and current date and time. You can check it at the top left hand corner of the screen.
Point your smartphone to your subject. In this case, Kriebstein Castle.
On the screen you can see what's going on in the sky right at that moment!
The blue curved lines you see on the Night AR view represent the Star Trails pattern you'll get when framing in that direction.
And the white moving dots are the stars. Their movement indicates the sense of rotation around the celestial poles.
So now you can see on the screen:
- Your subject, Kriebstein Castle.
- The Star Trails pattern you'll get when framing in that direction.
- The stars' movement and sense of rotation around the celestial poles.
Also, what's great about Star Trails is that you can photograph the same composition (same Star Trails pattern) every night. The only things that change are the weather and the Moon. Always double check the phase, position and path of the Moon in the Night AR view.
Therefore, decide the shooting date depending on what you need. In other words, just wait for a night with no clouds and the Moon conditions you want (e.g. no Moon, thin Moon to add light from the side...)
Going back to our example...
What's amazing is that the Polaris is right above Kriebstein Castle! So you can capture a beautiful circumpolar along with the castle, the waterfall below and part of the bridge.
On top of it, dragging your finger on the Night AR view allows you to see where the Moon and the Milky Way will be during the shooting:
- Do it from right to left to move time forwards.
- Do it from left to right to move time backwards.
Why would you like to know where the Moon is going to be?
Well, for 3 reasons:
- To know if the Moon is going to illuminate the scene, you need to know the Moon phase.
- If yes, what is going to be the Moonlight direction during the shooting session.
- And because you should avoid the Moon entering the frame at all times! Remember that you'll be shooting a sequence of long exposures for a few hours.
So, back to the plan...
According to the Night AR view, on July 10, 2022 the Moon will be towards the south west. So it's going to be behind you, illuminating Kriebstein Castle (80.9%).
Note: You can check the Moon phase using the Moon pill. Alternatively, have a look Panel 3 on the Planner checking that the Red Pin is in the shooting spot and the Time bar is set to July 10, 2022.
If the Star Trails pattern you get is not the one you want, just move around the location and readjust the shooting spot according to your needs.
Then, use the Night AR view again to check the Star Trails pattern, the stars' movement and how the elements are aligned in your composition.
If you don't like what you see, change the shooting spot and repeat the process. Simply iterate until you find the photo you want.
Plan your Star Trails shot from home (2)
To plan your Star Trails shot from home, your best ally is the Planner.
Let's see together the steps you need to follow.
Place the Red Pin on the shooting spot

Open PhotoPills and tap Planner (Pills menu).
Then, place the Red Pin on the potential shooting spot. In this case, in front of Kriebstein Castle, a beautiful castle located in Kriebstein near the town of Waldheim, Saxony (Germany).
Tap the Load button (at the bottom) and type "Kriebstein Castle" in the search bar. Then, select it and the Red Pin will be placed in the location.
Now, move the Red Pin to the other side of the Zschopau river, right at the end of the bridge crossing it from the castle.
If you don't know how to do it, this video shows you how to move the Red Pin.
Decide the Star Trails Pattern you want
On the map, north is straight up (in the direction of the castle based on the Red Pin position), south is straight down, east is straight right and west, straight left.
Knowing this, and with the help of the Night AR view, you also know the Star Trails pattern you'll get based on the shooting direction.
For example, in the Northern Hemisphere:
- Aiming north, you'll frame the Polaris, and thus you'll get a circumpolar image.
- Aiming east and west, you'll frame the celestial equator, getting a pattern where stars appear to move in 3 directions: in a straight line on the Equator and diverging away from it on both sides.
- Aiming south, stars will describe arches above the landscape.
To sum it up, place the Red Pin in a location where you can get the Star Trails pattern you want aligned with your subject.
In this example, I've placed the Red Pin to the south of the castle, placing the Polaris above it to capture a circumpolar image.
Set the shooting date and time and check the Moon


Once you've placed the Red Pin right where you are (ie. in the shooting spot), you need to set the date when you will shoot the Star Trails. So you can check the phase and position of the Moon.
Will it be below the horizon? Above the horizon? And where will it be in the sky (light direction)?
Since you know the date you want to photograph the Star Trails, let's say next Saturday, the next New Moon or any other date, you can set it using the Time bar.
When it's a date not far away from the present, set your current date and time by double tapping the Time bar below the map. And go forward in time by swiping it to the left to get to the date you want to take the photo.
When it's a date far away in time, set this specific date using the Calendar. To do this, tap the center of the Time bar. On the Date & time screen, tap Date to manually change the shooting date.
Once you've set the date, check the information the Planner is giving you.
First, the Moon directions:
- The thick light blue line tells you the direction of the Moonrise. Since it's happening at 06:06 pm, you don't need to worry about it because you don't intend to shoot at that time of the day.
- The thick dark blue line tells you the direction of the Moonset. As you can see, the Moon will set opposite your subject, so it will be right behind the Red Pin position (the shooting spot where you'll be). In other words, it won't be in your frame.
- The thin blue line tells you where the Moon is at the selected time. So you know where the Moon will be throughout the night. When the Moon is above the horizon, you'll know the Moonlight direction.
Second, Panel 4 is telling you that the Moon will set at 01:42 am, so there will be no Moon to worry about after that time. Therefore, unless you want to have the Moon lighting the foreground, you should start shooting after that time.
Third, Panel 3 is giving you the exact Moon phase percentage: 80.9%.
In addition to this, you can always use (even from home!) the Night Augmented Reality (AR) view to check the position of:
- The Polaris.
- The stars while creating the Star Trails pattern.
- The Moon.
- The Milky Way.
- The Galactic Center (red dot).
- The two crossing points with the horizon (represented by a thin white line on the Planner's map).
Great!
Now all you have to do is to save the plan tapping Save and then Plan.
Keep learning with our Star Trails photography guide!
12.How to plan a Meteor Shower shot
The key to successfully photographing a Meteor Shower is knowing:
- The peak date and time. So you can capture as many meteors as possible.
- The time the Moon will set, and the number of hours you can photograph the Meteor Shower with no Moon. Moonlight washes out meteors.
- And the position of the Meteor Shower's radiant.
“That's great Toni, but... What is the radiant? And why is it so important?”
Well...
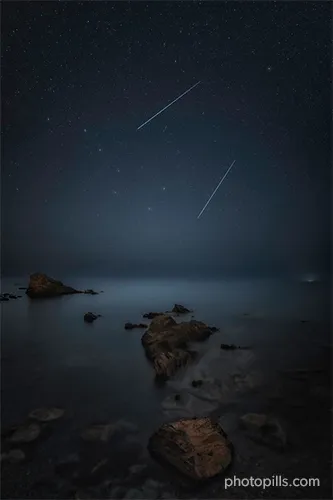
The radiant is the point in the sky from which meteors originate.
Include the radiant in the frame, and you'll be able to create in post-processing an image in which all meteors irradiate from a single spot in the sky. Just like you see in the picture above.
Or you could frame away from the radiant (30º-40º) to try to capture longer meteors.
It all depends on the photo you have in mind...
So the question here is:
How can you locate the radiant in the sky?
Easy...
Find it out with the help of PhotoPills:
- In the field, with the Meteor Shower pill.
- From home, with the Meteor Shower features of the Planner.
Long story short...
If you want to learn everything you need to plan a photo of a Meteor Shower you like (e.g. the Perseids, the Geminids...), watch this video:
But let me explain another example...
Let's say you want to plan the Geminids Meteor Shower above a magical taula – a megalithic stone monument formed by a vertical pillar with a horizontal stone lying on it. You can find many of these ancient constructions on the island of Menorca (Spain).
One of the most impressive ones is the taula of Torralba d'en Salort talaiotic village, one of the largest on Menorca and perfectly preserved.

Let's plan this photo. You can do it following 2 workflows: when you're in the field and from home.
Plan your Meteor Shower shot in the field (1)
Before the Sun sets, go to the shooting location in advance (hours, days, or months before the shooting date).
Why before Sunset?
Because finding a cool composition in the dark is complicated. Planning your photos during the day is much easier!
So...
When you're in the field, get close to your subject (the taula in this example). Then, use the Meteor Shower Pill in PhotoPills to quickly plan the shot for the Geminids.
The Meteor Shower Pill gives you instant access to all the key information of the most important Meteor Showers, including an Augmented Reality view to help you locate the radiant in the sky... And it works offline!
Select the Meteor Shower you want to photograph


Open PhotoPills and tap the Meteor Shower Pill (Pills menu).
PhotoPills uses your current date, time and location to show you all the key information about the upcoming Meteor Showers.
Notice that your location, date and time appear at the top of the screen (Info tab). If necessary, you can change the location, date and time from the Settings option (at the top right hand corner).
In this case, it shows you that you are at the Torralba d'en Salort talaiotic village in Menorca (Spain).
Now, choose the Meteor Shower peak you want to plan either from the Info tab (choosing one of the major upcoming showers) or from the Calendar tab.
Notice that to help you choose a cool Meteor Shower, the information PhotoPills provides includes the name, the period of activity, peak date, peak time, peak meteors/h and peak Moon phase.
It also includes a blue energy bar showing you how good the Meteor Shower is in terms of the number of meteors you could capture. The more filled the energy bar is, the better the Meteor Shower is expected to be.

Let's say that you have a look at the 2023 Meteor Shower calendar and decide to plan a photo of the Geminids.
It seems to be a great year for the Geminids. The peak is on December 15 at 01:00 am, the Moon is very thin (5.5%) and the shower is expected to be super intense (117.5 meteors/h) from your location.
In the Calendar, when you tap a Meteor Shower, you'll access the Meteor Shower information sheet. Tap the Meteor Shower peak info (first row of the table) to select it and see the Geminids information on the main Info tab.
Now you have everything you need to start planning your photo of the 2023 Geminids.
Find the shooting date and time


Once you've selected the Meteor Shower, all the key information will appear in the Info tab.
What you're seeing now is all the information you need to know about the Meteor Shower activity for your current location and for the date and time the 2023 Geminids is peaking (December 15 at 01:00 am). If you want to change the location, the date and time, tap Settings (at the top right hand corner).
In the big box, you have:
- The number of meteors/h for the selected date and time (the Geminids peak date and time: December 15 at 01:00 am). Notice that this number takes into account all the active Meteor Showers. You can see these Meteor Showers listed further down in the screenshot.
- The expected peak time and expected peak meteors/h (taking into account all active Meteor Showers).
Below the big box, you find the Moon phase and the amount of time you can enjoy the Meteor Shower activity without any Moon: 11h 24min.
Pretty cool, isn't it?
Swipe your finger on the big box to change time and see how the Meteor Shower conditions change throughout the night.
If you scroll down a bit, you'll also find the key Sun, Moon and Milky Way information.
And below it, there is a super interesting graph (see screenshot 2 above).
This graph is great to quickly know at what time the maximum intensity of meteors will happen and how intense the shower will be. Moreover, visualizing the paths of the radiant and Moon gives you valuable inputs on how the Moon and the radiant will affect the shooting session.
Swipe your finger on the graph to change the time and see how the Meteor Shower intensity evolves.
Finally, at the bottom, you'll find the azimuth and elevation of the Moon and all the radiants of the active Meteor Showers. It also includes the number of meteors/h of each shower.
Now...
When should you photograph the 2023 Geminids?
According to the meteors intensity graph, you should do so on the peak night, which is December 14 to 15, from 07:00 pm until 07:00 am.
As you've guessed, the longer you spend taking photos, the more meteors you'll capture.
Find your shooting spot and framing (locate the radiant in the sky)


You're there, in front of your subject, and you want to know the position of the radiant. Once you know it, you can decide the shooting spot from where you can capture the photo you want.
Previously, you've selected the peak date of the Geminids from the Calendar and you're ready for action.
Now, tap the AR button to locate the radiant at the beginning and at the end of the shooting session.
It's always a good idea to calibrate the AR view to make sure that what you're seeing through your smartphone is accurate.
Swipe your finger from left to right or right to left on the AR view to visualize how the radiant moves across the sky.
Cool...
Now that you know where the radiant is at all times, you can decide to include it in the frame, for example. Thus, walk around the area looking for the right shooting spot to get the composition you have in mind.
Yeah!
You have everything you need: the shooting spot, shooting date and shooting time!
Plan your Meteor Shower shot from home (2)
You can use the PhotoPills Planner to plan from your couch any Meteor Shower for any location on Earth!
Let's see how it works...
Choose the Meteor Shower and figure out the shooting date and time


Open PhotoPills and tap Planner (Pills Menu).
Place the Red Pin where you want to plan the Meteor Shower.
In this case, you want it next to the taula of Torralba d'en Salort in Menorca (Spain).
Tap the Load button (at the bottom) and type "Torralba d'en Salort" in the search bar. Then, select it and the Red Pin will be placed in the location.
Now, move the Red Pin to the other side of the Camí d'Alč, right where the taula is.
If you don't know how to do it, this video shows you how to move the Red Pin.
Then,
- Tap the Map Settings button. You'll find it on the Map, next to the (+) map button.
- Switch off the map layers you don't need (like the Sun layer for example). To do it, tap the eye icon you have next to each of the layers.
- Tap the Meteor Shower layer.
- And choose the Meteor Shower peak from the calendar.
Notice that to help you choose a cool Meteor Shower, PhotoPills provides the name, period of activity, peak date, peak time, peak meteors/h and peak Moon phase.
It also includes an energy bar showing you how good the Meteor Shower is in terms of the number of meteors you could capture. The more filled the energy bar is, the better the Meteor Shower is expected to be.
Let's use the Geminids again as an example and say that you want to plan to shoot them in 2023. On the Calendar, tap the 2023 Geminids to select it and see all the information on the map and on Panel 11.
According to the panel, for the Red Pin position, the Geminids are peaking on December 15 at 01:00 am.
On the Time bar you have the same gray graph you have in the Meteor Shower Pill. This is the graph that represents the curve of meteors/hour. So you know when to start and stop shooting.
According to the graph you should be ready to shoot all night from December 14 to 15, from 07:00 pm until 07:00 am to capture as many meteors as possible.
As you can see on the Time bar, the Moon will be below the horizon too.
Now that you know the shooting date and time, let's figure out the shooting spot for the composition you want.
Find your shooting spot and framing
To find your shooting spot and framing, you need to know the Meteor Shower radiant's position and path during the shooting session.
When you select a Meteor Shower from the calendar, the peak date and time will be set in the Planner (check the Time bar below the map).
And you'll find all the information you need to plan the photo on the map and on Panel 11.


On the map you have the following information:
- Radiant path: The curved dotted grey line you see is the path the radiant will follow during the night.
- Radiant position: Every grey dot on this curved line is the radiant position. The radiant azimuth line (that starts at the Red Pin) shows you where the radiant is at the selected date and time.
- Concentric circumferences: The contour lines help you understand the elevation of the radiant.
And for the position of the Red Pin and the selected time and date, on Panel 11 you have the
- Meteor Shower name (Geminids).
- Activity period (December 4 - December 17).
- Peak date and time (December 15 at 01:00 am).
- Radiant azimuth and elevation (276.6º and 49.63º).
- Number of meteors/h (62.9).
Swipe the Time bar to see how the radiant changes its position throughout the night.
Knowing the position of the radiant at all times will help you adjust the position of the Red Pin, and thus find your shooting spot and framing.
Locate the radiant in the sky
Finally, use the Planner's Night AR bottom option to view the radiant position in the sky. Notice that what you're seeing is the view from the Red Pin position (not from the position where you currently are).
So when the Meteor Shower peaking date arrives, go to the shooting spot (where the Red Pin is), and use the Planner's Night AR view (or the Meteor Shower Pill > AR) to locate the radiant at the beginning and at the end of the shooting session.
Again, calibrate the AR view to make sure that what you're seeing through your smartphone is accurate.
Swipe your finger from left to right or right to left on the AR view to visualize how the radiant moves across the sky.
This will greatly help you to fine tune the shooting spot based on the photo you want.
Now that you have the plan, it's time to save it to your to-do list of plans by tapping Save and then Plan.
Do you want to know more about Meteor Showers? Don't miss our Meteor Showers photography guide.
13.How to plan an architecture shot
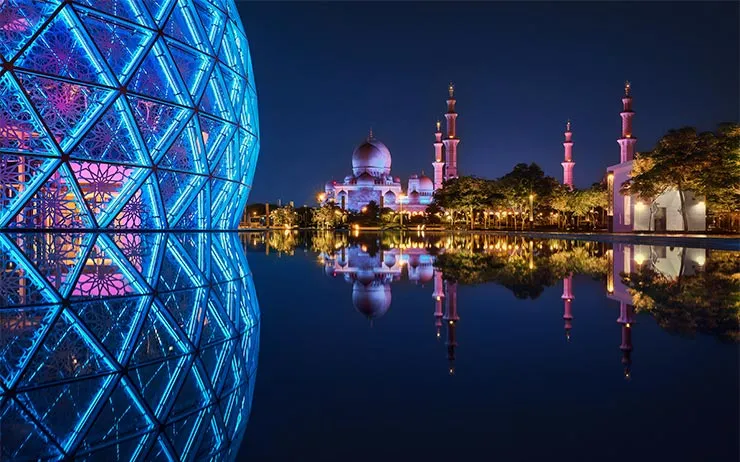
Photo by Jesús García
Lighting for architectural photography, as well as for interior photography, can be very demanding. The light defines the space or structure of the building.
However, the required conditions for architectural exterior photography depend on the weather and cloud formations.
And what are these required conditions?
Well, the clarity of the light, the type of sky, the direction of the Sun and the quality of the light (hard or diffused) are all critical factors.
In this sense, photos of buildings can really benefit from the soft light of the golden hours.
This is particularly true for the golden hour light just after Sunrise or just before Sunset because the Sun's low angle adds warmth, mood, and drama to the photograph with long, deep shadows.
This type of light makes all the colors very vivid and vibrant. It's perfect for creating an image with a positive, dramatic, and inspirational ambience.
So, it's always a good idea to plan your architecture shots during golden hour.
If you want to learn how to plan your golden hour shots from your couch, you can do 2 things.
The first one is to watch this video:
And the second one is to keep reading!
Let's see a cool example of architecture photography planning. It's a bit more advanced one.
You'll decide the framing you want and the light conditions you want first, and then you'll figure out the exact date and time you need to go and take the photo.

Let's say you want to photograph the iconic church of San Giorgio Maggiore, which is in Venice (Italy).
You can have a very nice view of the church from the Piazzetta di San Marco as you are facing the San Marco basin – the most iconic area of the Venetian Lagoon. From there, you can try to capture some gondolas along with the church of San Giorgio Maggiore while it's illuminated by a warm golden light before the Sunset.
And now you may be wondering...
What is the best location and framing during golden hour? And when will you have the church illuminated from the right of the frame?
Let's plan this picture to find it out, shall we?
To do it you'll use the power of the Find tool included in the PhotoPills Planner.
Place Red Pin on the shooting spot

Open PhotoPills, tap Planner (Pills Menu) and place the Red Pin right on the shooting spot you want.
For example, on the Ponte della Paglia – a beautiful 1850s bridge crossing the rio del Palazzo and located to the right of the Colonna di San Marco.
Exit the Piazzetta di San Marco, walk along the Palazzo Ducale on the Riva degli Schiavoni and you'll easily spot the Ponte della Paglia. From the edge you get a great view of the church of San Giorgio Maggiore and the Venetian Lagoon.
Also, this is a great spot because you can move along the bridge to get the best composition considering the Sunset direction.
To quickly place the Red Pin, tap the Load button (at the bottom) and type "Colonna di San Marco" in the search bar. Then, select it and the Red Pin will be placed next to it.
Now, do a long press on the spot where you want to place the Red Pin, somewhere on the Ponte della Paglia.
If you don't know how to do it, this video shows you how to move the Red Pin.
Place Black Pin where you want the Sun to rise (or set)


Now you need to place the Black Pin right on the spot you want the setting Sun to be, this is to the right of the church of San Giorgio Maggiore. Remember that you want the golden hour Sunlight hitting the church from the side.
So zoom out on the map, until you can clearly see the church of Santa Maria della Salute.
Swipe the panels above the map to the right until you find the Black Pin information panel (Panel 2). Tap the icon on the panel that's showing the Red Pin and the Black Pin to activate the Black Pin on the map.
Drag and drop the Black Pin on the tip of the area, also called Punta della Dogana, right where you want the Sun to set.
Find the dates and times when the photo is possible

Now it's time to find out if the photo is possible. If yes, when will it happen?
To do it, tap the Find button. It's located on the bottom left corner of the Planner. And then, select Sun at azimuth and elevation (Sun on Android).
On the new screen, you have to tell 3 things to PhotoPills:
- The date range you want to search for results. For example, 1 year starting from today.
- The Sun azimuth or direction. In this case, to the left of the church of San Giorgio Maggiore.
- The Sun elevation or altitude. The golden hour happens when the Sun has an elevation between 6º and -4º. In this case, set it between -4º and 6º, let's say 1º.
Enter the date range

Tap Date Range, tap Start date, then Today and OK (back arrow on Android).
Next, tap End date. Now you can enter a certain date or range. To enter a range, tap the black area of the screen and the date options will change. Select 1 year, for example, and tap OK (back arrow on Android).
Enter the Sun azimuth


To set the azimuth you want the Sun to set, you can drag and drop the Yellow Pin you see on the map. But the good news is that the Yellow Pin is linked to the Black Pin. So the azimuth of the Sun is already set (226.41º), to the left of the church of San Giorgio Maggiore.
Don't you know what the azimuth and the elevation are?
Well, don't worry. You have a quick reminder in section 4.
End of the side note. Let's get back to our example.
OK! You've set the azimuth. But what about the error or tolerance defined by the yellow sector you see on the map?
Now take a look at the first screenshot above: the azimuth is 226.41º with a ±2º error represented by the yellow area on the map.
For this shot, you want the Sun to set to the left of the church of San Giorgio Maggiore, but you don't need the azimuth (226.41º) to be super precise. This location allows you to move around to adjust the shooting spot, so I recommend you to set a relatively high azimuth error. This will give you more possible dates to shoot.
Set a higher error, for example ±5º. To change it, tap Numeric (at the bottom).
Enter the Sun elevation


Tap Elevation to set the elevation of the Sun.
In this case, you're looking for a golden hour during the Sunset. So you have to set an elevation between -4º and 6º, let's say 4º.
You can do this by dragging the yellow dot in the diagram until it touches the horizon. You can also do this by tapping Numeric and typing "4º" in the Elevation field of the new screen.
Also increase the elevation error (or tolerance) to 1.5º. Again, this will give you more possible dates to shoot. Because at the end of the day, you can always adjust the shooting spot and shooting time.
Get the possible dates on a table


Tap Search (magnifying glass icon at the top right corner) to see the potential dates.
Pick one of the dates in the table. For example, December 3, 2022. Tap it to review the Plan.
As you can see on the second screenshot above:
- The thick orange line indicates the Sunset direction for the selected date (12/03/2022).
- And if you swipe the top panel to Panel 4, you'll see the Sunset time: 04:28 pm.
Cool!
You have your Plan :)
You know the shooting spot, the Red Pin Position, and the shooting time, around Sunset (04:28 pm), the Sun will set where you want relative to the church of San Giorgio Maggiore.
Moreover, check on Panel 6 the time the golden hour begins, so you get there on time.
And since the Sun's position doesn't change that much from one day to the next, the photo is also possible on December 1, 2, 4, 5, 6... This allows you to choose the day with the best weather forecast ;)
Simply swipe the Time bar to change the day and adjust the shooting spot according to the new Sunrise direction.
In addition to this, when you're in the field, at the Red Pin position, use the Augmented Reality view (AR) on the Planner to visualize through your phone where the Sun will set.
Also, have a look at section 20 and plan your shot to the very last detail. This includes planning the field of view (the focal length) and the depth of field (to make sure you get everything in focus).
Finally, don't forget to save the Plan using the Save button! ;)
14.How to plan a portrait outdoors

Capturing stunning outdoor portrait photography requires planning and preparation.
Here are some basic questions that may arise:
- Where should you go for the shooting?
- When should you start the photo session?
- When is golden hour?
- How should you pose your subject?
- What's going to be the direction of natural light on location?
Based on the photo you have in mind, choosing your location right is mandatory and managing natural light is essential.
Be careful with direct sunlight as it can be treacherous – it makes your subject squint, and creates hard directional shadows.
Instead, you should shoot in other conditions (e.g. with an overcast sky or a low Sun) and try to capture your subject in soft, flattering light.
Like I did in the picture illustrating this section.

The photo was taken during golden hour in the s'Hostal Quarries (also known as Líthica), not far away from Ciutadella in Menorca (Spain). These are quarries of marés limestone, the stone traditionally used in the island for building. I just love the red, ocre and golden colors of the rocks there: they make a fantastic background.
The idea was to have the Sun setting to the left of the models so it would illuminate them from the side, while casting a fabulous golden light on them.
Would you like to know how I figure out the shooting spot and shooting time to get this particular natural light quality and direction?
Keep reading, because this is how I planned the photo.
Place the Red Pin in a potential location

Open PhotoPills and tap Planner (Pills Menu).
As always, when you plan a photo, the first thing you need to do is to place the Red Pin in the location where you'll be shooting your portrait.
At this stage, don't be obsessed with precision. Pick an area you like. You'll have time later to determine the exact shooting spot.
For example, place the Red Pin in the s'Hostal Quarries (also known as Líthica), not far away from Ciutadella in Menorca (Spain). If you don't know how to do it, this video shows you how to move the Red Pin.
Now that you have the Red Pin in the location you want, it's time to set the date you would like to go shooting.
Set the date you're planning to take the portrait


There are several ways to set the date in PhotoPills.
If it's a date close in time, let's say next Saturday, then double tap the Time bar below the map. Then, move time forward by swiping the Time bar to the left until you get to the date you want to take the photo.
You can also set any date using the Calendar. Tap the center of the Time bar and the Calendar will pop up. Finally, on the Date & time screen, tap Date to manually change the shooting date.
Now, suppose you want to take the portrait photo on May 28, 2022.
Set it in the Planner using the Time bar.
Find out the Sunset (or Sunrise) direction and time


You're in a gorgeous location, and you want to take advantage of the golden hour while the Sun is setting to the left of your main subject.
Therefore,
- The Sunset direction line is crucial to determine the perfect shooting spot.
- And you also need to find out the evening golden hour times.
Now that you've set the shooting date, use the information on the panels above the map and the lines on the map to plan your shot.
First, make sure that you have Panel 4 selected above the map. If not, swipe the top panels until you get to it.
Have a look at the screenshots above.
On the left screenshot, Panel 4 is telling you that on May 28, 2022 the Sun sets at 09:04 pm according to the Red Pin position. So you know the time you should be ready to press the shutter.
On the map, you have the Sun, the Sunrise and the Sunset directions for the selected date (05/28/2022):
- The Sun direction at the selected time (08:39 pm) is represented by the thin orange line.
- The Sunrise direction is represented by the thick yellow line.
- The Sunset direction is represented by the thick orange line.
Note: If you don't see these lines, activate the Sun layer. You can do this by tapping the Map Settings button. You will find it next to the (+) button on the map.
Second, let's figure out the golden hour times!
Swipe the top panels until you get to Panel 6.
On the right screenshot, Panel 6 is telling you that on May 28, 2022 the evening golden hour starts starts at 08:24 pm and ends at 09:24 pm, according to the Red Pin position.
Great!
Now you know the golden hour times and the light direction at all times (thanks to the thin orange line).
Let's move on!
Check different locations until you find a photo you like
Now that you know where the Sun will set, the time it will set, and the evening golden hour times, move the Red Pin to several cool locations you know. Do it one by one until you find the one where your portrait photo fits your idea.
Obviously, even if it takes longer, the more locations you can think of that might work, the better.
As you can see from the photo of this example, the models are at the beach with the Sun setting to their left (from your point of view). A nice golden light enhances the main subject's face and skin.
It's a great location. I just love the colors in the background.
So let's go back to PhotoPills and complete the plan...


Place the Red Pin in a nice location inside the quarries from which the Sunset direction (thick orange line) casts a nice side light.
From this shooting spot the Sun will set towards the northwest creating a beautiful side light to the left of the main subject.
In addition to this, swipe the panels above the map to the right until you find the Black Pin information panel (Panel 2). Tap the icon on the panel that's showing the Red Pin and the Black Pin to activate the Black Pin on the map.
Drag and drop the Black Pin in front of the Red Pin, right where you want the models to be, with the beautiful sandstone behind them.
And that's it!
You have your shooting spot and shooting time.
You've just planned a nice golden hour portrait outdoors.
In addition to this, when you're in the field, at the Red Pin position, use the Augmented Reality view (AR) on the Planner to visualize through your phone where the Sun will set.
Also, have a look at section 20 and plan your shot to the very last detail. This includes planning the field of view (the focal length) and the depth of field (to make sure you get everything in focus).
Now you just have to save the plan to your to-do list. Tap Save (at the bottom) and then choose to save a plan.
15.How to plan a wedding photo in natural light

Wedding photography can pose some serious challenges, even to seasoned photographers. Carrying gear around, being on your feet all day and staying mentally focused and creative for such a long time can be mentally and physically exhausting!
But most importantly, you have an immense responsibility to make sure that the special moments of the big day are captured and presented to the couple in a beautiful way. And just have one chance to do so! :O
That's why planning is so important...
You need to scout the venue in advance, trying to determine the best shooting spots and anticipate the type of light you'll have at all times.
In addition to this, planning some potential shots ahead of time will surely come in handy on D-Day.
Let me give you an example. Let's see how you can plan the wedding picture illustrating this section.

The photo was taken by Joan Mercadal in Alcaufar Vell, a rural hotel located in Menorca (Spain) and a fantastic venue for a wedding.
The idea was to have the Sun setting along the main building creating beautiful red and golden colors in the background, behind the newly weds.
And then, use a flash to light the adorable couple.
How did Joan figure out the right shooting spot and time on the wedding day?
He followed the following steps.
Place the Red Pin in a potential location

Open PhotoPills and tap Planner (Pills Menu).
As always, when you plan a wedding photo, the first thing you need to do is to place the Red Pin in the location where you'll be doing the wedding shooting session.
At this stage, don't be obsessed with precision. Pick an area you like. You'll have time later to determine the exact shooting spot based on the natural light direction.
For example, place the Red Pin in Alcaufar Vell, a rural hotel located in Menorca (Spain). If you don't know how to do it, this video shows you how to move the Red Pin.
Now that you have the Red Pin in the location you want, it's time to set the date you would like to go shooting. For example, the wedding date.
Set the wedding date


It's time to set the date of the wedding!
There are several ways to set the date in PhotoPills.
If it's a date close in time, let's say next Saturday, then double tap the Time bar below the map. Then, move time forward by swiping the Time bar to the left until you get to the date you want to take the photo.
You can also set any date using the calendar. Tap the center of the Time bar and the calendar will pop up. Finally, on the Date & time screen, tap Date to manually change the shooting date.
Now, suppose that the wedding takes place on June 11, 2022.
Set it in the Planner using the Time bar.
Great! The next step is to figure out the Sunset direction and Sunset time so you can decide your final shooting spot and shooting time.
Find out the Sunset (or Sunrise) direction and time

The wedding celebration takes place in the evening, and you want to take advantage of the golden hour while the Sun is setting behind the newly weds.
Therefore,
- The Sunset direction line is crucial to determine the perfect shooting spot.
- And, you also need to find out the evening golden hour times.
Now that you've set the shooting date, use the information on the panels above the map and the lines on the map to plan your shot.
First, make sure that you have Panel 4 selected above the map. If not, swipe the top panels until you get to it.
Have a look at the screenshots above.
On the left screenshot, Panel 4 is telling you that on June 11, 2022 the Sun sets at 09:11 pm according to the Red Pin position. So you know the time you should be ready to press the shutter.
On the map, you have the Sun, the Sunrise and the Sunset directions for the selected date (06/11/2022):
- The Sun direction at the selected time (08:45 pm) is represented by the thin orange line.
- The Sunrise direction is represented by the thick yellow line.
- The Sunset direction is represented by the thick orange line.
Note: If you don't see these lines, activate the Sun layer. You can do this by tapping the Map Settings button. You will find it next to the (+) button on the map.
Thanks to the Sun direction line, you'll know the light direction at all times. And that's a key piece of information when choosing the shooting spot.
And second, let's figure out the golden hour times.
Swipe the top panels until you get to Panel 6.
On the right screenshot, Panel 4 is telling you that on June 11, 2022 the evening golden hour starts starts at 08:30 pm and ends at 09:31 pm, according to the Red Pin position.
You now have the information you need to decide the shooting time.
Great! Let's move on.
Check different locations until you find a photo you like
Now that you know where the Sun will set, the time it will set, and the evening golden hour times, move the Red Pin to several cool locations within the wedding venue. Do it one by one until you find the one where your wedding photo fits your idea.
As you can see from the photo of this example, the couple is in the garden with the Sun setting behind them, to the left (from your point of view). You can also see the main building to their right.
It's a great location. So let's go back to PhotoPills and complete the plan...

Place the Red Pin in a beautiful garden inside Alcaufar Vell from which the Sunset direction (thick orange line) is along the main building.
From this shooting spot the Sun will set along the main building creating a beautiful backlight behind the newly weds. Remember that this lighting scheme will create a silhouette so you may need to use a flash from the right to illuminate the subjects and enhance them.
And that's it!
You've just planned a cool wedding shot during the evening golden hour.
In addition to this, when you're in the field, at the Red Pin position, use the Augmented Reality view (AR) on the Planner to visualize through your phone where the Sun will set.
Also, have a look at section 20 and plan your shot to the very last detail. This includes planning the field of view (the focal length) and the depth of field (to make sure you get everything in focus).
Now you just have to save the plan (tap Save and then choose to save a Plan).
Get this ebook for free now!