How to find sunrises and sunsets
Do you have an original idea for a sunrise or sunset shoot and you know neither whether it’s possible nor when it happens?
You’re at the right place! Follow these simple steps and use the Planner of PhotoPills to figure out when the photo you want to take occurs.
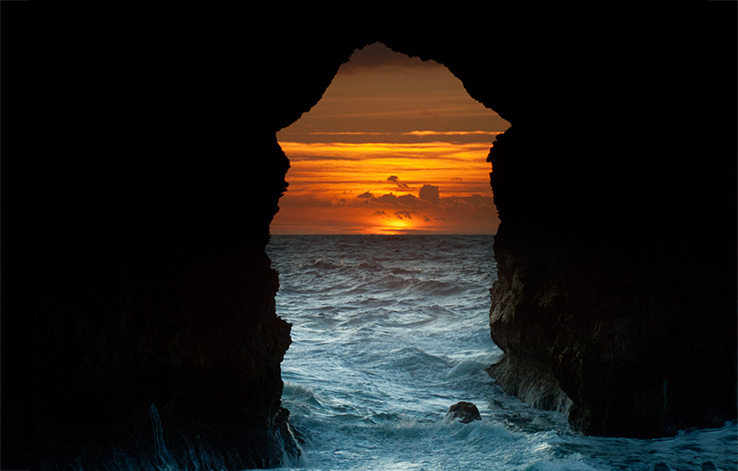
Let’s see an example: how to plan a sunset happening under a natural arch in Menorca.
Steps
- Imagine the photo and find the right spot from where to shoot
- On the Planner, place the Observer's pin on the chosen shooting spot
- Tap on the Find button, choose Sun and then At azimuth & elevation
- Set the Date range within you wish to find the sunset
- Set the azimuth of the sun where you want the sunset to happen
- Set the elevation of the sun to zero degrees
- Tap on the Search button and get the results
- Save and share the plan
- Check the Augmented Reality (AR) view
- Final advice for the shooting day
- Photos
1 Imagine the photo and find the right spot from where to shoot
Let’s imagine you come across with this fabulous natural arch which you quickly save as a Point of Interest in your PhotoPills’ list of locations.
You come up with the idea of shooting a sunset through the arch. After scouting the location, you find the perfect spot from where to take the photo. Now, you need to find out if the photo is possible or not.
I’ll show you how to use the Planner to calculate the exact date and time it happens.

2 On the Planner, place the Observer's pin on the chosen shooting spot
Go to the Planner and use the map to find the spot from where you wish to shoot. Then, move the Observer’s pin (red pin) to this spot.


TIPS
- The quickest way to bring the Observer’s pin and the map view to the location in study is to load a Point of Interest (POI) you’ve previously saved. In this example, we saved this natural arch as a POI under the name of “Pont d’en Gil” and loaded it from the Planner using the Load button you find at the bottom of the screen.
3 Tap on the Find button, choose Sun and then At azimuth & elevation
The Find button is located at the bottom of the Planner’s main screen. This option will help you easily figure out when the sun or the moon will be where you need them to be.
As you’d like to shoot a sunset aligned with the natural arch, you have to look for a date the sun will be in a determined position which coordinates are defined by the azimuth and the elevation. Therefore, once you’ve tapped on the Find button, choose Sun and then At azimuth & elevation.


TIPS
- If you are looking for a date the Sun will be at a determined azimuth and you’d like to have a look at all possible elevations before deciding which one you want, use the option Find Sun At azimuth. This option will give you all the dates the sun will be at the desired azimuth no matter the elevation. It will allow you to comfortably choose the elevation you prefer among all possibilities.
4Set the Date range within you wish to find the sunset
You’ve landed on the Find Sun At azimuth & elevation screen. Here you need to set three parameters: date range, azimuth and elevation.
Tap on Date range and introduce the Start date and End date. Then tap on Done to go back to the previous screen.
As you see, I’ve decided to look for all sunsets happening between December 20th 2013 and December 19th 2014 (one full year).


5Set the azimuth of the sun where you want the sunset to happen
You wish to capture the sunset happening under the arch. You need the azimuth of the sun to be the same as the azimuth of the arch.
To set the azimuth, I always use the map view (2D azimuth bottom option). The yellow pin you see on the map is the Sun’s Pin. You need to drag and drop it on the natural arch to set the azimuth of the sun, which results to be 247.5⁰.
Notice that PhotoPills will look for results with azimuth of the sun between 247.5⁰±0.5⁰. It means that all results will be within the interval of [247⁰, 248⁰], because you are setting a tolerable error of 0.5⁰. In this example, I’d like to get more results. I’ll set an azimuth error of 1⁰.
To change the azimuth error, just tap on the Numeric bottom option and set the error value to 1⁰. When you do it, you’ll see that the yellow sector between the Observer’s pin and the Sun’s pin gets wider. This way, you can visualize the exact area whithin you are looking for results.


TIPS
- The darker map area you see on the 2D azimuth view is the impossible azimuth area. It represents azimuths where it is impossible to find the sun for the selected date range. It has been designed to prevent frustration leading you to get results fast.
6Set the elevation of the sun to zero degrees
Tap on Elevation. For a sunset or sunrise, you need to set the elevation of the sun to zero degrees.
Use the 2D elevation option you find at the bottom. In this case, It’s the quickest way to set it among all options you have (2D, Inclinometer, AR and Numeric). Drag the sun picture until the elevation is zero.
Again, notice that PhotoPills will look for dates and times the elevation of the sun is between 0⁰±1⁰. This means that all results will be in the interval of [-1⁰, 1⁰], because you are setting a tolerable elevation error of 1⁰.
In this example, I’d like to have an elevation error of 0.5⁰ to narrow the search. To change the elevation error, tap on the Numeric elevation bottom option and set the error value to 0.5⁰.


TIPS
- The darker area you see on the 2D elevation view is the impossible elevation area. It represents elevations where it is impossible to find the sun for the selected date range and azimuth. Again, it has been designed to prevent frustration leading you to get results fast.
7Tap on the Search button and get the results
You’re almost done! You’ve set the desired date range, azimuth and elevation. Now, tap on the Search button (magnifying glass icon). You’ll find it at the top right-hand corner.
All possible dates and times the sun will be setting under the natural arch are shown in a table. Just choose the best day that matches your schedule.
Tap on the date to visualize the Plan on the main screen of the Planner. Now you know that on Tuesday, January 28th 2014 at 5:57 you must be on the shooting spot ready to press the shutter.


TIPS
- If you want to go back to the table of results, tap on the Find button again. To start a new search, tap on the Cancel button you find at the bottom of the table of results or move the Observer’s pin on the main screen of the Planner, then tap on the Find button.
8Save and share the plan
Congratulations! You have just planned the image you've imagined. It’s time to save the Plan in your To-Do list of planned photos. You’ll find the Save button at the top right-hand corner of the main screen of the Planner.
This new way of working will allow you to have a list of unique photos waiting to be taken. The more ideas you plan the more unique photos you’ll make.
Also, share the plan with other PhotoPillers using the Share button. Send the Plan by e-mail (KMZ file) and your friends will be able to import it onto PhotoPills.


9 Check the Augmented Reality (AR) view
The last thing I love doing when planning a shoot is to save a screenshot of the Augmented Reality view for the record. It gives me visual information of the sun path and it’s fun to share it on Facebook and Twitter.

TIPS
- Make sure you are away from any electronic device or magnetic field because they may interfere with the sensors of the device. I recommend you to shake your device and wait a few seconds to let the system become stable. The AR has proven to work better in landscape mode.
10 Final advice for the shooting day
Before leaving home, always do two things:
First, make sure you’ll have the map available. Often, you’ll have to work offline in the field. To make the map available set one of the Open maps type (OpenStreetMap, OpenCycleMap – classic or OpenCycleMap – landscape). Then, go to the Planner and view the locations you want available offline by panning, zoom in and out covering all the views you need. You can change the map type from Settings (My Stuff menu).
Secondly, switch on the option Show your current location on maps. This option is extremely useful to easily get to the shooting spot. It’s the best way to avoid getting lost. Again, you can switch on this option from Settings (My Stuff menu).
11Photos
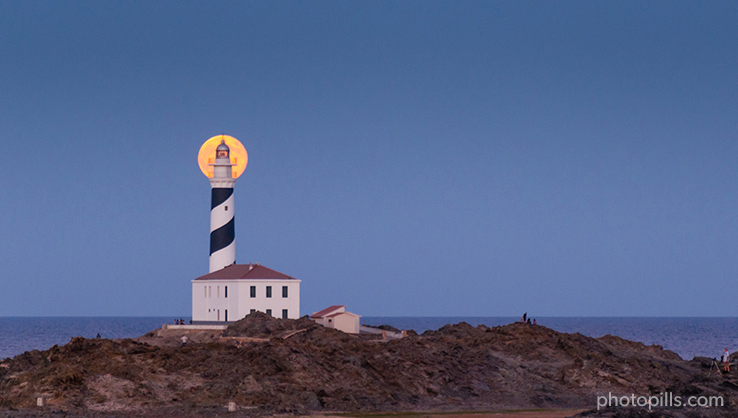
We followed these same steps to plan and shoot a dramatic sunset under the natural bridge Es Pont d’En Gil in Menorca (40.010818ºN, 3.79433ºE) on January 28th 2013 around 5:58 pm.


Happy Shooting!