Mercury Transit 2019: How to Photograph It
Today I’m going to show you everything you need to photograph the transit of Mercury across the Sun.
It will happen very soon, on November 11, 2019. And it’s a rare and amazing spectacle to photograph.
Every once in a while, a planet passes between Earth and the Sun blocking out part of the Sun's rays from reaching Earth. This phenomenon is called a transit.
There are only two planets that can be seen transiting the Sun from Earth: Venus and Mercury. Basically, because they’re the only planets orbiting inside Earth's orbit.
Transits are very rare. The next Venus transit, for instance, won’t happen again until December 2117...
Luckily for you, Mercury transits occur more often (like the November 11 one!). After that, it won’t happen again until 2032.
Considering this, it’s a great opportunity to photograph this event. Mercury will be a tiny black dot silhouetted against the Sun's disk!
Now, the good stuff is that in this article you’ll find everything you need to plan your picture (I’ll teach you how to use PhotoPills to help you) and to nail your shot.
Are you ready for the challenge?
When to shoot the 2019 Mercury transit
From 12:35 to 18:04 UTC, Mercury passes between the Earth and the Sun, appearing as a black dot on the solar surface. The greatest transit occurs at 15:19 UTC.
As I said, this event is very rare and occurs once every many years. Mercury's next solar transit will not take place until November 13, 2032.
A transit has 5 important phases:
- Contact I. The moment when the planet is externally tangent to the Sun.
- Contact II. The moment when the planet is internally tangent to the Sun.
- Greatest transit. The moment when the planet passes closest to the Sun's center (i.e., there is a minimum separation between both).
- Contact III. The moment when the planet is internally tangent to the Sun.
- Contact IV. The moment when the planet is externally tangent to the Sun.
Here is a table from where you can photograph the transit of Mercury across the Sun on November 11. All the information is in local time.
Please consider the local times of the table below as approximate. The transit times that I mentioned above (i.e. 12:35 to 18:04 UTC) are geocentric. In other words, they are only correct if you’re located at Earth’s center.
So, the contact times for your location may vary from the geocentric times by up to 2 minutes. You’ll be seeing the transit from Earth’s surface, not from its center ;)
Unfortunately, all the transit phases won’t be fully visible everywhere so I have also included cities where it will be partially visible, either because the Sun is rising during the transit or it’s setting. Check the Sunrise and Sunset times for your location with PhotoPills and compare it with the start and end of transit. This way you'll know from when to when the transit will be visible.
| Location | Start (Contact I) | Greatest transit | End (Contact IV) | Visibility |
|---|---|---|---|---|
| San Francisco (USA) | 6:47 am (1) | 7:20 am | 10:04 am | Partial |
| Mexico City (Mexico) | 6:44 am (1) | 9:20 am | 12:04 pm | Partial |
| Tegucigalpa (Honduras) | 6:36 am | 9:20 am | 12:04 pm | Total |
| Lima (Peru) | 7:36 am | 10:20 am | 1:04 pm | Total |
| Ottawa (Canada) | 7:36 am | 10:20 am | 1:04 pm | Total |
| New York (USA) | 7:36 am | 10:20 am | 1:04 pm | Total |
| Buenos Aires (Argentina) | 9:35 am | 12:19 pm | 3:03 pm | Total |
| São Paulo (Brazil) | 9:37 am | 12:19 pm | 3:03 pm | Total |
| Lisbon (Portugal) | 12:35 pm | 3:19 pm | 5:24 pm (2) | Partial |
| London (UK) | 12:35 pm | 3:19 pm | 4:15 pm (2) | Partial |
| Madrid (Spain) | 1:35 pm | 4:19 pm | 5:59 pm (2) | Partial |
| Berlin (Germany) | 1:35 pm | 4:16 pm | 4:18 pm (2) | Partial |
| Cape Town (South Africa) | 2:35 pm | 5:19 pm | 7:21 pm (2) | Partial |
| Cairo (Egypt) | 2:35 pm | 4:58 pm | 5:00 pm (2) | Partial |
| Moscow (Russia) | 3:35 pm | 4:26 pm | 4:28 pm (2) | Partial |
| Dubai (UAE) | 4:35 pm | 5:30 pm | 5:31 pm (2) | Partial |
(1) Before this time, the Sun is below the horizon.
(2) After this time, the Sun is below the horizon.
Sources: EclipseWise, Time and Date, In the sky.
If you want to know when the different transit phases occur according to your local time, open PhotoPills and follow these simple steps (see screenshots below):
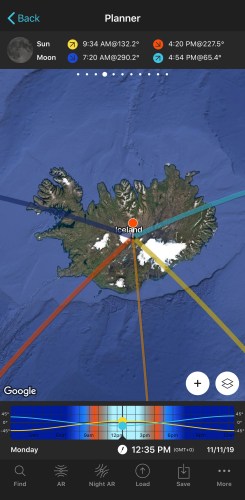
- Tap Planner (Pills Menu) and then place the Red Pin in Iceland. The cool thing about Iceland is that its time zone is the same as the UTC time. So it will help you know the local times of the start, greater transit and end of the transit for the location you want.
- With the Red Pin in Iceland, tap the clock below the Time Bar. On the Date and time screen, tap Date and set November 11, 2019. Tap Time and set 12:35 pm. Tap OK in iOS or the arrow to go back in Android.
- Now use the Load button (at the bottom) to place the Red Pin on the location where you want to photograph the transit. For example, using the Search address bar.
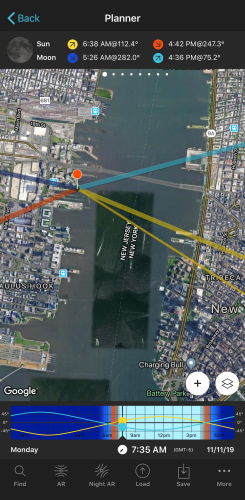
- Now, for the sake of this example, imagine that you want to capture the Mercury transit from New York (USA). So place the Red Pin in New York. You’ll see that the time shown is now in New York local time.
- New York is in the GMT-5 time zone, so the November 11, 2019 transit begins at 7:35 am and ends at 1:04 pm. The greater transit is at 10:19 am.
- On the map, the thin yellow line is telling you the direction of the Sun at the selected time.
- According to Panel 4 above the map, the Sun rises at 6:38 am so it will be above the horizon when the transit begins.
- Panel 3 tells you that at 7:35 am the Sun will have an elevation of 8.85º. That is, relatively close to the horizon. You may even align the Sun with the One World Trade Center (keep reading :P).
- Swipe the Time Bar to the left to move time forward until 1:04 pm. You can see where the Sun will be at all times.
As I told you before, the local times are approximate. So make sure you get to the shooting spot in advance. You should be ready to shoot at least 10 minutes before the start time you’ve calculated with PhotoPills.
Where to shoot the 2019 Mercury transit
The 2019 Mercury transit fully is visible, from start to finish, throughout South America, Central America, eastern USA and western Africa.
In Canada, Mexico, the rest of the USA, most of Europe, the Middle East, New Zealand and the rest of Africa part of the transit is visible, as the beginning or end of the transit occurs before Sunrise or after Sunset.
So...
Where should you go to photograph the Mercury transit?
Well...
As always, your shooting spot will depend on the photo you want:
- You want to have the Sun and Mercury as your main subjects.
- You want to capture the Sun, Mercury and the silhouette of your subject.
The Sun and Mercury as your main subjects
If you’re lucky to live in a place where the transit will be visible, open PhotoPills and go to the Planner. Then, place the Red Pin on the location where you want to plan the shot and use the Time Bar to set the date (November 11th) and the time at the beginning of the transit.
For example, in New York, the Mercury transit begins at 7:35 am. Follow the workflow that I explained in the previous section to figure out your local time.
Check the PhotoPills screenshots below.
I’ve placed the Red Pin near the Lefrak Point Lighthouse in Jersey City, where I have a beautiful view of Manhattan and a clear vision of the Sun (without obstacles). The thin yellow line you see on the map is showing you the direction of the Sun at 7:35 am, when the transit begins.
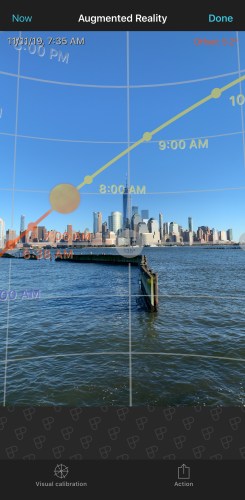
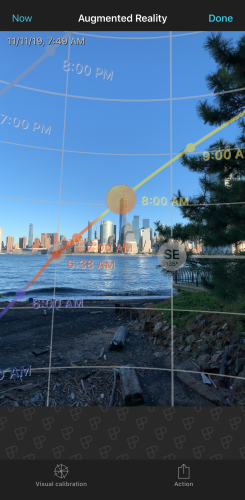
Once you’re on location, right where the Red Pin is, use the Augmented Reality button (at the bottom) to visualize the position of the Sun in the sky.
To see how the Sun moves across the sky during the transit
- On the Planner, swipe the Time Bar from right to left to see how the thin yellow line moves.
- On the AR view, swipe your finger on the screen from right to left to see how the orange dot moves.
Check where the Sun will be when the greater transit happens and when the transit ends. In New York (USA), for example, at 10:20 am and at 1:04 pm.
If necessary, change the shooting spot by moving the Red Pin. For example, if there is an obstacle blocking your view.
And you’re done.
You know where to stand and where the Sun will be at all times during the transit!
Capture the Sun, Mercury and the silhouette of your subject
If you want to go a step further, you can include the silhouette of a subject. In this case, you need to find the shooting spot and shooting time when the Sun is low enough to be aligned with your subject.
Let me give you an example.
The One World Trade Center roof is 417 m (1,368 ft) high, and the tip of the antena is 541 m (1,776 ft).
Imagine you want the Sun to be aligned with the roof of the One World Trade Center. So you need to find the shooting spot and shooting time this will happen.
All you have to do is go to the Planner, and follow these steps:
- Place Red Pin in New York using the Load button (at the bottom).
- Set the Date and Time at the beginning of the Mercury transit (November 11 2019 at 7:35 am). The thin yellow line is showing you the direction of the Sun at that time.
- Zoom in on the One World Trade Center and tap the button on Panel 2 so the Black Pin shows up.
- Then, place the Black Pin on the One World Trade Center ground floor.
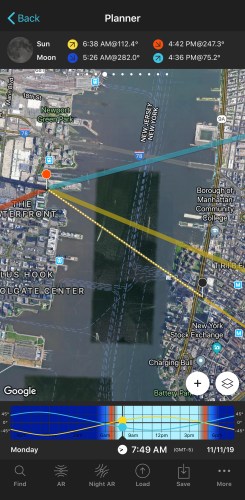
- Place the Red Pin in Jersey City making sure that the thin yellow line is close to the One World Trade Center.
- Swiping the Time Bar, change the time until the center of the Sun is at 417 m (1,368 ft) above the Black Pin according to Panel 2. This is the height of the One World Trade Center rooftop.
- Change the Red Pin position to align the Sun (yellow thin line) with the One World Trade Center (Black Pin).
- When you change the Red Pin position, topography might also change. If it does, repeat the process until the center of the Sun is at 417 m (1,368 ft) above the Black Pin.
- In this example, as you can see in the screenshot below, the shooting time is 7:49 am.
When you’re out there waiting for the Sun to be in position, always be ready to adjust your composition by adjusting your shooting spot.
As the Sun moves, you’ll have the opportunity to shoot different compositions :)
If you want to master the Planner’s Panel 2, check this video where Rafael uses it to plan a cool Moon shot with the Sky Tower in Auckland (New Zealand).
You can follow the exact same workflow to plan the Sun transit with your subject.
How to photograph the 2019 Mercury transit
The good news is that this type of shot is not as hard as it seems: use the Sun as a reference and everything will be fine.
So, in terms of composition, you should aim to have a close up the Sun (i.e. it should fill a large area of your frame). Same thing for the focus and the exposure, set your camera according to the Sun.
Having said that, you’ll obviously need:
- Your camera!
- A sturdy tripod, a ballhead and an intervalometer. You must avoid vibrations at all cost to keep everything sharp.
- A long focal length. The longer you can go the better. Mercury is a tiny little dot compared to the Sun.
- A solar filter.
- A pair of solar eclipse glasses.
Please, make sure you don’t forget the last two pieces of gear. You should protect your eyes and gear against the solar rays at all times. Otherwise, you risk damaging your eyesight and equipment.
When shooting the transit of Mercury, follow the same shooting workflow of a solar eclipse picture:
- Before going to the location, don’t forget to check the weather forecast. You won’t capture the Mercury transit with a cloudy sky.
- With the PhotoPills Augmented Reality view you can verify the Sun’s position at all times during the transit. It’s extremely helpful to frame and get the composition you want.
- Mount your camera on the tripod, put it on a solid surface and double check that everything is stable.
- Before the transit begins, put the solar filter over your lens.
- Turn off the image stabilization system.
- Shoot in RAW.
- Use the longest focal length you can (from 200mm to 600mm, or more!).
- Frame making sure that the Sun occupies a large portion of the composition, or even the whole framing.
- Focus on the Sun’s edge. Turn the Live View function on and zoom on the Sun’s edge to make sure it’s tack sharp. And if your camera has the Focus Peaking and/or Focus Magnifier functions, use them on too.
- Select the spot metering mode and meter light directly on the surface of the Sun. Do you have a mirrorless camera? Great, use the live histogram option to nail your exposure.
- Select the Manual shooting mode (M).
- Use a relatively small aperture (f/8). It usually is the sweet spot of most lenses so both the Sun and Mercury will be very sharp.
- Use the lowest ISO you can (100 or 200).
- Now that you know the metering, the aperture and the ISO, you can tweak the shutter speed so the light meter is centered at zero (correctly exposed).
- Select the 1-stop bracketing option in your camera and take several exposures (3 or 5 for example). If you can, use the live histogram option again to check the exposure.
- Use a manual white balance because the solar filter you’re using will have an impact on the color temperature.
- First, select a neutral temperature of 5500K and check the color you get.
- If the Sun is very yellow, use a lower temperature (about 4300K) to make it whiter.
- If the Sun is too pale (not yellow enough), increase the color temperature (about 6500K).
- Use an intervalometer or shutter release to avoid vibrations when pressing the shutter.
- Time to start shooting and enjoy the show!
Regarding the focus, one last thing.
If you want to capture the Sun, Mercury and the silhouette of your subject, focus on the subject as long as the hyperfocal distance is shorter than the distance to the subject. It’s the best way to make sure that the Sun is also in focus.
However, when the hyperfocal distance is greater than the distance to your subject, there are two alternatives.
- Use the Planner and the Depth of Field (DoF) tool to look for an element to focus on that is further away than the hyperfocal distance. First, enter the shooting settings in the calculator. Then, place the Black Pin on an element that is further away than the hyperfocal distance (it's marked on the map) and that you know will be visible from the Red Pin position. Now you can see on the map what will be in focus and what won’t.
- Focus directly on the Sun’s edge and leave your subject slightly out of focus. No one will notice it’s a bit blurry.
And that’s it!
Here you have it...
Everything you need to take your picture of the November 11th Mercury transit across the Sun.
You can’t miss it.
If you get the shot, submit it to the PhotoPills Awards. Can’t wait to see your photos.
And if you have any questions, leave a comment below.
I’m ready to help :)
Happy Mercury transit!
PS: And if you’re looking for more amazing events to photograph, check our guide to the best astronomical events.
Credits: Cover image by blackphobos.