How to photograph the Moon with a foreground
During my workshops, I get this question over and over:
"Toni, why is it so hard to photograph the Moon?"
Actually, learning how to photograph the Moon with a foreground is not as complicated as you imagine.
It only takes a bit of planning, with PhotoPills app of course...
And some precision during the shooting as I'll explain to you later on.
Follow the next steps and you'll get amazing photographs of the Moon with a foreground!
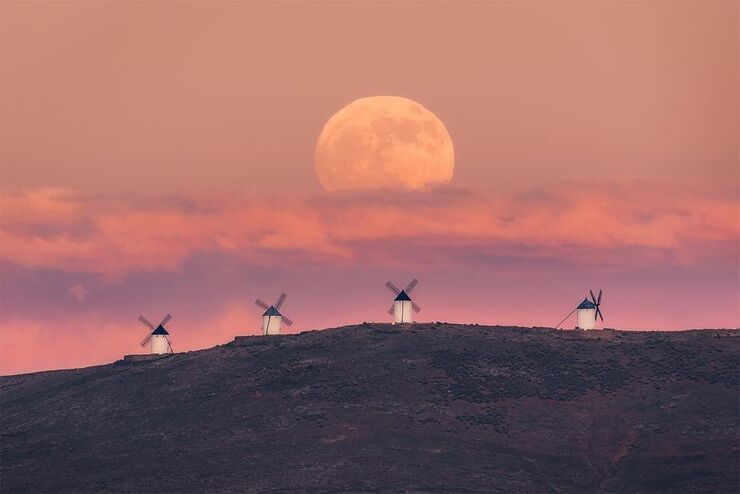
Photos like the one above these lines, where Juan López Ruiz captured a big Moon aligned with the ancient windmills of Consuegra, Spain.
Content
- Get inspiration with these 3 amazing pictures of the Moon with a foreground
- Plan your Moon photo ideas
- Choose the best lens for Moon photography
- Choose the best camera to take pictures of the Moon
- Get to your shooting spot in advance
- Place the tripod at the shooting spot
- Prepare your gear
- Set the shooting mode to Manual (M)
- Set the focal length according to the Moon size and the framing (composition) you want
- Set the aperture between f/4 and f/8
- Have in focus both the Moon and the foreground
- Set the ISO to 100
- Adjust the shutter speed, but never above 1s
- Take a test shot, check the histogram
- Take a 3-shot bracketing of 1 stop
- To the Moon and back!
"That's really cool Toni, but what settings should I use to photograph the Moon?"
The settings you should use to capture the Moon with a foreground are:
- Aperture between f/8 and f/4, depending on
- The depth of field you want in your Moon picture.
- The natural light present in the scene at the shooting time.
- ISO between 100 and 1600
- Trying to keep it as low as possible.
- Depending on how much noise your camera produces.
- Shutter speed never above 1s
- According to the exposure triangle.
- Because of the Earth's rotation.
Apart from reading this tutorial, you can also watch this video where you'll learn how to photograph the Moon with a foreground:
And if you want to dive deeper into Moon photography, have a look at our super detailed Moon Photography guide where you'll find everything you need to know on the matter.
You can download it for free below!
Get this ebook for free now!
1.Get inspiration with these 3 amazing pictures of the Moon with a foreground
When it comes to photographing the Moon in a landscape, with a cool foreground, with an interesting subject you like there are a few things that you should take into consideration.
The first step is to think about what kind of picture you want to shoot. So you can plan the photo afterwards...
It can be a Full Moon.
Or not. You don't need to wait for a certain date to capture a cool Moon shot – it can be a crescent Moon, for example.
You can align it with your subject. Or place it next to it.
The possibilities are endless!
What? You can't think of anything?
No problem, here are a few examples to inspire you...
Full Moon aligned with a moving subject (1)
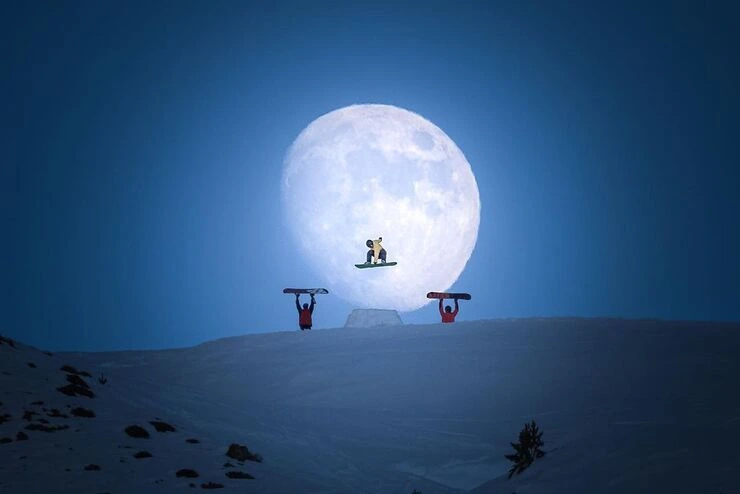
Photo by Yhabril Moro
This picture is a fine example of excellent planning and outstanding shooting.
To get this result you need to coordinate very precisely the Moon position in the sky and the snowboarders (especially the one jumping!).
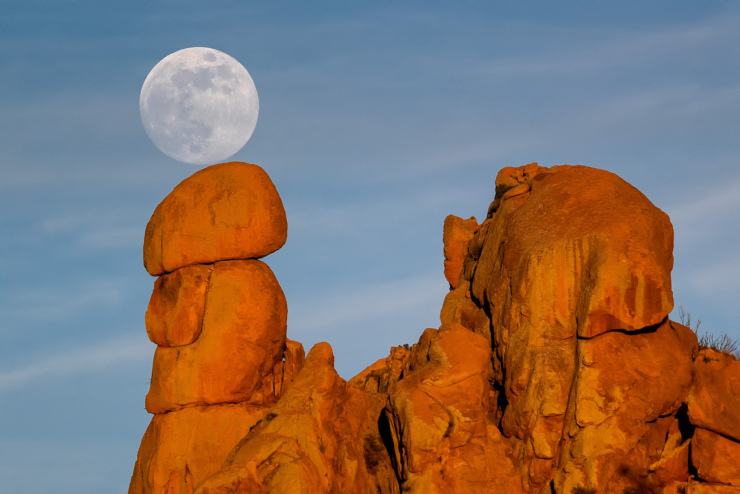
Waning Moon aligned with a subject (2)
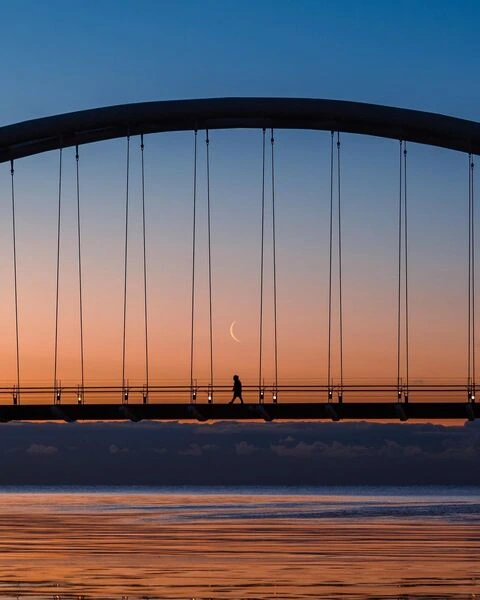
Photo by Aflah Zikar
As you can see from this example, there's no obligation to capture a Full Moon.
This alignment only happens once every month or two, and even then you have to wait for a clear day. You set the limits and create the challenge.
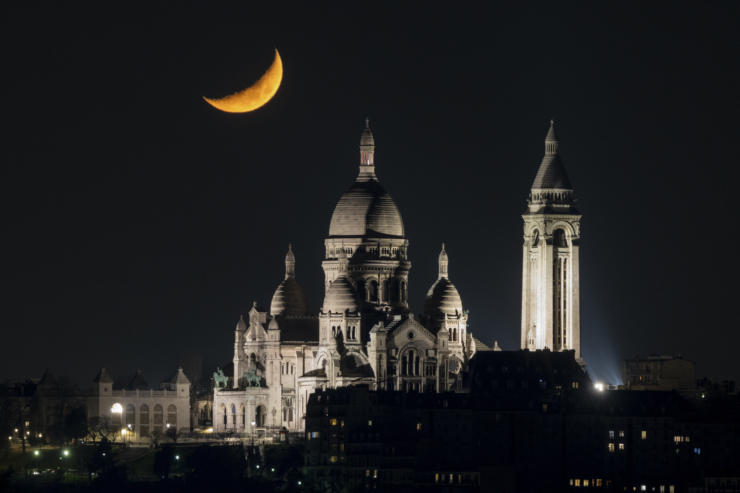
Crescent Moon setting behind a subject (3)
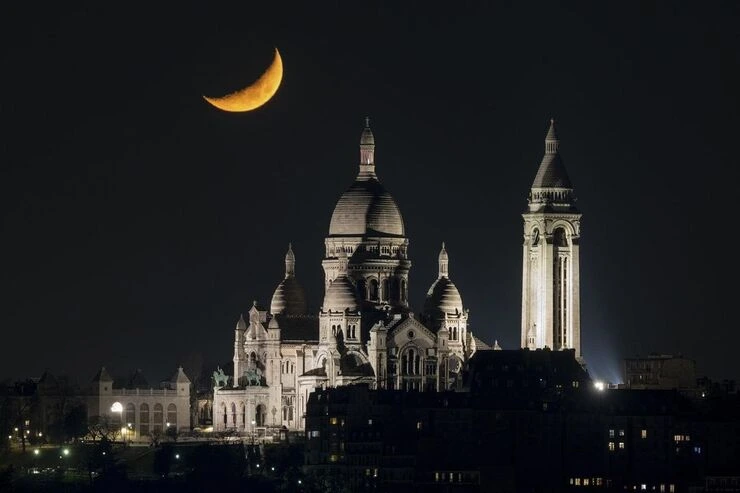
Photo by Joss Desmars
This is the easiest shot of the 3 examples because:
- You don't need a Full Moon, so you can shoot more nights along the month.
- You have a certain margin on where you can position the Moon within the frame. In other words, you don't need to be super precise with the shooting spot (Red Pin position).
If you're looking for more examples to inspire you, have a look at these Moon pictures.
And if you don't have enough, check the PhotoPills Awards where dozens of PhotoPillers like you submit their best Moon photos every day.
2.Plan your Moon photo ideas
If you want to figure out the best time to photograph the Moon, you'll have to do a bit of planning.
And using a Moon app or a photography planning app like PhotoPills is crucial :)
What is Moon photography planning?
Let's start with the basics.
What's photography planning?
Planning a photo means to find:
- The shooting spot (Red Pin position in the PhotoPills Planner) from where you'll be taking the picture.
- The shooting date when the Moon will have the phase you're looking for.
- And the shooting time when the Moon will be right where you want it to be in the sky and in your composition.
Why is planning essential when photographing the Moon with a foreground?
Because knowing where and when to go will help you organize your shooting session and nail the shot.
Otherwise, without planning, photographing the Moon with a cool foreground, or aligned with a subject you like, is almost impossible. Or, if you're lucky enough, you'll have to wait for a long time (maybe years) until you get the photo you've imagined.
Planning is a shortcut to get the photos of the Moon you want.
The 2 most common Moon planning cases
When planning the Moon, the 2 most common cases are:
- A plan for a certain date, as for example, when you want to plan the next Full Moon.
- A plan with the Moon in a certain position. In this case, you know the shooting spot and the photo you want, and you want to find out when it happens.
Planning your photos of the Moon requires a bit of study and practice. The more you practice the better...
I'll give you the basics of Moon planning in this section but, if you want to master Moon photography planning, read the following guides:
This Moon calendar will prove helpful as well.
5 essentials about the Moon
"Toni, how do you make the Moon look big in pictures? Is it some sort of Photoshop trick?"
No, there's no magic trick!
And you certainly don't need Photoshop... ;)
You basically need to be relatively far away from your subject and use the right focal length.
When planning a photo of the Moon, these are the 5 things you need to keep in mind:
The shooting distance determines the size of the Moon relative to the subject size.
The focal length determines the Moon size in the frame.
Depending on the type of natural light in the scene, the color of the Moon will change.
The azimuth and elevation define the Moon position in the sky.
The Moon altitude over the terrain and buildings define the Moon position relative to the subject.
Believe me, they're key to successfully planning your Moon picture.
For more details, read the 5 essentials you should know before planning any Moon picture.
How to expose for the Moon and the foreground?
I know. I know.
You may be wondering why I'm talking about the settings you should use to photograph the Moon when we're actually dealing with the planning...
Well...
Because it's related to natural light. More specifically, to the natural light you have in the scene at the time of pressing the shutter.
So, when planning your photo of the Moon, you'll need to know what the right type of natural light would be and try to shoot then in order to get both the Moon and your subject correctly exposed in a single photo.
There are 2 scenarios here.
Scenario #1: There is artificial light at night
The first one is when the foreground or your subject is lit at night (for example when photographing a cityscape with the Moon). Then, in this case, you can correctly expose the Moon and your subject in one single photo even at night.
Scenario #2: There is no artificial light at night
In absence of artificial light, you'll need to have enough natural light to take just one shot (no bracketing) in which both the Moon and the foreground are correctly exposed.
In this case, the best time to photograph the Moon is during:
- Daytime.
- Golden hour.
- Blue hour.
And if you can't take the picture in just one shot, because you don't have enough light, take a 3-shot bracketing of 1 stop, keep the photo where the foreground is underexposed and recover the shadows in post-processing.
To sum up, once you've planned your Moon shot, check the natural light you'll have at the time of the shooting to know whether you'll need to take 1 or more exposures.
Plan the field of view and the depth of field of your Moon picture
Yes!
You can plan the field of view (what will be in the photo) and the depth of field (what will be in focus) using the depth of field (DoF) tool in the PhotoPills Planner.
Use it at home, and you'll be able to answer these 2 important questions:
- What focal length you need to use to get the framing you want.
- What aperture you need to use to have both the Moon and the subject in focus.
Curious?
Here you have a short video where Rafael explains how to use PhotoPills to answer both matters:
Hint: To get both the Moon and the subject in focus, you'll need to understand what the hyperfocal distance is ;)
Additional Moon planning resources
As I said, Moon planning is super important, a skill you need to have... because it opens a door to a new universe of creative possibilities.
So, here you have 2 more resources that will help you a lot when planning your photos of the Moon:
- Moon Photography with Buildings | Step by Step Planning Tutorial.
- How to Plan a Photo of the New Crescent Moon.
3.Choose the best lens for Moon photography
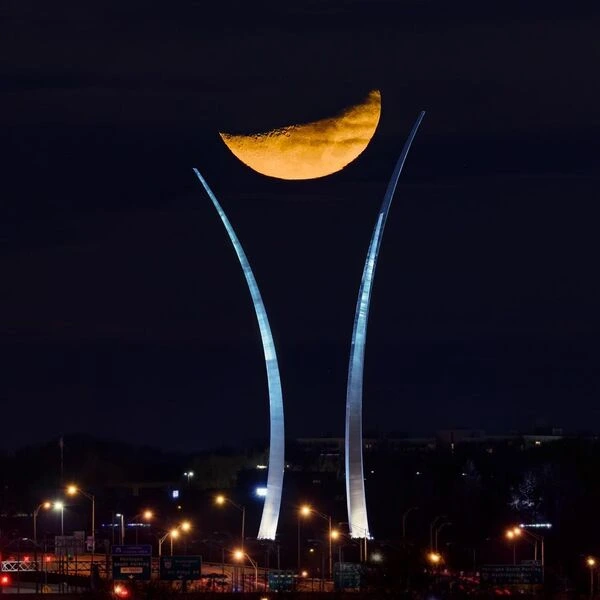
Photo by Dave Lyons
"OK Toni, let's get to the point... What lens should I use to shoot the Moon?"
The best lens is the one you have, the longer the better...
But...
To nail your Moon pictures, make sure your lens is:
- Very sharp.
- Reasonably fast (f number as low as possible).
After years testing and comparing many camera lenses these are, in my opinion, the best lenses to photograph the Moon:
- Nikon NIKKOR Z 100-400mm f/4.5-5.6 VR S.
- Sony FE 100-400mm f/4.5-5.6 GM.
- Canon EF 100-400mm f/4.5-5.6L IS II.
- Fujifilm XF 100-400mm f/4.5-5.6 R LM.
- Sigma 100-400mm f/5-6.3 DG.
And if you wish to go longer, you can always use a 1.4x or 2x teleconverter.
Have a look at what I consider the best lens for Moon photography.
4.Choose the best camera to take pictures of the Moon
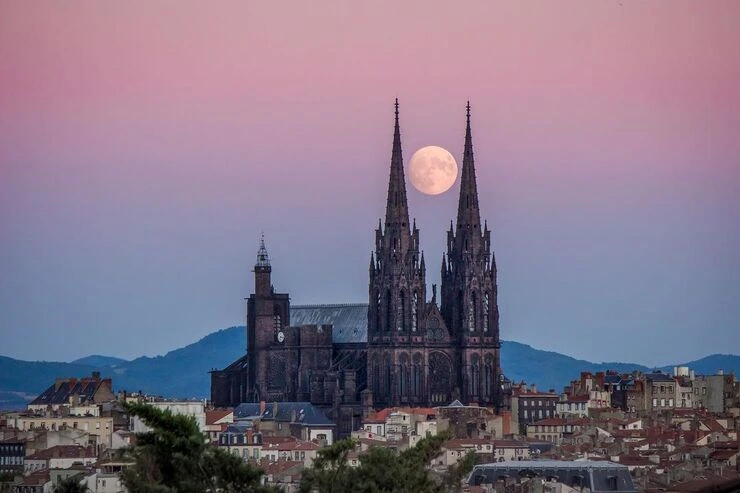
Photo by Sandrine Bonnardot
To get the best possible Moon photos, make sure your camera:
- Has a sensor with a reasonably high dynamic range sensor.
- Produces as little noise as possible.
After years testing and comparing many camera bodies these are, in my opinion, the best cameras to take pictures of the Moon:
Have a look at what I consider the best camera to take pictures of the Moon.
5.Get to your shooting spot in advance
On the shooting date, arrive at the planned location at least 1 hour before the shooting time.
The time you spend there will be crucial to make sure you're at the right shooting spot.
A mistake of 1 meter to the right (or to the left) and...
The Moon won't be where you wanted it to be! :(
6.Place the tripod at the shooting spot
As usual, in your PhotoPills plan, the shooting spot is the Red Pin position.
But... How can you know where the exact shooting spot is when you're at the location?
Well, I suggest you follow these strategies:
- Find visual references (e.g. a rock, a house)
- On the map while you're using the PhotoPills Planner at home.
- On the field when, as I always recommend, you're scouting the location before the shooting date.
- Switch on your position (blue dot) on the map.
- First, tap the (+) button on the map.
- Then, tap the eighth button on the toolbar that just showed up (it's the compass icon).
- Finally, zoom in on the map and check that the blue dot is actually aligned with the base of the Red Pin (the exact spot where the stick is pinned).
- Use the AR views available on the Planner.
Once you're sure of your position, place the tripod and the head on a solid surface, press it against the ground and check that it's completely stable.
7.Prepare your gear
Attach the lens to the camera, put the camera on the head and connect the intervalometer.
Yes, I recommend using an external intervalometer. When shooting, the less you touch the camera the better.
The last thing you want is to press the shutter and produce vibrations into the system because vibrations produce blurry images.
You surely want your picture of the Moon to be as sharp as possible!
8.Set the shooting mode to Manual (M)
You aim to get the perfect exposure for your photo.
To do so, you need to precisely control the exposure triangle: aperture, shutter speed and ISO.
So select the Manual shooting mode (M).
9.Set the focal length according to the Moon size and the framing (composition) you want
The focal length is an essential setting.
It determines:
- The Moon size in the photo, as I told you in section 2.
- The framing of your picture, depending on the composition you've envisioned.
Use a:
- Wide-angle lens (10-35mm) to get a Moon as a dot.
- Intermediate focal lengths (35-200mm) to capture a small Moon.
- Long focal length (>200mm) to get a big (or huge!) Moon.
If you're still in doubt, go back to section 3 or read more about the best lens for Moon photography.
10.Set the aperture between f/4 and f/8
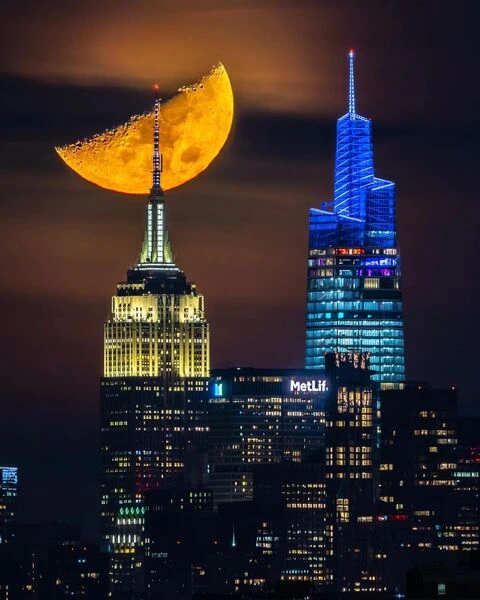
Photo by Dan Martland
"What aperture should I use for the Moon?"
The aperture is a key setting in Moon photography.
The exact aperture you'll use for your shot depends on:
- The depth of field you want in your Moon picture.
- The natural light present in the scene at the shooting time.
This is the workflow I recommend you to follow:
Start with f/8.
Open the aperture (f/5.6, f/4) as the light fades away. You shouldn't go over f/4, otherwise you'll get a shallow depth of field and part of your picture will be blurred.
Obviously, it will be easier to shoot at f/8 if you're looking to get a golden hour or blue hour Moon shot. Since you'll have more light in the scene, you can shoot at a small aperture while getting both the Moon and the foreground correctly exposed in one single shot.
In similar fashion, in absence of light, you'll shoot at f/4 during the astronomical twilight.
11.Have in focus both the Moon and the foreground
As Rafa explains in the video in section 2, focus directly on your subject. This way your subject will be tack sharp.
If your subject falls behind the hyperfocal distance, the Moon will be acceptably sharp too!
And, if your subject falls in front of the hyperfocal distance, then the Moon will be out of focus.
But, in my opinion, it's always best to have your subject tack sharp and the Moon (somewhat) out of focus, not the other way around.
12.Set the ISO to 100
Ideally, you should use an ISO as low as possible.
Start with ISO 100 and increase it depending on the light conditions.
I recommend you keep it between 100 and 1600. But, as always, it all depends on how much noise your camera produces.
Also, when natural light fades away, you'll need to push the ISO up to keep the shutter speed under 1s.
13.Adjust the shutter speed, but never above 1s
Now that you've set the aperture and the ISO, adjust the shutter speed according to the exposure triangle, but never above 1s.
Why?
Because of the Earth's rotation! ;)
So if you set a very slow shutter speed (> 1s) when shooting a scene with very little light or completely dark, the Moon will come out blurred.
14.Take a test shot, check the histogram
Photo by Jesús Manzaneque
Now that you've set the camera settings for your photo of the Moon...
It's time to take a test shot.
Check the histogram, and adjust the settings if needed to get a correct exposure.
If the photo has a low lightness (it's darker than you want), follow this workflow:
- Use a wider aperture (small f number), always checking that you get the depth of field you want.
- If the photo is still underexposed, use a slower shutter speed (longer exposure time), but never exceed 1s to avoid a blurry Moon.
- If that's not enough, crank up the ISO.
If the photo has a high lightness (it's brighter than you want), follow this workflow:
- Use a smaller aperture (big f number), always checking that you get the depth of field you want.
- If the photo is still overexposed, use a faster shutter speed (shorter exposure time).
- If that's not enough, lower down the ISO.
15.Take a 3-shot bracketing of 1 stop
Play safe!
When natural light is fading away, it's always a good idea to bracket your exposure.
Do a bracketing to avoid blowing out the Moon. Take a 3-shot bracketing of 1 stop.
Then, you can pick the picture with the best exposure as the base of your post-processing. From there, you can easily recover the shadows.
Remember that shadows are easy to recover, but highlights are not. So, avoid blowing out the Moon.
16.To the Moon and back!
Photographing the Moon with a foreground is not as difficult as you imagined.
As you read throughout this tutorial, it only takes a bit of time and practice.
But if you follow the steps I detailed and you rely in the power of PhotoPills, you can capture breathtaking Moon pictures!
And if you need some inspiration, have a look at this selection of some of the top Moon photographers in the world.
They'll help you take your pictures to the Moon and back! ;)
Note: Some links on this page are affiliate links. What does this mean? If you buy/rent using these links you're helping support us and it costs you nothing extra. Thank you for your support.
Get this ebook for free now!