Star Trails Photography: The Definitive Guide (2024)
Have you noticed it?
Every time you shoot a Star Trails image and share it on Instagram or Facebook, you get more interactions, more likes, more surprising comments such as:
"Mind-blowing!", "Impressive!", "Epic!"
And it happens every single time!
Surprised?
You shouldn't be.
Because Star Trails are those type of images people love. Images that people can't simply stop staring at.
It's as if the spirals made of bright stars were trapping people's eyes, in the same way a deep black hole would engulf the Millennium Falcon itself.
[Sorry Han (Solo), this is how it is... And you know it's true!]
Such is the magnetic power of Star Trails.
Why?
Because you're showing something remarkable to the world. Something that's happening out there, in the universe, but no one can see with the naked eye:
"The movement of the static stars, the traces of time, together with a breathtaking foreground."
And this, my friend, is incredibly hypnotic!
The good news is that with a little help everybody can create striking Star Trails images.
Even if these are the first words you're reading about Star Trails photography. This guide will help you imagine, plan and shoot Star Trails images nobody has taken before. Images that people can't stop sharing and talking about.
Promised!
I'll give you everything you need. From start to finish. All in one place. So you don't have to spend hours and hours searching for answers in the chaos of Internet.
Yes, everything!
From hundreds of Star Trails photography tips, inspiring examples, inspiring photographers, key compositional ingredients and fast planning tools like the PhotoPills Night Augmented Reality view to equipment, camera settings, focusing and advanced editing workflows.
So by the time you get to the end of this article, you'll have gained the power to create truly hypnotic Star Trails images, including circumpolar, celestial equator, vortex, accumulated Star Trails timelapse videos and many many more stunning images.
Oh, and no matter whether you live in the Northern or in the Southern Hemisphere. We've got you covered! ;)
You'll understand everything as you read through this guide.
Are you ready?
3, 2, 1...
Go!
"For my part I know nothing with any certainty, but the sight of the stars makes me dream." - Vincent van Gogh
Get this ebook for free now!
Content
- The 21 Star Trails images you must shoot before you die
- The principles behind your idea generation (or diverge before you converge)
- The 6 key Star Trails tips you should know before start brainstorming
- The foreground makes the difference, go to an award-winning location
- How to plan your Star Trails photo ideas for success
- The best equipment for Star Trails photography (beginner, advanced and pro)
- How to shoot single long exposure Star Trails
- How to shoot multiple long exposure Star Trails (image stacking)
- The best star stacking software for Mac and PC (and how to use it step by step)
- How to create a Star Trails vortex (or swirl)
- How to create a Star Trails timelapse
- How to shoot defocused Star Trails
- The 19 mistakes that will seriously damage your Star Trails images
- 7 Star Trails photography Masters that are worth following
- What? Are you willing to learn even more about Star Trails?
1.The 21 Star Trails images you must shoot before you die
Do you want to learn how to create beautiful Star Trails images?
You can make it happen, but you need to go step by step.
Rome wasn't built in a day.
It's not a secret that even the best writers, the best painters, the best photographers reached the glory scaling from the bottom. Working hard, learning and practicing... Practicing by copying the masters or, to say it in a softer way, by "getting inspired" by the masters.
Why?
Every teacher knows it:
"Because before you can fly free and create your personal style, you need to get it right first."
Before you can write a book, you need to learn how to write good copy first.
That simple.
And the fastest way to reach an acceptable level of expertise, no matter what you're trying to learn, is by copying the ones that lead, the ones that master the topic.
Think about it for a second. Do you remember how you learnt how to write?
Yes, you do.
By practicing. By copying words perfectly written, right?
Well, it's exactly the same in photography. By shooting great photos (even if they're not your ideas), you learn how to take great photos (your ideas).
Obviously, ethics goes first!
Don't publish the photos you're copying: you don't want to be accused of theft. Keep them for you. These are just exercises.
At this stage, when learning, it's all about getting the feeling, getting more comfortable when composing, shooting and editing your images.
So, read this guide, learn the theory, look for Star Trails images you love on Internet and take action, replicate them and before you realize it, you'll be taking you own original and striking photos.
"That's great Toni, but I don't have time to look up for images on the Internet now."
OK, fine...
You can start with the following Star Trails ideas ;)
I shot most of them in the beautiful island of Menorca (Spain), my home.
"You have to learn the rules of the game. And then you have to play better than anyone else." - Albert Einstein
Circumpolar (1)

Probably the easiest, but also the most powerful Star Trails image. Choose your subject, frame at the Polaris (North Star) or the south celestial pole (Southern Hemisphere) and you can't get it wrong!
Don't you know how to find the Polaris or the south celestial pole?
Just use the PhotoPills Night Augmented Reality view ;)
The celestial equator magic (2)

Aim your camera to the east or west and the story changes. There, you'll find the celestial equator and you'll see how stars follow three different paths.
On the celestial equator, stars follow a straight line. But they tend to curve away on both sides of the equator. This is a very spectacular pattern.
Mixed with artificial light trails (3)

Why not introducing artificial light trails in the foreground?
Playing with both Star Trails and the lights of fast moving vehicles can give you great results too.
Arching above your subject (4)

In the Northern Hemisphere, framing south gives you the power to lock your subject under the beautiful Star Trails. It's a totally different story!
In the Southern Hemisphere, just frame north :)
Water reflections (5)

I love capturing the Star Trails reflex on the water.
Where there is water, there is life!
Capturing the color of the stars (6)

Stars are not white!
Surprised?
Yes, at first glance, they seem to be white. But, the truth is that stars cover a range of colors: gold, blue, white and even red. This is caused by their different surface temperatures.
Capturing the natural color is easier when you're shooting in a light pollution free location. In section 3 you'll learn how to capture the real color of the stars.
Connecting with the past (7)

The goal here is to build a connection between the stars and one of those rare buildings that our ancestors left for us to enjoy.
The photo shows the celestial equator and the Milky Way together with a true treasure: the Naveta d'es Tudons – a remarkable megalithic chamber tomb located in Menorca. It's a building that served as a collective ossuary between 1200 and 750 BC!
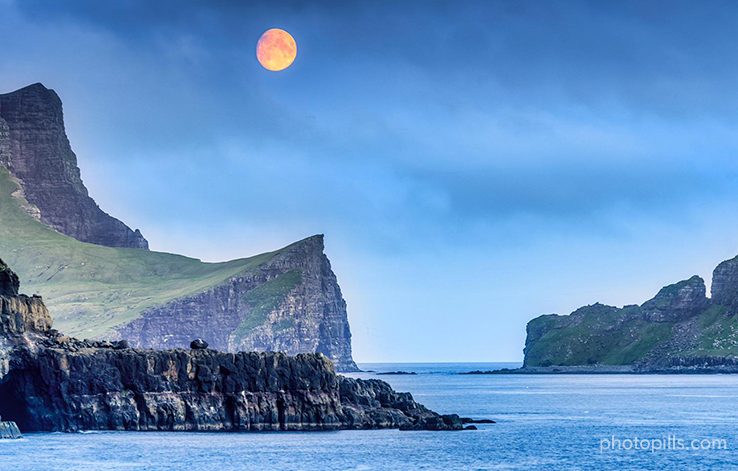
Moon trails (8)

Sometimes, including the Moon in the frame can give the right spicy touch to the image. What do you think?
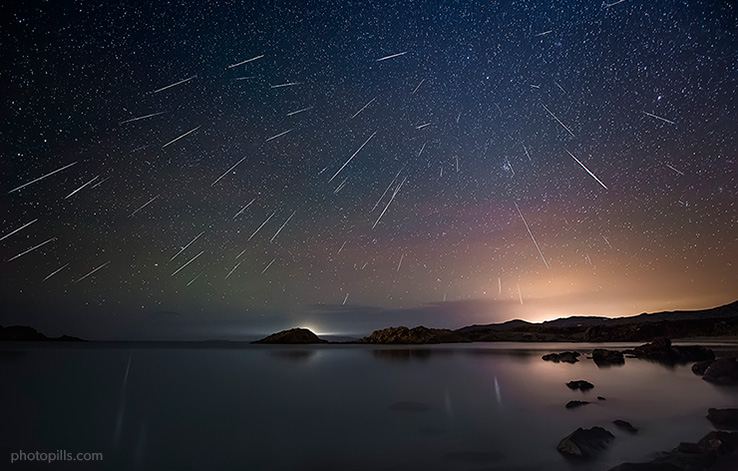
A big Meteor Shower (9)

Spending the whole night shooting a Meteor Shower pays off. Do it, and you'll not only take stunning still images, you'll also be able to create amazing Star Trails images and timelapse videos.
Take a look at our guide to the best Meteor Showers. You'll learn everything you need to make the most of these natural late night shows: when they happen and how to shoot them, step by step.
Inside out (10)

Imagine that after a long day hiking, you're comfortably resting inside a cave, enjoying the stars and the night sky...
Suddenly, the stars begin to trail.
Your heart would jump out of your chest!
Urbanscapes (11)

What do you see in this image?
I see two enemies fighting to reach the sensor of my camera: the stars and the light pollution creators – the city lights.
Apart from this, the image gives me a clue of how beautiful the stars would have looked in this place before all these human interferences.
I used a 2-stop soft graduated neutral density filter (GND) placing using its darker area to dim the city lights. So I got a longer exposure without overexposing the artificial lights on the foreground.
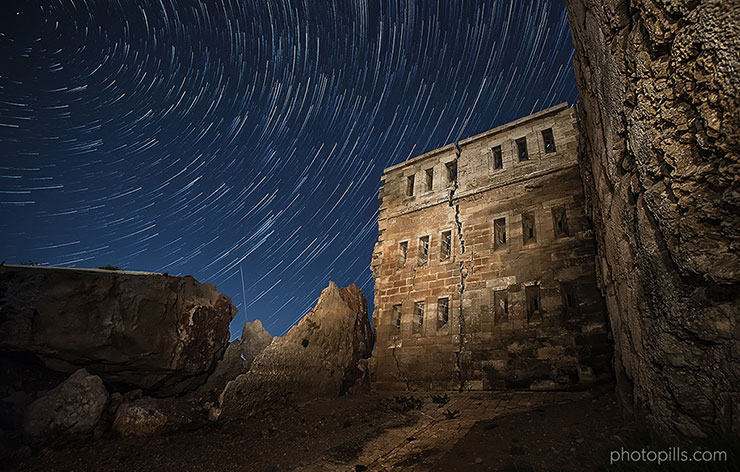
The drama of the abandoned (12)

Star Trails are great for creating a ghost like atmosphere around an abandoned building.
In the image above you can see the ruins of an ancient military base. It's located in the fortress of La Mola, in Menorca.
From time to time, I like to go there with my students and spend the night capturing stars.
Lonely subjects (13)

Including a vertical and isolated subject in the foreground makes the image more intriguing, more hypnotic.
Look for a tree, a rock, a lighthouse... Look for amazing subjects, include them in your foregrounds and you'll create dazzling Star Trails images.
Playing with fire (14)

Have you ever light painted with steel wool? It truly ignites the frame!
All you have to do is to attach some steel wool to a paint roller, light it and make it roll.
But be careful, because it can be extremely dangerous!
Panoramas, the whole story (15)

It's a little bit more challenging, but it pays off the effort. Create one, and you'll become addicted...
And so will do anyone who sees your image ;)
Human figures (16)

Human figures allow you to create very appealing images by playing with many different compositions.
Here, you have the power to decide where you want the model to be and tell the story you want.
Black and white (17)

Why not trying something different for a change?
What about a white and black shot? ;)
Hypnotic vortex (18)

It's the queen of all the hypnotic images!
You can produce the vortex Star Trails at home, editing a single shot, or in the field, using a motorized system to smoothly change the focal length while the shutter is open. You can learn how to do it reading section 10.
You can also do it manually, but there's a high chance that you'll ruin the photo.
Defocused Star Trails (19)

By progressively defocusing the stars during a single long exposure or after each exposure (image stacking), you'll create what's called the "comet effect" or "badmington shuttlecock effect".
How can you defocus the stars?
All you have to do is to rotate the focus ring of your lens a few degrees to pull the depth of field far limit away from infinity.
Do it after each exposure if you're using the stacking technique. Or at a 1-minute interval if you're shooting a single long exposure.
I explain you exactly how to do it in section 12.
Timelapse or Star Trails in motion (20)
If you believe that creating a Star Trails image is fun, you're going to love creating your own Star Trails timelapses.
Instead of staking all the photos to produce one single image, just turn them into a video. And show the world the stars in motion.
Do you want to learn how to do it? Then, go to section 11.
Your turn (21)
"But, Toni... I've only seen 20 inspiring images, and you said you would give me 21!"
You caught me! :D
You're right.
The thing is, I changed my mind.
I think it's funnnier if you suggest the 21st inspiring image in the comments section, right at the end of this guide :)
Come on! Don't be shy!
Read this article, take action and share your photos with the tribe!
And if you'd like to improve your Star Trails photography face to face with the whole PhotoPills team and a bunch of PhotoPills Masters, you should definitely attend the PhotoPills Camp! ;)

What's all this fuss about?
PhotoPillers from all over the world join us, the creators of PhotoPills app, along with a squad of easy going Photography Masters (like Mark Gee, Elia Locardi and more) in a 7-day exclusive photo immersion in the beautiful island of Menorca, a nature sanctuary!
The Camp takes place only once a year!
Are you interested?
Then, you should read more about the PhotoPills Camp.
2.The principles behind your idea generation (or diverge before you converge)

"You can't wait for inspiration, you have to go after it with a club." - Jack London
So true!
I love this quote by Jack London.
I took it from a surprising book. A book that produced a huge impact in my creative workflow: 'The Torch Principle: Light Up Your Mind', by Javier Ideami.
I'm always looking for all sort of inspiration sources, anything that can help me see the world from a different perspective, from a different point of view. Anything that can get me out of my comfort zone.
I usually find inspiration in photos, films, music, books... All sort of books, not only in photography books.
From time to time, I come across a book that's a game changer for me. And 'The Torch Principle, Light Up Your Mind' is one of these unique and rare books that surprised me.
Long story short...
Creativity is something you can and should train.
Yes, it's possible!
Like Javier explains:
"You cannot run a marathon without first training your body muscles regularly. Similarly, you cannot become a master at innovating original solutions without first learning to exercise your creative muscles as well."
So, to be more creative is a matter of choice. To train or not to train, that's the question.
If you do train, if you do face this challenge, you'll find the key to making your photography more innovative, fresh, original and joyful.
How to train your creative mind?
Getting used to diverge before you converge!
In other words, get used to think big first, believe in the impossible, don't put a limit to your imagination.
Find a powerful location and simply let your imagination fly.
Take advantage of the power to foresee the future that PhotoPills provides. Take advantage of the power to compose with natural light, the Sun, the Moon, the Milky Way, the stars...
Come up with a remarkable story to tell.
Then, visualize the crazy photo that's telling that story.
It might seem like an impossible scene to capture. But don't give up, use your knowledge, plan it with PhotoPills, figure out when it happens, and use your equipment and your photography skills to make it real.
Learn what it takes, buy new gear if necessary (or rent it), and take action.
If you're starting, the photo may not be exactly the one you dreamed due to equipment limitations, lack of skills, weather conditions, or even the Laws of Physics. But it'll be innovative and original.
I promise.
And if you're not happy with the result, repeat the process. Iterate, try it again until you get what you want.
I know, I know... It's not easy.
You need to empty your brain, give space to your imagination, and erase your limiting beliefs before you can come up with original ideas.
But let me tell you a secret: all you have to do is to train yourself to think as a child again.
Get rid of all your adult rational thinking and start dreaming.
Become an artist again!
"Every child is an artist, the problem is staying an artist when you grow up." - Pablo Picasso
3.The 6 key Star Trails tips you should know before start brainstorming
Before you can go to a powerful location and start brainstorming like crazy, there are 6 key facts you should know about Star Trails.
What you're about to learn now will help you put your imagination to work in the right direction. So you can come up with original ideas for your Star Trails shots much faster.
Let's start with the very beginning: the origin of Star Trails...
Earth rotation or the origin of Star Trails (1)

Star Trails photography is all about capturing the apparent motion of the stars caused by the rotation of the Earth. The longer the exposure time (15min, 1h, 2h, 5h...), the longer the Star Trails will be.
That's right!
Stars don't turn around planet Earth.
It's the Earth rotation around its axis what causes the Star Trails.
What's the rotation speed?
The Earth rotates once every 23 hours, 56 minutes and 4 seconds around the imaginary line (or axis) that connects the North Pole with the South Pole.
Thus, the North and South poles are the points (in the Northern and Southern Hemisphere) where the Earth's axis of rotation meets the Earth's surface.
Celestial sphere, celestial poles, celestial equator and circumpolar stars (2)

As you'll learn in the next section, being able to locate the north celestial pole (Northern Hemisphere), the south celestial pole (Southern Hemisphere) and the celestial equator is key in Star Trails photography.
Why?
Because it gives you the power to decide where to aim your camera to get the Star Trails pattern you want in your photos.
Therefore, it's essential you understand what they are, how to find them in the sky and how you can take advantage of them as a compositional tool in your Star Trails images.
Of course, if you're not an astronomy master, you can always use the PhotoPills Night Augmented Reality view to easily locate all these astronomical elements in the sky (watch the video in section 5). This simplifies all the planning work a lot.
Celestial sphere
In astronomy, the celestial sphere is defined as an imaginary sphere concentric with the Earth. It's what astronomers use to plot or project stars, planets and other objects in the sky.
It helps you understand and visualize the celestial poles and the celestial equator.
North celestial pole
As seen from the Northern Hemisphere, it's the imaginary point in the sky where the Earth's axis of rotation intersects the celestial sphere.
The north celestial pole is so close to the Polaris (north star) that, in practice, you can locate it by finding the Polaris.
Trace a line from Merak to Dubhe (the two pointers in the Big Dipper), and continue it towards the Little Dipper. The Polaris is the last star of Ursa Minor (the Little Bear o Little Dipper).

It remains static while the Earth rotates.
So include it in your frame and you'll capture a circumpolar Star Trails pattern (stars turning around it).
South celestial pole
As seen from the Southern Hemisphere, it's the imaginary point in the sky where the Earth's axis of rotation intersects the celestial sphere.
In the Southern Hemisphere, there is no Polaris to help you locate the position of the south celestial pole.
So if you don't want to use PhotoPills to find it, another way to do it is by using the Gacrux and Acrux stars (located in the Southern Cross or Crux constellation) and the two Southern Pointers (Alpha Centauri and Beta Centauri).
Trace an imaginary line from Gacrux to Acrux. Then, a second line constructed perpendicularly between Alpha Centauri and Beta Centauri. Their crossing point marks the south celestial pole.

The south celestial pole also remains static while the Earth rotates.
Therefore, if you live in the Southern Hemisphere, you can include it in your frame to capture a circumpolar Star Trails pattern.
Celestial equator

It's the circumference that results from the intersection between the celestial sphere and the plane that contains the Earth's Equator. It forms 90º with both the north and south celestial poles.
Simply aim your camera towards the east or the west to capture it. You'll see that stars "move" in three different directions.
Along the celestial equator, Stars Trails form a very straight line. While, on both sides of it, stars appear to curve away towards the north and south celestial poles.
Circumpolar stars

A circumpolar star is a star that never sets or never disappears below the horizon.
When you capture these stars in a Star Trails image, they seem to draw a circle around the Polaris (Northern Hemisphere) and the south celestial pole (Southern Hemisphere).
Like the circumpolar stars, there are constellations that never set. Here are a few examples:
- Northern Hemisphere: Camelopardalis, Cepheus, Draco, Cassiopeia, Auriga, Lynx, Perseus, Ursa Major, and Ursa Minor.
- Southern Hemisphere: Grus, Tucana, Ara, Eridanus, Indus, Hydrus, Horologium, Reticulum, Octans, Apus, Pavo, Triangulum Australe, Lupus, Circinus, Musca, Crux, Centaurus, Phoenix, Carina, Vela, Puppis, Dorado, and Chamaeleon.
Great!
Now you have all the astronomical knowledge required in Star Trails photography. It's time to take advantage of it.
Let's put it into practice :)
Tell me where you're aiming and I'll tell you the Star Trails pattern you'll get (3)
This is the key compositional tool in Star Trails photography:
"Depending on the direction you aim your camera, you'll get a different Star Trails pattern."
In other words, given a location and a subject, you can choose the shooting spot and shooting direction based on the Star Trails shape you need to tell the story you want.
Northern Hemisphere
In the Northern Hemisphere stars appear to move counter-clockwise.
Depending on the direction you're aiming your camera, you'll get all these different Star Trails patterns.

Tips
- Include the Polaris to create a circumpolar Star Trails.
- Aim east or west to include the celestial equator and capture stars moving in three different directions.
- Aim south and the Star Trails will arch above your subject.
Southern Hemisphere
On the contrary, in the Southern Hemisphere stars appear to move clockwise.
So you'll have the following patterns.

Tips
- Include the south celestial pole to create a circumpolar Star Trails.
- Aim east or west to include the celestial equator and capture stars moving in three different directions.
- Aim north and the Star Trails will arch above your subject.
Equator
From Equatorial latitudes, the north and south celestial poles seem to be very close to the horizon.
So, if you live on the Earth's equator, you can create stunning images capturing half of the circles described by the stars.
Also, the celestial equator appears as a vertical line, creating a striking effect.

The PhotoPills shortcut
The Night Augmented Reality view is one of my favorite tools of PhotoPills.
You're probably wondering why...
Well, for a given shooting spot and shooting direction, it allows me to perfectly visualize the Star Trails pattern I'll get relative to my subject.
This way, you can easily choose the shooting spot and shooting direction for the composition you like the most. All you have to do is go where your subject is, take your smartphone, point it at the sky and use PhotoPills to plan the shot.
And if you're at home, comfortably sitting on your couch, you can set a different location (let's say Hawaii) and see the Star Trails options you'll have. So, as you reach a more advanced level, you can plan your shots before actually being in the location.
How?
In section 5 you'll learn how you can use PhotoPills to easily plan your Star Trails ideas, no matter where you are on Earth!
The Star Trails length (4)
What's the right Star Trails length?
My suggestion is to go for long Star Trails.
Why?
When I shoot the stars, I follow two different approaches:
- When shooting the Milky Way, I like to capture stars as big bright spots, no trails at all. So, I calculate the longest shutter speed (or maximum exposure time) that allows me to prevent the stars from trailing in my images. In this case, I always shoot one single exposure. You'll find how to calculate this shutter speed in our Milky Way guide.
- When shooting Star Trails, I like to capture long Star Trails by shooting multiple exposures and stacking them in post-processing. Total exposure times from 2 to 5 hours are great. The longer the better because you'll have the ability to decide the Star Trails length you need in the final image by stacking more or less photos.
This is just my personal approach. I don't really like Star Trails images with short trails (a total exposure of just a few minutes) unless it's the only option I have.
"In this case... When am I forced to capture short Star Trails?"
It happens when you're shooting one single long exposure (one single shot of several minutes or hours) while the Moon is present or when you're under light pollution conditions.
In this case, if you want to get an image correctly exposed (in one single shot), you won't be able to use a very slow shutter speed (or long exposure time). If you do so, you'll get an overexposed image.
This exposure time limitation is the reason you'll only be able to capture short Star Trails.
The good news is that you can easily overcome this limitation by shooting multiple shorter exposures and stacking them in post-processing.
"But Toni, how can I control the length of Star Trails?"
Well, it's all about controlling two variables:
- The stars' distance to the celestial equator, and
- The total exposure time, which the most important one.
The stars distance from the celestial equator
Since the Earth rotates around its axis, for a given exposure time, stars that are closer to the celestial poles will produce shorter trails. For example, the Polaris, which is very close to the north celestial pole, seems not moving at all.
On the contrary, stars that are closer to the celestial equator will produce longer trails. The longest ones are the trails produced by the stars on the celestial equator.

Therefore, depending on the area of the sky you're capturing in your frame, the trails will be longer or shorter.
This explains why, when shooting the Milky Way (i.e. you don't want trails), you can go for longer exposure times if you include in the frame the stars that are closer to the celestial poles. Because these stars require more time to leave a trail.
On the contrary, including stars that are on the celestial equator will force you to use shorter exposure times to capture stars as big bright spots (i.e. no trails). Because the stars on the celestial equator are the fastest ones.
In practice, I use a rule that's called the NPF rule to calculate the right exposure time in my Milky Way shots.
Total exposure time

Elementary, my dear Watson!
As you see in the animated image above, the longer the total exposure time, the longer the trails.
I'm using the concept of total exposure time because, as you'll see in next section, you can create Star Trails images by shooting a single long exposure or by stacking several short exposures in post-processing (image stacking).
In this second case, the total exposure time results from the addition of the exposure time of each photo.
There is no much more to say here. If you want long Star Trails, go for longer total exposure times.
Simulate the look of Star Trails
If you want to know, for a given exposure time, how a circumpolar image will look like, you can take advantage of the PhotoPills Star Trails calculator.
Let's have a look at an example.
What's the difference between a 1-hour exposure time circumpolar image compared to a 2-hour one?
Have a look at the two screenshots. The first one is showing you a Star Trails simulation for a 1-hour exposure time. And the second one for a 2-hour exposure time.
This way you can easily visualize the result you'll get.


You can compare the screenshots with the following two Star Trails images.


Find out the total exposure time of an existing Star Trails image
The PhotoPills Star Trails calculator is also very useful when you wish to estimate the total exposure time of an existing circumpolar image.
Let's imagine you find a really nice circumpolar image on our Instagram account (follow us!) and you would like to figure out the total exposure time used.
Well, all you have to do is to use Photoshop to measure the rotation angle of one star around the Polaris or the south celestial pole.
Then, type this angle in the Star Trails calculator to get the total exposure time.
Conclusion
To sum up, and as I said, the longer the trails the better!
In my opinion, longer trails produce more hypnotic images. So get ready to spend the whole night under the stars.
"So Toni, when should I shoot shorter Star Trails?"
The only situation is if you're shooting one long exposure under light pollution or Moonlight conditions. In this case, you're forced to use a shorter exposure time to get a photo well exposed.
When shooting multiple exposures to stack them afterwards, you don't have this limitation.
And all this finally leads us to one of the greatest dilemmas in Star Trails photography:
"What should I shoot, a single long exposure or multiple short exposures (image stacking)?"
Single long exposure vs multiples exposures (5)
My goal with this guide is to help you learn how to shoot both single and multiple exposures Star Trails, no matter the equipment you have.
But, I must admit that I prefer shooting multiple exposures and stacking them using a special software.
Why?
These are, in my opinion, the pros of shooting multiple exposures (image stacking).
Almost any camera will do the job
Since you're shooting multiple short exposures, you have a better control of the sensor heat. So, your images end up with less noise. This allows you to shoot longer Star Trails with almost any camera.
On the contrary, your image surely has a lot of noise when shooting one very long exposure with a low-end or mid-range camera.
Both the smaller sensor and the lower quality produce much more noise in the final image.
The workaround here is to limit the total exposure time. But, if you do so, you get shorter Star Trails too.
It's far less risky
When shooting a single exposure Star Trails, the big challenge is actually getting the shot.
So many things can go wrong that when you nail it, you should definitely celebrate!
On one hand, these are just a few things that can ruin the photo:
- Unexpected things happen! Clouds in the sky, something entering your frame like a bird or a plane... Somebody may accidentally lit the foreground (overexposing it) or an artificial light source may end up in the frame (torch, car lights, etc.).
- There is no easy way to clone out the trails created by planes or satellites.
- Running out of battery before the exposure ends is a major concern. No battery means no image.
- Image noise problems due to sensor heat.
- Very long exposures may produce images that look like as if they were taken during daylight. And if you're doing night photography, you want to show people the beauty of the night, don't you?
- You don't have that much control over how the foreground is lit.
- Light pollution can easily ruin your photo or force you to shoot a shorter exposure.
On the other hand, when shooting multiple exposures, you have more control over all these problems.
- Unexpected things don't ruin the image because you can easily remove the ruined frames (planes, satellites, artificial light sources, tripod vibrations, etc.).
- You can very easily clone out the trails created by planes or satellites. Actually, you can just remove the frames that contain these undesired trails.
- If you run out of battery, at least you go home with all the captured images. No empty hands!
- Shorter exposures mean less sensor heat and, thus, less noise in the image.
- You can create great Star Trails images with almost any camera. Using a basic camera is not a limitation.
- It allows you to give the shot the adequate night flavor.
- You have total control of how the foreground is lit. As a rule of thumb, use the first image you take and the last one to make sure the foreground is properly lit.
- You can control light pollution to a higher extent.
It's far much productive
If you're shooting a single long exposure, at the end of the shooting, you'll only have one image. Period.
Shooting multiple exposures allows you to capture multiple images that can be used separately or together to create other stunning effects like timelapse videos.
Furthermore, as you'll be stacking the number of photos you want, you can decide in post-processing the length of the Star Trails you want.
A great example of a high productive night is when you're shooting Meteor Showers.
After spending the whole night in the cold, don't you want to have more than one image?
Of course!
You want as many great images as possible.
For example, shooting multiple exposures during the Geminids Meteor Shower allowed me to produce a great number of images and videos.
First, I got a great number of photos that could be used alone. Imagine that you capture a nice Meteor Shower and you want to share the image separately. You wouldn't be able to do it if you shoot a single exposure.
By stacking all the photos in one, I managed to create a beautiful Star Trails image.
And why not creating a timelapse video to show the world the beauty of the whole Meteor Shower?
But that's not it.
We were so lucky that night, that we could even reproduce a brutal meteor explosion!
And we're not done yet!
There are two additional and amazing outputs that you can get in post-processing.
The first one has a lot to do with the radiant of the Meteor Shower.
Let me explain it.
During a Meteor Shower, all meteors radiate from one single spot in the sky. This spot is called the radiant.
Knowing that, you can use a special post-processing technique to put together the following image. Notice that all the meteors appear to converge from one single spot (the radiant).

You can learn how to create this stunning effect by using the technique described in the Perseids Meteor Shower Photography Masterclass with Ian Norman.
Finally, you can also produce a timelapse showing how Star Trails grow as Earth rotates. I show you how to do it in section 11 ;)
The Moon is not a problem
The presence of the Moon is a problem when shooting a single exposure Star Trails. The Moonlight will probably over lit the foreground, getting an overexposed image.
This puts a limit to the exposure time producing shorter Star Trails in the image. And, thus, what I believe will be a less powerful image.
With multiple exposures the Moon is not a problem. All you have to do is to take into account the Moonlight when exposing.
If you want to have Moonlight in the scene to lit the foreground, plan it well.
Check the PhotoPills Moon pill and pick a night when the Moon phase is between 30-50%. Or even Full Moon if you dare!


Moonlight will be great when the Moon has an elevation between 5º to 20º. The lower the Moon, the better because you'll get longer and more dramatic shadows on the foreground.
Moreover, it's important to plan for a Moon that is perpendicular to the shooting direction. In other words, you should look for some kind of side lighting. This way, the foreground will have more texture and volume.
And, if you're up for a challenge, you could even include the Moon in the frame to create a stunning Moon trail.
The color of the stars (6)
I'll be thrilled if, after reading this guide, you're capable of capturing the real color of the stars in your Star Trails. It would mean that you've reached the next level.
Your Star Trails images will look much more dramatic and hypnotic. And this, my friend, is one of my main goals with this guide.
Yes, stars are not only white!

Although, stars seem to be white at first glance, the truth is that they cover a large range of colors: white, red, gold, blue...
The color depends on the surface temperature of each star.
Let's see a few well known examples:
- Blue: Bellatrix, Sirius, Vega, Rigel, Achernar, Hadar, Altair, Acrux, Spica, Deneb, Regulus, Castor, Shaula, Miaplacidus, Alnilam.
- Yellow: Canopus, Alpha Centauri, Capella, Procyon.
- Red: Antares, Betelgeuse, Gamma Crucis.
- Orange: Arcturus, Aldebaran.
How to capture the color of the stars in your Star Trails
Don't panic!
Capturing the color of the stars is not that difficult. Everybody can do it.
All you have to do is to follow these simple recommendations:
- Use the image stacking technique. It's much easier, and allows you to capture longer Star Trails. You get more control over the final result. If you want to capture the color of the stars using one single long exposure, you'll need to use a shorter exposure time. Otherwise, stars will be absolutely white in the photo. This will force you to capture only short trails, which is not cool at all!
- The darker the sky the better. Avoid shooting under Moonlight and light pollution. Any extra light that bounces in the atmosphere will be captured by the camera sensor. This faints the stars and overexposes them so it's more difficult to capture their original color. They will tend to appear white in your final image. Any extra light washes out the color of the stars.
- ISO is the key variable here. Try to keep your ISO under 1600. Using higher ISOs will tend to overexpose the stars, washing out their color. And you'll end up with white stars only. According to my experience, depending on the ISO values you can get the following results:
- 200-400 ISO: You'll capture the beautiful color of the stars, but your camera sensor will capture less stars.
- 800-1600 ISO: You'll still capture some color in the stars and also more stars.
- Above 1600 ISO: It allows you to capture many stars but no color at all.
- Light pollution: You should keep the ISO as low as possible (200-400). Otherwise, the extra light will wash out the color of the stars.
- Dark skies: It's a balance between capturing the color of the stars and the number of stars. You can use ISO values between 800-1600, and adjust at your will.
- Stop down the maximum aperture of your lens by one full stop if you have a fast lens (like a f/2.8). This improves the image quality. For example: f/2.8 -> f/4.
- The shutter speed (or exposure time) is the result of the combination of ISO and aperture thanks to the exposure triangle. Finding the right value is a matter of testing. Typical shutter speeds go from 30s to several minutes.
- Saturate a little bit the colors in post-production to enhance the color of the stars.
- Since you are shooting in RAW, you can always adjust the white balance in post-processing. But when I'm shooting, I usually use these values and adjust from there accordingly:
- Dark skies: 3900K
- Light pollution: 3400K
The color of the stars help you with your post-processing
If your want is to keep the true color of the scene (foreground, stars, etc.), knowing the color of the stars is a huge advantage when post-processing your images.
For example, when you're editing a Milky Way picture, if Antares is white instead of its red natural color, you're doing something wrong. You're not getting the natural look of the Milky Way.
Tweak your post-processing settings to give Antares its red hue. This will result into a more realistic image :)
However, when you're shooting the Milky Way and there is light pollution in the scene, it will be almost impossible to give Antares its red color. In this case, try at least to give it a touch of its red hue.
I use this trick everytime I edit the Milky Way and I recommend you to do the same. But, photography is a form of art, so there is nothing wrong in showing your creativity and adjust the white balance at your will.
Great!
In this section, you've learnt the key astronomy elements (celestial poles and celestial equator), how to find them and all the possible Star Trail patterns you can capture.
Now you have the power to choose the right shooting spot and shooting direction that give you the Star Trails pattern you need to tell the story you want.
But Star Trails provide only half of the action captured in the image. The other half is happening in the foreground.
In conclusion, you need to combine a fantastic Star Trails pattern with a powerful location... An award-winning one!
4.The foreground makes the difference, go to an award-winning location
Sure, you can always aim your camera at the sky and capture the stars trailing.
But, images that only show the trails of the stars look all the same. They are pretty boring images. And you want the opposite.
You want to create stunning images!
It's the foreground that makes the difference. Include a powerful foreground and you'll go from boring people to win hearts and minds. It's that simple!
And how do you find a great foreground?
First, you must find an award-winning location.
Let me give you the key ingredients you need.
No light pollution
Even though you can take Star Trails images under light pollution, it's not ideal to capture a great number of stars and their natural color.
Light pollution works against your interests. The extra artificial light from the cities washes out the color of the stars and also reduce their number. And you don't want that.
You want to capture the natural color of the stars and a great number of them!
So, take your car (or a plane) and escape from the city. Go to a location where it's pitch black.
The darker the sky the better.

Do you want to know where the dark skies are?
There are many online sources to help you find a nearby light pollution free location. These are just a few I like:
- NASA's Blue Marble: The site uses a Google Maps interface with NASA's most recent Night Lights image. You can browse the maximum resolution of 4 pixels per km², as well as a slightly coarser night-lights map, enhanced by town names and national borders.
- The World At Night (TWAN): It has one of the largest collections of global categorized astronomic landscape images sorted by regions.
- International Dark Sky locations: I love these guys' movement. The International Dark Sky Association promotes the preservation and protection of night skies across the globe for future generations. You'll find 5 types of designations in their database: communities, parks, reserves, sanctuaries, and urban places. These areas are home to some of the darkest and most pristine skies in the world.
- Wikipedia Observatories list: Observatories are located in completely dark skies. It's a good idea to check where they are to find black crystal skies.
- Look for Local Astronomy Clubs: There are amateur astronomers everywhere. Make sure you ask them for suggestions. Most of them enjoy sharing their love for astronomy and would be happy to point you in the right direction.
- Light Pollution Map (also available on iOS and Android) helps you locate nearby dark skies to take a telescope, watch Meteor Showers, or simply relax under the stars. See light pollution maps of the entire world, along with dots that indicate good observing locations.
Tips
- If you're surrounded by light pollution or can't go far enough, point your camera away from the city lights as much as possible. Do not include light sources in the frame.
- Put your creativity at work! Sometimes you can take advantage of light pollution as a compositional tool. If you have it, use it at your convenience!
- Shooting multiple exposures will help you get under control the negative effects of light pollution.
Work during the day to succeed at the night
After a few minutes studying the NASA's Blue Marble light pollution map... Hooray! You find your dark sky.
And yeah, it is a good one!
So you don't think it twice. You get in the car and drive for a couple of hours while the Sun is setting.
Finally, you're there, in the field, under a pitch black sky. And you're about to shoot a great Star Trails.
But suddenly...
You realize it's very dark! Too dark, actually!!
How are you going to find a powerful foreground now? No clue!
You're lost!
I learnt this lesson a few years ago:
"If you want to succeed at the night, you must work during the day."
And I'm not talking about flirting.
Well, maybe I do... :P
No, just kidding!
What I mean is that you should visit the location during daytime.
When the Sun is up and the light is harsh, do your scouting work. Find your foregrounds and your main subjects. Come up with ideas and plan every detail.
Use the PhotoPills Night Augmented Reality view to locate the Polaris (Northern Hemisphere), the south celestial pole (Southern Hemisphere) and the celestial equator. Find the shooting spot and shooting direction that gives you the Star Trails pattern you want.

I even recommend you to take your camera out and try different framings until you get what you want.
Then, come back at night. Set the tripod at the planned spot, aim the camera to the planned direction, and start shooting a truly hypnotic Star Trails.
You don't have to create a gazillion Star Trails images. You only need to make one: the good one.
Therefore, spend as much time as necessary imagining and planning. You need to make it really unique.
Believe me, it pays off.
A powerful subject

I'll repeat it a million times:
"The foreground makes the difference."
Jokes aside, finding a beautiful foreground that includes a powerful subject will surely rise the interest of the viewer.
So, when scouting a location looking for foregrounds, I'm always looking for interesting subjects. Subjects that inspire me.
Look for lonely subjects that can stand powerful in the foreground.
Great subjects are lighthouses, trees, rocks, natural arches, buildings, abandoned vehicles and windmills... The options are endless!
Human figures
Including a human figure in the frame has many advantages.
From giving a sense of scale, conveying a sense of movement and showing context, to building a more interesting story...
Sometimes, when your foreground is not great, including a person can save the image. It's the simplest way to add interest to a boring scene.
Leading lines and triangles

Helping the viewer find his way through the image is a plus!
Use converging lines, curved lines or a simple straight line to lead the viewer to the most important point of the image (the focal point), whether it is your subject, the Polaris (or south celestial pole) or the celestial equator.
Where can you find lines?
Anywhere!
Use a road, a fence, a wall or even the alignment of several rocks.
Using triangles is another great way to improve your images. When you're in the field, pay attention to rocks, trees, and other structures that alone or combined have a form of a triangle.

If you include a triangle that points up, you'll convey a sense of stability to the viewer. And when the triangle points down, you'll convey the opposite: a lack of balance.
As always, it's a matter of choice. It all depends on the message you want to get across.
Use all the elements you find to your advantage.
Magic atmospheres
There are places that have a magic atmosphere. You feel it as soon as you step out of the car. The air feels simply different...
You don't know why, but something is pushing your imagination to fly!
I'm talking about places like cemeteries, battlefields, ghost towns, volcanos, craters, deserts, and old buildings.
All of them will surely challenge your creative mind.
Check different sources of information
When doing your research, don't forget to
- Find inspiration looking at photos: Instagram, Flickr, 500px, Unsplash, Getty Images, 1x.com, Viewbug, Pexels, Youpic, Shutterstock, Adobe Stock and Google Images.
- Learn from what other photographers have found and shared on Locationscout and on ShotHotspot.
- Have a look at travel magazines (National Geographic, Condé Nast Traveler and Travel + Leisure), travel curated content (Exposure), travel guides (Lonely Planet) and the photography section of newspapers such as The Atlantic, The Guardian and The New York Times.
- Explore the websites of other photographers (such as the PhotoPills Masters participating in the PhotoPills Camp).
- Look into Wikipedia and the lists of interesting places. For example, if you're looking for lighthouses, you can type on Google "lighthouse list Wikipedia".
- Ask the elder people in town.
- Look into books on local history and natural biodiversity.
- Visit your town's City Hall, particularly the Culture and Tourism areas. People working in these areas will know where to find unique points of interest.
- Check the Points of interest (POIs) included in PhotoPills.
What are you waiting for?
Go and find an unexplored location!
Time to plan
Congrats!
You're one step closer to your goal.
Now that you've found a great location with a very nice foreground, ideas start to flow in your head.
It's time to plan!
5.How to plan your Star Trails photo ideas for success
"If you fail to plan, you are planning to fail!" - Benjamin Franklin
You probably know that our battle cry is:
It perfectly describes the PhotoPillers philosophy and workflow.
No matter whether you're planning some Star Trails, the Milky Way, the Moon, Meteor Showers, the Sun, lunar eclipses or simply the natural light:
"Imagination comes first, shooting goes last and planning is what makes everything possible."
The plan is the bridge between the kingdom of dreams (the land of Oz) and planet Earth, your reality.
Luckily, planning a Star Trails shot is very easy. I'll prove it to you in a second.
But first...
Where, when and at what time
I'll go straight to the point:
- Where: As I mentioned in section 4, find a powerful location with dark skies. And if you have light pollution, take advantage of it when composing the shot.
- When: Pick a nice clear sky preferably with no Moon. Check the weather forecast to avoid clouds. Cold nights are best since you get crispy stars and it takes more time to the thermal noise (caused by sensor heat) to appear in the photos. Finally, you could choose a night when a natural phenomenon is happening, like Meteor Showers.
- Time of the day: Wait until the astronomical twilight ends. It's when there is no residual light from the Sun and the sky is completely dark.
Moon considerations
If you're a beginner, I'd still recommend to start planning your Star Trail shots with no Moon. And once you nail your shots, go one step further and try to include Moonlight in the foreground, or even the Moon in the frame (Moon trail).
As I mentioned in section 3, if there is Moon, it's much easier to get great results by using the image stacking technique. Shooting multiple shorter exposures gives you the absolute control over light and, thus, exposure.
The best way to plan the Moon is by using the PhotoPills Moon pill or the Planner.
I prefer using the Planner because it shows me all the information I need in one single screen: Moon phase, Moon elevation and Moon direction (on a map).
Plan for a Moon which:
- Phase is between 30-50% (if you plan to stack your pictures) and up to 30% (if you plan to take one shot).
- Elevation is between 5º to 20º.
- Direction is perpendicular to the shooting direction, so you get some side lighting.
Drafting before planning
Imagine you've already decided the location you want to go and a few good ideas start coming to your mind...
Why not drawing a draft to see things crystal clear?
This is my personal choice, along with the rest of the PhotoPills team. We love putting all our ideas on paper in the first place, before start planning.
Let's take the example of the Star Trails we shot during the Geminids Meteor Shower. In this case, our powerful location was the beautiful beach of Cala Pregonda, in Menorca (Spain). A truly unique place.
How did we plan the shot?
It all began with Germán (the Developer) drawing a beautiful draft of the idea.

Drawing a draft will help you ask the right questions, so you can use PhotoPills to figure out the right answers.
- When is the next Meteor Shower? Check the Meteor Showers guide.
- Where will the Polaris be? Use the Night Augmented Reality view.
- Where will the celestial equator be? Use the Night Augmented Reality view.
- Will I have Moonlight in the scene? Use the Night Augmented Reality view or the Planner.
- What's the best shooting spot? Use the Night Augmented Reality view or the Planner.
- Will I have light pollution? Can I take advantage of it? Check NASA's Blue Marble light pollution map.
- At what time should I start shooting? Wait until the astronomical twilight ends. Use the Planner or the Moon pill.
Plan smarter, not harder!
In the following video you'll learn how to use PhotoPills to quickly plan any Star Trails photo you imagine, no matter where you are in the world.
Do you want more videos?
Check our YouTube channel for more cool planning examples and videos on how to master PhotoPills!
You'll find everything you need in the video above.
But, if you need further explanations, here is a brief description of the exact workflow I followed to plan the Geminids Star Trails image.
Go to the location
If you're getting started in Star Trails photography, I strongly recommend you to plan your shots in the field, in situ.
Simply go to the location, choose your shooting spot and use PhotoPills. Both the Planner and the Night Augmented Reality view help you to easily visualize all the possible compositions and Star Trails patterns you have.
If you don't like what you see, change the shooting spot and repeat the process. Simply iterate until you find what you want.
Slowly, as you shoot more and more Star Trails, you'll gain the skills to plan your images from home. But for now, the best thing you can do is to plan your shots out there, in the field.
Let's start the planning!
Place the Red Pin on the shooting spot
Once you are at the location, place yourself on the initial shooting spot.
Open PhotoPills and tap on Planner (Pills menu).
Then, place the Red Pin right where you are.
The easiest way to do it is to tap on the (+) button you see on the map. And then, tap on the GPS button (the first button on the left-hand side). The Red Pin will automatically relocate to where you are.


Great, the first step is completed.
Now, let's have a look at the second step. Let's set the date!
Set the date and time and check the Moon
Once you've placed the Red Pin right where you are (i.e. in the shooting spot), you need to set the date when you will shoot the Star Trails.
When is the best time to shoot Star Trails?
You can shoot Star Trails everyday at night if you want. It all depends on your goal:
- Check the PhotoPills Moon calendar (phase, rise and set times) to pick the right night. Sometimes you'll want a New Moon (or when the Moon has already set), and other times you'll want a certain Moonphase.
- Weekends work better (at least for us!) because Star Trails require spending the whole night out shooting.
- Cold nights are great because the air tends to be a little bit drier and clearer. This causes less diffraction of the incoming light. Basically you'll be able to see the stars much sharper. Also, at lower temperatures, it takes more time for the thermal noise (caaused by sensor heat) to show up in the photos.
- When a Meteor Shower is peaking.
- Wait until the astronomical twilight ends. It's when the sky is completely dark.
Going back to the example, let's plan a Star Trails shot during the Geminids Meteor Shower.
Check our Meteor Showers guide to find when the Geminids' peak is happening. This is the night of maximum intensity, when it is possible to capture lots of meteors.
In 2015, the peak of the Geminids happened during the night between December 13 and 14th. So, set the date to December 14 and the time at 12:00 am. We spent 5 hours capturing Meteors and Star Trails.
Have a look at the first screenshot below.
Panel 4 is telling you that the Moon rose at 10:07 am, so there was no Moon to worry about during the night. Besides, the picture of the Moon you see on the same panel indicates that the Moon was very thin.
In addition to this, and as a curiosity, Panel 3 is giving you the exact Moon phase percentage: 7.1%.


Great!
You're on the shooting spot and the date have been set on the Planner. Now set the time to the end of the astronomical twilight.
Tips
- Do you want no Moon (perfect dark skies)? Shoot around New Moon or wait until the Moon has set. If there is no Moonlight, get ready to lit the foreground using artificial light sources (a torch, LED panels...).
- If you want to use the Moonlight to naturally lit the foreground, shoot around the first and last quarters when shooting multiple short exposures (Moon phase between 30% and 50%). And use a Moon phase up to 30% when shooting a single long exposure Star Trails.
- A Full Moon will probably wash out many stars and lit too much the foreground.
- There are many possibilities. You only have to make sure you take into account the Moon when planning the shot and when choosing the camera settings.
Use the Night AR view to find the Polaris, the celestial equator and the possible Star Trails pattern
The power of the PhotoPills Night Augmented Reality (AR) view dwells in the capacity of visualizing exactly what Star Trails pattern you'll get depending on the shooting spot and shooting direction... So you know where to frame!
Drag your finger from right to left on the Night AR view to move time forwards. This allows you to see where the Moon and the Milky Way will be during the shooting.
Drag your finger from left to right and you'll move time backwards.
By using the Night AR view you'll be able to readjust the shooting spot according to your needs. It's as simple as checking whether the Star Trails pattern you get is the one you want. If it's not the case, simply change the shooting spot ;)
Again, if you need help with the Night AR view, please watch the video at the beginning of this section. You'll learn how to properly take advantage of the Night Augmented Reality view to plan your Star Trails shots.
Below are two screenshots of PhotoPills Night AR view I took in Cala Pregonda.
The first one shows where the Polaris is. And the second one, where the celestial equator is (thick blue diagonal). The thin blue curves you see show the Star Trails pattern I'll get in each direction.


To sum up, put the Polaris (or the south celestial pole) in the frame and you'll get stars describing beautiful circumferences.
Put the celestial equator and you'll get stars moving in three different directions.
Put both of them in the frame and you'll get a hypnotic image.
The reward
This is exactly how we planned the shot.
We used the PhotoPills Night AR view to find a shooting spot from where both the Polaris and the celestial equator would be in the frame.
Creating this image, the scene we imagined, was a priceless experience for us.
6.The best equipment for Star Trails photography (beginner, advanced and pro)

Believe it or not, you can create beautiful Star Trails images with "almost" any camera and lens.
I said "almost" because there are a few ideal requirements like the camera bulb mode and an acceptable noise performance (thermal and ISO) or that the lens includes short focal lengths (wide angle lens).
"Really? Any camera?"
Well, this is particularly true when you're shooting short multiple exposures for one hour or two (image stacking).
Due to sensor heat, basic cameras tend to produce noise much earlier than professional cameras.
"Yes, that's great info Toni. But what equipment should I buy to create nice Star Trails images?"
In my opinion, you should get the best equipment for night photography you can afford, even if it's used (second hand). Because, at the end of the day, it's a way to save money.
Buy a basic equipment and sooner or later you'll find yourself spending more money on a better one. I know it because I've been there too. And I've seen this in every workshop I run.
A basic equipment will surely limit your creative potential, and this is pretty annoying.
Why night photography and not only Star Trails?
Because when we're talking about Star Trails, we're talking about night photography. And I bet you also want to photograph the Milky Way, right?
The truth is that you need a better camera and a better lens to shoot the Milky Way than to shoot Star Trails. Therefore, the Milky Way should rule your equipment choice.
In our guide to Milky Way photography, I extensively discuss the pros and cons of the basic, advanced and professional equipment to capture the Milky Way. I recommend you to have a look at section 8 of that guide. There, you'll find what to buy and not to buy depending on your goals and your budget ;)
Let's see what you need.
Camera
These are the key features I believe a good camera (either DSLR or mirrorless) for night photography should have:
- Full manual exposure controls of aperture, shutter speed, ISO and focus.
- A Full Frame sensor is better, because its noise performance is much better than in APS-C cameras. This allows you to use higher ISO values, collect more light and, thus, capture more stars. For a given number of megapixels, Full Frame cameras generally produce less noise in the image than APS-C cameras.
- Good noise performance when cranking up the ISO to 3200 or higher.
- Full manual control of the white balance.
- Most of the settings (ISO, white balance, etc.) are directly accessible through external buttons, without having to dig into the camera menu.
- Shoots in RAW.
- A perfectly sealed camera body with optimal construction to withstand the effects of wind, water, rain, humidity, sand, dust, etc.
- Good heat dissipation system to prevent the sensor to heat up and, thus, avoid thermal noise in the picture. Besides the noise, if the sensor temperature is too high, the sensor might start vignetting with a magenta color.
- A built-in intervalometer. It comes very handy when you forget to bring the external intervalometer or when it runs out of battery.
- The option to use non-CPU lenses.
Not all the cameras on the market fulfill all these requirements. Obviously, the more expensive are the best ones. But you can still get a great camera to achieve acceptable Star Trails and Milky Way images at an affordable price.
These are my recommendations depending on your budget.
Low-end cameras
- Cameras with an APS-C sensor: Nikon Z30; Canon 4000D, 250D and M5; Sony a6600.
- Cameras with a Micro 4/3 sensor: Olympus OM-D E-M10 Mark IV and Panasonic G95.
- Compact camera (1" sensor): Sony RX100 VII.
These cameras allow full manual exposure and manual white balance (or, at least, choosing a white balance preset).
All of them will allow you to shoot multiple short exposures for one hour or two, even at ISO 1600. If you go beyond two hours, the sensor heat will produce noise in your images.
Unfortunately, basic DSLR and mirrorless cameras don't allow you to use ISOs of 3200 and higher without producing noise.
Since they are basic cameras with relatively small sensors, keep an eye to noise when shooting a single long exposure. Even if you use the noise reduction function in your camera, you'll probably capture to much noise. This will limit the exposure time and, thus, your Star Trails length.
Mid-range cameras
These cameras give acceptable quality at a reasonable price when shooting both the Milky Way and the Star Trails. Their noise performance at ISOs of 3200 and above is great.
- Cameras with an APS-C sensor: Nikon Z50, Zfc and D7500; Canon R10, R7, 850D, 90D and 6D Mark II; Fuji X-S20 and X-T30 II; Pentax KF; Sony a6700.
- Cameras with a Micro 4/3 sensor: Olympus OM-D E-M5 Mark III and Panasonic G9 II.
- Full Frame cameras: Nikon Z5 and D750; Canon RP; Sony a7C II.
Olympus cameras include a cool feature that makes your life easier when shooting Star Trails: the Live Composite feature. With this feature, you can create your Star Trails images directly in camera, without having to use any other sofware.
So, all you have to do is to Imagine, Plan and Shoot... nothing else!
High-end cameras
On the higher price range (and higher quality), I recommend you these cameras.
- Cameras with an APS-C sensor: Nikon D500; Fuji XH-2S, XT-5 and X-Pro3.
- Cameras with a Micro 4/3 sensor: Olympus OM-1 and Panasonic GH6.
- Full Frame cameras: Nikon Zf, Z6 II, Z7 II, Z8, Z9, D780, D850 and D6; Canon R8, R6 Mark II, R5, R3, 5D Mark IV, and 1D X Mark III; Panasonic S5 II, S5 II X, S1R and S1H; Pentax K-1 Mark II; Sony a7 IV, a7 CR, a7R V, a9 III and a1.
All are great cameras for night photographers. Their performance at ISO 6400 and higher is just stunning.
Camera vs single exposure
The rule here is very simple, the better the camera the longer the single exposures can be. And thus, the longer the Star Trails you'll capture.
Low-end cameras (with smaller sensors) suffer a lot from noise due to sensor heat.
On the contrary, Full Frame cameras have larger sensors and thus larger photosites (pixels). Larger photosites can collect more light per unit of time, so the camera doesn't have to amplify the signal that much. This reduces noise, achieving a greater dynamic range and minimizing heat in the sensor at the same time.
So, if your camera suffers a lot when shooting a single long exposure Star Trails, start shooting shorter exposures and stack them afterwards in post-processing.
Lens
Get a wide angle lens. Or even a fisheye lens!
The typical focal lengths go from 10mm to 35mm depending on how much landscape and sky you want to include in the frame. The shorter the focal length the more sky and landscape you'll capture and the more spectacular the image will be.
If you want to use longer focal lengths (70-200mm) to tell a different story, there is nothing wrong with it. Star Trails can be shot with any focal length you wish. It's all about composition.
You can get awesome images using longer focal lengths too.
Also, you need the lens to have a range of wide apertures (f/2.8 to f/5.6). This is essential to bring as much light as possible into the system and capture the maximum number of stars, and the brightest as possible.
Low-end lenses
If you only have a basic 18-55mm f/3.5-5.6 lens, my advice is to invest in a better one.
The lens makes the image, the camera records it. Your lens is a crucial part of your equipment, and you should definitely invest in quality lenses.
These basic lenses work pretty well for daylight shots at an aperture of f/8. But you'll get poor results at night or in low light conditions. And this is particularly true when photographing the Milky Way.
However, capturing beautiful Star Trails with this type of lens is still possible. Just, set the aperture to f/3.5, use the nominal ISO of your camera (ISO 100 or 200) and shoot longer exposures. Use the exposure time that gives you an image correctly exposed.
If you're looking for an affordable wide angle lens, I'd recommend the Rokinon 14mm f/2.8 with AE chip and the Irix 15mm f/2.4 Firefly.
Mid-range lenses
For Micro 4/3 cameras all the following lenses are great for night photography:
- Olympus M.Zuiko Digital ED 7-14 mm f/2.8
- Olympus M.Zuiko Digital ED 12-40mm f/2.8 PRO
- Olympus M.Zuiko Digital ED 12mm f/2.0
For APS-C cameras, I'd like to highlight the following lenses:
- Rokinon 12mm f/2 or Samyang 12mm f/2
- Rokinon 16mm f/2.0 or Samyang 16mm f/2.0
- Tokina 11-16mm f/2.8
- Sigma 10-20mm f/3.5
- Sigma 18-35mm f/1.8 Art
- Sigma 17-70mm f/2.8 Macro
For Full Frame cameras, these prime lenses are great:
Keep in mind that these lenses also work on APS-C cameras, but you need to take into account the crop factor. For example, for a camera with a crop factor of 1.5x, the Rokinon 14mm would be equivalent to 21mm for a Full Frame camera.
High-end lenses

Yes, I know I told you that you can shoot Star Trails with both short and long focal lengths.
But if you're seriously getting into night photography, you should look for a sharp, fast, wide angle lens with no coma distortion at the edge nor other chromatic aberrations.
One of my favorite lenses due to its quality is the Nikon 14-24mm f/2.8. It's an incredibly sharp lens with very little coma and vignetting.
It's not only used by Nikon photographers, but also by photographers using other camera brands like Canon. In this case, you need to use a top quality adapter ring like the Novoflex EOS NIK NT.
You also have the iconic Nikon 17-35mm f/2.8, although it suffers from coma, at f/4 it's a great option for Star Trails.
At a much higher price, you have the Zeiss 15mm f/2.8, which is also very sharp and without coma. But it has an over contrasting glass, and this is a problem at night. The Nikon 14-24mm f/2.8 will show details in the blacks where the Zeiss only shows pitch black.
If you're looking for a very sharp lens, try the Tokina 16-28mm f/2.8.
Similarly, the Rokinon 14mm f/2.8 and the Samyang 14mm f/2.8 give exceptional results. Both lenses have little coma.
On the Canon side, you have the Canon 16-35mm f/2.8L III.
Other awesome lenses are:
- Tamron 15-30mm f/2.8
- Canon 11-24mm f/4L
- Canon 14mm f/2.8L II
- Sigma 14mm f/1.8 Art
- Sigma 14-24mm f/2.8 Art
Tripod and head
You need a sturdy tripod, a tripod that weighs!
Since you'll be shooting long exposures, you need to keep your camera steady and still to prevent vibrations from blurring your photos.
Do you have a basic tripod?
Basic tripods usually don't weigh too much, which makes them pretty unstable. So, you'll probably have problems with blur when shooting long exposures.
However, if you want to prevent vibrations:
- Load the tripod with extra weight by hanging a bag filled with stones or even your camera bag from it. But don't do it when it's windy, you'll get the opposite effect!
- Don't raise the center column of the tripod if it has one, it will make it more unstable.
Do you want a great tripod at a reasonable price?
Get the Manfrotto 055XPRO3. It's probably the best seller tripod among advanced amateur photographers.
Another suggestion that I usually make to the students of my workshops is the Travel line by Benro.
At a higher price scale, you have the carbon fiber tripods.
These tripods are robust and weigh less than the aluminium ones. They allow loads from 5 kg to over 25 kg (11-56 lb) depending on the model.
Brands like Gitzo, Manfrotto, Benro, Induro or Really Right Stuff offer tripods of great quality in both materials, carbon and aluminum.
What about the heads?
The most commonly used heads in night photography are the ball head and the pan/tilt head.
The type of head depends on your taste, but make sure that it can bear at least 5-7 kg (11-16 lb) of weight and that includes a removable plate.
In my opinion, the tripod's best friend is a good ballhead. The Really Right Stuff BH-55 is the one that I use. Supporting up to 23 kg (50 lb), it bears the weight of my gear with no problem. It allows me to work comfortably and with great precision.
Other ballheads that I like are the Gitzo GH1382QD, the Kirk Enterprises BH-1 and the Arca Swiss Monoball Z1 SP, all robust and with very high endurance (minimum 13.5 kg or 30 lb).
Lighting gear
When shooting night photography a LED headlamp is compulsory.
In absence of Moon or with a very thin Moon, you'll have to use LED flashlights, LED panels or flashes to lit the foreground. Otherwise, you'll miss most of it and your image will look pretty poor (dark foreground with no detail).
Headlamp
It helps you see what you're doing in the dark, and also make focus at the hyperfocal distance.
Oh, and make sure you're not annoying the photographers around you with your headlamp!
Since our eyes take 20 minutes to get used to being in the dark, I recommend you to use a headlamp with included RED Night Vision Light. It's the best choice to avoid white flash lights that ruin your night vision. A few good ones are: Petzl Tikka XP, the Pelican 2750 and the Pelican 2760.
Other powerful LED headlamps are the Led Lenser SEO5, the H14R or the H7R.2.
LED flashlight
LED flashlights are commonly used to add texture and volume to a certain area of the foreground or to a determined subject. It allows you to apply light with precision.
A good idea is to take two flashlights with you (one more powerful than the other):
- A powerful flashlight to illuminate subjects over long distances, such as Coast HP7 or Led Lenser M7.
- A second less powerful flashlight, such as the Coast TX-10, the Led Lenser L7 or the Maglite Mini to illuminate foreground subjects.
LED panels

The continuous light provided by LED panels is great to lit a large area of the foreground. I recommend you to have at least two of them.
Flash
The great power of the flash allows you to freeze your subject, for example a model, when shooting a long exposure.
I also suggest you to use stands or tripods for flashes and softboxes or octoboxes.

Both LEDs and Flashes will give you a daylight color temperature of about 5500K (white light). But you can change their temperature using colored gels.
Colored gels
A gel is a colored plastic sheet that you can place in front of the light source to color its light.
CTB gels (Color Temperature Blue) are used to cool the scene, because they turn tungsten light of 3200K into daylight color (5500K).
While CTO gels (Color Temperature Orange) turn daylight color (5500K) into tungsten (3200K), allowing you to warm the scene.
You can find gels of many intensities or strengths (1/4, 1/2, 3/4, etc.). The lower the intensity the less the color temperature is corrected.
Ideally, you should always have in your bag at least a couple of color correction gels. They are very cheap and useful.

In addition to color correction gels, there are the so called color gels. These are used to allow color lighting accents and unnatural effects. There is a huge number of colors available from several manufacturers: red, yellow, green, dark blue, etc.

Intervalometer
When you're shooting multiple long exposures, you want to prevent vibration as much as possible. Therefore, you need a way to trigger your camera without having to touch it.
Shutter releases and intervalometers will do the job. But, in my opinion, you should avoid remote shutter release and get a good intervalometer instead. Even a cheap intervalometer is fine.
Nowadays, you can even find cameras that include it.
Why is an intervalometer a better option?
Because remote releases are not programmable. You cannot shoot at regular intervals automatically.
An intervalometer is a programmable remote shutter that you can use to set the exposure time, the time interval between each shot, the total number of photos you want to take and even the time delay of the first picture.
Furthermore, when using the Bulb exposure mode, an intervalometer allows you to shoot exposures of more than 30 seconds, which is great for timelapse and Star Trails photography.
These are all great intervalometers:
- Pro intervalometer: SMDV.
- For cheap intervalometers check the brands Neewer, Phottix and Vello.
A great alternative is a device called CamRanger. Right now it’s available for Nikon, Canon, Fuji and Sony cameras.
It's a stand-alone device that you connect to your DSLR or mirrorless camera with a USB cable. It creates an ad hoc WiFi network to which you can connect your smartphone or tablet (iOS, Android and Windows). Thanks to the CamRanger application you can control your camera without a computer or an Internet connection.
Best of all, this device is independent. Therefore, if your mobile device loses its connection, the CamRanger has an internal memory to keep shooting. Imagine that you are making a timelapse, your sequence would be cut if the camera stops taking pictures in the time frame you’ve set...
So the CamRanger is great for many types of photos: timelapses (of the Milky Way, of Star Trails, of solar eclipses or lunar eclipses...), bracketing, focus stacking for macro and landscapes... and many more!
Memory cards
When you're shooting multiple long exposures to create a Star Trails image, your memory card should have:
- A high transfer rate, because it allows each picture to be saved into the memory card quicker, providing a shorter delay between two consecutive shots.
- A large capacity of storage, 64GB or higher, to make sure you have enough space to store all the photos.
Before leaving home, always make sure you bring with you several memory cards with enough capacity. You don't want to run out of memory space in the middle of the shooting session.
I recommend you to test how many MB one of your photos weighs. Once you know the weight of one photo (24MB for example), the shooting interval (2s), the exposure time (20s) and the shooting duration (3h), you can use PhotoPills Timelapse calculator to find out the total memory usage ;)


What memory cards should you buy?
There are many different types of SD Cards (Secure Digital) depending on their capacity and data transfer speed.
Both SDHC and SDXC Class 10 cards are ideal for advanced amateur photographers. Their writing performance is good enough to have an acceptably short time interval between two consecutive exposures.
It might seem this is not that important, but it's vital when shooting timelapses at night or low light conditions, as you want to take the maximum number of photos possible.
If you can, get the best SD Cards (like SanDisk or ProGrade) to minimize the risk of losing your photos and to get the maximum transfer speed.
The SDXC UHS-II Class U3 cards are ideal for professional photographers. Their writing performance is excellent and they have an incredibly short time interval between two consecutive exposures.
The cards can have a capacity of 16GB, 32GB, 64GB or even more. If you plan to shoot timelapses, I recommend you to get a 64GB card or with a higher capacity (128GB or even 256GB), to make sure you have enough space to store all the photos.
While there are still cameras that can work with CompactFlash (CF) cards, this system is slowly disappearing.
And to replace it, SanDisk, Nikon and Sony launched a new card format called XQD currently available for several Full Frame (Nikon D4, D4s, D5 and D850; Panasonic S1 and S1R), APS-C (Nikon D500) and mirrorless (Nikon Z6, Z6 II, Z7 and Z7 II) models. These cards
- Have a very high storage capacity (from 32GB to 256GB).
- Have a super fast reading and recording speed (400MB/s compared to 160MB/s for a CF card or 250MB/s for an SD card).
- Are very secure, resistant and with an incredible durability.
Later on, in 2017, CFexpress launched the latest standard memory card from the CompactFlash Association with 2 new form factors, Type A and Type C were announced, with the existing XQD form factor becoming Type B.
- Type A has, so far, only been adopted by Sony in all of its newest models.
- Type B is a far more common format offering a lower price. It has been widely adopted by Nikon in its Z series, Canon in some EOS R bodies, and Panasonic in the S1/S1R and GH6.
- Type C is not being produced yet.
Batteries
After all the brainstorming and planning, you don't want to run out of battery before the shooting is completed, right?
Before leaving home, check and fully charge all the batteries of your different cameras and bring some spare ones with you just in case. Depending on the type of camera and of photography, the number of batteries will vary from 2-3 (DSLR) to 6 or more (mirrorless).
I use a Nikon D4s or a Nikon Z6. Both allow me to shoot long timelapse sessions and Meteor Showers without any battery problem.
Since you'll be shooting at night, the cold will surely shorten the battery power performance. In this case, all the extra power available is more than welcome. So a grip with extra batteries comes in very handy when you're shooting Star Trails.
If you don't have a grip, but you still want to spend several hours shooting a timelapse, you'll have to replace the battery as quickly as possible.
But, when you do so, make sure you don't move the camera!
If you plan to use them, don't forget to check that the batteries of flashlights, LED panels, flashes and headlamp are also fully charged.
Finally, it's a good idea to take a portable power bank for your smartphone or tablet.
Equipment against moisture

Ah! Dew, moisture... What a nightmare for night photographers!
Because I live in a very small island, I have to constantly deal with moisture condensation on the cold surface of my lens.
How do I fight dew?
I combine these three anti-dew methods.
Hood
Use the hood and moisture will take longer to condense on the surface of your lens.
Fan
Simply connect a portable battery to a PC fan and the steady stream of air will keep the lens dry.
I particularly use a small portable rechargeable Li-ion 12V 3800mAh battery with a 5.5mm barrel jack and USB connectors. Here, I had to adapt a 5.5mm barrel jack connector to the wire of the fan. Finally, I put the fan onto a flexible loc-line hose adhered to a clamp so it can be attached to the tripod.
Dew heater
Use it to heat the lens to a temperature above the dew point and you'll avoid moisture condensation. All you need is a heater strip, a battery and a cable to connect the heater to the battery.
- Heater strip. Perhaps, the two most popular heater strip brands are Dew-Not and Kendrick. I use a Dew-Not 3" DN004, which perfectly fits my Nikon 14-24mm f/2.8. This model has a length of 33cm (13"), long enough to cover the diameter of the lens. Make sure you buy a strip that can go around the entire circumference of the lens.
- Battery. As for the power supply for the heater strip, I use a 12V 3800mAh battery. The same battery I use to power the PC fan described in the previous section serves well. Bringing a spare battery is always a good idea.
- Cable connector. Most heater strips have a male RCA connector, while portable batteries have a 5.5mm barrel jack connector. Therefore, you need to purchase a RCA/Jack 5.5mm adapter. I built mine from a RCA cable and a 5.5mm barrel jack.
Another great heater is the multi-bodywarmer by TheHeatCompany.
These heaters are used by photographers, film crews and athletes all over the world. Their advantage is that you never run out of battery. Just tape one on the bottom of your lens and you're done!
Double-check that the fan doesn't appear in the frame!
7.How to shoot single long exposure Star Trails
Shooting a single very long exposure Star Trails image is a real challenge for any photographer and any camera sensor (depending on its noise performance). But it's also a very rewarding and exciting experience which I recommend living!
It's incredibly challenging because you'll have to deal with two big issues: uncertainty and noise.
Setting the camera to Bulb mode and leaving the shutter open for one, two or three hours is definitely very risky.
There are so many things that can go wrong and ruin the final image... Just to mention a few: the wrong exposure, changing weather (clouds), intrusive artificial lights, tripod vibration, planes and satellites, battery problems. And even something (a plane) or someone (a fellow photographer) could just walk in front of the camera!
Besides, not many cameras offer a good noise performance with very long exposures, even at the nominal ISO (100, 200).
So run a few tests and get to know the limits of your camera. It's the only way to figure out the maximum exposure time your camera sensor can handle an acceptable noise performance (minimum thermal noise produced).
"Toni, stop scaring me. Please, tell me how it works!"
Ah, that's the spirit!
Firsts thing first...
Before leaving home
Imagine that the shooting day has finally arrived. You have the shot perfectly clear in your mind. Every detail has been thoughtfully planned.
You're ready for action!
Now, before leaving home, make sure to check the weather forecast. And, above all, the clouds forecast. You'll be shooting a very long exposure, so the last thing you want is the sky covered with clouds.
Also check that you take all you need with you (the gear I described in section 6). And don't forget to bring enough memory cards and a few spare fully charged batteries.
Get to your shooting spot in advance
You can use the PhotoPills Night Augmented Reality view to double-check you're at the right spot and that you'll have the Star Trails where you want and creating the pattern that you planned.
Place the tripod, ballhead, camera, and lens
Once you're sure, place the tripod on the planned shooting spot and make sure it's stable.
In this case, since you're going to be leveling the camera, it's not necessary to level the tripod. Unless, of course, you're shooting a Star Trails panorama.
In this case, leveling the tripod is also compulsory. You want to make sure that all the photos have the same level and inclination, which is crucial to stitch them together. To do so, use the bubble level of your tripod or an external bubble level.
Remove the UV filter
If you usually use an ultraviolet (UV) filter to protect your lens, remove it as soon as you start preparing the equipment.
It's completely useless.
In night photography, an ultraviolet (UV) filter can even ruin your photos. This type of filter slightly reduces the sharpness and contrast of your images. But it can also cause reflections, halos and flares.
Use a light pollution filter (optional)
If there is light pollution in your scene from sodium vapor light sources, you should use a light pollution filter to remove in camera the yellowish glow they usually produce.
Turn off the lens stabilization system
Some lenses include a function to stabilize vibrations. Canon, for example, calls it Image Stabilization (IS), while Nikon calls it Vibration Reduction (VR), and Sigma, Optical Stabilizer (OS). Other brands, such as Sony, Olympus and Pentax have been pushing for in-camera stabilization.
The lens stabilization system allows you to shoot handheld in low light conditions at shutter speeds slower than usual without getting a blurred image. This is possible because the lens compensates the vibrations you produce.
Since you're using a tripod, turn off this function. Even without camera vibrations or movement, the image stabilization system might try to correct nonexistent movements. And this will cause vibrations that may negatively affect the sharpness of the image.
Turn it off! ;)
Long exposure noise reduction: on or off?
Since noise is one of the greatest enemies of long exposure shots, almost all cameras include an option to automatically reduce noise in the final image: the long exposure noise reduction function.
When this function is enabled, right after taking the photo, the camera takes a second exposure with the same parameters (shutter speed, ISO and aperture) but without letting any light into the system. This second photo has almost the same noise as the first one.
Finally, the camera detects the noise of this second picture and removes it from the first one.
When should you use it?
Only when you're shooting long single exposures with a shutter speed (exposure time) under 10-20 minutes, and you're willing to wait to see the photo.
Remember that it takes another exposure after the first photo. So, you'll have to wait for another 10-20 minutes to see it.
In my opinion, this function is not useful in Star Trails photography because:
- I prefer shooting much longer single exposures and I don't want to wait so long to see the photo.
- It consumes battery. You could even run out of battery in the middle of the process and end up without your photo.
- When shooting multiple short exposures (image stacking), I don't want to have such a big gap between two consecutive photos. It halves the number of photos I can take and it produces horrible gaps in my Star Trails. In this case, you can take a dark frame at the end of the shooting. Put the cap on the lens and shoot to capture noise only. Then, use this frame to reduce noise in post-processing.
Shoot in RAW
In the shooting menu, select the RAW option as the resulting file.
It allows you to produce better pictures because a RAW file contains all the image data recorded by the camera sensor.
This information can be used to improve the image and correct problems that wouldn't be recoverable in JPEG format.
Use the shortest focal length you can
Short focal lengths are commonly used in Star Trails photography (14-35mm) because they provide a wider angle of view. And this is great for two reasons:
- You'll capture a larger area of the sky, also capturing more Star Trails.
- You can easily incorporate interesting elements of the foreground into the composition.
Despite the composition is more difficult, you can also use longer focal lengths such as 50mm, 70mm, 200mm or more.
In this case, you capture less sky and less landscape, but you are able to focus the attention on the main subject or part of it (a rock, a tree, etc.).
The good thing is that, since you're zooming in, Star Trails will look longer in the frame, so you'll need a shoter exposure time (faster shutter speed) to capture the shot.
So what focal length should you use?
It depends on the lens you have and the image you have in mind. Choose the available focal length on your lens that gives you the result you're looking for.
My advice: try to shoot all sort of images and compositions (short and long focal lengths).
Select the Manual shooting mode (M)
If you use your camera's auto mode you won't be able to capture any Star Trails.
You need to have the total control over exposure by freely setting aperture, exposure time and ISO. Therefore, set your camera shooting mode to Manual shooting mode (M).
Set the shutter speed (exposure time)
It's a trade off between Star Trails length and noise level.
Taking into account your camera limitations (how much noise it produces), choose the exposure time that gives you the desired Star Trails length to tell the story you want.
Test your camera and figure out the maximum exposure time that still provides an acceptable level of noise.
Further down this section, I explain you in detail how to use the reciprocity law to work out the exposure time that gives you a photo correctly exposed. But let me give you the highlights:
- You need to take a test shot at a shorter exposure time to check exposure.
- Set the test shot settings (for example: f/2.8 or the widest possible, 30s, ISO 3200 or the highest possible depending on your camera), focus at the hyperfocal distance and take the test shot.
- Check the histogram and adjust the exposure time until you get a photo correctly exposed.
- Then, use the PhotoPills Exposure calculator to find out the equivalent exposure time you need using the reciprocity law. Lower the ISO as much as you can to avoid noise. You may need to close aperture to increase the exposure time even to get the Star Trails length you want.
- In the calculator, set the ISO value as low as possible (100, 200) and check the equivalent exposure time you get. If you want a longer exposure time, just close the aperture (f/4, f/5.6, etc.) until you get the value you need (30min, 1h, 2h, etc.). The longer the exposure time, the longer the Star Trails will be.
Don't you know how long the Star Trails will be for a given exposure time?
Here you have a quick workaround :)
As I mentioned in section 3, you can use the PhotoPills Star Trails calculator to make simulations, so you can estimate the exposure time that gives you the Star Trails length you want.
Set the ISO
Given certain light conditions, the exposure is determined by the shutter speed (exposure time), aperture and ISO settings.
Since you're going to shoot a single long exposure that gives you a desired Star Trails length, the exposure time and the noise performance will determine the aperture and ISO combination.
Here, the biggest issue is noise. So keep the ISO value as low as possible (100, 200). Then, choose the aperture accordingly.
Set the aperture
Again, for a desired exposure time and a low ISO value, choose the aperture that gives you a photo correctly exposed. To do so, use the equivalent exposure method described further down this section.
If you set the widest aperture of your lens (for example, f/2.8), you'll capture many stars, but the exposure time might be not as long as you wish.
Therefore, close a bit the aperture (by one or two stops). You won't capture that many stars but you'll get these two benefits instead:
- Longer Star Trails because you'll need a longer exposure time.
- Since you'll be using apertures that are closer to the sweet spot of your lens (the sharpest aperture), Star Trails will look sharper and crispier.
Yes, lenses are not equally sharp at every aperture. There are apertures that are sharper than others.
So, what is the sharpest one?
The rule of the thumb says that the sharpest aperture is the one that results from stopping the lens aperture down 2.5 to 3 stops from its maximum aperture. For example, if the maximum aperture is f/2.8, then use apertures between f/5.6 and f/8.
Notice that this approach is totally different from how you choose the aperture in when photographing the Milky Way. In that case, since you limit the exposure time to prevent stars from trailing (usually under 30s), you have to use the widest aperture to collect as much light as possible. This way, you'll capture stars as big bright spots.
Focus at the hyperfocal distance
The easiest way to have both the foreground and the Star Trails perfectly in focus is to focus at the hyperfocal distance.
If you do so, your image is focused from half of this distance to infinity.
So, forget about "turning the focus ring to infinity" or "using the Live View" of your camera to focus at the stars. Your depth of field in the foreground will be shallower!
How to calculate the hyperfocal distance
Once you've decided the focal length and aperture, use the PhotoPills Depth of Field (DoF) table or Depth of Field (DoF) calculator to figure out the hyperfocal distance.
As an example, using my Nikon D4s together with an aperture of f/4 and a focal length of 14mm, the hyperfocal distance is 1.65 m.


Once you've calculated the hyperfocal distance, you just need to focus at it.
How to focus at the hyperfocal distance
It's very easy, just watch this video and you'll learn how to do it in less than 1 minute!
But watch out!
You don't need to focus exactly at the hyperfocal distance. The secret here is to make sure you're focusing at a slightly longer distance.
If the hyperfocal distance is 1.65 m for example, there is nothing wrong about focusing at 2 m. But don't focus at 1.5 m. Never fall short!
Always, always, always, make sure you don't focus at a shorter distance than the hyperfocal one. If you do so, you'll get the Star Trails out of focus.
Lock the focus
After using the automatic focus mode to make focus at the hyperfocal distance, set it back to manual focus. This way you make sure that your focus doesn't change.
Always check whether the stars are in focus before starting the shooting
Finally, make sure to take a test shot.
Use the Live View function on the LCD of your camera to focus accurately. And if your camera has the Focus Peaking and/or Focus Magnifier functions, turn them on too because they will help you to be even more precise.
Once the camera is attached to the tripod, take as many test shots as you need to see if you're getting the framing you want and adjust accordingly.
The last thing you want is to spend the whole night in the cold and find out at the end that your stars are out of focus.
Set the white balance manually
Since you're shooting in RAW, you can always adjust the white balance in post processing.
But, if you want to capture the real colors of the stars and the scene right in your camera, I recommend you to give a try to the following values and adjust from there:
- Dark skies: 3900K
- Light pollution: 3400K
Frame and level the camera
It's time to put your camera on the tripod and frame the scene.
Everything is much easier when you have already visited the location during the day and have the photo pictured in your mind. Take advantage of the hard light hours of the day to compose your shots, so at night, you know exactly where to frame.
When framing, use a powerful torch to lit the landscape and foreground elements. Then, when you think you have the right composition, take a short exposure at a high ISO and short exposure time to see if everything is at the right place.
Obviously, avoid to include any direct light source. It would ruin your photo.
Don't forget to use the built-in level of your camera to have everything perfectly leveled. If your camera doesn't have a level, use an external bubble level.
Now, let's see how to expose.
Take a test shot, check the histogram, check focus and adjust exposure
You need to set 3 variables: exposure time, aperture and ISO.
Your goal is to capture the longest Star Trails possible (or the length you wish).
How to expose a Star Trails shot
Use the reciprocity law (equivalent exposure method):
- Start finding a good exposure (test exposure). Set the exposure time to 30s, a high ISO (1600, 3200, 6400, depending on your camera and light conditions) and a wide aperture (f/2.8, f/4, depending on your lens).
- Start, for example, taking a test exposure at 30s, ISO 3200 and f/2.8 (or the values that your lens and camera allow). If the photo is too bright, try an exposure time of 20s. If it's too dark, try an exposure time of 40s. Iterate until you get the exposure time that gives you the right exposure.
- Use the camera histogram (or the live histogram option) to check the exposure. Usually, you want an histogram that gives you a neutral exposure, with both edges of the histogram just touching the edges of the histogram window.
- Use the PhotoPills Exposure calculator to calculate the equivalent exposure time for a lower ISO (100, 200, etc.) and/or a narrow aperture (f/4, f/5.6) to get longer trails (see section 8).
- Then, set the shutter speed to Bulb and shoot the long exposure you've calculated (30min, 1h, 2h, 3h, etc.).
- Finally, check the how much thermal noise your camera produces. If there is too much noise due to the camera sensor heat, you'll have to go for shorter exposures.
How to calculate the exposure time (equivalent exposure)
Imagine that you've taken a test shot at f/2.8, 30s and ISO 3200 and you get a correctly exposed picture. Open the PhotoPills Exposure calculator and follow these steps:
- First, set the Shutter Speed as the variable you wish to calculate.
- Enter the settings of the exposure test: f/2.8, 30s and ISO 3200.
- Now, it's time to enter the equivalent settings you want to use for the shot and that will allow you to capture longer star trails, keeping the same exposure. In this case, the ISO and the aperture.
- Lower the ISO and use your camera nominal ISO to minimize noise: 100 or 200.
- Finally, close the aperture to f/5.6, f/8, etc., until you get the desired exposure time for the Star Trails length you wish to capture. Remember, the narrower the aperture, the less Stars Trails will be visible.
- In the equivalent settings, make sure the last parameter is blank (-- stops), as you're not using any neutral density filter (ND). This field can be used to calculate the equivalent exposure time when using a neutral density filter (ND).


Light painting the landscape
When you're not using any Moonlight, using a soft artificial light source (like a LED) to side lighting the foreground will surely increase the sense of place, adding depth and volume to the scene.
Moreover, using a flashlight to apply light with precision to highlight a determined spot can add interest to the final image.
Light painting the scene when shooting multiple short exposures (image stacking) is much easier, because you can run as many tests as you wish before you start the shooting. Once you get the foreground with the light you want, just keep taking the rest of the photos.
But when you're shooting a very long exposure, the story is completely different. Every test simply takes too much time. The slightest mistake and you're forced to start from scratch.
So, for long exposures, here's my advice:
- Before starting the shooting, take a test shot with the equivalent settings set in camera (1-2 minutes or the time you need) to see if you're getting the foreground with the light your want.
- Keep the light source moving the whole time. Don't stop moving the LED or flashlight. This way you'll avoid overexposing one portion of the scene.
- Once you get the amount of light you want, start the shooting and follow the same steps to light the foreground again. If there is no other external light source (light pollution or moonlight), at the end of the shooting, your foreground will have kept the aspect you gave it (no extra light added).
- With light pollution or Moonlight, remember to add less light to the foreground. You need to take into account the extra light that will be added during the exposure by the external light sources.
Single long exposure Star Trails with human figures
It's possible!
The only requirement is that the model must stand still during the whole exposure time :P
Dealing with sensor heating problems
The simplest way to fight sensor overheating, mitigating its negative effect (it produces noise), is to shoot during cold nights.
8.How to shoot multiple long exposure Star Trails (image stacking)

In section 3, I gave you a long list of reasons to justify why I prefer shooting multiple short exposures (for 2 to 5 hours) and stacking them in post-processing.
Very quickly, the key points are:
- No matter the camera and lens you have, even with a point and shoot camera and a basic lens, you can create great Star Trails images.
- You have the total control over the Star Trails length (number of photos stacked) and the foreground lighting.
- It's far less risky than shooting a single long exposure. You can easily overcome any unexpected issue (like plane trails or intrusive light sources) by removing the ruined frames.
- It's much easier to shoot Star Trails even when you have Moon or light pollution.
- The night is far much productive: Star Trails images of different Star Trails lengths, timelapse videos, Star Trails timelapse, a single short exposure photo that includes a Meteor...
- It's much easier to capture the real color of the stars.
Great!
Now that you're excited, let's start with the workflow :)
Before leaving home
Check the weather and the clouds forecast. You don't want to shoot in a cloudy night.
Also make sure you take all the equipment with you (section 6), together with enough memory cards and a few spare fully charged batteries.
Get to your shooting spot in advance
Use the PhotoPills Night Augmented Reality view to double-check you're at the right spot and that you'll get the Star Trails pattern and composition you want.
Place the tripod, ballhead, camera, and lens
Place the tripod on the planned shooting spot and make it stable.
Remove the UV filter
If you usually use a ultraviolet (UV) filter to protect your lens, remove it as soon as you setting up your gear.
It's completely useless.
In night photography, an ultraviolet (UV) filter can even ruin your photos. This type of filter slightly reduces the sharpness and contrast of your images. But it can also cause reflections, halos and flares.
Use a light pollution filter (optional)
If there is light pollution in your scene from sodium vapor light sources, you should use a light pollution filter to remove in camera the yellowish glow they usually produce.
Turn off the lens stabilization system
Some lenses include a function to stabilize vibrations. Canon, for example, calls it Image Stabilization (IS), while Nikon calls it Vibration Reduction (VR), and Sigma, Optical Stabilizer (OS). Other brands, like Sony, Olympus and Pentax prefer in-camera stabilization.
The lens stabilization system allows you to shoot handheld in low light conditions at shutter speeds slower than usual without getting a blurred image. This is possible because the lens compensates the vibrations you produce.
You're using a tripod, so it's always better to turn off this function. Even without camera vibrations or movement, the image stabilization system might try to correct nonexistent movements. And this will cause vibrations that may negatively affect the sharpness of the image.
Long exposure noise reduction: on or off?
When this long exposure noise reduction function is turned on, the camera takes a second exposure just after the first one. For this second exposure, the camera uses the same settings (exposure time, ISO and aperture) but without letting any light into the system.
Since this second photo presents almost the same noise as the first one, the camera uses it to reduce noise.
The problem is that it takes twice the exposure time to take one photo!
Then, for a given shooting time, having this function turned on will automatically halve the number of photos you can take.
And this is the opposite of what you need: to take as many photos as possible.
In addition to this, you don't want a long time frame between each photo. I would say that 2 seconds is enough to cool down a bit the sensor and to avoid having those ugly gaps in your Star Trails.
So... Turn it off!
Shoot in RAW
Always shoot in RAW!
The RAW file allows you to make the most of the data recorded by the sensor. Take advantage of it, use it in post processing and produce better images.
Use the shortest focal length you can
Actually, you can use both short and long focal lengths.
But, if you're getting started in Star Trails photography, I recommend you to go for the short ones first (14mm, 18mm, 24mm).
You can capture a larger number of stars, and it's much easier to include the interesting elements of the foreground.
Long focal lengths like 70mm or 200mm allow you to fill the frame with the main subject to tell a totally different story. But composition is a bit more difficult.
Select the Manual shooting mode (M)
By using the Manual shooting mode (M) you get full control over exposure.
You can set the exposure time, ISO and aperture to capture the exposure that you want.
Set the shutter speed to calculate the total exposure time
I like spending around 2 to 5 hours shooting exposures of between 20 to 30 seconds. These short multiple exposures ensure that I'm not getting Star Trails in my individual images.
That's right.
You don't need trails in the photos. You're going to create them when stacking all the individual images in a single one.
I recommend you to follow the same approach. But, as always, it's a matter of taste, a personal choice. You could also shoot longer exposures and get great results.
In my opinion, shooting short exposures gives you more flexibility and control over the final Star Trails image:
- Finding the right exposure using the trial and fail method is much faster and easier.
- You can easily remove the frames that you don't like (or the ruined ones) without affecting the final image.
- It's way more productive (timelapses, Star Trails and many other results like a Star Trails timelapse, etc.).
- Light painting the foreground is also much easier.
How to calculate the exposure time
Like I do in my Milky Way photos, I use the NPF rule to figure out the maximum exposure time that allows the camera to capture the stars as big bright spots (i.e. without creating any trails).
The good news is that you can use the PhotoPills Spot Stars calculator to do all the math ;)
Obviously, if there's any Moonlight or light pollution you need to take the extra light into account when exposing.
Total exposure time vs Star Trails length
The total exposure time results from the addition of all the short exposure times. It determines the length of the Star Trails.
Again, as I mentioned in section 3, you can use the PhotoPills Star Trails calculator to estimate the total exposure time you need to get a determined Star Trails length.
Obviously, the longer the total exposure time is, the longer the Star Trails will be. But, as the sensor heats up, there will be a moment when the camera will start producing a ton of thermal noise. And you don't want that in your images...
Total exposure time vs thermal noise
Using the short exposure strategy (image staking), noise produced by sensor heat will become an important issue only when you push your camera sensor to the limit. Depending on your camera, this can happen after one, two or more hours shooting.
It also depends on the temperature. In warm nights, noise appears earlier.
How many hours can your camera shoot continuously without producing excessive thermal noise?
Every camera is different. You need to test it!
The good news is that until you reach that limit, you can use all the photos you've taken to create Star Trails. Maybe not the one you wanted, but I'm sure you will get a final image with long trails.
Set the ISO
Set the ISO as if you were going to shoot the Milky Way.
Since you want to capture stars as bit bright spots (short exposure time), you have to set a high ISO to avoid an underexposed image.
The ISO choice depends on the noise performance of your camera. Start with a high ISO (6400, 3200, 1600, 1250, 800) and adjust accordingly.
If you want to capture the color of the stars, don't go beyond ISO 1600. Use the lower value possible that gives you an image correctly exposed. Remember that, in this case, you have to increase the exposure time, not getting stars as spots in the photos.
Now, one word about shooting Star Trails during Meteor Showers.
The higher the ISO, the more Meteors you'll capture. So set a high ISO (while keeping an reasonable noise performance) and reduce the exposure time and/or close the aperture to keep the photo correctly exposed.
Set the aperture
If you want to capture the stars as big bright spots in every single shot, you need to collect as much light as possible during the exposure time. So use the widest aperture possible (f/2.8, f/4, depending on your lens).
The more light the sensor collects, the more stars and the brighter.
Moreover, it helps you keep the ISO within the limits so you can control noise.
Notice that this is exactly the same workflow you should follow in Milky Way photography.
This approach might wash out a bit the color of the stars. If you want to maintain the color, close the aperture by one stop (f/2.8 -> f/4) and increase a bit the exposure time applying the reciprocity law.
You won't get stars as spots in each single frame, but it will help you capture their natural color.
Focus
When it comes to focusing you have two options:
- Focusing at the hyperfocal distance.
- Focusing at one star.
Depending on your taste, choose one or the other.
Focusing at the hyperfocal distance
If you've read section 7, you know that:
- By focusing at the hyperfocal distance your image is focused from half of this distance to infinity. Therefore, both the foreground and the Star Trails are in focus.
- You can calculate the hyperfocal distance using the PhotoPills Hyperfocal Table or the Depth of Field (DoF) calculator.
- Once calculated, make sure not to fall short when focusing at it. This means that you must make sure to focus at a slightly longer distance than the hyperfocal one. Watch this 1-minute video to learn how to do it.
- Lock the focus! After using the automatic focus mode to focus, set it back to manual focus.
- Always take a test image and use the Live View option to make sure the stars are in focus before you start shooting.
If you're interested in learning more about the hyperfocal distance, take a look at our depth of field (DoF) guide.
Focusing at one star
If you want the stars to be tack sharp, but you don’t mind losing a bit of sharpness in your subject, then focus at one star.
Set the camera and lens to manual focus.
Now, find a star and zoom in on it to magnify it (or use the Focus Magnifier option). Then, turn the focus ring to make focus on it. Turn it until you see the star as a tiny little dot (actually, the smallest possible dot).
Set the white balance manually
If you're shooting in RAW, white balance is something you can adjust in post-processing.
But, since I'm sure you would like to capture the real colors of the stars right in camera, use the following values as starting points and then adjust it from there:
- Dark skies: 3900K
- Light pollution: 3400K
Frame and level the camera
Put the camera on the tripod and frame the scene.
You'll have 99% of the job done if you've scouted the location during the day. I always do it.
Go there, and walk around looking for potential compositions and framings. Once you find the scene you like, plan it with PhotoPills (section 5). And when the shooting date arrives, come back at night at the right time for the planned shot.
When framing at night, use a flashlight to lit the foreground and its elements. Then, take a short exposure at a high ISO to see if everything is at the right place.
And don't forget to level your camera!
Light painting the foreground
Always add light in the first and in the last shots of the session!
At the beginning of the session, test your exposure and the light painting of the foreground. When you're happy with the image, make sure to quickly start the shooting using the intervalometer.
At the end of the session, just before you stop the camera, light paint the foreground again. This way, you have at least two great photos from where to choose the foreground for the final image.
So, use your skills with the LED and flashlight to turn a boring foreground into an appealing one. Make sure the extra light is subtle. It makes the image look more natural.
Use the LED to add a soft continuous side light to the foreground. And use the torch to highlight a certain area.
When applying light, make sure to keep moving the light source. That way you'll avoid overexposing a specific area or spot.
In addition to this, count the seconds you're lighting the scene while taking the test shot. It will help you to make further adjustments afterwards.
If you have Moon, take advantage of it when it's low in the sky and its light comes from the side (not the front or the back).
Take a test shot, check the histogram and adjust exposure
You're almost ready to start the shooting. You've calculated the exposure time to get stars as bright spots, and you have set a wide aperture and the ISO value according to all the considerations I explained before.
All you have to do now is to take a couple of test shots and check the histogram to adjust exposure.
Let's say you start testing a 30s exposure time, a f/2.8 aperture and a 1600 ISO:
- If your image is too dark, crank up the ISO or increase the exposure time.
- If your image is too bright, lower the ISO.
You're looking for an histogram that gives you a neutral exposure, with both edges of the histogram just touching the edges of the histogram window. Obviously, this depends entirely on the colors of your scene.
Once you get the exposure you want:
- Set the camera to Bulb mode.
- Set the exposure time in the intervalometer.
- Set a 2-second time frame time between two consecutive photos in the intervalometer.
- Shoot a few photos to adjust the light painting of the foreground.
Finally, when you get the foreground lit in a pleasant way, quickly start shooting the rest of the photos.
Before you finish the shooting, lit again the foreground and take the last shot. This way, you'll have two foregrounds to choose from ;)
Turn off the LCD display before start shooting
Save battery!
Turn off the LCD display before starting the shooting. Otherwise, your camera will automatically display every single frame.
You're not going to check all the photos, are you?
Take a couple of dark frames at the end of the shooting session (optional)
Depending on the noise performance of your camera, it may be a good idea to take a couple of dark frames at the end of the shooting.
These dark frames will capture the noise produced by the sensor heat. They will be very useful during the post-processing to reduce the noise of the final Star Trails image.
How to include a model in the photo
If you want to include a human figure in the foreground, you should include it in the first photo you take, making sure his or her body doesn't go above the horizon (doesn't cover any star) to avoid the ghost effect.
Repeat the photo until you make sure the model has stayed still during the whole exposure time.
Then, start shooting the rest of the photos.
Take a second camera with you and enjoy shooting the Milky Way
When you have your main camera set and working, it's time to set a second camera, lens and tripod and start shooting the Milky Way.
But always keep an ear on the first camera. You're going to be listening to its music for hours.
If the music stops, run to the camera and change the battery!
And you'd better run fast...
9.The best star stacking software for Mac and PC (and how to use it step by step)
This is one of my favorite moments!
After waking up late the following day, and having a delicious well deserved breakfast, I sit down in front of my computer and start creating the Star Trails image.
My workflow is very simple:
- First, I edit the RAW files in Lightroom and export them (JPEG or TIFF format depending on the star stacking software you'll use).
- Then, I use StarStaX to create the Star Trails image.
Further down this section, I show you how to use Lightroom and StarStaX to edit and put together a truly hypnotic Star Trails image.
But first, let me say a word on the different star stacking software options you have.
The best star stacking software
You know that the main function of any star stacking software is to merge a series of photos into a single image. By doing so, the relative motion of the stars creates structures that look like Star Trails.
Here are the main options you have.
StarStaX (free)
StarStaX is my favorite star stacking software by far. It's free and it runs on Mac, Windows and Linux.
In my opinion, these are the main pros:
- It's much easier and faster than other options like Photoshop.
- What this software do is to take one photo as a base and adds to it any extra light it finds in the other photos.
- You don't need to create a blank document at the beginning of the session.
- It includes an interactive easy to use gap-filling blending mode. This feature is great to get rid of those ugly gaps in your Star Trails.
- You just import your images, enable the gap-filling option and click 'Start' to get the image finished in a few seconds.
- Combined with After Effects, you can create an awesome timelapse video showing the image sequence of the blending process (section 11).
Startrails for Windows (free)
StarTrails is one of the first star stacking software solutions that was created. It was very popular among photographers before the launch of StarStaX.
Star Trails app for Mac (paid)
This app for Mac is a great choice because it allows you to do both:
- Create Star Trails images.
- Create Star Trails timelapse videos: simple, partial and full.
It makes things even easier.
Star Trails stacking in Photoshop
Unfortunately, it takes too much time to fill in the gaps and to stack all the images in Photoshop.
But, there are a few free actions that help though:
- Image stacking Photoshop Stacking action by Chris and Dow Schur.
- Star Trails gap-filling action by Floris Van Breuge.
Star Trails stacking in Lightroom
Can you use Lightroom for Star Trails stacking?
The answer is yes, but don't do it!
Star Trails stacking in Lightroom is pretty painful and time consuming. You're forced to use Photoshop actions, which it takes too much time and computer memory.
My advice: use StarStaX.
How to post-process Star Trails
It's very easy. There are tons of videos on YouTube that explain how to do it.
I particularly like a video by Michael Shainblum. Watch it to learn:
- How to use StarStaX to create the Star Trails image.
- How to use Photoshop to create the meteor effect in a Star Trails image.
I think this video is super helpful, but I thought that you'd like to have the main steps written down too.
How to edit your Star Trails RAW files in Lightroom
No matter if you have to edit 80, 160 or 1,000 photos. It takes the same time.
- In Lightroom, select the image you wish to use as the foreground, the one you like the most. Then, edit it according to your preferences.
- I follow this order when editing:
- Global adjustments: exposure and contrast.
- Volume local adjustments: highlights/whites and shadows/blacks.
- Contrast local adjustments: clarity or remove haze (Dehaze slider).
- Adjust contrast in specific areas with the tone curve panel.
- White balance adjustments.
- Noise reduction.
- Increase sharpness if necessary.
- Since this editing workflow will be copied to the rest of the photos, I never use advanced features like the radial filter, gradient, brush, etc. Remember that all the photos are different and if you do copy this type of settings to all of them, you get something that doesn't look good at all.
- Try to make the photo as powerful as you can. Then, go to Settings > Copy Settings to copy all the adjustments you've done. Before you copy them, make sure all the settings you've changed are selected.
- Now, paste these settings to the rest of the images. Select all the images, and right-click on any of them. Then, choose Develop Settings > Paste Settings and you're done. All the settings will be also applied to all the selected images. You can also copy and paste the settings by using the Sync feature. Select the image you've edited and make sure it's visible on the screen.
- Then, select all the images by holding Control + A on PC or Command + A on Mac. Now, click the Sync button located in the lower right-hand side of the panel, choose all the settings you adjusted and click Synchronize.
- Finally, create a folder and export all the photos in JPEG format.
Let's switch to StarStaX!
How to use StarStaX to stack Star Trails
It takes just a few minutes to create the Star Trails with StarStaX.
- In StarStaX, load all the images you've edited in Lightroom with the Open image icon or just drop them onto the left area of the StarStaX UI.
- Load the the black frames you took with the Open Dark Frames icon. StarStaX uses them to reduce image noise.
- The Preferences panel is on the top left-hand side. There, select the Blending tab and then Blending Mode.
- Here, select Gap-filling mode as the blending mode. It automatically fills in the gaps when the Star Trails is created.
- Start processing by clicking the Start Processing icon (4th top button) or the corresponding menu item.
- In the Gap Filling mode, once the stacking process has finished, the Tools palette with the interactive gap filling controls comes up automatically.
- Let's have a look at the first control parameter Threshold:
- It selects the pixels in the image, where the Gap filling mode is applied, based on brightness. The selected pixels are highlighted in green when you move the slider or when you check the Show Threshold Overlay checkbox.
- To better see the effects of gap-filling, press Z to view the image in 100% view.
- When it's set too high, you limit gap filling only to very bright Star Trails.
- On the contrary, when it's set too low, lots of background pixels are included. And this can affect the background negatively.
- A good threshold includes most of the Star Trails while disregarding most of the background pixels.
- The second slider is called Amount. It controls the amount of gap filling to be applied to pixels above the brightness threshold. Keep adjusting its value until you get a satisfactory result.
- The last step is to save the Star Trails image. By default, the image will be saved as a JPEG. If you want to save it as a TIFF image, make sure you name the file with the suffix .tiff when saving it.
If you don't use the Gap filling mode, your image will probably have gaps in the Star Trails. Maybe you don't notice it on your computer screen, but if you zoom in, you'll see them.
10.How to create a Star Trails vortex (or swirl)
Spending the whole night shooting like crazy to build a beautiful Star Trails image is great, but there are a couple more astonishing images and effects you can create. So, why stopping now?
Why don't you take advantage of all the shooting and create a vortex Star Trails?
Hypnotic, isn't it?
When I first saw Lincoln Harrison's vortex Star Trails, I felt completely blown away. Lincoln is truly a master telling stories with the Milky Way and Star Trails. And he has inspired me in many ways.
In section 13, I'll talk about Lincoln and many other awesome photographers that have inspired me, but now, let's go straight to the point.
How can you create vortex Star Trails?
Well, you could do it in the field using a custom motorized zooming device, like Lincoln Harrison does. If you're looking for a great motorized zooming system, check the ZenFocus and the Opteka FFR-900.
These zooming devices progressively move your lens' zoom ring during the shooting (zooming out). For example, you start with a focal length of 50mm and end with 14mm. Then, you stack all the photos in post-processing getting the spiral effect.
Doing it in the field is a real adventure, but you can also do it at home, comfortably sitting in front of your computer.
Mike Ver Sprill wrote a great article on how to create vortex Star Trails. It has a few years but you may like to have a look at it.
He also published a great video tutorial on how to create vortex Star Trails using LRTimelapse and Lightroom.
11.How to create a Star Trails timelapse
Yes, you can make a Star Trails video, starting with the first photo and ending with the last one to shows the Star Trails growing over time.
Here's an example!
This is another great way of showing the apparent motion of the stars as Earth rotates.
And you can easily do it!
Creating a Star Trails time lapse video with StarStaX and After Effects
In section 9, I showed you how to create a Star Trails image combining Lightroom and StarStaX.
Now, to create a Star Trails timelapse video, follow the same workflow. But in StarStaX, select the Save each cumulative stacked image option before stacking.
So at the end of the stacking process, you'll end up with the same number of photos, but each one will contain the cumulated trail resulting from stacking the previous ones. And the last image will be the full Star Trails image.
Finally, take all these cumulated images and use After Effects to easily create a timelapse video.
Photographer Purwaji Santoso shows how he creates it in this video.
If you are a Mac user you can also use the Star Trails app.
This simple to use piece of software is incredibly useful, because it allows you to do both:
- Stack photos to create Star Trails images.
- Automatically produce Star Trails timelapse videos.
An even more hypnotic video
I love this effect!
Daniel Low's approach to Star Trails timelapse is to show how Star Trails are formed (until a certain size) and then they start rotating (keeping a constant length).
This effect makes the Star Trails video even more hypnotic.
Judge it by yourself.
If you want to learn how he did it, take a look at the the following article on Petapixel: 'Beautiful Time-Lapse of Long Exposure Star Trails Traversing the Night Sky'.
12.How to shoot defocused Star Trails
I learnt this effect from Ian Norman thanks to his tutorial 'How to Photograph a Defocused Star Trail "Rain Shower"'.
Defocused Star Trails is one of the most challenging effects. You create it directly in camera, while shooting.
You have to continuously defocus your camera's lens during one single long exposure or from shot to shot (when shooting multiple exposures).

The more you defocus the lens, the wider the trail will be. The result is a pretty curious effect, which reminds me of a badmington shuttlecock.
So crazy!
These are the steps I followed to create the image above:
- I went to the location and used the PhotoPills Night Augmented Reality view to choose the shooting spot and shooting direction for the Star Trails pattern I wanted. Go to section 5 to learn how to plan a shot with a specific Star Trails pattern.
- Once at the shooting spot, I placed the tripod and framed the scene including a large area of the sky.
- I shot a couple of test photos to get the right exposure and foreground illumination (using a LED)
- Then, I started shooting multiple exposures. Go to section 8 to learn how to shoot multiple long exposures Star Trails.
- Between each photo, I consistently defocused the lens a few degrees trying to keep the same rotation.
Once at home, I followed the steps I described in section 9 to create the final image with Lightroom and StarStaX.
And that's it!
There are many other stunning effects you can produce (comet, blobulous and even panoramas), but I believe it's time to start learning from the best: the true Star Trails Masters!
13.The 19 mistakes that will seriously damage your Star Trails images
These are the most common mistakes that people make when doing Star Trails photography. I know them because I've made them too.
Believe it or not, all of them are very easy to avoid ;)
Not planning (1)
What happens when you play the lottery?
That you lose 99.99% of the times.
Having ideas and not planning them for perfect execution is like playing the lottery. It might be easy, it might be fun, but you lose every single time.
If you want to start shooting stunning images you need to start planning them. Period.
Follow the steps I showed you in section 5 and you'll turn your ideas in real images in the blink of an eye.
Not composing during daylight (2)
I insist!
"Work during the day to succeed at the night."
I'm not talking about partying, I'm talking about photography! :D
Do your scouting work during the harsh light hours of the day. Go and look for locations and frames. Just take your camera out, place the tripod, focus at the hyperfocal distance and take the same photo you want to take at night.
It's much easier to compose your shots when you see than when it's completely dark.
This may seem obvious, but it's a pretty common mistake.
Run out of memory space (3)
If you're going to shoot multiple short exposures (stacking), you're probably going to take several hundred photos to get long Star Trails. This means that you need to plan the number of memory cards you need to take.
So, use PhotoPills Timelapse calculator to find out the total memory usage and take enough memory cards with you!
Run out of battery in the middle of the shooting (4)
Ah! My favorite!
I can really feel the pain in my heart when my camera stops because the battery died, and I forgot to take a spare one with me... Such a waste of time!
Before leaving home, always make sure you charge your batteries and take a few spare ones. You can also use a grip with extra batteries.
You'll be shooting at night, usually in the cold, and low temperatures drain batteries much quicker.
Tripod is not stable enough (5)
There are two main causes of an unstable tripod: little weight and misplacement.
And both can cause:
- Star Trails not to follow a continuous path.
- Blur in you photos due to camera shake.
- What's even worse, your camera and lens could fall.
The solution: get a sturdy tripod and make sure is steady and still.
Gaps in your Star Trails (6)
To avoid gaps in your Star Trails make sure:
- To turn off the noise reduction function of your camera when shooting multiple short exposures (stacking). On the contrary, the camera will wait another full exposure before taking the following shot, causing big gaps!
- To set a 2-second time frame between two consecutive shots. It gives enough time to the camera to save the image in the memory card, to cool down a bit the sensor and have no gaps in the trails.
There are other things that can cause gaps: you ran out of battery, you ran out of memory space in your card, you got several ruined frames (lens condensation, plane and satellite trails, punctual intrusive lights, sporadic clouds, etc.) and you removed them.
Sometimes, dealing with gaps is inevitable.
In this case, you can get rid of small gaps when post-processing in StarStaX. Just make sure you select the Gap filling blending mode.
The Star Trails are not following a perfect arch (7)
Sometimes your Star Trails don't draw a circumference. It looks like somebody or something has altered the framing. And now the stars follow a different path.
This problem can be easily corrected by:
- Using a sturdy tripod and making sure it's stable.
- Turning off the lens stabilisation system. You're going to use a tripod, so you don't need to use this function. In absence of vibrations, it can try to correct inexistent movements causing the opposite effect!
- Using an intervalometer or a shutter release. Avoid touching the camera no matter what.
The horizon is not horizontal (8)
Always, always, always level the camera before start the shooting. Use an external bubble level or the internal level of your camera.
If you're still getting an unleveled horizon, follow these steps in Lightroom to correct it:
- Go to the Lens correction/basic tab
- Window Upright
- Click Level
There is a second way to do it:
- Go to the Develop module
- Choose the Crop and Straighten tool
- Straighten and crop the photo
And a third way to do it:
- Go to Panel > Transform
- Choose Upright > Level
The Star Trails are out of focus (9)
When you get the foreground in focus but the stars out of focus, it means that you failed when focusing at the hyperfocal distance. You probably focused at a shorter distance.
Refocus again and make sure that you're focusing the lens at a slightly larger distance than the hyperfocal distance (1 m is ok). Above all, make sure not fall short again!
You'll find how to focus at the hyperfocal distance in section 8 and in this video.
Your photo is completely blurred, what's going on? (10)
If the whole photo is completely blurred, and you've focused correctly at the hyperfocal distance, it's because you're having vibrations in the camera and lens, you accidentally changed the focus or you're suffering from moisture condensation on the lens:
- Use a sturdy tripod and make sure it's stable.
- Turn off the lens stabilisation system. You're using a tripod, so you don't need to use this function. In absence of vibrations, it can try to correct inexistent movements causing the opposite effect!
- Use an intervalometer or a shutter release. Avoid touching the camera at all costs.
- Check the lens autofocus is disabled.
- Double check the focal length is the right one. Make sure you don't touch the ring of the lens.
- Keep your lens dry. Use the anti dew tools I mentioned in section 6.
Always take a test shot to double-check that everything is in focus.
The stars are not as bright as you thought (11)
You're probably using a narrow aperture like f/8 to increase the depth of field.
Don't do it!
With narrow apertures, you're not letting too much light into the system, and the Star Trails will be pretty weak. Obviously, you could crank up the ISO, but your camera will produce more noise!
Instead, use a wide aperture and focus at the hyperfocal distance. You'll get bright Star Trails and everything in sharp focus.
The foreground is too dark (underexposed) (12)
If there is no Moonlight or light pollution, you'll get a pretty dark foreground when exposing the photo. Use a LED or a torch to add artificial light.
Have a look at section 8 and learn how to light paint the foreground the right way.
The foreground is too bright (overexposed) (13)
When there is a lot of light in the scene that you don't control (such as light pollution or the Moonlight), the workaround is to lower the ISO, close a bit the aperture, reduce the exposure time or a combination of the three.
Another solution is to use a graduated neutral density filter (GND). Place it keeping its darker side in the bottom of the filter holder. This way, you'll be darkening the foreground.
You're getting too much noise and you don't know why (14)
Usually, a high ISO and sensor overheating produce noise. To avoid this you can:
- Lower the ISO or use the highest value at which your camera can still provide good noise performance.
- Shoot multiple shorter exposures to get noise under control. On the contrary, when shooting a single long exposure Star Trails, noise becomes a real challenge. In this case, noise will surely limit much more the length of the Star Trails (limited exposure time to avoid noise).
- For the same sensor size, use a camera with less megapixels. The more megapixels, the more sensor heat (more noise).
- For the same megapixels, choose a camera with a larger sensor size. The larger sensor size, the less sensor heat (less noise). Just keep in mind that technology is advancing very fast. Nowadays, there are new cameras with more megapixels and better noise performance than older cameras with less megapixels.
- Set a 2-second time frame between each photo to help the sensor cool down a bit.
- Shoot in cold nights to keep the sensor temperature low.
Your Star Trails are too short or too long (15)
One of the reasons image stacking is so great is that it allows you to have absolute control over the Star Trails length. Depending on the number of photos you're stacking, you get one length or another.
The more photos, the longer the trails are.
You only get white stars! Damn! (16)
Different stars have different colors (white, blue, red, etc.). If you're getting only white stars, it's because the camera sensor is capturing too much light:
- The ISO is too high.
- The exposure time is too long.
- There's too much light in the scene (light pollution or Moonlight).
It's much easier to capture the true color of the stars when you're shooting multiple short exposures under a pitch black sky. Find out the right exposure using ISO values from 800 to 1600.
Light pollution or Moonlight washes out the color of the stars. In this case, if you're stacking, close a bit the aperture (f/4, f/5.6) and lower the ISO (400-800).
In this case, avoid shooting a very long single exposure.
Wow... Was it that foggy? (17)
It's not fog, it's moisture condensation on the lens!
Use the anti-dew equipment I mentioned in section 6 ;)
You got the sky with a blue hue... (18)
Check the white balance you're using. I bet you're using something around 2500-3000K.
If that's the case, you're telling the camera the scene is warm (yellow hue). And the camera will try to compensate it with a blue filter, giving a blue hue to the photo.
The goal here is to capture the real color of the sky (as real as possible). To do so, I like to use the following white balance settings:
- Dark skies: 3900K
- Light pollution or Moonlight: 3400K
You shot in JPG and now you cannot edit! (19)
Always shoot in RAW, and edit the RAW files in Lightroom.
The RAW file contains all the information captured by the sensor of your camera. So it's much easier to make adjustments in the image without losing any quality.
In JPEG format, the image is compressed and a lot of information is lost.
14.7 Star Trails photography Masters that are worth following
I believe that following the work of great photographers is a fantastic way to get inspired, try new things and evolve.
So, every time you find a photo you like, stop and look at it for a while. Read it, analyze it in depth.
Try to figure out how it was made:
- The story.
- The location.
- The elements.
- The composition.
- The lighting.
- The edition.
I'm sure that after a while, without any particular reason, you'll start connecting the dots. The mix of the locations you know, the subjects available and the stars will make ideas flow like water down a hill!
These is the list of my favorite Star Trails photographers. If you have other names, please, share them with me and the rest of the PhotoPillers in the comments section at the end of this tutorial.
Elia Locardi
Simply one of the most internationally acclaimed professional travel photographers. Elia Locardi is a real nomad. He and his wife are traveling around the world since 2009. He has been a great inspiration for me. I'm sure he'll inspire you too.
Ian Norman
He is behind one of the greatest astrophotography blogs on Internet, LonelySpeck. His photos, tutorials and videos have inspired and educated many photographers around the world, including me.
Lincoln Harrison
Based in Australia, Lincoln Harrison surprises us with his spectacular colorful Star Trails. If you're looking for hypnotic images, Lincoln is your guy!
His trick: spending the whole night shooting.
Tanja Schmitz
You'll find her chasing the stars in South Africa and Namibia. Tanja Schmitz not only creates awesome Star Trails images, she also shares her knowledge with the world.
She runs a fantastic educative platform, together with her husband Cory Schmitz: Photographing Space.
Jack Fusco
Photography is his escape. His goal is to make us find the same beauty and serenity in viewing his images as he finds making them. His method, spending hours planning shootings outdoors days, weeks and sometimes even months in advance to make sure all of the elements align properly.
This is Jack Fusco!
Brad Goldpaint and Marci Buckner
It takes a brave dose of guts and grit to pick up your life and pack camper to chase down your dream, but this is exactly what this intrepid couple is doing. Brad and Marci have embarked on an odyssey to educate the public about the damaging effects of light pollution and help reconnect people with the beauty of the night sky through art.
Michael Goh
Who hasn't heard about the Astrophotobear?
Michael Goh bought his first DSLR camera back in 2010, and after a short period of time has become one of the great masters of the night sky.
Get inspired by other PhotoPillers [bonus track]
You can also get inspired by PhotoPillers from around the world. Check the images that we're featuring everyday in the PhotoPills Awards!
You can access to all the photos from the Awards button you'll find in the My Stuff menu of your PhotoPills app (or in our Instagram account).
And you can submit yours too, and inspire others.
15.What? Are you willing to learn even more about Star Trails?
So there it is. An entire guide to Star Trails photography in just one place.
Read this guide and you'll soon know more about Star Trails photography than 99% of your photography peers.
Study it and you'll be overflowing with Star Trails ideas.
And if you're still hungry to learn more about Star Trails – maybe you'd like to discover the perfect Star Trails strategy for you and your equipment – ask me, let me know the problems you're facing by leaving a comment right now.
I'm here to help! ;)
Note: Some links on this page are affiliate links. What does this mean? If you buy/rent using these links you're helping support us and it costs you nothing extra. Thank you for your support.
Get this ebook for free now!